#ESP32S2
Explore tagged Tumblr posts
Visit Tumblr Blog
Explore Tumblr blogs with no restrictions, modern design and the best experience.
Last Seen Tumblr Blogs


Fun Fact
Mobile US users spent an average of 115.8 minutes on Tumblr app monthly.
Text


PCB of the day! The Adafruit ESP32-S2 TFT Feather - 4MB Flash, 2MB PSRAM, STEMMA QT, an open-source hardware design! 🔌🖥️🕹️ It's got all the gooeyness of a mozzarella stick features of a Feather main board, the comforting warmth of an ESP32-S2 WiFi microcontroller, and the crispness of a 240x135 pixel color TFT display. All that and it will even plug in nicely into a breadboard, terminal block wing, or Feather Doubler or even just stack on top of another wing.
22 notes
·
View notes
Text
Introducing the S2 Mini V1.0.0 ESP32-S2 Development Board!
Looking to power up your next IoT project? Meet the S2 Mini V1.0.0 – a compact yet powerful Wi-Fi development board that's perfect for all your tech experiments.
Key Features:
4MB FLASH for plenty of storage
2MB PSRAM for speedy performance
Wi-Fi connectivity to take your projects online
Ideal for home automation, wearables, and DIY smart gadgets!
Type-C USB Interface: Easy and convenient connectivity.
27 Digital I/O Pins: Supports interrupt, PWM, I2C, single wire ADC, DAC, SPI, UART, and USB OTG.
With the ESP32-S2 at its heart, this development board is designed to handle everything from real-time data processing to seamless web communication. Whether you're a hobbyist or a professional, this is the board you need for cutting-edge projects.
Click here to purchase the product: https://dhakarobotics.com/.../1045-s2-mini-v1-0-0-esp32.../
Contact Us: +8801740298319
visit our website: https://dhakarobotics.com/

#ESP32S2#DevelopmentBoard#WiFiBoard#IoTProjects#SmartDevices#DIYTech#EmbeddedSystems#TechInnovation#HomeAutomation#WearableTech#MakersCommunity#TechGadgets#PSRAM#Microcontroller#Electronics#dhakarobotics
0 notes
Text
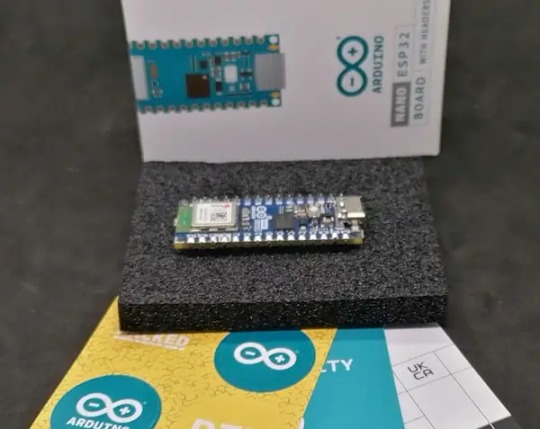
Neuer Arduino Nano: Jetzt mit ESP32S3 Power!

Willkommen zu meinem neuesten Blogbeitrag! Heute möchte ich euch einen aufregenden Neuzugang im Arduino-Ökosystem vorstellen: den Nano ESP32. Dieser leistungsstarke Mikrocontroller bringt den beliebten ESP32S3 in die Welt der Arduino- und MicroPython-Programmierung. Egal, ob ihr euch als Anfänger in die Welt des IoT oder MicroPython wagt oder als fortgeschrittener Benutzer euer nächstes Produkt entwickeln möchtet - der Nano ESP32 ist die perfekte Wahl. Mit Wi-Fi, Bluetooth, Arduino- und MicroPython-Unterstützung sowie HID-Funktionen bietet er eine beeindruckende Palette an Features. Lasst uns die Highlights dieses faszinierenden Boards erkunden und herausfinden, warum es keine Ausreden mehr gibt, um eure Projekte zu verzögern!
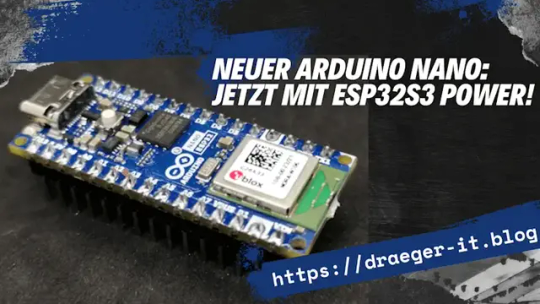
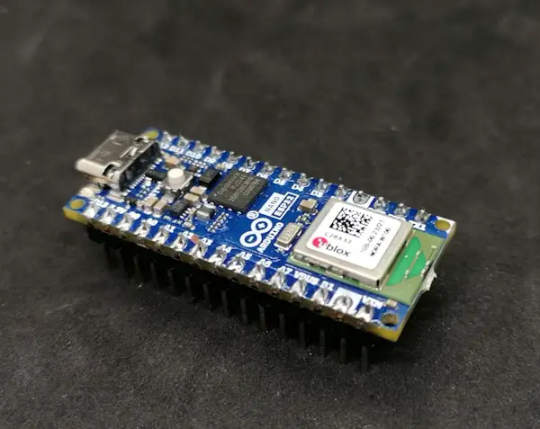
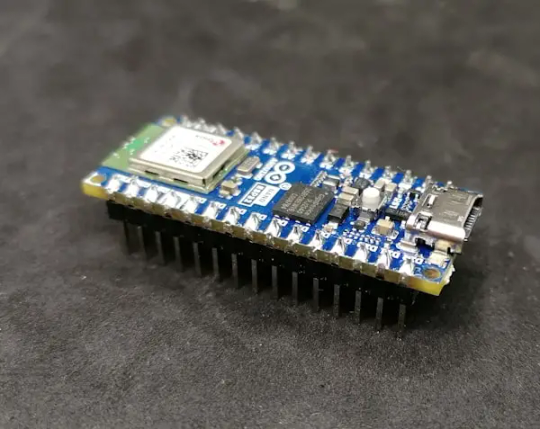

Technische Spezifikationen des Arduino Nano ESP32S3
Zunächst einmal die harten technischen Spezifikationen des Arduino Nano mit ESP32S3 Chip: Mikrocontrolleru-blox® NORA-W106 (ESP32-S3)Taktgeschwindigkeitbis zu 240 MHzSpeicher384 KB ROM, 512 KB SRAM, 16 MB (128 Mbit) externer Flash SpeicherWi-Fiu-blox® NORA-W106, 2,4 GHz, max. 1 MBit DatenrateBluetoothu-blox® NORA-W106, Bluetooth 5.0Eingangsspannung6 V bis 21 VSpannung an den GPIOs3.3 Vdigitale Pins14, Alle digitalen Pins können als externe Interrupts und PWMs verwendet werden!analoge Pins8max. Stromaufnahme pro GPIO40 mAStromsenke pro GPIO28 mASchnittstellen2x UART, I2C, SPIUSB-Typ-CFeaturesRGB LED (D14 bis D16) BUILTIN_LED (D13)Abmessungen (L x B)45 mm x 18 mmAuszug aus den technischen Daten des Arduino Nano ESP32S3 von https://store.arduino.cc/products/nano-esp32
Vergleich zum Arduino Nano V3
Der neue Arduino Nano mit ESP32 Chip ist vergleichbar mit dem in die Jahre gekommene Arduino Nano V3. Was besonders heraussticht ist, dass diese vom Pinout identisch sind, somit kannst du recht einfach deine Arduino Nano Projekte mit dem neuen Mikrocontroller um die WiFi und Bluetooth Funktionalität erweitern. Zurzeit bekommst du den neuen Nano ESP32S3 sogar deutlich günstiger (18 € zzgl. Versandkosten) im offiziellen Shop als den alten Nano V3 (21,60 € zzgl. Versandkosten).

Natürlich gibt es auch schon seit langem kleine Mikrocontroller im Arduino Nano Faktor welche WiFi und Bluetooth haben. Jedoch haben diese ein anderes Pinout. Technische Daten des Arduino Nano V3 Mikrocontroller ATmega328Taktgeschwindigkeit16 MHzSpeicher32 KB Flash Speicher, (2 KB für Bootloader reserviert), 2 KB SRAMGPIOs22 digitale Pins, davon 6 PWM, 8 analoge PinsFeaturesBUILTIN_LED (D13)SchnittstellenUART, I2C, SPI Micro-USBEingangsspannung7 V bis 20 VStromaufnahme19 mAmax. Stromaufnahme per GPIO40 mAAbmessungen (L x B)45 mm x 18 mmAuszug aus den technischen Daten des Arduino Nano V3 von https://store.arduino.cc/collections/boards/products/arduino-nano
Bezug des Nano ESP32S3
Den Mikrocontroller bekommst du derzeit exklusiv im Arduino Store für 18 € zzgl. Versandkosten. Zum Lieferumfang gehört lediglich der Mikrocontroller und ein wie üblich ein paar Aufkleber sowie ein Garantiezettel.

Durch die USB-C Schnittstelle sollte eigentlich jeder zu Hause solch ein Kabel daheim haben und somit wird an diesem gespart. Zumal meistens bei den Mikrocontrollern immer diese recht kurzen beigelegt werden, die man im Normalfall sowieso nicht verwenden kann.
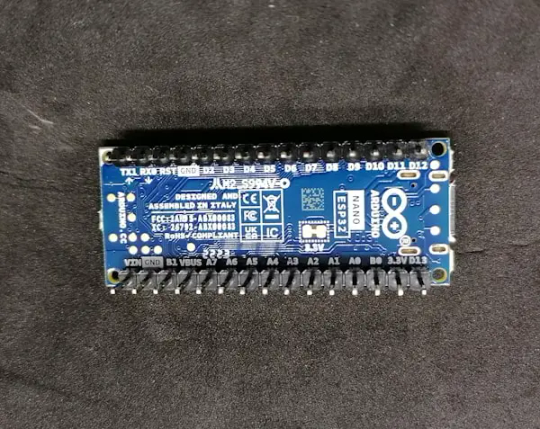
Pinout
Nachfolgend nun das Pinout des Nano ESP32. Du kannst hier gut erkennen, dass alle digitale Pins als PWM Pins dienen, dieses ist ein deutlicher Pluspunkt gegenüber dem Arduino Nano V3.

Zusätzliche Features sind die USB-C Schnittstelle, sowie die RGB LED.

Schnittstelle, LEDs & Taster am Arduino Nano ESP32
Energieverbrauch
Durch den ESP32S3 und die somit mitgelieferten Features von WiFi & Bluetooth benötigt dieser Mikrocontroller jedoch deutlich mehr Strom als sein Vorgänger. Der Hersteller gibt an, dass dieses Modul im Deep-Sleep 7 µA und im light sleep Mode 240 µA verbraucht. Stromaufnahme im Vergleich MikrocontrollerStromaufnahmemax. Stromaufnahme per GPIOStromsenkeArduino Nano V319 mA40 mAArduino Nano ESP32S340 mA28 mA
Programmieren des Arduino Nano ESP32S3
Der Mikrocontroller lässt sich in der Arduino IDE 2.0 sowie mit MicroPython in dem Arduino Lab programmieren. Für die Arduino IDE 2.0 benötigten wir zunächst einen Boardtreiber welchen wir über den internen Boardverwalter installieren müssen.


Programmieren der onboard RGB LED Im Nachfolgenden möchte ich dir nun gerne zeigen, wie du die onboard RGB LED über die Arduino IDE programmieren kannst. Die RGB LED ist an den digitalen Pins D14 bis D16 angeschlossen und ist eine simple RGB LED mit quasi 4 Beinchen. Also keine NeoPixel, WS18B20 oder ähnliches! //Pin für die rote LED - D14 #define ledRot 14 //Pin für die grüne LED - D15 #define ledGruen 15 //Pin für die blaue LED - D16 #define ledBlau 16 void setup() { //beginn der seriellen Kommunikation mit //9600 baud Serial.begin(9600); //definieren das die Pins der RGB LED als //Ausgang agiert pinMode(ledRot, OUTPUT); pinMode(ledGruen, OUTPUT); pinMode(ledBlau, OUTPUT); } void loop() { //aktivieren / deaktivieren der roten LED Serial.println("rot"); digitalWrite(ledRot, HIGH); delay(1000); digitalWrite(ledRot, LOW); //aktivieren / deaktivieren der grünen LED Serial.println("gruen"); digitalWrite(ledGruen, HIGH); delay(1000); digitalWrite(ledGruen, LOW); //aktivieren / deaktivieren der blauen LED Serial.println("blau"); digitalWrite(ledBlau, HIGH); delay(1000); digitalWrite(ledBlau, LOW); } Das kleine Programm lässt jetzt die onboard RGB LED in die Farben rot, grün und blau aufleuchten. Da wir die Pins auch als PWM Pins ansteuern können, können wir theoretisch jede erdenkliche Farbe mit diesen drei Werten mixen. Read the full article
0 notes
Text
Understanding ESP32 Pin Configuration: A Developer's Guide
The ESP32 microcontroller has become a cornerstone of IoT development, thanks to its versatility and powerful features. One of the most crucial aspects of working with ESP32 is understanding its pin configuration and capabilities. Let's dive into the essential aspects of ESP32 pins that every developer should know.

GPIO Pins Overview
The ESP32 boasts up to 34 GPIO (General Purpose Input/Output) pins, but not all are available for use in most development boards. Some key points about ESP32 pins:
GPIO 6-11: Reserved for internal SPI flash connection
GPIO 34-39: Input-only pins with no internal pull-up/pull-down resistors
ADC Capabilities: Two 12-bit SAR ADCs, supporting 18 measurement channels
Touch Sensors: Up to 10 capacitive touch GPIOs
Special Function Pins
Several pins serve dual purposes or have specific functions:
Boot Mode Pins GPIO 0: Bootloader mode when pulled low during reset GPIO 2: Connected to on-board LED in many development boards
UART Pins GPIO 1 (TX) and GPIO 3 (RX): Default UART0 communication Often used for flashing and debugging
SPI Pins VSPI: GPIO 5 (CS), 18 (CLK), 19 (MISO), 23 (MOSI) HSPI: GPIO 14 (CLK), 12 (MISO), 13 (MOSI), 15 (CS)
Best Practices for Pin Usage
Strapping Pins Always check the strapping pin status before using GPIO 0, 2, 4, 5, 12, and 15. These pins may affect boot behavior if incorrectly configured.
Input-Only Pins When designing sensor interfaces, prefer GPIO 34-39 for analog inputs as they're input-only and less susceptible to noise.
Pull-up/Pull-down Configuration
ADC Usage ADC1: Can be used with Wi-Fi/Bluetooth active ADC2: Only available when Wi-Fi/Bluetooth is disabled
Common Pitfalls to Avoid
Don't use GPIO 6-11 in your projects as they're connected to the internal SPI flash.
Avoid using strapping pins for critical functions that can't be changed during boot.
Remember that GPIO 34-39 don't have internal pull-up/pull-down resistors.
Be cautious with voltage levels - ESP32 pins operate at 3.3V.
Conclusion
Understanding ESP32 pinout is fundamental for successful project development. By following these guidelines and best practices, you can avoid common issues and make the most of your ESP32's capabilities. Remember to always consult the official ESP32 technical reference manual for detailed specifications and updates.
#ESP32 #PinConfiguration #DevelopersGuide #Microcontrollers #EmbeddedSystems #IoT #Programming #Hardware #Electronics #Arduino #ESP32S2 #ESP32C3 #ESP32C2 #ESP32C6 #ESP32S3 #ESP32H2 #ESP32P1
#ESP32#microcontroller#pinconfiguration#GPIO#ADC#DAC#I2C#SPI#UART#PWM#analog#digital#input#output#microcontrollers#embeddedsystems#IoT#InternetOfThings#electronics#hardware#software#programming#development#Arduino#ESP8266#RaspberryPi#microcontrollerprogramming#embeddedprogramming#IoTdevelopment#electronicdesign
1 note
·
View note
Text
ML_SynthTools ~ Arduino Synthesizer Library
This library is made to be used for synthesizer projects. It contains modules to create sound, to drive an audio codec and create some audio effects. This library supports different platforms: ESP32, ESP32S2, ESP32S3 ESP8266 Seeedstudio XIAO (samd21 – cortex-m0plus) Teensy 4.1 (imxrt1062) Daisy Seed (cortex-m7) Raspberry Pi Pico (rp2040) STM32F407…
View On WordPress
0 notes
Link
0 notes
Text
[Media] WUD v1.
WUD v1.2 The device has an ESP32-S2 module that allows it to be identified as a keyboard + USB disk. It also a microSD slot that can be identified as MSC SD Card. The new ESP32-S2 module from Espressif addresses the security flaws in the original ESP32. While the ESP32-S2 does include improved security features, it lacks the Bluetooth capabilities of the original ESP32 module. But it supports native USB. The pre-flashed firmware is "Wireless USB disk". It use ESP32-S2 as an USB Disk with Wireless accessibility. HTTP file server be used with both upload and download capability. Firmware: ▫️ Source code of wireless usb disk - written in Arduino ▫️ usb_msc_wireless_disk from espressif ▫️ WUD-Ducky Thanks tobozo for his great projects Buy online: 🛒 https://ali.ski/AJoiRH #esp32s2 #usb #ducky

0 notes
Photo

Coming soon! Testing the Metro ESP32-S2 SPI https://t.co/FU8F3g5O5U This new Metro features the USB/WiFi/PSRAM capable ESP32 module - we are testing it with Arduino (there's a branch for ESP32S2 support and it seems to work OK!) https://t.co/a2aElIVLTJ https://twitter.com/adafruit/status/1313610942173925377 https://t.co/FU8F3g5O5U http://twitter.com/adafruit/status/1313610942173925377
0 notes
Link
via Adafruit Industries – Makers, hackers, artists, designers and engineers! https://ift.tt/2ybLOyy
0 notes
Text
2.8" TFT touchscreen revision with TSC2007 🛠️🖥️🚀
We're finally redoing our 2.8" resistive touch screen shield https://www.adafruit.com/product/1651, which has been out of stock for a looooong time due to parts shortages and then TFT pricing nuttiness. This time, we're revising it to use the TSC2007 https://www.adafruit.com/product/5423 and testing it against the new Metro ESP32-S3 prototypes. We've wired the IRQ pin-up, and the touchscreen responsiveness is excellent. One nice thing about using I2C is that we don't have to share the SPI port, so if you're using something like LVGL, which does TFT drawing or touch screen reading in an interrupt, there's less risk of contention.
#adafruit#ESP32#ESP32S2#TFT#I2C#LVGL#opensource#opensourcehardware#electronics#engineer#espressif#innovation#techupdate#microcontrollers#shieldupdate#touchscreen#tsc2007#digitaldesign#resistivetouch#esp32s3#electroniccomponents
10 notes
·
View notes
Text
MAX3421e USB Host FeatherWing test 🖥️ 🔌 ✅
We previously made a jerry-rigged USB Host Wing (https://www.adafruit.com/product/5858) tester based on an ESP32-S2 TFT board (https://www.adafruit.com/product/5300) and a pogo-pin (https://www.adafruit.com/product/394) filled Feather Doubler (https://www.adafruit.com/product/2890) - but for final testing of hundreds of boards off a panel, a nice custom-made PCB is better. This one uses a Metro M0 since our SAMD21 board support package has TinyUSB support - so we can verify if we enumerate the connected USB peripheral. If a vid/pid is found, we're good to go, and beep and blink to indicate the test has passed.
#MAX3421e#USBHostFeatherWing#ESP32S2#PCBTesting#Adafruit#TechDIY#ElectronicsTesting#MetroM0#TinyUSB#HardwareTesting
2 notes
·
View notes
Text
youtube
It's 10pm … Do you know where your ESP32 linux install is?? 🌙💻🐧
Theres nothin' like staying up late and cross-compiling linux for some ridiculous platform… which is why that's what we're doing tonight! we're going to try to get linux booted on an esp32-s3, there's some details here on the esp32 forum: https://esp32.com/viewtopic.php?t=33675 and the linux port itself is here https://github.com/jcmvbkbc/linux-xtensa - to build we tried WSL without success so now we're getting a virtualbox debian build going - turns out trying to cross compile on a handy pi 4 is going to take hours!
#linux#10pm#10pmchallenge#its10pmdoyouknowwhereyourchildrenare#its10pm#its10pmdoyouknowwhereyourengineersare#adafruit#ESP32#ESP32S2#Youtube
4 notes
·
View notes
Link
Small size ePaper Evaluation Kit with ESP32S2 Advantages of e-Paper Display Paperlike readability. Sunlight and non-unif
0 notes
Photo

We put the ESP32-S2 METRO video on @tiktok_us ... maybe there is an electronic TikTok community out there that might like it ... https://t.co/0MNMoSNCPu @EspressifSystem @ESP32net #esp32s2 https://t.co/RkVFMayoj0 https://twitter.com/adafruit/status/1313587959250194434 https://t.co/0MNMoSNCPu http://twitter.com/adafruit/status/1313587959250194434
0 notes