#Collage photos are from Unsplash!
Explore tagged Tumblr posts
Visit Tumblr Blog
Explore Tumblr blogs with no restrictions, modern design and the best experience.
Last Seen Tumblr Blogs


Fun Fact
Mobile US users spent an average of 115.8 minutes on Tumblr app monthly.
Text

“What is it that you’re searching for? What is it that you still fear?”
In search of the legends, we walked for miles into the deep, dark night.
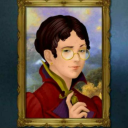
#pokemon#trainer red#trainer green#trainer blue#trainer leaf#pokemon red#pokemon blue#pokemon leaf#blue oak#green oak#Tagging this is so hard — what name does Blue/Green go by most often??#Collage photos are from Unsplash!#kanto trio#This is technically an AU; it has a bit of a timeskip!#I love them so much 😭#articuno#zapdos#moltres
40 notes
·
View notes
Text

Thoughts about masculinity
#mine#i arted this#statues#trans art#queer masculinity#masculinity#collage#digital collage#image description in alt#photos from unsplash#this is about vague feelings shapeless yearning and amorphous ideas#its about bodies and postures and picture details#its about wanting but being unsure what exactly you want or in which way you want it#if this piece makes you feel something i love you#gender
34 notes
·
View notes
Text

anafabula - SCP-2747 Poster
Wanted to try making collage art. Found this super nice photo of this creature with seven appendages, I think it fits 2747 super well. The poster turned out well too! (Images used are from Unsplash.)
SCP-2747 - As below, so above by minmin: http://www.scp-wiki.net/scp-2747
151 notes
·
View notes
Text
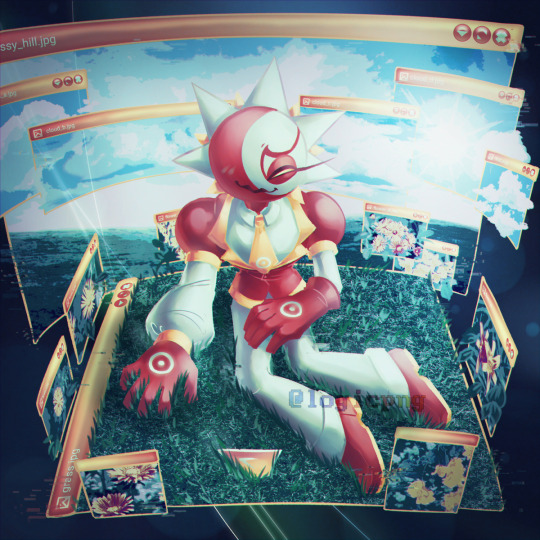

safe... ♪
couldn't resist uploading the bg too i'm really happy with it
[Image ID:
Digital illustration, depicting Aster, a humanoid being in a suit and a starry head, with Rigel fronting, indicated by red and orange colors and symbols of the sun on the backs of his gloves and tie. He is sitting on a window of an image viewing program displaying an image of grass, which seems to be growing out from the surface of the program, a mouse cursor laying in front of him, lightly buried by the grass. The two are surrounded by a collage of other image viewers, depicting various flowers, clouds, sun, and a grassy hill. The space behind him is filled with an ethereal light, shown separately in the second image.
End ID]
Photo credits under cut, + timelapse
photos used by following folk on unsplash:
Hongru Wang - sky & hill
Debashis RC Biswas - grass
CHUTTERSNAP - sky & sun
clouds:
Wolf Zimmermann
Rodion Kutsaiev
engin akyurt
Nicholas Swanson
flowers:
Robert Woeger
Daniella Cressman
Szymon Ostrowski
Richard Loader
Myrlene NUMA
Dagmara Dombrovska
Geraldine Dukes
Richard Burlton
#original#oc#original character#object head oc#object head#frutiger aero#ai oc#aster#rigel aster#CaelOS#technically it fits the aes it deserves the tag
424 notes
·
View notes
Text
Making Fanfic Banners/Collages with Canva for FREE
Hello friends! Canva is an online software tool that mostly gets used for creating social media advertisements, but YOU can use it to make pretty, custom banners/collages/images for your fanfiction! For FREE!
WHY should you do this?
Fun
Custom art thing for your fic!
If you put pictures on your fic posts, sometimes you get more notes (sometimes)
The joy of creation!!!
I will walk you through it (with pictures) below the cut!

STEP ONE: GO TO CANVA, MAKE AN ACCOUNT
You can sign up with email, gmail, or FB. Gmail is the most convenient, but I think they do 2FA no matter what, so take that into account.

STEP TWO: DON'T PAY ANY MONEY & IGNORE AI
Every time you login or make stuff or do ANYTHING, Canva will try to get you to pay for Canva Pro. Don't do that. I've had access to the Pro and free versions and there's no reason to pay for anything on here. Also, they have an AI that's supposed to make things for you, but it sucks & isn't fun. Ignore it.


STEP 3: CHOOSE A TEMPLATE
Okay, so if you're a graphic designer... I mean I'm not sure why you're reading this tutorial, you can definitely make cooler stuff than I can! You should just use the 'create blank [post type]' button and go to town! But if you're not (like me) what I usually do is pick a type of template that Canva has (like blog banners, instagram posts, facebook covers, etc) and go browse their designs. My advice is not to look for something that you completely like, but something that has the right vibe-- you're going to be messing with all the individual aspects of the post anyway, so just pick based on aesthetics. Try to make sure that if you're going to put your fic title on your work that you pick/create a design where the text is clearly displayed/in an easily legible font.
NOTE: Some of the designs will have a little crown in the corner, and these designs are only available if you pay for premium. If they have a little $ on them, instead, that just means they have individual paid elements in them that you can get rid of, so feel free to use those, too!

STEP 4: CHOOSE YOUR PICTURES
Okay, so I like this screaming seagull one. I clicked on it, and selected 'customize template'. So now I want to get rid of the seagull, and replace him with my own stuff. You can do this a couple of ways: if you have screenshots from your game/show/other media, you can upload them by clicking on the little cloud icon on the left side that says "Uploads". If you DON'T have pictures, or you don't have ones you need, there are a couple options:
You can try to browse Canva's selection of pictures. It is in the "Elements" tab; you type in a search, and then select the "photos" filter from the little marquee below the search bar. My advice is to only use one word search terms, because Canva loves showing you all the photos that you can use if you pay for them, and if you use more words, they do that more often. There ARE free photos in there, but you have to scroll a bit.
If you don't want to deal with the search system or can't find what you're looking for, sites like Pixabay, Pexels, and Unsplash provide free photos that you can use without attribution, and do not require you to have an account to download. Please DO NOT just search using google/other engines and take things from there-- those photos are often not licensed for free use. The sites I linked will try to sell you pictures, but not as much as Canva, and there's usually a lot of free stuff to choose from. Download the pictures you want in a good resolution and upload them to Canva!


STEP 5: MESS AROUND WITH STUFF!
Okay, so now you can add your stuff and mess around with it!! Just click on the element (like the seagull) and delete it. Then go to your uploads and click + drag the image you want onto the canvas. You can use them as the background by dragging them to one of the corners, but you can also just put them on the canvas and mess around with them. In the left picture, you can see some of the options you have to resize and move around the image, so different elements appear on top of or behind it. If you click on the button that says 'edit' on the little bar menu that comes up when you select the image, you'll get the menu in the right picture, where you can mess with filters and colors, etc. It's not a completely comprehensive editing software, but you can do a lot of things! I encourage you to mess around and see what looks cool!


STEP SIX: ADD MORE STUFF, IF YOU WANT!
I love adding more stuff. You can change and add text by clicking on the textboxes that are already there, or you can use the "text" section on the left menu to add new blocks. They have some fun combinations and a lot of fonts! A thing I like to do is go in the elements tab and search for 'patterns'; you can add them on top of your image or elsewhere! The opacity setting is your best friend; you can overlay a bunch of stuff and create interesting/unique collages! You can also add basic shapes, frames, moving elements, and clipart, if you want!

STEP SEVEN (FINAL): DOWNLOAD YOUR THING!
When you're done, the 'share' menu in the upper right corner will let you download your image in a bunch of different formats (I'm pretty sure you could make a looping GIF for your fic here on Canva, too!) I usually do PNGs for the quality. I haven't had any issues uploading on Tumblr (or on Twitter, when I used it).
Anyway, I hope you'll try making these! I didn't show it, but there are a lot of different templates you can use, so if you want to make a collage instead, just look around! I think it's super fun to do for my fics! If you have any questions, you can bother me on my blog or in the replies section of this post, just please be polite! Thanks for reading!
40 notes
·
View notes
Note
do you get your pngs from like. a special site? i would love to do little things like that with my own art but im not sure where to look for them!
I mainly cut them out myself out of free stock photos ! I think there's quite a bit of fun on that extra step, makes it feel like you're making a collage, i recommend Pexels and Unsplash
You can also have this quick little tutorial i made for making transparent pngs out of stock photos :-)

#saturn speaks#i used to get most of my pngs from this one free website but turns out it was full of viruses#so y'know can't exactly recommend it#so i think making your own is the best way to go
32 notes
·
View notes
Text

Shout out to Matt Briney on Unsplash! Thanks for taking and posting this picture. It's great inspiration for my character Joan Watson from my fanfiction-in-progress! For those of you who don't know, Unsplash is a free resource where you can find stock photos! I use it a lot - especially when looking for collage material or writing. It's a great place to get some atmospheric inspiration.
Check out this image, and others on Unsplash, here: Photo by Matt Briney on Unsplash
#novel writing#writinggoals#creative writing#writing advice#unsplash#free photos#writing hacks#inspiration#writing inspiration#dark academia#dark aesthetic#johnlock#sherlock x john#bbc sherlock#sherlock fandom#sherlock holmes#sherlock bbc
13 notes
·
View notes
Note
i ADORE your art so much and this pairing is something I didn’t know I needed but I couldn’t live without now, the way you draw them is such a big inspiration for my art but i gotta ask where do you get your poses and your inspiration from <33
im really touched to receive a lot of kind words, especially right now, thank you so much!! ♡( ; ω ; ) as for question - from everywhere, im positioning myself as someone who's just like to draw because of fixation, i can't call myself an actual artist but i appreciate that other people may see me as one, so you can see a lot of posts with 'practice'/'study' captions. i trying to avoid using pintrst, mostly i googling smth, i like to use unsplash com, i like to save random photos from local social network, for practices i really like to use korean idols / models photos or jsf (japanese street fashion) promo photos from sites like lolitawardrobe, i read some manhwas/manhua and like to save smth that inspires me from them too, im doing collages of artworks from different artists and beloved concepts to try mix all this into smth new, my own, and also of course just some random things that my last braincell generates ᓚ₍ ^. .^₎
8 notes
·
View notes
Text

collage by me // poem from Sylvia Plath - Mad Girl's Love Song // photos from unsplash: vlad kutepov // matthew schwartz // annie spratt // soroush karimi // fuu j
10 notes
·
View notes
Text

Collage put together by me, all photos except of Hugh and Mads were sourced from Unsplash.
Uncharted Waters
In-Progress - Chapter 1 of 3
Fandom: Hannibal (TV)
Pairing: Will Graham/Hannibal Lecter
Rating: Mature
CW: Merman Hannibal ¦ Disposal of a Body ¦ Dismembered Body ¦ The dismembered body is only mentioned briefly at the very beginning ¦ Animal Death ¦ Hannibal Kills a Fish with a Spear
Tags: Alternate Universe ¦ Merman Hannibal Lecter ¦ MerMay 2024 ¦ MerMay ¦ Human Will Graham ¦ Non-Human Hannibal Lecter ¦ Disposal of a Body ¦ Dismembered Body ¦ The dismembered body is only mentioned briefly at the very beginning ¦ Love at First Sight ¦ Smitten Hannibal Lecter ¦ Possessive Behavior ¦ Courtship ¦ Courting Rituals ¦ Merfolk Courting ¦ Gift Giving ¦ Hannibal Lecter Loves Will Graham ¦ Slow Burn ¦ Falling In Love ¦ Animal Death ¦ Hannibal Kills a Fish with a Spear
Word Count: 9,102
Summary: Hannibal has never really seen the appeal of humans before, he finds their plain legs unappealing compared to the elegance of a colourful merfolk’s tail, but 𝘵𝘩𝘪𝘴 𝘮𝘢𝘯, this man is the most beautiful thing he's ever seen. Wild dark curls of hair ruffle in the wind at the nape of his neck, a thick stubble decorates his jawline and his pale throat is decorated with faint freckles, he has strong hands and corded forearms that speak of capability and strength. Hannibal is besotted with this stunning creature who has unwittingly wandered into his domain. Before he can even think of acting on his new desire the boat engine strikes up and the man sails out of the cove and out of view.
~~~~
When a human finds their way to Hannibal's cove he becomes utterly fascinated by them.
#hartfeathers fic#Hannigram#MerMay#Will Graham/Hannibal Lecter#Hannibal fanfic#Murder Husbands#Hanibal fanfiction
19 notes
·
View notes
Text

A 3D Chess Match. Oros (Star Trek) & Arkady Balagan (Endgame 2011), AU crossover set in the Star Trek Universe [digital art]
An illustration to my crossover fic "Статистические вероятности".
Oros escaped the Emerald Chain captivity a couple of years ago, lies low, lives a quiet life and has no idea how to find his best friend Tarka who had escaped before him. He is almost ready to accept his loss, however meeting the chess genius Arkady Balagan brings him a new hope. Maybe there's still a chance to find Tarka if Oros can open up to Arkady and take some risks. During his journey Oros also meets Sam Besht who's in a difficult situation of his own. Together they can solve this puzzle and help each other along the way. [gen + background slash]
I've also made a collage as another illustration.

Statistical Probabilities. Oros, Arkady, Sam & Tarka. Star Trek: Discovery and Endgame (2011) crossover [digital collage]
Image sources: — screenshots from Endgame, Star Trek: Discovery, Star Trek: TOS; — image of the United Federation of Planets flag from Star Trek Shop website; — photo by Clarisse Meyer from Unsplash; — photo by Yoad Shejtman from Unsplash.
#star trek fanart#star trek discovery fanart#discovery fanart#endgame tv#oros star trek#arkady balagan#sam besht#ruon tarka#crossover fanart#digital art
4 notes
·
View notes
Text

Crossposting my tribute to @acaseofthewiggins' female Riley from the 2019 oneshot Yes. I Am a Lesbian., who lives rent free in my head. (None of the people in the photos are meant to be an exact face claim for this alternate Riley; it's about the vibes!)
Credit for materials (and the original versions of the images used):
Top left: Toy sword by Jon Nelson (Creative Commons BY-NC sharealike - which means that the same license applies to my collage)
Top middle: Farm Girl by snordq (Creative Commons BY-NC)
Top right: Something Blue screencap from kissthemgoodbye dot net
Tool rack image below the top row: assorted handheld tools in tool rack by Barn Images (Unsplash license)
Middle left: Farm girl by brokencamera123 (Creative Commons BY-NC)
Middle: Dontaskdonttellcredible.jpg by Assistant Secretary of the Army for Manpower and Reserve Affairs, Dept. of the Army - public domain in the US
Middle right: selective photo of flag by Sara Rampazzo (Unsplash license) - this one was pre-colorized!
Bottom left: Drywalling! by Michael Hollander (Creative Commons BY-NC sharealike)
Bottom middle: Rainbow Cookies by JETT DAVIS PHOTOGRAPHY (public domain)
Bottom right: I don't have a source for the text of the tomboy/lesbian quip, but I know the image of it on a book cover that's one of the older forms of this meme isn't a real book. The design is based on a Pixlr preset.
Overlay: A Rainbow Background by Katie Rainbow (Pexels - free to use)
Shoutout to Pleasantville (1998) not because it really inspired what I did with colors here (I decided on my course of action based on Sara Rampazzo's flag photo if anything and THEN, incidentally, watched Pleasantville for the first time), but because I thought the movie did an amazing job humanizing characters that initially appear boring.
2 notes
·
View notes
Text
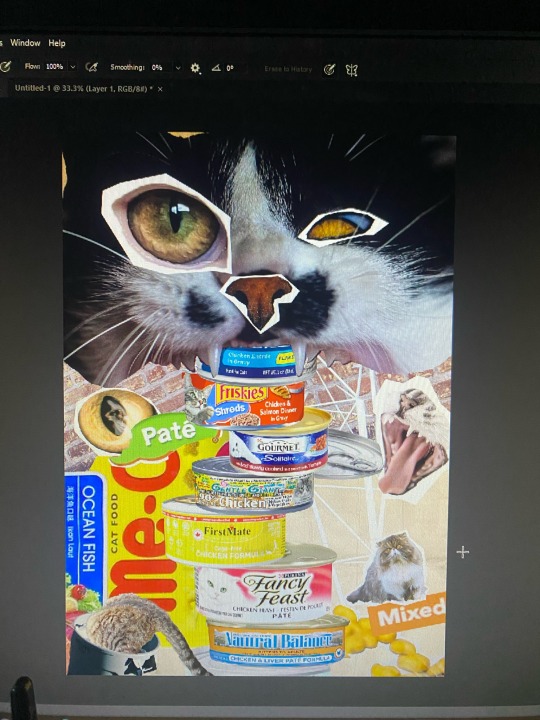
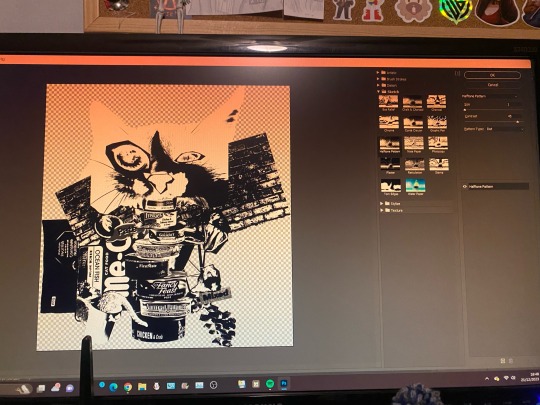
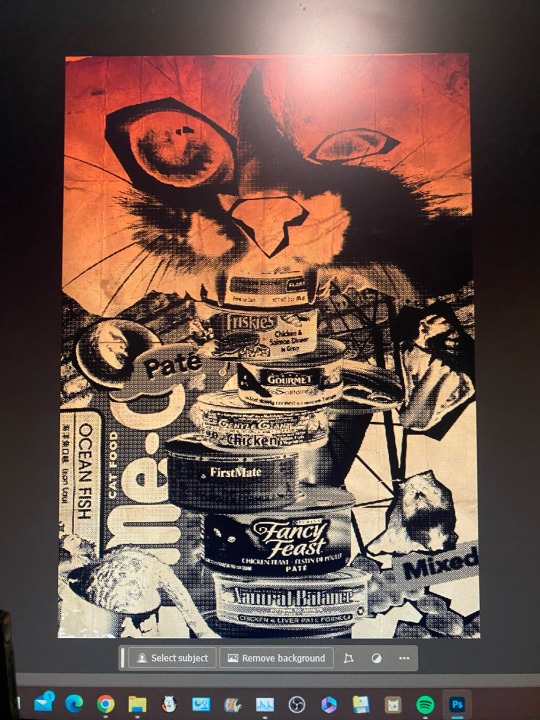
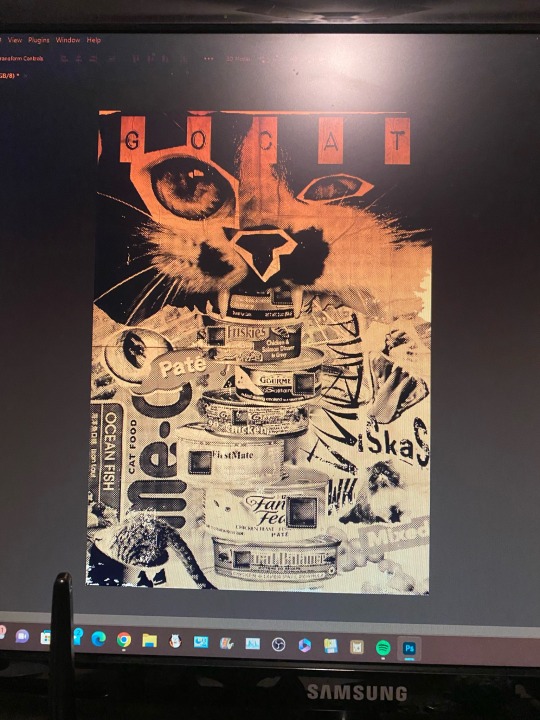
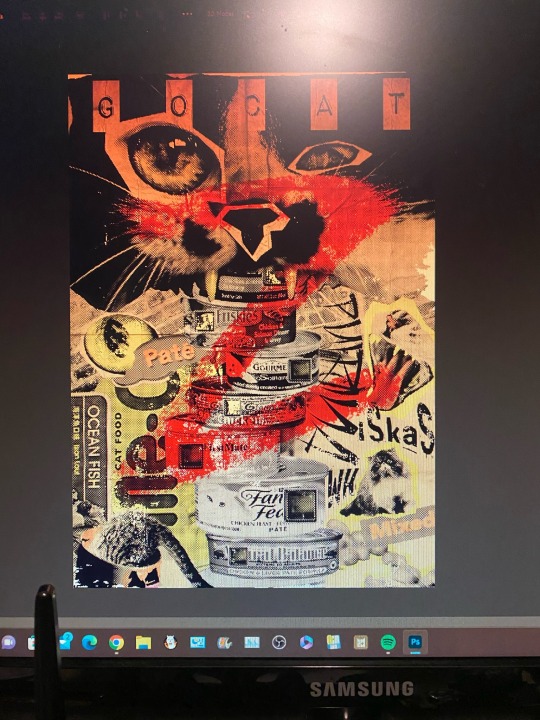
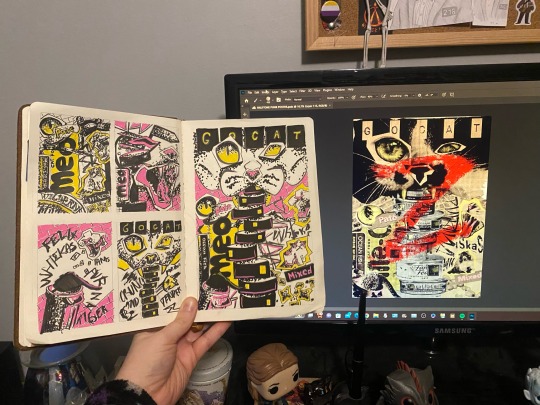

CHRISTMAS BREAK: Final piece work for Project 001: Identity and Place. After exploring my initial ideas and final idea for my punk halftone poster, I went ahead and collaged my final idea in photoshop, using copyright-free photos from Unsplash for a high resolution, ethical design. Once I had the collage ready, I followed a video tutorial online by “Blue Lightning TV Photoshop” on how to use Photoshop’s built-in filter gallery to achieve a punk, 70s-inspired halftone effect, which I manipulated and adjusted with colour, contrast and texture to create the grungy look I was going for. The process of making the poster was quicker than I expected as collaging the piece togerher was only a question of composition, however navigating the filter gallery and layer adjustments was new to me and a bit of a struggle. Hope to take this design to screenprint for a final elevation.
2 notes
·
View notes
Note
Trick for wip or character of your choice 🖤🧡🖤
Thank you for the tag.
Assuming this is referring to this Trick-Or-Treat ask game and is thus a request for a moodboard. I'm not particularly experienced with these, but here's one for @thearchivistsjournal.

The real funny part about making a moodboard for this is that there actually was a collection of images that were a large part of the original inspiration/prompt for this story, but they were all unsourced, and most of them I could never manage to track down the original artists to credit.
Between having those specific images as the seed and the year of that imagery mutating in my head as I practically lived there mentally while writing it, trying to pick out moodboard images was one giant exercise in "That's sort of close-ish, but so very very not right." The big one is that all the library/archive images I could find were either way to grand or way to modern for how I imagine the Village's archive being. That and trying to find any sort of photos of mist/fog that are blindingly thick enough to properly convey a mist night rather than just being artful misty accents.
Still, an interesting exercise all in all and a welcome chance for me to revisit the Village.
Images sourced from Unsplash and assembled into collage via Photo Collage, then given background bordering via Adobe Photoshop CS5.
#writeblr#writers on tumblr#answered asks#writeblr trick or treat#writeblr community#ask#moodboard#wip moodboard#The Archivist's Journal
4 notes
·
View notes
Note
Hi, I was wondering where do you find resources for your art/digital collages? I'm a fellow artist and I was just wondering because it's so hard to find good free images. Thanks!
I'm gonna be real with you if I'm heavily editing a generic image/incorporating/compositing it into the background I rarely check the license 😬 bad habit I know. that being said, I've found pexels and unsplash extremely useful. if an edit relies heavily on one photo, chances are it's from there
also I know you didn't ask but I feel compelled to plug 1001fonts and dafont if you're looking for good fonts. what can I say, I'm a font hoarder
good luck creating! hope this helped
#watch as I get cancelled for this#answered#anon#that being said if theres a font/overlay/effect I used that you want I'm happy to help! I barely make mcr edits anymore so i feel like i#should pass the torch lol#i was just sick of my stuff getting stolen#advice for new fanartists: once your art breaks 1k notes. Watch Out
2 notes
·
View notes
Text
Malek

Mature • F/M/M, M/M, F/M • 76,100 Words • Dark • Angst • Whump • Hurt/Comfort • Mentions of Gang Rape (off screen) • Graphic Torture • Mental Instability • PTSD • PoW • Stalking • Gaslighting • Sexual Harassment • Non-permanent MCD • Love Triangle • Poly
One of the first covers I made, but I realize I never posted it.
@polyamships
Photos…
• The moodboard borders are from with Collageable. • The photos from left to right, top to bottom. • Screenshot of Malek from Stargate. • Hands from Unsplash. • Pete. • Castle dungeon from Wiki Commons. • Hand model from Wiki Commons. • Pain stick. • Composite photo, both originally from Wiki Commons. • Shadowy figure/knife from Unsplash. • Screenshot, JR Bourne in The Lost Treasure of the Grand Canyon. • Dungeon steps from Unsplash. • Sam. • River from Unsplash. • Lantash, recolored. • Berries from Wiki Commons. • The stone boarder is from Wiki Commons.
#stargate sg1#fan fiction#tok’ra#tok'ra#meushell fan fic#fic cover#dead dove do not eat#dark fic#whump#angst fic#hurt/comfort#poly fic#malek#martouf#lantash#sam carter#pete shanahan#jacob carter#selmak#stargate#sg1#stargate fandom#fanfiction#fan fic cover#fanfic#polyam shipping
1 note
·
View note