#CentOS7
Explore tagged Tumblr posts
Visit Tumblr Blog
Explore Tumblr blogs with no restrictions, modern design and the best experience.
Last Seen Tumblr Blogs


Fun Fact
In 2020, Tumblr had 29.4 million users in the US.
Text
How To Setup Elasticsearch 6.4 On RHEL/CentOS 6/7?

What is Elasticsearch? Elasticsearch is a search engine based on Lucene. It is useful in a distributed environment and helps in a multitenant-capable full-text search engine. While you query something from Elasticsearch it will provide you with an HTTP web interface and schema-free JSON documents. it provides the ability for full-text search. Elasticsearch is developed in Java and is released as open-source under the terms of the Apache 2 license. Scenario: 1. Server IP: 192.168.56.101 2. Elasticsearch: Version 6.4 3. OS: CentOS 7.5 4. RAM: 4 GB Note: If you are a SUDO user then prefix every command with sudo, like #sudo ifconfig With the help of this guide, you will be able to set up Elasticsearch single-node clusters on CentOS, Red Hat, and Fedora systems. Step 1: Install and Verify Java Java is the primary requirement for installing Elasticsearch. So, make sure you have Java installed on your system. # java -version openjdk version "1.8.0_181" OpenJDK Runtime Environment (build 1.8.0_181-b13) OpenJDK 64-Bit Server VM (build 25.181-b13, mixed mode) If you don’t have Java installed on your system, then run the below command # yum install java-1.8.0-openjdk Step 2: Setup Elasticsearch For this guide, I am downloading the latest Elasticsearch tar from its official website so follow the below step # wget https://artifacts.elastic.co/downloads/elasticsearch/elasticsearch-6.4.2.tar.gz # tar -xzf elasticsearch-6.4.2.tar.gz # tar -xzf elasticsearch-6.4.2.tar.gz # mv elasticsearch-6.4.2 /usr/local/elasticsearch Step 5: Permission and User We need a user for running elasticsearch (root is not recommended). # useradd elasticsearch # chown -R elasticsearch.elasticsearch /usr/local/elasticsearch/ Step 6: Setup Ulimits Now to get a Running system we need to make some changes of ulimits else we will get an error like “max number of threads for user is too low, increase to at least ” so to overcome this issue make below changes you should run. # ulimit -n 65536 # ulimit -u 2048 Or you may edit the file to make changes permanent # vim /etc/security/limits.conf elasticsearch - nofile 65536 elasticsearch soft nofile 64000 elasticsearch hard nofile 64000 elasticsearch hard nproc 4096 elasticsearch soft nproc 4096 Save files using :wq Step 7: Configure Elasticsearch Now make some configuration changes like cluster name or node name to make our single node cluster live. # cd /usr/local/elasticsearch/ Now, look for the below keywords in the file and change according to you need # vim conf/elasticsearch.yml cluster.name: kapendra-cluster-1 node.name: kapendra-node-1 http.port: 9200 to set this value to your IP or make it 0.0.0.0 ID needs to be accessible from anywhere from the network. Else put your IP of localhost network.host: 0.0.0.0 There is one more thing if you have any dedicated mount pint for data then change the value for #path.data: /path/to/data to your mount point.
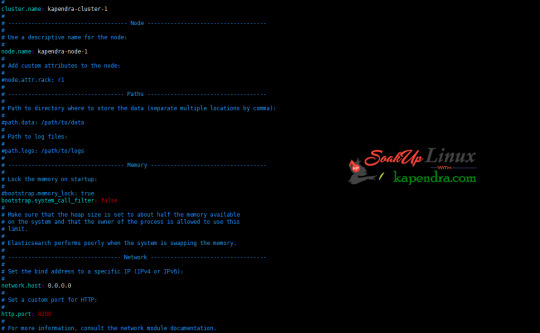
Your configuration should look like the above. Step 8: Starting Elasticsearch Cluster As the Elasticsearch setup is completed. Let the start Elasticsearch cluster with elastic search user so first switch to elastic search user and then run the cluster # su - elasticsearch $ /usr/local/elasticsearch/bin/elasticsearch 22278 Step 9: Verify Setup You have all done it, just need to verify the setup. Elasticsearch works on port default port 9200, open your browser to point your server on port 9200, You will find something like the below output http://localhost:9200 or http://192.168.56.101:9200 at the end of this article, you have successfully set up Elasticsearch single node cluster. In the next few articles, we will try to cover a few commands and their setup in the docker container for development environments on local machines. Read the full article
2 notes
·
View notes
Text
Try Intel MPI Benchmarks: MPI Performance Analysis Guide

Ping-Pong with Intel MPI Benchmark (IMB)
The latency experienced when sending a fixed-sized message between two ranks on separate virtual machines is measured by IMB Ping-Pong. When utilizing the HPC Rocky Linux 8 image instead of the GCP Rocky Linux 8 default image, they observed improvements of up to 15%.
Setting up benchmarks Two instances of h3-standard-88 Intel OneAPI MPI library 2021.11.0 is the MPI library. Intel MPI Benchmarks 2019 Update 6 is the MPI benchmarks application. Environment variables for MPI: Processor List I_MPI_PIN_LIST=0 SHM:ofi I_MPI_FABRICS= FI_PROVIDER = tcp Mpirun -n 2 -ppn 1 -bind-to core -hostfile is the command line. IMB-MPI1 Pingpong -iter 50000 -msglog 0:16 AllReduce – Intel MPI Benchmark (IMB) – single process per node The collective latency across multiple ranks across virtual machines is measured by the IMB AllReduce benchmark. It uses the MPI_SUM operation to reduce a vector with a fixed length.
Initially, they display 1 PPN (process-per-node) result (1 MPI rank) on 8 VMs in order to isolate networking performance.
When comparing the HPC Rocky Linux 8 image to the default GCP Rocky Linux 8 image, they observed improvements of up to 35%.
Setting up benchmarks Eight times the h3-standard-88 Every node has one process. Intel OneAPI MPI library 2021.11.0 is the MPI library. Intel MPI Benchmarks 2019 Update 6 is the MPI benchmarks application. Environment variables for MPI: SHM:ofi I_MPI_FABRICS= FI_PROVIDER = tcp 11 is I_MPI_ADJUST_ALLREDUCE. Mpirun -n 008 -ppn 01 -bind-to core -hostfile is the command line. IMB-MPI1 Allreduce -iter 50000 -npmin 008 -msglog 0:16 Benchmark Intel MPI (IMB) One process for each core (88 processes per node) in AllReduce
They display 88 PPN results with 1 thread/rank (704 ranks) and 88 MPI ranks/node.
When comparing the HPC Rocky Linux 8 image to the default GCP Rocky Linux 8 image for this test, they observed an improvement of up to 25%.
Setting up benchmarks Eight times the h3-standard-88 88 processes per node, or one process per core Intel OneAPI MPI library 2021.11.0 is the MPI library. Intel MPI Benchmarks 2019 Update 6 is the MPI benchmarks application. Environment variables for MPI: SHM:ofi I_MPI_FABRICS= FI_PROVIDER = tcp 11 is I_MPI_ADJUST_ALLREDUCE. pirun -n 704 -ppn 88 -bind-to core -hostfile is the command line. IMB-MPI1 Allreduce -iter 50000 -npmin 704 -msglog 0:16 Google is pleased to announce today the general availability of HPC Virtual Machine (VM) images for workloads involving high performance computing (HPC), primarily tightly coupled workloads like fluid dynamics, molecular modeling, and weather forecasting. These images are based on CentOS 7 and Rocky Linux 8.
They have made it simple to create an HPC-ready virtual machine instance using the HPC VM image by integrating their finest practices for HPC on Google Cloud, such as:
Virtual machines prepared for HPC right out of the box Virtual machines prepared for HPC right out of the box For closely coupled HPC workloads, there’s no need to manually adjust performance, handle virtual machine reboots, or stay current with Google Cloud updates especially with their frequent releases of HPC VM images. As soon as tunings call for them, the HPC VM image will take care of the reboot process automatically.
Optimization of networking for closely coupled workloads Networking best practices for workloads that are closely connected Applications that heavily rely on point-to-point and collective communications benefit from optimizations that lower latency for small messages.
Compute optimizations These include adjustments to lessen system jitter, which improves scalability by ensuring consistent single-node performance.
Enhanced application compatibility A high level of system interoperability is made possible by alignment with the node-level specifications of the Intel HPC platform specification.
Measuring performance with HPC benchmarks They have evaluated the HPC VM images’ performance using the Intel MPI Benchmarks (IMB) against the GCP-optimized Rocky Linux 8 image and the default CentOS 7 image.
The following images served as the benchmarks.
Rocky Linux 8 for HPC hpc-rocky-linux-8-v20240126 is the image name. The cloud-hpc-image-public image project GCP Rocky Linux 8 default Rocky-linux-8-optimized-gcp-v20240111 is the image name. Picture project: cloud-linux-rocky In order to reduce network latency, each cluster of machines was deployed using compact placement with max_distance=1, which meant that all virtual machines were situated on hardware that was physically on the same rack
The HPC VM image and the Cloud HPC Toolkit The Cloud HPC Toolkit, an open-source tool that makes it easier to deploy environments for a range of workloads, including machine learning, AI, and HPC, is where you can use the HPC VM image. Actually, the HPC VM image is used by default by the Toolkit blueprints and Slurm images based on CentOS 7 and Rocky Linux 8. The HPC VM image can be further customized with the help of the Cloud HPC Toolkit, allowing for the installation of additional software and configuration changes, thus increasing its utility.
It is possible to create and share blueprints for creating optimized and specialized images, increasing reproducibility while lowering setup time and effort, by using the Cloud HPC Toolkit to customize images based on the HPC VM Image.
Setting up an HPC-ready VM Overview In tightly coupled high performance computing (HPC) workloads, processes and VM instances communicate via MPI.. However, creating your own VM image that is optimized for MPI performance calls for additional maintenance time, familiarity with Google Cloud, and system knowledge. You can use the HPC VM image to quickly create virtual machine instances for your HPC workloads. A substitute is to use the H3 machine series to build virtual machines (VMs).
The HPC virtual machine image is designed for tightly coupled HPC workloads and is based on either CentOS 7.9 or Rocky Linux 8. It contains pre-configured network and kernel tuning parameters needed to build virtual machines (VM instances) with the best MPI performance on Google Cloud
These options can be used to create a virtual machine that is ready for HPC:
Cloud CLI for Google Google Cloud interface. The image can be accessed in the console via Cloud Marketplace. Slurm, the workload manager from SchedMD, defaults to using the HPC VM image. Omnibond CloudyCluster defaults to using the HPC VM image. Advantages The advantages of the HPC VM image are as follows:
Virtual machines that are ready for HPC right out of the box For closely coupled HPC workloads, there’s no need to manually adjust performance, handle virtual machine reboots, or keep up with Google Cloud updates.
Networking best practices for workloads that are closely connected Applications that heavily rely on point-to-point and collective communications benefit from optimizations that lower latency for small messages.
Computation-related improvements for HPC tasks The inclusion of jitter reduction optimizations increases the predictability of single-node high performance. reliable and consistent performance. Application-level performance is consistent and repeatable with VM image standardization. enhanced compatibility with applications. System interoperability is greatly enhanced by alignment with the node-level requirements of the Intel HPC platform specification.
Features Collective tunings for Intel MPI Compact placement policies were used to perform Intel MPI collective tunings on c2-standard-60 and c2d-standard-112 instances, which are included in the HPC VM image.
RPMs that are already installed The RPM packages listed below are pre-installed on the HPC virtual machine image
Package group “Development Tools” contains the following: Lmod, dkms, htop, hwloc, hwloc-devel, kernel-devel, ltrace, libXt, nfs-utils, numptl, numptl-devel, papi, pciutils, pdsh, perf, redhat-lsb-core, redhat-lsb-cxx, rsh, screen, trace, wget, zsh
Read more on Govindhtech.com
0 notes
Text
CentOS 7 Üzerinde CyberPanel Kurulumu
Web sitesi sahipleri için CyberPanel, ücretsiz ve kullanımı kolay bir kontrol paneli olabilir. Sitemizde CentOS 7 üzerine kurulumunu adım adım anlattığımız makalemizde minimum gereksinimlerden SSL sertifikası kurulumuna kadar her adımı detaylıca ele aldık.
CentOS 7 Üzerinde CyberPanel Kurulumu
0 notes
Text
how to configure client vpn on centos7
🔒🌍✨ Ganhe 3 Meses de VPN GRÁTIS - Acesso à Internet Seguro e Privado em Todo o Mundo! Clique Aqui ✨🌍🔒
how to configure client vpn on centos7
Configuração VPN cliente CentOS7
A configuração de uma VPN para um cliente CentOS 7 é um processo importante para garantir uma conexão segura e privada à rede. Uma VPN (Rede Virtual Privada) permite que os usuários se conectem a uma rede privada de forma segura através de uma conexão à Internet. Neste artigo, vamos abordar os passos necessários para configurar uma VPN em um cliente CentOS 7.
Antes de começar, é importante destacar que existem várias formas de configurar uma VPN no CentOS 7, sendo uma das opções mais populares o uso do OpenVPN. Para configurar o OpenVPN, é necessário instalar o pacote openvpn no CentOS 7 através do gerenciador de pacotes yum.
Após a instalação do pacote openvpn, o próximo passo é configurar o servidor OpenVPN e os certificados necessários para a autenticação dos clientes. Em seguida, os arquivos de configuração do servidor devem ser transferidos para o cliente CentOS 7.
No cliente CentOS 7, é necessário instalar o pacote openvpn e copiar os certificados do servidor para o diretório adequado. Em seguida, o arquivo de configuração do cliente deve ser ajustado conforme as configurações do servidor.
Por fim, após a configuração do cliente CentOS 7, é possível estabelecer uma conexão VPN segura e privada com o servidor OpenVPN. É importante realizar testes para garantir que a conexão VPN esteja funcionando corretamente e protegendo os dados de forma eficaz.
Em resumo, configurar uma VPN para um cliente CentOS 7 requer a instalação e configuração do OpenVPN, além da transferência e ajuste dos certificados de autenticação. Com os passos corretamente seguidos, é possível desfrutar de uma conexão VPN segura e protegida.
Tutorial VPN cliente CentOS7
VPN, ou Virtual Private Network, é uma tecnologia que permite a criação de uma rede privada virtual através de uma conexão segura à internet. Com o uso de VPN, é possível proteger a privacidade e segurança dos dados, tornando a comunicação mais segura, principalmente em redes públicas. Neste tutorial, vamos abordar como configurar um cliente VPN em um sistema CentOS 7.
O primeiro passo é escolher um serviço de VPN confiável e fazer o download do software cliente para CentOS 7. Em seguida, siga as instruções de instalação e configure as credenciais de acesso fornecidas pelo provedor de VPN.
Após a instalação do cliente VPN, abra o aplicativo e insira suas credenciais de usuário e senha. Em seguida, selecione o servidor VPN desejado para estabelecer a conexão. Certifique-se de configurar corretamente as opções de segurança, como o protocolo de criptografia a ser utilizado.
Uma vez conectado, verifique se a conexão VPN foi estabelecida com sucesso. Você pode verificar seu endereço IP para confirmar se está navegando anonimamente através do servidor VPN escolhido.
Por fim, lembre-se de desconectar a VPN quando não estiver em uso, para preservar a segurança dos dados e a velocidade da conexão. Com este tutorial, você poderá configurar facilmente um cliente VPN em um sistema CentOS 7 e desfrutar de uma conexão mais segura e protegida na internet.
Passo a passo VPN cliente CentOS7
A configuração de uma VPN em um cliente CentOS 7 pode ser uma tarefa desafiadora para alguns usuários, mas com um guia passo a passo, torna-se mais simples. Aqui estão as etapas para configurar uma VPN em um cliente CentOS 7:
Instalação do OpenVPN: Comece instalando o pacote OpenVPN no seu sistema CentOS 7. Você pode fazer isso usando o gerenciador de pacotes yum. Basta digitar o seguinte comando no terminal: sudo yum install openvpn.
Configuração do cliente VPN: Após a instalação do OpenVPN, você precisará configurar o cliente VPN. Para isso, edite o arquivo de configuração do OpenVPN localizado em /etc/openvpn. Você pode usar o editor de texto de sua preferência para fazer as alterações necessárias.
Conexão à VPN: Uma vez que a configuração do cliente VPN esteja completa, você pode se conectar à VPN digitando o seguinte comando no terminal: sudo openvpn nome_do_arquivo_de_configuracao.conf. Certifique-se de substituir nome_do_arquivo_de_configuracao.conf pelo nome do arquivo de configuração que você criou.
Verificação da conexão: Para garantir que a conexão VPN esteja funcionando corretamente, você pode verificar o status da conexão digitando o comando ifconfig ou ip addr no terminal. Isso exibirá informações sobre o status da sua conexão VPN.
Ao seguir esses passos simples, você poderá configurar com sucesso uma VPN em um cliente CentOS 7. Lembre-se de que a segurança e privacidade dos seus dados são fundamentais ao usar uma VPN, portanto, verifique regularmente a configuração e a conexão para garantir que estejam protegidas.
Configurar VPN no CentOS7
Configurar uma VPN no CentOS 7 é um processo importante para garantir a segurança e a privacidade dos dados transmitidos pela rede. Uma Virtual Private Network, ou VPN, cria uma conexão segura entre o seu dispositivo e a internet, protegendo assim as informações de acessos não autorizados.
Existem diferentes maneiras de configurar uma VPN no CentOS 7, sendo uma das opções mais comuns o uso do software OpenVPN. Para iniciar o processo, é necessário baixar e instalar o pacote do OpenVPN no sistema operacional.
Após a instalação, o próximo passo é configurar o servidor VPN. É preciso gerar as chaves de criptografia, criar um arquivo de configuração, definir as políticas de segurança e configurar as permissões de acesso dos usuários.
Com o servidor configurado, o passo seguinte é configurar os clientes VPN. Para isso, é necessário gerar as chaves de criptografia no cliente, criar um arquivo de configuração específico e conectar o cliente ao servidor VPN.
É importante ressaltar que a configuração de uma VPN requer conhecimentos específicos em redes e segurança da informação. Portanto, caso não se sinta confortável em realizar esse procedimento, é aconselhável buscar a assistência de um profissional especializado.
Em resumo, configurar uma VPN no CentOS 7 é uma medida fundamental para proteger a integridade dos dados transmitidos pela rede. Seguindo os passos corretamente e tomando os devidos cuidados, é possível garantir uma conexão segura e privada em seu sistema operacional.
Cliente VPN CentOS7
Um Cliente VPN é uma ferramenta fundamental para quem deseja proteger sua privacidade e segurança online. No CentOS 7, um sistema operacional de código aberto amplamente utilizado em servidores, é possível configurar facilmente um Cliente VPN para garantir uma navegação segura e anônima.
Existem várias opções de Clientes VPN disponíveis para o CentOS 7, sendo o OpenVPN uma das mais populares devido à sua confiabilidade e segurança. Para configurar o OpenVPN no CentOS 7, é necessário instalar os pacotes necessários e criar as chaves de criptografia.
Após a instalação e configuração do Cliente VPN, os usuários podem estabelecer uma conexão segura com um servidor VPN remoto, ocultando seu endereço IP real e criptografando seus dados. Isso é especialmente útil ao utilizar redes públicas de Wi-Fi, protegendo contra possíveis ataques de hackers e interceptação de dados.
Além da proteção da privacidade, um Cliente VPN no CentOS 7 também pode ser usado para contornar restrições geográficas em serviços de streaming, permitindo acessar conteúdo que não está disponível na região do usuário.
Em resumo, configurar um Cliente VPN no CentOS 7 é uma prática altamente recomendada para quem valoriza sua privacidade e segurança online. Com as ferramentas certas e a configuração adequada, é possível desfrutar de uma navegação mais segura, anônima e livre de restrições geográficas.
0 notes
Link
看看網頁版全文 ⇨ Linux開機時略過掛載失敗的外接裝置 / Skip Disconnected Devices on Boot in Linux https://blog.pulipuli.info/2023/07/skip-disconnected-devices-on-boot-in-linux.html 要記得在/etc/fstab的掛載參數加上nofail。 ---- # 掛載設定 / fstab https://linux.vbird.org/linux_basic/centos7/0230filesystem.php#fstab。 要在Linux掛載儲存裝置的話,除了在開機之後再用mount手動指令掛載之外,比較正式的寫法是在 /etc/fstab 檔案裡面設定儲存裝置,這樣就能在開機時自動掛載。 /etc/fstab的設定相當複雜,可以參考鳥哥的介紹。 大家比較常注意的是以下幾點:。 - 掛載的裝置:用路徑表示,通常是/dev/開頭。 - 掛載點:實際上可以存取的資料夾,一樣用路徑表示。 - 檔案系統:通常是ext4。 然而,後面的掛載參數還有更多設定值得關注。 # nofail https://bobcares.com/blog/nfs-fstab-nofail/。 其中一項值得關注的參數叫做「nofail」。 他的意思是,Linux會在開機的流程中嘗試掛載該裝置。 但如果該裝置無法掛載,那Linux會略過它,繼續完成後面的開機裝置。 nofail通常用在連線狀態可能不穩的設備上。 例如:。 - 用網路連接的裝置:NFS - 用USB連接的外接裝置:隨身碟、隨身硬碟。 - 透過讀卡機的讀取的裝置:電腦上的Micro SD記憶卡。 如果你的Linux會連接以上裝置的話,那可能你也需要加上nofail喔。 https://unix.stackexchange.com/questions/589434/emergency-mode-error-on-startup。 如果沒有nofail,而儲存裝置在開機時又無法連線的話,通常Linux會卡在開機程序中,出現類似上圖的提示,讓你可以用維護模式進入指令列。 進入指令列之後,可以試著在 /etc/fstab 加入 nofail 參數,接著再 reboot 看看。 下次開機可能就會成功。 # 設定例子 / Example 以下是在 /etc/fstab 加上nofail掛載的例子:。 [Code...] 它的意思是: - /dev/sda3 : 掛載的設備。這是SATA設備 (/dev/sd) 之中的第一個設備 (a) 之中的第一個磁碟分區 (3) 。 ---- 繼續閱讀 ⇨ Linux開機時略過掛載失敗的外接裝置 / Skip Disconnected Devices on Boot in Linux https://blog.pulipuli.info/2023/07/skip-disconnected-devices-on-boot-in-linux.html
1 note
·
View note
Text
まだ /usr/lib/systemd/system のサービス設定ファイルを編集しているの?
CentOS7(RHEL)やUbuntu(Debian)などのsystemdでサービス起動している設定ファイル(ユニットファイル)を書き換えるときの注意点をまとめました。 Zabbix-Agentをroot起動したいときに `zabbix-agentd.conf` の `AllowRoot=1` にしただけじゃ足りず、`/usr/lib/systemd/system/zabbix-agent.service` で設定しているユーザー、グループを書き換える、ありますよね? でもその方法、合ってますか? https://tamulab.jp/systemd-unit-files-configure/?utm_source=dlvr.it&utm_medium=tumblr
0 notes
Text
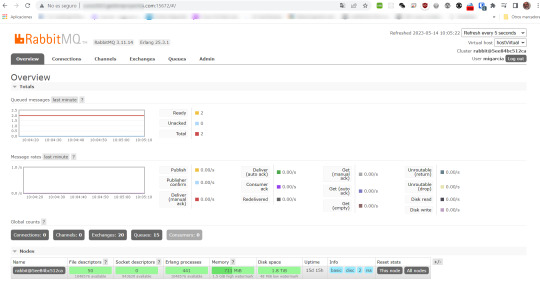
Java17 - Probando el trabajo con RabbitMQ - 2
La configuración de RabbitMQ Una vez planteado el problema, cosa que hicimos en el articulo anterior, nuestro siguiente paso, es preparar el servidor RabbitMq para nuestros propósitos. En mi caso, he preparado un servidor en internet; he utilizado un servidor barato, con Centos7, y he instalado docker, y una imagen, para hacer mas rápida la instalación. Con ello, puedo visualizar la pantalla…
View On WordPress
0 notes
Text
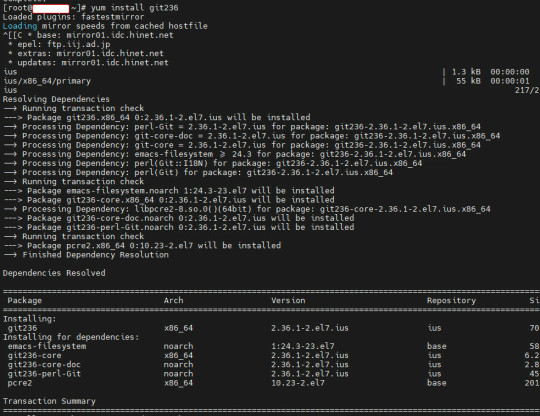
【數位3C】免編譯CentOS7使用yum升級Git版本到2.0版以上
因為CentOS7 預設使用yum 只能安裝到1.8版的git 但目前最新版已經到了2.37 網路上一般更新到2.x以上都是要另外下載自行編譯 不過這樣實在太辛苦了 所以這裡使用別的來源來實現更新到2.0以上的新版本 不過我們要先移除舊版 yum remove git 安裝裝三方來源 yum install epel-release 再安裝(整段複��) yum install \ https://repo.ius.io/ius-release-el7.rpm…
View On WordPress
0 notes
Video
youtube
ORDS Oracle tutorial 7 Install Weblogic Server on CentOS 7
0 notes
Text
OpenVPN CentOS 7
wget https://raw.githubusercontent.com/Angristan/openvpn-install/master/openvpn-install.sh -O centos7-vpn.sh chmod +x centos7-vpn.sh sudo ./centos7-vpn.sh
0 notes
Text
Installing Docker in CentOS7
https://docs.docker.com/engine/install/centos/
1. Uninstall Old versions of Docker
$ sudo yum remove docker \ docker-client \ docker-client-latest \ docker-common \ docker-latest \ docker-latest-logrotate \ docker-logrotate \ docker-engine
2. Set-up the Docker repository
$ sudo yum install -y yum-utils $ sudo yum-config-manager \ --add-repo \ https://download.docker.com/linux/centos/docker-ce.repo
3. Install the Docker Engine
$ sudo yum install docker-ce docker-ce-cli containerd.io
4. Start the Docker Engine
$ sudo systemctl start docker
5. Add socket privileges in order avoid “Got permission denied” error
$ sudo chmod 666 /var/run/docker.sock
0 notes
Video
youtube
How To Change php version in CWP CentOS Control panel
In this video I will show you How To Change php version in CWP CentOS Control panel. if you need to solve you need to CWPPRO license to use this module to change PHP version in CWP. If you encounter any issues or need further assistance, you can contact me in https://www.fiverr.com/perfectminhaj #hosting #CWP #centos #centos7 #php #php8
1 note
·
View note
Photo

Install CentOS Web Panel on CentOS 7. Visit www.coderclick.com #centos #centos7 #hosting #vps https://www.instagram.com/p/CAVmI1slTL7/?igshid=ni5s9i096t6h
0 notes
Text
How to Clear Disk Space on CentOS 7+

If you've stumbled upon this post, it most likely means that you're looking for a way to free some reasonable amount of disk space on a CentOS 7 machine. In this article I'll try to summarize some easy techniques that can be easily pulled off using the command-line / terminal to fullfill such task.
Show free disk space
The first thing to do is to check how much free disk space we do have on our CentOS drive. There are a lot of useful tools that can do that, the best one of them arguably being gt5 - a freeware terminal utility that shows the available disk space using a neat colored interface:

If you want to use gt5, you can download it from here. If you don't want to install an additional package, you can also use the built-in df system utility - which is already included in CentOS - and obtain a similar result using the following command: df -h Which should return the following info:

Now we know how much disk space we do have: in the above screenshot, we can see how the situation is quite troublesome, since we do have only 4.3 free MB left.
Install yum-utils
The next thing to do is to install the yum-utils package using the following command: yum install yum-utils This package consists of a collection of utilities that integrate with yum to extend its native features in several ways, thus making it more powerful and easier to use. In the unlikely case we do not have the required amount of disk space to perform the install of yum-utils, the best thing we can do is to manually delete some log file from the /var/log folder: luckily enough the package is quite small, therefore a couple log files (for a total amount of ~1-2 MB) should do the trick.
Trim log files
Now we can start to clean up our system. Let's start with the following command, that will truncate all the log files on the /var/ folder that are either older than 7 days and greater than 50M or older than 30 days. find /var -name "*.log" \( \( -size +50M -mtime +7 \) -o -mtime +30 \) -exec truncate {} --size 0 \; Right after doing that, it could be useful to repeat the gt5 or df -h command to see how much disk space we've recovered.
Clean up YUM cache
The next thing we should do is to cleanup our YUM cache with the following command: yum clean all Unfortunately, the above command don't always remove everything, therefore it can be useful to also perform a direct cleanup of the main YUM cache folder: rm -rf /var/cache/yum And also the YUM user-cache folder: rm -rf /var/tmp/yum-* Again, once we've done that, we should repeat the gt5 or df -h command to see how much disk space we've recovered.
Remove orphan packages
The next thing to do is to check the installed orphan packages to see if we can safely remove them; by orphaned packages we mean all packages which no longer serve a purpose of package dependencies. Here's how we can safely see the orphan packages we do have on our system: package-cleanup --quiet --leaves --exclude-bin And here's how we can delete them: package-cleanup --quiet --leaves --exclude-bin | xargs yum remove -y The above commands should be launched multiple times, because the packages deleted with the first batch could create additional orphan packages, and so on: be sure to perform these tasks until no orphan packages appear anymore after the first package-cleanup command.
Remove WP CLI cached Wordpress downloads
If the CentOS machine you're cleaning is a Web Server hosting one or more Wordpress instances, you might want to clean the Wordpress CLI cache as well. Wordpress CLI saves Wordpress archives every time you setup a new Wordpress website: these archives can be removed with the following commands: rm -rf /root/.wp-cli/cache/* rm -rf /home/*/.wp-cli/cache/*
Remove old kernels
Whenever you update your CentOS kernel, the old kernel gets backupped by the system for safety reasons: however, you rarely need all of them. Here's a useful command that can be used to only keep the 2 latest kernels installed, thus removing the previous ones: package-cleanup --oldkernels --count=2 This command should hopefully recover a good amount of disk space, as shown in the following screenshot.

Remove Composer cache
Again, if your CentOS machine is a web server, it could be useful to cleanup the Composer cache. Composer is an application-level package manager for the PHP programming language that provides a standard format for managing dependencies of PHP software and required libraries; every time we use it, it creates a cache of previous packages that can be safely removed to free up some disk space with the following commands: rm -rf /root/.composer/cache rm -rf /home/*/.composer/cache
Conclusions
That's it: I sincerely hope that the above commands will help you to cleanup your CentOS drive and free some disk space. If you have additional general-purpose suggestions that can be used fo fullfill such task, feel free to describe them in the comments section: we'll be happy to add them to this post! Read the full article
0 notes