#Best video player for mac free vlc
Explore tagged Tumblr posts
Visit Tumblr Blog
Explore Tumblr blogs with no restrictions, modern design and the best experience.
Last Seen Tumblr Blogs


Fun Fact
Celebrities use Tumblr as well.
Text
KIP'S BIG POST OF THINGS TO MAKE THE INTERNET & TECHNOLOGY SUCK A LITTLE LESS

Post last updated November 23, 2024. Will continue to update!
Here are my favorite things to use to navigate technology my own way:
A refurbished iPod loaded with Rockbox OS (Rockbox is free, iPods range in price. I linked the site I got mine from. Note that iPods get finicky about syncing and the kind of cord it has— it may still charge but might not recognize the device to sync. Getting an original Apple cord sometimes helps). Rockbox has ports for other MP3 players as well.
This Windows debloater program (there are viable alternatives out there, this one works for me). It has a powershell script that give you a little UI and buttons to press, which I appreciate, as I'm still a bit shy with tech.
Firefox with the following extensions: - Consent-O-Matic (set your responses to ALL privacy/cookie pop-ups in the extension, and it will answer all pop-ups for you. I can see reasons to not use it, but I appreciate it) - Facebook Container ("contains" Meta on Facebook and Instagram pages to keep it from tracking you or getting third party cookies, since Meta is fairly egregious about it) - Redirect Amp to HTML (AMP is designed for mobile phones, this forces pages to go to their HTML version) - A WebP/AVIF image converter - uBlock Origin and uBlacklist, with the AI blacklist loaded in to kill any generative AI results from appearing in search engines or anywhere.
Handbrake for ripping DVDs— I haven’t used this in awhile as I haven’t been making video edits. I used this back when I had a Mac OS
VLC Media Player (ol’ reliable)
Unsplash & Pexels for free-to-use images
A password manager (these often are paid. I use Dashlane. There are many options, feel free to search around and ask for recs!). There is a lot that goes into cybersecurity— find the option you feel is best for you.
Things I suggest:
Understanding Royalty Free and the Creative Commons licenses
Familiarity with boolean operators for searching
Investing in a backup drive and external drive
A few good USBs, including one that has a backup of your OS on it
Adapter cables
Avoiding Fandom “wikias” (as in the brand “Fandom”) and supporting other, fan-run or supported wikis. Consider contributing if its something you find yourself passionate or joyful about.
Finding Forums for the things you like, or creating your own*
Create an email specifically for ads/shopping— use it to receive all promotional emails to keep your inbox clean. Upkeep it.
Stop putting so much of your personal information online— be willing to separate your personal online identity from your “online identity”. You don’t owe people your name, location, pronouns, diagnoses, or any of that. It’s your choice, but be discerning in what you give and why. I recommend avoiding providing your phone number to sites as much as possible.
Be intentional
Ask questions
Talk to people
Remember that you can lurk all you want
Things that are fun to check out:
BBSes-- here's a portal to access them.
Neocities
*Forums-- find some to join, or maybe host your own? The system I was most familiar with was vbulletin.
MMM.page
Things that have worked well for me but might work for you, YMMV:
Limit your app usage time on your smartphone if you’re prone to going back to them— this is a tangible way to “practice mindfulness”, a term I find frustratingly vague ansjdbdj
Things I’m looking into:
The “Pi Hole”— a raspberry pi set up to block all ads on a specific internet connection
VPNs-- this is one that was recommended to me.
How to use computers (I mean it): Resources on how to understand your machine and what you’re doing, even if your skill and knowledge level is currently 0:
This section I'll come back an add to. I know that messing with computers can be intimidating, especially if you feel out of your depth. HTML and regedits and especially things like dualbooting or linux feel impossible. So I want to put things here that explain exactly how the internet and your computer functions, and how you can learn and work with that. Yippee!
692 notes
·
View notes
Text
Best IPTV Service Providers-Top Picks in 2025
Find the best IPTV services with 4K streaming and affordable pricing. IPTV USA FHD is the best service provider in the USA, Europe & Asia.

Television has evolved, and IPTV is leading the charge. Say goodbye to expensive cable bills and hello to unlimited streaming—thousands of TV series, movies, and live channels at your fingertips. With countless IPTV providers available, choosing the best can be overwhelming. That’s where we step in! We've tested and reviewed multiple services to bring you the top five IPTV providers of 2025. While all offer great features, one stands above the rest: IPTV USA FHD. It delivers unmatched quality, reliability, and content variety. Keep reading to discover why IPTV USA FHD is the ultimate choice for seamless entertainment!
What is IPTV (Internet Protocol Television)?
IPTV (Internet Protocol Television) is a modern way to stream TV shows, movies, and live channels using the internet instead of cable or satellite. Unlike traditional TV, IPTV offers on-demand content across multiple devices like Smart TVs, smartphones, Firestick, and Android boxes. Enjoy 4K streaming, live sports, international channels, and a vast content library—all at a fraction of the cost of cable.
What to Look for When Shopping for IPTV Service.
Types of IPTV Services
Live IPTV – Streaming live TV channels in real time, similar to traditional broadcasts.
Time-Shifted IPTV – Allows users to watch previously aired content (like catch-up TV).
Video-On-Demand (VOD) – On-demand access to movies, shows, and other content.
Key Features of IPTV Subscription:
Live TV Streaming: Watch live broadcasts of news, sports, or entertainment channels.
Video on Demand (VOD): Access a library of movies and TV shows to watch whenever you want.
Time-Shifted Content: Pause, rewind, or watch previously aired shows (Catch-Up TV).
High-Quality Streaming: Often includes HD or 4K resolution options, depending on the provider and your internet connection.
Device Compatibility: Works on a range of devices, including Smart TVs, streaming boxes (like Roku or Amazon Fire Stick), and mobile devices.
Common Requirements:
A stable and fast internet connection (minimum of 10 Mbps recommended for HD streaming).
A compatible IPTV player app or device (e.g., VLC, Kodi, or a dedicated IPTV box).
An IPTV service provider offering subscriptions tailored to your content needs.
Legality of IPTV Subscription Online Service
While IPTV technology itself is legal, the legitimacy of the service depends on the provider. Some providers may stream unauthorized or pirated content. To ensure legality, choose an IPTV subscription from reputable, licensed service providers.
What to Look for When Shopping for IPTV Service
Channel Selection: Does it offer live TV, movies to watch, TV series, sports, and international channels?
Video Quality: Look for HD, Full HD, and 4K streaming options.
Device Compatibility: Supports Smart TV, Firestick, Android, iOS, Windows, and Mac.
Pricing: Affordable plans with flexible subscriptions.
Reliability: A buffer-free IPTV stream service with minimal downtime.
Customer Support: 24/7 support with active response time.
Let's dive into the top 5 picks for the best IPTV services in 2025! 🎯
IPTV USA FHD - The Best IPTV Subscription Service Provider🚀

IPTV USA FHD stands out in 2025 due to its crystal-clear Full HD streaming, buffer-free performance, and extensive channel lineup covering sports, entertainment, and international content. With advanced cloud-based technology, 24/7 customer support, and affordable pricing, it offers a superior alternative to traditional cable. Additionally, features like multi-device compatibility, VOD libraries, and interactive TV guides make it a top choice for modern viewers.
❇️Features of IPTV USA FHD
High-Quality Streaming: Full HD (1080p) and HD (720p) channels for a crisp viewing experience.
Extensive Channel Selection: Access to thousands of live TV channels, including sports, news, entertainment, and international channels.
VOD (Video on Demand): Large library of movies, TV shows, and series available on demand.
DVR Functionality: Option to record, pause, and rewind live TV programs.
EPG Support: Electronic Program Guide for browsing and scheduling shows.
Multi-Device Compatibility: Available on smart TVs, smartphones, tablets, laptops, and streaming devices.
4k Streaming: Support for multiple streams on different devices.
Affordable Plans: Competitive pricing compared to cable and satellite services.
User-Friendly Interface: Easy navigation and search options.
24/7 Customer Support: Reliable assistance for technical or subscription issues.
50,000+ Live TV channels
65,000+ Movies & TV series
Updated Content Library
Easy-to-use Electronic Program Guide (EPG)
🔰Subscription Price of IPTV USA FHD
1 Month- $16,99
3 Months- $28,99
6 Months- $35,99
1 Year- $59,99
IPTV USA FHD offers a FREE trial so you can test the service before committing to a subscription! 🎉
✅Pros:
Best value for money
High-quality streaming with minimal buffering
Works on all devices
Massive sports & entertainment catalog
24/7 customer support with instant replies
Supports multiple connections
Anti-freeze technology ensures smooth viewing
Regularly updated content with new movies & series
User-friendly interface for seamless navigation
Compatible with major streaming devices
❌Cons:
No free trial (but money-back guarantee available)
Risk of unreliable or unlicensed providers.
Why Choose IPTV USA FHD Service?
Affordable Pricing: Provides cost-effective subscription plans compared to cable and satellite services.
No Geo-Restrictions – Watch your favorite shows from anywhere in the world.
Customization & Flexibility – Choose from various plans that fit your needs.
Live Sports & Pay-Per-View Events – Never miss a game or event again.
High-Quality Streaming: Offers Full HD (1080p) and HD (720p) channels for a superior viewing experience.
Extensive Channel Lineup: Access thousands of live TV channels, including local, international, sports, entertainment, and news.
VOD Content: Access a vast library of movies, TV shows, and series on demand.
DVR Capabilities: Record, pause, and rewind live TV shows for convenience.
EPG (Electronic Program Guide): Easy navigation and scheduling with an interactive guide.
Buffer-Free Performance: Optimized servers for smooth streaming without interruptions
Global Content Access: Offers channels and shows from around the world.
Flexible Plans: Options for monthly, quarterly, and yearly subscriptions.
No Hardware Required: Works over the internet; no need for cables or additional devices.
24/7 Customer Support: Reliable technical assistance and guidance whenever needed.
Frequent Updates: Regular content and feature updates to enhance user experience.
The Best IPTV Subscription
Aris IPTV

Aris IPTV is a leading player in the IPTV market, known for its vast library of content and excellent streaming quality. It offers over 18,000 channels, including local, regional, and international options. The service also includes a large selection of on-demand movies and TV shows.
This verified IPTV service is trusted by thousands of users for its reliability, minimal buffering, and compatibility with multiple devices. Whether you're looking for live news, entertainment, international channels, or premium sports content, Aris IPTV delivers it all.
Key Features:
Content: 30,000+ live channels and an extensive VOD library.
Compatibility: Works seamlessly with smart TVs, Android, iOS devices and more.
Quality: Offers content in HD and 4K, depending on availability.
How to Get Started with Aris IPTV
Choose a Subscription Plan – Select a package that best suits your needs.
Receive Login Details – Get your IPTV credentials after completing the payment.
Set Up Your Device – Follow easy installation instructions for your preferred device.
Start Streaming – Enjoy seamless access to live TV, sports, and on-demand content.
With its premium features, excellent performance, and affordable pricing, Aris IPTV is an ideal choice for those looking for a top-tier IPTV experience.
Subscription Price Aris IPTV
1 Month- $11,99
3 Months- $19,99
6 Months- $30,99
1 Year- $45,99
KROOZ IPTV Provider
Features: Offers over 30,000 channels and a basic VOD library.
Pricing: 1 Month: $10
Pros:
Affordable pricing for budget-conscious users.
Compatible with major streaming devices.
Cons:
Limited 4K content; most streams are in HD.
Frequent buffering issues during peak hours.
Customer support is slow and unresponsive.
RawIPTV
Features: Claims to offer 20,000+ channels.
Pricing: 1 Month: $9.99
Pros:
Short-term subscription options.
Cons:
Poor server stability and frequent downtimes.
Limited customer service support.
Many users report issues with activation codes.
Insight IPTV
Features:
Content: Access to over 15,000 live TV channels and VOD options.
Multi-Screen Support: Allows streaming on multiple devices simultaneously.
EPG: Detailed EPG for easy navigation.
Price Insight IPTV
1 Month- $10,99
3 Months- $19,99
6 Months- $35,99
1 Year- $59,99
IPTV Requirements
Before you jump into subscribing to an IPTV service, make sure you have the following:
Stable Internet Connection
A VPN (Recommended for privacy and security)
A Reliable IPTV Subscription (We’ll show you the best options below)
FAQ
What is the best IPTV service in 2025?
IPTV USA FHD ranks as the best IPTV provider.
Can I use IPTV services on any device?
Yes,Including Android, iOS, Windows, Smart TVs, and Firestick.
Do I need a VPN for IPTV?
A VPN is recommended for privacy and security, especially if IPTV services are restricted in your region.
Final Thoughts
IPTV is revolutionizing the entertainment industry by providing cost-effective and flexible ways to stream content. The top providers mentioned above offer the best IPTV service provider in the USA for 2025, ensuring a seamless viewing experience. If you’re looking for the best IPTV subscription service provider, IPTV USA FHD is your top pick.
0 notes
Text
🎥 How to Play MKV Files on Mac: 3 Effortless Methods You Need to Know!
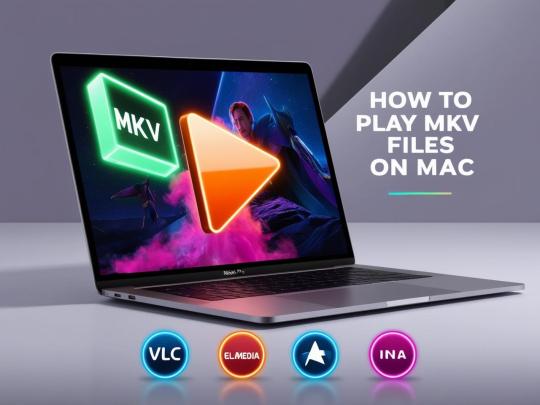
✨ Struggling with MKV playback on your Mac? You're not alone! Macs don’t natively support MKV files, but here’s the good news: you can fix it quickly with these 3 easy methods! 🖥️
💡 Method 1: Use a Dedicated MKV Player 🚀 Our Top Picks: 1️⃣ VLC Media Player – Free, reliable, and supports almost every format. 2️⃣ Elmedia Player – Sleek design with AirPlay features. 3️⃣ IINA Player – Made for macOS with modern vibes.
👉 Pro Tip: Drag and drop your MKV file into any of these players for instant playback!
💡 Method 2: Convert MKV to Mac-Friendly Formats 🍏 Convert MKV to MP4 or MOV using tools like: ⚙️ HandBrake – Free and beginner-friendly. ⚙️ Any Video Converter – Fast with high-quality output. ⚙️ CloudConvert – No downloads needed, works right in your browser!
💡 Method 3: Enhance QuickTime Player with Plugins 🌟 Install codec plugins like Perian to expand QuickTime’s compatibility. ⚠️ Heads up: Perian may not work on macOS Catalina or newer versions.
🔑 Why Choose These Methods? MKV files are awesome for their flexibility, but QuickTime isn’t built to handle them. With these methods, you can easily: ✅ Play your videos without interruption. ✅ Avoid complicated setups. ✅ Enhance your Mac’s playback experience.
🌟 Bonus Tips for Smooth Playback:
Keep your media player updated! 🛠️
Optimize Mac performance by closing unnecessary apps. ⚡
Check your MKV file for corruption—it might not be your player’s fault! 📂
💬 Which method works best for you? Share your experience in the comments or reblog this post to help others struggling with MKV playback!
0 notes
Text
Purchasing a MacBook is a dream for many. Realizing the fullest potential of one of the best portable devices is another story. It is the conventions of apps that help one make the optimum use of the gadget. There is no dearth of useful & entertaining apps for Mac. Best Mac apps: 20 must-have apps for Macbook surveyed scores of MacBook users to understand the usage of Apps, free as well as paid that could alter the way one uses Mac. Ranging from music & entertainment to enhancing productivity, communication & more, the crux of the study is presented in the form of a list of 20 must-have apps for MacBook. So, add a bit of a soul to your Mac by installing these must have Apps. Spotify (Audio) -Free Take your love for music to another level with the Spotify app. Spotify has been providing streaming music services since its inception. Classical or rock, whatever your type is, is available on this app. Choose from the vast list and tune in to your favorites anytime anywhere. VLC (Video) - Free What more do you need than a media player that plays video and audio files in any format? It is the best ever media player in the market that is fast and smooth. This impressive player is always ready to serve your music palate with finest tunes & melodies. Evernote (Productivity)-Free Busy schedules and even busier brains! Remembering everything all the time is not everyone’s cup of tea until and unless you have a manager known as Evernote. This must have app does everything for you- write notes, checklist and remembers things on your behalf. In a nutshell, it organizes your schedule & makes sure you manage your time better. Fantastical (Productivity)-$39.99 This fantastic app is fun to use. Go on to add your event by writing a short description with a single click and swiftly return to the task you were doing previously. Moreover, it is simple to edit and delete without much fuss. The best thing is that it works with Mac calendar service that makes your job even easier. You can download 21 days free trial before purchasing it. Wunderlist (Productivity) -Free Untangle your daily routine with this stylish app. Whether you are planning a weekend party’s menu or preparing the grocery list, just update it with the Wunderlist and it will remind you. Like a good manager, it informs you of the completion of any task. This wonderful app syncs with all your devices thus upgrading the convenience. Remind, record and notify- it does it all diligently. IWork (Productivity)-Free What Microsoft office is to windows iWork is to MacBook. For businessmen, this is a befitting app - Pages, words, keynote, presentation, and spreadsheet. The app with its chic feel, clear interface, and cloud syncing facility is definitely making you love it. And yes, now u can say “I Work” with a broad smile. IA Writer (writing)-$9.99 Imagine writing your heart out till you are done without any disturbances, without anything to distract you. It deletes the option of any formatting or menu bars allowing you to concentrate on writing. It sharpens your writing skills with the syntax features and comes with auto markdown support, importing word docs. Well, this uncomplicated word processor lets you do what you want to, write! DropBox (email)-Free Share and synchronize our files easily with Dropbox. The ‘drag and drop’ option allows you to store your important files, photos, music, and videos and share them all with your folks whenever you want to. It is simple, straightforward and comes with 2GB of free space. Caffeine (Utility Tool)-Free Like name like work! The app induces your Mac with energy whenever it is about to go to sleep while an important file is being downloaded. This humble app lives in your menu bar and makes sure that the job has been done before the Mac is turned off manually. Unarchiver (Utility Tool)-Free Unarchiver (Utility tool)-Free You must have come across the app for unzipping the files where you had limited choice with the format. Not anymore. With unarchiver,
now unzip files with almost any format; find your file with foreign characters in the finder easily. What else? It’s free and very handy to use. Ccleaner (utility Tool)-Free This is a very efficient and widely loved cleaner that you can use for your Mac. Delete the unwanted files, clear up the trash and free up space for the next big thing. TextExpander (time Saving Tool)-$44.95 This tops the list when it comes to the time-saving app. You like writing, but it’s quite boring to keep writing the same phrases or make the same typo errors when you can define the keyboard shortcuts, isn’t it? Using this tool wisely grants you a lot of free time. Alfred (time -saving Tool)-Free Let me call it as a comfortable app because of its quick ability to allow you to access websites, online searches, application, files, contacts, etc at just a click. It learns from your behavior and arranges the apps in that order. IBank (Utility Tool)-$59.99 Manage your personal finance with the help of iBank. Handle your portfolio, transactions, bank account, spending and the online payment with this simple yet effective app. Quite a dependable app it is. Pixelmator (photo Editing) -$29.99 In case you have been a fan of Adobe Photoshop then you are going to love this Pixelmator app thoroughly. This image editor allows you to re-touch your original picture, fill colors, filter and add the amazing effects. One of the interesting features is that you can carry forward your work from Mac to iPad without any worries of it getting lost. Chrome (communication)-Free Lightweight, stable, super-fast and prompt; for a browser like chrome you don’t need to look for something else. It offers quick downloads, comes with a number of extensions and handles Javascript readily. Surely a browser you can trust upon. Adium (communication)-Free The first thing you notice about this instant messaging app is that it has one of the cutest icons (a little duck) and while its’ cute, it supports a number of services like ICQ, Yahoo, Gtalk, Jabber, etc. It is highly customized and translated into a number of languages. What more? It can be integrated with your favorite twitter too. Transmission-Free It is the most trusted BitTorrent clients. Sublime and lightless it has improved a lot since its inception. You can set priority levels, stall limit times, control the bandwidth quantity and filter by groups. Self Control-Free Finally, an app to save you from all the apps! Save yourself from all the things –websites, emails, and internet and make good use of your time with the help of this strict supervisor. All you need to do is set timer and blacklist the sites and until the timer last you have no option but to concentrate on your work. Onyx OnyX is a multifunctional tool for optimization and maintenance of Mac Device. It is fully compatible with Intel processors and Power PC. There are various built-in Unix programs in OS X which can be easily controlled with Onyx. Some of its most popular features are as follow: Verify startup disk Repair disk permissions Rebuild launch services Rebuild spotlight Force empty trash Configure hidden parameters Delete caches Quicksilver Quicksilver is a great tool for those who want to improve their productivity. This simple yet so effective tool will enable you to launch apps quickly, open files easily and search content thoroughly. Quicksilver’s launcher pad will allow you to locate whatever you want and the search results will be shown much quicker than your expectation. This tool can also be used to manage iTunes, find dictionaries, and send emails and various other similar activities. Mailbox The mailbox has been redesigned by Dropbox to make emails faster and lighter so users can easily scan conversations and move messages to trash or archive. You can now get a completely new and even better inbox for your MacBook. Mailbox enables you to deal with your emails more professionally as you don’t need to get stuck to them if you have other important things to do right now.
Mailbox auto-swipe feature allows you to come back to your message later. GIF Brewery GIF Brewery enables users to convert small video clips into GIFs. If you want to give a preview of a video clip or produce cat GIF, this little app can do bigger things for you. You don’t have to use Adobe because everything can be done with this simple tool on your Mac. Some other popular features are: Crop or resize the video to create GIF Set looping direction like playback, palindrome or reverse Put multiple captions to your images Use filters for core image Fantastical 2 This is the calendar app for Mac users and once you start using it, you will find it really difficult to live without it because there are a number of ways in which you will be able to enjoy this great app. For example, you don’t have to click on a certain time or a day to set appointments because the only thing you have to do is to type a sentence and the Fantastical will figure out whatever you want to schedule. Some of its features are: Set events and alerts Set geofence alerts to set reminders Complete time zone support View location maps for events places Get your favorite dark or light theme Duet Display Duet is a great app for you when you want to use an additional display for Mac because this app will enable you to use an iDevice as an additional display. It has been built by ex-apple engineers to increase at least 48% productivity level. This is without any doubt is the best display for your Mac. Some of its features are: Secure Wired Connection Lag Free Plug & Play Setup Retina Display (optional) 60 Frames Per Second Same Day Support Touch Enabled 1Password Everyone who uses the internet has various accounts and for each account, he has to set a unique password and sometimes, it becomes quite difficult to remember each password. However, if you are using 1Password, it will allow you to save all your unique passwords at a single place. In addition to this, you will also be able to create a master password which can be used at multiple accounts and the best thing about it is that all your passwords will be provided maximum security. Handbrake If you have to do a lot of work with your videos to convert them into playable files for different devices, you would love to discover Handbrake which is an amazing tool to convert any format videos into widely supported modern codes. There are various options to work with this simple tool but the best thing about it is that anyone who wants to convert videos can easily use it without getting into complex functionalities. Clear Clear is a simple yet so effective app for those who have a busy schedule. If you have to use a to-do-list app on a regular basis, this can be the best option for you. Clear enables you to rearrange your everyday activities as per the level of their importance. Its simple design allows you to get things done every more effectively. CrashPlan CrashPlan is a wonderful app to select and back up your important files to a local area network or a local drive. You can also use cloud services to secure your data in a safer place. The app has made computer backup absolutely easier and you don’t have to worry about your data security any more. Free Local Backup Free Offsite Backup Unlimited Online Backup Security Blanket Access App-ified This article is contributed by Sawaram Suthar and Elizabeth Olsen. Sawaram Suthar is a self-motivated Digital Marketing Consultant, currently associated with Just Total Tech – A Mobile App Development Company. He contributes new ideas and tips on digital marketing, mobile apps, web design and small business on his blog The Next Scoop. Follow him on Twitter @sawarams Elizabeth Olsen is a Digital Marketing Developer at Most Secure VPN which are based on online security Issues. She loves to read and write about different tech and trends, and also produced review like ExpressVPN Review. Get connected with Most Secure VPN today and stay updated.
Updated On June 2019: Fixed Broken links and updated minor typos.
0 notes
Text
2023's Elite: Unveiling the Top 5 IPTV Players for Linux and Ubuntu

Nowadays IPTV is becoming more popular for its performance and reliability across the world. For that reason, IPTV is being a Brand day by day. IPTV delivers live TV streams, Movies, Music, and Video on Demand to your Smart devices through the Internet connection so I’m telling you about the Top 5 IPTV Player for Linux and Ubuntu In this guide.
There are a vast number of IPTV Players available for Android, iOS, Windows, MAC, Linux, Ubuntu, and many more. If you want to enjoy IPTV services instead of Cable or Dish TV then you have to choose the best desired IPTV Player for your device. If you are using Linux or Ubuntu OS, then there are some best IPTV Players available for Linux and Ubuntu OS which can give you an uncountable entertainment experience.
Top 5 Best IPTV Players for Linux and Ubuntu:
#1. Kodi – [Best IPTV players]
Kodi is a media player and one of the best IPTV players. It is very user-friendly and easy to use. Kodi supports almost all desired devices. As a media player, it has plenty of cool features for which it wins millions of hearts. You can anytime stream any content just by entering the URL.Kodi supports M3U URLs so you don’t need to face any severe issues for entering the URL. The process is simple and it is a user interface platform. One of its cool features is you can add plenty of playlists and local files as much as you want.
#2. VLC Media Player – [Most Used Media Players]
VLC Media Player is one of the most used media players worldwide. It is one of the top picks as an IPTV Player. Using IPTV VLC Media Player is so easy as it takes a few minutes to do all the procedures. It has a huge number of features included in it. One of these features is to stream live with M3U URLs.Also, you can add more playlists and can start streaming more. It contains an option by which you can add the playlists as a local file as well. VLC Media Player is widely known for its user interfaces.
#3. Ubuntu TV – [Easily Integrate Broadcast for Ubuntu]
Ubuntu TV is a newcomer to modern IPTV that contains Live TV streams, Music, Movies, and Videos on Demand. By using Ubuntu TV, you can easily integrate broadcast, stream, applications, and many more cool features. Those desired applications will allow you to search, stream, record, and watch live channels and Videos on demand.Also, there are millions of music, movies, and on-demand videos that are available over the web. So, Ubuntu TV can be an option as an IPTV Player for Linux and Ubuntu.
#4. IPTVX – [Best IPTV Players for Linux]
IPTVX is another best IPTV players for Linux and Ubuntu, but it is highly recommended for Linux as it has a dedicated application available only for Linux. The LibVLC library of the IPTVX application is mostly used for watching videos and listening to audio.There is also a playback option available for that you can stream the videos later. So, it is a cool feature of using iptvx right? It is very easy to use with lots of quality performance. There is also an option available and the option is you can browse any content and check the EPG channel list anytime.
#5. FreeTUXTV – [Amazing IPTV Player]
FreeTUXTV is an amazing IPTV Player that is highly dedicated to the Linux platform. It always allows its users to stream a variety of different TV channels and radio stations respectively by using your Internet connection.You can watch all sorts of live TV channels, shows, and radios for free by installing it. The best benefits of using IPTVX are you can record any streaming media. Besides, it has plenty of good features too. You can add playlists locally as well.
#iptv#iptv service provider#iptv subscription#adult iptv#iptv linux#iptv ubuntu#iptv for linux & ubuntu#iptv provider
0 notes
Text
Best video player for mac free vlc

#BEST VIDEO PLAYER FOR MAC FREE VLC FOR ANDROID#
#BEST VIDEO PLAYER FOR MAC FREE VLC FREE#
#BEST VIDEO PLAYER FOR MAC FREE VLC WINDOWS#
You can lock this app with the use of TouchID, FaceID, or numeric password.Īs you can see, we introduced the top 5 video players that you may use on different devices as well as their special features.
In addition, you can import video via USB data or WLAN and adjust playback speed. For example, this app allows you to playback HD videos and Dolby Surround Sound technologies. This is an iOS video player app that lets you play multiple video formats and it includes several great features. It is one of the best video players for iPhone that you can use. This is most especially one of the best video players for Mac. Just like the other video players, this video player allows you to apply audio and video filters, customize the frame rate, adjust the quality, and a lot more. You can play videos on MPV continually without buffering.
#BEST VIDEO PLAYER FOR MAC FREE VLC FREE#
It is a free yet powerful media player that can be used especially on Mac. MPV is a video player that enables you to play videos in different formats. It consists of tons of customization options.Moreover, it has built-in keyboard shortcuts. Just like with VLC, it offers up tons of special features and also supports common video file formats. It is one of the best free media players that you can use for Windows. Why not try out PotPlayer? It is developed by Kakao, which is an internet company in Korea.
#BEST VIDEO PLAYER FOR MAC FREE VLC FOR ANDROID#
Overall, this is one of the best video players for Android that you may use.Ĭhoosing the right video player will make your work easier. Furthermore, you can fast forward and rewind video by double-tapping on the screen. Also, it offers tons of features to choose from. You can play several video formats on this app such as MP4, MKV, MOV, ASF, AVI, MPG, and a lot more. If you are looking for a handy video player, try to use FX player. There is no buffering when playing videos.It allows you to import multiple tracks.Aside from that, it has some default audio options to choose from.
#BEST VIDEO PLAYER FOR MAC FREE VLC WINDOWS#
Furthermore, it is one of the best video player for Windows because of its simple and speedy user interface and it doesn’t required any complicated steps to use it. You can play multiple videos on this video player. VLC Player FX Player PotPlayer MPV PowerHD Use VLC PlayerĪn intuitive and easy to use video player is called VLC Player. Here we prepared 5 of the best free video players and their features. So if you want a simple and easy user interface, then you’re in luck. Some of them are a bit complicated to use. Choosing the right video player is not an easy task, because they all have different features and strong points. They are available for different devices such as Windows, Mac, iPhone, and Android. As we all know, there are tons of video players available online.
1 note
·
View note
Note
Hey I have been thinking of making gifs but i have no idea where to start so I thought y not ask a fellow carat who makes awesome gifss❤️
A little guidance would mean a lot!!
aww, anon!! thank you for coming to me for this. i love talking people’s ears off!! DFJKJDFKDF but that being said, i’ll keep this under a keep reading since i’ll go through things quite thoroughly!
there’s really a million and one ways to make gifs, but i’ll show you how i do it and the basics in general (+ maybe some alternatives). keep in mind that i use windows though, so i’m not sure how helpful this will be if you’re on a mac. anyhoot, i’ll be dividing this tutorial into 6 parts, namely sourcing, choosing a program to resize/import with (vapoursynth and/or KM player basics), photoshop basics (KM Player tutorial extension), sharpening, coloring, and exporting.

the primary issue with sourcing is that the videos we want to gif come from different sources, and not all of them are conveniently downloadable. i’m going to list a few different sites/programs (that are free! <3) which allow me to download them!
4k Video Downloader: this program allows you to download from multiple sites, but i mainly use this for youtube. it’s better than other online alternatives (such as y2mate, which you can use if you can’t download this!) since it allows you to download above 1080p and also allows you to download subtitles if you want to. make sure to download it as .mkv though because options above 1080p will not show up if you’re downloading in .mp4!
Soshistagram: this is my go-to vlive downloader! it also allows you to choose the quality of your download.
Twitter Video Downloader & Instagram Downloader: exactly as their name implies, lol. twitter and instagram don’t really provide HD videos so i don’t mind downloading them through these. (the 2nd link also enables you to download from a number of other sources!)
Inspect Element: when worse comes to worst and if you're incredibly desperate to gif something that cannot be downloaded from any of these, you can (almost) always rip it off from the source code, lol. i won’t get into too much detail about this since so much information about this is readily available on the internet!
as you may have noticed, i’ve been mentioning quality for a lot of these. while being able to download content may be the priority, it is also really important (maybe even equally important) to download high quality resources. it’s not a very good idea to gif from anything below 720p as they usually don’t come out as nice, so to get videos like these, i usually go to either the sources themselves (e.g: their official youtube account, music shows’ respective youtube accounts, studio choom, etc.) and if i won’t be able to find them there, they’re surely on our beloved and reliable rosebay (who provides almost every svt content out there! people usually go here to get performance stages and huya streams, but almost everything is literally here, lol). you can also find performance stages on kpopexciting and kpop24hours (which requires membership, so watch out for when they open registrations up!). that being said though, it’s quite hard to find sources for chinaline, but legohouse is the best for this!
when sourcing from fansites, always check if they allow editing first! if it’s not explicitly said, you can always ask them. (most of them reply :D) if you don’t know how to, here’s a good guide for such! thank you @hanwooz for making this guide. <3
it’s also worth noting that performance stages and a few other high quality content come in .tp/.ts files which you might need a different media player for. for this, i use vlc for everything! this is also available for mac.
sometimes, you might also need to extract files (as sources compress them to take up less space during upload). i use peazip to do this! it’s a great AND FREE alternative to winrar.
you might also encounter download limits on gdrive. you can simply make a copy of the file, put it in a folder, then download the whole folder.

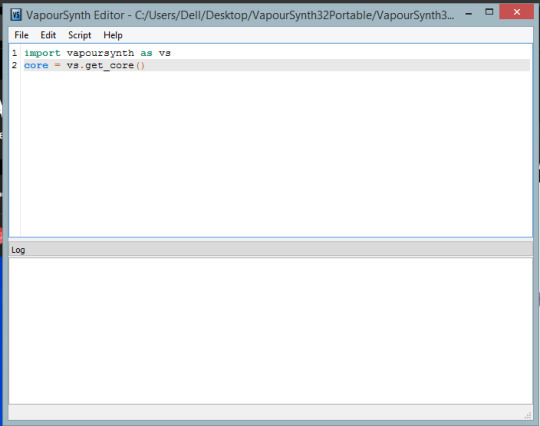
on to the more interesting part, we finally start making our gif! for this, i use photoshop cc (i downloaded it here lol) and vapoursynth OR KM player. these aren’t the only programs you can use, but these are what worked for me and my old 32-bit laptop, lol. you can find 64-bit and mac alternatives on the links as well i believe, and if not, you can just do a bit of digging around those sites!
(additional notes: another alternative for photoshop is GIMP but i don’t really remember how to use it. photopea’s also a web-based alternative, but i can’t say much about it since i haven’t dabbled there yet. there are also add-ons for photoshop such as topaz, but i (again) cannot use those, but i heard that they help a lot with making gifs look clean! avisynth is also an alternative to vapoursynth, but vapoursynth has added features i believe)
gifs are basically just moving pictures, so you can either capture moments you like as a video or as a series of images. photoshop accepts both, but as for me, i cannot import videos directly to photoshop so i do them frame by frame. to capture these images, one method is processing them through KM Player.

km player is basically a media player with a feature that allows you to get snapshots of videos continually (therefore, the series of images).
step 1: simply go to the timestamp of the moment you want to gif (i usually watch the videos first and type out all the timestamps of all the moments i want to gif) and press CTRL + G

this window would then show up. you can choose where you want your snapshots to go by changing the folder that’s highlighted. keep in mind that you need separate folders for each gif! if you don’t change the folder, the new screencaps would overwrite the frames you previously captured. as for the image format, i only use either PNG or JPG/JPEG, as they capture the best quality from this media player. PNGs take a lot longer to capture though. the numbers to extract tells you how many frames it would capture. i set it to ‘continuously’ so gifs don’t come out choppy/look like they’re skipping. it’s almost the same principle with the other panel named frames to extract. as for the rest, just make sure to follow every setting on screenshot! (you can always explore/experiment with the rest of them later on)
step 2: afterwards, click start, and play your video. your laptop might get quite slow when this process starts.
step 3: when you’ve gone through your timestamp, press 'stop’, and go to the folder you previously chose!
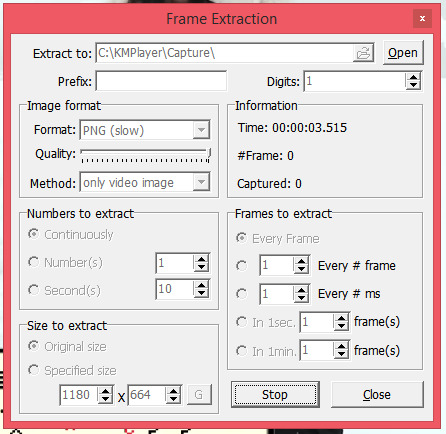
your folder should look similar to this:
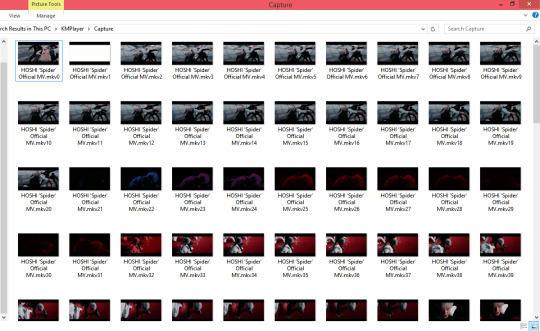
simply erase all the frames that you don’t want to be included in your gif, and you’re ready to import! we’ll be keeping these aside for now and learn another way to get frames.

another alternative is to use vapoursynth. to me, this is a whole LOT easier and basically does all of the work for you. i really recommend this! ever since i got it to work just a few months ago, i can never really make gifs without it anymore. i use the old version though (rip </3), so i won't have the new preprocessors, denoise filters, and sharpening. i suggest you always take the most updated one because i heard they make a lot of difference output-wise!
bear in mind that vapoursynth uses python, so if you encounter some errors, it might just be that you don’t have it downloaded yet. just follow the instructions here! (for the longest time i couldn’t figure out why my vs wouldn’t work and it was because of this.... lol)
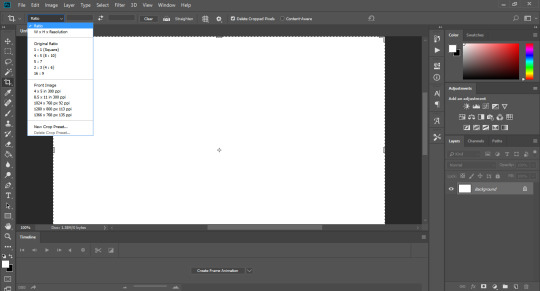
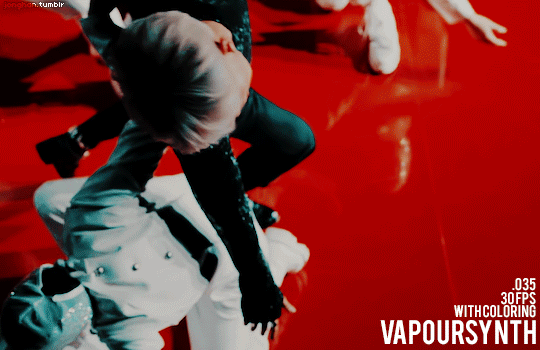
it’s very important to know tumblr size dimensions when it comes to gifs (whether you’re going to use vapoursynth or not), but i’m including it on this part since it’s crucial to how vs (vapoursynth) works. your gifs may look good on photoshop, but if they’re the wrong size they’ll inevitably end up blurry on tumblr unless someone clicks on them. here are the dimensions (image made by @dazzlingkai):

you can use any height for these gifs, but these are the width dimensions you need to follow! **UPDATE: the middle gif for a 3-set is now also 177px!
nibreon has a video on how to gif using vs, but if you like text better, i can also provide it step by step for you.
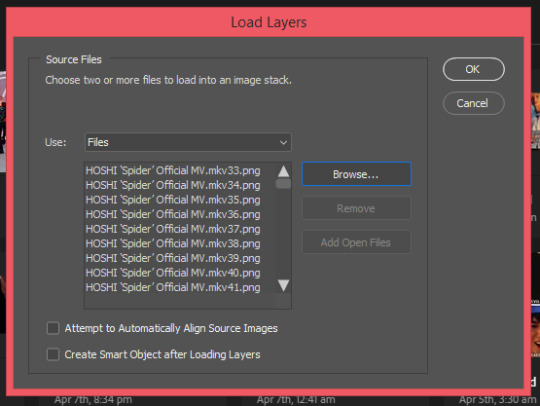
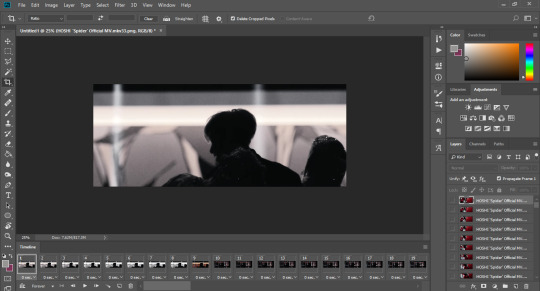
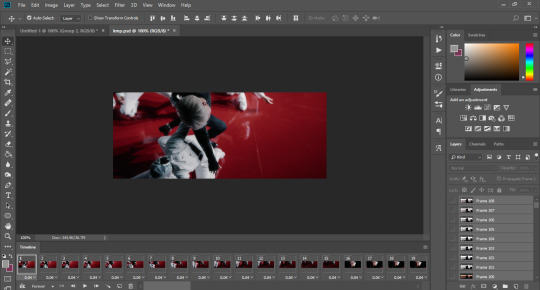
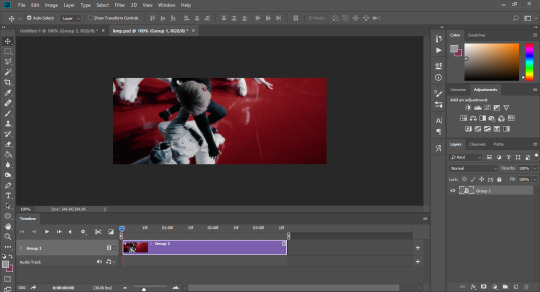
step 1: to get started, simply drag your file to the vs shortcut (entitled “vapoursynth (drop video file on me)”). and this window should appear. (i’m using hoshi’s spider mv for this tutorial btw!)
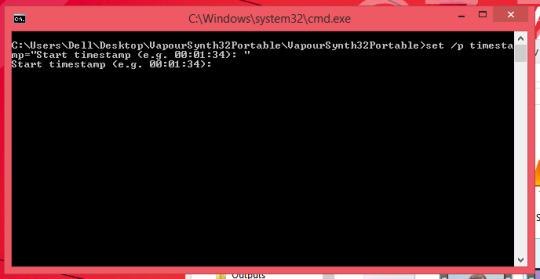
simply encode your chosen timestamp (in this case mine is 00:02:02) and press enter. (i don’t really trim my videos as other CCs do and just send them straight to vs, haha.)
step 2: this second line then asks you how long you want the video to be trimmed/previewed for. if your timestamp is 00:02:02-00:02:08, then what you’ll encode on this line is 00:00:06. (basically the duration of the video/part of the video)

step 3: after it processes, this resizer will then show up in your default browser.
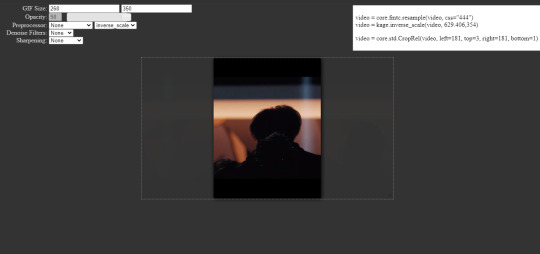
this is where the size dimensions become important! choose the size of your liking and resize the video as you want. i find resizing much easier with vs as you have more control over the size with real time feedback.
additional notes:
opacity: just allows you to view the area outside of your size width. doesn’t really matter much, but i love it as it helps me precisely resize gifs especially when i don’t want to include captions/subtitles.
preprocessor: refers to how vs would process (lol??) your gifs frame by frame. this is crucial to how your gifs would look! it is explained very well and thoroughly here, but basically, it tells you the speed and the manner in which the images/initial video of your gif will be exported in. this one doesn’t matter much on regular videos, but for performances (.ts/.tp files, etc.) it does make a lot of difference. i usually use qtgmc 60 slow on performances. for the rest, i use qtgmc 30 fast (or 60 fast when there are very few frames just so they would run smoother). i’m also always on resamplehq (the second part of preprocessing)! a lot of CCs don’t use preprocessing for regular videos though (.mp4, .mkv, etc.). if it’s still unclear for you, i’ll include more tutorials and examples (although very few) at the end, dw! **UPDATE: i’m now on the 64bit ver. as i’m using a new laptop, my preprocessor is now debilinear (instead of resamplehq). i also am now a changed woman and discovered that you really don’t need to use the fps preprocessor for regular videos BECAUSE they’re not rendered “splicely”, it just takes more of your time. they look exactly the same. <3
denoise filters: smoothens out your gifs. very useful especially if the source is grainy! i always use KNLM for this but you can try BM3D as well. bm3d takes much longer to process though!
sharpening: pretty self-explanatory. it just makes your gifs look clearer/sharper! i use finesharp almost always set to 1, but it really depends on your preference. i also do additional sharpening on photoshop most of the time though! **UPDATE: recently changed how i make gifs and i don’t use this sharpening anymore because my preferences have changed, but it’s still a good place to start if you’re just beginning to make gifs!!
step 4: after this, go onto the vs window. the lines of code initially look like this:
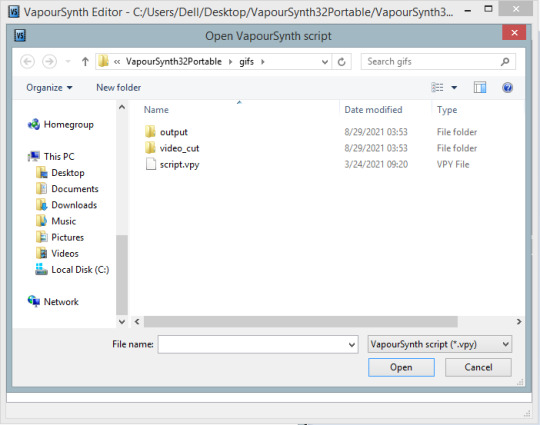
but in order to process the video for gif purposes, we need to use vapoursynth’s plugins. you can modify this later on (which is really unnecessary, but it’s possible if you want to experiment more fjdjkdf), so for now, just open up the included script from the vapoursynth folder (gifs).
if you’ve downloaded vapoursynth directly from their site and not from the link i’ve included, this won’t show up in the folder and you’d have to assemble it all yourself. this is what i meant when i mentioned that you can modify vapoursynth’s plugins yourself! i’ve never seen anyone do that, but just so you know lol.
your code should now look similar to this:

note: you can also lessen the ram usage of vs so your laptop won’t lag as much!! just follow what line 9 says <3
step 5: then, copy and paste the text that’s in the upper right corner to vapoursynth. you must paste it after the 13th line! it should look similar to this.
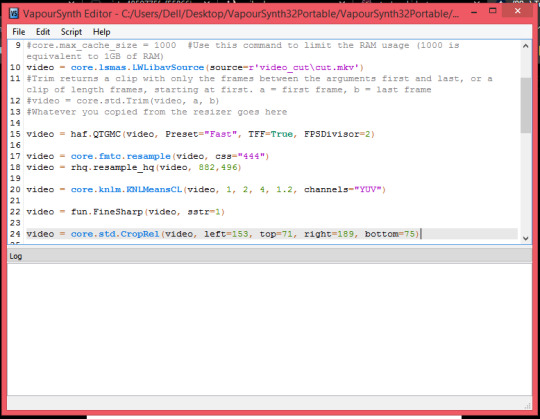
step 6: just press f8 (or go to script, then encode video). this window will show up.
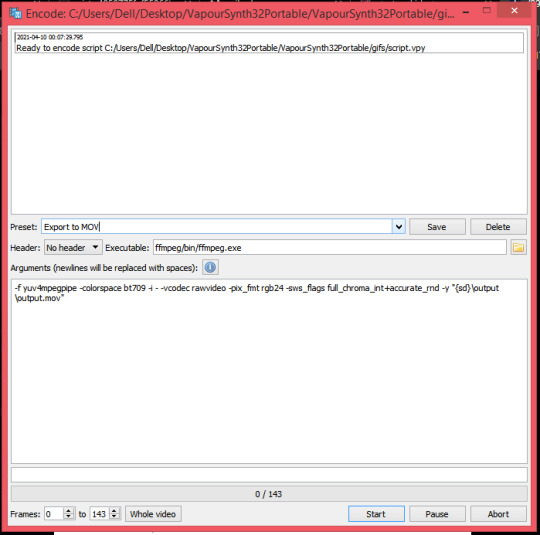
this is what you’ll usually do if you want to save it as a video, but since i can’t import videos, i change the preset to ‘export to png sequence’. some CCs like trimming the video here (as you can see at the bottom, there’s a label for the number of frames), but just like what we did with KM Player i just export it all (by pressing start). make sure your header is also set to Y4M if you’re exporting to PNG!
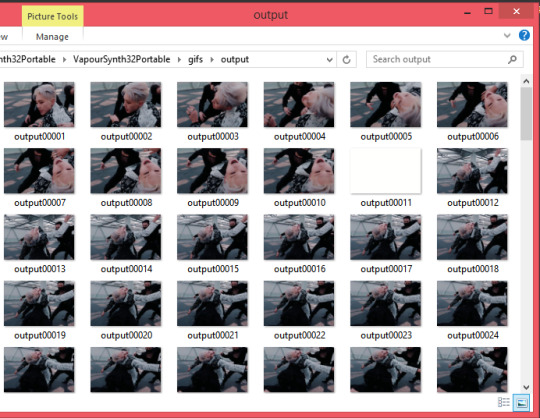
step 7: you’ll see all of your frames on the vs folder and if you didn’t trim (like me jdsjdskj), you can just erase unwanted scenes (just like what we did for KM Player)! if you’re making more than one gif, transfer these pngs to another folder (or rename them) as in the case of kmplayer. you need separate folders/names for each gif as not changing the folder/name and exporting again would overwrite the frames you previously captured.
and this is where it ends for vapoursynth!

now that we have all the frames ready, we’re going to be using photoshop and get all the fun stuff going!

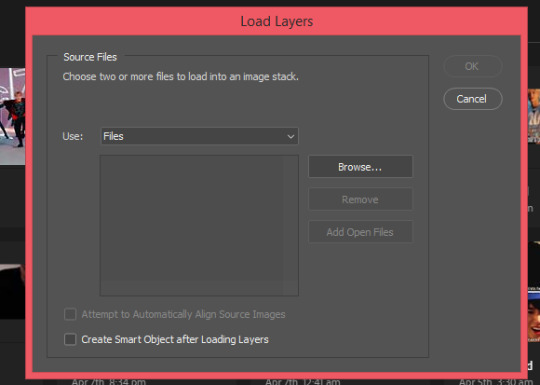
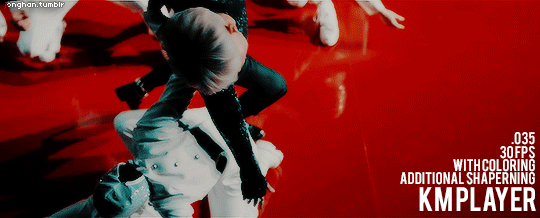
KM Player is a lot more tedious (can’t believe i used this for more than a year omg), so we’re gonna have to do a few more steps and pick up from where we’ve left.
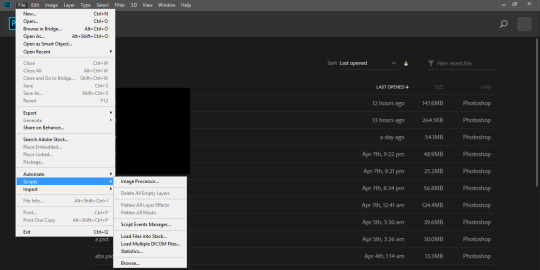
step 1: import your frames by going to file, scripts, then ‘load files into stack’
step 2: click browse, select the folder you saved your frames in, select all the frames, click enter, and then press ‘OK’.
step 3: your workspace should look something like this. click create frame animation (if that doesn’t initially show up and your window says ‘create timeline animation’, just click the little arrow beside it and switch it to frame).
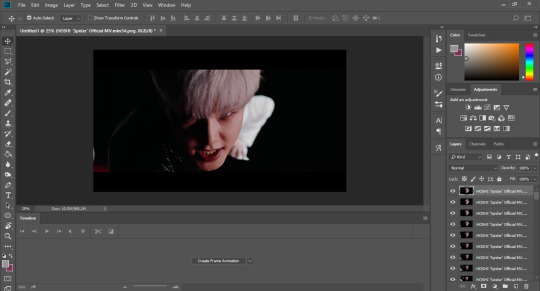
(additionally, if you don’t see the timeline below, you can enable it by going to window, then check the timeline option)
step 4: make frames from layers.
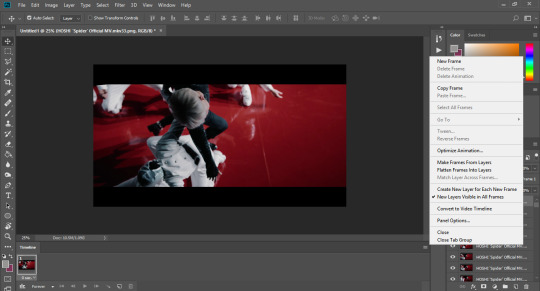
step 5: reverse frames.

step 6: the trickiest part of giffing from km player!! (thankfully, we’re only making 540px gifs for this tutorial) estimate the area you want to include, then crop your canvas by pressing ‘C’ on your keyboard or selecting the crop tool on the toolbar (it’s the 5th icon here on my screen).
**UPDATE: you can also crop by ratios using the crop tool as seen on the screenshot below!
after cropping, your workspace should look similar to this.
step 7: and now we FINALLY resize like barbarians :D i always like shortcuts (which you can prob tell by now) a.k.a the easier and more convenient route, so just click ‘CTRL + ALT + I’ so the image resizing window can pop up. alternatively, you can go to image, then image size.

now set the width to 542 (which is 2 pixels larger than tumblr’s required width) and press ‘ok’.
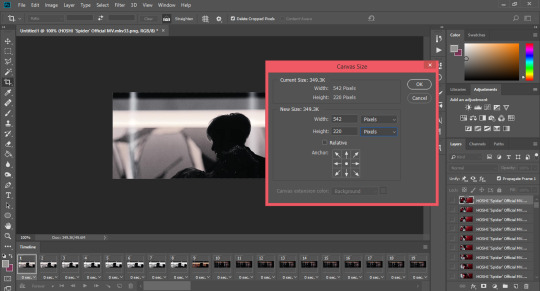
step 8: as you can see, there are weird white/kind of faded pixels on the outer edges of the gif, and that’s the exact reason why we needed those 2 extra pixels from the last step. you can remove this the hard way by zooming at 1800% and removing 2 pixels per side or we can always go the easy route and press ‘CTRL + ALT + C’ (or go to image, then canvas size) and then resize the canvas width to 540 (don’t forget to remove 2 pixels from whatever height u have too!) <3
step 9: now we have a clean and sexy gif. you can completely stop here, and start exporting, but coloring and sharpening make all the difference (to me at least)!
as for vapoursynth, you only need to follow steps 1 to 5 (aka importing <3)

these steps aren’t ‘necessary’ but these are the essence and what makes tumblr gifs tumblr gifs (aka prettie <3).
there is so much potential with sharpening alone! usually, if they haven’t used the sharpening settings on vs, CCs may choose to do it through photoshop (although i personally always do additional sharpening on ps even if they’ve already gone through vs) by converting these frames into a smart object. you can do so by:
step 1: press ‘CTRL + ALT + A’ on your keyboard. this will select all of your frames IN THEIR LAYERS (not the ones on the timeline)
as you can see, they’re all highlighted on the bottom right panel.
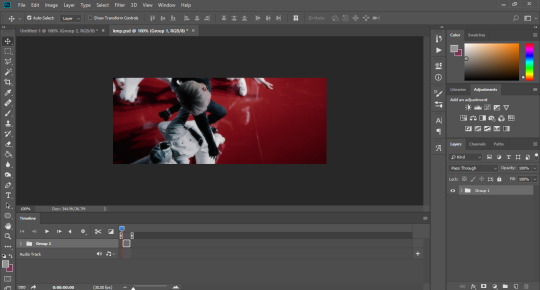
step 2: place all of them in a folder by clicking this one!
step 3: then, convert your frame animation into a timeline by clicking the tiny icon beside the ‘forever’ loop.
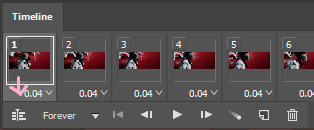
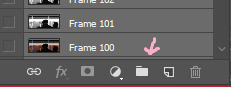
it should look like this afterwards:
step 4: now we finally convert to smart filters by clicking filters, then convert to smart filter
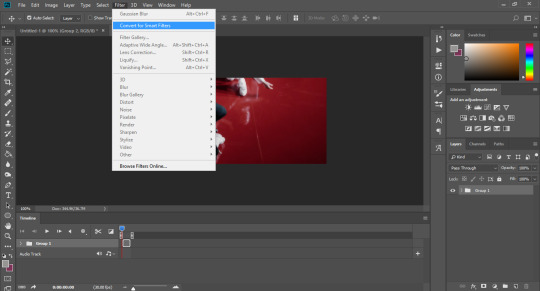
which turns out like this after being converted
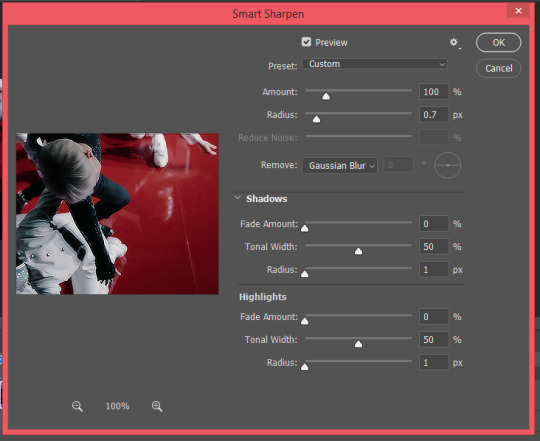
step 5: now sharpen to your liking! go to filters, sharpen, then smart sharpen. these are the settings i use, but i usually just play around with them until i like what i see. i won’t go in depth about this because there are a lot of tutorials that talk about this (which i will link some of below!!). the most important part to adjust is the amount and radius though!
again, you can stop here, but i like adding a bit of glow to my gifs, which is done by adding gaussian blur (another filter)! i learnt this method from this tutorial. i don’t think i can add any more to it as it’s perfectly complete as is, so i won’t be elaborating anymore!
additionally, if you don’t want to do all of that manually (although i suggest you learn how to do it manually first), there are available sharpening actions you can see around the internet. just choose one that’s to your liking! here are a few of them. you can also save your own settings as an action if you don’t wanna do them repeatedly.

my personal favorite! this is what makes the giffing process so rewarding for me. for coloring, adjustment layers are your best friends! you can try messing around with all of these.
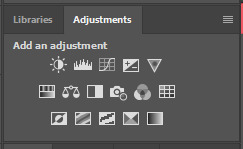
i usually use selective color (my beloved <3), levels, curves, saturation, exposure, vibrance, color balance, photo filter, channel mixer, and gradient maps (not specifically in that order). i won’t actually do a specific tutorial as coloring extremely varies from each gif (one psd/coloring might work for another but may look absolutely horrifying on one lol, this applies even to frames that are from the same video!!) but i’m just going to give a few tips and refer to a few tutorials that might help you out!
generally, the more colors there are in your gif, the bigger the gif size will be. this is also important when you are exporting! (gifs that have very few frames with a lot of color and gifs that have up to 200 frames but have very few colors in them can actually save as the same size)
if you wanna lessen the file size and noise, gamma, and off-set are your best friends! (make the gifs a bit darker) you can also delete a few colors as shown in this tutorial!
i used to be unaware of this when i was a new gifmaker, but be careful of whitewashing! dreamy (@scoupsy) has an excellent tutorial that combats this. annie (@imjaebumaf) also touches a bit more on this!
resources are always available for you to learn! one good way of learning how to color is by seeing how others also do it, and that is through their psds. i really love izzie’s (@coupsnim) colorings, and she recently put out a set for her blog’s anniversary too, so you can check that out! <3 i’ve also seen a lot of psds here from tumblr resource blogs, and deviantart has really good ones as well.
i don’t really have things i keep in mind other than those. just have fun and i’m sure in time it’ll turn out great! again, practice is everything!

last but not the least, we address the speed of the gif before we export! it’s the decimal places under the frames on the timeline. make sure that you select all frames if you want a consistent speed! you can always play around with it though.
for 30fps gifs, i usually do 0.03 to 0.035. photoshop shows 0.035 as 0.04, but i’m pretty sure it isn’t the exact same speed as 0.04. as for 60fps gifs, my speed ranges from 0.01 to 0.025.

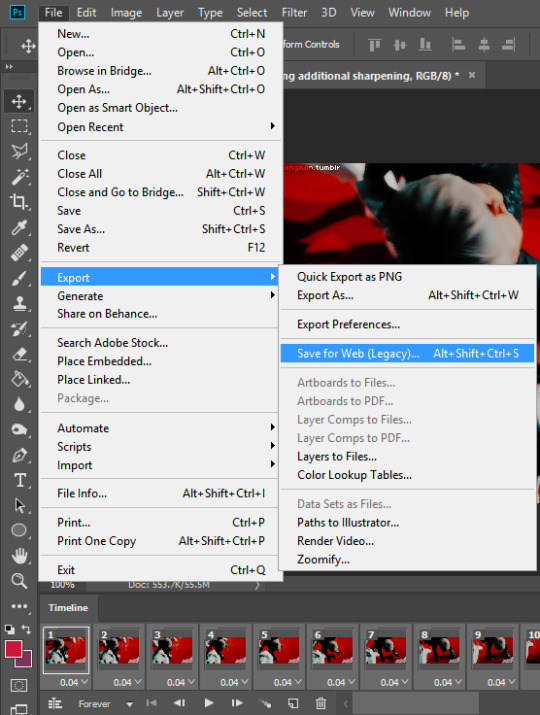
and finally, we go to the settings themselves! i used to take exporting settings very lightly, but lately i have realized that it also impacts the way your gifs look by a lot! to export, press ‘CTRL + SHIFT + ALT + S’ on your keyboard, or simply go to file, export, then save for web.
there are so many ways you can play around with it, but here are my current settings.
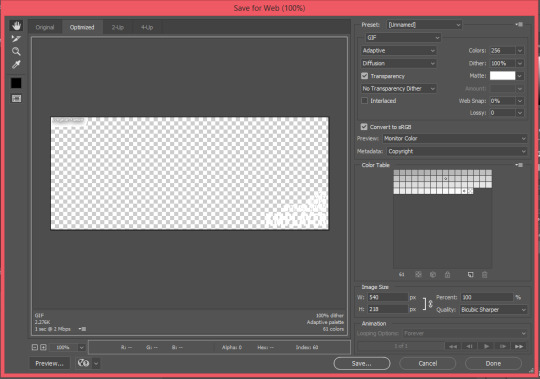
the color reduction algorithm (i.e: adaptive, selective, etc.) is one of the most important things as this determines the quality and color table of your exported gif! it really differs for each gif, but lately i lean towards the adaptive setting as i like the way it has been making my gifs look.
also very important to remember that tumblr’s current gif size limit is 10MB so make sure to keep your gifs under that size!!
you can also remove a few frames/skip every nth frame to lessen size if you’re running over the limit. :)

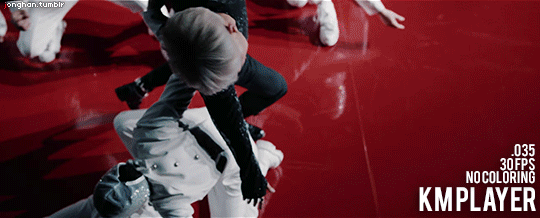
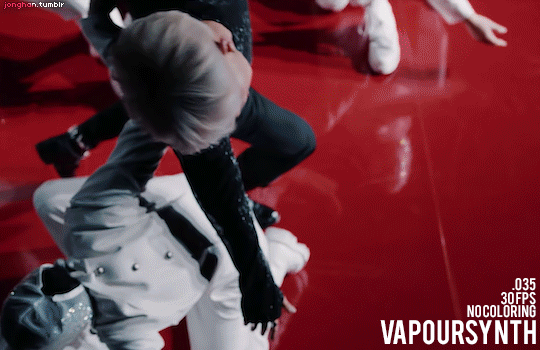
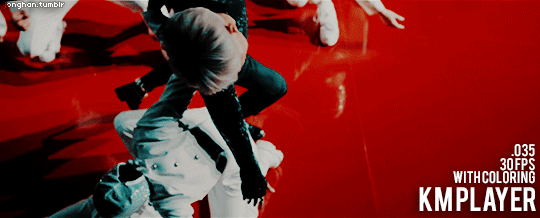
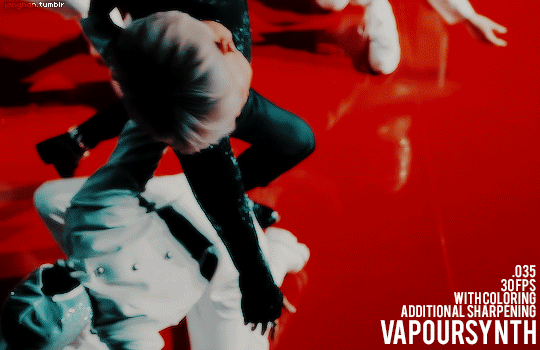
to show you how different each process will make a gif look, i’m including some examples (actually the ones we were working on during the tutorial!) to demonstrate a bit better.
this is specifically for an mv, but this tutorial has been really long now jdkjkfdjkfd so i will link down resources that show examples of it w/ performance stages (you can see a much bigger difference here)! also note that the vs one has slightly lesser frames (they could have the same frame number and size but i didn’t wanna redo it lol 😭). again, the .035 indicated is the speed used.

i know this is a bit much for an intro, but i wanted this to be a one-stop guide so you won't have to scramble for more resources. however, if some parts are hard to understand, here are a few tutorials that might help! (1, 2, 3 by @jinims, 4 by @soonhoonsol, 5, 6 is another general tutorial but i find the sharpening part especially helpful!)
and a few more resources that helped me out when i was beginning
sparkle tutorial
sparkle action
blurring captions
**UPDATE: my own sharpening tutorial <3, update 2
**UPDATE: my own color reduction algorithm tutorial
i hope this was helpful, and i can’t wait to see your gifs! <3
#a bit all over the place but#i learnt all of this on my own and through tutorials as well but i hope this at least makes sense!!#this is literally everything i know ig lol#don't hesitate to ask if some parts are unclear <3#all of this is also intimidating at first but i'm sure you'll get the hang of it!!#it's really just dexterity sdksdjk trial and error!#i hope i didn't forget anything? i might also edit this if i find the need to/i rmb to add smth <3#i didn't know tutorials took this much time omg i respect tutorial blogs even more now#literally took me more than 4 hours omg and i know u can tell the exact moment i started losing it#edit: i put those tags on while i saved the draft but i literally sat here for 5+ hours making this but it's worth it and i really enjoyed!!#i'll proofread this tmr it's 3 am now and my brain is fried from uni too <3#anon#y.ask#flashing tw#ok i just proofread this but it already has 20 notes that's so embarrassing <3#u can literally witness my sleep deprivation#anyway it's fine now i think (or my sleepy brain thinks it is)#i'll prob revisit this again tmr#y.psd#y.tutorial
229 notes
·
View notes
Photo

Before we start, I want to make it clear this is NOT a giffing tutorial (I offered some guidelines on how to create gifs using these softwares but they’re very basic). This post contains three softwares to make HQ GIFS (I used to have a longer list but I’ve lost it)!! If you are interested in how to go about creating a gif, or where to download HD video files to create gifs, here are two good place to start:
✦ @robertdowneys has a very detailed process on giffing for beginners (this is focused on using photoshop which is the preferred method of giffing) ✦ @kylos has a master post on the best sites to download HD videos files
Now that we get that all sorted out, let’s focus on the softwares now. In no order, here are the softwares:
✦ Photoshop (any version is doable and it works for BOTH PC and MAC; I personally use Photoshop CC 2019. For download links, look through this download tag by @chaoticresources) ✦ GIF Brewery 3 (this is for MAC; you can find it on the app store ! It used to be a paid app but it’s free now I believe, let me know if that is no longer the case) ✦ PhotoScape X (works for both PC and MAC; you can download it at their website )
By now, you’re wondering, how do you make gifs from these softwares, and can you really make HQ gifs from a software other than Photoshop? The answer is yes! While I’m not offering a tutorial (sorry I suck at making them), I’ll give a few guidelines and details on how to use these softwares:
PHOTOSHOP:
✦ For Photoshop, you have two options on how to import your files: ✦ Load files into stack (this is my preferred method which basically means you open the folder where your screenscaps is stored!) ✦ Or import video frames to layers (where you load your video file and trim it down to the length/scene you want to gif). ✦ You can use VLC player, gom player, mpv, kmplayer, and a whole bunch of others! ✦ For how to create the gifs, coloring, etc, check the tutorial I’ve provided above (there are also so many of them on tumblrs, you can easily find them!) ✦ EX of GIF (FROM photshop):

GIF BREWERY 3:
✦ Okay, this one is straightforward. All you need is a video file (you can try a video from YouTube!) ✦ Then you click on open video. After that, resize your video file to 540 (or any other dimensions you want but MAKE SURE there are the acceptable sizes for tumblr or your gifs will look weird). ✦ Please crop the video and don’t force it be your desired dimensions, say 540X400 or it WILL look weird and too tall. ✦ After that, go to the filter tab located above, and color your gif. Please note you can only create simple gifs with GIF Brewery 3. ✦ Next go setting (this is on the right side of the app when you open it) and click “calculate frame count & delay” (the default is by 12 secs, you most likely should change this to 15 secs or it will be too fast) ✦ Now make sure you choose the “optimize gif colors” option and make sure the color count is at 256! This is important! ✦ Also click on the enhanced color optimization! You can see your frames in the left hand corner! ✦ And viola, there you go, you made a gif! ✦ EX of GIF (from Gif Brewery 3):

PHOTOSCAPE X:
✦ You need to take screencaps for this one. Your edits can be simple or advanced (to a degree). For advanced, you have to go to the editor and edit it frame by frame. For example, if you want to create a colorful gif. ✦ Next choose the batch section in the app and load all your screencaps there. ✦ You can then edit, crop, etc as you please. As this is a batch file, your coloring will transfer to all the rest of the screencaps. ✦ After that, save your batch files and then go the create gif section. Here you just load the batch files (the screencaps you edited) and viola, you’ve created a gif. EX of GIF (from Photoscape X):

🌟 I hope this helps! I know this is very basic and doesn’t exactly provide info on how to create gifs. I just thought I should share these in case anyone wants to learn how to make gifs from different softwares. I’m sorry if this is confusing but I really, really tried to make this as simple as I can. I’m not good with these things. I know giffing can be daunting and scary, so if you’re new to giffing and needs some help, I can provide you with some links or help out in any way I can. Thanks, let your inner gifmaker shine! 🌟
#gif resources#itsphotoshop#completeresources#resources#userjessie#userrobin#usercandy#userliliana#underbetelgeuse#arthurpendragonns#usersharon#usertom
258 notes
·
View notes
Text
[F.A.Q.] Engeki Haikyuu Subtitles

Hello~! First of all, I’m so glad to know that everyone is enjoying all the Engeki Haikyuu subtitles that I’ve posted and that you’re all looking forward to more~! A huge thank you to all of you who have messaged me words of encouragement and gratitude for all the projects! I really appreciate all of them and the fandom and I’m just glad to have been able to contribute~! \(^▽^)/
But since I keep getting the same DMs and asks about a lot of stuff regarding the subs, I decided to make this FAQ. I unfortunately don’t have the time to answer all anon asks and DMs about the subs, so please do check this FAQ first before asking me anything, thank you!
I’ll reblog this every now and then so it doesn’t get buried under the other posts I make! FAQ under the cut ^^
1.) The file won’t open. | What program do I need to open a .ass file?
--> I’ve mentioned this again and again, but the file I’m sharing are only the softsubs! That means, the video is not included in them. In order to be able to watch the play with subtitles, you need to have both the subtitles (the ones I post) and the video itself.
2.) Where can I get the videos? | Do you know who is sharing the videos? | Where can I download?
--> If you can’t get enough of the videos and want to see more, especially the backstage, the Engeki Haikyuu DVD/BDs are all available to order here. The site ships internationally, so by all means, feel free to order if you can ^^
Here’s a guide for first-time buyers~
3.) I have the video, how do I load the subs? | How do I play the subs?
--> If you are using VLC, here’s a tutorial for how to play the video with subs. --> If you are using DAUM PotPlayer, here’s a tutorial. --> If you are using a Mac computer, here are various media players you can check out to try and play the videos. But from what I’ve been told, VLC works best! I unfortunately don’t know the differences between Mac and Windows players, so I can’t help with this too much if there are problems ^^;
--> For those who are downloading on mobile, MXPlayer works pretty great! It’s what I use and it’s easy to play videos and add subtitles to them. Free version may have ads, but it works pretty great! If you can, you can pay once to get the full version just for smoother playing. NOTE: There may be lags/unsyncing with the subs depending on your phone.
4.) The link isn’t working, can you re-upload them? | I can’t access the link anymore, will you re-upload?
--> Yes, I will re-upload anything that gets taken down! Just tell me which subtitle you’re looking for or which link isn’t working so I can update them on the masterpost ^^
5.) Do you have subtitles for “Start of a Giant”? | Are you working on “Start of a Giant”?
--> Yes, I still am. However, I have other priority projects, plus commissions, and real life + quarantine that keep me busy, so they are progressing really slow right now. I am grateful that you are very patient with me on this one though!
6.) I recently got into Engeki Haikyuu and found the first two plays, do you have subs for them? | Do you have subs for “Itadaki no Keshiki”?
--> No, I have not worked on “Itadaki no Keshiki” or its re-run. When it was first uploaded, it came subbed by the one who shared the original video, so I cannot help you with that. I also do not have subs for the “Karasuno, Revival!!” curtain calls because from what I remember, there’s already someone on Tumblr who has worked on them.
--> I only started working on Engeki Haikyuu starting from “Karasuno, Revival!” until “The Strongest Challengers” which I am currently finishing.
7.) Can I re-translate your subtitles into [insert language here]?
--> Yes!! Feel free to re-translate them~! The more people who know and support Engeki Haikyuu, the better! I just ask that you please keep my credit in the subs as the original English translator and uploader, thank you!
--> If you post the re-translated subs on Tumblr, feel free to just tag me ^^
8.) What are all the subs you’ve worked on? | How many Haikyuu plays have subs? | Is there a masterpost?
--> Yes~! I’ve made a masterpost of all the Haikyuu!! content that I’ve worked on before~!
--> The masterpost is here for those who couldn’t find them ^^
STEP BY STEP GUIDE ON HOW TO PLAY THE SUBTITLES:
1.) Download video (Read #2 about where to get it.)
2.) Download subs (In the masterpost at # 8)
3.) Play video and then load subs (Refer to #3 for how to load them on your media player.)
※ I’m really grateful for all the patience you have with me regarding these subs, and I felt a bit bad that I couldn’t answer all your questions individually >< Hopefully, this FAQ will help out a bit!
※ If there’s still something unclear and something I have not addressed in the FAQ, please DM me ^^ I’ll try my best to help, if ever!
※ If you enjoyed my work so far, please consider buying me a coffee here, if you can. It’ll really help me out a lot.(o^▽^o) Thank you!!
#engeki haikyuu#engeki haikyuu subs#hyper projection performance haikyuu#faq#announcement#haikyuu stage play#haikyuu!!
338 notes
·
View notes
Note
What website/software do you use to create your gifs? They're always such good quality.
hello! I’m so sorry for only getting round to answering this now, it’s been sitting in my inbox for months and since you sent it I’ve completely changed the platform I make my gifs on. I’m now using photoshop cc 2018 but the gifs you must have been referring to were made using completely different, free and accessible software/websites. There’s a lot of photoshop tutorials out there but less so for other options so I’ve decided to just go through my previous process in the hopes that someone will find it useful!
To be honest, the differences between my gifs BP (before photoshop) and AP (after photoshop) aren’t that huge as long as the video quality is good. It’s easier to add subtitles, to colour and to play around with the gif size/quality, but there’s no need to give your soul away to adobe to create good gifs there’s obviously always the possibility of downloading ps less legally which i of course would never in a million years do. So, to create gifs as I did BP you will need three different things:
a screen recorder (I use QuickTime Player which is preinstalled on a mac but there are many others out there, and then VLC player if I had already downloaded the video which didn’t happen often as I mostly gif matches so I’d just screen record parts of the match if I couldn’t download it)
a video editor (I used iMovie which again is preinstalled on macs but there are other options out there if you have a poke around - if necessary this step can also be skipped but it’s useful and will improve gif quality)
the lord and saviour ezgif.com (a free website at everyone’s fingertips which provides many of the features you can get with ps)
1A. Screen recording: have the part of the video you want to record on your screen, open up QuickTime Player, right click on the image of the app in your dock, then click on “new screen recording”. You can then click on the arrow pointing down to change your sound settings, I usually have mine like this
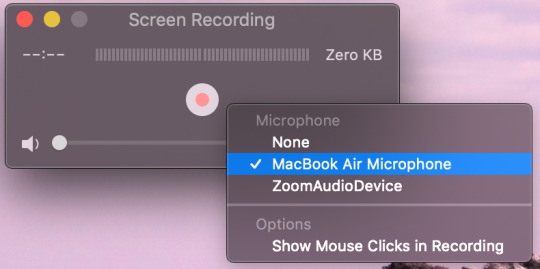
click on the circle with smaller red circle (play button) after which these instructions will appear across your screen: “click to record the full screen. Drag to record part of the screen. End recording by clicking the stop button in the bar menu”. So you can chose to record your full screen or just a part of it depending on whether you click or drag. If you drag you are then given the opportunity to adjust the area you want to record and then you press “start recording. Once you have finished recording the part you want to gif, click on the circle with a black square inside (stop button) in the menu bar at the top of your screen. Go to file > save and then save the video in whatever file and under whatever name you want. After this you will have finished step one!
1B. The alternative, if rather than screen recording a video you haven’t downloaded you want to record a certain part of an already downloaded video then you can use software such as VLC (you can also just upload the video directly to iMovie and crop it there but if it’s very long/you don’t want to go through the middle step then you may want to consider this as an option). Go to Finder for the video you’ve downloaded, right click on it then Open with > VLC. Find the part you wish to use for your gif, go to Playback > Record like so.

It will immediately start recording what’s playing, stopping when you click on Record again once the part you want to gif is over. Then step one method two is done!
2. iMovie: as ezgif isn’t the best for colouring, and anything that it does do is pretty slow and arduous, then I used iMovie to shorten, slow down and colour my videos before turning them into gifs. Here I go Create New > Movie > File > Import Media. I find the video(s) I want to use to make gifs, click import and then drag and drop them into the timeline.
Usually I try to make my gifs about 3 second long, so first thing I would do is change the speed from normal to about 70/80% (this is a completely individual choice though!) so these would be my current settings

Then I find the exact bits I want to gif and divide them into individual clips, as I said they’re usually 3 second long but it can vary. This is done by right clicking on the part of the video you want your gif to start and clicking on “Split Clip”, and again at the point you want your gif to end. Repeat for however many gifs you want. Simply delete the parts of the video(s) you don’t want to keep after this is done.
Now I attempt to add some colouring. First I go to “Colour Correction” which is in the same bar “Speed” is - it’s the little artist’s palette. I play around with the different toggles a little bit until I find something which I believe works. This honestly varies so much from gif to gif but usually I up the saturation just a lil bit, leave the temperature as it is and darken the video so that it ends up a bit like this but honestly it fluctuated a lot and it’s all about personal preference.

If I’m feeling funky I’ll also mess about with the “Colour Balance” which is under the first icon on the left which is a half white circle. I use the eye dropper to change the skin tone balance and sometimes the “White Balance” eye dropper which is a simplified version of ‘curves’ in photoshop.
Once you’re happy with how your video looks then save it by going to File > Share > File. Name it and, if possible save it in as high a quality as possible. My settings usually look something like this

click Next > Save and step two is finished!!
3. Actually making the gif using ezgif.com/video-to-gif. Go to “Choose Files” and select the video you want to gif, then click “Upload Video!”. Chose the time frame you want for your gif, the size (the x540 one which says for Tumblr is the one to use if you’re uploading them onto here), the frame rate (the more per second the better the quality but also the bigger the gif size). All of this is also very well explained by ezgif at the bottom of the page so I’d definitely recommend having a read through all that. Then click “Convert To GIF!”.
From here you can either ‘crop’ to make the gif a particular size or use other tools such as ‘effects’, ‘speed’ or ‘optimise’ if you didn’t use iMovie or want to make some further changes. I usually only use the ‘crop’ as iMovie won’t let you change the dimensions of the gif whilst here you can do that. However I mostly stay away from the other tools as I find them a bit clunky and annoying to use. Once you’re happy with the final product click “Save” and hey presto your gif has been downloaded and is ready to be used!!
I hope some/all of this helped and feel free to hmu with any questions you might have if anything isn't explained that well. It took me ages to write this because I'm never sure whether these explanations make sense outside of the realms of my brain :)))
#sleep who? i only know what making gif tutorials at ungodly hours is#genuinely hope this helps people!!#i developed this process bit by bit so thought id finally share :))#gif tutorials#tutorials#colouring tutorials#how to#og#ezgif tutorials#coloring tutorial
21 notes
·
View notes
Text
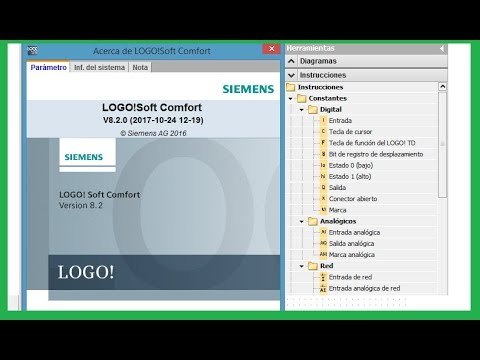
Logo Soft Comfort V8 Para Mac

Related searches
Logo Soft Comfort V8 Para Mac Pro
Logo Soft Comfort V8 For Mac
LOGO!Soft Comfort is a Freeware software in the category Education developed by Siemens AG. It was checked for updates 817 times by the users of our client application UpdateStar during the last month. The latest version of LOGO!Soft Comfort is 8.2.0.16, released on. It was initially added to our database on. Is the perfect choice for a quick, easy and space-saving solution for basic control tasks. Software supports small automation projects through simple and intuitive configuration and application: from the engineering software LOGO! Soft Comfort via the LOGO! Access Tool up to the LOGO! Web editor for the one in LOGO!
» logo soft comfort v8.2 portable full
» logo soft comfort v8.2 actualización
» logo soft comfort v8.2 sp1 doonload
» logo soft comfort v8.2 software gratis
» logo soft comfort v8.2 kopen
» logo soft comfort v8.2下载
» descargar logo soft comfort v8.2 gratis
» logo soft comfort v8.2 descargar para pc
» logo soft comfort v8.2 download
» aggiornamento logo soft comfort v8.2
logo soft comfort v8.2
at UpdateStar

More
LOGO!Soft Comfort 8.2.0.16
It is recommended to always keep the LOGO! Soft Comfort software up to date with the latest Upgrades/Updates. Updated software is required to be able to communicate with the latest device releases (e.g. more info...
More
VLC media player 3.0.11
VLC Media Player Foot Pedal allows VLC Media Player to be used as transcription software for transcription of all types of media files with full foot pedal support. more info...
More
Google Chrome 87.0.4280.141
Chrome is a web browser developed by Google. It is characterized by its speed and many innovative features. more info...
More
CloneDVD 2 2.9.3.6
CloneDVD is a flexible and easy to use DVD movie copy software. Without special setting, CloneDVD automatically removes all protections (CSS, RC, RCE, UOPs and Sony ARccOS) on-the-fly, lets you freely copy all of your DVD movie … more info...
More
Soft Data Fax Modem with SmartCP 7.80.4.63
More
Autodesk Advanced Material Library Image Library 2 16.11.1
More
AusweisApp 2 1.22
Bundesamt für Sicherheit in der Informationstechnik - 14.3MB - Freeware -
Mehr Sicherheit im Online-Geschäftsverkehr und bei Online-Behördengängen! Mit der Online-Ausweisfunktion des Personalausweises und des elektronischen Aufenthaltstitels können Sie sich einfach und sicher im Internet und an Bürgerterminals … more info...
More
FastStone Image Viewer 7.5
FastStone Image Viewer is a fast, stable, user-friendly image browser, converter and editor. It has a nice array of features that include image viewing, management, comparison, red-eye removal, emailing, resizing, cropping and color … more info...
More
Energy Star Digital Logo
More
Razer Synapse 2 20.15.707
Descriptions containing
logo soft comfort v8.2
More
Google Chrome 87.0.4280.141
Chrome is a web browser developed by Google. It is characterized by its speed and many innovative features. more info...
More
Realtek High Definition Audio Driver 6.0.9030.1
REALTEK Semiconductor Corp. - 168.6MB - Freeware -
Audio chipsets from Realtek are used in motherboards from many different manufacturers. If you have such a motherboard, you can use the drivers provided by Realtek. more info...
More
Mozilla Firefox 84.0.2
Coupon Search Plugin for Firefox, find some of the best discounts and deals around from the best retailers on the net. Coupons, discount codes and more. CouponMeUp have thousands of the best coupons from hundreds of online retailers. more info...
More
VLC media player 3.0.11
VLC Media Player Foot Pedal allows VLC Media Player to be used as transcription software for transcription of all types of media files with full foot pedal support. more info...
More
LOGO!Soft Comfort 8.2.0.16
It is recommended to always keep the LOGO! Soft Comfort software up to date with the latest Upgrades/Updates. Updated software is required to be able to communicate with the latest device releases (e.g. more info...
More
Windows XP SP2 20080414.175804
Windows XP Service Pack 2 (SP2) contains major security improvements designed to provide better protection against hackers, viruses, and worms. more info...
More
Foxit Reader 10.1.1.37576
Foxit Software Company, LLC - 32.8MB - Freeware -
Foxit Reader is a free PDF document viewer, with incredible small size, breezing-fast launch speed and rich feature set. Foxit Reader supports Windows 2000/XP/2003/Vista/7. more info...
More
Internet Download Manager 6.38.16
Accelerate downloads by up to 5 times, schedule downloads, recover and resume broken downloads. The program features an adaptive download accelerator, dynamic file segmentation, high speed settings technology, and multipart downloading … more info...
More
Ravi Bhadaniya 23.15.2.1.910
O 2 UMTS Stick für DSL -Anschluss more info...
More
ACDSee Photo Manager 32
ACDSee Pro 2 streamlines your workflow and increases productivity. It empowers you to view, process, edit, organize, catalog, publish, and archive your photo collections with precision and control. more info...
Additional titles containing
logo soft comfort v8.2
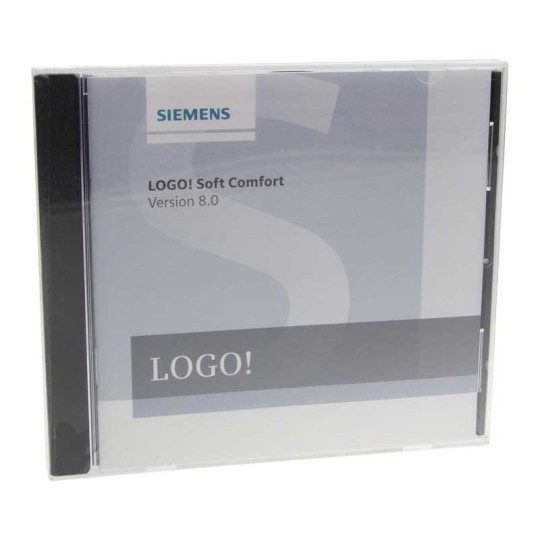
More
LOGO!Soft Comfort 8.2.0.16
It is recommended to always keep the LOGO! Soft Comfort software up to date with the latest Upgrades/Updates. Updated software is required to be able to communicate with the latest device releases (e.g. more info...
More
Soft Data Fax Modem with SmartCP 7.80.4.63
More
Autodesk Advanced Material Library Image Library 2 16.11.1
More
AusweisApp 2 1.22
Bundesamt für Sicherheit in der Informationstechnik - 14.3MB - Freeware -
Mehr Sicherheit im Online-Geschäftsverkehr und bei Online-Behördengängen! Mit der Online-Ausweisfunktion des Personalausweises und des elektronischen Aufenthaltstitels können Sie sich einfach und sicher im Internet und an Bürgerterminals … more info...
More
CloneDVD 2 2.9.3.6
CloneDVD is a flexible and easy to use DVD movie copy software. Without special setting, CloneDVD automatically removes all protections (CSS, RC, RCE, UOPs and Sony ARccOS) on-the-fly, lets you freely copy all of your DVD movie … more info...
Most recent searches
» install watspp
» m4cad ita
» old flash player download
» forge of freedom 2
» marine aquarium screensaver windows 10
» tendyron driver
» acer touchportal для windows 8
» téléchargement gratuit d avast 2016
» sterowniki op com windows xp
» paperport 14.5 driver
» gta social club 2.0 download
» ada activex viewer install
» fortnite descargar updatestar
» classic shell namechange
» actualizacion de red ethernet
» calculadora inteligente free download
» driver multilingue free
» gamemaker 1.4.0 free
» dell atualização de drivers
» alice screenserver
In this opportunity we will download and install LOGO! Soft Confort v8.2 in its DEMO version, is the programming software for Logic LOGO! Modules, in previous tutorials we made the revision of a LOGO! 12/24 RCE reference 6ED1052-1MD00-0BA8
Something interesting is that these devices are programmed from a different platform than SIEMENS TIA PORTAL, the programming environment for PLC’S and HMI from Siemens.
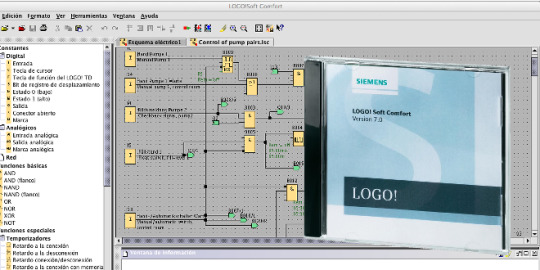
The logo! Soft Comfort v8.2 is available on the Siemens website:
Oficcial Website: siemens.com/logic-modules
We select the platform (Operating System), in this case I will install it on a Windows with 32 bits, in next tutorials I will try on Linux.
Open the executable and install, install the USB Drivers for other versions of LOGO! , in our case it is an Ethernet version.
LOGO! Soft installed
The next step is to create control logic and download our LOGO! This test will be done in the next tutorial.
Complete Video:
Logo Soft Comfort V8 Para Mac Pro
Conclusions
This software allows to program with logic of control, but also allows to realize configurations such as the web server, and configurations like client / server Modbus TCP, S7Comm communication using TSAP client / server mode.
Logo Soft Comfort V8 For Mac
In future integrations we will connect our Logo! with platforms like Node-RED.
2 notes
·
View notes
Note
Hello! I was looking through ur guide trying to find a how to on downloading videos onto to vlc or km player couldn’t find one I was wondering what websites would be best to download tv show episodes or movies
Here is a thorough explanation of which websites are great for downloading shows and movies and how to do so. You can also find shows and movies to download on various twitter and tumblr accounts like these (x, x, x, x). This is a thorough post on t*rrenting with links to more reputable sites. qbittorrent is a free t*rrent client. Here and here are tutorials that explain the process in an understandable way. As for programs, MPlayer OSX Extended is a great option for Mac, and VLC is another good option that works for Windows too after you have downloaded the content you want to gif!
11 notes
·
View notes
Text
i learned how to gif under my current method from a tutorial by user @cvmpbell-deactivated20200616 and um, well, as the mention says, they’ve deactivated. that said, i thought i’d share the information here for anyone who’d like to learn. i’m on photoshop cc 2020 for mac, but tbh as long as you have the timeline function you’re fine.
you will not require any screencaps or any software other than photoshop for this. (while i personally run my footage through iMovie first to cut out anything i don’t want this is very much not necessary to this process, it just may take longer to get through stuff if you have a huge video file. let’s get started!
just a warning this has a lot of large images in it, you are forewarned.
so to start you’ve got your video, i don't know what all of the photoshop accepted video formats are, i’m ngl, but i know it’ll take both a .mov and a .mp4. it will not take a .mkv file, but i have recently learned that if you’re also a mac user, you can convert that with vlc player. i think i read that conversion is a lot easier on a pc... but i have no clue so i’m not gonna pretend to know much about that.
EDIT: if you’re wondering how i get my video, check out THIS sweet anon i answered!
you open photoshop, and once you’ve got your software open you simply go file > open > and select your video footage. open it right up like you would any other document. it takes a few moments depending on your computer speed and how big of a file it is, but once you’ve opened it up, you should have your timeline at the bottom.

if you don’t see the timeline, you can go up to the menu bar, go to window, then select timeline. you want a video timeline, do not convert it to a frame animation.

now that you have your timeline open, you want to shift your focus over to your layers. you see that little “video group one” folder looking thing, you’re going to go ahead and select that folder.

and then right click it, and go ahead and hit convert to smart object.

now it looks like this! it’s a smart object now!

you can now go ahead and do your cropping for your first gif. go to image > canvas size

and then you should be able to put in whatever dimensions you want that gif to be. these are mine! yours can be whatever you please

now i’ve got myself a canvas size that i want my gif to be, so i just select my video layer, and utilize control t to move it around and resize the footage so it’s in frame how i want it to be. you can move it around just like any still image.

now that your image is in the right spot (you can move it later if need be just for now this is done), you can go focus on your timeline to make your gif.
you’re going to use the blue curser (or whatever color it is for you) to move to the beginning of your gif in the footage. then, you right click the blue part, and in that menu, select ‘set start of work area’.

and then you repeat this step, moving your blue curser to the end of the footage for your desired gif, but this time select ‘set end of work area’.
now you should have the ‘work area’ selected to only include footage you want for your gif. here’s mine!

now i’d go shift focus into the layer menu, and do whatever sharpening / coloring you’d want for this gif. you can also move the image layer around to make sure you’ve got everything in frame still now that you’ve seen what the whole length of the gif is. (you can use the blue curser to scan through the footage which will become your gif, or use the play triangle but... that moves too slowly for my taste)
note: the coloring doesn’t need to be in a folder, i just like to have mine that way so it stays out of my way in the timeline more. (folders appear smaller than layers in the timeline and every existing layer appears in the timeline)

now you’ve got to go to file > export > save for web.

make sure you’re exporting as a gif and not as a png!

now just check the size, make sure it’s under 2M for best results to make sure you can use the gif in a post without problems.

now you hit save and save it as whatever file name you want, wherever you want!
the best part is, now you just go through the rest of your footage, moving the start and end of the work area as described above and exporting the exact same way. just make sure you give each gif a different name of course!
but yeah anyway, now i have my little gif right here of olivia as elle aka my precious ballerina.

i hope this was helpful!
it may have been rather... excessively detailed but i do like to err on the side of over explaining rather than under explaining. feel free to let me know if you have any questions!
69 notes
·
View notes
Text
Wmv Player For Mac Free
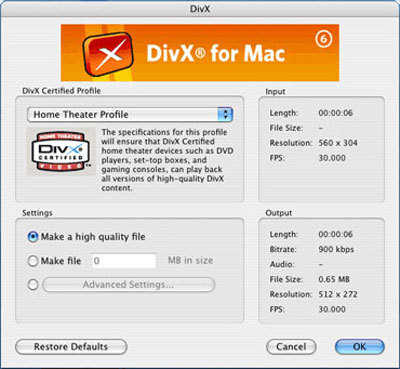
WMV Viewer Free. Utilities & tools File managers. Open and play your audio & video files instantly today with this app. This app supports many formats such as 3g2 / 3gp / wma / wmv. To search for Windows Media Video converters, type wmv into the search box, and then press Return. From the list of results, download and install the conversion software you want. In OneNote, go to the audio or video clip icon in your notes that you want to play, right-click (or Control-click) it, and then click Save As on the menu that appears. Top 5 WMV Players Mac to Play WMV Files on Mac with Ease No.1: 5KPlayer – Free 4K Video Player for Mac/Windows 10. Serving as a versatile multimedia player for high definition videos, 5KPlayer is able to play WMV files on Mac up to 8K/5K/4K UHD or 1080P/720P HD without installing any other third-party plug-ins.
WMV stands for Windows Media Video. It is developed and controlled by Microsoft for Internet streaming and watching videos on a personal computer. Sometimes it’s not an easy thing to play WMV movies on Mac with Apple’s QuickTime player. That is because of the competitive relation between Windows and Mac. And the two will never fully get along.
Playing WMV (Windows Media Video) on Mac needs the corresponding component for your QuickTime player. So the best way is to fine an alternative tool. Here we recommend the Aurora free WMV Player for Mac to you. Although, this Mac WMV player is not the only choice and there are also tools like VLC, Flip4Mac Component for Mac, etc. We still recommend the Aurora Blu-ray Player because it can not only play WMV file on Mac directly, but also be used as a powerful Blu-ray decryption tool.

The most important is that this free WMV Player for Mac is an all-in-one Mac Media Player. It means you can play Blu-ray disc, ISO, DVD, Video CD, WMV, FLV, RMVB, etc. on Mac OS X directly and smoothly without any other third party plug-ins. Below I will show you how to play WMV files on Mac easily.
Tutorial in Detail
1. Download and install
Download free WMV Player for Mac and install it by dragging the APP file to your Applications folder. Then launch the application.
2. Play files
Free Wmv Player For Mac Os X
Now you can load the WMV files you'd like to play to the player the following ways:
- Drag the WMV files to the app window or onto its icon in the dock.
- Right-click a WMV file in Finder, select 'Open With' option then choose Aurora Blu-ray Player.
- Choose 'File' from Main menu -> 'Open File'. (”Open URL” allows you to play online WMVs).
Wmv Player For Mac Free Download
Now you can enjoy WMV files on Mac with no hassle! Besides the WMV movies, you can also play various file types: Blu-ray, DVD, FLV, RM, MOV, MP4, AVI, MP3, WMA, etc.
Related Tutorials:
1 note
·
View note
Text
Mp4 To Avi Free Mac
Mp4 To Avi Free Online Converter
Best Mp4 Converter Free Download
Best Free Mp4 Converter
Mp4 To Avi Free Converter For Windows 10
Download Free WMV AVI Converter for macOS 10.7 or later and enjoy it on your Mac. This Free WMV AVI Converter helps you convert WMV and AVI video to any popular video file and then to play on your iPhone X/8/SE/7/6/6 plus/5s/5s/5/4s, or iPad Air 2/mini 3/mini 2/4, or iPod touch/nano. The Mac MP4 converter can convert AVI to MP4, MP4 to AVI, AVI to M4V, MP4 to MP3 music on Mac OS X for playing on iPod, iPod touch, iPhone 3G, iPhone 3GS, iPhone 4, PSP, Apple TV, Archos, iRiver, Creative Zen, PS3 and other portable MP4 players. This Mac MP4 converter helps you convert various multimedia files like AVI, MPEG, VOB, 3GP, MOV, MP4.
Convert Mp4 To Avi For Mac free download - Free Convert to DIVX AVI WMV MP4 MPEG Converter, Free AVI to MP4 Converter, Free Convert MPEG WMV to MP4 FLV AVI Converter, and many more programs. Here's how to convert an AVI to an MP4 on Mac computer with QuickTime Player Pro. Launch QuickTime Player on Mac. Go to File Open File, select the AVI video you want to convert, click Open. Select File Export. Select Movie to MPEG-4 from the Export drop-down list. Your Mac's QuickTime will start converting AVI file to MP4 format. Whenever we start any discussion on the best Mac MP4 to AVI converter software, or whenever you have problems converting MP4 to AVI using ffmpegx for instance (the new.avi file only lasts about 3 second with no video but a short bleep of sound), VLC Media Player should come in the list and rescue your life. It's a comprehensive free option for.
4Media MP4 Converter for Mac Introduction
No matter which digital player you own, you will find 4Media MP4 Converter for Mac is made just for you. The Mac MP4 converter can convert AVI to MP4, MP4 to AVI, AVI to M4V, MP4 to MP3 music on Mac OS X for playing on iPod, iPod touch, iPhone 3G, iPhone 3GS, iPhone 4, PSP, Apple TV, Archos, iRiver, Creative Zen, PS3 and other portable MP4 players
This Mac MP4 converter helps you convert various multimedia files like AVI, MPEG, VOB, 3GP, MOV, MP4, M4V, WAV, WMA, M4A, AAC, MP3, MP2, 3G2, AC3 to MP4 video and M4A, AAC, MP3 audio, such as converting AVI to MP4, MP4 to MP3 on Mac.
More features can be expected in 4Media MP4 Converter for Mac: trim the video and audio to get what you want, adjust output settings like codec, bit rate, frame rate, etc. to get custom file, take snapshot in preview window and so on. Really exceptional Mac MP4 converter to produce video collection for your MP4 players!
Key Functions
Convert AVI to MP4, MPEG to MP4
Convert many video formats like AVI, MPEG, WMV, MOV, 3GP, QT, YUV, ASF to MP4, MPEG-4, H.264/AVC, AVI, XviD, and watch the enchanting videos on MP4 players as best AVI to MP4 converter for Mac.
Get MP3 audio from multifarious video and audio files
Convert AVI, MPEG, VOB, 3GP, MOV, M4V, MP4 to MP3 on Mac, convert WAV, WMA, M4A, AAC, MP3, MP2, 3G2, AC3 and other formats to MP3, AAC, M4A audios with perfect sound quality. CD decoding is supported.
Convert videos and audios for numerous digital players
This MP4 converter for Mac is specially designed for iPod, iPod touch, iPhone 3G, iPhone 3GS, iPhone 4, Apple TV, PSP, PS3, Archos, iRiver, Creative Zen digital devices to watch MP4 videos.
System Requirements
OS
32 bit: Mac OS X v10.6 - 10.14(Mojave) 64 bit: Mac OS X v10.9 - macOS Big Sur(Version 11)
Processor
Intel® processor
RAM
512MB RAM
Free Hard Disk
100MB space for installation
Graphics Card
Super VGA (800×600) resolution, 16-bit graphics card or higher
Tricks and Tips
Award
Are you looking for an MP4 to AVI converter? Or do you want to save your time in conversion? If YES, this article is for you.
As we all know, MP4 and AVI are both popular formats in our daily lives. While both formats are excellent, there are sometimes where you convert your MP4 into AVI video format.
This mostly happens when the media player you have installed does not cooperate with your format, and the user is left to convert the file to AVI.
So, if you’re dealing with this exact situation, look nowhere because these free online MP4 to AVI converters will help you solve your problem.
To save your time and make your job easier, I have listed the top 4 free MP4 to AVI converters that will instantly convert your file. So let’s get started.
1 Convert MP4 to AVI with ToolRocket Video Converter
ToolRocket Video Converter is one of the most popular video converters that help you convert your video between various multimedia formats and supports 1080p HD videos to deliver an excellent visual experience.
Plus, if you’re looking for your video file to make as a GIF, this professional video converter will easily convert your video into GIF, and it will save it on your computer.
It comes with multiple practical and editing tools that enable you to cut video files into several clips, remove unnecessary clips, and combines your video files with ease.
The best part about this software is that it can add an unique watermark to the video. Apart from the watermark, it helps you to compress and capture your videos.
All in ToolRocket Video Converter is the best and efficient tool for video processing.
So how to change the file format from MP4 to AVI with ToolRocket Video Converter? Please follow the steps given below:
Step 1: Click on the download button below to install this MP4 to AVI converter. After installing, open the video converter.
Step 2: Click on the “Converter” option to run the video converter on your PC.
Step 3: Click on “Add files” to add one or batch of files or drag your selected file to the software.
Step 4: Click the drop down list of “Output Format” and select “AVI”.
Step 5: Finally set the output path and click on the “Convert All” button to turn the MP4 file(s) added to the AVI format.
Pros
• Multiple practical and editing tools
• Supports 4K video conversion
• Practical video editing functions, incl. video compression, video merging/splitting, video optimizing
Cons
• It takes a little bit time in converting
2 Convert MP4 to AVI using VLC
The VLC media player is the famous and rich media player available. The main reason behind this popularity is that it plays most multimedia files and DVDs, VCD, and several other streaming protocols.
Additionally, this media player can stream other famous websites like Disney+, Netflix and also accepts live video from Facebook, Twitter, and YouTube.
With a simple and easy-to-use interface, this platform gives you to customize your control panel to give your program a personal touch.
VLC media player works excellent with video and audio files. Using this, you can easily convert your videos because it’s free without any limitations.
Step 1: Click here to begin downloading VLC media player on your PC.
Step 2: Open and navigate to Media option.
Step 3: Under media option, click on Convert/Save.
Step 4: Click on add button and NAVIgate your MP4 file you wish to convert.
Step 5: Navigate down and click on convert/save button.
Step 6: Select the edited profile and click on AVI format.
Step 7: Click on Save.
Step 8: Under destination, name your file and click Save.
Step 9: Lastly, click on Start to convert your MP4 to AVI file.
Pros
• It plays most multimedia files
• Interactive interface gives you a personal touch
• Works excellent with audio and video files
Cons
• To play files, you have to directly open from their folders
3 Convert MP4 to AVI with PDF2everything
PDF2everything is an excellent online video converter with several features you are looking for inside a video converter tool. From converting PDF to multiple formats and editing files to convert your audio and video, PDF2everything is the right choice for your conversion.
The best thing about this tool is that it has multiple sets of features to help you with every type of conversion you need for your work. All you have to do is select the format, upload the file and click on conversion; that’s it, you’re ready to go.
Here’s how you can convert AVI file to MOV with this online video converter:
Step 1: Open this online MP4 to AVI converter in your Chrome/Firefox/Safari Browser.
Step 2: Drag or click on “select file” to upload your file.
Step 3: Click “Start”.
Step 4: It will automatically upload your converted file.
Step 5: Wait for the moment to download your converted AVI file.
Step 6: Lastly, your video file will be converted with this free online MP4 to AVI converter.
Note: Make sure to upload your file within 100 MB
Pros
• Multiple set of features
• Delivers fast conversion
• Simple and easy to use
Cons
• Low file size limit
4 Convert MP4 to AVI with Zamzar online converter
Zamzar is a dedicated online video converter that helps to transform all your videos, songs, images, and documents into different formats easily.
They support more than 1200+ file formats which you will not find in any other converter out there. When it comes to speed, Zamzar lets you convert your file within 10 minutes.
With an experience of 15+ years, Zamzar is successfully converting all the files and keeping millions of customers happy.
You don’t have to download this software, just pick your file, select a format, and you’re ready to go for conversion.
Here’s how you can do it:
Step 1: Open Zamzar by clicking here.
Step 2: Click on “Add Files” or drag and drop your file.
Step 3: Click on “Convert To” and select the “AVI” format.
Step 4: Click on “convert now” to convert your file.
Step 5: Agree the Zamzar terms and conditions.
Step 6: Wait for a while to convert your MP4 to AVI file.
Step 7: Lastly, your fill will be converted with MP4 to AVI Zamzar.
Note: Max file size should be 50 MB
Pros
• Easy to use

• Supports more than 1200+ file formats
• It offers free conversion up to 100 MB
Cons
• Users need to wait a bit long for conversion
5 FAQs On converting MP4 to AVI
Mp4 To Avi Free Online Converter
Question 1: What is the best free MP4 to AVI Converter?
ToolRocket Video Converter is the best and free MP4 to AVI converter because it lets you convert your video file easily within minutes. All you have to do is add your file, select the format, and click on the conversion button to convert MP4 to AVI file.
Question 2: Is AVI format better than MP4?
Both AVI and MP4 are known for their excellent formats. However, AVI is connected with DivX codec and MP4 is connected MPEG-4 AVC/H. 264 codec. Therefore, the AVI format is better than MP4.
Question 3: What is AVI format used for?
AVI stands for Audio Video Interleave created by Microsoft in 1992 is used for synchronized playback for several types of audio and video streams.
Question 4: How can I convert AVI to MP4 for free?
Best Mp4 Converter Free Download
You can convert your file with this ToolRocket Video converter. Just add your AVI file to the video converter and set MP4 as the output format. Then it can convert the file from AVI to MP4.
Best Free Mp4 Converter
6Conclusion
Mp4 To Avi Free Converter For Windows 10
These MP4 to AVI converters will save all of your time in conversion. The exciting thing about these converters is that they all are free and simple to use. You can use these converters anytime, anywhere and with their simple and easy-to-use interface, you’ll be able to convert MP4 to AVI video files easily without any trouble. If you try ToolRocket Video Converter, you don’t need to install any other free video editing software.
1 note
·
View note
Text
Best Iptv Player Mac

Best Iptv Player App
Best Iptv Player Android
Best Iptv Player For Mac
Download and Install Cloud Stream IPTV Player, a very robust IPTV Player for Apple IOS devices. Once installed open the app click the to add your M3u file. Click the + Button to add the M3u file. You will then be presented with a new screen, Click on Load M3u File and add the m3u link which was sent to you. The IPTV Smarters Pro app is the most downloaded and the best streaming IPTV player in the market today. This is a brilliant way to stream media content directly from your device without purchasing any software. IPTV Smarters is an app that is also available for Windows And Mac OS.
In this high-tech life, the trend of watching satellite and cable TV has become old fashioned, and people prefer to watch their favourite sports, TV series and movies on their desktops and handy devices. In the provision of live streaming of TV shows, movies and sports, IPTV plays a significant and yes, by connecting the internet and IPTV apps, you can stream all of your favourite stuff live on your iOS, Android, Mac and Windows devices.
However, if you are still not familiar with IPTV players, then we should try it as soon as possible. We would also suggest the IPTV users turn on any good VPN while streaming their favourite shows on IPTV to watch them without being noticed by the government and other authorities. It’s just safety because the use of IPTV players has legal concerns in many countries, but with the use of an excellent VPN service, you can stream them without any tension. In this article, we are going to share one of the most reliable and best IPTV players with our readers. Here we go:
BlueView TV — Best IPTV Player
Either you use desktop devices with Windows or Mac operating systems or prefer to watch with your smartphone or tablets with iOS and Android systems, BlueView TV is the perfect IPTV player for you. Yes, you can install this IPTV player on all of your devices with great ease. Its subscription charges are also very affordable for all users.
See major features of BlueView TV IPTV Player here:
It offers its users a buffering free experience to its users. No doubt, while streaming you will notice about 95% less buffering as compared to other IPTV players.
To check its channels and streaming quality, you can go with its 3 days free trial offer.
With unlimited channels, it only charges very reasonable subscription charges from its users.
It is applicable for iOS, Windows, Mac and Android.
See BlueView TV’s All IPTV Channels here.
VLC Media Player — Free IPTV Player
Mayhap, many of you already have this application on your Windows and Mac devices. However, if you don’t have this application, then you really do no need to worry because it is easy to install for all operating systems including Mac, iOS, Windows and Android. According to IPTV service providers, VLC Media Player is one of the most user-friendly IPTV players. You only need to do its settings with your IPTV service, and in this regard, several videos are available on YouTube, which would assist you. Keep in mind, it doesn’t offer channels itself. Probably, you would have to connect it with your IPTV provider.
See its core features here:
It is easy to set up this player for IPTV to streaming your favourite shows.
This is free, and the open-source platform is easy to play with several formats.
It has the ability to work with a variety of streaming protocols.
It doesn’t offer channels, and you need to connect with the IPTV service.
Perfect Player
With great ease of setup and installation, Perfect Player is another great IPTV player which is available for almost all operating systems including Linux, Windows, iOS and Android. Moreover, with unique features, it also allows its users to customize the picture quality like pixels etc.
See the main features of Perfect Player here:
Best Iptv Player App
Several codecs and protocols are available.
It supports both formats JTV and XMLTV.
Unluckily, it doesn’t contain channels, and you need to use it with an IPTV box.
Kodi
If you are willing to stream your NFL live matches and TV series in 4K HD quality, then Kodi should be your first preference. With add on features, Kodi streams numerous channels and movies on demand according to its subscription plan. However, we would suggest our readers to must cross-check the legal status of addons before turning them on.
Explore more features of Kodi IPTV Player here:
Available for Windows, Raspberry Pi, macOS, Android and Linux etc.
Great anti-freezing features while streaming channels.
Need to verify the addons legal status before subscribing to channels.
UKTVNow — IPTV Player for the UK
Though it streams near about 160 plus TV channels but UKTVNow could be a great choice if you are a resident of the UK or willing to watch UK channels. Similarly, the picture quality of this IPTV player is also very reliable, according to viewers. However, it would provide you with the best results if you are using 4K HD devices in this regard.
See major features of UKTVNow here:
Easy to stream with Android devices.
Good picture quality.
Need to connect with the IPTV box to stream live channels, and most of the channels are from the United Kingdom.
GSE Smart IPTV
If you are looking to stream your shows of different IPTV subscriptions via a single IPTV player, then GSE Smart IPTV should be your first preference. It offers great support to iOS and Android devices.
See its features here:
It offers support to both JSON and M3U formats.
Provides user-friendly interface and is easy to set up with IPTV box.
You need to connect it with IPTV subscribed channels, but it doesn’t offer channels.
Not available for Windows and macOS.
Smart IPTV
Best Iptv Player Android
Another great option to stream your IPTV box channels is Smart IPTV. Though it asks for one-time charges but it’s a great player to invest. It supports a number of devices including desktops, android TVs and small gadgets. However, it shows issues with the iOS platform, but according to application providers, they will resolve soon.
Explore more features of this IPTV player here:
Best Iptv Player For Mac
It provides multi-device support.
User-friendly interface with easy installation and setup quality.
It offers excellent support to Amazon TV, Firestick TV and Windows.
All in all, in this article, we tried our best to share one of the best IPTV players. Again, we would mention here the use of a VPN with the use of an IPTV player. Withal, if you think we should add more IPTV players here according to your experiences, then you are welcome to send your feedback to us. You can also share your views by commenting below!
1 note
·
View note