#ALSO CHECK THE SOURCE. take the first frame and image search to find an original photo. if the person is a celebrity @ them in the video
Explore tagged Tumblr posts
Visit Tumblr Blog
Explore Tumblr blogs with no restrictions, modern design and the best experience.
Last Seen Tumblr Blogs


Fun Fact
The total number of visits Tumblr.com received during January 2021 is 327 million.
Text
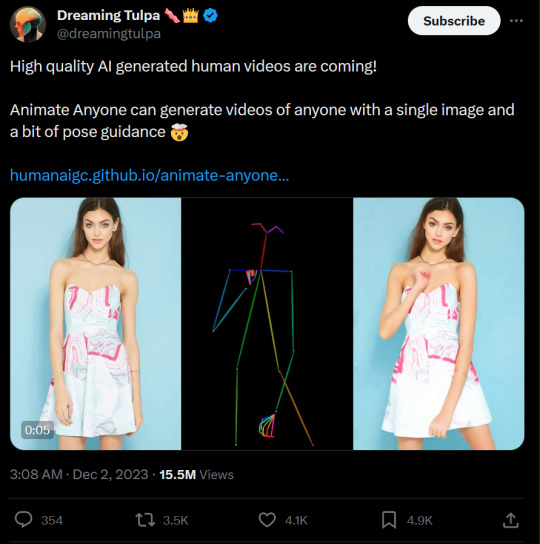
In my tags I explain what to look out for if you're unsure if a video is ai or not. It's just what I look for so it's not foolproof, but if you don't know where to start it's there.
With our political climate always ask yourself what the media is trying to portray. Who would benefit from it. Who would be disadvantaged by it.
This is giving me a headache.
this is the end folks
i know people will say its not perfect and etc etc but the point isn't how convincing it is now, its how fast it evolved to this point. imperfections will be ironed out and the internet the internet is a warzone
[X]
#what to look out for:#weight. they are very light on thier feet and move as if there isnt muscle and fat on their body effecting their movements#theyll probably do this for skinny people so keep a close eye when they are skinny#watch the hair too. flowy in certain places and stiff in others#clothes. think about the texture. if its silk why is it stiff like thick cotton? or if its baggy jeans why does it billow like a skirt?#also look at the patterns on clothes. does the model turn? is the pattern matching or even?#i should say watch the faces but we already have those ai's. those will be integrated soon enough#for now watch the faces and how it relates to the movements.#watch for random blur and graphical errors. specially around hands and where hair ends#also when they stomp and jump watch to see if the camera vibrates. watch for camera focus if they change positions. film grain in dark area#when they move quick look for motion blur#when they move from their starting point check the background for leftover shadow or inconsistencies#.......... is this analog horror. like. observation duty. oh my god new video game idea just dropped.#texxt#ALSO CHECK THE SOURCE. take the first frame and image search to find an original photo. if the person is a celebrity @ them in the video#ask yourself who is posting the video. ask them where they got the video. ask your friends if the video doesnt look right.#ask yourself. what is the video trying to portray? is it just a silly dance? is it propoganda? is it a false accusation? is it false proof?
43K notes
·
View notes
Text

COMPREHENSIVE GIFFING TUTORIAL (vapoursynth + ps cc 2018) + some tips and tricks on color correction, blending and subtitles
You guys asked for it, so here we are! This is by no means the gold standard to giffing. Rather, this is simply my process and my own preferences. Take it as you will. Additionally since I use a mac some of my controls/panels may look different than what you would see for windows users.
DOWNLOADING YOUR SOURCE
This step is extremely important to the quality of your gifset. If you want high-quality gifs I would recommend giffing sources in 1080p whenever possible (especially if you��re going for larger dimensions). You may get away with 720p for smaller gifs. For kdramas, your go-to source would be dr*maday or torrents. (you can search my faq tag if you’d like to know specifics on finding and downloading torrents).
IMPORTING + PROCESSING YOUR FILES WITH VAPOURSYNTH (VS)
Please note that this tutorial does not cover basic installation and set-up of vs. If you would like to know how to download and set-up vapoursynth (it works for both mac and pc) along with some of it’s basics you can find more information at: https://hackmd.io/@nibreon/vapoursynth-book/%2F%40nibreon%2Fvapoursynth-book
Once you’ve identified what portion of your video you’d like to gif, simply drag your video file into VS. Specify the start time and duration of the clip you’d like to import. Typically you’ll be aiming for ~3-8 second clip depending on how big your gifs will be. I am very lazy when it comes to importing. The less of it I have to do, the better. Therefore, I often import clips that are 10-15 seconds long, sometimes even up to 20 seconds. I wouldn’t recommend going over 15 seconds most of the time though, because this will usually bring you over the 500 frames photoshop allows you to import at once. (when I do go over, I will sometimes import the processed VS file into PS in segments). You can also choose to import the VS output as segments if you want all your gifs on separate canvases. (I'll go into more detail on this later)
Once you’ve imported the clip into VS your screen should roughly look like this once the resizer pops up:

In the top left is where you will be applying your cropping, sharpening and denoising filters. Cropping: Keep in mind the Tumblr dimensions: 540px for full-width gifs and 268px for half size gifs, 177/178/177px for 3 gifs across. The height is completely up to your own preference. Usually I work in 540x300px. Once you edit those parameters you can drag/resize your video file to fit your new canvas. Sharpening + Denoising: You can choose to skip this if you would rather sharpen in ps. I personally do all my cropping, denoising and sharpening in vs. I use finesharp and KNML for sharpening and denoising respectively. Once you select those two filters from their drop down menus, be sure the select the checkbox as well. You should now notice 2 additional lines of code in the top right box. The line that reads: video = core.knlm.KNLMeansCL(video, 0, 6, 4, 1.2, channels="YUV") is where you will adjust your denoising parameters. You will only be adjusting those 4 numbers. I usually use: 0, 1, 0, 1.2. Now find the line that reads: video = hnw.FineSharp(video, sstr=0.22). These are your sharpening parameters. once again we’re only adjusting the number at the end. I typically use somewhere between 0.33-0.55. Depending on the quality of your source and preferences these parameters may change.
Here is a breakdown of the KNML parameters (source: @/nibreon HackMD):
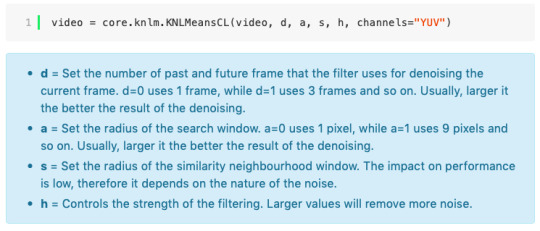
Once you have finalized your parameters, copy all the code in that top right box and paste it into your vapoursynth editor. Note: you can ‘inactivate’ certain lines of code by adding the # symbol at the start the line. That line of code will then be greyed-out. This is what your code should now look like (the highlighted section is the part I just copy and pasted):
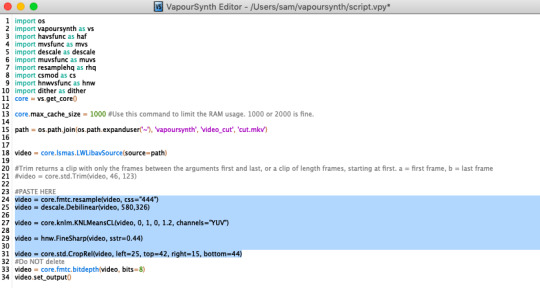
If you would like to preview your filters and see if you need to make any adjustments, simply navigate to the top bar and select script > preview. If you like what you see, great! If not, you can adjust the parameters directly in the editor until you see a result you’re happy with. Once you’re happy you can move onto the final step in vs: processing.
Processing: Once again, navigate to the top bar and select script > encode video. Another window should pop up. Make sure you set ‘header’ to ‘Y4M’ then click ‘start’. Patiently wait for that to finish processing. The longer your clip is and the more filters you add, the longer it will take.
IMPORTING YOUR CLIP INTO PHOTOSHOP (PS)
Now you’re done with the vapoursynth section! Not too hard, right? I use the timeline method when I gif. To import your video file into ps navigate to file > import > video frames to layers. Here you can use the sliders to further specify what range you would like to import. Make sure the ‘make frame animation’ box is checked. To optimize smoothness of your gif, avoid checking the ‘limit to every _ frames’ box. Hit ‘OK’ and wait for the frames to import. Depending on the size of your clip, ps may notify you that you are importing a large file and it may take a long time to process, simply say ‘ok’ to this. UNLESS you get a message saying it will limit to 500 frames. This means your clips contained more than 500 frames and you should select a smaller section to avoid cutting out any critical parts. (Note: you can always go back and repeat this process to select a smaller range of frames from the same video clip until you’ve imported all the frames you need).
Timing: You can adjust the timing of your gifs before converting to timeline. Select all the frames (Navigate to the icon with the 4 bars at the bottom right of you screen. Select “select all frames”). Click the drop down next to the timing of any of the frames. Select ‘other’ and input a your preferred timing. I personally use ‘0.04′ but I've seen people use anywhere from 0.4-0.8ms. Also as a note: when you convert your gif to timeline it has a tendency to mess up your timing so even if you input 0.04 or 0.05 it won’t actually be that timing later. If you want the true frame rate you can set your timing right before saving. You can also adjust timing at the end. (see export/saving gif section for more info)
Now the next part can be tedious and for that reason I’ve created numerous actions to speed up this process. But for the sake of this tutorial I will walk you through the steps. At the bottom of your screen is your timeline. As you can see, it defaults to frames, but we want to convert this into a smart object so that all your coloring/edits are made to all of the layers. To do this: 1) Navigate to the icon with the 4 bars at the bottom right of you screen. Select “select all frames” 2) Now select all your layers in your layer panel. On mac you can use cmd + option + A as a shortcut. 3) Back to the icon with the 4 bars, select “convert to video timeline” 4) Right click on all layers (which should still all be selected) and find “convert to smart object”
(Aside: Actions) actions are SUPER helpful to streamlining your giffing process. you can find actions people have made available on resource blogs like itsphotoshop OR you can choose to make your own custom actions. To do this, all you need to do is locate your action panel. Then from the controls at the bottom of the panel select the one that looks like a sheet of paper to “create a new action” Once you’ve named it and hit ‘ok’ the record icon should now be red. PS will now basically ‘record’ whatever you do. To stop recording hit the square icon. Now whenever you want ps to execute the same set of steps you just did, you can locate the action you just made and ‘play’ it by selecting the triangle icon. I highly recommend making an action for the steps I just outlined above to convert your gif into a smart object timeline. It will make your process much faster and more painless.
COLORING
Now the fun part! I focus on emphasizing the colors already present in the video source or getting rid of some less-than desirable overtones when I color. It gives the gif a natural look, but makes everything pop a little more. We will be working with selective color, curves, levels, and brightness/contrast mostly. This is the original gif I will be using to demonstrate coloring:
Curves: I always start with curves. The first curve layer I use to set a desirable black point. To do this, locate the top dropper icon from the curves panel and select the darkest point of your image. This will set that section to “true black” Feel free to play around with this until you find a desirable outcome. Now add another curves layer. This one we will be using to adjust the brightness/contrast. First, I always start off with ‘auto’ and see where that takes me. If you like the outcome, great! If you don’t play around with the different curve points until you get an outcome you like.

Selective Color: This adjustment layer will be your best friend. For me, I will typically work with reds, yellows, and black. If the source has a lot of blue/cyan I will use those too. Basically look at your source and determine which base colors you’d like to emphasize/alter. For blacks I usually up the black by +1-5 depending on the source. For reds, it also depends on the source. But I will typically either decrease cyan (to make red stand out more) or increase cyan (to make the red not look so overexposed). You want to be careful here. Overexposing the red can make your skin tones look like red tomatoes! And for my content base, where most of the actors are of asian descent, we should be emphasizing the yellows and NOT the reds (see aside on color correction + skin tones for more info). After altering the reds to my liking, I do the same process for the yellows. To bring back natural skin tones and color, you will likely want to darken the yellows, expose them a bit more and maybe even up the yellow slider. A common rule of thumb: if you want to make any of the colors less exposed, increase the cyan. If you want to increase exposure on any of the colors, decrease the cyan. If you want a color to appear more strongly or prominently, increase the black. The magentas and yellows I use more to adjust hues. You can add multiple selective color layers to further emphasize your changes.
Levels: Now we will work on the lighting some more. This creates more contrast and depth to your gif, often making them look ‘crisper’ To emphasize the bright parts, move the right-hand slider to the left. The emphasize the dark parts, move the left-hand slider to the right. You may also choose to move the middle slider to adjust more neutral lighting. Do so until you find a setting to your liking.
Miscellaneous: Depending on your gif you may need to play with other adjustment layers. Some other ones I often use are the brightness/contrast and exposure to adjust lighting and add more dimension to the gif. For additional color correction I use color balance and to a lesser extent hue/saturation and vibrance.
(Aside: Color correction + skin tones): We are anti-whitewashing and anti-redwashing when it comes to asian media. Like I mentioned earlier, natural asian skin tones have yellow undertones, not red/pink. Therefore when you’re bringing in color you should be mindful of this delicate balance. Adding more red does NOT equal un-whiteashing. Be VERY careful how you balance the yellows with selective color/hues/color balance.
^^ Here is an example of what I mean by overexposing the reds. Poor seungho is looking as sunburnt as a cherry tomato. Note: if your original source is already overexposed with red, fix it! You can do this by applying the same basic principles I explained earlier. Try upping the cyan on the reds in selective color, or shifting the color balance to favor cyan over red with the color balance adjustment layer. You may also choose to favor the yellow over blue.
^^ Now this is straight-up whitewashing. This is what happens when you are not careful with your correction of yellow. I’m not saying you can’t touch the yellow slider or get rid of some yellow form the overall image (because sometimes it is very much needed), but you should be very mindful how your corrections can affect skin tones. If you decide to decrease saturation of yellows, or decrease yellow in the selective color section of the reds, do so with caution. If your reds are looking too pink, add some yellow in the red selective color, up the yellow and black of the yellow selective color.
^^ If you hit that happy medium, you can emphasize the natural skin tones without overexposure. Here the underlying tones are very much still in the yellow range.
(Aside: Blending): I will very briefly talk about how to blend two gifs together. First make sure you’ve imported both your gifs into ps and converted them into the timeline format. On one of the gifs, right click the gif layer in the layer panel > duplicate layer > select the canvas of the gif you’d like to blend the gif with. On the canvas you just copied your second gif to, you can now drag the two layers around the on the canvas to get your desired positioning. On the top gif apply a layer mask. This can be found in your layers panel at the bottom, and is indicated by the white rectangle with the circle. Next, make sure you select the mask in the layer panel (it will show up as a white rectangle on the layer you applied the mask). Grab your paintbrush tool and make sure your color is set to black. Now you can effectively ‘erase’ the part of the top gif you don’t want to show anymore. I recommend setting your brush hardness to 0% to get a smoother transition. You can also play with the opacity settings. If you want to add back in a part you erased, just switch to a white paintbrush and you will be able to undo what you had just ‘erased’ with the black. When you merge the gifs, they will play the same number of frames. This means your blended gif length is limited by the gif with the fewer number of frames. You can move around your timeline layer and shorten the included portion by dragging either end of the timeline layer in until you get both gifs to play the parts you want.

CAPTIONS/SUBTITLES
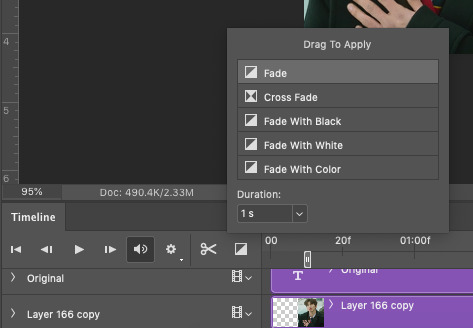
I often get asked about my subtitle font/styling settings. Personally I find the best fonts for subtitles are calibri and arial. I use calibri with the following settings: 12-14px, bold italic plus faux bold, 1px black stroke (optional: drop shadow set to ‘multiply’ at around 85% opacity), and tracking (VA) set to 75. If you would like your subtitles to fade-in or fade-out you can apply the ‘fade effect’. Locate the b/w square icon in your timeline panel. Select fade and drag it onto your text layer in your timeline. You can then right click on the wedge shape to adjust your fade duration. I usually use 0.35s. If you drag and drop the effect towards the beginning of your text you can get the fade-in effect. To get the fade-out, simply drag and drop your fade towards the end of your text layer.
SAVING/EXPORTING YOUR GIF
We’ve reached the final stretch! If you need to adjust your frame rate timing: you will need to revert your timeline to frames. To do this: 1) Navigate to the icon of 4 bars at the right of your timeline panel. Select convert frames > flatten frames into clips. 2) Navigate to the icon of 4 bars at the right of your timeline panel. Select convert frames > convert to frame animation > when promoted hit ’ok’. If at this point you see more than one frame in your timeline panel, delete the frames until only one is left. In the example below I would delete the first frame by hitting the trash icon from the timeline panel.

If there is only one frame, leave it as is. 3) Navigate to the icon of 4 bars at the right of your timeline panel. Select ‘make frames from layers’ You will most likely need to delete the first frame in your timeline panel (it won’t have your coloring). Sometimes ps adds in some ‘blank’ frames as well, delete those too. Now you can adjust your timing.
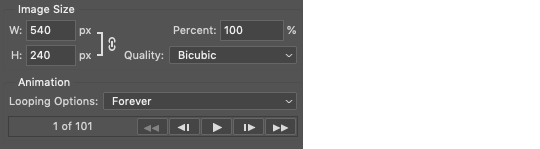
Once your timing is set: When you’re saving your gif, just keep in mind it must be under 10mb. Navigate to file > export > save for web. When it comes to your save settings I typically use either selective diffusion or adaptive diffusion. I also also occasionally use adaptive pattern (I find this is best for dark scenes without a lot of contrast). Set colors to 256, quality to bicubic and looping options to forever. If you want to preview your gif, hit the preview button in the bottom left. Otherwise, go ahead a hit ‘save’ and you’re DONE!

ADDITIONAL RESOURCES
Feel free to check out my ‘ps things’ tag for more photoshop stuff/mini tutorials. Additionally @/nibreon and the hackmd site I linked previously are your best resources for vs questions. If you would like to see my giffing process in motion feel free to check out this video. It’s sped up but you can slow down the playback. Additionally be sure to check out resource blogs like itsphotoshop for more helpful tutorials and resources.
If you reached the end of this beast, kudos to you! I hope this helps and never be afraid to reach out with any questions.
542 notes
·
View notes
Note
Hi ! I just wanted to say that I love your writing and I wanted to ask how you go about doing research for all your au's. Thanks!
Hi! Thank you so much, anon! And what a fun question! I could talk about researching all day, haha. My undergraduate degree is actually in history too, so research is something that’s sort of fundamental to my education in a lot of ways.
To talk about researching is kind of hard though, because while the steps are more or less the same, the approach is really different depending on what it is that I’m writing. For instance, the answer’s pretty different if I’m writing a modern day au where I can shorthand certain things because my readers know what I’m talking about vs an historical au where I really have to think pretty deeply about everything if I want to submerge a reader in a storyworld.
So I thought it might be fun to answer this question using my two biggest au’s as sorts of case studies! This is probably an extremely nerdy answer, I don’t know, haha, and it talks about both researching and incoporating research into the creative process while writing, so I hope that’s okay!
Generally speaking, all my writing starts with a question:
What’s the story that I want to tell?
This is always a process that tends to vary for me, but I rarely actively ask the question to myself prior to getting ready to write it? Usually it ends up as me sort of thinking over a concept then getting to a point where I know I’m going to write it, and it’s only when I really start to think seriously about that that I ask myself that question.
In both of these cases, it was pretty typical for me, haha:
And well, then we get to the next question.
What background do I need to know to be able to tell that story?
While this question might seem AU specific, it’s something that’s actually a step in everything I write. I was working on the second part of the Christmas fic today, which is technically canon divergent, but has made me think a lot about Beth and Rio’s canon cultural backgrounds.
I’ve always liked the headcanon that Beth and Annie are Jewish, but disconnected from their heritage (Marks is a traditionally Jewish surname, Annie’s used some yiddish slang before), and Rio’s obviously Latino, but of Mexican heritage if we apply Manny’s background, and wears rosary beads on the show which indicate that he’s Catholic. I wanted to embrace both of those things, so I’ve tried to thread them through the story where it’s appropriate to do so. For instance, there's a scene of a Las Posadas celebration at Sainte Anne de Detroit which required a LOT of research on my part and hopefully reads well!
The point is that those things felt important to me to include in a Christmas fic about Beth and Rio in the C&C ‘verse because the entire series is about their lives entwining and getting to know each other fully. I want to include detail that feels specific to what we know about them and embraces and (with any luck) deepens our connection to the characters in my fic.
What I’m getting to in a really roundabout way is that once I have a story idea, I start to think about what I’m going to have to understand if I’m going to do the story justice.
In the case of the pornstar and pirate aus, this couldn’t look more different:
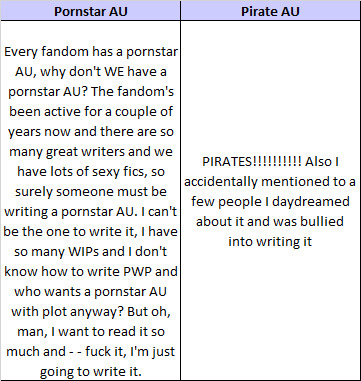
Annnnnd so on, haha.
As you can see, sometimes that background research is really clear and straight forward, as it was with the pornstar AU. I looked up how it worked, and because I knew that I wanted it to steer clear of the seedy and toxic parts of porn, I basically researched ideal environments and best practice, put those in place, and then focused on how to get Beth from her suburban home into a legitimate studio.
The pirate AU was extremely different and much more of a mutable process. Without a clear sense of the era from the get-go, I had a much wider scope to explore when and where the story could take place, and when I realised that dating the story would inevitable force me to contend with parts of history I might not want to (i.e. the lead up to The Civil War), it let me re-shape a world around an era, but not feel entirely beholden to it.
In that sense, the research process for both of them involved me choosing fantasy over reality – I negated certain realities to focus on the things I wanted to write (I highly doubt you will find a porn set anywhere near as ethical as Thank You Ma’am after all) – but if I can’t do that in fanfic, where can I? The aim still is for there to be enough that is real that you feel grounded in the story even if I’ve taken certain creative liberties for the sake of telling the story I want to tell.
That’s the beauty of research. Once you know enough about it, you can make informed choices about what you use to shape your storyworld, and make it feel authentic even as you’re fictionalising it.
The point of that though is that this background research is so fundamental to the DNA of the story itself, that it can’t even begin to exist without it.
Loose plotting
It’s usually around this point that I’ll put together a loose plot. This is generally pretty thin, but I’ll start to put pieces into a bit of an order.
The pornstar au is, again, a really easy example of this. Three parts felt right for it, the shooting of the porno itself was always going to be in the final part, which gave me two chapters to get Beth there. I knew she was going to submit herself through an amateur talent callout which I’d discovered in my background research, so the question of it was more around why would someone like her sign up? Canon plot points help – Beth needs money! Fantasy kicks in again, haha – because she and Dean are finally divorcing.
On the other hand, the pirate au is pretty much unrecognisable from it’s first loose plot.
In it, I’d pencilled in Beth travelling on a ship with Dean and the children, pirates boarding, and Rio kidnapping Beth as collateral to help him escape.
My loose plots change a lot and usually grow in detail, evolve and change shape as I start to ask myself why, and there are a lot of reasons why the pirate au changed so much, but I’ll get to that a bit later.
The point is, once I have a loose plot, I’ll usually throw some more words down, see what I’ve got, and then get to the part of the research process I like to call:
Question time
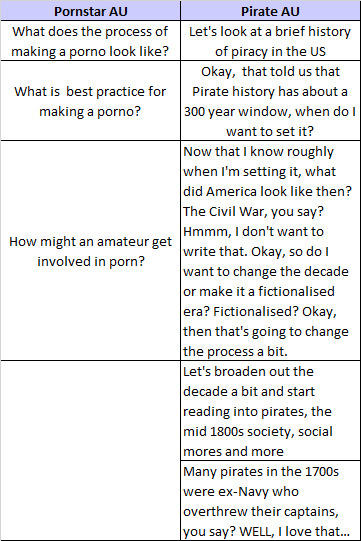
With background research done and a loose plot and some draft scenes written, I hit a much more specific part of the research process where I don’t need to know broadstroke background detail, I need to know the answers to really specific stuff. I usually write a list and try to do it all at once so that the writing process isn’t too much stop-start. I bullet point the answers in my creative doc then too, so the information is right there when I need it.
Again, the questions I asked of the pornstar au and pirate au were pretty different (although there were a few similarities, haha). Some of the questions I asked were:
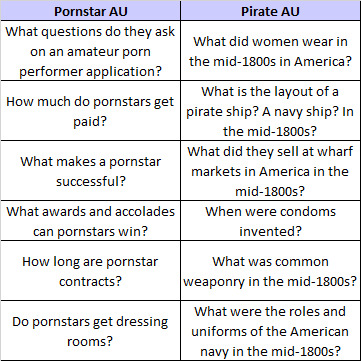
This is actually a case where the pirate au was, in a lot of ways, easier. History is well documented and fact checked after all, but current porn industry standards are, y’know. Not quite as transparent, haha. I’ve mentioned it before, but I actually started to fill out an amateur porn application (with a false identity of course, haha), so that I could see the full form and get a genuine sense of the questions they ask, which is hilarious, annnd brings us to sources.
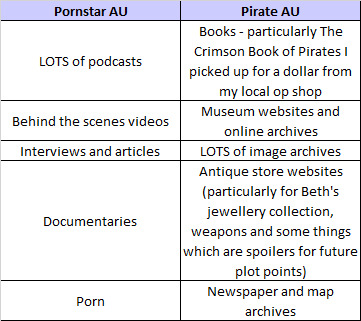
Sources
In researching, there are definitely things I’ll just Google, but I also like to utilise sources pretty widely. In particular, Google’s not really going to give you a great sense of what - say - the life of a pornstar’s like, but there are some great podcast series where performers talk about their lives in their own words. Similarly, Google searches are great for the cliffnotes of an answer, but don’t hold a candle to era-made drawings, letters and newspaper clippings.
For the two, I’d probably say my sources looked something like this:
How do the answers to these questions affect the story that I want to tell?
Annnd of course, the answers to these questions frequently end up re-shaping and re-framing my story, both directly and indirectly. Originally for instance, I wasn’t going to have condoms at all in the pirate au, because I naively assumed they wouldn’t be invented yet in a loose 1800s-set fic, only to discover that some version of a condom has been around since Ancient Rome (it was made using the bladders of animals! Gross!).
Other times it’s indirect. The idea for instance in the pirate au to have Beth realise the houses that the men had robbed through certain items they were wearing came really from looking a lot at antique store sites and image archives and seeing how much was custom made for families and individuals. That in turn made me think how for someone who’s ability to think on her feet and observe are her strengths, that could really come into play as a plot point.
Re-Plotting and Writing
It’s usually around this point that everything comes together and I start to really map out a fic in a firmer, more meaningful way, and also just throw myself into the writing of it. I generally feel like I’ve got the tools at this point in the process, and start to talk to the story in a bit more of an informed way.
It’s also really where I start asking myself why? and what does this mean for the next scenes? a lot.
Jumping back to the original pirate au plot, this was really where it pivoted as drastically as it did. There were too many tropes in that premise that I didn’t like. I didn’t like that Beth had no agency in the act that connected her to Rio, I didn’t like the trope of the MOC kidnapping a ‘helpless’ white woman, I didn’t like that Beth would be taken from her children by force and how that would impact any connection her and Rio formed and ensure that a major part of the story would have to be devoted to Beth trying to get back to them.
Immediately that made it a case where Beth had to choose to go with Rio, but why would she leave her family? And why would Rio let this upperclass lady onboard his ship? So she snuck on. So she had to, because Dean lost everything again. Okay, but would Beth just leave the kids with Dean after he’d done that? No way, not with the implications of the time, so who would she leave them with? Annie or Ruby - no, I want Ruby on the pirate adventure. Annie. But what on earth could put Annie in a secure enough position that Beth would willingly entrust her children to her?
Thus the subplot of Greg wanting to legitimise Ben was born! Which I doubly liked, because it kind of mirrors canon, haha.
In that case, the research really helped me flesh out a story world that let me explore character storylines in a way that I wouldn’t always do, which is insanely fun to me, haha, so I forever am left hoping it’s fun to read too.
But yes! In a nutshell, that’s my research process. :-)
19 notes
·
View notes
Text
Ranting Time!!!:
Marapets is EXTREMELY racist, misogynistic, fatphobic, ableist, is an insult to people living in poverty or have lived in poverty in the past, mocks anorexia, participates in cultural appropriation, and is way too inappropriate and misleading for children.
But what is Marapets exactly? Marapets is an online pet website for kids that allows you to take care of your own pets, play games, explore the world it takes place in, interact with NPCs or other players, dress up your characters in costumes or clothing, and take part in quests. It's also pretty well known at this point for being almost a blatant rip-off of an older pets website called Neopets.
Racism and Cultural Appropriation: Marapets has turned people's cultures into simplified costumes for your pet to wear, and most of these costumes use colors that represent actual skin colors or colors that are normally used to mock poc (People of color).
Examples:
The Native Costume: Your pet's fur color becomes red with little white stripes and the usual idea of what Native Americans traditionally wear.
The Chinese Costume: Pet fur color turns yellow with the stereotypical idea of what Chinese People wear. This changed later on, when the fur color just turned red and white instead, but it still has the same old outfit.
The Pilgrim Costume: Pet fur color is now a more peachy, white skin color, with the usual Pilgrim Outfit.
The Sports Costume: All the other pets' fur colors are still a more peachy or greenish color, except for one pet, who wears the basketball costume and now has a brown fur color. Looks like the stereotypes continue.
The Voodoo Costume: Just Google it yourself, and you'll probably understand why this is cultural appropriation.
The (Other) Native Costume: Yet again, just Google this.
Of course, there are even more racist costumes like the ones mentioned above, and many of these costumes are in fact retired, but this should still be taken into account. If you want to see more examples of this, then I would suggest that you check out the Marapets Wiki and Izzy's video about Marapets, where she goes into even more detail about this depraved shit, along with how the artists are treated and the creator's reaction to any kind of criticism. The reasoning for why many of these costumes are retired (Judging by the Marapets Wiki yet again), is because of the lack of popularity or because of the fact that they just aren't appealing anymore? So basically, it's just a bunch of excuses for this, instead of taking accountability and explaining why this shit is very racist and disrespectful to the actual people out there who have these kinds of cultures.
Ableism, Fatphobia, and the treatment of anorexia:
The Mental Costume is an example of the ableism in this game. The way physchopathy and mental illness is treated is very disturbing. They present people with mental illness as the kind who need to be in an insane asylum, with a lack of freedom while being treated like they're starving savages who don't have any sense of control and need to be kept away from society completely. Their reasoning as to how these pets have mental illness is also pure bullshit and misrepresents people with mental illness. I'm sure that theirs even more signs of ableism in this game, but I would suggest that you try and find this for yourself if you truly want to.
Fatphobia: Characters who are obese are treated like lazy, cheating, drunken, dirty, or extremely hungry pigs. Many of these traits are normally combined into one character, and they also misrepresent obesity. These characters are constantly being portrayed as bad people or as the kind who just make excuses for themselves when it comes to their weight. And no, I'm not trying to deny the fact that these kinds of people do in fact exist in the world, but the way this game handles subjects like these, is very inappropriate. Not all people with larger body types are unhealthy in that regard, not all overweight people are overweight because of their own habits or actions, and not all of the people who are unhealthy because of their weight who participated in bad eating habits and used to exercise every once in a blue moon, make excuses for themselves. We need better representation of people who are overweight or just have larger body types, without constantly excusing their issues as completely normal, either. (I encourage that you all take a look at the "Obese Fairy's" bio as well, but as a fair warning: It's probably going to make you pretty uncomfortable.)
Anorexia: Remember how I was just talking about ableism not too long ago. Well guess what? This is also extremely disgusting and disgraceful to people with issues like mental illness. Except this time, it's anorexia! (I'm not entirely sure if Anorexia is a mental illness or a disorder though, so please take some the stuff I say here with a grain of salt, but I would still argue that this is somewhat like the kind of ableism I was just talking about.) Anyways, yes the Skinny Costume was a thing, and it honestly seems a lot more like Anorexia tbh. And the fact that it's just used as a costume doesn't really help Marapets's case either. (This part is also going to lead me into a couple other points that I have against this game as well, so just keep that in mind.)
The treatment of people living in poverty: The misrepresentation is also a serious problem in this aspect as well. The Hobo Costume of course frames homeless people as dirty hobos, along with one of the NPCs in this game. The Homeless Fairy is a character that doesn't have an actual place of his own, because of some sort of serious issue that occurred, and he only appears to want fame. The Trash Fairy is a character who was an alcoholic and had a gambling addiction, causing her to lose her job and become homeless. She was portrayed as a cheater, overweight, and dirty. This character was later on revamped into the Lazy Fairy, who is still portrayed as a dirty, obese, lazy, homeless, and a cheater as well.
The Inappropriate Content and other Misleading Shit: First of all, the fact that children playing this game have probably seen the Skinny Costume and now feel bad about their bodies, even if they are completely healthy, is pretty gross. Even though the characters with the costume on look pretty sad, the name is still pretty iffy, and the fact that society normally expects for people to be skinny in order to be healthy, doesn't make the situation any better. There's also the issues surrounding plastic surgery originally being in this game, presenting toxic beauty standards, along with some of the more provocative clothing and the misrepresentation that I've already gone over. Some of this information came from a site that I don't exactly remember the name of, but when I do, I'll be leaving it in the Sources section. Then there's also the Guillotine Fairy, the Headless Pet Costume, and the other overly bloody and violent shit that could probably be found in this game.
Conclusion: This game is extremely toxic and not appropriate for its target demographic. And I've barely even scratched the surface of this situation. I really hope that you will all do your own search when it comes to finding some of the information that I haven't presented in this post. If you have any questions for me about the things that I've just discussed, don't be afraid to ask! And thank you all for taking the time to read this, and I hope that you have a good day.
Sources: Izzy's video about Marapets, that one website that I forgot the name of, the Marapets Wiki, and Google Images.
8 notes
·
View notes
Text
graphics guide
a guide filled with basic info, tips, and answers to common questions that i hope helps people who want to start making graphics
*this was made based on my experiences of making graphics and is what i thought was important to cover but everyone has different ways and approaches so dont feel the need to follow everything on here
what is a graphic?
a graphic (also known as ‘gfx’) is a image edit that incorporates various elements (textures, filters, text, etc) in order to visualize a idea or to create a aesthetic composition
unlike making gifs, there is no right or proper way to make a graphic so dont get too caught up in the idea that a graphic should look a certain way - just stick with your style and what you think looks good
anatomy
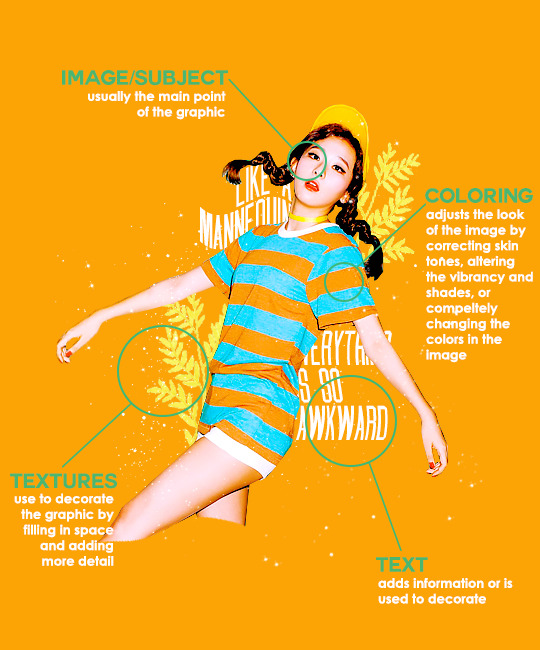
image/subject
usually the main focus of the whole graphic
you should always try to use a sharp hd picture - getting it from the original source is always the best option
make sure the source of the picture allows editing - pictures from public sources like a company or the news can be edited while fansite pics and scans need to have permission asked (and if they give you permission make sure you link them when you post your graphic!)
coloring
often referred as ‘psd’ because that is the format they are in (i.e. pink psd pack)
comprise of multiple layers that can alter the images look
a lot of people make their own colorings since the outcome of the look also depends on the image’s original coloring
textures
smaller cut out images that are often used to decorate the graphic
can also refer to a image that can be use as a background of a graphic
can be found in the form of a png (copy + paste into graphic) or a brush (”painted” on to the graphic)
avoid using any textures that does not state the original poster made them - you could unintentionally be using someone’s work that was not made to be used [read more about it here + resources that you can actually use]
text
text can be used to tell information or just for decoration
try to choose fonts and colors that are legible
faq
what software can i use to make graphics
most people use some version of photoshop (i currently use photoshop cc 2018) and a lot people have it cracked but if you cant afford photoshop, find a cracked version or a patcher (i used adobe zii 3.0.4 for mac), or are uncomfortable with getting a cracked version then there are other softwares that are just as good!
i can only vouch for gimp since i used it when i first started making gfxs. it is very similar to photoshop and shares most of the same tools and has a similar look to photoshop. it is also probably the most popular photoshop alternative and would totally recommend it if you cant get photoshop!
[visit + download gimp here]
where do you get your pictures from
official sources such as teasers companies release, photos released by press, photos from idol’s instagram - basically photos that are made for the public to see are whats best to use for a gfx. you should download the photos straight from the source so you get it at its highest quality
some phrases you can use to search for pictures on google: - [group name] photoshoot - [idol name] press - [group name] showcase - [idol name] teaser
remember the more specific you are in your search the better! also when you search through google make sure you check your source!
avoid getting photos from reposting websites like we heart it and pinterest avoid using fansite pictures and scans unless you are granted permission
i don’t know where to start/i’m overwhelmed and i don’t know what to do/ where should i begin
figure out what you want to make or a theme you want to follow - do you want to make a simple graphic or a infographic? do you want it to center around a certain theme like a comeback or a photoshoot? once you determine what you want to do it becomes easier getting ideas and finding stuff you will need for the gfx
example thought process: “i want to make a loona graphic” → do you want it to be the whole group or a certain member or unit? will it just be a simple gfx or a AU gfx or based on a event that the group is doing? “i’ve decided on doing a kim lip one” → do you want it to have a certain theme like kim lip smiling or kim lip with blonde hair? is there a certain frame of time in which you want the graphic to represent like during eclipse era or hi high era? “i want it to be from max and match era with her teasers” → from here you can start finding pictures to use and thinking of colors and textures that would fit your theme
where do you get ideas/inspiration from
i mean it’s different for everyone but for me i literally just think of stuff and i’m like wow i want to make that happen asdfsdfj but mostly when i see pictures or watch something thats where i suddenly get a idea
but tumblr is full of graphic makers!!! ive seen so many amazing graphics from various fandoms like kpop, anime, marvel, etc.
some amazing graphic editors i know myself include: primirene, ireone, nctjaemin, celo-mar, 1hyungseo, jeongahn, haechxnie, sonxiumin, syua, lulumelody, dinomite, lovelyeo, joohys, whatchatalkabout, yveu, maerinah, mihyon, lorbits, cherryjennie, thatporcelain, monoka, ifbin, 7ww
some other places you can look at are behance (dont go on behance if you have a cracked ver of ps - it might trigger a ingenue software alert that is a huge pain to deal with), pinterest, deviantart, dribble, and probably any social media platform if you just look up #graphicdesign
remember if you take inspiration from someone’s work then you should cite them in your caption - if you are afraid that you might’ve accidentally copied someone when you were trying to take inspiration from them its best to either try to remake the gfx again or just to ask the creator permission if its fine if certain details are similar/same
my stuff sucks how do i get better
literally just keep on making stuff aka practice. you can’t improve if you don’t bother putting effort.
ways i’ve forced myself into practicing making gfxs is by: 1) starting a gfxs series - its self paced and is based on what you want to make (i.e. introducing my biases gfx series, my favorite outfits gfx series, etc) 2) taking in requests - people who would request from you probably like your stuff so its a win win situation (i.e. send me a idol + era, send me your bias + palette, send me a group and i’ll make a gfx of my fav member, etc)
tips
only sharpen your pictures after you are done resizing them, if you sharpen and then resize it might result in a more blurry or grainy picture
always save your graphic every 5-10 mins in case photoshop crashes
have two copies of your image cutout: one will be the original and the other one will be the one you edit with - in case you mess up like over erasing or over sharpening your image you have a back up you can use
stick with a color palette so you don’t get overwhelmed when having to color everything and it makes all the graphic panels you have look more cohesive
on photoshop you can favorite fonts!!! take advantage of it!!! your computer has a lot of fonts saved on it and it takes forever to look through a whole list of fonts so by favoring fonts you can see all of the fonts that you like to use for graphics
combine a png pack to one psd → when you open a png pack you will probably get a lot of png files and it gets annoying having a lot of tabs open in photoshop when most of them are just textures so by putting all of those pngs into one psd you can cut down the files you open and can easily see all of your options
make folders dedicated to colorings and textures that way you can easily access them instead of looking through your computer for a certain file
name your layers... i dont do it because its easy for me to tell what layer is what but when you are working with a lot of layers its best just to name them it’ll make life easier
lock your main image/subject so that when you play with texts’ and textures’ location you don’t accidentally move your main image
use curves to help get a photo back to its original coloring! like if you have a photo that has a weird filter on it just use curves and it’ll help the picture look more natural! [tutorial]
try warping your text to make it stand out more! you can access it by pressing the icon on the top text bar that has a T with a curved line under it. i use flag and wave the most
alter a particular color by using a selective color layer
rather than changing the actual color of an image/texture you can: create new layer → select the image/texture and color it on the new layer instead of on top of the image/texture → change the opacity or the mode of the layer so that the color is put on the image/texture while keeping its detailing and not affecting the actual image/texture
resources
colorings: can be found on deviantart or tumblr just look up ‘psd coloring’ or ‘[color] psd’
textures: can be found on deviantart (check to see if its og content or stolen) simply just search what you are trying to find or ‘png pack’ or ‘texture pack’ common textures you can try to find: vintage flowers, memphis shapes, organic shapes, doodles other wesbites: pngtree, creative market, lost and taken, spoongraphics
fonts: if you are looking for a certain font then you can just do a google search but if you are browsing then dafont and font squirrel are really good websites too some of my favorite fonts: abril fatface, agfatumc, antonellie calligraphy, arcadeclassic, bebas neue, century gothic, couture, daily news 1915, dark larch, hondurhas, kotori rose, krinkles, risingstar, sant joan despi, studly, zing rust
color palettes: i made one myself which you can find here, color hunt, and honestly a quick google search will give you tons of options
if you have any questions, other stuff you want me to cover, or want to add more resources and tips then please dm or send an ask! i hope this helps!
#i really hope this helps someone and that it makes sense#i literally woudlve been so happy if i saw this when i first started it took me so long to figure things out and im still learning#also i basically told where i got everything so like please dont take advantage of this and end up copying my gfxs... its happened to me a#lot#idk what to properly tag this alfkjasd#ps help
129 notes
·
View notes
Text
Custom Stretched Canvases: How to pick the ideal custom stretched canvas?
Oil paintings, and that can be original pieces of art, possess a number of advantages over mass produced framed and matted prints. While limited edition prints, autographed and numbered by the artist, therefore are valuable and collectible prints that is seen in virtually any dwelling goods or decoration keep are produced and have no value beyond that of the framework along with mat. About the flip side, stretch canvas paintings hold their value and quality over the years; they are versatile, dramatically fashionable and remarkably affordable.Prints can yellow and deteriorate with age, however acrylic paintings are highly durable and can hold their shade and quality when properly kept and retained out of direct sunlight or strong artificial light. Oil paintings that are kept and exhibited in a low-humidity environment and at a temperature, that will be average to the majority of residential and commercial preferences, will endure for generations. Canvas oil paintings are original artwork which can be handed down from 1 generation to the next.Oil paintings have a very depth and dimension that can't be seen in mass produced prints. They have feel and layers of nuance which create sure they are individualistic because each canvas is painted by hand. Whether the artist chooses to paint conventional renderings these as portraits and landscapes or summary contemporary canvases, an acrylic painting can bring unique artistic and style intensity to some space. The most nature of an oil painting which makes it a more timeless and also wellchosen center thing which may enhance any cosmetic style.Paintings and prints are traditionally framed and framed, with the frame enhancing and replicate the style of the painting. Frameless stretch canvas paintings present a remarkable and new approach for showing pieces of art, whether the painting's subject is contemporary or traditional. The sides of the stretch canvas painting are all painted to match the background of their painting, and they also got. The frame-less demonstration brings dimension and depth with a presence, with no frame buffering the painting's visible impact. Stretch framed canvas paintings three or four panels offer you alternatives for display and arrangement that will accentuate surfaces or generate a unique focus. The panels might be employed or enmasse to decor. Frameless canvas acrylic paintings are frequently less expensive than framed prints, even at which all of the markup enters the frame , and they are undoubtedly less expensive than styled first works of art. You'll locate frame less canvas oil paintings in every selling prices out of online and retail origins as well as in demonstrations that'll add a radically one of a kind invoice into some area, whether cosmetic influences prefer traditional or contemporary sources.They state a picture paints a thousand words? We consent, and when your talking modern wall graphics for the house you cant go far wrong than considering a canvas artwork. Additionally, there is an abundance of canvas art on the web galleries small and big out there - all of them offering various solutions at various rates. The following informative post is targeted toward providing a balanced view of what is hot and what isn't at the wonderful world of canvases. We expect these somewhat abstract phrases of knowledge will help you in your search to pick out a excellent canvas impress to get yourself.A picture printing, also called a extended canvas or canvas artwork, may be that the result of a graphic printed onto a canvas that's elongated, or gallery wrapped onto a frame as well as shown. Many sellers offer canvas art. Stretched canvas takes the headache from the process for your buyer. The canvas will likely be'wall prepared' outside of this shipping vessel. But frequently you are able to save yourself a little bit of dollars buy requesting the own canvas printing to become shipped unframed, your printing will probably arrive in a tube and then you will should hand build a framework before hanging out. I would recommend investing in a modest extra of your hard-won cash for getting your canvas printing framed. This way your leaving it for the pros to get what they do best.Historically reproductions of unique artwork have been printed onto canvas for many decades together with what's commonly referred as offset printing in the commerce. In the past few years that the industry has recently now exploded with all the growing popularity of printers and electronic photographic apparatus. Significant format printers may publish to large sizes as much as sixty inches in diameter. This size and scale of picture printing has meant that an almost endless scope for design and decoration of both photographic images and artwork. Nowadays, Head into some contemporary restaurant and also you may nearly guarantee that you may discover an immense macro focused image of this chef's latest culinary delight. The increase of the internet in the digital age has had huge effects for those professional services which canvas art shops can offer to their buyers. Online 2.0 has meant creation of user generated applications programs that permit everyone to load up photos, do essential effects to all those pictures and reproduce them as Photograph art prints. Many online canvas art vendors do nothing other than produce art created by consumers of their websites. Others have huge artwork catalogues that might be reproduced'on demand' for customers rather. We recommend when considering that company order your canvas artwork out of check their delivery programs. Some supply services within 48 hours others 2 weeks! Go for the 48 hour selection as a week can often run unto weeks since the task builds up within chaotic periods.The process of decorating a contemporary canvas print takes expertise and skill to attain a professional excellent finish. Be certain the print is tightly stretched over around the sides of the box stretcher framework whenever you obtain it. Good stretcher frames will probably likely be professionally, accurately cut with a sloping profile which minimises contact with the front face of the canvas, steering clear of the impression marks. With this incline you will find that over years in place of months the belief indicates eventually become so awful as to destroy the true canvas film. They should also be elastic, supplied with tensioning wedges in every inside corner that can be exploited in slightly allowing occasional re-tightening of the canvas. To choose the perceived risk out from the'purchasing canvas artwork' equation look for sellers offering no money back guarantees subsequent reception for a time period. Not only can you check out the caliber against that which we recommend within this report however, you may even'stay with' the picture wall artwork to get a few times to check it fits your wall décor and modern furnishings.So which sort of canvas art seller is most useful I hear you cry? We do not have a answer for this matter but we still now have a few ideas on things to watch out for. Many wall canvas sellers encounter from a printing background... wonderful you could think, what could go wrong? Well have a think, and take a have a look and examine it with additional canvas sellers. You will see a few similarities since they'll probably acquire images from stock photography sellers. As an item of'artwork' these picture prints will probably be worthless over the long term. Because there is no artist they deficiency just a little ethics because they'll be limited editions accepted by the artist! Look out for advice on musicians, limited edition numbers and thus forth, this is usually a great sign for the wellbeing of value for your own canvas wall artwork. Make sure your canvas artwork retailer has one foot in the printing industry and the other dipped into the art realm reef! As canvas continues to acquire popularity at the fine art and photographic digital printing industry, the multitude of brands and varieties will last and flood flooding industry in an attempt to make the most with this increasingly desirable consumable. Current market research indicates that inkjet canvas is now selling three times longer than inkjet paper, which traditionally, never become the circumstance. This swing in market trends implies that artwork consumers are impressed with the aesthetic allure and novelty of digitally printed custom canvas since it's a relatively new, yet logical moderate for fine art reproduction. As an entrepreneur running a print making business, picking an inkjet canvas that will probably soon likely function as the base for your reputation and long term success minus the collection of possibilities, can be a daunting or even impossible job. Regardless, it's the duty of the printmaker to comprehend and examine custom canvas to source the highest quality to ensure sustainable-revenue and also the integrity for their enterprise. Therefore the purpose of this report will be to provide printmakers together with the proper tools to evaluate inkjet canvas based upon general data and quantifiable attributes; in an attempt to produce higher-quality, more-archival, and more sellable fine art custom canvas prints.In order to properly assess inkjet canvas for the printmaking firm, a number of criteria must be assessed and considered. This criterion might be simplified to four principal classes: decorative appeal, endurance, production/business practicality, along with also brand institution. Analyzing multiple brand names and forms of inkjet canvas is the very best thing that you can perform for the small business enterprise, your customers, and the fine art industry as a total . That being said, the first thing that you'll want to do in order to begin is buy sample cloth out of several prominent inkjet canvas makers. Make this article are the checklist or guide to walk you although the major test process.This group was listed above most others since it's the single most essential aspect for assessing your chief,"residence" ink-jet canvas. The simple fact is that this is the fine art industry and if you are the artist, a gallery operator, a writer, or a printmaker, the ultimate worldwide aim is to promote artwork. Art is mainly sold like a result of its aesthetic appeal and also also the derivative of this image demonstration. To put it differently, the larger your own prints seem, the greater your artists will probably promote, which can naturally lead in printing business. If the artists that you publish for are certain which you're reproducing their work from the absolute most aesthetically appealing fashion and this is reflected in their printing earnings, you can make sure that they can continue to employ your services. On the flip side, if the artist decides to search round or happens to come in contact with an alternative printmaker who's obviously producing superior inkjet canvas prints, then the artist is going to undoubtedly likely be gone in a minute. The single means to be sure you are producing probably the most aesthetically appealing inkjet canvas prints, is to try out various ink-jet canvases for colour gamut, Dmax (optical density), resolution, feel, and burden reduction Why don't we attentively consider every one of these features individually.Color Gamut - In this competitive industry only offering great color reproduction isn't enough. You need to give the best shade reproduction. Even though precise color gamut dimension tools, like a Colorimeter or even spectrophotometer may and needs to be used when available, the nude eye is generally adequate to tell apart a more superior custom canvas canvas. Print a color target, that is composed of a few different color stains, on every single inkjet canvas which you're analyzing. Use these aims to evaluate every individual color to figure out which custom colour produces the best colour gamut. It is also recommended to print the exact very same, vibrant image on each custom canvas and also determine that produces one of the very vibrant colors. To find added details on this please view publisher site. Dmax can be a measure of utmost density of a image's shade but specifically its black density. Again, the most precise dimensions might be obtained with a densitometer, but also the nude eye will suffice if this equipment is not available for your requirements personally. When discussing paper and inks, D-Max is commonly defined as the blackest. Black density is in analyzing the quality of paper, ink, inkjet canvas, and also even printmakers potentially one of the most discernable feature. Thus attaining the blackest black possible are absolutely the absolute most critical factor for each fine art printmaker. Inside this industry, like colour gamut, presenting unions is not enough. You want to offer you the blackest blacks possible.Resolution - This identifies into the smallest discernable pixels or dots, commonly measured as dpi or dots per inch. In connection with fine art reproduction, it's a measurement of the"fineness" of depth in a published image. Resolution is really just a crucially important feature simply since devoid of"fineness" and detail, image quality is compromised. No matter how accurate your hues will be or your black can be if the image appears blurry in the place of tidy and sharp, you may have decreased as its perceived price will be negatively affected by it, your chances of marketing that printing. This will dissuade the artist out of obtaining true market value for his do the job, which will cause one to the printmaker to drop small business to a rival who uses a canvas with superior resolution. It should be said that custom made canvases with excess texture may compromise resolution and must really be averted. The extreme slopes and valleys at the canvas texture can bring about ink into"bleed", or run, which can blur second aspects of an printed image.Texture - The best feel of inkjet yarn is the one that is going to exude an all natural custom canvas appearance, with no compromising resolution or reducing the amount of viewable angels in that your art might be valued. The latter results from any type of glossy finish onto a highly textured custom canvas. The end result is that a"glowing" affect due to light reflecting off of those glistening peaks and valleys of this reflective inkjet canvas. Sparkling ink-jet canvas prints no longer take about the attributes of a first painting that causes art consumers to perceive them cheap reproductions. In an industry driven by quality and allure, cheap reproductions won't promote and will likely undoubtedly also be detrimental to your printmakers' reputation. All things considered, even should a inkjet canvas is an obvious leader in color gamut, D Max, and resolution, it could have excess feel that alone can compromise caliber. So, texture that is excess should be tested for by printmakers. This is sometimes done in 2 manners. First, print images with depth and search to get a deficiency of crispness and picture cleanliness . Work with a semi-glossy or glossy post-print protective coating and search for amazing when light reflects off the surface. It is crucial to keep in your mind that texture is a subjective characteristic . As a printmaker, it is recommended to advise your customers to make a texture conclusion based upon objective information which could improve the sale ability of the prints rather than attempt to deliver particular custom canvas textures to attract each and every artist's private preference.Longevity identifies how long a inkjet canvas print can continue until it starts to noticeably deteriorate. This is an absolutely critical element in deciding on which inkjet canvas to use for the business. In order to appropriately tag your self a"fine art printmaker", you need to produce fine artwork prints. By definition, fine art prints are all expected to keep up their structure for decades. Fine artwork prints that deteriorate in the short-term assert no significance and were fact, not fine art prints to begin with. So, longevity has to be taken under consideration in every printmaker business plan as attempting to sell prints will without a doubt subscribe to the passing of your future company in the fine art industry.
1 note
·
View note
Text
How to Avoid Misinformation About COVID-19
https://sciencespies.com/nature/how-to-avoid-misinformation-about-covid-19/
How to Avoid Misinformation About COVID-19
In mid-February, World Health Organization director-general Tedros Adhanom Ghebreyesus told an international security conference: “We’re not just fighting an epidemic. We’re fighting an infodemic.”
As COVID-19 cases have surged across the globe, so has misinformation. According to research by the Bruno Kessler Foundation in Italy, every day in March 2020 an average of 46,000 new posts on Twitter linked to inaccurate or misleading information about the crisis. The rapidly changing situation means that people are naturally grasping for information about the pandemic. So what’s the best way to separate the trustworthy from the fake? Smithsonian asked experts who study science communication and misinformation what readers should keep in mind while watching the news, reading an article or scanning Facebook.
Why COVID-19 Misinformation Spreads
If you’ve found yourself unsure whether a soundbite or headline you saw or shared was true, know that you’re not alone, says Dietram Scheufele, a professor at the University of Wisconsin-Madison who studies science and political communication. Uncertainty and anxiety about the pandemic, combined with the political overtones and partisanship that influence how we respond to new information, create an environment ripe for misinformation. Research on political misinformation suggests emotions like anxiety and anger impact how people process fake news, which itself often goes viral due to its ability to provoke emotion. On top of that, nearly half of Americans polled by the Pew Research Center agreed in 2017 that “[t]he public doesn’t really know enough about science to understand findings in the news.”
Another fact to remember: We are all more gullible than we might think. A 2016 Pew survey found that 23 percent of Americans reported sharing fake news at one point or another. When shown untrue or misleading articles about COVID-19, only 30 percent of people recognized the news to be false, according to research published in the Washington Post by New York University and Stanford researchers.
“When we see something, the first thing we want to do is believe it,” says Reyhaneh Maktoufi, who researches misinformation as a Rita Allen Foundation Civic Science Fellow at NOVA WGBH.
But it’s easy to fight misinformation, too: Simply taking a moment to pause and assess the accuracy of the information you’re spreading helps. People are less likely to share COVID-19 misinformation after being “nudged” to consider the accuracy of an unrelated headline, according to a study researchers at the MIT Sloan School of Management and the University of Regina in Canada just published on a preprint (not yet peer-reviewed) server.
Maktoufi advises a three-step process: Check the source, check the author and check the content. Read on for a step-by-step guide explaining the expert-recommended way to vet news, plus guidance for what to do if someone you know shares misinformation.
Table of Contents
How do you know whether a news source is trustworthy?
If the source isn’t one you’re familiar with, then Google it to make sure it is a legitimate news organization, says Emily K. Vraga, an associate professor in mass communication at the University of Minnesota who researches health misinformation on social media. The site “Media Bias/Fact Check” rates various news organizations on “factual reporting” as well as ideological skew. Major health organizations such as the Centers for Disease Control and Prevention (CDC) and World Health Organization (WHO) are among the most credible sources of information on the COVID-19 pandemic.
Once you’ve made sure that the news source is reliable, Scheufele and Maktoufi recommend checking out the author. Consider whether the writer is a coronavirus or pandemic expert or just a scientist in a related field. If the author is a journalist, check to see what their usual beat is. Is this a health reporter with experience covering scientific topics?
Another rule of thumb: “Don’t just rely on one source,” Scheufele says. Instead, practice what communication scholars call “lateral reading” and gather information from a variety of diverse news sources. If a certain conclusion appears repeatedly in different reliable sources, that should increase your confidence in it.
How do I make sure the information in a report is legitimate? What are red flags to watch out for?
Check when the story was published. “Especially for COVID-19 [news], the date matters so much,” Vraga says, because “a lot of the facts on the ground may have changed,” like case counts.
Try to determine where the information presented is coming from. Is it from a state epidemiologist, the CDC or another trusted organization? If there’s a link to the source, click on that link to double-check the data yourself. The “click the links” rule also applies to scrolling past headlines on social media: Read the article before you share.
“Take a deep breath and be skeptical,” Vraga says, especially when you see the following red flags: too-good-to-be-true headlines or news that plays strongly to emotional cues instead of taking a level-headed approach.
What should I know about how scientific research works? How can I tell strong research from weak research?
In a 2016 National Science Board survey, 77 percent of Americans said they didn’t understand or couldn’t define the concept of a ‘scientific study.’ “Science is always an iterative, ongoing, self-correcting process,” Vraga says. Treat any single study as a blurry data point that needs further research to back it up and put it in sharper detail. The scientific community calls this reproducibility, which a 2015 National Science Foundation report defines as the “ability of a researcher to duplicate the results of a prior study using the same materials and procedures.” If this process reveals a major error in the original team’s work, which happens rarely, the research will be retracted, which signals to the scientific community that the data is flawed or unreliable. Academic journals may withdraw retracted studies from publication, but news of that retraction may not necessarily make it into previous coverage of that research in a more mainstream news outlet.
Studies are typically put through a rigorous vetting process known as peer review during which scientists who were not involved will double check the team’s results before the study is published in a reputable scientific journal. The peer-review process can take up to weeks or months, but in these unprecedented times, researchers around the world have turned away from their usual work to run a full-court press on COVID-19, expediting the pace of science. In February, a Reuters report showed that of 153 studies published on COVID-19 at the time, 92 had not yet been peer reviewed and 3 had been retracted.
Likewise, news about drug and vaccine trials should be approached with caution, since clinical trials involve multiple, time-consuming rounds of testing to ensure treatments are both safe and effective for humans.
Because science is so specialized, it’s unrealistic to expect yourself to vet a scientific study all on your own, Scheufele says. Instead, he suggests asking these questions: “Is the study peer-reviewed? Is it in a reputable journal? Do the authors work at a top-tier university? And if the study is covered by news media, what do other independent experts think of the results?”
If a study runs contrary to current scientific consensus, that warrants extra skepticism, he adds. Vraga suggests checking a study’s sample size (how many people or datapoints were involved) to know whether a study might be too small to be generalizable to the larger population. Finally, Scheufele says, “If a study makes absolute claims without any acknowledgment of uncertainties or caveats, it’s probably too good to be true.”
There are a lot of “my friend who is a healthcare provider at X hospital says,” posts circulating on social media lately. Should I trust these?
“The plural of anecdote is not data,” Scheufele says. In other words: Be wary of treating one person or one healthcare worker’s experience as broadly generalizable.
What should I know when looking at a chart, image or infographic circulating on social media?
For an image or video—such as the widely circulated video falsely claiming a dolphin had been spotted in Venetian canals when the video was actually from the southern Italian island of Sardinia—try running the photo or a video frame through a reverse image search tool like Google Images.
Both Bang Wong, who leads the Broad Institute’s data visualization group Pattern, and Alberto Cuadra, Science magazine’s lead graphics editor, encourage readers to seek out context for charts or infographics. Look for an explanation of the graphic from a reputable source, read the axis labels carefully, see where the data depicted came from and pay attention to the units of measurement. For example, cases per capita, overall cases and growth rate are three different metrics to understand which areas have severe outbreaks, but recognize that test availability—how many possibly sick people are able to get tested and counted—might skew those numbers.
How do I judge whether an information source is twisting the facts to suit a political narrative?
“Look at the content and see: Who is it benefitting?” Maktoufi says. “Is it benefiting a specific group or partisan group or company?” You can also compare statements you’re unsure about with the coverage at specialized journalistic sources (like Stat News, which focuses on health coverage) and information from career civil servants at the CDC and FDA.
What should I do if someone in my social circle shares information I know is false?
Don’t be condescending or cruel. Your friend, acquaintance or family member is likely well intentioned and anxious about the disease, just like you. Gently correct them and link to an unimpeachably credible source, Maktoufi says.
That last step is critical. A few years ago, Vraga showed hundreds of college students participating in her study simulated Facebook and Twitter feeds containing a misinformed post about the Zika virus. When the made-up commenters linked to a source (Snopes or the CDC) in their corrections, it made the students less likely to agree with the falsehood when asked about it later, whereas unsourced corrections didn’t persuade them.
You might phrase a polite correction like this, Vraga suggests: “I understand that this is scary and we’re all looking for solutions, but the best evidence is…” Go on to state exactly what that best evidence shows in case whoever reads that comment doesn’t click through on your link. Avoid restating the myth—you don’t want bad information circulating any further.
If there’s already another correcting comment, Vraga says, then back up that person, ideally by commenting yourself and linking to a distinct source. Research suggests that if you’re close to someone, your correction has a higher chance 0f sticking.
What should I do if I accidentally share inaccurate information?
If you realize you’ve already shared misinformation, Vraga says you should self-correct, ideally by deleting the original, inaccurate statement and create a new post, email or text—whichever platform you originally shared it on—with the accurate information. Alternatively, you can prominently update your original post with the correction, although people may not see the updated version on their feeds. Plus, thank the friend who tipped you off to the error.
Expert-recommended reliable sources:
Misinformation/Myth-busting pages:
The WHO maintains a “Myth Busters” page debunking COVID-19 misinformation
Researchers from the Ryerson Social Media Lab in Canada are tracking COVID-19 misinformation and matching false claims with fact-checks. As of April 8th, their tracker has 1,714 entries classified as false, misleading, unproven or manipulated.
NewsGuard lists websites that have propagated COVID-19 misinformation
Media Bias/Fact Check
Wikipedia has a fairly thorough list of “fake news” websites
Find trusted fact-checkers on this list of news organizations that part of the International Fact-Checking Network
#Nature
2 notes
·
View notes
Text
July 2019 Pond LiveChat Recap
We had a great time chatting with @crispychrissy today! Thank you so much, Chrissy, for joining us!
This month, to make up for not having a chat in June, we chatted for two hours about some issues related to posting your works on Tumblr. Chrissy talked to us about making our own gifs, we discussed giving credit to gifmakers, how to make a Keep Reading cut, and much more!! A rundown of the chat, as well as general Pond news, is below the cut!
[Editor’s Note: For ease of understanding, the tags you put at the bottom of a post with a # will be called #hash-tags, while the tags you use to notify another Tumblr user that you’ve posted something will be called @mention-tags.]
Q: What programs do you use to make gifs? Are they free, or do you have to buy them?
Chrissy: Well, there is a free one I used back when I started called GifCam. It's easy to set up (it's just an exe) and there's a little learning curve, but it's easier than what I do now. I currently use a screen capture program that came with my $1500 graphics card along with Sony Vegas. If anyone wants GifCam, I can send it to them.
Q: And are you watching via Netflix or some other way?
C: Yes, I use Netflix. I have the first 6 seasons on DVD along with 12 and 13, so for bloopers and deleted scenes I have to use the DVD's. For current episodes, I have YouTube TV, and use the screen capture option with that. Tumblr has a 3MB limit on file size, so it’s really hard. The amount of frames you can fit in a sub-3MB gif depend on so many factors. Colors in the scene, movement, FPS (frames per second), and length. A low FPS gif looks pretty choppy, while a high FPS gif is smooth as butter.
Q: So that's why some gifs seem to go on forever, and others are quick things.
C: Yes. I can make a really long gif of something that's really really tiny, but if you want it to fit into the pixels of a Tumblr post, it limits how long they can be.
Q: And I guess that's also why some gifs I find from Google and try to put into a post won't animate right. If they're too big, I guess Tumblr stops them?
C: Yes. Tumblr just freezes the image instead of animating it. When you save it, check the file size.

C: So this is an example of the brightness and colors of a gif affecting the size. Since there's so much brightness and color, the more the gif has to render, meaning the bigger the size. This worked out to be only 35 frames, which is like... really small, but the gif itself came out to be 2.83 MB.
Q: Are websites that come up when I Google "gif maker" worth my time and effort?
C: Only if you don't mind a stupid watermark from the company.
Q: About giving credit to gifmakers....any thoughts?
C: Well, all my gifs have "cc" in the bottom right corner, that's how I give myself credit if they're used. Not everyone knows the "cc" gifs are mine, but I do. I offer my gif making services to anyone if they need a specific gif made for a story or otherwise, not limited to SPN. I've made porn gifs, ones from YouTube, and from other shows. If it exists, I can gif it. Tumblr's search feature is... well, it's not perfect, but it'll help give you a quick gif and give credit to the author. When someone uses a gif I've posted, it gives me a notification, which is awesome, but annoying if it gets reposted a crap ton. It also links the person back to the original post and who posted it.
Q: Some folks seem to think that if they grab a gif from Google, just saying they found it on Google is giving credit. I know this isn't the case. (I mistakenly thought that pasting the link to the image would allow folks to click through to where I found it, but discovered last night that's not the case.) If I found a gif on Google that was yours and used it, and provided a link to the page where Google found it, would that be enough, do you think?
C: Sometimes a reverse image search can be helpful, but it mostly doesn't work with gifs. That would be fine for me. Like I said, I have "cc" in the corner so that's me marking the gif as one of mine. I can't control where someone reposts them or uses them. There's a difference between reposting it to a site like Pinterest or using my gif on a LiveJournal post and saving it and reuploading it like it's yours and without giving me credit. One is malicious, the other isn't. I have a problem with the latter.
Q: I started looking at where Google finds gifs last night, and noticed that sites like gfycat have whole pages of gifs, and just citing that page might not be enough. (And trying to find where Google found them many times leads to a Tumblr blog that’s now gone.)
C: Google finds gifs all over the place. Someone can take my gif from Tumblr and reupload it to a bunch of different websites, all which would show up in a Google search. It's hard to find the original poster when it happens. Yeah, people delete their pages, but the gif stays. If you get to that point, just say, “Gif found on Google, unable to find original post"
Q: Speaking of finding gifs, how does the search function work on Tumblr? Is it just whatever the post was tagged with or the first 5 tags like regular searches or something else entirely?
After some discussion, we all decided that the gif search uses whatever #hash-tags are on a post where a gif is used, and then makes that gif searchable by that #hash-tag. So, if you make a post about chronic pain and use a gif of the Winchesters hugging, that gif will then show up in the gif search under #chronic pain. Also, popularity of the gif ensures it shows up at the top of the search. As people stop using a gif, it eventually falls out of the search results.
Q: Going back to file sizes...Do the dimensions of the source video (like watching Netflix/YouTube in full screen vs in a smaller window) impact the size of the gif, specifically with GifCam?
C: Now, that's a HUGE reason why I switched the way I make gifs. Netflix has a set streaming rate, which is only optimized at full screen. So the smaller you make the window to get it to fit into the size of the gif, the more degraded the image is. (Some confusion was expressed, so she continued to explain it further.) Netflix likes to run as big as possible. It wants as many pixels it can get to show you an image. If you minimize the window, it kind of freaks out and has to quickly scramble to make everything smaller so the video keeps playing. It does that by squishing everything down, making the image look weird. It might not be too noticeable when you look at it, but when you make gifs, they're gonna come out lookin all wonky.
Q: So, you have to make the Netflix window smaller in order to capture the images with the gif-making software? The gif-making software can't capture full screen?
C: GifCam will record the gif based on the window size. You gotta squish the window down to make it a reasonable size to fit on Tumblr. Other programs, which you might have to pay for, might be able to capture full screen and do the squishing for you. (Side note: during this discussion, Chrissy gave us some examples, and in showing them to us, revealed that a good gif size for Tumblr is around 410-430 wide, 230-250 high.)
After that, we moved on to other topics that had been brought up in the Pond survey a while back.
How to make a Keep Reading cut and when you should use it.
Note: Although this worked for one person on the app, it doesn’t seem to work for all, and we’re not sure why. There are too many variables to determine the root cause for why it doesn’t always work.
Q: "When should I give someone credit for being a beta (for example: I bounced ideas with someone for a minute or two but they didn’t technically beta read it; I can’t decide between X and Y (with no context), pick one)"
A: Always mention anyone who helped you. You don’t have to say they beta-read your story, but at least mention that they helped, even if they didn’t know it! Gratitude is always a good thing!! Writing takes a village, and being thankful for help is courteous, kind, caring, and helps you to make friends that will be the same right back to you.
How do I add my masterlist for my blog description?
Note: Chrissy pointed out that if you change your bio by hitting “edit appearance” instead of “edit theme” the link will break, so be careful where you add this! These things and more can be found in the Pond FAQ list!!
Q: The facts on search issues (re: links, tags, and anything else that keeps a fic from being “searchable”)
A: A lot of testing and research went into trying to figure this out, and we still probably don’t have it all figured out, but we learned some interesting things!
Most importantly, since we have a lot of smut writers, if you use the #hash-tag #NSFW on your post, your post will NOT show up in any searches!!
Adding an external link should not cause your post to be unsearchable, but that’s not guaranteed. According to Tumblr’s own help pages, “some links may cause posts to be hidden from recent search results.” Since spambots use external links in their posts, this will always be something that could possibly interfere with your post being searchable.
According to Tumblr: “Blogs that have been either self-flagged or flagged by us as “explicit” per our old policy (before December 17, 2018), will not show up in search. Users under 18 are still not allowed to click through to see the content of these blogs. If you think your blog has been erroneously marked as explicit, you can file an appeal by following these instructions.”
When you are searching for your post, make sure you are looking at Most Recent posts, not Most Popular!
Some things to know about searching:
There are two ways to search a blog. If you use the search box at the top, then your results will have a URL like this: https://spnfanficpond.tumblr.com/search/big-fish-chat
However, that is not the only way you can search your blog. If you look at a post, and click on one of the tags on that post, your results will have a URL like this: https://spnfanficpond.tumblr.com/tagged/big-fish-chat
The first search will look through all of the text in a post to find the words you’re searching for. The second search will only look for posts with that specific tag. If a blog doesn’t have a search box in its theme, you can type these searches in manually, and they will still work.
You can also do these searches manually through all of Tumblr. Keep this in mind when you’re doing your general Tumblr search and check the URL of your results, because... “search” & “tagged” look at #hash-tags differently!
(This is so confusing, we know.)
“Search” will look through 20 #hash-tags. “Tagged” will only look through 5 #hash-tags. So, put your most important #hash-tags in your first 5!!
Q: Can you talk about xkit?
A: xkit is awesome and we should all bow down to the xkit guy because he fixes things when Tumblr poops on the carpet. Seriously. It’s only for use on desktop, but it makes Tumblr so much easier to manage.
xkit is an extension for your browser. Look for New xkit, and download that. Once you have xkit loaded, click on the xkit icon near the top right of your screen. When the xkit window pops up, click on Get Extensions. We could suggest a list of the best extensions, but they’re all seriously awesome. Blacklist seems to be the most common, as it filters out posts you don’t want to see based on tags and text. Auto Tagger, Activity+, Outbox, One-Click Postage, and Quick Tags are all ridiculously useful for everyday blogging. The whole thing is super easy to learn and use, and you can’t break anything while you’re learning. Some extensions, like Blacklist, may slow your computer down when you’re surfing your dash because they essentially surf it ahead of you and manipulate it. If you start seeing problems, you can disable any extensions you decide you don’t want to use, anymore.
Seriously, it’s freaking awesome.
Great talk, guys! If you have ideas for topics, please let us know!!

General Pond Updates and Reminders
What we’ve got cooking up next:
We’re working on setting up the discord server. We’re still learning the ins and outs and all the options available. More options means more discussion among the admins and decisions to be made, so please be patient! We’re getting there!
Reminders:
Angel Fish Award nominations are accepted all month long! No need to wait to tell us how much you liked a fellow Fish’s work! IF YOU HAVE SENT IN A NOMINATION, BUT HAVE NOT RECEIVED A PRIVATE MESSAGE CONFIRMING WE RECEIVED IT, WE DIDN’T GET IT. Be sure to use Submit instead of Ask!
Don’t forget to submit your stories to be posted to the blog! When your stories are on the blog, then they are easier to nominate for Angel Fish Awards!
SPNFanFicPond Season 14 Weekly Episode Challenge - Now that the season is over, we will be reposting each prompt list through the summer months! Remember, there’s no deadline for submissions!
Say hi to June’s New Members!
Check the Pond CALENDAR to see when Big Fish will be in the chat room and other Pond and SPN events are happening! Know of something that’s not on the calendar, send us an ask or submission with the deets info details! The calendar offers a lot of features, such as showing you when things are in your own timezone! Since we’re an international group, that’s a definite plus!!
We don’t have a topic or speaker set up for August’s event, yet, so if there’s something you want to talk about, or someone you want to talk to, LET US KNOW!
9 notes
·
View notes
Text
a complete gif tutorial
hi! so i was requested by @popalice007 to make a tutorial on how to make gifs and i am very happy to oblige! this will cover pretty much everything, from capturing frames to saving the final product. this is just how i personally do it, and there are loads of other ways to gif, and i recommend looking at other gifmakers’ tutorials to get a more well rounded view on how to gif. please continue reading if you are interested, and please like/reblog if you find it useful!
disclaimer this is going to get really wordy as i try to explain where to find things and how to do them and my thought process behind why i do them, but please send me a message/ask if something needs clarified!
also some of the pictures can be viewed in full size by clicking on them!
part 1: required materials and other tips
just another heads up, i have a pc, and while i believe most of this should be the same whether you have a mac or a pc, i could be very wrong as i’m not a computer expert and have never really used anything besides windows.
so the two programs i use are kmplayer and adobe photoshop cs5 portable. kmplayer can be downloaded for free here. i have the 32 bit version for windows, so that is what i’m going to be providing the instructions for, since the 64 bit version seems to be a little different. photoshop is pretty expensive, but thepiratebay has several torrents for it, and other downloads and torrents for it do exist. i downloaded mine quite awhile ago so i don’t remember exactly where and how i did it so it might require some researching. i would just double check the comments and instructions to make sure the download will work. there are also dedicated photoshop tumblrs that will probably have links to downloads.
if you are giffing a scene from a tv show, movie, video, etc, you also need to have the video saved somewhere on your computer/flashdrive/whatever. hd-source is a good source for tv shows, and there are tons of other sources. i download a lot from thepiratebay using a program called utorrent (i just use the free version) but beware because since you are downloading copyrighted materials it isnt legal, and while i have never had a problem, i have heard of people getting warning letters from their internet providers. you can also download youtube videos and videos from other places and there are lots of other ways to get videos that i won’t cover.
no matter where you get your video, you want it to be pretty high quality, since the higher quality the video is, the clearer and nicer the gif will turn out to be. most of the time you want 720p if you can get it. 1080p is nice and if you can get your hands on it without the video size being enormous you can certainly utilize it, but it isn’t a necessity and usually i don’t bother. anything lower than 480p can get to looking pretty grainy especially if you are doing full size 540 px gifs, but if you are giffing something from a convention panel video taken by a phone, for example, you don’t really have an option.
additionally, if you are giffing dialogue, find a script online somewhere or find subtitles. you can transcribe it yourself if you want, but if a character is mumbling or has an accent or something i like to be sure of what they are saying.
and finally, have some patience! a lot of the popular gifmakers have been doing this for years and have streamlined their process so it doesn’t take hours, but as a beginner it takes time to get everything right,so it is totally normal if you get to feeling frustrated.
part 2: capturing the frames
first you will want to have an idea of what scene you would like to gif. before i get started i create a new folder where i want the captured frames to go, and i name it something memorable so i can find it again later. kmplayer does also automatically create a folder called capture that you can use if you want. if you are doing a gifset like this, i would have 8 different folders and gave each of those gifs/scenes their own folders.
however, the example i’m going to be using throughout this tutorial is going to be a dialogue scene, specifically this one here, just because they can get a little more complicated imo (plus i want to show how i use the text tool etc). if i’m giffing a scene where characters are talking, even if the scene is a long one with back and forth dialogue, i usually like to cap it all at once and put it in the same folder, and then i separate it out later in photoshop. you can also plan ahead and put all the different bits in different folders, thats up to you and your personal preference.
next i open up kmplayer. kmplayer likes to update pretty regularly and will let you know when you open it if it wants to update. it doesn’t usually hurt to ignore it if you are in a rush, but i usually let it do its thing and make sure i don’t also download whatever browser service, etc. it also wants to install. sometimes ads show up on the right side, you can close them by hitting the little arrow between the ads and the video screen
to open the video, click on “kmplayer” in the upper left hand corner and then click on “open files”. search for your video file and double click it to open it

kmplayer will then open the video, and if its 720p often i have to make the window smaller because it fill up the entire screen and i need to be able to see other windows besides the video. if i remember correctly when you first download kmplayer it isnt automatically set to keep the aspect ratio the same, so if you need to, hit the f2 key to open the preferences or click the lightning bolt on top next to kmplayer, and then click on preferences. under general and then screen on the sidebar, and then under general again i have my settings like so, and hopefully that resolves that issue if you have it. you might have to reopen the video again for that to kick in but i’m not positive. if it still doesn’t work try to google it. i’ve had the problem a couple times and the answer is out there but i’m no tech pro.

anyway, i then locate the beginning of the scene that i want to gif. you can click around on the bottom along the progress bar, as well as using alt+left or right to jump forward and back a minute, the left or right arrow key to jump 5 seconds, or the f key to go forward a single frame. every frame counts, and it is preferable to have too many frames and have to delete them later than to find out your gif will only be 10 frames long because you started capping in the middle of the scene, or because you stopped capping too early. i typically will watch the clip a few times so that i have a set idea of where i want to start and stop.
once you are paused at the beginning of the scene you want to gif, press ctrl+g to open kmplayer’s frame extraction window. click on the folder icon so that you can locate that empty folder you had made earlier. this is where kmplayer will save the screencaps. i then set my settings to png, continuously, original size, and every frame, like so

now we are ready to start capturing! click start on the frame extraction window, and then click back over to the video (this is why i make the video window smaller, so that i can see the video and the frame extraction window at the same time). once i’m back on the window, i hold down and/or tap the f key. kmplayer will capture the frames as you go along. the audio plays along with it albeit choppily which is why i watch the clip several times beforehand, because it can be hard to follow and is disorienting. you can also click the play and pause button, but, again, the audio tends to play at a different rate and it gets confusing, so for me frame by frame is the way to go. keep tapping f until you get to end of the scene/wherever you want to stop. i keep the folder where the caps go open usually so if i mess up or change my mind on where to start/end, i can delete the whole folder and create a new empty one to start over again. this process takes practice and is often dependent on what you are trying to gif and its not a big deal if you have to try it a couple times to get it right.
once you have reached the end of the scene, click back over to the frame extraction window and click stop. if you are giffing multiple scenes from the same video you can click the folder icon and select a different folder to save frames into and then repeat the process of finding the scene and capping it, or if you want to cap from a different video, you can open a new video and cap from there. then if you are satisfied and have all your caps, you are free to exit out of kmplayer.
part 3: making the gif
now it is time to actually make the gif! go ahead and open photoshop, and if it is your first time you can play around and familiarize yourself with where things are. basic gifs don’t require a lot of the tools that photoshop has, and you can customize some as to what windows and panels are open. below is what my workspace typically looks like so that i can get to certain things quicker, but i will explain as i go along where the controls normally are found in the toolbar. also, if you hover over a control photoshop will tell you what it is and what it does.


to open the frames, go to file, then scripts, then load multiple dicom files. then find your folder of caps, select it, and then click OK to open

be aware that depending on the number of frames in that file and the size of the images it sometimes can take awhile to fully load. once they are loaded, you should be able to see all those screencaps as layers on the right hand side of the screen. if not, go to the top where it says windows and click on layers. i frequently accidentally cap a couple extra frames where the scene shifts and i go ahead and delete those layers by highlighting them (use the shift or ctrl key to highlight several at a time) and then clicking on the trashcan at the bottom of the layers sidepanel.
next we are going to turn these layers into gif frames! i have combined this step into an action that i use to automatically do this for me to save time since i gif on a semi regular basis, but the steps are as follows.
first, make sure the animation bar is open. if it is not then go up to window and click animation, and then it should open at the bottom of the screen. you also have to be in frame animation mode. on the upper right hand corner of that panel is an icon with four lines and and an arrow. click on that and then click on convert to frame animation. then in the same menu click make frames from layers.

this can also sometimes take some time if there are a lot of caps but when its done loading there will be frames in the animation bar. in the animation menu click select all frames. then, underneath any of the frames, there will be an arrow beside where it says 0 sec. click it and change the frame delay. what you set it to can be up to personal preference. i typically set mine to 0.07 or 0.08 which seems a bit slow, but i find when i convert the gif to a smart object (we’ll get to that) that seems to speed it up a little so i’ve just stuck with it. feel free to change the delay if you find later that that is too slow for your taste. also in lower left corner of the animation bar is where you set how many times the gif loops. change it from once to forever. the controls to play the gif are also below the frames.

since i gif a scene like this all in one big long take, it is now time to separate it into separate gifs if need be. if you are making a gifset like this you can skip this part because you most likely capped frames from different scenes and gave them their own folders, so they shouldnt need separating.
sometimes you have to get creative on how you split apart the scene, and there arent really any hard and fast rules. here are some things i like to keep in mind:
the camera angles - this is the most important for me. if the camera goes from showing one character to another, or from one angle to another, i separate those into separate gifs pretty much no matter what.
the length of the gifs - this is dependent on the size you are going to crop to, how much movement the scene has, how much color, etc., but i typically try not to go over 80-100 frames in a 265px width gif. they can be trimmed down later, but if it takes 200 frames for the camera to switch to the other character, don’t make that one gif
the dialogue - if there is a natural break in the dialogue, that is a good place to end a gif. you don’t need 50 frames of no one speaking if you are doing a gifset with dialogue.
how many gifs you are making/size - at some point you have to decide how wide your gifs will be and how many of them. if your gifs will be 268 px wide (2 columns of gifs) then you have to have an even number of gifs, and you will need to separate to account for that
going along with the first tip, i’m going to separate the frames by camera changes. i do this first so that way when i crop the gifs, i get things centered how i like.
you can see here by looking at the thumbnails of the layers what i mean by the camera changing angles.
first, press ctrl+n to open a new blank image. if the preset doesn’t say dicom files, click on that menu and click dicom files, that way the new image will be the same size as the original. hit ok.
next, highlight the layers in the original that are going to be the new gif. hold shift while clicking the first and last layer that you want to be in the new gif to do that. click on them, hold, and drag them over to the new document. they will probably be off center and/or invisible. if the layers are invisible click an empty box next to one of the layers so that an eye appears and the layer shows up. then click the move tool and move the layers around til the fill the document correctly. be sure not to stretch/transform the layers by dragging on the edges and corners. as long as all the layers are still highlighted they should all move at once.

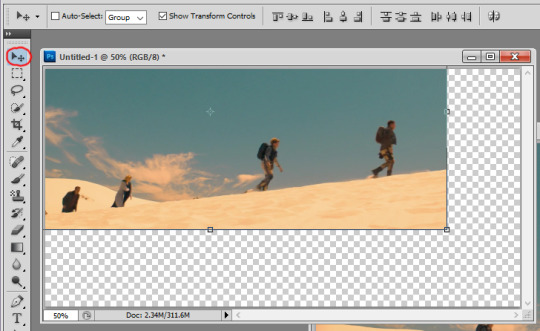
next, scroll to the bottom of the layers and delete the blank layer. then repeat the steps to make frames and set the time delay and there is your new gif!
the layers for that new gif are still in the original document, so go ahead and hit the trashcan to delete them, as well as the now blank frames. continue opening new documents and splitting up the scene until you have a new gif for every camera change. the last gif i leave in the original document. i ended up with 5 camera changes so 6 gifs to start with
at this point i crop each gif. tumblr has a guide for image sizes, and the width is the most important thing to follow there. the height is really up to you. if i’m only doing two or four gifs i tend to make them taller than if i do 8 or 10 gifs just because it looks better to me. i’m going to probably end up with 8 gifs because a couple bits are a little long, so i’m going to go with 268 px as the width and 175px as the height. again, the 268 part is the important part to get right since i’m doing two gifs across. to crop, find the crop tool on the left and set your dimensions at the top. make sure when you enter your dimensions, it is in pixels/px and not inches or centimeters.
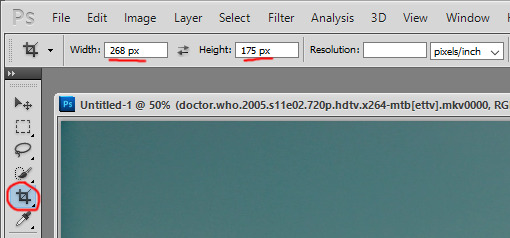
click, hold, and drag to stretch to create a shadow for what you cropping. i usually go as big as the edges of the image will allow, and then bring the corners in a tad, since occasionally i get a video that has a black outline and i don’t like to have that in the gif. either hit enter or the checkmark in the upper right corner of the toolbar to crop.

you might have to zoom at this point and resize your window. in the bottom left corner there is a percentage you can change, and now that the gif is cropped it will be small enough that you can set it to 100% if it isn’t that already. continue to crop the remaining gifs to the same size. after this i usually play through each one to make sure i have everything in the frame and roughly centered. if you need to undo, press ctrl+z or ctrl+alt+z and recrop or redo whatever needs redone. there is also a history you can pull up under windows, and you can use that to backtrack multiple steps.
next i figure out if i need to break up any of the gifs because of their length. with a gif this size i can probably get away with having more frames and i can trim them later, but if a gif has more than 100 frames i look and see if i can either trim it down now because there is a lot of frames without talking or movement, or if there is a natural break in dialogue where i can split it into two gifs. there are also times when the gifs are really short that you can sometimes combine with a gif before or after that one. that’s your perogative ultimately and what you think looks good but will fall under the 3mb limit, and takes practice and experience to get an idea if a gif is going to be too large. sometimes i go back and rewatch the scene to figure out where to split things up. i also keep in mind that i want 8 gifs for this scene and right now i have 6, so i need to create 2 more, whether i separate two gifs in half, or separate one gif into three new ones.
ultimately i decided to split my largest gif of 180 frames into 3 gifs because it has quite a bit of dialogue, and the other gifs are either already under 80 frames or can easily have some frames deleted out of it. between using the script, rewatching the scene a few more times, and trying to lipread what the doctor was saying, i decided to separate between frames 65/66 and 120/121 so that way they were roughly the same number of frames. the process to separate them is the same as it was when we had the big original gif. i selected the last frame i wanted to include in the new gif so that way the eye appears next to the corresponding layer in the layer panel, and this is how i know which layers to drag to the new document. for example, in the picture i’m moving frames 1-65 to the new document, so i select frame 65, then find that layer and select all the layers below and including that layer and drag them. then repeat the steps to make the frames, etc.
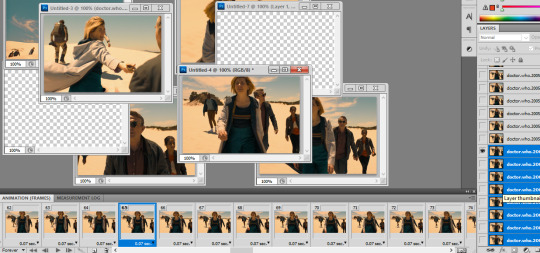
go ahead and delete the empty frames, as well as any frames on the other gifs you may want to delete to trim them up.
so now we should have all of our gifs laid out! my next step is to sharpen them, and i do this using smart objects, and the steps are as follows. (i also made this into an action.)
first, select all the frames and all the layers in the gif. if you deleted some frames but didn’t delete the corresponding layers, don’t worry about it, it doesn’t matter and doesn’t affect the final product.
next, click on convert to timeline animation. this is in the animation menu where we earlier found convert to frame animation.
then, at the top go to filter and click on convert for smart filters. this creates a smart object and turns all of the frames and layers into just a single layer/object. this allows us to sharpen the whole gif at once instead of having to sharpen each frame one at a time (trust me that takes forever if you don’t have an action or do it this way).

next under filter again, then under sharpen, click on smart sharpen. this brings up a window with a bunch of settings. these are what mine are:
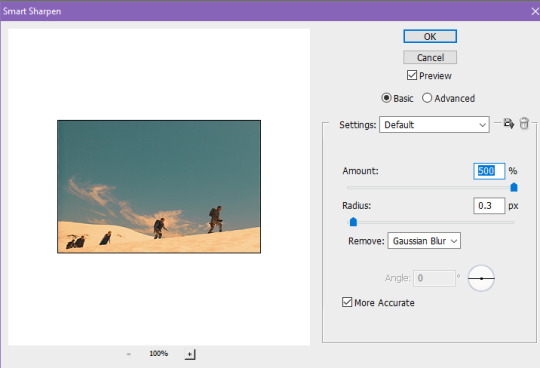
repeat this for every gif. look how much better they look already!
at this point, if you haven’t saved yet, do it now! this is a good time to save and take a break. go to file and then save. the format should be set as photoshop/.psd. i go ahead and rename the files too, for example, dwshades1 and so on. i number them too so i can get the order right when i upload them. with it saved as a psd, you could close out and reopen it later and the layers will all be there.
next is coloring! this is technically optional, but is usually the most fun part of giffing in my opinion, and i tend to find uncolored gifs rather boring and bland. this is where you can do some brightening, color correcting, make gifs black and white, and more! its time to get creative with those adjustments.
as there are so many ways to color things, and whole tutorials dedicated just to coloring, i’m only going to show the basics of where to find the adjustments and some of the different adjustment layers that i use most. my first step always though is to create a group just for the coloring layers. the button to create a group is at the bottom of the layer panel and looks like a folder. the button to the left of that is the one that contains the different adjustments you can make.

the black and white circle contains a list of different adjustments you can make. the two i like to use most are curves and vibrance. curves is really useful to brighten gifs and vibrance obviously adds vibrance. my advice is to just play around with all the settings, and look at coloring tutorials. a lot of gifmakers also have psds that you can download. you can either use them as is to apply to your gifs and credit the maker, or just study what they did and learn from it.
anyway, i went ahead and colored my gifs. here is a before and after look, as well as a list of adjustment layers i added:


in this case the before gif doesn’t look bad, but that isn’t always the case, sometimes they start out super dark and colorless. and i like the tone and colors of the colored gif better (you can see how much i like purples and blues lol). again, all personal preference.
whether you color or not, if you have dialogue in your gifs, the next step is adding it in! if the gif doesn’t have a dialogue or if you don’t want to add text, you can skip this next bit.
first, select the text tool on the left side toolbar, it looks like a T. next i choose my font, font size, and color at the top. here are my settings, the key thing is to make it easy to read.

there are more settings like bold and italics under window and then character. these are my settings.

after these are set, click in roughly the middle of the gif and start typing the text that goes with that gif. i usually start with white for the first person to speak, and then change to yellow for the second person and so on, so that way its clear who is speaking, but that’s up to you. when the text starts to go off the edge of the gif, i hit enter to start the next line until i’m out of text. otherwise photoshop will allow you to type right off the edge of the gif.
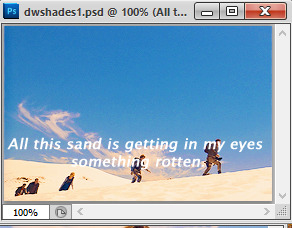
a little hard to read, right? that’s why i add stroke, which outlines the text. to do this, make sure the text layer is highlighted, and then click the fx button at the bottom of the layer panel, and then click stroke.
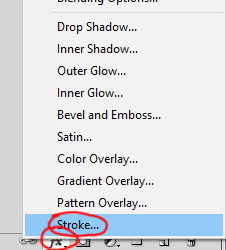
these are the settings i use. usually i only have to change the size from 3 to 1px. hit ok.
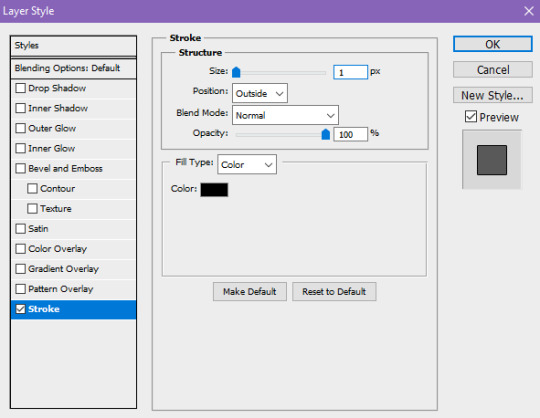
so much easier to read! also, double check to make sure that the text layer is above the coloring layers.
next, i want to move the text to where i want. select the move tool on the left, and first move the text layer all the way to the bottom. photoshop has it so that it is kind of magnetized to the edges. i then go back to the character menu and change the baseline shift setting to 5 pt.
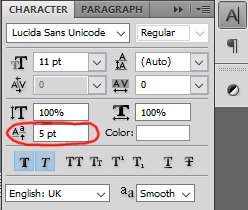
however, when you click to a different gif it doesn’t reset back to 0, so manually reset it back to 0 before moving your text layer, then change it to 5 again.
next, to center it on the gif. first select the gif layer, then hold ctrl while you select the text layer. the order is important, if you select the text then the gif, the gif will be moved to center itself around the text. then, with the move tool still selected, click this button on the top tool bar to align horizontal centers.

great! now save your gif again, and repeat all these steps for the text for every gif that you are adding text to. most of the time i type the text on each gif first, and then move the text that way i’m not switching tools a dozen times, but it really doesn’t matter.
your gifs are officially done! time to save them in a format that you can upload to tumblr. go up to file, and click save for web and devices. these are my settings, but you can play around with some of the ones on the upper right side. however, you want to make sure that it is a gif, and that it is set to loop forever. those are circled. hit save, name your gif however you want, and save it somewhere you can find it later. do this for all of your gifs.

the other thing i circled in the document size. tumblr does not allow you to upload images that are above 3mb. if yours is above this, you have a few options to cut down on the size. changing the settings on this window such as going from diffusion to pattern, or reducing the number of colors can change the size, but if you reduce the number of colors, you lose some quality. you can also change your coloring layers around, because making a bright gif with a lot of colors can increase the size. black and white gifs tend to be smaller.
the option i tend to go for if i want to keep the colors and quality, is to reduce the number of frames you have. its a little trickier to do in timeline mode than it is when the frames are all there, but this is how to do it. if your gifs are all under 3mb, you can skip ahead to uploading.
in the timeline animation bar, there are blue rectangularish sliders you can move at the beginning and end, as well as a triangular one that shows where you are within the gif. decide the new place where you want the gif to start and end, and move the rectangle sliders there, like so. one tick over does not equal a frame, so i use the triangle indicator to figure out how many frames over i’m moving.

then in the animation bar menu, click trim document duration to work area. this will set your gif to begin and end where those sliders were. at this point you can try saving again to see if your gif is below 3mb. if so, then save it! if not, continue to move the sliders and trim until your gif is below the limit.
so now all your gifs are saved and ready to be uploaded! upload them like you would any other photo post. i always save as a draft first so i can make sure they upload right and so i can look them over again to be sure they are looping correctly and have no typos. only then do i close out of photoshop. tag with the appropriate edit tags (for example, dwedit for doctor who) or tag popular blogs for maximum exposure, but be aware that only the first 5 tags count and will appear in the tags. post and you are done! congrats!
#popalice007#yeahps#completeresources#chaoticresources#gif tutorial#hey look something original#my resources
46 notes
·
View notes
Text
Social media marketing: A quickstart guide for tradespeople
For some of your potential customers, your social media presence is the deciding factor when choosing between hiring you or one of your competitors. Get started with social media marketing for your business by reading 9 expert tips from our Social Media Manager, Sarah, below.
1. Start with a social media marketing plan

Consistency is key to growth. So, it’s important to create a realistic social media plan that you’ll be able to stick to. The first thing to think about is your resources.
How often will you post on social media? Think about how much time you have to spend posting on social media. Remember to factor in time to respond to comments and messages.
What money can you invest into your social media marketing? Sharing updates, links to your website, photos and videos is free, but you may want to consider paid advertising too. That way, you can target the people who are most relevant to your business with your ads to familiarise them with your company and potentially win work from them.
2. Choose your social media platforms
The platform that’s best for you depends on your trade and business goals. If your work is very visual – maybe you build impressive extensions or transform gardens with beautiful landscaping – then an image-based platform like Instagram is a good choice. On the other hand, if your work is less visual but you’ve got lots of technical expertise, such as in electrics or plumbing, try a video-based platform like YouTube or TikTok where you can explain some of the crux of the job and position yourself as an expert.
Find out the pros and cons of each social media platform in our blog post: Which social media is right for your business?
3. Know your audience

To get the most out of your social media marketing, it’s important to make sure you’re using the platforms that:
Are used by your target audience.
Fit with the type of content you’d like to create.
Allow you to achieve your goals for social media.
Social media platformAverage age of usersSuggested contentYour goalFacebook25-34Updates on your businessBuilding loyaltyInstagram25-34Visual content such as before and aftersInspire potential customersYouTube15-25How-to videos, day in the life videos, adviceInform and entertain your audienceTwitter30-49Sharing positive reviews, company updates and trending newsConnecting with similar businesses in your industryTikTok18-24Fun and creative videos of your workShow off your creativity and the fun side to your businessPinterest30-49Pictures of your workGive your audience interior inspirationLinkedIn46-55Sharing trade news and company updatesNetworking
Source of average age of users statistics – Sprout Social
However, don’t dismiss certain channels straight away based on factors like age. For example, TikTok may be known for being a platform for a younger crowd, but our research has found that it’s very popular for home transformations, #BrickTok and general trades work.
Take a look at some more social media video ideas and tips for tradespeople.
4. Research your competitors’ social media marketing activity
Take a look at what similar businesses to yours are doing on your chosen social media platform(s) to get an idea of the types of content that your potential customers are interested in. If you’re not sure who your competitors are, start with a Google search along the lines of ‘*your trade* in *your area*’ (e.g. Carpenter in Birmingham).
Keep an eye out for how often they post, the type of content they’re posting and which posts get the most interactions. Once your research is done, think about what you could do better on your own social media profiles.
5. Nail your profile

Your social media profile looks and performs at its best when it’s fully completed and optimised. When you’re creating a social media profile, you’ll need to have the following things to hand:
A clear photo of yourself (if you’re a sole trader), your team (if you’re a small business) or your logo. You’ll need one of these for your profile picture.
A photo that’s relevant to your industry. It’s good practice to upload an eye-catching cover photo – this could be a picture of your tools/equipment, you or your team in action or of some work you’ve done.
Photos of your work. Potential customers love to see your handiwork.
Keywords. Optimise your bio with keywords that you think people would search on Google to find you. An example is ‘London plumber’.
Find out how to take great photos of your work for social media.
6. Grow your audience and build a rapport with your followers
A great way to entice new followers and get your business in front of new eyes is to:
Run a competition where you ask your followers to tag their friends, like your post and follow your page. This will create a domino effect and spread the word about your business.
Tag other brands in your posts – for example, if you’re posting a picture of your work, you could tag the companies you bought the materials from. Then, they might share your post too!
Use relevant hashtags to get your business in front of others who are searching for those hashtags, or similar ones. For example, if you share a before and after photo of a bathroom transformation you’ve worked on, tag #bathroominspo. If you need help finding relevant hashtags, you can use display purposes or another free hashtag sourcing tool.
Use geotargeting and add your location so others can see the areas you work in and find your posts more easily.
Create engaging posts. Some social media platforms have features that allow your followers to engage with you easily. Instagram Stories has lots of options for interactive stickers such as polls, ask a question and quiz features, for example.
Put links to your social media profiles onto your business card, in your email signature, on your posters, on your van branding and on your other social media profiles.
Asking your customers to share photos of your work on their own social media profiles and to tag you.
How to keep your followers once you’ve got them
To keep your followers once you’ve got them, you should continue to engage with them. At a minimum, you need to like and respond to comments on your posts and answer any questions professionally. You should also like and comment on relevant posts from your audience, to build up a relationship with your followers.
Other ways to decrease the likelihood of people unfollowing you include:
Asking for their opinions. Some platforms have poll features that let you pick the brains of your audience.
Offering a loyalty scheme or referral programme through social media.
Offering your followers a discount for jobs booked within a certain time frame.
7. Work out the best time to post

When you first start your social media marketing, post your content at different times of the day. Once you’ve built up an audience, some social media platforms have analytics features that allow you to see what time of day your audience is active. Then, you’ll know what times are best to post at moving forwards.
You can also see the age, gender and location of your followers in Creator Studio Insights for Instagram and Facebook, and on Analytics for Twitter, LinkedIn and TikTok.
8. Schedule posts for when you’re busy
Social media marketing doesn’t need to be extremely time-consuming. By scheduling your posts in advance, you won’t have to worry about your next social media post when you’re on the go.
It’s a good idea to block out some time at the start of the week to scheduling your posts for the rest of the week. Just make sure to respond to any engagements that you get on those posts as soon as you can!
9. Share your posts with us, too
Get your content in front of thousands of more people by sharing your work with us. Simply tag us using @RatedPeople and use the hashtag #RatedPeople and we’ll share your work on our social media platforms, like we did for Lockhart Roofing on TikTok (check it out below).
@ratedpeople


Lockhart Roofing #rooferslife #roofer #bricktok #brickwork #roofing #roofingconstruction #tradesman #trades #ratedpeople #beforeandafter
♬ original sound – Rated People
Social media plays an important part in your marketing. For advice on how to integrate it into your wider marketing plan, visit our Trade Advice Centre:
Top 10 marketing tips for small businesses.
Coronavirus: Digital marketing tips to make your small business stand out.
The post Social media marketing: A quickstart guide for tradespeople appeared first on Rated People Blog.
Social media marketing: A quickstart guide for tradespeople published first on https://fanseeaus.tumblr.com/
0 notes
Text
Fallen Loves Part 2
Pairing: Castiel x Reader, Jack x Adoptive Mother!Reader
Part 2: The Foundling
Word Count: 4060
Summary: Kelly’s pregnancy is coming to an end, she leaves you and Castiel a dying wish. After she dies, she give you and Castiel the responsibility to take care of her son like your own but things will prove to be difficult when you’re left to protect Jack with a broken heart and broken Winchesters.
Warnings: Angst, Mentions of Character Death, Season 13 spoilers in this part and the upcoming ones.
A/N – Overall title was thankfully given by @misticty – my bestie; I love you and thank you! - ‘To play on the fallen angel thing but also shows why jack is alone in most of the images’ and this weeks title was given by @feelmyroarrrr
You felt empty but knew that you had to do everything in your power to protect Kelly’s baby boy. Cas was no longer in the picture and although it tore you apart to the point where you thought you couldn’t function. You couldn’t just leave Jack to fend for himself. A baby, even though he the spawn of Lucifer, couldn’t fend for himself. You just had to pray that you could suck it up and take on these newly found responsibilities to care for a Nephilim.
With Dean still kneeling by Cas, you left him to grieve. You had passed the shock and denial stage and all you felt was complete nothingness. Like there was a hole left in your chest or your heart had been ripped from your ribcage and been squeezed until you were left with a sense of longing for Castiel and a sense of maternal instinct to protect Jack materialising within you.
You left without a word. A fire building in the pit of your stomach, like a power was transferring from another into you. It pushed you toward the cabin in search for Jack, unbeknownst to you Dean had briefly recovered to put on a facade of a tough guy, who hadn’t just lost a friend that meant the world to him, and followed you inside.
Creeping up the stairs and peeking around the frame in the nursery door, you saw a grown naked man sitting on the floor next to Jack’s crib, his eyes glowing yellow. The said baby not in his crib, the one Kelly had demanded and cried for during the hormones of the pregnancy.
You heard another unfamiliar voice, ‘father?’
Sam repetitively whispered no. It didn’t sound right; it sounded as if he was scared. ‘I-I-I’m not your father, Jack.’ Sam stumbled over his words, shuffling on his feet, undecided on whether he should stay put or run as fast as he could. ‘It is Jack, right?’
Jack?
How could that have been possible. Jack should have been a baby, you were supposed to take care of a baby!
‘Father.’ Jack repeated.
With your heart racing and your mind and legs having an argument, your legs won, lifting them and drawing you into the room slowly. As not to startle either Sam or the Nephilim, you cleared your throat, making your presence known to each of them.
‘Jack?’ You raised your hands, showing him that you were of no threat and not there to cause any harm. ‘It’s okay. You’re safe, we’re not here to hurt you, okay? Your mom...’
‘My mother, you know her?’ Jack’s eye still glowed an illuminous yellow. It scared the hell out of you but you had to stand your ground, you knew how much power a Nephilim held. And if he couldn’t control it, there would be serious consequences – for everyone around you.
Before you could answer, you heard the door of the cabin being swung open, footstep following closely behind, thudding with every step he took.
‘Sam? Sammy. Y/N?’ Dean’s voice boomed through from the bottom floor to the top.
‘We’re in here.’ Sam had answered for the both of you, never once removing your eyes from the child with the powerfully amber lit ones.
Dean walked in behind you, catching one glimpse of the Nephilim and immediately raising his gun and shooting at him.
‘No.’ Sam’s voice raised.
Flinching, Jack closed his eyes but quickly recovered, his eyes trained on the three of you. His mouth opened wide and the wave lengths running through the air shattered the windows, slowing down yours and the Winchesters’ movements and pushing you away so you were far away from the scared child.
What had felt like hours to you, a mere five seconds in real time, had passed before you all had been shoved against the wall away from Jack, all hitting your heads roughly against the wall, effectively being knocked out
You woke up with a gasp of Castiel’s name running passed your lips, your head pounding as if your brain was having a battling with your temple. At the time, Dean was holding his head, seemingly having the same effect of a headache that you were having and Sam had jolted awake, slapping away the remnants of his dream or nightmare, everyone’s reaction implied the latter.
Sam and Dean jumped from their spots on the floor, having a quicker reaction time than you, obviously, it took you a little longer to shake your head and get up off the floor, your thoughts jumbled as you saw the spawn of Lucifer in action. You were screwed if anything else was going to happen to the three of you.
‘Can he teleport?’ Dean demanded an answer.
‘Dean, he’s a kid. He won’t be able to control his powers after just hours of being born.’
‘He nearly killed us, Y/N, and you’re defending him!’ He roared.
‘I’m defending him because you scared him, you waltzed in there, guns blazing. You shot first, you didn’t even attempt to talk to him. He was fine just talking to Sam and I, and you shot at the damn kid, one of the most powerful kids, might I add, like a freaking psycho.
‘Didn’t you say that it isn’t just black and white with monsters. This kid could have been good and you took a shot at him. You took a shot at my kid, he’s my responsibility and now he gone. Alone in this world, naked, why can’t you just think for one goddamn second?’
Dean fumbled with the keys to his beloved car until he found the right key. ‘One, don’t quote me to me and B, he’s Lucifer’s son, what more do you need to prove he’s a bad kid?’
‘Oh I don’t know, the fact that he’s half human!’ You all but shouted at him, pulling open the back door to the impala and getting in with a huff of annoyance.
Sam had got the information of Jack’s whereabouts from a restaurant called Pirate Pete's Jolly Treats. He led you and his brother to the North Cove precinct in Washington where the Sheriff had told Sam that she had kept Jack at the station, gave him some clothes for the lost and found, and taken his fingerprint; find something peculiar – although not to the three of you – in the scanning database.
When you got there, you hopped out of the impala and sprinted toward the flickering lights within the precinct. Jack was screaming, clutching at his head, a sheer sign of the Angel radio blasting and thrumming through his eardrums. Lights exploding above him as he tried to stop the pain or tried to figure out what the source was.
He laid eyes upon Dean, you noticed, and his irises shone brighter, before he could do any harm, though, Sam had shot him with a taser gun, rendering him unconscious.
‘Nice shot.’ Dean had said, you only rolled your eyes at him, weighing up whether it was a good or a bad thing to have electrocuted the Nephilim.
The bad being you had scolded Dean for shooting at him but the good being it had knocked Jack out so that he could feel pain nor could he hurt anyone else.
Sam tentatively ambled towards Jack’s crumpled body, checking him but the cock of a gun had caught your attention. The Sheriff.
‘Don’t-’ Sheriff Christine Barker surveyed the area, clearly walking in and getting the wrong idea of what was happening. ‘What the hell is going on here?’
Breathing out a sigh, the three of you raised your hands at the view of the gun pointed and ready to shoot.
Christine had thrown you, the younger Winchester and the Nephilim into the cell and locked you inside, cuffing Dean to question him on the situation she had walked in on. As she sat him down, Christine had spread out his arsenal on her desk.
‘I’m sorry, say that again.’ Her expression no doubt incredulous as he told her about himself, his brother and you, about what you did – what you really did.
You sat with your knees drawn up to your chest, your chin resting atop of them. The picture of inside the cell became blurry and you found that it was because of your tears, Cas’ death replaying over and over and over again inside your mind, you hadn’t realised your body wracking with sobs until Sam had placed a hand on your shoulder to calm and bring you comfort.
Your sobs had awoken Jack but he had spun around so quickly it made your head spin, he retreated away from you his eyes glowing once more and trained on you and Sam.
‘Woah, woah, woah. Easy, easy, easy, easy. It’s okay. You’re okay. We’re not gonna hurt you.’
‘You already hurt me.’ Jack spat out at Sam, he apologised to him, trying to explain that he wanted to slow Jack down before he hurt his brother and himself.
‘Jack?’ Your voice coming out steady and soft, as not to rattle and provoke him further. ‘Are you okay?’
‘I don’t- I- I was scared.’ The Nephilim revealed, his glowing eyes reverting back to their original blue. ‘When I get scared, things… happen. I can’t stop them.’
He shook his head, not understand the power he held within himself.
‘Why were you scared?’ Sam asked, still leaning his weight away from the powerful child.
‘Because of the voices. They were so loud… so angry.’ His voice lowered.
Wiping away the stray tears, you slowly let your legs fall to the floor, leaning toward him. You were still skeptical that this was Jack Kline, the fully grown kid that was supposed to be a baby. ‘Do you- do you hear them now?’
From the crouching position Jack was in, he truly thought about the answer, listening carefully to what was inside his own head. ‘No.’
You and Sam let out a breath that neither of you thought that you were holding, thankful that the Angels had been silenced.
To your surprise, Jack had carefully sat down on one of the benches in the cell, crossing his legs as if he was in elementary school. He was so pure and he held all this power that had been passed down from his archangel father. How they were related you had no idea.
‘I’m sorry… would you tell them that I’m sorry?’
‘Oh, Jack, honey, of course. We know you didn’t meant too okay. We’ll protect you. I’ll protect you.’
Jack nodded his thanks and smiled honestly, not that he would know the difference but it was nice to see someone so… so innocent considering the way that he had been brought into the world.
‘How are you- um- how are we talking right now? You’re supposed to be a day old and you speak English?’
You were just as confused as Sam was but was thankful that he had asked the question that had been playing on your mind.
‘My mother, birth mother, taught me.’ A proud grin on his face as he spoke fondly of Kelly. Jack explained that he had become Kelly but didn’t learn his powers from her. He stood from his place in the cell and walked over to the window. ‘I don’t know why these things happen. It’s like I’m me but not… me.’
‘Jack, before you were born you opened up a door to another door. Do you remember that?’ Sam kept him talking and Jack traced his fingers against the cement walls before clenching his fists. He spoke his affirmation, Sam following up with the question of whether he could do it again.
The boy hesitated, he shook his head and changed the subject. ‘I have to find my father. He’ll protect me.’
Your eyes shot to Jack, already arguing that it was a bad idea. Sam on the exact same page as you but when he mentioned Lucifer, the boy said that Lucifer wasn’t his father’s name.
‘My father is Castiel.’ You gasped as the Nephilim said your dead Angel’s name, he took a seat again. ‘And my mother said that Castiel, he would protect me. She said that she would no longer be my mother after she goes, that Y/N would protect me too. She said that the world is a dangerous place. I couldn’t be a baby or a child so I had to grow up fast. That’s why I chose him to be my father and her my mother. Where are they?’
Sam swallowed and bluntly said that Castiel was dead, Jack’s hopeful face dropped, he was upset too. He hadn’t already met Castiel yet he loved him. To recover Jack’s fallen mood, Sam pointed to your frozen frame, ‘but this- this is Y/N.’
‘Mother!?’ The word finally brought you out of your stupor and you shook your head.
‘Hey Jack,’ you replied with a small curl of your lips, ‘but you don’t have to call me mother. It makes me feel old.’ You let out a watery chuckle. ‘Castiel’s gone but I’m still here and I’ll protect you the best I can. I promise.’
Dean strolled in, ‘we’re good to go.’
‘Really?’ ‘Are you sure?’ You and Sam answered at the same time.
The older Winchester nodded, telling you both that he gave the Sheriff the talk and that she would need to process the information.
With you sitting next to him and offering him comfort, Jack remained still as Dean talked about getting out and going back home, commenting on getting rid of the Nephilim.
Sam and you had jumped from your seats, telling Dean that Jack was a good kid and nothing like Lucifer.
A commotion had arisen from the front of the precinct and Dean rushed out to see what it was leaving you, Sam and Jack still in the cell.
Creaking and cracking came from another exit, Sam had walked along the length of the cell gate. The door window cracked before it was ripped off of its hinges, that being the fault of a celestial being, of two of them. The taller darker skinned Angel’s eyes glowing blue; Jack’s ears ringing out as the Angel radio blasted his ear drums.
Meanwhile the woman had torn off the cell door, attempting to take Jack but you wouldn’t let her, neither would Sam. He punched her while you threw yourself in front of Jack, ready to take on the Angels after him.
Sam dealt with the female Angel, until she overpowered him and slammed him into the wall. The male had taken over kicking Sam in the head and in the ribs, whilst the woman made a move to attack you.
Her fists swung back and forth, the skin on your cheeks breaking and bleeding as her knuckles collided with your face. She wasn’t getting Jack if you had something to do with it. You would do everything in your power to protect him, even if it meant getting a few licks off of an angry Angel.
Their torture continued until you had – unintentionally – left your post in front of Jack. The Angels had got a hold of Jack and only got to the jail cell door before Sam had blasted them away with a sigil; Jack, as well as an Angel blade, dropping to the floor.
‘Jack,’ you whispered in a hoarse voice, ‘are you okay, honey?’
Another Angel, the chick you saw earlier at the restaurant, strutted in without a care in the world – like most Angels.
The taller Winchester warned her not to touch him, to stay away from him as she looked into the cell at Jack. She nodded and held her blade out so that Sam could take it, but the hesitation he had caused her to snarl shouting that if the Angels couldn’t have him, nobody could. Right then, she flipped her hand and stabbed the Nephilim in the chest.
‘Jack! No!’ You cried out, unbelieving that you could lose Castiel and Jack in such a short time frame. Jack fell to his knees before Sam had stabbed her stomach, obliterating her from her chosen vessel. She fell to the floor with a thud but when you reached Jack, he wasn’t affected at all. You stood there stunned as he pulled the blade out of his chest, blood covering the blade but none dripping from the wound that should have been there.
‘How? How are yo-? What?’
‘I’m fine.’ He simply said.
You sat with Jack on the bench outside the precinct, the Sheriff’s son being wheeled away on a gurney into the ambulance.
Jack’s hands resting on his thighs, you took one of his in yours, covering the back of his hand was the only comfort you could provide.
Leading Jack to the impala, you sat in the back with him, sitting in silence as Sam and Dean threw open the doors and shuffled in the front, heading back to the cabin.
‘Can I tell you something, Y/N?’ Jack whispered in a low voice. Your head rested against the back bench of the impala and you rolled it to the side so that you could face him, one of your eyes opening a slither so that you could just see him.
‘Of course, Jack.’
‘I like nougat. I tried some today, and I liked it.’
You snorted at him, ‘good for you Jack. If you want, when we get to a gas station, I’ll buy you a whole back full of nougat bars. Just make it last and don’t eat them…’ you paused to yawn, ‘don’t eat them all at once because I don’t know what your digestive system or metabolism is like yet.’
‘Thank you, Y/N. You’re the best.’
When you arrived, you shoved the door open and overheard the Winchesters talk about burning Castiel’s body. You couldn’t listen to another word; you still refused to believe that he was really, truly, gone. You led Jack inside of the cabin, apologising with every chance you got that you hadn’t protected him like you had promised.
‘It’s okay, Y/N. You tried – to the best of your ability, you protected me like you promised. I am alive,’ he paused, ‘because of you and Sam and Dean. I am safe. It it more than I could say if I was in the custody of Lucifer. I’m glad I chose you as my mother.’
Licking your lips, you looked down at your feet, hopping from one foot to the other. You cleared your throat and wiped away the tears that threatened to fall. Jack had chosen you and Castiel to be his parents but you were the only one left.
‘Sorry, I- um, I’m thankful you gave me a chance to protect you. But if you do something stupid, I will not hesitate to turn on my mom mode and kick your ass into shape. If something goes bad then- then we’ll figure it out.’ You told him with all seriousness, pointing a finger at him.
Jack looked behind him, trying to angle his head correctly, ‘my- my ass is out of shape? I don’t-’
You lightly chuckled, ‘no Jack. It’s just an expression. It means that there will be repercussions if you intentionally do something bad, if it’s an accident we work out what caused it and try to fix it. We do everything we can to help you, to steer away from the bad if it comes to that, but we’ll look after you, we’ll take care of you, I’ll take care of you because it’s my job, because you’re my responsibility, because you’re my son now.’
Sweeping away his unkempt hair, you pecked a kiss on his forehead and lead him inside the house to say goodbye to his birth mom.
Sam followed the two of you in. You bit your lip at the sight of Kelly, her still warm corpse on the bed, under the thin sheet. Standing aside, you gave Jack’s arm a squeeze of reassurance before you let him walk closer to his mother.
He was hesitant in his movements, as he should be, his mother had died giving birth to him, even though he didn’t know a lot of emotions but he experienced grief, sorrow, he even felt the guilt creeping up inside of him.
Slowly reaching out, Jack opened up his hand, his fingers twitching before closing around her clothed feet. He was close to breaking, his eyes swelling, almost puffy and reddening in colour.
The blaring sun had sunk and dawn had now made its appearance, the Winchesters deeming it the right time to burn Castiel’s body, Dean had already prepared his body using the tatty curtains that were there when you, Cas and Kelly had first arrived – trying to protect both Kelly and Jack.
Castiel was on the pyre, your arm around Jack, the tears had already fallen, streaking down your cheeks. Dean was pouring the liquid gas over the pile of wood and the covered and tied body
‘Do you wanna say anything?’ Sam said, shoving his hands into the pockets of his orange jacket.
You shook your head. ‘Can’t, not yet.’ Your throat was sore as it felt like sandpaper working against your windpipe, restricting any further noise coming from you. Resting your head on Jack’s shoulder, you tilted your head upwards, glancing at Jack to see if he had any words for his father figure.
‘What do you say?’
‘Right.’ he paused, remembering that Jack was only but born a day ago. ‘Thank you. You say thank you and you say you’re sorry. You hope that they’re somewhere – uh – without sadness, pain. You hope they are somewhere better.’ He nodded, trying to convince himself. ‘You say goodbye.’
Sam had finished his explanation, you held on tighter to Jack at the thought of saying goodbye to your Angel, to the love of your life, your reason for living. It was harder than you thought, when you didn’t want to let go.
Dean joined the group, standing in between you and Sam, ready but reluctant to ignite the pyre. ‘Well goodbye, Cas.’ Dean fiddled with the lighter in his hand waiting for you to say your final goodbyes.
‘Goodbye, my love.’ It felt like your whole self had collapsed inside of you, your feet feeling heavy and your heart feeling empty.
Surprisingly, Dean continued, albeit with an understandably hoarse voice, ‘goodbye Kelly, goodbye Crowley, goodbye mom.’
‘We don’t even know-’
‘Yeah we do. We do, Sam. Lucifer killed her the moment he realised we trapped his ass, he killed her, you know he did.’ He stared down at his feet to compose himself, already facing the fact that he lost his mom and everyone else that he had grown fond of dead. ‘She’s gone, they’re all gone.’
No more words were spoken between you, the Winchesters and the Nephilim. Dean flipped the lid of the lighter then flicked it so the flame sparked.
He couldn’t even look as he tossed the lighter into the pyre.
The flames whooshed and grew, the oranges and yellow licked and kissed the air on the cold night in Washington. The ring of wood ignited and you were blinded by the light and stepped back from the heat. Jack arm hesitantly came to wrap around your shoulder, offering you the small comfort that he had slowly learned.
Tears gathered in Dean’s eyes, you noticed when you looked over at him, you were sure that they matched your own.
Licking your lips and biting the bottom one, you put an end to your quivering lip and grabbed hold of Dean’s hand, interlinking your fingers together, silently consoling him, needing his to know that you were there too to offer the reassurance that you both needed.
Your life was gone and the foundling was yours to protect and you were going to stick to your promise and oblige Kelly’s wishes and look after her son and to raise him as your own, you just didn’t know whether Dean could keep his opinions about Jack being the spawn of Lucifer to himself. The question was: would nature or nurture with the foundling growing up? Would you be enough to steer him away from the darkness? Could you do this alone? Without Cas?
Lemme know what you think…
Cas tags: @thorne93 @becaamm @you-know-whodoesthat-crazypeople @jotink78 @love-kittykat21 @hymnofthevalkyrie @kurosaki224-new-blog @thing-you-do-with-that-thing @iwantthedean @mrswhozeewhatsis @feelmyroarrrr @mizzezm @jesspfly @skybinx-blog @casbabes @plaidstiel-wormstache @lilasiannerd @ladydork @purplediamon @graceforme86 @nervousmemzie @percussiongirl2017 @oneshoeshort @whit85-blog @moonlover19 @emoryhemsworth @reallyverynodansi @captainemwinchester @ilsawasanacrobat @cojootromuelle @essie1876 @dancingalone21 @dslocum89 @atc74 @superwhomerlockinuum @spnbaby-67 @anitalasirenita @queencflair @weasleywinchester-blog @ria132love @nightlyinsomnious @easelweasel @grace-for-sale @roxyspearing
Fallen Loves tags: @princess-of-erebor1992 @d34n-l0v3s-c4s @kasia-fields @kudosia @jessilliam-caronday @supernaturallymarvellous @spn-smut-destiel @erin654 @unleashthemidnight @worried-and-horny @goldenolaf25 @melonberri @kenmen02 @sorenmarie87 @sophiebobzz @ericaprice2008 @sinners-winchester @cxemilyxlopezxc @briannaaae3 @growningupgeek @scionofthestars @gone-to-fight-the-fairies @samwinchestergal @demonlover87 @lupine-princess @katrodriguez1234 @misha-hoechlin @thepallaspalace @maryartposts @everythingpumpkinspiced @lonelyfandoms @angelblazon @firefly124 @thatshellfiredean @plaidstiel-wormstache @poukothenerd @dancing-the-hellfire-rumba @kamaroon @madeinthenh @superseejay721517 @robecca-le-blog-des-citations @hillywooddestiel @walkerchick007 @angie-tomlinson @deanandsamsbitch @luthien-princessofdoriath @yeppudaasims @smileydolphinsml @sir-helen-keller @trashforwinchesters @wotinspntarnation @megiestuff @daring-to-screw-up @sillesworldofwriting
#castiel x reader#cas x reader#jack x reader#jack x adoptive mother!reader#castiel angst#cas angst#jack angst#jack the nephilim#supernatural series#cas series#jack series#castiel fanfiction#cas fanfiction#jack fanfiction#supernatural fanfiction#fallen loves#fallen loves series#fallen loves part 2#the foundling#part 2#jayankles#jayankles writes#bailey writes
201 notes
·
View notes
Text
Part 1 | Part 2 | Part 3 | Part 4 | Part 5 | Bonus | Part 6
Part 6: Videos – YouTube+
Note: I know I’m talking about YouTube, just days after the San Bruno attacks. My heart goes out to those affected by the attacks.
I’ve talked about a LOT of social media forms. You might have wondered what could POSSIBLY be next?
Google+ or LinkedIn (Nah, although, I do cross-post my blog over there, for people who prefer those social media forms, they don’t seem active enough)
Goodreads? No, although, I’m there and in a few book clubs.I mostly use it to keep a presence, and stay accountable for my book-reading goals.
I’m pretty sure you’re all thinking “Um, Morgan, I think you’ve gone seriously overboard on this social media thing…” and you’re COMPLETELY right.
Today, though? Today, I’m going to be talking about VIDEOS. Both at Youtube, and in other social media forms.
YouTube
YouTube is second only to Netflicks in using up bandwidth on the internet. It’s huge.
What’s more? Videos go viral all the time. New ones, old ones, quirky ones, it’s hard to know what’s going to be popular.
So, how do you get that to work for you as a writer?
I have a YouTube channel [Subscribe Here!] and, as I say in my episodes, it’s “my online blog, in video format.” So, if you’d rather listen to me ramble while doing other things, you totally can.
How To Start A YouTube Channel
A video channel should be approached like a website.
Pick a theme and stick with it
Pick an update schedule and stick with it
Pick a format and stick with it
(noticing a trend here?)
Step One – Check out the other Writer Vloggers
See what else is out there, see what other writers are doing, see if there’s a niche you can fill or a format you prefer for getting the information.
It’s hard to establish quality content if you don’t know what sort of options there are and what formats appeal to you.
Here’s a list of the top 15 from The Write Life.
Step Two – Set-up To Film A Vlog
Necessary equipment:
camera
microphone
a youtube account
preferably some WiFi to upload this thing, cause videos are large
Beyond that, all I use is a Logitech HD 1080p USB camera and 2 umbrella lights – all birthday presents from family – pictured above. Oh, and MS Paint.
Equipment to up your game:
umbrella lights
a webcam that isn’t built into your computer
a quiet space
video editing software
a microphone (maybe with pop filters!)
interesting-yet-not-distracting background (clean up trash, dirty clothes)
makeup – maybe even some if you’re not femme presenting. Minimalist suggestions are:
foundation to even out skin tone and get rid of shine
mascara to make the eyes pop
a touch of lip color, to define lips
Step Three – Filming
If you’re using a phone, TURN IT SIDEWAYS. No, really. Please.
I made that mistake my first time and now, for eternity, (or until I rerecord it) I’ll have those stupid black bars to my left and right–or worse, that double-image, zoomed in blur beside me.
5-12 minutes is a standard video length. People have short attention spans.
If you have more, cut it into 2 parts! (Or more!)
Keep to the same format
Look the camera in the eye when you can try not to look like you’re reading your blog post. *looks around innocently*
I like to do 2-5 takes and just roll with the last take. I’m planning on experimenting with video editing software after I move at the end of the month.
A lot of the quality vloggers you see will have done several takes and will clip them together. BUT. They’ll change the camera angle between takes, so you get the feel of ‘time passing’ or something. It’s a format that seems to be popular, plus, it allows you the ability to cut out any dead-air time.
Step Four – Post-Processing
The easiest bit of post-processing I do is take a couple trial photos before I start my video.
Trial pictures let me
checks the lighting
check the umbrellas aren’t in the camera
check I don’t have food on my shirt
And? Allows me a couple photos to add my Vlog title to.
I literally open them in MSPaint, Impact size 48 or whatever the title on one side of me, and roll.
Yes, YouTube will give you freeze frames as the preview image, but usually, they’re the most awkward poses I’ve ever seen. Luckily, there’s a handy-dandy “upload preview” button so you can toss your new image in there.
This is when you’d cut together all those different takes from step 3. Maybe add some background music if you like that feel. Maybe just an intro bar or two of notes.
Step 5 – Uploading To YouTube
When I upload my videos, I make sure to click the drop-down and select ‘Schedule’. Once you start uploading, you can’t switch and the default goes live as soon as you hit publish.
I don’t want my videos to upload the second I’m done prepping them, I want them to post in the mornings, not somewhere between 10:30pm and 1am the night before the blog post goes live.
This is where you can add that title-added preview image.
Things I like to do with my videos:
Schedule them
Add preview image with my title on it
Add Tags
Add the video to my playlist, so people can subscribe to that [like here!]
You can have different playlists on the same channel
book reviews
writer tips
guitar playing
life updates
etc
Type up a short twitter-worthy shout-out to draw people in (with hashtags)
Give links to my other social media and the original blog post in the ‘about’ field
Things I’ve been testing recently.
I found the ‘default settings’ for uploads last week, where you can pre-load all your tags, all your repeated ‘about’ information, etc, so you don’t have to remember what tags you used last week.
How do you find out what tags you should use?
check out a popular vlogger who shares a lot of the same subject matter
in your browser settings, have ‘developer options’ turned on
hit F12 to view the page’s source code
hit ‘ctrl-F’ to open up search
type “tags”
copy-paste the list after the word [ make sure it seems to be a list of usable tags, the word may be in the source code more than once. If it’s not what you’re looking for, hit enter to move to the next entry.]
SnapChat and Instagram and Facebook
I’ve already talked about Instagram, but why is SnapChat even on this list?
For those who don’t know, SnapChat lets people message each other and the message immediately is deleted after they view it. It warns you if the other person screen-shots the message.
So, how does this grow your social media presence?
I personally don’t do it, and it may be more useful for artists, but you can upload STORIES. These are images, text, or VIDEOS that are shown to anyone OR everyone on your list–and they stay visible for a day.
If you have a following, uploading a ‘story’ or two a day can be a good way to interact and form a more personal feeling connection.
Instagram also allows stories to be shared and these are promoted posts.
And Facebook? Facebook LOVES videos. Unlike blog links, or worse PATREON links, Facebook doesn’t try to hide these as much.
YouTube and Facebook Live Video
These intimidate me, but they are growing in popularity and are given priority viewing on Facebook. If you find a time that’s good for a lot of your followers (plus, it can be viewed after the fact), it’s a great way to re-engage with your followers and be given priority viewing on both social media sites.
If you’re brave enough.
Putting yourself out there, creating content, and recording your image, voice, and thoughts for all of posterity is intimidating.
Every week, I strive to do a little better (or at least not worse) than the week before.
And that’s it.
The introduction to social media types. ALL OF THEM. (Or at least a good, wide-spectrum of them.)
If there’s any I skipped that you’d like me to talk about, feel free to ask in the comments.
If there are any tips you’d like to share, feel free to reach out!
Thinking about starting a vlog? My tips are aimed at writers trying to establish a social media presence, but can be helpful for anyone! #amwriting #socialMedia #youtube #vlog #vlogger #vlogging #writersLife #advice #writing #video Part 1 | Part 2 | Part 3 | Part 4 | Part 5 | Bonus…
2 notes
·
View notes
Text
INTERVIEW: The God of High School's Director Studied Martial Arts on YouTube

A wide variety of people come together to bring an anime series to life, and we're here to shine a spotlight on the talented creators behind the newest Crunchyroll Original, The God of High School.
Heading the production of every anime is a director, someone who can organize and bring together all of the different individual contributions into one complete work. After his directorial debut with GARO -VANISHING LINE-, Sunghoo Park is now taking the helm of Crunchyroll Original The God of High School. We had the opportunity to talk with Park about his experience working on the anime adaptation of the smash hit WEBTOON series!

How did you get your start in the anime industry? Was this a career path you always planned on pursuing?
In elementary school, I got hooked on a series called Macross, and that’s when I decided my dream was to become an animation director. To make that dream come true, I focused on studying art in middle and high school. I got into a university in Korea that had an animation department, but I decided to study abroad instead for the chance to broaden my horizons more. I had trouble deciding whether to go to America, where Pixar was located, or Japan, where Macross was made, but I ended up deciding to study in Japan based on the strength of its hand-drawn animation.
Could you tell us how you first became involved in the anime adaptation of The God of High School?
[Manabu] Otsuka-san, the president of MAPPA, gave me a proposal. I was familiar with the name The God of High School, but I hadn’t read the series, so I read the entire thing right after that. The action was incredible, and I knew right away that I wanted to animate that with my own hands. Also, as a Korean myself, I was deeply intrigued by the concept of animating a Korean WEBTOON series, so I considered it a great opportunity.
The fight scenes in The God of High School are dynamic and engaging to watch! Could you talk about how the team used real-life martial artists and specific animation techniques for this series?
The God of High School tournament brings many different martial arts styles together in one venue. For that reason, I wanted to try out each of those martial arts styles myself, but I had neither the time nor the budget, so all I could do was research them all on YouTube (lol). For example, I studied taekwondo techniques on YouTube, then reproduced their motions in hand-drawn key frames. I incorporated my own style of camerawork to create highly intense images that give the impression of great speed.

How closely did you work with orignial creator Yongje Park in adapting his series?
In general, all the scripts, storyboards, and designs were sent to the author so he could check them over. I explained to him in detail how we were using the original work as a base while changing the designs and scripts in ways unique to the anime format, and he was very happy with it. He had deep respect for the way anime is produced, which made the project much easier to work on.
You also directed Garo the Vanishing Line, another MAPPA series with intense and excellent action elements. Did you incorporate anything you learned from that series into The God of High School?
I learned that making animation is all about teamwork. GARO was the first title I directed, so I gave it everything I had, but for perhaps the very same reason, I wasn’t clearly seeing what was going on around me. So this time, I wanted to have more faith in each member of the staff throughout the production process.

What do you think makes The God of High School stand out from other anime with a martial arts focus?
I felt much more of a sense of speed from The God of High School than I sensed from other martial arts titles. So, I decided that the most important point of this title’s design was that sense of speed, and I matched that with some very cool music to create action scenes with just the right tempo.
What is the day in the life of an anime director like? How did you spend your hours while working on The God of High School?
Well, I start with the most important part of a director’s job, checking over storyboards and working on the ones for the episodes I’m responsible for. Things like meetings and design checks follow that, and then I draw key frames for the episodes I’m responsible for and do checks on cuts from other episodes. And after work, it’s time for a beer! What do you find special or unique about the WEBTOON series source material?
I think the most unique thing is that readers can access full-color series on their smartphones and other digital devices free of charge. The series are also very high-quality, with some being adapted as movies or dramas and spreading all around the world. I think the medium has a lot of potential to grow even more.

What has been your favorite part of adapting The God of High School? What has been the most challenging part?
My favorite part is the friendship between the three main characters. That’s the primary theme of this series. Mori, Daewi, and Mira are all participating in the tournament for their own reasons, and seeing them grow together as friends and as a team is my favorite part of the series.
The most challenging part was the sheer number of action cuts. GOH has far more action cuts than the average TV series, making it quite a challenge. At first, I actually considered reducing the number of action scenes. But the action is the main appeal of the series, so I knew I had to follow through. Anime set in real-world locations outside of Japan are uncommon. How did your staff familiarize themselves with South Korea as a setting?
That part was pretty challenging. We typically relied on internet searches to build the setting, but I was the only Korean person at both the production and dubbing studios, so everyone came to me with their questions about how to use Hangul (the Korean writing system), car license plate numbers, household customs, place names, and more. But since I’ve been working in Japan for so long, it was a lot of fun describing my home country to the people here. I felt a deep sense of responsibility at the same time, though. Some of the staff were fans of K-pop or Korean films, and some had even flown to Seoul on their own to familiarize themselves with it.

Check out the original The God of High School WEBTOON series here!
Read our other interviews with The God of High School creators:
Tatsumaru Tachibana (voice of Jin Mori)
Arisa Okehazama (composer) and Yoshiki Kobayashi (sound director)
Kiyoko Yoshimura (writer)
0 notes
Text
Crazy Ex-GIFs
Hi Bunch!
I’d like to do a soft opening of my new Crazy Ex-Girlfriend fan-made content project in progress that I’m calling “Crazy Ex-GIFs”:

The motivation for this project is that I was super frustrated with the state of Crazy Ex-GF GIFdom. There are so many great gif sets out there, but no good organized source for everyone’s favorite reaction gifs. Like this one:

Or this one:

Secondly, the gifs out there are mostly optimized for Tumblr gif sets and not for use as reaction gifs in texts and what not. Because of the limits gif sizes on Tumblr, this means lower quality, shorter gifs. Also, since the gifs are made as part of a set, people aren’t generally focusing on making great gifs of single moments... like this one:

Or this one:

See? these are gifs but they probably aren’t playing on Tumblr, but trust me, they are fine on Twitter, FB, iMessage etc. Here are the links to the originals without Tumblr interference:
Party
Holy RBG
And to one on Twitter (#humblebrag)
Anyways...
The goal of this project is to make sharing and using Crazy Ex-Girlfriend reaction gifs as easy as possible for us fans so we can incept the show into the minds of our friends and acquaintances. Or at least just make them go “Wow that is super weird wtf is that”
This show has such a unique charm, and I feel like the medium of the reaction gif as spread through the daily internet and text message interactions of the bunch of us fans is a great way to get people curious about this strange and delightful television program.
To address the concerns of gif organization, quality optimization, and ease of use on iPhone so that more of the amazingness of show can be spread around this way, here are the three parts of Project Crazy Ex-GIFs:
1) Crazy Ex-GIFs Originals: A brand new world of Crazy Ex-Girlfriend reaction gifs.
This is a collection of gifs I’m working on which are specially made to be used as reaction gifs. They are flashy and colorful and try to capture great CXG moments that you can co-opt when you’re communicating with people digitally. “Big Party” and “Holy Ruth Bader Ginsburg” above are two of about 20 I’ve made so far and the collection will grow approximately weekly (I’ll let you know on twitter @bunch_of_fans when I’ve added new content). Click the link above for the current collection.
What I need from you guys, if you will, is 1) to suggest in my ask here on Tumblr or tweet @bunch_of_fans on Twitter some great moments that you’d like made into this kind of reaction gif, and 2) to just use these whenever you can where ever you can! No credit necessary unless you are referring a friend to the gifs for he or she to use. Post on Reddit, Twitter, your blog, etc. (don’t specifically claim them as your own of course but otherwise, go crazy).
2) Crazy Ex-GIFs on GIPHY
GIPHY is a popular, widespread gif app available for the iMessage app on iPhone (and maybe Android messages, but I don’t have an Android to check so lemme know, dudes).
For easy sharing of these CXG gifs, simply 1) make a GIPHY account and login, 2) go to the Crazy Ex-GIFs channel on GIPHY, 3) pick the gifs you’d like to save for use in texts, and 4) click the little heart to favorite them! Your favorites are available through the iMessage app with a couple of tap, tap, taps. Download the GIPHY iMessage app free from the app store, login with your credentials, and follow these easy steps to insert a Crazy Ex-GIF into your text:
1) iMessage -> expand options.

2) Click apps icon.

3) Open GIPHY (if you do this once, it will become your default when you click the apps icon from then on unless you enter another app).

4) Click the menu icon

5) Open your favorites (note: Login before your first use -- after that your credentials are saved).

6) Scroll through the gifs from my channel and others that you’ve favorited and select the appropriate one. It will play you a preview of them all. I picked Josh/Greg Tap High-Five.

7) It’s in your message... Add a caption if desired.

8) And send. High five!

That’s it!
The GIPHY only includes Crazy Ex-GIF Originals (my personal gifs), but if other gif creators want to make a GIPHY account so people can favorite their gifs, do it! You can tweet @ me your channel url and I will retweet to followers of @bunch_of_fans -- We retweet all fan-made content, after all.
(For the record I don’t work for GIPHY or anything, they just happen to be the most popular site with the best iMessage integration. Furthermore, Twitter’s GIF search works through them -- that’s how widespread the app is. You can’t currently find for these through Twitter GIF search but I’m working on it!)
3) Crazy Ex-Girlfriend Reaction GIF Comprehensive Organization on Imgur
The third part of this effort is to organize all Crazy Ex-Girlfriend gifs by episode and by “reaction type/mood”. This is for those times when you want to browse the full scope of gifs to find a specific one that you just KNOW exists but can’t find, or when you want to hone in on the perfect mood/reaction and need more options.
This effort aims to put all gifs under one roof including gifs from other creators (with full credit in the image descriptions of course). I have some example of what this will look like in place (click the link above); however, this part of the project is currently incomplete because 1) wow, it takes forever to do this gif by gif for every episode and 2) I thought the most efficient way to do this would be to call on the other gif creators to upload their own gifs from their own computers (a drag and drop process as opposed to me downloading and re-uploading).
If you’re a gif creator and you want to be involved in this effort, message me here or @ me on Twitter and I will give you access to the Imgur account so you can add your gifs to this collection. Note: This is meant specifically for short “reaction” gifs -- gifs you might send to a friend over a message. Length should be reasonably short and words on the gif should be short and sweet. I also ask that you add some kind of meaningful summary line and credit yourself in the image description box.
That’s it guys!! Enjoy!!! Please use this for its intended purpose: seeding curiosity about the show everywhere around the internet and the known universe! We want to tap into people’s curiosity by sharing some weird and great moments from Crazy Ex-Girlfriend.
Yours Truly, Frame by Frame,
Chelsea (@bunch_of_fans)
#crazy ex-girlfriend#crazy ex-girlfriend cw#Crazy Ex-GIFs#gifs#crazy ex-vangelism#show outreach#fan promotion#reaction gif#rachel bloom#rebecca bunch#1.01#1.14#1.02#2.02
3 notes
·
View notes
Text
How to Tell If a Wedding Planner (or Pro) is Real
With so many instagram accounts and social media profiles “sharing” other people’s work, how can you tell if what you are looking at is truly the work of the wedding pro you are considering?
If you have read the book “Steal Like An Artist” by Austin Kleon, you know that there is very little in the world that is completely, wholly original. As artists and creatives, we are inspired by the world around us. To be inspired by the world is to take that which you see and make it better. I take colors, textures, and patterns and I mix them in a new way. I make note of the weddings, events, and interior designs that I love so that I can dissect and dismantle them. I break the world into tiny pieces, and then put it back together in a way that - hopefully - makes people feel things other than that which they felt before. This is not theft. It is inspiration and, in so many ways, art. I honor the work that has come before me by pushing it further.
Theft in the wedding and event space is about showing work that is not your own and failing to properly credit the appropriate individuals. It is taking an idea or an image and knocking it off in a way that degrades the value of the original work. When I talk to my clients about design, I find myself saying, “You wouldn’t carry a knock off Chanel or YSL bag. Why would you pay for a knock off wedding?” My advice for clients and creatives alike is always this: Be better. Be better than Pinterest. Be better than Instagram. You deserve more than a knock off; especially a bad one.
How do you as a couple know whether or not the work a wedding pro is showing is actually theirs?
Over the last month, many of us have been made aware of the fact that our work has been “stolen” and is being shared by other wedding pros as their own. As a professional and a business owner, it is incredibly frustrating to see work be abused in such a cavalier manner. Many of us have dedicated our lives to the pursuit of this work. We have spent decades honing our craft and invested thousands of dollars and countless hours in order to develop ourselves as creatives. Our ability to see the world in an utterly unique way, to imagine a world more beautiful than the one we live in, and to manifest that into reality is an artform. Having it pilfered and passed around as if it is nothing is not only wrong, but incredibly hurtful. It is hard to understand how one professional can do this to another.
As maddening as it is for us as creatives, the real damage to is to our clients. Newly engaged couples begin their search for inspiration online. Social media sites such as Instagram and search engines such as Pinterest are the go-to sources of inspiration for brides and grooms. Couples find an image they love, trace the clicks back to a website, and book a particular vendor based on what they have seen online. The relationship starts with a lie, and nothing good can come from that place. As the process moves forward, couples find themselves struggling with their vendor (be it a planner, designer, photographer, etc.) because the hired team cannot meet their expectations. There is a gap between the perceived talent of the vendor and their actual ability. The faulty pro has sold their clients a lie, and the unknowing couple is left confused about where they have gone wrong. This leads to heartbroken clients and a negative impression of our beloved wedding industry.
So how can you, as a couple and potential client, determine if the work you are seeing online is truly the work of the professional you are considering? Here are three ways that you can suss out the legitimacy of a wedding professionals’ presented work:
5 Tips for Validating a Wedding Pro’s Authenticity
COMPARE: Compare the image you love to the rest of the wedding pros portfolio. Does the image you love fit in with the rest of their presented work? Wedding planners will plan to the desires of their clients, but there should be a sense of style and a vibe that carries through their work. For example, I love production. My weddings will all feature a major design element and there will be a sense of transformation and storytelling. My images are captioned with ways that explain how and why I created a certain environment. Every element I add to a design is personally vetted, and there is a reason behind each decision I make. As , have a very specific style and vibe. Their composure, the lighting, and the way in which they frame their subjects will have a thread of consistency. If you look at a photographer’s site and there are inconsistencies in the filter and tone of the images, it is a good indicator that the work you are seeing may not be theirs.
FOLLOW THE FEED: Scroll through the feed of the company you are considering in search of other images from the same wedding or event. Legitimate pros will have multiple photos of the same wedding, and those photos will also appear on their website. Beware of new accounts that are featuring over the top work that appears to be their own. New businesses need time to develop their own original portfolios. If you see something that you adore but the pro seems too new to have perhaps produced it, reach out and ask about the origin. Some new businesses have approval to share work they contributed to while they were employed with another company. In that case, the pro will likely direct you to the original source and explain how they worked on the project. Always double check, and ask the actual wedding planner or photographer what they can tell you about the posting pro’s involvement.
IMAGE SEARCH: Did you know that you can search for an image via google? Simple drag the image you love into the search bar and do a little digging. You would be able to trace back the original origin of the photo, and also see where else the image has appeared. Pay particular attention to weddings that have been published by third party blogs and magazines, as the editors will list the legitimate vendors that were involved in the project.
TAGS AND COMMENTS: From time to time, vendors will share the work of other pros to showcase inspiration or to highlight a relationship. Legitimate vendors will note clearly that the work they are sharing is not their own. They will list detailed credits in the captain and note that the images and videos shared are not from events that they have produced. However, less scrupulous people will share work without specifically saying who it belongs to. They will craft comments and captions that make it seems as if they did the work, and they will “hide” the real vendors as tags in the image. This is tricky, as the poster will say things such as “I never claimed it was mine” or “well, I tagged you in the image” to deflect responsibility. I know that it sounds crazy, but you should always do your due diligence and ensure that there are no hidden tags or credits that you may be missing.
ASK FOR FULL SET OF IMAGES: It is very easy for someone to repost one piece of work and claim it as their own. It is much more difficult to hijack an entire gallery. While qualifying your vendors, ask to see the full set of images from the weddings you love. Not just the public gallery that they are showing; ask for the full set of images. Wedding pros who have actually worked an event will have their own behind the scenes photos they can share.
It may sound like a lot of work, but vetting your wedding professionals - especially your wedding planner - is one of the most important things you will do while building your team. Hire the right person with the right credentials - one that also sees the world as you wish it were - and you are all but guaranteed to love not just the final product, but the process. However, if you fall victim to someone who claims work that is not their own or that overly embellishes their experience, and you are likely doomed to find yourself steeped in regret. (For a real-couple’s account of their experience having hired the wrong wedding planner, watch my VIDEO or listen to my PODCAST.)
How can we as wedding professionals protect ourselves from unsavory “pros” who pass our work off as their own?
Perhaps you are wedding professional that has had your work “borrowed” by your competition; what then? Every established wedding professional that I know has experienced this. Some attempt to prevent theft and unauthorized usage by putting large logos and watermarks on their images. This is an awful look and prevents the real pros from properly showcasing their art. Additionally, anyone who wants to take any image can and will easily get around a logo. I do not believe in compromising the work to prevent the bad behavior of others. I do believe in addressing the behavior, however, and doing your best to stop others from being actively injurious.
I am not a lawyer, but I have taken the following steps with great success over the years:
If you find that your work is being used without your consent, the first thing to do is to send a message directly to the offending party. Let them know that you have become aware of their unauthorized use of your work. State clearly that you do not give this person permission to use your image/video/design/words and request that they take it down. Next, you should reach out to all of the pros that worked on the wedding or event in question and let them know that another business is sharing their work inappropriately and without credit. In my experience, other vendors will be just as disgruntled by this action as you are, and they will also reach out to the offending party. Peer pressure is a powerful influence, and often encourages the poster to remove the images they have posted. If, after all this, you still find that your work has not been removed, make your plea public. Post a comment on the image that clearly states that the work being is yours, and that it does not belong to the posting business. Request that they remove the image and make a note to follow up and ensure that they take it down. Screengrab the image, and keep a detailed record of your requests and the business’ response to them. If a week passes with no resolution, you can escalate your request by sending a cease and desist letter. In layman’s terms, “cease” means to stops doing something and “desist” advises them not to resume the behavior. This type of notification will typically be the last step you need to take in order to resolve the issue. After this, you need to either bring in an actual attorney or you need to let it go.
Personally, I struggle in letting things like this go. But I also believe that every moment I spent policing the behaviors of others takes away from the time and energy I can put into creating something new. That doesn’t mean that I stand by and allow others to wantonly steal my work. It just means that I won’t allow them to steal my time or my joy along with it.
Instead, we fight the good fight. We do the best we can. We share the work of others to celebrate them and to share inspiration, and we protect that which we created in honor of not only our work, but for the clients that we created it for. Anything else disrespects the process, the journey, and the story. If we fail to honor those things, then we have nothing. And pretty without purpose will always fall flat.
And so my engaged friends, continue to seek inspiration online. Pin the photos you love, save the Instagrams that inspire you, and use the many resources available online to educate yourself about who you are working with and what you are buying. Buy from and work with the best, and remember that integrity and art are a winning combination.
Always….
PS - My friends at Anee Atelier recently published their own account of having not only their work but their entire site plagiarized. (You can read their incredible article here).
0 notes
Text
How to Create Landing Page Variants & Optimize with AI
You’ve built the perfect landing page. Your headline is simultaneously descriptive and urgent. You’ve got a hero image of someone holding your product, weeping with joy. Your explainer video becomes a surprise hit at Cannes (though it’s controversially snubbed by the Academy). Your testimonials include Beyoncé and Tom Hanks, and you have to shrink the New York Times just to fit Disney into your “as seen in” logo spread.
Dream on, right? There’s no such thing as a perfect landing page because there’s no such thing as a page that converts every visitor. One person thinks your headline is condescending. Another doesn’t see themselves in your hero image. Everyone loves Beyoncé, but plenty think the live-action remake of The Lion King was a cash grab. Your page doesn’t speak to each person uniquely, so they bounce.
That’s why Unbounce created Smart Traffic, an AI-powered conversion tool that automatically routes each visitor to the landing page where our robot algorithm says they’re most likely to convert. Unlike A/B testing (which is all about creating landing page variants and choosing the one that performs best), Smart Traffic lets you create as many variants as you need to appeal to each type of visitor.
Bottom line: Smart Traffic helps you capture more of those leads you’re missing out on.
Sounds great, right? (Biased opinion: It is.) The only catch is that Smart Traffic needs variants to send traffic to, and coming up with different versions of the same page can be tough. What the heck are you even supposed to… you know, variate?
We’ve always said that the most effective landing page structure includes five core elements. Below, we’ve got ideas for how you can use variants to optimize each one of them, plus examples of brands that are already doing it right:
Unique Selling Point (USP)
Hero Image & Page Design
Features & Benefits Copy
Social Proof
Call to Action (CTA)
“Do I really need Smart Traffic?” A/B testing often needs thousands of visitors to glean any useful information, but Smart Traffic starts optimizing in as few as 50 visits. Learn more about the benefits of AI-powered optimization.
Variant Idea #1: Try Changing Your Unique Selling Point (USP) in the Headline
If you’re new to landing page optimization, experimenting with your unique selling point (USP) might be the quickest way to get started. Changing the way you frame your offer can help you stand out from your competitors. Clearly describing the value people will get makes them more likely to convert. And with a tool like Smart Traffic, you can create landing page variants to highlight different selling points for each audience segment.
While your USP should inform your entire page, the headline (and subheadline, if you have one) is where you really state it outright. Along with your hero image, this is the first thing your visitors see above the fold.
The goal here is to clearly and succinctly describe your value proposition (while also ensuring the message matches the traffic source, whether that’s a search ad or email promo). It also better be engaging. You’ve only got a few seconds to capture visitors’ attention and assure them they’re in the right place.
Check out how Winc, a wine club subscription service, is optimizing their headline and hero image on this great-looking Unbounce-built landing page:
In their original page, Winc uses the headline “Unbox, Uncork, Enjoy.” It’s catchy—the sort of thing that’d stick in someone’s head after they’ve left—but anyone unfamiliar with the company might not get it right away.
Images courtesy of Winc. (Click to see the whole thing.)
This Winc variant takes the subhead from the original page and deploys it as the primary headline. Paired with a new hero image that includes one of Winc’s delivery boxes, this variant more quickly and clearly communicates the company’s USP: “a world of wine [at] your doorstep.”
Sometimes, the headline and subhead that work best will surprise you (which makes them fun to experiment with). Here are some things to try as you set up your variants for Smart Traffic:
Try different selling points. Could you frame your USP in more than one way? If you’re running a car wash, maybe one headline is about having the shiniest wax, while another is about the speed of your service. Create variants for each value prop.
Appeal to various audiences. Your visitors are a motley bunch. They come from all over the world. They click through from different sources on different devices. How can you pitch your USP in your headline to resonate with those different groups?
Keep it simple. Try to describe your USP as quickly and explicitly as possible, then make it your headline. If someone read that and not any other part of your page, would they understand your offer?
Change the tone. Is your headline highlighting a problem (negative), or presenting a solution (positive)? Is it serious, or funny? Could it be reframed from a statement to a question? Test your language to see how that changes the way visitors react to your USP.
Introduce social proof. Sometimes other people sell your offer better than you can. We’ll get to social proof a little further on, but short quotes from customers can make for compelling headlines or subheads.
Variant Idea #2: Swap in a Different Hero Image or Rearrange Your Page Layout
Another great element to optimize is your hero image. This is your opportunity to show your offer in the context of use: a person happily pushing your new-age lawnmower, or someone really jazzed up by your webinar. (Hey, we can dream.) You’ve got a video of that lawnmower annihilating Elon Musk’s overgrown lawn? All the better.
As we saw in the Winc example above, experimenting with your hero image can help you find better ways to communicate your offer (or, if you’re using Smart Traffic, tailor each variant to highlight a different aspect of your offer). Winc’s original hero shot displayed a row of wine bottles. Just by putting a delivery box alongside that image, Winc adds a new layer of meaning. Visitors instantly understand the USP.
And it’s not just your hero image. Every design element on your landing page is up for negotiation. For example, see how popular meal delivery service Dinnerly created two variants of this price comparison landing page—one with navigation, one without.
Images courtesy of Dinnerly. (Click to see the whole thing.)
Or check out this Unbounce landing page from the sleep experts at Helix. The original variant is great: it lays out Helix’s USP step-by-step, includes loads of (often hilarious) social proof, and keeps things light with casual copy and memery.
Still, Helix felt like something was missing… a certain je ne sais quoi. So they decided to zhuzh it up.
Literally. (you, Helix—you guys crack us up.)
Images courtesy of Helix. (Click to see the whole thing.)
Just by adding a little color—a yellow squiggle here, a red block there—Helix makes the page pop. It’s fun. And you can zhuzh up your own landing page design by experimenting with some of these variants using Smart Traffic:
Swap out your hero image. If your hero shot is product-focused, try using one that’s more about people (and vice versa). Explore whether photography or illustration resonates better with your audience.
Introduce video. They say a picture is worth a thousand words. Then what about blasting 60 pictures every second? There are some real benefits to using video on your landing pages, so if you’ve got the resources, give it a shot.
Scramble your layout. Try removing navigation from your landing page. Split your layout into two or three columns. Mix your sections around to see what works best.
Add some flair. Directional cues and movement can help you focus visitor attention on specific parts of the page. Adding a splash of color or quirky visual elements can help you cut through the noise.
Variant Idea #3: Optimize Copy Length & See Which Benefits Resonate Most with Different Audiences
Next up, we’ve got your benefits—all those words below the fold that describe your offer and explain the real value of it. In terms of content, you want to both inform visitors what your product or service is (the details and features) and why they should care (how those features make their lives better).
Where you can really optimize here is in the way you present that information. Some offers need to be explained at length. Others might not need more than a few sentences. You can also toy with line breaks and bullets to make your copy more digestible, or rearrange content so that visitors see certain benefits first.
Take a look at this landing page from Savile Row Company, an upscale clothing brand. The page (built with Blimpp) is super thorough. Savile Row highlights the different value props, the range of shirts available, the glowing reviews from customers.
This page really hammers home the quality of the product, but how much of that stuff is essential to converting visitors? Savile wanted to find out, so they created a variant of the landing page that’s less than half the length of the original.
Images courtesy of Savile Row Company. (Click to see the whole thing.)
It’s got most of the same imagery, but lots of the copy—the value propositions, the descriptions of each kind of shirt—have been scrapped. As a result, this variant of Savile Row’s landing page is out-converting the original by a few percentage points. Less can be more.
Try creating variant landing pages for Smart Traffic with some of these changes to your benefits copy:
Make it about value. Yeah, tell visitors what your offer is or does, but also be sure to explain how it benefits them in a meaningful way. Shameless example-plug: At Unbounce, we like to talk about our drag-and-drop builder, but the value of that is marketers can create awesome landing pages fast, without a developer.
Check out reviews for new angles. Sometimes, one of your (seemingly) less significant value props can be the most important for a subsection of your audience. Sort through reviews of your offer and see if there’s a particular benefit that’s popular enough to have its own page variant.
Play with length and formatting. Long landing page? Try scrapping half of it. If you’ve got a short page, see what happens when you create a variant with extra sections. Shuffle up the order of your copy and try breaking things up with bullet points.
Variant Idea #4: Find New Sources of Social Proof
One of the most powerful tools of persuasion at your disposal is social proof. It tells visitors you’re reliable—that your product or service works like you say it does. It also tells them they can trust you with precious data, like their email addresses, credit card information, and Netflix history.
Your main opportunity here is to optimize with different types of social proof, so we’ll jump right into applying them to your Smart Traffic variants:
Use (believable) testimonials. Find and include customer reviews from people online. (Double-check each website’s rules to be sure you can use them.) If you’ve already got some, make sure they sound like they came from a real person. Even legit reviews can come off as plants if they’re too robotic or kind.
Add a logo bar. Logos from other brands that have used your product or service (or media outlets that have featured your company) can act as a stamp of approval. You become more trustworthy just by association.
Include review scores. If you’re on Amazon, Yelp, or Capterra, you can repurpose your customer ratings on your landing page. Make sure it’s at least equivalent to 90% or above, though—anything lower doesn’t look great. (Tell that to my college GPA. C’s get degrees, y’all.)
Variant Idea #5: Rewrite Your Call to Action (CTA) & Incentivize Your Offer
Finally, we’ve got your call to action (CTA). The jewel in the crown. The thing that the rest of your landing page exists to support.
There are a few ways to experiment with your CTA. One is testing the CTA itself—the actual text and button on the page. The copy should be snappy and engaging, and tell visitors the benefit they’ll get with their click. It should also stand out from the rest of the page. Try making it bigger, changing the color, or adding directional cues to help draw attention.
Also consider how much work you’re asking visitors to do. Clicking a single button is much lower effort than filling out a lengthy form. The incentive matters, too. Free shipping, a trial period, or a small discount can help convert people who are on the fence.
Here’s a simple example from Codecademy, which has online courses in a ton of different programming languages. They created a variant of this landing page with just one teeny difference: the bit of copy in their CTA button.
Images courtesy of Codecademy. (Click to see the whole thing.)
Who are these different CTAs for? “Get Pro Now” likely appeals to visitors who are already sold on the platform—they know Codecademy Pro is what they want, so hurry up and give it to them, damnit. But people who aren’t familiar with Codecademy might be hesitant. “Start My Free Trial” is a lower commitment and might better convert those who are undecided.
Here are some ideas for optimizing your call to action with Smart Traffic:
Change up your copy. Is your CTA compelling? Does it say what’s going to happen when a visitor clicks? Would you click it? The copy here is ripe for experimentation, so go wild.
Test out the button. Use a sharp color that stands out from the rest of the page. Make the text bolder, big. Think about how visitors scan your page (top to bottom, left to right). Could your CTA be in a more obvious spot?
Make it easy. Do you really need visitors’ email addresses, or do you just want them to buy your knockoff Lego? Where you can, replace forms with a clickthrough button. If you absolutely need a form, try cutting down on the number of fields, or hide the form on a second page behind a button CTA.
Incentivize action. Highlight any bonus value you’ve got—things like free shipping or 90-day returns. See how even a small discount impacts your conversion rates.
Automatically Optimize Your Landing Pages with Smart Traffic
It���s true that there’s no such thing as a perfect landing page for your whole audience. But there is a perfect landing page for each individual visitor.
Smart Traffic helps you get more sales and signups by automatically sending visitors to the landing page that best resonates with them. No more testing, no more champions—just more conversions.
from Digital https://unbounce.com/marketing-ai/optimize-with-smart-traffic-landing-page-variants/ via http://www.rssmix.com/
0 notes