#600ppi
Text
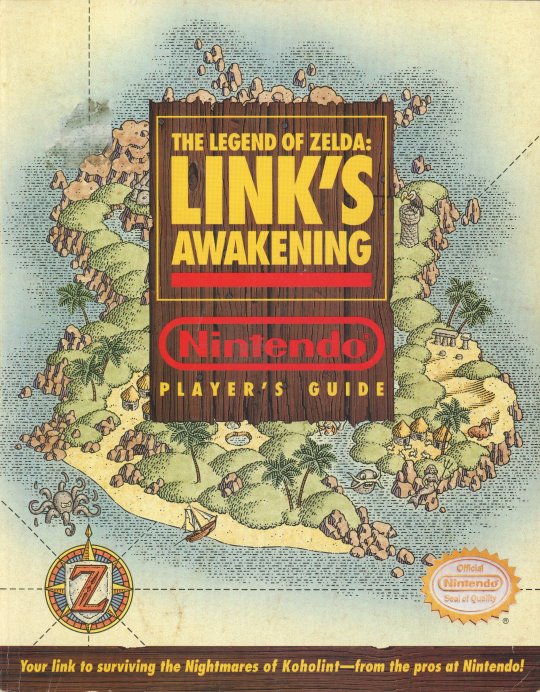

I just made & uploaded new 1200dpi scans of one of the best Zelda publications of all time: Nintendo Player's Guide for Link's Awakening. All the art is incredible & the writing is great too, just like the LttP one.
In fact, my top 4 Western strategy guides, in order, are:
The US Link to the Past Player's Guide
The German Link's Awakening Player's Guide (I'm re-scanning this next)
The US Link's Awakening Player's Guide
The German Link to the Past Player's Guide
The Legend of Zelda Link's Awakening Nintendo Player's Guide. Publisher & ISBN Info: Nintendo of America. Tokuma Shoten Publishing Co. 1993
#The Legend of Zelda#Link's Awakening#ゼルダの伝説#夢をみる島#Strategy Guide Zelda#tLoZ#LoZ#LA Link's Awakening#SNES#600ppi#1200ppi#RAW#RAWS#scan#scans#high res#high rez#high resolution#Link#Nintendo#book#videogame#Nintendo Power#Strategy Guide#Game Guide#Player's Guide#Katsuya Terada#Zeruda no Densetsu: Yume o Miru Shima#Windfish#Koholint Island
295 notes
·
View notes
Text
Shot & Chaser update delayed by Texas-wide internet outage
Hi all - With our internet down and just a cell connection, I can't transfer the giant page files for conversion to web size. Will update when connection is restored.
Thanks for your patience!
#shot and chaser#webcomic update#texas#i mean they're 600ppi full color files with like 15 layers so
81 notes
·
View notes
Photo

Oops, made some tone brushes
ID: A graphic with a pastel gradient background that reads "Quatrefoil Tones." Below this are thirteen black-outlined squares labeled 1a through 5b that each house variants of quatrefoil tone patterns. Below are two arrow bullet points reading "13 Procreate Brushes" and "6x6"/600ppi tone images," Next to this a cartoony quatrefoil guy holds a thumbs up and says "Cool!" End ID.
There's no why to this, I just needed a calming thing to do for a bit and so I made a bunch of tone brushes by making pixel quatrefoil patterns. They're all over at Itchio for free/pay what you want.
19 notes
·
View notes
Text
I'm opening up some BG3 Tav (or any character/franchise/OC, really) Headshot commissions cause I need some funds.
5 slots, TAT 2 days once yours is started.
Price: $45 USD
Paypal, venmo, cashapp, or me emailing you an invoice via square (my preferred method) are all acceptable forms of payment. Link to High res (600ppi) png file will be sent upon completion.
Slots:
1. @megs-98 - Tav Done!
2. @megs-98 - D&D Character Done!
3. @boufsy - Tav- Done!
4.
5.
Style examples:


#bg3#baldur's gate 3#dragonchildgraphics#digitalart#art#commissions#commission#taking commissions#commissions open
18 notes
·
View notes
Text

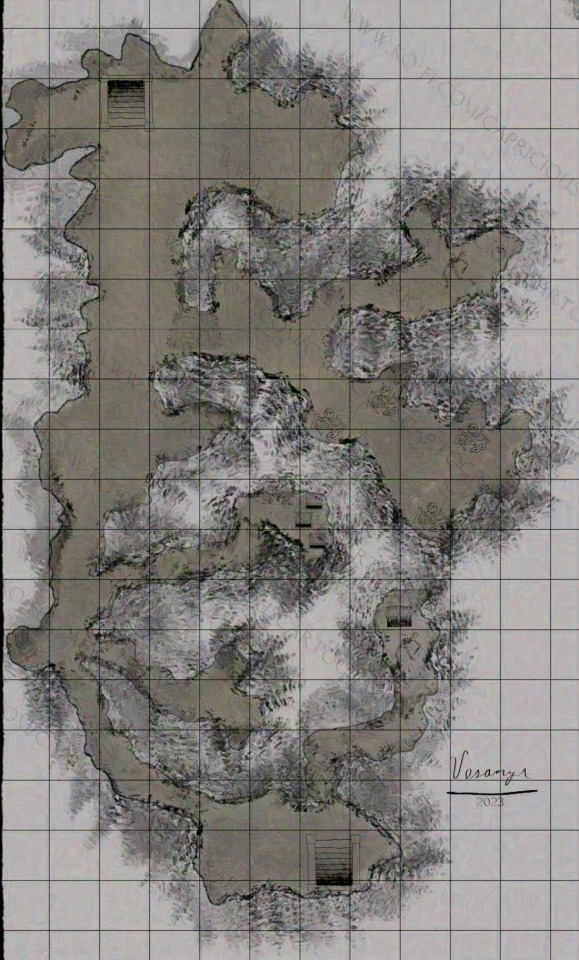
| Support me |
New month, new map! Welcome to the Far Caverns! Hand-drawn with custom assets, it's time to take your adventures underground! The Far Caverns is a 4 floor map available in PWYW, Web, and Print ready formats. The latter two contain 26 individual maps to cover every version you might want, as well as blank versions ready to customize and slap your favorite tokens on!
Take your players through the depths for treasures or horrors in equal measure with this ND accessible dungeon map, available now on my shop (link above)
As always, print ready versions are 8k and 600ppi, web are 2k and 200dpi, and PWYW are 1080p, 55dpi. Not for use with AI, NFTs, or cryptocurrency.
8 notes
·
View notes
Text
Top 1st 3D Interior Rendering Services in the USA
3D Architect studio is the development of interpreting a waiter's answer into the photograph the browser “paints” as soon as a person visits an internet site. A bad translation overall performance can decode into a moderately high certain fee. There are distinctive server answers which decide whether or no longer a bit of paper is focused. High-quality scenery options on the interpretation dialog consent you to lay down the favoured class for the focused photograph. To present-day a plan to customers, you stereotypically want a high eminence rendered spitting picture. But, excessive-eminence purified images can be slow to engender. 3D Interior Rendering Services within the United States can use an extract with an adjective that publicizes a person's country to mention that a person or to some degree is changed into that government. As an instance, if a large shot or something makes a thing meaningless, you can say that they pay attention it innocent. The handiest impact translation has in your improvement is making it informal for audiences to load and view the content on their processor.
Select out a price between 300 to 600ppi will spring more than an adequate quantity of statistics for standard fashion condenses. In case you want to do any lifestyles-threatening near-united states on the realistic, you might prerequisite to do check extracts to see if it is essential, and if no longer, deliver throughout at a tough PPI. 3D Interior Rendering Services within the USA is an entertainer's clarification of a scene. The main varieties of equipment for a meltdown are epoxy resin, sand, lime, and marine. A commonplace mix ratio used for translation is 6 components sand, 1 part epoxy resin, and 1 element bottle green. Any widespread dedication cement can be solid-off, even though the sand should be quality and smooth of layers. An amazing quality exterior translation will make your draughty home a whole lot greater strength-green. External house translation is idyllic to feature lagging to the property having strong wall building. The upkeep of current condenses is regularly informal and does not have to be completed on a regular basis as conventional ways and methods. they are low repairs due to the fact they may be water nauseating - as an instance, the silicone render will only require an irregular strain shampoo.
9 notes
·
View notes
Link
Free procreate brushes download
2 notes
·
View notes
Text
BlackBerry Classic 2024 BlackBerry'nin ikonik formülüne nostaljik bir dokunuşla geliyor. BlackBerry Klasik, BlackBerry, hayranların yıllardır değer verdiği tanıdık tasarım ve form faktörlerini geri getiriyor. 131,00 mm x 72,40 mm x 10,20 mm'lik kompakt boyutları ve 178 gram ağırlığı, onu sağlam ve taşıması kolay bir cihaz haline getirir. Nokia Orbit 5G gelecekte satışa sunulacak. Yaklaşan Nokia Phones konsepti, Vids 4u YouTube Kanalı tarafından güzel bir şekilde hayata geçiriliyor.
Nokia Orbit 5G gelecekte satışa sunulacak. 1920×1080 piksel çözünürlüğe ve 600PPI piksel yoğunluğuna sahip 6,7 inç dokunmatik ekran. Bu yeni yüksek verimli ekranlar, üretken yazılımlar ve mesajlaşma için rahat bir görüntüleme deneyimi sağlar.
BlackBerry Classic, 12 GB ve 16 GB RAM'e sahip eşleştirilmiş 1,5 GHz çift çekirdekli Qualcomm Snapdragon 8 Gen 4 işlemci tarafından destekleniyor . Dahili depolama kapasitesi 256 GB ve 512 GB olup , microSD kart ile 1 TB'a kadar genişletilebilir. Bu yapılandırma, sorunsuz bilgisayar görevleri ve uygulamaları, dosyalar ve medya için geniş alan sağlar.
BlackBerry Classic 2024 Kamera:
Kamera bölümünde ise cihazda hareket halindeyken ayrıntıları yakalamak için LED flaşlı 50 Megapiksel + 50 MP arka kamera bulunuyor. Resimler ve selfieler için uygun 32 megapiksel ön kamera. 5500 mAh çıkarılabilir pil, BlackBerry Classic'in performansını garantiliyor ve modern amiral gemilerinin dayanıklılığı orta düzeyde kullanım için yeterince iyi.
BlackBerry Classic 2024, 2G, 3G ve 4G, 5G LTE ağlarını çalıştırıyor. 2G için GSM 850/900/1800/1900, 3G için HSDPA 850/900/1900/2100 ve çeşitli LTE bantları (1, 2, 3, 4, 5, 7, 8, Yüksek hızlı veri bağlantısı için 13, 17, 20 , 25, 28, 29, 40, 41). Cihaz , internet erişimi, tarama ve uygulama indirme işlemleri için kablosuz ağlara bağlanmanıza olanak sağlayan 802.11 b/g/n Wi-Fi özelliğine sahiptir.
Bluetooth 5.1 ile BlackBerry Classic'i kulaklık, hoparlör ve diğer çevre birimleri gibi uyumlu cihazlarla eşleştirebilirsiniz. Kesintisiz veri aktarımını ve kablosuz iletişimi sağlar. BlackBerry Classic, diğer NFC özellikleriyle hızlı eşleştirmeye veya mobil ödeme yapma olanaklarını NFC seçenekleriyle birlikte sunar. Standart ses girişi, müzik ve aramalar için kulaklık veya harici hoparlör bağlamanıza olanak tanır.
BlackBerry OS 11 üzerinde çalışan Classic, BlackBerry'nin imzalı mesajlaşma ve güvenlik özelliklerini koruyor. Dört izlemegeni ve dokunmatik ekran kombinasyonu, dokunsal giriş takdir edenlerin ilgisini çekecek şekilde sürekli gezinmeyi sağlar. Şimdi gelin beklenen fiyat ve çıkış ayrıntılarına değinelim. BlackBerry Classic 2024 fiyatının Türkiye'de 20.000 TL'den başlaması bekleniyor. Çıkış tarihi olarak Aralık 2024 tahmin edilmektedir. Bu detayların beklentilere dayalı olduğunu ve resmi duyuruların farklılık gösterebileceğini unutmayın.
Özetle, BlackBerry Classic 2024, ikonik BlackBerry deneyimini özleyen kullanıcılara hitap etmeyi amaçlıyor. Spesifikasyonlar açısından çok güçlü olmasa da, nostaljik ve işlevsellik karışımı, bazı kullanıcılar için hoş bir geri dönüş haline gelebilir. Çıkışlar yaklaştıkça güncellemeler için bizi takip etmeye devam edin!
Yasal Uyarı: Gösterilen teknik özellikler gerçek üründen farklı olabilir. Bu sayfada verilen bilgilerin %100 doğru olduğunu garanti edemiyoruz. Lütfen satın almadan önce satıcıya uygundur.
0 notes
Photo

My JLA Classic for Sideshow has finally been revealed! If you're interested in the limited edition print (450 paper / 75 canvas) sign up for their RSVP list to be notified. I'll eventually have artist proofs to sell, but that usually takes a few months. This piece was done entirely in Photoshop at 600ppi. I'll eventually do a series of posts showing all the reference that went into its creation. This is considered a variant of my previous JLA Modern print (which is sold out). The print includes some detail assistance from Ian MacDonald, and it's based on a composition from Ryan Sook. https://instagr.am/p/CS7nt6OhF-z/
88 notes
·
View notes
Note
hi micky! how do you get such good quality when you post your art??
i rly don’t think my art posts in good quality ive been rly struggling with that but currently I fluctuate between 300ppi and 600ppi and my canvases usually never get bigger than 10x10in ^__^
14 notes
·
View notes
Text
5 Artist Studio Must Haves
When it comes to the right studio space for any artist, some of us can be limited or find it hard to know what we need before we can sit down and draw. I have taken around 3 years to learn and build up the must have items I use every day for my commission work. In this blog I have laid out the 5 Artist Studio Must Haves I cannot live without including scanners and drawing board. There is a direct amazon link for a UK or US customer for each item I talk about. I hope this is useful to you. Let me know in the comments below.
Wooden Artist Draws
I search a while for these draws, and they were so hard to find. I ended up getting this 4 Drawer Wood Artist Supply Storage Box from the american amazon store since the UK one only sold two or three draw types which isnt really enough. They are the perfect size for pencils and stackable, so as your collections of pencils grow you can buy more draws to fit them all. These draws fit my 76 Caran D’Ache Luminance pencils box, 2x 24 set of Derwent Drawing Pencils and my set of 120 Faber Castell Polychromos Pencils. So they four draws is plenty!
They also come with handy dividers inside so you can separate your colours and have everything organised and easy to use. I highly recommend getting them as a must have studio tool.
Click the following buttons to buy from amazon if you are in the UK or US.
A0 Drawing Table
My A0 Drawing Board is definitely one of my favourite items I have bought for my studio. The UK link is the exact table I have bought but the USA link is the smaller version created by the same company. It’s worth spending more money on quality drawing table so it can last your entire artistic career. As a professional I use it all day every day and I am constantly tipping it backward and forward for drawing and photography of my work. It is really easy to use, and you can even adjust the height, so if you are a shorty like me you can have it lower than a normal table, or a lot higher than one. This A0 size gives me plenty of elbow room and the foot supports on the bottom are a great height for keeping your legs at a relaxed angel. I recommend buying this A0 Drawing Board if you have the room.
Click the following buttons to buy from amazon if you are in the UK or US.
Daylight Lamp
The right lamp is so important for drawing so you can trust you are seeing the right colours all the time and you are not dependent on a good sunny day. Since I live in a cottage in the middle of Wales, I don’t have the best lighting in my studio and therefore I am so happy I bought this lamp. The PHIVE LED Architect Lamp lights my work with a bright even light and you can hold down the power button as a dimmer switch. It secures well to my drawing board or a desk and has a long cable which is useful for plugging it in far from a socket. I would recommend getting this lamp to work on your latest creation, all hours in the day and night.
Click the following buttons to buy from amazon if you are in the UK or US.
Technology Must Haves
Technology wise I cannot complete a portrait without my Lenovo Tab E7 Tablet and my Canon LIDE 220 Scanner. I upload the reference picture to my tablet so I can zoom in on details and have a clear picture to work from. There are many tablets out there by this was the most affordable for me and does its one job perfectly. After I have completed a portrait, I use my Canon LIDE 220 Scanner to scan in my work at 600ppi. This means I have a high-quality image to use for prints and on my website whilst the customer keeps the original. This is an A4 size and larger sizes are available at a higher cost. But usually I scan the image in parts if it is larger than A4 and then put the picture together in photoshop which doesn’t take too much time. I will hopefully save up and get a large printer scanner but for now this one does the job perfectly for me.
Thank you for reading my blog about my 5 Artist Studio Must Haves. I hope it was helpful and if you have any questions then please do not hesitate to contact me or comment below. I look forward to hearing your thoughts.
Hello and welcome to my blog. My name is Sema Martin and I am a realism pet portrait artist based in Wales, UK. I specialise in colour pencil as a medium and have created many pet portraits for customers in Wales drawing from their reference photo sent to me by email. The high-quality brand of colour pencils used is a mixture of Faber Castell Polychromos and Caran D'ache Luminance on extra smooth Bristol Board paper.
#art careers#artist help#artist tips for colour pencil#artist studio set up#5 Artist Studio Must Haves#proffessional artist help#wales portrait artist#artist#art help#art career help#art motivation#artist set up#studio set up#artist studio
52 notes
·
View notes
Text

2400dpi scan of the Zelda II: The Adventure of Link map from Nintendo Power Issue 4
A good version of this has never been online before. I scanned and cleaned it so there is one version with the text and one version without. You can also find the RAW scans as well.
Find it here: https://archive.org/details/zelda_np_aol_map_hyrule
#Zelda II#Zelda 2#Zelda#Link no Bouken#tLoZ#LoZ#AoL#600ppi#RAW#RAWS#scan#scans#high res#high rez#high resolution#Link#Princess Zelda#Hyrule#Nintendo#NES#Famicom#Family Computer#Famicom Disk System#book#videogame#The Legend of Zelda#Art#ゼルダの伝説#The Adventure of Link#リンクの冒険
112 notes
·
View notes
Text
So like, I've been wondering for a while now why my drawings look so bad when I upload them online. 'cause that didn't use to be a problem before.
Well turns out that since I been drawing on my new laptop instead of my desktop, like I usually do, I had to setup my default settings in Krita again, right.
And somehow I managed mangle it up to where, instead of my usual 3508x4960p 300ppi (which is still fairly big), I've been drawing them in 4961x7016p 600ppi. Like they're huge!
I don't understand how I somehow didn't catch this before.
0 notes
Text
A Quick Almost-Tutorial on My Digital Drawing Process
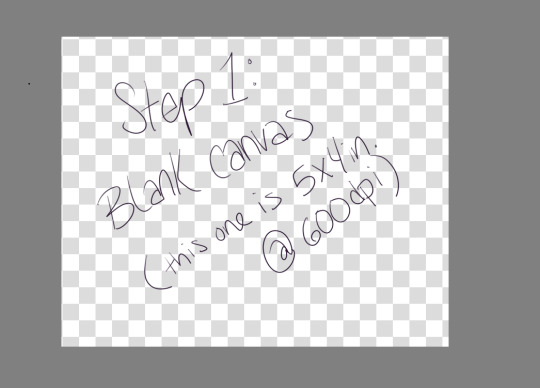
Step 1: Make a blank canvas. My preferred program is Krita, so I open that and make a canvas. I usually do 5x4 inches at 600ppi because when I save PNGs I can upload them to tumblr and the quality is still pretty good.
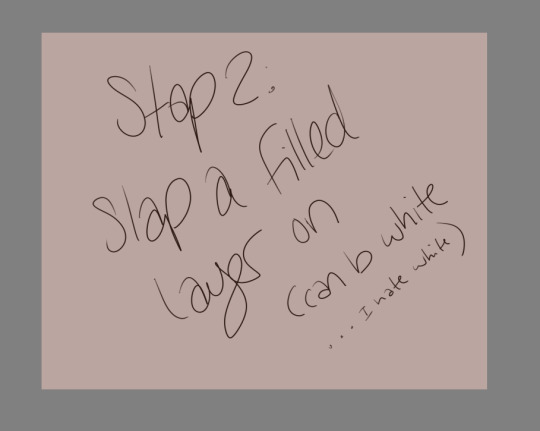
Step 2: Slap a filled layer on that shit. I hate white, but I know a lot of people just use it because it’s easy and also like paper. I tend to go wild with color, and also if you have a colored background already it makes backgrounds easier.
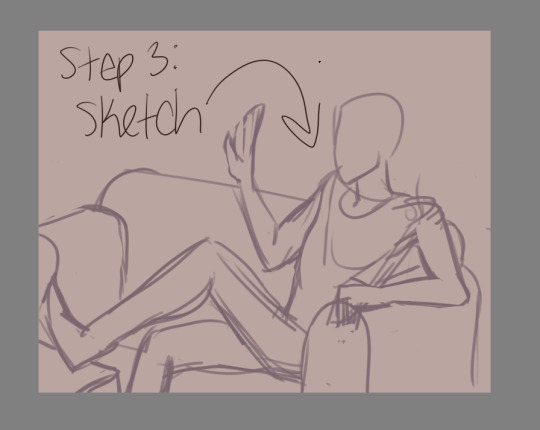
Step 3: Sketch. Use a decent sized brush, but make sure you can still scribble some details (like fingers) if you need to. I use a 27 pixel brush to sketch, just because I can. USE REFERENCES. Think about composition, but not too hard. Then lower the opacity so you can trace over it and still see.27 pixel brush to sketch, just because I can. USE REFERENCES. Think about composition, but not too hard. Then lower the opacity so you can trace over it and still see.
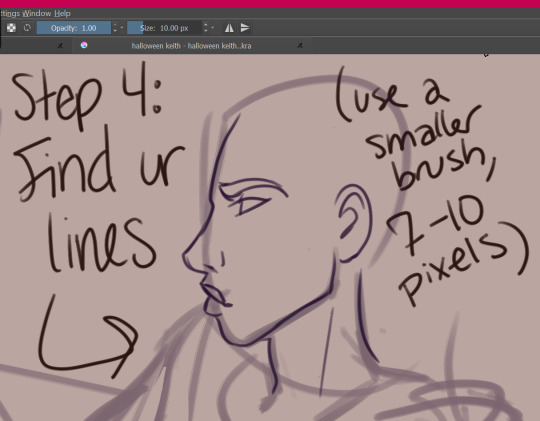
Step 4: find your lines! Sometimes I do this twice, where I use like a 15px brush to get more detail, and then a 7px brush to do my final lines. I don’t use solid black, usually--this one is dark purple. Idk, mang, I just have a hard time with black and white.
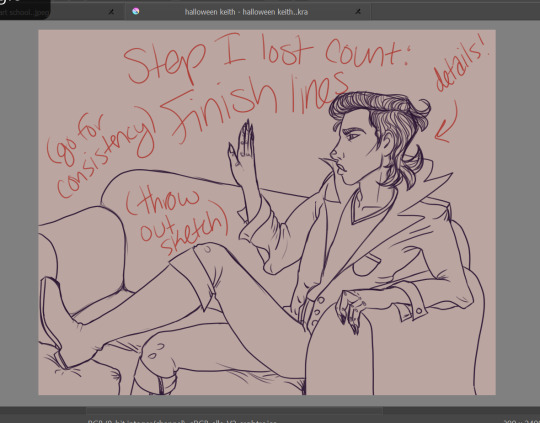
Step 5: Finish your lines with some detail and throw out the sketch (or like... turn the visibility off). If you’re just learning with your tablet, my advice is to focus on consistency. Try to get your lines to all have the same smoothness, opacity, thickness, etc. You can worry about varying line thickness when you have nice, clean lines. ADD CLOTHING FOLDS. ADD BUTTONS. ADD SOME TEXTURE IF YOU WANT TO.
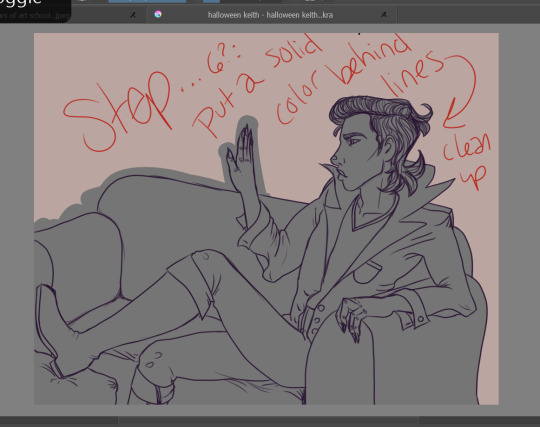
Step 6: Put a solid color behind your lines and clean it up. This is going to make it so that you can put color on top and NEVER GO OUTSIDE THE LINES. LMFAO you don’t have to do this, but I usually do because... erasing............ is hell. I do figures in one color, and furniture in another. Separate layers!!!!!

Step 7: Your program, whatever it is, probably has a version of a clipping mask. Krita technically has an alpha channel toggle that does the same thing. It just means that you have a layer/layers on top of your solid color that will ONLY draw where that color is. You can look up tutorials.
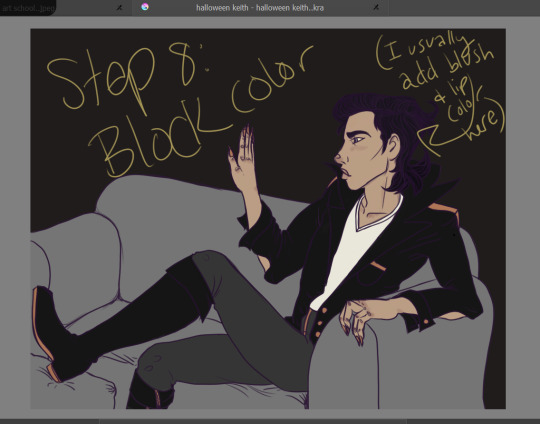
Step 8: Block out your color. I do each color on a new layer. It’s easy to add some variation on the skin here, ie fill in the lips and add some blush. Don’t worry if you can’t really see the lines on top of dark colors! All that detail will come back later.
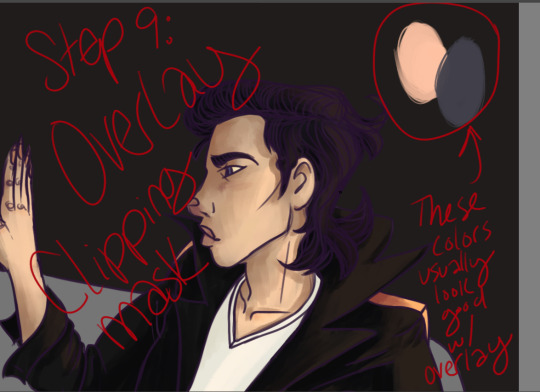
Step 9: Make another clipping mask layer on your color (I usually do it all at once instead of color by color because FAST). Change the blending mode to OVERLAY. Then find your highlights and shadows! A light peachy color will usually look good for the light parts, while a dusty purple looks good for the shadows. Start bringing back the detail! This method really brings life to your colors, so you don’t have to worry about having dull colors. It makes the light parts warmer and the dark parts cooler, which, if you know color theory, makes shadows seem more real.
Here’s where you gotta start worrying about blending. If you’re using photoshop, you have to do it all manually lmfao. The overlay thing might be hard to grasp at first if you have to do all your blending soooooo carefulllyyyyyyy. That’s the reason I use Krita--it has brushes that do my blending for me and make it super easy. This part is the most like actual painting, and not everyone gives a shit. This is optional. You can honestly do cell shading here.
If you want to, however, you can add all your texture here.
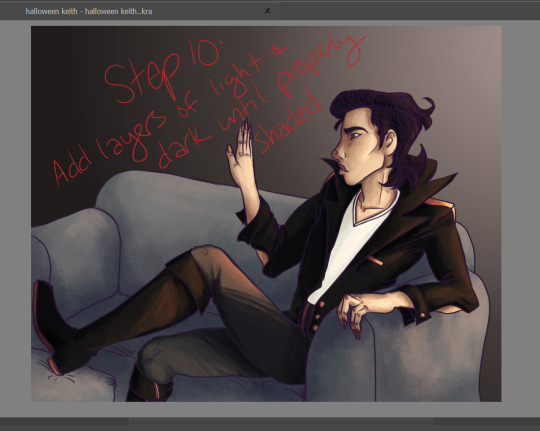
Step 10: You can add more than one layer like this. Add layers of light and dark until it’s properly shaded. See how the detail on the jacket and boots are back? The hair is still flatish, but I wouldn’t worry about that yet. Just think about which way the shadows go, and how much depth you need for your figure to look like they actually exist in their environment! Periodically step back and look at the whole thing to make sure you’re doing it all evenly, instead of focusing on one small area and overdoing it.
You can add a LOT of texture while you do this. The couch here is just light and shadows done with a sponge brush. Fuck around with blending modes, they’re pretty cool.
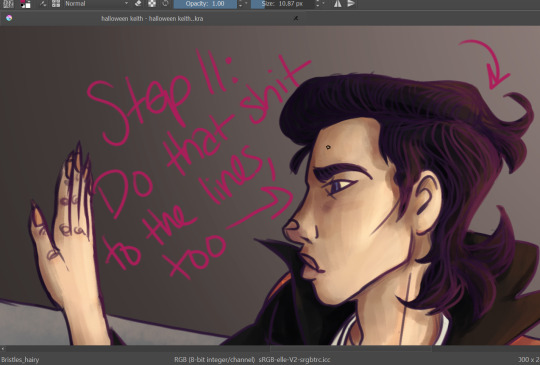
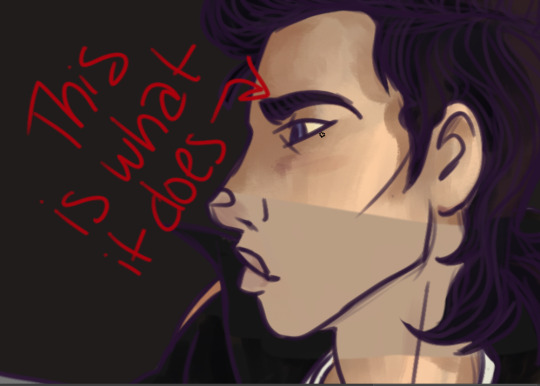
Step 11: You can do the light/dark overlay clipping mask thing to the lines, too! It’s subtle, but it has an effect. Add light where your light source is, add dark on the opposite side.
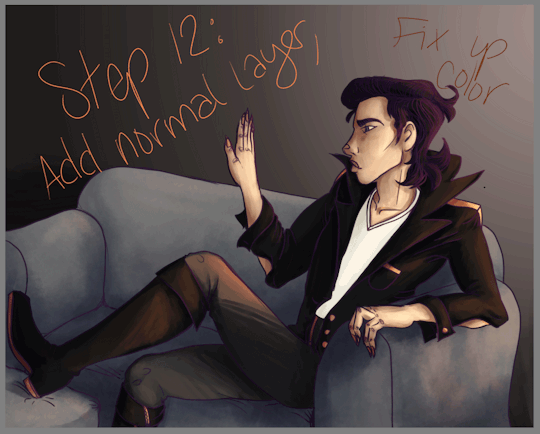
Step 12: Another subtle thing, but now is the time to fix up the color! Add another normal layer, and just use the eye dropper tool to blend your colors until it’s as smooth as you want it. You can also fix up anything that didn’t take too well to the overlay (like that white shirt... sigh). Sometimes super light/dark/bright colors won’t change when you have an overlay layer, so you’ll need to do those by hand. Just eyedrop the color, and nudge it a little up/down on your color picker chart--if you want to be consistent, nudge it a little toward the purple spectrum if you go darker, and a little toward orange if you go lighter. Not much! It’s a subtle difference. You’ll be able to see if it looks waaaaaaay too orange.
Also, if you have a layer that you think comes on a little strong, you can always take down the opacity! REMEMBER THAT!
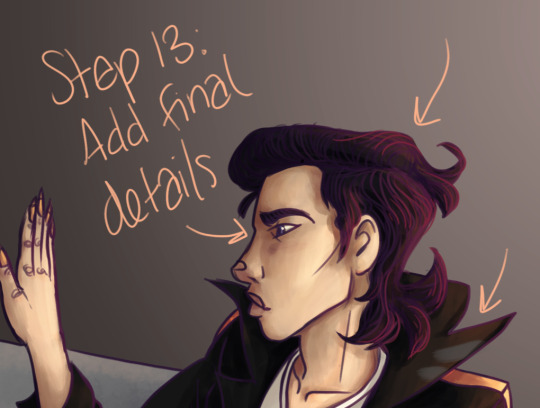
Step 13: Add those final details! The little eye shine, the last hair texture, any other points of visual interest... freckles... etc... add those here. You can do it either on top of the lines or under--i usually just add it on top because heck, it’s easy.
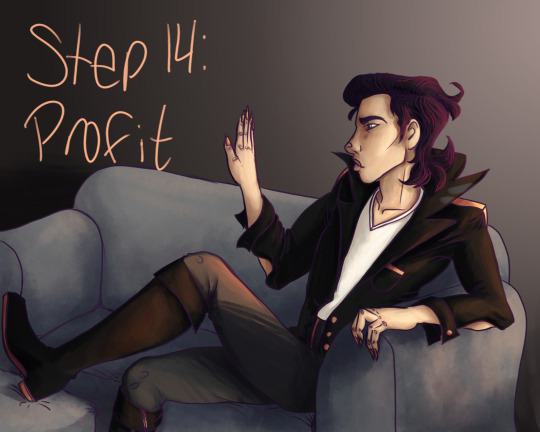
Aaaaaaand... you’re done!
Pretty cool, eh?
49 notes
·
View notes
Text
Understanding Image Resolution
Resolution is a time period used a lot in photography these days - regardless which sort of photography you do, or which type of camera you use, understanding photograph decision, pixels and the extraordinary homes attributed to them is so vital.
whether or not you are printing, scanning or sending an photograph by means of email, you want to apprehend and realize how to hold your images sharp and keep as a lot element as feasible for your very last print.
This subject matter does reason some confusion, so i'm hoping the following will assist.
photo decision defined: images resolution is a dimension of photo high-quality, so you can also outline resolution by how a good deal element is on your print. if your print has sharp element you could remember your photo to be of exact resolution. If detail is blur to your photo you could take into account your picture to have bad decision. proper decision is a direct end result of getting a huge wide variety of pixels in an picture.
Pixels explained: digital snap shots are made up of thousands and thousands of small dots - every dot is called a pixel. every dot consists of a small piece of image facts, and whilst brought together with the alternative pixels you may get your final photo.
Print decision is measured in pixel according to inch (ppi) or in dots consistent with inch (dpi) - both preserve the same cost. 300ppi manner that there are 300 pixels per inch or 90,000 pixels consistent with a square inch.
What length am i able to print my photographs?
A virtual image it is 1500ppi extensive will print a 15-inch wide print if the print resolution is 100ppi.
if you change the identical photograph to a print decision to 300ppi your final print size turns into a
five-inch huge print.
if your image record is 3000ppi extensive x 2400ppi excessive with a print resolution 300ppi, your very last print size will be 10 x eight inch. The same document with a print resolution of 150ppi will provide you with a very last print of 20 x sixteen inch.
Divide the print resolution into the pixel width or peak of your picture.
higher resolution ought to not be taken to mean that your photos could be of higher quality - your pictures might handiest be of high quality if you print to the appropriate layout.
instance - in case you print a 3000ppi x 2400ppi size file to a print size of 20 x 16 inch at 300ppi, the pixels may be seen resulting in a blur photograph. You need to print it at 600ppi to reap suitable pleasant.
What size decision have to i use?
At 600ppi (that is an exceptionally large decision) your photo could be excellent sharp. you may be limited with print size.
Printing your images at 300ppi is the standard high-quality. image sharpness would not get a good deal better. The simplest setback is that the maximum print size may be constrained - you may want to drop the decision to get a larger photograph.
in case you want a massive print from a small record print your document at 150ppi - your print will lack detail and the pixels can be visible. You ought to not print an image any smaller than 150ppi.
72ppi is widespread along with your computer display screen. don't print your photos at this length - the pixels might be seen.
decision guidelines: test your photos as large as viable; it's smooth to resize them later. if you test an photo to small you may need to re-scan at a later date to get a bigger print.
if you need a print it is two times the dimensions of the authentic - scan it at 600ppi and print it at 300ppi.
try and print your image at 300ppi.
if you use a tripod whilst taking an picture you may be able to push the print decision decrease than the encouraged 300ppi - this may enable you to get a bigger print.
0 notes
Text
グラフ作成ソフト DeltaGraph7で作成した図を高精細で保存する方法
グラフ作成ソフト DeltaGraph7は学術論文などに使用する図を簡便に作成できるソフトです。
論文の投稿時に図の解像度は600ppi程度あれば、トラブルになることは少ないと思います。マイクロソフトのパワーポイントで作成した場合は最大300dpiです。
300では雑誌によってはもっと解像度を上げろと要求してくる場合があるので、この点でもDeltaGraphを使用して図を作成する価値はあると思います。
PowerPointスライドのエクスポート解像度を変更する方法
https://docs.microsoft.com/en-us/office/troubleshoot/powerpoint/change-export-slide-resolution
今回はDeltaGraph7で作成した図を高解像度で出力する方法を記事にしたいと思います。
DeltaGrap…
View On WordPress
0 notes
Last Seen Blogs
kikmofo
kikimofo

lifekillsnotdrugs
Just Me Kodie

amberleesnider
LilAmber’s Finds

bluecaredentalclinic-blog
Untitled
norree
norree arts