#3d texture addon
Explore tagged Tumblr posts
Visit Tumblr Blog
Explore Tumblr blogs with no restrictions, modern design and the best experience.
Last Seen Tumblr Blogs


Fun Fact
Forty percent of Tumblr users are between the ages of 18 to 25.
Text


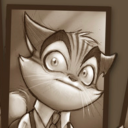
yay yippie lowpoly guys :3
chibi version of friend's oc's protogen version (it might be a mouthful but dont chomp. its lime)
#protogen#chibi#3d#3d model#3d modeling#blender#blender3d#b3d#aseprite#low poly#lowpoly#pixel art#pixelart#3d art#pribambase#i got pribambase working for this#pixel textures requires LOTS of straightening UVs (homophobic)#kinda trial and error at this point#but maybe i'll find a good addon soon that will straighten the UVs for me
98 notes
·
View notes
Text
Tomodachi Life Mods
By far my most popular post on this blog is my post about the gay marriage mod by Kobazco. To my knowledge, this mod has been on hiatus for quite some time, and unfortunately will probably continue to remain on hiatus for a long time. This mod requires reverse engineering of the games code, which is complex and takes time.
HOWEVER, there are a multitude of mods that I would like to highlight that actually are available for download currently (including one that actually works around the gender issue). All of them are relatively simple to install (assuming you are either using Citra, or have custom firmware on your 3ds).
Below the cut, I have chosen some specific mods and addons I would like to highlight!
Gender Removal Mod


This mod aims to remove any and all gendered language in Tomodachi Life, replacing any mention of "He" or "She" with They/Them pronouns. Of course, this does not get rid of the gay marriage discrepancy, but it does prevent any of your Miis from being misgendered.
The only issue in my experience, is that the European version of the mod does not change pronouns in Mii News (which I believe is not an issue in the US version of the mod). Some visual stuff is also not edited, but is possibly subject to change in the future, though the developer has not updated the mod in over a year.
Japanese & Korean Tomodachi


This mod replaces Japanese and Korean text from those versions of the game with English text. This mod is relatively recent and still has a few issues, but I think this is a really cool mod if you want to check out the Japanese or Korean versions without having to manually translate text. Most of the text in this mod is not directly translated, and instead is pulled from the English version(s), but it does seek to translate the stuff that is not available in any English versions.
The biggest issue I have had with this mod is specifically with the Japanese version not being able to open Mii News without crashing. I have also had issues with it crashing on an emulator in both versions occasionally (and also has some text formatting errors). Regardless though, I will keep an eye on the development of this mod, as it is being actively worked on currently.
HD Mii Texture Pack
This is a Citra texture pack that gives the Mii faces HD textures. Though not technically a "mod" for gameplay, I do want to highlight it. This texture pack exclusively for Citra that just replaces the low res Mii face textures from the Mii Maker with higher resolution textures. If you are deciding to play the game in HD on an emulator, I think this is something you will appreciate, considering the Miis make up a good percentage of everything you see in-game.
I personally have had no issues with this texture pack, though it seems that some people have had issues with lag and crashing. So, I would just be aware of that if you decide to install this pack.
Tomodachi Enterprise
This is a mod that changes tons of food, adds custom rooms, clothing, activities, interactions, items, and more. This is a mod that I have not actually played myself (yet), but is one i am looking forward to finally checking out. This mod is currently in development and is being actively updated, and I would consider to currently be the most in-depth mod for Tomodachi Life.
The only reason I have not played this yet is other life obligations, but I have seen a lot of what's in it. I would still say that if you are interested in mods like this, I would definitely go check it out yourself!
---
But yeah, this is what I would consider to be interesting mods for the game if you are looking for something like that. All of these come from Gamebanana, and this is not the full extent of what is available on there, these are just some of my personal favorites. I suggest looking into it yourself if you are interested, or if you are interested in developing mods for the game yourself! I just wanted to highlight some mods that I find interesting. I may post some other mod related stuff if you are interested!
#tomodachi life#miis#3ds#miiblr#nintendo#mii#nintendo 3ds#3ds mods#3ds modding#citra#citra emulator#mod#mods
436 notes
·
View notes
Text
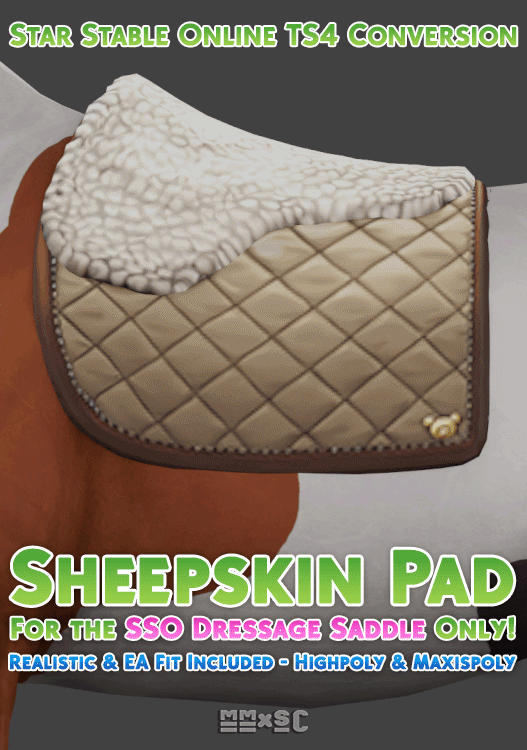

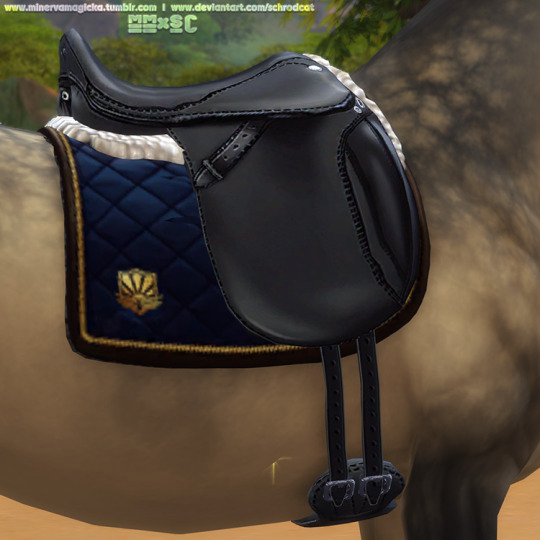
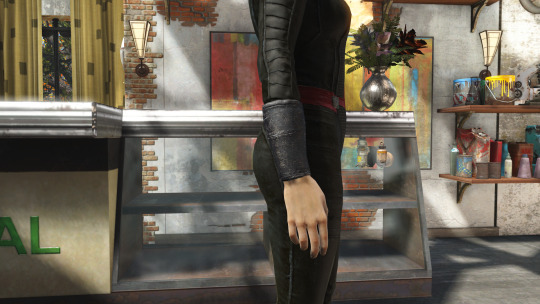
[SSO Conversion] Sheepskin Pad
For the SSO Dressage Saddle only!
Can't stress this enough, it will ONLY fit that saddle as it was designed to do so, even in SSO! That being said, versions to fit the Realistic & the EA Fit versions of said saddle are included :>
...Anyhow, an addon! This is a Saddlepad Overlay, meaning it will replace the default white pad on the SSO Dressage Saddle, but it will also add a little 3d sheepskin pad to it that I meshed based on the SSO textures to make it a bit more 3D. The swatches (~7) all come directly from SSO!
DL, info, etc. under the cut!
By myself & Schrodcat @ DA 🖤

Choosing a Version
Note: If you've already read this from the SSO Dressage Saddle you can safely skip! You should just grab the count version that matches whatever you installed for the Dressage Saddle.
First things first; in the download folder there are two different .rar files to choose from. One is labelled Highpoly and the other is labelled Maxispoly. YOU MUST CHOOSE ONE. THEY WILL OVERRIDE EACHOTHER IF YOU INSTALL BOTH HIGHPOLY AND MAXISPOLY TOGETHER.
The Highpoly version of the saddles is based on the original mesh resolution of SSO (Clocking in at ~4500 polys on LOD0 )which is why we have labelled this version as Highpoly. We offer it primarily for simmers who plan to be taking screenshots vs actually playing the game for extended periods of time, or for those with stronger PCs.
The Maxispoly version of the saddle is a decimated version of the mesh intended to be more in-line with Maxis polycounts, and therefore be more performance-friendly. It's about 50% less dense in polys than the Highpoly counterpart (LOD0 on the Maxispoly clocks in at ~2,339 polys), however it is still higher-poly other EA meshes. YMMV!
Custom Thumbnails appear as follows, with the version made to fit the EA-specific Dressage Saddle labelled as such! If you try to use the Realistic one with the EA saddle and vice-versa, the halfpad WILL look wonky!

Terms of Use
Credit/link to me AND Schrodcat AND note it is a conversion from SSO if you intend to edit, replicate or otherwise use this .package, meshes & textures as a base for your own derivative work. Additionally, at this time, we both ask you do not backport this model or its' textures to TS3.
Do not sell or post behind a paywall, even a timed one. This tumblr is anti-paywall to the extreme. This includes any content that might be created under Rule One. Do not do this. I will think you are an asshole. I have had issues with this in the past and my tolerance for it is absolutely zero. Additionally this asset is exported from a copyrighted game with the intention of it being used transformatively for derivative fanworks; it may be actually illegal to profit from it!
Do not reupload. If you let me know if there's an issue with SFS, I'll reupload it myself. Please link to this post or to the .package on SFS when sharing.
Credits: SSO for the textures; Schrodcat with fitting the meshes & testing/screenshots, me with meshing the 3d halfpad using the SSO textures for reference & for putting it all together into one diabolical package.
Download [SFS]
☕ Buy me a coffee!
☕ Buy SchrodCat a coffee!
586 notes
·
View notes
Text
youtube
Some Tukk Tales BTS details! ✨
visually, this is a one-man project (aside from Robert Hranitzky's awesome titles/logo), got AMAZING people for everything sound related though
I made every 3d model from scratch, textures are mostly hand-painted, everything is keyframe-animated
mostly using Blender (with some addons & my own scripts), Substance Painter, Photoshop, Blackmagic Fusion/DaVinci & Embergen
with most of the shortfilm still being in rough previz phase, all teaser trailer shots were finalized early, within less than 4 weeks & will get some tweaks/improvements for the final release
for generating the laser FX I wrote a Blender addon & put it for free on Gumroad
lots of trickery in compositing for the smoke FX to keep render times low
the music was composed just for this teaser trailer specifically, by the extremely talented Luis Humanoide who did an exceptional job in very short time. Go check out his work!
saw some people assume the voices are AI. Nope! I wouldn't be comfortable with that. That's Tyler Weston as the clones & AVeryDandyLad & I as the battle droids
all edited & mixed by my dear friend Jonas Hausotter, with some additional sound work by Kyberphonic
#captain tukk#tukk tales#high ground animations#star wars#the clone wars#tukk#241st#the bad batch#fan film#hill company#star wars the clone wars#Youtube
491 notes
·
View notes
Text
BIG update of my content
4th part! Preview, details and download under the cut~


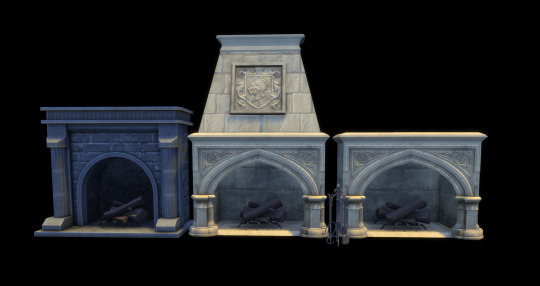
Totally 32 items. ______________________________________________________________
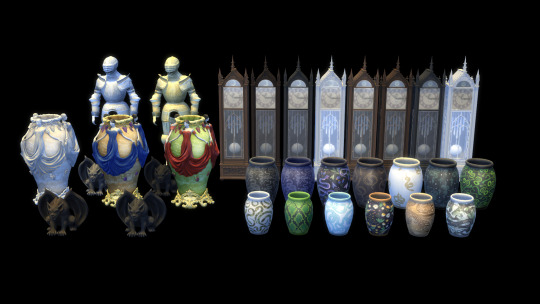
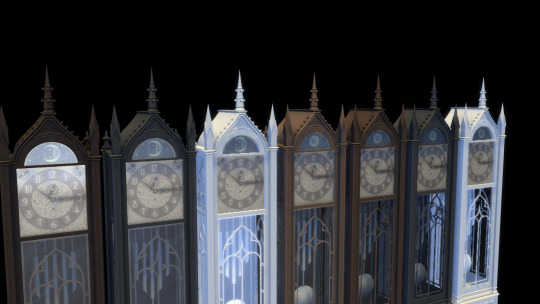
4 wood tones from prev. set parts. Clocks with sun and moon) Gargoyles REQ. THIS MOD (they are talking)
______________________________________________________________
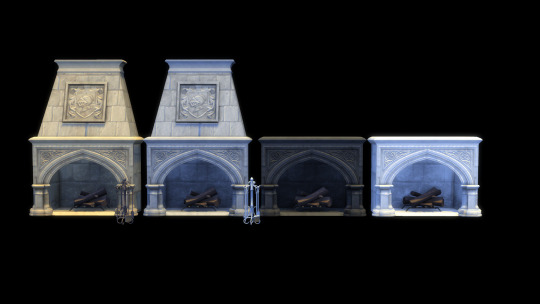
2 fireplaces made as Castle Estate Addon. 4 swatches. 3d fireplace - 1 sw. Firestokes 2 sw
______________________________________________________________
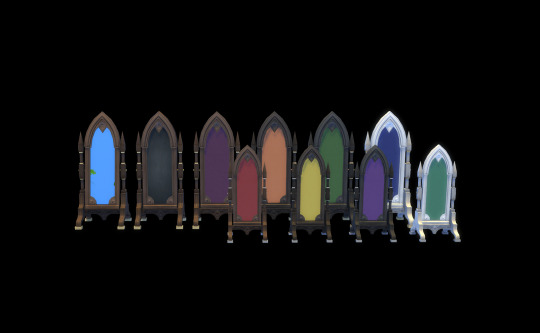
4 wood tones vampire mirror recolors with silver and gold decor. Chalkboard and stickerboard too, but stickerboard with different textile colors. Also it have many slots for stickers.

Diagrams for chalkboard (can be placed 1 per side). Can be placed on walls. Shining in night. Upsized for preview)
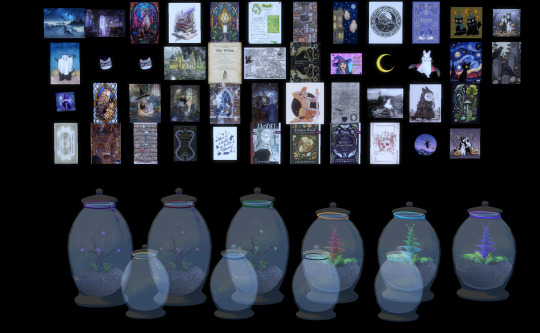
Postcardas and stickers for stickerboard. Can be placed on wall. Upsized for preview) Empty jar with slot (4 tag colors) and 2 jars with plants (3sw both)

Marble floor waysigns and decor (bad preview i know). Perfect with Madlens marble floors (cuz used this textures).
Used texture resources by @peacemaker-ic and @madlensims
1st set with paintings HERE 2nd set with bookcases HERE 3d set with furniture HERE ofc its not full set:) Full set will req: GtW,CaD, Vamp, MR, HSY, CotLiv
Thank`s for sharing @sssvitlanz @ivysccfinds @witchysimmers

MOST OF MY CC RECOMBINED AND UPDATED. ACTUAL LINKS HERE
#ts4cc#ts4 custom content#ts4 download#sims 4 cc#sims4cc#ts4#sims4#sims 4 custom content#sims4 decor#ts4 witchy content#ts4 books#ts4 library#ts4 gothic#my cc#sims 4 buy mode#sims 4 buy and build#sims 4 buy cc#ts4 addon
137 notes
·
View notes
Text
How To Get Your Character Models Out Of A Game: Tips And Tricks For Bitches That Have Never Used Blender
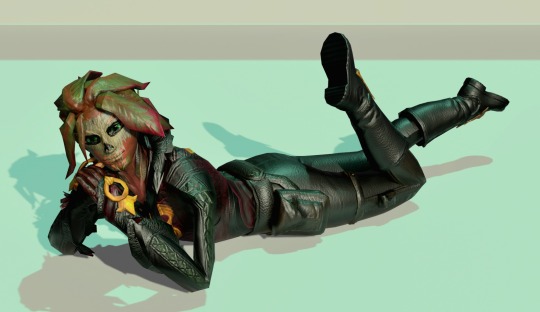
(it's me, i'm bitches)
(also ignore how messy that lighting is it's 1am and i should have been asleep hours ago. he's there for proof of concept 💕)
a couple people (specifically @forsaken-constellation and @ratasum) asked for a tutorial on how to rip models out of the game. this is not that, but it is a compilation of resources i used to learn about ripping, blender, and 3d modeling in general. i desperately wanted a post like this to exist when i was trying to figure this out, so here we go! all the resources below are completely free, with the exception of a link to the patreon of the person that created ninjaripper.
disclaimers:
there are probably more efficient ways to do the things i am doing. i watched a tutorial to learn shortcuts and then skipped to character models. if you have tips to add, corrections to make, or other thoughts, please feel free to share! i'll link to your post here. ^^
i do not know if any of this will get your account banned. i've ripped several models, so i'm going to assume it's fine as long as you don't try to make money off of it. use your best judgment, be an adult, etc etc etc
last updated: june 30, 2024
PROGRAMS & WEBSITES
ninjaripper 1.7.1 - there's a newer version on the creator's patreon, presumably with support for newer versions of blender and fewer bugs, but i haven't tried that
blender 2.79 - the import addon that comes with ninjaripper 1.7.1 is outdated for the current version of blender (3.5 as of this post), so 2.79 is needed to combine the .RIP files into a .BLEND (blender) file
noesis - ninjaripper saves your textures as .DDS files, noesis lets you view them and export them as .PNGs
blender 3.5 (optional?) - i just like it better than 2.79. if you're completely new it might not matter to you. all of the tutorials linked later are for later versions, though.
mixamo (optional) - rigs your character for you and lets you put them in Situations (like my guy above.) there's a whole library of free animations and poses you can try!
TUTORIALS
how to use ninjaripper - most of what you need to know about actually ripping the files and using ninjaripper is covered here. do not skip this one.
how to use blender 3.5 - full disclosure i haven't finished this series because it's uhhhh many hours long. but if you are a complete newbie to blender, i do recommend at least the first few videos; you'll learn about shortcuts that will make your life easier, how to unfuck your model when it fucks itself for no reason, and different terms that will help you google things you don't know later on. possibly he even covers some of the things i'm about to link! anyway.
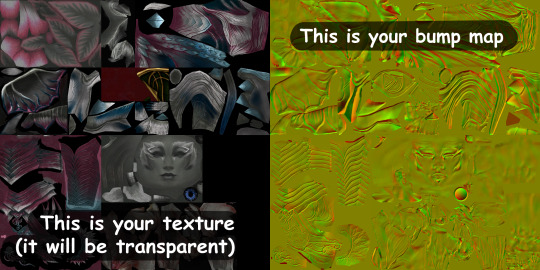
what's a uv map?
how to apply textures
how to apply bump maps (note: for our purposes, you wouldn't add a color ramp node, you would add an image node with your bump map, and attach it to the bump node as the person does in the video)
there should be stuff here about weight painting, cloth physics, emission maps (makes your sylvari glow), and other stuff, but um. i haven't figured those out <3
TIPS
TURN UP YOUR GRAPHICS BEFORE YOU RIP - if you don't, you might end up missing certain textures/glows/etc. HOWEVER, you should turn animations down, because apparently high animation can make your meshes misplace themselves
rip from the character select screen, rather than an instance, because you will have 100 meshes to sort through instead of 1400. i am not exaggerating either of those numbers. if you are new to blender, please love yourself and start with character select.
your textures will be fucked up the first time you try to apply them. this is because the UV maps (the things that tell your textures where to go) of your models are flipped upside down in relation to the texture image. you can flip them back over manually, ooooor you can just flip the entire texture file in something like CSP or photoshop.
for some reason all eyes are red in the texture files. i have not figured out why. i recommend editing the .PNG to have the correct eye color before applying the texture.
that's all i can think of for now - if you have other questions, feel free to shoot them my way, although i can't promise i'll have a straight answer ^^;;
mixamo only works for humanoid characters with tight clothing (or without clothing at all). if you try to use it to rig a charr or asura, or someone with a skirt or big sleeves, you will most likely be disappointed.
2024 edit: sometimes parts of hair meshes just...disappear. i have no idea why. if you can figure it out please let me know LMAO
information from bookahlogy about character proportions, fixing normals, and other fun tips
449 notes
·
View notes
Text
*Pay Attention - Part 2 - Tutorial*
I was about to go back to my business and quietly leave y'all with a word of wisdom but the very next package I opened raised my hackles. So here we go, hold on to your seat.
Disclaimer for younger/sweeter - followers - this has language in it because I'm pissed... I apologize in advance.
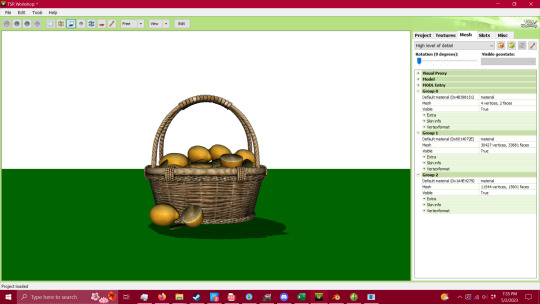
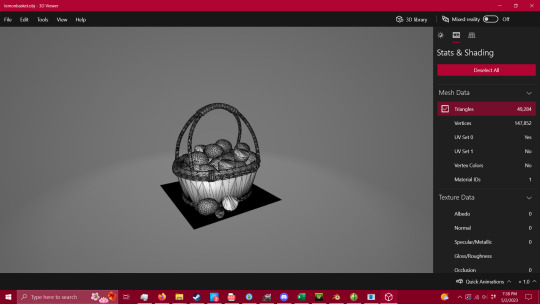
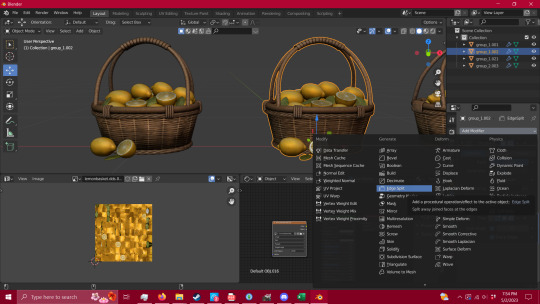
49,282 Polycounts. That's 50K for a fucking basket!!!
It's pretty, it's beautiful, and I downloaded it because it's everything you could want out of a basket of lemons... whoever created it did an outstanding job... for a movie production.
NOT PC GAMES.
So let's fix it - and let's hold our creators and converters to a higher standard or send them along to a different platform where they can create without our bitching.
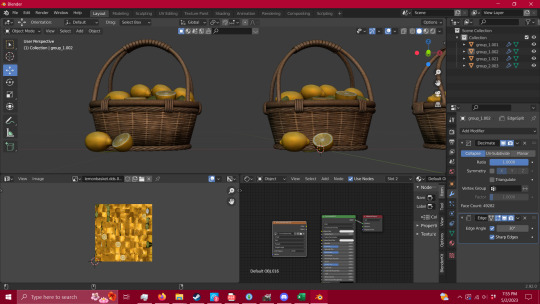
First off, there's 3 or 4 ways you can check polycounts.
1 - TSRW under Mesh tab
2 - S3PE (Pretty sure you have to have an addon to do this - I'll try to find it when I'm done and add the link) Under MLOD, right click and go down to Preview. It'll open up a window and you can view the model and the polycount.
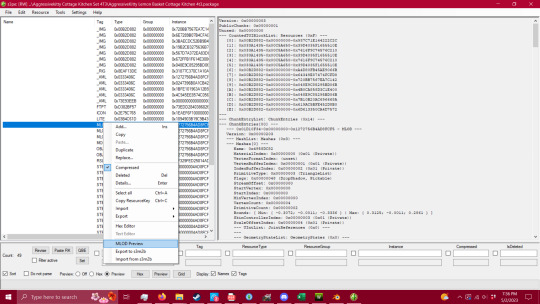

3 - 3D Viewer on your computer
4 - Blender or Milkshape

Now that we have the ability to check our polycount - we're gonna fix this mesh. I'm not going to show you how to package it, there are other tutorials for that part, but this is VITAL to having a healthy game, and honestly, being a creator or converter for this game. I do understand that you have to have the knowledge before you can fix a problem, so here it is - literally handed to you in a basket. I also understand that there are creators/converters who don't post polycounts because they're afraid people won't download it - that is inexcusable. If that's the case then you will eventually be boycotted by the players who know better.
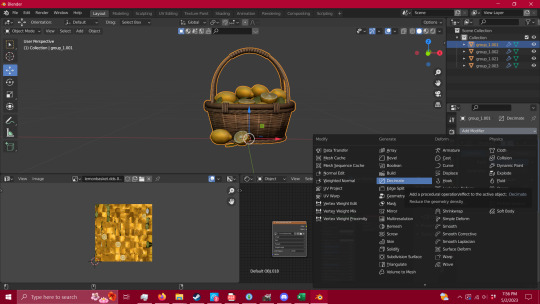
Alright, so step one - you're going to want to get into blender after exporting your mesh. You're going open the modifier properties and add a decimate modifier (the wrench circled in red, and the add modifier drop down menu).
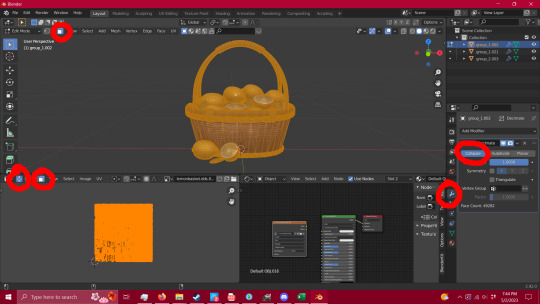
Keep it in Collapse, not un-subdivide. It's gentler on the mesh itself and you'll get a lot farther with it. You're also going to want your UV map to match what you're doing with your mesh, in case you need it for selection (I'll explain that in a minute) and have faces tagged so the selection is easier.
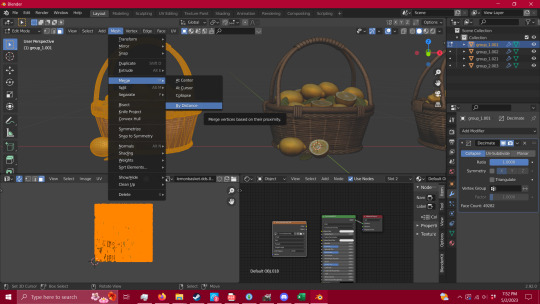
Now that you have that set up, you're gonna want to remove unnecessary vertices. See the shadows on the bottom of the basket? Here's how to fix that - hit tab, press A to select everything, and then go to MESH/MERGE/BY DISTANCE. This removed 16,900 loose vertices that didn't need to be there.
Go back to your modifiers and add an edge split modifier and hit apply.
Boom - no shadows.
Now that that is all done you're going to go in to edit mode (tab) and press L while hovering over what you're wanting to select. This is going to select all of the islands in your UV, and it's the fastest way (that I've found) to quickly select pieces of your mesh.
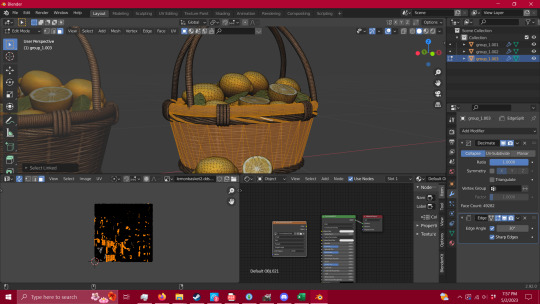
When you have your whole group selected (you can also figure out at this point what pieces need alternate textures or groups for TSRW later in your packaging process) you're going to hit P-Selection. That's gonna split whatever you have selected into a separate group.

Now, you can do that to however many pieces you see fit, but for this I'm just gonna stick with two - the lemons and the basket itself. You're going to click the blue Ratio box - and type in .5 and hit enter. That will collapse your polycount in half - (you can move that ratio box lower if you wish, but this way is the gentlest way possible and I've gotten better results. So play with it and see for yourself if you wish to. ) - Now repeat the process until your mesh starts to lose quality, I tend to stop there unless I can push it a bit further without making it look bad.
Now repeat that process with all groups.
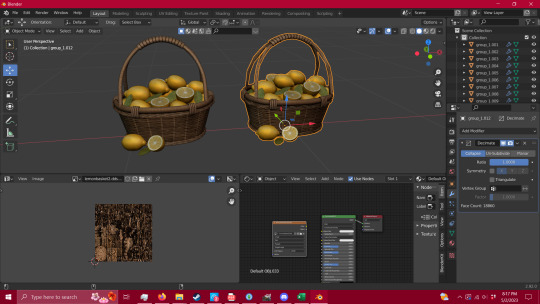
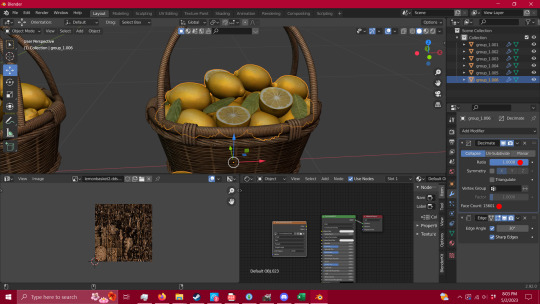
Given that this particular mesh was such high polycount and an intricate mesh, I could only manage to get it from 49,282 faces (polys) down to 18,860. This is absolutely not okay for TS3 - and I'm using as a lesson rather than using something that I can get down to an okay level - because this is what you're going to run into when getting meshes that start in the tens of thousands of polys. THIS IS NOT MEANT FOR TS3, it's beautiful, yes, but you are putting people's equipment at risk by advertising a mesh for a 13 year old game without disclaiming that it's dangerous for it.
This tutorial will absolutely work for most objects, and I've used this process for a couple of years now with success, but you have to be able to decide what you're willing to put into TS3. We have all of these tutorials for reducing lag in this old as dirt game, but NONE of that matters if you're carrying objects like this - no matter how pretty they are.
If you need it that bad, figure out how to make a version of it that CAN look as good as this with a little less detail (think the spirals in the wicker that is actually meshed rather than just textured), or ask a creator to make something for you.
If you have any questions, please feel free to ask. If I have the time, I try to help whoever comes into my inbox. If I can't help, there is a hoard of creators out there that probably can.
So have fun, CHECK YOUR CONTENT, and keep your computer safe.
And creators/converters - do better.
Edit to add - to the creators/converters who do put out their polycounts, or a disclaimer of high poly/photo use only - thank you. I do understand the need for high poly objects for photo-op purposes, and I'm not here to attack anyone's preferred gaming style. I just want people to be safe while they play, as there are those who don't know what they're putting into their games. Let's help ensure that everyone has a chance to play whether they're experienced creators or regular game-players.
Edit to add 2 -
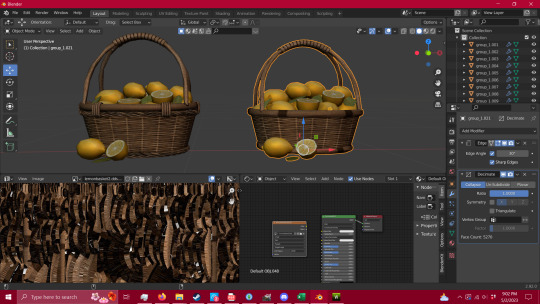
To add a bit of context - I was able to get the reduced mesh even further by removing some of the intricate details of the mesh, to create a simpler version. This is now down to 5,270 - and it could be lowered even further by removing the top of the handle - which is 1700 by itself because it's spiraled. So when you're dealing with a high mesh object such as this, pay attention to what's really adding weight, and if you can replace/remove it without taking too much away. The shadows can be fixed in gimp as well.
350 notes
·
View notes
Note
is there a public mod list for terrimortis? purely curious whats all in there
I started to answer this on mobile and then it was bothering me so its laptop time. theres a couple notes for things but i can answer and questions about it. this is roughly it, excluding any libs an apis
Main Mods:
Ammendments
Armourer's Worskshop - lets us build cool cosmetics (Ezra's wheelchair, all the antenae, leopolds legs, etc)
Beautify Refabricated
Chipped
Clumps
Collective
Incendium
Indium
Structory
Supplementaries
Another Furniture
Better Furniture
Cluttered
Comforts
Convenient Name Tags
Cosmetic Name Tags - How we change our names!
Croptopia
Joy of Painting - pai n t in g mo d
Dark Paintings
Ferritecore
Lithium
Mighty Mail - mailboxes!!
Origins
World Edit
Spark
Trinkets
Stellarity
Twigs
Villager Names - note, makes it so wandering traders dont despawn
Building Wands
Macaws:
Bridges
Doors
Fences
Trapdoors
Lights and Lamps
Paths and Pavings
Windows
Clientside:
Build Guide
Entity Model Features - Lets us use custom models like with optifine
Entity Model Textures
CIT Resewn - allows us to use optifine packs
Continuity - connected textures
Iris Shaders
Jade - lil pop up when you hover over blocks
Jade Addons
JEI
Skin Layers 3D
Sodium
Xaero's Minimap
Xaero's World Map
Zoomify
Chiseled bookshelf visualizer
Cull Leaves
Custom Stars
JER
LambDynamicLights
More Mcmeta
More Mcmeta Emissive Texures
Sodium Extras
Bobby
40 notes
·
View notes
Text
Last updated 05.11.2024 As a few people have come here recently, I wanted to make a post in which I will write a little about how I like to play, what I use most often and what are my must-haves in the game. This will be a bit of a resources/faq.
Am I WCIF friendly? Yes I am, text me I’ll be happy to help.
How do I like to play Sims 4? I like cozy vibe gameplay. I basically love everything about this game.
Maxis match or Alpha? Maxis match only!
What presets do I use? I use gshade, Gia by Kindlespice for screenshots and Luminescent by Hazelminesims for gameplay.
What do I use to edit photos? I lately started to edit my photos a little bit in Photopea, I use two of Hazelmine actions (Sharp, then Texture) but I don't always do that, I don't change colors or anything, it's all Gia preset.
What lightning mods do you use? I use Even Better In-Game lightning mod (Average) by Northern Siberia Winds and Sunblind by Softerhaze
Skin details/Body details: Eye shine remover Beetle eyes (default and addons) Pierced ear detail Little details by Nesurii Belly overlay by Samii-xox Skin detail cc pack by peachyfaerie (clevage) Clevage overlay by Pralinesims Cellulite overlay by Miiko Age wrinkles by Northern Siberia Winds Face definition by Nesurii Misc. face details by Okruee About face skin details by pyxis Defined Nose by Nexus Under Cover Nose Details by slythersim Eyebags by Tamosims Chubby cheeks by faaeish Face Kit No 2 by Miiko Body Kit by Miiko Wedding ring tan line by XUrbanSimsX
Teeth: Imperfection Teeths Set Happy Gappy Teeth Set Skinblends: Bare Skintones Pluto Default Skin by Sammi-xox Posie Skinblend by Sammi-xox Sweet Pea by Sammi-xox
Sliders: Breast sliders Teanmoon Mouth Scale Slider
Makeup: - Lashes: EA Eyelashes Remover by Kijiko 3D Lashes Uncurled Eyelashes by Kijiko Almost every Eyelashes by Obscurus Every eyelashes by TwistedCat Every Eyelashes by Miiko - Blush/Highlighter/Contour: Petals Blush by Breezytrait Sunbloom by Virtygo Horse Girl Blush by Crypticsim Moomoo Blush by Squeamishsims Bisou Highlighter by Vevesims Lily Contour by Peachyfaerie - Eyebrows: Daya Brows by Greenllamas Eyebrows N4-N5 by Northern Siberia Winds Every Eyebrows (No. 2- No.9) by TwistedCat Maxis Match Eyebrows (61-65) by Obscurus - Lipsticks: Lip Kit by Peachyfaerie Jelly lips by Kumikya Birdie lipstick by Crypticsim Hazel Gloss by Crypticsim Madison Lipstick by Crypticsim Vcr Lipgloss by Crypticsim Honey and Suga Gloss by XUrbanSimsX Green Tea and Latte Lips by Norther Siberia Winds RealLipsRevisited by Amoebae Lips CC28 by GoppolsMe Lipstick 01 by Grimcookies DateNight Lipstick by Twistedcat
Gameplay Mods: Tidy CAS by YoruQueenofNight Controlled Position Mod by Norther Siberia Winds CAS Tuning by NSW More CAS Presets by Zerbu UI Cheats by Weerbesu Control any sim by TitanNano Sleep All Night By LittleMsSam No Cold Clothes Inside by scarletqueenkat, (stopped creating so link doesn’t work) Shorter University Degrees by Peridot (I'm using 6 credits) Faster Uni Homework by LittleMsSam Longer Parties & More Guests by Weerbesu The Missing Plumbob by mintvalentine No Zzz by Krys29 ISO Full Control Camera by Ravasheen Photographic Memory 2.0 by Ravasheen Sims Portrait Maker by Ravasheen Phone Overhaul by Apricot Rush Steady Sit & Seat Any Sim by Amellce 2xSlower fish and food Spoil by simmythesim
Wicked Whims by Turbodriver (E404P, Amra72, Kiki, lupobianco, Mia, Mike24, ooOLaLaWorld, Yummy-o-Tummy) for those cute animations and Posing.
I don't use any major gameplay mods or furniture/build-buy cc anymore. Only hair, makeup, skin details and clothes.
161 notes
·
View notes
Text
So after watching wife @twosides--samecoin make some custom retextures to use in her screenshots, I decided to take a stab at it myself. As with all off-the-cuff decisions I make, it has become...involved.
Luckily for me, it has also become a collaborative project with wife! She has been learning this stuff for a while/has been providing infinite patience with my hyperfocus and swearing at the computer advice; meanwhile, her fic provides the test project: a standalone version of Olivia's vault suit. Thus far we have:

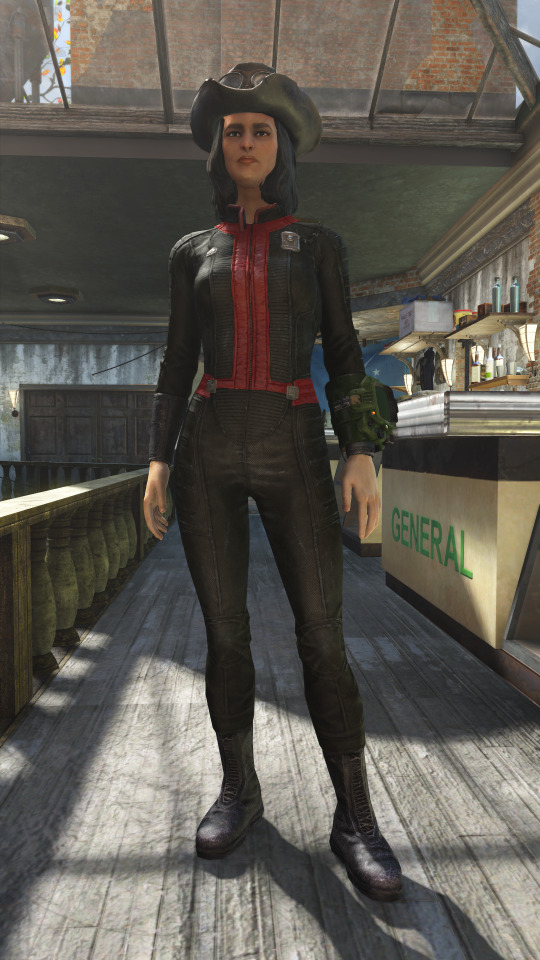
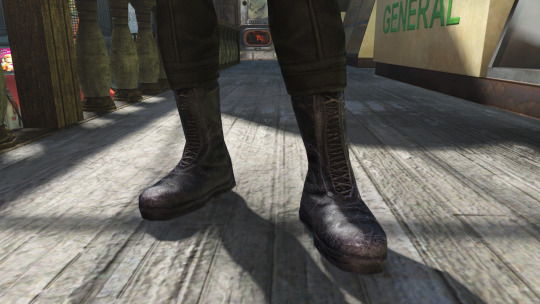
This first attempt is a bit crunchy, but I'm OK with it as a test. I am now handing it to my wife to Make It Better ™ and use/publish/reuse as she see might see fit 😂 (The maple leaf patch on the collar is still missing but one of us will get it there eventually...) What we've Learned So Far:
paint.net
basic creation kit use (I have avoided this for so long)
material editor use
2d texture painting/proper compression (I still refuse to paint directly in 3d modeling software, but it'll happen eventually)
material swaps in CK
armor addons in CK
armor creation in CK
dynamic retexturing
constructible object creation in CK
keyword use in CK
how to export to .ba2 archive (this is still loose files in a .zip atm because not quiiite done screwing with the maps, but file structure is in good order to be packed once complete)
how not to fuck up the base game masters
how to ensure your diffuse/normal/specular maps are actually the correct maps for the armor you wish to retexture instead of wasting 89234 hours on the wrong maps like a noob
how to read the nexusmods tutorials from start to finish like a normal person so you don't create an obscene number of problems you have to go back and fix later because you Did Not Read All The Instructions Before Starting The Assignment.
(Seriously 99% of the problems I encountered were due to Failure to Read All Instructions (or due to overlooking separate tutorials))
7 notes
·
View notes
Note
Dude, where can i find model packs of Manhunt (1-2) to load into Blender? Usually when i look at it, there are characters created as mods for the game. But i couldnt find it as a 3D character model. Help lol 😭🙏🏻
idk about manhunt 1, because i dont have that game installed on my pc, though i believe that the you should be able to import the mh1 models the same as the mh2 models.
idk if you wanted a not-really-long-winded but long-winded explanation of how to do it (didnt think of that before i typed it up 😭), but i put it under the cut (alternatively i can just share the models with you 😳)
i extracted them myself, using this manhunt 2 mdl extractor (don't know if this the exact link i had found it to download originally, but it is this program), which converts mh2 mdl files to dff , & downloading this blender addon (dragonff) to import those files into blender :3
then you use manhunt 2 tex/txd to export textures (self-explanatory)
when u import the model into blender, you mayyyy get this popup error, but it doesnt mean anything bc the model still imports (like belowww :3)

#chat#bruh i was in the same position as u bc i was like. i cant find models to just download for blender#and i was so dumb i was like. omg i'll just learn how to use source workshop or whatever that thing is called.#SOURCE FILMMAKER. sorry to the people that use that thang but i noped out that shit so fast
4 notes
·
View notes
Link
0 notes
Text
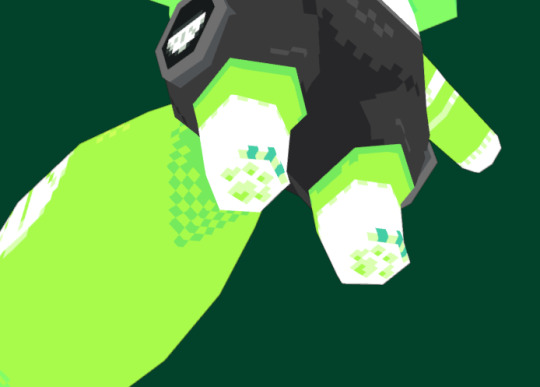
How I create 3D anime characters.

The face is drawn in 2D (front and side). And in my 3D software, I use the drawings of the face as a reference to modelize the head.
The head is a mid poly mesh. The hair, eyes, ears and mouth are planes with a transparent PNG texture. It means , when you turn around the head, you see the trick.

Note: The skin, shadows and black hair, are painted in Blender. I used a 2$ addon called "PSD Layers" to separate my colors onto different layers. The outline is the only generated effect.
Thank you for reading!
5 notes
·
View notes
Text
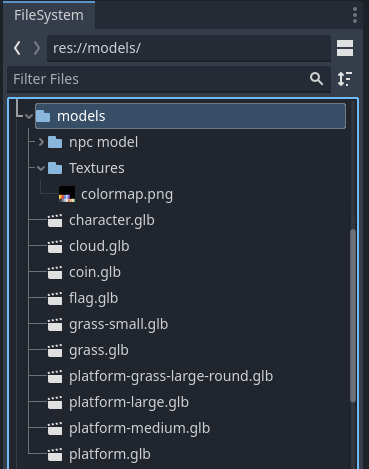
So while working through game concepts and deciding what to work on next, I've been refreshing my Godot skills. Wanting to get back into 3D and prepare for doing more narrative heavy games. Made this demo to learn nathanhoad's excellent Dialogue Manager addon and also test drive Kenney's new Godot platformer kit.
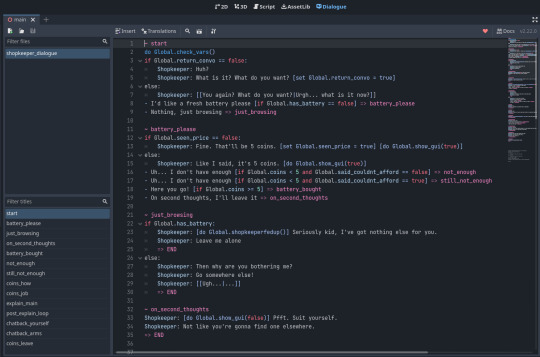
I'm really, really enjoying Dialogue Manager so far and feel it has a tonne of potential. Think it covers a lot of things I've been looking for:
Direct engine integration is super useful, as well as using custom resources to store dialogue. They're also text files so can still use external editor to update
Straightforward syntax, reminds me a lot of ink and yarn. As well it's named node approach feels familiar
Able to access global game variables for conditionals, and having conditional based loops and choices is very straightforward
Also able to call methods directly within dialogue, which is super powerful when combined with signals (showing/hiding coin UI mid conversation, playing sound effect)
Lots of options for random dialogue choices - just used the single line ones for now but in docs have seen they also have option for setting custom probabilities, just ncie to add more flavour
Hyped it has a built in approach for translations (create IDs and reference CSVs) that looks like integrates with Godot's localisation tools - a bit of a future thought but glad it has stuff to help built in
Docs you can mention you can create dialogue resources at runtime. Can imagine this being very useful - an example would be creating a record of all lines seen to replicate Ren-py's "log" feature.
The methods for displaying dialogue are super flexible. At the moment just used their example balloons but looks like it should play nicely to let you build custom GUI - and maybe even multiple forms (e.g. dialogue scenes vs flavour barks in main game world). Think next experiments will focus on this.
There's a few more things I'm keen to learn and see if they're feasible with this - "disabled" choices that still appear but can't be accessed would be nice, also looking at how you can integrate this with an audio system for voice acting - I think they have an example that includes voice acting?
Only thing I'm a bit nervous of is it looks like it can only grab variables from autoload/global scripts, so when putting into actual game will need to take care with save systems and methods for loading choice variables into a choice master global so we aren't keeping too much in memory at once. But if I'm wrong on this assumption, or others have approaches, more than happy to be corrected on this!
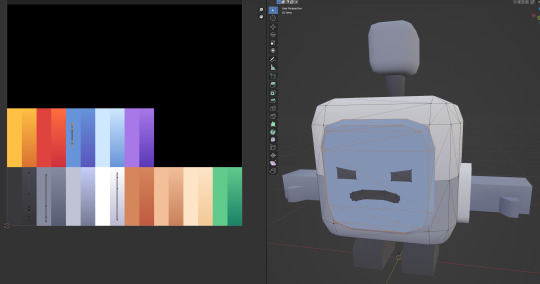
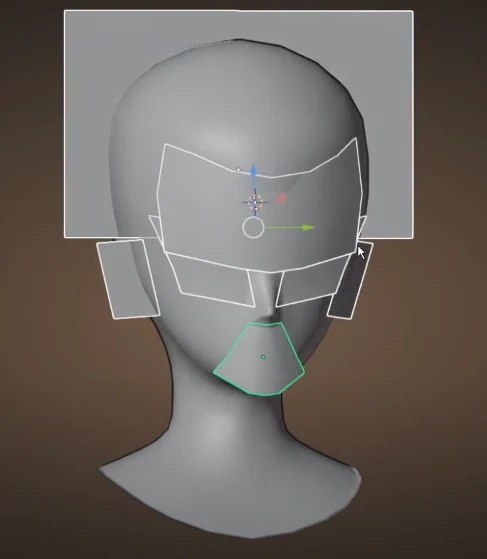
Also really enjoying Kenney's 3D platformer kit and it's been fun and . Making the shopkeeper bot was super simple. All the details on the original character model are modelled so just adjusted the face and for changing colours just had to move UV islands for limbs and face to different parts of the pallete textures.
Haven't tried this technique for modelling and texturing before but seen it crop up a few times so will definitely experiment with this in the future. Also might help with optimization - I think most of the materials in the pack refer to this single image texture? By default the pack only has the model glbs and a single colormap png so assuming that's how it's working.
Original plan was to fill in the shop with another pack so there's a few little platform challenges within this, but they all needed collisions adding so might add that in future. But main aim was focusing on the dialogue and think we've got a good approch going forward, and highly recommend the add on for other Godot devs making narrative games!
#Godot#game dev#godot 4#game development#dev log#game dev experiment#interactive fiction#dialogue system
37 notes
·
View notes
Text
[ my batim models ]
it's been a long time since batim first started gaining popularity, and over that period, most people already had an idea of what the characters would look like or what alternative designs might exist. i was among them, and those were pleasant times for me.
to stay active, i'd like to share my work with you. actually, none of this was created completely from scratch; instead, it was carefully assembled using free addons.
below each image, you'll find the names of the authors whose materials were used in creating the models. so let’s start with the most famous – this trio.

alice angel, boris the wolf & bendy
These models are the most refined of all my creations, and they've also been updated and changed for the longest period, as the first versions date back to 2018.
of course, there have been situations related to them that led to some bad habits, especially when focusing on events in the batim x mmd fandoms, so... i'm just glad i finally achieved the end result.
ALICE MODEL CREDITS: TDA, cacti-sloom, Omizuri, KISS, cutiebxt, Palcario, wishuponacrane, EriPhantomhive, shining nikki, kittyinhiding, Rain-Break, Metra-Philia, MMDFakewings18, なつか, MonoCereal, Y0K0NI, Chibi-Snorlax. BORIS MODEL CREDITS: TDA, HarukaSakurai, Jjinomu, ゆるん (akirinaf), xMMDPandux, wishuponacrane, 黎鷹さん, MMDFakewings18, roksi10, Y0K0NI. BENDY MODEL CREDITS: TDA, HarukaSakurai, TDA, ChococupCakeWarrior, Metra-Philia, ChocolatLoid, Jjinomu, SetsunaKaoP, SEGA, PDParts, wishuponacrane, amiamy111, Y0K0NI.
okay, the next two is...

allison pendle & susie campbell
i had several versions of Susie’s design, but not everything turned out as expected, particularly the textures. for example, she was meant to be dark-skinned from the start, as i had imagined her that way for a long time. When assembling the model, i lacked artistic experience, so there was little i could do about it. the only thing that worked was achieving a different skin tone between susie and allison. (I clarify, the model dates back to 2023, but old textures were used)
as for this version of allison, it’s the only one - she was assembled in december 2023.
i wanted to stick to the style inherent in the batim universe's lore, but also added my own little touches. even though it’s a simpler design compared to existing ones, i closed some gestalt with projects i started but never finished.
ALLISON MODEL CREDITS: TDA, Littlemisshorror, illusion, RageXYZ, Shiro-NekoVocaloid, Gwennlian, Hiro K, AneCoco, Custom Maid 3D, meiteki. bag by Shining Nikki-Papergames and Staralco130313DA SUSIE MODEL CREDITS: TDA, illusion, RageXYZ; TrashBoiAlex, DeadFox-chan, Kittyinhiding, Rain-Break, Montecore, 黒鬼, nyantarox, Paper Studio\Paper Games, MonoCereal, 雨林, Illusion, AkemiWhy, Littlemisshorror, Gwennlian.
[ BONUS ]
And now, I'm happy to share a snippet from my previous project. It was 2018, and it would have been the largest model build, but I never managed to finish the design. However, here's a render by my best friend @hydescrookedhouse, created in 2021, when I was trying to resume work on this model.
i really appreciate her, as she still supports me, and i owe her a lot. i hope she finds her inspiration and continues her creative journey (of course, if that’s what she desires).
[ CONCLUSION ]
sometimes i look back at the fandom that greatly influenced the formation of my tastes and preferences, and i’m grateful for it. i’m glad to see that it’s still active. ...
thank you all for taking the time to read my post! i wish you peaceful skies and continued inspiration. 💌 ...
[ please, do not share this post or images from this post outside of tumblr! ]
#batim#bendy and the ink machine#batim fanart#susie campbell#allison pendle#video games#3d model#mmd#mmdmikumikudance#mmd model#ink machine#mikumikudance
6 notes
·
View notes