#3d embroidery wrap
Explore tagged Tumblr posts
Visit Tumblr Blog
Explore Tumblr blogs with no restrictions, modern design and the best experience.
Last Seen Tumblr Blogs


Fun Fact
The Tumblr app for Google Glass was released on May 16, 2013.
Text
3D Sunset Summer Beach Landscape Tumbler Wrap Bundle, 3D sublimation design, 20oz Skinny Tumbler Wrap PNG Straight/Tapered Digital Download
#20 oz skinny tumbler#tumblers bundle#3d tumbler wrap png#3d tumbler wraps#3d tumbler png#3d tumbler designs#beach tumbler wrap#sunset tumbler wrap#3d beach wrap#beach sunset png#summer tumbler wrap#3D landscape PNG#3d embroidery wrap
0 notes
Text
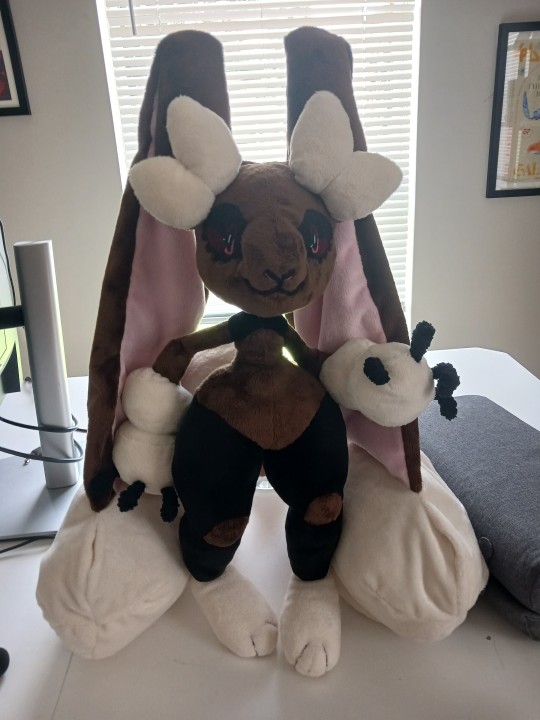
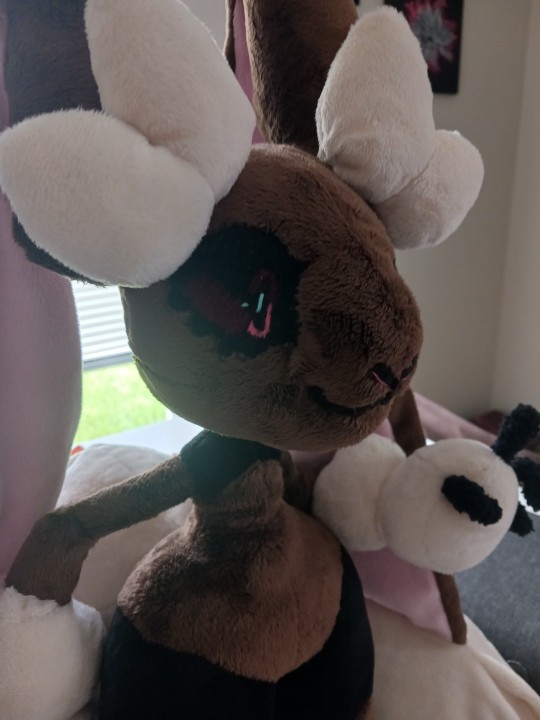
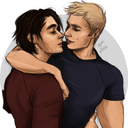
I finally finished my buni doll! he's taller than my arm and pretty hefty. it was my first time embroidering, wire armateuring, using this specific pattern making process, etc.... so I think he turned out better than I ever expected lol!
he's mostly posable tho the wire I had access to isn't strong enough to combat the minky. live and learn 🤷♂️
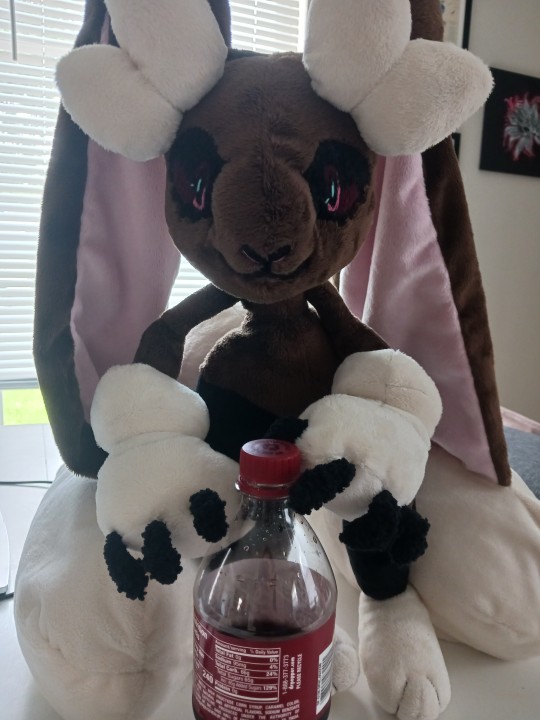
*& dr pepper for scale LOL
#pokemon#suckerpunch#anthro#ooak plushie#lopunny#mega lopunny#<- hes half of both to make his design better LOL#his fingers are fuzzy but that was a just get it done compromise#hes been shelved for months bc i couldnt make myself needle felt like i needed to#i finally said fuck it and sewed yarn to wire in thick wraps and called it finished LOL#better to finish at all 👌#i made his pattern with plushify by 3D modeling him first and then using uv seams to unwrap yhe pattern#plushify helps with scaling and predicting if your seams will actually work how you want them to#as well as labeling pieces and colors / fur direction / embroidery / etc#best part is it was a college project so theres no tracking or cookies. its all client side and totally free#oc#buni
65 notes
·
View notes
Text

A 2023 retrospective. Lots of crochet this past year.
#embroidery#fiber art#3d embroidery#crochet#mushroom art#botanical art#botanical crochet#mushroom crochet#queer embroidery#theenbyroiderer#2023 recap#2023 wrapped
52 notes
·
View notes
Text
Been watching a YouTube video on how to spot AI-generated images on Etsy listings of embroidery patterns and I now really want to try and make a fake-looking image in reality.
There are a number of examples shown of basically "real embroidery doesn't work this way" and my brain immediately jumped to taking it as a challenge.
Like, she showed a design with what looked vaguely like satin stitch except the threads curve, which doesn't happen in satin stitch. But could you maybe wrap a very thin thread round and round a piece of thin wire so that it looks like a normal thread, but then you can use the wire to make it curve?
There was one that looked almost 3D in the photo and maybe you could do something with stitching on a piece of fabric with wire outline, stumpwork style, so that you could layer that over the top and create that effect.
Another one had colours changing on the thread mid-stitch, and there are multi-coloured threads out there, so careful placement of the multi-colour thread in the section so that the colour change lines up could achieve that effect.
Basically, I want to see if it is possible to achieve in actual real life embroidery something that looks like a fake AI piece.
35 notes
·
View notes
Text


Jewelry designed by Miriam Haskell.
Beginning in the late 1920s, she created big, colorful, 3D pieces that were desirable not for the materials used but for their elaborate, handmade quality. She had a completely different way of constructing her jewelry than other costumer jewelers of the time. Mainly, she never used glue. As described in the "history" section of the modern Haskell company website, "the [jewelry] element, no matter how diminutive, was threaded, encrusted, or wrapped by hand onto a wire, a chain, or handset into a channel or finding. It’s the tight embroidery of the elements-that bares no sign of the base underneath - that is one of the most distinctive features of Miriam Haskell jewelry."
54 notes
·
View notes
Text
Now that most big dates have passed, I'm excited for the summer :)
It's always so interesting, the feeling of 'I'm done with the school year so I can start learning now' ^^' But it's so much easier to be healthy and curious on my own. Wish they'd just let me do whatever + the freedom to bother teachers as much as i wanted, and give me a degree based on the quality of my portfolio lol


For the rest of june, I've been challenging myself to wrap some stuff up, so I can start fresh on the next chunk in july!
✔ rough schedule for july
✔ finish drawabox lesson 3
✔ finish Duolingo Hebrew/Chinese units
✔ finish Korean book chapter
✔ deep clean my room ✧ the kitchen ✧ my files and images
✔ sew on previous embroidery project and set up the next
✧ wrap up the modeling and texturing part of my 3D model, ready for rigging ~
✔ watch/read only 'watch later' videos and posts
Here's some of the video essays from channels I overall recommend! These long form vids sometimes take me like a week to get through lmao but it works well while doing tasks like this week.
> Kawaii: Anime, Propaganda, and Soft Power Politics Moon Channel
> how dark mode killed good design Answer in Progress
> Analyzing Every Torture Scene in Call of Duty — All 46 of Them Jacob Geller
> Bardcore : Neo-Medieval vs Actual Medieval Music Farya Faraji
✧ respond to asks and tag games finally
✔ make the most of the rest of free trial hip hop dance course lol
11 notes
·
View notes
Text
Book Progress 06: Starting to get somewhere.

The gold appliques were a bear. I just got a new iron and the two were immediately bitter rivals. This better be a fucking enemies to lovers real lickysplit or they both get the horns.
The vinyl seems like it should be very close to the last steps for the cover. I should have glued on the final layer of the front board and folded the cloth to make a nice, tidy package. But fuck, I can't. If I did, I would have perhaps melted the beadwork I'm about to sew into the coffin element. I've already lined it black velvet and painted the two charms, I suppose, I'll be using for the books.


My sewing is clearly perfunctory at best but it Is sewing. You gotta give me that. I knew I wanted Some sort of embroidery-oid, just thematically, but I also knew that 3D bobbles tend to be destroyed fairly quickly. The slipcase will help but the raised elements were my quickest solution. The book should slide in and out of a bookcase without getting Too caught up. With Luck.
As today is a productive day, I'm going to split the update here to talk about the edge wrap-up.
10 notes
·
View notes
Text
Assemble
Tuesday 10/12/2024
I felt like I was lacking some 3D pieces in my exploration of my project. I really enjoyed embroidery last time and thought it might be interesting to create a mock up of a piece of headwear which can be worn during ritual practice which is inspired by Alister Crowley's cloak and hood which often gets mistaken for a hat.
I got a piece of fabric and embroidered the eye of Horus in a triangle with 5 points and rays, a symbol seen across thelemic clothing, I then created a card structure to wrap the fabric around and sewed the fabric to it to create the hat.


Overall I thought that this was a fun experiment as it let me get to use a medium I’m not very comfortable with, however, the structure of the piece could be improved as it was very quickly put together and is somewhat off centre.
If I were to do this again I would focus much more heavily on the foundations and structure of the piece.
3 notes
·
View notes
Text

Today i finished up an embroidery piece that i made to encapsulate the full scope of my project in one symbol.
I picked an ear as the body part as it is the most common place in the body for someone to get a piercing. Earrings are seen as more socially acceptable and even desired by the majority of people who other wise would have no interest in body mods. However my project tends to focus on the more loud pieces and so i added a series of spiked helix piercings. As well as them i added a small ear tattoo of a snake wrapping around the outer shell of the ear while starting and ending on the inside to tie in the tattoo aspect of my project. While the embroidery itself is complete i want to get large earrings to attach to the lobes for a 3d effect.
This was my first time doing embroidery and hope to use it more in further projects.
2 notes
·
View notes
Text
Going Over the Details of the Cosplay
While I wait for the sample swatches to arrive, it's time to comb through the models to figure out how all of these materials will come together.
Aloy's Shield-Weaver outfit is simple in design; there's just a lot of layers. I've marked up a render of her with my notes.
As for Talanah's... very little of her outfit makes sense to me. There are many questionable and impractical details that left me scratching my head. Then again, the game designers aren't prioritizing practicality when they're creating. They just want to make something look as cool as possible.
Makes it especially challenging for the cosplayer though.
First, let's talk about her shirt. The asymmetry is awesome, but a nightmare! In essence, I've rationalized the design to be an off the shoulder, wrap shirt that is attached to a stiff leather collar.

Key Points of Weirdness:
On the front of the shirt, left-side, there is a leather trim that does not continue all the way through to the back. At some point it switches to the gold embroidery trim. This transition is hidden by the shoulder straps, so I'll also take advantage of that.
The leather neck collar seems to be under the shirt, but then peeks out on the front right-side! Additionally, it seems to be supporting the shirt up on that side.
Originally, I thought the sleeve flaps protruding out from the arm was a render problem when I reviewed the in-game screenshots. Then once I reviewed the 3D model, I realized that no, they really did just have some flaps sticking straight out through the sleeve.
How are the shoulder straps attached? How are the cuff armor straps attached?? How is the arm piece attached??? In-game they just all magically float there in place.
Next, the pants. WTF are the pants???

Looking at the cutouts, one might say, "Oh, there's just mesh fabric there."
And then you zoom in and NO - NO IT'S JUST BARE SKIN.
Talanah has to wear a thong. Or she goes commando. There's no other way to have cutouts that high on pants and you don't see any underwear. However, aside from that, there's the stability of the pants. You cannot have two separate pieces of fabric connected by 3 tiny points of contact and expect it to smoothly follow the contours of your leg. Especially when moving?
I was pretty confused on this aspect of the cosplay until I remembered that this thing exists:

These are anti-chafing pantlets from the 1930s. My idea would be to modify this pattern for the burgundy fabric of the pants, and then attach the turquoise leather sides onto the elastic. Tack down at key points so the world doesn't see your yahoos, and the pants should be able to shift while moving without pulling and making weird creases.

I might have enough time before the sample swatches arrive to do a mockup of this design. Then I'll be able to get a feel of feasibility and how much fabric I'll need to accomplish this.
#cosplay#horizon zero dawn#horizon forbidden west#aloy#talanah khane padish#shield weaver amor#why are her pants so weird#proj-2023-00#proj-design
17 notes
·
View notes
Text
youtube
manufacturer knit sweaters
YS knitting sweater production factory https://customknitfactory.com
email: [email protected]
manufacturer knit sweaters knit yarn over purl,sueter navideo 2023 para hombre,womens cardigans with pockets,women's sweater so we will see,cowboy sweater,maglione in cashmere made in italy,newborn baby sweater,knitwear long dress,he blazer,grown-ups Jumper,crew neck oversized sweater distressed,dog costume cartoon hand knit pet sweater,5xl pullover hoodies,cardigan pearl,elders Shrug,bride jumpers,mature people Cardi.Sweaters,hunde pullover gotland,Older folks Jumper,sweater barbie,pullovers shirt,sexy turtleneck sweater dress,jumper sets,Older adults Pull-Ons,jacquard sweater vest solid color 2pcs set,sweatsuit 4t girls,knit women skirt set,sweater song spongebob, chompas para hombre,manufacturer knit sweaters Bespoke sweater 2 piece Production factory https://customknitfactory.com/bespoke-sweater-2-piece-production/ manufacturer knit sweaters sucides sweaters, sweaters size Processing factory,winter children clothing,ensemble d un pull et un cardigan assortis,women's printed fleece cotton sweaters,lil uzi sweater,damsel wraps,childrens sweater Firm,bad bunny ugly sweater,men's tall cardigan sweater,j crew factory sweater coat,sweters gym baseball,embroidery knit sweater,girl wrap,sweater neck,cardigan small,sweaters ii,hoodie cotton knitwear men jacquard sweater,he sweater, knit sweater,portrait sweaters,wool men's cardigan sweater with elbow patches,zomer trui,sweater women jumpsuits,suckling poncho,woolen jacquard knit pullover vest,knitted cardigan custom,pullover xxl damen,what the sweatshirts with the c,manufacturer knit sweaters bayan triko kazaklar companies https://customknitfactory.com/bayan-triko-kazaklar-companies/ manufacturer knit sweaters sweater zip up vest,sweaters hoodies large,joules childrens fleeces,fancy sweater,knitwear6,suter mujer marca,gaa jumper,make sweater shrug,v sweater,sweaters & cardigans,baby pullover & pants sets kids 2pcs sweatsuit, sweater knitting pattern,luxury brand men jumper, cardigan sweater coat,blended knitted girls pullover,erkek rg yelek,navy blue sweater for men,juveniles Knitted Jackets,youngster Boleros,sleeveless sweater mens vest sweater,fluffy knitted shirt, custom logo custom,jacquard cotton sweater,nice pullovers,custom sweater knit companies,women's lambswool cardigans uk,custom cashmere sweater for companies,lambswool sweaters,crochet women,manufacturer knit sweaters pullover frau manufacturer china https://customknitfactory.com/pullover-frau-manufacturer-china/ manufacturer knit sweaters Male blazer,wholesale cardigans for women,infantile vests,pullover sweater custom orde,sweater ideas outfit,sweater itachi,sweater costume design,custom oversized sweaters,private label mock neck sweater Manufacturing plant,embroidered sweater women xxl,Suit Shrug,weihnachts pulli Producer,women anoraks windcheater knit 100otton,fisherman's sweater,maglione odm,winter sweaters women,crochet long sleeves dress, women cardigan sweaters,korean style sweater,infant Tunics,3d sweatshirts amazon,women over size sweater,baklava desenli kazak yelek,alpaca sweaters bolivia,Outfit Sweater top,langer pullover,Elderly people blazer,custom jacquard sweater 4xl,men's pullover oversized zipper,vestido formal corto stretch,sweater jumpsuit Processing factory,cardigan letterman unisex,chompas de hilo para dama, cardigan street,ugg pullover sherpa,color block oversized kids sweater,jumper pattern,spiderman chompa,fisher men cable sweater,cashmere silk sweater de caballero company, sweater knit sweater Producer,korean sweater vests for women,cloaks Hoodies,green fleece sweater,he Cardi.Sweaters,Bespoke vest for women Processing factory,oversized sweater sweatshirts blanket long sleeves,pullover blanket,m&s fleeces for men,knitted company,fall sweaters for women,light sweater,suetersdemujer,cotton kimono cardigan,cardiganernest,sweater anak laki laki,youth hoodies,pullover 164,flannel Shawls,sweater women manufacturers,sueterunicornio, merino wool sweater men cardigan factory,sueter de caballero
0 notes
Text
Master the Craft: Essential Embroidery Techniques for Beginners

Welcome, embroidery enthusiasts, to a comprehensive guide designed to elevate your stitching skills! Whether you're a complete novice or a seasoned stitcher, there's always something new to learn in the delightful world of embroidery. This post dives deep into essential techniques, offering valuable knowledge for beginners and introducing advanced concepts to broaden your creative horizons.
Embroidering Basics: A Foundation for Success
Before we delve into intricate stitches, let's solidify the fundamentals. Here's what you'll need to get started: Embroidery hoop: Keeps your fabric taut and prevents puckering. Choose a size appropriate for your project. Fabric: Opt for tightly woven fabrics like cotton or linen for better stitch definition. Embroidery needles: Sizes vary depending on thread thickness and fabric weight. Sharper needles are ideal for finer fabrics. Embroidery floss: Choose high-quality threads in colors that complement your design. Six-stranded floss is the most common type. Embroidery scissors: Sharp scissors ensure clean thread cuts. Embroidery pattern: This can be a pre-printed design, a digital file, or even a freehand drawing on your fabric. Threading the Needle: Mastering the Basics Separate a strand: Most embroidery floss comes in six strands. For most projects, you'll separate two to three strands depending on the desired thickness. Cut a length: Aim for a strand approximately 18-20 inches long. Thread the needle: Loop one end of the floss and thread it through the eye of the needle, leaving a tail at the opposite end. Knotting the end: Secure the floss with a simple knot close to the needle's eye. The Stitches that Make Magic: A Beginner's Guide Now that you're prepped, let's explore some fundamental embroidery stitches: Running stitch: This basic stitch creates a continuous line and forms the foundation for many other stitches. Make small, even stitches with the needle going up and down through the fabric. Backstitch: This stitch secures your work and prevents thread from unraveling. Make a small stitch forward, then bring the needle back a stitch length, pushing the thread under the previous stitch before going forward again. Repeat for a secure line. Straight stitch: Similar to running stitch but with spaces between each stitch. This creates a dotted line effect. Satin stitch: Creates a smooth, solid surface. Make small, close stitches side-by-side, completely covering the fabric underneath. French knot: A decorative knot that adds a raised, 3D effect. Wrap the thread around the needle a few times, hold it down with your thumb, then push the needle through the fabric, leaving the knot on the surface. Beyond the Basics: Exploring Advanced Embroidery Techniques As your skills grow, venture into more intricate techniques that add depth and dimension to your projects: Stem stitch: Ideal for creating outlines and stems. Make diagonal stitches, one on top of the other, following the desired line. Lazy daisy stitch: Creates a delicate daisy-like flower. Make a small circle of satin stitch, then radiating straight stitches around the circle. Blanket stitch: Creates a decorative edging or can be used to join two pieces of fabric. Make small diagonal stitches that catch the edge of one fabric and loop under the other fabric's edge. Appliqué: Sew a pre-cut fabric shape onto another fabric using decorative stitches for a layered effect. Free-motion embroidery: Detach the embroidery hoop and move the fabric freely under the sewing machine needle to create organic shapes and designs. Essential Tips and Tricks for Flawless Embroidery Transfer your design: Use transfer paper, a water-soluble pen, or a light source to trace your embroidery pattern onto your fabric. Sharpen your needles: Blunt needles snag and damage fabric. Invest in a needle sharpener for continuous smooth stitching. Relax your grip: Avoid holding the thread too tightly, as this can cause tension and puckering of the fabric. Practice even tension: Maintain consistent tension on the thread as you stitch for clean and uniform results. Experiment with color: Don't be afraid to play with color combinations to create unique and vibrant designs. Finishing touches: Once your embroidery is complete, press it with a warm iron to flatten stitches and remove wrinkles. You can also frame it or use it to embellish clothing, bags, or home decor items.
Developing Your Design Skills:
Sketch your own designs: Don't be limited by pre-made patterns. Sketch simple shapes, flowers, or lettering to create your own unique motifs. Trace from life: Use leaves, flowers, or other natural objects as inspiration. Place them on your fabric and trace their outlines for a natural aesthetic. Digitize photos: Convert photos or illustrations into embroidery patterns using specialized software. This allows you to incorporate personal images into your projects. Combine techniques: Don't be afraid to mix and match different stitches and embellishments within a single project. Experiment with textures and layering to create depth and interest. Resources for Embroidery Enthusiasts: Embroidery books and magazines: Find a wealth of inspiration, patterns, and tutorials in embroidery publications. Online embroidery communities: Join online forums and social media groups to connect with other stitchers, share your work, and learn from others. Embroidery classes and workshops: Consider taking a class or workshop to learn new techniques and get hands-on guidance from experienced instructors. Download our 3 Free Books Here Troubleshooting Common Embroidery Problems: Puckered Fabric: This is usually caused by uneven tension. Loosen the fabric slightly in the hoop and re-tighten as you stitch. Thread breaks: Blunt needles or using too much thread can cause breaks. Ensure your needles are sharp and use the appropriate number of floss strands for your fabric and stitch. Uneven Stitches: Practice maintaining consistent tension on your thread and focus on making stitches of similar length. Knots on the wrong side: These can be unsightly. Try burying the knot under a few stitches at the beginning of your work. The Art of Embroidery: A Journey of Skill and Self-Expression Embroidery is more than just creating beautiful stitches; it's a journey of learning, exploration, and self-expression. With dedication and a little practice, you'll master essential techniques, develop your design skills, and discover the joy of creating unique and personalized pieces. So, grab your needle and thread, embrace the creative process, and let your imagination blossom with every stitch! Bonus Section: A Beginner-Friendly Embroidery Project Feeling inspired? Here's a simple yet charming project to get you started: Embroidered Floral Hoop Art Materials: Embroidery hoop (4-inch diameter) White cotton fabric (slightly larger than the hoop) Embroidery floss (various colors of your choice) Embroidery needle Embroidery scissors Water-soluble pen Pencil and paper (optional, for sketching your design) Instructions: Prepare your fabric: Cut the fabric to a size a few inches larger than your embroidery hoop. Transfer your design: Sketch some simple flowers on paper first (optional), or use a pre-printed floral pattern. Using a water-soluble pen, lightly trace your design onto the fabric. Set up your hoop: Loosen the screw on the embroidery hoop, place the fabric over the inner hoop, and then tighten the screw to secure the fabric taut. Choose your stitches: For this project, we'll use a combination of basic stitches. Use a backstitch for the flower outlines, French knots for the flower centers, and lazy daisy stitches for the flower petals. You can also experiment with other stitches you've learned. Embroider your design: Thread your needle with your chosen color and begin stitching according to your traced design. Refer to the explanations above for each stitch if needed. Finishing touches: Once your embroidery is complete, tie a knot at the end of the thread and weave it under a few stitches on the backside to secure it. Trim any excess thread close to the knot. Frame your art: Cut away any excess fabric around the hoop, leaving a clean edge. You can display your beautiful hoop art as is or add a decorative ribbon around the outer hoop for an extra touch. Remember, embroidery is a relaxing and rewarding hobby. Embrace the learning process, have fun experimenting, and enjoy the satisfaction of creating something unique and beautiful with your own hands! Read the full article
0 notes
Photo
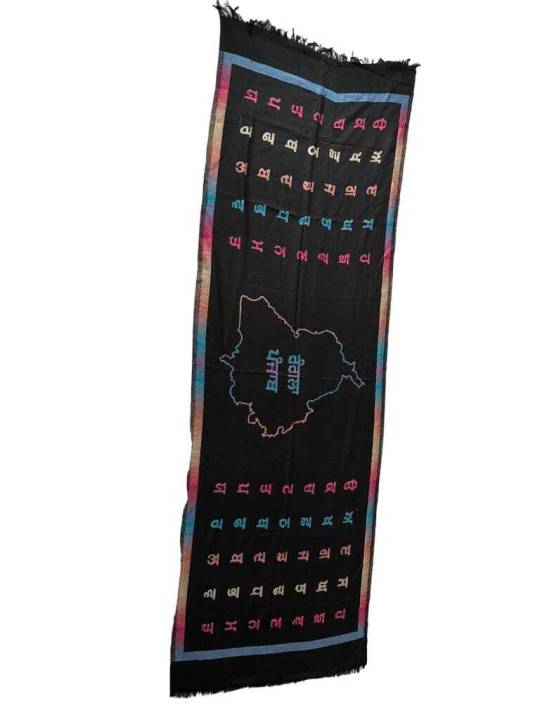
Gurmukhi Urra Airra Alphabet Panjabi Woolen Shawl Rangla Punjab India Stole Lohi
Gurmukhi Urra Airra Alphabet Panjabi Woolen Shawl Punjabi Indian Stole New Lohi - Rangla Punjab Wording and Punjab Map wooven Shawl
Limited Quantity Available. Comes in three colours. Please choose from Variation List.
Authentic Maryada Lohi
Standard Punjabi Shawl Length - fits all adults and ages. Unisex
It is a Standard size Lohi. Weighs approx. 400g
Wrap yourself up in a beautiful shawl that showcases the Gurmukhi Punjabi Alphabet Urra Airra. Made from 100% wool, this unisex piece features intricate embroidery and is available in various colours to suit your style. Whether you're heading out for a casual day or dressing up for a special occasion, this shawl pairs perfectly with a kurta pajama and adds a touch of cultural flair to any outfit. Ideal for both adults and children, this Punjabi Lohi is a perfect gift for those who appreciate the beauty of Indian culture. The shawl is expertly crafted in India and is available from OnlineKaraStore, a trusted brand in specialty clothing and accessories. So wrap yourself up in this stunning Lohi and make a statement with its striking design and superior quality.
Trending and in Fashion now
Various colours to choose from.
Limited stock available
0 notes
Text
Artist statement -
A nice warm bed, wrapped up in fluffy blankets, eating your favourite snack and being surrounded by your favourite objects.
Do you feel comfortable?
You can’t hide there forever, you have to come out at some point.
The real world is scary and there is no fluffy blanket big enough to wrap it in.
Coming out of your comfort zone means trying new things and being frightened and amazed of what you are capable of creating.
I used this project as a chance to break out of my comfort zone by allowing me and my art to evolve by using unpredictability through experiments.
—————————————————-
Information about final outcomes -
3D outcome -
Mix media experimental sculpture based off the evolution of manipulating fabrics and evolution of stepping out of my comfort zone. I have the tendency to stick to doing art that I will know how it will look when it’s finished. I didn’t see a point it making something just to experiment. I now see the value of experimenting and evolving my own mind set to art.
Scrap fabric , silicone , trash , flowers , prints , paper , embroidery
Stuffed with trash , scrap fabric and flowers
2D outcome -
Mix media clay illustration formed from unpredictably, I wanted to create a 2D piece that is verging on being a 3D piece as that in itself is unpredictable. I first did a workshop with this technique and I had a lot of fun making it as I felt like I could let go and not feel pressure to draw/sculpt something perfect while also combing the techniques I had recently learned and evolved.
Time based outcome -
I used the audio from our workshop and created a short film of me destroying one of my sculptures to show how far I have come to evolve my work and get out of my comfort zone , sometimes that means trying new things and letting go of being able to predict the outcome of everything. The video i made felt very organic as I didn’t plan it I just did what came naturally and it ended up going with the audio very well.


0 notes
Text
Why are my art supplies considered hoarding right up until they’re considered useful, and then it’s straight back to hoarding afterwards.
‘You have too much stuff~’
It’s just disorganized. A messy stack always takes more space than the same things when clean and orderly. I know I need to straighten up.
‘You never use these~’
I’ve literally used every single kind of item I’ve bought. I might not have used all of each, (eg. a set of five stamps, but I’ve only used two so far), but that is just a matter of time.
‘Why do hold on to these things, they’re garbage~’
I specifically only hold on to a set amount of what you called ‘garbage’, and I reuse these items as I see fit. Old, non-donate-able clothes are now practice cloths for embroidery, cheap filling for pillows, patches for quilts and other decorations. Those paper towel rolls are supports and filler for papier-mâché. Those jars are, well, jars. I put things in them. I use scrap lace and leftover patterned paper on homemade cards. Cardboard boxes can be cheap canvas, supports for 3D projects, or just boxes. Maybe put the jars there lol
‘Hey, I need tissue paper and card stock for this gift I’m wrapping. Do you have any?’
And suddenly my apparent over abundance is no longer just some eyesore, but your great boon. Because yes, I have twelve kinds of tissue paper and two kinds of card stock. I also have wrapping paper if you’d prefer, dozens of kinds of ribbons if you’d like, and a calligraphy pen with four different nibs and three kinds of ink if you wanna get fancy on the card.
And they walk off with gift, impeccably styled, and my art stuff is all seemingly just junk to them again. The same stuff they were so grateful for just a moment ago. I don’t understand it. Why can’t my art supplies just be art supplies.
0 notes
Text


Leek Green Hand Embroidered Wrap Shirt And Drape Skirt And Golden Zari Embroidered Garden Jacket
Golden Zari Embroidered Garden Jacket
Jacket fabric Zari Silk Golden colour Hand and machine embroidered with Resham and sequins. Long trench style with same belt Jacket lined with golden Zari fabric Machine and hand embroidery with Resham and sequins.
Leek Green Hand Embroidered Wrap Shirt
Wrap shirt in olive green habutai silk fabric with light cotton voil lining Wrap shirt has deliacte hand embroidered with 3D flowers on shoulders.
Leek Green Drape Skirt
The Draped skirt is in olive green modal silk fabric.
#betrue#beyou#newcollection#festiveedit#indianwear#newlaunch#diwali#chanderi#silk#embroidery#intricatedesign
0 notes