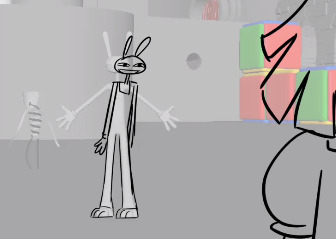
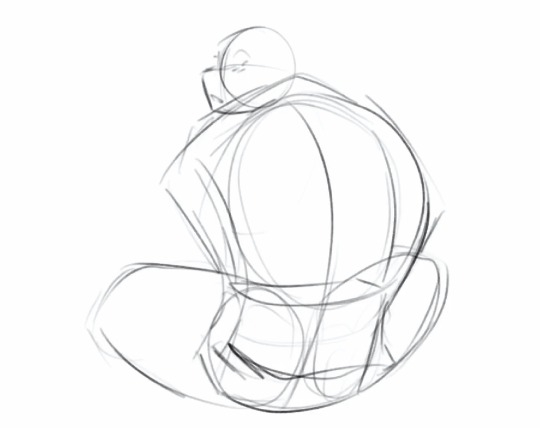
#3d drawing hole
Text
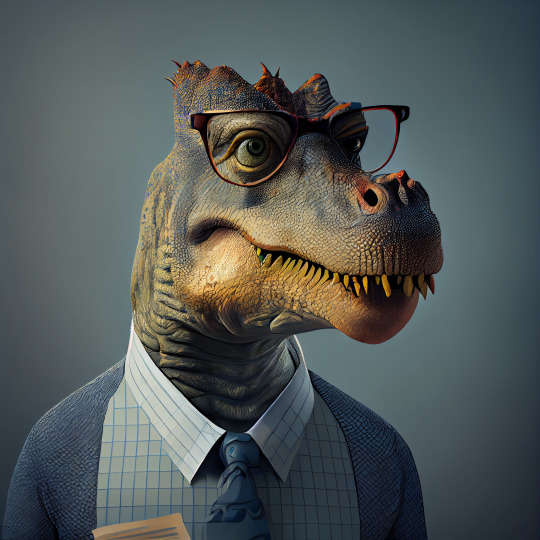
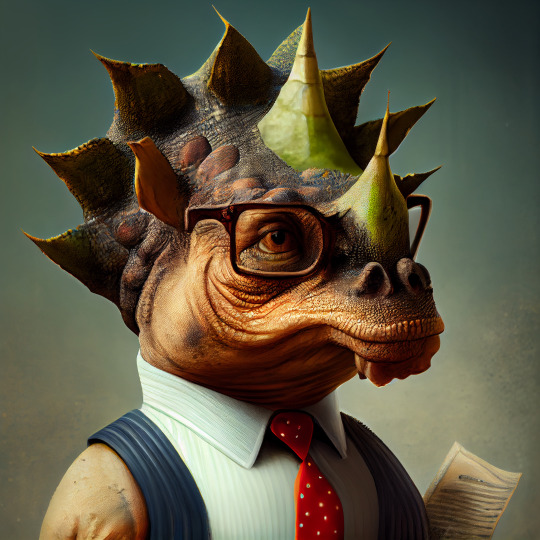
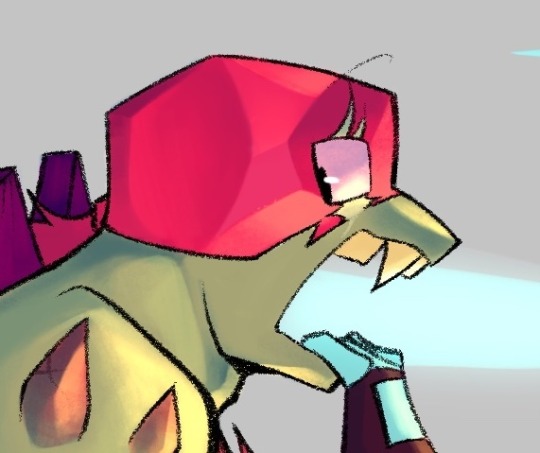
Dino Accountant


#3d drawing#3d drawing easy#drawing#3d art drawing#pencil drawing#drawing 3d#easy drawing#how to drawing#drawing 3d art#3d drawing hole#3d
3 notes
·
View notes
Note
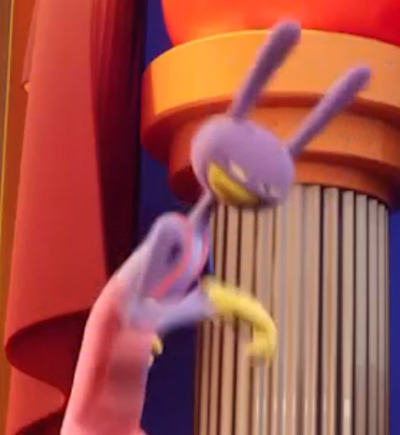
If they ever make a Sir Dadadoo plush do you think they'd make his mouth an open hole or would it be flat?
If they gave him an open mouth people would do evil things.
Example:

#do you guys not remember the mlp plush hole incident#tldr: i think they'd play it safe and just make it a flat faced plush#also because making a 3d mouth for a plush's mouth seems a lil hard but I've never made plushes so idk#garten of banban#garten of banban 6#gobb#gobb 6#garten of peakpeak#ignore the mediocre art i don't rlly draw much
45 notes
·
View notes
Text

#janettkabeh#artists on tumblr#denim#artwork#denim art#art#levi’s#jeans#pointillism#artist#needlework#thread#textile art#textiles#fiber artist#fiber art#fine art#modern art#hole punch#illusion#3d art#2d art#drawing#sketch#photography#content
4 notes
·
View notes
Text


Workin on some concept art, who knows if/when I’ll have the focus+energy to do anything more polished w/ this.
#my art#my ocs#opal#lyssa#concept art#visdev#worldbuilding#wip#got scared of the uplooking shot so I’m building confidence by doing a dif angle+pallet first#my window fucking sucks so I’m probably not gonna be able to draw much tomorrow which blows :(#3d stuff is done in blender btw#I’ve had the idea of opal living a pin a crystal city for a while#but the hole bit is new. tryin to think of a justification for hole city besides ‘it’s cool’ for the lore nerds but idk what yet#also since I wrote the whole vaugue magic shit I’ve realized I really like sci-fi shit so that’s getting a lot more incorporated into their#which actually ties really nicely into some secret shit which is exciting 4 me.#I’m rambling and tired so I’m gonna go sleep now
13 notes
·
View notes
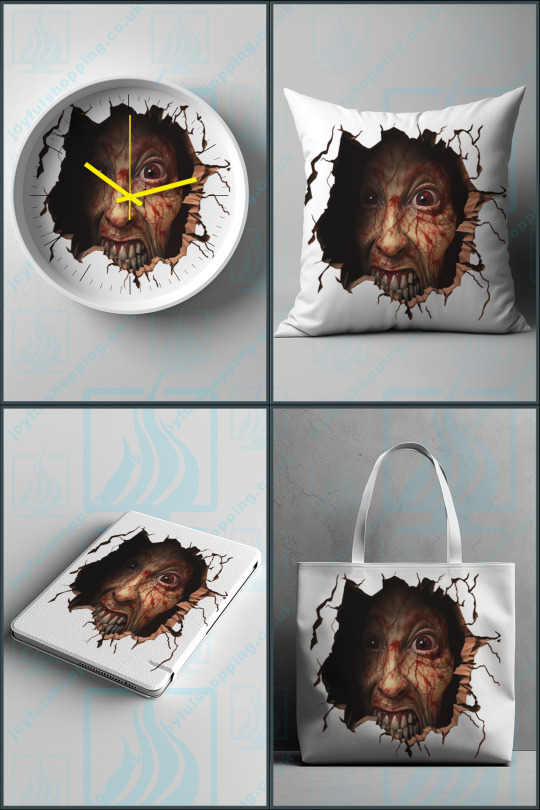
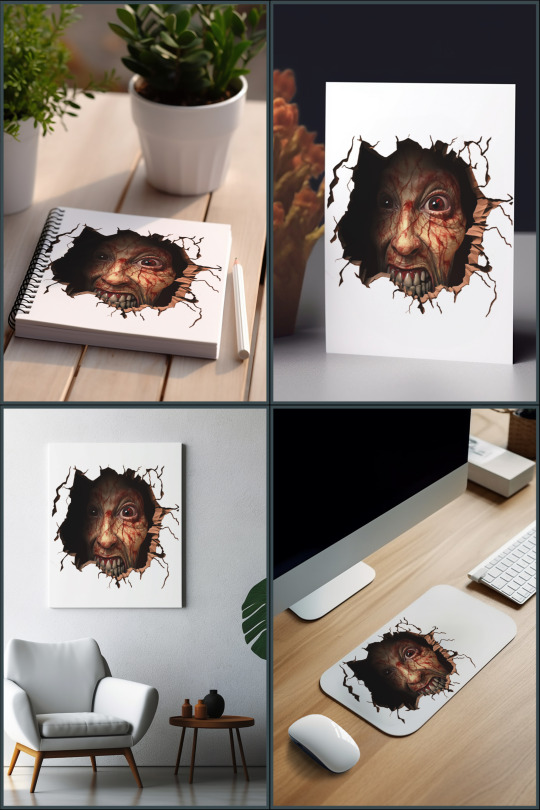
Text
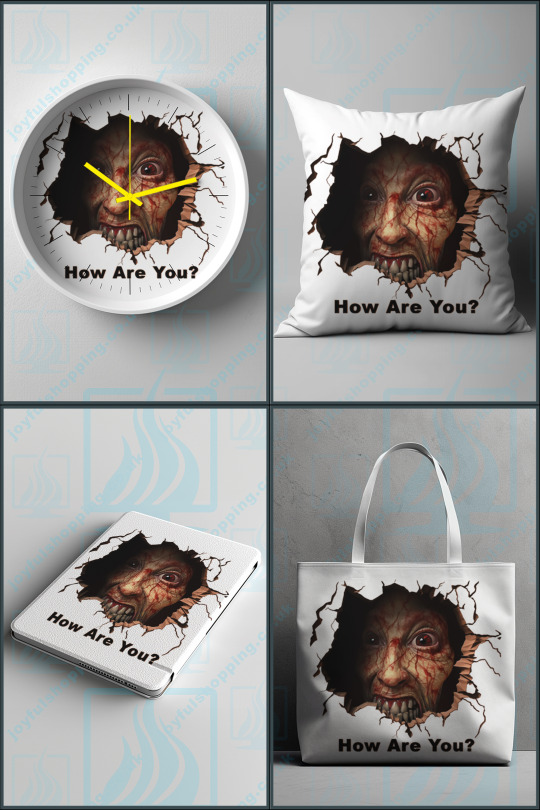


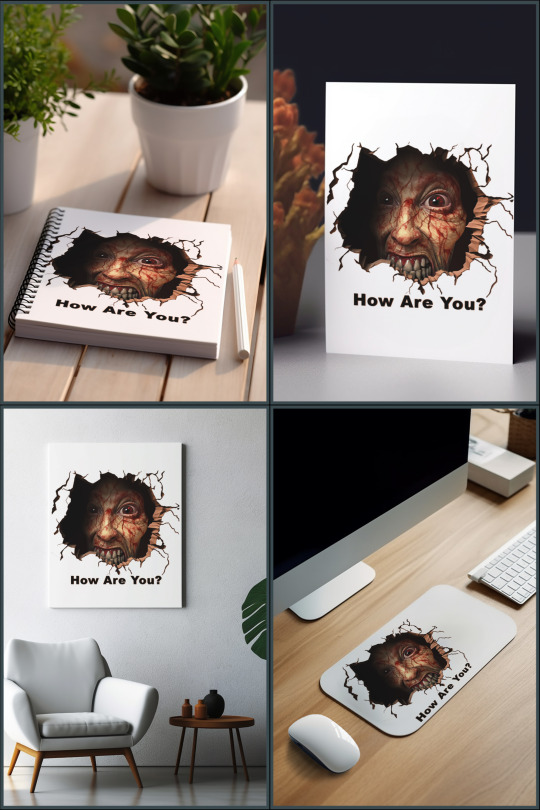

Terrifying Bloody Face Coming Out of a Hole Asking How Are You Funny Design
https://joyfulshopping.co.uk/home/182-terrifying-bloody-face-coming-out-of-a-hole-asking-how-are-you-funny-design.html
This scary 3D design shows a horrifying bloody face coming out of a dark hole in a concrete wall. The face appears distressed, yet is asking "How are you?" for a humorous effect. The depth and emotion of the artwork gives it an unsettling lifelike quality. Use this frightening yet funny design to decorate for Halloween or make your friends laugh! Download now and print it on t-shirts, mugs, posters and more.
#scary face#bloody face#3d illusion#face coming out hole#scary hole#creepy drawing#halloween decoration#halloween art#horror gift#horror illustration#horror design#dripping blood#scary wall#terrifying artwork
0 notes
Text
Every fun post on here that encourages people to have hobbies/be creative always gets an avalanche of "Some people are poor Karen" type reactions and respectfully, you're all super annoying. I've never lived above the poverty line and this is a list of hobbies I have that were cheap or entirely free:
Read books: Go to the library, lend a book from a friend
knitting, crochet, embroidery: Get some needles from the bargan store and ask around, people have leftovers from projects they'll happily give you. Thrift stores also often carry leftover fabric and other supplies. And talk about your hobby loud enough and an old lady will show up and gift you their whole collection, because there are way more old ladies with a closet full of wool than there are grandchildren who want to take up the hobby.
Origami/paper crafts: get some scrap paper and scissors, watch a youtube tutorial
walking: put on shoes open door
pilates/yoga/etc: get a mat or just use your carpet, watch a youtube tutorial
Houseplants: look online for people that swap plant cuttings. There are always people giving out stuff for free to get you started. If you're nice enough you'll probably get extra
gardening: You're gonna need some space for this one of course but you can just play around with seeds and cuttings from your grocery vegetables.
aquarium keeping is a bit of an obscure one but I got most of my stuff second hand for cheap or free and now I have a few thousand euro worth of material and plants.
drawing/art: You get very far just playing with bargan store materials. I did my entire art degree with mostly those.
writing: Rotate a cow in your head for free
cooking: again one you can make very expensive, but there are many budget recipes online for free. Look for African or Asian shops to get good rice and cheap spices.
Join a non-profit: Cities will have creative organisations who let you use woodworking machines or screen presses or laser cutters or 3D printers etc etc etc for a small fee. Some libraries also lend out materials.
candle making: You need some molds (cheap), wick, two old cooking pots for au bain marie melting and a ton of scrap candles, ask people to keep them aside for you.
a herbarium, flower pressing: Leaves are free, wildflowers too, ask if you can take from peoples gardens.
puzzles: thrift stores, your grandma probably
Citizen science: look for projects in your area or get the iNaturalist app
And lastly and most importantly: Share! Share your supllies, share your knowledge. Surround yourself with other creative people and before you know it someone will give you a pot of homemade jam and when you want to paint your kabinet someone will have leftover paint in just the right color and you can give them a homemade candle in return and everyone is having fun and building skills and friendships and not a cent is exchanged. We have always lived like this, it's what humans are build to do.
And all of it sure beats sitting behind a computer going "No stranger, I refuse to let myself have a good time."
Anyway I'm logging off bc I'm making some badges for a friend who cooked for me and then I'm going to fix some holes in everyones clothes.
20K notes
·
View notes
Text
some observations from going down a rabbit hole of japanese language xigbar yesterday
(apologies for the youtube watermarks. i got this clip from this video.)
[Video ID: a fifteen-second clip from a cutscene from kingdom hearts 3D: dream drop distance, with japanese audio and english-language visuals. it's the scene where xigbar tells sora that he's not going to wake up. end ID.]
keep in mind that this clip is just the japanese audio being played over the visuals from the english language release. the subtitles aren't a direct or literal translation of the words being spoken; they correspond to the localized dialogue that the english voice actors wouldve been given
hōchū ōtsuka (xigbar's japanese va) and james patrick stewart (his english va) give, to my ears, pretty similar vocal performances. this is the case for pretty much all of the characters ive seen so far in my xigbar-centric explorations (roxas's vas sound nearly IDENTICAL). the notable exception being xemnas, whose japanese va straight up sounds like he's trying to talk without moving his mouth
in the english dub cutscenes, the character animations often feel...floaty? disconnected? like, because they're not synced up to what the characters are saying and how, their gestures frequently seem random and unmotivated. in retrospect it's obvious that this issue wouldnt be present in the original language because that's the dialogue they would've been animated around in the first place!
now that im actually watching the character animation with the dialogue it was actually done for, i appreciate it a lot more. its so expressive. smiles.
at the end of xigbar's speech here you may notice him saying the phrase "tte hanashi." this is his japanese catchphrase! it means something along the lines of "so they say", "or so I've heard", et cetera. i love "as if" im a big fan of "as if" but i also love the idea of xigbar consistently undermining the information he gives and emphasizing how often he eavesdrops and spies on people.
he says "tte hanashi" very very often. multiple times in most of his scenes that ive seen so far. way more often than the english dub says "as if"
he doesn't say it normal like im pretty sure that's not how you say it in normal speech. like sometimes he does say it normal, but he always draws it out at least a little and often really draws it out, emphasizing it with some kind of gesture, like he does in the clip
seriously if there's a moment in the games where xigbar says something while doing a cunty little gesture he is probably saying "tte hanashi" in the japanese version
this is my new vocal stim. i can't stop saying it
#&BTW im absolutely going to make a supercut of every time he says tte hanashi in the games...once i....actually play 3#&also i know vastly more about japanese than the average person and vastly less than someone who speaks it fluently#im sure there are cultural/character signifiers in the way he speaks that im missing. pensive emoji.#&if you know for sure that any of my information here is wrong pleas let me know thank u. smile!#kh#kingdom hearts#xigbar#blakeposts
284 notes
·
View notes
Note
hey idk if you do art tutorial/tips but i love the way you draw faces HOW DO U DO IT!!
3d models and being so gay that like i study the men's faces so hard it might look like im trying to drill a hole right through their head irl.
also say hi to soaps icy blue eyes

158 notes
·
View notes
Text

Head-canons 3
Growing up + Mr. & Mrs. Seresin and Sophia
Note: I’ve hit a block with mini fics and I need requests to help the brain rot flow because I’ve been staring at a blank doc for a while.
Warning: mention of child loss.
════ ⋆★⋆ ════

JAKE
★ Jake was the kid who had to get a matchbox car or tiny plane from the store every time they went.
★ He helped his dad cut the lawn as a kid. By help meaning he sat on his dad’s knee and “drove” the mower.
★ Can draw fairly well, won his second grade class art contest by of drawing the Blue Angels squad. His mother had it framed in her office.
★ Used most of his allowance on Galicia at the arcade in town. Held the highest score for a year.
★ Did the water bottle muffler on his bike.
★ Knows how to sew his own clothes, his mother taught him how after she got tired to mending the tears in his pants.
★ As a baby when he was done napping he would shake the crib bars until someone came to get him.
★ All his favorite matchbox cars are still lined up on a windowsill at his parents house.
★ Had the glow in the dark stars on his ceiling.
★ Had a favorite chicken, her name was Candy.
★ Had beef with a lot of teachers in school, he wasn’t a quiet kid.
★ Competed in the rodeo with Tyler, he did barrel racing and roping with their mom’s horse Storm Warning. He won a few times.
★ Touched the electric cattle fence because older sis Sophia told him it was off. It wasn’t.
★ Sucked at hangman in school (still does)

TYLER
ᯤ Excellent at math, was in honors and AP all though high school.
ᯤ Flipped his first truck doing donuts in a field, it was fine aside from a few dents.
ᯤ Liked to garden with his mom, he had a ljttle kiddy gardening set. He liked to dig the holes for the seeds and flowers.
ᯤ Had multiple concussions from the rodeo. Only had one 3d grade concussion and it was his last.
ᯤ Almost got struck by lighting when he was ten trying to get a look at the storm.
ᯤ Got stood up on prom night and ended up not going. Jake bailed on his date so Ty wasn’t alone.
ᯤ Released crickets into the school hallway.
ᯤ Climbed out of his crib when he was done with nap time.
ᯤ Spray painted his bike red (it got everywhere)
ᯤ Was the bottom bunk when he shared a room with Jake.
ᯤ Was a stuffed animal kid, his parents have totes of them still.
ᯤ Liked to set his marshmallows on fire.
ᯤ Sophia locked him in the chicken coop more than once.
ᯤ Won the science fair two years in a row, he build a mini version of Dorothy and a tornado.

THE SERESIN FAM
✿ Brisket.
✿ Sophia is four years older than the twins. She is a veterinarian in Austin, she’s been married for two years.
✿ She originally did not like her brothers, she didn’t want anything to do with them when they were infants.
✿ There was supposed to be a another sibling, a girl, before the twins were born. Her name was Dana.
✿ Mrs. Seresin’s name is Rosalie. Her maiden name was Hayes.
✿ Mr. Seresin’s name is Cole.
✿ Mrs. Seresin has a small business, she crochets many different things. She sells a lot at craft fairs.
✿ Mr. Seresin regularly mixed up the twins as babies, hence the color coding.
✿ They have one goat named Guy. Guy will stand on the porch and bleat until he gets his daily apple slice.
✿ All three siblings have a strong and loving relationship with their parents. Both mom and dad support them in everything.

(Please tell me yall get the crickets in the hallway reference)
#jake hangman seresin#tyler owens#top gun maverick#twisters#glen powell#glen powell tyler owens#twisters movie#seresin twins#top gun hangman#jake seresin
55 notes
·
View notes
Text


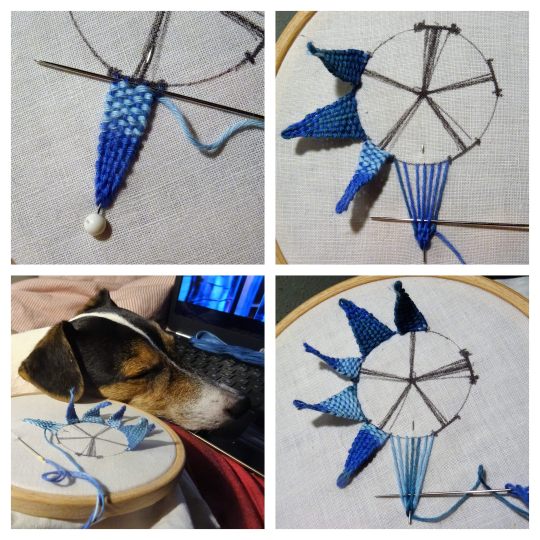
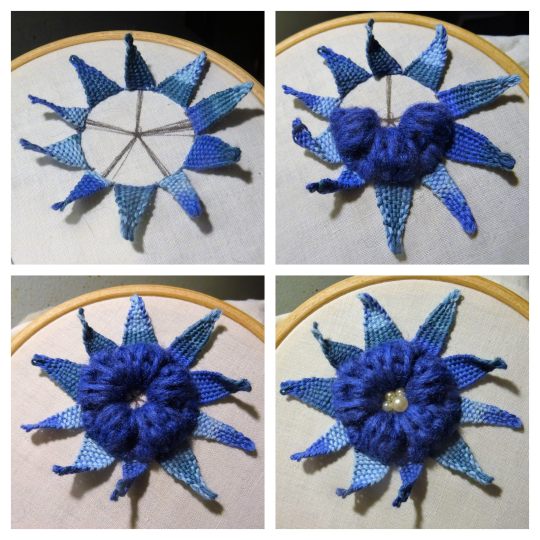

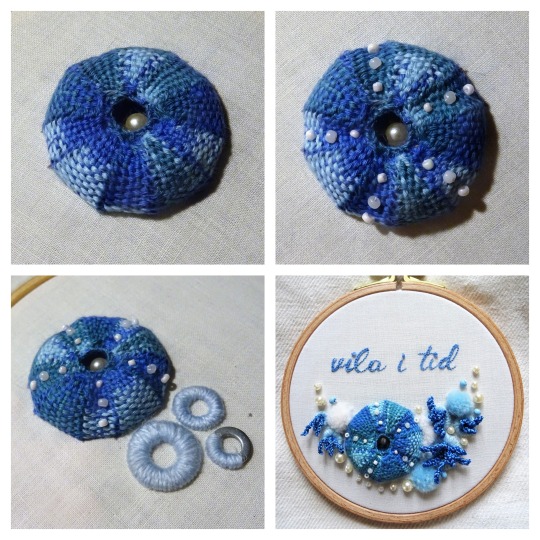
People seemed to appreciate the tutorial I posted so here is another one. Here is how you can stitch a 3D sea urchin (without the spines). This one is a bit more advanced and needs some descrioption to accompany the images.
Technique: The technique is called woven picot. If needed you should be able to find better stitch instructions on youtube.
Threads and yarns: I've preferred using a twisted thread for the woven picot. In the tutorial I'm using sashiko thread, and that worked ok but wasn't ideal. I would recommend cotton perle or mercerised cotton crochet yarn for this technique. The top example is mercer cotton. The tighter the thread is twisted the better I'd say. I do NOT recommend using six-stranded floss.
Variegated thread is fun for this project. If the randomeness of it bothers you then you can cut out lighter and darker sections of your variegated thread and then do every other wedge of woven picot darker and every other lighter, as I've done in the top example.
The yarn in the middle is some really chunky wool knitting yarn, which is a bit of a struggle to work with. You could also just ball some yarn up, pack in there and fasten it with some stitches with a thinner thread. It's not going to be visible anyway, so you can improvize.
Needle: A blunt needle is better for this technique too, but I only had sharp ones at the time I made this tutorial. Don't be like me.
Process: I'd say the pictures are pretty self explanatory, but here is a brief rundown. Draw a circle on the fabric, in the size you want your sea urchin to be. Split this circle in to five equal sections. A sea urchin typically has a patter that is made up of five broader wedges interspersed by five narrower wedges, so that's what we want to achieve. So when you have your five sections, try to sketch out five broad and five narroow sections using the lines you've already drawn as a guideline.
Make the wedges as pictured above. Each wedge needs to be of equal length and a bit longer than the radius of the circle.
Fill the middle with som padding, as described above. I've made five puffs of padding, one for each broader wedge. Which leaves little valleys for the narrow wedges to rest in, and creates a shape typical of some sea urchins.
The woven wedges are then simply joined together as neatly as possible with a thin thread of similar color (I just split the sashiko thread down to half the thickness and used that).
Lastly I finished the edge of the hole in the middle with some button hole type stitches maybe? I'm shit at stitch names... Beading is optional, I just thought it looked neat.
#embroidery#3d embroidery#fiber art#embroidery tutorial#fiber art tutorial#3D embroidery tutorial#stumpwork#tutorial#sea urchin#sea urchin art#theenbyroiderer
329 notes
·
View notes
Text
-whispers- new cosplay time.


(I got a 3D printer for Christmas which means I'm going to actually make the Aloy costume I've been planning on since Forbidden West came out).
Some interesting observations having really started investigating how the Nora Anointed armor is assembled;
- there's a LOT of sherpa on this and all of it seems to be padding. The shoulder straps and upper arms on the sleeves are absolutely lined with really thick sherpa and it seems intended to cushion the weight of the armor (the shoulder straps) and absorb shock (the upper arms) given that the sleeves are open under the arms almost to the elbow for breathability. The fur on the boots is pretty ideally positioned to cushion the lower shins. I'm also going to quilt the front shell of the chest plate onto the hair side of sherpa to get that deep quilted look.
- the round pieces on the front of the shoulder straps kinda look like they might be speaker covers. I gotta think about whether I'm gonna actually use speaker parts for real or fudge it.
- the cord tied around the ankles is functional actually. These boots shift like crazy without them, but with cord wrapped around the ankle the leather stays snug to my feet and the insoles stay in place. Presumably all the cord around the wrists and forearms is also functional, to keep the sleeves from fouling a bowstring. Also the boots are hella comfortable (I used economy buckskin with an insole of the same heavy suede I'm going to use for the skirt).
- The skirt designs really seem like a mixture of dye, paint, and decorative stitching. It looks like the darker blue on the edges of the panels is dye, the lighter blue is paint, and then the details on top are a decorative zigzag saddle stitch done with sinew. Then the red is cord, but it is way denser than you could stitch into leather in real life without absolutely demolishing that part of the leather. I will probably have to punch a bunch of offset stitching holes for that to get the look.
- I thought the sleeves would be laced in on top like a pauldron but they're actually stitched directly onto the upper back portion of the shoulder straps, which wraps around the back of the neck and supports the shoulderblade armor. I assume this is for better range of motion, it would definitely be easier to draw a bow with the sleeves stitched on in the back as opposed to on top of the shoulders.
- I'm going to need to spend so much on cord and by-the-foot electrical cabling at Home Depot lmao.
#my cosplay#hfw#horizon forbidden west#Aloy#cosplay WIP#I've really wanted to do this cosplay for forever but like. the armor really needed to be 3D printed. there's no other good way to do that.#so until I knew how I was gonna get the armor printed there was no point in starting#but I'm hyped to get going and test all the leatherwork skills I've recently been acquiring#not to mention really get intimately familiar with 3D printing
31 notes
·
View notes
Text
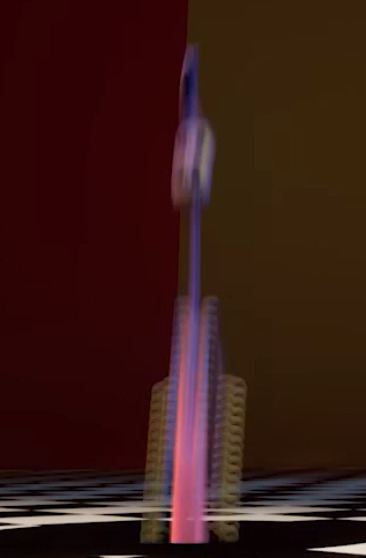
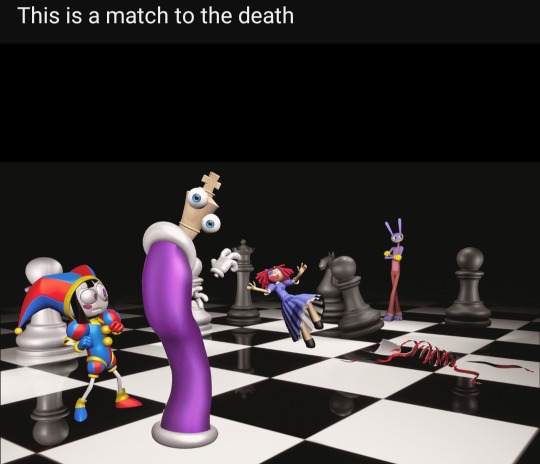
DIGITAL CIRCUS THEORY
I was scrolling through Gooseworx's tumblr page and came across some images from the development of TADC. So I'm gonna theorize on what is going on in these scenes!
The first is a storyboard! On the drawing layer, Jax has a smirk on his face and seems to be looking at Ragatha (or maybe Pomni? it's hard to make out)
On the 3D layer, we see Gangle (presumably Happy Mask Gangle considering her carefree body language and no broken mask in sight) walking away from Jax and Ragatha. We also see Jax's model in an idle pose.
As for environment, they seem to be standing in a large hall with colourful cubes in the background, something red on an upper ledge and what looks to be a hole in the wall?? (those are probably placeholders tho)
My guess is that Jax is about to prank Gangle (probably breaking her mask) and is saying something mischievous to Ragatha like "watch this 😼". This lines up pretty feel with what we saw him doing in the character introductions.
The next are a bunch of funny smear frames from (what I assume to be) fully animated scenes! Although they look weird, it's very exciting to see a glimpse of what will happen in the pilot!

Caine flying on the stage we saw in the first teaser.

Pomni standing on the stage we saw in the first teaser.
Jax jumping in a room with brown/red walls.

Ragtha sitting down IN THE SAME HALLWAY WE SAW IN THE FIRST TRAILER! WHERE THE BLACK LINE CAME FROM!

Gangle lying face down on the floor (she's so me)

Bubble...sticking out their tongue?? I think??? In the same stage we say in the first teaser.
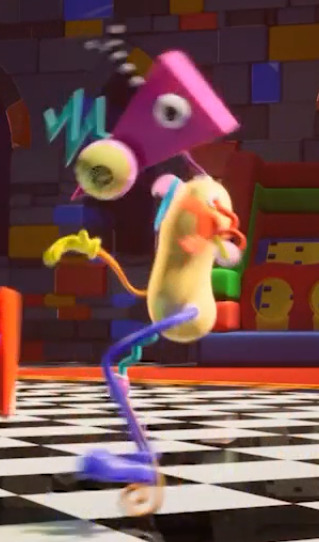
This where stuff gets interesting! Zooble is standing in a strange location with a checkerboard floor and walls made out of building blocks!

And this seems to be Kinger glitching the very same location! The building blocks look very similar to a castle, playing into the chess theme!
Another shot of Jax jumping in a room with brown/red walls, accept now we can see him jumping into a hole with the same checkerboard floor!
Jax sliding down a red slide.
Jax turning around (maybe laughing) on what looks to be the iconic stage.
A lot of these images reminded me of THIS promo from the Glitch Productions YouTube channel.
It has the same reflective checkerboard floor with Gangle lying face down on the floor! Although this is just a teaser, and not a screenshot from the actual pilot, I do think it's foreshadowing what'll happen in this episode.
So heres my guess on what some of these mean! I think this promo, the Zooble and Kinger images, the images of Jax jumping, the image of Gangle lying down AND possibly the storyboard, all take place in the same area!
This area seems to be a life-sized chess board with colourful blocks in the background making a castle! Assuming all these images were taken from the pilot, I think this will be the main location of the first episode! It will probably be where Caine teleports them to do Pomni's first challenge!
Considering the floor, I think this challenge will be real-life chess! With the character playing as different peices, working to try and capture Kinger! This may be used to show why Kinger is always so paranoid, because in chess the King is actually a very weak peice.
This may be looking to deep into it, but this may also explain why Gangle has fallen down in both teasers. Maybe, if the peice your playing as gets killed in the game, your out and you either faint, have to pretend to be dead or actually die and get revived later.
Or I'm completely wrong, we'll just have to "wait and see!"
#the amazing digital circus#the digital circus#digital circus#tadc#tadc jax#tadc pomni#pomni#kinger#gangle#zooble#Tadc gangle
145 notes
·
View notes
Text
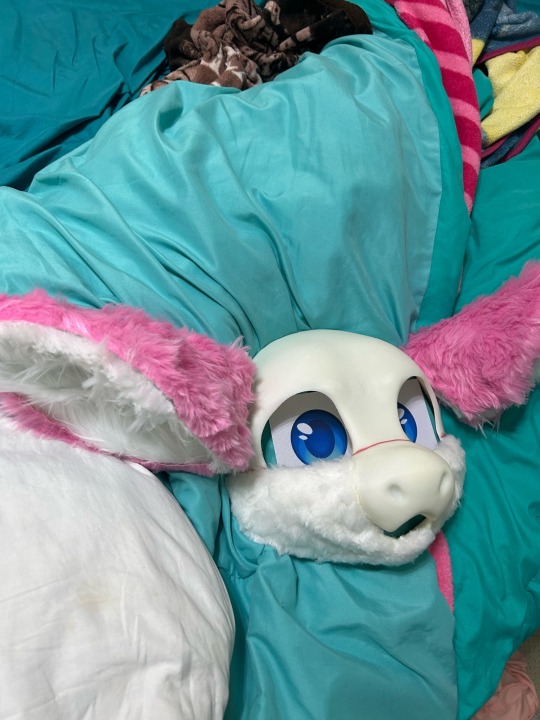
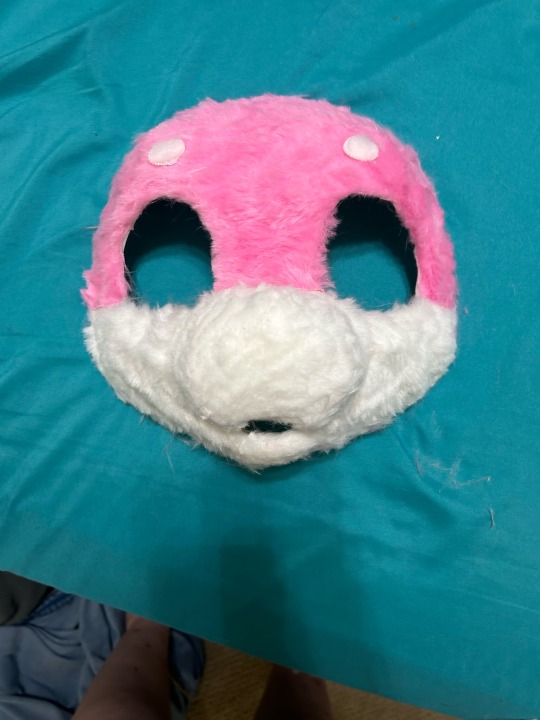
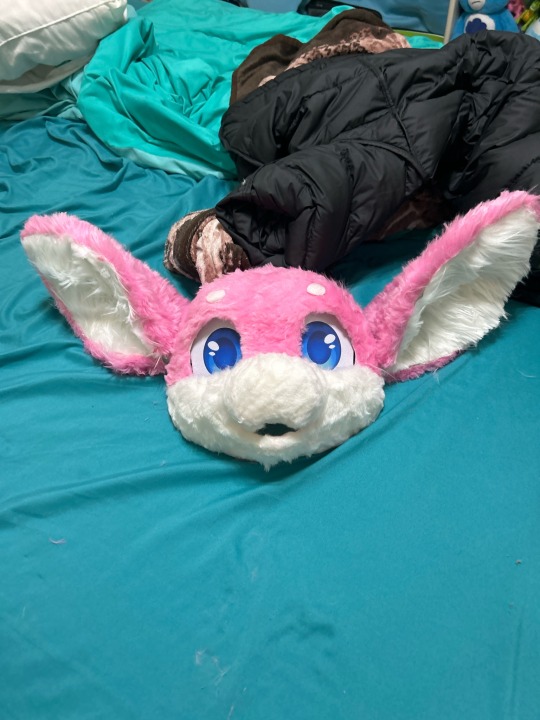
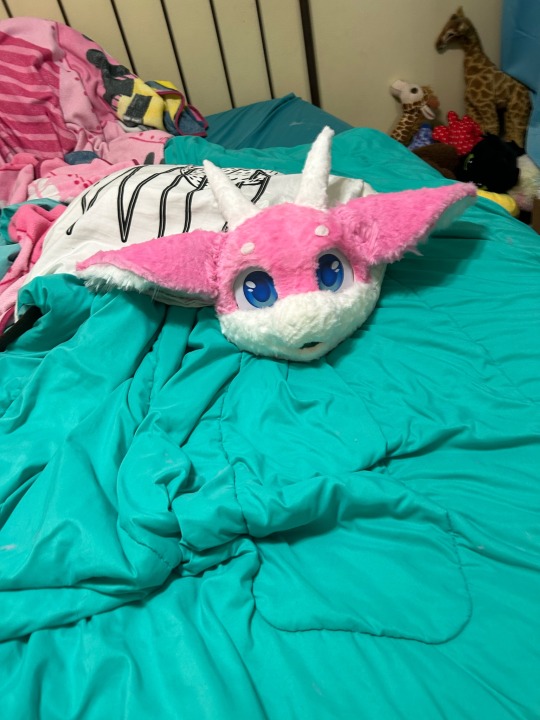
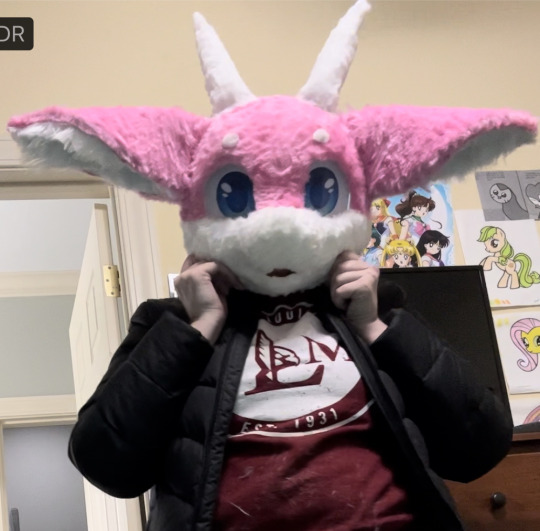
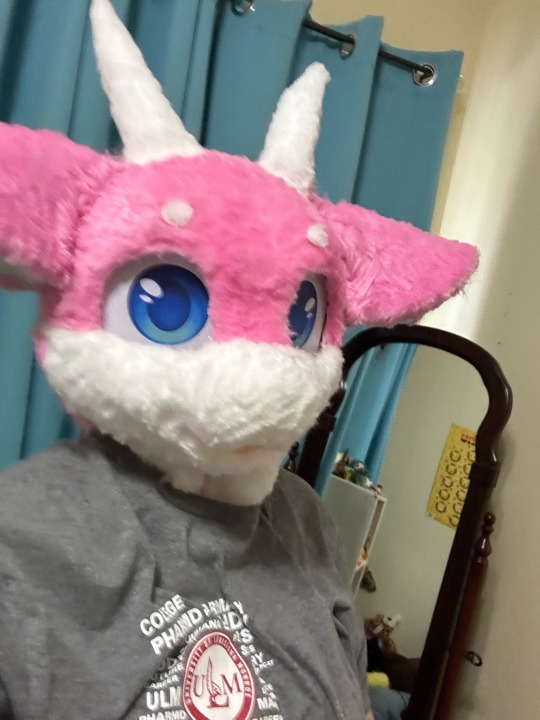
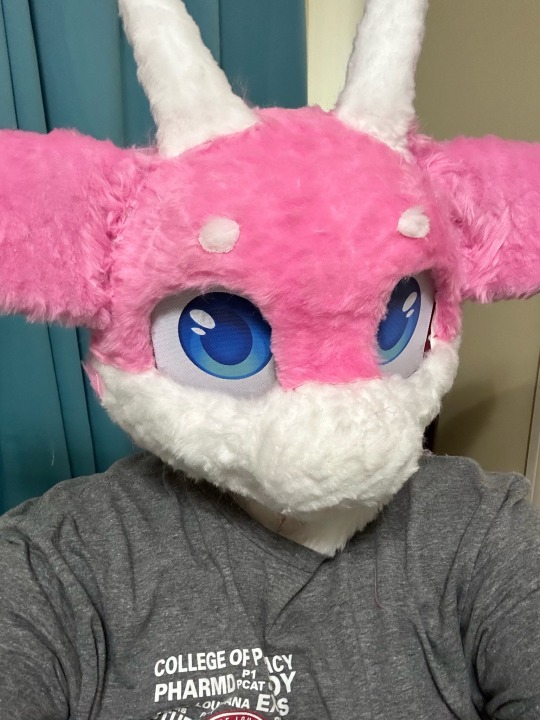
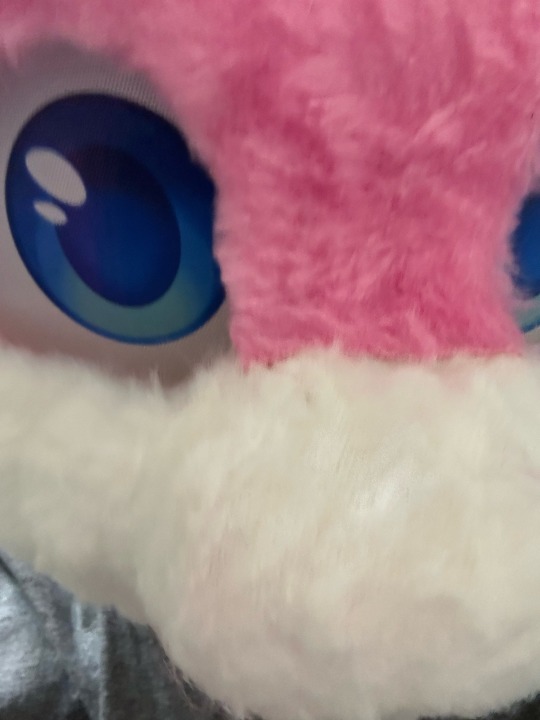
How to build your first fursuit head for ~$100 USD (2023)

What’s good furries? I’m sure a lot of you have a fursona and want to make your first fursuit. I recommend starting with a partial just in case you mess up or fall out of the hobby. It’s also less expensive!
This tutorial will only cover the head. I haven’t made any of the other stuff and I’m probably going to buy it online premade because I’m lazy.
1.) Have a reference sheet for your fursona.
If you are an artist, draw (the best you can) a reference sheet of your fursona from the front, side, and back. I made a little turnaround animation for mine, but this is not necessary.
Not an artist? Don’t want to draw? Commission someone to do it for you. I recommend Etsy, but you can find furry artists with open commissions all over the internet.
No money for commissions? You might be out of luck. Ask a friend or draw it the best you can. Alternatively, you can edit someone else’s fursona reference sheet to make it look like your fursona. Yeah, it’s stealing. Just don’t post it and act like it’s yours 👍
You can also go into the Roblox game, Catalogue Avatar Creator, and assemble something that looks kind of like your fursona. Take a screenshot of it from the front, side, and back, then go into a photo editor (I recommend IbisPaint or MediBang Paint, they are both free) and add in your special details.
I recommend not making your first fursuit super complicated or some kind of rare species. But you do you. It will just be really hard.
Also determine what style of fursuit you want. Toony? Kemono? Realistic? (I don’t recommend realistic for your first fursuit but you do you). This will be important later.
2.) Find Shit to Build It With
Once again, I recommend Etsy. You’ll need:
+ all the fur colors you need (try 2-3)
+ eye mesh
+ 3D printed mask
+ hot glue gun and hot glue sticks (dollar store)
+ needle and thread (dollar store or Walmart)
+ balaclava
+ styrofoam head
+ fabric scissors
+ extra foam pieces for ears or horns
Assemble all of that. It should be around $80-120 USD.
Your 3D printed mask is the most important thing. Another reason to get a relatively common species. Mine was a dragon. Remember the fursuit style you picked earlier? Search on etsy “3d printed [style] [species] furry mask” and you should be able to find one. You can also get pre-made foam heads. I don’t recommend trying to make your own head base, because A) it’s hard and B) those materials cost more money.
This shit will take a while to come in so don’t get too excited about it. My mask took like a month because it came from Germany.
3.) Mark the Color Spots on your Head Base
Basically just take a sharpie and outline the different color regions on your headbase. You can also use a pencil if you’re a pussy /j
4.) Uhhhh Eyeball That Fabric Pattern and Hot Glue the Pieces to Your Headbase
Some people use duct tape to make a pattern. That did not work for me! So I eyeballed it. Made some mistakes. That’s okay.
5.) Trim Down the Fur Length
Most people use clippers for this but I didn’t want to buy any and I didn’t know how to use them so I did it VERY CAREFULLY with scissors.
6.) Fill in the Cracks Between Your Hot Glue Seams With Loose Fur
Look at all this damn fur on the floor! If only there was something to do with it!
Put hot glue between the super visible seams where you hotglued different pieces of fabric next to each other, then pack in some of that loose fur. Cut it down if it’s too long. The seams will be less visible.
7.) Hot Glue the Eye Mesh Behind the Eye Holes
VERY CAREFULLY hot glue this so your character isn’t cross-eyed. You can try follow-me eyes but I didn’t do that with mine.
8.) Add Your Extra Details
You know like whiskers or plastic teeth or a tongue or anything else you want to put on there.
Now you’re done with the mask part.
9.) CAREFULLY Hot Glue Your Balaclava to the Inside of the Mask
The eye hole should be where your eye mesh is so that you can see out. Also make sure some of the balaclava is glued to the top of the mask.
10.) Weigh Down Your Styrofoam Head With a Heavy Rock
Or put it on a stand. Or hot glue it to the table. Whatever works.
11.) Put the Balaclava that you Glued to the Mask on the Styrofoam Head
Pretty simple. The reason we weighed down the styrofoam head is because the front of your mask will be heavy and make it fall over while you’re trying to work.
12.) ????? Put Fur On the Balaclava
You’ll also need to like add some fur connecting the sides of the mask to the balaclava. Hard to explain. You’ll probably figure it out?
13.) Trim that Fur and Put the Trimmings in the Seams Like Before
14.) Take it off of the Styrofoam Head
You may need to cut a slit in the back of the neck of your fursuit head. Not only will it help get the styrofoam head out, now your head can get in and out too!
15.) Put it on
Edit it if something is wrong. It might feel crooked but it’s probably not.
16.) Enjoy!
Hopefully this was helpful! This is how made mine.
#furry community#furry anthro#furry#furry fandom#fursuit head#fursuit#first fursuit#fursuit making#tutorial#fursuit tutorial#partial fursuit#fursuit partial#maximilliansblogstuff
116 notes
·
View notes
Text

Kirbtober Day 14: 3DS!
I was working on this beforehand but it technically fits the prompt so it's what you're getting today.
Advice for drawing the wings:
My advice is to do the outline of the whole thing first, witih the bumps and everything. Then do the swirly bit and those hearts. That way, you know where everything else should go in relation to the most important parts. Absolutely use a reference.
I asked my buddy @transmasckirby for input (as he's very good at drawing these) and his advice is as follows: block out the main shape first before adding holes. Focus on the negative space for those. He also recommends doing the lines last.
Also, there's absolutely no shame in tracing the wings. Unless you really have your heart set on free-handing them please save yourself the pain.
#kirbtober#kirby series#queen sectonia#how to draw#<- check that tag for more of this kind of reference stuff#do you guys like these. part of why i do them (a big part) is for myself bc they're really good practice to make.#if you wanna see a character i haven't done yet lmk
147 notes
·
View notes
Text

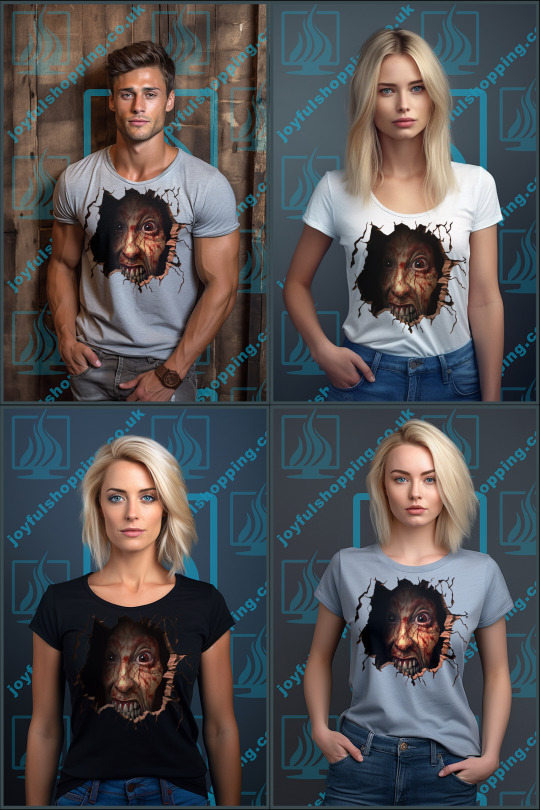
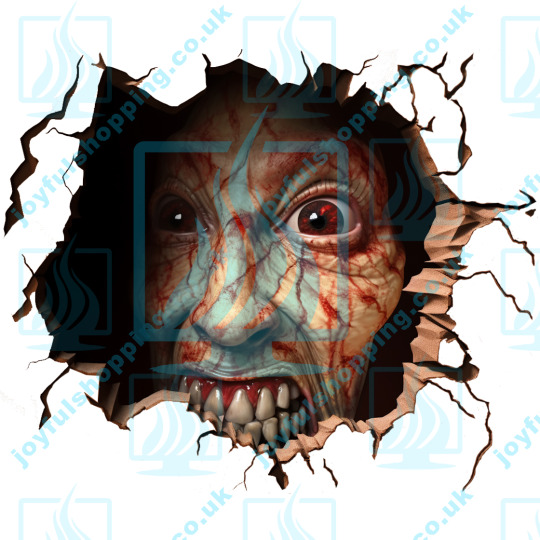
Terrifying Bloody Face Coming Out of a Hole Wall Design
https://joyfulshopping.co.uk/home/181-terrifying-bloody-face-coming-out-of-a-hole-wall-design.html
This scary 3D design shows a horrifying bloody face coming out of a dark hole in a concrete wall. It appears as if there is a person trapped behind the wall trying to break free. The dripping blood around the distressed face adds to the terror. The depth and emotion of the artwork gives it an unsettling lifelike quality. Use this frightening design to decorate for Halloween or creep out your friends! Download now and print it on t-shirts, mugs, posters and more for horror fans.
#scary face#bloody face#3d illusion#face coming out hole#scary hole#creepy drawing#halloween decoration#halloween art#horror gift#horror illustration#horror design#dripping blood#scary wall#terrifying artwork
0 notes
Note
tips on how to draw raph? :3
I’m a raph lover but he is so hard to draw 😔
hey an!! listen i get u completely, this big spikey boy can be a real challenge
my main advice would probably be to recognise raph’s structure? his shapes and how he’s formed, etc. and the best way for that imo are references! i have a tag for this actually
and here’s some raph refs!

if u wanna know how to draw the entirety of the best boy this post wouldn’t do it justice so here’s some main things:
if you’re trying to replicate the show’s style keep in mind how angular everything is. raph's main shape is a square because of how bulky and rigid he is (helps to encourage his character's role too! love that they made him such a fucken tank)
raph’s head shape is basically if you widened leo’s head- they’re both pointed too
one main thing i do for any head really is keep in mind the eye placement and the cheeks
if u happen to draw faces with the fabled circle and two lines- i use the horizontal line to mark where the bottom of the eyes are- and where the start of the cheek begins (i’m doing my best not to make this into a ‘now draw the rest of the owl’ moment)
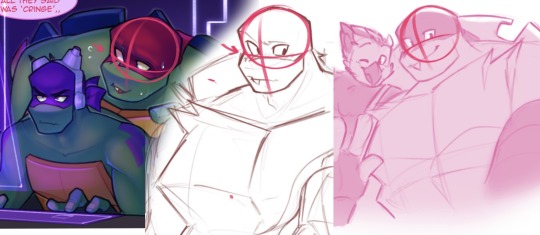
if that makes any sense. heres a really shoddy 'tutorial'
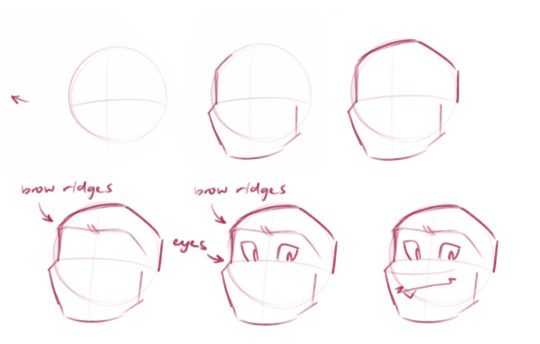
i kinda just blank out on my canvas and raph appears out of sheer will
but also just like.
figure out how you like raph's head to look (maybe u want his snout longer, or his jaw shorter, etc etc)
figure out where his brow ridges are located and how they're moving (is he grumpy? is he angry??)
make a mask for his eyes to go in (jebus take the wheel)
pronounce snout (it protrudes, which makes it easy to figure out his facial planes)
do whatever feels right for his mouth- im not exactly rigid with how i draw as of rn, i just do what feels right
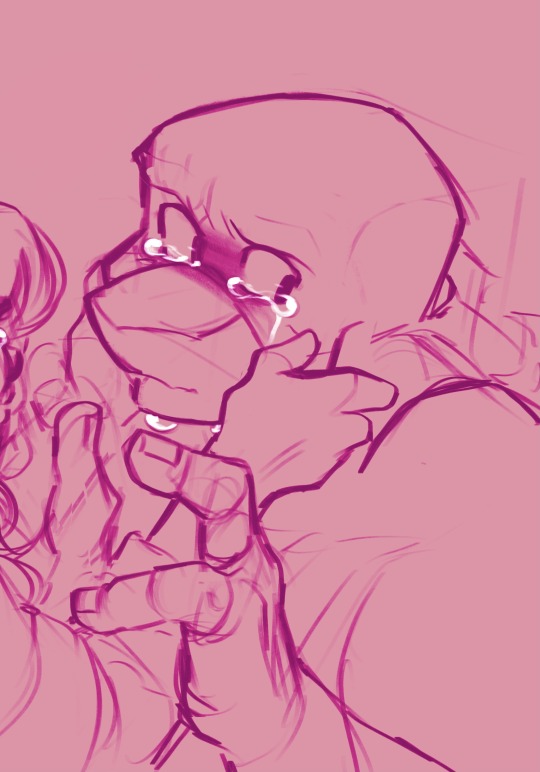

ive drawn raph with a more pronounced snout too, and oscillate between designs if i feel like it (truthfully i also sometimes begin his head shape with a square (i mean if im doing a different style), feel free to do that if it helps i dunno-)
if you want to draw his shell and plastron here’s what i do:
being able to carve out 3D shapes will help a lot with the border of his shell
by blocking out the main shape and then carving away at it you can then see how raph’s shell is structured (just. try decipher my sketch if u can pfghjhj)

for the actual shell itself it’s a lot like mikey and leo’s where it has a big curve and then dips at his midsection (where his belt goes!) also keep in mind the spikes of his shell follow those same curves (ft. dr belle)
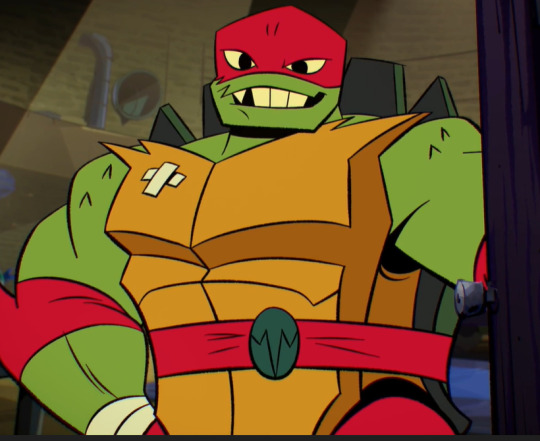
with his plastron (chest plate) i basically make sure it’s the same length of his clavicle? the jagged edges of it i mean. it helps a lot to map out where his shoulders meet his arms
(pls keep in mind my art’s inconsistent and i don’t even follow my advice- the hole in his shell changes every time i draw it 💀)

his body shape is also just in general wider and stockier- if i ever see people draw him skinnier than he is you'd be able to hear my soul exiting my body
all of him is wider in general! hes bigger than the rest of his brothers so dont forget to show it instead of just giving him a height difference. he BEEG.
i’m not sure how else to describe the process of drawing him other than just. draw him?? 😅 my best advice would be to draw him repeatedly based on references- and study your favourite raph artists’ way of drawing him (mine would be jacocoon and itz_jazzy_jazzin)
and it helps to study bc it can answer these questions
how do you want to draw him? do you like the way a specific artist stylises his features? do you want him more spikey? more sharp? maybe you want to draw him bigger! (i myself like to give him a tail, extra markings on his spikes + a few scars post movie and his mismatched eyes)
repetition is super important to get it all engrained in your brain- and it’s why i don’t really even use refs for him anymore fldjs
dont forget a very important rule: appreciate the big boy in all his glory
#im not exactly the artist to go to for help unfortunately dfkdjhsdh#hoping this helps somehow#its better to understand his structure#every now and then i apply it to my sketches#most times ill just dick around on my canvas#feel free to dm me if you want more in depth stuff ajhddgh#rise raph#rottmnt#rise of the teenage mutant ninja turtles#rottmnt raph#ask
66 notes
·
View notes
Last Seen Blogs

zach-sisco
ZachSisco
enflorpecer
Enflorpecer

rcoffey10
Rachel Coffey

the-stone-demon
thestonedemon

lefetfritos
Lefetfritos