#25fps
Text
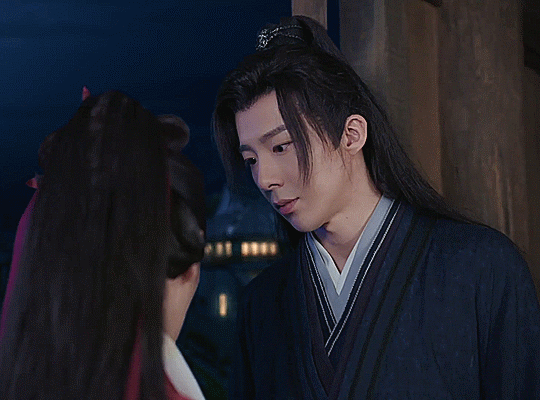
⟡ army of the doomstar × the metalocalypse .


#hevstims.gif#eyestrain#bright colours#bright colors#metalocalypse#dethklok#gifs#my gifs#20fps#25fps#gifset#aotd#army of the doomstar#metalocalypse gifs#mtl
130 notes
·
View notes
Text

(x)
#fairbairn films#what are you doing#what does that mean#what the fuck#what is happening#what am i looking at#confusion#youtube#my gifs#540px#10mb#25fps#To get that smooooth squint#Legit#What#What?#What is going on?
1 note
·
View note
Text
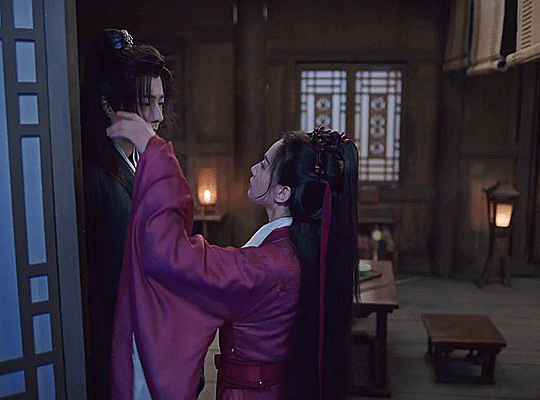
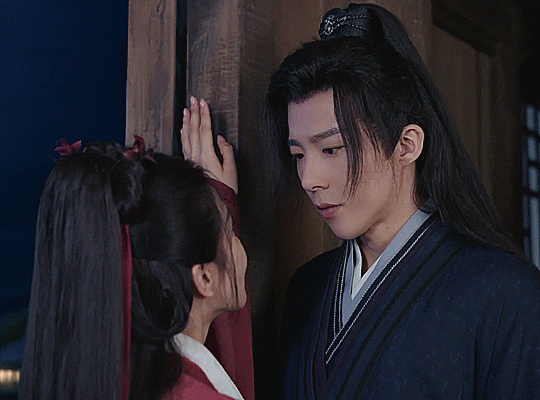
一念关山 | A Journey to Love E6 ° Your cunning and scheming is just what I like about you.
#一念关山#A Journey to Love#cdrama#Liu Yuning#character: ning yuanzhou#meowmao gifs#finally starting to catch up!#sorta#there are two more parts from this scene I'd like to gif#my dl has 50 fps when usually they're 25fps - so that's new and takes some getting used to...#dsnt stop my gifs from looking bad though- thats all me babey
93 notes
·
View notes
Photo


⟣ jongho ⟡ logbook 27 ⟢
#ateez#jongho#choi jongho#jongho gifs#ateez jongho#kazgifs#atzsource#heyiri#heyfio#lunanuggets#jonghomies#tuserjazzy#tuserchrissy#useryukuz#shoutout to the 25fps logbook frame rate <3 not smooth to gif even a little <3#lucieblr#marieblr#forbelleseyes#kazgifs.cjh
174 notes
·
View notes
Text


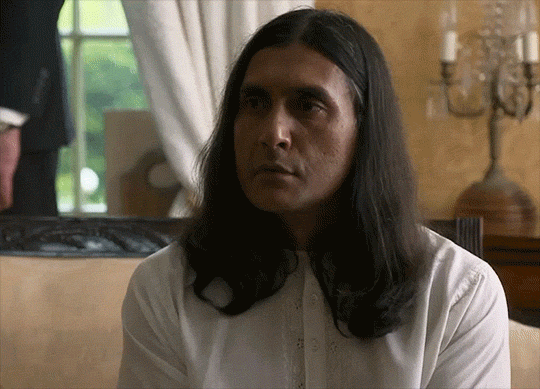

Ramon Tikaram as Umesh Varma
in Father Brown, s1 e3: The Wrong Shape
#ramon tikaram#father brown#2013#click for bigger#sadly it seems like the source i found was a 24fps recapture of a native 25fps‚ so it does stutter a bit sometimes#or skip rather
11 notes
·
View notes
Text
btw!!! if you're using footage that's a higher fps than you're used to, your gifs might look slower/choppier than usual! I'm used to using ~25-30fps footage, but for a new project I'm working on, I used footage that was 50fps. FPS = frames per second, so if you're using a higher fps, that means you're getting more frames per second of screentime. So a gif that previously might have been around 40 or 50 frames will now be closer to 80 frames. And while this can produce a really smooth gif, it will have a larger file size and will also need to be sped up so that it looks fluid.
So while my usual speed for gifs is 0.06 (per frame), if I used that with footage that's 50fps, it would look like this:
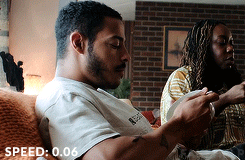
That's because it has more frames and needs to move faster to look natural.
This is the same gif at 0.03s instead.

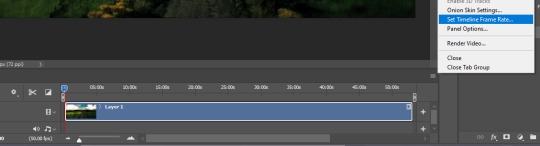
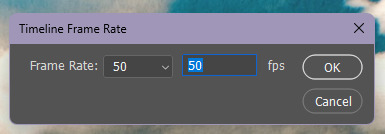
So if you notice that your gifs are slower or choppy like the gif above, try just speeding up your frames a little! Alternatively, you can also change your footage from 50fps back down to 25fps in photoshop with the directions below!
Go to the Timeline, click on the hamburger menu on the top right of the panel, and select "Set Timeline Frame Rate"
A little window will pop up and you can change the fps there!
It should look like this afterwards, while paused.
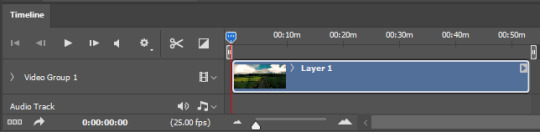
Do not pay attention to the number when it's red! That just shows you how fast photoshop is displaying the footage to you!

The length of the animation timeline will also shrink a bit after you change the fps. This method will save some space in your gifs for coloring!
#basically i found this out the other day and I'm like oh my god who else didn't know this#i remember when I gave the same footage to someone else I was like 'one is 25fps and the other one is 50fps if that matters?'#AND NOW I KNOW IT DOES MATTER!!!#gif tutorial#kinda#mytutorial#yes this is okay to rb! spread the good word bahaha
21 notes
·
View notes
Text
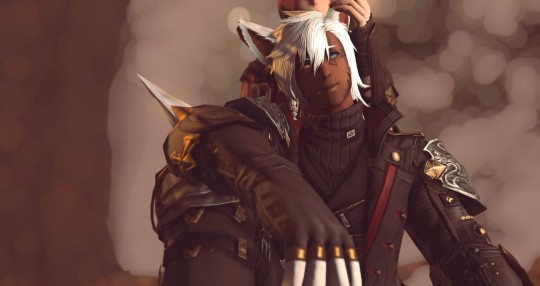
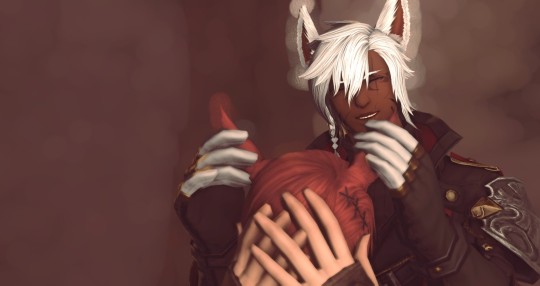
when you play with your partners fluffy ears, don't be surprised when he returns the favour
#hs.post#ffxiv#ffxiv wol#ffxiv gpose#g'raha tia#wolgraha#c: g'raha#c: tu'veer#spent an hour fighting presets#this one tanked me to 25fps when i usually sit about 115 lol#i love this mod so much i worked the fluffy ears + tail into his canon#he is literally an arctic fox now that i may make his post-shadowbringers hair white#queue
12 notes
·
View notes
Text
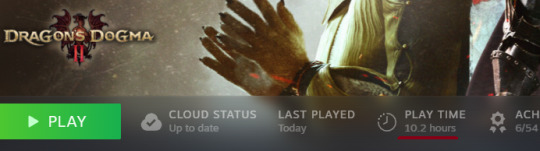
10 hours on the first day! had an incredible time, only died twice due to falling off a roof in the city! and got to level 16
this is the most I've sat down and played something in a single day in a long, long time
#[static]#wolf plays dragon's dogma#dragon's dogma 2#didn't have any issues whatsoever which was awesome! I got worried since ppl were yelling about the fps. had it dip maybe to-#-25fps for all of 3 seconds when I entered vermund for the first time but thats literally been the only instance & but i literally dont car#it feels incredibly cozy to run around and gather and fight things the pawns are even more fun than they were in the first game#gold is soooo easy to make too i dont remember it being this easy#voice acting is awesome the music is so gorgeous ... idk it's just everything I wanted and I'm so happy
5 notes
·
View notes
Text
been editing videos for almost 14 years and frame rates still fuck me over
#just realized i should have rendered all my iwtv vidoes in 29.97 instead of 24/25fps#suffering. enduring.#guess we live and we learn
7 notes
·
View notes
Text
The new pokemon games would be great if it wasnt for everything wrong with them
#i mean this kinda as a joke but also seriously#I binged scarlet this weekend and enjoyed it a lot#this game had my favorite story and characters out of any pokemon game ive played#tho i havent played BW which is supposed to be great too#the gameplay is fun the QoL changes are great#the world map was just really fun to explore#but the game runs like such assssssssss#terrible pop in on everything more than 10ft away from you#ugly af textures on everything thats not a character or a pokemon#it chugs at like 50% speed any time youre out in the open#drops to sub 10fps any time there are any kind of effects on screen#and barely is able to keep a constant 25fps in the best of times#so ya i really mean it when i say that#Coulda been an all time great in the series if it actually fuckin worked#all the peices are there except the literal most important one#my own tag#pokemon
3 notes
·
View notes
Text
I've gotten over being scared of votv to only come to the realization my laptop can only consistently run it at 15 fps with minimum settings fuck my gay baka life
#mort.txt#i got like 25fps MAX#n like. im fine w 30. even 25 is a comfortable frame rate#but under that its. a slide show and not having shadows gives me a headache bc it has blown out gmod brightness
1 note
·
View note
Text
can someone tell the usamerican people who love bluey that it's only a disney thing in their country? the show is not funded by them, they just have a deal to host it in the US. it's not going to be directly/immediately impacted by disney's dvd sale choices in australia.
#the thing that might fuck with you though if you're buying them from us is that our dvds are encoded to 25fps instead of 24#shouldn't be too weird though. regionless players know what they're doing#the abc shop doesn't sell physical media anymore apparently. but jb hifi sure still does
0 notes
Text
photopea gif tutorial!
i recently started learning the craft of gifmaking with the free software photopea. when i first started, i had to piece together several different tutorials as well as extrapolate from some photoshop tutorials because-- no one uses photopea.
but they should! it's free! it can run in your browser! it can do most everything photoshop can do and you don't have to deal with adobe or torrenting. so i'm making a tutorial of my photopea gifmaking process because that's what i needed a couple months ago, and i hope it can be of use to some others. let's go!
1: PREPARING
source the scene you want to gif. it's best to download your video when you can, but screen recording can work in a pinch. this is the video downloader software i use.
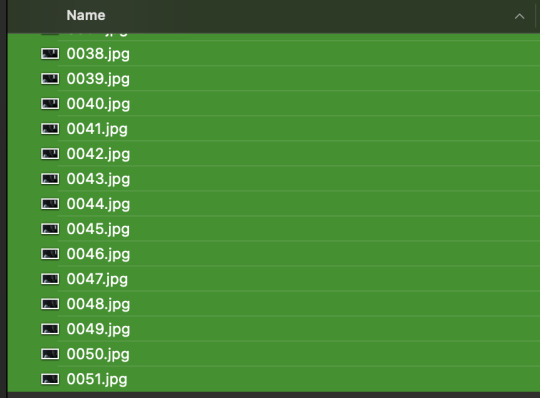
once the source video is downloaded, i like to pick out the specific moments i'm going to gif and save them as their own files-- this makes future steps easier. an individual gif shouldn't be more than 4ish seconds, so limit your selections to about that. name your files in a way that makes sense to you:

2: CONVERTING TO .JPG
i like to convert my video clips to .jpg format. it is possible to load video clips directly into photopea, but unless it is a very short <30fps clip, it is likely to freeze or crash in my experience. i use this website as it downloads a higher framerate (~25fps) than others i've used.

convert your video files and download the .zip folder containing your frames. make sure to unzip them and name them something helpful if you need to.
3: OPENING YOUR FRAMES IN PHOTOPEA
photopea looks like this when you open it:

select "open from computer" and select only the first frame of your first gif:
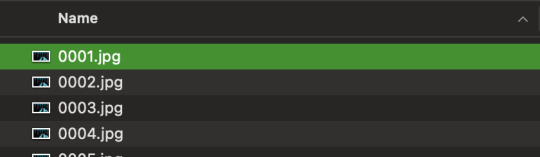
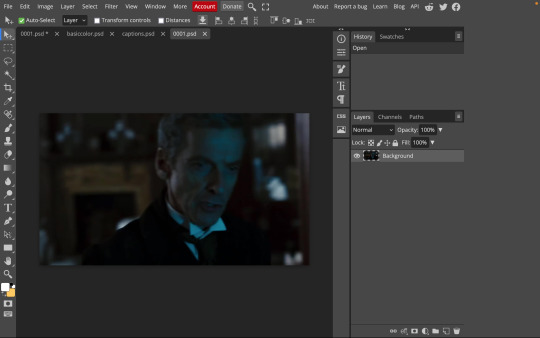
your environment should look like this (ignore the other projects i have open, you should just have 0001.psd or similar):
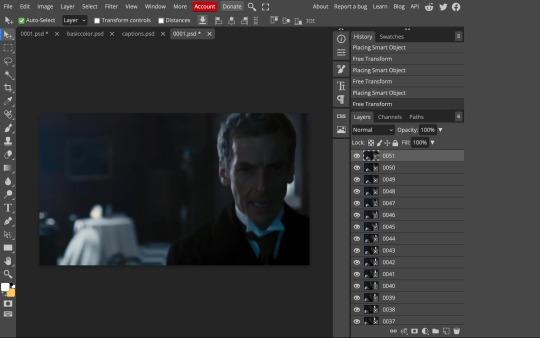
go to file> open and place, and select ALL of the rest of the frames from your first clip:
they'll load in one by one, and your environment should look like this:
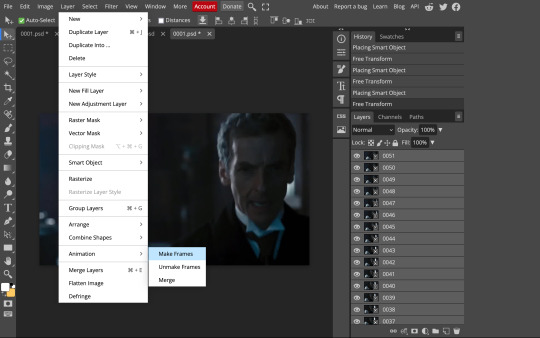
notice how all the frames have a little square in the corner? that means they are smart objects, and we need them to not be for our purposes. select all of your frames, right click, and choose rasterize:

in order to make the series of jpgs move as a gif upon download, select all of your frames and go to layer> animation> make frames:
all your layer names should now start with _a_. you can really do this at any point in the process so it's not a big deal if you forget at the beginning.
finally, you want to limit the frames in individual gifs to around 50 or less. if you find you have more, delete some frames off of the beginning or end by right clicking and selecting delete.
4: CROPPING AND RESIZING
select the crop tool on the left hand panel:

at the top bar, select fixed size:

gifs on tumblr are limited to 540px wide for single column gifs, 268px for two columns, and 178px for three columns. the height is up to you; i like to use 350px height with the 540px width.
enter your values into the W and H fields and do not press enter yet. drag the cropped area to where you want it to be-- try to line up the top and bottom edges so as not to lose too much of your image. once you're satisfied with the selection, press enter. your gif is now cropped and resized to tumblr standards.
5: SHARPENING
(if you are working with low-qual video, check out this tutorial by @hellboys before sharpening. basically filter> filter gallery > grain, select soft and play with the settings. then proceed!)
still making sure all of your layers are selected, navigate to filter> sharpen > smart sharpen:
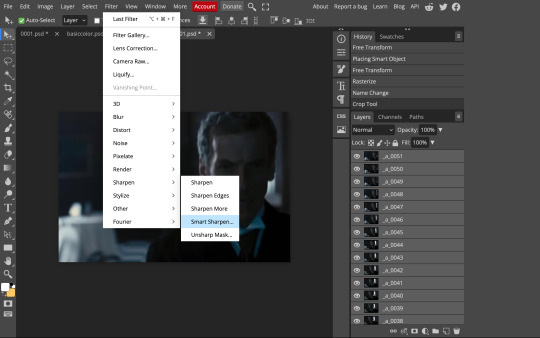
you should see this dialog box:
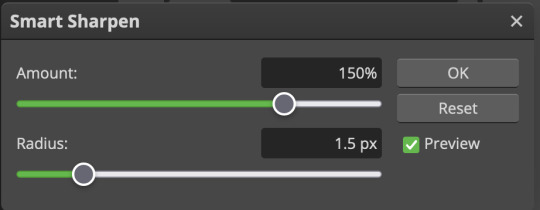
these are the settings i like to use, but you can play around to see what you like. here's the before and after of my sharpening settings:
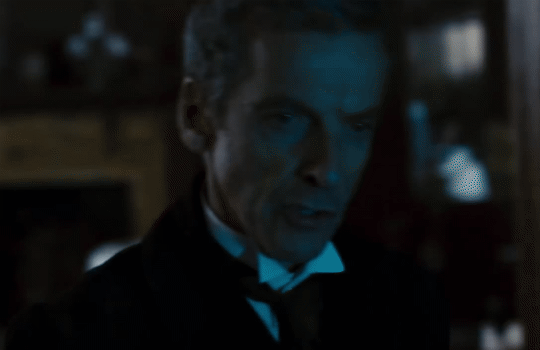
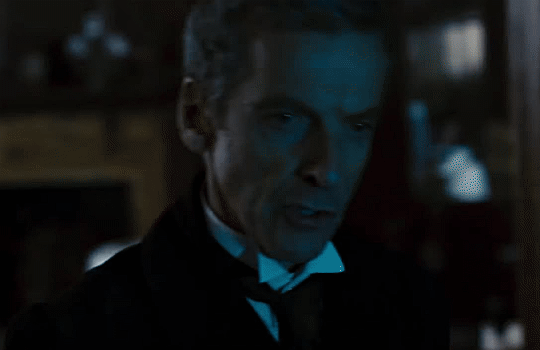
the difference will be more noticeable once we complete the next step-- brightening and coloring.
6: BRIGHTENING & COLORING
navigate to layer > new adjustment layer:
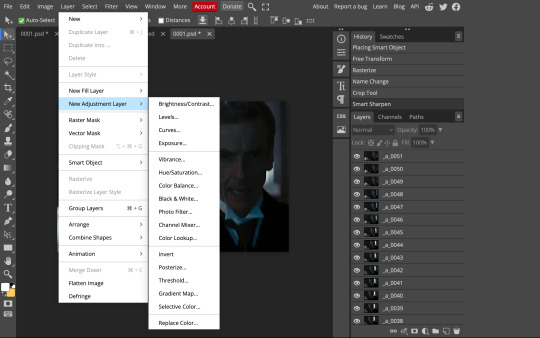
at any time, you can edit your adjustment layers by clicking this button in the right hand panel:

for each edit you make to your gif, you will add a new adjustment layer. always make sure they're at the top of your layer stack. i like to start with adjusting the brightness and exposure, which are both pretty straightforward.
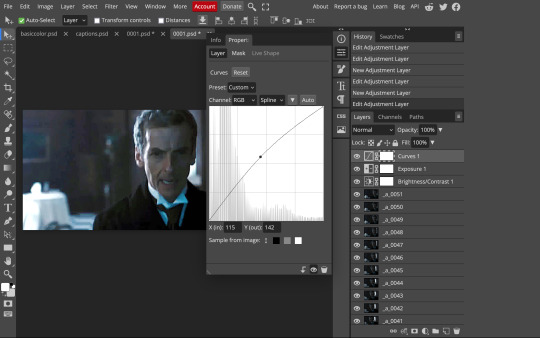
additionally ,you can select a curves adjustment layer, choose the RGB channel, and drag the curve just slightly upwards to further brighten your gif, like so:
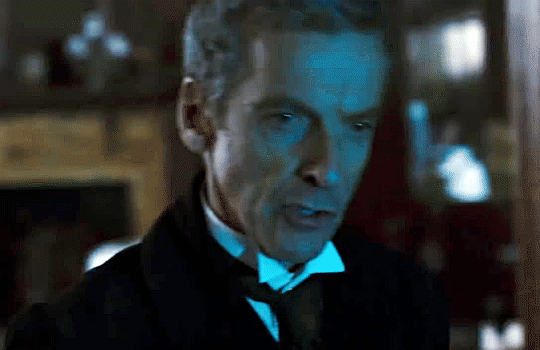
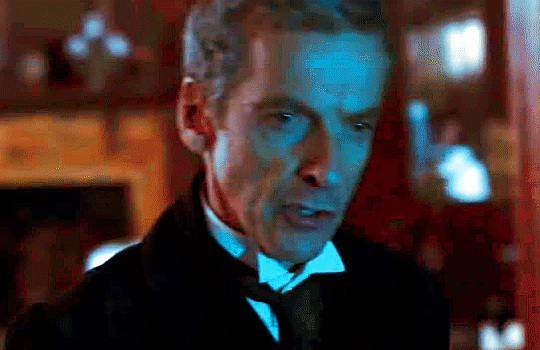
here's a before and after:
now for coloring-- i mostly use the saturation/vibrance, curves, color balance, and selective color adjustment layers. just play around with all of these until you find a style you like. i like my gifs to look really bright and colorful, so i push the saturation and try to draw out warmer tones in the color balance:
7: CAPTIONS
the font i like to use for captions is arial bold italic. you can download it (or any font of your choosing) from pretty much any free font website. if you choose to download a font not in photopea, go to file> open and select your font; it will now show up in the list of fonts.
navigate to the text button in the left hand panel:

and type in the captions for your gif. i make the font size 20 for 540px gifs.
next, while only your text layer is selected, navigate to layer> layer style > blending options:
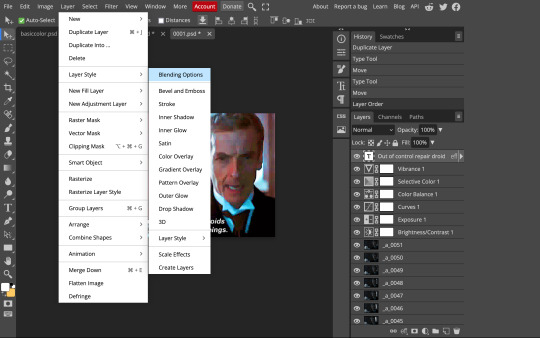
click on drop shadow, and play around with the settings until you get something you like. here's mine:

next, click on stroke and do the same thing:
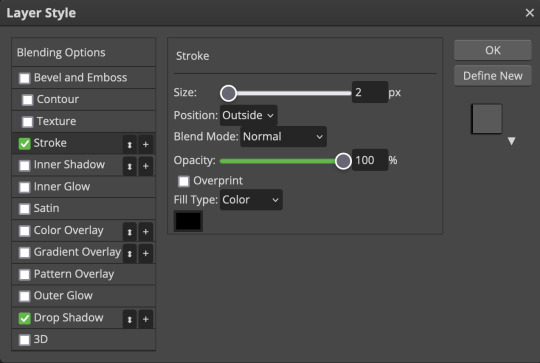
when you're done, make sure your text is your top-most layer.
8: EXPORTING
you're done! head to file> export as> GIF. you'll be prompted with a dialog that looks like this, with your gif playing (you can also do these steps without saving if you want a preview of your gif during editing):
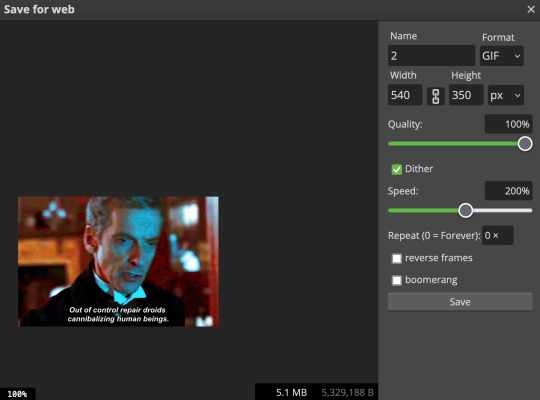
the only thing you should need to adjust is speed. this is the main difference between photopea and photoshop. the only way to specifically adjust the delay in photopea is to manually enter "_05" (or whatever amount of delay) at the end of every layer name. if you're like me you'll agree that is simply too much and settle for the speed slider.
i don't really know what logic governs the speed slider. it doesn't seem to be consistent across gifs, so play with it until it looks right. i've had it on 200% lately which seems insane but looks visually normal.
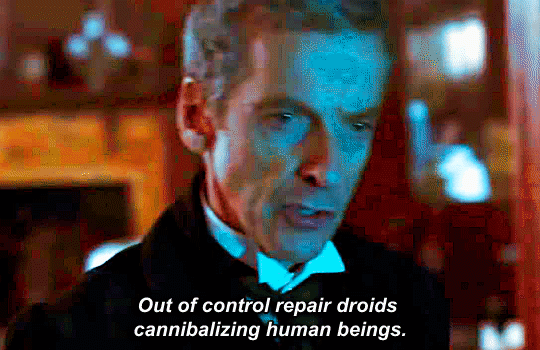
once the speed is adjusted, hit save and you're done! here's a final before and after of all the work:
BONUS: SAVING .PSD PRESETS
did you think manually creating and editing all those adjustment layers was a lot of work? here's how to streamline it for next time.
at the very bottom of your screen, below your layers, select the icon that looks like a folder (third from the right).
it will create another layer called folder 1. drag your adjustment layers into this folder, making sure they stay in the same order. your layers should look like this when you're done:
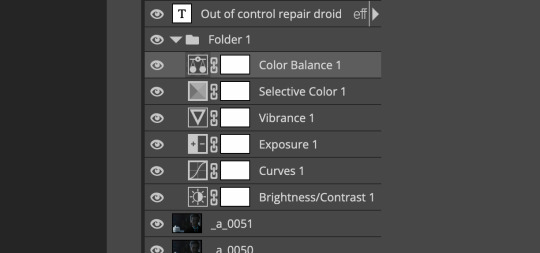
ONLY ONCE YOU HAVE SAVED YOUR GIF, delete all other layers that are not in the folder. then select file> save as PSD. save it somewhere convenient.
next time you're making gifs, after you've cropped and sharpened your frames, select file > open and choose your .psd file. it will open as another project. select the layer that says folder 1, and drag it to whatever project you're working on at the top bar. voila! your adjustment layers are applied to your new gif!
i still like to play with the settings, as coloring and brightness needs will differ from gif to gif.
thanks for reading! here's the gifset i made while making this tutorial :-)
#milk post#gif tutorial#doctor who#photopea#i can't tell if i went too detailed or not enough lol. tag me if you use this i want to see ppl's gifs!!
271 notes
·
View notes
Text
If you’re wondering how this trickery works, it’s actually relatively simple. The main source of confusion is whether it’s the frame rate or shutter speed that makes the effect possible, but both are actually necessary to pull it off. In an online discussion about the phenomenon, an anonymous reader broke it down:
It’s a factor of both. Since each frame has to ensure the blade is in the same position as the last it therefore needs to be in sync with the rpm of the rotor blades. Shutter speed then needs to be fast enough to freeze the blade without too much motion blur within each frame. Here the rotor has five blades, now lets say the rpm of the rotor is 300. That means, per rotation, a blade is in a specific spot on five counts. That gives us an effective rpm of 1500. 1500rpm / 60secs = 25. Therefore shooting at 25fps will ensure the rotor blades are shot in the same position every frame. Each frame then has to be shot at a fast enough shutter speed to freeze the blade for minimal motion blur.
Check out @scienceisdope for more science and daily facts.
Video credit: unknown (please DM me if you know/are the creator)
1K notes
·
View notes
Text

Day 13: caramelldansen
Base I used I set it at 25fps and doubled the frames and tripled the two tallest ones
#murasaki splatoon#splatband#splatbands#splatoon#splatoon bands#squid squad#daily murasaki#murasaki#i was going to add the audio to the post but it literally wasnt fucking working#i tried multiple times throughout the day i started CRYING I WAS SOBBING REAL LIFE TEARS#BECAUSE IT WOULDNT FUCKING WORK#AND IM STILL MAD#im not okay im not im not im not but whatevernhahahh WHATEVER!!!!!!!!!!!!!!!!!#edit because I Forgot#I’m so tired honk mimim
44 notes
·
View notes
Last Seen Blogs

almiec
Black cat

pvklotus
Only Here For A Good Time, Not A Long One

tloz
tell me...

rereinborderland
it's all futile in this world

worldwidedatahubsworld
Worldwide Datahub