#2% on the petticoat
Explore tagged Tumblr posts
Visit Tumblr Blog
Explore Tumblr blogs with no restrictions, modern design and the best experience.
Last Seen Tumblr Blogs


Fun Fact
In 2020, 27% of US Tumblr users had an annual household income of over $100,000.
Text
lumi wig out for delivery getting the sewing machine this weekend for sure already have all the base materials..... things are about to get So Scary i have GOT to make this happen i have GOT to make this work im so determined to do it
#im like 40% confident on the dress#70% on my ability to style the wig#30% on the details#2% on the petticoat#if i can figure out without any tutorial how to make a high-low petticoat following the dress shape#itll.be a fucking MIRACLE#and i say all this knowing nothing abt diff fabrics or sewing techniques#barely knowing how to use a machine#and on a Time Limit#god fucking help me fr#aly.genshin#anything to make dendro lumi real
1 note
·
View note
Text
i feel like it's important that everyone know that quinton reviews did NOT make a 38 hour video on The Beverly Hillbillies.
quinton reviews's DAD made a 38 hour video on The Beverly Hillbillies seasons 1-3 (out of 9), Petticoat Junction seasons 1 and 2 (out of 7), related episodes of Mr. Ed, and the radio program Granby's Green Acres.
he hasn't even touched the henningverse media that's in color yet.
#guys this thing is HUGE you dont even knowwww#can you tell green acres + related materials has been a special interest of mine since 2019 lol#sincerely hoping there's a part 2. i want russ reviews to talk about Married Blorbos Lisa and Oliver Wendell Douglas#quinton reviews#the beverly hillbillies#petticoat junction#green acres#old tv
446 notes
·
View notes
Text

La Mode nationale, no. 26, 2 juillet 1898, Paris. Notre patron découpé (Grandeur naturelle). Jupon de dessous. Bibliothèque nationale de France
Explications du Patron découpé:
Ce modèle très élégant se fait en soie, avec volant coupé en forme et plissé; il peut se faire également en alpage, moire de laine ou satin de laine avec volant uni ou garni de dentelle.
Il se compose de 4 morceaux:
No. 1. — Lé du devant; se taille double sans couture, c'est-à dire le milieu du devant au lacé sur le plis de l'étone.
No. 2. — Lé de côté; se raccorde au lé du devant à AB.
No. 3. — Lé du dos entièrement droit fil; se raccorde au lé de côté par CD.
Un pointillé sur chaque lé marque l'endroit où doit être cousu le volant.
No. 4. — Volant; se raccorde au lé du devant à E, au lé du dos à F.
Ce morceau est donné en patron d'une seule pièce; mais comme il est impossible de pouvoir le couper d'un seul morceau dans les étoffes de petite largeur, nous donnons sur le croquis la façon de le prendre dans une étoffe de 0m,56 de large.
1re partie; se taille double droit fil, le milieu du devant sur le pli de l'étoffe.
2e partie GHIJ; se prend entre les deux lisières.
3e partie IJ; se prend sur la lisière.
Ce volant pour être en plissé devra être posé sur l'étoffe préparée d'avance, les plis plus larges dans le bas que dans le haut.
7 mètres de soie en 0m,56 avec volant plat; 11 mètres avec volant plissé.
Le patron n'étant donné que jusqu'à la monture du volant, ajouter pour continuer le bas du jupon: 1er lé milieu du devant FK 0m,29; couture du côté LB, 0m,31. Largeur du bas, 0m,27.
2e lé: couture LB, 0m,31; couture MD, 0m39. Largeur du bas 0m,44.
3e lé: couture MD, 0m,39; couture FN, 0m,52. Largeur du bas, 0m,44.
—
This very elegant model is made of silk, with a shaped and pleated ruffle; it can also be made in alpine, wool moire or wool satin with a plain ruffle or trimmed with lace.
It consists of 4 pieces:
No. 1. — Front strip; is double cut without seam, that is to say the middle of the front laced on the folds of the etone.
No. 2. — Side strip; connects to the front strip at AB.
No. 3. — Back strip completely straight grain; connects to the side strip via CD.
A dotted line on each strip marks the place where the ruffle should be sewn.
No. 4. — Steering wheel; connects to the front strip at E, to the back strip to F.
This piece is given as a one-piece pattern; but as it is impossible to be able to cut it in a single piece in fabrics of small width, we give in the sketch how to take it from a fabric 0.56 m wide.
Part 1; cut double straight grain, the center of the front on the fold of the fabric.
2nd part GHIJ; is caught between the two edges.
3rd part IJ; gets caught on the edge.
To be pleated, this ruffle must be placed on the fabric prepared in advance, with the pleats wider at the bottom than at the top.
7 meters of silk in 0.56 m with flat ruffle; 11 meters with pleated ruffle.
Since the pattern is only given up to the flounce frame, add to continue the bottom of the petticoat: 1st center front strip FK 0m.29; seam on LB side, 0m.31. Bottom width, 0m.27.
2nd strip: seam LB, 0.31 m; MD sewing, 0m39. Bottom width 0.44 m.
3rd strip: MD seam, 0.39 m; FN seam, 0m.52. Bottom width, 0.44 m.
#La Mode nationale#19th century#1890s#1898#on this day#July 2#periodical#fashion#fashion plate#découpé#pattern#bibliothèque nationale de france#dress#petticoat
27 notes
·
View notes
Text
It's been almost two weeks since my last sewing update, but I have been making progress on a couple different projects, thankfully. I mentioned in my last post that I was hesitant to cut into a king-sized 100% linen bedsheet that I've been hoarding for 10+ years. I knew I wanted to make an apron, but I also knew that it wouldn't take up anywhere near the whole sheet, and I had the thought that I might be able to get two projects out of this one sheet (and the remnants of the matching fitted sheet) if I was careful about how I cut out all my pieces. Possibly a gathered tiered skirt/petticoat, along with the apron.
I measured the two long sides of the flat sheet that had identical ~1.25" deep hems, and I found that each side was 112" or just over 3 yards long, not counting the top and bottom hems. That meant if I did side seams, I could get a 6 yard wide bottom tier for the skirt and not have to do a hem at all, just use what was already there. Not the widest hemline on this kind of skirt (I have a purchased skirt with a 25 yard hem, and years ago I made a 26 yard tiered skirt out of muslin), but with this heavy weight linen it felt like 6 yards at the hem would be plenty.
Gathered tiered skirts are really just rectangles and a bit of simple math. Since the sheet's side hem determined the size of the lowest tier at 224", I figured I would do 2-to-1 gathers and make the next tier up 112" wide, and the third tier up 56" wide. A fourth tier at that 2-to-1 gathering ratio would have been only 27" wide, which wouldn't have fit over my hips, so the skirt would have 3 tiers.

I'm a short girl at not quite 5'2" and I like to wear my skirts pretty low on my hips for spoonie comfort issues, so after measuring a purchased skirt whose length I like, I decided that between 30" and 33" inches in total length would be ideal. With three tiers that length could easily be divided into tiers that are each 10"-11" tall. I added a half inch for seam allowance (but no hem allowance on the lowest tier, since I was re-using the existing hem) to get the exact measurements for each of the pieces I needed for the skirt.
I was able to tear most of my pieces, since the linen bedsheet was nicely on the grain and tore relatively cleanly, thus saving my hands from cutting all those long pieces. I had meant to cut the top tier at 14" tall so that I'd have room to turn under a nice thick waistband too -- and then I totally forgot and cut it at 12" just like the middle tier, lol. I was able to get one of the middle tier pieces and both of the top tier pieces out of the remains of the matching fitted sheet, so I only needed one middle and two bottom tiers from the flat sheet. That left me with plenty of flat sheet left over for the apron, but I'll talk more about that in my next sewing post.
With my pieces all cut out, it was time to start the most annoying part of making a gathered tiered skirt: gathering all those tiers. I'm trying to sew with cotton thread more often these days, but for the gathers I switched back to polyester thread just for the strength. For the two bottom tier and two middle tier pieces I ran two lines of gathering stitches along the top edge, placed pins to divide each panel into quarters, and got to gathering and pinning.
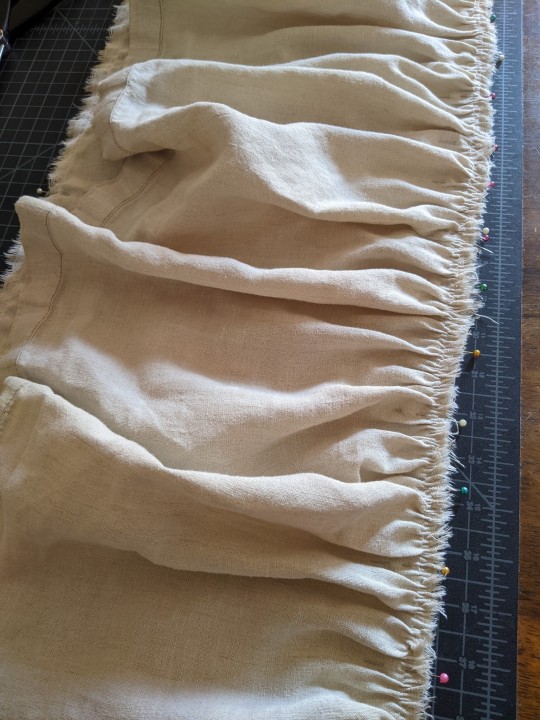
With tiered skirts I really prefer to work from the bottom up, so that I'm always attaching a gathered piece to a completely flat piece of fabric, and save side seams for last. So the bottom tier pieces got gathered up and attached to the middle tier pieces, then the middle tier got gathered up sewn to the top tier.
Since I accidentally cut my top tier pieces shorter than I'd meant to, I did play around with adding a separate waistband for the top tier to be gathered onto. But I couldn't do a full 2-to-1 gather if I wanted the waistband to pull on over my hips, and the waistband made the proportions look weird, like the top tier was too long. So I ended up cutting the waistband off after I sewed it and actually shortening the top tier even a little bit more. After turning under the top edge to enclose the raw ripped edge and then turning under 3cm (~1.2") for a waistband casing, that top tier ended up being about 9" tall, and the proportions of that look much better for some reason.
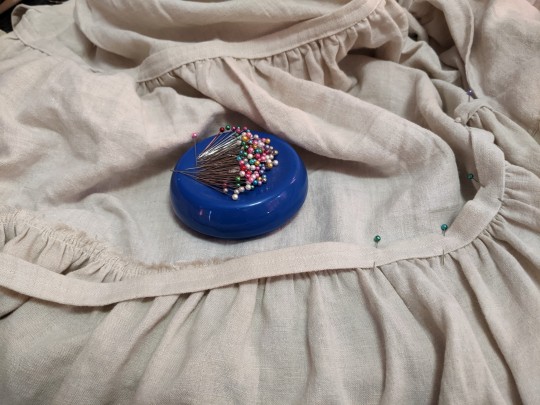
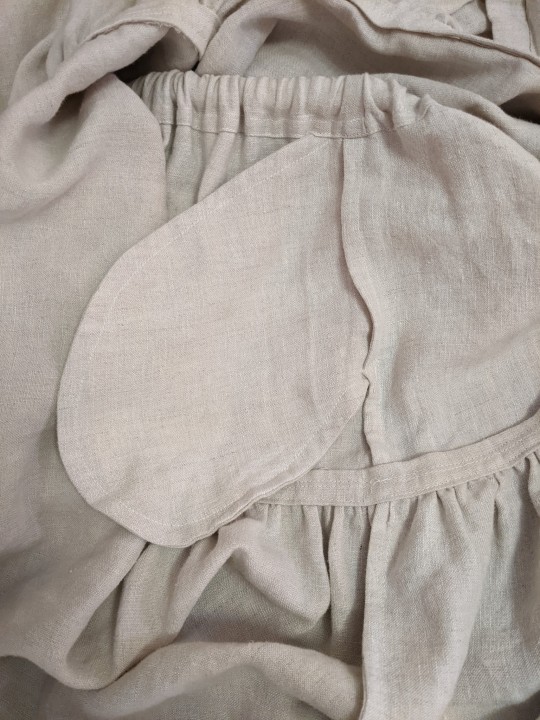
Before I sewed the side seams, I decided that this skirt needs to have pockets, of course. I knew I was planning to do French seams to protect the raw edges against unraveling, so I put the pockets in with a French seam as well.
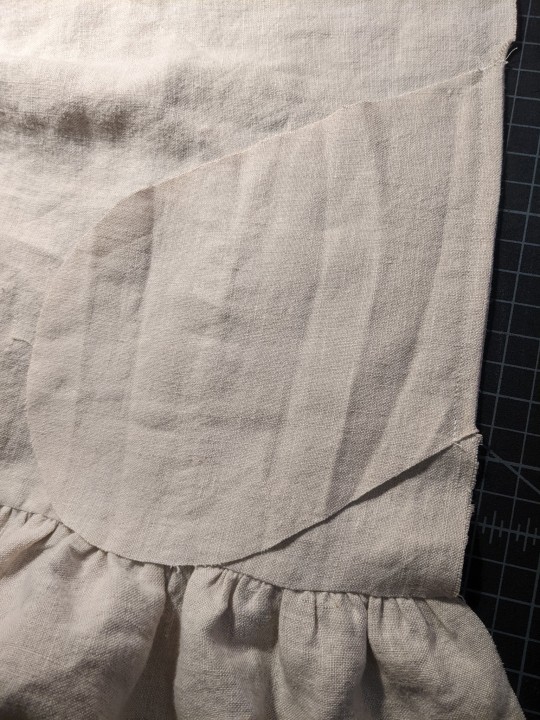
With the pockets in place, the next step was to do the side seams (including the pocket bags), being careful to match up the height of the hem and each of the tiers so everything was nice and clean and square. Then I was able to turn under that waistband casing and sew it in place -- my original plan had been put in three separate channels for narrow elastic that would result in a bit of a faux-cartridge pleating look, but actually getting the elastic strung through there turned out to be more of a pain than it was worth, so I ended up picking that out and just using a single 1" wide elastic band in the waistband casing instead.
And with that, the skirt was technically wearable, and with some fabrics I might have been happy to leave it there. But the raw ripped edges at the seams between each of the tiers worried me. I've had well-loved sewing projects just shred after many wears and washes because I left the seams unfinished, figuring I would be the only one to see the inside. Ideally I want this skirt to be in my rotation for years and years, so I decided to make the effort to finish those seams too.
My original plan had been to cover the raw edges inside with 3/4" herringbone twill tape. For some reason I was convinced that I had a bunch of it left over from a Wasteland Weekend project from 2018, only to discover that I actually only had ~3 yards left. So rather than ordering more and waiting for it to arrive (and then inevitably having some of that left over too), I decided to just make some 3/4" tape from the linen sheet itself. Since this whole skirt is rectangles on-grain and the tape wouldn't have to go around any curves, I made the tape from on-grain rectangles too, rather than bothering with proper bias tape.
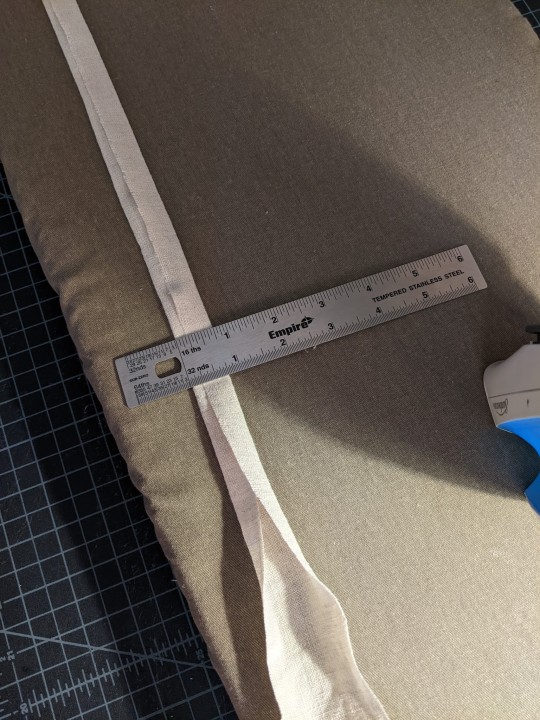
With the hem and the waistband already cleanly finished, I just needed tape to cover the ~3 yard seam between the bottom and middle tier and the ~1.5 yard seam between the middle and top tier. I tore nice straight strips, trimmed off the frayed edges, and ironed the raw edges under to give me that 3/4" width. It's three layers thick in the middle but only 2 layers thick on the sides, since it isn't a proper double-fold tape.
Then it was just an issue of pinning it over the raw edges inside the skirt -- first from the inside in roughly the right place and then from the outside to make sure it lined up with the seam well.
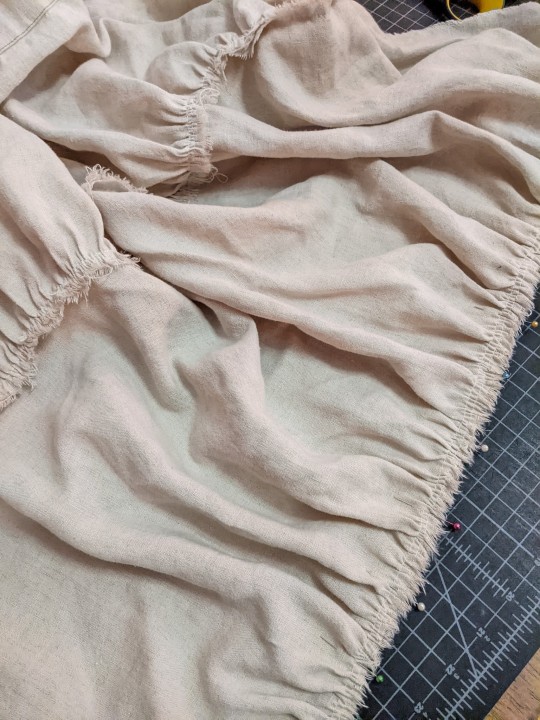
I stitched-in-the-ditch from the outside right where the gathers met the next tier up, and then went back and did another line of stitching just slightly up from that, using the width of my machine foot (~1cm) as a guide. That covered all the raw edges inside and reinforced the seam, and gave it a nice neat appearance from the outside.
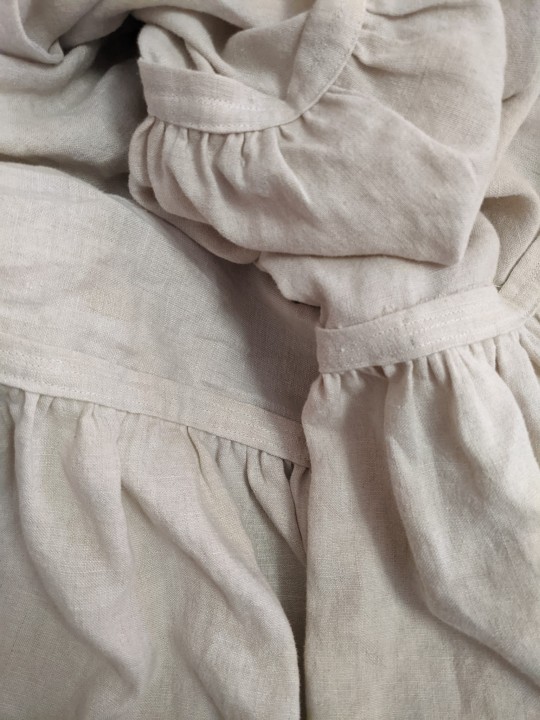
It also had the added benefit of behaving almost like cording on a corded petticoat -- the gathered seems have a lot more body and stiffness now than they did before, which gives the finished skirt a really lovely lofty structure.
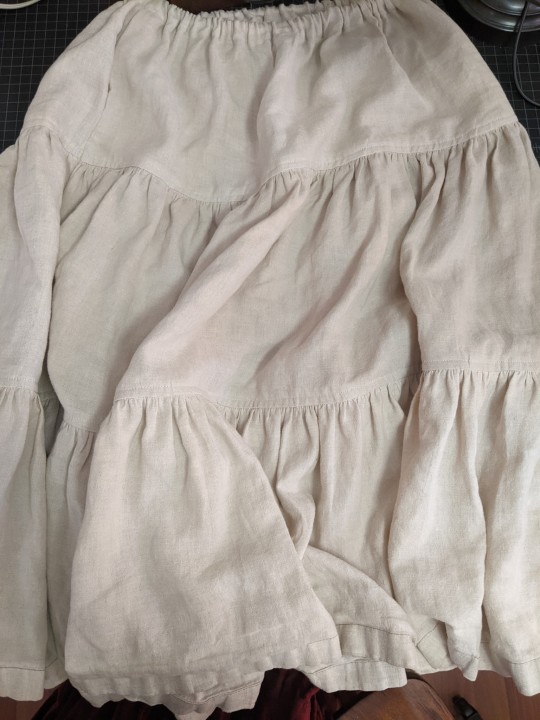
The whole skirt ended up being about 31" long, right in that 30"-33" length I had originally aimed for, and when I wear it low on my hips where it's most comfortable, it just brushes the tops of my feet.
My plan is to wear this mostly under other long skirts and dresses, more as a petticoat than a skirt on its own (tho it is heavy enough and neat enough to be worn on its own, if I want). That lofty structure from the seam finishes adds a lot of floof to my other long skirts, just barely peeking out the bottom of the purchased green skirt I originally measured to figure out the length for this one, and hiding completely under my purchased 25 yard burgundy skirt but giving it enough extra volume that it doesn't drag on the ground quite so badly.
As the colder weather sets in I'm sure this will get a lot of wear under skirts and dresses (including the several dresses I'm still planning to sew in the next couple months!), but even now in the last heat of summer it's quite comfortable to wear, since it's linen. Jack commented that it seemed like a lot of work for a skirt that won't be seen (and it did manage to remind me how much I dislike gathering long lengths of fabric), but as long as it's functional and gets used often, I feel like all the effort was worth it.
While I was putting this together, I also cut out and started assembling the apron project from the same bedsheet. Even with all those pieces cut out, I still have enough linen left over for at least one more, maybe two more projects. Next up I'm going to get to all the finishings on the apron (which will be getting its own post once it's done) and keep trucking along on the handsewn eyelets for the Lengberg Castle Bra-thing. And once those two are done, I think I just might be ready to finally start on all the dresses I want to make with my new fabric.
#sewing#tiered gathered skirt#peasant skirt#bellydance skirt#if you can sew a straight line on a sewing machine you can make this skirt#I wouldn't recommend trying to sew it by hand but it's a good beginner sewist project#the math is really easy and you can work upwards from the hem like I did or downwards from your waist measurement if you want#gathering in a 2-to-1 ratio (so the final piece is half its original width) is pretty standard but you can also do 3-to-1#bedsheets and quilting cotton are excellent options for this kind of skirt#and if you're careful with re-using hems like I did or using the finished selvedge edge of the fabric you can avoid hemming it entirely#long post#my sewing#2024 mood#linen petticoat project#linen apron project#which is actually all assembled and just needs all the hems and finishings. but that'll probably take me most of this next week I think#post on that coming eventually#and then: DRESSES
9 notes
·
View notes
Text

Was going through my files and found some art I never posted that I still like. I have 2 other unposted pieces but their both still very much WIP and I intend to finish them, even if its taking me a long time to get there.
#if anyone really likes the 2 adopts theyre available and have higher quality images but like im not expecting any offers lol#adoptables#open adopts#adopts#naruto oc#harley quinn#homestuck#troll oc#trollsona#old art#doddle#i still really like the sprite for the homestuck adopt#and i adore the first adopt- the guts petticoat situation and teeth waist are so fun
3 notes
·
View notes
Text
i didn't get the specific one i was after, but i DID get a k-cup coffee maker!!! fuck yeah!!! and it came with a coffee filter too, so i can still make regular coffee in it :D
#and i didn't have to buy one of those separately!!#ALSO got a k-cup stand thing. which is cute af to me.#and for only $5 each!!!#so >:DDDDDD#all in all worth getting out of bed so early and driving 30min to get here#i do feel a LITTLE bad bc when my friend texted me and i sent a photo of where i was#she got upset bc she was about to ask me if i wanted to go together#but like.#i let get know i read going to go yesterday via telling her i wanted to see if they still had the one i was after#and she didnt say anything then so#she says she was distracted but#nothing to do about that ig#i waited to see if she would say anything yesterday and when she didnt i didnt stress it#bc i know myself well enough to know that if i had let myself stress it i wouldve not left when i did#and i probably would've missed out on what i did get today#by being like an hour or two later#so im not gonna let myself feel guilty#there wasn't really much here anyway tbh#i did get a pattern 2 movies and 2 vhs too but#like#that's simply bc they're things I've already seen and i want to expand my physical collection of movies#alas still couldn't find operation petticoat though 😔#ill have to check online for that ig#shh ac
4 notes
·
View notes
Text
Sadly not dressed up for Halloween but luckily I look like a freak on a normal day so I'm doing better than Johnny GAA-shorts across the desk from me. Did you guys know you can layer pants
1 note
·
View note
Text
⚓Boat Media Tournament⚓
Round 2, match 12


#bmt2 polls#bmt2 round 2#boat media#boat media tourney#the sea hawk#montague siblings#the gentleman's guide to vice and virtue#the lady's guide to petticoats and piracy#the nobleman's guide to scandal and shipwrecks
25 notes
·
View notes
Text
The universe aligned in such a way that the weather is colder than a witch's titty, which means I can wear a Ghostface mask and I am going to be performing a burlesque number with it and a knife that is also a whip. Super sexy, but so many notes.
#unfortunately i have 2 weeks to relearn this number#but the whip knife i made is so fun to play with#i put it off to last second when i initially made it so i actually have time to play with it#but i made a worbla knife with whip tail ends coming from the blade tip and i made the most MCR-coded black and red petticoat#it swishes and sways and my cat mercy cannot help but fucking attack it anytime i strip out of it#i'll be mid practice and she'll have POUNCED on my pretty lace skirt#bat rambles
2 notes
·
View notes
Text
Shoe and blouse dramas sorted. Now to come up with last minute fall backs in case things don't arrive in time
#as if i dont still have a little under 2 months up my sleeve#all thats left is the petticoat but ive got one lined up and just need to order it#realising with how much i talk about it ill probably have to post co-ord pics once everything arrives#whether or not that actually happens remains to be seen ill probably chicken out morning-of anyway#hamb goes on a ramb
0 notes
Text

so pretty sure this shirt is what lisa wears in the opening scene and to the party and this skirt is the closest ive found to the one she wears with the plaid shirt (they/he)
#soy yo#i have had the shirt for like 2 or 3 years and imagine my SHOCK AND DELIGHT when i realized it was probably the same one#now i need to find the plaid shirt and get a red petticoat#ok to rb
0 notes
Text
me: hmm I wonder what clothes for myself I could make with one yard of fabric
the internet: have you considered having children so you can use up your one yard fabric scraps for clothes for them. or bags. that's it.
#please I can at least make some waistcoats#maybe some simple jackets (though sleeves take up a LOT of fabric)#I'm considering an 18th century caraco#but also please send me suggestions#I have 2 pieces of wool of one yard-ish each#also if someone could send me some simple late victorian petticoat ideas/patterns that'd be great
0 notes
Text
I really love sewing and making things but why the heck does it take so much energy,,,, like I stop for the day and ohhh boy I’m exhausted, I have no right to be as it’s a fricking hobby but wow
#sewing#dressmaking#started my very first ballgown#currently 5 days#5 bodice versions#2 petticoat layers#and one round of dyeing in#just finished stitching and boning the final lining#and am having SO MUCH FUN because I love sewing#and fluffy dresses#and shiny thread#and sewing boning channels#and even ironing#but goodness I’m tired
1 note
·
View note
Text
I hope this package comes before i stream cause if not it'll probably come WHILE I am streaming and it's going to actually kill me waiting to open it
#Mr. L is in it Mr. L is supposed to be in it#and after I accidentally ordered the wrong volume of the pkmn bw manga I gotta like. double check he's actually there dshgjkfh#(I got the volume where the Ingo & Emmet arch is wrapped up not the one where it actually happens lmfao)#ALSO it's note done done yet i gotta. 1) get a proper wig for it and 2) do some finishing touches on it BUT#If I deem it looking good enough I will post pictures of the “finished” peach dress cause it actually became a wearable garment very quickl#Today I'm getting the accessories and the petticoat that'll finish it off#plus Super Mario-Kun with Mr. L in it#So it's a big W today
0 notes
Text

As you would expect February 29th is a bit bereft of anniversaries, but did you know..........
Anyone born on this day is said to be unlucky in Scottish culture, and referred to as “Leaplings.” True, they don’t get to celebrate many birthdays, but to make things worse, Scottish tradition adds on another layer by saying that leaplings are doomed to a lifetime of “untold suffering.” They also consider leap years as doomed for farmers, as the saying goes: “Leap year was never a good sheep year.”
Ithink we all know that it is the day of the year a lady can traditionally propose toher man, but in Scotland women intending to propose are advised to wear a red petticoat visible to their love – perhaps to give them fair warning! ;) Tradition also stated that any man who refused a Leap Day proposal should be issued with a fine, which could range from money to silk gowns.
If you are trying to work out the math on what you're exact age would be if you were born on February 29th, then you are in luck.
1920: 104 years old or 26.
1924: 100 years old or 25.
1928: 96 years old or 24.
1932: 92 years old or 23.
1936: 88 years old or 22.
1940: 84 years old or 21.
1944: 80 years old or 20.
1948: 76 years old or 19.
1952: 72 years old or 18.
1956: 68 years old or 17.
1960: 64 years old or 16.
1964: 60 years old or 15.
1968: 56 years old or 14.
1972: 52 years old or 13.
1976: 48 years old or 12.
1980: 44 years old or 11.
1984: 40 years old or 10.
1988: 36 years old or 9.
1992: 32 years old or 8.
1996: 28 years old or 7.
2000: 24 years old or 6.
2004: 20 years old or 5.
2008: 16 years old or 4.
2012: 12 years old or 3.
2016: 8 years old or 2.
2020: 4 years old or 1.
The next leap year will take place in 2028.
2K notes
·
View notes
Text


Otakon was amazing. Finally getting to wear my Azem summoning circle gown in person was so much fun. I had multiple people stopping me to gush over my costume and people from HERE telling me they saw it online and were so excited to see it in person. I haven’t been to a con since right before the pandemic and it was so nice to come back to a space I love so much. My goal of someone knowing what I was without me explaining was reached (thanks to the ffxiv photoshoot)! And I can’t wait to see the pictures of the group photo shoot. I added more details to the costume and (minus the stars which were my nemesis falling off the whole day) everything was perfect.
The gown itself took about 100 hours total. 85 originally and 15 to add finishing touches. The top is gold lamé and the chiffon overlay was ripping so I removed it. I have a whole costume breakdown under the tag for the original dress creation.

The necklace has an Azem summoning stone that my fantastic friends brought me from Fanfest which I repurposed. The most added details are the stars. I felt the black spots between the p design and the beams was a bit too big and wanted something to bridge the gap. I also considered adding my statics job symbols in the circles but they keep changing jobs XD

I added some more filigree details to the main Azem design in the front of the gown and individual rhinestones to each of the right angle v filigree and each of the small mirrored circles that make up the big circles because I’m extra along with a gold ribbon for the hem


Then I decided to add lights
Again because I’m extra

I don’t have skill with LEDs so I used individual 6ft fairy lights with tiny battery packs. I painted each battery pack black because the white shows through the skirt especially when lit up. There are about 75-90 battery packs I lost count at 2 am on Wednesday honestly ahaha. I looped them twice up and down so the effect would be less spaced out but I might edit that in the future if I figure LEDs and how to get more powerful ones because they weren’t really strong enough for 10 hours (you can faintly see them in the pictures above) and I kept turning them off when I sat. I used the same petticoat but added a hoop skirt because I was wearing tennis shoes (sadly sensible instead of fashionable) instead of my platform boots.
When people complimented me I would ask if they wanted to see my favorite part (which is spinning) and the laughs and gasps of delight were fantastic. Overall I’m so fucking proud of this costume. Thank you to all of you fab people from the FFXIV coordination who said such kind things I’m so flattered and lovingly overwhelmed. It was an amazing return to cosplay.
#azem#otakon#summoning circle#ffxiv#ffxiv cosplay#azem summoning circle#nekos cosplay saga#final fantasy xiv#final fantasy 14#final fantasy xiv cosplay#spinning#video#WOL#endwalker#shadowbringers#dawntrail#cosplay#ffxiv azem#costume#final fantasy cosplay#my face#costume breakdown#cosplay breakdown
726 notes
·
View notes