#1sc
Explore tagged Tumblr posts
Visit Tumblr Blog
Explore Tumblr blogs with no restrictions, modern design and the best experience.
Last Seen Tumblr Blogs


Fun Fact
The KCSC sent more than 20K requests to delete posts related to prostitution and porn to Tumblr from January to June 2017.
Text

manufactuer #factory
hydraulichose #rubberhose
📞 Phone/Whatsapp:+86-15297607201 💌 Email: [email protected] 💻Website: www.bailihose.com wa.me/8615297607201
#16 years experience.#2sc#16/r17#1sc#1sn#hydraulic hose manufacturers#hydraulic hose#hydraulic#hydraulic hoses
0 notes
Text
genuinely, what is it about crochet that makes you incapable of doing basic math
#I'm just rubber ducking#but#I have 31 stitches#16 of which are short rows#so 15 usable stitches#I want to get down to 24#24-16=8#So that's 7 dec 1sc#(I'm trying to freehand something for the first time and got a little too ambitious)
0 notes
Text

Since I crocheted Error last time I wanted to crochet Ink so they could hold hands :3
If you also want to crochet him I attached my pattern below
Have fun crocheting :)
Ink Sans
Abbreviations
R - Row
Rd - Round
ch - chain
ss - slip stitch
sc - single crochet
hdc - half double crochet
dc - double crochet
trc - treble/triple crochet
inc - increase
dec - decrease
flo - front loops only
bl - back loops
[…] x2/3/6 - repeat what is inside the brackets 2/3/6 times
(…) - the number inside of the brackets is the number of stitches that round is supposed to have
Legs x2
Rd1: 6sc into Magic Ring
Rd2: 6inc
Rd3: [1sc, inc]x6
Rd4-18: sc around
don’t tie off the second leg, connect it to the other leg with a ss
Rd19-21: sc around (36sc)
Change color to black
Rd22-30: sc around
Rd31: 2sc, Dec, 5sc, Dec, sc,Dec, 6sc, Dec,6sc, Dec, sc, Dec,3sc
Rd32: 8sc, 3dec,7sc, 3dec, 3sc
Rd33: 7sc, 2dec, 2sc, 2dec, 2sc, 2dec, 1sc
Rd34: [1sc, Dec]x6
Rd35: sc around (12sc)
3sc to middle of the back and change color to white
Rd36: [1sc, inc] x6
Rd37: [2sc, inc] x6
Rd38: [3sc, inc] x6
Rd39: [4sc, inc] x6 *fertig
Rd40: [5sc, inc] x6
Rd41: [6sc, inc] x6
Rd42: [7sc, inc] x6
Rd43-47: sc around
Rd48: [7sc, Dec] x6
Rd49: sc around
Rd50: [6sc, Dec] x6
Rd51: sc around
Rd52: [5sc, Dec] x6
Rd53: [4sc, Dec] x6
Rd54: [3sc, Dec] x6
Rd55: [2sc, Dec] x6
Rd56: [1sc, Dec] x6
Rd57: 6 Dec
Arms x2
Rd1: 6sc into Magic ring
Rd2: 6inc
Change color to brown
Rd3-4: sc around
Change color to black
Rd5-18: sc around
Toes x2
R1: ch7
R2: 6sc
Sew body together and add the face
Pants
Rd1: ch31
Rd2: ss into first chain, 30sc
Rd3-4: sc around
Rd5: [8sc, Dec] x3
Rd6-7: sc around
Rd8: [7sc, Dec] x3
Rd9-11: sc around
Rd12: [6sc, Dec] x3
Rd13: sc around
Don’t tie off the second pant leg, connect with ss to other pant leg
Rd14-15: sc around
Rd16: [12sc, Dec] x3
Rd17: [11sc, Dec] x3
Rd18: 16sc, flo 9sc, ch1, turn
R19: 9sc, ch1, turn
R20: 9sc, ch1, turn
R21: 9sc, ch1, turn
R22: 9sc
Suspenders x2
R1: ch21
R2: 20sc
Sew the suspenders to the pants
Shirt
Panels x2
R1: ch17
R2-12: 16sc, ch1, turn
R13: 13sc, ch1, turn
R14: 10sc, ch1, turn
Sleeves x2
Rd1: ch13
Rd2: ss into first chain, 12sc
Rd3-7: sc around
Rd8: 6sc, ch1, turn, 6sc, ch1, turn, 12sc to end of round
Rd9: sc around
Sew everything together
(The white wool I had was thinner than the rest of the wool that I used. So now the stitches are bigger than I would’ve liked but if you use the right wool it should be fine)
Crop top
Panels x2
R1: ch19
R2: 18sc, ch1, turn
Change color to brown
R3-4: 18sc, ch1, turn
R5: 15sc, ch1, turn
R6: 12sc, ch1, turn
R7: trc, dc, 2hdc, 4sc, 2hdc, dc, trc
Scarf
R1: ch6
R2-90: 5sc, ch1, turn
Brush
Rd1: 3sc into magic ring
Rd2: 3inc
Rd3: [1sc, inc] x3
Rd4: [2sc, inc] x3
Rd5: [3sc, inc] x3
Rd6: [4sc, inc] x3
Change color to brown
Rd7: [5sc, inc] x3
Rd8: [6sc, inc] x3
Rd9-11: sc around
Rd12: [2sc, dec] x6
Change color to yellow
Rd13: flo sc around
Rd14: sc around in the previously unworked bl of the last brown row
Change color to beige
Rd15-30: sc around
Change color to yellow
Rd31: flo sc around
Rd32: sc around in the previously unworked bl of the last beige row
Change color to beige
Rd33-36: sc around
Rd37: 6dec
Belt
R1: ch4
R2-46: 3sc, ch1, turn
Sew the ends together to make a loop
R1: ch4
R2-11: 3sc, ch1, turn
Sew onto loop (this will be where the brush is being held)
Optionally you can cut out the vials out of felt and sew them onto the front of the belt
Now just dress your Ink and finished
Now he‘ll be able to hold hands with your Error :>

You’ll find the crochet pattern for Error here
You can slo find the pattern for classic here
This is my second ever pattern so if you have any questions feel free to ask me and I’ll try to clear things up. Have fun :)
#undertale au#utmv#utau#utdr#ink sans#ut#inktale#crochet#crochet pattern#crochet plushie#inkisadorable
316 notes
·
View notes
Text
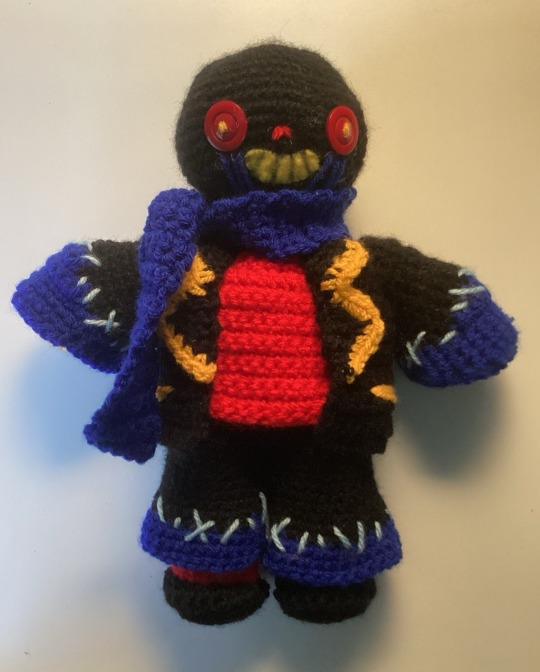
Gummigoo free crochet pattern
FREE pattern at my Ravelry link and under the cut! Pattern includes photo references.
My boy is done! I started making myself a Gummigoo right after seeing episode 2 of The Amazing Digital Circus. While I was making it I realised that you guys might want one too. This doll and this pattern weren't nearly as tough to make as I thought they would be, and I really enjoyed making them.
PDF now edited to remove typo and add another couple of photos.
Pattern and photos under cut!
You need:
(less than) 50g/150m of the following colours of yarn: white, yellow, green, brown
3.5mm hook
Stuffing
Pins
Scissors
Special stitches used:
Picot: chain 3, then slip stitch into the back loop of the first chain.
Bobble: Yarn over. Pull up a loop, yarn over and pull through two, do 4 more times until you have 6 loops on the hook. Yarn over and pull through all six. Pull stitch a little tight.
Triple bobble (regular bobble stitch but twice as tall): Yarn over twice. Pull up a loop, yarn over and pull through two, yarn over and pull through two again, do 4 more times until you have 6 loops on the hook. Yarn over and pull through all six. Pull stitch a little tight.
Double decrease (a decrease over 3 stitches): Pull up a loop through each of 3 stitches, yarn over and pull through all three.
HEAD (white)
1. 6sc into a magic ring [6]
2. 6 inc [12]
3. sc around [12]
4. 2sc, 2 dec, 6sc [10]
5. 2sc, 2inc, 6sc [12]
6-8. sc around (3 rounds) [12]
9. (2sc, inc) x2, 6sc [14]
See special stitches for how to do a bobble stitch -- it's five double crochets to create one stitch.
10. 4sc, bobble stitch, 2sc, bobble stitch, 6sc [14]
11. 4sc, bobble stitch, 2sc, bobble stitch, 6sc [14]
12. 1sc, dec, 6sc, dec, 3sc [12]
13. (2sc, dec) x3 [9]
Stuff.
14. 1sc, dec) x3 [6]
Cut a tail long enough to sew with. Thread the yarn through the front loops of each remaining stitch and pull to cinch the hole shut. Leave the tail out until needed for sewing.
BODY (white)
1. 6sc into a magic ring
2. 6 inc [12]
3. (5sc, inc) x2 [14]
4-5. sc around (2 rounds) [14]
6. (6sc, inc) x2 [16]
7. (7sc, inc) x2 [18]
8-10. sc around (3 rounds) [18]
Stuff as you go. It's hard to stuff long pieces at last minute.
11. (7sc, dec) x2 [16]
12. sc around [16]
13. (6sc, dec) x2 [14]
14. sc around [14]
15. (5sc, dec) x2 [12]
16. sc around [16]
17. (5sc, inc) x2 [14]
18. sc around [14]
19. 1sc, 4dec, 1sc, 4inc [14]
20. 1sc, 4hdc, 9sc [14]
21. 1sc, 4hdc, 9sc [14]
22. 1sc, 2dec, 9sc [12]
23. 4hdc, 8sc [12]
24. 2dec, 8sc [10]
25. Dec, 8sc [9]
Finish stuffing.
26. (1sc, dec) x3 [6]
Cut the yarn, cinch the hole shit and hide the end.
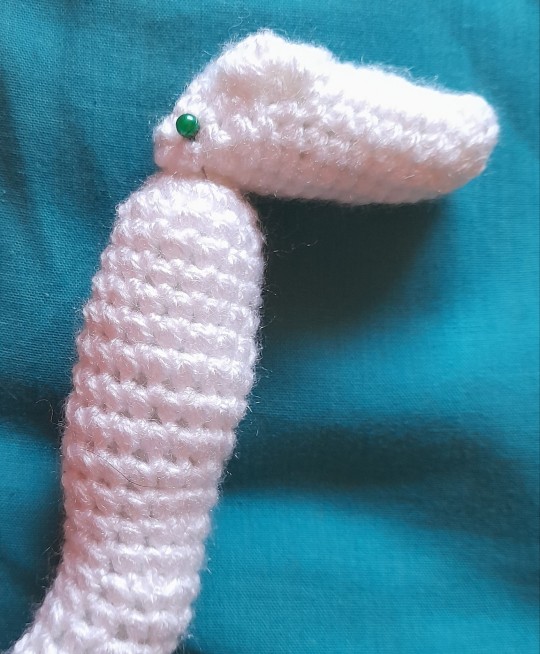
Connect the head to the body at the very back of the bottom of the head. It should face forwards levelly with the torso erect (90°). The head and neck should connect smoothly at the back to the body.
OVERLAY (yellow and green)
Start in yellow.
1. 6sc into a magic ring [6]
2. 2sc, inc, 2sc. Leave last stitch unworked. Picot (chain 3 and slip stitch into the back loop of the first chain) and turn. [6]
3. 6sc. Picot and turn. [6]
4. 4sc, inc. Leave last stitch unworked. Picot and turn. [6]
5. 4sc, inc. Leave last stitch unworked. Picot and turn. [6]
6. 2sc, inc, 1sc, inc. Leave last stitch unworked. Picot and turn. [7]
7. 3sc, inc, 1sc, inc. Leave last stitch unworked. Picot and turn. [8]
8. 3sc, inc, 2sc, inc. Leave last stitch unworked. Chain (not picot!) and turn. [9]
9. 4sc, inc, 2sc, inc. Leave last stitch unworked. Chain and turn. [10]
10. 4sc, inc, 4sc, inc. Chain and turn. [12]
11. 10sc, dec. Chain and turn. [11]
12. 9sc, dec. Chain and turn. [10]
13. 4sc, dec, 4sc. Chain and turn. [9]
14. 9sc. Chain and turn. [9]
15. 9sc. Chain and turn. [9]
The next row will start colour changing to green. Always hide yarn on the wrong side of the work. There will also be a triple bobble (same as a bobble stitch but with triples -- see special stitches).
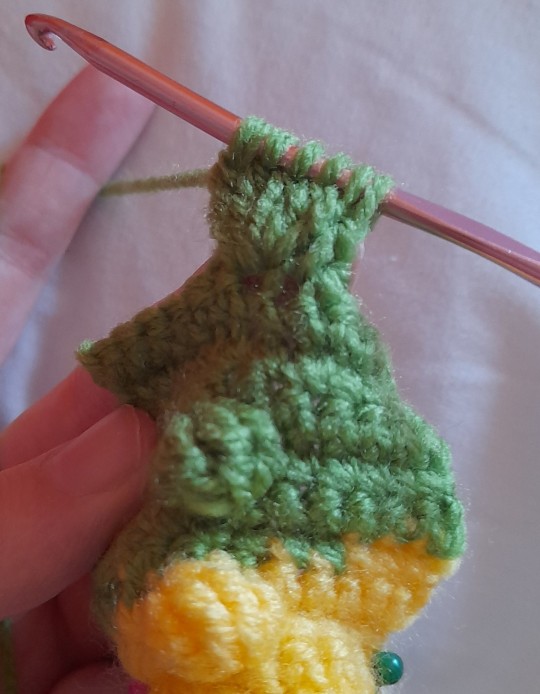
Bobbles aren't exactly sharp, but neither are gummy spikes tbh.
16. (Right side is facing you, hide yarn at back:) Inc, 3sc, triple bobble stitch, 2sc, change to green, sc, inc. Chain and turn. [11]
Careful not to skip stitches. Bobbles like to squish the stitches at the side of them and this makes them easy to skip while you're crocheting.
17. (Wrong side is facing you, hide yarn at front:) Inc, 5sc, change to yellow, 4sc, inc. Chain and turn. [13]
18. 3sc, change to green, 10sc. Chain and turn. [13]
13sc in green. Chain and turn. [13]
There will be no more yellow stitches. Leave enough yellow tail to stitch the yellow part on and cut the yarn.
19. 6sc, triple bobble, 6sc. Chain and turn. [13]
Again, careful not to skip stitches around bobbles. Count the stitches at the end of the row following a bobble.
20-22. 13sc (3 rows) [13]
23. 6sc, triple bobble, 6sc. Chain and turn. [13]
24-26. 13sc (3 rows) [13]
27. 6sc, triple bobble, 6sc. Chain and turn. [13]
28-30. 13sc (3 rows) [13]
31. Dec, 4sc, triple bobble, 4sc, dec. Chain and turn. [11]
32-34. 11sc (3 rows) [11]
35. Dec, 3sc, triple bobble, 3sc, dec. Chain and turn. [9]
36. Dec, 5sc, dec. Chain and turn. [7]
37. Dec, 3sc, dec. Chain and turn. [5]
38. Dec, 1sc, dec. Chain and turn. [3]
39. Double decrease (decrease over 3 stitches). Chain 1.
Pull enough yarn through the chain to stitch the green parts down and cut the yarn.
Pin the overlay in place. It should go from just over the tip of the snout to the very tip of the tail, and should fit snuggly and symmetrically. Remember to shape the angles -- the snout should face forwards, the tail should face backwards, the torso should be upright.
Pin the teeth individually if you have enough pins. This ensures the spaces between are visible when connected. The teeth may be uneven/asymmetrical on opposite sides of the mouth due to the way the picots stagger, but just make sure they're pinned and sewn okay and they'll look even.
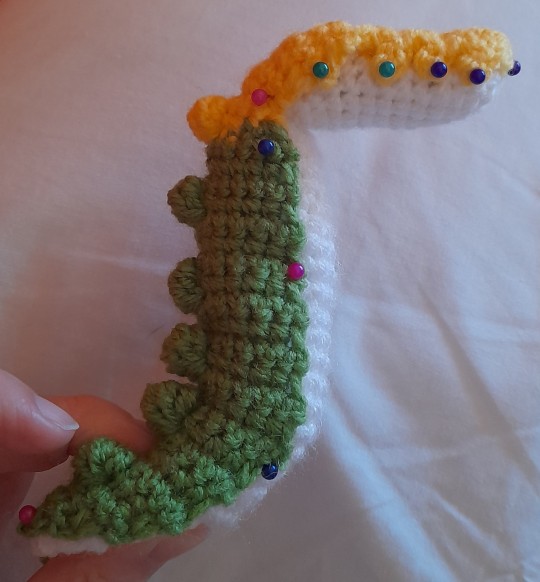
Note the shape -- it'll need to be bent like this when you fit the overlay on or it'll scrunch when bent later.
Sew! You don't have to go into every row, sewing every other stitch of the body should connect it okay with no glaring gaps. Make sure to sew with the correct colour of yarn tail.
Embroider on a couple of white eyes underneath the eyebrow ridges, with small eyebrows in white.
The eyes are embroidered on with an eyebrow each.
ARMS (one yellow, one green)
Start with a magic ring and leave enough of a tail to attach the end. Leave this end hanging outside the arm.
1. 7sc into a magic ring [7]
2-6. sc around (5 rounds) [7]
7. 2sc, dec, 3sc [6]
8-14. sc around (7 rounds) [6]
Stuff.
15. sc, (picot, sc in the next stitch) x4, slip stitch into the last stitch. Cut the yarn and cinch the palm shut, not too tightly. Hide the end inside.
The green arm is sewn on the higher-green shoulder and the yellow arm on the yellower side. Make sure the biggest finger gap is facing inwards to the body, this is like the wrist.
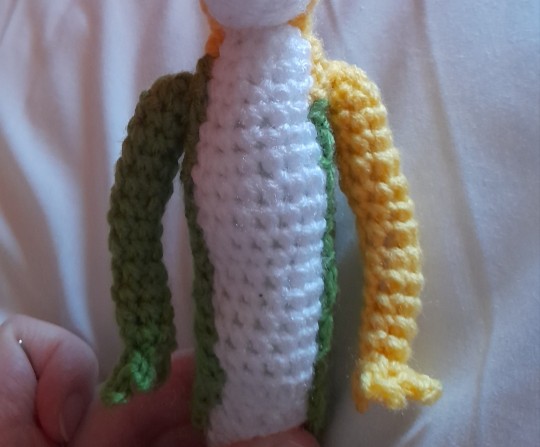
Leave a gap for the neck and match the arms to the shoulders. You'll find that the arms and fingers are a little bit posable.
LEGS (x2 in green)
Start with a magic ring and leave enough of a tail to attach the end. Leave this end hanging outside the leg.
1. 7sc into a magic ring [7]
2-9. sc around (8 rounds) [7]
10. 2sc, dec, 3sc [6]
11-13. sc around (3 rounds) [6]
14. 4inc, 2sc [10]
15. dec, 4sc, 2dec [7]
Stuff.
Cut yarn and cinch hole shut.
The legs should be connected at the hips with the legs pointing straight down and should connect closely at the top of the leg to make the hips look smoothly attached.
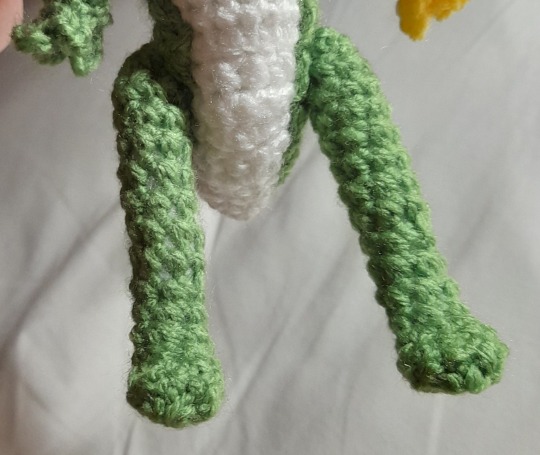
The hips are not at the lowest point of the body, they're where the lower curve begins to happen when the torso is straight upright and the tail points backwards.
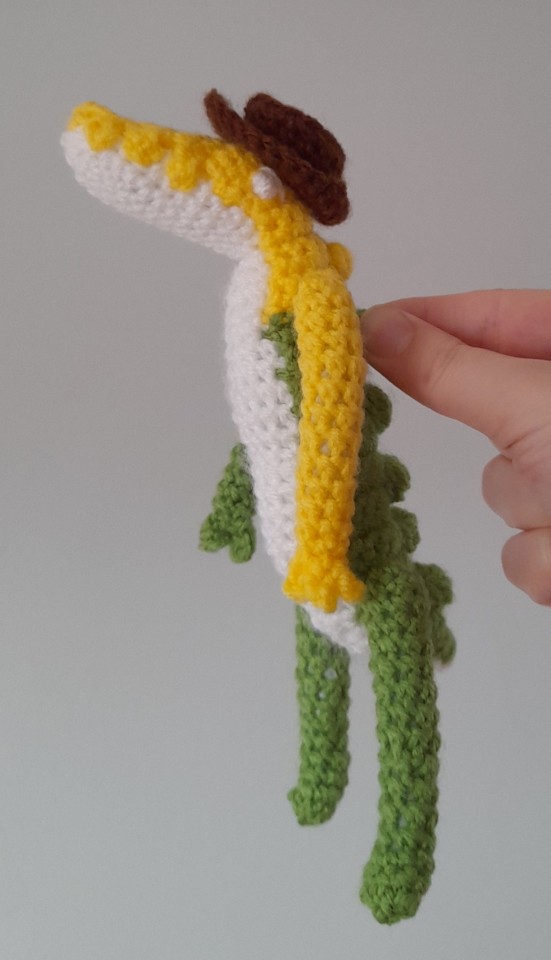
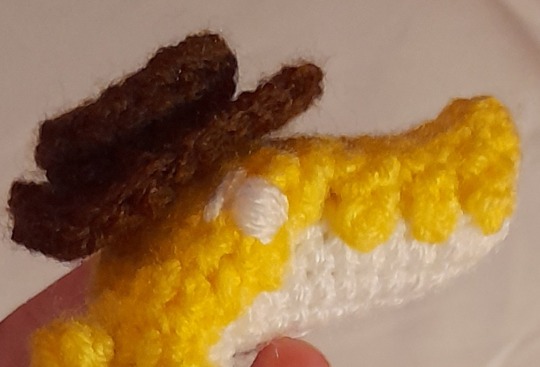
HAT (brown)
1. 8sc into a magic ring [8]
2. (2sc, 2inc) x2 [12]
3. 3sc, 2inc, 4sc, 2inc, 1sc [16]
4. In the back loops only, 4sc, dec, 6sc, dec, 2sc [14]
5-6. In both loops, 14sc (2 rounds) [14]
7. In the front loops only, (1sc, inc) x7 [21]
8. In both loops, 5sc, hdc, 2dc in 1, 2dc in 1, hdc, 7sc, hdc, 2hdc in 1, hdc, 2sc [24]
Slip stitch and finish off.
The wider part of the brim with the dcs is the front of the hat. Attach the hat by either tying a string under the chin, or by sewing a couple of inner rim stitches to the head to keep it in place.
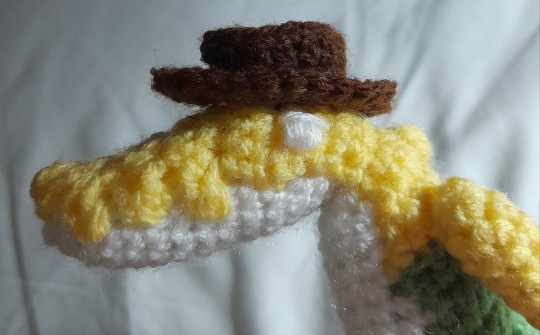
Sewn in place by two stitches at opposite sides of the inner edge. Yeehaw.
Hat connected by its straps: non-canonical but cute.
And that's it! Gummigoo is done.
I love my lil guy. Hope nothing bad happens to him when I show my friend Caine
#crochet#free crochet pattern#amigurumi#gummigoo#tadc#the amazing digital circus#gumigoo#gummygoo#tadc episode 2#tadc ep 2#tadc gummigoo
155 notes
·
View notes
Text

Erissa's Doll
It's finally done! Here is my take of Erissa's dolls..or puppets? Do we know what SSO is calling them yet? I admit, I messed up the proportions a bit and it isn't exact to the game model, but I'm still so proud and think it came out really cute! This was the first time I made my own pattern, and while there are things I think I would do differently next time, I'm still pretty happy with her!
Free Amigurumi Pattern below!
DISCLAIMER! This is my first pattern, so it may read rough. These are the exact steps I used to make the doll in the picture, but feel free to modify to look closer to the original.
MATERIALS
Weight 4 in 3 colors. I don't have exact amounts because this yarn came from my stash of rug yarn. Definitely less than a full ball, probably about 1/3 to 1/2. I believe it was Loops and Threads brand. The bows used a very small amount, less than a fist's size each.
4mm crochet hook
tapestry needle
safety eyes or buttons
stuffing material
LEGEND
r# - round/row
mc - magic circle
inc - increase
sc - single crochet
fo - fasten off (pull the tail through to knot)
ch - chain
dec - decrease (I used the invisible decrease, where you pull up the inside loops only of the 2 stitches you're decreasing)
slst - slip stitch
LEGS (make 2)
r1 - mc 4sc [4] r2 - inc x4 [8] r3 - (inc, 3sc) x2 [10] r4 - (inc, 4sc) x2 [12] r5 - (inc, 5sc) x2 [14] r6 - (inc, 6sc) x2 [16] r7 - 16sc [16] r8 - (inc, 7sc) x2 [18] r9 - 18sc [18] r10 - (inc, 8sc) x2 [20] r11 - 20sc [20] r12 - (inc, 9sc) x2 [22] r13 - 22sc [22] r14 - (inc, 10sc) x2 [24]
Don’t FO the first leg, leave a hands length tail.
After you finish the second leg, chain 2 and join with the unfinished loop of the first leg.
sc once into the next stitch on the first leg, and then sc 2x into the side of the chain 2.
Rejoin leg 2 with a sc and continue to sc around leg 2.
Continue to sc down the chain and around the next leg. You should have about 52-54 stitches in this round, give or take. Consider the point where you rejoined the second leg after coming back on the side of the chain 2 the start of your round.
NOTE: About here on, your stitch counts might not match mine, and that's okay. The rest isn’t so precise, so if it looks good to you, you’re good!
BODY (continuing from last step)
r1 - r3 - sc around (54)
Stuff the legs.
This is where we start decreasing. On each “decrease round”, you’re going to DEC at the front and back of (for lack of a better term) the crotch.
r4 - (25sc, dec) x2 [52] r5 - 52sc [52] r6 - (24sc, dec) x2 [50] r7 - 50sc [50] r8 - (23sc, dec) x2 [48] r9 - 48sc [48] r10 - (22sc, dec) x2 [46] r11 - 46sc [46] r12 - (21sc, dec) x2 [44] r13 - 44sc [44] r14 - (9sc. dec) x4 [40] r15 - (8sc, dec) x4 [36]
Another reminder to stuff here.
r16 - (7sc, dec) x4 [32] r17 - (6sc, dec) x4 [28] r18 - (5sc, dec) x4 [24] r19 - (4sc, dec) x4 [20]
FO and leave a long tail for sewing (2 hands length)
HEAD
r1 - mc 6sc [6] r2 - 6inc [12] r3 - (1sc, inc) x6 [18] r4 - (2sc, inc) x6 [24] r5 - (3sc, inc) x6 [30] r6 - (4sc, inc) x6 [36] r7 - (5sc, inc) x6 [42] r8 - (6sc, inc) x6 [48] r9 - (7sc, inc) x6 [54] r10 - (8sc, inc) x6 [60] r11-18 60sc [60] r19 - (8sc, dec) x6 [54]
If you are adding safety eyes, add them between rows 17 and 18, about 12 stitches apart
r20 - (7sc, dec) x6 [48] r21 - (6sc, dec) x6 [42] r22 - (5sc, dec) x6 [36] r23 - (4sc, dec) x6 [30] r24 - (3sc, dec) x6 [24] r25 - (2sc, dec) x6 [18] r26 - (1sc, dec) x6 [12]
FO and leave a few inches to weave in
Stuff firmly and sew to body, stuffing the joint as you close it. Be careful to line your stitches up so the eyes face forward, and don't list to the left like mine did.
ARMS (make 2)
r1 - mc 4sc [4] r2 - inc x4 [8] r3 - (inc, 3sc) x2 [10] r4 - (inc, 4sc) x2 [12] r5 - (inc, 5sc) x2 [14] r6 - (inc, 6sc) x2 [16] r7 - 16sc [16] r8 - (inc, 7sc) x2 [18] r9-13 - 18sc [18]
So at this point, I know it would be more accurate to attach the arms fluffed and sewn a bit open to the body…but I decided to lightly stuff and slst the opening closed, leaving a tail for sewing.
BOWS (make 2 in different colors)
r1 - ch36, slst into first chain to close the loop, making sure the chain doesn’t twist [36] r2 - (into the sides of the chain) ch1, sc35 [36] r3-10 sc36 [36]
slst and weave the ends.
With the same color, we’re going to make the bow’s knot.
r1 - ch 11 [11] r2 - sc in the second stitch from the hook and down the remaining 9 stitches, ch1 and turn [10] r3-4 - 10sc, ch1, turn [10] r5 - fold your work so the short ends touch and slst to join down the short side [4]
Leave a long tail for sewing.
To assemble, scrunch/gather the first part of the bow you made and slide it through the “knot” with the openings at the top and bottom. Rolling it up and twisting helps. Then fluff out the sides so it looks how you like.
Then assemble! Your head should already be attached. Go ahead and add the arms about 6 rows down from the head connection, or place them visually. Attach the bows to the top using the tail from the knot. Fluff the bows and you're done!
#sso#ssoblr#star stable online#star stable#sso erissa#sso erissa doll#crochet#crochet pattern#amigurumi#free crochet pattern#free amigurumi pattern#star stable crochet
127 notes
·
View notes
Text

Invader zim crochet pattern
IMPORTANT INFO (PLEASE READ BEFORE YOU GO ON TO THE PATTERN):
THIS PATTERN IS WRITTEN IN U.S. TERMINOLOGY
PLEASE DO NOT SELL MY PATTERN ON ETSY, RAVELRY, OR ANY STORE OF THE LIKE, BUT YOU CAN REPOST IT AS LONG AS YOU LINK IT TO MY BLOG (millys-craft-corner) OR TIKTOK/YOUTUBE (fiestywyvern) FEEL FREE TO SELL ANY FINISHED PRODUCTS. Be sure to link me if you post your Zims as I’d love to see them.
Zim stands at about 5 inches tall or 12.7 cm, not including antennae
Techniques used
Sc
Inc
Dec
Triple dec
Triple inc
Magic ring
Chain
Basic embroidery and sew techniques
Not so well known techniques used
Triple inc- an increase with 3 stitches in one stitch instead of 2
Triple dec- a decrease going across 3 stitches instead of 2
Materials
3.5 mm crochet hook
size 3 or light worsted or light yarn weight in these colors light green, black, deep ruby red, light grey, and light pink
aluminum wire in size 14 or pipe cleaners
black embroidery thread
a medium sized sewing needle
tapestry needle
pliers if you’re using wire
hot glue
light pink felt
stuffing
Head and torso (make 1)- start with green
R1: 4sc in mr (4)
R2: triple inc around (12)
R3: 1 sc, (triple inc, 2sc)x3, triple inc, 1sc (20)
R4: 2sc, (triple inc, 4sc)x3, triple inc, 2sc (24)
R5: 3sc, (triple inc, 6sc)x3, triple inc, 3sc (36)
R6: 4sc, (triple inc, 8sc)x3, triple inc, 4sc (44)
R7: blo
R7-16: sc around (10 rounds) (44)
R17: blo- 4sc, (triple dec, 8 sc)x3, triple dec, 4sc (36)
R18: 3sc, (triple dec, 6sc)x3, triple dec, 3sc (28)
R19: 2sc, (triple dec, 4sc)x3, triple dec, 2sc (20)
R20: sc, (triple dec, 2sc)x3, triple dec, sc (12)
R21: dec around (charge to light pink at the end) (6)
R22: inc around (charge to red at the end) (12)
R23: sc around (12)
R24: inc, sc around (18)
R25-30: sc around (6 rounds) (18)
R31: blo- dec, sc around (12)
R32: dec around (6)
F/o, leave a long tail and 3 embroider stripes, using black yarn, so they cut the torso into thirds
Use the tail to close up piece
Shoulder pads (make 2)- light pink
R1: ch 5 and sc down from the 2nd chain from the hook, ch 1 and turn (4)
R2: 2 dec, ch 1 and turn (2)
R3: dec
F/o and leave a long tail for sewing
Arms (make 2)- start with black
R1: 3sc in mr (3)
R2: sc around (3)
R3: inc around (6)
R4: sc around (6)
R5: dec around (3)
R6: sc around (change to pink at the end) (3)
R7-10: sc around (4 rounds) (3)
F/o leave a long tail for sewing and embroider stripes using sewing needle and black thread
Legs (make 2)- black
R1: 4sc in mr (4)
R2: inc around (8)
R3-7: sc around (5 rounds) (8)
F/o and leave a long tail for sewing
Feet (make 2)- black
R1: 3sc in mr (3)
R2: sc, inc, sc (4)
R3: sc, inc, 2sc inc (6)
R4: 2sc, inc, 2sc, inc (8)
F/o leave a long tail for sewing
Pak (make 1)- light grey
R1: 4sc in mr (4)
R2: inc, sc (6)
R3: 2inc, sc, inc, 2sc (9)
R4: 2sc, 4inc, 2sc, slst (13)
R5-6: sc around (2 rounds) (13)
F/o leave a long tail for sewing
Big pak spot (make 1)- light pink
R1: 4sc in mr (4) Sl st into 1st stitch
f/o and leave a long tail for sewing
Small pak spot (make 2)- light pink
R1: 3sc in mr (3) sl st into 1st stitch
F/o and leave a long tail for sewing
Eyes (make 2)- red
R1: 6sc in mr (6)
R2: inc around (12)
R3: 4sc, 2inc, 4sc, 2inc (16)
R4-5: sc around (2 rounds) (16)
Antennae (make 2)- black
R1: 3 sc in mr (3)
R2-19: sc around (18 rounds) (3)
Assembly
Sew arms to shoulder pads
Sew bottom of feet to the sides of the legs so they create an “L” shape
Sew pak spots to the pak
Sew pak to body
Sew arms to body
Sew legs to body
Sew eyes to the lower left and lower right sides of the head
Cut out eyeshine out of light pink felt and hot glue it or sew it to the eyes
Cut 2 pieces of 5 inches of pipe cleaner/wire and fold in an inch on both sides so it’s 3 inches long. Insert them into each the antennae and sew antennae towards the back of the head. Fold back 1/4 of the antenna so it creates a right angle.
Congrats you just finished your irken invader, now go take over the earth!


265 notes
·
View notes
Text


Waddles!
Written pattern below:
legs - 4 [brown] mr 4sc (1sc, inc)x2 {6} [pink] 6slst blo 6sc blo (1sc, inc)x3 {9} 9sc fo
body - mr 8sc 8inc (sc, inc)x8 (2sc, inc)x8 sc around (2sc, inc)x4, 20sc sc around [dark pink] 2sc, [pink] 14sc, [dp] 2sc, [p] 17sc, [dp] 1sc 3sc, [p] 12sc, [dp] 4sc, [p] 4sc, 1sc through one of the legs, 4sc, 1sc through a second leg, 5sc, [dp] 2sc 3sc, [p] 12sc, [dp] 5sc, [p] 3sc, (slst into leg, 4ch, slst into other side of leg, sk1), 3sc, repeat (), 4sc, [dp] 2sc 3sc, [p] 12sc, [dp] 5sc, [p] sc, hdc, sk1 on leg, (slst on leg, 3ch, slst into other side of leg, hdc in body), sc, hdc, repeat (), [dp] sc, [p] sc, [dp] 2sc 2sc, [p] 14sc, [dp] 4sc, [p] sc, [dp] sc, [p] hdc in slst, 3sc along leg, hdc in body, 2sc, hdc in slst, 4sc along leg, hdc in body, 2sc, [dp] 2sc 2sc, [p] 14sc, [dp] 4sc, [p] 3sc, 3hdc, 4sc, 4hdc, 2sc, [dp] 3sc [p] 18sc, [dp] 3sc, [p] 2sc, 2hdc, 6sc, 2hdc, 2sc, [dp] 4sc [p] 18sc, [dp] 4sc, [p] dec, 2sc, dec, sc, dec, 2sc, dec, [dp] 4sc [p] 18sc, [dp] 4sc, [p] 4sc, dec, 4sc, [dp] 2sc, [p] sc 19sc, [dp] 2sc, [p] 13sc sc around 20sc, (inc, 2sc)x4, inc, sc stuff hind legs sc around for 4 rows 24sc, 1sc through a leg, 6sc, 1sc through the last leg, 7sc 6sc, (2sc, inc)x3, 9sc, (slst into leg, 4ch, slst into other side of leg, sk1), 5sc, repeat (), 6sc 26sc, hdc, slst into leg, 3ch, slst into other side of leg, hdc into body, 3sc, hdc, slst into leg, 3ch, slst into other side of leg, hdc, 5sc 5sc, (2sc, inc)x3, 12sc, hdc, 4sc, hdc, 3sc, hdc, 4sc, hdc, 3sc, inc, sc inc, (dec, 2sc)x5, (inc, sc)x2, 9sc, dec, 2sc, dec, 5sc, (sc, inc)x2, sc inc, (sc, dec)x5, (sc, inc)x4, 24sc 2sc, dec, 7sc, dec, 35sc sc, dec, 7sc, dec, 10sc, (3sc, dec)x3, 9sc stuff legs dec, 8sc, dec, sc, [dp] sc, inc, [p] (2sc, inc)x3, 5sc, (2sc, inc)x4, dec with start of row - begin next row in next stitch 8sc, [dp] dec, 2sc, inc, [p] (2sc, inc)x3, 11sc, (2sc, inc)x4 2dec, 2sc, dec, [dp] dec, 4sc, [p] sc rest of row dec, 2sc, dec, [dp] 3sc, [p] sc rest of row place eyes 5-6 stitches apart and stuff dec around for 2 rows cut long tail for sewing weave closed through the front loops of the top and bottom halves of the final row
snout - [snout pink] mr 8sc sc, hdc, dc, ch, sc in side if dc, 2sc, ch, dc, (hdc, sc), sc, slst, fo [pink] standing sc into a back loop, blo sc around 9sc, 2dec 9sc, dec stuff fo snd cut long tail for sewing
lower lip - 5ch 4sc, ch and turn 2dec, ch arnd turn 2sc fo and cut tail for sewing
sew snout and lip onto body
ears - 2 7ch 6sc, ch and turn (do this at the end of each row) 6sc inc, 4sc, inc inc, 2sc, dec, 2sc, inc 3sc, dec, 4sc <- reverse order for this row on 2nd ear dec, 4sc, dec 6sc dec, 2sc, dec 2dec 2sc dec fo
sew ears onto body
tail - slst into row 3 12ch 11inc fo
#wanted to practice more with writing custom patterns#it took a while to get his spot patterns right lol#i think he turned out quite cute :]#gravity falls#waddles the pig#waddles#gf waddles#gravity falls fanart#crochet#crochet pattern#yarn crafts#artists on tumblr#void's art
19 notes
·
View notes
Text
Chicken pattern.
R1- 6sc in mr (6), R2- 6inc (12), R3- inc sc x 6 (18), R4- 18sc (18), R5- 18sc (18), R6- 18sc (18), R7- inc 2sc x 6 (24), R8- 1sc' inc' 2sc x 3' 14sc (27) R9- 5sc' 2inc' 20sc (29) R10- 1sc' Dec' 2sc x 7 (22) R11- 1sc' Dec' sc x 7 (15) R12- 8dec.
WINGS: R1- ch6 R2- 1sc' 1hdc' 1dc' 1hdc' 1sc. Terms: ch= chain. Hdc= half-double crochet. Dc= double crochet. sc= single crochet. Mr= magic ring. Inc= increase. Dec= decrease.
117 notes
·
View notes
Note
Pattern for the cute foxy?????? Please?????
Of course!
Abbreviations-
- sc: Single Crochet
- mc: Magic Circle
-Inc: Increase
-Dec: Decrease
-st: stitch
Crochet Pattern Red Fox
Head
Start with orange
R1: 6sc in MC (6)
R2: (6inc) x 6 (12)
R3: (1sc, 1inc) x 6 (18)
R4: (2sc, 1inc) x 6 (24)
R5: (3sc, 1inc) x 6 (30)
R6-R9: 30sc
R10: 6inc, 24sc (36)
Turn to white
R11: 4inc, (3 sc in 1st) x 3, 3inc (42)
R12-R13 42sc
R15: (5sc, 1dec) x 6 (36)
R16: (4sc, 1dec) x6 (30)
R17: (3sc, 1dec) x 6 (24)
R18: (2sc, 1dec) x 6 (18)
Stuff
Attach eyes between R8-R9, 4sc apart
Add nose between R11-12
R19: (1sc, 1dec) x 6 (12)
R20: (6dec) x 6 (6)
Close
Ears make 2
Use black yarn
R1: 6sc in mc (6)
R2: (6inc) x 6 (12)
R3: (3sc, 1inc) x 6 (18)
R4-R6: 15sc
I’m gonna be honest I did not plan out sewing the ears on I just placed them where it looked right.
Body
Use orange yarn
R1: 6sc in mc
R2: (6inc) x6 (12)
R3: (1sc, 1inc) x6 (18)
R4: (2sc, 1inc) x6 (24)
R5: (3sc, 1inc) x 6 (30)
R6-R9: 30sc
R10: (3sc, 1dec) x 6 (24)
R11: (2sc, 1inc) x 6 (18)
R12-R13: 18sc
Stuff and leave a tail for sewing the head and body together
Tail
Start with white yarn
R1: 6sc in mc (6)
R2: (6inc) x6 (12)
R3: (3sc, 1inc) x 6 (15)
R4: (4sc, 1inc) x 6 (18)
R5: (5sc, 1inc) x6 (21)
R6: (6sc, 1inc) x6 (24)
R7: (7sc, 1inc) x6 (27)
R8: (8sc,1inc) x6 (30)
Turn to orange
R9-R11: 30sc
R12: (8sc,1dec) x6 (27)
R13: (7sc,1dec) x6 (24)
R14: (6sc, 1dec) x6 (21)
R15: (5sc, 1dec) x6 (18)
R16: (4sc, 1dec) x6 (15)
Stuff
Leave a long tail for sewing to body
Legs make 2
Start with black yarn
R1: 6sc in mc
R2: (6inc) x6 (12)
R3-R5: 12sc
Turn to orange
R6: (6dec) x6 (6)
Lightly stuff
Leave a tail for sewing to body
Arms make 2
Start with black yarn
R1: 6sc in mc
R2:(6inc) x6 (12)
R3-R4: 12sc
Turn to orange
R5: 12sc
Lightly stuff
Fold in half and sc across
Leave a tail for sewing to body
And you have your own fox!! If you use my pattern and post it online please tag me I would love to see it!
But also for credit reasons
135 notes
·
View notes
Text
Free pattern
Put in mind I'm not that much of an expert making patterns but i hope this is helpful

We making This rock thingy from lmk s5
Key words:-
Rnd = round
Ch = chain
Sl st = slip stitch
Sc = single crochet
Inc = increase
Dec = decrease
Mr = magic ring
Main body:-
Rnd 1: 7sc in mr (7)
Rnd 2: 7 inc (14)
Rnd 3: 1sc, 1inc (21)
Rnd 4: 2sc, 1inc (28)
Rnd 5: 3sc, 1inc (35)
Rnd 6: 4sc, 1inc (42)
Rnd 7- 17: sc all around (42)
Rnd 18: 4sc, 1dec (35)
Rnd 19: 3sc, 1dec (28)
Rnd 20: 2sc, 1dec (21)
Rnd 21: 1sc, 1dec (14) and stuff
Rnd 22: dec all around and close off

Fire:-
Fire pattern:-
Rnd1: 6sc in mr
Rnd 2: 1sc then 3ch, skip the first ch and sc in the other two, continue in the next v on the ring doing inc stitches until stitch marker (should look like a tear drop)
Rnd 3: 1sc (3sc in pillar then ch 2, ignore the extra 2 ch and make 3 sc in pillar) 4 inc in next 4 v, in the next one, 1sc then ch2, ignore ch 2 and move on to next v, repeat last step 3 times, then sl st to close

Eye pattern ()=white, []= black:-
Rnd 1: (7sc in mr)
Rnd2: [7 inc]
Rnd 3: (1sc, 1inc) in first 8 Vs, [1sc, 1inc] in the last 6 Vs
End result:-

If anyone ends up making it, plz tag me, i wanna see em
-Nova
26 notes
·
View notes
Text
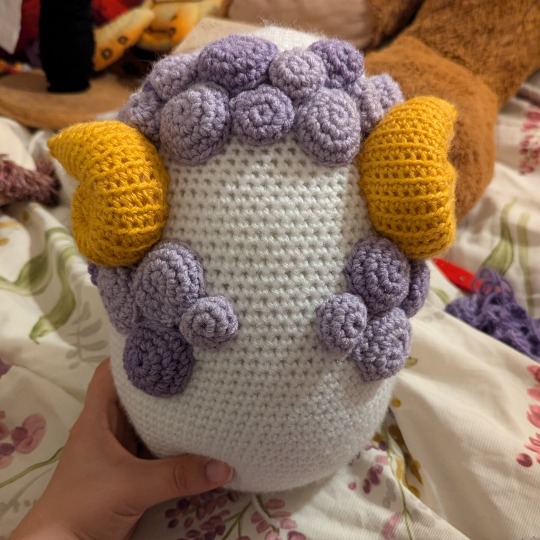
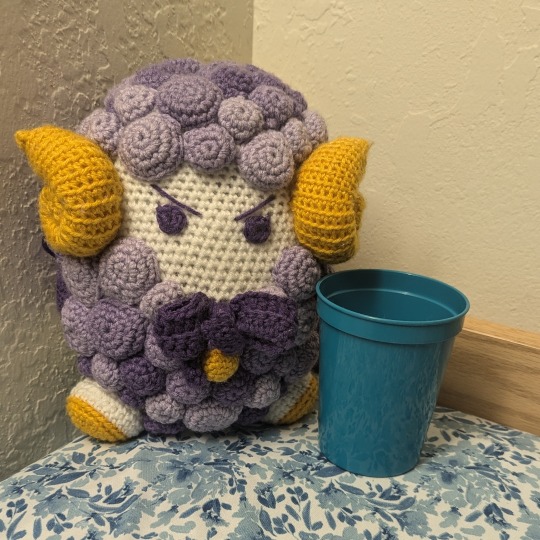
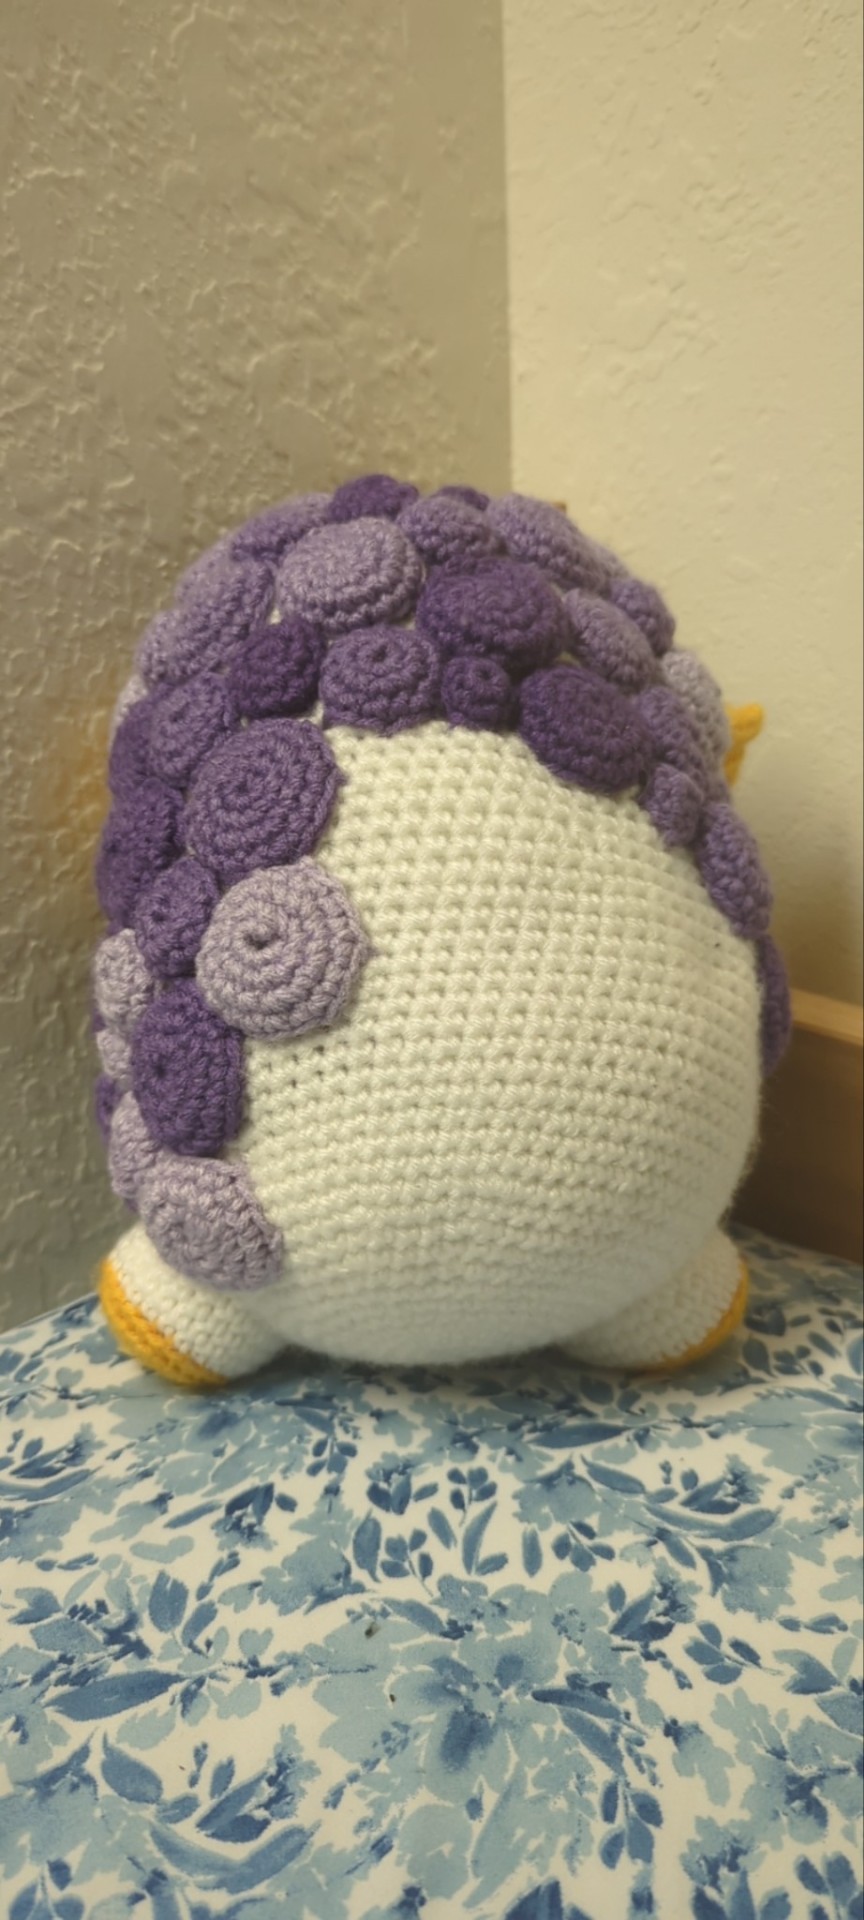
Hello everyone!
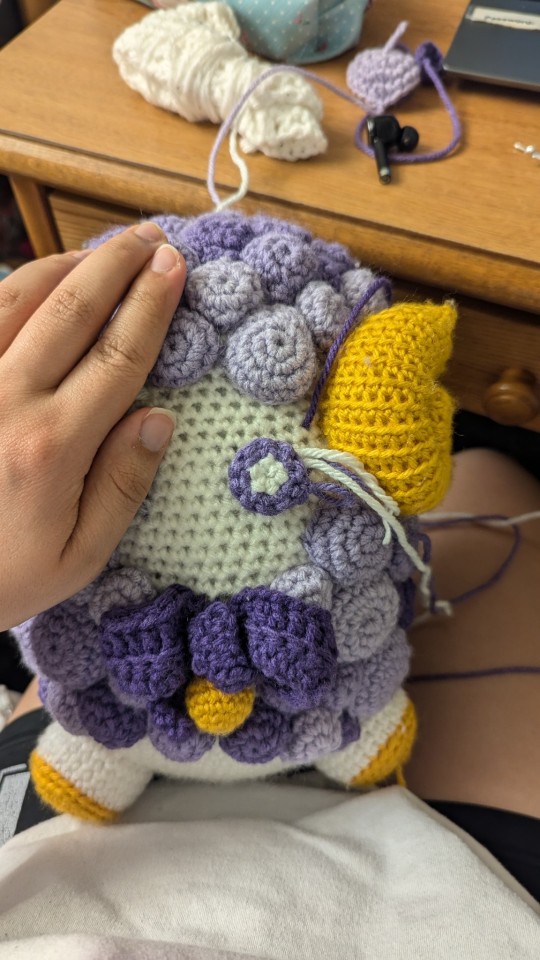
Here's sheep MC from Obey me in crochet form! ^.^
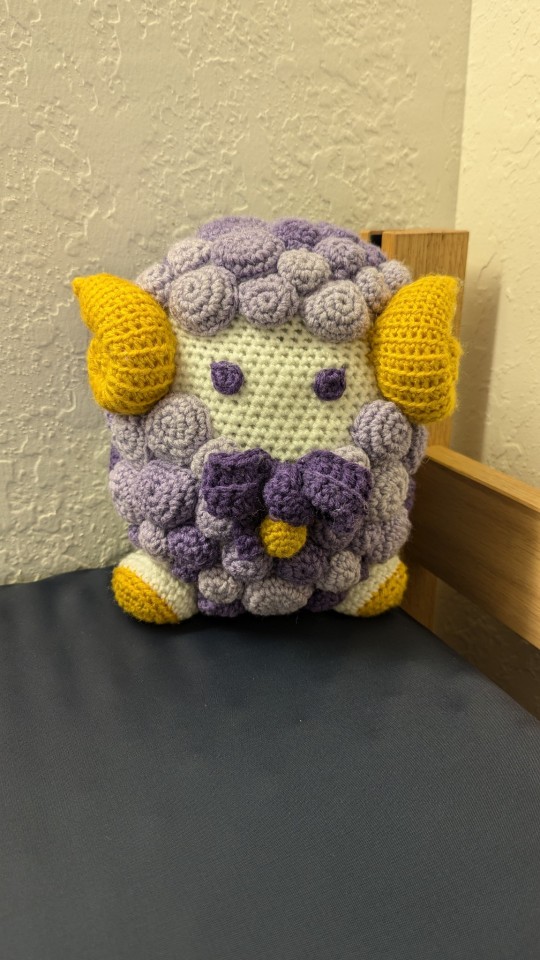
They're not fully done yet (their butt is bald) but here they are
Below is some information on how I made it though it's not perfect
For the horns I used this tutorial (though I did slightly alter it so the horns would be a bit more curled.)
youtube
Here they are from the side so you can see the horns more
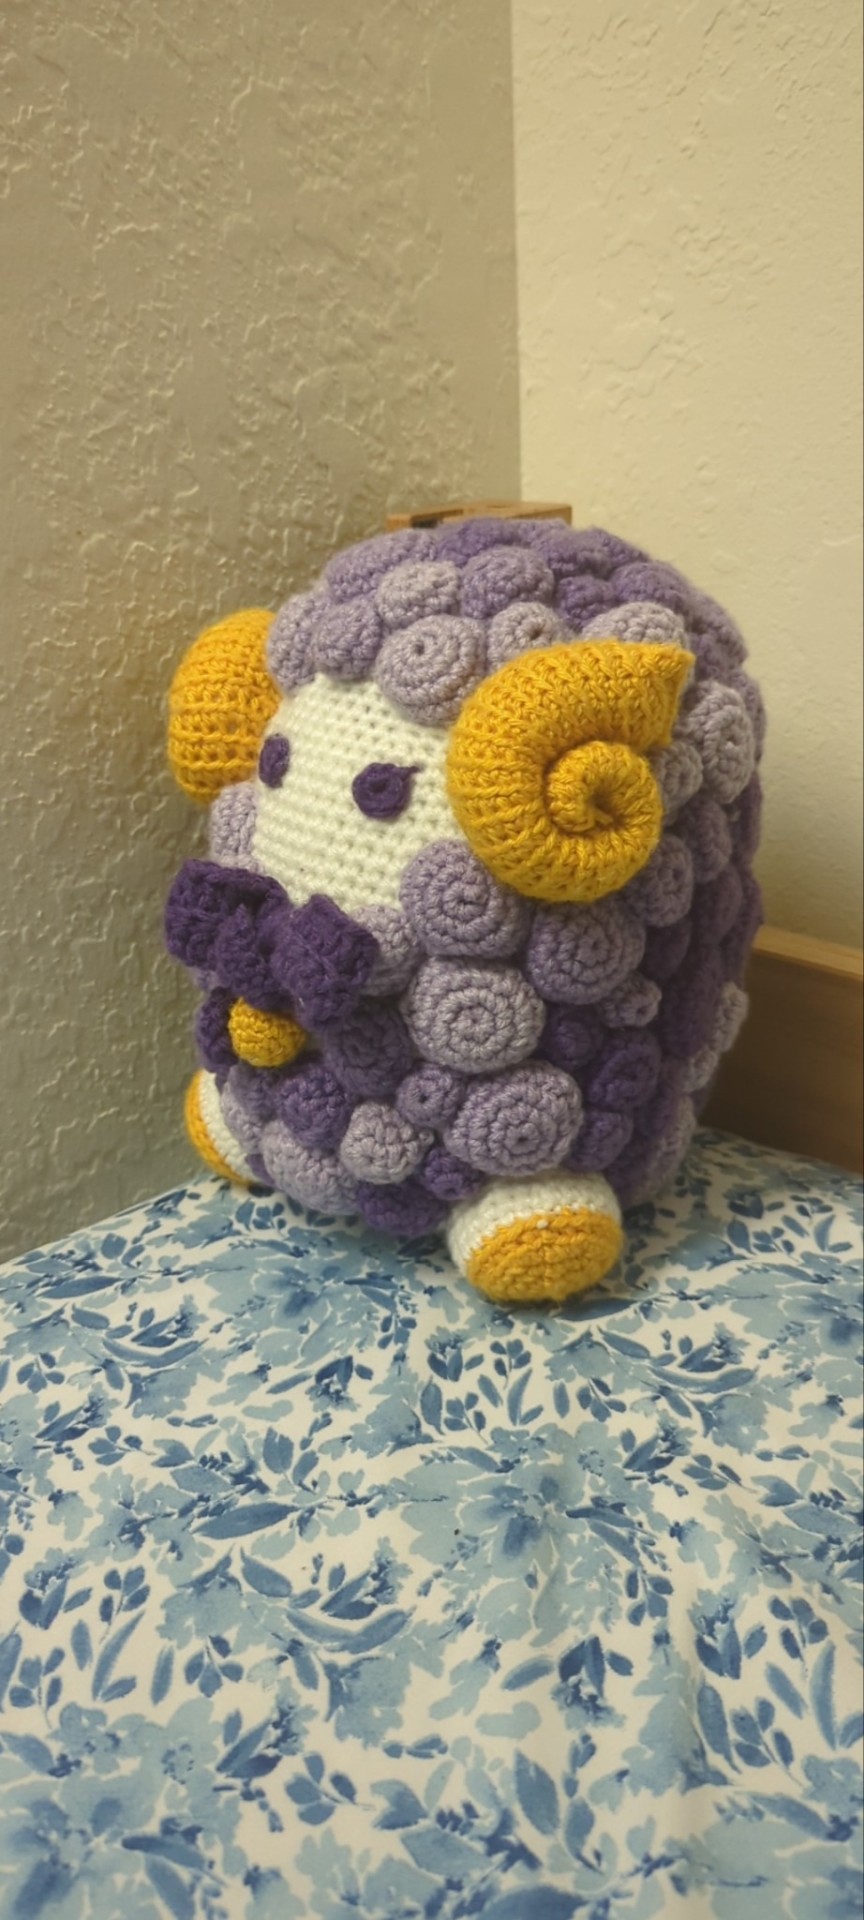
The base is just a oval but one that's larger at the bottom than the top. For mineI started from the bottom to the top and I did a few rows of the hexagon circle pattern - I don't know what it's actually called but it's basically
6sc[6],6inc[12], 6(1sc-1inc)[18], 6(2sc-1inc)[24], 6(3sc-1inc)[30], etc.
and then I crocheted a few rows the same length and decreased gradually until I liked the shape kind of like
6 rows of 90sc, 6(13sc-dec)[84], 6 rows of 84, 6(12sc-dec)[78], 6 rows of 78, etc
Though this will vary based on how you decide to make it
When you like the shape and want to finish it try to end on a multiple of 8 or just decrease in a way to get a multiple of 8 like if you have 60sc then decrease only 4 times to get 56 which is a multiple of 8, then to finish the head decrease in an octagonal pattern like
72sc, 8(7sc-dec)[64], 8(6sc-dec)[56], 8(5sc-dec)[48], 8(4sc-dec)[40], etc.
So that the head would be flatter and then easier to put the balls on top and shape the head a bit so they don't look entirely like an egg.
For the little wool balls I just made a bunch of half circles in a bunch of different sizes (I used 3 different sizes for variation) and sewed them on, though they are all stretched out beforehand since I didn't have much string and needed to get the most out of my current batch of urple. I also gave them long tails in the end to make it easier to sew them on.
And for the feet I just made a half circle and once I liked how long the hooves (the yellow part) was I single crocheted into the back loop (or whichever loop would be facing they inner part of the feet so that there is a line outside for you when your finished making the entire foot) and added my main color (white) and single crocheted until I liked the foot size
For the eyes I made a magic circle and crocheted 5 single crochets into it before slip stitching to close it and using that stitch kinda like the eyelashes they have in their in-game picture.
I made a few other eye variations but I didn't really like them
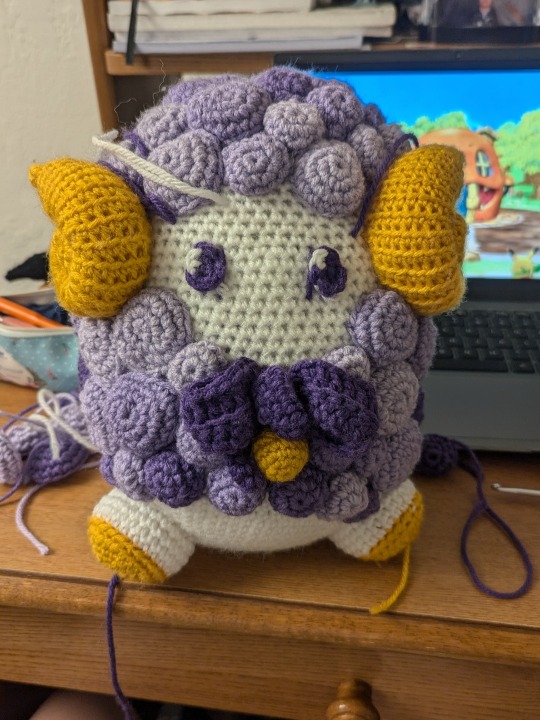
The bell is just a crochet oval (or a circle with more normal rows that are not increasing to decreasing in number of stitches within a row)
For the bow I used this tutorial and again I altered it slightly so that it would look good on MC to me.
youtube
And here they are basically as I was beginning to put the parts together
Hope y'all like em (also I'm using American crochet terms so my single crochets might be double crochets if you live in the UK, and it may be different in other parts of the world just to give y'all a heads up)
The main beginning stitch I used for everything (except the bow) were magic circles just to let you all know just in case you need to learn a new skill in order to make them
Besides the stitches in the videos I only used single crochets (back loop/front loop for feet details) and sewing everything on
Goodbye I hope this may help a little bit if you want your own personalized MC plushie and remember to hydrate or diedrate
(I also may be making personalized charms to represent some of the boys in the game but it depends if I can actually get their sin logo? appearance? symbol? correct since they are pretty detailed)
Also here's their bald butt and that I have not been able to finish yet lmao
#crochet#obey me#obey me mc#obey me: one master to rule them all#obmswd#Youtube#my art <3#took me way too long#my fingers are dying#my wrists are on a well needed vacation for 5 minutes#sorry I took a year lmao
18 notes
·
View notes
Text

manufactuer #factory
hydraulichose #rubberhose
📞 Phone/Whatsapp:+86-15297607201 💌 Email: [email protected] 💻Website: www.bailihose.com wa.me/8615297607201
0 notes
Text
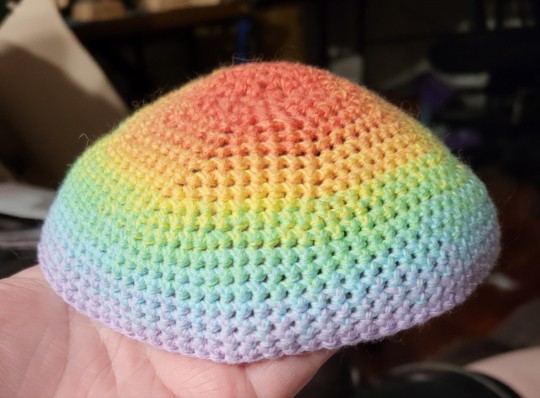
Someone asked for my kippah pattern.
The pattern is so basic. What makes this kippah so pretty is the yarn.
https://hobbii.com/sultan-deluxe, color way Martian Pink. I do the first 3 rounds in the red and then each successive round is one step in the long gradient
Pattern under the cut
Magic circle, ch1, 8 sc into the circle, slst to join, ch1
2sc in each stitch around, sl st to join, ch1
1sc in first stitch, 2sc in next stitch, repeat around, sl st to join, ch1
Continue, adding one sc per round, to round 11: sc in first 10 stitches, 2sc in next st, repeat around, sl st to join, ch1
Round 12: sc in each stitch around, sl st to join, ch1.
Repeat chain 12 until you have the size you want. Tie off and weave in ends.
76 notes
·
View notes
Text

I wanted to crochet Error and that’s what I did. I’m pretty proud of him
If you want to crochet him as well I attached my pattern below. Have fun crocheting
Error Sans
Abbreviations:
Rd - Round
R - Row
ch - chain
ss - slip stitch
dec - decrease
inc - increase
sc - single crochet
hdc - half double crochet
dc - double crochet
trc - treble/triple crochet
blo - back loops only
[…] x 2/3/6 - repeat what is inside the brackets 2/3/6 times
(…) - number of stitches that round should have
Legs x2
Rd1: 6sc into Magic Ring
Rd2: 6 inc
Rd3: [1sc, inc]x6
Rd4-18: sc around
don’t tie off the second leg, connect it to the other leg with a ss
Rd19-30: sc around (36sc)
Rd31: 2sc, Dec, 5sc, Dec, sc,Dec, 6sc, Dec,6sc, Dec, sc, Dec,3sc
Rd32: 8sc, 3dec,7sc, 3dec, 3sc
Rd33: 7sc, 2dec, 2sc, 2dec, 2sc, 2dec, 1sc
Rd34: [1sc, Dec]x6
Rd35: sc around (12sc)
3sc to middle of the back and change color to black
Rd36: [1sc, inc] x6
Rd37: [2sc, inc] x6
Rd38: [3sc, inc] x6
Rd39: [4sc, inc] x6
Rd40: [5sc, inc] x6
Rd41: [6sc, inc] x6
Rd42: [7sc, inc] x6
Rd43-47: sc around
Rd48: [7sc, Dec] x6
Rd49: sc around
Rd50: [6sc, Dec] x6
Rd51: sc around
Rd52: [5sc, Dec] x6
Rd53: [4sc, Dec] x6
Rd54: [3sc, Dec] x6
Rd55: [2sc, Dec] x6
Rd56: [1sc, Dec] x6
Rd57: 6 Dec
Arms x2
Rd1: 6sc into Magic ring
Rd2: 6 inc
Change color to red
Rd3: sc around
Change color to black
Rd4-5: sc around
Change color to red
Rd6-18: sc around
Sew body together and add the face
Pants
Rd1: ch31
Rd2: ss into first chain, 30sc
Rd3-4: sc around
Change color to black
Rd5: [8sc, Dec] x3
Rd6: sc around
Rd7: [7sc, Dec] x3
Rd8-10: sc around
Don’t tie off the second pant leg
Connect with ss to other pant leg
Rd11-12: sc around
Rd13: [14sc, Dec] x3
Rd14: [13sc, Dec] x3
Rd15: [12sc, Dec] x3
Rd16: [11sc, Dec] x3
Shirt
Panels
R1: ch19
R2-12: 18sc, ch1, turn
Rd13: 16sc, ch1, turn
Rd14: 14sc, ch1, turn
Sleeves
Rd1: ch13
Rd2: ss into first chain, 12sc
Rd3-16: sc around
Neck
Rd1: ch25
Rd2: ss into first chain, 24sc
Rd3: sc around
Sew everything together
(The neck piece doesn’t have the same amount of stitches as the panels+sleeves so you’ll have to use some stitches twice when sewing it on)
Scarf
R1: ch6
R2-80: 5sc, ch1, turn
Jacket
Sleeves x 2
Rd1: ch25
Rd2: ss into first chain, 24sc
Rd3-4: sc around
Rd5: 12sc, ch1, turn, 10sc, ch1, turn, 8sc, ch1, turn, 6sc, ch1, turn, 6sc
Change color to black
Rd5: 14sc to end of round
Rd6: sc around
Rd7: [6sc, Dec] x3
Rd8: [5sc, Dec] x3
Rd9: sc around
Rd10: 12sc, ch1, turn, 9sc, ch1, turn, 7sc, ch1, turn, 5sc, ch1, turn, 5sc
Rd10: 8sc to end of round
Rd11: sc around (18)
Back panel
R1: ch22
R2-16: 21sc, ch1, turn
R17: 18sc, ch1, turn, 15sc, ch1, turn, 15sc, ch1, turn, 2dc, 2hdc, 7sc, 2hdc, 2dc
Front panels x 2
R1: ch9
R2-16: 8sc, ch1, turn
R17: 5sc, ch1, turn, 5sc, ch1, turn, sc, 2hdc, 2dc
Collar piece
R1: ch37
R2: 2sc, 1hdc, 1dc, 1trc, ch3, 2ss, ch3, 22trc, ch3, 2ss, ch3, 1trc, 1dc, 1hdc, 2sc
Change color to yellow
R3: 5sc, ch1, 8sc, ch1, 22sc,ch1, 8sc, ch1, 5sc
Sew everything together and stitch the details on
Slippers x 2
Rd1: 6sc into magic ring
Rd2: 6 inc
Rd3: [1sc, inc] x6
Rd4: [2sc, inc] x6
Rd5: blo 10sc, ch1, turn, 10sc, ch1, turn, 10sc
Sew onto body

Now just dress your Error and finished
This is my first pattern so if there are things that aren’t clear you’re free to ask me about it and I’ll try to clear things up. Have fun :)
I have now also crocheted Ink. You can find the pattern here
You can slo find the pattern for classic here
226 notes
·
View notes
Text

Here's a seperate pattern for this lil Strabby
(Could also be a white strabby, razzby, or black razzby if made in different colours)
LIL STRABBY (begin in red)
1. 4sc into a magic ring [4]
2. (1sc, 1inc) x2 [6]
3. (2sc, 1inc) x2 [8]
4. 8sc [8]
Change colour to green
5. (1dec, picot) x4
Slip stitch and cut the yarn. Embroider two tiny eyes with black and white yarn. Tuck all ends inside. You probably don't need to sew the top shut.
I shoved mine onto the end of a pen lol
29 notes
·
View notes
Text
free crochet pigeon pattern
original page (Archived link)
PDF link here. (Archived link)
if you follow the original pattern with the yarn sizes and stuff it's 15 inches or 38 centimeters tall.
Basic pattern with symbols to simplify, no color change suggestions so you can do whatever you want:
Body: End all rows with a slip stitch and a chain 1 to start the next row.
Chain 2, 6 single crochets into the first chain. Or use a magic circle. But I don't like them.
VVV
IV
IIV
IIIV
IIIIV
IIIIIV
IIIIII(6)V
III
III
IIIIIII(7)V
III. Place a stitch marker in the 7th, and 18th stitches to mark where the legs will go. (Or don't)
III
IIIIIIII(8)V
III
III
III
III(30)X.III(11)X. Place a stitch marker for the tail. X. Repeat III(11),X, until end of row.
III(30)X.III(7)XXXX III(7)X
III
III(39)X. III(8)
III
III(27) Repeat until the end of the row: X.IIIII.
III
III
III(7)X.
III. Place stitch markers in the 6th and 26th stitches for the wings. Or don't. You can always just…wing it.
III(7). IX, IX, IX, IX, I, repeating. Add filler.
III
III
III(27).XIX
III
III
III
III
III
III
III
IIIIIIII(8)X.
III
III
III(7)X.
III
IIX
IX
XXX Close with drawstring method, cutting a tail (does Not have to be super long despite the original instructions). Use your hook to pull the tail through the top loop of each remaining stitch, pulling it toward the center. When you get all the way around the circle, pull the tail to close it, then secure with a slip stitch anywhere.
Tail:
Chain 2. 4sc into the 2nd chain from the hook.
III
VI
III
VI
III
VI
VI
Back loops only if you're fancy: III
BLOIYF: III
BLOIYF: III
VIIIII(5)
VIIIIII(6)
III
III
VIII
III
III
IIIIII(6)VVV III(12)VVV. III
III. Place marker in 18th stitch for tail placement. Fasten off and cut long tail for sewing in. Add filling. Line up the markers on the tail and body and sew together.
MY simplified wing.
Chain 2. 6sc into 1st stitch.
VVV
18 rows of just plain single crochet.
5 rows with 1 decrease each.
Fasten off and leave a tail for weaving.
actually the original pattern for the wings is so obnoxiously overcomplicated and over-written I'm not even gonna write it out. sorry not sorry.
Thighs:
Chain 2. 6sc into 1st stitch.
IV
IIV
IIV
IIIV
III
III
III
IIIIV
IIIII(5)V
III
III Fasten off leaving a long tail for sewing.
Feet:
Chain 2. 6sc into 1st stitch.
III
III
III
III
III
II, Chain 5. 1sc into 2nd chain from hook. III. Repeat 3 times to make the toes. single crochet in last stitch. Fasten off, leaving long tail for sewing.
Legs:
Ch2. 6sc in 1st stitch.
Chain 5. 1sc into 2nd chain from the hook. 1sc into the next 3 chains. Slip stitch into the next sc. Repeat 3 times. Fasten off.
Beak:
Chain 2. 6sc into 1st stitch.
III
III.
Fasten off with a long tail for sewing. fill beak.
Sew the beak onto the face.
Add some white detailing to the top base of the beak for fanciness with whatever the heck a satin stitch is.
Eyes: Chain 2. 8sc into 1st chain. That's it. Fasten it off. With a little bit of white yarn, ~satin stitch~ triangle highlights into the eye. Or just change color for the last stitch around but whatevs.
Attach everything.
There you go you have a pigeon now.
4 notes
·
View notes