#>> out of character brackets are double arrows
Explore tagged Tumblr posts
Visit Tumblr Blog
Explore Tumblr blogs with no restrictions, modern design and the best experience.
Last Seen Tumblr Blogs


Fun Fact
28.6 is the average number of monthly visits per US mobile user.
Text

☆ Welcome to Shattered Sleep, Dandy's World AU made by yours truly..
☆ Basic info about the AU:
. ★ Centered around both Boxten and Astro
. ★ Boxten's pretty 'restless' and most, if not all, of the cast seems to blame Astro for this.
. ★ Astro will be the main toon here answering asks, so if asks are not directed to anyone, they go straight to him.
☆ Rules:
. ★ No NSFW asks will be answered.
. ★ Interactions with other blogs are allowed, I jist wont allow ship rps.
. ★ Other than that, im pretty chill. rules will be updated as time goes on.

More info under read more!
☆ Tag guide:
. ★ #sleep-filled answers! - tag for asks answered
. ★ #sleep-talk! - posts with no asks attached
. ★ #dream friends! - interactions with other blogs
. ★ #ooc stuffs! - out of character posts :3
. ★ #☆★☆★☆★☆ - used to help seperate tags for sorting from tags for reach
#Shattered Sleep AU#sleep-filled answers!#sleep-talk!#dream friends!#ooc stuffs!#>> out of character brackets are double arrows#>> also! divider credits go to moi#☆★☆★☆★☆#dandys world#dandy's world#dw#dandys world au#dw au#astro dandys world#astro dw#dandys world astro#dw astro#astro novalite#boxten dandys world#boxten dw#dandys world rp#dandys world askblog#ask blog#rp blog#roleplay blog
25 notes
·
View notes
Text
Twine Sugarcube 101
AKA, all you need to make a Twine game (I swear to god)
I’ve seen a lot of people go “Twine is too complicated for me :(” and give up before they’ve even started. And that makes me sad, partly because they’re giving up on a really cool hobby, and also because that’s false! It’s absolutely not too complicated for you!
I think the problem is that people look up Twine, see the documentation, and go “There’s way too much there! I can’t learn all that!” Well guess what- you shouldn’t learn all that, at least not yet. As a beginner you can skip pretty much all of this:
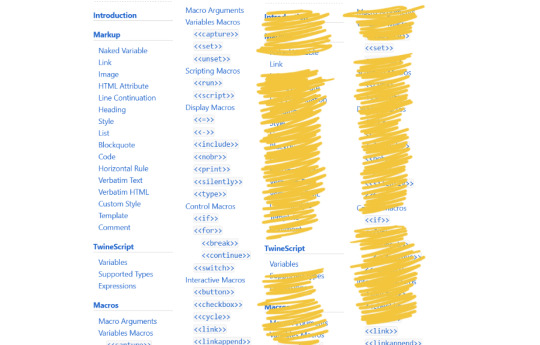
(Ignore <<linkappend>> too, forgot to crop that one out)
That’s a lot more manageable, right? Below the cut, I’ll let you know how to use all those remaining important things to make your story! Warning- it’s quite long! You might want to read it in sections! And while I’ll try to keep it entertaining, it’s also a coding tutorial, so... y’know. Might not be the most exciting read if you aren’t trying to learn Twine.
Welcome to below the cut!
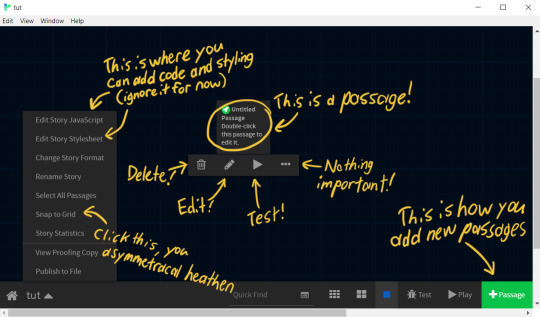
First off, make sure your story format is set to Sugarcube 2. On the right side of the home screen (with all your stories), click format and choose the one labeled “Sugarcube 2.x.x” then open a new story with the green button! Here’s what you’ll see and what it all means:
Passages are all like individual web pages that you navigate between to play the game. When they’re linked together they’ll be shown like this:

Anything you write in a passage will just be shown on screen as plain text, no code required! But if you want to make anything more than just one passage with a bunch of text, you’ll have to link passages together with...
Links!
A link is composed of two parts- the text you see on screen, and the name of the passage you’re attaching it to. These are enclosed in [[double square brackets]], with a vertical bar | or a little arrow -> between them. If you want to show the passage name instead of alternative text, you can just put the passage name in square brackets alone! So this in the editor:
[[Visible text|Passage name]]
[[Visible text->Passage name]]
[[Passage name]]
Will look like this in the story:
Visible text
Visible text
Passage name
And all of them will lead to the passage labeled “Passage name.” You don’t even need to create the passage- when Twine sees that you’ve linked to a passage that doesn’t exist, it’ll add that passage for you.
That’s all you need to know! Technically, all you need to do to make a Twine story is add those fancy links between passages. If you add your awesome writing skills, that story will be super cool!
...but you want to do some fancy shit, right? Well let me introduce you to the next step up in complexity,
Variables!
“Variable” is a fun, code-y way to say “a bit of information that can change.” You could say they... vary.
Variables are useful for keeping track of information. If the player chooses to be blonde instead of a redhead, you might want to bring that up again- but you probably don’t want to write an entirely separate story based on that choice, right? So instead you save that information as a variable.
In Twine, variables are written as words with a $ in front of them. So my hair colour variable might be “$hairColour.” If you just write the variable out without any code, Twine will print the information you put into the variable. So if $hairColour is set to “blonde,” this...
She had $hairColour hair.
Will become...
She had blonde hair.
The value in a variable can be a boolean (ie. true or false), a number, or a string (like “blonde” or “any other string of characters”). They can also be fancy stuff like arrays, but we won’t be touching on that.
You can use variables to keep track of a lot of things! For instance...
How much money the player has
Whether a player has a key
What the player’s name is
I keep mentioning the value of a variable or “setting” it, but how do you do that? Well, one way is to add it to a link. If you want a link to set hair colour to blonde, for instance, you could write [[Blonde|Next passage][$hairColour to “blonde”]]. Clicking on that link would forward the player to “Next passage” and set the value of $hairColour to “blonde.”
There is a better way of doing it, however, but we’ll need to talk about...
Macros!
A macro is a snippet of code that runs when you put a special code word inside these <<spiky boys>>. You can write your own macros with JavaScript if you’re smart, find them on the internet if you’re even more smart, or just use the ones that come built in with Sugarcube.
The ones we’ll be talking about, and the ones that are the most important for most Twine games, are <<set>>, <<if>>, and <<link>>.
<<set>>
The <<set>> macro allows you to, you guessed it, assign a value to a variable. For instance, if you want to set $hairColour to blonde... well, that’s all you need to do! It’s just:
<<set $hairColour to “blonde”>>
It’s important to remember with the <<set>> macro that strings (collections of different characters) require quotation marks around them to show the code that it isn’t a number or a true/false value. If you put quotes around a number and try to do math with that variable, you’ll get a big ol’ error message.
If you’re using numbers, you can also use JavaScript operators in place of “to.” Each one will perform a calculation on the variable if that variable is a number, and then replace the variable with the result. If you want to add $5 to the player’s $money, you could use this:
<<set $money += 5>>
The “+=“ will add the number on the right to the variable on the left. “-=“ will do the same for subtraction, “*=“ for multiplication, and “/=“ for division. Easy enough, just don’t forget the = sign after the usual symbol!
By default, the <<set>> macro will be executed as soon as the page it’s on loads. Sometimes that’s useful, but sometimes you would rather the player click a link that sets a variable- like if they choose a hair colour. You might also want the same link to set multiple variables, like subtracting money and giving them an item when they use a shop. How do we do that?
<<link>>
The <<link>> macro is also pretty simple. All it does is create a link, and when that link it pressed it executes whatever is inside of it. Here we’ll be using it with <<set>>, but you can use it with all kinds of different macros and even nest some of them to do really complicated stuff!
As an example, we want the player to click “buy key,” give the player the key, and subtract $5 from their money. Here’s how we do it:
<<link “Buy key”>>
<<set $key to true>>
<<set $money -= 5>>
<</link>>
The text the player will click is in quotation marks, and after all of the macros we need to execute we have to close off the code by adding <</link>>. Easy, right?
But other than printing them on the screen, what can you actually use those variables for? Well, for that we’ll be using...
<<if>>
The <<if>> macro is my favourite, hands down, because it’s an easy way of accomplishing hard stuff. Simply put, <<if>> will check if the thing you asked about is true, and if it is, it will do whatever you put inside of it.
Here’s a simple example:
<<if $key is true>>
[[Use the key|Progress]]
<</if>>
Whatever is inside the <<if>> macro will be executed if the “if” statement is true. In this case, the link “Use the key” will be printed on the screen only if the player has the key. This also applies to code- if you put a <<set>> macro inside, that macro would only set a variable if the player has the key.
Now here’s a more complicated example, to show everything the <<if>> macro is capable of. Here we also want to check if they’ve already opened the door, and display alternate text if they have no key and the door is locked.
<<if $key is true>>
[[Use the key|Progress]]
<<elseif $doorOpen is true>>
[[Walk through|Progress]]
<<else>>
You need to find a key.
<</if>>
I’ll break it down line by line to tell you what each thing does.
<<if $key is true>>
This line is the only necessary one- it checks whether $key has been set to true. You can check for any value that a variable can be, like a number, true/false, or a string. You can also check for other things with this macro- for instance, “isnot” will check that the variable isn’t equal to the value on the right. “gt” or “lt” will check if the variable is greater/lesser than the value on the right, and “gte” or “lte” will check if it is greater than or equal to the value.
<<elseif $doorOpen is true>>
This line allows us to check for something else within the same <<if>> macro. Once the game has checked the original <<if>> and found that it is false, it will move on to checking each <<elseif>> until it finds one that is true. You can have as many <<elseif>>s as you need, and they can check the same variable or different variables, but only the first true one will be executed! And, of course, you can’t use <<elseif>> on its own- it’s stuck to the <<if>> macro!
<<else>>
This line is the last resort- if the original <<if>> and any <<elseif>>s have all been false, the game will execute whatever is after <<else>>. Because of this, there can only be one <<else>> line within any <<if>> macro! If you don’t have an <<else>>, nothing at all will be executed, so whether you include one depends on the situation.
<</if>>
This closes off the <<if>> macro. Nothing special, but very important! Put it after the last piece of code or bit of text you want the macro to control.
Phew. That’s it! That’s all I wanted to show you!
Now, HOMEWORK!
Okay, not homework, just practice. Here are some things you can try building to practice all these tools and get comfortable with how they work!
A store system with different items for different amounts of money
A character creation screen, followed by a description of your character (with variables!)
A puzzle that requires you to choose the right answer to proceed
If you have any trouble, need to ask any questions, or if something in this tutorial wasn’t clear to you, please let me know- you can DM me or send me an ask anytime and I’m happy to answer any Twine questions you have. I hope this was of use to you, and have fun making games <3
#told you i was making a tutorial!#not crosshollow#tutorial#game dev#twine game#twine#interactive fiction#gamedev
2K notes
·
View notes
Text
Destruction
Wassup ya’ll? Time for day 17 (i think)
Today I present some platonic Wild and Time fluff
Let’s get into it.
Also some things might be in brackets or asterisks and that’s because I forgot to italicise or bold them
-----------------------------------
Time and Wild had recently been separated from the rest of the group.
They were currently in Wild’s Hyrule.
“What do we do?” Time asked. Wild shrugged. “This is a moment I regret giving my slate to Four.” He had indeed given his slate to the hero of four. Sure, it mightn’t’ve been the best idea but, hey?
The kid was interested.
“Haven’t you explored this place?” Wild gestured his arms around. “We’re literally in the Hebra Mountains, Gerudo Highlands, Mount Hylia, Mount Lanayru, Mount Granajh, or atop the Duelling Peaks - given that one’s unlikely - but that’s still like six places, Time!”
“Jeez there’s a lot of snow in your Hyrule.” “I know. It sucks. But all we can do is head in a direction and hope we don’t run into trouble.” Wild said. “Trouble?” Time asked with a small smirk. “Look, if we do encounter trouble, just say back. I don’t want you to get hurt. Without you I’m sure Twilight would be driven to madness.” WIld laughed as he spoke.
“Alright fine. But which way should we go?” Wild looked around at an attempt to answer Time’s question. “How about that way?” Wild pointed north and Time shrugged. “Sure.”
Given, travelling north from any of those places was a bad idea but that’s just Wild’s middle name.
“Boko camp ahead.” Wild said, pulling out a royal broadsword and his Hylian shield.
“That sword looks like it’s about to break.” Wild shrugged at Time’s words. “They have more.” He said before dashing into the camp.
He moved quickly, switching from sword to bow and back again in split-second timeframes.
It was impressive.
“Alright, they’re gone!” Wild called from the top layer. Time walked up, passing gemstones, monster remains, rupees, and weapons. He left them all as he walked. Wild killed them, he can have the stuff.
“Wanna burn it?” Wild asked, looking at a campfire.
Time smiled.
“Don’t tell the boys about this but…”
Time pulled out his own boy and equipped fire arrows.
Wild gasped mockingly.
“Wow. You can have fun.” He said with a laugh.
The two boys ran around like maniacs, burning every part of the camp they could reach.
Which was the whole thing.
After watching it burn to the floor, the pair started laughing, clutching onto each other for support.
“Oh my goddesses. You nearly died!” Wild laughed. “So did you!” Time said as the pair looked at the remainder of the fire.
“Should we keep walking?” “Sure.”
The pair walked.
And walked.
An walked.
“Okay, we have to be in hebra.” Wild sighed. “Haven’t we passed that mountain already?” Time asked. “I don’t know, let’s head east.”
Mind you, at this point the boys had climbed up mountains too.
They were tired.
As they kept walking, they found ruins of some sort.
Yeah, they burnt those down too.
Same with all the camps they passed.
“What are those?” Time asked, pointing down the mountain. Wild looked to where he was pointing.
Three lynels.
“Fucking perfect.” Wild sighed.
Given, maybe only one would go after them but still…
It was annoying.
“Those are something we should avoid, if we go that way,” Wild pointed south east.
“What about the boys?”
Wild did a double take on the lynels.
Just as Time said…
The other seven were against one.
“They’re gonna die. Let’s go.” Wild handed Time the spare paraglider he had and they glided down.
“Stay back!” Wild yelled out to everyone. They immediately backed up as he landed on the Lynels back.
He switched to a savage lynel crusher and hit the lynel as many times as he could before flipping off of it, shooting the back of it’s head with three shock arrows at a time using a savage lynel bow.
This continued until the lynel died.
Wild picked up the remains, even taking the chance to wave the guts in Twilight’s face.
Time looked at Wild and they smirked at each other before pulling out bows.
“You guys should run.” Time said, pulling out fire arrows. The group started to walk away and the pair ran in the direction the other two lynels were.
With loud laughter, they shot arrow after arrow until the lynels were surrounded with flames.
Wild immediately summoned his horse and master-cycle zero. He got on the latter as Time mounted the horse.
They rode quickly to the other seven boys and pulled two each onto their transportation.
Hyrule, Wind, and Four were on Epona, Wild and Twilight were on the master-cycle zero, Time, Legend, and Sky were on Wild’s horse, and Warriors…
Well Twilight shot the claw-shot at him and he’s currently shield surfing behind everyone.
“Aye! Aye! Twi you better pull me closer or I swear to Hylia!” “Huh? What was that? I can’t hear- oh shit!” Twilight saw the two lynels charging at them and immediately drew Warriors in closer.
“Take the wheel.” Wild said. Twilight grabbed the handle bars, pulling Warriors onto the bike. It was lucky he knew how to drive the damned thing. Wild jumped off and paraglided to the lynels, shooting arrows at both of them.
He went through the bow and pulled out another of the same type.
After dropping down to the floor, he pulled out a new weapon, having broken the crusher: specifically a royal guard’s claymore.
After 14 hits, Wild threw it at one of the Lynels and pulled out the fierce deity sword, quickly pulling out his slate to change into the clothes to match.
“Come at me pussy!” He yelled. He was running ahead of the lynels at an attempt to keep up with everyone.
Wild eventually got rid of both lynels, using three Urbosa’s furies in the process. He then used a Revali’s gale to catch up with everyone.
“This was a great idea!” He yelled as he flew over Time.
Good thing the old man hadn’t seen the fierce deity clothes.
But… Wild was dressed as dark link for night-time speed up.
“Goddess dammit, Hy! Watch where you’re aiming that thing!” Wild yelled as a bomb arrow flew past his ear.
“Not my fault you look like dark link! Fuck sake Wild you’re giving Time flashbacks!” Wild looked down to see Hyrule was right. Not just Time but Warriors and a few others looked like they just saw a demon.
Four was a different story for obvious reasons. He looked like he just saw a god.
“Stable!” Wind yelled, veering Epona out of the way - much to Twilight’s approval.
The same couldn’t be said for Wild’s horse or the master cycle zero.
They both crashed head on as Wild burst out laughing. “Jeez Time, we weren’t meant to break the stable too!” He yelled with a laugh.
Safe to say, everybody found out the old man had a rather destructive side.
Wild also had to hand over wood and rupees to repair the damage.
Twilight still doesn’t understand how the boy had left over stuff.
END
---------------------------------------
I hope you guys liked this lol.
The og plan was for Time and Wild to accidentally burn down the bridges to rito village but eh.
LEAVE REQUESTS BELOW!
REQUESTS MUST INCLUDE:
PAIRING
TYPE/GENRE/CATEGORY (fluff, angst, etc)
PLATONIC OR NOT
I WILL WRITE ONLY ABOUT THE LINKS (including the ravio, shadow, the zeldas, and requested characters. Will not write about whole other fandoms though)
I CAN DO READER INSERTS IF REQUESTED (no oc’s tho)
CAN DO AN AU IF REQUESTED
#linked universe#wild linked universe#time linked universe#twilight linked universe#warriors linked universe#legend linked universe#wind linked universe#four linked universe#hyrule linked universe#sky linked universe
17 notes
·
View notes
Text
Corvo’s Writober 2019 - Day 5 & 6
This is PART of a bigger thing I wrote, after what happened in yesterday’s D&D session. And I kind of wished that I always wrote everything so I could have the entire story of my character’s misadventures.
The original version of this is around 1577 words long, but since it’s more a novel-ized(?) version of what happened in a tabletop roleplaying game, I didn’t want to translate and share everything. I don’t know why, but I feel that this is a little bit personal in some ways. And also I didn’t want to spend hours on the ita-eng translation.
Since I still wanted to share something instead of jumping directly to Day 7, I decided to share only the pieces with the prompts in them and put some filler brackets for the left out parts.
The prompts I used are:
Day 5 - “I might just kiss you” from Fictober 19 prompt list by @fictober-event
Day 5 - Afterlife & Day 6 - Scorched from Writetober 2019 prompt list by @virtu-s and @elventhief
Day 6 - “I can’t decide if this is the best, or the worst way to die” from October 2019 prompt list by @downwithwritersblock
___
Title: Love is a burning thing
The enormous Troll shouted in anger and fury when that flaming spell exploded in a big flame. Two guards collapsed lifeless on the floor, burnt from the magic fire that hit also the Paladin that wasn’t able to dodge it completely, but the giant Troll was still standing and even more furious. He turned around to look at who attacked him and with a growl moved in huge strides in the big kitchen to reach the violet Tiefling, golden eyes full of pure rage and despair, that was near the door that took to the fields behind the great mansion. He roared ferally and again struck his four muscular arms trying to hit the wizard, trying maybe to grab him and rip his head off like the creature already did on the other Tiefling that decided to defend the Paladin instead of continuing to be on his side. Two hits failed, but the wizard wasn’t enough agile – or maybe not enough clear-headed – to avoid the other two hits that took his breath away and made every fibre of his body scream in pain. He staggered back few steps, trying to recover from the attacks, left index finger pointed towards the Troll that for some moments found himself wrapped in black hellish flames that burned him further and making him exhale a pained growl. “I can’t decide if this is the best, or the worst way to die” was what crossed over the mind of the Tiefling Wizard. “Burned… scorched by one of my spells”. He had only a few instants to decide how to act.
“Lhuis, it’s been a lot since last time I talked to another Tiefling” said the wizard “We know each other such a brief time, but I have to admit that I like being with you.” the tail with the double-arrow looking tip moved and wrapped itself around the right leg of the Wizard, in a common instinctive movement that for Tieflings means embarrassment or nervousness. Nervous, the one that never shied away from flirting (or, at least, trying to flirt) openly with anyone he liked. “You know… finally finding someone that gets me, that likes me the way I am. And then… I have to confess to you that I like you. A lot.” violet lips, like his complexion, parted in a smile that let show a little part of his white pointy teeth that – with the horns and tails – gave him an even more devilish look. The other Tiefling, with unusual light skin, in the meanwhile took off the half mask that he used to cover the remainings of his horns, chopped off with his tail in the past by some intolerant humans that felt extreme hate towards what they saw as half-demons. He turned towards the wizard and moved few steps to stand very close to him “Kylech, I… I might just kiss you, you know?” asked, with a sweet smile on his face. Kylech reduced more the tiny gap between them, softly taking the other’s face between his hands “And so, kiss me” murmured on his lips, taking then the first step kissing him lightly.
[Here there was another big piece of flashback about Lhuis and Kylech and about the series of unfortunate events that lead to the current situation, and Kylech's realization that Lhuis is what he searched and needed after all his travellings.]
The golden eyes of the desperate wizard were fixed in the direction of the furious Troll with the maw still stained with his lover’s blood. Only a few instants before the Troll recovered from the pain caused by the hellish flames that hit him, few moments to decide. Risking to be mauled by the enraged being, or using his strongest spell even if that the too close range would mean risking being struck by it as well?
“Lhuis, I’ll join you in the Afterlife!” shouted the Tiefling, before striking against the Troll in front of him that fireball that at the impact exploded, flaring up and burning everything that was in its proximity.

Italian under the cut!
Questo è PARTE di una cosa più grande che ho scritto, dopo quello che è successo nella sessione di ieri di D&D. E tipo mi sarebbe piaciuto aver sempre scritto tutto, così da avere l’intera storia delle disavventure del mio personaggio.
La versione originale di questo è attorno alle 1577 parole, ma dato che è una versione romanzata(?) di quello che è successo in un gioco di ruolo cartaceo, non ho voluto tradurre e condividere tutto. Non so perché, ma mi sembra che sia anche un qualcosa di un po’ personale in qualche modo. E inoltre non avevo voglia di trascorrere ore nella traduzione ita-eng.
Siccome volevo condividere comunque qualcosa invece di saltare direttamente al Day 7, ho deciso di condividere solo le parti dove ci sono gli spunti e aggiungere delle parentesi riempitive per le parti tralasciate.
Gli spunti usati sono:
Day 5 - “I might just kiss you” from Fictober 19 prompt list by @fictober-event
Day 5 - Afterlife & Day 6 - Scorched from Writetober 2019 prompt list by @virtu-s and @elventhief
Day 6 - “I can’t decide if this is the best, or the worst way to die” from October 2019 prompt list by @downwithwritersblock
___
Titolo: Love is a burning thing / L’amore è una cosa che brucia
Il gigantesco Troll urlò di rabbia e ira quando quella magia infuocata esplose in una enorme fiammata. Due guardie stramazzarono a terra esanimi, bruciate dal fuoco magico che colpì anche il Paladino che non fece in tempo a scansarsi del tutto, ma il gigantesco troll era ancora in piedi e ancora più furente. Si voltò ad adocchiare chi lo aveva attaccato e con un ringhio avanzò a grandi falcate nell’ampia cucina per raggiungere il Tiefling viola, occhi dorati pieni di pura rabbia e disperazione, che si trovava in piedi nei pressi della porta che dava verso i terreni sul retro della grande magione. Ruggì bestialmente ancora una volta e fece saettare le sue quattro muscolose braccia per cercare di colpire il mago, cercare anche di afferrarlo e staccargli la testa con un morso come aveva fatto con l’altro Tiefling che aveva deciso di difendere il Paladino anziché stare dalla sua parte. Due colpi andarono a vuoto, ma il mago non era abbastanza agile – o forse non abbastanza lucido – per poter schivare gli altri due colpi che gli mozzarono il fiato e urlare di dolore ogni fibra del suo corpo. Indietreggiò di un passo, barcollando e cercando di riprendersi dai colpi, dito indice mancino che si puntò in direzione del Troll che per qualche momento si ritrovò avvolto da nere fiamme infernali che lo bruciarono ulteriormente facendolo ringhiare ancora di dolore. “Non so decidere se questo sia il migliore o il peggior modo di morire” fu quello che passò nella mente del Mago Tiefling “Ustionato...arso da un mio stesso incantesimo”. Aveva solo qualche istante per poter decidere come agire.
“Lhuis, era da parecchio tempo che non parlavo con un altro Tiefling” disse il mago “Ci conosciamo da così poco, ma devo ammettere che sto bene con te.” la coda terminante in una doppia freccia si avvolse attorno alla gamba destra del mago, in un classico istintivo movimento che nei Tiefling indica imbarazzo o nervosismo. Imbarazzato, lui che non si era mai fatto problemi a flirtare (o, almeno, tentare di flirtare) apertamente con chiunque gli piacesse. “Sai… finalmente qualcuno che mi riesce a capire, che mi apprezza per come sono. E poi...devo confessarti che mi piaci. Molto.” labbra viola come il resto della sua carnagione che si stirarono in un sorriso che lasciò intravedere la candida dentatura appuntita che – assieme a corna e coda – gli davano un’aria ancora più diabolica. L’altro Tiefling, dalla carnagione insolitamente chiara, aveva intanto posato la mezza maschera che utilizzava per nascondere quel che rimaneva delle sue corna, mozzate assieme alla sua coda molto tempo prima da umani intolleranti che provavano un odio estremo verso quelli che vedevano come mezzi demoni. Si voltò nuovamente verso il mago e mosse qualche passo fino a fermarsi vicinissimo a lui “Kylech, io… potrei baciarti, lo sai?” domandò, con un dolce sorriso sul viso. Kylech ridusse ulteriormente quella minima distanza che li separava, prendendo delicatamente il viso altrui tra le proprie mani “E allora baciami” gli sussurrò a fior di labbra, prendendo poi l’iniziativa scoccandogli un primo leggero bacio.
[Qui c’era un grande spezzone di flashback riguardo Lhuis e Kylech e sulla serie di sfortunati eventi che hanno portato alla situazione attuale, così come la realizzazione di Kylech del fatto che Lhuis è tutto quello che aveva cercato e voluto dopo tutti i suoi viaggi.]
Gli occhi dorati del disperato mago erano fissi in direzione del rabbioso Troll dalle fauci sporche del sangue del suo amato. Rimanevano pochi istanti prima che l’essere si riprendesse dal dolore causato dalle fiamme infernali con cui era stato colpito, pochi istanti in cui decidere. Rischiare di essere dilaniato a propria volta dalla creatura furente, oppure usare il proprio incantesimo più forte nonostante la distanza ravvicinata e rischiare di venirne investito a propria volta?
“Lhuis, ti raggiungo nell’Aldilà!” esclamò il Tiefling, prima di scagliare contro il Troll di fronte a lui quella palla di fuoco che all’impatto esplose divampando e investendo tutto quello che si ritrovava nelle sue vicinanze.
#mgcorvo-author#mgcorvo-author original writing#mgcorvo-author writing#corvo writes content#mgcorvo-author excerpt#writober 2019#fictober19#dnd
2 notes
·
View notes
Text
monday night raw fantasy booking
raw 16/7/2018
opening segment roman reigns comes out conceeds that he lost fair and square, but then goes on a shoot style rant about how it was a worthless fight and that he's had enough of brock lesnar and most importantly the man who let this happen and who "ruined my career by forcing me into this awful character" vince k mcmahon where roman drops the mic and storms to the back, announcers acting confused and a brief bit of silence to convince the crowd that it was a shoot and nothing was planned for right now
next segment the b team come out to celebrate theyre win but are interupted by the deleaters of worlds, matt and bray cut a promo on some inane shit and use reincarnation symbology a lot and mentioning a war coming and they need soldiers and the soldiers need to be ready, they come down to the ring wanting theyre rematch but spend that rematch destroying the b team, leaving the b team passed out in the ring
kurt angel comes out following up on his promise that if brock wouldnt show and wouldnt make a deal for where he'll put his title on the line that he would strip brock of the title, and because brock refuses to relinquish the title then were gonna get a brand new title and to crown its champion with 16 superstars and each will come out and draw a number to see who theyll face
16 names come on the titantron
baron corbin, bobby roode, bobby lashley, finn balor, braun strowman, roman reigns, dean ambrose, seth rollins, chad gable, jason jordan, drew macintyre, elias, kevin owens, mojo rawley, jinder mahal
all but reigns come out and draw their number
bracket A 1: ambrose vs elias, 2: rollins vs rawley, 3: gable vs corbin , 4: jordan vs mahal
bracket B 1: lashley vs cena, 2: balor vs owens, 3: macintyre vs roode, 4: strowman vs ???
kurt angel gets a message over the intercom that reigns is breaking into the production room and the titan cuts to a live camera following a pissed off reigns kicking down a door flattening people left and right before getting to vince, clocking him with the most realistic punch he can before spitting on him and then triple h and various seccurity staff pull them apart and escort reigns out the building
reigns has been fired starting immediately, the screen cuts to kurt backstage immediately trying to figure out who to have as a final member to face strowman, he gets a call from ec3 saying hes on his way in his private jet, but theres no time he calls for the next match to get started
bayley and banks are outta therapy and now best of friends and theyre up against sarah logan and liv morgan, they have a 10 minute match with liv and logan double teaming sasha, bayley comes into make the save with a kendo stick left over from extreme rules but instead of going for liv and logan she wails on sasha, taking out years of frustration and leaving a broken sasha in the ring
cut back to kurt looking at the large bill for the friends therapy saying what a waste, saying so much has gone wrong and that he cant find anyone to enter the new title tournament because strowman is in the last spot, he gets a nock on his door, opens it with neville offering to be the 16th man
first match of the tournament starts, its gable vs corbin, they have a 17 minute match with gable going insane with suplexes at the end
tag team match between the authors of pain and the ascension, authors of pain win in 4 minutes being beat by the super colldier victor getting powerbombed on top of konner and pinned like that, they lie in the ring and tyler breeze comes out to console them, cutting a promo on how hes gonna get the ascension back into fighting shape and he has the perfect idea
go backstage to balor watchin a kevin owens match from nxt, hes approached by the good brothers saying want to have finns back hes hesitant and the camera cuts away before he can answer
final match of the night is neville vs strowman and they put on a 30 + minute match where neville tries his hardest to dodge everything and gradually wear down the left leg of braun strowman eventually getting him down long enough to land the red arrow, trying to pin but strowman kicks out throwing neville into the air where he lands and climbs the ropes for a second red arrow but even that isnt enough to put strowman down, he ralleys and defeats neville
explanations reigns being fired is part of a very long term plan to get reigns over with a fresh character, someone who isnt roman, bayley going heel is becuase banks makes to much money as a face for it to be feasible and bayley needs something to make her more legitamate, something to make her credible and intimidating
4 notes
·
View notes
Text
Part 8: Reunion
In this chapter, we explore a watery cave and also meet up with someone from Tensho’s past...
If you don’t know what this is about, please refer to this previous post.
[Any new comments by me will be designated by brackets.]
Alright, we were stuck in a really long cutscene last time, so I'm continuing on from there. After the whole bit with Hiko in the Houshindai, you're instantly whisked away to Mount Kongrong 2, where Tensho, Youzen, and Taiitsu basically just have one big discussion about something. [I unfortunately have no idea what they’re talking about here.]

Nentou’s name comes up during the conversation, though. (The real on this time--not Soushou.)

Then Taiitsu goes on to explain some more things (which I still don’t understand).
Youzen then leaves your party, and Taiitsu hands you this:

I am assuming he made it from the meteorite you found earlier in the game.
Here’s the explanation screen for this thing, if anyone is interested:


Once the whole convo is done, you'll find yourself on the first floor of Kongrong. You should probably rest up in your room before heading out. Also, you should really save the game if you haven’t yet.
Upon trying to exit Kongrong, you’ll see Raishinshi blocking the exit again.
There's a lengthy convo here, and then you're given two choices.

I don't really know if the choices here will affect anything plot-wise, but I know for sure that the first choice will make you lose an important item (I think it's the thing that you got from winning against Raishinshi earlier), and the second choice will let you keep it. Either way, he'll move out of the way and you'll be able to pass.
I choose to hold onto the item.

Oh hey... TWO new spots on the map! (One is located next to Mount Kongrong, and the second location is another cave thing.)
You can really go to either place first, but I'm choosing to go to the cave, because that's a pretty easy (and short) dungeon. Plus, I know what happens at the end of it...

[The cave entrance.]

Yeah... These are panels that, when stepped on, will force you to move in that direction until you get deposited on a space that doesn’t have an arrow. It's not as bad as it sounds, trust me.
When you first walk in the door, just step on the arrow straight ahead of you. You'll be sent to the far end of the room. Don't worry, though; just take the arrow (going down) below that, and continue taking arrows until you reach this place:

Don't bother thinking too much about which arrow you need to take, because you'll eventually get to your destination anyway by just continuing to take the next set of arrows after you get dropped off somewhere. And feel free to take any of the treasure along the way, though there are a few that you can't reach yet. (You'll need the help of a certain character to get those.)
There are monster encounters here, but they're all really easy, especially since you had to fight these same monsters in the last dungeon. Anyway, once you get to the stairs shown above, go down and you'll find yourself in another room full of arrows.

Take this set of arrows (the one Tensho is standing next to).

Then take this set. (Once again, the ones Tensho is standing next to.)

If you do it right, you'll be deposited right in front of the next flight of stairs. Nice!
SAVE HERE. And heal. But don't bother healing Nataku because, uh... well. You’ll see.
Take the stairs down and walk upwards. You'll see this scene:

Ou Kijin!

And Ko Kibi! And...

...DAKKI?! WHAT?! I thought you joined with the earth years ago!
After a short convo, Dakki and Kibi leave, leaving Kijin to deal with you and Nataku herself.
Didn't Nataku single handedly defeat her though in their last battle though--


Well CRAP!
Tensho gets mad that Kijin put Nataku out of comission, so he tries to fight her with little success... It's because that darned Hagoromo (the scarf thing) Kijin has is reflecting all the attacks!

Just as all hope seems lost, someone else appears from the shadows...

.....
.....
.....................

Hey, it’s Tenka!

Kijin tries to pull the same attack that injured Nataku, but Tenka counters and attacks with the flame paopeis, Karyuuhou; burning up her Hagoromo for good! Now her protective barrier is gone, and we can finally fight her on even ground.

[This scene really warms my heart. Apparently Tensho’s saying “big brother!” here.]

Okay, now to actually fight her for real this time. (All the stuff that happened before was just a cutscene.)
And since Tensho is fighting with his brother, you get a new team attack!

(The animation was too fast for me to screencap, though...)
Alright, Kijin is probably the first "hard" boss you'll encounter. But at this point, you'll still probably just be using standard attacks with Tensho. If you're at a high enough level, you'll get a super attack (it will be listed as Tensho's fifth move), but it costs a heck of a ton of EP (20 EP!). It makes rocks appear out of the ground to hit the enemy.
Tenka has... pretty much all attacks and no supporting moves at this point. You can really choose any attack you want, though its probably best just to stick with his standard and low EP attacks for this fight.
(I'll detail all his attacks fully after the boss fight...)
Kijin is only really "hard" because she tends to abuse her super attack (the one where a cg image is shown). It does a decent amount of damage and hits all characters in your party. However, if you keep an eye on your HP and heal when necessary, then this fight should still be reasonably easy.


After reducing her HP to zero, she promptly turns back into her true form: a stone lute. To be honest, I don't really feel any pity for her after what she did to Nataku.
Unfortunately, before you can smash the lute for good, Kibi appears and whisks it away...
Ah well... At least Tensho has his brother back! And Nataku's still alive!

...Well, barely alive. Tensho and Tenka quickly rush him back to Mount Kongrong 2, and Taiitsu is... less than pleased.
Taiitsu quickly goes to work on repairing Nataku.

After the cutscene, the only thing you can do is in your room in Mount Kongrong. After doing that, head back to Taiitsu's room and you'll find out that Taiitsu will have finished reparing Nataku. Unfortunately, Nataku won't be conscious for a while... Which means he won't be fighting alongside you for a while. Not to worry, though--He'll make his return soon enough.
The only thing you can do now is to press forward. And, since you now have an extra space in your party, you can take along another character!
At this point, you can either take along Igo (first floor, far left room), or Raishinshi (top of M. Kongrong).


To get either of them, just choose the second option when given the chance. (You'll have to do this twice on Igo, though; because he needs convincing.)
(Hint/tip: Remember, if you want to switch out a character, you'll have to talk to Li Sei, who can be found eternally standing on top of Mount Kongrong. Some characters can't be dropped off, though; such as Tenka at this stage. He's needed for a plot point coming up.)
For this run-through of the game, I'm going to go with Raishinshi, because he has a wider range of attacks. (Igo’s meant to be more of a support character)
Anyway, Tenka's in-battle moves are:
1st move: A single sword slash 2nd move: A double sword slash 3rd move: He throws the Sanshintei at all enemies (the mini-light saber knives) 4th move: He throws the flame paopei, Karyuuhou 5th move: He powers himself up, I think. (His attack was increased after I used that move)
And I guess I'll just detail Rai's and Igo's moves too...
Raishinshi moves are:
1st move: A slashing attack, hits all enemies. 2nd move: Lightning strike, hits all enemies. 3rd move: Some kind of kick attack.

4th move: A supporting move that paralyzes the enemy. (Makes them lose a turn or more.) However, it also makes Raishinshi lose a turn.
Igo's moves are: 1st move: A strike attack 2nd move: A support attack that I think heals status ailments 3rd move: A paralyzing support move
Okay, that's all for today; so see you guys next time!
To be continued...
1 note
·
View note
Text
Shift Command For Mac Os

To use a keyboard shortcut, press and hold one or more modifier keys and then press the last key of the shortcut. For example, to use Command-C (copy), press and hold the Command key, then the C key, then release both keys. Mac menus and keyboards often use symbols for certain keys, including modifier keys:

On keyboards made for Windows PCs, use the Alt key instead of Option, and the Windows logo key instead of Command.
When you take a screenshot on your Mac – using the Shift-Command-3 shortcut to capture the whole screen, or Shift-Command-4 to capture a portion of it – the image files are saved straight to. Displays the Mac OS X Help Viewer: Command+Shift+A: Takes you to your Applications folder: Command+Shift+C: Takes you to the top-level Computer location: Command+Shift+G: Takes you to a folder that you specify: Command+Shift+H: Takes you to your Home folder: Command+Shift+I: Connects you to your iDisk: Command+Shift+Q: Logs you out: Command+Shift+N.

Some keys on some Apple keyboards have special symbols and functions, such as for display brightness , keyboard brightness , Mission Control, and more. If these functions aren't available on your keyboard, you might be able to reproduce some of them by creating your own keyboard shortcuts. To use these keys as F1, F2, F3, or other standard function keys, combine them with the Fn key.
Cut, copy, paste, and other common shortcuts
Command-X: Cut the selected item and copy it to the Clipboard.
Command-C: Copy the selected item to the Clipboard. This also works for files in the Finder.
Command-V: Paste the contents of the Clipboard into the current document or app. This also works for files in the Finder.
Command-Z: Undo the previous command. You can then press Shift-Command-Z to Redo, reversing the undo command. In some apps, you can undo and redo multiple commands.
Command-A: Select All items.
Command-F: Find items in a document or open a Find window.
Command-G: Find Again: Find the next occurrence of the item previously found. To find the previous occurrence, press Shift-Command-G.
Command-H: Hide the windows of the front app. To view the front app but hide all other apps, press Option-Command-H.
Command-M: Minimize the front window to the Dock. To minimize all windows of the front app, press Option-Command-M.
Command-O: Open the selected item, or open a dialog to select a file to open.
Command-P: Print the current document.
Command-S: Save the current document.
Command-T: Open a new tab.
Command-W: Close the front window. To close all windows of the app, press Option-Command-W.
Option-Command-Esc: Force quit an app.
Command–Space bar: Show or hide the Spotlight search field. To perform a Spotlight search from a Finder window, press Command–Option–Space bar. (If you use multiple input sources to type in different languages, these shortcuts change input sources instead of showing Spotlight. Learn how to change a conflicting keyboard shortcut.)
Control–Command–Space bar: Show the Character Viewer, from which you can choose emoji and other symbols.
Control-Command-F: Use the app in full screen, if supported by the app.
Space bar: Use Quick Look to preview the selected item.
Command-Tab: Switch to the next most recently used app among your open apps.
Shift-Command-5: In macOS Mojave or later, take a screenshot or make a screen recording. Or use Shift-Command-3 or Shift-Command-4 for screenshots. Learn more about screenshots.
Shift-Command-N: Create a new folder in the Finder.
Command-Comma (,): Open preferences for the front app.
Sleep, log out, and shut down shortcuts
You might need to press and hold some of these shortcuts for slightly longer than other shortcuts. This helps you to avoid using them unintentionally.
How to scan for mac address on network. Download a free network analyzer to monitor, analyze and troubleshoot your network. How does it work? Choose a subnet from the Local Subnet combo box and click the Start button or F5 to execute scan. Colasoft MAC Scanner will display scan results in the list, including IP address, MAC address, Host Name and Manufacture. It will group all IP.
Power button: Press to turn on your Mac or wake it from sleep. Press and hold for 1.5 seconds to put your Mac to sleep.* Continue holding to force your Mac to turn off.
Option–Command–Power button* or Option–Command–Media Eject : Put your Mac to sleep.
Control–Shift–Power button* or Control–Shift–Media Eject : Put your displays to sleep.
Control–Power button* or Control–Media Eject : Display a dialog asking whether you want to restart, sleep, or shut down.
Control–Command–Power button:* Force your Mac to restart, without prompting to save any open and unsaved documents.
Control–Command–Media Eject : Quit all apps, then restart your Mac. If any open documents have unsaved changes, you will be asked whether you want to save them.
Control–Option–Command–Power button* or Control–Option–Command–Media Eject : Quit all apps, then shut down your Mac. If any open documents have unsaved changes, you will be asked whether you want to save them.
Control-Command-Q: Immediately lock your screen.
Shift-Command-Q: Log out of your macOS user account. You will be asked to confirm. To log out immediately without confirming, press Option-Shift-Command-Q.
Download microsoft office for free full version mac. * Does not apply to the Touch ID sensor.

Finder and system shortcuts
Command-D: Duplicate the selected files.
Command-E: Eject the selected disk or volume.
Command-F: Start a Spotlight search in the Finder window.
Command-I: Show the Get Info window for a selected file.
Command-R: (1) When an alias is selected in the Finder: show the original file for the selected alias. (2) In some apps, such as Calendar or Safari, refresh or reload the page. (3) In Software Update preferences, check for software updates again.
Shift-Command-C: Open the Computer window.
Shift-Command-D: Open the desktop folder.
Shift-Command-F: Open the Recents window, showing all of the files you viewed or changed recently.
Shift-Command-G: Open a Go to Folder window.
Shift-Command-H: Open the Home folder of the current macOS user account.
Shift-Command-I: Open iCloud Drive.
Shift-Command-K: Open the Network window.
Option-Command-L: Open the Downloads folder.
Shift-Command-N: Create a new folder.
Shift-Command-O: Open the Documents folder.
Shift-Command-P: Show or hide the Preview pane in Finder windows.
Shift-Command-R: Open the AirDrop window.
Shift-Command-T: Show or hide the tab bar in Finder windows.
Control-Shift-Command-T: Add selected Finder item to the Dock (OS X Mavericks or later)
Shift-Command-U: Open the Utilities folder.
Option-Command-D: Show or hide the Dock.
Control-Command-T: Add the selected item to the sidebar (OS X Mavericks or later).
Option-Command-P: Hide or show the path bar in Finder windows.
Option-Command-S: Hide or show the Sidebar in Finder windows.
Command–Slash (/): Hide or show the status bar in Finder windows.
Command-J: Show View Options.
Command-K: Open the Connect to Server window.
Control-Command-A: Make an alias of the selected item.
Command-N: Open a new Finder window.
Option-Command-N: Create a new Smart Folder.
Command-T: Show or hide the tab bar when a single tab is open in the current Finder window.
Option-Command-T: Show or hide the toolbar when a single tab is open in the current Finder window.
Option-Command-V: Move the files in the Clipboard from their original location to the current location.
Command-Y: Use Quick Look to preview the selected files.
Option-Command-Y: View a Quick Look slideshow of the selected files.
Command-1: View the items in the Finder window as icons.
Command-2: View the items in a Finder window as a list.
Command-3: View the items in a Finder window in columns.
Command-4: View the items in a Finder window in a gallery.
Command–Left Bracket ([): Go to the previous folder.
Command–Right Bracket (]): Go to the next folder.
Command–Up Arrow: Open the folder that contains the current folder.
Command–Control–Up Arrow: Open the folder that contains the current folder in a new window.
Command–Down Arrow: Open the selected item.
Right Arrow: Open the selected folder. This works only when in list view.
Left Arrow: Close the selected folder. This works only when in list view.
Command-Delete: Move the selected item to the Trash.
Shift-Command-Delete: Empty the Trash.
Option-Shift-Command-Delete: Empty the Trash without confirmation dialog.
Command–Brightness Down: Turn video mirroring on or off when your Mac is connected to more than one display.
Option–Brightness Up: Open Displays preferences. This works with either Brightness key.
Control–Brightness Up or Control–Brightness Down: Change the brightness of your external display, if supported by your display.
Option–Shift–Brightness Up or Option–Shift–Brightness Down: Adjust the display brightness in smaller steps. Add the Control key to this shortcut to make the adjustment on your external display, if supported by your display.
Option–Mission Control: Open Mission Control preferences.
Command–Mission Control: Show the desktop.
Control–Down Arrow: Show all windows of the front app.
Option–Volume Up: Open Sound preferences. This works with any of the volume keys.
Option–Shift–Volume Up or Option–Shift–Volume Down: Adjust the sound volume in smaller steps.
Option–Keyboard Brightness Up: Open Keyboard preferences. This works with either Keyboard Brightness key.
Option–Shift–Keyboard Brightness Up or Option–Shift–Keyboard Brightness Down: Adjust the keyboard brightness in smaller steps.
Option key while double-clicking: Open the item in a separate window, then close the original window.
Command key while double-clicking: Open a folder in a separate tab or window.
Command key while dragging to another volume: Move the dragged item to the other volume, instead of copying it.
Option key while dragging: Copy the dragged item. The pointer changes while you drag the item.
Option-Command while dragging: Make an alias of the dragged item. The pointer changes while you drag the item.
Option-click a disclosure triangle: Open all folders within the selected folder. This works only when in list view.
Command-click a window title: See the folders that contain the current folder.
Learn how to use Command or Shift to select multiple items in the Finder.
Click the Go menu in the Finder menu bar to see shortcuts for opening many commonly used folders, such as Applications, Documents, Downloads, Utilities, and iCloud Drive.
Mac Os Command List

Document shortcuts
Mac Os Shell Commands
The behavior of these shortcuts may vary with the app you're using.
Command-B: Boldface the selected text, or turn boldfacing on or off.
Command-I: Italicize the selected text, or turn italics on or off.
Command-K: Add a web link.
Command-U: Underline the selected text, or turn underlining on or off.
Command-T: Show or hide the Fonts window.
Command-D: Select the Desktop folder from within an Open dialog or Save dialog.
Control-Command-D: Show or hide the definition of the selected word.
Shift-Command-Colon (:): Display the Spelling and Grammar window.
Command-Semicolon (;): Find misspelled words in the document.
Option-Delete: Delete the word to the left of the insertion point.
Control-H: Delete the character to the left of the insertion point. Or use Delete.
Control-D: Delete the character to the right of the insertion point. Or use Fn-Delete.
Fn-Delete: Forward delete on keyboards that don't have a Forward Delete key. Or use Control-D.
Control-K: Delete the text between the insertion point and the end of the line or paragraph.
Fn–Up Arrow: Page Up: Scroll up one page.
Fn–Down Arrow: Page Down: Scroll down one page.
Fn–Left Arrow: Home: Scroll to the beginning of a document.
Fn–Right Arrow: End: Scroll to the end of a document.
Command–Up Arrow: Move the insertion point to the beginning of the document.
Command–Down Arrow: Move the insertion point to the end of the document.
Command–Left Arrow: Move the insertion point to the beginning of the current line.
Command–Right Arrow: Move the insertion point to the end of the current line.
Option–Left Arrow: Move the insertion point to the beginning of the previous word.
Option–Right Arrow: Move the insertion point to the end of the next word.
Shift–Command–Up Arrow: Select the text between the insertion point and the beginning of the document.
Shift–Command–Down Arrow: Select the text between the insertion point and the end of the document.
Shift–Command–Left Arrow: Select the text between the insertion point and the beginning of the current line.
Shift–Command–Right Arrow: Select the text between the insertion point and the end of the current line.
Shift–Up Arrow: Extend text selection to the nearest character at the same horizontal location on the line above.
Shift–Down Arrow: Extend text selection to the nearest character at the same horizontal location on the line below.
Shift–Left Arrow: Extend text selection one character to the left.
Shift–Right Arrow: Extend text selection one character to the right.
Option–Shift–Up Arrow: Extend text selection to the beginning of the current paragraph, then to the beginning of the following paragraph if pressed again.
Option–Shift–Down Arrow: Extend text selection to the end of the current paragraph, then to the end of the following paragraph if pressed again.
Option–Shift–Left Arrow: Extend text selection to the beginning of the current word, then to the beginning of the following word if pressed again.
Option–Shift–Right Arrow: Extend text selection to the end of the current word, then to the end of the following word if pressed again.
Control-A: Move to the beginning of the line or paragraph.
Control-E: Move to the end of a line or paragraph.
Control-F: Move one character forward.
Control-B: Move one character backward.
Control-L: Center the cursor or selection in the visible area.
Control-P: Move up one line.
Control-N: Move down one line.
Control-O: Insert a new line after the insertion point.
Control-T: Swap the character behind the insertion point with the character in front of the insertion point.
Command–Left Curly Bracket ({): Left align.
Command–Right Curly Bracket (}): Right align.
Shift–Command–Vertical bar (|): Center align.
Option-Command-F: Go to the search field.
Option-Command-T: Show or hide a toolbar in the app.
Option-Command-C: Copy Style: Copy the formatting settings of the selected item to the Clipboard.
Option-Command-V: Paste Style: Apply the copied style to the selected item.
Option-Shift-Command-V: Paste and Match Style: Apply the style of the surrounding content to the item pasted within that content.
Option-Command-I: Show or hide the inspector window.
Shift-Command-P: Page setup: Display a window for selecting document settings.
Shift-Command-S: Display the Save As dialog, or duplicate the current document.
Shift–Command–Minus sign (-): Decrease the size of the selected item.
Shift–Command–Plus sign (+): Increase the size of the selected item. Command–Equal sign (=) performs the same function.
Shift–Command–Question mark (?): Open the Help menu.
Other shortcuts
Shift Command For Mac Os 10.13

Cached
For more shortcuts, check the shortcut abbreviations shown in the menus of your apps. Every app can have its own shortcuts, and shortcuts that work in one app might not work in another.
And the best program to create presentations that we can download to our Mac is definitely Microsoft PowerPoint, the classic tool included in the Microsoft Office suite. Powerpoint download for mac free. When it comes to presenting a project or idea, giving a conference or explaining any concept in public, it's always a good idea to reinforce your talk with supporting audiovisual material. PowerPoint for Mac: the best tool to create presentationsEver since it first appeared in the 80s', this program has evolved constantly, incorporating improvements to adapt it to the demands and technological possibilities of each moment.
Apple Music shortcuts: Choose Help > Keyboard shortcuts from the menu bar in the Music app.
Other shortcuts: Choose Apple menu > System Preferences, click Keyboard, then click Shortcuts.
Learn more
Create your own shortcuts and resolve conflicts between shortcuts
Change the behavior of the function keys or modifier keys
0 notes
Text
Commands For Mac Os


Safe mode: shift. Safe mode is a way of starting up your Mac that makes sure it performs certain. How many times did you have something running on your Mac and you wanted to make. An A-Z Index of the Apple macOS command line (macOS bash) afconvert Audio File Convert afinfo Audio File Info afplay Audio File Play airport Manage Apple AirPort alias Create an alias. alloc List used and free memory apropos Search the whatis database for strings asr Apple Software Restore atsutil Font registration system utility automator Run an Automator workflow awk Find and Replace text.
To use a keyboard shortcut, press and hold one or more modifier keys and then press the last key of the shortcut. For example, to use Command-C (copy), press and hold the Command key, then the C key, then release both keys. Mac menus and keyboards often use symbols for certain keys, including modifier keys:
On keyboards made for Windows PCs, use the Alt key instead of Option, and the Windows logo key instead of Command.
Some keys on some Apple keyboards have special symbols and functions, such as for display brightness , keyboard brightness , Mission Control, and more. If these functions aren't available on your keyboard, you might be able to reproduce some of them by creating your own keyboard shortcuts. To use these keys as F1, F2, F3, or other standard function keys, combine them with the Fn key.
Cut, copy, paste, and other common shortcuts
Command-X: Cut the selected item and copy it to the Clipboard.
Command-C: Copy the selected item to the Clipboard. This also works for files in the Finder.
Command-V: Paste the contents of the Clipboard into the current document or app. This also works for files in the Finder.
Command-Z: Undo the previous command. You can then press Shift-Command-Z to Redo, reversing the undo command. In some apps, you can undo and redo multiple commands.
Command-A: Select All items.
Command-F: Find items in a document or open a Find window.
Command-G: Find Again: Find the next occurrence of the item previously found. To find the previous occurrence, press Shift-Command-G.
Command-H: Hide the windows of the front app. To view the front app but hide all other apps, press Option-Command-H.
Command-M: Minimize the front window to the Dock. To minimize all windows of the front app, press Option-Command-M.
Command-O: Open the selected item, or open a dialog to select a file to open.
Command-P: Print the current document.
Command-S: Save the current document.
Command-T: Open a new tab.
Command-W: Close the front window. To close all windows of the app, press Option-Command-W.
Option-Command-Esc: Force quit an app.
Command–Space bar: Show or hide the Spotlight search field. To perform a Spotlight search from a Finder window, press Command–Option–Space bar. (If you use multiple input sources to type in different languages, these shortcuts change input sources instead of showing Spotlight. Learn how to change a conflicting keyboard shortcut.)
Control–Command–Space bar: Show the Character Viewer, from which you can choose emoji and other symbols.
Control-Command-F: Use the app in full screen, if supported by the app.
Space bar: Use Quick Look to preview the selected item.
Command-Tab: Switch to the next most recently used app among your open apps.
Shift-Command-5: In macOS Mojave or later, take a screenshot or make a screen recording. Or use Shift-Command-3 or Shift-Command-4 for screenshots. Learn more about screenshots.
Shift-Command-N: Create a new folder in the Finder.
Command-Comma (,): Open preferences for the front app.
Sleep, log out, and shut down shortcuts
You might need to press and hold some of these shortcuts for slightly longer than other shortcuts. This helps you to avoid using them unintentionally.
Key Commands For Mac Os

Power button: Press to turn on your Mac or wake it from sleep. Press and hold for 1.5 seconds to put your Mac to sleep.* Continue holding to force your Mac to turn off.
Option–Command–Power button* or Option–Command–Media Eject : Put your Mac to sleep.
Control–Shift–Power button* or Control–Shift–Media Eject : Put your displays to sleep.
Control–Power button* or Control–Media Eject : Display a dialog asking whether you want to restart, sleep, or shut down.
Control–Command–Power button:* Force your Mac to restart, without prompting to save any open and unsaved documents.
Control–Command–Media Eject : Quit all apps, then restart your Mac. If any open documents have unsaved changes, you will be asked whether you want to save them.
Control–Option–Command–Power button* or Control–Option–Command–Media Eject : Quit all apps, then shut down your Mac. If any open documents have unsaved changes, you will be asked whether you want to save them.
Control-Command-Q: Immediately lock your screen.
Shift-Command-Q: Log out of your macOS user account. You will be asked to confirm. To log out immediately without confirming, press Option-Shift-Command-Q.
* Does not apply to the Touch ID sensor.
Finder and system shortcuts
Command-D: Duplicate the selected files.
Command-E: Eject the selected disk or volume.
Command-F: Start a Spotlight search in the Finder window.
Command-I: Show the Get Info window for a selected file.
Command-R: (1) When an alias is selected in the Finder: show the original file for the selected alias. (2) In some apps, such as Calendar or Safari, refresh or reload the page. (3) In Software Update preferences, check for software updates again.
Shift-Command-C: Open the Computer window.
Shift-Command-D: Open the desktop folder.
Shift-Command-F: Open the Recents window, showing all of the files you viewed or changed recently.
Shift-Command-G: Open a Go to Folder window.
Shift-Command-H: Open the Home folder of the current macOS user account.
Shift-Command-I: Open iCloud Drive.
Shift-Command-K: Open the Network window.
Option-Command-L: Open the Downloads folder.
Shift-Command-N: Create a new folder.
Shift-Command-O: Open the Documents folder.
Shift-Command-P: Show or hide the Preview pane in Finder windows.
Shift-Command-R: Open the AirDrop window.
Shift-Command-T: Show or hide the tab bar in Finder windows.
Control-Shift-Command-T: Add selected Finder item to the Dock (OS X Mavericks or later)
Shift-Command-U: Open the Utilities folder.
Option-Command-D: Show or hide the Dock.
Control-Command-T: Add the selected item to the sidebar (OS X Mavericks or later).
Option-Command-P: Hide or show the path bar in Finder windows.
Option-Command-S: Hide or show the Sidebar in Finder windows.
Command–Slash (/): Hide or show the status bar in Finder windows.
Command-J: Show View Options.
Command-K: Open the Connect to Server window.
Control-Command-A: Make an alias of the selected item.
Command-N: Open a new Finder window.
Option-Command-N: Create a new Smart Folder.
Command-T: Show or hide the tab bar when a single tab is open in the current Finder window.
Option-Command-T: Show or hide the toolbar when a single tab is open in the current Finder window.
Option-Command-V: Move the files in the Clipboard from their original location to the current location.
Command-Y: Use Quick Look to preview the selected files.
Option-Command-Y: View a Quick Look slideshow of the selected files.
Command-1: View the items in the Finder window as icons.
Command-2: View the items in a Finder window as a list.
Command-3: View the items in a Finder window in columns.
Command-4: View the items in a Finder window in a gallery.
Command–Left Bracket ([): Go to the previous folder.
Command–Right Bracket (]): Go to the next folder.
Command–Up Arrow: Open the folder that contains the current folder.
Command–Control–Up Arrow: Open the folder that contains the current folder in a new window.
Command–Down Arrow: Open the selected item.
Right Arrow: Open the selected folder. This works only when in list view.
Left Arrow: Close the selected folder. This works only when in list view.
Command-Delete: Move the selected item to the Trash.
Shift-Command-Delete: Empty the Trash.
Option-Shift-Command-Delete: Empty the Trash without confirmation dialog.
Command–Brightness Down: Turn video mirroring on or off when your Mac is connected to more than one display.
Option–Brightness Up: Open Displays preferences. This works with either Brightness key.
Control–Brightness Up or Control–Brightness Down: Change the brightness of your external display, if supported by your display.
Option–Shift–Brightness Up or Option–Shift–Brightness Down: Adjust the display brightness in smaller steps. Add the Control key to this shortcut to make the adjustment on your external display, if supported by your display.
Option–Mission Control: Open Mission Control preferences.
Command–Mission Control: Show the desktop.
Control–Down Arrow: Show all windows of the front app.
Option–Volume Up: Open Sound preferences. This works with any of the volume keys.
Option–Shift–Volume Up or Option–Shift–Volume Down: Adjust the sound volume in smaller steps.
Option–Keyboard Brightness Up: Open Keyboard preferences. This works with either Keyboard Brightness key.
Option–Shift–Keyboard Brightness Up or Option–Shift–Keyboard Brightness Down: Adjust the keyboard brightness in smaller steps.
Option key while double-clicking: Open the item in a separate window, then close the original window.
Command key while double-clicking: Open a folder in a separate tab or window.
Command key while dragging to another volume: Move the dragged item to the other volume, instead of copying it.
Option key while dragging: Copy the dragged item. The pointer changes while you drag the item.
Option-Command while dragging: Make an alias of the dragged item. The pointer changes while you drag the item.
Option-click a disclosure triangle: Open all folders within the selected folder. This works only when in list view.
Command-click a window title: See the folders that contain the current folder.
Learn how to use Command or Shift to select multiple items in the Finder.
Click the Go menu in the Finder menu bar to see shortcuts for opening many commonly used folders, such as Applications, Documents, Downloads, Utilities, and iCloud Drive.

Document shortcuts
The behavior of these shortcuts may vary with the app you're using.
Command-B: Boldface the selected text, or turn boldfacing on or off.
Command-I: Italicize the selected text, or turn italics on or off.
Command-K: Add a web link.
Command-U: Underline the selected text, or turn underlining on or off.
Command-T: Show or hide the Fonts window.
Command-D: Select the Desktop folder from within an Open dialog or Save dialog.
Control-Command-D: Show or hide the definition of the selected word.
Shift-Command-Colon (:): Display the Spelling and Grammar window.
Command-Semicolon (;): Find misspelled words in the document.
Option-Delete: Delete the word to the left of the insertion point.
Control-H: Delete the character to the left of the insertion point. Or use Delete.
Control-D: Delete the character to the right of the insertion point. Or use Fn-Delete.
Fn-Delete: Forward delete on keyboards that don't have a Forward Delete key. Or use Control-D.
Control-K: Delete the text between the insertion point and the end of the line or paragraph.
Fn–Up Arrow: Page Up: Scroll up one page.
Fn–Down Arrow: Page Down: Scroll down one page.
Fn–Left Arrow: Home: Scroll to the beginning of a document.
Fn–Right Arrow: End: Scroll to the end of a document.
Command–Up Arrow: Move the insertion point to the beginning of the document.
Command–Down Arrow: Move the insertion point to the end of the document.
Command–Left Arrow: Move the insertion point to the beginning of the current line.
Command–Right Arrow: Move the insertion point to the end of the current line.
Option–Left Arrow: Move the insertion point to the beginning of the previous word.
Option–Right Arrow: Move the insertion point to the end of the next word.
Shift–Command–Up Arrow: Select the text between the insertion point and the beginning of the document.
Shift–Command–Down Arrow: Select the text between the insertion point and the end of the document.
Shift–Command–Left Arrow: Select the text between the insertion point and the beginning of the current line.
Shift–Command–Right Arrow: Select the text between the insertion point and the end of the current line.
Shift–Up Arrow: Extend text selection to the nearest character at the same horizontal location on the line above.
Shift–Down Arrow: Extend text selection to the nearest character at the same horizontal location on the line below.
Shift–Left Arrow: Extend text selection one character to the left.
Shift–Right Arrow: Extend text selection one character to the right.
Option–Shift–Up Arrow: Extend text selection to the beginning of the current paragraph, then to the beginning of the following paragraph if pressed again.
Option–Shift–Down Arrow: Extend text selection to the end of the current paragraph, then to the end of the following paragraph if pressed again.
Option–Shift–Left Arrow: Extend text selection to the beginning of the current word, then to the beginning of the following word if pressed again.
Option–Shift–Right Arrow: Extend text selection to the end of the current word, then to the end of the following word if pressed again.
Control-A: Move to the beginning of the line or paragraph.
Control-E: Move to the end of a line or paragraph.
Control-F: Move one character forward.
Control-B: Move one character backward.
Control-L: Center the cursor or selection in the visible area.
Control-P: Move up one line.
Control-N: Move down one line.
Control-O: Insert a new line after the insertion point.
Control-T: Swap the character behind the insertion point with the character in front of the insertion point.
Command–Left Curly Bracket ({): Left align.
Command–Right Curly Bracket (}): Right align.
Shift–Command–Vertical bar (|): Center align.
Option-Command-F: Go to the search field.
Option-Command-T: Show or hide a toolbar in the app.
Option-Command-C: Copy Style: Copy the formatting settings of the selected item to the Clipboard.
Option-Command-V: Paste Style: Apply the copied style to the selected item.
Option-Shift-Command-V: Paste and Match Style: Apply the style of the surrounding content to the item pasted within that content.
Option-Command-I: Show or hide the inspector window.
Shift-Command-P: Page setup: Display a window for selecting document settings.
Shift-Command-S: Display the Save As dialog, or duplicate the current document.
Shift–Command–Minus sign (-): Decrease the size of the selected item.
Shift–Command–Plus sign (+): Increase the size of the selected item. Command–Equal sign (=) performs the same function.
Shift–Command–Question mark (?): Open the Help menu.
Other shortcuts
For more shortcuts, check the shortcut abbreviations shown in the menus of your apps. Every app can have its own shortcuts, and shortcuts that work in one app might not work in another.
Apple Music shortcuts: Choose Help > Keyboard shortcuts from the menu bar in the Music app.
Other shortcuts: Choose Apple menu > System Preferences, click Keyboard, then click Shortcuts.
Terminal Commands For Mac Os
Learn more
Commands For Mac Os
Create your own shortcuts and resolve conflicts between shortcuts
Change the behavior of the function keys or modifier keys
0 notes
Text
Shortcuts Excel For Mac

Excel Shortcuts For Macbook Pro
Keyboard Shortcuts For Excel Macros
Save As
To use a keyboard shortcut, press and hold one or more modifier keys and then press the last key of the shortcut. For example, to use Command-C (copy), press and hold the Command key, then the C key, then release both keys. Mac menus and keyboards often use symbols for certain keys, including modifier keys:
On keyboards made for Windows PCs, use the Alt key instead of Option, and the Windows logo key instead of Command.
This article describes the keyboard shortcuts, function keys, and some other common shortcut keys in Excel for Mac. Notes: The settings in some versions of the Mac operating system (OS) and some utility applications might conflict with keyboard shortcuts and function key operations in Office for Mac. Excel Shortcuts List for Mac and PC (Searchable) How to Use this Shortcut List: + Indicates to hold the previous key, while pressing the next key. The first type of keyboard shortcuts accesses the ribbon. You can try it by pressing the Alt-key. After pressing Alt key, letters will be shown on the ribbon.
Some keys on some Apple keyboards have special symbols and functions, such as for display brightness , keyboard brightness , Mission Control, and more. If these functions aren't available on your keyboard, you might be able to reproduce some of them by creating your own keyboard shortcuts. To use these keys as F1, F2, F3, or other standard function keys, combine them with the Fn key.
Cut, copy, paste, and other common shortcuts
Command-X: Cut the selected item and copy it to the Clipboard.
Command-C: Copy the selected item to the Clipboard. This also works for files in the Finder.
Command-V: Paste the contents of the Clipboard into the current document or app. This also works for files in the Finder.
Command-Z: Undo the previous command. You can then press Shift-Command-Z to Redo, reversing the undo command. In some apps, you can undo and redo multiple commands.
Command-A: Select All items.
Command-F: Find items in a document or open a Find window.
Command-G: Find Again: Find the next occurrence of the item previously found. To find the previous occurrence, press Shift-Command-G.
Command-H: Hide the windows of the front app. To view the front app but hide all other apps, press Option-Command-H.
Command-M: Minimize the front window to the Dock. To minimize all windows of the front app, press Option-Command-M.
Command-O: Open the selected item, or open a dialog to select a file to open.
Command-P: Print the current document.
Command-S: Save the current document.
Command-T: Open a new tab.
Command-W: Close the front window. To close all windows of the app, press Option-Command-W.
Option-Command-Esc: Force quit an app.
Command–Space bar: Show or hide the Spotlight search field. To perform a Spotlight search from a Finder window, press Command–Option–Space bar. (If you use multiple input sources to type in different languages, these shortcuts change input sources instead of showing Spotlight. Learn how to change a conflicting keyboard shortcut.)
Control–Command–Space bar: Show the Character Viewer, from which you can choose emoji and other symbols.
Control-Command-F: Use the app in full screen, if supported by the app.
Space bar: Use Quick Look to preview the selected item.
Command-Tab: Switch to the next most recently used app among your open apps.
Shift-Command-5: In macOS Mojave or later, take a screenshot or make a screen recording. Or use Shift-Command-3 or Shift-Command-4 for screenshots. Learn more about screenshots.
Shift-Command-N: Create a new folder in the Finder.
Command-Comma (,): Open preferences for the front app.
Sleep, log out, and shut down shortcuts
You might need to press and hold some of these shortcuts for slightly longer than other shortcuts. This helps you to avoid using them unintentionally.
Power button: Press to turn on your Mac or wake it from sleep. Press and hold for 1.5 seconds to put your Mac to sleep.* Continue holding to force your Mac to turn off.
Option–Command–Power button* or Option–Command–Media Eject : Put your Mac to sleep.
Control–Shift–Power button* or Control–Shift–Media Eject : Put your displays to sleep.
Control–Power button* or Control–Media Eject : Display a dialog asking whether you want to restart, sleep, or shut down.
Control–Command–Power button:* Force your Mac to restart, without prompting to save any open and unsaved documents.
Control–Command–Media Eject : Quit all apps, then restart your Mac. If any open documents have unsaved changes, you will be asked whether you want to save them.
Control–Option–Command–Power button* or Control–Option–Command–Media Eject : Quit all apps, then shut down your Mac. If any open documents have unsaved changes, you will be asked whether you want to save them.
Control-Command-Q: Immediately lock your screen.
Shift-Command-Q: Log out of your macOS user account. You will be asked to confirm. To log out immediately without confirming, press Option-Shift-Command-Q.
* Does not apply to the Touch ID sensor.

Finder and system shortcuts
Command-D: Duplicate the selected files.
Command-E: Eject the selected disk or volume.
Command-F: Start a Spotlight search in the Finder window.
Command-I: Show the Get Info window for a selected file.
Command-R: (1) When an alias is selected in the Finder: show the original file for the selected alias. (2) In some apps, such as Calendar or Safari, refresh or reload the page. (3) In Software Update preferences, check for software updates again.
Shift-Command-C: Open the Computer window.
Shift-Command-D: Open the desktop folder.
Shift-Command-F: Open the Recents window, showing all of the files you viewed or changed recently.
Shift-Command-G: Open a Go to Folder window.
Shift-Command-H: Open the Home folder of the current macOS user account.
Shift-Command-I: Open iCloud Drive.
Shift-Command-K: Open the Network window.
Option-Command-L: Open the Downloads folder.
Shift-Command-N: Create a new folder.
Shift-Command-O: Open the Documents folder.
Shift-Command-P: Show or hide the Preview pane in Finder windows.
Shift-Command-R: Open the AirDrop window.
Shift-Command-T: Show or hide the tab bar in Finder windows.
Control-Shift-Command-T: Add selected Finder item to the Dock (OS X Mavericks or later)
Shift-Command-U: Open the Utilities folder.
Option-Command-D: Show or hide the Dock.
Control-Command-T: Add the selected item to the sidebar (OS X Mavericks or later).
Option-Command-P: Hide or show the path bar in Finder windows.
Option-Command-S: Hide or show the Sidebar in Finder windows.
Command–Slash (/): Hide or show the status bar in Finder windows.
Command-J: Show View Options.
Command-K: Open the Connect to Server window.
Control-Command-A: Make an alias of the selected item.
Command-N: Open a new Finder window.
Option-Command-N: Create a new Smart Folder.
Command-T: Show or hide the tab bar when a single tab is open in the current Finder window.
Option-Command-T: Show or hide the toolbar when a single tab is open in the current Finder window.
Option-Command-V: Move the files in the Clipboard from their original location to the current location.
Command-Y: Use Quick Look to preview the selected files.
Option-Command-Y: View a Quick Look slideshow of the selected files.
Command-1: View the items in the Finder window as icons.
Command-2: View the items in a Finder window as a list.
Command-3: View the items in a Finder window in columns.
Command-4: View the items in a Finder window in a gallery.
Command–Left Bracket ([): Go to the previous folder.
Command–Right Bracket (]): Go to the next folder.
Command–Up Arrow: Open the folder that contains the current folder.
Command–Control–Up Arrow: Open the folder that contains the current folder in a new window.
Command–Down Arrow: Open the selected item.
Right Arrow: Open the selected folder. This works only when in list view.
Left Arrow: Close the selected folder. This works only when in list view.
Command-Delete: Move the selected item to the Trash.
Shift-Command-Delete: Empty the Trash.
Option-Shift-Command-Delete: Empty the Trash without confirmation dialog.
Command–Brightness Down: Turn video mirroring on or off when your Mac is connected to more than one display.
Option–Brightness Up: Open Displays preferences. This works with either Brightness key.
Control–Brightness Up or Control–Brightness Down: Change the brightness of your external display, if supported by your display.
Option–Shift–Brightness Up or Option–Shift–Brightness Down: Adjust the display brightness in smaller steps. Add the Control key to this shortcut to make the adjustment on your external display, if supported by your display.
Option–Mission Control: Open Mission Control preferences.
Command–Mission Control: Show the desktop.
Control–Down Arrow: Show all windows of the front app.
Option–Volume Up: Open Sound preferences. This works with any of the volume keys.
Option–Shift–Volume Up or Option–Shift–Volume Down: Adjust the sound volume in smaller steps.
Option–Keyboard Brightness Up: Open Keyboard preferences. This works with either Keyboard Brightness key.
Option–Shift–Keyboard Brightness Up or Option–Shift–Keyboard Brightness Down: Adjust the keyboard brightness in smaller steps.
Option key while double-clicking: Open the item in a separate window, then close the original window.
Command key while double-clicking: Open a folder in a separate tab or window.
Command key while dragging to another volume: Move the dragged item to the other volume, instead of copying it.
Option key while dragging: Copy the dragged item. The pointer changes while you drag the item.
Option-Command while dragging: Make an alias of the dragged item. The pointer changes while you drag the item.
Option-click a disclosure triangle: Open all folders within the selected folder. This works only when in list view.
Command-click a window title: See the folders that contain the current folder.
Learn how to use Command or Shift to select multiple items in the Finder.
Click the Go menu in the Finder menu bar to see shortcuts for opening many commonly used folders, such as Applications, Documents, Downloads, Utilities, and iCloud Drive.
Document shortcuts
The behavior of these shortcuts may vary with the app you're using.
Command-B: Boldface the selected text, or turn boldfacing on or off.
Command-I: Italicize the selected text, or turn italics on or off.
Command-K: Add a web link.
Command-U: Underline the selected text, or turn underlining on or off.
Command-T: Show or hide the Fonts window.
Command-D: Select the Desktop folder from within an Open dialog or Save dialog.
Control-Command-D: Show or hide the definition of the selected word.
Shift-Command-Colon (:): Display the Spelling and Grammar window.
Command-Semicolon (;): Find misspelled words in the document.
Option-Delete: Delete the word to the left of the insertion point.
Control-H: Delete the character to the left of the insertion point. Or use Delete.
Control-D: Delete the character to the right of the insertion point. Or use Fn-Delete.
Fn-Delete: Forward delete on keyboards that don't have a Forward Delete key. Or use Control-D.
Control-K: Delete the text between the insertion point and the end of the line or paragraph.
Fn–Up Arrow: Page Up: Scroll up one page.
Fn–Down Arrow: Page Down: Scroll down one page.
Fn–Left Arrow: Home: Scroll to the beginning of a document.
Fn–Right Arrow: End: Scroll to the end of a document.
Command–Up Arrow: Move the insertion point to the beginning of the document.
Command–Down Arrow: Move the insertion point to the end of the document.
Command–Left Arrow: Move the insertion point to the beginning of the current line.
Command–Right Arrow: Move the insertion point to the end of the current line.
Option–Left Arrow: Move the insertion point to the beginning of the previous word.
Option–Right Arrow: Move the insertion point to the end of the next word.
Shift–Command–Up Arrow: Select the text between the insertion point and the beginning of the document.
Shift–Command–Down Arrow: Select the text between the insertion point and the end of the document.
Shift–Command–Left Arrow: Select the text between the insertion point and the beginning of the current line.
Shift–Command–Right Arrow: Select the text between the insertion point and the end of the current line.
Shift–Up Arrow: Extend text selection to the nearest character at the same horizontal location on the line above.
Shift–Down Arrow: Extend text selection to the nearest character at the same horizontal location on the line below.
Shift–Left Arrow: Extend text selection one character to the left.
Shift–Right Arrow: Extend text selection one character to the right.
Option–Shift–Up Arrow: Extend text selection to the beginning of the current paragraph, then to the beginning of the following paragraph if pressed again.
Option–Shift–Down Arrow: Extend text selection to the end of the current paragraph, then to the end of the following paragraph if pressed again.
Option–Shift–Left Arrow: Extend text selection to the beginning of the current word, then to the beginning of the following word if pressed again.
Option–Shift–Right Arrow: Extend text selection to the end of the current word, then to the end of the following word if pressed again.
Control-A: Move to the beginning of the line or paragraph.
Control-E: Move to the end of a line or paragraph.
Control-F: Move one character forward.
Control-B: Move one character backward.
Control-L: Center the cursor or selection in the visible area.
Control-P: Move up one line.
Control-N: Move down one line.
Control-O: Insert a new line after the insertion point.
Control-T: Swap the character behind the insertion point with the character in front of the insertion point.
Command–Left Curly Bracket ({): Left align.
Command–Right Curly Bracket (}): Right align.
Shift–Command–Vertical bar (|): Center align.
Option-Command-F: Go to the search field.
Option-Command-T: Show or hide a toolbar in the app.
Option-Command-C: Copy Style: Copy the formatting settings of the selected item to the Clipboard.
Option-Command-V: Paste Style: Apply the copied style to the selected item.
Option-Shift-Command-V: Paste and Match Style: Apply the style of the surrounding content to the item pasted within that content.
Option-Command-I: Show or hide the inspector window.
Shift-Command-P: Page setup: Display a window for selecting document settings.
Shift-Command-S: Display the Save As dialog, or duplicate the current document.
Shift–Command–Minus sign (-): Decrease the size of the selected item.
Shift–Command–Plus sign (+): Increase the size of the selected item. Command–Equal sign (=) performs the same function.
Shift–Command–Question mark (?): Open the Help menu.
Other shortcuts
For more shortcuts, check the shortcut abbreviations shown in the menus of your apps. Every app can have its own shortcuts, and shortcuts that work in one app might not work in another.
Apple Music shortcuts: Choose Help > Keyboard shortcuts from the menu bar in the Music app.
Other shortcuts: Choose Apple menu > System Preferences, click Keyboard, then click Shortcuts.
Learn more
Create your own shortcuts and resolve conflicts between shortcuts
Change the behavior of the function keys or modifier keys
If you’re used to working with Excel on Windows, one of the most confusing aspects of using Excel on a Mac is shortcuts. Even basic shortcuts you’ve been using for years in Windows may not work as you expect.
After a few problems, you might wind up thinking that Mac shortcuts are “totally different” or somehow “broken”. In reality, Excel shortcuts on the Mac are quite capable, you just have to understand and adjust to certain differences.
In this article, I’ll walk you through the key differences you need to be aware of to work productively with Excel shortcuts on a Mac.
1. Special symbols
One of more confusing aspects of keyboard shortcuts on the Mac are the symbols you’ll see for certain keys. For example, the Command key is abbreviated as ⌘, the Control key with ⌃, and the option key as ⌥. These symbols have a long history on the Mac, and you’ll find them in menus everywhere.
The Mac Finder – abbreviations appear in all applications, not just Excel
You’ll see these symbols in menus across all applications, so they’re not specific to Excel. There really aren’t too many symbols, so I recommend that you bite the bullet and memorize them. The table below shows some example shortcuts with a translation.
CommandShortcutTranslationNew workbook⌘NCommand NSave As⌘⇧SCommand Shift SToggle ribbon⌘⌥RCommand Option RPaste Special⌃⌘VControl Command VSelect row⇧SpaceShift Space
2. Function keys
Excel Shortcuts For Macbook Pro
Like their counterparts in the Windows world, Mac keyboards have function keys. These keys sit at the top of the keyboard and are labeled F1 to F12 on standard keyboards and F13, F14 and higher on extended keyboards.
Standard Mac keyboard with 12 function keys
As you know, function keys are uses for many shortcuts in Excel. For example, you can use F1 for help, F7 for spelling, and shift + F3 to insert a function. But if you try these shortcuts directly on a Mac, they don’t work. Why?
By default, Function keys on a Mac control the computer itself, things like screen brightness, volume, video pause and play, and so on. This means that if press only the function keys in Excel, you’ll end up controlling the Mac, and not Excel.
To make function keys work like you expect in Excel, you need to add a key: the function or fn key. You’ll find the fn key in the lower left on your keyboard. Here are a few examples:
Keyboard Shortcuts For Excel Macros
CommandWindowsMacNew chartF11fn F11Calculate worksheetsF9fn F9Open SpellingF7fn F7Evaluate formulaF9fn F9
If you really hate using the fn key, you can change this behavior by changing a preference at System Preferences > Keyboard. Here you can check a box that will that will change function key behavior to work like “standard function keys”.
If you do this, however, note that you won’t be able to use function keys for things like Brightness, Volume, etc. unless you hold down the fn key. In essence, this setting reverses behavior so that you need to use fn to control the Mac.
Personally, I like using the function keys to control the computer, so I leave this setting alone, and just the fn key when needed in Excel.
3. Missing keys
Save As
Another difference that may trip you up on a Mac is certain keys are missing.
Unless you’re using an extended keyboard, keys like Home, End, backspace, Page up, and Page down are nowhere to be found. This is a problem, because many of these keys are used in Excel shortcuts. The solution is to use specific substitutions, as shown in the table below.
WindowsMac equivalentHomefn arrow leftEndfn arrow rightPage Upfn arrow upPage Downfn arrow downScreen rightfn option arrow downScreen leftfn option arrow upMove to Last cellfn control arrow rightMove to first cellfn control arrow leftDeletefn DeleteBackspaceDelete
The substitutions let you perform the same actions you can do in Windows. However, They can make some shortcuts seem complicated on a Mac because you have to use more keys. What mac for music.

Note: If you’re using an extended keyboard on a Mac, you don’t need to worry about substitutions, since you’ll have keys for Home, End, Page up, etc.
Extended keyboards have all the keys

4. Ribbon shortcuts
In the world of shortcuts, perhaps the most painful difference on a Mac is a lack of ribbon shortcuts.
In Excel on Windows, you can use so called accelerator keys to access almost every command in Excel using only your keyboard. This doesn’t matter much when you’re performing an action that has a dedicated shortcut (i.e. Control + B for bold), since dedicated shortcuts are faster than ribbon shortcuts. But when you want to trigger an action that doesn’t have a dedicated shortcut (like sort, hide gridlines, align text, etc.), it hurts a bit.
Excel ribbon in Windows with accelerator keys visible. No equivalent on the Mac!
5. Just different
Finally, some Excel shortcuts are just plain different on a Mac.

For example, the shortcut for Edit Cell in Windows is F2, and on a Mac, it’s Control + U. The shortcut to toggle absolute and relative references is F4 in Windows, while on a Mac, its Command T. For a complete list of Windows and Mac shortcuts, see our side-by-side list.
If you want to see more Excel shortcuts for the Mac in action, see our our video tips. These videos come from our video training. Whenever we use a shortcut, we show both the Windows and Mac version.
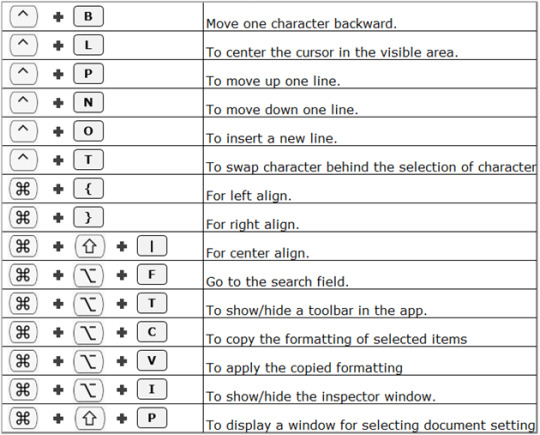
Note: With the introduction of Excel 2016 on the Mac, Microsoft has started to adjust Mac shortcuts to be more aligned with Windows. We’re currently testing Excel 2016 on the Mac, and will publish a summary once we have a good understanding of the shortcut changes.
0 notes
Text
Honk introduces a real-time, ephemeral messaging app aimed at Gen Z
A new mobile app called Honk aims to make messaging with friends a more interactive, real-time experience. Instead of sending texts off into the void and hoping for a response, friends on Honk communicate via messages that are shown live as you type, with no saved chat history and no send button. The end result is a feeling of being more present in a conversation, as Honk will notify users the moment someone leaves a chat. And if you really want to get someone’s attention, you can send them a “Honk” — a hard-to-miss notification to join your chat.
If it’s even more urgent, you can even spam the Honk button by pressing it repeatedly. This sends notifications to a friend’s phone if they’re off the app, or a flood of colorful emoji if they have the app open.

Need to get someone's attention fast? Honk them! They'll get a notification to come to the chat. If it's super important, you can spam the Honk button — that's hard to miss. pic.twitter.com/VqcinmeeT2
— Honk (@usehonk) December 22, 2020
After setting up an account by customizing your profile pic, selecting a username and adding friends, you can then tap on a friend’s name in your list to send them a message.
When you enter a chat in Honk, you’ll be presented with two, large conversation bubbles. The gray one on the top is where your friend’s messages are shown, while you type in the blue one. (You can change the colors and theme, if you choose.)
As you type, the other person will see the text you’re entering into this box in real-time — including the pauses and typos that would normally be missed. This “live typing” experience is reminiscent of older communication technology, like the early instant messaging app ICQ, or the innovative collaboration tool Google Wave, for example.
In Honk, you’re given 160 characters to type out your thoughts, and this is counted down on the right side of screen below the conversation bubbles. But you don’t tap a “Send” button to share the message — the recipient saw the text as it was entered, after all. Instead, you just tap the double arrow “refresh” button to clear the screen and type something new.
There are also buttons for sending emoji, snapping a photo, or accessing photos from your Camera Roll to share in the chat. The emoji here work more like iMessage’s “Send with Echo” screen effect, as you’re not just sending a single emoji when you use this feature — you’re sending several huge emoji that temporarily fill the screen.

With Magic Words, you can assign any emoji to any word or phrase, which automatically trigger effects as you type. It's the best way to personalize your chats and bring them to life. Set up to 50 unique Magic Words per chat! pic.twitter.com/2BYUyNrEzz
— Honk (@usehonk) December 23, 2020
You can also optionally assign emoji to any word or phrase within an individual chat, using a “Magic Words” feature that will trigger effects as you type. (See above). Plus, you can customize chat themes on a per-conversation basis or turn off notifications from an individual user, if you don’t want to hear from them as much.
None of the conversations are stored and there’s no history to look back on. This is similar to messaging apps like Snapchat or Messenger’s Vanish Mode, for instance. (Honk hasn’t clarified its position on security, however, so proceed with caution before getting into riskier content.)
Facebook’s Snapchat-like ‘Vanish Mode’ feature arrives on Messenger and Instagram
And, of course, if you need to get someone’s attention, you can tap “Honk” to flood them with notifications.
If this all seems somewhat silly, then you’re probably not the target market for the Honk messaging experience.
The app is clearly aiming for a young crowd of largely teenage users. When Honk asks for your age during setup, in fact, you can select an exact number from the list that appears — unless you’re “old,” that is. The last option on the list of ages is “21+” — the “older folks” age bracket that may sting a bit for the millennial crowd who often still think of themselves as the online trendsetters.
But Honk is aiming to grab Gen Z’s interest, it seems. It’s even marketing to them on TikTok, where it’s already generated some 140K+ “Likes,” as of the time of writing, despite having only uploaded its first video yesterday. Honk founder Benji Taylor also noted on Twitter the app has seen 550,000 “Honks” sent so far, as of Wednesday, Dec. 23, 2020, shortly after noon Eastern.
@usehonkwait for it ##fyp♬ original sound – Honk
Per its website, Honk is the flagship product from software company and app publisher Los Feliz Engineering (LFE), which is backed by investors including Naval Ravikant, Elad Gil, Brian Norgard, David Tisch, Jeff Fagnan, Ryan Hoover, Sarah Downey, Josh Hannah, Sahil Lavingia, and others.
“It’s exceptionally well designed,” said Product Hunt founder and Weekend Fund investor Ryan Hoover, about Honk. “[Honk founder] Benji [Taylor] and team labored over the small details, from the animations to the sounds. They’re also super focused on speed,” he added.
Taylor declined a full interview when TechCrunch reached out, noting the team was focused on building the product for the time being.
“We’ve been working on Honk for a while now. Our goal is to make messaging fun, and empower people to communicate in new, creative ways that take relationships deeper,” Taylor told TechCrunch. “Ultimately though, we’re a small team building this for ourselves and our friends. If other people like it, all the better,” he said.
Honk, we should note, has been struggling under the load of new signups at launch and high usage. Honk users report the app will sometimes say they’re offline when they’re not, for example, among other bugs. Honk acknowledged the issues on its Twitter and says it’s been working to resolve them.
The app is currently a free download on iOS. It does not include in-app purchases or have any obvious business model.
from iraidajzsmmwtv https://ift.tt/38y2pey via IFTTT
0 notes
Text
Honk introduces a real-time, ephemeral messaging app aimed at Gen Z
A new mobile app called Honk aims to make messaging with friends a more interactive, real-time experience. Instead of sending texts off into the void and hoping for a response, friends on Honk communicate via messages that are shown live as you type, with no saved chat history and no send button. The end result is a feeling of being more present in a conversation, as Honk will notify users the moment someone leaves a chat. And if you really want to get someone’s attention, you can send them a “Honk” — a hard-to-miss notification to join your chat.
If it’s even more urgent, you can even spam the Honk button by pressing it repeatedly. This sends notifications to a friend’s phone if they’re off the app, or a flood of colorful emoji if they have the app open.

Need to get someone's attention fast? Honk them! They'll get a notification to come to the chat. If it's super important, you can spam the Honk button — that's hard to miss. pic.twitter.com/VqcinmeeT2
— Honk (@usehonk) December 22, 2020
After setting up an account by customizing your profile pic, selecting a username and adding friends, you can then tap on a friend’s name in your list to send them a message.
When you enter a chat in Honk, you’ll be presented with two, large conversation bubbles. The gray one on the top is where your friend’s messages are shown, while you type in the blue one. (You can change the colors and theme, if you choose.)
As you type, the other person will see the text you’re entering into this box in real-time — including the pauses and typos that would normally be missed. This “live typing” experience is reminiscent of older communication technology, like the early instant messaging app ICQ, or the innovative collaboration tool Google Wave, for example.
In Honk, you’re given 160 characters to type out your thoughts, and this is counted down on the right side of screen below the conversation bubbles. But you don’t tap a “Send” button to share the message — the recipient saw the text as it was entered, after all. Instead, you just tap the double arrow “refresh” button to clear the screen and type something new.
There are also buttons for sending emoji, snapping a photo, or accessing photos from your Camera Roll to share in the chat. The emoji here work more like iMessage’s “Send with Echo” screen effect, as you’re not just sending a single emoji when you use this feature — you’re sending several huge emoji that temporarily fill the screen.

With Magic Words, you can assign any emoji to any word or phrase, which automatically trigger effects as you type. It's the best way to personalize your chats and bring them to life. Set up to 50 unique Magic Words per chat! pic.twitter.com/2BYUyNrEzz
— Honk (@usehonk) December 23, 2020
You can also optionally assign emoji to any word or phrase within an individual chat, using a “Magic Words” feature that will trigger effects as you type. (See above). Plus, you can customize chat themes on a per-conversation basis or turn off notifications from an individual user, if you don’t want to hear from them as much.
None of the conversations are stored and there’s no history to look back on. This is similar to messaging apps like Snapchat or Messenger’s Vanish Mode, for instance. (Honk hasn’t clarified its position on security, however, so proceed with caution before getting into riskier content.)
Facebook’s Snapchat-like ‘Vanish Mode’ feature arrives on Messenger and Instagram
And, of course, if you need to get someone’s attention, you can tap “Honk” to flood them with notifications.
If this all seems somewhat silly, then you’re probably not the target market for the Honk messaging experience.
The app is clearly aiming for a young crowd of largely teenage users. When Honk asks for your age during setup, in fact, you can select an exact number from the list that appears — unless you’re “old,” that is. The last option on the list of ages is “21+” — the “older folks” age bracket that may sting a bit for the millennial crowd who often still think of themselves as the online trendsetters.
But Honk is aiming to grab Gen Z’s interest, it seems. It’s even marketing to them on TikTok, where it’s already generated some 140K+ “Likes,” as of the time of writing, despite having only uploaded its first video yesterday. Honk founder Benji Taylor also noted on Twitter the app has seen 550,000 “Honks” sent so far, as of Wednesday, Dec. 23, 2020, shortly after noon Eastern.
@usehonkwait for it ##fyp♬ original sound – Honk
Per its website, Honk is the flagship product from software company and app publisher Los Feliz Engineering (LFE), which is backed by investors including Naval Ravikant, Elad Gil, Brian Norgard, David Tisch, Jeff Fagnan, Ryan Hoover, Sarah Downey, Josh Hannah, Sahil Lavingia, and others.
“It’s exceptionally well designed,” said Product Hunt founder and Weekend Fund investor Ryan Hoover, about Honk. “[Honk founder] Benji [Taylor] and team labored over the small details, from the animations to the sounds. They’re also super focused on speed,” he added.
Taylor declined a full interview when TechCrunch reached out, noting the team was focused on building the product for the time being.
“We’ve been working on Honk for a while now. Our goal is to make messaging fun, and empower people to communicate in new, creative ways that take relationships deeper,” Taylor told TechCrunch. “Ultimately though, we’re a small team building this for ourselves and our friends. If other people like it, all the better,” he said.
Honk, we should note, has been struggling under the load of new signups at launch and high usage. Honk users report the app will sometimes say they’re offline when they’re not, for example, among other bugs. Honk acknowledged the issues on its Twitter and says it’s been working to resolve them.
The app is currently a free download on iOS. It does not include in-app purchases or have any obvious business model.
via Social – TechCrunch https://ift.tt/38y2pey
0 notes
Text
Asus TUF Gaming A17 Review
Asus' TUF gaming laptops are priced and positioned below its elite Republic of Gamers (ROG) models, but the TUF Gaming A17 gives you more than you might expect for $1,099.99. It combines a beefy eight-core AMD Ryzen 7 4800H "Renoir" processor with a very ample 16GB of RAM and a positively generous 1TB solid-state drive. It backs its 17.3-inch full HD display with a capable Nvidia GeForce GTX 1660 Ti GPU. It offers longer battery life and tougher construction than many competitors, passing MIL-STD 810H tests against shock, vibration, and environmental extremes. The GTX 1660 Ti won't max out the system's 120Hz-refresh-rate screen—and the screen isn't the most gorgeous thing you've seen—but the A17 is a good option for plus-size gaming on a budget.
TUF-Guy Credentials
Available in Fortress Gray or Bonfire Black (my test model TUF706IU-AS76 was the former), the A17 combines an aluminum lid with a plastic keyboard deck and underside. The lid is decorated by four faux corner screws and an ungainly winged-shield logo that (sort of) spells "TUF" if you squint at it sideways. The rear edge of the lid is sliced away to reveal a strip of the deck with "TUF GAMING" lettering.
Medium-thin bezels surround the 1080p non-touch screen, and a slight bump in the top bezel accommodates the webcam. The camera lacks IR face recognition capability and there is no fingerprint reader, so you can't use Windows Hello to bypass typing passwords. Chiseled lines bracket the keyboard, which features translucent W, A, S, and D keys. A hexagonal power button occupies the top right corner.
Though ponderous next to a 15.6-inch system, the Asus is not too big and heavy for a 17.3-inch gaming rig, measuring 1.0 by 15.7 by 10.6 inches and weighing 5.7 pounds. That undercuts the HP Omen 17 (1.6 by 15.8 by 11 inches, 7 pounds). There's little flex if you grasp the screen corners, though some is noticeable if you press the keyboard deck.
The only ports on the notebook's right side are a USB 2.0 port and a Kensington lock slot. On the left, you'll find Ethernet and HDMI ports, two USB 3.2 Type-A ports, one USB 3.2 Type-C port, an audio jack, and the connector for the AC power brick. Asus forgot an SD or a microSD card slot.
Colorful, Comfortable Keys
Pricier gaming laptops tend to divide their RGB keyboard backlighting into multiple zones or allow for the programming of individual keys, but the A17 shows just one color at a time. Using the Fn and cursor arrow keys, however, you can adjust the ample brightness of the key lights, or choose among color cycling, breathing, or strobing effects.
There's a Home/End key at the far top right of the layout, but you're most likely to access Home, End, Page Up, and Page Down via the numeric keypad, which will mean awkward toggling of Num Lock as you switch from data entry to navigating a spreadsheet. The typing feel is pretty good, a little shallow and plasticky, but fairly snappy and firm. The good-size touchpad has two rubbery buttons. It glides and taps smoothly.
As for the TUF Gaming's biggest asset—the 17.3-inch screen—it offers support for adaptive sync and a 120Hz refresh rate for games. (Asus says the TUF works with G-Sync monitors plugged into the USB-C port via a DisplayPort adapter.) Alas, though, the native display is the least-appealing feature of the TUF Gaming A17. It's dim even at the top backlight setting, making white backgrounds look dingy, and colors appear muddy and muted. Viewing angles are broad, and the contrast and detail are decent, but overall the screen is no better than bearable.
The 720p webcam captures adequately bright and colorful but rather soft-focus and noisy images. Sound from the bottom-firing speakers isn't very loud, even cranked to the max, but it isn't bad—short on bass, but clear and able to distinguish overlapping tracks. DTS:X Ultra software lets you make a minimal difference in the audio's character by choosing among music, movie, RPG, shooter, strategy, and voice presets, or playing with an equalizer. A free 14-day trial of DTS headphone software is included.
High Marks in Performance Testing
We've tested 17-inch gaming rigs that cost three times as much as the TUF Gaming A17 (Asus' own ROG Strix Scar 17 comes to mind), but for our benchmark comparisons here I chose four more or less affordable gamers. Two are 17.3-inch machines, the Aorus 7 SA and HP Omen 17—which stretches the definition of "affordable" by some $500 over the TUF, splurging on a GeForce RTX 2070 GPU that makes it the favorite in our graphics tests. Two are 15.6-inch systems, the Dell G5 15 SE and our $999 Editors' Choice winner, the MSI Bravo 15. You can see the contenders' basic specs in the table below.
Productivity and Media Tests
PCMark 10 and 8 are holistic performance suites developed by the PC benchmark specialists at UL (formerly Futuremark). The PCMark 10 test we run simulates different real-world productivity and content-creation workflows. We use it to assess overall system performance for office-centric tasks such as word processing, spreadsheet jockeying, web browsing, and videoconferencing. PCMark 8, meanwhile, has a storage subtest that we use to assess the speed of the system's boot drive. Both yield a proprietary numeric score; higher numbers are better.
Like its rivals, the A17 blew past the 4,000-point mark that indicates excellent productivity in PCMark 10. Like nearly all modern laptops with PCI Express-based solid-state drives, all five contestants aced PCMark 8's storage subtest.
Next is Maxon's CPU-crunching Cinebench R15 test, which is fully threaded to make use of all available processor cores and threads. Cinebench stresses the CPU rather than the GPU to render a complex image. The result is a proprietary score indicating a PC's suitability for processor-intensive workloads.
Cinebench is often a good predictor of our Handbrake video editing benchmark, in which we put a stopwatch on systems as they transcode a brief movie from 4K resolution down to 1080p. It, too, is a tough test for multi-core, multi-threaded CPUs; lower times are better.
The eight-core, 2.9GHz (4.2GHz turbo) AMD Ryzen 7 4800H is one potent processor (in the 45-watt desktop replacement and gaming rather than 15-watt ultraportable class), and it gave the Asus, Dell, and MSI superb results in these tests.
We also run a custom Adobe Photoshop image-editing benchmark. Using an early 2018 release of the Creative Cloud version of Photoshop, we apply a series of 10 complex filters and effects to a standard JPEG test image. We time each operation and add up the total. (Lower times are better.) The Photoshop test stresses the CPU, storage subsystem, and RAM, but it can also take advantage of most GPUs to speed up the process of applying filters.
The MSI and Dell slipped a bit in this exercise, but the TUF posted a first-rate time, even if its ho-hum screen and lack of an SD card slot make it an unlikely choice for avid photo editors.
Graphics Tests
3DMark measures relative graphics muscle by rendering sequences of highly detailed, gaming-style 3D graphics that emphasize particles and lighting. We run two different 3DMark subtests, Sky Diver and Fire Strike. Both are DirectX 11 benchmarks, but Sky Diver is more suited to laptops and midrange PCs, while Fire Strike is more demanding and lets high-end PCs and gaming rigs strut their stuff.
As expected, the Omen 17's GeForce RTX 2070 graphics claimed first place, but the Asus delivered a creditable performance, a notch above low-cost gamers with GeForce GTX 1650 GPUs.
Next up is another synthetic graphics test, this time from Unigine Corp. Like 3DMark, the Superposition test renders and pans through a detailed 3D scene, this one rendered in the eponymous Unigine engine for a second opinion on the machine's graphical prowess.
The Asus, Dell, and Aorus essentially tied for second place behind the HP. Spending more will get you higher frame rates, but these are more-than-acceptable results.
Real-World Gaming Tests
The synthetic tests above are helpful for measuring general 3D aptitude, but it's hard to beat full retail video games for judging gaming performance. Far Cry 5 and Rise of the Tomb Raider are both modern AAA titles with built-in benchmark routines. We run these tests at 1080p resolution using both moderate and maximum graphics-quality presets—Normal and Ultra for Far Cry 5 under DirectX 11, Medium and Very High for Rise of the Tomb Raider under DirectX 12.
Once again, it trailed the Omen 17, but the A17 posted very satisfactory results for its price, easily surpassing the desirable 60-frame-per-second mark even at the games' finest image quality settings. We've tested many budget gaming laptops that wish they could do this well.
Battery Rundown Test
After fully recharging the laptop, we set up the machine in power-save mode (as opposed to balanced or high-performance mode) where available and make a few other battery-conserving tweaks in preparation for our unplugged video rundown test. (We also turn Wi-Fi off, putting the laptop into airplane mode.) In this test, we loop a video—a locally stored 720p file of the Blender Foundation short film Tears of Steel—with screen brightness set at 50 percent and volume at 100 percent until the system quits.
We like to see at least four hours of battery life from a gaming notebook. The Asus more than doubled that, winning this event. Actual gaming will, of course, drain the battery faster than mere video viewing, but with the A17 it's at least possible.
One of the Better Deals in a 17-Inch Gamer
With its 1TB SSD—and a second M.2 slot accessible by unscrewing the bottom panel—the Asus TUF Gaming A17 is a welcome change from low-cost gaming laptops with a skimpy 256GB of storage, and its Ryzen 7 processor is a real powerhouse. But while you can live with the screen, you won't be thrilled with it; I waffled between giving the laptop three-and-a-half and four stars on our rating scale, and the display narrowly tipped me to the lower score.
Still, its less-than-dazzling display doesn't negate the TUF Gaming A17's above-average value when you tally up the rest of the components. Good 17.3-inch budget gaming rigs are scarcer than their 15.6-inch counterparts, and if you desire a big screen but lack a big checkbook, this sturdy performer deserves consideration.
0 notes
Link
Discover Functional JavaScript was named one of the best new Functional Programming books by BookAuthority! JavaScript has primitives, objects and functions. All of them are values. All are treated as objects, even primitives. PrimitivesNumber, boolean, string, undefined and null are primitives. NumberThere is only one number type in JavaScript, the 64-bit binary floating point type. Decimal numbers’ arithmetic is inexact. As you may already know, 0.1 + 0.2 does not make 0.3 . But with integers, the arithmetic is exact, so 1+2 === 3 . Numbers inherit methods from the Number.prototype object. Methods can be called on numbers: (123).toString(); //"123" (1.23).toFixed(1); //"1.2"There are functions for converting strings to numbers : Number.parseInt(), Number.parseFloat() and Number(): Number.parseInt("1") //1 Number.parseInt("text") //NaN Number.parseFloat("1.234") //1.234 Number("1") //1 Number("1.234") //1.234Invalid arithmetic operations or invalid conversions will not throw an exception, but will result in the NaN “Not-a-Number” value. Number.isNaN() can detect NaN . The + operator can add or concatenate. 1 + 1 //2 "1" + "1" //"11" 1 + "1" //"11"StringA string stores a series of Unicode characters. The text can be inside double quotes "" or single quotes ''. Strings inherit methods from String.prototype. They have methods like : substring(), indexOf() and concat() . "text".substring(1,3) //"ex" "text".indexOf('x') //2 "text".concat(" end") //"text end"Strings, like all primitives, are immutable. For example concat() doesn’t modify the existing string but creates a new one. BooleanA boolean has two values : true and false . The language has truthy and falsy values. false, null, undefined, ''(empty string), 0 and NaN are falsy. All other values, including all objects, are truthy. The truthy value is evaluated to true when executed in a boolean context. Falsy value is evaluated to false. Take a look at the next example displaying the false branch. let text = ''; if(text) { console.log("This is true"); } else { console.log("This is false"); }The equality operator is ===. The not equal operator is !== . VariablesVariables can be defined using var, let and const. var declares and optionally initializes a variable. Variables declared with var have a function scope. They are treated as declared at the top of the function. This is called variable hoisting. The let declaration has a block scope. The value of a variable that is not initialize is undefined . A variable declared with const cannot be reassigned. Its value, however, can still be mutable. const freezes the variable, Object.freeze() freezes the object. The const declaration has a block scope. ObjectsAn object is a dynamic collection of properties. The property key is a unique string. When a non string is used as the property key, it will be converted to a string. The property value can be a primitive, object, or function. The simplest way to create an object is to use an object literal: let obj = { message : "A message", doSomething : function() {} }There are two ways to access properties: dot notation and bracket notation. We can read, add, edit and remove an object’s properties at any time. get: object.name, object[expression]set: object.name = value, object[expression] = valuedelete: delete object.name, delete object[expression]let obj = {}; //create empty object obj.message = "A message"; //add property obj.message = "A new message"; //edit property delete obj.message; //delete propertyObjects can be used as maps. A simple map can be created using Object.create(null) : let french = Object.create(null); french["yes"] = "oui"; french["no"] = "non"; french["yes"];//"oui"All object’s properties are public. Object.keys() can be used to iterate over all properties. function logProperty(name){ console.log(name); //property name console.log(obj[name]); //property value } Object.keys(obj).forEach(logProperty);Object.assign() copies all properties from one object to another. An object can be cloned by copying all its properties to an empty object: let book = { title: "The good parts" }; let clone = Object.assign({}, book);An immutable object is an object that once created cannot be changed. If you want to make the object immutable, use Object.freeze() . Primitives vs ObjectsPrimitives (except null and undefined) are treated like objects, in the sense that they have methods but they are not objects. Numbers, strings, and booleans have object equivalent wrappers. These are the Number, String, and Boolean functions. In order to allow access to properties on primitives, JavaScript creates an wrapper object and then destroys it. The process of creating and destroying wrapper objects is optimized by the JavaScript engine. Primitives are immutable, and objects are mutable. ArrayArrays are indexed collections of values. Each value is an element. Elements are ordered and accessed by their index number. JavaScript has array-like objects. Arrays are implemented using objects. Indexes are converted to strings and used as names for retrieving values. A simple array like let arr = ['A', 'B', 'C'] is emulated using an object like the one below: { '0': 'A', '1': 'B', '2': 'C' }Note that arr[1] gives the same value as arr['1'] : arr[1] === arr['1'] . Removing values from the array with delete will leave holes. splice() can be used to avoid the problem, but it can be slow. let arr = ['A', 'B', 'C']; delete arr[1]; console.log(arr); // ['A', empty, 'C'] console.log(arr.length); // 3JavaScript’s arrays don’t throw “index out of range” exceptions. If the index is not available, it will return undefined. Stack and queue can easily be implemented using the array methods: let stack = []; stack.push(1); // [1] stack.push(2); // [1, 2] let last = stack.pop(); // [1] console.log(last); // 2 let queue = []; queue.push(1); // [1] queue.push(2); // [1, 2] let first = queue.shift();//[2] console.log(first); // 1FunctionsFunctions are independent units of behavior. Functions are objects. Functions can be assigned to variables, stored in objects or arrays, passed as an argument to other functions, and returned from functions. There are three ways to define a function: Function Declaration (aka Function Statement)Function Expression (aka Function Literal)Arrow FunctionThe Function Declarationfunction is the first keyword on the lineit must have a nameit can be used before definition. Function declarations are moved, or “hoisted”, to the top of their scope.function doSomething(){}The Function Expression function is not the first keyword on the linethe name is optional. There can be an anonymous function expression or a named function expression.it needs to be defined, then it can executeit can auto-execute after definition (called “IIFE” Immediately Invoked Function Expression)let doSomething = function() {}Arrow FunctionThe arrow function is a sugar syntax for creating an anonymous functionexpression. {};Arrow functions don’t have their own this and arguments. Function invocationA function, defined with the function keyword, can be invoked in different ways: doSomething(arguments)theObject.doSomething(arguments) theObject["doSomething"](arguments)new Constructor(arguments) doSomething.apply(theObject, [arguments]) doSomething.call(theObject, arguments)Functions can be invoked with more or fewer arguments than declared in the definition. The extra arguments will be ignored, and the missing parameters will be set to undefined. Functions (except arrow functions) have two pseudo-parameters: this and arguments. thisMethods are functions that are stored in objects. Functions are independent. In order for a function to know on which object to work onthis is used. this represents the function’s context. There is no point to use this when a function is invoked with the function form: doSomething(). In this case this is undefined or is the window object, depending if the strict mode is enabled or not. When a function is invoked with the method form theObject.doSomething(),this represents the object. When a function is used as a constructor new Constructor(), thisrepresents the newly created object. The value of this can be set with apply() or call():doSomething.apply(theObject). In this case this is the object sent as the first parameter to the method. The value of this depends on how the function was invoked, not where the function was defined. This is of course a source of confusion. argumentsThe arguments pseudo-parameter gives all the arguments used at invocation. It’s an array-like object, but not an array. It lacks the array methods. function log(message){ console.log(message); } function logAll(){ let args = Array.prototype.slice.call(arguments); return args.forEach(log); } logAll("msg1", "msg2", "msg3");An alternative is the new rest parameters syntax. This time args is an array object. function logAll(...args){ return args.forEach(log); }returnA function with no return statement returns undefined. Pay attention to the automatic semi-colon insertion when using return. The following function will not return an empty object, but rather an undefined one. function getObject(){ return { } } getObject()To avoid the issue, use { on the same line as return : function getObject(){ return { } }Dynamic TypingJavaScript has dynamic typing. Values have types, variables do not. Types can change at run time. function log(value){ console.log(value); } log(1); log("text"); log({message : "text"});The typeof() operator can check the type of a variable. let n = 1; typeof(n); //number let s = "text"; typeof(s); //string let fn = function() {}; typeof(fn); //functionA Single ThreadThe main JavaScript runtime is single threaded. Two functions can’t run at the same time. The runtime contains an Event Queue which stores a list of messages to be processed. There are no race conditions, no deadlocks.However, the code in the Event Queue needs to run fast. Otherwise the browser will become unresponsive and will ask to kill the task. ExceptionsJavaScript has an exception handling mechanism. It works like you may expect, by wrapping the code using the try/catch statement. The statement has a single catch block that handles all exceptions. It’s good to know that JavaScript sometimes has a preference for silent errors. The next code will not throw an exception when I try to modify a frozen object: let obj = Object.freeze({}); obj.message = "text";Strict mode eliminates some JavaScript silent errors. "use strict"; enables strict mode. Prototype PatternsObject.create(), constructor function, and class build objects over the prototype system. Consider the next example: let servicePrototype = { doSomething : function() {} } let service = Object.create(servicePrototype); console.log(service.__proto__ === servicePrototype); //trueObject.create() builds a new object service which has theservicePrototype object as its prototype. This means that doSomething() is available on the service object. It also means that the __proto__ property of service points to the servicePrototype object. Let’s now build a similar object using class. class Service { doSomething(){} } let service = new Service(); console.log(service.__proto__ === Service.prototype);All methods defined in the Service class will be added to theService.prototype object. Instances of the Service class will have the same prototype (Service.prototype) object. All instances will delegate method calls to the Service.prototype object. Methods are defined once onService.prototype and then inherited by all instances. Prototype chainObjects inherit from other objects. Each object has a prototype and inherits their properties from it. The prototype is available through the “hidden” property __proto__ . When you request a property which the object does not contain, JavaScript will look down the prototype chain until it either finds the requested property, or until it reaches the end of the chain. Functional PatternsJavaScript has first class functions and closures. These are concepts that open the way for Functional Programming in JavaScript. As a result, higher order functions are possible. filter(), map(), reduce() are the basic toolbox for working with arrays in a function style. filter() selects values from a list based on a predicate function that decides what values should be kept. map() transforms a list of values to another list of values using a mapping function. let numbers = [1,2,3,4,5,6]; function isEven(number){ return number % 2 === 0; } function doubleNumber(x){ return x*2; } let evenNumbers = numbers.filter(isEven); //2 4 6 let doubleNumbers = numbers.map(doubleNumber); //2 4 6 8 10 12reduce() reduces a list of values to one value. function addNumber(total, value){ return total + value; } function sum(...args){ return args.reduce(addNumber, 0); } sum(1,2,3); //6Closure is an inner function that has access to the parent function’s variables, even after the parent function has executed. Look at the next example: function createCount(){ let state = 0; return function count(){ state += 1; return state; } } let count = createCount(); console.log(count()); //1 console.log(count()); //2count() is a nested function. count() accesses the variable state from its parent. It survives the invocation of the parent function createCount().count() is a closure. A higher order function is a function that takes another function as an input, returns a function, or does both. filter(), map(), reduce() are higher-order functions. A pure function is a function that returns a value based only of its input. Pure functions don’t use variables from the outer functions. Pure functions cause no mutations. In the previous examples isEven(), doubleNumber(), addNumber() and sum()are pure functions. ConclusionThe power of JavaScript lies in its simplicity. Knowing the JavaScript fundamentals makes us better at understanding and using the language. Read Functional Architecture with React and Redux and learn how to build apps in function style. Discover Functional JavaScript was named one of the best new Functional Programming books by BookAuthority! For more on applying functional programming techniques in React take a look at Functional React. You can find me on Medium and Twitter.
0 notes
Photo


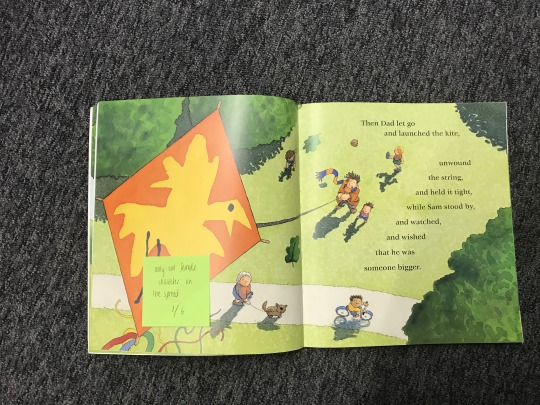


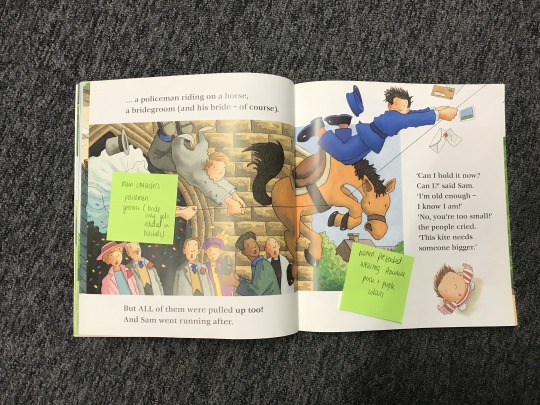
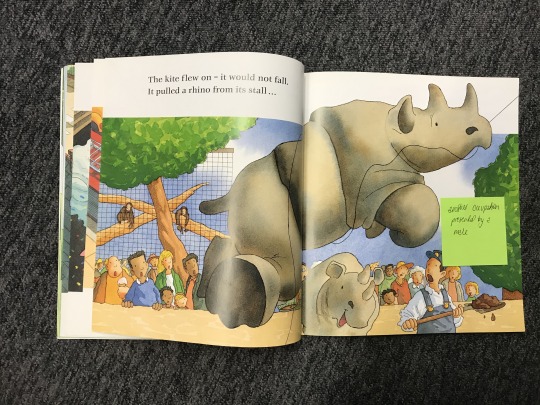

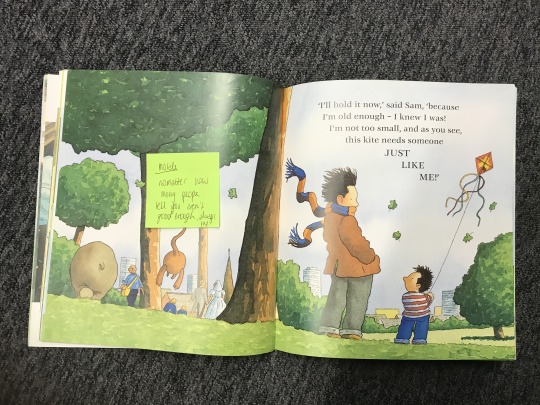
Annotation of ‘‘Someone Bigger” by Jonathan Emmett and Adrian Reynolds.
As previously stated, within the comparison three books are being used and their main three differences are the main leading role. This book has a strong male leading role as both the main character (Sam) and secondary character (Dad) are male.
When focusing on the front cover both the main characters are displayed, however neither of their names is, unlike in The Paper Bag Princess.
Fashion:
Both the males are dressed in similar clothing, consisting of dark coloured jeans and striped tops. Sam is presenting some more ‘youthful’ colours, by wearing a white and red top paired up with white, red and yellow trainers. The dad figure on the other hand is presented wearing brown boots with a brown coat to match and a couple of accessories such as a black buckle belt and a striped scarf. Could these be counted as a typical ‘male outfit’? Focusing on the colours only, there is a dominant colour range of red, blue and orange, could these be considered as ‘male’ colours?
The Dad is presented as strong father figure, holding the big kite and not allowing Sam to hold it. When looking at the illustration itself the reader can see that the kite is almost the same size as the dad. Does this fall under the stereotype that males are the stronger, hence why the father is taking care of it.
Looking at the first double spread where more characters are presented, out of 6 there is only one female character presented. The only way the reader knows that is because she is seen wearing, what appears to be a light blue skirt. However because it is paired up with a red jumper it goes back to the point of the dominant colours used. Is red and blue used dominantly throughout the book? Which leads onto the question, why is the female wearing lighter shades of the colour in comparison to the males? Could this be to suggest that the female figure is more delicate? When looking at the rest of the double spread the other boys are seen carrying out, boy connotated activities such as playing football.
As the book progresses more characters get hold of the kite, most of them being male. The book presents a lot of job occupations, however their gender choices are not diverse. Looking at the spread where the postman and the prisoner is caught on, there is only once again a single female shown, once again wearing lighter colours in comparison to the male characters, she can also be distinguished by the long blond hair. The job roles presented run under the stereotypical light of the fact that males are mostly seen doing said job. Could there also be a link to the fact that there is a higher proportion of males carrying out crimes, hence the male prisoner? (NOT AN ACCURATE STATISTIC, ONLY OPINION. FIND DATA?) The prisoner is seen wearing a white top and bottom with black arrows pointing upwards, is there a reason for that? UPDATED: In 1870s the prison uniforms with broad arrows all over them were introduced, this was due to the fact that they would be easier to spot, hence harder to escape but also it was considered a mark of shame. Due to the fact that the uniforms were worn predominately in 1800s and the book has been published in 2003; the uniform does stand out from the modern society dress of everyone else in the book.
Continuing along the story more female characters appear amongst the different scenes, ie. the church where a wedding couple get caught onto the kite. Once again the colours worn by females are much paler than the ones worn by men; the women can be distinguished due to the fact that they are wearing dresses. This can be justified for the bride as it it known for the wedding dress to be of a paler colour however the other two females presented are wearing pink and purple; two very typical feminine colours known to the society. Similarly to the other two books in the comparison. With a closer look at the text the narrative states ‘a bridegroom’ but follows with ‘his bride’ in brackets, could this suggest a less of importance female figure or furthermore the grooms possession? As it refers to her as ‘his’?
As previously mentioned there is a large diversity of job occupations presented in the story however none of them are carried out by females. There is a team of firefighters as well as a zoo keeper, all male. Could the fact that the authors are both male have an impact on these factors? Or is it the influence from the society at the time? Something to look into.
Looking at the statistics of the main characters: there are 14 characters holding onto the kite. 4 of them being animals and as there is no further detail to wether they are male or female, they will not be counted. That leaves 10 characters, with only one of them being female. This seems to be the pattern within the book, where males are the dominant gender.
The moral of the story comes across as no matter how many people will tell someone they are not good enough, unless they try they will never know.
0 notes
Text
So I have everything set for the tournament. I should probably share who the DMPCs are. Michael is a aasimar acolyte life cleric. Yi'eta is a kobold outlander druid. Lastly, Tharash of the Bloodpit is a barbarian orc gladiator (the variant of entertainer). I made them awhile ago, in fact only Abraham and Jeff had even been started at the time, to fill out a party role(s) that the party at the time was lacking mostly support and/or tank. Since then we got a pair of barbarians and a death cleric with spare the dying, so the tank role is definitely filled and the support role is kinda sorta filled if you squint.
Next the double elimination bracket pits Michael against Abraham, Katface against Yi'eta, Elfy against Tharash of the Blood Pit, and Jeff against Jiani.
Next let's go over the arenas
The first arena is pretty simple a 40ft by 40ft square with the contestants starting at opposite corners

Next I'm going to use an old map i have called crossroads which leads me to the first challenge as depicted on the map. A rat hunt, who ever incapacitates the most rats(capture, knock unconscious, kill whatever) wins the challenge. The contestants start of in a randomly determined position in the "circle" on the top right of the map and the 16 rats start out in the house. The contest is open to everyone regardless of their position in the tournament and the winner gets a ring of animal influence.
Next will be the tier 2 fights which start out as shown with both fighters starting out on opposite ends of the map on the road

Next up is the gauntlet challenge. The goal is the get from one side to the other(left to right in the picture) without dying by the traps. Again everyone is welcome to join the challenge regardless of their tournament standings. The first (represented here by goblin disks) is a pair of poison sprayers which require a con save or you take poison damage. Next are dart shooters (represented by rats) that shoot at anyone who passes between them. Then you have the rolling boulder trap which forms an intersection with the main gauntlet that runs from the top to the bottom where it passes through a portal that drops it back on top that requires a dex save. Next in the lineup of traps are swinging blades(represented by hobgoblins) which need a decent save. Finally my most devious trap(represented by skeletons) requires a wisdom save, on a fail you are compelled to go all the way back to the beginning through the gauntlet. If someone can make it they are rewarded with a vicios weapon

This is the next arena full of corridors and traps(ignore most of the decals on the tiles they don't matter except the pit and the statues).
So let's do through the traps. First, the statues are actually stone golems that activate and become hostile if touched. Next the pit in the middle is a 20ft pitfall trap. Then we have the spike traps represented by pairs of kobolds that shoot up if stepped on. After that we have a pair of arrow traps that are activated by stepping on a pressure plate (represented by rats) and ejected out of holes in the wall (represented by home made d and d disks) down the hall with the pressure plate damaging the first creature it hits and moving on to the next target if it misses. Lastly, we have something that isn't a trap, a pair of teleportation runes(represented by skeletons) that instantly transports you to the other rune upon being touched

Next is my favorite challenge which teaches the important (especially in Chult) lesson, sometimes you can't fight everything, sometimes you need to just run, the t-rex survival challenge. Usual challenge rules, anyone can join doesn't matter your tournament standings, yada yada. In this challenge the characters have to survive in the arena for one minute with a t-rex. Added bonus (for me),

destructible pillars. So while they may be able to hide for a bit in the middle, eventually the t-rex my attack the pillars, leaving nothing but difficult terrain making rubble to slow it down. If they can survive the full minute, they get an immovable rod. If by some miracle they can take it down, I'll let the one who strikes the final blow pick whatever they want from the magic items list that is rare or lower because they are all level 1 and a t-rex is CR 8, they definitely deserve it.
Finally the championship match the one that determines the champion of the whole tournament. They get the 60ft wide arena they fought the trex in (pillars repaired) with 4 additional pillars to use for cover, to climb, to destroy, to whatever. I don't know about you guys but I can't wait to see who wins, and what do they get? 100 platinum pieces more than enough money to start out in Chult
So everything is ready all I have to do is wait for them all to be here and all ready to play
I just am amazed at the characters my little cousins and little brother made.
First we have a human monk soldier, Abraham, who is probably the most normal party member
Second we have a old enough to die of old age incredibly light dwarf rogue criminal, Jeff. Which is borderline an oxymoron
Third and forth(yes this is two characters with two players) we have a sibling pair of gold dragonborn barbarian guild artisans(calligraphers), Jeoni and Katface, the younger of which(the sister, Katface) was originally statted out to be a druid. Extra amusing is the brother's player(who is my brother) originally was only wanting to be a dragonborn if the sister's character wasn't going to be a dragonborn until I said they could be different types of dragonborns(them deciding there characters were siblings happened between that and them picking the type of dragonborn)
Fifth and last we have a five foot tall(I talked her down from 6) five year old dark elf death cleric criminal,Elfy, who has wisdom as one of her lowest stats
This will be interesting, once we finish actually making these characters. We just need to do class stuff and the background features (I forgot my bad)for the human and dwarf, the first level spell for the cleric(thank goodness for the minimum number of prepped spells), and the none mechanical bits like traits and bonds and flaws for everyone. Then we can be off to chult were I hope not to tpk them instantly
#d and d#small children campaign#Elfy#Katface#Jiani#Abraham#Jeff#Michael#Yi'eta#Tharash of the Blood Pit#soon the battle will begin#and after that to Chult
20 notes
·
View notes