Text
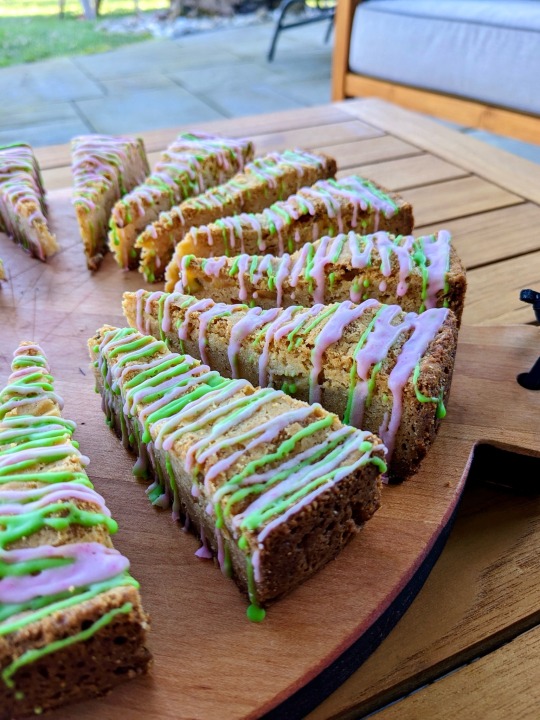
White Chocolate Pistachio Brownies with Rose and Cardamom
A prayer for Free Palestine
INGREDIENTS
8 oz (226 g) high quality white chocolate bars, chopped, or chips
3⁄4 cup (168 g) unsalted butter, chopped into small cubes
2 eggs
2 egg yolks
1 1⁄4 cups (250 g) granulated white sugar
1 tablespoon (15 ml) vanilla extract
1 3⁄4 cups (219 g) all-purpose flour, spooned and leveled, or weighed
3⁄4 teaspoon salt
1/2-1 cup of roughly chopped unsalted pistachios
A lot of powdered sugar
Rose Water
3-4 cardamom pods
3 Tbs of whole milk
NOTES:
I scaled the recipe up by about a third to bake them in a 9” round. I found out that they come out better if you make them square according to the recipe as is.
INSTRUCTIONS
1. Preheat the oven to 325 degrees. Lightly grease a 9x9 pan and set aside. (You can also line the pan with parchment paper for easier removal.)
2. Melt the butter and the white chocolate together in a double boiler over medium-low heat. Stir continuously to ensure the white chocolate gets heated evenly. Then remove from the heat.
3. Add the eggs, egg yolks, sugar and vanilla to a large bowl and whisk together until pale and smooth. (You can also use an electric hand mixer on high speed to make it easier.)
4. Pour in the white chocolate mixture and whisk until combined and smooth.
5. Fold the flour and salt into the wet ingredients with a rubber spatula just until combined. Then fold in the pistachios.
6. Pour the white chocolate brownie batter into the prepared pan. Use a mini offset spatula to smooth the batter out.
7. Bake the brownies for 30-35 minutes. Then let the brownies cool completely in the pan on a wire rack.
8. Once cool, use a butter knife to loosen the edges of the brownies from the pan, and turn over to gently release. Cut into 16 squares.
9. Make the rose and cardamom drizzle. Warm the milk in a saucepan and break open the cardamom pods. Simmer them in the milk on very low heat until the flavor has infused. Usually 15 minutes to a half hour. Taste the milk to confirm.
10. Strain out the cardamom pods and let the milk cool to room temperature. Add 1/4 tsp rosewater to the milk (you can add more later if you want a rosier flavor) and begin adding powdered sugar. Add a quarter cup to start and stir until no lumps remain. Continue adding powdered sugar until you get a nice thick drizzle-able consistency. Taste and adjust the rosewater content if necessary.
11. Split the icing into two batches. Add pink food coloring to one and green food coloring to the other.
12. Put each icing into separate sandwich bags/piping bags. Cut a very small hole in the corner and use the bag to pipe the icing. Alternatively, you can just use a fork to do the drizzle. Allow to set.
13. Call your reps and demand a permanent ceasefire in Gaza. Go to protests. Boycott Starbucks, HP, Puma, Sodastream and the other companies that support the violence against Palestinians, found at this link. Do everything you can. Don’t look away.
“When Prophet Ibrahim was thrown into fire by the oppressor of the time, Numrud, a bird took drops of water in her beak and dropped it over the fire.
The other animals laughed: ‘what will your drops of water do for the largest of fires?’
The bird replied: ‘it may make no difference to the flames but when God asks me, ‘my Friend was burning, what did you do’ at least I won’t be ashamed.’
When you speak, when you protest, when you write, remember that.
God’s friends are burning. Let us not be ashamed 🇵🇸”
Taken from @zainab_alavi1 on instagram.
When this is over will you be able to face yourself?
#free palestine#free gaza#from the river to the sea palestine will be free#baking#magical cookery#color magic#cottagecore#witchythings#kitchen witch#witchy#witchcore#cooking#honeycore#white chocolate#brownies#cookies
8 notes
·
View notes
Text
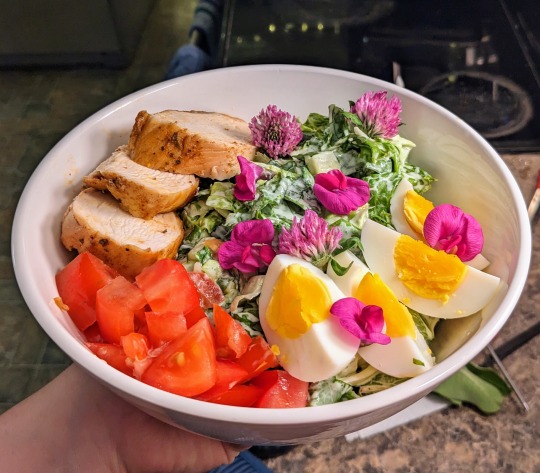
Litha Wildflower Salad🌼
A wonderful way to celebrate Litha or any day in the summer is to add delicious wild edibles to your meals. Today I went on a plant walk to gather wild flowers for a flower crown and I happened upon these wild pea flowers and red clover flowers. I sprinkled them on top of a green goddess salad. They were so delicate and sweet and summery :)
A note of caution when collecting or eating wild foods: eat a plant only if you have a 100% ID. Plants can have lots of lookalikes and there are many poisonous plants. Additionally, when introducing a new food, it’s best to try a small amount of them first, so you can get a sense of whether you can tolerate them. Basically like a patch test when you use new skincare or makeup.
I love you, happy solstice, or happy whenever you’re reading this!
#cottagecore#honeycore#witchythings#fairycore#kitchen witch#faerycore#witch community#hedge witch#witchcraft#flowercore#green witch#witchblr#witchy recipes#cooking#cottage#herbalism#magical cookery#edible flowers#foraging#sweet pea#red clover#green goddess#salad recipe
24 notes
·
View notes
Text

✨Lucky In Love Strawberry Spell✨
Feeling a bit lost in your love life? Hoping to find a group of friends who really get you? Perhaps you’re looking to draw that special someone into your life? Strawberry can help with that.
Strawberries have many magical associations, among them are love, affection, pleasure, and devotion. They make a handy friend when it comes to drawing love and care into your life. This recipe combines strawberries with lemon’s powers of friendship, love, and new beginnings, along with their shared element of water to create a delicious beverage that you can imbue with as much or as little magic as you see fit. Magic aside, this recipe yields a very tasty end result.
✨Beverage Supplies✨
🍓Blender
🍓Fine Mesh Strainer (optional but recommended
✨Magical Supplies✨
🍓Rose Quartz for Love
🍓Green Aventurine for Success in your Venture to Find Love
🍓Clear Quartz is always a good substitute for any crystal you don’t have
🍓1 Small Pink or White Candle
✨Ingredients✨
🍓1 Cup of In-season Strawberries (frozen would work too!)
🍓Juice of Up to 2 Lemons
🍓Sugar or Simple Syrup to Taste
🍓1 Quart Filtered Water
✨Instructions✨
1. Make some magic. Light your candle and bring in your relevant crystals.
2. If using fresh (and not frozen) berries, wash em! Then remove the green berry tops.
3. Cup the prepped berries in your hands over the blender cup. Visualize a pink mist flowing from deep within you, surrounding your hands and the berries, shrouding them and embedding them with your magical purpose. If you have a mantra, this would be a great time to say it, either out loud or in your head. “I draw love to myself and I deserve the love I want.” Visualize yourself surrounded by new friends, or in the thrall of a new and satisfying lover. When you feel that you have completed this, plop the berries in the blender cup.
4. Juice 1 lemon. While doing so, visualize squeezing the magic out of the lemon and concentrating it in the juice. Add the juice to the blender cup.
5. Add a couple tablespoons of sugar (not too much, you can always add more later) to the blender cup, imagining that you are sweetening the spell, calling the sweetness of love to yourself.
6. Add the water to the blender cup, and then blend until extremely well combined, long enough to dissolve the sugar.
7. Taste, and adjust for acidity and sweetness. Blend again.
8. When you are satisfied with the flavor, strain through a fine mesh strainer to remove the gritty seeds. Or don’t! It’s optional and I myself don’t always do it.
9. Enjoy your beverage, making sure to savor it. Just like strawberry season, love is sumptuous, and can feel impossibly far off during the lean months. But the changing of the seasons assures us that the strawberries will return, and love will come again.
#cottagecore#honeycore#witchythings#fairycore#kitchen witch#faerycore#witch community#hedge witch#witchcraft#flowercore#green witch#witchblr#witchy recipes#cooking#cottage#herbalism#magical cookery#strawberry#beverages#recipes#magical recipes#summer recipes#lemonade#strawberries
325 notes
·
View notes
Text
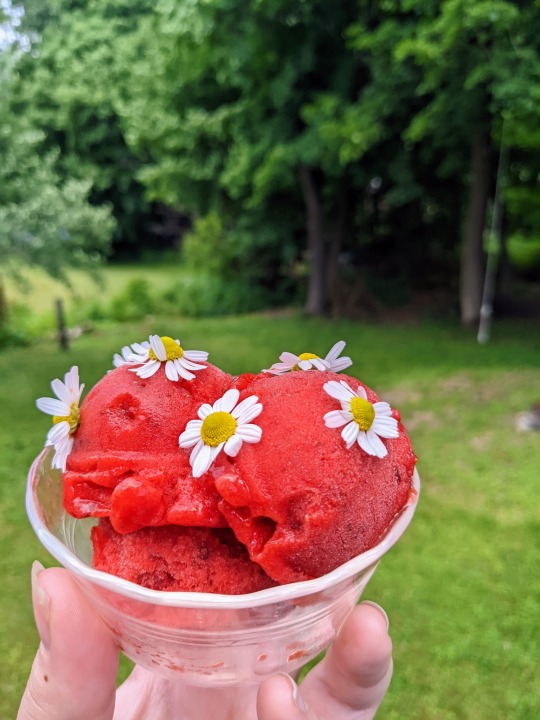
✨Magical Motivating Strawberry Rosemary Sorbet✨
Having trouble sticking with a project or a daily practice? Do you have big plans but you’re not quite sure how to start? Might I suggest a delicious strawberry spell!
Strawberries contain the magic of devotion to fertility (and no I don’t mean it that way.) You can ask strawberry to help you devote yourself to a meaningful practice where you may not see the fruits of your labor for a while. Think learning an instrument, starting a business, or sticking with actually journaling every day.
Reproducing primarily through runners, strawberry gives of herself until the young plants are well established, and can even support the runners into maturity if there is no viable soil around. Strawberry is all about support and follow through. The mantra I used for this spell follows that logic. “I see my projects through and give of myself what is needed of me.” Here’s hoping this gets me motivated to finish my web design project!
Sorbet Supplies✨
🍓Blender
🍓Ice Cream Maker
Magical Supplies✨
🍓Candle (orange for motivation, or white for general purposes)
🍓Crystals (tiger’s eye for shaking off lethargy, amethyst for purpose, and a clear quartz point to direct the energy. It’s also fine to not have crystals!)
Ingredients✨
🍓2 Quarts of Strawberries (ideally fresh and in-season, but frozen or out of season will work too!)
🍓Juice of Less Than One Lemon (to balance flavor)
🍓Pinch of Salt (to balance flavor)
🍓Fresh Rosemary (1 medium sprig) (to protect your intentions)
🍓1 cup of sugar
🍓A few tablespoons of water (just enough to make a simple syrup with the sugar)
🍓Fresh Chamomile Flowers for Garnish (or an extra couple rosemary needles or skip the garnish)
Instructions✨
1. Make some magic. Light your candle and bring in your relevant crystals.
2. If your berries are fresh and not frozen, wash em!
3. Decapitate your berries (cut the green tops off.) You can use a little knife or melon baller or even your thumb nail.
4. Enchant your berries. Hold as many of them as you can in your cupped hands and imagine an orange mist swirling around them while you say your mantra. When you’re done, drop them in the blender and blend them until consistent, then add to a large mixing bowl. (If you have too many berries for the blender cup, blend the berries in batches.)
5. Mince the rosemary. You should have about a tablespoon minced. Then, cup the minced rosemary in your hands and enchant it with a white light of protection. Then add it to a saucepan.
6. Add your sugar and water to that saucepan, with the heat on medium high. Make sure you add enough water for it to be a syrup and not a caramel. Maybe 3-4 tablespoons, maybe more. Stir to dissolve, and then turn the heat down to very low and simmer for 5 minutes. Turn off the heat and rest the syrup with the lid on for a few minutes to let the flavor infuse.
7. Add 2/3rds of the syrup to the strawberry purée along with a tablespoon of lemon juice and a pinch of salt. Stir to combine. Stir longer than you think you will need to, because the mix is thick and the flavors won’t distribute unless you distribute them with purpose. Taste, and then add more syrup if needed. It should taste slightly sweeter than you would like, because freezing mellows the sweetness. Keep adjusting and mixing until it tastes right.
8. Add it to your ice cream maker and churn until thick but not totally set (it’ll finish setting up in the freezer.) 15 minutes to a half hour. Freeze for at least 2 hours before scooping.
9. Scoop and garnish with edible flowers or leftover fresh rosemary needles.
10. Eat with intent :)
#cottagecore#honeycore#witchythings#fairycore#kitchen witch#faerycore#witch community#hedge witch#witchcraft#baking#flowercore#green witch#witchblr#witchy recipes#cooking#cottage#herbalism#edible flowers#foraging#magical cookery#recipes#sorbet#strawberry#color magic#summer#rosemary#chamomile#dessert
240 notes
·
View notes
Text

Summer goth 🖤🌻
#witchythings#fairycore#kitchen witch#faerycore#witch community#witchblr#alt girl#goth aesthetic#goth outfit#summer goth#wigstyle#i’m fat#space buns#black lipstick
12 notes
·
View notes
Text
I love when I get a follower notification and it’s like “gay-lesbian-who-is-gay-and-loves-women is now following you” simply the best, immaculate vibes
8 notes
·
View notes
Text

Enchanted Bacon Cheddar Chive Scones for Protection🌱✨
Time to fire up the oven and warm up your chilly kitchen. These bacon-chive-cheddar scones are tender, flaky, savory, and so so special. Not so hard to make either! They require no special tools, and can be mixed and shaped entirely by hand (and with a knife, of course.) Eat them to veil yourself and your loved ones in protection, and also because they are super yummy and nourishing. You might even like to get extra supplies because you’ll be tempted to make a second batch as soon as you take your first bite🌱✨
The magic in this recipe comes from the chives and the bacon. Chives offer powerful protection magic (as well as powers of healing and lust) and bacon offers intensification to the spell. Bonus points if you grew the chives yourself 🌱✨
Ingredients
* 2 cups (240g) all purpose flour or 2 cups (226g) pastry flour
* 1/2 teaspoon salt
* 1 tablespoon (14g) baking powder
* 2 teaspoons granulated sugar (8g)
* 4 tablespoons (57g) cold butter, ideally cut into small cubes and then frozen for at least a half hour.
* 1 cup (113g) very coarsely grated or diced cheddar cheese (I recommend a mix of sharp and very sharp.)
* 1/3 cup (about 14g) snipped fresh chives or 1/3 cup (21g) finely diced scallion tops (the green part) (for protection, healing, and lust)
* 1/2 pound (227g) bacon, cooked, cooled, and crumbled (about 1 cup) (intensifies a spell)
* 3/4 cup + 2 tablespoons (198g) heavy cream or whipping cream, or enough to make the dough cohesive
Instructions
1) Make some magic. Light a white candle in your kitchen and bring in any crystals relevant to your purposes. Some great crystals for this purpose are amethyst, citrine, and rose quartz.
2) Preheat the oven to 425°F with a rack in the middle to upper third. Lightly grease a baking sheet, or line it with parchment.
3) Whisk together the flour, salt, baking powder, and sugar. Work the butter into the flour until the mixture is unevenly crumbly, with some of the butter remaining in larger pieces. This can be done in a food processor, by hand, or using a pastry cutter.
4) Enchant your flavor ingredients for protection (chives and bacon.) Hold each one in the palm of your hand and envision a white light of protection surrounding the ingredient, and say or think your protection mantra if you have one. Then add them to the mixture along with the cheese.
5) Mix in the cheese, chives, and bacon until evenly distributed.
6) Add 3/4 cup of the cream, stirring to combine. Try squeezing the dough together; if it's crumbly and won't hang together, or if there are crumbs remaining in the bottom of the bowl, add cream until the dough comes together. Transfer the shaggy dough to a well-floured work surface.
7) Pat the dough into a smooth 7" disk about 3/4" thick. Transfer the disk to the prepared baking sheet. Use a knife or bench knife to cut the disk into 8 wedges, spreading the wedges apart a bit on the pan.
8) Brush the scones with a bit of cream; this will help their crust brown.
9) Bake the scones in the middle or upper third of the oven for 22 to 24 minutes, until they're golden brown. Remove them from the oven, and cool right on the pan. Serve warm, or at room temperature.
10) Refrigerate any leftover scones, well wrapped, for several days; reheat before serving. Freeze for longer storage.
#cottagecore#honeycore#witchythings#fairycore#kitchen witch#faerycore#witch community#hedge witch#witchcraft#baking#flowercore#green witch#witchblr#witchy recipes#cooking#cottage#hearth witch#magical cookery#scones#savory scones#bacon#cottage witch#winter cottage
214 notes
·
View notes
Text
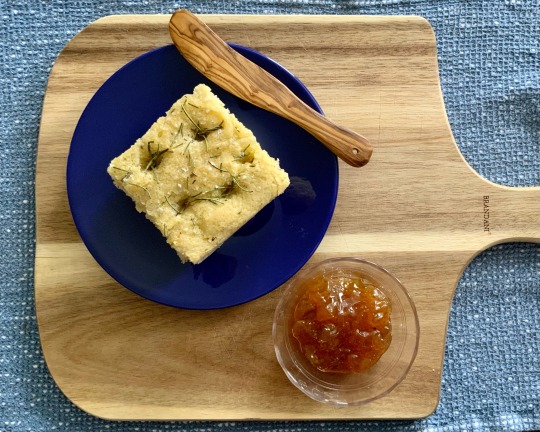
Easy Rosemary Focaccia Loaf for Love and Protection ✨
With Valentine’s Day right around the corner, now is as good a time as any to enchant (metaphorically or literally, if you get their consent of course) your lover with this glorious loaf of focaccia. It is outrageously lovely; crunchy on the outside, tender on the inside, and brimming with the aroma and magic of rosemary. Magic or no, this loaf is so good it could win anyone’s favor ✨
Rosemary holds powers of love and protection, and has a history as an aphrodisiac. Rosemary is also traditionally burned to purify a space, so you can also enjoy the benefits of the aroma filling and purifying your home as this loaf bakes. In a more tangible sense, it has been shown to improve working memory and cognition, so it might behoove you to enjoy a bit more rosemary in your cooking if you need a boost.
Ingredients
* 1 Package of Active Dry Yeast (.25 oz, or 7 grams)
* 1 Cup or 237 grams of warm water (105 degree F, or thereabouts)
* 6 tablespoons or 81 grams of extra virgin olive oil, divided
* 3/4 teaspoon of salt (4 grams)
* 1/4 cup or 42 grams of semolina flour (you could probably get away with using bread flour if you don’t have semolina but I haven’t tried it myself)
* 2 teaspoons of fresh or dried chopped rosemary
* 2 1/2 cups or 300 grams of bread flour
* 3 more tablespoons or 40 grams of olive oil
* 2 more teaspoons of fresh or dried rosemary
* 2 big pinches of flaky sea salt
Instructions
Make some magic✨ Light a white candle in your kitchen and set your intention.
Enchant your rosemary with your intention. If you plan to make this as an aphrodisiac, imagine your person of choice being utterly smitten with you! Hold the rosemary in the palm of your hand, and focus and concentrate your intention as an orb of white light around the rosemary. If you have a mantra, recite it to yourself out loud or in your head.
Back to the practical! Whisk the yeast with the warm water. Then, add 2 tablespoons of oil, 3/4 teaspoon of salt, 2 teaspoons of rosemary, and semolina flour and whisk to combine.
Add all the bread flour and stir it in with a spoon, to the extent possible.
Dump out the dough onto a floured surface and knead for three minutes, until the dough is smooth, dusting with flour as needed to keep the dough from sticking to your surface.
Pour 2 tablespoons of olive oil right onto the dough ball and knead it into the dough. Honestly, this is going to seem like a mess at first, but after a minute, it will start to look right again. Then, pour 2 more tablespoons of olive oil on the dough and knead it in again. Knead the dough until it becomes extremely homogeneous and somewhat sticky.
Oil the dough ball and put it in a bowl, and cover that bowl with foil or a lid. At this point, you can either proof it at room temperature for an hour or two until it doubles in size, or you can put it in the fridge overnight. I prefer to fridge it overnight, because I think it makes the flavor better, but it’s up to you!
Grease a baking sheet or an 11 x 7 baking dish. Press and spread the dough out until it’s about a half inch high. If working with a baking dish, push and pull the dough to fill the space. Then rest for fifteen minutes to let the gluten relax.
Oil your fingers and dimple the dough, pushing all the way down (but making sure not to break through the dough.) Then, pour on 2 ish tablespoons of oil, distributing it across the whole surface of the dough. Then sprinkle with your remaining enchanted rosemary on top, along with your flaky sea salt. I use maldon salt, but any salt would probably do. Just use lots! This bread really wants to be quite salted. Rest the dough at room temp for 45 minutes, or until doubled in size.
Preheat your oven to 475ºF. When the oven comes up to temperature, put in your loaf, and bake it for 15 minutes.
Pull the loaf out of the oven and immediately transfer to a cooling rack so that the bottom doesn’t get soggy.
Slice into big hunks and devour gleefully, sharing with the object of your desire (with informed consent for any spells you have put on the loaf.) Enjoy with a mild jam, like fig or pear, or by itself.
#cottagecore#honeycore#witchythings#fairycore#kitchen witch#witch community#hedge witch#witchcraft#baking#green witch#hearth witch#food spells#protection spell#spell work#love spells#rosemary#focaccia#recipe#witchy recipes#valentines day#magical cookery#magic#witchblr#love magic#spell craft#cooking#italian food#cottage aesthetic#herbalism#herb magic
781 notes
·
View notes
Text

Lovely Rosewater Almond Sugar Cookies
A Spell For Self Love 🌸💕✨
With Valentine’s Day looming just around the corner, it’s the perfect time to explore the love that matters most. The love of the self. We are steeped in a culture that benefits from our self-hatred, and one of the best ways to fight back and to heal ourselves is self love. I strongly suggest you pair this spell with a cup of tea and an evening of journaling about the parts of yourself that you love, and exploring what societal or social reasons you might have to dislike the parts that you are not fond of.
The central magical ingredient in this recipe is rose. Roses are associated with love, healing, psychic powers, and protection, and are ruled over by many of our beloved deities. Eros, Aphrodite, Demeter, Aurora, Isis, to name only a few.
Ingredients
For The Rose Water Sugar Cookies:
* 3 cups flour (360 grams)
* 1 teaspoon baking soda (6 grams)
* 1/2 teaspoon baking powder (2 grams)
* 1 cup (2 sticks) unsalted butter, softened (226 grams)
* 1 1/2 cups sugar (297 grams)
* 2 eggs
* 1 teaspoon almond extract (vanilla is fine if you don’t have almond)
* 1 teaspoon rose water
* 1 tablespoon of culinary roses
For The Rose Water Icing:
* 1/2 cup confectioners’ sugar (57 grams)
* 1 tablespoon milk (15 grams)
* 1/2 teaspoon rose water (more or less depending on how strong you would like the flavor)
* 1 drop of food coloring, if desired
Instructions
1. Step one is to make some magic. Light a candle, ideally pink, but white is fine too, and gather your ingredients with intention. If you have some rose quartz pieces, round them up and set them by your candle.
2. Step two is to enchant your ingredients. Hold the rose petals in your hand and imagine a white light made of love surrounding them. Say to yourself out loud or in your head “I love myself, and I am loved by myself.” If you want to enchant more ingredients, repeat this process with each of them.
3. Back to the practical! Preheat your oven to 375 degrees F (190C.) To make the cookies, add the flour, baking soda, and baking powder to a medium bowl. Mix to combine.
4. In a large bowl, add the butter and sugar and mix using a hand mixer on low until well combined (about 2 minutes).
5. Add the eggs, almond extract, and rose water and mix on low for another minute.
6. Add half of the dry mixture to the wet mixture. Mix to combine. Add the second half and mix until combined.
7. At this point you have two options. You can roll out the dough (1/4 at a time) and cut it out with a cookie cutter, or you can take scoops of the dough, and pat them into flat rounds. That is what I did because I do not own cookie cutters.
8. Bake at 375 degrees F (190C) for 10 minutes on cookie sheets lined with parchment paper.
9. To make the icing, combine the confectioners sugar, milk, rose water, food dye, and vanilla extract. Add more milk if you would like a thinner consistency. I actually made mine with just rosewater and confectioners sugar (and dye) because I wanted a really strong rose flavor, but I know that’s not for everyone.
10. After the cookies have completely cooled, drizzle the icing over the cookies. (place the cookies on more parchment paper before drizzling.)
11. Sprinkle with your enchanted rose petals
12. Allow to set.
#cottagecore#honeycore#witchythings#fairycore#kitchen witch#witch community#hedge witch#witchcraft#green witch#baking#self love#food spells#spellwork#witchy recipes#eclectic witch#cottage witch#witchblr#rose#magical cookery#color magic#love witch#hearth witch#edible flowers#pink#love spells#faerie#crystals#naturecore
669 notes
·
View notes
Text
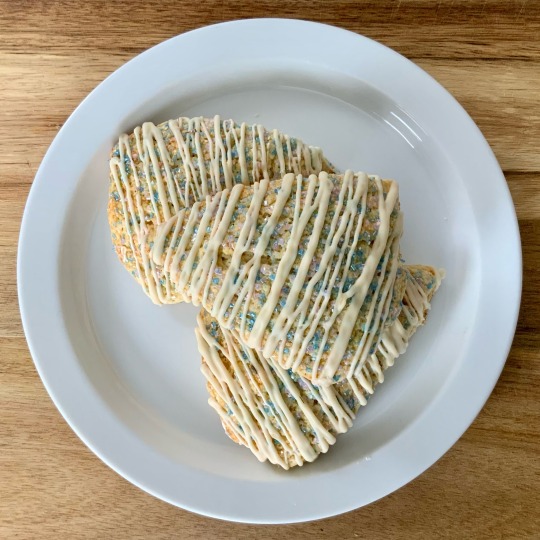
Heavenly Lavender Scones
A Spell for Happiness and Anxiety Relief 💜🦋✨
I think we all need a little bit more joy and a little less spiraling misery. I won’t pretend that life isn’t deeply challenging right now, and I wrote this spell to carve out a bit of delicious relief. Make these scones and see for yourself <3
Lavender is associated with calm and anxiety relief, and it’s also associated with Selene, goddess of the moon. The heady scent of dried lavender serves as a reminder of summers past and that there will be summers again.
Scones:
* 2 cups (250 grams) all-purpose flour
* 1/3 cup (67 grams) granulated sugar
* 1 tablespoon (12 grams) baking powder
* 1/2 teaspoon salt
* 5 tablespoons (70 grams) unsalted butter chilled and diced
* 1 tablespoon dried lavender
* 2/3-3/4 cup (158-177 milliliters) heavy cream plus extra for brushing
* 1 large egg
* 1/2 vanilla bean or 1 teaspoon vanilla extract
* Decorating sugar
Vanilla Glaze:
* 1 cup (120 grams) powdered sugar
* 1/2 vanilla bean or 1 teaspoon vanilla extract
* 1-2 tablespoons (15-30 milliliters) milk
* Dried Lavender for garnish
Instructions:
* Preheat oven to 400˚F (200˚C). Line a baking sheet with parchment or lightly grease.
* In a large bowl, combine the flour, sugar, baking powder, and salt.
* Quickly cut in the butter using a dough blender, food processor, two forks, or your fingers until blended and no pieces are larger than a pea.
* Pour the tablespoon of lavender right into your hand and imagine a white light surrounding the herbs. Imagine that it is a light of gentle healing and joy. Say to yourself “I invite joy and relaxation into my life” while focusing on holding the light around the herbs.
* In a small bowl, whisk together your now enchanted dried lavender, 2/3 cup (158 ml) heavy cream, egg, and seeds from the vanilla bean (or extract).
* Gently mix the cream mixture into the dry ingredients until the dough just comes together. Add most but not all of the cream mixture at first. You want a shaggy dough. Add a little more cream only if the dough is too crumbly to hold. It should not be sticky.
* On a lightly floured surface, smush and pat the dough out into a circle, pressing it together so that it is not shaggy anymore. The circle should be about 3/4” high.
* Cut the circle into 8ths and transfer to a prepared parchment lined baking sheet.
* Brush the tops of the scones with a thin layer of heavy cream and then immediately sprinkle with your decorating sugar. Bake in preheated oven until lightly golden, 21-24 minutes. Gently transfer the scones to a wire rack and cool to room temperature.
* In a small bowl, combine the powdered sugar with the seeds from a vanilla bean or vanilla extract. Whisk in 1-2 tablespoons milk until a smooth glaze forms.
* Drizzle the glaze over the cooled scones and immediately sprinkle with a small pinch of dried lavender if desired.
* Allow the glaze to set. These Lavender Vanilla Scones are best served the day they are made.
#cottagecore#honeycore#witchythings#fairycore#kitchen witch#spells#witchblr#magick#hearth witch#winter#baking#winter baking#cooking#witchy recipes#recipes#selene#moon#full moon#hedge witch#hedgewitch#green witch#eclectic witch#witchcraft#witch aesthetic#witchyvibes#witch community#baked goods#scones#moon magic
1K notes
·
View notes
Text
Hi My Loves :) I’m still here
Winter is for resting and drinking cocoa <3
Maybe I’ll see you in the spring?
6 notes
·
View notes
Text
I met someone who works for Tumblr this weekend and I asked her “have you ever been bullied by the residents of tumblr” and she replied simply: “dude. I’m @staff”
So. Please be nice to them.
12 notes
·
View notes
Text
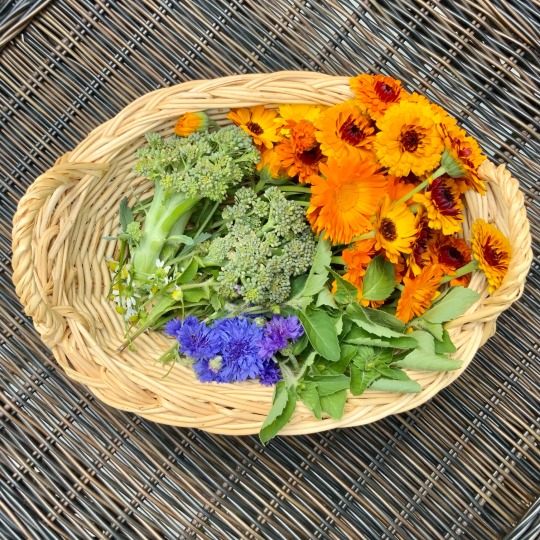
Morning Harvest <3
Broccoli, Calendula, Tulsi, Cornflowers, and Chamomile :)
#cottagecore#honeycore#witchythings#fairycore#kitchen witch#faerycore#witch community#hedge witch#witchcraft#flowercore#garden#organic gardening#edible flowers#flowers#flower garden#witchblr#green witch
88 notes
·
View notes
Text
:D
IT'S ALMOST OVER THE GARDEN WALL REWATCH TIME
410 notes
·
View notes
Text

Bouquet Curtain <3
If you like to look at your flowers while they dry out, try this method<3
Materials:
Stemmed flowers
Twine, cut in one 3 foot piece and several 6-10 inch pieces
Scissors
Instructions:
Cut your flowers with medium to long stems. Anything over a few inches will do.
Pull the leaves off the stems and arrange in a bundle on top of a 6-10 inch piece of string. When you have enough flowers piled, tie the string and cinch it medium tight. Too tight and it could cause molding rather than drying. Tie in a bow so you can undo it later. Trim the ends to make the bouquet short-ish and tidy and even.
Tie a 3-4 foot piece of twine to your curtain rod, and then tie in your bundles one at a time. I did it by tying slip knots into the middle of the long piece and slipping the bouquets in, and then sliding them to tightness. You can use any knot, though! Whatever works.
Run a fan in the room to keep the air circulating, or just open some nearby windows. Revel in your beautiful token of the summer harvest <3
Please my darlings tag me if you do this, I would be soooo excited to see how it comes out!
#cottagecore#honeycore#witchythings#fairycore#kitchen witch#faerycore#witch community#hedge witch#witchcraft#flower drying#flowercore#flowers#edible flowers#herbal medicine#herbalism#botany#botanical art#organic gardening#witchblr#witch#naturecore#sabbatic witchcraft#sabbats#harvest season#summercore#green witch#green witchcraft
70 notes
·
View notes
Text
Sumac “Lemonade” :)
A wonderful cooling and tonifying summer treat, Sumac “Lemonade,” aka sumac sun tea, is easy as pie to make and is certainly worth the non-effort. A wonderful way to celebrate Lammas, the start of harvest season!
Sumac is that red spike bearing tree you see lining all the highways in July and august, and it’s official common name is “Staghorn Sumac.” This is because the new branches are fuzzy like antlers :) This is a different plant than poison sumac, which bears only small round white berries, rather than these palm sized red spikes.
Sumac is a pioneer species, meaning it is quick to colonize and rehabilitate disturbed ecosystems. That’s why you see them flanking all the highways.
Just look for the distinctive red spikes somewhere that’s not, like, super heavily trafficked. We don’t want to eat car dust, right? The berry spikes are really easy to harvest, you can just cut them off the tree and you’re good to go. I suggest you bonk the spikes against a hard surface to get any critters out before you pack em up and take em home.
They’re ready to process right away; you don’t have to dry them or cure them. Just mush the berry bits between your fingers and they will fall from the spikes. You can squeeze them right into your water vessel, like I did here. I would suggest one fruit spike per quart of water. Let your vessel sit in the sun for a couple hours (some recipes say as little as an hour, some say all day,) then strain out the plant material (and compost it!) and grab your sweetener. You could drink this without it, but I think sweetness really brings out all the lovely flavors.
A note about sweeteners: if you want to use something that needs to dissolve into your beverage, like granulated sugar or honey, it’s probably not going to dissolve so well in this cool tempered tea. And if you were to heat up the batch, it would muddy (and some say ruin) the flavor. So here’s what i did! I microwaved a little bit of the beverage in a mug, with my sweetener (honey) already in it. When it was hot, it was easy to stir in the honey, and then I decanted it back into my pitcher of iced tea. Good to go! Some people might even refer to that as a simple syrup :)
You can store this sweetened tea in the fridge for a couple days, but not too long! Because it will start to get fizzy from the natural yeasts on present on the sumac berries.
Please please pleaseeeee make this I just know you’ll love it <3
#cottagecore#honeycore#witchythings#fairycore#kitchen witch#faerycore#witch community#hedge witch#witchcraft#sabbats#lammas#harvest holiday#forage#foragecore#foragedfood#foragers#wild food#sumac#staghorn sumac#witchblr#witchy recipes#cottage witch#witchyvibes#green witch#forestcore#forest#nature#naturecore
83 notes
·
View notes
Text
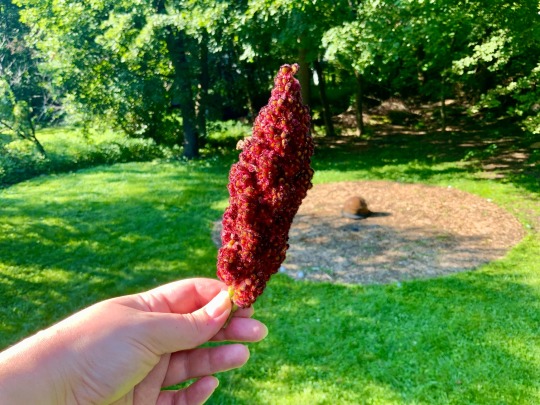
The Incredible Edible (and Magical) Sumac!
If you’re ever flying down the highway in the dog days of summer, you’ve probably seen dark red spikes growing from the trees lining the road. And if you’re anything like me, you’re probably like “what in the fuck are those??” Well, wonder no more, they are the mature berry spikes of the Staghorn Sumac plant!
A safety and cautionary note: this is a different plant than poison sumac. Poison sumac has white round berries, and not these large red berry spikes. It also grows in marshy areas, bogs, and swamps, rather than disturbed roadside areas like staghorn sumac does. Moving onto…
Taste! Staghorn sumac berry spikes taste like lemonade, and they’re delicious as hell steeped in cool water for a few hours. Strain, add sweetener, and you have a delicious, tangy, medicinally cooling beverage.
As the tang may suggest, sumac is high in vitamin C; it’s also high in antioxidants! It is excellently astringent, so it makes a great acne wash. Drinking sumac lemonade can even help with varicose veins.
Magically speaking, I leave it to the experts at herbmagic.com:
“Sumac brings harmony, and resolves difficulties. A last ditch law trick: if you have been found guilty in a court of law, it is said that you can still help yourself if you carry 9 sumac berries in your pocket when you go for sentencing, for you will receive a lighter sentence or smaller fine.”
If nothing else, when you see one of these berry spikes on the side of a path, you should absolutely stop to stroke the soft fuzzy spikes. And maybe harvest a couple for a batch of sumac-ade :)
#cottagecore#honeycore#witchythings#fairycore#kitchen witch#faerycore#witch community#hedge witch#witchcraft#cooking#herbs#herbalism#herbal medicine#herb magic#forestcore#sumac#nature#foraging#foragedfood#wild food
110 notes
·
View notes