
Statistics
We looked inside some of the posts by itmlab and here's what we found interesting.
Average Info
Notes Per Post
5
Likes Per Post
5
Reblog Per Post
0
Reply Per Post
0
Time Between Posts
5 days
Number of Posts By Type
Text
17
Last Seen Tumblr Blogs


Fun Fact
130K people were victims of a chain letter scam that affected Tumblr in May 2011.
Text
How To Connect Your Ring Doorbell to Alexa?
Ring and Amazon are excited to announce the integration of Elgato Eve and Ring products. With this integration, customers can now use their Amazon Alexa voice service to access their video feed, play back recorded video clips, control their Ring Doorbells, and more.
For more info: How To Connect Your Ring Doorbell to Alexa?- ITMlab
Make sure you have the right equipment.
Make sure you have the right equipment.
Your Ring Doorbell and Alexa device must be connected to a WiFi network, which means they must be within range of your router or modem. The Ring Doorbell also has an Ethernet port that can be used if your home has wired internet access (which is more common than you might think). If this is your case, then plugging it directly into the modem will give you better reliability and faster speeds than connecting wirelessly–but only if all of those components are actually working correctly!
The Ring Doorbell needs to be connected via either WiFi or Ethernet cable before proceeding further; otherwise, many features won’t work properly.
Set up your Ring Doorbell on the Alexa app.
Open the Alexa app on your mobile device.
Click on the menu button in the top left corner of your screen, then select Devices.
In the top right corner of your screen, click Add Device.
Select Ring from the list of available devices and then enter an email address and password for connecting to Ring’s service (these details will be pre-populated with information if you’ve already set up other smart home devices).
Put your Amazon Echo Show, Echo Dot or Fire TV Cube in discovery mode.
To connect your Ring Doorbell to Alexa, you’ll need to put your Amazon Echo Show, Echo Dot or Fire TV Cube in discovery mode.
Go to Settings on your Alexa device and select Devices.
Select Add Device.
Choose Ring Doorbell from the list of available devices and follow instructions on screen.
Once you’ve connected your Ring Doorbell to Alexa, you’ll be able to see a live view of your front door when someone rings it. You can also use Alexa to talk with visitors and hear them through the built-in speaker on your Echo device.
Pair your Echo Show, Echo Dot or Fire TV Cube with your Ring 2 device.
Connect the Ring 2 device to your router.
Pair your Echo Show, Echo Dot or Fire TV Cube with your Ring 2 device.
Make sure that all of your accounts are active and working properly
before continuing. If you are using a Fire TV Cube, make sure that Alexa is enabled and working properly.
Make sure that all of your accounts are active and working properly.
Check that your Ring Doorbell is connected to the internet.
Make sure that your Ring Doorbell is connected to the Alexa app.
Make sure that your Ring Doorbell is connected to Amazon’s cloud service, which allows voice commands sent through Alexa devices (like an Echo Show) or third-party devices like this one from Samsung or Google Home Hub, which also have built-in speakers and microphones.
If any of these things aren’t working properly, try unplugging the device and plugging it back in again before trying again!
It’s very easy to connect a Ring doorbell to Alexa!
Connecting your Ring Doorbell to Alexa is very easy. You just need to make sure that you have the right equipment and then follow these steps:
Make sure that you have an Amazon Echo device with Alexa enabled (e.g., the Echo Show, Dot or Fire TV Cube). If not, please refer to Amazon’s website for more information on how to purchase one of these devices.
Open up the Settings section within the Alexa app on your mobile device or computer browser; this can be done by clicking on ‘More’ in top-left corner and then selecting ‘Settings’ from dropdown menu options list.*
Within Settings page under Smart Home Devices section select “Add Device” button which will open up new window where users should enter their Ring account email address & password along with serial number found on backside label located near power adapter port area inside box containing all components needed.
In this article, we have shown you how to connect a Ring Doorbell to Alexa. The process is very easy and only takes a few minutes. You can now ask Alexa to tell you who’s at your door or see if anyone has rung it by saying “Alexa, show me my front door.
For more info: How To Connect Your Ring Doorbell to Alexa?- ITMlab
0 notes
Text
How to Reset Your Admin Password on a Mac?
Your Mac’s admin password is the guardian of your digital realm. It protects your files, privacy, and system settings. However, there are moments in life when memory fails us, and we find ourselves locked out of our own device. Fear not! In this guide, we will explore the methods to reset your admin password on a Mac, empowering you to regain control and access your precious files.

Understanding the Significance of the Admin Password
The admin password on your Mac is more than just a combination of characters; it’s the key to your digital kingdom. It secures your data, prevents unauthorized access, and ensures the integrity of your system. Forgetting or losing this password can be a daunting experience, but fortunately, there are ways to reset it.
Methods to Reset Admin Password: Exploring Your Options
When it comes to resetting your admin password, Mac offers multiple avenues. The three primary methods include using your Apple ID, accessing Recovery Mode, and leveraging another admin account. Each method has its unique approach and prerequisites, ensuring there’s a solution for various scenarios.
Resetting Admin Password via Apple ID: A Lifeline in Your Pocket
If you’ve associated your Mac with your Apple ID, resetting your admin password becomes relatively straightforward. By entering your Apple ID credentials, you can reset your password and regain access to your Mac. This method is convenient and secure, provided you have a functioning Apple ID.
Using Recovery Mode to Reset Admin Password: A Deeper Dive
Recovery Mode is your Mac’s emergency response system. It allows you to perform various tasks, including resetting your admin password. By booting into Recovery Mode, you can access the Terminal and reset the password using command-line magic. However, be cautious: this method might lead to data loss if not executed carefully.
Resetting Admin Password with Another Admin Account: Teamwork Makes the Dream Work
If there’s another admin account on your Mac, you’re in luck. You can use the cooperative power of multiple users to reset the forgotten password. By logging in with another admin account, you can change the password for the locked account, granting you access once again. Collaboration, in this case, is the key to success.
Preventive Measures and Best Practices: Building a Strong Castle
Prevention is always better than a cure. To avoid finding yourself in a password-related predicament, it’s essential to create a robust admin password. Combine letters, numbers, and symbols, and avoid easily guessable information like birthdays or common words. Regularly updating your password further enhances your Mac’s security.
Common Issues and Troubleshooting: Navigating the Challenges
During the password reset process, you might encounter issues such as errors, failed attempts, or complications with Recovery Mode. Fear not! We’ve compiled a list of common problems and their solutions to guide you through the troubleshooting process. Remember, persistence and attention to detail can often resolve these challenges.
Conclusion: Your Mac, Your Control
In conclusion, your Mac’s admin password is the linchpin of your digital world. Losing it may seem like a daunting experience, but with the right knowledge and methods, you can regain control swiftly and securely. By understanding the significance of the admin password, exploring the available options, and following best practices, you can ensure a seamless Mac experience while keeping your digital kingdom safe and sound.
For more information: How to Reset Your Admin Password on a Mac? — ITMlab
0 notes
Text
How to add apps to roku?
Roku is a popular streaming device that offers a wide range of entertainment options. One of the key features of Roku is the ability to add apps, which allows users to access their favorite streaming services and enjoy a variety of content. In this blog post, we will focus on how to install the Downloader app on Roku TV, which will open up even more possibilities for your streaming experience.
For more information: How to add apps to roku? — ITMlab
Step 1: Enable Developer Mode
Before you can install the Downloader app on your Roku TV, you need to enable Developer Mode. Follow these steps:
Press the Home button on your Roku remote to go to the main screen.
Scroll up or down and select “Settings.”
Choose “System” and then select “Advanced system settings.”
Select “Developer mode” and follow the on-screen instructions to enable it.
Make a note of the IP address displayed on the screen, as you will need it later.
Step 2: Download the Downloader App
Once you have enabled Developer Mode on your Roku TV, it’s time to download the Downloader app. Here’s how:
On your computer or smartphone, open a web browser and go to the Roku developer website at https://developer.roku.com/.
Sign in using your Roku account credentials. If you don’t have an account, create one for free.
Once you’re signed in, click on “My Account” and then select “Add a Channel.”
Enter a name for your channel. You can use any name you like.
Under “Channel type,” select “Developer SDK Tools.”
In the “Direct Publisher Feed URL” field, enter the following URL: https://my.roku.com/account/developer/my-channels/add/de63a7f24e381452a7e33212bf94e01a?DevBangla24
Click on “Add Channel” to initiate the channel installation process.
Step 3: Install the Downloader App on Roku TV
Now that you have added the Downloader app to your Roku developer account, it’s time to install it on your Roku TV. Follow these steps:
On your Roku TV, press the Home button on your remote to go to the main screen.
Scroll down and select “Streaming Channels.”
In the Roku Channel Store, scroll down and select “Search Channels.”
Type “Downloader” in the search bar and select the Downloader app from the search results.
On the app page, select “Add Channel” and confirm your selection when prompted.
Wait for the installation to complete. Once installed, you will find the Downloader app on your Roku TV’s home screen.
Step 4: Use the Downloader App to Install Apps
Now that you have successfully installed the Downloader app on your Roku TV, you can use it to install other apps. Follow these steps:
Open the Downloader app on your Roku TV.
In the app’s main menu, enter the URL of the app you want to install. You can find URLs for Roku-compatible apps on various websites, or you can search for them using a search engine.
Once you have entered the URL, select “Go” or press the Play button on your remote.
The Downloader app will download the app’s installation file and prompt you to install it.
Follow the on-screen instructions to complete the installation process.
Congratulations! You have successfully added the Downloader app to your Roku TV and learned how to use it to install other apps. Now, you can explore a wide range of streaming services and enjoy an enhanced entertainment experience on your Roku device. Happy streaming!
Outline:
I. Introduction
Brief explanation of the popularity of Roku devices for streaming.
Importance of adding apps to Roku for personalized entertainment.
II. How to Access the Roku Channel Store
Step-by-step guide on accessing the Roku Channel Store on your Roku device.
Explanation of the intuitive interface for browsing and adding apps.
III. Finding Apps in the Roku Channel Store
Tips on searching for specific apps using the Roku search feature.
Exploring different categories and genres to find relevant apps.
IV. Adding Apps to Roku
Detailed instructions on how to add apps to your Roku device.
Explanation of the “Add Channel” or “Install” process for both free and paid apps.
V. Managing and Organizing Installed Apps
Guidance on how to rearrange the order of apps on the Roku home screen.
Explanation of app removal and reinstallation options.
VI. Best Apps for Roku
Recommendations for popular streaming, entertainment, and utility apps.
Brief descriptions of top-rated apps for different interests.
VII. Troubleshooting: Common Issues and Solutions
Addressing common problems like app installation failures or playback issues.
Providing troubleshooting tips and solutions for a seamless experience.
VIII. Roku App Updates: Why They Matter
Explanation of the importance of keeping apps updated for performance and security.
Instructions on enabling automatic updates for installed apps.
IX. Conclusion
Summarizing the ease of adding apps to Roku for personalized streaming.
Reinforcing the convenience and flexibility of Roku devices for entertainment.
For more information: How to add apps to roku? — ITMlab
0 notes
Text
Read This Before You Buy Any Udemy Course?- ITMlab
In the digital era, online learning has become a cornerstone of personal and professional development, and platforms like Udemy offer a plethora of courses catering to various interests. However, with the abundance of options, it’s crucial to tread carefully before investing your time and money. This article aims to guide you through essential factors to consider before purchasing any Udemy course, ensuring a worthwhile and enriching learning experience.
For more information: Read This Before You Buy Any Udemy Course?- ITMlab
Researching Your Learning Goals
Before diving into the sea of Udemy courses, reflect on your learning objectives. Define what skills you want to acquire or improve upon. Are you looking to enhance your programming skills, delve into digital marketing, or explore creative arts? Having clear goals will help you narrow down your choices and find a course tailored to your needs.
Evaluating Course Reviews and Ratings
Reviews and ratings are valuable indicators of a course’s quality. However, not all reviews are created equal. Look for detailed feedback that highlights specific aspects of the course. Be wary of overly positive or negative reviews that lack substance. Cross-referencing reviews across multiple courses can provide a more balanced perspective.
Instructor Credibility and Expertise
The credibility of the instructor is paramount. Investigate the instructor’s background, expertise, and experience in the field. Genuine instructors often have a strong online presence and may have authored books, articles, or have a professional website. Verify their credentials to ensure you are learning from a knowledgeable source.
Course Curriculum and Content Preview
Examine the course curriculum meticulously. Are the topics covered aligned with your learning goals? Additionally, take advantage of Udemy’s free preview feature. Preview a few lectures to gauge the instructor’s teaching style, clarity, and the depth of content. This firsthand experience can significantly influence your decision.
Engaging Learning Formats
Different people learn in different ways. Some prefer video lectures, while others benefit from interactive quizzes and assignments. Udemy offers a variety of learning formats within its courses. Consider your learning preferences and choose a course that aligns with your favored mode of learning.
Assessing Course Materials and Resources
A well-rounded course provides supplementary materials such as PDFs, exercises, quizzes, and additional resources. These materials enhance the learning experience and offer valuable references for future use. Ensure the course you choose provides comprehensive resources that support your understanding of the subject matter.
Udemy Pricing and Discounts
While Udemy courses are generally affordable, it’s wise to compare prices and discounts. Be cautious of courses that are excessively discounted, as these could be scams. Verify the course’s original price and evaluate the discount offered. Additionally, check for any hidden costs or subscription fees associated with the course.
Check for Lifetime Access and Updates
One of the advantages of Udemy is lifetime access to purchased courses. Ensure the course you choose offers this feature, allowing you to revisit the material whenever needed. Also, check if the course materials receive regular updates, especially for subjects evolving with new technologies or trends.
Community and Support
Udemy fosters a sense of community among learners. Engage in course discussions, ask questions, and interact with fellow students. An active community enhances your learning experience and provides valuable insights. Additionally, assess the instructor’s responsiveness to queries, which reflects their commitment to student support.
Udemy Refund Policy
Familiarize yourself with Udemy’s refund policy. If a course does not meet your expectations or if you encounter issues, you have the option to request a refund within the stipulated timeframe. Understand the refund process and keep it in mind as a safety net if the course doesn’t align with what was promised.
Avoiding Scams and Fraudulent Courses
Be vigilant against scams and fraudulent courses. Look out for red flags such as unrealistic promises, lack of detailed course information, or unverified instructors. Report any suspicious activities to Udemy to protect other potential learners from falling victim to scams.
Comparing with Other Learning Platforms
Before finalizing your choice, explore other online learning platforms. Compare the features, course offerings, instructor quality, and pricing. Each platform has its strengths, and a comparative analysis ensures you make an informed decision based on your specific requirements.
Success Stories and Testimonials
Lastly, read success stories and testimonials from other learners. Genuine testimonials provide insights into real experiences. They offer a glimpse into how the course impacted others and can help you gauge the practical benefits you might gain from the learning journey.
Conclusion
In conclusion, while Udemy offers a vast array of courses, not all are created equal. Your learning experience greatly depends on your choices. By researching thoroughly, evaluating courses based on your goals, and being aware of potential pitfalls, you can make the most out of your Udemy learning journey. Remember, a well-informed decision leads to a rewarding educational experience.
For more information: Read This Before You Buy Any Udemy Course?- ITMlab
0 notes
Text
Who is better Alexa or Siri?
I’ve been using voice assistants for years. I remember when the iPhone first came out, and I was amazed that you could talk to this device and it would do things for you. But now there are so many options, it can be confusing to know which one is right for you. So I decided to put them head-to-head: Alexa vs Siri!
For more info: Who is better Alexa or Siri? (itmlab.com)
Siri

Siri is a voice assistant and virtual assistant developed by Apple. It’s an artificial intelligence that can help you with many things, including setting reminders, checking traffic and weather, sending text messages and emails, finding nearby restaurants or movie theaters.
Siri is part of SiriKit (an API) which allows third-party developers to integrate their apps with Siri so users can interact with them using voice commands like “Call [the name of your friend]”.
Alexa

Alexa is a voice assistant that lives in the cloud. It’s always getting smarter, because it learns from your questions and interactions with it. Alexa is available on a wide range of devices, including Amazon Echo (powered by Alexa), Fire TV, Fire tablets and phones, and other products from device manufacturers such as Sonos or Ford Connected Vehicles.
Alexa was designed to make your life simpler and more convenient–whether you’re shopping for music or ordering groceries from Amazon Fresh; playing games with family members across town; controlling home automation devices; managing your calendar; getting news briefings with flash briefings from NPR News or The Washington Post; listening to podcasts like TED Radio Hour through TuneIn Radio or Audible audiobooks via Audible for Alexa skill; checking traffic conditions before heading into work; telling jokes…the list goes on!
Alexa and Siri have been in the same room for a long time, and they’re both pretty good at what they do. But when it comes to choosing between them, there are some things to keep in mind:
Alexa has better voice control over smart home devices than Siri. If you want your lights turned on or off with your voice alone, Alexa is still your best bet.
Siri has some neat tricks under its belt that Alexa doesn’t have yet–like sending text messages through third-party messaging apps like WhatsApp or Telegram (and even making payments). If this sounds appealing to you, then go ahead and choose Siri over Alexa!
In this article, we explored the question of who is better Alexa or Siri? We looked at the history of each platform and its capabilities in order to help you make an informed decision about which voice assistant is right for your home.
For more info: Who is better Alexa or Siri? (itmlab.com)
1 note
·
View note
Text
How to Use Hyperlinks in Google Sheets? - ITMlab
Click anywhere on the sheet and choose Insert Hyperlink from the shortcut menu.
Oops! Click Regenerate Content below to try generating this section again.
For more info: How to Use Hyperlinks in Google Sheets? - ITMlab
A dialog box appears with “No link selected” written in it.
When you click on the hyperlink icon, a dialog box appears with “No link selected” written in it. This means that you need to select a cell before you can create a hyperlink. When you click on a cell, it will be selected and ready for you to use as your hyperlink destination.
Click the URL field and type the URL of your page.
To link to a web page, enter the URL of your page in the first row of cell A1. Make sure that you have entered the correct URL and that there are no spaces in it. If you want to link to another sheet in Google Sheets, type its name into cell A1 instead (for example: “Sheet2”).
Click OK.
When you click OK, the link will be added to your spreadsheet. You can edit the link by clicking it and using the Edit Hyperlink dialog box.
You can make a hyperlink in Google Spreadsheets
To create a hyperlink in Google Sheets, you need to use the Insert Hyperlink command. This can be found under Tools > Insert Link or by pressing Ctrl+K (or Command+K on Mac).
Once you’ve selected this option, enter the URL of the page you want to link to into your spreadsheet. Then click OK and your hyperlink will be created!
Now that you know how to make hyperlinks in Google Sheets, it’s time for you to get started! You can create links to websites, documents or even other sheets within your own spreadsheet. And if you want more information about how this process works, check out our blog post on creating hyperlinks in Excel. And if you’re looking for more tips on how to use Google Sheets, check out our blog post on how to create a drop-down menu in Google Sheets.
Certainly! Here’s a step-by-step guide on how to use hyperlinks in Google Sheets:
Open Google Sheets: Open your web browser and navigate to Google Sheets (sheets.google.com). Sign in to your Google account if you haven’t already.
Create or Open a Sheet: Create a new sheet or open an existing sheet where you want to add hyperlinks. If you’re creating a new sheet, give it a suitable name.
Select the Cell: Click on the cell where you want to insert the hyperlink. The selected cell will be the destination of the hyperlink.
Insert the Hyperlink: There are two methods to insert a hyperlink in Google Sheets:a. Menu Option Method:
Click on the “Insert” menu at the top of the screen.
Enter the URL you want to link to in the “Text” box.Click on the “Apply” button to insert the hyperlink.
From the drop-down menu, select “Link.”A small window will appear.b. Keyboard Shortcut Method:
Press the “Ctrl” (or “Cmd” on Mac) + “K” keys together.
A small window will appear.
Enter the URL you want to link to in the “Text” box.
Click on the “Apply” button to insert the hyperlink.
Customize the Display Text (Optional): By default, the hyperlink in Google Sheets will display the URL as the text. If you want to customize the display text, follow these steps:a. Right-click on the cell with the hyperlink. b. From the context menu, select “Edit Link.” c. In the window that appears, change the text in the “Text” box to your desired display text. d. Click on the “Apply” button to update the hyperlink with the customized display text.
Test the Hyperlink: To check if the hyperlink is working correctly, simply click on the linked cell. It should open the URL you specified in a new browser tab or window.
Edit or Remove Hyperlink: If you need to edit or remove a hyperlink in Google Sheets, you can follow these steps:a. Right-click on the cell with the hyperlink. b. From the context menu, select “Edit Link” to modify the URL or display text. c. To remove the hyperlink, select “Unlink” from the context menu.
Copy and Paste Hyperlinks: To quickly insert multiple identical hyperlinks in other cells, you can use copy and paste:a. Highlight the cell with the hyperlink. b. Press “Ctrl” (or “Cmd” on Mac) + “C” to copy the cell’s content. c. Select the destination cells where you want to paste the hyperlink. d. Press “Ctrl” (or “Cmd” on Mac) + “V” to paste the hyperlink into the selected cells.
That’s it! You have now learned how to use hyperlinks in Google Sheets. You can utilize this feature to link to external websites, internal sheet cells, specific ranges, or documents by following the aforementioned steps.
For more info: How to Use Hyperlinks in Google Sheets? - ITMlab
0 notes
Text
How to Open a Website in New Window from Google Sheets Menu? - ITMlab
Google Sheets is a fantastic tool for managing and organizing data, but I often find myself wanting to do more with the data in my spreadsheets. For example, I want my customers or clients to be able to access certain information without having to open up my Google Drive account. With a few simple steps, you can set up your own custom menu bar inside of Google Sheets which will allow you to open websites directly from your spreadsheet without having to leave it! Step 1: Create a Custom Menu Bar for Google Sheets
For more information; How to Open a Website in New Window from Google Sheets Menu? - ITMlab
First things first, you’ll need to create a custom menu bar in Google Sheets. To do this, simply click on the “File” tab at the top of your screen and then select “Create” from the drop-down menu. From there, choose “Custom Menu Bar.
Open a Website in a New Window

To open a website in a new window, follow these steps:
Open the script editor by clicking on Tools > Script Editor.
Copy and paste the following code into your script editor:
function openURL(url){
Replace the URL with your desired page to open. You can use any website address that you want; just make sure it’s correct!
Click Save as Draft or Publish as needed (see below).
How to Run a Google Script from Google Sheets Menu
Go to Script Editor
Open the script you want to run
Click on Run
Choose Pop out window (you can also choose another window size)
Open the menu in your spreadsheet and select Run Menu Item
Quick Tip for Adding Script Download Buttons to Your Spreadsheets
Add a button to your spreadsheet.
Add the script to the button.
Add the script to a menu in Google Sheets, such as “Tools > Script Gallery”.
Google Sheets can now be used to open websites in a new window. To do this, follow these steps:
Copy the script below into a Google Sheets cell.
Go to File > Publish to Web and select “On Open.”
This will allow you to open websites from the menu bar at any time by clicking on the “Open in New Window” button.
Google Sheets is a great tool for creating scripts that you can use to automate your work, but it can be difficult to remember all of the different commands needed to run them. This article has shown you how to create a Google Script menu in Google Sheets, which will allow you to run scripts from within your spreadsheet without having to remember anything other than the name of the script or file location (which is usually just its title). You can also add a Google Script menu to your Google Sheets sidebar by clicking on the “More” button and then “Customize this sheet.” From there, you can drag a new menu onto the right side of your spreadsheet and then click on the “Add-ons” button in order to select which scripts you want available from that menu.
Sure, here is a step-by-step guide on how to open a website in a new window from the Google Sheets menu:
Open your Google Sheets document and go to the menu bar at the top of the screen.
On the menu bar, click on “Extensions” and then select “Apps Script” from the drop-down menu. This will open the Apps Script editor in a new tab.
In the Apps Script editor, delete any existing code and start with a fresh script.
Copy and paste the following code into the script editor:
For more information: How to Open a Website in New Window from Google Sheets Menu? - ITMlab
1 note
·
View note
Text
How to Convert HTML to PDF with Google Script? - ITMlab
The Google Script is a powerful tool that allows you to automate repetitive tasks in Google. It allows you to create JavaScript-based applications that use Google services. The following code can be used to convert HTML files into PDF:
For more information: How to Convert HTML to PDF with Google Script? - ITMlab
Convert HTML to PDF
Converting HTML to PDF is easy. You can do it yourself, or you can use Google Script to do it for you.
To convert HTML to PDF using Google Script:
Create a new script in Google Drive and name it “ConvertHTML.”
In the “Code” section at the bottom of your script editor window, copy and paste this code:
var docs = SpreadsheetApp.openByUrl( ‘https://docs.google.com/spreadsheets/d/YOUR_SPREADSHEET_ID_HERE’ ); var sheets = docs.getSheets(); var sheet = sheets[0]; var rows= sheet .getRange( ‘A1’).getValues();
1. Create an HTML file that has a table of contents, headers and footers
Before you can convert HTML to PDF, you’ll need to create an HTML file that has a table of contents, headers and footers. Here’s how:
Open Notepad or another text editor on your computer (if you’re using Google Chrome, then we recommend using the built-in Developer Tools).
Type out some basic text like this:
Create a table of contents by adding tags around each major heading in your document; if there are no major headings in your document yet (you haven’t started writing), then type out some more text until there are multiple levels of headings so that we know where our table should begin! For example:
This is my first Heading, This is my second Heading. Make sure these tags are indented with two spaces from each side so that we can tell them apart from regular paragraphs later when we convert them into actual tables!
2. Save the file as an HTML file with a .html extension
Save the file as an HTML file with a .html extension
Make sure you have the right extension. If you don’t, Google will not be able to open it and convert it into a PDF file. You can also save it as a text file and then open it in a browser to see if it works.
3. Open your Google Drive account in your browser and log in if you haven’t done so already.
You need a Google account. If you don’t already have one, go to https://accounts.google.com/signup and follow the instructions to create one.
You’ll need to be signed in to your Google Drive account. If you haven’t done so yet, sign in using your email address or phone number associated with the account (the same credentials used for Gmail).
Sign out of Google Docs if it’s currently open: Click on “File” at top left corner of screen then select “Account settings” from dropdown menu under My Drive section at right side of page; next click on “Sign out” link at bottom left corner of window that appears when hovering cursor over ‘My Drive’ heading before signing back into new window where we will begin creating our script file below this paragraph!
4. Click on the “Script” option in the left-hand sidebar menu at the top of the screen (or click here)
The next step is to click on the “Script” option in the left-hand sidebar menu at the top of the screen (or click here). This will open up a window with some code that looks something like this:
var doc = DocumentApp.openById(‘myDocumentId’);
doc.setHtmlContent(‘Hello World!’);
For more information: How to Convert HTML to PDF with Google Script? - ITMlab
0 notes
Text
How to Convert HTML to PDF with Google Script? - ITMlab
The Google Script is a powerful tool that allows you to automate repetitive tasks in Google. It allows you to create JavaScript-based applications that use Google services. The following code can be used to convert HTML files into PDF:
For more information: How to Convert HTML to PDF with Google Script? - ITMlab
Convert HTML to PDF
Converting HTML to PDF is easy. You can do it yourself, or you can use Google Script to do it for you.
To convert HTML to PDF using Google Script:
Create a new script in Google Drive and name it “ConvertHTML.”
In the “Code” section at the bottom of your script editor window, copy and paste this code:
var docs = SpreadsheetApp.openByUrl( ‘https://docs.google.com/spreadsheets/d/YOUR_SPREADSHEET_ID_HERE’ ); var sheets = docs.getSheets(); var sheet = sheets[0]; var rows= sheet .getRange( ‘A1’).getValues();
1. Create an HTML file that has a table of contents, headers and footers
Before you can convert HTML to PDF, you’ll need to create an HTML file that has a table of contents, headers and footers. Here’s how:
Open Notepad or another text editor on your computer (if you’re using Google Chrome, then we recommend using the built-in Developer Tools).
Type out some basic text like this:
Create a table of contents by adding tags around each major heading in your document; if there are no major headings in your document yet (you haven’t started writing), then type out some more text until there are multiple levels of headings so that we know where our table should begin! For example:
This is my first Heading, This is my second Heading. Make sure these tags are indented with two spaces from each side so that we can tell them apart from regular paragraphs later when we convert them into actual tables!
2. Save the file as an HTML file with a .html extension
Save the file as an HTML file with a .html extension
Make sure you have the right extension. If you don’t, Google will not be able to open it and convert it into a PDF file. You can also save it as a text file and then open it in a browser to see if it works.
3. Open your Google Drive account in your browser and log in if you haven’t done so already.
You need a Google account. If you don’t already have one, go to https://accounts.google.com/signup and follow the instructions to create one.
You’ll need to be signed in to your Google Drive account. If you haven’t done so yet, sign in using your email address or phone number associated with the account (the same credentials used for Gmail).
Sign out of Google Docs if it’s currently open: Click on “File” at top left corner of screen then select “Account settings” from dropdown menu under My Drive section at right side of page; next click on “Sign out” link at bottom left corner of window that appears when hovering cursor over ‘My Drive’ heading before signing back into new window where we will begin creating our script file below this paragraph!
4. Click on the “Script” option in the left-hand sidebar menu at the top of the screen (or click here)
The next step is to click on the “Script” option in the left-hand sidebar menu at the top of the screen (or click here). This will open up a window with some code that looks something like this:
var doc = DocumentApp.openById(‘myDocumentId’);
doc.setHtmlContent(‘Hello World!’);
5. Click on “Create from URL” and select ‘Create a copy…’. Then paste in this script code into the “Script Editor” box that appears below htpps://docs.google.com/spreadsheets/d/1L0N37Nrka0lQ2c3qpx3YB–e_pIg1__jZQbzswrItxM/edit#gid=269221153
Click on “Create from URL” and select ‘Create a copy…’. Then paste in this script code into the “Script Editor” box that appears below htpps://docs.google.com/spreadsheets/d/1L0N37Nrka0lQ2c3qpx3YB–e_pIg1__jZQbzswrItxM/edit#gid=269221153
You can also use the Google Spreadsheet API to convert HTML to PDF, but it requires some technical knowledge about coding languages such as Javascript or Python.
This is a great script if you want to convert your HTML files into PDFs. It’s easy to use and it has all the features that you need in a script like this one. If you want to convert your HTML files into PDFs, then this is a great script for you. It’s easy to use and it has all the features that you need in a script like this one.
For more information: How to Convert HTML to PDF with Google Script? - ITMlab
0 notes
Text
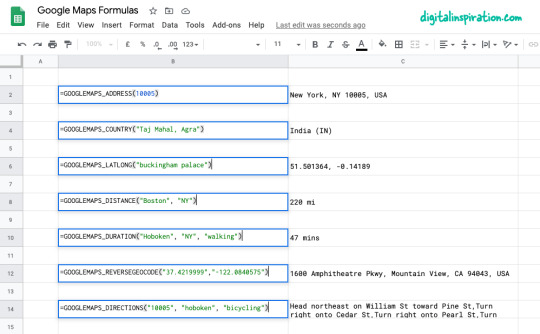
Find Google Maps Formulas for Google Sheets? ITMlab
Google Sheets is a free spreadsheet app that lets you create and edit spreadsheets online. You can also access your spreadsheets from any computer or mobile device with an internet connection. For example, if you wanted to create a formula that would automatically add a new row at the bottom of your list whenever it went past 10 rows, you could do so with the following formula: =OFFSET(Sheet1!A1,0,0,COUNT(Sheet1!A$1:A$10). You can download a Google Sheet by clicking File > Download as > Save As > Microsoft Excel 97-2003 Workbook (.xls).
For more information: Find Google Maps Formulas for Google Sheets? ITMlab
Google Sheets is a free spreadsheet app that lets you create and edit spreadsheets online.
Google Sheets is a free spreadsheet app that lets you create and edit spreadsheets online. It’s part of the Google Drive service, which also includes Google Docs, Google Slides and Google Drawings.
Google Sheets can help you:
Create spreadsheets to track budgets or sales numbers.
Track your expenses using formulas that automatically update when you add new items to your list.
You can also access your spreadsheets from any computer or mobile device with an internet connection.
You can also access your spreadsheets from any computer or mobile device with an internet connection. To view, edit, and share a spreadsheet:
On your computer, open the Google Sheets app at https://docs.google.com/spreadsheets.
In the upper right corner of the screen, select Open > Document (or open an existing document).
To learn more about sharing documents with other people or viewing them in their own browsers so they don’t need to download anything first:
For example, if you wanted to create a formula that would automatically add a new row at the bottom of your list whenever it went past 10 rows, you could do so with the following formula: =OFFSET(Sheet1!A1,0,0,COUNT(Sheet1!A$1:A$10).
For example, if you wanted to create a formula that would automatically add a new row at the bottom of your list whenever it went past 10 rows, you could do so with the following formula: =OFFSET(Sheet1!A1,0,0,COUNT(Sheet1!A$1:A$10).
If you want to learn more about formulas and functions in Google Sheets (or any spreadsheet program), check out our full guide here!
You can download a Google Sheet by clicking File > Download as > Save As > Microsoft Excel 97-2003 Workbook (.xls).
You can download a Google Sheet by clicking File > Download as > Save As > Microsoft Excel 97-2003 Workbook (.xls).
To import the data into your own spreadsheet, open up the .xls file and then select Import Spreadsheet in the Data tab.
Google Sheets is a free spreadsheet app that you can use to create and edit spreadsheets online. You can access your spreadsheets from any computer or mobile device with an internet connection, so it’s easy to work on a spreadsheet wherever you are.
Google Sheets offers many powerful formulas for performing calculations in sheets, but if you’re looking for something specific or don’t know how to build it yourself, there are some great resources out there for finding them.
The Google Sheets app is a great way to create and edit spreadsheets online. You can also access your spreadsheets from any computer or mobile device with an internet connection. For example, if you wanted to create a formula that would automatically add a new row at the bottom of your list whenever it went past 10 rows, you could do so with the following formula: =OFFSET(Sheet1!A1,0,0,COUNT(Sheet1!A$1:A$10).
Here are the step by step instructions on how to find Google Maps formulas for Google Sheets:
Open a new or existing Google Sheet
Click on the cell where you want to add the formula
Click on the “fx” button located at the top left of the screen, which is the “Insert Function” button
Type “maps” into the search box and click “Go”
You will see a list of available Google Maps functions, such as “StaticMap”, “Geocode”, and “Distance”. Select the function that best suits your needs and click “Next”
Follow the instructions to enter the necessary parameters for the function. For example, if you are using the “StaticMap” function, you will need to enter the location of your map and the size of the image you want to generate
Once you have input all the necessary information, click “Ok” to add the formula to your sheet
And that’s it! You should now see your Google Maps formula in the designated cell within your Google Sheet.
For more information: Find Google Maps Formulas for Google Sheets? ITMlab
0 notes
Text
How to Unlock an iPhone Without the Passcode? - ITMlab

For more visit: How to Unlock an iPhone Without the Passcode? - ITMlab
If you’ve forgotten your iPhone’s passcode, you’ll need to find another way to unlock it. There are two ways to do this: resetting or unfreezing the device. You can only use these methods if you know the last date and time that someone used the phone last, but it’s worth noting that it doesn’t matter whether or not they’re still using it today. In this article we’ll show you how to unlock an iPhone without a passcode using both methods so let’s get started!
How to Unfreeze an iPhone
If your iPhone has a passcode, you can use it to unfreeze the device.
In Settings, tap Passcode (or Touch ID & Passcode on an iPhone X or later).
Enter your passcode and tap Turn Off Screen Lock or Change Passcode if prompted to do so by entering an old one that’s no longer valid and then creating a new one for future use when prompted again by iOS 11+ devices or earlier versions of iOS 10 – 12+.
Once the screen is unlocked after entering your security code correctly, go back into Settings and navigate down until you find General > Reset > Erase All Content & Settings; then tap Reset All Settings near the bottom right corner of this page next time you need help with any kind of problem related specifically towards these two different types as well as other common ones involving battery life issues etc., which are often caused by third party apps installed on top of stock apps preinstalled within Windows Phone 8 OS software packages themselves rather than being caused by hardware itself failing due entirely instead due partially maybe even slightly due mostly perhaps entirely too much stress placed upon physical components inside those phones’ casing which causes them eventually break down over time leading up until eventually breaking down completely leaving nothing left behind except maybe some dust particles floating around inside air pockets created under pressure between different parts connected together tightly enough together tightly enough so not too many particles escape through cracks created during production process at factory level back when manufacturing line workers were still working hard trying hard laboriously day after day night after night
How to Unlock a Locked iPhone Without the Passcode
If you’re locked out of your iPhone and don’t know the passcode, there are a few ways to unlock it.
Use the emergency call option: If you can’t use Touch ID or Face ID because of an injury or other reason, go to Settings > Emergency SOS and tap “Call.” You’ll be able to make an emergency phone call without unlocking your device.
Connect the phone to a computer: If you have access to a computer, connect it through iTunes or iCloud (depending on which service was used when setting up the passcode). In both cases, this will allow iTunes/iCloud Backup & Restore options that will let you restore from a backup without entering any passwords or passcodes at all!
How to Reset the Passcode on an iPhone 7 or Older
If you have an iPhone 7 or older, resetting your passcode is a little different than unlocking it.
First, turn off Find My iPhone in iCloud settings. Launch Settings on your device and select General > Reset. Scroll down and select Erase All Content and Settings, then tap Erase iPhone (or whatever name pops up).
Resetting the passcode on a newer iPhone is slightly different. First, turn off Find My iPhone in iCloud settings. This will prevent the phone from being locked if it’s lost or stolen in the future. Then, launch Settings on your device and select General > Reset. Scroll down and select Erase All Content and Settings, then tap Erase iPhone. Wait for your device to reset itself and then set it up as a new device from scratch using its default settings.
If you’re trying to unlock an iPhone without the passcode, here’s how:
Resetting the passcode on a newer iPhone is slightly different. First, turn off Find My iPhone in iCloud settings. This will prevent the phone from being locked if it’s lost or stolen in the future. Then, launch Settings on your device and select General > Reset. Scroll down and select Erase All Content and Settings, then tap Erase iPhone (or Erase All). Wait for your device to reset itself and then set it up as a new device from scratch using its default settings.
You can use one of these methods to unlock your phone without the passcode
There are two ways to unlock an iPhone without a passcode. If your phone is not protected by a passcode, then there’s nothing stopping you from simply pressing the home button and seeing if it unlocks. If it does, then great! You don’t have to worry about anything else right now.
If your iPhone is protected by a passcode but you forgot what it was set up as (or if someone changed it), then there are still options available for unlocking it without entering that code.
If you’re looking for a way to unlock your iPhone without using its passcode, then this article is for you. We’ve discussed all of the different options available to you and explained how they work in detail. Hopefully, one of them will work for your situation!
Outline of the Article:
I. Introduction
Importance of iPhone security and the significance of unlocking methods
Brief overview of the methods covered in the article
II. Using Face ID to Unlock iPhone
Explanation of Face ID technology and its setup process
Step-by-step guide on unlocking iPhone using Face ID
III. Unlocking iPhone with Touch ID
Introduction to Touch ID and its fingerprint recognition system
Instructions on setting up and using Touch ID for unlocking
IV. Using Siri to Bypass Passcode
Cautionary note about the risks associated with Siri bypass
Steps to attempt unlocking iPhone using Siri (if applicable)
V. Using iCloud to Remove Passcode
Guide on using iCloud’s Find My iPhone feature to erase the passcode
Detailed steps for remotely unlocking the iPhone through iCloud
VI. Contacting Apple Support
Importance of reaching out to Apple Support for professional assistance
Information on Apple’s verification and security procedures
VII. Conclusion
Summary of the methods discussed and their implications
Emphasis on the importance of iPhone security and responsible unlocking practices
For more visit: How to Unlock an iPhone Without the Passcode? - ITMlab
0 notes
Text
How to Block Websites on Chrome? - ITMlab
With the advent of the internet, procuring information or availing of various services has become easier for an ordinary person. Many websites are available, some of which are purposeful and others useless. These include websites containing explicit, fraudulent, malicious content that can deter our devices from working. Moreover, they also access our details, such as geographical location, banking details, and other confidential data.

Furthermore, businesses incur huge losses due to hacking and web threats, which halt their procedural tasks. Thus it is advised to safeguard our browsers from such malicious websites.
Many browsers, such as Google Chrome, offer unique features to block such web content. However, there are several other methods to block websites on Chrome.
Here are a few ways to assist you.
Blocking Websites Using Built-In Parental Control Feature
Parental control feature helps to reduce screen time and eliminate access to unwanted content for minors.
To block websites on Windows 11
Open the windows menu and go to Settings> Accounts to set up a child account
Now go back and click on Family And Other Users>Add A Family Member>Add Account
Now you will be prompted to enter an email account. Select the option ‘Create One for a Child.’
After creating an account, you can access it on the Microsoft account page
Go to Content filters>Blocked Websites and enter the URL of the website that you wish to block
In the end, click on the plus icon to add it to your blocked websites
Blocking Websites Using the Safe Search Feature
The safe search feature helps to block certain websites. Go to your Google Account and then click on preferences. Select the secure search feature and click the bottom to save your choice. This feature will help you eliminate explicit information from your browser.
How to block websites on Chrome using the built-in feature
Open Google Chrome on your computer.
Click on the three-dot icon in the top right corner of the Chrome window.
Select “Settings” from the drop-down menu.
Scroll down to the “Privacy and security” section and click on “Site settings.”
Click on “Block sites” under the “Permissions” section.
Click on “Add” to add a website to the block list.
Enter the URL of the website you want to block and click on “Add.”
The website will now be blocked, and anyone using Chrome on your computer will not be able to access it.
Blocking websites using the Blocklist Url feature
If you work as an administrator or an IT head in your organization and wish to block certain websites, then you can use this option. It can be done using your Google Admin account. You can easily manage multiple devices without manually blocking each website.
Open the Google Admin Console by clicking the link on Chrome.
Go to Devices>Chrome>Settings>Users and browsers on the Home Page.
Now select the Top Organizational Unit to block website access for all Chrome users, utilizing the organization’s google service.
Select a Child Organizational Unit if you want to block websites for specific people.
Now scroll to the bottom of the website to the URL-blocking section and insert the URL of the website you wish to block
You can check if the website has been blocked through the linked device.
Outline of the Article
I. Introduction
Introduce the importance of blocking websites on Chrome for productivity, security, and parental control purposes.
Explain the relevance of the topic for Chrome users.
II. Using Chrome Settings to Block Websites
Accessing Chrome Settings:
Guide users on how to access Chrome settings.
Site Settings:
Explain how to navigate to Site Settings to manage website permissions.
Block or Allow Specific Sites:
Provide step-by-step instructions on how to block or allow specific websites.
III. Using Chrome Extensions for Website Blocking
Introduction to Chrome Extensions:
Explain what Chrome extensions are and how they enhance browser functionality.
Top Website Blocking Extensions:
List and describe popular Chrome extensions designed for blocking websites.
Highlight their features and user-friendly interface.
IV. Blocking Websites on Mobile Devices
Using Mobile Chrome Browser:
Explain how to block websites on the Chrome mobile browser.
Third-Party Apps for Mobile Devices:
Mention third-party apps available for blocking websites on mobile devices.
Provide a brief overview of their functionality.
V. Advanced Website Blocking Techniques
Editing Hosts File:
Explain how to edit the hosts file on Windows and macOS for advanced website blocking.
Using Parental Control Software:
Mention parental control software options for comprehensive website blocking and content filtering.
VI. Troubleshooting and FAQs
Common Issues and Solutions:
Address common problems users might face during website blocking and provide solutions.
FAQs:
Answer five frequently asked questions related to website blocking on Chrome.
VII. Conclusion
Summarize the methods discussed for blocking websites on Chrome.
Emphasize the importance of website blocking for online safety and productivity.
For more visit: How to Block Websites on Chrome? - ITMlab
0 notes
Text
How to Transcribe Audio and Video Attachments in Gmail? - ITMlab
Here’s a step-by-step guide on how to transcribe audio and video attachments in Gmail:
Log in to your Gmail account using your username and password. Open the email with an attachment. Click Attachments in the menu on the left side of your screen. Select the audio or video file from the list of attachments and click Download. Open your browser and navigate to https://transcribeit.com/.

Locate the email that contains the audio or video attachment you want to transcribe. Click Attachments in the menu on the left side of your screen. Select the audio or video file from the list of attachments and click Download. Open your browser and navigate to https://transcribeit.com/ Click Sign Up.
Open the email by clicking on it. If you don’t see an attachment, click on the link in the email to open. Click Attachments in the menu on the left side of your screen. Select the audio or video file from the list of attachments and click Download. Open your browser and navigate to https://transcribeit.com/ Locate the email that contains the audio or video attachment you want to transcribe. Click Attachments in the menu on the left side of your screen.
Find the attachment within the email. It may be listed as an audio or video file, such as .mp3 or .mp4. Click On the file and select “Open in” from the dropdown menu. Select “Quicktime Player” and click Open. This will open the audio or video file in QuickTime Player on your computer. Click on the play button to listen to it while you transcribe it using TranscribeIT.
Download the attachment to your computer by clicking on the download button or link provided. Open the attachment in QuickTime Player and click on File > Export. Select “Export for Transcription” from the dropdown menu and click Next. Choose a file location on your computer where you want to save the file that will be created by TranscribeIT.
Once the file is downloaded, open it using a media player software installed on your computer. Many people use QuickTime Player, which comes preinstalled on Mac OS X and Windows. Other popular options include VLC media player and iTunes.If the file is an audio recording, you can use any software that allows you to play music files such as these programs.
Play the audio or video file to ensure it is working properly and that you can hear or see the content. The file may be corrupted. If the file is a video, try playing it in VLC media player or QuickTime Player. If it’s an audio recording, try playing it in iTunes or another music player program.
While playing the file, listen or watch closely and type out the content being transcribed into a text document or any word processing software. If the file is a video, you can use the VLC media player to play the file. This program allows you to select an area in the video and pause it so that you can type out what is being said on screen. For example, if there is a TV show playing on your computer and you want to transcribe one episode into text format, simply open up VLC media player and choose File > Open File from the menu bar at the top of your screen. Then browse through your computer’s hard drive until you find.
Pause or replay the audio or video as needed to accurately capture all the words and phrases. Once you are done, simply click the red “X” in the top-right corner of your screen to close VLC. From there, open up a text editor such as Notepad and paste in what you have typed out from VLC media player. You can then save it as a document file so that you can access it later on if needed.
Keep transcribing the content until you have completed the whole audio or video file. If you are looking for a more efficient way to transcribe your audio and video files, then check out our transcription services.
Review and edit the transcribed text to ensure accuracy and clarity. Once you have completed your transcription, check it over and make sure to review it for any errors. You can do this by comparing the transcribed text with the original audio or video file. If there are any differences between what you have written and what was said, then go back and fix them up so that they match up perfectly.
For more visit: How to Transcribe Audio and Video Attachments in Gmail? - ITMlab
1 note
·
View note
Text
Find Google Sheets Linked to your Google Forms? - ITMlab
If you’re a Google Forms user, you may want to know how to find the form links on your spreadsheet. This can be useful for learning purposes or for teachers who want to see what content their students have filled out on their forms. Here are steps that will help you access this information:
Find Google Sheets Linked to your Google Forms? - ITMlab
Create a spreadsheet and add a Google Form as an embedded component

Let’s say you want to create a new spreadsheet and add a Google Form as an embedded component.
In your browser, go to Google Sheets.
Click Create New > Blank Spreadsheet.
Enter your title, press Enter (Windows) or Return (Mac), then click the down arrow next to Insert Chart at the top right corner of your screen:
Next, click Add-ons > Forms > Embed form in spreadsheet:
Share the spreadsheet with students.
Once you’ve created your Google Form, it’s time to share the spreadsheet with students. You can do this in a few ways:
Send an email invitation to each student and ask them to fill out the form. This is by far the easiest method, but it also means that only those who receive your email will be able to respond (and if someone doesn’t check their inboxes regularly enough, they may miss out on taking part).
Invite students via group messaging apps like WhatsApp or GroupMe (if they’re available at your school). This could be a good option if you want more than just one person from each class/grade level/etc. involved in filling out the form; however, this method isn’t always reliable because some students might not check their group messages often enough either!
Ask students to complete the Google Form.
Once you’ve created your Google Form, be sure to include the link in your spreadsheet. If students are completing the Google Form at home or on their phones, they may not be able to access it if they don’t know its exact URL (i.e., https://docs.google.com/spreadsheet/viewform?formkey=dF9rQ2tTc1VzY1NkYjA5WlhZTVpM0E6MA).
It’s also important that you specify how long your assignment will be open for completion. The default time is 24 hours; however, if this doesn’t suit your needs and schedule, there are other options available: 1 week; 2 weeks; 1 month (this option allows users who have completed the form before its closure date but haven’t submitted yet); 3 months (this option allows anyone who has accessed it within three months from today).
Finally–and most importantly–make sure that anyone with access rights can view this file!
You can view the results in the spreadsheet or download them as a CSV file. The students will receive an email notification on their Google account when they complete the form, and your spreadsheet will automatically update with the results.
Google Forms are a great way to collect data from students, and they can be used in any subject area. Google Sheets is a great tool for organizing that data, so it’s easy to see trends or patterns across classes or grades. The best part about using these tools together is that there’s no need for students to learn new software–they’re already familiar with Google Apps!
Here’s a step-by-step guide on how to find Google Sheets linked to your Google Forms:
Open your web browser and go to the Google Forms website (www.forms.google.com).
Sign in to your Google account if you haven’t already.
Click on the Google Forms form that you want to check.
Once you have the form open, click on the “Responses” tab at the top of the page.
In the “Responses” tab, you will see a green icon with a Google Sheets logo on it. This icon indicates that the form responses are being saved to a Google Sheets spreadsheet.
Click on the green Google Sheets icon to open the linked spreadsheet.
The Google Sheets spreadsheet will open in a new tab or window. You can now view, edit, and analyze the form responses in the spreadsheet.
That’s it! You have successfully found the Google Sheets linked to your Google Forms. Now you can access and manage the data collected from your form.
FAQ:
1. Q: How can I find Google Sheets linked to my Google Forms?
For more visit: Find Google Sheets Linked to your Google Forms? - ITMlab
1 note
·
View note