
Don't wanna be here? Send us removal request.
Statistics
We looked inside some of the posts by apsetuplogin and here's what we found interesting.
Average Info
Notes Per Post
1
Likes Per Post
1
Reblog Per Post
0
Reply Per Post
0
Time Between Posts
1 month
Number of Posts By Type
Text
14
Link
1
Photo
1
Last Seen Tumblr Blogs


Fun Fact
Tumblr has a low social media market share in South America.
Text
How can I get into wifi.wavlink.com?
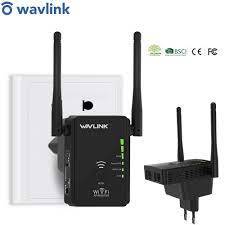
To access wifi.wavlink.com, you'll need a phone or a computer. The wifi.wavlink.com setup page is used to manage your wifi extender and make changes to settings such as WiFi password, firmware update, and reset procedure. In this article, we'll go through all of the tips and techniques for troubleshooting any problems you could face while trying to visit the Wavlink setup page.
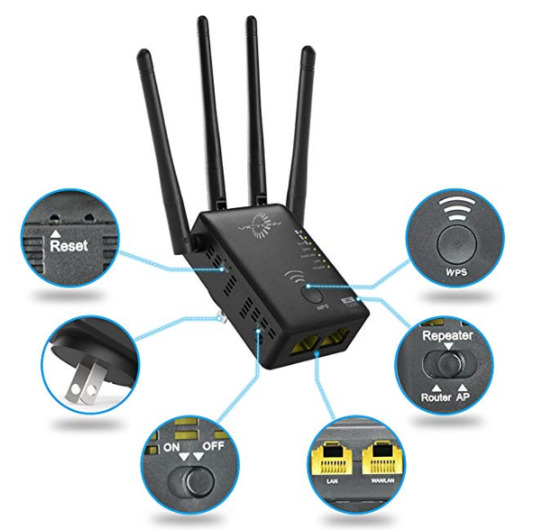
Wavlink Extender setup using wifi.wavlink.com
Firstly, power on your extender.
Place your extender close to the router.
Wait for the LED light solid green.
Use any smart device to get started.
Open the settings menu on your WIFI device and select the WIFI option.
Connect to the setup EXT Wavlink extender.
Go to WiFi.wavlink.com to get started.
The new extender setup page should now be visible.
How do i reset Wavlink extender via wifi.wavlink.com
Step by step process to reset your wavlink extender:
Connect your repeater to.
Grab the paper pin or clip to reset your extender.
Hold the position for 8 to 10 seconds.
Then wait for your Wavlink repeater to restart.
When it's finished, you'll notice that all of the lights are solid green.
Some light closes automatically after a few seconds.
That means your booster has been successfully reset.
Troubleshooting steps for Wifi.wavlink.com
The wavlink extender should be placed close to the router.
To access the page, you'll need a laptop, desktop, or smartphone.
Wifi.wavlink.com is a page that is only available locally.
To access the address, you must be connected to the repeater.
Make that the extender's power light is solid.
0 notes
Text
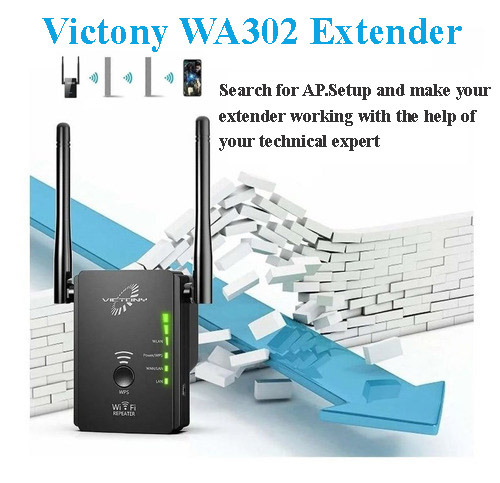
Why Does My Victony WA305 ExtenderDisconnecting?
Disconnecting?
Victony WA305 WiFi range extenders have turned dead zones into fun zones, resolving the problem of dead zones. Moving into more aggressive areas while also increasing current WiFi signal strength by up to 30%. The Victony WA305 Extender extends the signals from your primary router to provide continual internet access to all of your wireless network devices, even in areas where connectivity is low.
Although the Victony WA305 WiFi range extender provides a lot of useful features, it has a few flaws that many find annoying. The Victony WA305 Extender Setup, in reality, frequently disconnects.
But don't be worried if you're having the same problem. We are well aware of your worry. This is why we've put up this step-by-step guide to help you properly resolve the problem. Now is the moment to begin reading!
Make a connection to the correct network name.
You'll be given a new, expanded WiFi network name once you've installed the extender. The Victony WA305 WiFi Extender Disconnect has been successfully set up. It's possible that the current network has a different SSID than the one you're using. Almost probably, you're still linked to the WiFi of the previous network, not the one you just joined. You may find that when using a Victony WA305 WiFi extender, the device is frequently disconnecting. As a result, just connect to the network name of your extender.
Use the power cycle button on your Victony WA305 Extender.
A simple power cycle method should also be used to troubleshoot the Victony WA305 Extender. Simply disconnect and let your Victony WA305 Extender disconnect for a few minutes to reset it.
Try to keep your Victony WA305 Extender as far away from interference as possible.
Make sure your Victony WA305 Extender is in the correct position if you're having problems with it. Don't place your Victony WA305 Extender WiFi signal near other nearby devices if you don't want it to interfere with theirs. You won't be able to get continuous internet signals throughout your house since not only would placing your device near thick or concrete walls disrupt your connection, but you won't be able to because you won't be able to if you do. Because it's inconvenient to fix this, move your device and the extender to a different location.
It is highly recommended that you update the firmware on your Victony WA305 Extender.
The firmware for the Victony WA305 Extender is already installed. The software, on the other hand, is prone to being outdated, which can lead to the problem. To solve the problem, make sure your extender's firmware is up to current. The most recent firmware version can be found at ap extender setup. If new firmware is available, download and install it using the on-screen instructions.
0 notes
Text
The Wavlink AC600 Extender will not connect to a smart tv.
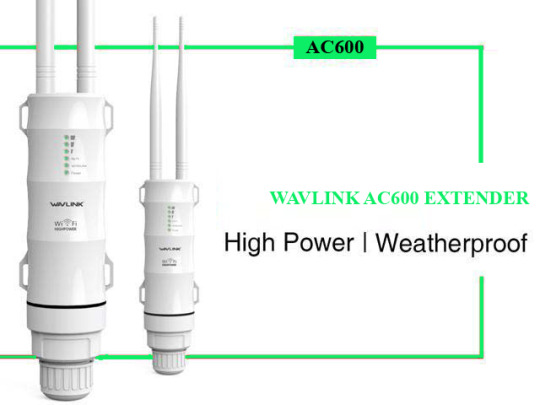
Wavlink AC600 Extender setup is your go-to answer for internet-related problems. On a regular basis, it removes dead zones from your home. AP.Setup can help you expand your network for a faster, more secure, and more dependable internet connection. The most important aspect of extending your network for quicker, safer, and better internet is the Wavlink AC600 WiFi Extender Setup. Wavlink extenders are compatible with all of your devices when it comes to compatibility. Wavlink is capable of controlling a wide range of devices, including smartphones, smart TVs, and Roku boxes. In this post, we'll go through how to set up your Wavlink extension.
There are three simple methods for connecting your Smart TV to the internet.
1. Use your home Wi-Fi to connect to the internet.
Most modern Smart TVs are Wi-Fi enabled, which means they include a built-in wireless adaptor. It only takes a few minutes to connect to the internet, however this method works best when your TV is in the same room as the router.
The advantages of using a wireless connection
Your living space will be clutter-free because there are no trailing cables.
Because you can set your TV anyplace in your living room, it's the greatest choice for wall-mounting.
It's really easy to set up – all you have to do is push a few buttons on your TV remote.
How to Make a Connection
On your TV remote, press the Menu button.
Then select Network Settings from the drop-down menu. Create a wireless network.
Choose a name for your Wi-Fi network at home.
Type your Wi-Fi password into the button on your remote.
2. The wired option - connect to your router directly.
Do you want the strongest, most reliable connection possible? Using an Ethernet wire, connect your TV to the internet router. Your television must be in close proximity to your router.
When connecting several devices, choose a powerful beamforming router to ensure your connection stays strong.
The advantages of a connected connection
It's simple to set up: just plug it in.
It delivers the best stable connection — no buffering should occur while your streaming.
It's significantly faster than Wi-Fi.
How to Make a Connection
Look for the Ethernet port on the back of your TV.
Connect your router's Ethernet cable to the TV's Ethernet port.
On your TV's remote, go to Menu, then Network Settings.
Select the option to connect to the internet through a wired connection.
Using the buttons on your remote, type your Wi-Fi password.
Sporting events to watch
3. Use a powerline TV upstairs or in another room from your router while your TV is upstairs?
This does not preclude you from watching Netflix or iPlayer.
The signal gets weaker as you get further away from your network. A powerline kit, on the other hand, can increase the range of your home network for smoother streaming.
Two adapters and two Ethernet cables are included in a powerline kit. The internet signal is sent down your electricity lines after the adapters are plugged into power sockets and your router.
Advantages of a Powerline
It provides a powerful internet connection from the second floor or through thick walls.
It will be simple to extend the internet to the remote reaches of your home.
How to Make a Connection
The first powerline adapter should be plugged into a wall outlet in the same room as your router.
Connect the adapter to your broadband router with an Ethernet cable.
Connect the second powerline adapter to a wall outlet near your Smart TV.
Then connect an Ethernet cable to your Smart TV's Ethernet connection.
Connect the Ethernet cable's opposite end to your powerline adaptor.
0 notes
Text
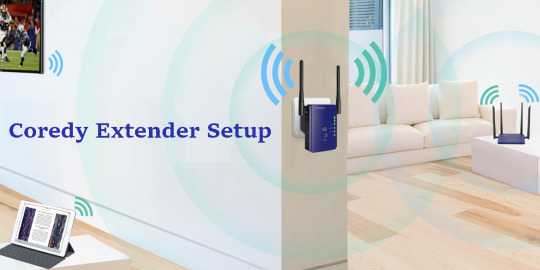
Coredy Wi-Fi Extender Setup
0 notes
Text
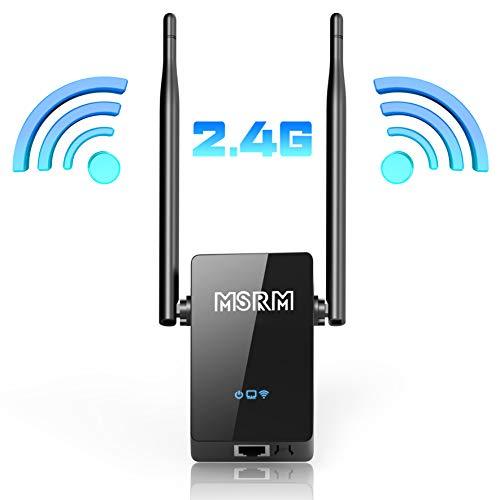
How does the MSRM US753 Extender Setup function?
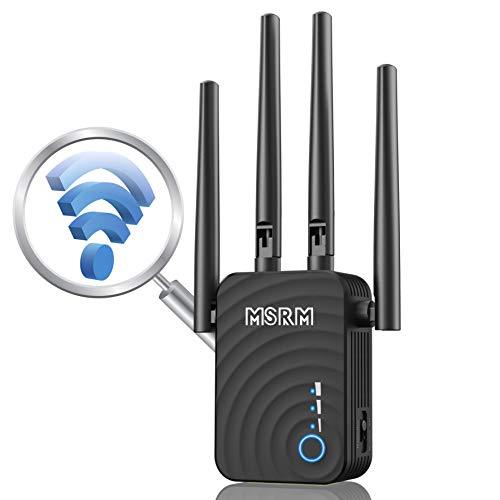
MSRM US753 Extender is a wireless network extender from MSRM. So, what's the first thing that comes to mind? Is that the purpose of a wifi network extender, and why do we require one? We may use our devices in areas where the range is limited, such as our homes or offices, by using a Wi-Fi extender. The coverage provided by a home router isn't always enough to offer a strong and consistent wifi signal across the house. This is where devices like the MSRM US753 wall-mounted wireless range extender come in handy. It is capable of reaching even the most secluded regions of a house.
What is the best way to log into my MSRM US753 Extender ?
This step is crucial because it is at this time that you will be able to adjust all of the Ap.setup Wi-Fi Booster's associated settings. You won't be able to finish the configuration until the extender's web browser is open.
You won't be able to finish the configuration until the extender's web browser is open. To go to the MSRM US753 Extender Setup, follow these steps.
It should be accessible using a web browser on your desktop connected to the extender's network.
If you're using a router and an extender and your home has multiple WiFi network names, type ap.setup into the web page's URL field (SSIDs).
It is highly recommended that you connect to a Wi-Fi network with the same name as yours (SSID). To ensure that the two machines are connected, you must type the IP address into the address bar of your browser.
Press the 'Enter' key once you've finished entering all of your information.
A login screen will appear on the screen. Your account will be disabled if you do not provide a username and password. Fill in your email address in the username field.
To proceed, enter your login credentials. Then click on the 'login' button.
This page contains the 'Status' information.
Select the 'Menu' icon from the menu to open the 'Menu' drop-down menu in your web browser.
A MSRM US753 Extender menu will appear on the screen.
To change the extension's setup, go to 'Settings' from here.
Technical information:
MSRM US753 is a clothing line.
The material is ABS+PC.
The colour is white.
Plug type: US plug or EU plug (optional)
Rated voltage is 100-240V AC.
Power usage is 2.5W.
2.4GHz, 2.4GHz, 2.4GHz, 2.4GHz, 2.4GHz, 2.4GHz, 2.4GHz, 2.4GHz, 2.4GHz, 2.4GHz, 2.4GHz, 2.4GHz, 2.4GHz,
2 Antennas that are integrated Antenna form is an important consideration.
The default mode is AP / Repeater.
It is feasible to get speeds of up to 300 Mbps.
IEEE 802.11b/g/n standards are met.
WPA2, WPA, and WEP (128/64 bit) are all supported for wireless security.
0 notes
Text
What are the features of the MSRM US302 Extender Wavlink AC1200 Extender?
MSRM US302 Extender
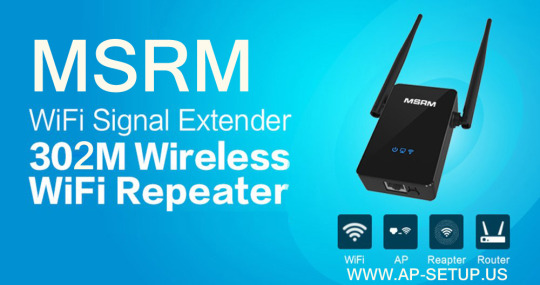
The WiFi 6 (802.11ax) protocol is supported by the MSRM US302 Extender Setup, which is the most recent version of the WiFi standard.
At the same price as before, the high-capacity mesh extender provides higher performance, range, and capacity.
With the potential to link your home at up to 1.8Gbps, you can build a more connected environment and extend faster WiFi to the most remote regions of your home.
4stream WiFi increases the available bandwidth and lowers the latency for all connected devices by adding additional physical streams to the WiFi network. This is the best option for small and medium-sized residences with up to four bedrooms since it gives strong WiFi in every room while using the fastest internet available to get the speeds you pay for.
The MSRM US302 Extender is also appropriate for up to four-bedroom apartments and condominiums. With a WiFi 5 Mesh Extender, you can obtain faster WiFi speeds and extend your network by up to 1.5 times, allowing you to connect numerous devices to your WiFi network today and in the future without worrying about it overheating.
Using your present router, you can rapidly set up a WiFi mesh network throughout your home.
Fast wifi rates are provided by WiFi 6 with 4-stream technology (up to 1.8Gbps)
11ac is 1.5 times faster and has 1.5 times the performance of 11ac.
A 1.5GHz quad-core processor allows for smooth 4K streaming and gaming.
A gigabit WiFi network can be accessed by PCs, laptops, cellphones, and other devices.
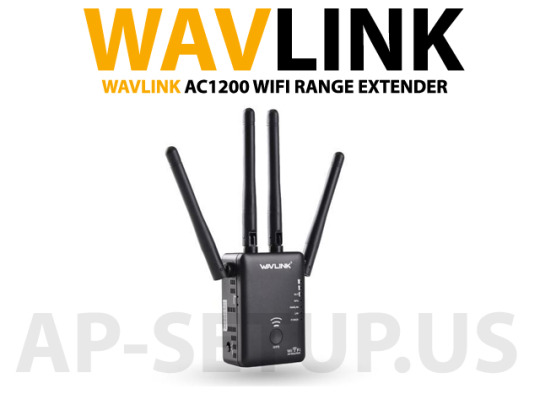
Wavlink AC1200 Extender
The Wavlink AC1200 extender setup, you can quickly extend the range of your current wireless network to any region. Four antennas are positioned in a patented omnidirectional configuration to increase the performance and durability of your existing network. With the Wavlink AC1200 dual-band wireless range extender, you can progressively improve your wireless network. It is easy to install due to its extremely small and convenient size. Its simple design also makes it easy to match with the rest of your home or office decor.
You can connect all of your gadgets from anywhere in your house thanks to the high-performance antennas. Wavlink can also connect to your router wirelessly. As a result, it immediately recognises your router's signals and begins boosting them.
With simultaneous 5G 867Mbps and 2.4G 300Mbps connections, the Wavlink AC1200 Dual Band Router for More WiFi Devices delivers a total bandwidth of 1167Mbps.
Simple tasks like composing emails or browsing the internet can be performed on the 2.4GHz frequency, while bandwidth-intensive applications such as online gaming or 4K video streaming can be performed on the 5GHz spectrum — all at the same time.
Expanded Wireless Coverage with High Gain Antennas – 4 x 5dBi omni-directional antennas dramatically increase wireless coverage in all WLAN networks, resulting in even higher wireless performance and transmission rates over longer distances, giving you exceptional wireless coverage and reliability throughout your home.
Router with Through-the-Wall High-Power Capability – A high-power amplifier (PA) increases the magnitude of the signal, whereas a low-noise amplifier (LNA) reduces noise while boosting the signal's intensity. To summarise, PA+LNA can improve performance while also penetrating barriers.
Ethernet Ports (Wired) – WPA2 wireless security protocols are supported on one 10/1000Mbps WAN interface and four 10/100Mbps LAN interfaces.
Router, LAN Bridge(AP), and WISP modes are all supported for a variety of applications.
The WAVLINK WL-WN530H4 comes with a 12-month product replacement warranty and helpful customer service.
PORT FORWARDING IS NOT SUPPORTED BY THIS WARNING.
If you're having trouble with your router, please don't hesitate to contact us for assistance.
0 notes
Text
What are the best wireless range extenders for gaming?
As a result, here are the three range enhancers that provide the finest gameplay experience:
MSRM US753 Extender :
The MSRM US753 Extender Setup network is competitively priced and capable of offering a reasonable range boost, but it sacrifices style and sturdiness in the process. It's essentially a plug-in wifi extender that will come in handy if you're looking to save money. At the same time, be sure that every room in your house has a stable internet connection. The MSRM US753 Extender Setup resembles an AC power converter with one transmitter on each side, rather than a standard wifi extender. The Ethernet connector on the right-hand side of the extender will be completely hidden if you flip the antenna downwards.
The following are the features of the MSRM US753 Extender :
Up to 15 devices can be linked, and the WiFi network coverage can be extended up to 1000 square feet.
Due to dual frequency and the unique FastLane technology, performance of up to 750 Mbps is feasible.
It works with any WiFi connection, gateway, or cable modem that supports WiFi.
One 10/100 Ethernet port is supplied for optimal speed.
Wireless security protocols WEP, WPA, and WPA2 are supported.
There is only one USB 2.0 port for your convenience.
It may not operate with routers or ports that have had their firmware modified, use open source software, or are out of date or non-standard.
Wavlink AC1200 Extender and how does is work?
Using ap.setup, configure the WAVLINK AC1200 High Power Dual Band WiFi Range Extender.
With 5GHz 900Mbps and 2.4GHz 300Mbps, the speed delivered is unrivalled by other Wifi Boosters.
Beamforming Technology– With the latest beamforming technology, you can stay connected to the Internet at all times. It works by supplying bandwidth to your appliances while you're on the move.
The device has several modes, including Router Mode, which allows you to use it as a router. Choose Repeater Mode if you want to expand your signals wirelessly. AP Mode turns your router into a hotspot while it's connected to an ethernet connection.
You'll be up and running in 10 seconds–when you push WPS, the extender will automatically connect to your router and configure itself.
Setup of the Wavlink AC1200 Browser
Connect your device to the router and wait for the power LED to stabilise before proceeding.
Press the button on the left side of the repeater to activate the repeater mode.
Wait for the lights to come back to normal.
Take any of your devices, such as a computer or laptop, and look for the wavlink network in the WiFi list. It will show up as Wireless-N or Wireless-G.
Open a browser and type or 192.168.10.1 or ap.setup into the address bar when you've joined to the network.
When prompted for a login password on the setup screen, type admin.
Follow the on-screen instructions to set up your wavlink ac1200 repeater.
0 notes
Text
Wavlink Aerial X Extender Setup
📷📷📷📷📷📷
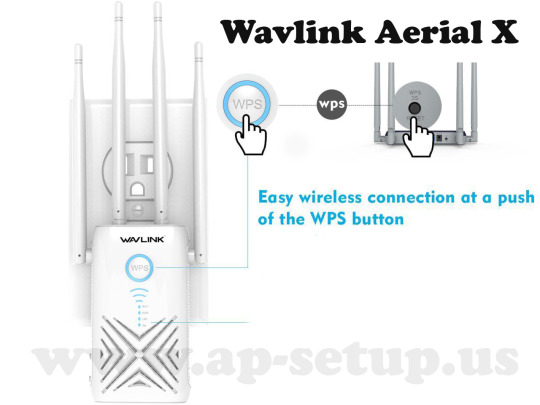
The Wavlink Aerial X Extender has a lot of great features, and it's simple to install. The coverage area can be easily extended. It has an Ethernet port and an LED control panel, allowing the user to attach several devices to it. The LED lights can be used to locate the Wavlink Aerial X wifi range Extender in the best possible spot. You can easily handle the Tether application.
Wavlink Aerial X Extender SETUP WITH WPS BUTTON The Wavlink Aerial X Extender setup can be unwrapped. You may examine how the Internet works from this location. Link your Wavlink Aerial X to the power supply after that. You can now verify that the Wavlink Aerial X Extender power light is on. Here is where you can position your Wavlink Aerial X Extender Setup in relation to your Wavlink Aerial X wifi router. Your Wavlink Aerial X Extender and your Wavlink Aerial X wifi router now have WPS buttons. Then, on both the Wavlink Aerial X wifi range extender and your Wavlink Aerial X wifi router, press the WPS button. The light is blinking, indicating that it is connected to the relationship. The configurations are captured in a matter of seconds. You can use your Wavlink Aerial X Extender in this situation.
SETUP OF THE Wavlink Aerial X Extender Setup WITH THE TETHER APP The Tether application can be downloaded easily. The Wavlink Aerial X Extender can be unwrapped here. After that, you can enter information about the Wavlink Aerial X Extender Setup. The QR code for the Wavlink Aerial X wifi range extender can be found here. It now takes a few seconds for the settings to catch up. You can use your Wavlink Aerial X Extender right away. It detects wifi automatically, but if it does not, you must manually enter the password. It is possible to use your existing Wavlink Aerial X Extender Setup.
Through THE Wavlink Aerial X Extender Setup LOGIN It is possible to open a web browser. You may either type ap extender setup or the Wavlink Aerial X Extender IP address, which is 192.168.10.1 All users are administrators, so ap.setup can enter their user name and password here. After that, you'll be able to quickly access the settings.
0 notes
Text
MSRM US300 Extender Setup
MSRM US300 Extender Setup
Ultimate pace and full coverage of the MSRM US300 Extender Setup repeater in your building. It is compact in size and makes it easy to fit inside the interior of your house. Supporting the 802.11b/g/n Wi-Fi networking protocol with up to 300 Mbps Internet bandwidth. MSRM Extender Configuration can be linked to your different devices, including your computer, laptop, cell phone, game console, tablet, etc.
Setup of MSRM Extender via Browser:
Halfway between your router and the place where you need the Internet, plug in your extender.
Take your cellphone or laptop now and look for the MSRM network name in your Wi-Fi folder. It could be shown as Wireless-N Wireless-AC.
It can take about 10 seconds to connect to the network and you and no internet can be shown on the MSRM after that.
Open a tab on the same device and type AP.Setup OR 192.168.10.1 in the address bar to complete the setup of the MSRM US300 Extender Setup.
This will direct you to the admin login form page for both your username and password.
Among the options there, find the repeater option and select next.
Choose the name of the Wi-Fi network key from the Wi-Fi network list that it offers you after searching for a network.
Enter your Wi-Fi password now and it should be the same as your Wi-Fi password on the router.
You can customize the MSRM network name in the next step, or you can leave it as it is.
After setup, your extender network will show up at the end as your Wi-Fi Network SSID Ext.
Until the extension reboots, you can try connecting computers to the extended network.
MSRM US302 Setup for Wi-Fi Range Extender
Make sure you have an active internet link with an existing wireless router in your home before buying and Setup the MSRM US300 Extender Setup. This means that in your home or workplace, you already have Wi-Fi running somewhere.
Find a weak spot which has a weak signal, or a dead zone. If there is no signal at the position you chose, then the installation of the extender becomes pointless.
Plug-in Extender to an electrical wall socket, now go to the Wi-Fi selection screen and pick MSRM to attach using a wireless computer such as your mobile phone, laptop, tablet, etc.
In the Address area, open any Web browser at work and select 192.168.10.1 It will open an admin page. To enter the panel, type the following credentials. Name of user: admin/Password: admin/Admin: (everything is tiny)
Tap the mode for "Repeater".
From your own wireless router, pick the current SSID (name) of your existing Wi-Fi network you are looking to expand.
You now have two options: you can build a new name for the Wi-Fi network in the fields below, or use your current SSID router name and the same password. The latter is suggested as you do not want to have to create a new link in your home or office with existing devices.
Enter the name of the current Wi-Fi network and the same password in the SSID repeater area. If you want to build a new name for your network, just type a different name (the password must remain the same as the router).
It is time to connect to your extended WiFi network once you have reached the link and your settings are saved correctly.
With your expanded Wi-Fi network, it should now be all set up. With an extender unit, you should be fine, but if your home or office is big and there are more dead zones, you can buy additional extensions to enhance Wi-Fi coverage.
You can read a complete analysis of the MSRM US302 300Mbps Wi-Fi Range Extender if you are new to this device and see if it is the best match for you. With any questions, feel free to leave comments below. I hope you will be helped by this guide.
MSRM US300 Extender Setup via WPS:
Before the setup is done, you need to insert the MSRM US300 Extender Setup into the same room as your router for this setup.
You can see a blinking light on it when you press the WPS button on it until the power light on the US300 repeater is steady.
Within two minutes, click on the WPS button on your router. If your router's WPS button is disabled, then connect to your router's wireless settings and activate the WPS from there.
On both cameras, you can now see the WPS light blinking for about 10-15 seconds.
The WPS on a router will stop and, after a successful setup, the WPS on the repeater will turn solid.
You will see an Extender now appearing in your Wi-Fi folder as your network name (SSID EXT).
Unplug and position the extender halfway between your router and the place where the internet is required. Set it away from large appliances, such as AC, microwave, etc.
0 notes
Text
AP Extender Setup
AP Extender Setup
The Setup of the Wi-Fi extender
It extends the WiFi network's reach by boosting WiFi and improving overall signal quality across long distances. The signal from an existing WiFi router is duplicated by the extender. The same method can be used to configure AP.Setup.
How to connect to the WiFi Extender:
Place the extender and use the control to connect to your WiFi network. By connecting the extension device into an electrical socket, you can add power.
1. Place the extender in the same location as your WiFi router. The distance of the WiFi router is only important during the first setting.
2. Place your extender in a power outlet. LED lighting using Green Power. If the Power LED does not light up, press the Power Button.
Connection to WPS: You can connect to a secure Wi-Fi network without entering the network's password or name. Protected Wi-Fi Setup (WPS). The WEP network is not protected by any WPS. When you use WEP encryption,
Click the WPS button on the extender's side panel. The WPS LED blinks.
Click WPS on your router or access point within two minutes. Your existing wireless network is connected to the WPS LED when the extender lights, Router Link LED lights, and the expander are solid green. Find the name of the extender and replace it with the new WiFi network name for the wireless network extension (SSID). Connect your WiFi devices to the Wavlink Extender setup. The WiFi password you use for your WiFi router is the same. You should be able to select a location within the range of your existing WiFi router network. Use an extender to connect two wires in an electric socket. LED lighting using Green Power. If the Power LED does not light up, press the Power Button. Install an extender-to-router connection in the router's front panel, using the LED link.
NETGEAR Genie Smart Setup
Use the WiFi network manager to find and connect NETGEAR EXT (SSID) to your PC or mobile device. When the connection is built into a PC or mobile device, the Client Link LED lights are turned on. Open a web browser window on the same screen or mobile device. You can access the smart Netgear Genie Setup right from your browser. Continue pushing the Continue button to expand the WiFi network.
In the Password field of the Continue button, type the network password (sometimes called passphrase or security key).
Select Private Network or Public Network using the Radio Continuation button. In the Name box, type the name of your New Extender (SSID) and then click the Continue button.
You can use the mobile device's Wi-Fi network management to connect to the new WiFi network extender. Carry do this move on all of your smartphones and computers.
If you still have a screen on your computer or phone, check the box below and then click the Continue button.
Unplug the extender and move it to a location with a weak WiFi signal near the extender field. You must choose a location within your existing WiFi router network.
Use an extender to connect two wires in an electric socket. LED lighting using Green Power. If the Power LED does not light up, press the Power Button. The Router Link LED can be used to locate a spot where the device to router connection is the strongest.
Find the right place
The LED flashes for 2 minutes the first time you contact the expansion network if the WiFi signal is weak. If you do, adjust the extension's position.
There are no arrow-lit LEDs. The extender is in a good place.
Router arrows that blink. Close the distance between the extender and the router.
The user's face is lit up with arrows. Place your computer or mobile device next to the extender.
Expansion of effectiveness
These LED expansion systems may display the Wi-Fi signal between the router and the Wi-Fi signal of the extend to the computer or mobile device.
Color coding of LEDs is:
Green offers the most strong cooperation.
The colour amber denotes a close bond.
A weak link is proposed by Red.
A Wi-Fi connection is not visible if the LED is turned off.
0 notes
Text
Rockspace Extender Setup
After you correctly connect your wifi go extender, the arrangement from the re.rockspace.local website can be efficiently achieved on your wifi driven gadget. You should move it to another location where the wifi signals are appropriate until the Rockspace extender is arranged, so that the extender extends the device evenly to all parts of the property.
You can see below the re.rockspace.local design system projects.
Plug in the rockspace local extender setup electrical socket.
Build a secure connection between the extensor and the PC
The Power LED light should be switched on
Open an internet browser and head to , the website gui.
You can register the default Extender certs in the fields when the site opens.
Click login and it will view the AP Extender Setup.
Follow the instructions and guidance given and customize the wifi range extension without any problems.
Rockspace Extender Setup Manual Process :
At the stage that you are attempting to manually organize your wifi extender, you should automatically follow the below procedures.
The wifi extender and power to connect to the network are plugged in.
Wifi range extender rockspace app with the PC
Open an internet browser and enter Rockspace range extender setup in your browser's address bar. You're on the profile tab now,
You may enter the username and secret key when you have entered the login tab
You can click login after accessing the default certificates.
Then you can see the New extender setup page for the extender and you will see the effective structure of the extender.
Save all the settings and then shift the extension to a location where the wifi signs are suitable.
Complete the setup of the wifi extender after registering your gadget and holding the extender in the right position. The LED markers on the wifi go extender that illuminate as shown by the design of the wifi signals at a particular location will find the right place. At the point where the WPS button is lacking on the tap, the extender can be used in the manual procedure above without much of a stretch system. If you can't get to the rockspace extender setup site with the system gui, then you can try the IP address of the 192.168.10.1 extender.
0 notes
Text
How to Setup Victony WiFi Extender
Victony Wifi Extender setup: When it comes to a value-based initiative, none will reach the expertise of Victony wireless range extenders. Victony makes things simpler online, smoother and more secure. Victony does this with the help of the 1200 MBPS speed that it provides.
So, it can be done in a second whether it is gaming, downloading video, or even uploading. Victony Extender setup is filled with several choices and is a great tool for getting rid of any website related problems.
Follow the steps below to set up Victony Wifi Extender using WPS:
Link your extender to your router with a power supply at close range in the first place.
• When connected, take a look at the power LED to ensure that it displays a solid color image.
• Place the WPS button on both the router and now the extender. If found, push the button for around 2-3 seconds at each of the devices simultaneously.
When you see a green blinking light on your extender, you have successfully connected the extender to your router mywifiext login
• After 10-15 seconds, you just have to wait to allow the systems to learn each other and start.
The lead on the extender becomes a strong green colour after successful contact.
• Now, you may feel free to withdraw the extender from the spot and position it elsewhere in your home. For better advantages, it is advised that the extender be installed in places where the internet does not work at all.
Let 's dive into the alternate approach now.
0 notes

Text
How to Connect with AP setup
What is Ap setup
The physical setup for a wireless access point is very simple: you take it out of the box, Ap.setup place it on a shelf or on top of a bookcase between a network jack and a power outlet, plug the power cable in, and plug the network cable in.
Follow the steps for AP Extender setup
Fitting to the electrical plug in the extender and keeping on until the Light hits a clear Orange.
Click and hold the WPS button for 3 seconds on the turn, and also the WPS on the extender.
site Mywifiext setup which is a disconnected page to arrangement the extender.
When the WPS light on the Extender goes to strong green it reveals the corresponding extender.
Other options to build your Extender include plugging the Extend
0 notes
Text
Configure your wavlink extender setup using ap.setup
Still unable to install the wavlink extender setup? Don't panic, our free support team helps you to easily install ap.setup and fix your problems in a few minutes.
Ap.setup will help you to improve or enhance current wifi signals in dead spots and remove the areas. Wavlink wifi Extender setup allows you to play HD videos and movies and experience lag-free gaming comfortably and deliver the best performance. Below is the process to install the wavlink extender so you can avoid wasting your time.
Step by step instructions to Ap.setup:
Plug the Wavlink Extender for Ap.setup into a power socket nearby the router.
Switch on your Wavlink extender setup and stay till the LED is stable.
Select either of your WiFi enabled devices and connect to your Wavlink network. Go to the Wi-Fi network and connect to the network.
Open the browser of your preferences and enter the username and password for wavlink http:/ap.setup in your browser. .Press the enter button
Please provide the login details of the Wavlink Extender in the required fields and press 'Login'
Choose from the ap.setup page and click on the new home Wifi network and enter the wifi network address.
You need to type the WAVLink Extender Network Wi-Fi name and password on the next tab.
Then press the 'Save' button to apply the settings.
New extender setup via is successfully completed and then you will be able to enjoy fast internet service.
Still unable to install the wavlink extender setup? Don't panic, our free support team helps you to easily install ap.setup and fix your problems in a few minutes.
0 notes
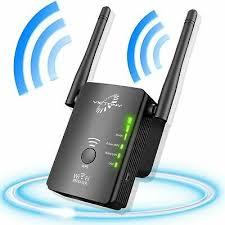
Photo
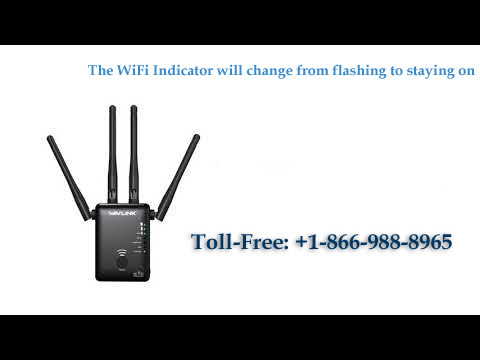
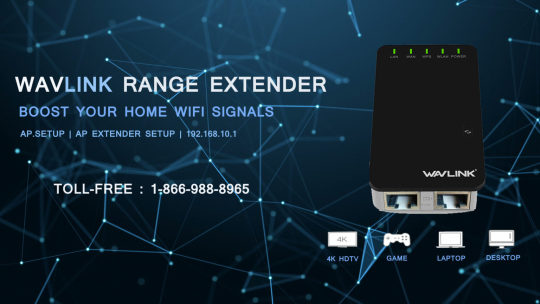
Wavlink WiFi range extenders are easy to set up, configure, and manage. You can install the device on your own by going through simple procedures. For any othery query contact Ap Setup support team +1-866-988-8965
1 note
·
View note