Thank You for taking the time to visit my blog! Truebluemeandyou is my catalog of unique and good DIY crafts. I have made and sold almost every craft out there, and it is easy for me to see which DIYs are going to turn out well. I always link back to the original source. For more info on me, go to my "ABOUT ME" page. If you own an image you want taken down please email me at truebluemeandyou [at] gmail [dot] com
Don't wanna be here? Send us removal request.
Photo
MORE RELEVANT THAN EVER

Craftifesto
The power is in your hands!
Craft is Powerful - We want to show the depth and breadth of the crafting world. Anything you want you can probably get from a person in your own community
Craft is Personal - To know that something is made by hand, by someone who cares that you like it, makes that object much more enjoyable
Craft is Political - We’re trying to change the world. We want everyone to rethink corporate culture & consumerism
Craft is Possible - Everybody can create something!
Craftifesto was written by Cinnamon Cooper and Amy Carlton, and illustrated by Kate Bingaman-Burt
I have always been a fan of Craftivism (Craft Activism). One friend, who is no longer blogging, opened my eyes to how powerful Craftivism can be.
#craftivism#craft is political#craft activism#truebluemeandyou#craft is possible#crafting can be protest signs#crafting can be protest banners#craftifesto#craftifesto the power is in your hands
172 notes
·
View notes
Photo
I am posting this pattern now, thinking of the Tale of Two Cites written by Charles Dickens. There was a character named Madame Defarge. Madame Defarge records the names of those she wants to exact revenge upon, because they killed her entire family, by secretly knitting their names into a coded pattern. This serves as both a means of documenting her enemies and a metaphor for fate—once a name is knitted into her work, it is as if their doom is sealed. I think Tale of Two Cities is a very relevant book now.

DIY Knit Morse Code Cowl Free Pattern
Updated 2019
From Fringe Association:
It so happens that I have always liked inscriptions and secret messages and such, so the idea stuck. The next day I was learning the code and charting out a message — using a single purl stitch for a dot and 3 in a row for a dash. (“Dots” and “dashes” really being short and long signals.) And every space is a knit stitch: 1 between the dots/dashes of a single letter; 3 between letters; 7 between words. Then I figured if I’m doing something as dorky as knitting Morse Code, I might as well go all the way and make it punny, right? So this cowl says I wool always love you.
I love knitting and the idea of embedding secret messages in Morse Code - so I really love this pattern.
Morse Code DIYs: truebluemeandyou.com/tagged/morse-code
Knitting DIYs: truebluemeandyou.com/tagged/knitting
Crochet DIYs: truebluemeandyou.com/tagged/crochet
Find the DIY Knit Morse Code Cowl Free Pattern from Fringe Association here.
She also knit a F–K CANCER Morse Code Cowl for a friend here.

#diy#knitting#knitting secret coded words#Morse code knitting#craftivism#free Morse code knitting pattern#truebluemeandyou#Time to start knitting#how to embed names into your knitting#activism#don't say the quiet things out loud
2K notes
·
View notes
Photo
I’m posting these again for Valentine’s Day as I’ve done for several years. Artists and creatives are more important than ever RIGHT NOW. Who knows what art and images will be censored in the US if things don’t change in the coming weeks. Everyone please stay safe out there.
Here’s a video I found helpful for me:
NLG Know Your Rights reminder: Shut the f*** up!myself https://m.youtube.com/watch?v=nWEpW6KOZDs
youtube

Elmo Hood Kings and Queens “Beat as One” Playing Card Art
Elmo Hood just posted his most recent artwork today.
To celebrate Pride London this weekend there is a 25% discount on the Queens and Kings “Beat as One” limited edition prints. Use code PRIDE in checkout to activate, offer ends Sunday night 🌈 www.elmohood.com
Elmo Hood A.K.A. Elliot Hood is one of my favorite artists. I’ve posted Elmo Hood’s playing card artwork since the beginning in 2013 when he created Queen of Hearts/Suicide King. You can find all my posts with his artwork here: truebluemeandyou.com/tagged/elmo-hood
#valentines#Valentine's Day#love is love#Elmo hood#love is love is love#democracy is dying#censorship#playing card art#art is important#Youtube
98 notes
·
View notes
Photo

#playing cards#Valentine's Day#king of hearts#diy playing cards king giving queen heart#diy playing cards valentines day#romantic#love#cards#paper
2K notes
·
View notes
Photo
Posting my favorite Valentine’s Day DIYs from my archive. Find hundreds of Valentine’s Day DIYs here.

DIY Crochet Mini Anatomical Heart Free Pattern
Updated Link 2020
The free pattern is for the mini one pictured on the lower right. The life size anatomical heart pattern is available from his Etsy store for $3.99 here.
There are 3 videos to help you out in addition to the free written pattern for the mini heart.
Find the DIY Crochet Mini Anatomical Heart Free Pattern from Louie’s Loops here.
For other unique anatomical heart DIYs including a template that you could print out for cards go here.
#diy#Valentine's Day#crochet#crochet anatomical heart#galentines#free pattern anatomical heart#updated link#truebluemeandyou#hearts#best of my archive#anatomical heart
576 notes
·
View notes
Photo
Posting my favorite Valentine’s Day DIYs from my archive. Find hundreds of Valentine’s Day DIYs here.
THE FIRST LINK WHICH HAS A TUTORIAL WORKS. The others may not.


DIY Message and Predator/Prey Clothespin Tutorials
GIFs by me using my favorite GIF program: makeagif.com
Top Photo: Good Luck Secret Message Clothespin Tutorial from Creative in Chicago.
Bottom Photo: DIY Predator and Prey Clothespin Tutorial by Estefi Machado Tutorial. I used Chrome to translate.
This is another idea from ImmortalFallenFerret on deviantart that I posted here (but no tutorial) here.

#diy#valentines day#galentines#diy message clothespin#cheap valentines DIYs#hearts#clothespins#truebluemeandyou#kids crafts#best of my archive
2K notes
·
View notes
Photo
Posting my favorite Valentine's Day DIYs from my archive. Find hundreds of Valentine's Day DIYs here.
Design Sponge's website is dead. Here's their tutorial on the WayBackMachine here.

#diy#valentines day#galentines#heart paperclips#diy heart paperclips#truebluemeandyou#updated link in reblog#hearts#decorative paperclips#cheap diy gifts#best of my archive
2K notes
·
View notes
Photo
A Valentine gift perfect for our dystopian world. Because SHTF. This blogger also has lots of craftivism DIYs especially on this post here. For example, know someone with anxiety or stress in these times? This would be a thoughtful gift. In the words of the author of the blog "Stuff You Can't Have":
"Don't miss this opportunity to create your own ugly little voodoo doll and stick it with pins. Two different varieties! This post offers a complete how-to with instructions and downloadable pdf. Come on, you know you want to."


Feel free to change the text.

DIY Survival Doll Tutorial from Stuff You Can’t Have.
Make a DIY Survival Doll filled with many things you will need if the SHTF. This has got to be one of the most original doll/plush hacks I’ve ever seen.
Whether earthquake, tornado, terrorist attack, the rapture, or an alien invasion from outer space, you have only to grab your survival doll and run.
Concealed within this innocent-looking, seemingly worthless doll is everything you will need to survive just about anything that could possibly happen.
Arms - filled with rice
Legs - filled with beans
Head - made with a plastic bottle with hardware like fish hooks, nails, safety pins, twine, and fishing line.
Heart - filled with silver dimes
Minted prior to 1964, these dimes are comprised of 90% pure silver and can be used for negotiable currency after the global economy collapses.
Torso - survival gear
Petticoat - layered petticoats printed with a survival manual.
**You can always modify an existing plush toy if you don’t sew**

#diy#craftivism#valentines day#valentines#diy survival doll#ugly voodoo doll#ugly pin cushion#creatives are more important than ever#shtf
4K notes
·
View notes
Photo
I will be posting my most popular Valentine’s DIYs up until February 14th for those new-ish to my blog. I’d have been blogging on Tumblr since 2011 and have hundred of cheap, clever, and unique Valentine’s Day ideas here.

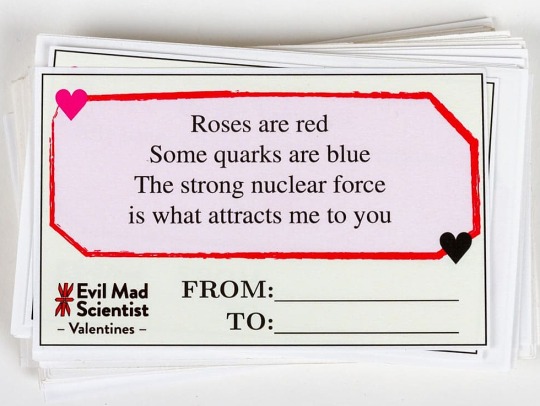
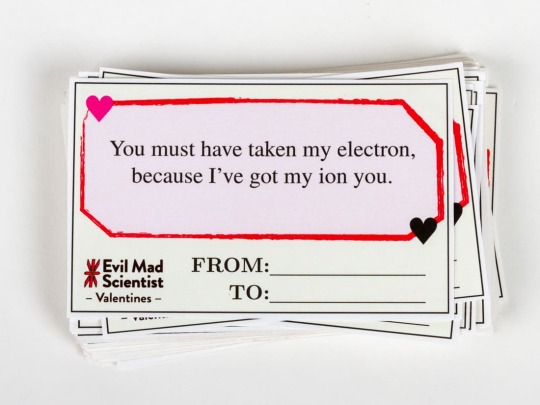
DIY Geeky Science Valentine’s Day Cards
I have posted Evil Mad Scientist’s Valentine’s Day cards every year - for the past 6 years. How can you express your love this year?
This year’s set features geometry, division by zero, batteries, a nod to quantum chromodynamics, and two very bad puns. (Sorry not sorry.)
You can find these Valentines at Evil Mad Scientist here. I’ve posted all 6 years of Evil Mad Scientist’s Valentines, but you can download all 7 years of them at the link.
2018 - 6 cards featuring parallel lines, friction, and activation energy
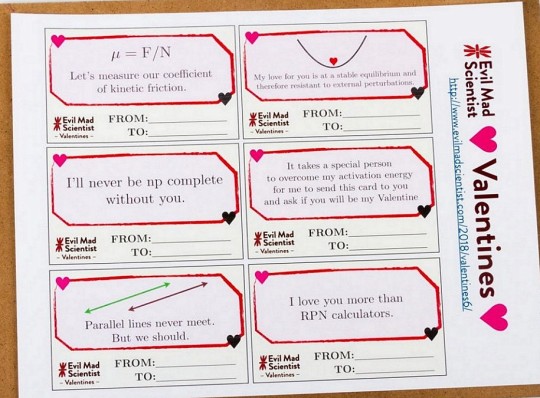
2017 - “atomic orbitals, exponential growth, and an epsilon delta declaration of love”

2016 - “Pluto’s cold heart, and the perfect card for your robotic expression of love”

2015 - love, hearts, and arrows

2014 - 6 symbol heavy cards

2013 - 6 equation heavy cards

#diy#geeky valentines cards#Valentine's Day#valentines cards#science valentines#printables#galentines#science valentines cards#science#hearts#truebluemeandyou#best of my archive
293 notes
·
View notes
Photo
I will be posting my most popular Valentine’s DIYs up until February 14th for those new-ish to my blog. I’d have been blogging on Tumblr since 2011 and have hundred of cheap, clever, and unique Valentine’s Day ideas here.


DIY Easy Love Wire Ring
Updated Link 2019
Don’t want love on your finger? Use this tutorial to spell out something else.
For pages and pages of wire and wire wrapped DIYs go here: truebluemeandyou.com/tagged/wire
Find the DIY Easy Love Wire Ring Tutorial from Swellmayde here.

#diy#wire wrapping#valentines day#galentines#diy love ring#diy wire love ring#wayback machine#galentines day#hearts#truebluemeandyou#best of my archive
2K notes
·
View notes
Photo
I will be posting my most popular Valentine’s DIYs up until February 14th for those new-ish to my blog. I’d have been blogging on Tumblr since 2011 and have hundred of cheap, clever, and unique Valentine’s Day ideas here.

DIY how to Fold a Heart Shaped Napkin
Learn how to fold a heart shaped napkin in just a few easy steps.
For hundreds of Valentines DIYs go here: truebluemeandyou.com/tagged/hearts
Find the DIY on how to Fold a Heart Shaped Napkin from One Kings Lane here.
If you like this then you might like my popular post The Ultimate Animal Towel Folding Guide here.
The folding guide includes:
Swan
Monkey
Elephant
Crab
Mouse
Snake

#diy#valentines day#heart folded napkin#galentines#how to make folded heart napkin#truebluemeandyou#best of my archive#hearts
963 notes
·
View notes
Photo
I will be posting my most popular Valentine’s DIYs up until February 14th for those new-ish to my blog. I’d have been blogging on Tumblr since 2011 and have hundred of cheap, clever, and unique Valentine’s Day ideas here.

DIY Gothic Altered Chocolate Boxes - I Love You to Death!
Take regular boring chocolate boxes and turn them into gorgeous gothic chocolate creations.
Top Photo: DIY Gothic Altered Chocolate Boxes tutorial here, Bottom Photo: DIY Chocolate Planchette tutorial here. Both tutorials are from Me and Annabel Lee.

#diy#valentines day#gothic#diy gothic chocolate box#gothic valentines day#gothic diy#truebluemeandyou#best of my archive#hearts#i love you to death
1K notes
·
View notes
Photo
I will be posting my most popular Valentine’s DIYs up until February 14th for those new-ish to my blog. I’d have been blogging on Tumblr since 2011 and have hundred of cheap, clever, and unique Valentine’s Day ideas here.


#diy#Valentine's Day#love letters#valentines cards#valentines pop up card#papercraft#hearts#truebluemeandyou#best of my archive#how to make a pop up card#tutorial
7K notes
·
View notes
Photo
I will be posting my most popular Valentine’s DIYs up until February 14th for those new-ish to my blog. I’d have been blogging on Tumblr since 2011 and have hundred of cheap, clever, and unique Valentine’s Day ideas here.

#diy#valentines day#no bake peppermint candy hearts#easy no bake candy#galentines#Valentine's Day candy#truebluemeandyou#peppermint#best of my archive#hearts
14K notes
·
View notes
Photo
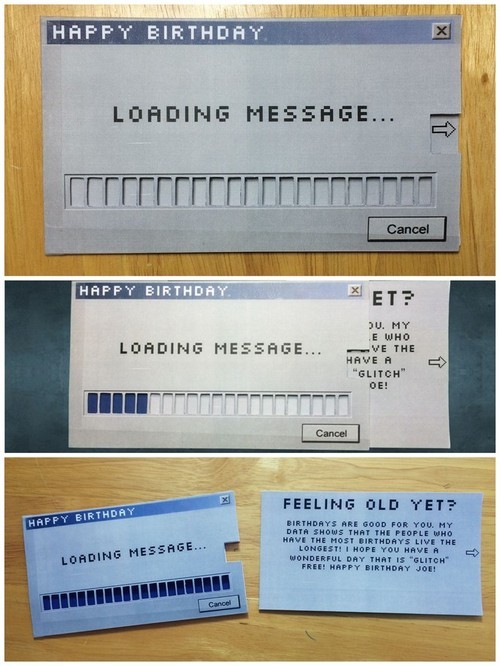
I will be posting my most popular Valentine's DIYs up until February 14th for those new-ish to my blog. I'd have been blogging on Tumblr since 2011 and have hundred of cheap, clever, and unique Valentine's Day ideas here.
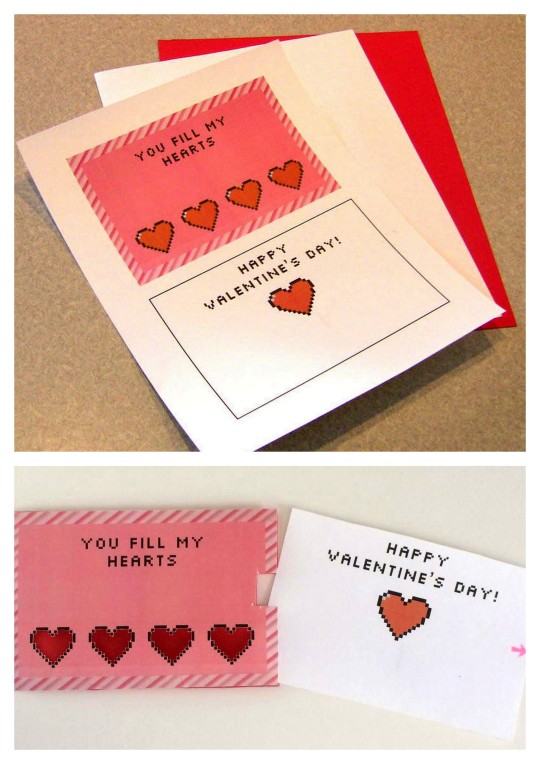
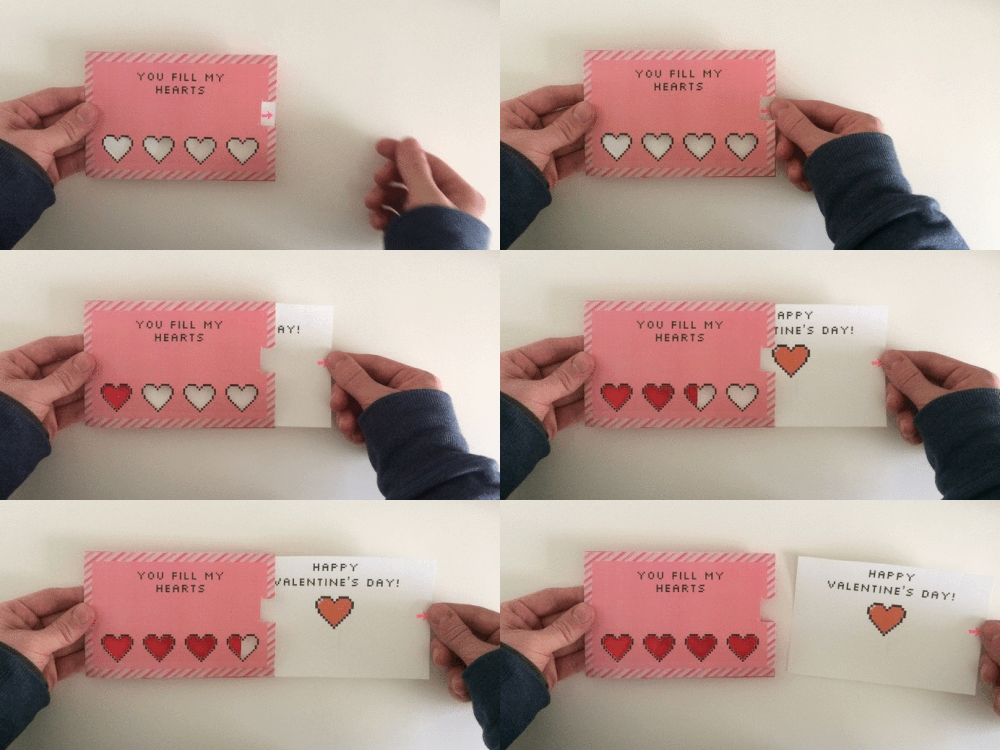
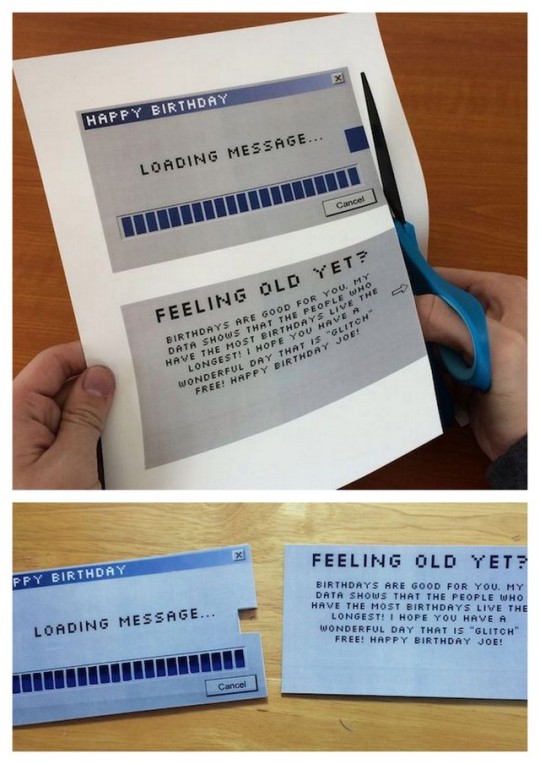
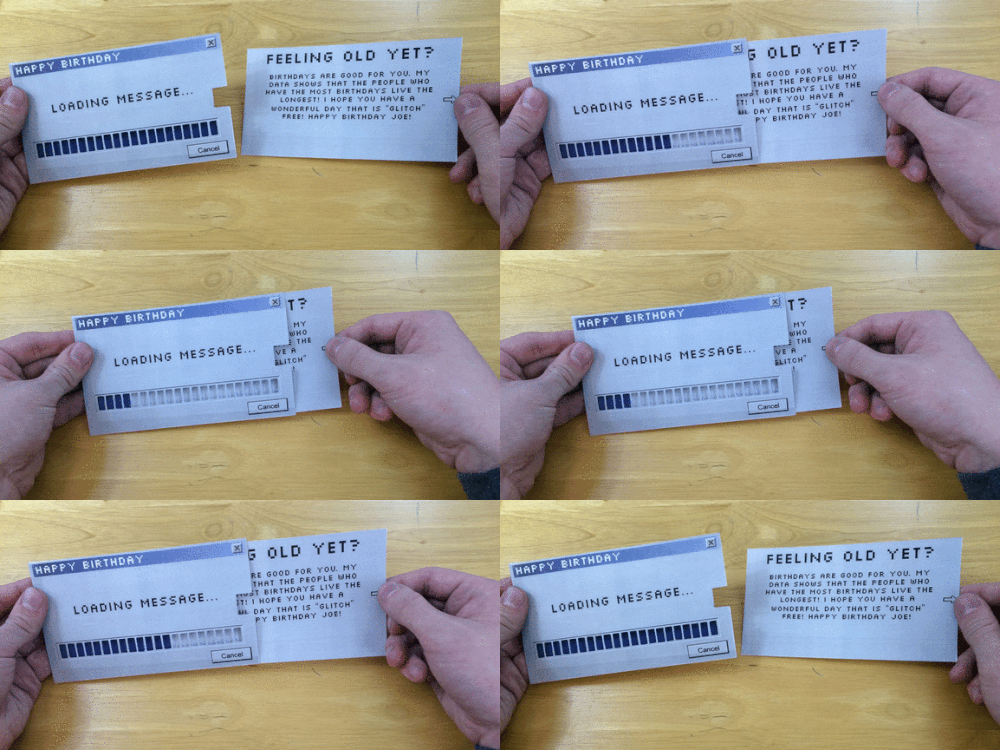
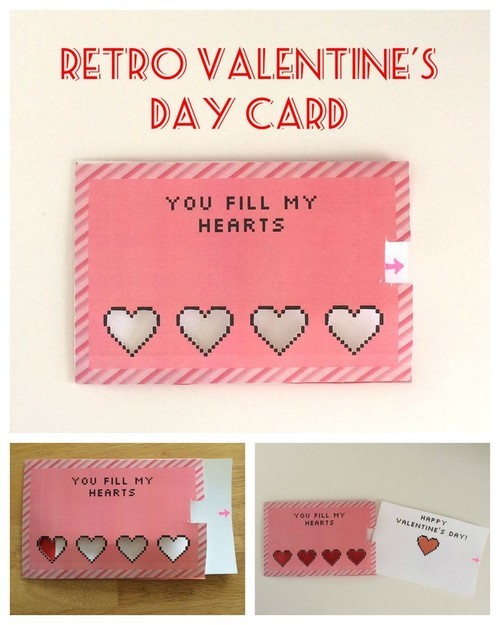
DIY Animated Cards Tutorials and Printables from Instructables’ User goldlego
Updated 2019
Make these clever DIY Animated Cards with just a few materials. There are PDF downloads at the links to make this a really easy DIY.
DIY Retro Valentine’s Day Animated Card by goldlego at Instructables HERE.
DIY Windows Retro 95 Animated Loading Birthday Card by goldlego at Instructables HERE. You can edit the message in this card.
#diy#valentines day#valentines cards#galentines#diy retro valentines card#printables#hearts#truebluemeandyou#best from my archive#cards#galentines day
123K notes
·
View notes
Text

DIY Cheap Knife Holder
My friend posted the top inspiration pic on FB and decided to do her own version of the Book Knife Holder. I asked her how she likes it and she said it works well and now she can see all her knives.
#diy#knives#diy knife block#diy book knife holder#truebluemeandyou#diy book hack#upcycling#upcylced#books
3 notes
·
View notes
Text
@will-the-kin Love these! Also really good tutorial. I can see these feathered wings being sized up and down for so many projects
A small tut on how i made my ear wings
List of things you’ll need:
Foam sheet/cardboard -> for the base
feathers (i used these :

Scissors
Glue (i used hot glue)
A headband
STEP 1:
Cut out the base (i recommend using a real wing as a reference. The height of the base of the wing should be a bit bigger than the height of your ear.
i labelled them left and right, but it’s pretty useless to do that.


STEP 2:
I painted the base white because the feathers aren’t opaque, and we could see the purple of the base.
STEP 3:
It’s time to glue the long feathers on! Make sure to position them before gluing, to make sure they look ok. Make sure to to follow those handy guide!


STEP 4:
Position the second (round) layer of feathers! I fold over any feather that went over the base on the top, to keep it looking clean.

STEP 5:
Now is the time to add the fluffy feathers if you want to!
STEP 6:
Time for the back! You can either leave it white or put feathers on the back too.
STEP 7:
Almost done! It’s time to attach them to the headband. If the one you have is made of plastic and is smooth, you should wrap some thread around it and glue it to the headband before the wings, so that the wings won’t detach

This is the pink thread i used, it’s embroidery thread. I used about the length of my arm for each side, and i then lathered it in hot glue. Not super clean, but it works.
MAKE SURE YOU VERIFY THE PLACEMENT OF THE WINGS BEFORE GLUING THEM SO THEY’RE NOT WONKY!!!!
Next, the actual attaching. You can glue the ears directly onto the headband.
STEP 8:
Wow! Your wings are done! Good job :3
Feel free to message me if tou have questions! I’m not the best at explaining stuff ;-;
Also, if you made these, could you reblog with your finished product :3 i’m curious to see how it turned out!

@ixekopernik , @shadowfoxink , ty for asking for this!
#diy#wings#cosplay#diy feathered wings#feathered wings tutorial#accessories#will-the-kin#how to make feathered wings
785 notes
·
View notes