
Statistics
We looked inside some of the posts by themsthenow and here's what we found interesting.
Average Info
Notes Per Post
5K
Likes Per Post
3K
Reblog Per Post
1K
Reply Per Post
33
Time Between Posts
13 days
Number of Posts By Type
Text
16
Note
1
Last Seen Tumblr Blogs


Fun Fact
Tumblr.com rank in the US is 25.
Text
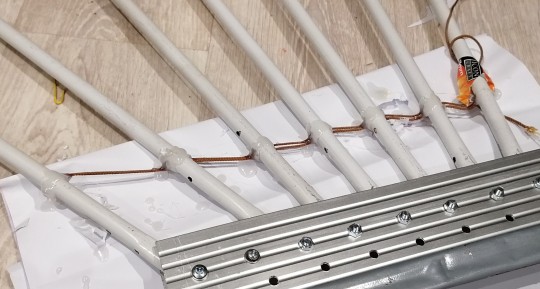
I ended up having to use one if the 8 holes to be a support for the frame but it all worked out the same


I started glueing on all the feathers and godamn it was an experience trying to get these things to stick on identically, both sides


I didn't get pictures for this but there was this whole rigmarole of looking for springs and needing a bigger backboard. But it doesn't matter anymore

All in all this unfinished project took about 2 years to axe
fun fact that adds nothing to this failed build: during the measurements for this thing, based of images bellowand the average height of an Australian women being 162-ish cm, me and my fried were talking about the total wingspan in Tessas


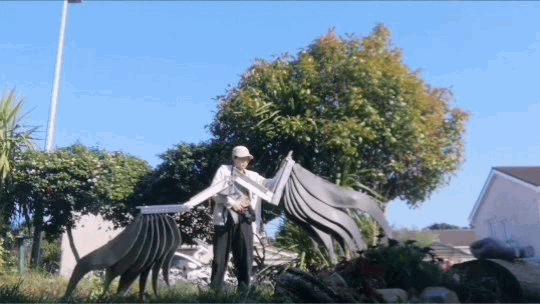
Process post for the wings
Beginning with the draw ups and stuff. Mini wood/plastic prototype thing to make sure this would work


Blah blah blah after the small scale tests I moved onto metal. I got a bunch of aluminum from a shop that doesn't exist anymore

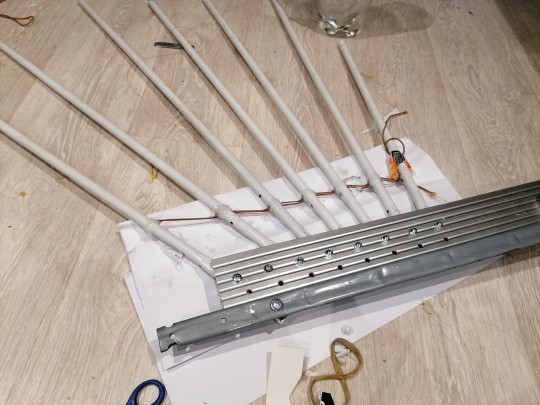
Cut the long bar into 2x60cm pieces, drilled 8 holes on each side on both pieces and cut out space for the wing feathers to slide in

The extra metal came from, I actually don't know, probably a building site

The general shape was put together

Extra metal was added at the back plate for more leverage to pull

That clothes horse in the top right corner got mauled for the bars ⬇️

61 notes
·
View notes
Text
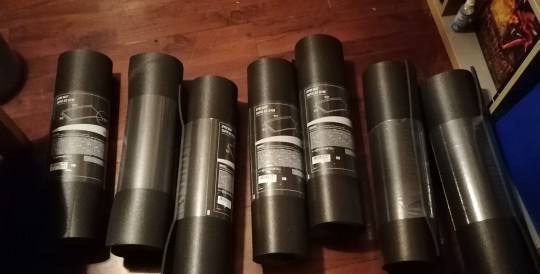
Wing feathers segment
Here's the pattern I drew up to waste the least amount of material. Measured on a copy book, each cube is representative of 10cm

Blew them up to proper scale on paper

Cut them out

Cut them out again (4 times, twice for each wing to sandwich the pole between them)


Process post for the wings
Beginning with the draw ups and stuff. Mini wood/plastic prototype thing to make sure this would work
Blah blah blah after the small scale tests I moved onto metal. I got a bunch of aluminum from a shop that doesn't exist anymore
Cut the long bar into 2x60cm pieces, drilled 8 holes on each side on both pieces and cut out space for the wing feathers to slide in
The extra metal came from, I actually don't know, probably a building site
The general shape was put together
Extra metal was added at the back plate for more leverage to pull
That clothes horse in the top right corner got mauled for the bars ⬇️
61 notes
·
View notes
Text
Terrible news: I can't finish these.
Even worse news: I have to get rid them
I was trying to cover the mechanism to look more like the originals but I can't finish them. They are big and heavy and I have more important things to deal with (last year of school). My dumbass measured the wings from the show and tried to make them to scale. I am not even tall enough to wear them
They're being dismantled because I have been told they are not safe to give to anyone (weight, material, discomfort, size)
Process post detailing the making coming soon
Update because the series is over and the spiders are gone
They spring out now :D


Still working on a mechanism for retracting them


976 notes
·
View notes
Text
Sold (yippee)
Selling my son for 150€ (not click bait)


Reblogging to spread this is very much appreciated but you don't have to


Claws and tail included + the cone arms if you want, but you don't have to take them if you don't want them


Price is 150€ ideally because I would like my money back on materials but we can negotiate
Dm me if your interested :)
Pay by revolute or cash depending on location
You can't see out of the head
sadly if you're across an ocean or sea or live on the moon you will have to pay for the shipping costs too. If we live in the same country it'd be easier to sell.
51 notes
·
View notes
Text
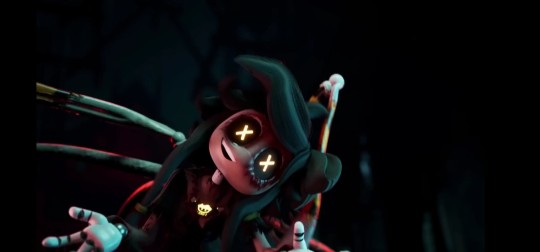
The visor and light came before the eyelight band


I had to redo the hat because the light band is apearantly attached to N's head and not his hat
Over all I enjoyed this project, it was fun


Process post since this part of the project is over

Started off with a paper mache base and vague measurements of N's head to the human skulls in the different episodes.


Drew in a general area of where the visor is. Folded in the bottom part of the head to curve it


Paper mache'd the empty spaces and made a the hat out of a yoga mat. Added green foam to define where the visor would go. The pink pen I used for this was a bic crystal and later bled through all the acrylic paint I added


93 notes
·
View notes
Text
Draw and labeled each strand of hair on the goober's head. I'm not joking when I say I have stared at the back this guys had tracing out where each individual strand of hair begins and ends


Redid every paper hair piece in yoga mat sandwich of mat/paper/mat and glued them on


Started painting the bits of hair with spray paint but it didn't work, so I repainted all of it with acrylic paint. Added black foam as the visor, at this point of the build I was debating the lights and plastic visors and whether or not I'd like to see though it or not

Painted the hat black and added the yellow eyelight band made out of extra large googly eyes to add the slight curve. Out of all the paints that worked, spray paint (different brand to the one used on the hair)was the best option. It gave an even coat of yellow that made light shine through it look good. Ultimately I did not add lights to the band tho


Process post since this part of the project is over
Started off with a paper mache base and vague measurements of N's head to the human skulls in the different episodes.
Drew in a general area of where the visor is. Folded in the bottom part of the head to curve it
Paper mache'd the empty spaces and made a the hat out of a yoga mat. Added green foam to define where the visor would go. The pink pen I used for this was a bic crystal and later bled through all the acrylic paint I added
93 notes
·
View notes
Text
Selling my son for 150€ (not click bait)
Reblogging to spread this is very much appreciated but you don't have to
Claws and tail included + the cone arms if you want, but you don't have to take them if you don't want them
Price is 150€ ideally because I would like my money back on materials but we can negotiate
Dm me if your interested :)
Pay by revolute or cash depending on location
You can't see out of the head
sadly if you're across an ocean or sea or live on the moon you will have to pay for the shipping costs too. If we live in the same country it'd be easier to sell.
51 notes
·
View notes
Text
I'm wrapping things up around here :)


The "how-to" post is already up so this'll just be a picture post since I forgot to do that


52 notes
·
View notes
Text

Damn project still going
19 notes
·
View notes
Text
Heres a quick turorial on how i make the snarl mask. If anyone needs a better explanation i can make another video, but for now i hope this helps.
2K notes
·
View notes
Text


I realise I didn't actually post any photos with this
Cone arms
13 notes
·
View notes
Text


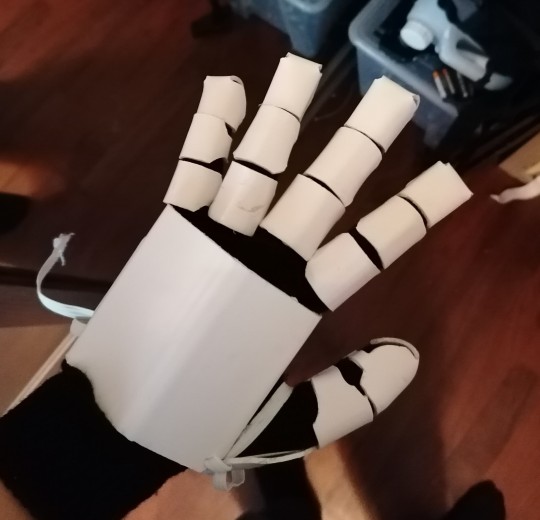
Tessa's ribcage and humerus(arm bone) after the solver/cyn melts away. I really do think she got teleported into, plus the fact that the solver/cyn lost because of teleporting into Uzi's hand and it essentially clipping through their body
Solver-possed cyn straight up just teleported into Tessa because there is no way that cyn was able to put her on like a coat while her skeleton was still in there too along with her organs and stuff

The drone arms are already bursting through the skin and the hands are bigger than them.
It would also explain the head shape since the rest of the humans in the show are anatomically accurate where as, you can see where the drone's visor connects to the mouth part underneath the skin
Also a small side thing
What would have happend if this lil creature got the patch. With absolutely no evidence to support this just imagine patched flesha being Tessa's consciousness trapped in what used to be her own body. But tbh it'd probably be pre-solver-possession cyn. But I'm here on the "man, I wish Tessa wasn't dead this entire time lol" wagon.
#I hate that this out of all things I've talked about is the thing that I can continue to talk about#murder drones#cyn md#tessa elliot#Rip Tessa ig
130 notes
·
View notes
Note
DUDE DUDE DUDE I AM OBSESSED WITH THE STUFF YOU MADE OMFG. the wings and the claws im!!!! im feral rn. holy shit
do you have any advice on where to get started if someone were wanting to make something like that of their own? or just generally propmaking for cosplay stuff, god knows i need to find a way to make wings of Some Form to appease the hyperfixation lol
love this stuff it's so cool holy hell
Wow, hey thank you for the nice words :).
In terms of advice, I'd say just be prepared for random stuff to go wrong.
DOWN SCALE.
Unless you have the wide open space required to house an extra entity, I'd say down scale it and make the wing span smaller, because I literally cannot put these anywhere lol. Me and my friends were measuring them by an estimated version of Tessa's height, assuming she was an adult Australian (160cm) and not a dead child wearing robot. The original wing span ended up being almost three and a half Tessas. Down scaling is definitely recommended.
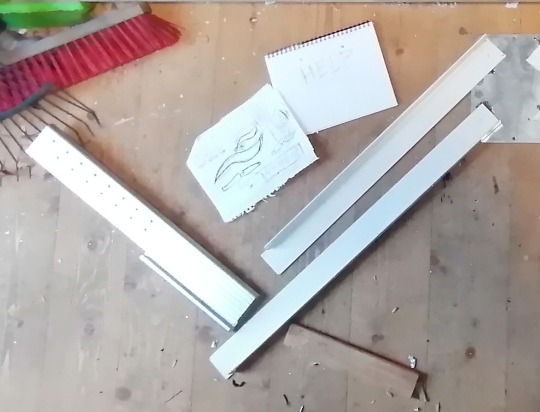
Then going on to material, I'm going to be honest, I don't really know what any good substitutes for what I've been using. The best thing I can think of would be like cutting up one of those big umbrellas you see in like outdoor seating areas because they are built to be sturdy and light enough to to transport places. The blade part of the wings were made out of cheapo yoga mats, they are not Eva foam(idk if Eva foam is more expensive, but cheapo worked for me), they are some kind of material similar to insulation sheets just slightly thicker, I have the cutting patterns on the blog (the mats are 140x50x1cm) . Springs are something similar to "helical extension springs"(they pull things together, like trampoline springs) the strength of these will vary depending on how and if you downscale the over all project.
The general wing mechanism had to be redone a little bit but the new design is just based off an umbrella. It's good to use when you fold it in that the sections form a square in between the joints as a reference because it makes it easier to translate to the wings when drilling holes. The grey moving bar is on the outside now👇
I'll be reall, this part👆 needs a bit of precision. The two holes at the bottom have to be the exact same distance and stuff as each other so the mechanism works. You could probably find a way to optimise the mechanism but I did not (this was just easier for me at least)
The way all the blade parts go up is kinda cheesing it if you want all individual parts to work perfectly without extra materials. I was tying a string together on the bars and it worked to space the wings as I wanted to.
All in all, I'm going to be making a big ol summary post detailing all the stuff whenever I'm done fully.
Until then, I hope this helps, good luck to you and don't be afraid to make mistakes :).
(it's only a mistake if you give up)
Prop making and cosplay in general are things I probably can't comment on because I have never done cosplay and most of the prop things, I make are made out of random trash I can find that would cost dumb money if you went out to buy it new.
These for example are gutter or house liner plastic that was left over from a building site (gloves were uber cheap) and they were tedious and smelly to cut out and melt over an open flame, but if you want to do this too wear a mask for saftey unless you don't care about your lungs (which you should)
The claws were a lot easier to make. Easy enough that I made two sets (I think I went through the process of making these already)
28 notes
·
View notes
Text
Update because the series is over and the spiders are gone
They spring out now :D
Still working on a mechanism for retracting them
#murder drones#n murder drones#Cringe in the alt text#Just wondering but would anyone want these if I were to give them away or something
976 notes
·
View notes