Text
Make a website dynamic using AWS API Gateway
This is Part-2 of a multi-part blog post of how you can run a fast dynamic website in a completely serverless manner using managed services provided by AWS. In the previous post, we have discussed how to setup a static website using S3. Every website has at least one dynamic section like contact us, email subscription or a feedback form. When hosting the website using serverless technologies such as Amazon S3, APIs are essential for powering the dynamic sections of the website. Amazon API Gateway gives us the ability to create any number of arbitrary APIs using Amazon Lambda as the backend. The best thing about these two services is, their Free Tier quota is quite high so you won’t have to pay anything until your website gets very popular. Lets create a contact-us api for a website. First we need a data store to keep our contact-us form data, and for that we will use Amazon DynamoDB (NoSQL Database). Then we need an Amazon Lambda function to process the POST requests of the contact-us form. And finally we need an API endpoint to call the Lambda function from the website for that we will use Amazon API Gateway. Logon on AWS Management console and select DynamoDB and follow these steps. Click Create table.Enter mywebsite-contact-us as Table name.Enter email as Partition key.Leave the rest of the settings as it is and click Create. Note: Table creation may take few minutes. Once the table is ready, lets write a Lambda function in Node.js to store contact-us form data into this table. Logon on AWS Management console and select Lambda and follow below steps. Click Create a Lambda function.Select Blank function.Skip Configure Triggers and click Next.In Configure function, set mywebsite-contact-us as Name and select Nodejs 8.10 as Runtime.Copy below function to Lambda function code. 6. Select Create a custom role as Role. 7. Set mywebsite_lambda_role as Role Name and Click Allow. 8. Click Next and then Create function. The Lambda function needs permissions to store data in the DynamoDB table mywebsite-contact-us. Logon on to the AWS Management console and select IAM and follow these steps to set required permissions. Click on Roles and select mywebsite_lambda_role.Under Inline Polices select Create Role Policy.Select Custom Policy and enter mywebsite-contact-us-table as Policy name.Copy and paste the following policy. Logon on to the AWS Management console and select API Gateway and follow these steps. Click “Getting started”.Click “Create API”.Select check box “Import from Swagger”Paste following swagger template and then click “Import” The mywebsite API is created with contact-us resource and we will now have to integrate it with the Lambda function mywebsite-contact-us to process contact-us form requests from your website. Select mywebsite API.Click on POST method under contact-us resource.For Integration type select Lambda function.Select the region of mywebsite-contact-us Lambda function.Set Lambda function as mywebsite-contact-us and click Save.Click OK to give permisison for API Gateway to call mywebsite-contact-us Lambda function.Click on OPTIONS method under contact-us resource.For Integration type select Mock and click Save.Click Enable CORS under Actions for Cross-Origin Resource Sharing. This is needed for posting contact-us form data to this API from your website. The mywebsite API is created now and we need to deploy it so that we can make calls to the API. Select Deploy API under Actions.Select New Stage and Set test as stage.Keep Invoke URL handy as we will need this for testing. Now everything is ready and we need to make sure everything is working as expected. We use Postman for API testing but feel free to use any REST client.Our testing URL will be Invoke URL appended with contact-us, for example the testing URL should look like https://abcde12345.execute-api.ap-southeast-1.amazonaws.com/test/contact-us.Select method as POST and use the testing URL.Post following JSON as request body.{ "email": "[email protected]", "name": "Dilip", "message": "I am just testing :)" } 5. Logon on to the AWS Management Console, and navigate to DynamoDB. Here check the items of the table mywebsite-contact-us and you should find one entry with the above details.

We have covered only few aspects the website here and there is lot to cover so in upcoming posts, so watch out for future posts in this series. Try this to create your first API and please let me know how did it go. What’s next? You want to learn more about AWS DynamoDB then you can also read this blog. Read the full article
0 notes
Text
Make a website dynamic using AWS API Gateway
This is Part-2 of a multi-part blog post of how you can run a fast dynamic website in a completely serverless manner using managed services provided by AWS. In the previous post, we have discussed how to setup a static website using S3. Every website has at least one dynamic section like contact us, email subscription or a feedback form. When hosting the website using serverless technologies such as Amazon S3, APIs are essential for powering the dynamic sections of the website. Amazon API Gateway gives us the ability to create any number of arbitrary APIs using Amazon Lambda as the backend. The best thing about these two services is, their Free Tier quota is quite high so you won’t have to pay anything until your website gets very popular. Lets create a contact-us api for a website. First we need a data store to keep our contact-us form data, and for that we will use Amazon DynamoDB (NoSQL Database). Then we need an Amazon Lambda function to process the POST requests of the contact-us form. And finally we need an API endpoint to call the Lambda function from the website for that we will use Amazon API Gateway. Logon on AWS Management console and select DynamoDB and follow these steps. Click Create table.Enter mywebsite-contact-us as Table name.Enter email as Partition key.Leave the rest of the settings as it is and click Create. Note: Table creation may take few minutes. Once the table is ready, lets write a Lambda function in Node.js to store contact-us form data into this table. Logon on AWS Management console and select Lambda and follow below steps. Click Create a Lambda function.Select Blank function.Skip Configure Triggers and click Next.In Configure function, set mywebsite-contact-us as Name and select Nodejs 8.10 as Runtime.Copy below function to Lambda function code. 6. Select Create a custom role as Role. 7. Set mywebsite_lambda_role as Role Name and Click Allow. 8. Click Next and then Create function. The Lambda function needs permissions to store data in the DynamoDB table mywebsite-contact-us. Logon on to the AWS Management console and select IAM and follow these steps to set required permissions. Click on Roles and select mywebsite_lambda_role.Under Inline Polices select Create Role Policy.Select Custom Policy and enter mywebsite-contact-us-table as Policy name.Copy and paste the following policy. Logon on to the AWS Management console and select API Gateway and follow these steps. Click “Getting started”.Click “Create API”.Select check box “Import from Swagger”Paste following swagger template and then click “Import” The mywebsite API is created with contact-us resource and we will now have to integrate it with the Lambda function mywebsite-contact-us to process contact-us form requests from your website. Select mywebsite API.Click on POST method under contact-us resource.For Integration type select Lambda function.Select the region of mywebsite-contact-us Lambda function.Set Lambda function as mywebsite-contact-us and click Save.Click OK to give permisison for API Gateway to call mywebsite-contact-us Lambda function.Click on OPTIONS method under contact-us resource.For Integration type select Mock and click Save.Click Enable CORS under Actions for Cross-Origin Resource Sharing. This is needed for posting contact-us form data to this API from your website. The mywebsite API is created now and we need to deploy it so that we can make calls to the API. Select Deploy API under Actions.Select New Stage and Set test as stage.Keep Invoke URL handy as we will need this for testing. Now everything is ready and we need to make sure everything is working as expected. We use Postman for API testing but feel free to use any REST client.Our testing URL will be Invoke URL appended with contact-us, for example the testing URL should look like https://abcde12345.execute-api.ap-southeast-1.amazonaws.com/test/contact-us.Select method as POST and use the testing URL.Post following JSON as request body.{ "email": "[email protected]", "name": "Dilip", "message": "I am just testing :)" } 5. Logon on to the AWS Management Console, and navigate to DynamoDB. Here check the items of the table mywebsite-contact-us and you should find one entry with the above details.

We have covered only few aspects the website here and there is lot to cover so in upcoming posts, so watch out for future posts in this series. Try this to create your first API and please let me know how did it go. What’s next? You want to learn more about AWS DynamoDB then you can also read this blog. Read the full article
0 notes
Text
How To Receive Messages Using AWS Pinpoint

Ref: https://bit.ly/2VpnLnzBanking mobile apps in India are required to support verification of mobile number using SMS as per RBI guidelines. When the user downloads the app and opens it for the first time, the app will generate a unique verification token, which should be sent to a designated mobile number via SMS. Then the bank processes the received SMS and verifies the user mobile number and associates the app to the user’s bank account. AWS Pinpoint provides a two-way SMS feature using which it can receive SMSs and pass the message to an API for further processing. Let us see this in more detail now.
PrerequisitesLong code: In order to receive SMS using Pinpoint, we need to request a long code using AWS support.Note: Two-way SMS is not supported for all countries so please check here before you start. Also the Long code registration depends on the telecom providers so it can take upto 3–4 weeks.
Architecture

StepsRequest Long code using AWS support case.
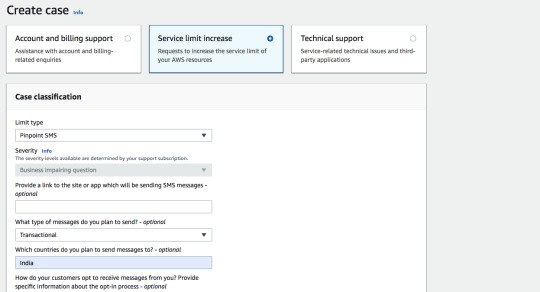
Create Sevice Limit increase request for Pinpoint SMS
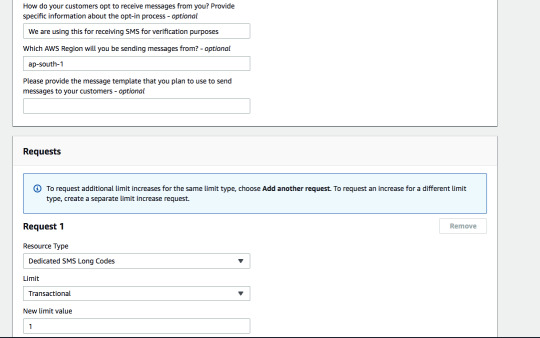
Request for Long codeProvide necessary details to AWS so that they can register a dedicated long code for you. 2. Create a Lambda function to process messages from an SNS topic in the following format and send it to the verification API. { "Records": }3. Create an SNS topic and add the above Lambda function as a subscription.

4. Once long code is available, Create a Pinpoint Project and configure to receive SMSs.

Create a Pinpoint projectYou will be able to see the register long code from Project’s Settings -> SMS and Voice
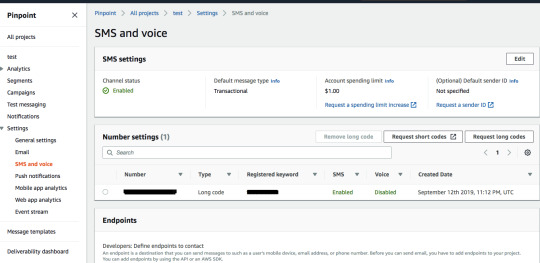
Registered Long code and settingsTo enable the SMS channel for the PinPoint project, click on Edit.

To enable Two-way SMS, click on the Phone Number (Long code)

Keywords in Pinpoint are used for automatic responses and we need at least one to get started.

SMS Settings for the Long codeEnable two way SMS for the long code.
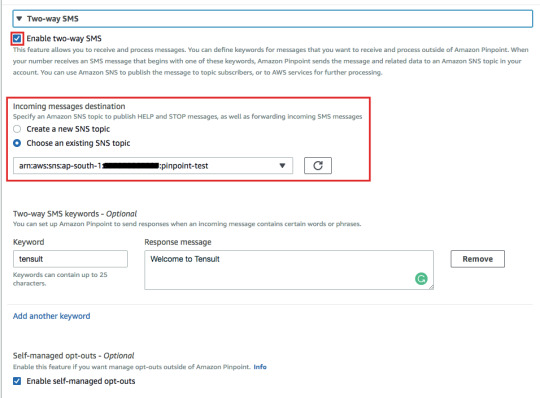
Enable two-way SMS and select SNS topic to forward the message5. Test the long code by sending a sample SMS from your mobile phone.
ConclusionYou have learned how to use Amazon Pinpoint two-way SMS feature to receive SMSs and also how to use that for verifying the phone number for the banking use case. I hope you have learned something new today, cheers. Read the full article
0 notes
Text
Troubleshooting applications in Linux
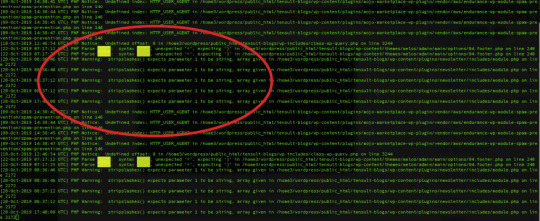
I have developed several applications in my career and by heart, I am a Software developer and coding is my livelihood. I have learned a few Linux commands which I find very useful to troubleshooting applications. Troubleshooting applications starts by knowing the status: lsof: lists open files When you want to know the list of the files opened by the various processes. $ sudo lsof COMMAND PID TID USER FD TYPE DEVICE SIZE/OFF NODE NAME httpd 28689 root 9w REG 202,1 0 21582 /var/log/httpd/ssl_error_log This is useful to resolve errors like "Too many open files" When you want to know the process ID by the port number $ sudo lsof -i :80 # (PORT) COMMAND PID USER FD TYPE DEVICE SIZE/OFF NODE NAME httpd 23872 apache 4u IPv6 6431188 0t0 TCP *:http (LISTEN) This is useful to resolve errors like "Bind failed error: Address already in use". If you get this error then you need to use this command: kill -9 to the kill the process which is already using desired port. When you want to know the port numbers of a process ID $ sudo lsof -P -i|grep 23872 # (PID: process ID) httpd 23872 apache 4u IPv6 6431188 0t0 TCP *:80 (LISTEN) httpd 23872 apache 6u IPv6 6431198 0t0 TCP *:443 (LISTEN) ps: Process status Gives the details about the process by using the name or ID # $ ps aux|grep apache # (By Name) apache 23872 0.2 0.3 516232 30760 ? Sl 17:13 0:49 /usr/sbin/httpd -DFOREGROUND $ ps aux | grep 3378 # (By Process ID) root 3378 0.0 0.1 694888 13624 ? Ssl 2019 1:28 /usr/bin/amazon-ssm-agent service: Services status Some applications such as web servers run like services so we can use the service command to know their statuses. Use the service command to know the status of a particular service $ service httpd status # here service name is httpd Redirecting to /bin/systemctl status httpd.service ● httpd.service - The Apache HTTP Server Loaded: loaded (/usr/lib/systemd/system/httpd.service; enabled; vendor preset: disabled) Active: active (running) since Mon 2019-11-25 19:35:03 UTC; 1 months 8 days ago Troubleshooting applications using logs Checking the logs is the next important process in troubleshooting applications. Almost all the applications emit some kind of logs and by looking at them we can know about the health and stability of the applications. grep: prints matching lines to a particular pattern It may be not an exaggeration to say that we can’t work on the Linux machine without using grep at least once a day. Search access logs by a date string $ grep "01/Jan/2020" access_log 172.16.2.36 - - 448 "GET /health HTTP/1.1" 200 7 "-" "ELB-HealthChecker/2.0" Search access logs by regular expression # Get access logs for 5xx errors $ grep -E " HTTP/1.1\"\s5{2}\s" access_log 100.100.100.2 - - 3015173 "GET https://www.tensult.com/cloud-reports/ HTTP/1.1" 500 38677 "-" "Mozilla/5.0 (Macintosh; Intel Mac OS X 10_10_1) AppleWebKit/600.2.5 (KHTML, like Gecko) Version/8.0.2 Safari/600.2.5 (Applebot/0.1; +http://www.apple.com/go/applebot)" # Get access logs which doesn't have 2xx status $ grep -v -E " HTTP/1.1\"\s2{2}\s" access_log 100.100.100.2 - - 472 "GET /tensult-azure HTTP/1.1" 304 - "-" "Mozilla/5.0 (Windows NT 6.1; Win64; x64) AppleWebKit/537.36 (KHTML, like Gecko) Chrome/79.0.3945.88 Safari/537.36" Get the matching access logs with context The following command prints 5 lines before and after the matching file so this helps to get more pre and post context about the error. $ grep -A 5 -B 5 error error_log PHP Notice: Undefined index: HTTP_USER_AGENT in /home3/wordpress/public_html/tensult-blogs/wp-content/plugins/mojo-marketplace-wp-plugin/vendor/aws/endurance-wp-module-spam-prevention/spam-prevention.php on line 146 PHP Notice: Undefined index: HTTP_USER_AGENT in /home3/wordpress/public_html/tensult-blogs/wp-content/plugins/mojo-marketplace-wp-plugin/vendor/aws/endurance-wp-module-spam-prevention/spam-prevention.php on line 146 PHP Notice: Undefined index: HTTP_USER_AGENT in /home3/wordpress/public_html/tensult-blogs/wp-content/plugins/mojo-marketplace-wp-plugin/vendor/aws/endurance-wp-module-spam-prevention/spam-prevention.php on line 146 PHP Notice: Undefined index: HTTP_USER_AGENT in /home3/wordpress/public_html/tensult-blogs/wp-content/plugins/mojo-marketplace-wp-plugin/vendor/aws/endurance-wp-module-spam-prevention/spam-prevention.php on line 146 PHP Notice: Undefined offset: 0 in /home3/wordpress/public_html/tensult-blogs/wp-includes/class-wp-query.php on line 3244 PHP Parse error: syntax error, unexpected ' Read the full article
0 notes
Text
How to implement the forced password reset after continuous failed login attempts for AWS Cognito User pool
Cognito is an authentication service by AWS, it consists of two major components: User pool and Identity pool. Cognito User pool is a fully managed service storing and retrieving username, password, profile fields, and custom fields. This service is mostly used for authentication of mobile and web applications. Cognito Identity pool is also a fully managed service for issuing temporary AWS service access identities for your mobile or web app users using either social identity providers or Cognito user pool. In this blog, I will focus only on Cognito User pool service. This service provides triggers for various user login flows and we can integrate these triggers with Lambda functions. Cognito calls them synchronously using the push model. We can use these triggers to following use cases: Passwordless authentication like authentication by sending a link to email similar to Medium.Captcha validation for user signup using Pre-signup validation trigger.Sending custom messages or alerts based on user activity.Replicating user data to alternative data storage for redundancy.Collecting user activity Analytics.Adding more security to the user authentication flows like a forced password reset the one I am discussing in this blog.Migrating users from an existing legacy database to Cognito. In order to implement the forced password reset after continuous failed attempts, we have leveraged the following Cognito User pool triggers. Pre-Authentication This trigger is invoked just before Cognito verifies the provided username and password. For this trigger, we have implemented a custom Lambda function which stores the user’s Login attempts count in DynamoDB and based on this count we make the decision to whether we need to force the user to reset their password by email verification or not. Post-Authentication This trigger is invoked just after Cognito has successfully authenticated the user. In this Lambda trigger, we are resetting user’s Login attempts count in DynamoDB by deleting the item from the DB.

The architecture of the Password reset workflow We need to reset the login attempts count in Pre-authentication trigger once we force the user to reset their password else user won’t be able to login even after they have updated their password. Conclusion Now you know how to improve the security of your Cognito user pool implementation by using the above method to force the users to reset their password after continuous failed attempts. Please try this out and let me know if you have faced any issues while implementing this. Other related Cognito blogs by us:S3 Direct upload with Cognito authenticationWe recently needed to demonstrate AWS RDS for a customer’s existing Oracle database running in their colo datacenter…AWS Cognito Authentication for KibanaAccess control is a security technique that can be used to regulate the user/system access to the resources in an… Read the full article
0 notes
Text
S3 Direct upload with Cognito authentication
We recently needed to demonstrate AWS RDS for a customer’s existing Oracle database running in their colo datacenter. Their Oracle DB dump was about 200 GB in size and had to be moved to an AWS account securely. Let’s first discuss the existing options and why it wasn’t right for our situation and then we will explain how we solved it using S3 direct upload using Cognito authentication. Since we were dealing with large files, we wanted our customer to upload the files directly to Amazon S3. But unfortunately, our customer is relatively new to AWS and training them to upload using AWS CLI or the Management Console would delay the project so we started looking for alternate options. Problem statement: A customer needed to transfer an Oracle database dump of 200 GB securely to an AWS account. We considered Cyberduck as our second option. Cyberduck is an open source client for FTP and SFTP, WebDAV, and cloud storage, available for macOS and Windows. It supports uploading to S3 directly using AWS credentials. We could create a new IAM user with limited permission and share the credentials with the customer, along with credentials we need to share S3 bucket and folder names. But again in this solution also, the customer needs to install an external software installation and then follow certain steps to upload the files. It meant they had to take approvals to install software, and that was adding to the delay. This may be slightly easy compared to the first option but still introduced a lot of friction. While investigating further for a friction-free solution, we discovered that we can directly upload files into S3 from the browser using multi-part upload. Initially, we were doubtful if this will work for large files as browsers usually have limitations on the size of the file that can be uploaded. We thought unless we try it, we will never know so we decided to give it a shot. We can directly upload files from the browser to S3 but how to make it secure? Browsers expose the source code so obviously, we can’t put credentials in the source and we thought we should use S3 Signed URLs and very soon we realized that we need to pre-define the object key/filename to be stored while generating the pre-signed URL, which is again not a very desirable option for us. In order to make this process dynamic in our Serverless website, we need to write an AWS Lambda function which can generate the pre-signed URL based on file name the user provides, and call it using API gateway. While this is a possible solution, we found a better solution using Amazon Cognito. Cognito has user pools and identity pools. User pools are for maintaining users and identity pools are for generating temporary AWS credentials using several web identities including Cognito user identity. We created a user pool in Cognito and associated it to an identity pool. Identity pool provides credentials to both authenticated and unauthenticated users based on associated IAM roles and policies. Now any valid user in our Cognito user pool can get temporary AWS credentials using the associated identity pool and use these temporary credentials to directly upload files to S3.

We have successfully implemented the upload solution using above architecture and tested by uploading 200 GB files and it works seamlessly. Our customer was successfully able to upload their DB files without any issues. Also we have open sourced the solution, please check it out. Read the full article
0 notes
Text
Cross account and cross region RDS MySQL DB replication: Architecture
In my previous blog, I have discussed various disaster recovery options available for RDS. I recommend you to go through that blog, it makes it easier to understand this blog. Why cross account and cross region replication? Cross region replication helps to quickly recover from AWS region wide failures. Also it will help to serve the customer faster as we can use replica for read traffic and few of them might be closer to replica’s region. Cross account replication helps to recover data from replication account when our master AWS account is compromised and we have lost access to the account completely. Such incidents happened in the past where one of the AWS customer account got hacked and the attacker deleted all the data. AWS provides several mechanisms to protect the data but having separate backup account with very limited access and tighter controls will help in unforeseen circumstances. Before we dive into setup lets understand the overall replication process.
Overall Process
Architecture
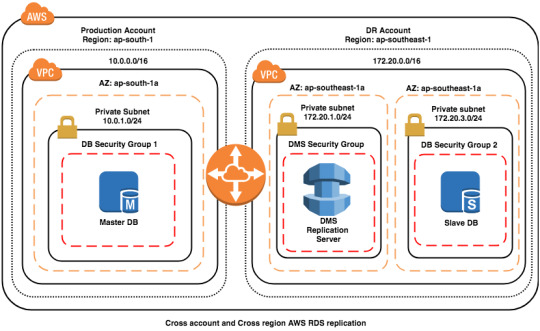
ExplanationBoth master and slave databases are not publicly accessible, this is a best practice to keep DB instances accessible from only application servers, hence we need to keep them in the private subnets with proper access restrictions using NACLs.We have connected both VPCs in different accounts and regions using VPC peering so that data never leaves the private network.We have added DMS and Slave DB in separate private subnets, this is another best practice, we need to keep every logically separated components in their own subnets so that we get a better control over network access.We can control DMS access to Slave DB instance using Security Group rules in DB Security Group 2 and NACLs on the subnet (172.20.3.0/24).We can control DMS access to the Master DB instance using NACLs on the subnet (10.0.1.0/24). Here using security group rules to restrict access to only DMS replication instance may not advisable as IP of the replication instance might change if Multi-AZ is enabled and we can’t restrict using DMS Security group id as that is in a different account.We have kept DMS replication instance in DR account than Production account as this instance is for DR purpose only so it is logical to keep in the DR account. This gives better control over overall DR setup and also this reduces attacks to the DR account by not exposing the info in the Production account else attacker may attempt to take down even the DR setup.How does this work? DMS reads Binary logs from Master MySQL DB instance and replays them on the Slve DB instance.

Source: AWSBinary logs (binlogs): MySQL DB keeps binlogs in order to support replication, binlogs are mainly all the modifications on DB, it won’t contain any read queries data. In RDS binlogs are enabled by Default with MIXED format but for DMS to work we need to change then to ROW format. Please note: enabling binlogs might have a slight performance impact so test on the Dev-Setup before using on the production setup. Supported DDL statements (Schema changes): DDL statements are the queries, that are sent to the DB instance to change the DB schema and only the following are supported for MySQL. Create tableAdd columnDrop columnRename columnChange column data typeSupported DB engine versions: MySQL 5.6 or above. Requirements:You must enable automatic backups.“binlog retention hours” should be 24.The binlog_format parameter should be set to ROW.The binlog_checksum parameter should be set to NONE. This will be NONE by default if automatic backups are enabled.Limitations:AUTO_INCREMENT attribute on a column won’t be set on the target instance.By default tables on the target is created with the InnoDB storage engine but this can be avoided if we create table manually on the target DB instance and migrate using do nothing mode.Above are the common ones and there are more limitations.
Preparation
Before we setup the replication process, lets prepare the source (master) DB instance. Check if automated backups are enabled: We can check from RDS console by select the Master DB instance and look for “Automated Back
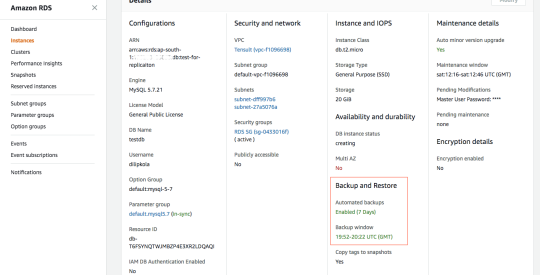
RDS instance details in the console If this is show Not Enabled then Modify the instance to enable. Using AWS CLI: aws rds describe-db-instances --db-instance-identifier myMasterDBInstanceId# Look for BackupRetentionPeriod and verify that it is a NON-ZERO value.# Incase this is 0 then we can change using following command:aws rds modify-db-instance --db-instance-identifier mydbinstance --backup-retention-period numberofday --preferred-backup-window "hh24:mi-hh24:mi"Check if binlog_format is ROW To change this parameter, we need to use custom Parameter group so first we need to create a Parameter group called replication and then update the binlog_format to ROW, then update the instance’s DB parameter group to replication. After that RDS will take sometime to modify the parameter group and then it will say pending-reboot and then we need to reboot the instance.
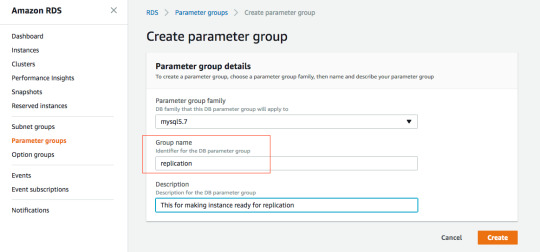
Creating Parameter group: replication

Update binlog_format to ROW of replication Parameter group

Modify the DB instance Parameter group to replication

Select appropriate option for When Apply Modifications

It should apply Parameter group changes

It should change to pending-reboot very soon Now we need to reboot the instance, make sure you do this when there is very less traffic to the DB instance else application may fail to connect to the DB. If you have enabled Multi AZ then down time will be quite less and RDS switches traffic to stand by DB instance in another AZ.
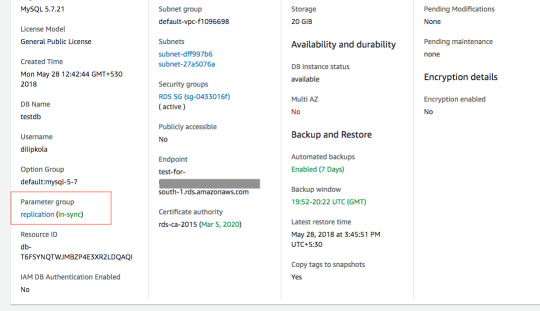
After the reboot, it should say in-sync Now our new parameter group is successfully applied to the Master DB instance. AWS CLI instructions: aws rds create-db-parameter-group --db-parameter-group-name replication --db-parameter-group-family MySQL5.7 --description "My DB params for replication"aws rds modify-db-parameter-group --db-parameter-group-name mydbparametergroup --parameters "ParameterName=binlog_format,ParameterValue=ROW,ApplyMethod=immediate"aws rds modify-db-instance --db-instance-identifier myMasterDBInstance --db-parameter-group-name replication# Wait for sometime so that instance finish modification and then reboot the instance.aws rds reboot-db-instance --db-instance-identifier myMasterDBInstanceSet binlog retention hours: Now connect to the instance using MySQL command line or your favourite MySQL client and execute following query to set binlog retention hours. call mysql.rds_set_configuration('binlog retention hours', 24); Now Master instance is ready for replication and we need to setup DMS replication and Slave DB instance. The same procedure works for Master to Master replication and DMS service can be used replicate RDS MySQL DB to on-premise or EC2 MySQL DB instance too. We will explain the complete setup in our next blog. Read the full article
0 notes
Text
AWS Lambda caching issues with Global Variables

We all love the Serverless revolution. The famous Lambda functions helps us to run applications, websites, stream processors and Whatnot without managing any servers. It is so easy to work with Lambda functions and we at Tensult run quite complex websites on Lambda, built with ~200 functions!!! One fine day we started seeing issues with one of the Lambda functions and we didn’t understand what was going for a couple of hours. We generate reports for all the categories of the website: one report for each category. If no report is existing for a category then we will initialise the report and then start the generation process. We noticed some category reports started getting items from other categories. Upon deeper investigation we figured out that it was an issue with how we have used global variables inside the Lambda function code. The very same day one of my friend’s friend also had similar issues and I helped him very quickly as I already know what was the issue so I thought I should write a a blog on this issue. To take the full advantage of the Lambda functions and get things done correctly, we need to understand how Lambda functions work behind the scenes else we will get into lot of issues and these will be very very hard to debug. The entire function code and all the variables outside of the Lambda Handler should be treated as constant and it shouldn’t have any shared variables in the global scope otherwise they will be modified across requests and cause caching issues. I will explain further with sample code so that it’s easy for you to understand the issue. Here I have chosen NodeJS 8.10 as Runtime but the concept is applicable to any Lambda supported Runtimes. let userGreeting = "Hello ! Have a Nice day!!"exports.handler = async (event) => { console.log("event received", event); userGreeting = userGreeting.replace("", event.name); console.log(userGreeting); return userGreeting; }; The above code is overly simplified but it suffices to give you context. Here we have defined “userGreeting” as a global variable and replacing it in the handler to generate greeting as per the input parameters. Run 1: input = { name: ‘Dilip’ } START RequestId: 57ecb648-949c-11e8-9d95-c14eee1f73e8 Version: $LATEST 2018-07-31T08:33:04.902Z 57ecb648-949c-11e8-9d95-c14eee1f73e8 event received { name: 'Dilip' } 2018-07-31T08:33:04.904Z 57ecb648-949c-11e8-9d95-c14eee1f73e8 Hello Dilip! Have a Nice day!! END RequestId: 57ecb648-949c-11e8-9d95-c14eee1f73e8 REPORT RequestId: 57ecb648-949c-11e8-9d95-c14eee1f73e8 Duration: 8.92 ms Billed Duration: 100 ms Memory Size: 128 MB Max Memory Used: 20 MB Run 2: input = { name: ‘Kola’ } START RequestId: 689b30e3-949c-11e8-82e8-97480c18d4cf Version: $LATEST 2018-07-31T08:33:32.616Z 689b30e3-949c-11e8-82e8-97480c18d4cf event received { name: 'Kola' } 2018-07-31T08:33:32.617Z 689b30e3-949c-11e8-82e8-97480c18d4cf Hello Dilip! Have a Nice day!! END RequestId: 689b30e3-949c-11e8-82e8-97480c18d4cf REPORT RequestId: 689b30e3-949c-11e8-82e8-97480c18d4cf Duration: 0.47 ms Billed Duration: 100 ms Memory Size: 128 MB Max Memory Used: 20 MB Please make a note of the output, it is same even though the input has changed, this is because “userGreeting” is modified after the Run 1 and it will be remain cached with modifications till the function container is reinitialised and that happens only when function is updated. How to fix this? We shouldn’t use any modifiable variables in global scope so we need to convert them to a function scope by wrapping a function around them. Now there is no global variable which getting modified in the request scope hence there won’t be variable caching issues. function getUserGreeting() { return "Hello ! Have a Nice day!!"; }exports.handler = async (event) => { console.log("event received", event); let userGreeting = getUserGreeting(); userGreeting = userGreeting.replace("", event.name); console.log(userGreeting); return userGreeting; }; Run 1: input = { name: ‘Dilip’ } START RequestId: 6ca5f8b0-949e-11e8-bf7b-dff3b8b6145b Version: $LATEST 2018-07-31T08:47:58.391Z 6ca5f8b0-949e-11e8-bf7b-dff3b8b6145b event received { name: 'Dilip' } 2018-07-31T08:47:58.391Z 6ca5f8b0-949e-11e8-bf7b-dff3b8b6145b Hello Dilip! Have a Nice day!! END RequestId: 6ca5f8b0-949e-11e8-bf7b-dff3b8b6145b REPORT RequestId: 6ca5f8b0-949e-11e8-bf7b-dff3b8b6145b Duration: 9.69 ms Billed Duration: 100 ms Memory Size: 128 MB Max Memory Used: 20 MB Run 2: input = { name: ‘Kola’ } START RequestId: 8e4f1188-949e-11e8-abc1-058894d830c6 Version: $LATEST 2018-07-31T08:48:54.867Z 8e4f1188-949e-11e8-abc1-058894d830c6 event received { name: 'Kola' } 2018-07-31T08:48:54.867Z 8e4f1188-949e-11e8-abc1-058894d830c6 Hello Kola! Have a Nice day!! END RequestId: 8e4f1188-949e-11e8-abc1-058894d830c6 REPORT RequestId: 8e4f1188-949e-11e8-abc1-058894d830c6 Duration: 3.49 ms Billed Duration: 100 ms Memory Size: 128 MB Max Memory Used: 20 MB Please see now output is correct as per the input given. Conclusion Now you have understood why you shouldn’t use global variables which are modifiable in request scope while writing the Lambda functions. We also have seen how can we fix this by wrapping a function around a modifiable global variable. I hope you will never face such issues but just in case you face similar issues then now you know what to do. Read the full article
0 notes
Text
How to refresh AWS Cognito user pool tokens for SSO
Cognito user pool is an AWS user identity service which is implemented using the OpenID Connect (OIDC) standard so it gives the following three token upon successful authentication: ID Token contains details about the user attributes and can be used as an authorizer in AWS API gateway service.Access Token authorizes to Cognito user pool APIs for updating user profile or signing them out on their behalf.Refresh Token is for refreshing the above two tokens. The ID and access tokens are valid only for an hour but refresh token validity is configurable.

Source: https://amzn.to/2fo77UIWhat is Single Sign-On (SSO)? SSO is where you ask your end customer to sign in once and store the authentication result in the browser session using local storage or cookies and then reuse the session information for multiple apps without asking them to sign in again. We have implemented SSO using AWS Amplify where one application provides a login to Cognito user pool and other apps call the login app when a user needs to be authenticated and the login app redirects the calling app with the token when the user is successfully authenticated. AWS Amplify provides a nice wrapper on top Cognito user pool APIs and makes it easy to integrate web apps with Cognito User pool. AWS amplify automatically refresh the tokens but doesn’t provide any way to fetch new tokens using just refresh token so we couldn’t implement self-refreshing of Id and access tokens in the apps without calling the login app every time using AWS Amplify. I started researching further to find another way and I found a Cognito user pool API: InitiateAuth which can help with our requirement but when we tried to invoke the API using AWS Javascript SDK, it was asking to provide AWS credentials but we need to call this API from WebApp using refresh token and there are no AWS credentials in that context. We got stuck and I started digging into AWS Amplify and found that we can call the rest API directly using node-fetch without using AWS SDK. I am sharing the below code so that you can save a day. Conclusion This is a very small blog on how to refresh Cognito user pool tokens using refresh token from a web app but I hope this is helpful to you. Read the full article
0 notes
Text
AWS Redshift authentication with ADFS for better tracking
Our client has many business users who need access to the Redshift cluster for analysis and it is not really practical to create and maintain users directly on the cluster for every user so they ended up in sharing the same user credentials to everyone now the business users started to abuse the cluster by sending many poorly written queries. We wanted to solve both problems of not creating users directly on the cluster and at the same time, knowing who executed what query on the cluster so that we can educate them to send queries with the right filters. Our customer is already using Active Directory (AD) so we decided to integrate the AD with Redshift using ADFS so I am going to explain more about it in this blog. This blog assumes that you already have knowledge on AWS Redshift, IAM, AD and ADFS and if you are new to these topics then please visit the following blogs first. AWS authenticates from Active Directory with Single Sign OnWhy a Single Sign On ?AWS IAM Policies with ExamplesYou know, Administrator adds the users, the groups, authorises the users for the resources and so on… It is up to an…Amazon Redshift — Connect from your from Windows machineRedshift is a fully managed, petabyte-scale cloud based data warehouse solution from Amazon. You can start with…
Setup

Redshift access with ADFS integration processAWS Redshift SetupConnect to your cluster using your master user and password.Create DB Groups for AD users to join, here we are creating a DB group for read-only access on all the table.CREATE GROUP readonly;-- Following command needs to be run every-time you create new tablesGRANT SELECT on ALL TABLES IN SCHEMA public TO group readonly;-- For non-public schemas you will also need to grant USAGE PRIVILEGESGRANT USAGE ON SCHEMA TO group readonly; GRANT SELECT on ALL TABLES IN SCHEMA TO group readonly; Please use only lower case letters as DB group name otherwise connection errors occur while connecting to redshift using ADFS. You can create more groups as per your use case if you do that you need to map them to your AD groups also using “Relying Party Trust” claim rules.AD Setup If you don’t have AD already then please follow this blog to create it. We recommend you to create separate AD groups to provide access to your AD users to the Redshift cluster as it gives better control on managing access to the cluster. Create an AD group called Redshift-readonly.

Create an AD group with name Redshift-readonly Please note the format for AD group name: Redshift-{DbGroupName}. Redshift- prefix for the AD group name is very important as it will be used in “Relying Party Trust” claim rules while configuring ADFS. AWS IAM Setup Once AD authentication is successful, IAM will provide the temporary AWS credentials. And then we need to call GetClusterCredentials Redshift API with those AWS credentials to get the temporary DB credentials. This API creates the user and adds to a specified DbGroups so we also need to provide “redshift:CreateClusterUser” and “redshift:JoinGroup” permissions to the IAM role. Create an IAM identity provider by the following instruction from this blog.Create IAM policy with Redshift cluster temporary credentials creation permissions.{ "Version": "2012-10-17", "Statement": , "Resource": }, { "Sid": "CreateClusterUserStatement", "Effect": "Allow", "Action": , "Resource": }, { "Sid": "RedshiftJoinGroupStatement", "Effect": "Allow", "Action": , "Resource": } ] }Create an IAM role for ADFS using previously create identity provider with SAML 2.0 federation option.

AWS IAM Role for ADFS to login to Redshift clusterAttribute: SAML:aud Value: https://signin.aws.amazon.com/samlAttach the previously created policy to this role.ADFS Setup In this blog, I am going to talk only about the Redshift authentication related integration with ADFS so in case you are new to ADFS then please go through this blog first to understand concept of integrating ADFS with AWS. Create “Relying Party Trust” claim rule to store the AD groups logging user belongs to a temporary variable: “http://temp/variable” using the Custom rule template.

Expose the user AD groups as a temporary variablec: => add(store = "Active Directory", types = ("http://temp/variable"), query = ";tokenGroups;{0}", param = c.Value);Map AD groups to AWS IAM role, this role will give access to Redshift cluster after the user is successfully authenticated with AD.

AD groups to IAM role with redshift accessc: => issue(Type = "https://aws.amazon.com/SAML/Attributes/Role", Value = RegExReplace(c.Value, "Redshift-", "arn:aws:iam:::saml-provider/RedshiftADFS,arn:aws:iam:::role/Redshift-"));Map Role SessionName and DbUser to user’s email address. This will help us to know the logged in user identity.
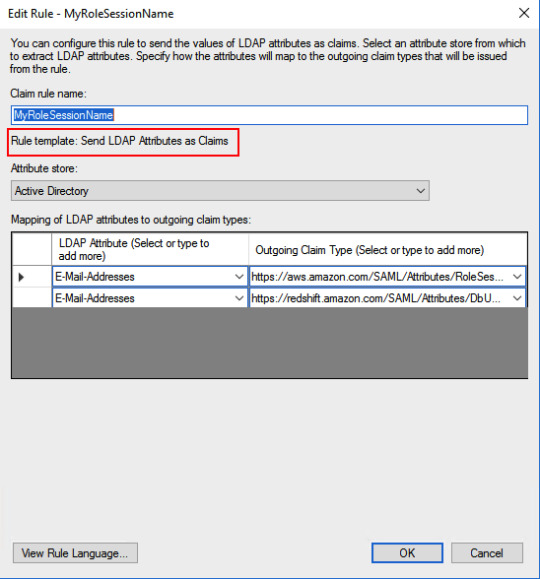
Map RoleSession and DbUser to EmailAddressAD attribute: E-Mail-Addresses -> https://aws.amazon.com/SAML/Attributes/RoleSessionNameAD attribute: E-Mail-Addresses -> https://redshift.amazon.com/SAML/Attributes/DbUserMap AD groups related to Redshift to DbGroups. Here I am using a regular expression to get DbGroups from AD groups which got stored in “http://temp/variable” in the previous rule.
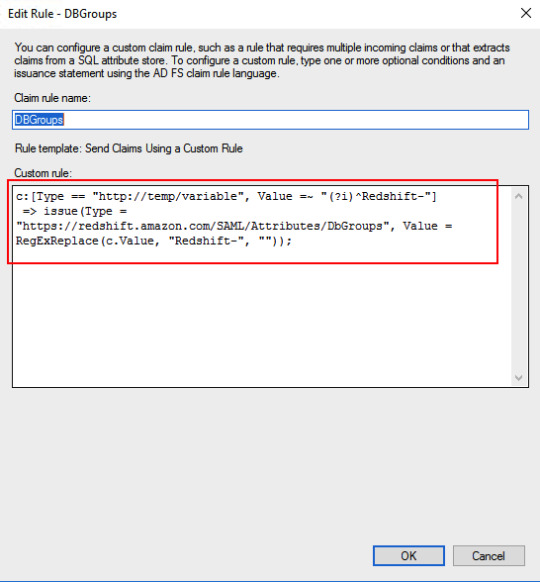
AD groups to Redshift DB groupsc: => issue(Type = "https://redshift.amazon.com/SAML/Attributes/DbGroups", Value = RegExReplace(c.Value, "Redshift-", ""));Add claim rule for Redshift AutoCreate DB user attribute.
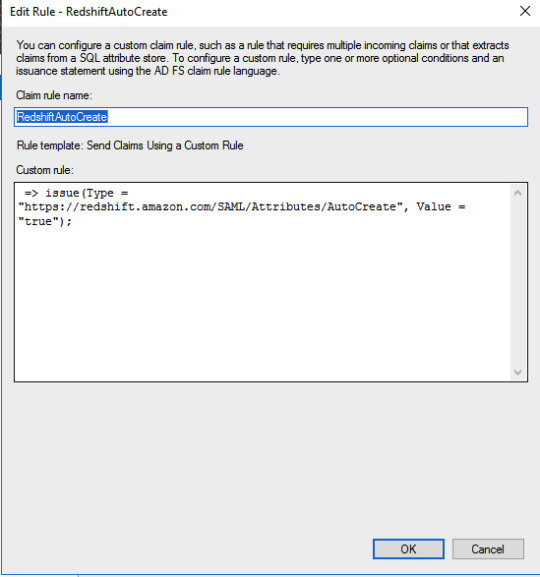
Redshift AutoCreate DB user Claim rule=> issue(Type = "https://redshift.amazon.com/SAML/Attributes/AutoCreate", Value = "true");SQL Workbench/J setup Please setup SQL Workbench to connect with Redshift using this AWS documentation. Make sure that you are using a driver with AWS Java SDK or set it in the classpath. Create credentials profile in /.aws/credentials for ADFS authentication.plugin_name=com.amazon.redshift.plugin.AdfsCredentialsProvideridp_host=idp_port=443preferred_role=arn:aws:iam:::role/Redshift-readonly You need to add ssl_insecure=true to above configuration in case you are using self signed certificates in your test setup. Connect to Redshift using the following JDBC connection.jdbc:redshift:iam://:/?Profile=redshift-adfs-read You can also use Extentend Properties from SQL workbench directly instead of the Profile to set the properties plugin_name, idp_host, idp_port, preferred_role.

Extended Properties for SQL Workbench/J# If you are using extended properties then use the following connection string: jdbc:redshift:iam://:/d

The connection to Redshift is successful using AD authentication Now we can see the queries run by various users from Redshift console directly.

Queries run on the cluster by various usersConclusion We have learned how to use AD authentication to log in to Redshift. This surely helps us to analyze the Redshift performance and educate the user making improper queries to the cluster. I know this is pretty complex setup so you may not get it right in one go so please try it with patience and feel free to contact me for any help or clarifications. Read the full article
0 notes
Text
MyDumper, MyLoader and My Experience of migrating to AWS RDS
Ref: https://tinyurl.com/yymj43hn How did we migrate large MySQL databases from 3 different DB servers of total size 1TB to a single AWS RDS instance using mydumper? Migration of database involves 3 parts: Dumping the data from the source DBRestoring the data to target DBReplication between source and target DBs Our customer had decided migration from Azure to AWS and as part of that needed to migrate about 35 databases running out of 3 different DB servers to a single RDS instance. RDS currently doesn’t support multi-source replication so we decided that we only set up replication from the largest DB and use dump and restore method for other 2 DB servers during the cutover period.
Setting up RDS Instance
In order to test the application end to end, and during the testing we need to change the data on the DB and that might cause issues in the DB replication process so we decided to set up a separate staging stack for testing purpose alone. Initially, we used native mysql tools like mysqldump, but found that these tools generate a single dump file for the whole database and some of our databases are of a size more than 400GB. We have some of the triggers and views using DEFINER=`root`@`localhost` but RDS doesn’t have root user so we need to either update the DEFINER or remove it according to this documentation. We found it really challenging to update such huge dump files so then upon a suggestion from my friend Bhuvanesh, we decided to try out the mydumper tool. Setting up a server for mydumper We could have run mydumper from the source DB server itself, but we decided to run it in a separate server as it will reduce the load on the source DB server during the dumping and restoration phases. Now let us see how to install mydumper. # Installers: https://github.com/maxbube/mydumper/releases# You may choose to take latest available release here. sudo yum install https://github.com/maxbube/mydumper/releases/download/v0.9.5/mydumper-0.9.5-2.el7.x86_64.rpm# Now we should have both mydumper and myloader commands installed on the serverDumping data from the source MyDumper tool extracts the DB data in parallel and creates separate files from schemas and tables data so it is easy to modify them before restoring them. You will need give at least SELECT and RELOAD permissions to the mydumper user. # Remember to run the following commands in the screen as it is a long running process.# Example1: Following will dump data from only DbName1 and DbName2 time \ mydumper \ --host= \ --user= \ --password= \ --outputdir=/db-dump/mydumper-files/ \ --rows=50000 \ -G -E -R \ --compress \ --build-empty-files \ --threads=16 \ --compress-protocol \ --regex '^(DbName1\.|DbName2\.)' \ -L //mydumper-logs.txt# Example2: Following will dump data from all databases except DbName1 and DbName2 time \ mydumper \ --host= \ --user= \ --password= \ --outputdir=/db-dump/mydumper-files/ \ --rows=50000 \ -G -E -R \ --compress \ --build-empty-files \ --threads=16 \ --compress-protocol \ --regex '^(?!(mysql|test|performance_schema|information_schema|DbName1|DbName2))' \ -L //mydumper-logs.txt Please decide the number of threads based on the CPU cores of the DB server and server load. For more information on various mydumper options, please read this. Also incase you want to use negative filters (Example2) for selecting databases to be dumped then please avoid default database such as (mysql, information_schema, performance_schema and test) It is important to measure the time it takes to take the dump as it can be used to plan the migration for production setup so here I have used thetime command to measure it. Also, please check if there any errors present in the //mydumper-logs.txt before restoring the data to RDS instance. Once the data is extracted from source DB, we need to clean up before loading into RDS. We need to remove the definers from schema files. cd # Check if any schema files are using DEFINER, as files are compressed, we need to use zgrep to search zgrep DEFINER *schema*# Uncompress the schema files find . -name "*schema*" | xargs gunzip # Remove definers using sed find . -name "*schema*" | xargs sed -i -e 's/DEFINER=`*`@`localhost`//g' find . -name "*schema*" | xargs sed -i -e 's/SQL SECURITY DEFINER//g'# Compress again find . -name "*schema*" | xargs gzipRestoring data to RDS instance Now the data is ready to restore, so let us prepare RDS MySQL instance for faster restoration. Create a new parameter group with the following parameters and attach to the RDS instance. transaction-isolation=READ-COMMITTED innodb_log_buffer_size = 256M innodb_log_file_size = 1G innodb_buffer_pool_size = {DBInstanceClassMemory*4/5} innodb_io_capacity = 2000 innodb_io_capacity_max = 3000 innodb_read_io_threads = 8 innodb_write_io_threads = 16 innodb_purge_threads = 2 innodb_buffer_pool_instances = 16 innodb_flush_log_at_trx_commit = 0 max_allowed_packet = 900MB time_zone = Also you can initally restore to a bigger instance to accheive faster restoration and later you can change to the desired the instance type. # Remember to run the following commands in the screen as it is a long running process.time myloader --host= --user= --password= --directory= --queries-per-transaction=50000 --threads=8 --compress-protocol --verbose=3 -e 2> Choose the number of threads according to the number of CPU cores of the RDS instance. Don’t forget to redirect STDERR to file (2>) as it will be useful to track the progress. Monitoring the progress of loader: it is a very long running process so it is very important to check the progress regularly. Schema files get loaded very quickly so we are checking the progress of data files only using the following commands. # Following gives approximate number of data files already restored grep restoring |grep Thread|grep -v schema|wc -l # Following gives total number of data files to be restored ls -l |grep -v schema|wc -l # Following gives information about errors grep -i error Verification of data on RDS against the source DB It is a very important step to make sure that data is restored correctly to target DB. We need to execute the following commands on the source and target DB servers and we should see the same results. # Check the databases show databases;# Check the tables count in each database SELECT table_schema, COUNT(*) as tables_count FROM information_schema.tables group by table_schema;# Check the triggers count in each database select trigger_schema, COUNT(*) as triggers_count from information_schema.triggers group by trigger_schema;# Check the routines count in each database select routine_schema, COUNT(*) as routines_count from information_schema.routines group by routine_schema;# Check the events count in each database select event_schema, COUNT(*) as events_count from information_schema.events group by event_schema;# Check the rows count of all tables from a database. Create the following procedure: # Run the following in both DB servers and compare for each database. call COUNT_ROWS_COUNTS_BY_TABLE('DbName1'); Make sure that all the commands are executed on both source and target DB servers and you should see same results. Once everything is good, take a snapshot before proceeding any further. Change DB parameter group to a new parameter group according to your current source configuration. Replication Now that data is restored let us now setup replication. Before we begin the replication process, we need to make sure that bin-logs are enabled in source DB and time_zone is the same on both servers. We can use the current server should be as staging DB for the end to end application testing and we need to create one more RDS instance from snapshot to set up the replication from source DB and we shouldn’t make any data modifications on this new RDS instance and this should be used as production DB in the applications. # Get bin-log info of source DB from mydumber metadata file cat /metadata# It should show something like below: SHOW MASTER STATUS: Log: mysql-bin-changelog.000856 # This is bin log path Pos: 154 # This is bin log postion# Set external master CALL mysql.rds_set_external_master( '', 3306, '', '', '', , 0);# Start the replication CALL mysql.rds_start_replication;# Check the replication status show slave status \G;# Make sure that there are no replication errors and Seconds_Behind_Master should reduce to 0. Once the replication is completed, please verify the data again and plan for application migration. Make sure that you don’t directly modify the data and on DB server till the writes are completely stop in source DB and applications are now pointing to the target DB server. Also set innodb_flush_log_at_trx_commit = 1 before switching applications as it provides better ACID compliance. Conclusion We have learned how to use mydumper and myloader tools for migration of MySQL DB to RDS instance. I hope this blog is useful for you to handle your next DB migration smoothly and confidently. In case you have any questions, please free to get in touch with me. Read the full article
0 notes
Text
AWS Elastic Beanstalk Migration between accounts
In this blog, I will be walking you through on how to migrate an Elastic Beanstalk environment from one AWS account to another. For the purpose of this blog, I will be creating an Elastic Beanstalk environment for an open-source application called Metabase with Docker Platform. You can launch the Metabase environment by following the instructions here. Once your environment is up and running, access the Metabase application using the URL. You can configure Metabase by following the Metabase documentation here.

Metabase environment

Metabase Homepage Once you have completed the configuration and checked the Metabase application you can go ahead and migrate your environment. Navigate to Elastic Beanstalk on your AWS console and select your Elastic Beanstalk environment. From the Actions menu select Save Configuration to save the configuration.

Save Configuration The saved configuration is stored in an S3 bucket in the same region as your Elastic Beanstalk Environment.

S3 bucket for Elastic Beanstalk

Configuration File of Elastic Beanstalk Environment Copy the contents of your Elastic Beanstalk Bucket from your source AWS account to a Target AWS account. You can follow our blog here to copy the contents of your Elastic Beanstalk Bucket from your source AWS account to a Target AWS account. Once you have copied the contents to the Target bucket, create an Elastic Beanstalk application with the same name as your source Elastic Beanstalk application in the Target AWS account. You will see the configuration you copied from your source account under the saved configurations of your new application.

Saved Configuration from Source Account Note: Edit the saved configuration file you copied from the source account by replacing the ServiceRole of the source account with the ServiceRole ARN of the Target account. Replace the region filed in PlatformArn parameter with the region you want your Elastic Beanstalk to be migrated to. You will have to create the application with the exact same name as the existing application in the source account to be able to see your saved configuration in the Target account. Use the Saved configuration to create a new environment.


Upload your code and you are good to go. Elastic Beanstalk takes care of the remaining work for you.

Elastic Beanstalk Creating Your Environment

Migrated Environment Alternatively, you can launch the Elastic Beanstalk environment by using the AWS CLI. aws elasticbeanstalk create-environment --application-name --environment-name --template-name --region "Please replace the placeholders in the above command" Note: Once is Elastic Beanstalk application is up and running, deploy your application code. Conclusion I hope you have understood Elastic Beanstalk migration between AWS accounts. That brings us to the end of this blog. Hope this was informative. Kindly share your thoughts in the comments section below. Please try this and let me know if you face any issues. Also, subscribe to our newsletter for more interesting updates. Read the full article
0 notes
Text
How To Configure Cross-Account Cross-Region AWS CloudWatch Dashboard

Cloudwatch Dashboard Sharing between AWS accounts Monitoring using AWS CloudWatch becomes quite hectic when you are handling multiple customers. Sure, you can use SessionBox and switching between accounts but what if you have a single dashboard for monitoring purposes? Then things will be much more simpler because then you don't have to switch between accounts. In this blog, I am going to explain how to configure Cross-Account Cross-Region CloudWatch dashboard. For the simplicity of this blog, I will be considering two AWS accounts. The steps mentioned here could be repeated for multiple account as well. First AWS account is the target account whose CloudWatch metrics you wish to monitor. Second AWS account is the monitoring account which is the source account from where you will be monitoring other accounts. Enabling the functionality in target AWS account CloudWatch We must first enable sharing in the target account's CloudWatch so that we can access the data from our monitoring account. Go to CloudWatch and check the left side panel for Settings.

2. Click on Settings and then in the next window which opens, you need to click on Configure.

By default, both the options Share your data and View cross-account cross-region will be disabled. You need to click on configure so as to enable the share your data option for target account. 3. In the next page, click on Share Data button and add the account ID of the monitoring account.


Permission settings 4. You will get the above options in the same window itself. Here you need to select on Full read-only... option and then click on Launch CloudFormation template. This will create a cross account sharing role with your monitoring account. Once it's done, you will be able to see the option enabled in the account as shown below. Next you can proceed with the monitoring AWS account setup.

CloudWatch>Settings Enabling monitoring account to view the CloudWatch dashboard Similarly, go to the monitoring account and we need to enable the option of viewing cross-account cross-region CloudWatch information. Go to CloudWatch>Settings and then click on Enable in the bottom half of the window which says 'View cross-account cross-region'.

View Cross-account cross-region enabled Once the viewing data option is enabled, then go to CloudWatch>Dashboards and you should see something like this:

Updated CloudWatch dashboard You must have noticed the new option above, 'View Data for' which can be used to access other accounts in various regions. Enter the account ID and region in that space and you will be able to see that account's CloudWatch dashboard. You can also click on Create Dashboard using which you can create a dashboard of the account which you want to monitor, on this monitoring account. The steps used for selecting the metrics are the same, just be aware of the account ID and region that you are selecting.

Selecting metrics and creating dashboard Once the dashboard has been created, we can monitor our customers' Cloudwatch dashboard from our own account and avoid switching every time to their account for monitoring purposes. The only thing I wish this feature had was for us to be able to export an already existing dashboard from the destination AWS account to our account. But for now, we have to configure the monitoring dashboard from scratch, metric by metric, graph by graph. Conclusion I hope this blog helps you in efficiently monitoring CloudWatch for your customer accounts. Kindly share this blog with AWS enthusiasts and also comment below if you have any suggestions. You can also subscribe to our newsletter by visiting here. Read the full article
0 notes