#yummy.....i should make that this week i have kale in my fridge still from the farmers market
Explore tagged Tumblr posts
Note
favorite ways of eating potatoes (i want potatoes)
hard to pick a single favorite but my usual go to when i'm cooking potatoes for myself is to cut em into wedges (or just big chunks if the potatoes are small), douse them in olive oil, salt, and whatever herbs or spices i feel like, and then roast them hot in the oven until they're soft and golden. usually takes like 20-30 minutes at 425f flipping them over once or twice, i find. any potato would work but gold potatoes are usually what's in my pantry. although if i can get purple potatoes at the farmers market i use those bc they're fun. it's a dirt simple way to prepare potatoes but they're super good, the tastiness to effort ratio is super high, and you can cook something else on the other half of the sheet pan at the same time too so you get a whole dinner with only one dirty pan
[ask meme]
#sasha answers#ask meme#sleepover saturday#infinitelytheheartexpands#ty!#we just call this oven fries in my house my mom made them frequently when i was growing up and i continued after i moved out#sooo good. and you can play around with the seasoning#mom always just did garlic salt but sometimes i do herbes de provence. sometimes a trader joes spice blend#like their everything but the elote seasoning goes really great on potatoes#(put a sheet of parchment paper down first tho otherwise they might stick which is sad)#i like to roast potato wedges like this with something like cornflake chicken tenders#(bits of chicken tender or breast meat breaded in crushed cornflakes and seasoning. also really good)#or alongside eggplant fries or chunks of pumpkin/winter squash...yumm#although recently i've been more and more interested in boiled potatoes. either whole in stews or subsequently mashed#i had mashed potatoes for the first time in a long time over winter break and i was like hold up. i forgot how fire these are.#and now i want to make them for myself a lot more often lol#but im also trying to eat more veggies where i can so im getting into colcannon now. mashed potatoes with kale in it#yummy.....i should make that this week i have kale in my fridge still from the farmers market
3 notes
·
View notes
Text
🌞🧹🌻Hearth Witch Tips!🌻🧹🌞
04: Your kitchen eats with you!
Just like with the rest of the house, what you put into the kitchen also heavily affects its energy. When you treat the hearth in certain ways, it reacts in certain ways. Your relationship with any room in the house is give-and-take. That means that if you don’t give back occasionally, the room will grow cold and stop appreciating your presence. But there are plenty of ways to mend your relationship! And the first step is to identify the problem!
From my experience, there are three main reasons why the kitchen stops being a warm and inviting place: 1) You are filling the cupboards with too much toxic, processed foods; 2) You aren’t spending enough time in that room; 3) Or you aren’t keeping the room clean enough.
When there’s a problem in the hearth, it’s always either one of these things or some combination of them. We’ll start with number three since it’s the easiest to explain. The kitchen should be anyone’s top priority to keep clean. It’s where all of your food, the nutrition and fuel of your physical and spiritual bodies, comes from! What you eat is your first defense against illness, injury, and your mental health. If the kitchen is filthy, then the food you take into your body will also begin to develop the same properties.
To keep the kitchen clean, I always start my day by washing last night’s dishes and give the counters a quick wipe. Once a month, I take stock of what’s in the fridge and freezer and scrub them out to prevent bacteria build-up. Sweeping the kitchen floors happens once a week and takes me all of three minutes to complete, tops. Once per season, normally at the beginning, I scrub the floors with soap and water, descale the coffee maker, wipe down the other appliances, and clean out the cupboards. So the only true “cleaning days” for the kitchen is four days out of the entire year. The rest of the time, the chores only take me about 30 minutes. As a quick tip, rinsing your dishes before setting them in the sink speeds up the dish washing process a ton! I’ve personally never trusted dishwashers since they don’t clean stuff well enough and it’s easier, faster, and far more cost effective to do it by hand.
The next problem the kitchen’s energy might be suffering from is how much time you’re spending there. First, spending a lot of time in the kitchen is a great thing! It absorbs the energy you feed to it, so when you don’t go in the kitchen very often or just don’t spend much time in there to begin with, the kitchen grows darker and colder. It loses the warmth and emotion and love that would’ve been sinking into it when you aren’t there.
The way to fix this problem is actually really easy! Cooking your own meals ensures that you are in there for a good amount of time each day because of the prep work and meal planning, etc. Plus, you get healthier, tastier food that way too! If you can’t cook all that well yet, don’t worry! Just like any skill, there’s no talent involved in learning something. It just depends on how much effort you apply to it. Another way to boost the hearth’s energy is to just hang out in that room. Invite some friends over, set out a snack tray, and just chill in the kitchen. Of course, since it’s pandemic right now, it’s best to wait until that’s over with to try this approach. But you, yourself, can still hang out in the kitchen!
The last problem, and a very, very common one in this day and age, is the influence of toxic food. Just like how your house absorbs energy from the land its on and what its built with, the kitchen also absorbs energy from the ingredients you keep within it. Toxic foods include anything processed or with a bunch of added sugars, and even GMO ingredients to some extent due to the trace chemicals that are still on the crops. These kinds of foods, if that’s the only thing in your house, will rot the energy. Not to mention, easy to grab snacks also end up causing you to spend a lot less time in the kitchen if that’s all you eat. Needless to say, no one eats healthy all the time. I don’t either! But having only toxic food in your kitchen isn’t great for you or the hearth.
Once again, cooking comes to the rescue! Even if you’re bad at it, it’s the thought that counts and little by little, as your skills grow and improve, the kitchen will learn to help guide you. There have been many times where I’d be stuck on how to fix something and a bottle of spice would fall of the shelf right next to me. If you listen to the kitchen, it will listen to you, too! Even if you don’t have time to cook, snacks like apples, berries, seeds, nuts, and dried meats are all healthy alternatives! I usually keep kale chips in the house for some yummy, salty crunchiness!
------------------------------
If you are worried about cost with this approach (believe me, due to my own situation it’s been a struggle at times), I’ve found out several tips and tricks to significantly lower the grocery bill. Anymore, my bill would actually be bigger if I bought crap food instead! Here’s my advice:
☀ Plan your week ahead! I always plan four meals a week that I’ll cook, and three days that I’ll scavenge for snacks and leftovers. I also stick to the rule of “one simple, one chicken, one meatless, one freebie” to remain more cost effective! The “simple” meal is just something I can make quickly if I know I’ll be short on time. The reason for have one of the meals be chicken is because it’s a much less expensive meat than beef or pork, and it’s a little better for the environment. The meatless meal is for the same reasoning. Meat is expensive and commercial brands are horrible for both the environment and the animals themselves. When I do buy meat, I make sure to buy local, grass-fed, organic meat as often as I can afford to. Keep in mind that every time you purchase anything, you are casting your vote for what is acceptable for society to continue. The “freebie” meal is just whatever I’ve been craving. If I want some kind of beef, I wait until this day.
☀ Learn to bake your own bread! For those of us with the time, this is a great way to save money and to stay healthy! Basic, white bread is actually pretty easy to make and only uses a couple ingredients. Those ingredients also go a long way. It costs me about 24¢ to make one loaf of bread because things like flour, sugar, salt, butter, honey, and yeast are all things that you buy once and can use for several loaves before you have to buy them again! It’s also not as time consuming as you’d think. Yes, it takes about 2 hours, but most of that time is proofing so you can easily be running around doing other things in between.
☀ Grow a garden! Even if it’s just a small, window herb garden, it can take the edge off of your overall food cost. Portobello mushrooms are also super easy to grow inside with minimal effort and equipment. If you have outdoor space, planting a small garden with the ingredients you use the most can help immensely!
☀ Only buy what you need! I know those sales look crazy tempting, but most of them are actually bogus and don’t actually save you any money. Think about what you are actually going to use before it goes bad and stick to your list. The bottom shelves at the store, aka the ones not in your direct line of sight, are usually where the grocery stores hide the better priced goods. At the back of most stores that have bakeries, there’s also usually a spot to get baked goods left over from the previous day for a slightly cheaper price. Day-old baked novelties like bread, cookies, and cakes are still perfectly good, and much easier to enjoy where you don’t have to spend as much!
☀ Check what’s already in your fridge before making your list! This is a huge one, since it prevents food waste, which in turn prevents money waste! What can you make during this week that can use up some of the ingredients leftover from last week? You’ll be impressed how quickly your food cost drops when you aren’t throwing things away. Waste not, want not! This trick also applies in another way, as well. When making your weekly meal plans, what types of foods use similar ingredients? If one meal calls for a slightly pricier ingredient, what other food can you cook with that ingredient to make the cost worth it? This also ensures that you get full use of things without wasting them. For example, this week I bought some fresh mozzarella cheese. Because this item is a little more expensive, I’m using it to make both the tomato mozzarella sandwiches and the beef wellingtons I’m making this week!
☀ Buy mostly produce! One of the best ways to lower your bill while still eating healthy is to simply add more fruits and veggies into your diet! There are so many tasty recipes that call for these babies that you’ll never run out of options, and there’s several things out there for everyone! Because I deal with sensory issues, I had to experiment a lot with what textures and tastes I could handle, especially on the bad days, but even still I found an over-abundance of things I love to eat. Fresh produce is way less expensive than meat, and much less expensive than many of the more mainstream snacks like chips or other processed foods.
------------------------------ All in all, taking care of your kitchen will also end up taking care of you, as well! Spending time there, actually using the kitchen the way it’s supposed to be, and just keeping it clean can work wonders in opening up your home and making it ten times warmer and more inviting! Trust me, your health and home will thank you for it!
#witchblr#hearth witch#pagan#witchcraft#cottagecore#writeblr#daily care#housecare#kitchen#hearth#positive vibes#know your home#healthy eating#health#naturecore#natural living#goblincore#home#kody
28 notes
·
View notes
Text
Hello Fresh Meals 5 & 6!
Y'all get a bonus today because, one, I am super behind schedule on these and two, one of them was almost kind of sort of a repeat? You'll see.
Anyway, who's up for some Lemony Chicken with Kale Caesar salad?
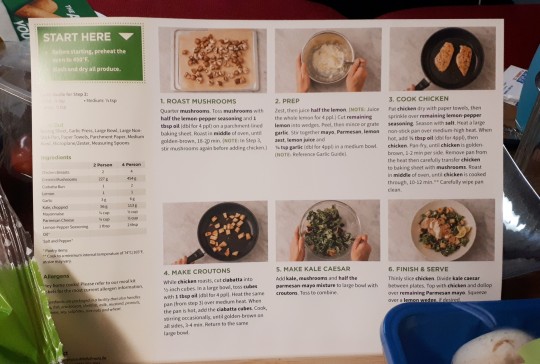
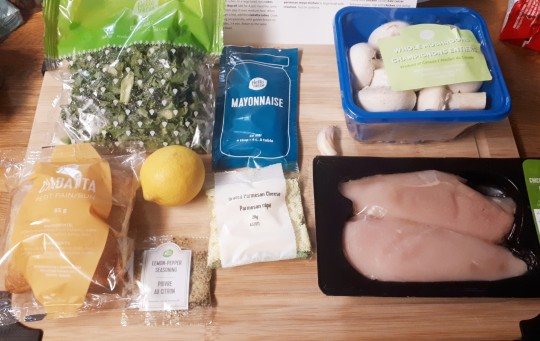
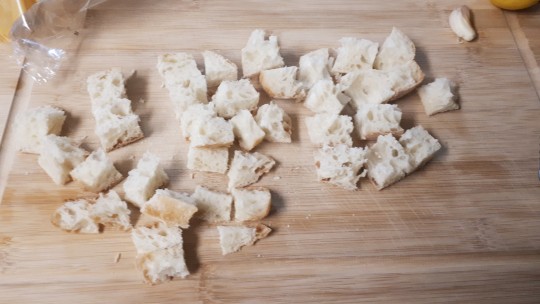
First step, as usual, was to wash and prep all the produce. I also moved up the step of cutting up the ciabatta so I could do it first before getting the cutting board mucked up with everything else.
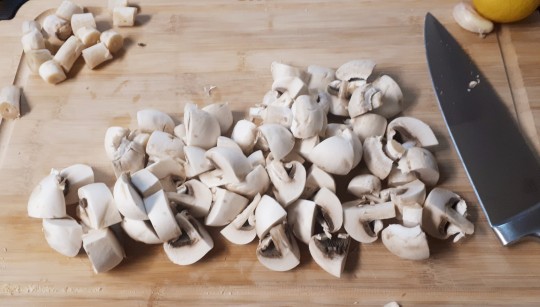
Next I quartered up the mushrooms - I actually cut some into six because they were gigantic. They got tossed with a bit of oil, salt and pepper and thrown on a parchment-lined tray in the oven to roast.
While the mushrooms roasted, the next step listed was to make the dressing but!! I recommend skipping ahead to cooking the chicken asap. When I did it, I mixed up the dressing with the mayo, parmesan, garlic, lemon zest and juice as instructed... then by the time the chicken was patted dry, seasoned, browned in a frying pan and ready to join the mushrooms in the oven, the timing was all messed up. So the chicken went in, then the mushrooms had to come out and the chicken had to go back in to finish cooking and it was just a big pain.
So do the chicken first, then worry about the other stuff while it's in the oven.
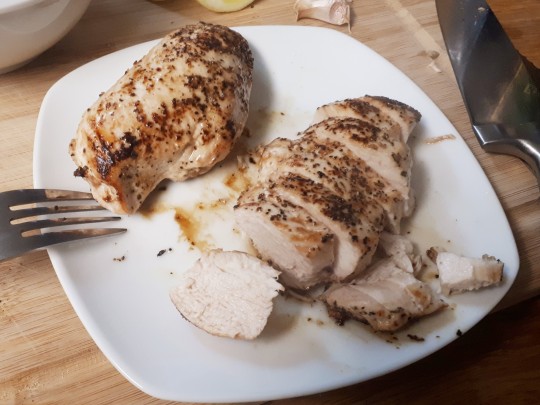
At least it turned out super yummy.
Once the frying pan was vacated of chicken, the ciabatta cubes were tossed with oil and browned in there, then the still-hot croutons joined the kale and mushrooms and half the dressing in a bowl and all got tossed together.
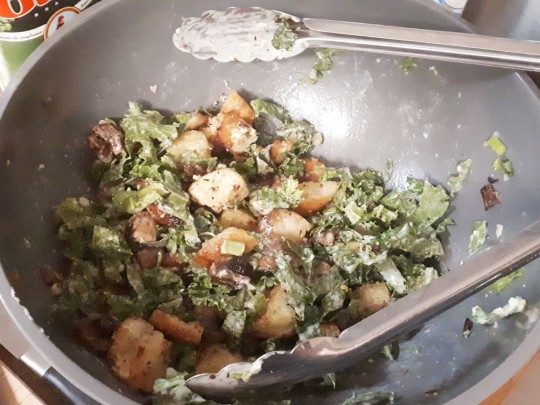
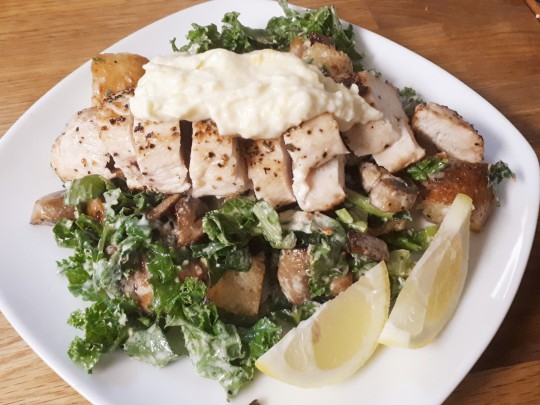
Finally everything was plated together with a bed of salad, a side of lemon, and a dollop of dressing atop the chicken.
As for reviewing this one... I wasn't really impressed? But please hear me out as to why.
I started HF because I was bored of food and needed some new and exciting stuff. This is.... a caesar salad with chicken. I could get something like this from Wendy's, or put my own together from a kit from Walmart. In fact, I could put together a BETTER one myself, because you know what this is desperately missing?
Proper caesar dressing. You know, the kind with anchovy paste. This dressing just kind of fell flat without it. Also bacon. Good caesar salad has bacon. The idea of adding roasted mushrooms was fun but I found they kind of got lost in the mix and didn't add a ton to the flavor overall.
It was, at least, quite easy to put together. It took maybe 40 minutes? And it was palatable enough. It was FINE. I just wanted something... more. This is, thus far, the low point of my HF experience.
How about a Caramelized Onion Burger!
No step-by-step here. It is practically identical to the Retro Burger technique except the cauliflower frites have a couple extra steps. Check it:
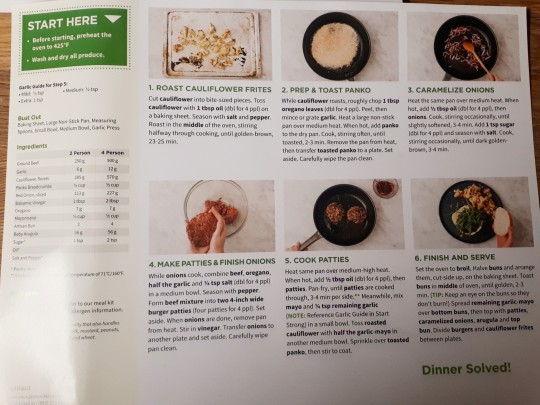
Hubby cooked this one entirely on his own. We left it in the fridge a bit long and the included arugula kind of went off, but we luckily, by complete coincidence, had some fresh arugula on hand and swapped it out.
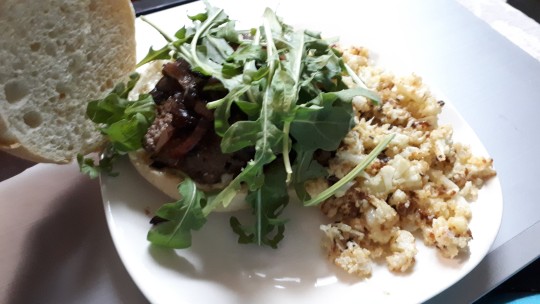

I found these burgs weren't as moist and juicy as the retro burgers. The big difference between the two, iirc, is that the Retro burgs had grated onion inside and these don't, so perhaps that made the difference. Both had a pile of caramelized onions on top, but this had the addition of arugula. The garlic aioli (literally just mayo with some grated garlic in it) was a nice touch on both the burger and tossed with the roasted cauliflower and panko side.
It took hubby about an hour to make this meal solo, so if you are a bit less experienced in the kitchen, that's about the time you should expect. Definitely a tasty and hearty meal - but if I had to choose between them, the Retro Burger is the winner so far.
The coming week includes meals like pesto chicken and couscous, some sort of Peruvian steak, and another burger of some kind, so keep an eye out for those reviews coming real soon!
15 notes
·
View notes
Text
ATKINS DIET - LADY’s CHOICE for a SLENDER SHAPE
As a woman, I always want to keep my body in good shape. Unfortunately, these days I was so busy with studying and working so my dining times were unstable and dinners often had lately at night (9:00 -10:00pm). As a result, I gained weight slightly, especially my belly had accumulated rather thick fat. Therefore, I decided to try Atkins Diet aim to control my weight within 7 days. The Atkins Diet is a well-known low-carbohydrate eating plan was designed by the cardiologist Robert C. Atkins in the years 1960s. This diet limits carbohydrate and encourage protein and fat.
A standard Atkins includes four phases of diet:
· Phase 1 (induction): daily carbohydrate consumption limited under 20g within 2 weeks. High-fat, high protein and low-carb vegetable should be eaten in meals.
· Phase 2 (balancing): gradually supplement nuts, low-carb vegetable and some fruits in meals.
· Phase 3 (fine-tuning): once dieters are close to their desired weight, more carb can be add into meals to slow down weight loss.
· Phase 4 (maintenance): at this period, eaters can enjoy more beneficial carbohydrates with toleration of body without weight regaining.
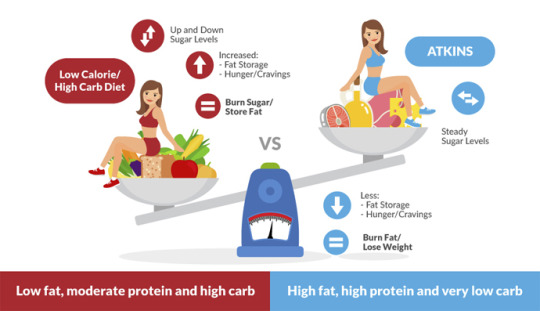
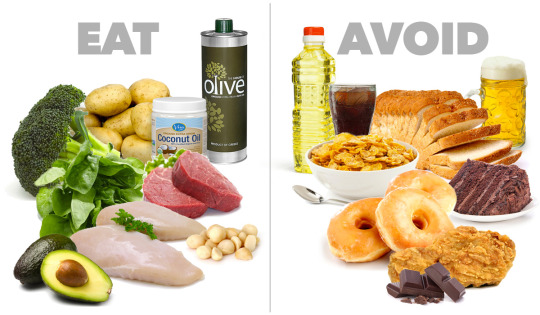
Nevertheless, it is impossible for me to follow these complex procedures, therefore I have obeyed basic requirements of this diet: Foods to avoid vs. Foods to eat as well as some of acceptable beverages as below guideline:
*Food to avoid:
1. Sugar: Soft drinks, fruit juices, cakes, candy, ice cream, etc.
2. Grains: Wheat, spelt, rye, barley, rice.
3. Vegetable oils: Soybean oil, corn oil, cottonseed oil, canola oil and a few others.
4. Trans fats: Usually found in processed foods with the word "hydrogenated" on the ingredients list.
5. "Diet" and "low-fat" foods: These are usually very high in sugar.
6. High-carb vegetables: Carrots, turnips, etc (induction only).
7. High-carb fruits: Bananas, apples, oranges, pears, grapes (induction only).
8. Starches: Potatoes, sweet potatoes (induction only).
9. Legumes: Lentils, beans, chickpeas, etc. (induction only).
*Food to eat:
1. Meats: Beef, pork, lamb, chicken, bacon and others.
Fatty fish and seafood: Salmon, trout, sardines, etc.
Eggs: The healthiest eggs are omega-3 enriched or pastured.
Low-carb vegetables: Kale, spinach, broccoli, asparagus and others.
Full-fat dairy: Butter, cheese, cream, full-fat yogurt.
Nuts and seeds: Almonds, macadamia nuts, walnuts, sunflower seeds, etc.
Healthy fats: Extra virgin olive oil, coconut oil, avocados and avocado oil.
*Beverages
1. Water: As always, water should be your go-to beverage.
Coffee: Many studies show that coffee is high in antioxidants and quite healthy.
Green tea: A very healthy beverage.

(Healthline, Kris Gunnars, 2018)
As the guideline, primarily grains (like wheat, rice) and high-sugar content vegetables/ fruits are prohibited in Atkins meals. This is definitely a huge challenge to me because rice is consumed every day in Asian cuisine, I must say it is vital ingredient account 60% in our meals portion as it provides half of energy source for one shot of dining. If we do not have rice, bread can be replaced sometimes but here bread is not allowed, too. To tackle this problem, I increase the amount of protein (fish, meat), fiber (vegetable, low-sugar content fruit) and drink more than 2L of water every day to fill up my stomach and reduce the feeling of hunger.
My typical daily menu in general:
- Breakfast: A glass of milk, nuts.
- Lunch: I eat much more than breakfast. One main course of meat and some vegetable added
- Dinner: Same dish as lunch but smaller portion, some fruits are added. I have less demand for dinner because at night from 7:00pm, the body will slow down its metabolic process and surplus energy will be accumulated as fat layers.
My menu during a week as following:
*Friday 21 Jun:
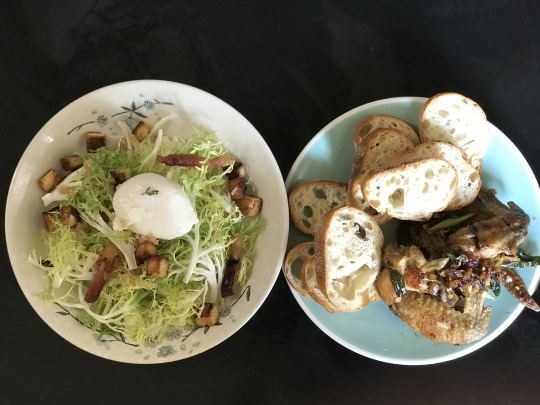
Main courses: Lyonnaise Salad + Pan Broiled Garlic - Sweet Fish Sauce Chicken Wing.
Dessert: Peach, almond, walnut
Supplement: 2% skimmed milk
In first day, I still use some slices of bread to substitute rice aim to let my body get along slowly well with this diet and milk is drunk to supplement nutrients and make me full.
*Saturday 22 Jun:
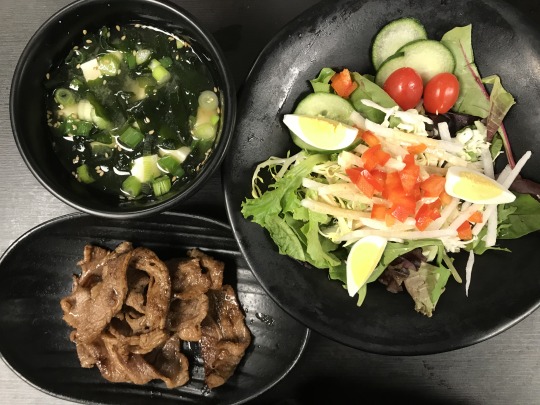
Main courses: Grilled Toro Beef + House Dressing Salad + Miso soup
Dessert: grapefruit, apricot, sunflower seeds
Supplement: 2% skimmed milk
*Sunday 23 Jun:
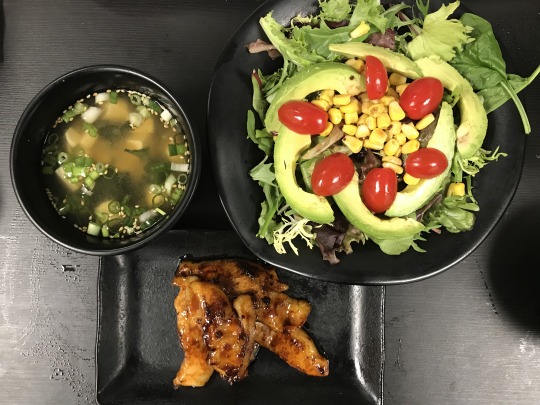
Main courses: Sauce marinated pork jowl + Avocado Salad + Miso soup
Dessert: strawberry, apricot, pitascho
Supplement: 2% skimmed milk
At weekend Sat-Sun, I treated myself by Japanese BBQ styles dishes. Grilled Toro beef and pork jowl are often combined to rice but I remove it out of meal and add a bowl of salad. Along with them are miso soup including tofu (plant-based protein) and seaweed (minerals and vitamins, fiber – supporting loosing weight by postponing hunger)
*Monday 24 Jun:
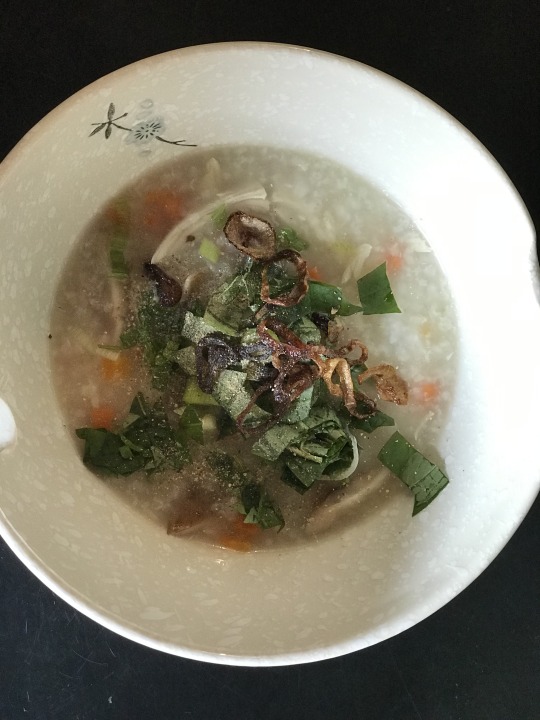
Main courses: Chick Breast Rice Soup
Dessert: strawberry, mandarin, sunflower seeds
Supplement: 2% skimmed milk
Dilute rice soup can calm down my body’s desire of rice. The chicken breast is less fat than other parts so used to add rice soup.
*Tuesday 25 Jun:
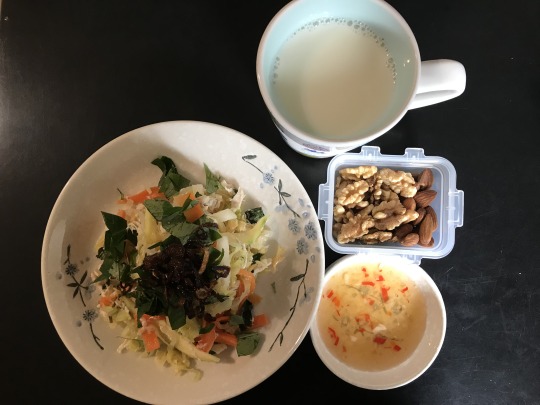
Main courses: Chicken Salad
Dessert: strawberry, almond, walnut
Supplement: 2% skimmed milk
I stayed home so energy is not required too much, I enjoyed my favorite chicken salad. You can see some brown saute’ shallot on top of salad, which aim to replace roasted peanut. Oil from shallot can balance the sour of salad as well as make body feel full longer.
*Wednesday 26 Jun:
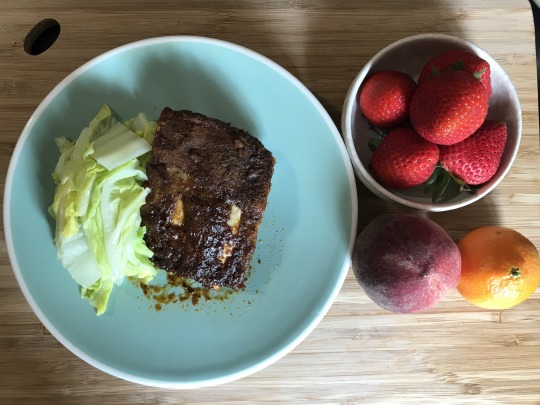
Main courses: BBQ Pork Rib
Dessert: strawberry, peach, mandarin
Supplement: 2% skimmed milk
At this time, my body survived better without rice, a piece BBQ sauce pork rib could satisfy my hunger. Then I refreshed with some cool fruits.
*Thursday 27 Jun:
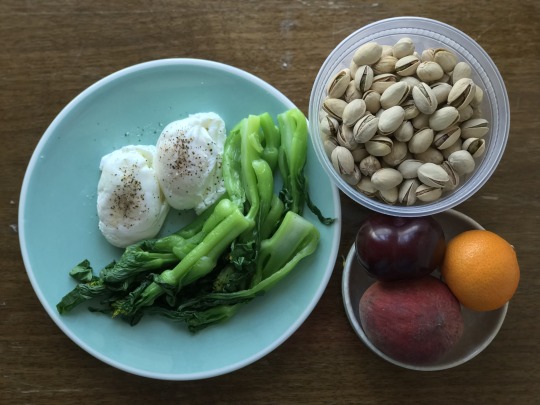
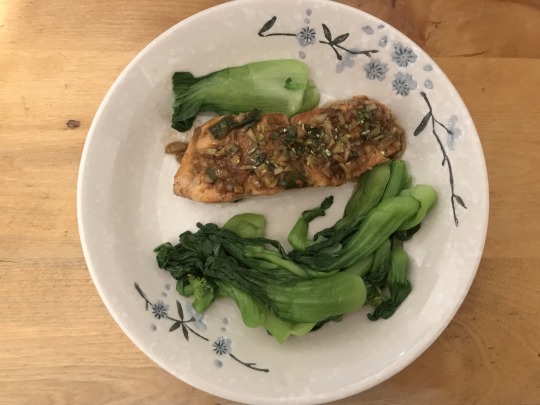
Main courses: Poached eggs, Grilled garlic butter sauce salmon & blanched bok choy
Dessert: apricot, peach, mandarin, pistachio
Supplement: 2% skimmed milk
The last day of diet, my body has less demand of energy which most generated from carbohydrate and it does not desire for rice like first days. So brunch was simply poached egg & blanched bok choy. Then I grilled salmon with garlic butter sauce cover on top, really tasty and yummy! Salmon is rich of nutrients and omega 3 which are useful for female’s skin.
I admits that I was crazily hungry as the amount of bread and rice got in the stomach too little, it seemed to shout every second that “Rice, please!” and I was almost exhausted when I worked at my restaurant, I ought to drink water constantly to overflow my stomach. If I could drink coke, my hunger would be satisfied (when the restaurant so busy and I have no time for break) but in this diet, soft drinks are not permitted.
One week probably is not enough to conclude this diet is suitable to me or not but generally I think this diet solution is good and healthy. It is not too strict about volume of foods and nutrients input therefore dieters might reduce weight gradually with less health troublesome. Lastly, I just lose weight slightly of 600g and my belly seems to be unchanged (I wish I could know why). Anyway, not bad for one week!
Among my dishes in my weekly menu, I would like to recommend you try to make Chicken Salad. It is easy to prepare and can be stored in fridge 3 days. The recipe as below:
- Chicken breasts: 2 pcs
- Cabbage: ½ pc
- Pickled carrot and daikon: 1 cup
- Garlic: 3 cloves
- Lime juice: 1 tbs
- Vietnamese coriander: ½ bunch
- Carrot: 1 pc
- Thai chilies: 2 pcs
- Shallot: 1 pc (saute’ until brown)
- Green mango: ½ pc
- Sugar: 2 tbs
- Fish sauce: 2 tbs
- Warm water: ½ cup
Step 1: boiled or steamed chicken breasts until tender.
Step 2: Slice cabbage, carrot and mango in stripes (1cm of width), collect coriander leaves and wash all vegetable. Strain them and put 2 pinches of salt to dehydrate water/moisture from vegetables and make them be crunchy
Step 3: chop and mince chilies and garlic -> put in a small bowl to make sweet fish sauce. Add sugar and pound hardly to mix well with chilies and garlic -> lime juice -> warm water -> fish sauce -> stir well.
Step 4: tear chicken meat in lardon -> mix with strained vegetable + pickle + sweet fish sauce + chopped coriander + saute’ shallot -> mix well and enjoy!
In my hometown, my sister often put roasted peanut into the salad instead of shallot. Peanut’s nutty taste helps to balance the sour of salad and encourage aroma and palate. Regretfully, when I arrived Canada, I had slight allergic symptom when I ate peanut while this had not happened in Vietnam. Therefore, I got rid peanut of my dish and change to shallot without changing the characteristic of the salad.
The Atkins diet is popular thanks to its weight-lost effectiveness and health benefits such as prevent or limit dangerous health conditions like metabolic syndrome, diabetes, high blood pressure and cardiovascular disease, improve heart health. Nevertheless, every coin has two sides, some experts concerns Atkins has some negative impacts to eater’s body like headache, dizziness, weakness, fatigue, constipation. Low card input result in nutritional shortage or inadequate fiber – cause constipation, diarrhea and nausea.
Eating and tasting foods are the happiness of a cook or chef, therefore I would not follow any Diet solution. Just try to balance daily foods intake to body not exceed my body needs also do daily simple exercise like walking and stepping stairs (TTC subway is a good choice as we use it every day).
In point of view of a service provider – a potential cook, of course, I will study more about various Diet solutions and give advice to my customers. Also, adjust the formula to match well with their digestive demands is necessary.
References of data & sources:
Mayo Clinic. (nil). Atkins Diet: What’s behind the claims?. Retrieved June 27, 2019, from https://www.mayoclinic.org/healthy-lifestyle/weight-loss/in-depth/atkins-diet/art-20048485
Healthline. (2018). The Atkins Diet: Everything You Need to Know. Retrieved June 27, 2019, from https://www.healthline.com/nutrition/atkins-diet-101
Healthline. (2018). 7 Surprising Health Benefits of Eating Seaweed. Retrieved June 27, 2019, from https://www.healthline.com/nutrition/benefits-of-seaweed
Right Shape. (nil). Atkins Diet. Retrieved June 27, 2019, from https://www.rightshape.com/atkins-diet/
Smile Delivery Online. (nil). 4 Foods that you should not eat while losing weight. Retrieved June 27, 2019, from http://smiledeliveryonline.com/food/4-foods-that-you-should-not-eat-while-losing-weight/
Health Fitness Revolution. (nil). 10 Good Reasons to Drink Green Tea. Retrieved June 27, 2019, from https://www.healthfitnessrevolution.com/10-good-reasons-to-drink-green-tea/
Manor Surgery. (nil). Healthy Lifestyle. Retrieved June 27, 2019, from https://www.manorsurgery.co.uk/healthy-lifestyle
0 notes
Text
The Green Smoothie Recipe I Almost Always Use
In this post:
Robyn’s Green Smoothie Template Recipe (with step-by-step directions!)
Green Smoothie Recipe Tips
Making Green Smoothies Every Day
Here’s my everyday green smoothie “template” recipe. It allows you to use virtually any green, and any fruit, maximizing the greens. It makes 8 cups of smoothie, so if your blender can’t accommodate that much, cut the recipe in half and you’ll still get your recommended full quart for the day. Enjoy!
Robyn’s Green Smoothie Template Recipe
Makes 8 cups (72 oz) of 100% raw smoothie.
Step 1: Put 2 1/2 cups filtered water in a high-powered blender.
Step 2: Optionally, add:
½ tsp. powdered or 3 drops liquid stevia (herbal sweetener)
¼ whole lemon, including peel (anti-cancer, high in flavanoids)
2-3 Tbsp. fresh, refrigerated flax oil or sprouted ground flax (omega-3 rich)
Step 3: Gradually add greens until, briefly pureed, the mixture comes up to the 5-cup line (or less if you are “converting”).
¾ to 1 lb. raw, washed greens, like spinach, chard, kale, collard. It’s about 3 large handfuls for me.
Puree greens mixture for 90 seconds until very smooth, and keep adding and blending greens until the puree hits the 5-cup line.
Step 4: Gradually add fruit until the container is very full, and blend 90 seconds or until smooth:
1-2 bananas
1-2 cups frozen mixed berries
any other fruit to taste (pears, peaches, apples, oranges, apricots, cantaloupe, mango, pineapple)
Keep adding and blending fruit into the mixture until the puree hits close to the 8-cup line.
Make a full blender and you’ll have some to drink and some to share. I know from my research that 84 percent of my readers who have adopted a green-smoothie habit are teaching others about it!
Green Smoothie Recipe Tips
Tip 1: If you don’t have a high-speed blender (Blendtec, Vitamix, or the newer Ninjas are my favorites), take the time to blend each ingredient in the green smoothie recipe separately until very smooth, before adding the next. Avoiding frozen ingredients will also help you not have “chunkies” instead of smoothies. Add a bit more water if you feel the smoothie is too thick.
Tip 2: For beginners and those trying to convert children to green smoothies, consider using LESS greens and MORE fruit (especially berries and bananas) in the beginning, gradually working up to a 50/50 ratio as described here. This is a very flexible green smoothie recipe–feel free to play with it!
Tip 3: Start with the mildest greens. With kids, consider using only spinach the first few days, then sneak in chard, collards, and kale, the other mild but excellent greens gradually. Add other savory, bitter or any other of my top 11 greens only when your family members are “experts” in green smoothies!
Tip 4: Green smoothies keep well 2 or 3 days in the fridge, but after the third day, they start to taste a little off. After a few hours, they often begin to separate some, but that is easily remedied by a quick shake or another spin in the blender.
Tip 5: You can freeze smoothies — I like to pour them into pint-size jars (leaving a half inch or so space for expansion) and store them in the freezer. When ready to use, allow to thaw at room temperature or in the fridge, and shake well (or reblend) before drinking. You can also freeze smoothies in ice cube trays to re-blend later.
Tip 6: Another freezing tip is to assemble the ingredients and freeze them together in ziploc bags. Make enough for the whole week’s worth of smoothies, and pull one out to thaw on the counter for 15 or so minutes before whizzing it up in the blender.
Use this free printer-friendly version of the green smoothie recipe template to tape up in your cupboard, giving you the steps to follow to use whatever you already have in your fridge or pantry to make a yummy combination.
Check out a video demonstration of my template recipe here.
Making Green Smoothies Every Day
I’ll never run out of things to say about green smoothies! Here are some of the articles I’ve written since I first posted this green smoothie recipe in 2009. You’ll find answers to the frequently asked questions about making green smoothies a part of your everyday life:
How Many Calories Are In A Green Smoothie?
How Much Does A Green Smoothie Cost To Make?
How Can I Get My Kids To Drink Healthy Green Smoothies?
What Greens Should I Use In My Smoothies?
Which Green Smoothie Ingredients Should Always Be Organic?
Come find us on Facebook, too! Green Smoothie Girl readers are a cut above the rest, and we’ve got a friendly community there who loves to talk all things smoothies and health.
Happy smoothie making!
Robyn Openshaw, MSW, is the bestselling author of The Green Smoothies Diet, 12 Steps to Whole Foods, and 2017’s #1 Amazon Bestseller and USA Today Bestseller, Vibe. Learn more about how to make the journey painless, from the nutrient-scarce Standard American Diet, to a whole-foods diet, in her free video masterclass 12 Steps to Whole Foods.
This post was originally published in December 2009 and has been updated for accuracy and relevance. This article may contain affiliate links, which allows you to support our mission without costing you extra.
[Read More ...] https://greensmoothiegirl.com/wp-content/uploads/2018/03/robynpurple-herxheimer-reaction-150x150.jpg https://greensmoothiegirl.com/green-smoothie-recipe-i-almost-always-use/
0 notes
Text
A Week of Healthy Breakfasts (That You Can Prep in Advance!)
We all KNOW we should start the day with a healthy breakfast. Right? But how many times have you opted for something processed or skipped breakfast entirely because you’ve been rushed or had too much on? Lots, I’m guessing, if you’re anything like me.
And even if you do manage to have a healthy breakfast, do you often find yourself eating the same thing over and over? I definitely do. Meaning you miss out on the variety and nutrition that can come from mixing it up. So, with the aim of starting the week off right, today we’re sharing with you a bunch of healthy breakfast ideas. One for every day of the week in fact! And a few ways you can prep in advance to make it a wholllle lot easier. Having these ideas on hand has really helped me to quit my coffee and croissant habit.
Because we know that it’s hard to remember what to have, we’ve created this illustrated cheat sheet for you! Hopefully, this should give you some ideas.
Monday: Granola Bowl
Granaola, with its mix of nuts, seeds and oats is one dish that’s healthy and bound to keep you fuller for longer thanks to all that fibre. It’s the perfect breakfast and also a great snack.*
Ingredients
Granola – Home Made Granola , Turmeric and Ginger Granola, Simple Nutty Granola.
Yoghurt or Milk (Almond Milk or Greek Yoghurt are my go to)
Fruit – Berries, Banana, Figs etc.
Make it: Layer the ingredients and tuck in!
Meal Prep Tips: This one is great for meal prepping on a Sunday, and takes only a few minutes to put together. Try our recipes:Tuesday: Avo Toast
Tuesday: Avo Toast
Not just good for that Instagram grid, the old avo toast is a classic that (thanks to good fats and fibre) will keep you full for hours. And if you make it at home you’ll still be able to afford that house mortgage! (Aussie’s will understand that one).
Ingredients:
1 Ripe Avocado
Lemon
Sea Salt & Pepper
2 Slices of Wholegrain/Sourdough Bread
Make it: Peel and slice up the avocado evenly and lay across each slice of toast. Add some salt, pepper, and chilli flakes, along with a squeeze of lemon juice. If you’ve got time, eggs cooked any way you like are a great (protein rich) addition.
Meal Prep Tips: This is one of those dishes where freshness rules, but make sure to have these items on your shopping list on Sunday!
Wednesday: Green Omelette
Recently I’ve become more conscious of getting five serves of veggies a day, and this yummy breakfast certainly helps to get a few under my belt early in the day – the mix of good fats and vitamins help to keep you focused and full until lunch time too!
Ingredients:
Two handfuls of Greens (Spinach, Kale, Broccoli)
Half a red onion
An assortment of herbs (basil, mint, parsley, dill etc)
2 or 3 Eggs
Butter or coconut oil
Salt and pepper
Handful of fetta cheese (optional)
Make it: Chop up your onion and add it to the butter in a pan. Cook until the onion is translucent, and then add the greens and herbs and allow to cook for a minute to two. Then, pour over the beaten eggs and mix together, creating a thin layer. Cook for about 1 to 2 minutes until set. Then, add any extras such as feta cheese on top. Fold in half and let cook for a further 30 seconds before putting on a plate.
Meal Prep Tips: After you do your shopping, wash and chop your greens in advance, putting them in a Tupperware container so there’s no downtime when you go to make your omelette.
Thursday: Bircher Muesli
Looking for something that’s totally grab and go and can even be eaten on your daily commute? Then a delicious bircher is for you. Like granola, Bircher gives you a great dose of fibre first thing in the morning, along with vitamins from the fruit and good fats from the yoghurt. Drizzle a bit of honey and you’ll be in breakfast heaven.
Ingredients
Half a cup of Rolled Oats
¼ tsp Cinnamon
Half a cup of Milk (Almond or Coconut Milk work well)
Half a Green Apple, grated
Chopped Nuts
A spoon of Honey
A spoon of greek yoghurt
Extra Fruit (Berries, Bananas or Pears are great choices!)
Make it: In a bowl combine the oats, cinnamon, milk and grated apple. Cover and refrigerate overnight. When you’re ready to serve, mix in the yoghurt and nuts, honey, and top with your fruit.
Meal Prep Tips: You can make a big batch of bircher in advance, and eat it throughout the week because it lasts well in the fridge for 3 – 5 days.
Friday: Banana Smoothie
Fridays are one of those days that can be a total shambles, as you try to finish everything that needs to be done before the weekend. Instead of skipping breakfast or grabbing something dubious from Starbucks on your way to work, make yourself this super quick smoothie filled with healthy fats and protein.
Ingredients:
1 cup of Unsweetened Almond Milk
2 frozen Bananas
Handful of almonds
2 tsp Honey
1 tsp Ground Cinnamon
Protein powder (optional)
Make it: Add all your ingredients to a blender and blend until smooth. Serve in a glass over ice and you’re good to go!
Meal prep tips: Make it easy on yourself by slicing and popping your bananas in the freezer in a tupperware container.
Saturday: Baked Eggs
It’s the weekend! Which means you’ve got more time to dedicate to breakfast making. With loads of protein and vitamins, baked eggs are both delicious and nutritious, so there’s no excuse not to have a go. Don’t hold back with improvisation either, this is a dish ideal for experimenting with your favourite ingredients.
Make it: Try our recipe for delicious spiced Shakshuka (middle eastern baked eggs) here.
Sunday: Banana Protein Pancakes
Salvage any overripe bananas and add them into your pancake batter. The best thing? These pancakes feel like a total indulgence when in reality they’re healthy(ish!).
Make it: Check out our recipe here.
*If there’s one thing I’ve craved throughout this pregnancy it’s been granola. Crazy right? I usually make about 2 kg of it on a Sunday and it’s gone by the end of the week. I’m always like ‘Ben did you eat this’ when faced with an empty jar and invariably he hasn’t at all.
The post A Week of Healthy Breakfasts (That You Can Prep in Advance!) appeared first on A Pair & A Spare.
from RSSMix.com Mix ID 8265713 https://ift.tt/2KJrc1Z via IFTTT
0 notes
Text
Homemade Chia Seed Beverage
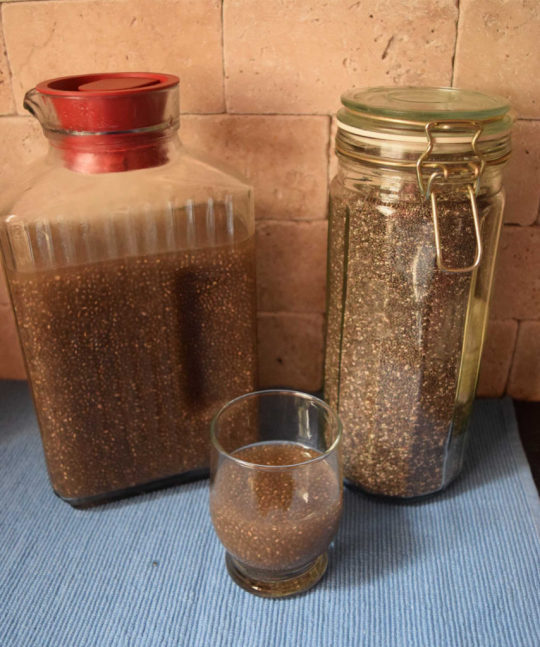
Most of you have probably heard about chia seeds. It is enjoying it's time in the limelight in the health food circles lately, kind of like kale did the last few years, and flaxseed meal is starting too. SUPER-FOODS! I hate that term. It gives the impression of trying too hard. Goji berries? Super-food. Chia seeds? Super-food. Blueberries? Super-food. Kale? Super-food. Salmon? Super-food. You get my drift. Perhaps it has something to do with the superhero craze of the last several years that causes companies to think that foods have to be labeled as 'super-foods' in order to try to get people to eat them. "Captain America enjoys green smoothies every morning...super-food!" Why can't they simply be 'good for you and, most of the time, delicious foods'? "But Sarah", you say, "all these uber-healthy foods are too expensive for me to eat regularly!" Oh I hear you! The price tags on things like Maca powder and goji berries have me rolling in laughter on the grocery aisle floor. But never fear! Sarah the Cheap-ass Homesteader is here!!! (Sorry, I figured with all the super talk, I may as well get in character. Unfortunately my alter ego is also my every day self. Sigh. I should at least sew myself a mask or something.) Anyway....I got way off topic there. Where was I? Oh yes, healthy eating while not breaking the bank. Some foods are just ridiculously expensive and they are likely to stay that way. For instance, I've never tried Goji berries because $13/lb?? Hahahahahaha, yeah... no. (You can grow your own, though!) However, some companies that sell high priced items in the grocery store are just trying to convince you that you have to pay those prices because their product is magical and made by unicorn/centaur hybrids in Herpty Derpty Land and you couldn't possibly find it any where else, for the same quality, at a lower price. But of course, half the time, you can, by making it yourself. I'm using for my example today: chia seed beverage. They are just the cat's pajamas in health-centered grocery stores right now, followed closely by kombucha drinks (which you can also make at home). You've likely seen them in the single-serve coolers at the store. Cute little bottles (usually 12 ounces or less) of exotically flavored juices filled to the brim with swollen chia seeds. They sell for anywhere from $2 to $5 a bottle. First, before we do some math (which will be brief, since while I am decent at math, I hate doing it) and I tell you how to make your own chia beverage, let's talk about why chia seeds are called a 'super-food', or basically, what their health benefits are. Every ounce of chia seeds contains 139 calories, 4.4 grams of protein, 9 grams fat, 12 grams carbohydrates and 11 grams of fiber (1/3 of the daily recommended intake for adults!) In addition to various vitamins and minerals, such as: Calcium, helps maintain healthy teeth and bones: 18% daily recommended intake per ounce. Manganese, good for your bones and helps your body use biotin and thiamine: 30% daily recommended intake per ounce. Phosphorus, helps maintain healthy teeth and bones AND is used by the body to synthesize protein for cell and tissue growth and repair: 27% daily recommended intake per ounce. (Chia seeds are great to consume as an after workout booster.) Chia seeds pack nearly 5 grams of omega-3 fatty acids in each ounce. Omega-3's are vital to overall brain health. Chia seeds slow the digestion and have a stabilizing effect on blood sugar, which can help prevent blood sugar spikes in diabetics. Chia seeds also have tryptophan, which helps regulate appetite, sleep, and improve one's mood. Unlike flax seeds, you can reap all the benefits of chia in it's seed form, so you don't have to worry about grinding chia seeds into meal. Recipe time! I usually make a triple batch a week, but this recipe is for a 16 oz amount, or two 8 oz servings. Measure out 8 fluid oz (or one liquid cup) of water and bring it to boiling on the stove top (you could also heat it up for a minute or two in the microwave). Put the hot water in a preferably glass container and add 3 Tbs (or 1.2 ounces) of chia seeds. Stir them up, cover the top of the container in plastic wrap and let it sit for about 4 hours, or until the chia seeds absorb the water and are now a smooth gel. Now stir in 8 fluid ounces (or 1 liquid cup) of whatever flavor liquid you'd like. I've tried 100% juices of all kinds of flavors, I've used plain green tea sweetened with a touch of honey, I've done a homemade tea of rooibos tea leaves, hibiscus, rose hips, elderberries and juniper berries...whatever you like! You could make green tea and flavor it with homemade ginger or lavender syrup. The possibilities are many.

And there you have it. Chia seed beverage. It takes a total of about 5 minutes of hands on work. Now let's do some math, kiddos!! Let's say you pick up a chia seed beverage from a certain mass merchandiser popular in the US. It will cost you $1.98+tax for a 10 ounce bottle. That works out to about 20¢ an ounce. Recently a health food store in my area, that sells chia seeds in bulk, had them on sale for $2.99/lb. I stocked up. Two stores that usually have chia seeds in bulk for fairly good prices are Natural Grocers and Sprouts Farmer's Market. If you have either of those stores in your area, check their bulk sections before buying chia seeds pre-packaged. The prices tend to soar for the pretty packaging. By weight, 1 tablespoon of chia seeds = 0.4 oz net weight. There are 16 Tbs in 1 dry cup, which means that are 6.4 oz of chia seeds per cup, or 2.5 cups per pound. Each 16 oz serving of homemade chia beverage uses 3 Tbs, or 1.2 ounces, of chia seeds. So with 1 pound of chia seeds, you could make about 13 sixteen ounce batches. I snagged some chia seeds in bulk at $2.99/lb, or about .19¢ an ounce. For an example made with green tea, you can usually find a box of good quality green tea that has 16 bags in it for around $3, which is about .19¢ a tea bag. So here's the break down for one batch made with green tea: 16 fluid ounces of water = negligible/varies by location 3 Tbs (1.2 oz) of chia seeds = 23¢ 1 green tea bag = 19¢ 3 tsp of honey = (calculated by what I pay for raw, organic honey) = 16¢ Grand total for a 16 oz chia seed beverage? 58¢ So, you would save $1.40, and get 6 more oz of beverage if you made it at home versus purchasing it from the store. For an even better comparison, here's the breakdown of the triple (48 oz) batch I make once a week. And we'll even use my grocery stores regular chia bulk price of $3.99/lb, or about 25¢/oz. 48 fluid ounces of water = negligible/varies by location 9 Tbs (3.6 oz) chia seeds = 90¢ 3 green tea bags = 57¢ 9 tsp of honey = 48¢ Grand total = $1.95. 3¢ cheaper than the 10 ounce bottle from the store. With chia seeds at $2.99/lb, it would've had a grand total of $1.74. But that's just for the 10 ounce bottle. If you wanted the equivalent amount from the store, or about 50 ounces, it would cost you just shy of $10, or about 5x more! If you drank five 10 ounces servings each week for a month, that would be about $40 a month. Homemade (one 48 oz batch a week) it would be about $8. Of course, if you used store bought fruit juice, the homemade price would fluctuate a bit. But it would still be vastly less than purchasing chia drink from the store. Okay, math class over! By the way, you can also add some chia seeds to a glass of almond milk, coconut milk, cow's milk or what-have-you, refrigerate it for an hour, stir it up and then leave it in the fridge overnight for a yummy chia seed breakfast beverage the next morning. (A very good friend of mine gave me that tip!) Too long, didn't read? Make you own chia seed beverages. It'll save you butt-loads of money. Click to Post
0 notes