#wood design on wall diy
Explore tagged Tumblr posts
Visit Tumblr Blog
Explore Tumblr blogs with no restrictions, modern design and the best experience.
Last Seen Tumblr Blogs


Fun Fact
Tumblr was created by web developers David Karp and Marco Arment.
Text
Folk Art-Inspired Coat Hooks


Painted a $5 thrifted coat hook with some second-hand acrylic paint and sealed it with polyurethane
#diy#upcycle#upcycled#upcycling#crafts#interior#interiordesign#ecofriendly#reduce reuse recycle#interiors#interior design#decor#home#home decor#home decorating ideas#homedecor#wall#poster art#wood#sustainability#sustainable#handmade#folkart#folk art#paint#acrylic#painting#folk art painting#coat rack#home decoration
48 notes
·
View notes
Text
Shop Unique 3D Wall Art Designs | 3D Frames & Wood Decor | Liora Craft
Explore an exclusive collection of 3D wood wall art and 3D wall hanging designs. Add dimension to your walls with 3D shapes and frames, perfect for modern interiors. Buy 3D wood art online in Gujarat today!
For More Information:-https://lioracraft.com/collections/3d-wooden-art

#3d wall decor#3d frame for wall#3d wall art designs#3d wall hanging#3d shapes wall hanging#3d wood wall art#Wooden Art Wall Decor#Buy Wooden Wall Decor Online#Buy Wood Wall Decor Items Online in Ahemdabad Gujarat#Wall Art Designs Wall Decor Paintings#Buy 3d Wood Art Online In Ahemdabad#Buy 3d Wood Art Online In Gujarat#Buy Diy 3d Wall Art Online In Ahemdabad#Buy Diy 3d Wall Art Online In Gujarat
1 note
·
View note
Text
0 notes
Text
If you're looking for an economical, long lasting and sustainable way to protect your balcony from swings and other activities, then you should consider using a balcony fence woven with bamboo! Bamboo is a versatile plant that is able to grow quickly and create a sturdy fence that is resistant to rotting and decay. This bamboo balcony fence is a great way to keep your balcony safe and secure, without costing you a fortune!
#wooden furniture#furniture#woodworking ideas#furniture ideas#wooden furniture ideas#diy furniture#curved wooden furnitures#100 ideas!#wood furniture#design ideas from pallet old pallets#creative diy wooden furniture ideas at home#wooden bedroom furniture design ideas#bedroom decorating ideas#design ideas#wooden wall decoration ideas#wood furniture ideas#woodworking#woodworking projects#make money woodworking#diy idea#scrap wood ideas#scrap wood projects
0 notes
Text


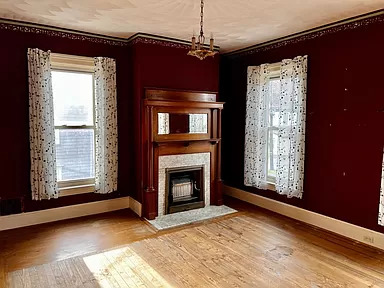
This 1877 home in Franklin, Pennsylvania needs some work and sprucing up, but the interior is stunning. 4bds, 3ba, $279K.

Plus, there's this little servant's house that could be rental income.

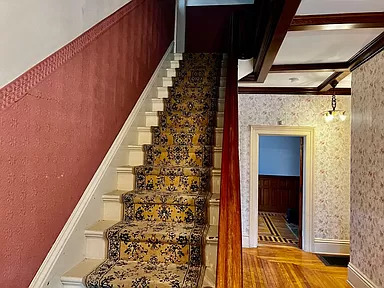
The entrance hall needs brightening, but it has original ceiling beams, floors and railings.

It looks like it's currently being used as an office building, but luckily, they haven't renovated it and everything is still intact.

For some reason, they put up this door w/side panels right behind the columns- that has to go. Look at how close it is- it's up against it.
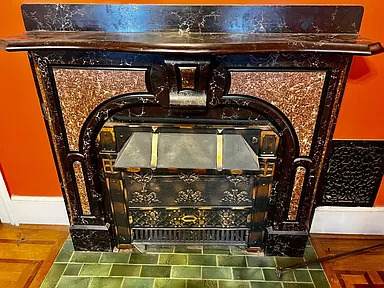
Closeup of an original fireplace. Isn't this unusual? Next to it is an original heating grate. Even if it's not functional, it's a great feature.

This is actually the dining room with two built-in cabinets and an original fireplace. Look at the wonderful inlaid floor.
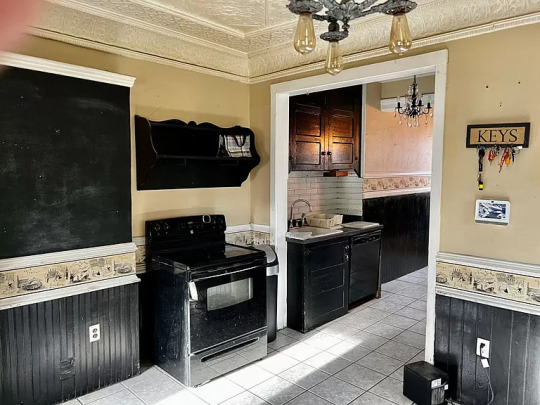
The kitchen had a DIY reno where they painted all the wood a flat black.
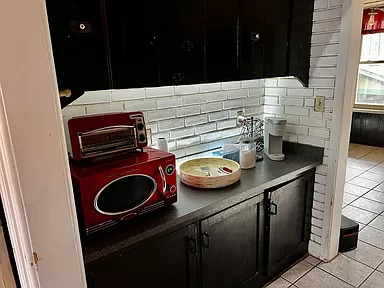
There's a small pantry.

This room is also an office and features a built-in bookcase. I hope they didn't ruin the bottom with all that stuff.

Details of a stained glass window.

Apparently they finished the lovely floor around the bed. I kind of like the flowers on the wall.
This is a nice bedroom with a beautiful fireplace, but again, they finished the floor only around the bed.

The ceiling in this room has a beautiful design.
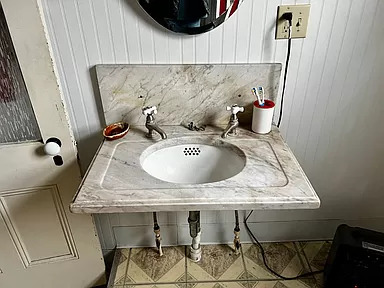
Look at the wonderful original marble sink.
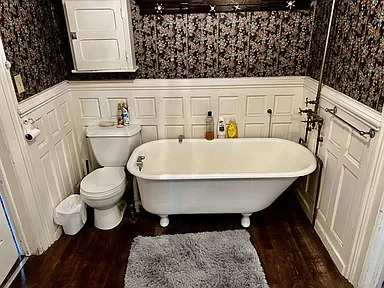
It isn't often that you find an original bath. Only the toilet is new.

There's a sunporch in the back, but you can't even get in with all the office stuff.
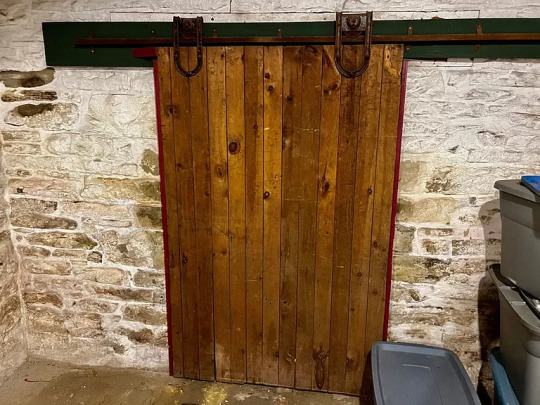
The basement. It may be the old coal room behind this door.

Up in the attic is a lovely stick construction room with a great fireplace and leaded glass windows.

I always liked Victorian stick construction and this vintage bath is great- the sink and toilet look original.

This is a beautiful room.


The lot is .86 acre.

The muddy creek along the property is called French Creek.
212 notes
·
View notes
Text
Do You Need Planning for a Patio?
So, you're thinking about adding a patio? Maybe you've been eyeing that open backyard space, imagining a cozy seating area for morning coffee or a full-blown outdoor entertainment hub. Sounds great—but do you need planning for it?
The short answer: it depends. The long answer? Well, that’s what we’re getting into.
What Kind of Patio Are You Thinking About?
First things first—what does "patio" mean to you?
A simple slab of concrete with a few chairs?
A screened-in outdoor space with bug protection?
A fully covered, weatherproof area with fans, heaters, and maybe even a built-in grill?
Each of these setups comes with different considerations, and that’s where planning (or permits) may come into play.
Do You Need a Permit for Your Patio?
South Bend has zoning laws and building codes that determine whether you need a permit for your project. Generally, here’s how it breaks down:
No permit needed: If you're installing a ground-level patio made of pavers, bricks, or concrete (as long as it doesn’t affect drainage).
Permit might be required: If your patio includes permanent structures, like a roof, walls, or electrical work.
Definitely need a permit: If you're building a patio that’s attached to your house, significantly elevated, or includes plumbing and electrical installations.
Why Does This Matter?
If you skip the permitting process when it’s required, you could run into problems down the road. Unpermitted work might affect your home’s resale value or create headaches if a city inspector gets involved.
Not sure what applies to your situation? It’s always a good idea to check with your local building department.
What Do You Want From Your Patio?
Now, let’s talk function. A patio isn't just about laying down some stone and calling it a day. It should fit your lifestyle. So ask yourself:
How do you plan to use it? Will it be a quiet space for relaxation, a gathering spot for family, or something else?
Do you want it enclosed? A screened-in patio keeps bugs away, but it’s more of an investment.
What’s the weather like in South Bend? A shaded or covered patio can make a big difference in comfort, especially in summer.
How much maintenance do you want? Pavers and wood decks need more upkeep than stamped concrete or composite materials.
Are you planning to live in your home long-term, or are you thinking about resale value? A well-designed patio can boost property appeal, especially for homebuyers looking for extra living space.
Choosing the Right Materials
The materials you pick determine not just the look but also the longevity of your patio. Here’s a quick rundown:
Concrete: Affordable, durable, and can be stamped for a decorative finish.
Pavers: Flexible, aesthetically pleasing, and easy to repair, but installation can be pricey.
Natural stone: Elegant and timeless, but one of the most expensive choices.
Brick: Classic look with good durability, but it requires occasional maintenance.
Wood or composite decking: More common for decks than patios, but a great choice if you want a raised look.
No matter what you choose, make sure it complements your home’s style.
What About a Screened-In Patio?
A screened-in patio is like an outdoor room—a game changer for people who love fresh air but hate mosquitoes. It also extends the usability of your space, letting you enjoy it even when the weather isn’t perfect.
But here’s the thing: if you’re adding screens, a roof, or enclosing your patio, you’ll probably need a permit.
Bonus Perks of a Screened Patio
Keeps out bugs and debris
Adds privacy
Protects furniture from the elements
Can be customized with fans, lighting, and even heating for year-round comfort
For families with kids or pets, a screened-in space is especially handy. No more chasing the dog down the street when it bolts after a squirrel!
DIY vs. Hiring a Pro: What’s the Right Move?
If you're a DIY enthusiast, you might be tempted to build your patio yourself. And for basic ground-level patios, that’s totally doable. But when it comes to more complex builds—especially those requiring permits, electrical work, or roofing—it’s usually best to bring in a pro.
Why?
Time-saving: A professional team can complete the project faster and more efficiently.
Quality: Proper grading, drainage, and installation ensure your patio lasts.
Code compliance: No worries about whether your project meets local regulations.
Final Thoughts
At the end of the day, planning your patio isn’t just about paperwork—it’s about making sure you end up with a space you’ll actually use and enjoy. A little thought up front can save you from headaches later.
So whether you’re dreaming of a simple backyard hangout spot or a fully enclosed sunroom, take a step back and ask yourself:
Do I need a permit? Check with your local building department.
What will I use the patio for? Plan with your lifestyle in mind.
What materials work best? Choose for durability and aesthetics.
Should I DIY or hire a pro? Be realistic about your skills and time.
And if you’re considering a screened-in patio, reach out to Screenmobile of South Bend—they’ll help you design a space that fits your home, style, and budget.
Because let’s be honest—who doesn’t want an outdoor space that’s both beautiful and functional?
7 notes
·
View notes
Text
I've been in a "watch 500 van conversion tour videos" mood lately so i'm just gonna post some of my thoughts (lots of complaining about YT and lifestyle minimalists here)
as always I hate YT's algorithm and how difficult it is to get past the wall of full-time influencers
Legitimately I hate when youtubers are like "here's an instructional video on how to do [thing i am doing for the first time]." This is something I genuinely think YT has damaged about DIY culture because ppl think that you can learn something just by watching a video. Like yes, you can receive instruction through a video, but you have not actually learned how to do something with your hands until you have learned it with your hands, and even then you shouldn't be giving people instruction on how to do it when you've only done it once??
I think the Malaysian food ep of Dish Granted is a really good example of this, when Steven is like "oh I'll pull chai while spinning in a circle the way the chaiwallahs do" and then realizes the hubris of that statement bc there is a high level of physical skill involved in what they do that simply watching a video simply does not magically gift you. I was really glad when Ronny Chieng basically called him out "sure the meal is good for a first attempt that you threw together but you can't pretend this compares to actual Malaysian street food. Like as street food it's crap lol"
in that vein I hate the videos that are titled "here's the best way to do xyz for your van" and it's like. the person's very first van build and they've never lived in a van before. like how do you know that's the best way? because you read about it on the internet?
anyways love this one tour video where 20 minutes into the tour, the dude goes "and here's my crockpot. because I really love soup." and then their camera guy who has been completely silent just busts out laughing and is crying "I rEaLLy LoVe SoUp."
one van had the BL sheets and I hate that my vision has been cursed this way
love the no-nonsense approach that the channel Cheap RV Living has.
also hate how hard it is to get past the YT algorithm of "wealthy white ppl doing xyz" and talking about the spiritual freedom it grants them to live more sustainably by getting rid of all their things that work perfectly well and then building an apartment's worth of furniture from scratch and cladding an entire van with virgin wood. did no one teach y'all about the thrift store.
every time someone is like "living in a van has enriched my life because it taught me how to be uncomfortable" i'm like "...... wait you guys were comfortable before?"
so many of the designer builds look completely the same but i will admit i do at least enjoy the current trends of interior design (warm whites, earth tones/natural wood stain, gold accents, the color green) as opposed to the whitewashed colorless shiplap trends of the 2010s. like yesss paint those lower cabinets green, go off girl. but also i have to wonder what the point of having something custom made is if it's just going to look like what everyone else has??? (aside from the fact that it garners views sure whatever)
at this point if it's a couple doing a van tour video i automatically skip it because i'm tired of the level of (fake?) cheerfulness it requires for 2 ppl to live in a 60sq ft space and talking about how "it's the best thing ever" in that social media voice. i say this but i haven't had any queer couples come across my feed yet so i could feel differently about that. I'd maybe watch videos from that lesbian couple in How to Build a Sex Room that were totally gunning for a threesome with the old lady designer.
take a shot every time a video is like STEALTH CAMPING and it's literally just someone hanging out in their van in the middle of the day watching TV before they go buy their groceries. i do that all the time, it's called "i don't want to get out of the car."
before someone even says what their previous housing status was, you can tell the diff between the homeless ppl and the rich ppl just based on who actually has stuff and is excited to talk about their stuff vs who is trying to emphasize their lack of material attachment while filming a video about their belongings.
also love the one dude who had a basic bed set-up in an otherwise empty van, went to IKEA and bought a metal folding table and a burner, set it up in the corner and had such genuine enthusiasm for having a kitchen in his car. like legitimately he was so excited and i was excited for him! vs the person looking like they were gonna murder someone bc they mismeasured a wood panel in their ~under $10K~ fully custom build.
16 notes
·
View notes
Text
12 Amazing Wooden Door Designs For Your Home
When you are designing the interior of your home, give some thought to the design of the doors. Doors are primarily a functional element of your home, as they provide much-needed security and privacy from the outside world. The design of doors is also important, as it can add to the aesthetic appeal and enhance your decor statement. We've rounded up the best wooden door designs to give you decor inspiration.
Front doors add character and style to the outside of your home and create the first impression of your home for visitors. They should be in keeping with the architectural elements of your building. Is it classical or contemporary? Would a natural framed door look good, or should it be painted to match the other design elements?
Are you aware of the difference between the wood used to make doors and furniture? If not, this guide will help you make the right choice between different types of wood before investing in furniture and decorative items, crafts, and handicrafts to decorate homes.

Ideas to incorporate beautiful Wooden Door Design in Your Home
1. Contemporary Teak wood Door
Here's a contemporary door in teak wood with a vertical glass insert that allows you to see who your visitors are before you even open the door. You can take, help best interior designers in Noida so they can guide you through this process.

2. Three Side Glass Panelled Wooden Door
This lovely entry door makes a grand statement and is surrounded on three sides by glass panels which add a lovely aesthetic.

3. Teak Wood Rectangular Panel doors with Mirror
Rectangular panels in polished teak wood emphasize this country home's rustic plaster façade, while tall glass panels on one side add functionality.

4. Rosewood Door
This fine rosewood door is embellished with cornice detailing and includes white panels to add visual appeal.

5. Ornamental Wrought Iron Doors
Gorgeous decorative wrought iron sets distinguish the panelling in this mahogany front door that blends in perfectly with the home's exposed brick façade.

6. Minimalist White Wooden Door
Elegant in white, this charming front door is detailed with molded panels that are simple and clean. The side window, even in white, gives a glimpse of the visitors.

7. Functional and Aesthetic Balcony Doors
Balcony doors are the transition between the inside and outside of your home. Large glass French windows can open the view and allow a seamless view of your garden. If you need privacy, use frosted or opaque glass that will still let in light.
Related blog: 15 DIY Vertical Garden Ideas in Budget

8. Glass Bathroom Doors
We love opening these all-glass bathroom doors to a private balcony. The dark wood frame is sleek and minimalist.
Related blog: 15 Bathroom Decorating Ideas on Budget for 2024

9. Wooden Doors with Glass for a Glimpse of The Outdoors
Glass adds a touch of contemporary style to any design and can make heavy doors look visually lighter. Strategically placed glass panels can allow sunlight to flow through during the day, bringing freshness and happiness to your home.
Related blog: How to Build a Gravel Patio: DIY 9 Steps

10. Get Twice the Style with Double Doors
If you have the space, open your areas with more eloquence. Double Door Twice adds elegance and makes a grand statement.
If you want to keep one side short and use only one side as an entry door, the overall width of your double door should be at least 6 feet.
Double doors look better in homes with high ceilings, as the design proportions work better in larger spaces.
Related blog: Types of False Ceiling Lights: Complete Guide

11. Sliding Doors That Are Sleek and Functional
Sliding doors allow you to create privacy when needed in open-plan homes. There are different types of sliding doors, including doors that completely disappear into the wall on either side. There are some sliding low folding doors that stack on the sides of the opening. Sliding doors come with single track (or top hung), and double track fittings.

12. Glass Panelled Doors
This glass-panelled wooden door slides in on both sides as well as is surrounded by glass above, allowing expansive views of the interior.

#Latest Wooden Door Design 2024#Wooden Door Designs#Door Design Ideas#Modern Door Design#Best Door Design For Home
6 notes
·
View notes
Note
if no one's asked already then you can do starbula for the ship ask meme you reblogged :P
Thank you so much! It took a while to fill out but enjoy! :D
Who wins a prize at a carnival/fair/festival: It depends on the game. Lol everything with shooting that two will end up making a competition outta it, figuring out who will win the most stuffed animals. That's how they got banned from playing any of the shooting related booths on several fairs already. The won stuffies will be gifted to the kids on Knowhere, althought they both chose always each for the other.
If it's other games, like for example fishing rubber ducks, Peter ends up winning always since Nebula has no patience for that game. But everything that requires aim? Nebula wins, always. Just by a few points, tho.
Who does most of the cooking: Peter. Not that I think he's that good of a cook himself but much more as I see it being Nebula. lol This two are so simple with food.(growing up taking what they get without much complain) Give them a few cans and snacks and they're good. Although Peter picked up the habit to cook at last once the week after being back on earth.
Who does most of the shopping: Nebula because Peter intends to get distracted, buying useless stuff and/or misplacing their shopping list. N: you went out to grab take out we ordered in advance. How, how did you ended up buying a fucking armchair?!
Who is hopeless at board games:Nebula. Her competition-genes get activated at every type of game, although it for sure cooled down since her childhood (where competition were a life or death situation) but she is a sore loser. lol
Who is always trying to make the other laugh: Personal headcanon that Peter gave himself the goal to make Nebula laugh more the moment she joined the guardians. Jokes, Puns, Stories, just showing her videos on his super cool new smartphone he downloaded because he knew she'd love them. Once they entered their relationship, Nebula slowly let her facade crumble that she's in love with Peter's humor. Things that before made her just look at him odd now makes her laugh. Turned out her faces before were her supressing laughing to not give him the satisfaction of his jokes working. (BIG HEADCANON that one of the things Peter fell in love with first were her soft giggles under her breath. They're were too adorable, to indulging, to not trying to hear more of it.)
Who has a tendency to give out TMI: We all know Peter Jason "Star Lord" "Can't keep his mouth shut for five minutes" Quill, right? That man will casually(and to his defense accidently) drop way too private things from their behind-doors-life. Nebula shuts him up with her "you better stop talking now or I'm a widow in a few seconds"-look.
Who does more DIY projects: Big Fan of Nebula going into handy work after becoming Leader of Knowhere. Growing up not being allowed to individualize her living space she slowly warms up to interior design once she and Peter moved in their own space. Building own furniture, spontanous deciding their walls need new color. Hey, maybe she grow a soft spot for "five Minute crafts", going all mad when it takes more than five minutes. Plus her tinkering on her arm with Rocket to advance it.
Who is the big spoon: They totally switch. Nebula on her part loves Peter's strong arms around her at night, giving her the safety she needed all her life. I dig Nebula enjoying being taken care of, allowing her to indulge the vulnerable sides of life once she let her guard down. Peter breathing in her neck at night, his heartbeat on her back all night, being that relaxing rhythm, his lips kissing the backside of her head in the morning. Bonus Peter being a damn furnace so she's always warm. She also feels his morning wood she totally not gets excited of Peter for his part is kinda the same? Loving being in his woman's embrace. her body having this duality on different sensations. Cold steel, warm flesh. Boobs Not that deep on his part, he's just a man who loves being cuddled.
Who gives more casual affection:Depending. Peter loves to give her the casual affection in public she allows as Nebula is not a fan of it. Sneaking kisses from her whe she isn't prepared for it. Holding her hand. Snuggling her cheeks when nobody is looking. This all continues behind closed doors just multiply it. But now, big twist. Once that doors are closed Nebula becomes a tamed wild cat just looking for pets. Being that touched-starved all her life and not being a fan of PDA she can't keep her hands off Peter. Sitting in his lap, casual cuddling... It took her so long to get comfortable to act on her desires for affection, Peter was so surprised once she shown it.
Who reads to whom: in love with the concept of Peter picking up reading back on earth and realizing he barly can't read english anymore. After getting back into it he started reading stories he remembered from his childhood to Nebula. Mostly fairytales. He also then realized that his mother always read him the non or at last less-violent versions of them. Nebula: Damn, didn't knew human fables were that gruesome. I kinda dig it. Peter: ...me neither. Fuck, when did Red Riding Hood got so violent? Nebula: Who cares? Keep reading!
Who brings drinks and food without being asked: Honestly, both. Peter plays little housewife when visiting Knowhere, bringing Nebula food to her office. But also Nebula will remind Peter to eat and drink as he intends to forget about it once he's busy with something that requires his entire attention. She had him too many times throwing up because he forgot to drink for hours and not realizing he was hungry.
13 notes
·
View notes
Text
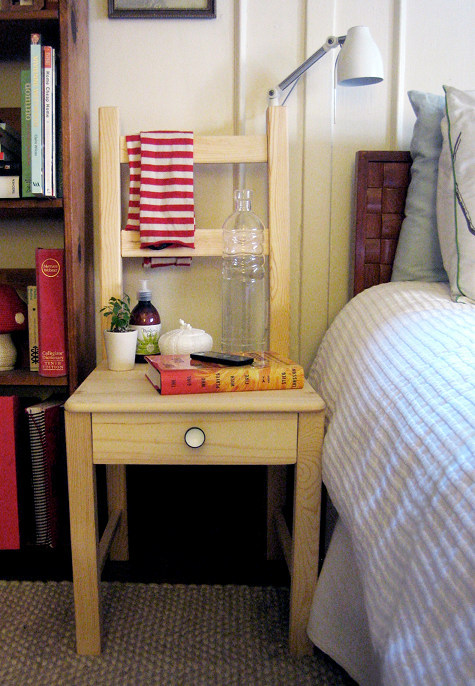
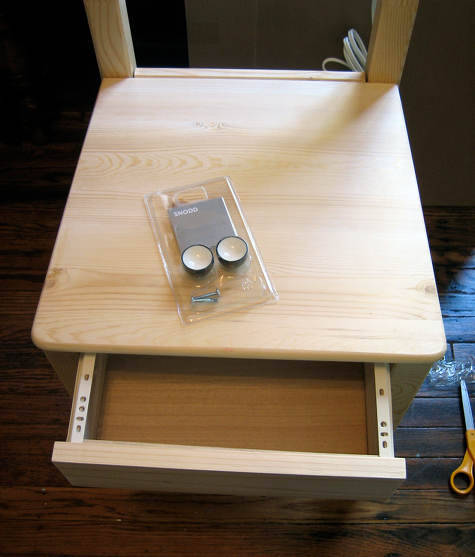
DIY IKEA Bedside Chair
Project by Kate Pruitt:
when we decided to move our bedroom to a different room in the house, we no longer had the space for our old bedside tables. i decided to use an old chair because it was narrow enough and it looked pretty good. unfortunately, i lost two important things in the switch: a place for private things (my ‘goody’ drawer, so to speak, although mine just has a journal and some nail clippers…saucy!!) and surface space – even with a smaller bedside lamp i didn’t have much room. i loved the quirkiness of using a chair (i’ve seen in many home tours and it is always very charming), but i needed these problems solved. ikea to the rescue!!
i am majorly inspired by “odd” furniture designs, like this “tamp and lable” by florian kallus, so i decided to work over a simple pine chair to create a multi-purpose bedside table, complete with a drawer and swivel lamp! i splurged a bit on the new trål wall sconce ($16.99) because it looked so good with the chair, and i like that it rotates so i can change the angle when i am reading in bed. if you aren’t into the industrial look of this piece (my boyfriend called this franken-furniture, which i love), i hope you will at least take away the knowledge that adding a drawer to a chair (or anything) is remarkably easy, and cheap! the great thing about this design is that you can still use the chair for seating if you need to, you can even have a little light over your shoulder! i hope you like this one, i had a lot of fun making it. have fun!! –kate
materials: 1. ikea ivar chair 2. ikea trål sconce 3. ikea snodd knobs (or any knob you like) 3. wood box or crate or old drawer (must be 12″ wide and under 12″ long. i used this wood craft boxfrom michael’s craft store) 4. drill (with a 3/8″ thick drill bit) 5. drawer slides 10″ long (these come in packs of two and are available at most hardware stores. they come in many lengths) 6. 1″ wood screws (x2)
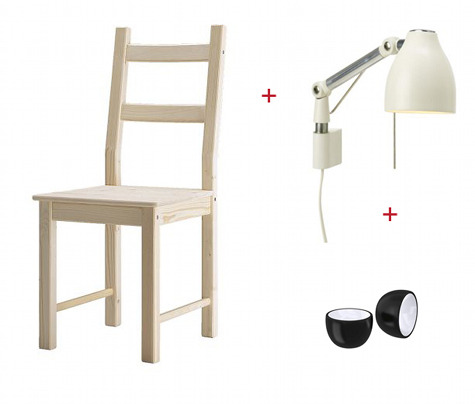
cost: ikea materials: $41 wood crate, box: free on hand, or $5 (at craft store) drawer slides: $5
time: 2-3 hours
instructions: 1. take the chair out of the box and connect the two side pieces with the back slats of the chair, according to the instructions. lay the seat on top, but do not attach.
2. take your drawer/box and slide under the seat in front to check the fit. the box from michael’s fit perfectly with the 12″ side as the front of the drawer.
3. take the drawer slides apart and attach the slides to the drawer according to the instructions that come with the drawer slides. you should have small screws included with the drawer slides that you can use. it’s okay if your drawer does not go the full length of the slides (my box was just 8″ wide, so 2″ of slide were extending on the back of the drawer). make the drawer slides flush with the front of your drawer, and screw in a couple places on each side to secure. you might want to add a piece of wood to the back for weight. i used the extra front panel piece of the chair that was left over.
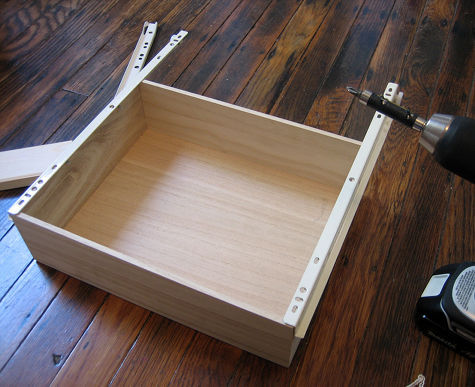
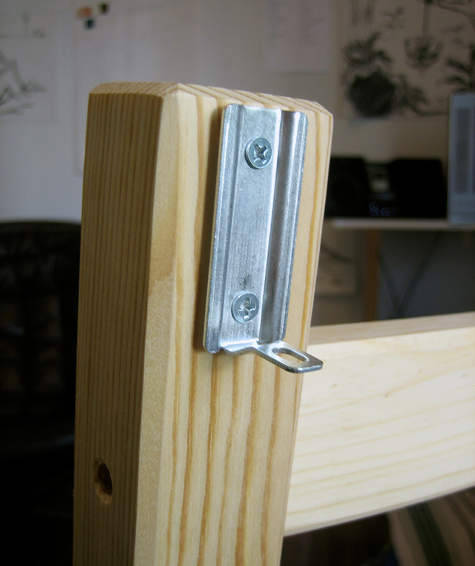
4. now that your drawer has the slides attached, take the seat off the chair so the interior of the sides of the chair are exposed. attach the other two pieces of the drawer slides to the left and right side of the chair. make them flush with the top edge of the sides, so that they seat will be right on top of them and the drawer. you can put your drawer in while holding the sides to make sure you have them in the right place. a second person is useful here for this purpose.
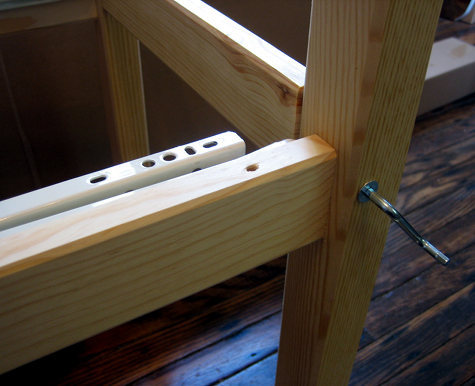
5. screw the front of the drawer slides into the chair legs with one screw on each side. then screw in the back of each drawer slide with the 1″ screws (to account for the gap between the slide and the wood of the chair).
6. now that your drawer slides are in, your drawer should slide into them easily. you will notice that the front of the chair is adjustable in width, because the seat hasn’t been attached yet. adjust their width so that the drawer is sliding in without any friction.
7. when you have the drawer in the right place and sliding properly, put the seat back on and screw in place using the screws that came with the chair. make sure the drawer still slides nicely when the seat is put in place.
8. drill a hole in the center of the front of the drawer and add the snodd knob. super cute! slide drawer back in place.

9. unwrap the sconce and read the directions for installation. it’s WAY too easy.
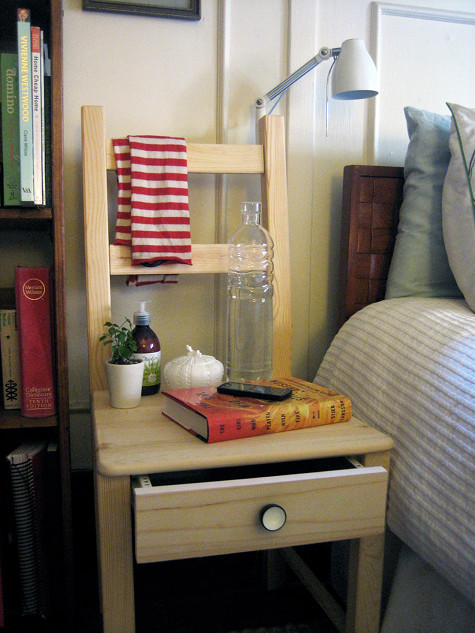
10. take the metal piece that attaches to the “wall” and screw it into the back of the top of the chair on the left side (or right, depending on which side of the bed your chair is going on)
11. slide the sconce piece onto the metal piece and add the pin to secure. add light bulb. if you want, you can staple the cord down the back of the chair to keep it neat, but it’s pretty easy to hide and tuck away also.
12. put next the bed and plug it in. hide goodies in drawer.
YOU’RE DONE!!
28 notes
·
View notes
Text
Made Another Poster Frame

Bought second hand poster board and wooden half dowels, used leftover wood stain and a saw blade, and stole some leftover Modge Podge from my mom. Put it all together to make a custom frame for the incredibly irregularly sized poster that I found in my parents' basement.
The (fake) mantle is still a work in progress.
#diy#upcycle#upcycled#upcycling#crafts#interior#interiordesign#ecofriendly#reduce reuse recycle#interiors#interior design#decor#home#home decor#home decorating ideas#homedecor#frame#wall#poster#poster art#poster design#wooden frame#wood#philadelphia#fireplace mantles#mantle decor#wood mantle#fireplace#sustainability#sustainable
3 notes
·
View notes
Text
Wall Hanging Craft Ideas for Unique and Trendy Home Decor
When it comes to decorating our homes, every corner and wall presents an opportunity to express our personal style. One of the easiest and most effective ways to enhance the aesthetics of your living space is through wall hanging craft. Whether you're a DIY enthusiast or prefer buying ready-made pieces, there are countless creative ways to use wall hangings to make your home look vibrant and inviting. In this blog, we will explore a variety of wall hanging craft ideas that can transform your home into a stylish haven, from name plate designs to wall clocks for sale and everything in between.
Why Wall Hanging Craft is Essential for Home Decor
Wall hanging craft is more than just a decorative element; it's a statement of your style, personality, and even your mood. In addition to being a simple way to personalize your space, wall hangings serve functional purposes, such as organizing or giving structure to a room. Whether it’s a Saraswati Yantra wall hanging for spiritual vibes or a funky wall hanging to bring a playful touch, these pieces of art can instantly change the atmosphere of your home. Wall hangings offer versatility and can be customized to suit any room – from the living room to the bedroom, kitchen, or hallway.
Creative Wall Hanging Craft Ideas for Every Room
1. Name Plate Design for Your Entryway
The entryway is the first thing people see when they walk into your home, and it’s essential to create a welcoming atmosphere. A personalized name plate design is a fantastic way to make your entrance unique. You can craft a wall hanging using materials like wood, MDF, or even repurposed materials to showcase your family's name or a fun quote. With creative paints, patterns, and typography, your entryway will make a lasting impression on guests.
Tip: Opt for a name plate design that aligns with your home’s overall theme. For example, a rustic wooden plate is perfect for farmhouse-style homes, while a sleek metal design suits modern decor.
2. DIY Return Gifts: Handcrafted Wall Hangings
If you're hosting a celebration or festive event, consider giving your guests personalized return gifts in the form of wall hangings. These crafted pieces are not only meaningful but also serve as functional decor. Whether it’s a small funky wall hanging or a spiritual Saraswati Yantra wall hanging, creating personalized return gifts can add a unique touch to your event.
You can handcraft mini wall hangings that feature intricate designs or symbols that reflect the theme of your event. For instance, during Diwali, consider creating colorful and vibrant Diwali decoration items that double as return gifts. Guests will love the thoughtfulness behind the gesture!
3. Saraswati Yantra Wall Hanging for Spiritual Energy
For those who appreciate spiritual energy in their home, a Saraswati Yantra wall hanging can be a powerful addition to any room. These sacred symbols, often made of metal or wood, are believed to bring wisdom, knowledge, and prosperity. Incorporating this into your home not only enhances the decor but also creates a peaceful environment conducive to learning and spiritual growth.
These wall hanging crafts can be placed in the study area, living room, or even a meditation space. The serene aesthetic and spiritual significance of a Saraswati Yantra wall hanging can promote a sense of tranquility and focus.
4. MDF Jewellery Box Wall Hanging for Storage and Style
A MDF jewellery box wall hanging is both a functional and stylish craft idea. These wall-mounted boxes offer storage for your precious accessories while adding a touch of elegance to your room. Whether you're placing it in the bedroom or the hallway, an MDF jewellery box can be customized with intricate carvings or painted designs to suit your decor style.
It also makes an excellent gift for a loved one. By combining functionality with aesthetic appeal, this type of wall hanging craft can elevate your home storage solutions.
5. Funky Wall Hanging: Add Playfulness to Your Space
Sometimes, your home decor needs a touch of fun! Funky wall hangings are perfect for adding a playful vibe to your space. These pieces often feature bold, quirky patterns, bright colors, and unique materials like fabric, beads, or even recycled items. They’re ideal for spaces like kids' rooms, home offices, or creative workspaces where you want to inject some personality into the decor.
A funky wall hanging could be anything from a colorful dreamcatcher to a modern abstract design. The idea is to bring joy and energy to your environment, making your walls a visual treat.
6. Roman Numeral Wall Clock: Timeless Elegance
Incorporating a wall clock into your home can be both functional and stylish. A Roman numeral wall clock is a timeless piece that adds sophistication and elegance to any room. These clocks are available in various materials such as wood, metal, or even glass, and can complement both traditional and modern decor. A Roman numeral wall clock brings a touch of vintage charm to your home while ensuring you’re always on time.
For a more contemporary vibe, you can choose an elegant wall clock that features clean lines and minimalistic design. Whether it’s the living room, kitchen, or office, a wall clock is a must-have accessory for any space.
7. Wall Art Decor: Express Your Creativity
One of the most exciting aspects of wall hanging craft is the ability to express your creativity. Wall art decor can take many forms, from abstract paintings to woven tapestries or even framed quotes. Using wall hanging crafts, you can create a personalized gallery wall that reflects your interests and passions.
You can use different mediums such as canvas, wood, or fabric to craft your own artwork. If you prefer to buy something unique, platforms like dbeautify.com offer a wide range of wall art decor that can instantly enhance your home’s aesthetic. These stores feature an array of handmade and modern designs, making it easy to find something that resonates with your style.
Where to Find Wall Hanging Crafts
If you're ready to add some wall hanging crafts to your home, you can find a wide selection on e-commerce platforms like mystore. These online stores offer a range of options, from ready-made pieces to customizable items, making it easy to shop for the perfect decor. Whether you’re looking for a funky wall hanging or an elegant wall clock, shopping online gives you access to various designs and styles, all in one place.
Combining Different Wall Hanging Crafts for a Cohesive Look
To achieve a stylish and cohesive home decor, consider mixing and matching different types of wall hanging crafts. For example, pair a Saraswati Yantra wall hanging with an elegant wall clock for a blend of spiritual serenity and timekeeping sophistication. Or combine a funky wall hanging with wall art decor to add dimension and personality to a room.
The key to achieving a well-coordinated look is balance. Don't overcrowd your walls with too many pieces—opt for a few carefully selected wall hanging crafts that complement each other.
Conclusion
Wall hanging crafts are a fantastic way to inject personality, color, and creativity into your home decor. From name plate designs to Saraswati Yantra wall hangings and stylish wall clocks, there’s something for every taste and every room. By mixing and matching different types of wall hangings, you can create a truly unique and trendy home that reflects your personality.
If you're looking for inspiration, check out e-commerce platforms like dbeautify.com or mystore for a wide range of ready-made and customizable wall hanging crafts. Whether you're a fan of modern minimalist designs or prefer the quirky charm of funky wall hangings, these platforms provide endless options to enhance your space.
Know More About home makeover tips
#mdf#wall#hanging#sculpture#elegant#decor#decoration#beautiful#stylish#engineered wood#wallart#home#décor#art#home improvement#home makeover#makeover#home beautify#easy to apply#art and craft#craft#0.05 mm accuracy#lightweight#black matte finish#black#classic#classic look#vintage look#easy installation#pre installed double sided tape
2 notes
·
View notes
Text
#home decor#home design#diy ideas#diy projects#diy#diy craft#diy pallet wood wall#rustic charm#transforming spaces
0 notes
Text
CONSTANT FUCKING FLASHING IN MY WINDOW im gonna tear down my neighbors christmas lights i swear to god. i started thinking abt my ideal bedroom as a nice peaceful "happy place" exercise to lull me to sleep but i forgot that im a fucking house design FIEND and i just ended up more awake than i have been ay all in the daytime. i am now thinking of my entire ideal house.its taking all of my willpower not to turn the lights back on and grab the graph paper. my dream... bro if i had it my way i would live in a custom $2.5 million idiot whimsigoth mansion with so much darkwood and pastel wallpaper it comes pre-haunted. the contractors wpuld have wishes out for my death due to all the micro-managing id be doing to make sure they use actual fucking solid wood ans stone and shit and no the industry standard papier mache. in reality i will almost certainly never achieve the architectural details i want or the whole "5 stories and sometimes you get lost in it" vibe or the included observatory and indoor pool, BUT if i had a non-rental property (or cool enough landlord) and enough Fucking Guts i could tet most or all of the interior design aspects i want. IMAGINE. i could make molds for plaster Corinthian faux-columns. couple screws into the wall and BAM rocossical (new combo i invented of rococo and neoclassical) wonderland. the subtle in-ceiling slow pulsing star lights would be harder to pull off diy but plastic glow in the dark stars area worthy second place. speaking of pulsing lights ITS LIKE A RAVE IN HERE WILL YOU TURN THOSE OFF!!
#is my comedic timing still good went im ranting. please do i get a good grade in 'presenting my unfiltered shit idiot chaos thoughts in a#form thats still sorta funny to read through'? pleeeease if im not funny in every moment of my life even the serious ones ill have#failed my name :( my honor...
10 notes
·
View notes
Text

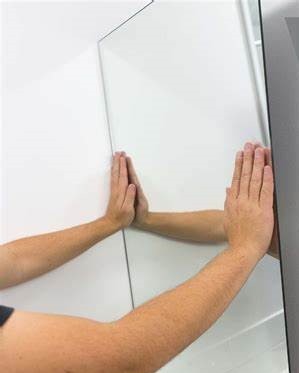
Introduction: Using Mirror mounting tape is a creative method to swiftly and effortlessly transform your space without the need for screws or nails.
Advantages of Using Mirror Mounting Tape Easy Installation The days of intricate mounting hardware causing trouble are long gone. The installation process is easy and hassle-free with mirror mounting adhesive. You can connect your mirror securely to any surface in a matter of minutes, which will save you time and effort.
Damage-Free Mounting: Traditionally, mirrors are frequently installed by drilling into walls, which may result in unattractive damage. Instead of worrying about breaking your walls, mirror mounting tape offers a damage-free option that lets you appreciate the beauty of your mirror.

Versatility in Use: Mirror mounting tape is useful for mounting mirrors in a variety of spaces, such as hallways, bedrooms, and bathrooms. It works well on walls, tile, and wood surfaces thanks to its powerful adhesive qualities.
Choosing the Right Mirror Mounting Tape: Weight capacity, surface compatibility, and weather resistance are important considerations when choosing mirror mounting tape.
Weight Capacity: To make sure your mirror can handle the weight, find out its weight before buying mirror mounting tape. Make sure the tape you purchase can withstand the weight of the mirror, as most tapes have a weight capacity listed.
Surface Compatibility: Not every surface can accommodate every type of mounting tape. Certain materials, like glass or tile, may be easier for some to stick to, whereas textured or porous surfaces may be more difficult for others. Make sure the tape you select works with the surface that you want to mount your mirror on.
Weather Resistance Select weather-resistant mirror mounting adhesive if you’re installing a mirror in a bathroom or other damp outdoor area. In humid situations, this will assist guarantee a strong adhesion between the tape and the surface.
Step-by-Step Guide to Mounting Mirrors with Mirror Mounting Tape Clean the Surface: First, make sure the area where the mirror will be mounted is very clean. Clear away any debris, dirt, or dust that might impede the tape’s adherence.
Cut the Tape: Cut the mirror mounting tape to the required length with scissors or a utility knife. To guarantee a snug fit, make sure to measure precisely.
Apply the Tape to the Mirror: Remove the tape’s backside and carefully affix it to the mirror’s back. To guarantee that the tape makes good contact with the mirror, apply pressure.
Position and Press: Place the mirror carefully where you want it to hang on the wall or other surface. Once in place, firmly squeeze the mirror to ensure it stays in that position.
Let it Cure: Hanging weight on the mirror should be delayed until the mirror mounting tape has had time to cure. By doing this, the tape and the surface will be guaranteed to cling firmly and securely.
Creative Ways to Use Mirror Mounting Tape Decorating Walls: Create a gallery wall of mirrors in your living room or bedroom by using mirror mounting tape. Combine various sizes and shapes to create a distinctive and fashionable effect.
Organizing Spaces: Put mirrors in your closet or entrance to make a useful area for glancing in before leaving the house. Mirrors are another useful tool for visually enlarging tiny areas and giving them a feeling of more openness.
DIY Projects: Use mirror mounting tape creatively by making mirrored accent pieces or furniture as part of your do-it-yourself projects. Mirror mounting tape offers endless opportunities for incorporating mirrors into your home’s design thanks to its powerful adhesive qualities.

Maintenance Tips for Mirrors Mounted with Mirror Mounting Tape To ensure your mirrors stay securely mounted and looking their best, follow these maintenance tips:
Regular Cleaning: Regularly wipe off your mirrors with a soft, moist cloth to keep them spotless and clear of smudges and grime.
Avoiding Heavy Impacts :Avoid shoving or bumping into tape-mounted mirrors since this can eventually erode the glue.
Checking Tape Integrity: Periodically inspect the mirror mounting tape for any signs of wear or damage, and replace it if necessary to maintain a secure hold.
Safety Considerations While mirror mounting tape offers a convenient and secure way to hang mirrors, it’s essential to observe safety precautions to prevent accidents or damage.
Weight Limitations: Mirror mounting tape should always be used in accordance with the weight restrictions listed by the manufacturer. The mirror may fall if the weight capacity is exceeded, compromising the tape’s security.
Avoiding Placement in High-Traffic Areas: Avoid mounting mirrors with tape in high-traffic areas where they may be bumped or knocked into frequently, as this can weaken the adhesive bond.
Checking for Loose Ends Regularly: Regularly look for any indications of loosening or peeling around the attached mirror’s edges. Reapply the tape as necessary to provide a tight hold if you see any problems.
Conclusion Mirror mounting tape makes it easier than ever to use mirrors to transform your area. Mirrors provide elegance and practicality to any area in your house, and they are simple to install, damage-free to mount, and incredibly useful. Mirror mounting tape provides an easy-to-use and efficient way to install mirrors securely without using screws or nails, whether you’re doing DIY projects, organizing areas, or decorating walls.
#mirror mounting tape#damage-free mounting#easy installation#versatile adhesive#wall mounting#mirror installation#DIY home decor#adhesive tape#home improvement#mounting solutions
2 notes
·
View notes
Text
Rustic Interior Design: Creating a Cozy and Charming Rustic Home

Transforming your space into a warm and inviting rustic retreat is all about embracing natural elements, earthy tones, and timeless charm. Here’s how you can create a cozy rustic home that radiates comfort and charm.
1. Embrace Natural Materials
Rustic design is grounded in the use of natural materials. Think exposed wooden beams, stone walls, and reclaimed wood furniture. These elements bring warmth and authenticity to your space, making it feel like a true rustic haven.
2. Incorporate Earthy Tones
Opt for a color palette that reflects the beauty of the outdoors. Shades of brown, beige, deep green, and warm reds create a cozy atmosphere and complement the natural materials typically found in rustic interiors.
3. Mix Vintage with Modern
Rustic interiors shine when vintage pieces are mixed with modern elements. Pair an antique wooden table with contemporary lighting or a sleek sofa to create a balanced, timeless look that’s both charming and functional.
4. Layer Textures for Warmth
Textiles play a crucial role in creating a cozy rustic home. Layer wool blankets, faux fur throws, and linen cushions to add texture and warmth. Rugs made from natural fibers like jute or sisal are also perfect for enhancing the rustic vibe.
5. Add Personal Touches
Rustic design is all about creating a lived-in, personal feel. Incorporate family heirlooms, handcrafted items, and DIY projects to make your space uniquely yours. Personal touches like these make your rustic home not just charming, but truly your own.
#architectdesign#architecture#design#home interior#interior decorating#interiordoor#interior design#interiors#interiorstyling#home#rustic
2 notes
·
View notes