#windows 8 password reset
Explore tagged Tumblr posts
Text
Forgot Windows 8.1 Local Admin Password No Reset Disk How to Resolve
How to get back into your Windows 8.1 computer if you have forgotten local administrator password no reset disk, how can you reset administrator password in Windows 8.1 without reset disk?

To resolve this problem, you can firstly try Offline NT Password Editor to help reset the forgotten Windows 8.1 administrator password without reset disk. Offline NT password Editor can help clear or reset Windows local account password via CD/DVD. The following procedure will show you the detailed walkthrough.
Trick 1: Use Offline NT Password Editor to Reset Windows 8.1 Local Admin Password (Work with CD/DVD).
When you forgot Windows 8.1 administrator password and a password reset disk was not created, “Offline NT Password Editor”, a free Windows password reset disk, can help you reset forgotten Windows 8.1 local account’s password without knowing it. Free download the ISO file from the official site. Extract the downloaded file and then burn the ISO file on to a writable CD/DVD. Once burning completed, you can use the CD/DVD which is bootable to crack Windows 8.1 Local Admin password.
Step 1: Power on your locked computer and then insert the bootable CD to the CD-ROM.
Step 2: Restart the computer to boot from CD/DVD. If it still boot into Windows, you may need to change device boot order in BIOS. Learn how to boot computer from CD/DVD.
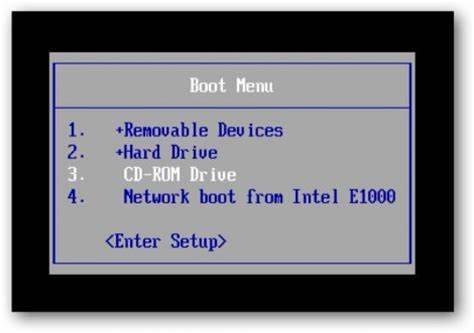
Step 3: When the computer boots from CD and loads Offline NT screen, press Enter until the “step one” appears. Type “1” and hit Enter.

Step 4: Select “Password reset”, type “1” and hit Enter.

Step 5: Select “Edit user data and passwords, type “1” and hit Enter.

Step 6: Select a user account, type “administrator” and hit Enter.

Step 7: Select “Clear user password”, type “1” and hit Enter.

Step 8: Administrator’s password is cleared. Select “Quit editing user and back to user select”, type “!” and hit Enter.

Step 9: Select “Quit”, type “q” and hit Enter.
Step 10: Write back changes, type “y” and hit Enter.
Step 11: When it asks you if try again, type “n” and hit Enter.
Step 12: Now eject your CD and then press CTRL-ALT-DEL to restart the computer.
Step 13: When Windows 8.1 welcome screen appears, click the screen to automatically sign in administrator without password.
Another simple method to reset forgotten Windows 8/8.1 local admin password is using a password recovery program, Windows Password Rescuer, which is working fine for all Windows systems including Windows 11. Here is how to use the utility to reset a local admin password on Windows 8.1/8 PC without logging in.
Trick 2: Reset Windows 8.1 Administrator Password with Windows Password Rescuer Run from USB.
If you have forgotten Windows 8.1 administrator password and need to get back into the account, you can use Windows Password Rescuer to create a bootable USB disk and then use the disk to reset Windows 8.1 local administrator password easily without losing data. It also works perfectly for Windows 11, 10, 8.1, 8, 7, Vista, XP and Windows server 2022, 2019, 2016, 2012, 2008, 2003 etc.
Equipment required: Another Windows computer, USB flash drive.
Read more detailed steps: How to reset Windows 8.1 Admin Password with USB.
Step 1: Use another computer to download Windows Password Rescuer and then install the software.
Step 2: Plug in a blank USB flash drive to the computer and launch the software. Select “USB device” on the software screen.
Step 3: Pull down the drive list and select your plugged USB flash drive. Then click “Begin Burning” to create a bootable USB under a minute.
Step 4: Once the burning process is completed, unplug the USB flash drive and then connect it to your locked computer that you want to reset Windows 8.1 password.
Step 5: Power on the locked computer and press F12 as soon as possible to open “Boot Menu”. Press arrow key to highlight USB option and press Enter to boot from USB.
Step 6: Once the locked computer boots from USB and locates Windows Password Rescuer, you can reset administrator or other local user account passwords with several clicks. Now click “Administrator” from user list.
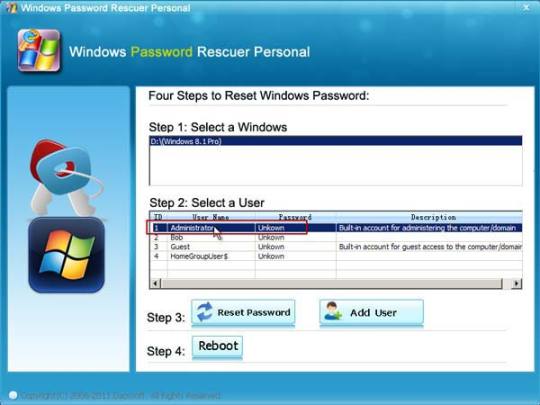
Step 7: Click “Reset Password”, when it asks you if reset administrator password to blank, click “Yes” to confirm it.
Step 8: Administrator password will be removed and shown blank in password list. It means that you will be able to sign in the account without password.
Step 9: Click “Reboot”. When it asks you to remove your USB, remove the USB from your computer and then click “Yes” to restart the computer.
Step 10: After restarting, you can log on administrator without password.

Methods in this article apply to any laptop and desktop computers such as Dell, HP, Toshiba, Acer, Lenovo, Asus etc.
0 notes
Text
Update: charger is here but the computer still is logged into some random persons account 😭
I’m gonna have to factory reset it yall
When I DO get it fully reset I’ll install 7 on it so I can run my older games that don’t work in 10 xd
Oh to actually be able to dig through my local recycling plants electronics bin
#I mean hey at least it works#windows 8 is my mortal enemy#I swear to god if I need the password to reset it I’ll kill the Microsoft dude#gonna dig up one of my ye olde windows 7 disks#it’s gonna take a century and a half to reset I just know it will
7 notes
·
View notes
Text
While my computer is broken, I’m trying to figure out using my grandmothers old windows 8 tower, but I don’t remember the password to it. I tried doing a factory reset, but it asked for me to put in a disk to reinstall windows which I don’t have. Does anyone who uses linux know if I could burn a disk of linux onto a disk and install that? If so, which linux distro would you recommend for someone new to linux who’s a bit dusty on old computer science knowledge?
2 notes
·
View notes
Link
Việc đặt mật khẩu (password) cho windows sẽ giúp bạn bảo mật dữ liệu tốt hơn. Tuy nhiên, vì một số lý do nào đó, bạn bị quên mật khẩu đăng nhập của mình. Bài viết sau đây, S8EVENT.vn sẽ hướng dẫn bạn cách reset mật khẩu đăng nhập Windows (hoặc reset lại tài khoản Microsoft) của mình. Các cơ sở để reset mật khẩu đăng nhập Windows Từ hệ điều hành Windows 7 trở về trước, tài khoản đăng nhập Windows sẽ được gọi là Local Account (hay tài khoản nội bộ). Đến khi Windows 8 ra đời, đã có thêm loại tài khoản Windows mới chính là Microsoft Account. Khi đó, password Local Accreset mật khẩu windowsunt sẽ được lưu tại /Windows/System32/Config/SAM. Còn password của tài khoản Microsoft sẽ được đồng bộ hóa online. Do đó, để có thể reset mật khẩu đăng nhập Windows thì bạn cần căn cứ vào loại tài khoản Windows mình đang sử dụng. Bởi tài khoản Local thì phá password rất dễ còn tài khoản Microsoft sẽ cần phải reset lại password từ trình duyệt máy tính. Hướng dẫn phá mật khẩu đăng nhập windows sử dụng tài khoản Local Dùng Active Password Changer để xóa mật khẩu Phần mềm Active Password Changer là một trong các công cụ gỡ bỏ password đăng nhập Windows tốt nhất trước đây. Phần mềm này có phiên bản DOS và phiên bản trên hệ điều hành Windows. Bạn có thể sử dụng cả 2 phiên bản Active Password Changer trong Anhdv Boot 2018 để xóa mật khẩu windows. Bước 1: Bạn chuẩn bị một chiếc USB có dung lượng tối thiểu 2GB và tạo USB boot theo hướng dẫn tại S8EVENT. Sau khi tạo xong thì bạn khởi động máy tính và chọn boot vào USB. Bước 2: Nếu là Windows UEFI - GPT thì sử dụng Active Password Changer trên Mini Windows. Và lựa chọn Boot Mini Windows trong menu boot. Theo cấu hình máy tính của bạn, bạn có thể lựa chọn Mini Windows 10 hoặc là Mini Windows XP. Khi truy cập vào Mini Windows, bạn chọn Active Password Changer trên Desktop. Hoặc bạn nhấp chuột phải vào Desktop → System Tool → Active Password Changer. Lúc này, bạn sẽ thấy phần mềm ghi rõ chỉ có thể phá (bỏ) password tài khoản Local hoặc có thể reset lại mật khẩu của tất cả các phiên bản Windows. Tiếp tục chọn Next để chuyển tới bước tiếp theo. Sẽ có 3 lựa chọn như sau: Search all volumes: Chức năng tìm tất cả các phân vùng cài Win. Select volume: Chức năng lư��a chọn phân vùng cài Windows thủ công. Find a folder: Chức năng lựa chọn thư mục Registry thủ công (config). Lúc này, bạn sẽ lựa chọn mặc định như hình trên rồi chọn Next: Phần mềm sẽ tìm kiếm và hiển thị các file SAM có ở ổ cứng. Bạn chọn file SAM mà mình cần reset mật khẩu đăng nhập Windows và chọn Next. Muốn chọn gỡ bỏ mật khẩu đăng nhập của tài khoản nào thì bạn chọn trong danh sách. Ví dụ, chọn reset mật khẩu đăng nhập Windows cho tài khoản có tên “anhdv”. Tiếp tục chọn Next để chuyển sang bước kế tiếp. Bạn nhấn chọn mặc định như hình trên và sẽ thấy password đăng nhập được xóa trắng. Tiếp tục nhấn chọn Apply để thực hiện reset mật khẩu đăng nhập. Lúc này, phần mềm sẽ hỏi bạn đồng ý thực hiện lệnh không, bạn chọn Yes. Nếu thành công, bạn sẽ thấy thông báo trên. Bạn thực hiện khởi động lại máy tính của mình. Nếu máy tính của bạn cài Windows thường agacy thì có thể lựa chọn phiên bản trên Dos. Bạn tiếp tục chọn Boot Dos Tool trong menu boot usb. Cuối cùng, bạn tìm đến Active Password Changer và cách thực hiện sẽ tương tự như đối với Mini Windows. Dùng NTPWEdit phá mật khẩu windows Công cụ này cũng được tích hợp sẵn trên Mini Windows của do S8EVENT cung cấp. Bạn sẽ thực hiện tạo usb boot tương tự như hướng dẫn ở trên. Khi vào Mini Windows, bạn chọn Windows Password Rescuer trên Desktop. Hoặc bạn nhấp chuột phải trên Desktop → System Tool → Windows Password Rescuer. Lựa chọn Windows mình muốn gỡ bỏ mật khẩu ở Step 1. Tiếp theo, bạn chọn tài khoản và bấm Reset Password để thực hiện. Bạn tiếp tục chọn Yes để reset mật khẩu đăng nhập Windows thành trống. Lúc này, bạn sẽ thấy ở cột Password, tài khoản “anhdv” có mật khẩu trống thành công. Bạn nhấn chọn Reset mật khẩu đăng nhập của những tài khoản khác nếu cần. Sau khi thực hiện xong, bạn chọn Reboot để khởi động lại máy tính của mình. Dùng Daossoft Windows Password Rescuer để reset mật khẩu Bạn khởi động từ USB để vào Mini Windows do S8EVENT cung cấp. Tiến hành chạy phần mềm NTPWEdit trên Desktop hoặc bạn nhấp chuột phải lên Desktop → System Tool → NTPWEdit. Nếu như phần mềm tìm thấy File SAM thì lựa chọn Open để mở. Bạn có thể nhấp vào biểu tượng “...” để tìm kiếm file SAM khác nếu có. Lựa chọn tài khoản cần reset mật khẩu và nhấn chọn Change password. Lưu ý rằng, với tài khoản đang ẩn thì cần chọn Unlock để hiện. Bạn nhập mật khẩu mới vào và điền lại ở mục Verify. Nếu muốn mật khẩu trắng thì bạn để trống cả 2 ô này. Lựa chọn Save Change để reset mật khẩu đăng nhập Windows. Đóng cửa sổ phần mềm và tiến hành khởi động lại máy tính. Reset mật khẩu đăng nhập Windows 10-8.1-8 với Microsoft Account Đối với tài khoản Live (Microsoft Account), bạn sẽ không thể gỡ bỏ hay phá mật khẩu đăng nhập Windows như cách ở trên. Lúc này, bạn cần phải reset lại tài khoản Microsoft của mình. Bước 1: Bạn sử dụng máy tính khác hoặc điện thoại truy cập vào trang Reset tài khoản Microsoft. Tiếp tục, nhấn chọn I forgot my password Bạn điền tên tài khoản Microsoft cần reset (Live, outlook, hotmail) và nhập đúng những ký tự xuất hiện rồi nhấn Next. Tùy theo thiết lập tài khoản Microsoft của mình, bạn sẽ có những lựa chọn gửi mã reset. S8EVENT sẽ chọn Text để nhận mã qua tin nhắn điện thoại. Bạn cần điền vào 4 số cuối của điện thoại rồi bấm Send code để Microsoft gửi mã reset tài khoản đến bạn. Bạn điền đúng 4 số cuối điện thoại thì mới nhận được mã reset. Tiếp theo, nhập mã reset nhận được qua tin nhắn rồi chọn Next. Cuối cùng, bạn nhập mật khẩu đăng nhập mới là xong. Thông qua bài viết này, S8EVENT.vn đã hướng dẫn bạn chi tiết các cách reset mật khẩu đăng nhập Windows khi lỡ bị quên. Trong quá trình áp dụng thực hiện, nếu có bất cứ khó khăn nào đừng ngại liên hệ cho S8EVENT để được tư vấn và hỗ trợ sớm nhất nhé. Xem thêm: Hướng dẫn cài đặt phần mềm diệt virus đơn giản Xem thêm: Cách fix boot Windows 10 nhanh chóng
0 notes
Text
How to archive a Discord channel
I'm going to say this way ahead of time: this is going to be waaaaaaay more of an annoying process than it should be. Discord should allow exporting the channel history to server owners, without the need of doing all this. I won't blame you if you give up.
Get the DiscordChatExporter application to download the chat history
This program has two versions
one that has a graphical interface, but works on Windows only
one that has a command line interface, but works on Windows, Linux and macOS
This guide covers the first. The second one maybe next time, in another post. The second version also makes it easier to download every channel on the server.
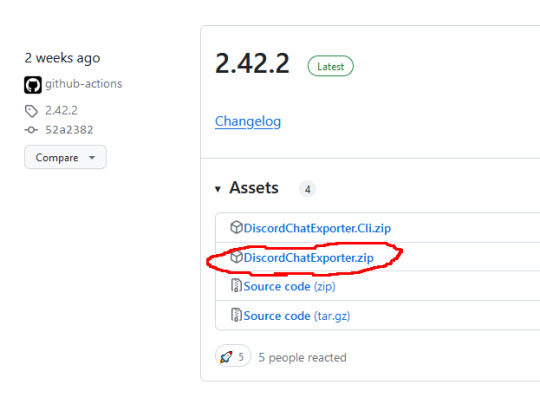
Step 1: Go to here, and download the latest version in the zip file named DiscordChatExporter.zip
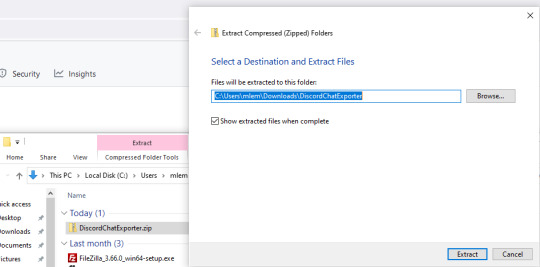
Step 2: Unpack the zip file
Step 3: Run DiscordChatExporter.exe
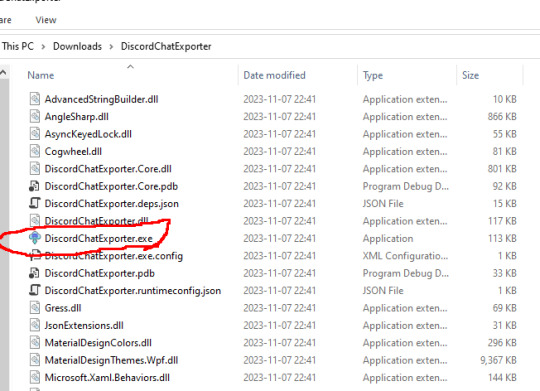
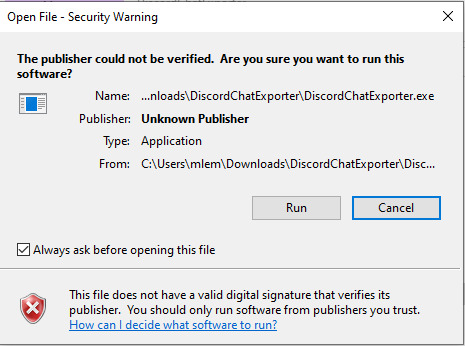
Step 4: Dismiss the scary looking warning as this will show up for any program that which developer can't afford paying $629 a year.
Step 5: Close the welcoming message and you'll see the application interface:
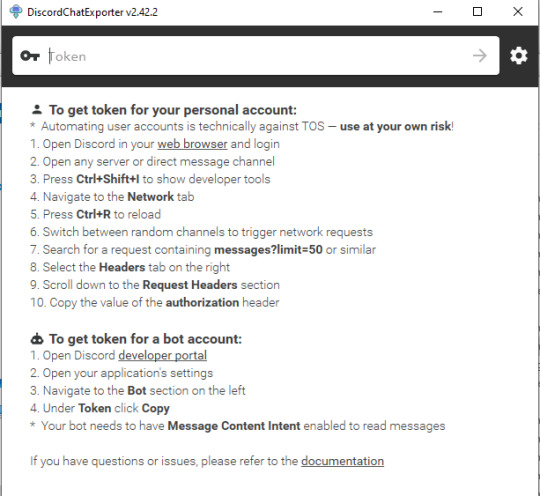
Prepare an access token. Do not share it to anyone else - treat it the same way as you treat your password.
There are two ways to do it:
Approach 1: use your own access token, will work with any channel you're able to access, including Direct Messages, but it is a violation of Discord Terms of Service, and therefore your Discord account could get banned for it. Use at your own risk.
Follow the instructions here, which are fairly detailed step-by-step instructions for Chrome, Firefox, and also the desktop app. I'm gonna expand more on approach 2 as I had to figure it out myself, and the current instructions for approach 2 are not really adequate enough. If you go with approach 1, skip down the entire section below, until the "Paste the token in the Token textbox and click the arrow button" section.
Approach 2: create a bot account, invite it to your server, and use its access token. This process assumes you have enough privileges to invite bots to the server ("Manage Server" permission), and therefore, but is also 100% okay as far as Discord's Terms of Service are concerned. It is also generally safer, as accidental leaking of the token will not risk you losing your user account.
Step 1: Go to the Discord developer portal.
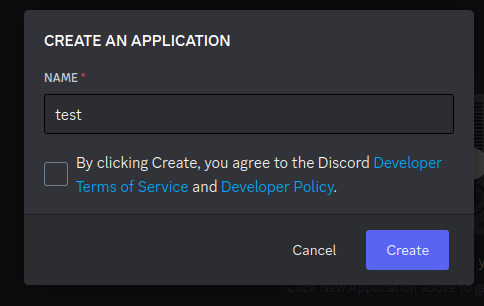
Step 2: Create a new application by clicking the "New Application" button

Step 3: Name it however you want, I personally named it "mlemgrab". Agree to the scary sounding long ass terms of service.
Step 4: Go to the Bot section, scroll down to the "Privileged Gateway Intents"

Step 5: Enable the "Message Content Intent". We don't have to worry about the "if your bot is in more than 100 servers" part because our bot will never be in this many servers.
Step 6: Save changes by pressing the green button "Save Changes"

Step 7: Go to "OAuth2" followed by "URL Generator"
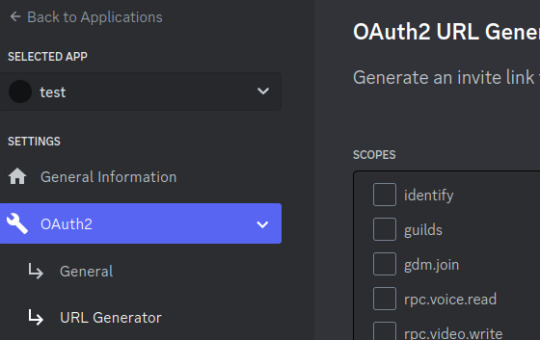
Step 8: Select the "bot" scope and then "Read Messages/View Channels" and "Read Message History" permissions

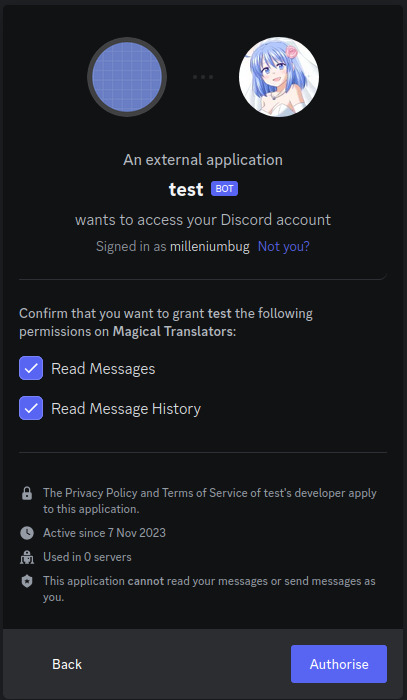
Step 9: Copy the link at the bottom and visit it:

Step 10: Press "Continue", and approve the required permissions by clicking Authorize. Once you do it, the bot account is on the server.
Step 11: Go to "Bot" and click the "Reset Token" button to get the token that will allow you to act (in our case, getting all the messages) using the bot user. If you lose that token, you can click reset again to get a new one.

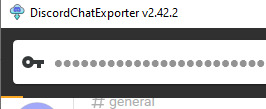
Paste the token in the Token textbox and click the arrow button

Select the server, and then the channel you want to archive

Click the download button on the bottom right

Select where you want to save it, and the format. HTML is good for easy browsing and preview in a web browser, JSON is good for further processing (let's say someone else later writes a program for importing the conversation elsewhere).
For archivization purposes I recommend saving in both HTML and JSON.
Click "More" for more options.
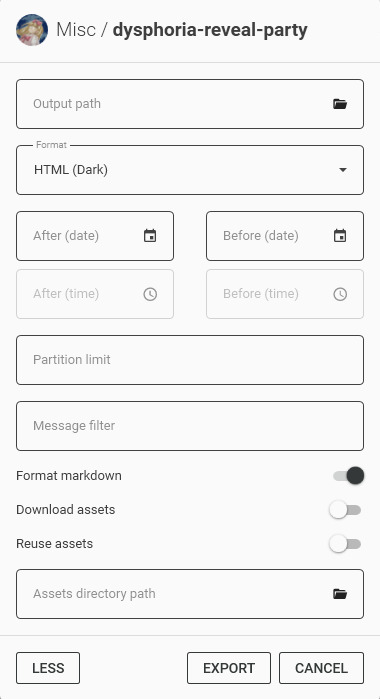
By default the program will not download any message attachments nor avatars or emotes. If you want that, select "Download assets" option. Preferably while also selecting the "Reuse assets" option and selecting a single directory for assets if you want to archive multiple channels.
You can also select the specific time range and using the partition limit - split the archive into several files each containing N messages.
Press Export. Wait. The progress bar will move very slowly.
Once it is done, you should be able to open the HTML file with your web browser.
Treat anything on Discord as media that will be lost
Do not use Discord to host your files. Do not rely on Discord to preserve your text. DO NOT RELY ON DISCORD FOR ANY KIND OF PRESERVATION OR HOSTING!!
It CAN be lost, it WILL be lost! You must consider Discord as a part of the Core Internet, controlled by one company that hosts the servers.
I thought it was impressive at first that it replaced IRC, but now I am horrified. If the company behind Discord went under today, how many friends would you lose?
How many relationships? How much writing?
You may think this won't happen, but I remember when AIM went down and along with it, entire novels worth of interaction with my oldest friend.
IT CAN HAPPEN TO YOU. IT WILL HAPPEN AGAIN. NO COMPANY IS INFALLIBLE.
Back up your files! Download anything you've saved to Discord NOW, before the API changes go into effect! And DO NOT RELY ON THEM FOR HOLDING IMPORTANT FILES!
51K notes
·
View notes
Text
304 - GM is Doomed Without CarPlay - With Guest Marty Jencius, Jeff Gamet, and Ben Roethig
The latest In Touch With iOS with Dave he is joined by guest Marty Jencius,, Jeff Gamet, and Ben Roethg. It seems GM may Regret Kicking Apple CarPlay off the Dashboard we discuss. The Let Loose May 7th Event is next week we give our predictions. Apple Q2 2024 earnings report and we review all the numbers. Beta this week. iOS 17.5 Beta 4 was released. It seems we are nearing final release soon. .Siri on HomePod Seems to Have Forgotten How to Give the Time and triggers Jeff. Plus much more.
The show notes are at InTouchwithiOS.com
Direct Link to Audio
Links to our Show
Give us a review on Apple Podcasts! CLICK HERE we would really appreciate it!
Click this link Buy me a Coffee to support the show we would really appreciate it. intouchwithios.com/coffee
Another way to support the show is to become a Patreon member patreon.com/intouchwithios
Website: In Touch With iOS
YouTube Channel
In Touch with iOS Magazine on Flipboard
Facebook Page
Mastadon
X
Instagram
Threads
Spoutible
Topics
Beta this week. iOS 17.5 Beta 4 was released. Apple Seeds Fourth Betas of iOS 17.5 and iPadOS 17.5 to Developers [Update: Public Beta Available]
Apple Seeds Fourth Beta of visionOS 1.2 to Developers
Apple Seeds Fourth Beta of watchOS 10.5 to Developers
Apple Seeds Fourth Beta of tvOS 17.5 to Developers
iOS 17.5 Includes 'Repair State' Option That Doesn't Require Turning Off Find My for Service
Apple Q2 2024 earnings report. 2024 Q2 Apple Results: $90.8 billion revenue, Services record
Apple's Q2 2024 Earnings Call Takeaways
Tim Cook on Generative AI: 'We Have Advantages That Will Differentiate Us'
Apple Vision Pro a big hit in enterprise
Will GM Regret Kicking Apple CarPlay off the Dashboard?
Will GM Regret Kicking Apple CarPlay off the Dashboard?
Report Examines GM's Controversial Move to Abandon Apple CarPlay
Let Loose May 7th Event predictions
Everything coming from Apple in May 2024 including new iPads (finally!
Speculation ramps up as 'Let Loose' billed as 'different kind of Apple Event'
5 reasons why the M4 iPad Pro rumors actually make sense
News
Siri on HomePod Seems to Have Forgotten How to Give the Time
Apple Watch AFib History Feature Qualified by FDA to Evaluate Medical Devices
FCC Fines AT&T, T-Mobile and Verizon Almost $200 Million for Illegally Sharing Customer Location Data
First Physical Apple Cards Expiring Soon, Apple Shipping Out Replacements
Apple must open iPadOS to sideloading within 6 months, EU says
How much Google paid Apple to be Safari's search engine in 2022
Apple ID Password Reset: What We Know -
Announcements
Macstock 8 is Here! July 12-14, 2024 Macstock Conference & Expo
Our friends Marty Jencius and Eric Bolden started a Vision Pro podcast. "Vision ProFiles." It is a weekly prosumer podcast on the Apple Vision Pro. I have connected with some 'visioneers' whom we hope to start bringing to the show to discuss news, new apps, and applications. VisionProFiles.info
Our Host
Dave Ginsburg is an IT professional supporting Mac, iOS and Windows users and shares his wealth of knowledge of iPhone, iPad, Apple Watch, Apple TV and related technologies. Visit the YouTube channel https://youtube.com/intouchwithios follow him on Mastadon @daveg65, and the show @intouchwithios
Our Regular Contributors
Jeff Gamet is a podcaster, technology blogger, artist, and author. Previously, he was The Mac Observer’s managing editor, and Smile’s TextExpander Evangelist. You can find him on Mastadon @jgamet as well as Twitter and Instagram as @jgamet His YouTube channel https://youtube.com/jgamet
Ben Roethig Former Associate Editor of GeekBeat.TV and host of the Tech Hangout and Deconstruct with Patrice Mac user since the mid 90s. Tech support specialist. Twitter @benroethig Website: https://roethigtech.blogspot.com
About our Guest
Marty Jencius, Ph.D., is a professor of counselor education at Kent State University, where he researches, writes, and trains about using technology in teaching and mental health practice. His podcasts include The Tech Savvy Professor , Circular Firing Squad Podcast. and VisionProFiles.info Find him at [email protected]
Here is our latest Episode!
0 notes
Link
Check out this listing I just added to my Poshmark closet: Microsoft Surface 2 RT (32GB) & Touch Keyboard 💖.
0 notes
Text
How to Unlock an iPhone Without the Passcode? - ITMlab

For more visit: How to Unlock an iPhone Without the Passcode? - ITMlab
If you’ve forgotten your iPhone’s passcode, you’ll need to find another way to unlock it. There are two ways to do this: resetting or unfreezing the device. You can only use these methods if you know the last date and time that someone used the phone last, but it’s worth noting that it doesn’t matter whether or not they’re still using it today. In this article we’ll show you how to unlock an iPhone without a passcode using both methods so let’s get started!
How to Unfreeze an iPhone
If your iPhone has a passcode, you can use it to unfreeze the device.
In Settings, tap Passcode (or Touch ID & Passcode on an iPhone X or later).
Enter your passcode and tap Turn Off Screen Lock or Change Passcode if prompted to do so by entering an old one that’s no longer valid and then creating a new one for future use when prompted again by iOS 11+ devices or earlier versions of iOS 10 – 12+.
Once the screen is unlocked after entering your security code correctly, go back into Settings and navigate down until you find General > Reset > Erase All Content & Settings; then tap Reset All Settings near the bottom right corner of this page next time you need help with any kind of problem related specifically towards these two different types as well as other common ones involving battery life issues etc., which are often caused by third party apps installed on top of stock apps preinstalled within Windows Phone 8 OS software packages themselves rather than being caused by hardware itself failing due entirely instead due partially maybe even slightly due mostly perhaps entirely too much stress placed upon physical components inside those phones’ casing which causes them eventually break down over time leading up until eventually breaking down completely leaving nothing left behind except maybe some dust particles floating around inside air pockets created under pressure between different parts connected together tightly enough together tightly enough so not too many particles escape through cracks created during production process at factory level back when manufacturing line workers were still working hard trying hard laboriously day after day night after night
How to Unlock a Locked iPhone Without the Passcode
If you’re locked out of your iPhone and don’t know the passcode, there are a few ways to unlock it.
Use the emergency call option: If you can’t use Touch ID or Face ID because of an injury or other reason, go to Settings > Emergency SOS and tap “Call.” You’ll be able to make an emergency phone call without unlocking your device.
Connect the phone to a computer: If you have access to a computer, connect it through iTunes or iCloud (depending on which service was used when setting up the passcode). In both cases, this will allow iTunes/iCloud Backup & Restore options that will let you restore from a backup without entering any passwords or passcodes at all!
How to Reset the Passcode on an iPhone 7 or Older
If you have an iPhone 7 or older, resetting your passcode is a little different than unlocking it.
First, turn off Find My iPhone in iCloud settings. Launch Settings on your device and select General > Reset. Scroll down and select Erase All Content and Settings, then tap Erase iPhone (or whatever name pops up).
Resetting the passcode on a newer iPhone is slightly different. First, turn off Find My iPhone in iCloud settings. This will prevent the phone from being locked if it’s lost or stolen in the future. Then, launch Settings on your device and select General > Reset. Scroll down and select Erase All Content and Settings, then tap Erase iPhone. Wait for your device to reset itself and then set it up as a new device from scratch using its default settings.
If you’re trying to unlock an iPhone without the passcode, here’s how:
Resetting the passcode on a newer iPhone is slightly different. First, turn off Find My iPhone in iCloud settings. This will prevent the phone from being locked if it’s lost or stolen in the future. Then, launch Settings on your device and select General > Reset. Scroll down and select Erase All Content and Settings, then tap Erase iPhone (or Erase All). Wait for your device to reset itself and then set it up as a new device from scratch using its default settings.
You can use one of these methods to unlock your phone without the passcode
There are two ways to unlock an iPhone without a passcode. If your phone is not protected by a passcode, then there’s nothing stopping you from simply pressing the home button and seeing if it unlocks. If it does, then great! You don’t have to worry about anything else right now.
If your iPhone is protected by a passcode but you forgot what it was set up as (or if someone changed it), then there are still options available for unlocking it without entering that code.
If you’re looking for a way to unlock your iPhone without using its passcode, then this article is for you. We’ve discussed all of the different options available to you and explained how they work in detail. Hopefully, one of them will work for your situation!
Outline of the Article:
I. Introduction
Importance of iPhone security and the significance of unlocking methods
Brief overview of the methods covered in the article
II. Using Face ID to Unlock iPhone
Explanation of Face ID technology and its setup process
Step-by-step guide on unlocking iPhone using Face ID
III. Unlocking iPhone with Touch ID
Introduction to Touch ID and its fingerprint recognition system
Instructions on setting up and using Touch ID for unlocking
IV. Using Siri to Bypass Passcode
Cautionary note about the risks associated with Siri bypass
Steps to attempt unlocking iPhone using Siri (if applicable)
V. Using iCloud to Remove Passcode
Guide on using iCloud’s Find My iPhone feature to erase the passcode
Detailed steps for remotely unlocking the iPhone through iCloud
VI. Contacting Apple Support
Importance of reaching out to Apple Support for professional assistance
Information on Apple’s verification and security procedures
VII. Conclusion
Summary of the methods discussed and their implications
Emphasis on the importance of iPhone security and responsible unlocking practices
For more visit: How to Unlock an iPhone Without the Passcode? - ITMlab
0 notes
Text
0 notes
Text
Unlock iPhone|For Forgetting iPhone Passcode
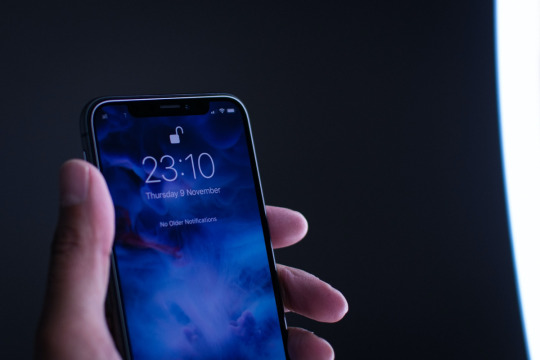
1. Using Erase iPhone (Without Computer and iOS 15 & Later)
In iOS 15.2, Apple added a new function called Security Lockout. It enables iPhone unlocking without a computer or iTunes and it is only available if Find My is turned on on your phone. Your iPhone will display the Security Lockout screen with an “Erase iPhone” option at the bottom right corner of the screen after you have entered the erroneous passcode more than seven times.
To reset your iPhone, you must utilize the Erase iPhone option. This is the steps:
Step 1.Make sure a cellular or Wi-Fi network is active on your iPhone.
Step 2.To verify your action, tap Erase iPhone one more after doing it the first time.
Step 3.To log out of your Apple ID, enter your password.
Step 4.To permanently remove all files and settings from your iPhone, tap Erase iPhone.
Step 5. Configure your iPhone.
2. Using iCloud (Without Computer)
iCloud might be your best bet for unlocking your iPhone if you don't see the Security Lock screen or if your iPhone is running iOS 15.1 or earlier.
Step 1. Visit iCloud.
Step 2. Log in to your iCloud account.
Step 3. Click All Devices in the menu at the top, then choose the iPhone you want to unlock.
Step 4. To disable Find My, click the Erase iPhone option and enter your Apple ID password.
Step 5. To delete your iPhone, click Next and adhere to the on-screen instructions.
Step 6. Set up your iPhone after the reset process is complete.
3. Using iTunes or Finder(Apple ID Required)
Using iTunes or the Finder is a different method to unlock your iPhone. iTunes and Finder do not detect your iPhone because it is locked. In order to unlock your iPhone on your computer, you must first put it in Recovery mode. Here's what you should do:
Step 1. Connect your Mac or PC to your iPhone.
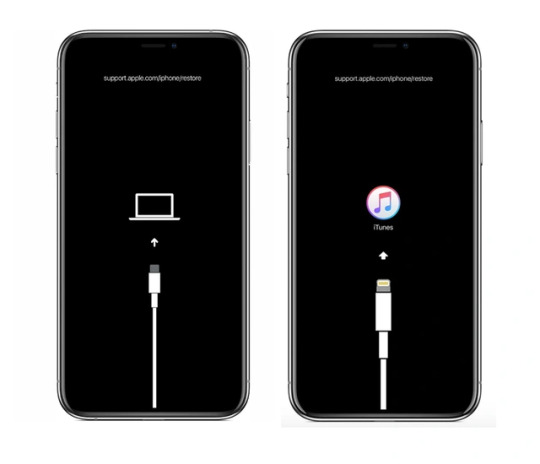
Step 2. To put your iPhone into recovery mode, take the following actions:
1) iPhone 8 and later: Press the Volume Up button once, immediately let go, then press the Volume Down button. When the recovery mode screen appears, press and hold the Side button.
2) iPhone 7 and iPhone 7 Plus: Hold down the Side and Volume Down buttons while tapping the Home button to enter recovery mode.
3) In order to enter recovery mode on an iPhone 6s or earlier, press and hold the Side and Home buttons simultaneously.
Step 3. You will see one of the following windows if your iPhone successfully enters recovery mode:
Step 4. To restore your iPhone, launch Finder on a Mac or iTunes on a PC and follow the on-screen directions.
Step 5. Set your iPhone once the restoration process is finished.
Choose the approach that works best for you to recover access to your iPhone now that you know how to unlock your iPhone if you forgot your passcode.
Be aware that all of the aforementioned techniques will wipe your iPhone. Do a backup of your iPhone if you haven't done so before carrying out the reset procedures.
1 note
·
View note
Text
Unlocking How To Netgear WiFi Extender Login
If you are unable to Netgear WiFi Extender login on your own, then you are at the right place. Here you will get to know how to log in to Netgear WiFi Extender.
The netgear wifi range extender can operate with any router or modem. It is not as challenging as you think, the Netgear WiFi Extender login is simpler than you think.
Netgear Wi-Fi extender is used to boost the speed of the internet and provides better coverage in hard-to-reach areas. A Wi-Fi extender is placed between the device and the wireless router.
It is the most satisfactory method to stimulate the network speed, and it should be within the range of the wireless router. WiFi range extender helps in fixing internet connectivity issues for any of your wireless devices.
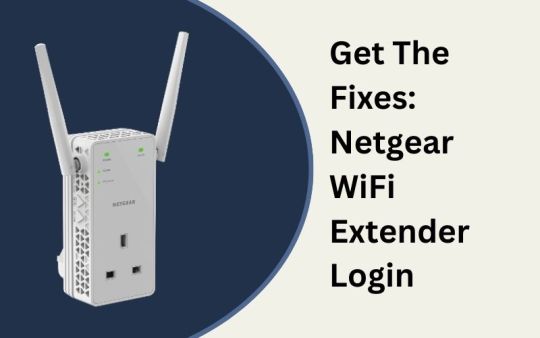
If you are unable to receive signals from your WiFi in far corners of your house. Then Netgear WiFi Extender is the perfect and most satisfactory booster.
It hardly takes 2-3 minutes to connect the extender to the home or office wireless system. If you do not know how to do so, then simply go through the following instructions for the Netgear WiFi Extender login.
Method for Netgear WiFi Extender login
Setting and configuring the Netgear extender is vital for improving the coverage of WiFi and guaranteeing a seamless browsing experience. You can log in to the netgear wifi extender in distinct methods.
In this, you will get a comprehensive guide for Netgear WiFi Extender login. So, before seeking help from someone else, obey the below techniques. With the following guide, you can easily complete the Netgear WiFi Extender login and setup process.
Netgear WiFi Extender login through the Ethernet cable
Firstly you have to connect your PC or laptop to the WiFi extender through the ethernet cable.
Now open the preferred web browser, and then search for mywifiext.net.
After this, You will be required to fill in your login credentials i.e., username and password.
Fill in the admin as a username and password to complete the login process.
Once you log in successfully, then visit the Setup, and click on the “wireless” option.
And then click on the “apply” option, before reconnecting the wireless devices.
With this, you have completed the Netgear WiFi Extender login through the ethernet cable.
Netgear WiFi Extender login through without ethernet cable
For the Netgear WiFi Extender login without an ethernet cable, firstly you have to factory reset the netgear extender
To factory reset the WiFI extender press the reset button on the netgear wireless signal booster for 8- to 10 seconds.
Now you have to connect your extender via wifi. And once it gets connected successfully, start the login process.
Launch the web browser, and enter mywifiext.net in the search field. And then fill in the default username and password.
After this, follow the netgear mywifiext setup wizard to set up the connection to an existing router.
Now connect to our WiFi device, with your Netgear wifi extender.
Netgear WiFi Extender login through Windows
If have you not seated and linked your extender to your current WiFi network, then simply visit the Netgear help page, and download the brief start guide for your model of the extender before resuming. So, obey the step-by-step guide for Netgear WiFi Extender login through the windows.
Open the web browser on your computer, which is connected to the extender network.
Also verify that you are connected to the extender network, because your router and extender may have different wifi network names/ SSIDs.
After this, enter mywifiext.net ormywifiext.local if you are logging in through Windows, and enter this, extender’s IP address if you are using Android devices.
Now click on the “enter” tab and then login windows will appear. In this, fill in your admin username and password.
Then click on log in, after this, if the browser displays the menu, then click on it. Now the menu of the extender will display.
Then click on settings to see and adjust the settings of the extender.
Conclusion
Certainly, these methods will help you with Netgear WiFi Extender login, doing this is not as difficult as it sounds. It is simpler than you think. Netgear WiFi extender is a wireless repeater, which is used to extend the range of a wireless network.
Simply follow this comprehensive guide for Netgear WiFi Extender login, if you think fixing this is a tough task. If these steps are not helping you with the Netgear WiFi Extender login, then get in touch with a Netgear expert. They will provide you with full assistance, and also help you in Netgear WiFi Extender login.
1 note
·
View note
Text
How to Download, Install and Activate ECUHelp HTProg?
This post comes with the user guide of ECUHelp HTProg. You will learn what this product is, and how to use it (download+ install+ activate).
What is ECUHelp HTProg?
HTprog is a comprehensive tool. It can be used to perform chip tuning, ECU clone, BDM read / write, Flash data edit, key reset, and BMW ISN read, etc.
There are three configurations for selection.
Option 1: ECUHELP HTprog Full Version (Adapter +Cables + Dongle)
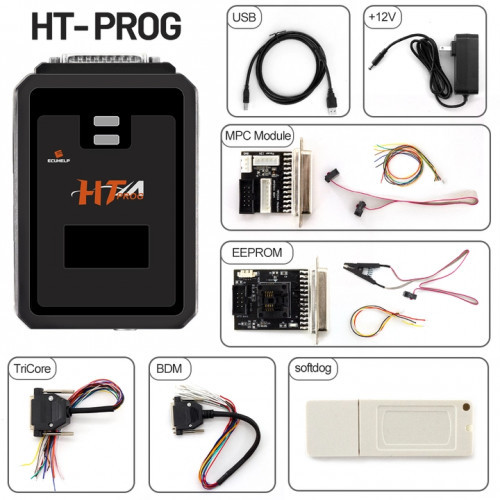
Works alone! No need to work with ECUHELP KT200
Package Includes:
1pc x MPC Module
1pc x EEPROM module
1pc x +12V Power Supply
1pc x BDM adapter
1pc x Tricore adapter
1pc x USB
1pc x Software Dongle
Option 2: HTprog Adapter and Cables for KT200
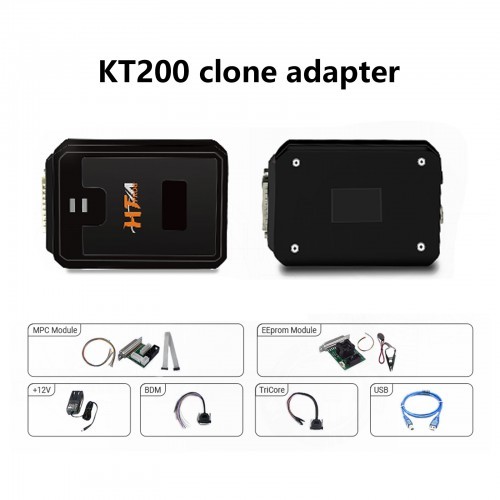
Works with ECUHELP KT200, not work alone.
Adds more ECUS and TCUS protocols, strengthens the cloning function, and supports more protocol cloning, also read and write car body modules, and refresh keys.
Package Includes:
1pc x MPC Module
1pc x EEPROM module
1pc x +12V Power Supply
1pc x BDM adapter
1pc x Tricore adapter
1pc x USB
Option 3: HTprog Clone Adapter for ECUHELP KT200
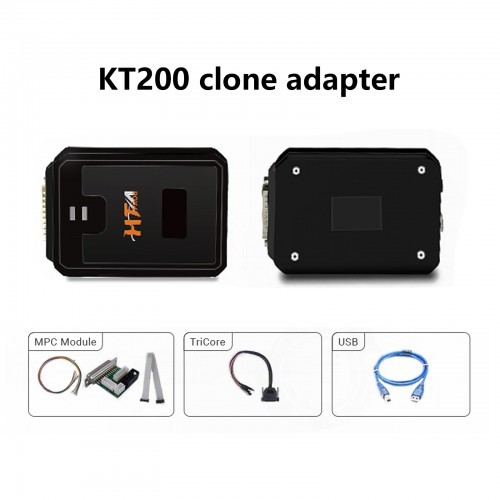
Works together with ECUHELP KT200, not work alone.
Can perform Chip tuning / ECU Cloning, on bench programmer, EEPROM programmer, and key function etc.
Package Includes:
1pc x KT200 clone adapter
1pc x MPC module
1pc x TriCore cable
1pc x USB cable
ECUHelp HTProg detailed functions instruction:
Chip Tuning / ECU Cloning:
With HTprog you can read and write P-Flash, D-Flash, External Flash and external EEPROM with the option of automatically checksum correction, you will have many methods in most of ECUs:
1.Factory mode (On Bench for most of ECU/TCU): with this option you don't have to open the ECU cover. Just plug some wires for power and signals and you are ready to go.
2.Tricore Boot Mode for all Tricore ECU: Opening the ECU is mandatory to connect the boot wire on the ECU board. This method is useful when the ECU is not responding.
3.BDM (Background debug mode)
4.JTAG for Renesas and Freescale
BDM Read / Write:
With HTprog you are able to break the protection of immobilizers like CAS in BMW, EIZ/EIS in Mercedes Benz, BCM in Volkswagen and Porsche, etc.
Built in Editors:
With HTprog you can edit many Flash data like:
Edit CAS3+ VIN, ISN and keys
Edit CAS4, CAS4+ VIN, and ISN
Edit mileage for BMW instrument clusters
Other functions:
You can do key reset for many brands like Audi, BMW, MINI, Porsche, Toyota, Fiat, Renault, etc.
Read/Write a wide range of SOP8 EEPROMs
Works side by side with Autohex to make keys
Key Features:
Master version. One License for all protocols on bench.
Supports one of the largest ECU/TCU list in Cars and Trucks for ECU cloning and Chip Tuning
Supports both old and latest ECU / TCUs from Bosch, Continental, Delphi, Marelli, Denso, Tenic, RW and Valeo, etc
Reads all BMW long ISN from BMW DME and DDE including MD1 and MG in F/G series
IMMO BDM Read/Write:
With HTprog you are able to break the protection of immobilizers like CAS in BMW, EIZ / EIS in Mercedes Benz.BCM in Volkswagen and Porsche, etc.
How to download ECUHelp HTProg software?
Just free download HTProg software by the following mega link.
https://mega.nz/file/8rJxhB5J#g1jnHe9yBfho7N1Y_0KiZyBM71HwuM6-gyhN4BsW_zg
Software version: 1.0.45
Size: 65.2 MB, no password
Compatible operating systems:
* Windows 7
* Windows 8/8.1
* Windows 10
* Windows 11!
Minimum recommended requirements:
CPU > 2.5 GHz (Intel i5, i7)
RAM > 8GB
NOTE:
1.It is advised to uninstall any antivirus software and disable the firewall before using the ECUHELP HTprog.
2.It is important not to upgrade the software to avoid any potential damage to the hardware.
3.Activation of the HTprog is necessary and should be done using the user's registered email address.
How to Activate HTProg Software?
After downloading, follow the on- screen prompts to install software.
Connect HTprog Clone Adapter to KT200 device, and then connect to the computer
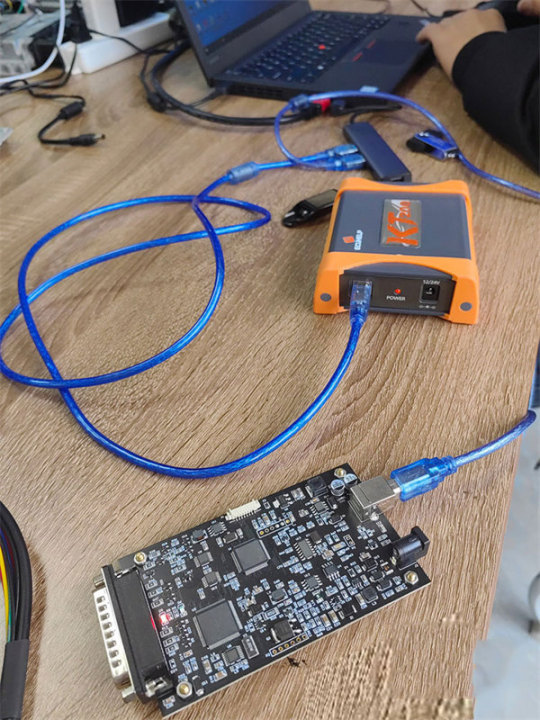
Run HTprog software, it will prompt you to enter your email address.
Enter your email address and wait for the activation link to be sent to you.
Once the HTprog Clone Adapter is activated for KT200, it is ready to use.
HTprog On Bench Programmer Support List.pdf (150K)
HTprog ECU Clone Support List.pdf (1.4M)
0 notes
Text
Most Common IT Support Issues and How to Resolve Them Fast!

IT Support Team IT support is an essential service in today's technology-driven world. However, it can be challenging to keep up with the constant stream of support requests, especially if the issues are repetitive. The most common IT support issues include slow performance, network connectivity problems, software bugs and failures, and hardware malfunctions. To resolve these issues fast, IT support teams must have a well-defined process that includes proper documentation, effective communication, and timely resolution. They must also have access to the right tools and expertise to diagnose and fix the problems quickly. Additionally, IT support teams should focus on educating end-users on how to avoid common issues and how to report them effectively if they do arise. With the right approach, IT support can help businesses maintain their productivity and ensure that technology is a valuable asset rather than a source of frustration. 1. How do I change my password? - Press Ctrl + Alt + Del (Windows) or System Preferences > Users & Groups (macOS). - Click "Change a password" (Windows) or click on the padlock and enter your current password (macOS). - Enter your current password, then enter and confirm your new password. - Click "Change password" (Windows) or "Change Password" (macOS). 2. How do I fix a blue screen of death (BSOD)? - Restart your computer. - Boot into Safe Mode: press F8 (Windows) or hold Shift while restarting (macOS). - Uninstall any recently installed software or drivers. - Update your drivers using Driver Booster. - Perform a System Restore or macOS Recovery if necessary. 3. Why is my Internet slow? - Restart your modem and router. - Update your router's firmware. - Use an Ethernet cable instead of Wi-Fi. - Check for bandwidth-hogging applications using Task Manager (Windows) or Activity Monitor (macOS). - Use a network optimization tool like NetSpot to analyze and improve your Wi-Fi coverage. 4. How do I solve application problems? - Restart the application. - Update the application to the latest version. - Check for compatibility issues with your operating system. - Reinstall the application. - Use a troubleshooting tool like Microsoft's Program Install and Uninstall troubleshooter. 5. Why does my computer suddenly shut down? - Check for overheating issues and clean your computer's cooling components. - Update your drivers using Driver Booster. - Run a malware scan with Malwarebytes. - Inspect your computer's hardware for failures or loose connections. - Use a diagnostic tool like Windows Memory Diagnostic or TechTool Pro (macOS) to test your hardware. 6. How do I fix a system failure? - Restart your computer. - Boot into Safe Mode: press F8 (Windows) or hold Shift while restarting (macOS). - Perform a System Restore (Windows) or macOS Recovery. - Update your drivers using Driver Booster. - Consult a professional technician if necessary. 7. Why can’t I log in? - Ensure Caps Lock is off and you are entering the correct username and password. - Restart your computer. - Use the "Forgot password" feature if available. - Log in as an administrator and reset your password. - Perform a System Restore (Windows) or macOS Recovery if necessary. 8. How do I recover deleted or lost files? - Check your Recycle Bin (Windows) or Trash (macOS) for the deleted files. - Use the "Restore previous versions" feature in Windows or Time Machine in macOS. - Use a data recovery software like Recuva (Windows) or Disk Drill (macOS) to scan and recover the lost files. - Consult a data recovery professional if necessary. 9. How do I solve my printer issue? - Ensure your printer is turned on and connected to your computer or network. - Check for paper jams or low ink levels. - Update your printer drivers using Driver Booster. - Restart your printer and computer. - Use your printer's built-in troubleshooting tools or consult its user manual for specific issues. IT Support Specialists 10. Why isn’t my USB being recognized? - Try using a different USB port or computer. - Check for physical damage on the USB device or port. - Update your USB drivers using Driver Booster. - Use a USB troubleshooting tool like USBDeview (Windows) or USB Prober (macOS). - Consult a professional technician if necessary. 11. How to connect to wireless? - Ensure your Wi-Fi router is turned on and functioning properly. - Click the Wi-Fi icon in your system tray (Windows) or menu bar (macOS). - Select your Wi-Fi network and enter the password if required. - If you're unable to connect, restart your router and computer. - Use a network analysis tool like NetSpot to check for interference or signal issues. 12. Why does my Wi-Fi keep disconnecting? - Restart your modem, router, and computer. - Update your router's firmware and Wi-Fi adapter's drivers using Driver Booster. - Use a network analysis tool like NetSpot to identify and resolve interference or signal issues. - Adjust your router's settings or invest in a Wi-Fi range extender if necessary. - Consult a professional technician if the issue persists. 13. Why can't I open certain attachments? - Ensure you have the appropriate software installed to open the file type (e.g., Adobe Reader for PDFs). - Update your software to the latest version. - Scan the attachment for malware using Malwarebytes. - Save the attachment to your computer and try opening it from there. - Contact the sender and request the file in a different format if necessary. 14. How to stop pop-up ads from appearing on my desktop? - Install a reputable antivirus program like Malwarebytes and perform a full system scan. - Use an ad-blocking extension like AdBlock Plus or uBlock Origin in your web browser. - Adjust your web browser's pop-up blocker settings to block all pop-ups. - Uninstall any recently installed software or browser extensions that may be causing the pop-ups. - Keep your operating system and software up-to-date to prevent security vulnerabilities. 15. How to improve my desktop or laptop's slow performance? - Restart your computer. - Run a malware scan with Malwarebytes. - Update your drivers using Driver Booster. - Use a system optimization tool like CCleaner or OnyX (macOS) to clean up temporary files and optimize your computer's performance. - Upgrade your computer's hardware (e.g., RAM or SSD) if necessary. 16. How to prevent overheating on desktop or laptop? - Ensure your computer is placed in a well-ventilated area. - Clean your computer's cooling components (e.g., fans and heatsinks) regularly. - Ensure proper thermal paste application between the CPU and cooler. - Consider upgrading your cooling solutions (e.g., better CPU cooler, additional case fans, or a laptop cooling pad). - Monitor your computer's temperature using a tool like HWMonitor or iStat Menus (macOS) to prevent overheating issues. 17. How to prevent ransomware on desktop or laptop? - Install and regularly update a reputable antivirus program like Malwarebytes. - Keep your operating system and software up-to-date to prevent security vulnerabilities. - Use a firewall to block unauthorized access to your computer. - Avoid clicking on suspicious links, attachments, or pop-ups. - Regularly back up your important data using an external hard drive or cloud storage service. 18. How to recover from ransomware on desktop or laptop? - Disconnect your computer from the internet to prevent further damage. - Run a malware scan with Malwarebytes in Safe Mode. - Use a ransomware decryption tool like No More Ransom to attempt recovery of your encrypted files. - Restore your data from a backup if available. - Consult a professional technician if necessary. 19. How to prevent a virus attack on desktop or laptop? - Install and regularly update a reputable antivirus program like Malwarebytes. - Keep your operating system and software up-to-date to prevent security vulnerabilities. - Use a firewall to block unauthorized access to your computer. - Avoid clicking on suspicious links, attachments, or pop-ups. - Regularly back up your important data using an external hard drive or cloud storage service. 20. How to recover from a virus attack on desktop or laptop? - Disconnect your computer from the internet to prevent further damage. 2. Boot your computer into Safe Mode: press F8 (Windows) or hold Shift while restarting (macOS). - Run a malware scan with Malwarebytes to remove the virus. - Use a system repair tool like System File Checker (Windows) or Disk Utility (macOS) to fix any corrupted system files. - Restore your data from a backup if necessary. - Update your antivirus program and perform a full system scan to ensure the virus has been completely removed. - Consult a professional technician if necessary. 21. How to fix a slow boot time on desktop or laptop? - Restart your computer. - Update your drivers using Driver Booster. - Use a system optimization tool like CCleaner or OnyX (macOS) to clean up temporary files and optimize your computer's performance. - Disable unnecessary startup programs using Task Manager (Windows) or System Preferences > Users & Groups (macOS). - Perform a disk cleanup using Disk Cleanup (Windows) or CleanMyMac X (macOS). - Upgrade your computer's hardware (e.g., RAM or SSD) if necessary. 22. How to fix network connectivity issues on desktop or laptop? - Check your physical network connections (e.g., Ethernet cables, Wi-Fi router). - Restart your modem, router, and computer. - Update your network adapter drivers using Driver Booster. - Use a network troubleshooting tool like Windows Network Diagnostics or Wireless Diagnostics (macOS). - Reset your network settings if necessary (e.g., Reset TCP/IP stack in Windows or Renew DHCP lease in macOS). - Consult a professional technician if necessary. 23. How to fix audio issues on desktop or laptop? - Check your physical audio connections (e.g., speakers, headphones, audio jack). - Ensure your audio output device is properly selected and not muted in your computer's sound settings. - Update your audio drivers using Driver Booster. - Restart your computer. - Use an audio troubleshooting tool like (https://support.microsoft.com/en-us/topic /open-the-audio-troubleshooter-46e4ea76-4e4d-4ab4-49db-460f-054a9c27a2ff) or Audio MIDI Setup (macOS). 6. Consult a professional technician if necessary. 24. How to fix video issues on desktop or laptop? - Check your physical video connections (e.g., monitor, video cable, video output port). - Ensure your display settings are properly configured in your computer's display settings. - Update your video drivers using Driver Booster. - Restart your computer. - Use a video troubleshooting tool like Windows Video Playback Troubleshooter or Reset NVRAM (macOS). - Consult a professional technician if necessary. 25. How to fix software installation issues on desktop or laptop? - Ensure your computer meets the minimum system requirements for the software. - Check for compatibility issues with your operating system. - Update your drivers using Driver Booster. - Temporarily disable your antivirus program during installation. - Run the software installer as an administrator (Windows) or with the correct permissions (macOS). - Use a troubleshooting tool like Microsoft's Program Install and Uninstall troubleshooter for Windows installation issues. - Consult a professional technician or the software vendor's support team if necessary. 26. How to fix data backup and restoration issues on desktop or laptop? - Ensure your backup destination (e.g., external hard drive or cloud storage service) has enough available storage space. - Use a reputable backup software like Acronis True Image (Windows) or Carbon Copy Cloner (macOS) to create and manage your backups. - Verify your backup data's integrity by periodically restoring a few random files and checking for corruption. - Encrypt your backups using built-in encryption tools or third-party software like VeraCrypt to protect your data from unauthorized access. - Store a copy of your backup data off-site (e.g., at a friend's house or in a cloud storage service) to protect against local disasters (e.g., fire or theft). 27. How to fix email-related issues on desktop or laptop? - Ensure your email account settings (e.g., username, password, server settings) are properly configured in your email client. - Update your email client to the latest version. - Check your email provider's status page or support resources for known issues. - Use an email troubleshooting tool like Microsoft's Outlook Support and Recovery Assistant or (https://support.apple.com/guide/mail/use-mail-connection-doctor-mlhlp1030/mac) (macOS). 5. Consider using an alternative email client like Thunderbird (Windows, macOS) or Spark (macOS) if your current client is causing issues. - Consult a professional technician or your email provider's support team if necessary. 28. How to fix keyboard and mouse issues on desktop or laptop? - Check your physical connections (e.g., USB cables, Bluetooth pairing) for wired or wireless keyboard/mouse. - Ensure your keyboard and mouse are clean and free of debris that may be causing input issues. - Update your keyboard and mouse drivers using Driver Booster. - Restart your computer. - Use a troubleshooting tool like Windows Keyboard Troubleshooter or macOS Keyboard Viewer to diagnose keyboard issues. - Test your keyboard and mouse on another computer to determine if the issue is hardware-related. - Consult a professional technician if necessary. 29. How to fix computer freezing or crashing issues on desktop or laptop? - Restart your computer. - Run a malware scan with Malwarebytes. - Update your drivers using Driver Booster. - Use a system optimization tool like CCleaner or OnyX (macOS) to clean up temporary files and optimize your computer's performance. - Monitor your computer's temperature using a tool like HWMonitor or iStat Menus (macOS) to check for overheating issues. - Test your computer's hardware components (e.g., RAM, hard drive, power supply) for possible failures using tools like MemTest86 or SeaTools. - Consult a professional technician if necessary. 30. How to fix software compatibility issues on desktop or laptop? - Ensure your computer meets the minimum system requirements for the software. - Update your operating system and drivers using Driver Booster. - Check for known compatibility issues in the software's release notes or support resources. - Try running the software in compatibility mode (Windows) or using a tool like Wine (macOS) to run Windows applications on macOS. - Consider using an alternative software with similar functionality if the compatibility issue persists. - Consult a professional technician or the software vendor's support team if necessary. 31. How often should I update my drivers? A1: It's best to update your drivers whenever there are new updates available, as they may contain important security patches, bug fixes, and performance improvements. A tool like Driver Booster can help you keep your drivers up-to-date. 32. What's the best way to prevent malware infections on my computer? Install a reputable antivirus software, keep your operating system and software updated, avoid suspicious websites and email attachments, and maintain strong passwords. Regularly scan your computer with tools like Malwarebytes to detect and remove any threats. 33. How can I improve my computer's performance without spending money on new hardware? A3: You can optimize your computer's performance by cleaning temporary files and uninstalling unnecessary software, using tools like CCleaner or OnyX (macOS). Adjust your computer's power settings, disable unnecessary startup programs, and update your drivers to ensure optimal performance. 34. What should I do if I accidentally delete an important file? A4: First, check your computer's Recycle Bin or Trash folder to see if the file can be restored. If not, use a data recovery tool like Recuva or Disk Drill (macOS) to attempt file recovery. In the future, create regular backups to avoid data loss. 35. How can I extend my laptop's battery life? A5: Reduce screen brightness, enable power-saving settings, close unnecessary programs, and disable Wi-Fi and Bluetooth when not in use. Additionally, ensure your laptop's battery is in good condition and consider replacing it if it no longer holds a charge as expected. In this article, we have covered 35 common IT support issues and provided step-by-step solutions to resolve them. As an IT blog writer and business owner with 30 years of experience in IT support services, I have accumulated a vast amount of knowledge to assist you in tackling these issues. Remember that each situation may require a unique approach, and the tools or software mentioned here can help you effectively address the problem. If you find yourself unable to resolve an issue, do not hesitate to consult a professional technician or reach out to the respective support teams. Regular maintenance, driver updates, and good security practices can prevent many IT issues, so be proactive in maintaining your computer systems for optimal performance and longevity. Read the full article
0 notes
Text
PassFab 4WinKey Crack License Key For Mac/Win
⭐ ⏩⏩⏩️ DOWNLOAD LINK 🔥🔥🔥 PassFab 4WinKey Ultimate Crack seems give to utility grants you master access to all of their Computer email addresses. The above capability allows. A passFab 4WinKey Keygen is an encryption tool for secret words to your frame as well as your Microsoft accounts as the most user-friendly. PassFab 4WinKey Crack Ultimate. Related Collections. One-click to create a Windows password reset disk (USB/CD/DVD). Compatible with Windows 10//8/7/Vista/XP and Server PassFab 4WinKey … Download Here. PassFab 4WinKey Ultimate Crack is a professional app to recover Microsoft account and local admin password on Windows. The PassFab 4WinKey Ultimate Crack is an expert utility to get a better Microsoft account and nearby administrator password on Windows. Aug 29, PassFab 4WinKey Ultimate Crack passfab 4winkey ultimate. Passfab 4WinKey Ultimate Crack Plus License Code PassFab 4WinKey. Jan 13, - passfab 4winkey Ultimate Crack is a professional program for recovering Microsoft account and local administrator. passfab 4winkey free alternative. PassFab 4WinKey Ultimate Crack seems give to utility grants you master access to all of their Computer email addresses. The above capability allows. A passFab 4WinKey Keygen is an encryption tool for secret words to your frame as well as your Microsoft accounts as the most user-friendly. PassFab 4WinKey Crack Ultimate. Related Collections. One-click to create a Windows password reset disk (USB/CD/DVD). Compatible with Windows 10//8/7/Vista/XP and Server PassFab 4WinKey … Download Here. PassFab 4WinKey Ultimate Crack is a professional app to recover Microsoft account and local admin password on Windows. The PassFab 4WinKey Ultimate Crack is an expert utility to get a better Microsoft account and nearby administrator password on Windows. Aug 29, PassFab 4WinKey Ultimate Crack passfab 4winkey ultimate. Passfab 4WinKey Ultimate Crack Plus License Code PassFab 4WinKey. Jan 13, - passfab 4winkey Ultimate Crack is a professional program for recovering Microsoft account and local administrator. passfab 4winkey free alternative. PassFab 4WinKey Ultimate Crack & (% Working) Serial Key Free Download [] ; By Bins ; office Tools, PC SOFTWARE ; 0 Comments. PassFab 4WinKey Ultimate Crack + Keygen Download · Adobe Software · Android Apps · Android Games · Animate Software · Anti Malware · Audio Converter. PassFab 4WinKey Crack grants you administrator powers to all of your Windows user accounts. This privilege allows you to reset passwords for. Download and run the PassFab 4Winkey software from any available computer. · Restart the locked device and select Boot from the menu. · Choose ". PassFab 4WinKey Crack is an expert app to get a better Microsoft account and nearby admin password on Windows. It is the perfect Windows. PassFab 4WinKey Crack This tool allows you to gain administrator-level rights over all your Windows user accounts. Your Life Saver to Recover Microsoft Account, Local Admin Password on Windows 10//8/7/Vista/XP/Server As the easiest Windows password recovery tool. It is a professional app to recover Microsoft account and local admin password on Windows. It is the easiest Windows password recovery tool and. With the PassFab 4WinKey Ultimate Crack , you can take control of all of your Windows user accounts at the administrative level. For any. PassFab for RAR Crack + Full Activation Key Download [] Latest. PassFab for RAR Crack + Serial Key [Mac + Win] Full Download; PassFab for RAR Crack. passfab 4winkey free alternative.
PassFab 4WinKey Crack License Key For Mac/Win
PassFab 4WinKey Crack Ultimate melush - Wakelet
PassFab 4WinKey Ultimate Crack & Keygen [Latest] Download
PassFab 4WinKey Ultimate Crack With License Key
4win download Search ResultsWeb resultsDownload Gpg4win - Gpg4win
PassFab 4WinKey Ultimate Crack + Free Keygen [Latest] Download » Ismail PC
4win download Search ResultsWeb resultsDownload Gpg4win - Gpg4win
PassFab 4WinKey Crack License Key For Mac/Win
PassFab 4WinKey Ultimate Crack & Keygen [Latest] Download
PassFab 4WinKey Ultimate Crack With License Key
PassFab 4WinKey Crack Ultimate melush - Wakelet
PassFab 4WinKey Ultimate Crack + Free Keygen [Latest] Download » Ismail PC
PassFab 4WinKey Crack Ultimate melush - Wakelet
PassFab 4WinKey Crack License Key For Mac/Win
PassFab 4WinKey Ultimate Crack & Keygen [Latest] Download
PassFab 4WinKey Ultimate Crack With License Key
4win download Search ResultsWeb resultsDownload Gpg4win - Gpg4win
PassFab 4WinKey Ultimate Crack + Free Keygen [Latest] Download » Ismail PC
PassFab 4WinKey Ultimate Crack Archives - Free Download 4 Paid Software
passfab 4winkey crack free download Archives - Crackbay
PassFab for ISO Ultimate Crack With License Key Download
PassFab 4Winkey Crack Free With Serial Key Torrent
PassFab 4WinKey Ultimate | Pro | Enterprise / Work with passwords / [download]
PassFab 4WinKey Crack With Activation Key For Windows
1 note
·
View note
Text
passfab 4winkey crack free download Archives - Crackbay
⭐ ⏩⏩⏩️ DOWNLOAD LINK 🔥🔥🔥 PassFab 4WinKey Ultimate Crack seems give to utility grants you master access to all of their Computer email addresses. The above capability allows. A passFab 4WinKey Keygen is an encryption tool for secret words to your frame as well as your Microsoft accounts as the most user-friendly. PassFab 4WinKey Crack Ultimate. Related Collections. One-click to create a Windows password reset disk (USB/CD/DVD). Compatible with Windows 10//8/7/Vista/XP and Server PassFab 4WinKey … Download Here. PassFab 4WinKey Ultimate Crack is a professional app to recover Microsoft account and local admin password on Windows. The PassFab 4WinKey Ultimate Crack is an expert utility to get a better Microsoft account and nearby administrator password on Windows. Aug 29, PassFab 4WinKey Ultimate Crack passfab 4winkey ultimate. Passfab 4WinKey Ultimate Crack Plus License Code PassFab 4WinKey. Jan 13, - passfab 4winkey Ultimate Crack is a professional program for recovering Microsoft account and local administrator. passfab 4winkey free alternative. PassFab 4WinKey Ultimate Crack seems give to utility grants you master access to all of their Computer email addresses. The above capability allows. A passFab 4WinKey Keygen is an encryption tool for secret words to your frame as well as your Microsoft accounts as the most user-friendly. PassFab 4WinKey Crack Ultimate. Related Collections. One-click to create a Windows password reset disk (USB/CD/DVD). Compatible with Windows 10//8/7/Vista/XP and Server PassFab 4WinKey … Download Here. PassFab 4WinKey Ultimate Crack is a professional app to recover Microsoft account and local admin password on Windows. The PassFab 4WinKey Ultimate Crack is an expert utility to get a better Microsoft account and nearby administrator password on Windows. Aug 29, PassFab 4WinKey Ultimate Crack passfab 4winkey ultimate. Passfab 4WinKey Ultimate Crack Plus License Code PassFab 4WinKey. Jan 13, - passfab 4winkey Ultimate Crack is a professional program for recovering Microsoft account and local administrator. passfab 4winkey free alternative. PassFab 4WinKey Ultimate Crack & (% Working) Serial Key Free Download [] ; By Bins ; office Tools, PC SOFTWARE ; 0 Comments. PassFab 4WinKey Ultimate Crack + Keygen Download · Adobe Software · Android Apps · Android Games · Animate Software · Anti Malware · Audio Converter. PassFab 4WinKey Crack grants you administrator powers to all of your Windows user accounts. This privilege allows you to reset passwords for. Download and run the PassFab 4Winkey software from any available computer. · Restart the locked device and select Boot from the menu. · Choose ". PassFab 4WinKey Crack is an expert app to get a better Microsoft account and nearby admin password on Windows. It is the perfect Windows. PassFab 4WinKey Crack This tool allows you to gain administrator-level rights over all your Windows user accounts. Your Life Saver to Recover Microsoft Account, Local Admin Password on Windows 10//8/7/Vista/XP/Server As the easiest Windows password recovery tool. It is a professional app to recover Microsoft account and local admin password on Windows. It is the easiest Windows password recovery tool and. With the PassFab 4WinKey Ultimate Crack , you can take control of all of your Windows user accounts at the administrative level. For any. PassFab for RAR Crack + Full Activation Key Download [] Latest. PassFab for RAR Crack + Serial Key [Mac + Win] Full Download; PassFab for RAR Crack. passfab 4winkey free alternative.
PassFab 4WinKey Crack License Key For Mac/Win
PassFab 4WinKey Crack Ultimate melush - Wakelet
PassFab 4WinKey Ultimate Crack & Keygen [Latest] Download
PassFab 4WinKey Ultimate Crack With License Key
4win download Search ResultsWeb resultsDownload Gpg4win - Gpg4win
PassFab 4WinKey Ultimate Crack + Free Keygen [Latest] Download » Ismail PC
4win download Search ResultsWeb resultsDownload Gpg4win - Gpg4win
PassFab 4WinKey Crack License Key For Mac/Win
PassFab 4WinKey Ultimate Crack & Keygen [Latest] Download
PassFab 4WinKey Ultimate Crack With License Key
PassFab 4WinKey Crack Ultimate melush - Wakelet
PassFab 4WinKey Ultimate Crack + Free Keygen [Latest] Download » Ismail PC
PassFab 4WinKey Crack Ultimate melush - Wakelet
PassFab 4WinKey Crack License Key For Mac/Win
PassFab 4WinKey Ultimate Crack & Keygen [Latest] Download
PassFab 4WinKey Ultimate Crack With License Key
4win download Search ResultsWeb resultsDownload Gpg4win - Gpg4win
PassFab 4WinKey Ultimate Crack + Free Keygen [Latest] Download » Ismail PC
PassFab 4WinKey Ultimate Crack Archives - Free Download 4 Paid Software
passfab 4winkey crack free download Archives - Crackbay
PassFab for ISO Ultimate Crack With License Key Download
PassFab 4Winkey Crack Free With Serial Key Torrent
PassFab 4WinKey Ultimate | Pro | Enterprise / Work with passwords / [download]
PassFab 4WinKey Crack With Activation Key For Windows
1 note
·
View note
Text
299 - Merging 2 Apple ID’s sort of - With Guest Guy Serle, Jeff Gamet, and Ben Roethig
The latest In Touch With iOS with Dave is joined by guest Guy Serle, Jeff Gamet, and Ben Roethig. Dave decided to finally “merge his 2 Apple ID’s. Well sort of. The issue is paid content like apps, movies, books, cannot be moved to the new Apple ID. This is where Family sharing gets involved. The latest beta has still not been released. But more importantly install iOS 17.4.1 for security fixes. WWDC 24 was announced. We talk about MacStock 8 and more.
The show notes are at InTouchwithiOS.com
Direct Link to Audio
Links to our Show
Give us a review on Apple Podcasts! CLICK HERE we would really appreciate it!
Click this link Buy me a Coffee to support the show we would really appreciate it. intouchwithios.com/coffee
Another way to support the show is to become a Patreon member patreon.com/intouchwithios
Website: In Touch With iOS
YouTube Channel
In Touch with iOS Magazine on Flipboard
Facebook Page
Mastadon
X
Instagram
Threads
Spoutible
Topics
Beta this week. Still no beta but very important Update Your iPhone Now: iOS 17.4.1 Includes These Security Fixes and iOS 17.4.1 and macOS 14.4.1 come with these 2 security fixes
Apple Releases Revised Versions of iOS 17.4.1 and iPadOS 17.4.1 With Updated Build Number
People The Apple Journal app isn’t sharing your location and name with everyone Apple Journal's 'Discoverable by Others' setting: How it works
Dave decided to finally “merge his 2 Apple ID’s. Well sort of. The issue is paid content like apps, movies, books, cannot be moved to the new Apple ID. This is where Family sharing gets involved.
Links to merging Apple ID that were referenced.
Request a refund for apps or content that you bought from Apple
If you can't find your family's shared apps and content - Apple Support
How to share an Apple Music playlist on your iPhone or iPad
Manage Family Sharing settings - Apple Support
What is Family Sharing? - Apple Support
Use Sync Library with your Apple Music subscription?
Use iTunes to sync your iPhone, iPad, or iPod with your computer - Apple Support
Save a copy of a playlist in Music on Mac - Apple Support
News
Apple Announces WWDC 2024 Event for June 10 to 14
Apple Hints at iOS 18 AI Announcements Coming at WWDC 2024
Apple Sues Former Employee for Leaking iPhone's Journal App and More
Apple TV+ is the streaming platform with the highest rated content on IMDb
Warning: Apple Users Targeted in Advanced Phishing Attack Involving Password Reset Requests
Canva Acquires Serif's Affinity Apps
Next-Gen Apple CarPlay Forcing Driver Instrument Cluster Takeover Triggers Lawsuit
Apple to Launch New iPad Pro and iPad Air Models in May
Announcements
Macstock 8 is Here! July 12-14, 2024 Macstock Conference & Expo
Our Host
Dave Ginsburg is an IT professional supporting Mac, iOS and Windows users and shares his wealth of knowledge of iPhone, iPad, Apple Watch, Apple TV and related technologies. Visit the YouTube channel https://youtube.com/intouchwithios follow him on Mastadon @daveg65, and the show @intouchwithios
Our Regular Contributors
Jeff Gamet is a podcaster, technology blogger, artist, and author. Previously, he was The Mac Observer’s managing editor, and Smile’s TextExpander Evangelist. You can find him on Mastadon @jgamet as well as Twitter and Instagram as @jgamet His YouTube channel https://youtube.com/jgamet
Ben Roethig Former Associate Editor of GeekBeat.TV and host of the Tech Hangout and Deconstruct with Patrice Mac user since the mid 90s. Tech support specialist. Twitter @benroethig Website: https://roethigtech.blogspot.com
About our Guest
Guy Serle Is the host of the MyMac Podcast and the (hopefully) reconstituted Guy’s Daily Drive…which isn’t daily, but is done by driving so half accurate. email [email protected] @MacParrot and @VertShark on Twitter Vertshark.com, Vertshark on YouTube, Skype +1 Area code 703-828-4677
Here is our latest Episode!
0 notes