#weidian
Explore tagged Tumblr posts
Visit Tumblr Blog
Explore Tumblr blogs with no restrictions, modern design and the best experience.
Last Seen Tumblr Blogs


Fun Fact
28.6 is the average number of monthly visits per US mobile user.
Text
Guide on How to Adopt Your Very Own Samomile and Cattawin
(aka Kyuu's buying guide for Weidian through Superbuy)

So it has come to my attention that the delightful artist Zerozeroling1 has released more Samomile and Cattawin plushies and last time I wasn't sure how much interest there would be so I didn't promote it
but I accidentally induced a lot of jealousy among my friends group, soooo this time I'm helping out with a promo tip + buying guide (and offer to do group order if you're still confused and we're friendly).
✨Link to Kyuu's Weidian Buying Guide✨

These are the Samomile and Cattawin plush available for adoption this time. Unfortunately the keychains aren't being offered again. This was shared in the promo deck for size comparison of how big your new friends are.
They come as a pair and are listed for 168RMB (approximately $25USD) and are 35 cm tall and 23cm wide (from arm to arm).

They'll come with a green and yellow scarf, as well as some other bonus goodies.
Pre-sale period: September 22nd - September 30th. No refunds will be accepted. Shipping will take place approximately 45 days after the end of pre-sale. (last time the items arrived at the warehouse about two months after I paid for the items).
My guess on shipping estimate: For China warehouse to US, it cost me the lower end shipping option of $20 for the two plush under 1lb. Please expect shipping for these two larger items to cost anywhere between $40-60USD to your location after processing.
I'm not the artist so if you miss the pre-order period, unfortunately you're out of luck.
Please enjoy your adoption!
#kinnporsche#man suang#mileapo#mile phakphum#apo nattawin#apo cattawin#samoyed mile#weidian#superbuy
38 notes
·
View notes
Text
Merchandise:

★│Source: BiliBili│★
Purchase Link (Weidian)
【永夜Minus Original】 痛みが流れる (痛苦流淌而出)
Composing/Arrangement/Tuning/Mixing/PV :Aya-亚夜-
Illustration:菊花猹
7 notes
·
View notes
Text
BOYFRIENDS OH MY GOODDD
TMK LIVE WEIDIAN
#PitangzhangxThomasKong
#bl drama#bl series#thai bl#domundi#dmd#dmd friendship the reality#thomas teetut#thomaskong#your sky the series#kongjiro
25 notes
·
View notes
Text

kind of obsessed with these kainess nuis from weidian
[link]
24 notes
·
View notes
Text
So he's actually not officially made at all! In what I've seen, Chinese fandoms tend to make their own plushies and if you know where to look, you'll see a ton of fanmade ones for Rider (I have two Kenzakis myself!)
Blade Garlic was designed by a fan and made by a factory specialized in making these plushies, and the thing about these sales is they're usually done to meet the MoQ (are usually 50 units, but can be as low as 10).
Usually they only get one run since it's a lot of work setting these sales up, but sometimes the doll mom (owner of design usually) will have a second (and even third) run! We can only hope he gets another in the future....
garlic is taking the bladeheads on xhs by storm I’ve seen so many posts about this fucking thing people are coveting the garlic, trading the garlic, hoarding the garlic, memeing about the garlic, praying for the garlic. And to be honest I’m with them. I want the garlic. I want the garlic so bad.
The “garlic” btw:
#i believe this doll mom has a 10cm joker plush but last i checked the deposit sale closed....#i unfortunately don't have access to the weidian (chinese storefront) page for the doll mom rn
213 notes
·
View notes
Note
If you made the badges and threw them on taobao I’d actually buy it they’re so cute
Really? Glad to hear that. In fact these badges are a giveaway for another product I'm preparing (Shane's Doll). But, yes, these can be purchased separately afterwards! (After the dolls are sold out)
I've thrown them on Weidian, app similar to Taobao. If interested, go and check it out!
My shop name is: XI_FUNCKTION


If you got any question, go DM me at my shop so I can reply on time <3
21 notes
·
View notes
Text

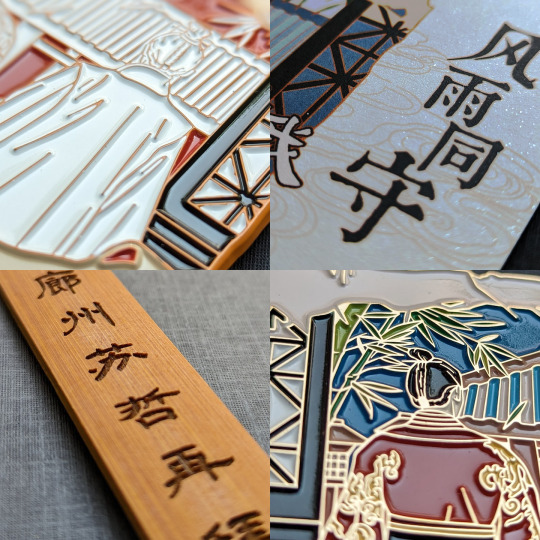
The trouble with collecting merch is it’s difficult to stop once you start. This Jingsu enamel pin is by the prolific 长风万里, who is responsible for some of the most iconic NiF pins (check out the weidian store for a partial selection). Like many fan-made pins, it’s a re-rendering of a scene from canon, in this case episode 52 [x], where Jingsu look on as thunder and wind portend the storm brewing on the horizon after Princess Liyang has agreed to present Xie Yu’s confessed crimes at the Emperor’s banquet.
The pin emphasizes the storm in both design (bamboo leaves scattering in the wind) and name: 风雨同守, loosely enduring the tempest together. As for why the image has been transposed onto a tattered scroll, the pin maker said the inspiration came from rubbings/拓印 and elaborated some more:
Personally, I think of this as an excavated artwork (with the surface damaged in its old age) that was created out of Jingyan’s longing. As if Jingsu actually existed in history and will live on for a long, long time. 我自己把这个当做是一件出土的画作(年岁久远画面有所破损),是景琰怀念所做。就好像历史上真有他们的存在,靖苏真的来日方长。
Historically, rubbings not only create an impression of existing artwork but are themselves artworks that take skill and patience. The typical process starts with adhering paper to a stone carving, then ink is dabbed to the paper such that the flat surface takes on the color of the ink while carved areas remain white (here’s a process video). Collecting rubbings was a popular pastime of the literati, and rubbings of good calligraphy were especially in demand for study and appreciation, serving a similar purpose to block printing in allowing many people to see replicas of an original. The originals may have also come from a non-stone medium: some artworks originally on paper or fabric were replicated onto stone so that rubbings could be made and collected [x]. Nowadays, ancient rubbings are valuable artifacts, especially in cases where the carving has been lost.
The rubbing influence is very clear in the second version of the pin, here juxtaposed against one of its inspirations:
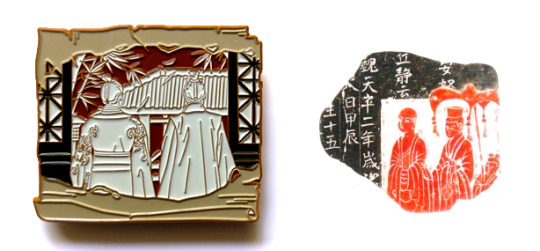
Though the text on the right rubbing says it’s from the Tianping Era of Eastern Wei, Year 2/魏天平二年 (535 CE), which is contemporaneous with the Liang dynasty that loosely inspired the fictional NiF Liang, I couldn’t find an actual historical artwork corresponding to this rubbing, and the mass antique market is flooded with fabrications (it’s also thoroughly possible I simply failed to find the original). But here’s a real fragment of a stone Buddhist votive tablet and its rubbing that’s now at the Art Museum of the Chinese University of Hong Kong [x]:
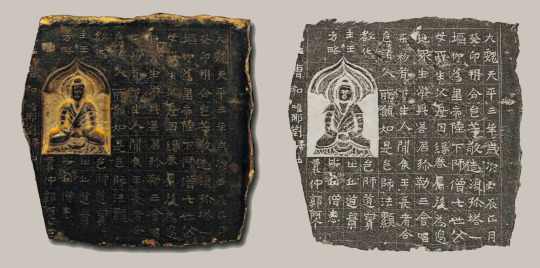
The text says that this was made in Tianping Era, Year 3, one year after the one above, and describes the building of a Buddhist pagoda in offering, which was a common practice at the time. This monochromatic rubbing style was also quite typical; though both black ink and red ink (cinnabar-based) rubbings existed separately, they were not really seen in combination in a single rubbing until much later. What is believed to be the only surviving book of bicolor rubbings before the modern era was made in the Qing dynasty around the 1800s and was itself a copy of a lost multicolor work from the same dynasty [x].
In this context of transference of art and meaning between mediums, it’s all too easy to imagine a backstory for this Jingsu scroll: first there was a stone carving, close enough to the actual scene that the artist must have worked from Jingyan’s memory of that day. Instead of the more common approach of carving the outline or the background, the artist decided to carve the foreground so the figures were sunken into the stone. And later, a rubbing was made and mounted onto a scroll, buried and excavated, then finally rendered from fiction to reality in the form of an enamel pin. Each creation is an act of remembering and reinventing, of placing yourself in the observer’s shoes, of stoking the flames of the original story—the fire burns on through metaphorical wood replaced over the centuries, its appearance ever-changing, its core not forgotten.

That’s enough of reading too much into things—I also like the pin on its own. One thing that 长风万里 does well is not just sell pins but also communicate the entire behind-the-scenes process with the QQ group, which is several months’ worth of iterations that I find at least as interesting as the final product. For this pin, you can trace through chat logs how the pin evolved all the way from the original concept sketch to the pieces of metal that fit in your hand (thanks to 长风万里 for letting me share the draft versions here):

Once the pin maker comes up with an idea and decides to go for it, the initial sketch is given to the commissioned artist (this pin was drawn by Forwrite, on weibo and lofter) along with reference images. The artist turns these into a line drawing following the design rules of enamel pins (each block of solid color should be fully enclosed by lines, for example). Some artists will color in the line art while other pin creators commission only the line art and fill in the colors themselves. The final colors are limited to the available palette at the factory chosen to make the pins, and once the color vector art is handed to the pin factory along with instructions on detailing and finishes, the physical manufacturing process begins in earnest (this could be the subject of its own long post).
You may have noticed that there are some color changes from the vector design to the physical pins, most notably the sky in the top pin. This came about as a serendipitous accident where the factory colored the sky of the sample pin dark blue instead of the requested sunset yellow, but the pin buyers active in the group chat liked the dark blue enough that it was kept as the final color. The light grayish blue variant ended up being chosen for the backing card/背卡 instead:
Though backing cards are nominally named for their purpose in supporting the pin, practically no one sticks their pins through these cards in Chinese fandom; instead, collectors generally buy cases and books to keep each piece in pristine condition. And so unlike utilitarian cards that are meant to serve as a background to the pin, fully designed backing cards that stand on their own are very much a thing. The card also adds back in the iconic Jingsu lines that were in the original concept sketch, I want to choose you, Your Highness Prince Jing/我想选你靖王殿下 from Mei Changsu and Sir and I are as one person/先生与我如同一人 from Jingyan.
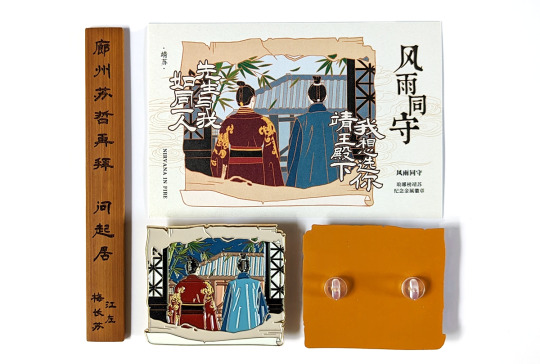
And now for the last part of the merch package that comes with the pin: the wooden piece on the left is an inscribed bamboo name slip/名刺 meant to resemble what MCS might have presented Jingyan when he visited his manor in episode 9 [x]. This was a preorder bonus to encourage buyers to get on board early, since the upfront costs to commission the artist and get a sample made at the factory are a significant portion of the overall costs (if not enough people preorder, the pin is canceled and the payment refunded, and the pin maker has to take the loss of at least the artist’s fees).
Name slips were the ancient analogs to modern business cards and an important tool of connection building in the ancient bureaucracy. The tradition of presenting a slip before you visit someone’s residence, especially if you’re lower in status than the person you’re visiting, persisted for many dynasties while the form of the slip evolved over time. Even though the visitation slip in canon appeared to be a bound paper booklet, folded books wouldn’t appear until the Tang dynasty—though paper was invented in the Han dynasty, it took time for the manufacturing process to improve sufficiently for a fundamental shift in writing mediums. Bamboo slips were what they would have used in the real Liang dynasty (plus, the modern-day replica is objectively great merch that can be used as a bookmark/fidget stick/cosplay prop/whatever else you can think of).
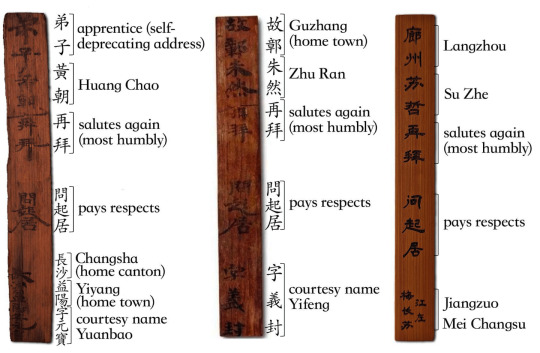
Slips from around the NiF time period generally stated some combination of your given name/名, your courtesy name/字, the region you’re from, and some boilerplate deferential language. Here are two real ones from Huang Chao/黄朝 and Zhu Ran/朱然 of the Three Kingdoms period next to MCS’s, with the meaning of some phrases listed in parentheses after the literal translation (using two of MCS’s names is a good solution for the lack of courtesy names in canon):
To balance out all the white background product photography, I’ll close with some texture shots:
#cost for everything was ¥90 or about $13#overseas shipping not included#先生与我,如同一人#chinese fandom#nirvana in fire#琅琊榜#merch review#long post
89 notes
·
View notes
Text


Higuchi Kouhei and Mashiko Atsuki for socool 搜酷 Magazine (upcoming sale on Oct 2023)
WHY ARE THEY SO CUTE 🥹🥹 But finally a magazine I don’t have to go above and beyond to get because its available on Weidian
45 notes
·
View notes
Text
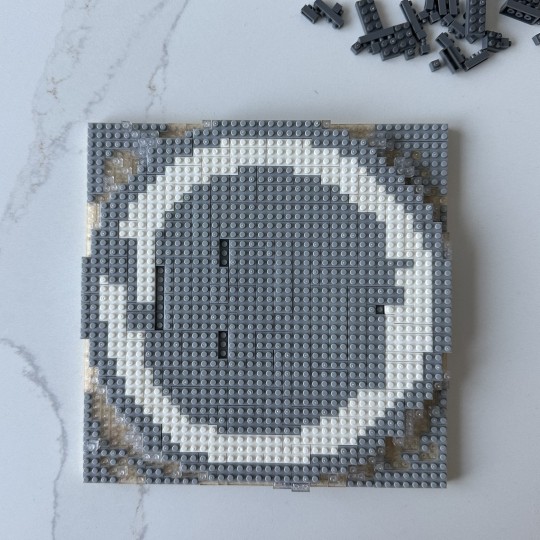
Building Block Figs - Armory
Following up on the recent sets of building block figs I've been posting, comes one of my absolute favorites!
As I mentioned with the earlier fig sets (Building Block Figs - Beautiful Fight Scene in the Middle of the Lake (Part One, Two, and Coda); Basking in the Sun, Catching Light, and Two Devils), I missed these sets when they first came out, so I've had to pick them all up on Xianyu. With the exception of this set! This one I couldn't get on Xianyu, despite my best efforts. I have only seen it for sale exactly once, and when I tried to buy it, it turned out the listing was only up to draw traffic, and the seller just had one other (vaguely related) set. I was resigned to just keep watching and searching for it and hoping for the best, which was a real pity, because just from the small sales picture I really, really had to have it.
Thankfully! Qilin, the merch wrangler extraordinaire (@88Qilin on Twitter), had bought this set way back in the day, and when she heard I was on the search for more of these sets, was kind enough to check in with me to see if I needed it. AND BOY DID I. She immediately sent it off, and it arrived in record time! She even included some wonderful little extras, that I took a picture of immediately, but for some reason can no longer find. I'll take another pic and add it! In the meantime, I'll add a placeholder:
[Qilin's extra goodies pic goes here]
I was so excited to get this set, I can't even tell you. I feel super, super lucky.
(Fun fact, Qilin is the reason I originally found out about fan made figs in the first place! I saw her post on Twitter (also way back in the day) about the New Year's series of 6 figs, and I absolutely had to have them. I had just reactivated my long-dormant Twitter account to keep up with the fandom, and I was super nervous to message her, thinking she would be like, "who is this total rando messaging me out of nowhere?!" But no, she was super nice, and very helpful, and it was entirely thanks to her I was able to buy the whole set. A minor miracle at the time, trust me, considering how green I was at navigating Weidian back then. If you ever want to buy figs directly, definitely check out her pinned post walkthrough on her Twitter page, it's invaluable information.)
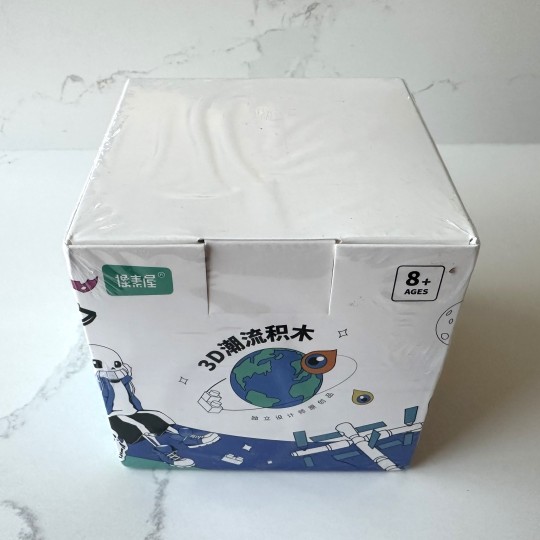
The set came sealed and as usual, in a plain box. Inside there was the same set up as the other sets in this series - a double bagged bag of bricks, the card with the QR code for the online 3-D instructions, and a handy little tool to separate bricks.
The full name of this set is Lao Wen Sacrificed his Life to Save Ah Xu. It measures 8.0 x 5.6 x 12.1 cm, and is rated 10 hours to complete. The "hours to complete" ratings have been extremely accurate to date. But, I was determined to get this set done over this holiday weekend, so hoped that my prior experience on these would serve me well to get it done in record time. So I timed myself!
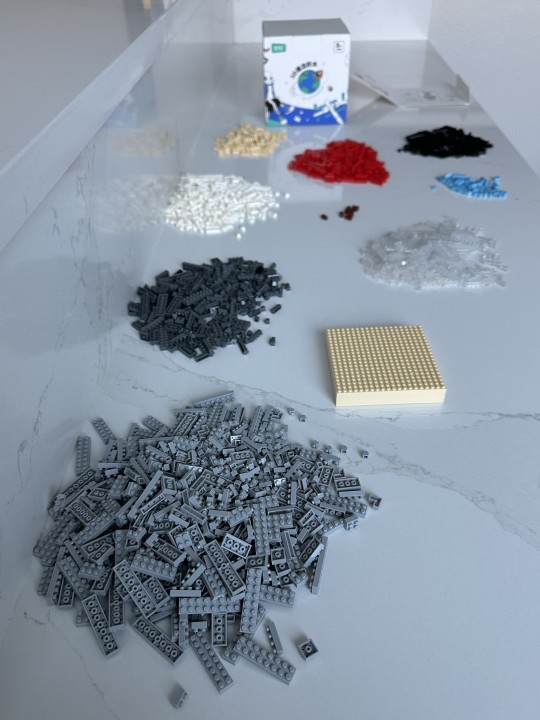
Here I am getting ready to start. Not a lot of colors, which is typical for these sets. Not too bad looking, huh? You'll notice that unlike the other sets, I didn't carefully pre-sort out all the pieces by size and shape. I simply sorted by color and left them in big piles like this, in a bid to shave off even more time. I was a bit curious if it would be faster to hunt-and-peck through each pile for the right bricks, or if sorting them was about the same. Given that it took about an hour to sort through the larger sets, I decided to roll the dice here.
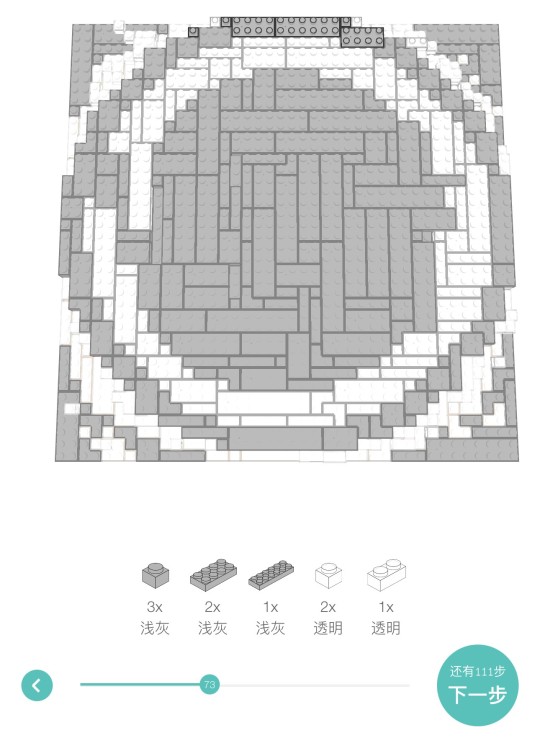
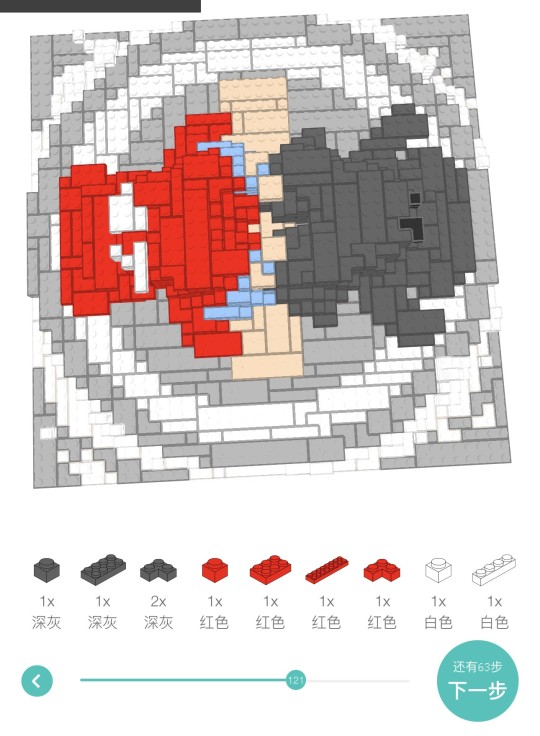
The directions informed me there were 184 steps in this set. Not too bad! I sat down, put on my headphones, cranked up some music, and got started.
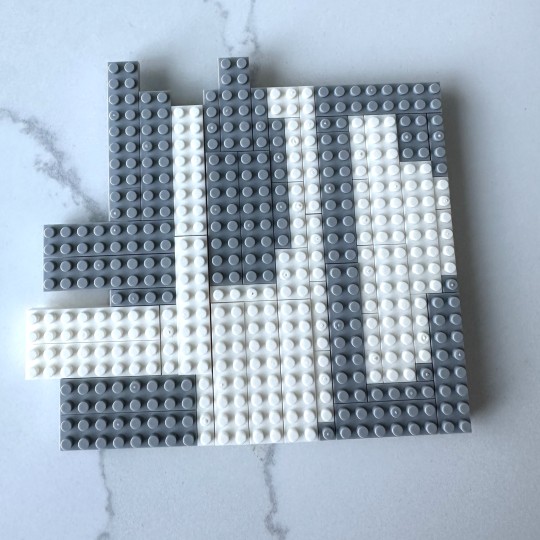
I finished the first little block just as fast as could be. I was flying! I was so proud of myself. It was a holiday weekend, the morning was bright and sunny, and I was having a grand old time.

The next step was to add a second base square in, and then a third and fourth. I added in the second base and kept on flying through it. And then...I ran out of a white brick in the largest size.
Which is kind of impossible. Each of these sets has extras of all the bricks - quite a few, actually. So I searched through the white pile a couple extra times, and sat there and wondered what was going on. As you know, I have lots of spare bricks from the previous sets, so it would be easy enough to pull the right one out, but this shouldn't be happening.
So I was like, wait a minute. I looked back at the phone directions for the step I was on, and said, hold on, I don’t see the character 白 for white anywhere. Uh oh. I Google Translated the characters that were there and sure enough, 透明 meant transparent.
I had just been going off the colors on the phone screen, and I mean, come on! The bricks looked white! If you scroll up and look at it, don't you think so too?
Anyway.
So, I pulled off all the white bricks, and replaced them with transparent bricks, and hey, what do you know, I had plenty of them.
Alright, alright, so this happens when you don't speak the language. Never fear, I'm back on track!
Dear friends, I was not back on track.
Sometime in all this confusion, I had spun around my little base square around, so when I attached it to the other base squares, I started filling in the top bricks the wrong way around. Luckily, I realized what I was doing after a few steps in, and I didn't have to totally reassemble it like I did with the Not White But Transparent Brick Debacle of early 2024. I just gently disconnected the base squares from each other, turned them around, and kept going.
So! I finished the first layer 1 hour, 46 minutes in. This, of course, includes the one major mistake and the one minor mistake. It's pretty big, isn't it? The other fig sets only had max 2 base squares, so I was pretty excited to see how nice and big this was. The transparent bricks look nice, huh?
I took a bit of a break. Made a little bit of lunch, tidied up a bit, and then came back excited to tackle the next round.

I was paying attention to the names of the brick colors at this point, believe me.
I finished the next layer 2 hours and 54 minutes in. Pretty cool looking, isn't it? It looks like some kind of disk in an alien language. I must admit when I got here, I was both quite happy and also a little concerned. Only layer 2? Still 138 layers to go, and it's been about 3 hours?
Well, no big deal if it took me longer, really. I was having a good time, and there was no actual rush. I will say that at this point, my finger tips were certainly feeling the constant pressing and snapping of the bricks. They had actually toughened up back when I was doing set after set after set, but it had been some time, and my fingertips were back to their usual soft selves.
Luckily for my fingers, I had errands to run and other things to do, so my sore little fingertips got a needed break.
The next morning, I was up and back at it!
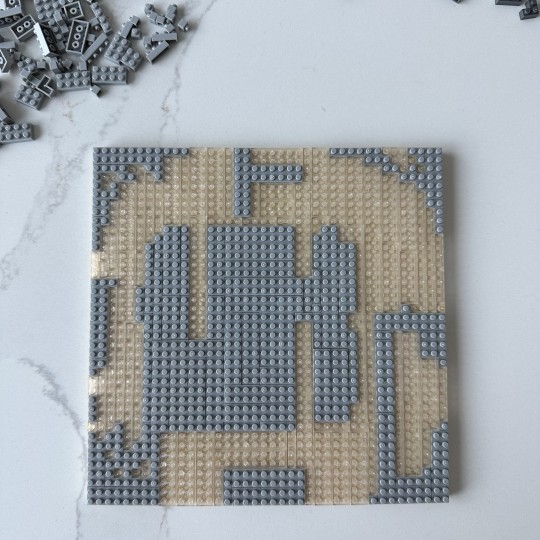
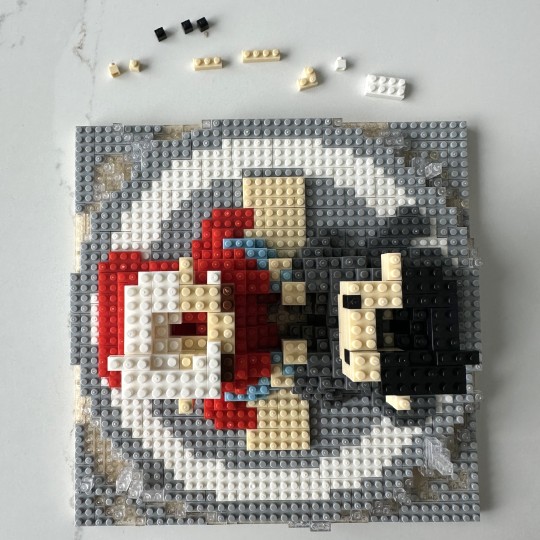
The third layer was starting to look like the actual base of the platform from the show. I was pretty excited to finish this layer, I have to say. I took little breaks here and there, but I was pretty determined to make some real progress.
By that evening, I had gotten pretty far. I stopped here at 6 hours and 3 minutes.

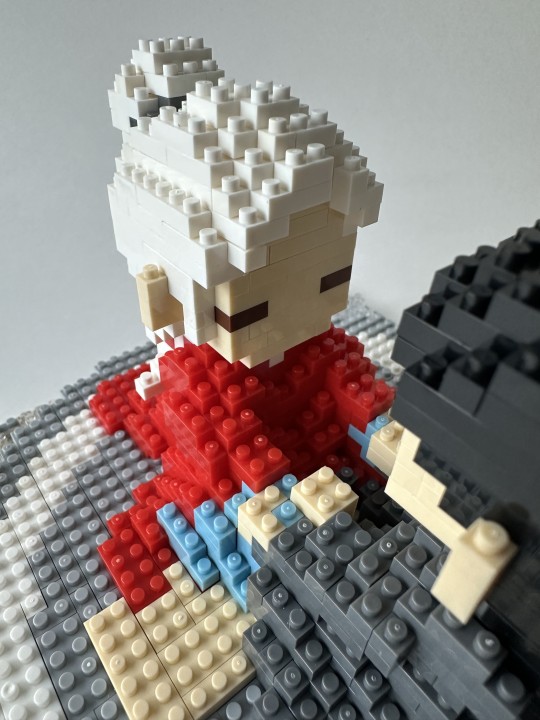
I was inordinately pleased by getting to this step. I could see the robes carefully spread out here, just like the show, and their hands out there. There was also a little bit of white where I was starting Lao Wen's new hair color.
You can tell the passage of time by how the light keeps changing in each of these pictures! I always end with the bricks for the step I'm on laid out in front of me, so I always know where I am when I pick the set back up. My memory is just too bad otherwise, I'll forget what I'm doing.
Well, 3-day holiday weekends don't last forever, so I woke up this morning determined to finish this. There was a little bit of race against the clock today, since I had appointments I had to take care of, and I needed to have enough light left to take final pictures. So, I sat down, and started going as fast as I could.
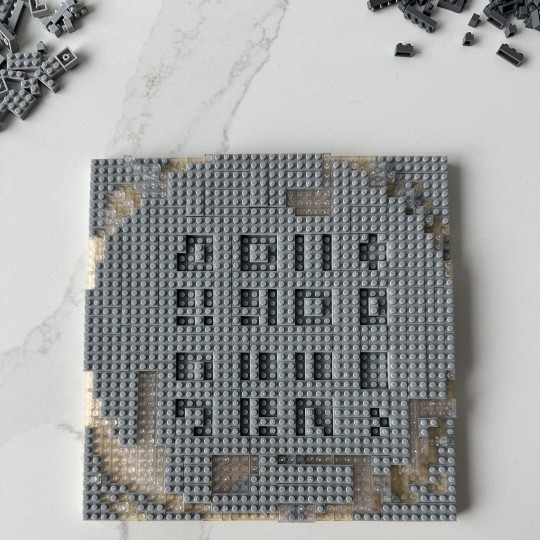
At 7 hours and 6 minutes, I had built up the bodies, and was on to the heads. I hurried through my afternoon errands and got back around 3:10 pm. The sun sets here around 4:20, so I didn't have much time. Tomorrow I get on a plane, so it really was up against the clock! I didn't even put my headphones on this time, I just sat down and focused.

But, it turns out that I didn't need that much time. 45 minutes later, I was done!
Total hours clocked in at 7 hours and 51 minutes. I will tell you, I was indeed flying through this set - all those other fig sets that I made mistakes on definitely helped me. I knew what I was doing, and I went fast. If this had been my first set, or even my second (ok, let's be real, even my third), it would 100% have taken me at least the full 10 hours. It also helped that other than Big Error 1 and Small Error 1, I didn't make any other mistakes.
You can see how many bricks are left (which is why I knew something was up when I ran out of that white brick earlier). I will say that not pre-sorting the bricks is definitely the way to go - it's pretty easy to pick out the right ones, and certainly saves a lot of time just organizing them into piles.
Alright! Let's do some beauty shots, shall we? As you know, the light wasn't super great, but it was good enough!

Oops, I see I need to press down a little on Lao Wen's head to get the bricks firmly squeezed together. I'll admit my aching fingertips were not pressing down super hard at this point!

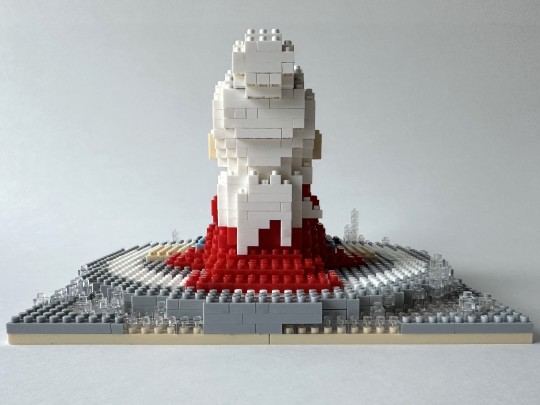
I really love the 3-D effect of the icicles ringing the platform. This set is just fantastic!

It's a little hard to see A-Xu's luxurious mane of hair here with the black on black, but it's quite nice.

Lao Wen's closed eyes! Please also note the little white underlayer on his robes here at his neck. So cute.
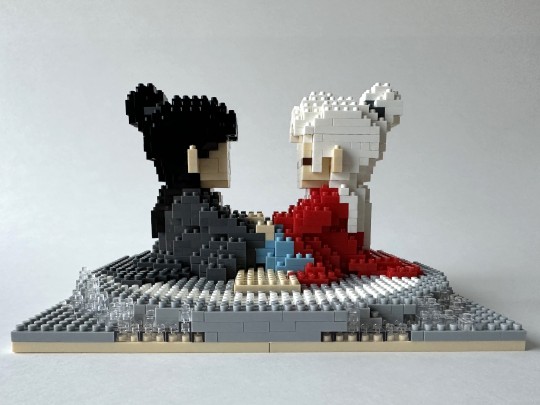
This is a nice angle to see A-Xu's married hair bun (minus one hairpin, of course) and Lao Wen's loop of hair.
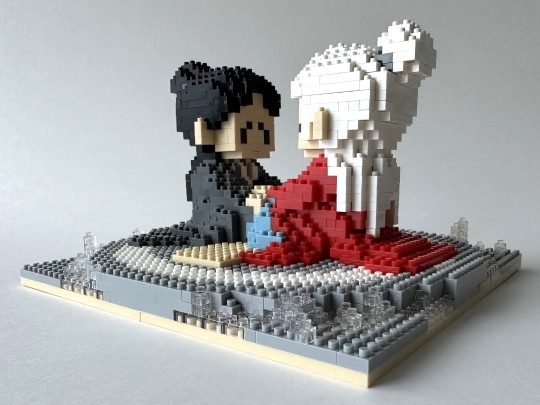
This angle is the coup de grâce of this whole set for me. For the longest time, I thought the single bricks was his eyes and the marks down his cheeks were tears, but in reality I think the larger bricks are his eyes, and the smaller bricks are his eyebrows going up in shock and horror. But all I can see are (non canonically accurate) tears free flowing down his cheeks!
I did waste several minutes at the point I was building this just contemplating his face, and I was THIS close to subbing in the light blue for to make tears after all, because (sorry A-Xu) I find it delightfully hilarious. Little Lego tears! I can't even. But, I decided to go with the actual design for this so you could see it (and go back and replace them afterwards).
Ahem. Anyway. This is also a beautiful shot to see Lao Wen's long white hair draping over his shoulders.
More of the snow and icicles all the way around. It looks great.

Seriously, don't you think they look like tears? Right, anyway. This actually isn't a bad angle to admire the modeling on the clothing.
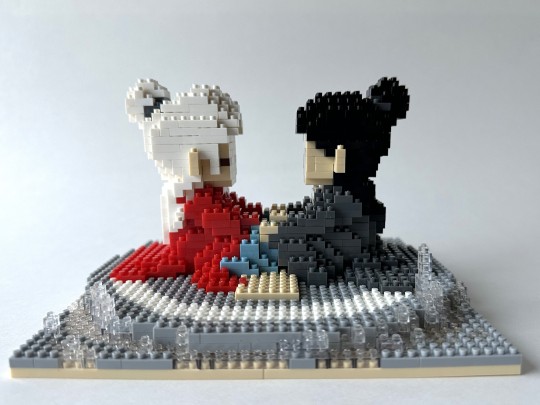
And we're back around. The modeling really is beautiful on this, with their robes carefully spread out behind them and to the sides of them.
Time for some closeups:
Aww, Lao Wen.

Aww, A-Xu, honey.

The bottoms-up angle was really hard to get on this set, since the base was so large.

The top down angle looks great I think. This is actually the first time that I'm noticing they have the scroll underneath them.
Honestly, I'm so impressed with this set. With only 9 colors, and some very basic building block shapes, they did a gorgeous job rendering this scene.

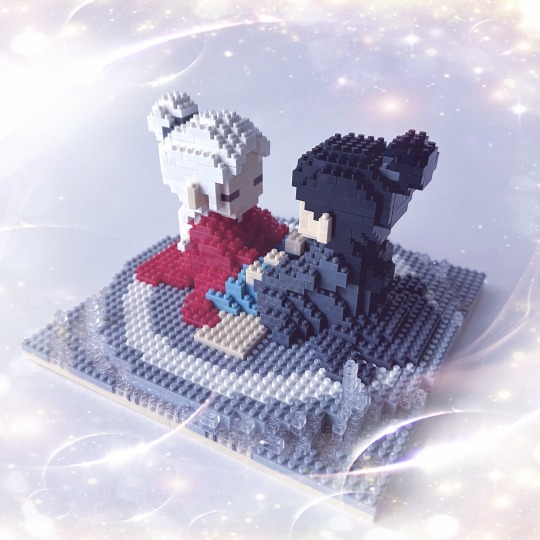
With my last picture, in the last of my fading light, here's my two sets of armory figs re-enacting this scene. The closest set is actually from the New Year's set of of 6 that Qilin helped me buy back in the day, so this really is full circle!
I couldn't quite get my camera to focus on both sets, but you can see the relative size difference at least. It's a big set!
Alright, these are the last of these sets for a while - there's two more sets of two single figures each, but I have not been able to locate them on Xianyu either. I'm ok with it though - this is the last of the big scene sets, and one I really, really wanted. The others are nice but not quite as special as the sets.
Thanks for the figthusiasts friends that have accompanied me on these building block fig posts! They're all quite long, so I appreciate you reading all my thoughts and experiences with these. I absolutely love them - they were a ton of fun, and I only wish I had more! I'd love to enact out the entire series with building block scenes - can you imagine?
Material: Plastic building blocks
Fig Count: 520
Scene Count: 37
Rating: Pure love
[link to the Master Post Index]
19 notes
·
View notes
Text
Allen and Hajun 20cm Dolls
1⃣ 【Allen has reached MOQ, he was sent to the factory for mass production.
Hajun is at 20/30, he still needs 10 more to reach minimum order quantity. Thank you so much for your support !!】
2⃣ 【If you want to purchase, you can use WeiDian or WeChat, or you can pay through me/a proxy. Please feel free to choose the payment method you think is most suitable. You will need a chinese address, and there will be another small payment later for shipping to CNaddress. If you don’t have the time to look for a proxy, I will use superbuy and send it to you then.
Purchase Links:
https://k.youshop10.com/7w5KcKHS
Wechat:DM me】
3⃣ The doll is 80rmb each and 3rmb extra for elastic ears. You can join the QQ (782337341) to await news.
4⃣These dolls are non-profit. neither of us are making any money from it, this is just us making dolls to share with other fans.
We will check all the goods to ensure their quality.
If you have questions or wish to purchase from me, please DM me or chibunsj (twt). we will be updating progress through twitter, discord, line, and kakaotalk and you can message me there as well.


11 notes
·
View notes
Text
Mini Samomile & Cattawin plushies: Kyuu's North America & UK Group Order

Have you seen these mini Samomile and Cattawin plushies around fandom and wondered how to adopt your very own? If so, great news: I am hosting a group order for folks in North America and the UK!
Basic info:
Made by Zerozeroling1 - I received her approval to run this GO
13x10cm plushies
Two plushies per set, with two sets (one old and one new)
cannot mix and match plushies from the sets
deadline to join this GO: 12:01 Midnight ET, New York Time - Friday, October 27, 2023
EXCEPTIONS CANNOT BE GRANTED
Two payments required to join group order:
Payment 1: $15/set USD down payment for one set ($30 for both sets)
Payment 2: Shipping to you. See document for shipping estimates by country and payment timing
(1) Please read this entire document for info & FAQs before filling out the form
(2) Put in your order plushie order via this Google form
Set A (old set):

Set B (new set):

Approximate sizing scale:

Want to handle it yourself? Don't want to share your personal info? Not in North America or UK? Check out:
✨Kyuu’s Superbuy Weidian Buying Guide✨
[currently info is set to large plush, but I will update it later today]
reblogs/boosts appreciated! 😘
Given this is the third run of Set A, it's very likely this will be the last time Zerolingling makes these. Please help spread the news so we don't have any regret!
29 notes
·
View notes
Text
Pandabuy,Sugargoo,Hagobuy,CSSBuy,Superbuy and Wegobuy in One Spreadsheet
The first site with weidian items that combine links to several agents that includes pandabuy,hagobuy,sugargoo,cssbuy,superbuy and wegobuy.And all agents' links in one spreadsheet.
→→pandabuypicks→→
2 notes
·
View notes
Text
Oop I forgot to share this find with y’all!
This true-form Sukuna plush! I have a Sukuna one already but not true form he’s so cute!! With his four little arms 😍
(This is creator photo not mine!)

Weidian link (i made an earlier post on how to buy from Chinese websites). He’s currently on preorder until 2.25 @ 8pm China time.
Although I did accidentally buy 4 when I only meant to buy 2 so when I finally get them I’ll probably sell the extras on my IG doll/nendo sales account. 😆
23 notes
·
View notes
Text
BURYING MY HEAD IN MY HANDS AS I TEXT SOMEONE "CAN YOU HELP ME BUY AN ITEM OFF WEIDIAN" THEN I SEND A LINK TO THE GAYEST MAGAZINE COVER TO EVER HIT CHINESE STORES THIS IS SO EMBARRASSING IM GOING TO DIE
2 notes
·
View notes
Note
Please vote for Jaedo on the Weidian app
https://shorturl.at/IhyDm
Link
0 notes
Text
Can you recommend a reliable and affordable website to buy replica bags besides DHGate or AliExpress?

Most of the replica manufacturers come from Putian. The weidian website is also very famous for selling replicas. Moreover, it is an online transaction with certain guarantees or xianyu. In addition to replicas, there are also many second-hand luxury goods, and the price is also lower than the original price of the product.
Elkexpress
0 notes