#visual studio code guide
Explore tagged Tumblr posts
Visit Tumblr Blog
Explore Tumblr blogs with no restrictions, modern design and the best experience.
Last Seen Tumblr Blogs


Fun Fact
The KCSC sent more than 20K requests to delete posts related to prostitution and porn to Tumblr from January to June 2017.
Text
Mini React.js Tips #1 | Resources ✨

I thought why not share my React.js (JavaScript library) notes I made when I was studying! I will start from the very beginning with the basics and random notes I made along the way~!
Up first is what you'll need to know to start any basic simple React (+ Vite) project~! 💻
What you'll need:
node.js installed >> click
coding editor - I love Visual Studio Code >> click
basic knowledge of how to use the Terminal

What does the default React project look like?

Step-by-Step Guide
[ 1 ] Create a New Folder: The new folder on your computer e.g. in Desktop, Documents, wherever that will serve as the home for your entire React project.
[ 2 ] Open in your coding editor (will be using VSCode here): Launch Visual Studio Code and navigate to the newly created folder. I normally 'right-click > show more options > Open with Code' on the folder in the File Explorer (Windows).
[ 3 ] Access the Terminal: Open the integrated terminal in your coding editor. On VSCode, it's at the very top, and click 'New Terminal' and it should pop up at the bottom of the editor.


[ 4 ] Create the actual React project: Type the following command to initialize a new React project using Vite, a powerful build tool:
npm create vite@latest
[ 5 ] Name Your Project: Provide a name for your project when prompted.

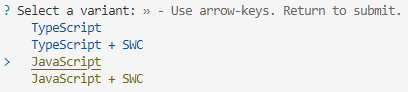
[ 6 ] Select 'React' as the Framework: Navigate through the options using the arrow keys on your keyboard and choose 'React'.

[ 7 ] Choose JavaScript Variant: Opt for the 'JavaScript' variant when prompted. This is the programming language you'll be using for your React application.
[ 8 ] Navigate to Project Folder: Move into the newly created project folder using the following command:
cd [your project name]
[ 9 ] Install Dependencies: Execute the command below to install the necessary dependencies for your React project (it might take a while):
npm install

[ 10 ] Run the Development Server: Start your development server with the command (the 'Local' link):
npm run dev

[ 11 ] Preview Your Project: Open the link provided in your terminal in your web browser. You're now ready to witness your React project in action!
Congratulations! You've successfully created your first React default project! You can look around the project structure like the folders and files already created for you!
BroCode's 'React Full Course for Free' 2024 >> click
React Official Website >> click
Stay tuned for the other posts I will make on this series #mini react tips~!
#mini react tips#my resources#resources#codeblr#coding#progblr#programming#studyblr#studying#javascript#react.js#reactjs#coding tips#coding resources
115 notes
·
View notes
Note
Greetings moose-mousse, it is a bit niche/weird (but let's see how far it goes) but may I ask for some suggestions / advice concerning making pseudo-code / fake code scripts / programs to put onto scenes to film? Because I work towards portraying sidestream programming environments of the past (yet customized into my own 16^12 worldbuilding stuff) to show for films I look forth to produce this summer and idk where to pull fitting samples, code style guides & whatnot to put on various screens.
A great start. Wireshark. It is a packet sniffer. Especially on wireless networks in looks great as background busywork. Do it to a public network and you will get plenty of noise to look technical. Basically in wireless networks, everyone is just screaming things. Only the intended target really reacts, and things are encrypted and all sorts of safety is in place, but the fact of the matter is still that everyone is screaming. So you can just have wireshark show you everything that is happening, and it gives a nice constant feed of technically valid but essentially nonsense to look at. Customize the look a bit and you are great. Note that this is both legal and fine. This is stuff it is ok to yell about in public The other is of course a command console. For that I would recommend installing Python, and then simply make a infinite loop that prints technical nonsense. If you need sample text then install anything by writing "pip install ______", copy the text and print it in your own python thing. Creates infinite nonsense text that looks real (because... it is a copy of something real.) Both of these should take less than an hour to set up, and will create great looking backgrounds on screens for "someone doing something technical"
If you want code just staying still on the screen, then basically install visual studio code, find an open source project on github and open a file. Open files of a few different types and visual studio code will automatically recommend you extension that will color the text to look like proper code.
8 notes
·
View notes
Note
Hey Kristi! how are you doing today? uwu.
I hope you have enough water thoughout your day.
How did you get into the IF world, and how did you learn how to code (or pseudocode)? What engine are you implementing on your game?
I love your story, and as a person who wants to tell a story, i am struggling with that. (I only speak python for god's sake i'm a poor it student)
Also, a recommendation for fans out there wanting to make a game independently?
When can we hold Blane for a sec really he needs a hug
<3
hi! so, all my advice i've tagged on my blog, but the best post i have for coding and this particular scenario is probably this one.
however, i've said it before and i'll say it again: i'm probably not the person you should go to for coding. i learned (a word i use loosely) everything in the span of two months and promptly forgot it all. ask me anything now and i'll be stumbling through an explanation that might not even be correct so. take all of my coding advice with a grain of salt.
but to answer your question, i use twine (sugarcube) to code my story. for ease of writing, i open my code in visual studio code with the twee extension that colour codes everything to make it easier on the eyes.
in general, my best advice for learning to code is to just go nuts. start with a template, play around with it, look at blogs that are better coders than i am and see if they can answer the questions you have. google things, search up css guides (w3schools was extremely useful for me) and eventually, you'll start to learn the patterns enough to put together what you want. it's very vague, i know, but this is genuinely how i learned and what worked best for me.
good luck !!
51 notes
·
View notes
Note
I'm a wittle shy but I has a question about programming :3.I love the process of coding and making things with it but ughhhh I just don't know what to make. Should I take a course on computer science like CS50 to get a better idea of the process (I've been coding for almost 2 years but have been very inactive this last year) or should I just wing it and try to make just something, and maybe learn a new language like C? Thankies :3
WING IT!
My best advice is lowkey just steal ideas from others. The thing that kinda domino-affected me into this whole programming thing was an emulator of Flipnote studio.
Find the things that you enjoy making and make those, be it video games, websites, applications, emulators, simulators, engines, programming languages, visual novels, text interface games, hacking.
And google is your best friend, anything you can think of has been made before and someone's probably put their code or a guide out there.
And I would reccomend learning C because it's so so so so so easy. People say C is scary, it's really not. Once you've learned Pointers that's it, you've learned the hardest part (and they are so easy). AND C has a library for everything you can think of, since it's been around forever.
That's pretty much it, dive straight into something fun. And if something gets to difficult it's never bad to take a break or focus on something else. Dont burn yourself out like I did once.
51 notes
·
View notes
Text
Are you new to CSharp? How about 22 FREE video tutorials to help you out? Here is a collection of videos that I've put together on this topic. All full-length. All for free! Collections & Enumerables: - Beginner's Guide to Dictionaries: https://youtu.be/5VvAcoBJGJs - Arrays, Lists, and Dictionaries: https://youtu.be/VFO5vK7QjBc - IEnumerable Crash Course: https://youtu.be/RR7Cq0iwNYo - Iterators: https://youtu.be/fU5-QeSLG2I - Iterators vs Collections: https://youtu.be/0s_VMhZSOwQ - Iterators vs Paging w/ EF Core: https://www.youtube.com/watch?v=lOX-TL5lcYA Enums: - Beginner's Guide: https://youtu.be/9GxabCuWTEk - Strings to Enums: https://youtu.be/VENbpXhGUZM - Flags: https://youtu.be/_yUOrzTCpGU - Avoid Incorrect Usage: https://youtu.be/Z_V-c7fph1U Testing: - Unit vs Functional: https://youtu.be/uCbAcMY65Tw - How to Test Internal Classes: https://youtu.be/TjsM3oVg5_w - Learn xUnit: https://youtu.be/rohq-Wqj0yI - Why Write Tests (Practical Example): https://youtu.be/Bpvs8g4ArwU - Composition Helps Testing: https://youtu.be/CQd2x2_3Tpc Strings: - Comparing Strings: https://youtu.be/nFFKfbuOvQw - StringBuilder: https://youtu.be/zQHc4RKC6F0 Visual Studio: - Debug Watches in Visual Studio: https://youtu.be/_v9k74gWJtE - Debug Watches in VS Code: https://youtu.be/agABzm60spg OOP: - Inheritence: https://youtu.be/yly0sXAmYt0 - Composition: https://youtu.be/iEfuyxwKQCE General: - How Record Equality Works: https://youtu.be/HZMh-unN-fY - How To Benchmark Your Code: https://youtu.be/Wa3sdKGp3wE ---- 📨 Sign up for my email newsletter! 🗣️ Share with your network! #beginners #softwareengineering #softwareengineer #softwareengineers
3 notes
·
View notes
Text
7 extensions of VS-Code to boost productivity.
Boosting your productivity as a beginner programmer is essential. Visual Studio Code (VS Code) offers many extensions to streamline your workflow. Here are some of the best VS Code extensions to help you write cleaner code, debug efficiently, and manage projects effectively.
1. Prettier - Code Formatter
Function: Automatically formats your code to make it clean and consistent.
Usage: Saves time on manual formatting and ensures your code adheres to style guides.
Install: Search for "Prettier - Code formatter" in the extensions marketplace and install it
2. ESLint
Function: Identifies and fixes linting errors in your JavaScript and TypeScript code.
Usage: Helps catch common errors and enforce coding standards.
Install: Search for "ESLint" in the extensions marketplace and install it.
3. GitLens — Git supercharged
Function: Enhances the Git capabilities in VS Code by providing insights into code authorship and history.
Usage: This makes it easier to understand the history and evolution of your codebase.
Install: Search for "GitLens" in the extensions marketplace and install it.

4. Code Spell Checker
Function: Checks your code for spelling errors.
Usage: Helps catch typos and improve code readability.
Install: Search for "Code Spell Checker" in the extensions marketplace and install it.
5. Path Intellisense
Function: Autocompletes file paths in your code.
Usage: Saves time and reduces errors when working with file paths.
Install: Search for "Path Intellisense" in the extensions marketplace and install it.
6. Bracket Pair Colorizer 2
Function: Colorizes matching brackets to make it easier to identify block structures.
Usage: Improves readability of your code, especially for nested blocks.
Install: Search for "Bracket Pair Colorizer 2" in the extensions marketplace and install it.
7. Pets
Function: Adds a fun, interactive pet to your VS Code workspace.
Usage: Provides a cute, engaging way to take short breaks and reduce stress.
Install: Search for "Pets" in the extensions marketplace and install it.
6 notes
·
View notes
Text
JavaScript Tutorial: A Beginner's Guide to the World of Web Development
Welcome to the exciting world of JavaScript! If you're looking to dive into web development, understanding JavaScript is essential. This versatile programming language powers the interactive elements of websites and is a key component of modern web applications. In this tutorial, we'll cover the basics of JavaScript, its syntax, and some practical examples to get you started.
What is JavaScript?
JavaScript is a high-level, dynamic, and interpreted programming language that is primarily used for enhancing the interactivity of web pages. It allows developers to create rich user experiences by manipulating HTML and CSS, responding to user events, and communicating with servers.
Why Learn JavaScript?
Ubiquity: JavaScript is supported by all modern web browsers, making it a universal language for web development.
Versatility: Beyond the browser, JavaScript can be used on the server-side (with Node.js), in mobile app development (with frameworks like React Native), and even in game development.
Community and Resources: With a vast community and numerous resources available, learning JavaScript is more accessible than ever.
Getting Started with JavaScript
Setting Up Your Environment
To start coding in JavaScript, you don't need any special software. All you need is a web browser and a text editor. Here’s how to set it up:
Choose a Text Editor: Popular options include Visual Studio Code, Sublime Text, and Atom.
Open Your Browser: You can use any modern browser like Chrome, Firefox, or Edge.
2 notes
·
View notes
Text
Game Development Classes

In today's fast-paced digital world, the gaming industry is booming, offering immense career opportunities for creative and technical minds. If you're passionate about gaming and want to turn your hobby into a career, Image Creative Education in HSR Layout, Bengaluru is your gateway to success. Our Game Development Classes are designed to equip you with the skills and knowledge needed to thrive in this exciting and dynamic field.
Why Choose Game Development?
Game development is more than just creating fun and engaging games. It’s about storytelling, innovation, and using cutting-edge technology to create interactive experiences. Whether you want to design characters, develop immersive environments, or program complex gameplay mechanics, game development offers a range of career paths. With the demand for game developers skyrocketing, now is the perfect time to enter this thriving industry.
What We Offer at Image Creative Education
At Image Creative Education, we provide comprehensive Game Development Classes tailored to both beginners and experienced individuals. Our expert instructors guide you through every aspect of game development, from concept creation to final production. You’ll learn key skills such as:
Game design principles: Understand the fundamentals of designing compelling games.
Programming: Learn coding languages like C++ and Unity to bring your game ideas to life.
Graphics and animation: Create stunning visuals and animations using industry-standard software.
Level design: Master the art of creating immersive game worlds and environments.
Game testing and debugging: Ensure your games are polished and ready for players.
Why Choose Image Creative Education?
Located in the bustling HSR Layout of Bengaluru, Image Creative Education stands out as a leader in creative education. With a state-of-the-art facility, experienced faculty, and a curriculum aligned with industry trends, we ensure that our students are fully prepared to meet the challenges of the game development industry.
Our Game Development Classes offer hands-on experience, allowing you to work on real-world projects and build a strong portfolio that will impress potential employers. Plus, our strong industry connections give you access to internship and job opportunities in leading gaming companies.
Join the Future of Gaming
Whether you dream of working for top gaming studios or creating your own indie games, Image Creative Education in HSR Layout, Bengaluru, will give you the tools to succeed. Our Game Development Classes are designed to foster creativity, technical expertise, and problem-solving skills that are essential in today’s competitive gaming industry.
Take the first step toward a rewarding career in game development. Enroll today at Image Creative Education and become part of the next generation of game developers.
#GameDevelopment#GameDesign#GameDevClasses#LearnGameDevelopment#BengaluruGaming#CreativeEducation#HSRLayout#IndieGameDev#GameProgramming#TechEducation#GameDevelopers#BengaluruTech#FutureOfGaming#GameArt#GamingCommunity
2 notes
·
View notes
Text
On putting together a custom fur thickness setting (works great for clipped fur)
16/10/2023: Updated to add more info for generating hash codes.
Another day, another guide, I found some time to put together this guide for y'alls.
Essentially, we'll be creating or own custom fur overlay. It's not really complex, just as the previous ones, bit annoying to put everything together neatly.
As always, we'll be using:
Sims 4 Studio
Whatever editing software you want, if you're editing just the fur texture, for others, I'm not sure, but very likely whatever software you want will work. I'm going to use GIMP.
Notepad at your own discretion.
As with my previous guides, we'll be using the following Sims 4 Studio tools:
Game File Cruiser
Hash Generator
Create a new, empty package to work with and let's get going.
Step 1:
Open up game file cruiser, just as in my previous guides, ep14 in the left search bar, leave the top right search bars empty for the time being, then go ahead and find CAS Preset box and tick it.

This is pretty straightforward - the files are nicely labelled, and we'll grab the second fur file and add it to our package.
From there, we'll need to scroll down in the list and click "Edit Items" on the Sculpts tag, copy the instance ID and then find it in the game file cruiser and add it to our package. Don't worry that it says "EYES" there, it's not relevant.


Now your package file will have 2 items in it - a CAS Preset and a Sculpt File.
Now, we'll want to add the following instance ID's from the Sculpt file to our package:

You'll have to copy each ID, find it in the game file cruiser and add it to your package file.
I recommend essentially copying an ID, then throwing it in the Instance field search, making sure the bottom search bar has ep14 in it, just in case and then selecting all file types and doing it that way. It'll be quicker.
Your package will look like this:

Now, we'll need to grab thumbnails, so we can create a custom thumbnail for the file, for when it shows up in-game.
We're going to copy the CAS Preset ID and put it in the Game File Viewer, instance field, make sure ep14 is enabled (It's just good practice when wanting to work with specific files).

Select both files (hold down ctrl and left-click on both) and press "Add to Package".
Now, it's time to add IDs to everything, in my previous guides, I've tried to take people step-by-step through the process of adding ID's, but I figure it's a lengthy process, so I'll provide a visual guide for what goes where.

These three MUST have the same ID, for the thumbnails to appear in-game.
And now the more annoying/difficult part:

Edited 16/10/2023: When generating your hash ID's, please use your creator name ie.: "[YourCreatorName/Blogname]TutorialCustomFurCoat1", this will give you a more unique hash code than hoping to be as descriptive as possible when generating the hashes (in this case instance ID's).
Thanks to Mizore Yukii for this advice, from Creator's Musings.
If you're added your files in order like this, it can be easy, but if you've accidentally sorted the files, or added them in a different order, it can definitely be confusing.
In case your files aren't in order, just compare the ID's and make sure to check twice and do it one by one, so you can use the method of elimination, if you're lost/confused.
To change ID's on images, press the "Data" tab and replace the instance ID as follows:

Once you've created all new instance ID's, we've got a few things left to do.
You'll want to copy the ID of "Sculpt" and then open "CAS Preset" and go down to "Sculpts" and replace the ID there:

Then press save and now you can begin editing your image files. You can essentially edit every image file, but if you're not familiar with bump maps, etc., I'd recommend just sticking to editing the "fur" texture for the first time.
This is the file you'll want to export for the "fur" texture edit:

Once you're happy with your coat, mine is here:

Export it as a PNG file, no compression, nothing, just let it export as is.
Then import the file into your new package file:

Save your package and now go ahead and edit your thumbnails, start by exporting both of them and then just do whatever you want and then import those two into the package:

Now, go ahead, save your package and have a look ingame:

And you're done.
#Sims 4 Horses#Sims 4 Equestrian#Sims 4 Equestrian CC#Sims 4 Horses CC#Sims 4 Horses Guide#Sims 4 Horses Custom Fur#Sims 4 Guide#Sims 4 Resources
17 notes
·
View notes
Text
Coding A Simple Firefox Extension
Hiya! Today I want to share my experience creating a simple Firefox extension. I was a bit intimidated by the idea of creating an extension, but I was determined to give it a try! Been on my 'projects to-do' list for a long time! 😅
I found that the process was actually quite straightforward, and with some guidance from a couple of YouTube videos, I was able to create a working (temporary) extension in just an hour. My hope is that this post will serve as a helpful guide for anyone who is interested in creating their own Firefox extension~!

What exactly are we making?
We will be making a simple temporary extension - an extension that only you have access to e.g. end-users will not be able to use the extension. This is a way to test if your extension works and find issues. I might make another post on how to actually upload it for other people to use, but for now, this method is for you to use the extension.
This is the link to the official Mozilla Firefox 'Temporary installation' Guide' for extenisions - LINK
Now, for the steps into making the extension:
Setting up the development environment
Creating a manifest file
Adding a pop-up window
Attaching JavaScript functionality to a button
Load your extension in Firefox
Let's get started~!
Step 1 - Setting up the development environment
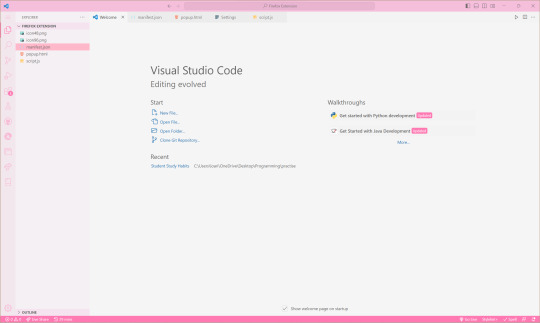
Obviously, you will need to have Firefox installed on your computer. You will also need a code editor, such as Visual Studio Code or Sublime Text, to write your code. I'm going to use VS Code.
In your code editor, create a new folder where you will store your extension files. You can name this folder whatever you like. For this example, I will call it 'Firefox Extension'. I also recommend adding the following files in the folder:
index.html (or in this case popup.html file)
icon image in .png or .jpg or similar formats
manifest.json - talked about in the next step
script.js
Step 2 - Creating a manifest file
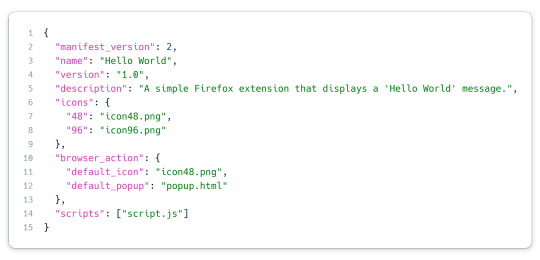
The most important file I believe when creating an extension is the manifest JSON file. This file will contain metadata about your extension, including its name, version, and permissions. In your new folder, create a new file called "manifest.json".
This is the general structure of the file. The icon size you need to have is 48x48 pixel size image and then you can have others to be responsive to screensizes, I just added one extra. The 'browser_action' part includes the default icon image that will display an icon in the Firefox toolbar and the popup html file. In 'scripts', that is where we will add the JavaScript code to run.
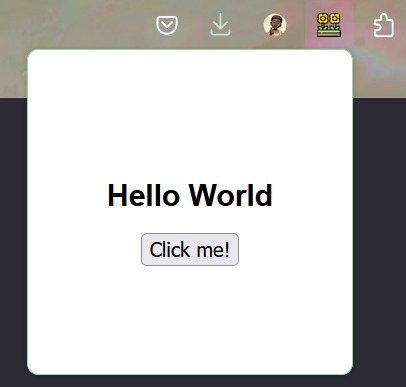
Step 3 - Adding a pop-up window
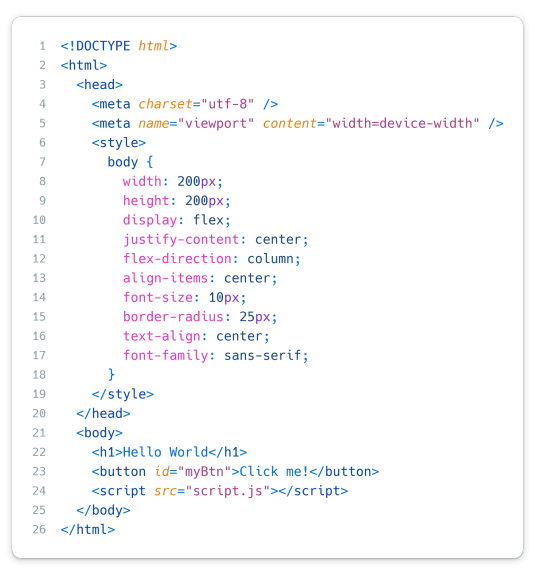
The code simply displays the text "Hello World" and a button in the center of the window. I assume you're good at your HTML and CSS so I won't go into too much detail here but the CSS is in the style tags within the head tags and what we can see also is what is between the body tags - the 'Hello World' and the 'Click me!' button.
Don't forget to include the script tag at the end of the body tag so it'll link to the script.js file in your folder AND include "scripts": ["script.js"] in the manifest.json for the javascript code.
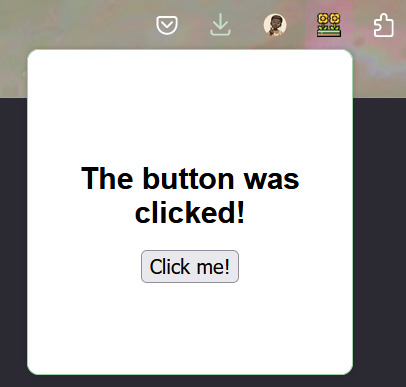
Step 4 - Attaching JavaScript functionality to a button

Again, I hope you very basic JavaScript. This code basically adds an event listener to the button with the ID "myBtn" (which is the button with 'Click me!' on it). When the button is clicked, it changes the heading 1 text from 'Hello World' to 'The button was clicked!'.
And that it! Done with all the coding part and now to upload it for you to use~!
Step 5 - Load your extension in Firefox
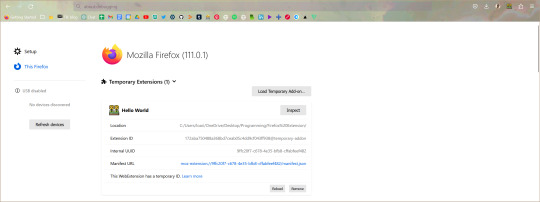
Open Firefox and type "about:debugging" in the address bar. This will open the Firefox Developer Tools page. Click the "This Firefox" section to the left of the page, then click "Load Temporary Add-on". Navigate to your extension folder and select the manifest.json file.
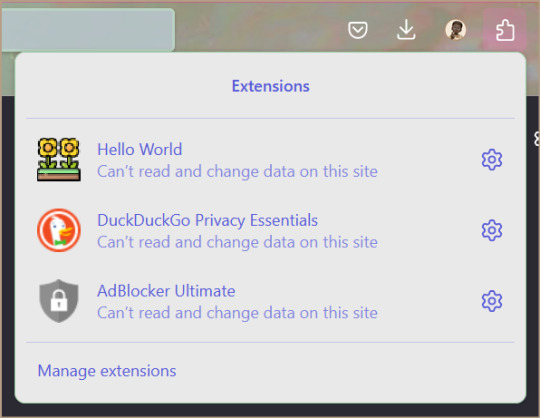
The extension is now loaded in Firefox! Click the icon in the toolbar to see your pop-up window!
Whenever you make changes to the extension, back on the Firefox Developer Tools page, click the 'Reload' button on your extension section and changes should show up!
I hope that this post has been helpful to you and that it has inspired you to create your own Firefox extension! 👩🏾💻💗 Remember, the most important thing is to have fun and experiment with different ideas - play with the colours or sizes or the javascript code! Don't be afraid to try new things and explore!!
Extra links that helped me learn:
How to build an extension for Firefox in less than 5 minutes [video]
Temporary installation in Firefox [webpage]
Thanks for reading 🥰💗
#xc: programming blog post#programming project#coding#programming#studying#studyblr#codeblr#progblr#firefox#extensions#computer science#project#tech#developer#web dev#add ons#comp sci#html5 tutorial#tutorial#learn how to code#my resources
169 notes
·
View notes
Text
youtube
🚀 Ready to elevate your coding skills? Our latest quick guide walks you through installing Visual Studio Code. Start coding like a pro today!
2 notes
·
View notes
Text
Frustrations
Following other developers, learners and makers are great. It facilitates learning and gives inspiration
But one thing that is often missing from people telling about how it is going, is the failures, frustrations and problems any developer will run into.
For this reason, two of my favorite maker youtube channels are Extractions&Ire (Chemistry) and Code Bullet (machine learning). Because these madlads are brave enough to not just show their process and result, but also their failures, mistakes and errors. And how they overcome them. Not always by learning (Sometimes making a dumb mistake is not really something you can learn from...)
It's good, because it's real.
Code tutorials and guides can give the impression that the normal process of development is "Open IDE, code, fix tiny typo error, compile, success". They don't do it out of malice, but out of a want to be concise. Which is fair.
So I also want to share when things do not go so well. I have programmed Atmel's AVR Chips for quite a while now. But I have done it mostly in microchip studio(former Atmel studio) and a bit in the arduino IDE. A job I am currently applying for, uses visual studio code. Which is fair enough. So to prepare for this specific job, and to acquire this quite good-to-have skill, I want to set that up for myself First things first, since I have not done this before, I cannot know if my code would have a weird error so I want to know everything else is working first. So I write a tiny program which simply have the microcontroller increase a number every 2 seconds and write it to my PC over UART. Takes 2 minutes.... I grab one of my Arduino Nano boards and a USB cable for it. And then... I cannot flash it... Its communication protocol have troubles.
I have seen this before. It is to do with the cables not being correct. If they are USB 2.0, very little magnetic noise can cause trouble. (And you cannot tell if a cable runs USB 2.0 or 3.0 by looking at it... because the universal serial bus is not universal... Insert grump rant here) I then spend an hour finding and trying different USB A to USB B-mini cables. Give up, notes down to buy (and MARK) some USB 3.0 versions for the future. I then grab a Arduino Uni instead, as they use USB B, which is much more resistant to noise... And then spend half an hour trying to find a the cable, as I do not have a lot of them, since... nearly nothing uses them. Finally find it, and yes, the program can now be flashed. So I packed all the cables I tested back in their places, after marking them so I will(hoefully) not have to do this again. Had to take several breaks feeling depressed and grumpy, and all in all, this adventure took 4-5 hours. And now I can START on this... And this is how work sometimes is. And that is ok. It is still... VERY frustrating ...
84 notes
·
View notes
Note
Hi there! So sorry to bother you but I was wondering how you add new regional forms to the game? Like what files do you have to change and add to? Also how do you add sprites to the sprite sheet? I'm super new to all of this, but I love your Aevian forms so much and they inspired me to try to make my own. Thank you and your team for the amazing game <3
It depends on what version of essentials you're using! I only have knowledge of the version v13 uses so I'll guide you based off that. NOTE*** The formatting has changed for v13.5 and up, so I'll have to update this as that comes out. To add new forms themselves is actually quite simple. For the mon you want, find their number in the Graphics/battlers folder, and then when you have a FRONT sprite for them. add a _1 at the end of that file name. For example, if this is a form for Pikachu, yes? If there was an Aevian Pikachu, it's be 25_1 for the FRONT sprite. For shiny variants, it should be 25s_1 For the BACK sprite, your file format name should be 25b_1. For shinies, 25sb_1 As for their metadata, you'll have to open MultipleForms.rb in the SCRIPTS folder with any code editing software. (Visual Studio is what I use.) and edit the data in there. Please look at Rejuv's code for examples. It's a lot to explain, but that's pretty much all you need there. You can also control which maps they appear on there as well. I think that's all, but if I'm missing something I'll edit this! also if you need additional help please do send another ask!
23 notes
·
View notes
Text
My stupid guide to getting the stupid list of people YOU FOLLOW on tumblr
if tumblr has some way fo getting a list of usernames and urls of blogs you follow i don't know of it, if theres some script i don't know it, if theres anything. LET ME KNOW. but since i dont think there is welcome to my bruteforce method of getting a list of people you follow.
I am not a coder, i don't know how to do this with a program, and i dont know of any program that does it, no programmer thats going to or anything so im bruteforcing this in perhaps a stupid way but it works
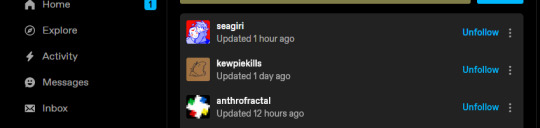
go to your https://www.tumblr.com/following page
its just this same link, it takes you to the list of everyone you follow Then you need to load EVERY FOLLOWER by scrolling ALLL THE WAY DOWN the list, i have 2000 blogs i follow but ti doesnt take long for me to get to the end, yes you have to do this.
rightclick and select inspect
a box will come up, this might be scary for non techy people, don't worry were just looking at the code underneath the site, nothing you change will be permanent. dont mess around here unless you know kinda what youre doing, but dont be scared for what were gonna do.
there are several tabs to this new window, we want to be in the inspector tab, and when you mouse over the text in here you can notice that it flashes certain parts of tumblr. these different lines all pertain to certain spots of the webpage so you can see what tumblr wants you to see.
we want to find where they put the followers
so were gonna hover over:
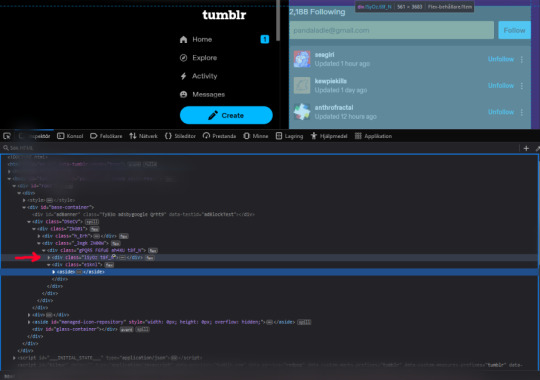
and notice that the very center and only the center where you're followers are shown is lit up, that means inside this line somewhere is your follower list ((its not gonna be pretty)) use the little arrow on the side of this line and click it to expand the underlying code (this is really called nesting i think im not a coder, basically when there an arrow, theres stuff in there)
open the next arrow too (main something something)
keep hovering over the lines within this one and see which one lights up the center and only open that one, next one is "section something something" next class something something
now this might start to look familliar to you if you read all these "data-cell-id=" lines these are all the people you follows usernames,

I'm sure someone who knows how to code would be able to grab this in a neat way and put it in a text document for us, but i dont know how to do that i just know i want it.
so what i do is:
right click the line whose arrow we just opened to be able to see this and select "copy, inner html" this line to be clear

and i make a new notepad document(txt) on my computer, and i paste all that shit in there. and yes it looks like complete nonsense because everything is going everywhere with text you dont need or understand. dont worry about it. you still have all your list of following usernames in there.
now i used vs code(or visual studio code) (its a free program you can just get it if you want use google) and you dont even need to know any coding for this cleaning step. to clean this up, i open the document i created with all this shit in it in vs code and it has the capability to select every instance of a word or symbol or whatever and delete every single one, or replace it. it can also write with multiple cursors at the end of every line of text at the same time. so this way i can get rid of all this nonsense stuff to line up everyones usernames the way i'd like.
you can use google to figure out how to do this, or fuff about in vs code, but selecting a chunk and right clicking and choosing "change all occurrences" is what i used the most.
now if someone who actually codes could… help.. help me please.. dont let anyone else have to use this guide, there has to be a better way. thank you i love you
#tumblr#tumblr guide#tumblr followers#tumblr following#tumblr list#guide#tumblr following list#list of people you follow#please mr google let someone in need see#please mr google let some coder who can help see
2 notes
·
View notes
Text
The Personal Experiences of Pixar and Elemental
Leaving a showing of the crew at Pixar and director Peter Sohn's latest film, Elemental, I was struck by how personal and certifiably unique the film was - no, not necessarily because of its story or even its characters (though the latter felt like a great inverse and even echo of the similar Zootopia), but because of how its themes of the immigrant experience, the duties and expectations of familial traditions, and even the feeling of multicultural love were conveyed or explored.
Much like how I have felt and seen myself in classic Disney and DreamWorks characters like Nick Wilde, WALL-E, and Hiccup Haddock, Ember and Wade spoke to me in ways I wasn't necessarily expecting or even considering walking into the theater some 2 hours earlier.
Like the literal flaming young woman that is Ember, I find myself in an interesting position in my life. While I have not necessarily found myself in the burden of following in family footsteps, I related very much to the idea of having to control one's temper in stressful situations. In the retail environment I have found myself in, I too have been overwhelmed by the constant hustle, bustle and flow of customers - all with their own wacky, weird and wild requests I probably wouldn't have even considered had I not stepped foot in a Home Depot for 8 hours every day. Oftentimes, I need a softer, creative, and often free-spirited side to awaken and comfort me when things get rough or tough sometimes. And, of course, that's where someone like a Wade comes in.
Like Wade, I do find myself easily crying at the most emotional of things - I do happily and readily admit. Yet, like the big ol' blob of water he is, I also find myself finding some clever solutions to problems I never once considered encountering. In addition, I do have a family and a creative community around me who have gone their own wacky and unusual ways, pursuing their own computer science or radiological techniques while I still try to find my own way around the world - living the dream as a writer for a film or motorsport publication or an archivist for a studio like Pixar, perhaps (funny, ain't it?).
Even then, it wasn't just the personal connections that I found in myself that drew me in. For the longest time, I had been longing for a Pixar film that felt like a true back to basics approach - the product of one voice guiding a similar creative team of thousands. Much like 2021's Luca, this was it - but on a big screen scale I didn't even think I wanted to see again. It felt refreshingly simple, pared back, even - which let the visuals carry the story even more than usual.
I didn't need any dialogue about butterflies, car windshields, code violations, blunt yet hard hitting racial allegories, games about making others cry, or depressed clouds trying to play visually trippy basketball equivalents (trust me, it all makes sense when you see the film) to keep me invested - all it took was a kaleidoscopic trip through a flooded old train station to find a flower that could survive in water and fire, some literal crowd waves at a sports stadium, and a literal familial flame to guide me through this weird world of living elements that Sohn and his team had created, showing more than saying what he had seen as a member of an immigrant family and perhaps even as a smitten romantic himself. Besides, as someone who spent a year in Oregon watching some of the best glassblowers in the world practice their craft, I couldn't help but smile watching that all come into play as a gift that Ember realized she had.
If anything, the flaws and traditional story beats the film had only served to draw attention more to what made it work - as a romantic comedy about literal opposites attracting, an unexpected tonal blender of comedy, drama and romance, and as a beautiful reflection of never really giving up on the dreams you discover and find as your life changes. I mean, if you told me I'd find a home at a Home Depot as a job I loved 5 or 10 years ago, I'd call you nuts! If you told me I'd come out of a film as mismarketed as Elemental listening to its beautiful score from Thomas Newman and admiring it mere hours after seeing it in a way that even Across the Spider-Verse couldn't match, I'd call you insane! And, perhaps most importantly of all, if you told me that I'd have a renewed hope, admiration and appreciation for the team at Pixar after how critical I was about their position in my last post - well, then you'd probably call me an unbelievable hypocrite with something stuck in my head. But that's just the way things work - and I couldn't be any happier to be wrong.
Plus, it made me more determined than ever to chase my own animated dreams. Now, if you don't mind, I'm gonna see what I should doodle next…

#elemental#pixar#wade#ember#someone give thomas newman the oscar already goddamn#home depot#peter sohn
19 notes
·
View notes
Text
Selenium Mastery: A Guided Expedition in Test Automation
Introduction: Empowering Test Automation with Selenium
In the landscape of test automation, Selenium emerges as a dynamic force, a leading open-source framework that streamlines web application testing. The journey to harness Selenium's prowess becomes even more accessible and impactful through Selenium Training in Pune. This specialized training imparts skills and knowledge, enabling individuals to navigate web automation challenges adeptly and contribute significantly to their professional domains.

Navigating the Test Automation Odyssey: A Holistic Approach
Embark on a comprehensive exploration of leveraging Selenium for efficient test automation with this guide. Unveil step-by-step insights, transforming your testing process into a seamless and strategic endeavor.
1. Establishing the Foundation: Setting Up Your Environment
Before delving into Selenium, lay the groundwork by ensuring your environment is primed. Install Java or a compatible programming language and configure Selenium WebDriver to align with your development environment. This foundational step ensures a seamless integration, preparing the terrain for your test automation journey.
2. Crafting the Framework: Initiating Your Project
Initiate a new project within your chosen Integrated Development Environment (IDE), be it Eclipse or Visual Studio Code. Forge a well-organized project structure and integrate necessary dependencies, creating a robust automation framework. This forms the cornerstone, setting the stage for scalable and maintainable test scripts.
3. Bridging the Gap: Adding Selenium WebDriver Dependencies
Integrate Selenium WebDriver seamlessly into your project by incorporating essential dependencies. These dependencies empower your project to communicate effortlessly with browsers, bridging the interaction gap between automation scripts and web applications. For a deeper dive into Selenium's capabilities, consider enrolling in the Top Selenium Online Training.
4. Initiating the Automation Journey: Writing Your First Selenium Script
Embark on your automation journey by crafting the inaugural Selenium script. Develop a fundamental script that initializes the WebDriver, navigates webpages, and interacts with elements through actions like clicks or text entries. This script becomes the bedrock for intricate test scenarios.

5. Validating and Verifying: Enhancing Your Test Script
Elevate your script's capabilities by introducing assertions to validate expected outcomes. Employ features like implicit and explicit waits to navigate dynamic elements, ensuring script adaptability to diverse scenarios. This enhancement amplifies the reliability and robustness of your automation suite.
6. Organizing for Efficiency: Embracing the Page Object Model (POM)
Implement the Page Object Model (POM) to enhance code organization and reusability. By crafting classes representing different pages or components, POM streamlines maintenance and fosters a modular approach within your automation framework.
7. Observing the Automation Symphony: Running Your Test
Execute your Selenium test script, witnessing the orchestrated automation unfold. As the script interacts with the web application, observe automated actions and validate expected outcomes. This step ensures alignment with the intended functionality of the web application.
Conclusion: Cultivating Continuous Advancement
The Selenium journey in test automation is not a destination but an ongoing learning odyssey. Traverse the evolving landscape of web application testing, continually explore advanced Selenium features, stay abreast of new releases, and embrace the efficiency Selenium brings to crafting automated tests for web applications.
In summary, mastering Selenium involves a harmonious blend of foundational setup, script development, and strategic organization. This guide propels you toward becoming a proficient Selenium automation engineer, elevating the quality and reliability of web applications through strategic and efficient testing practices.
2 notes
·
View notes