#usb microphone cable
Explore tagged Tumblr posts
Text
Signal ink usb software, wireless USB, cheap USB, mini-USB, Universal Serial Bus
USB3315 Series 3.3 V 24 MHz USB 2.0 High Speed ULPI Transceiver - QFN-24
#Microchip#USB3315C-CP-TR#Signal Interface#USB#Signal ink usb software#wireless USB#cheap USB#mini-USB#Universal Serial Bus#radio interface#wifi adapters#signalink usb#usb interface cable#usb microphone cable#ethernet adapters
1 note
·
View note
Text

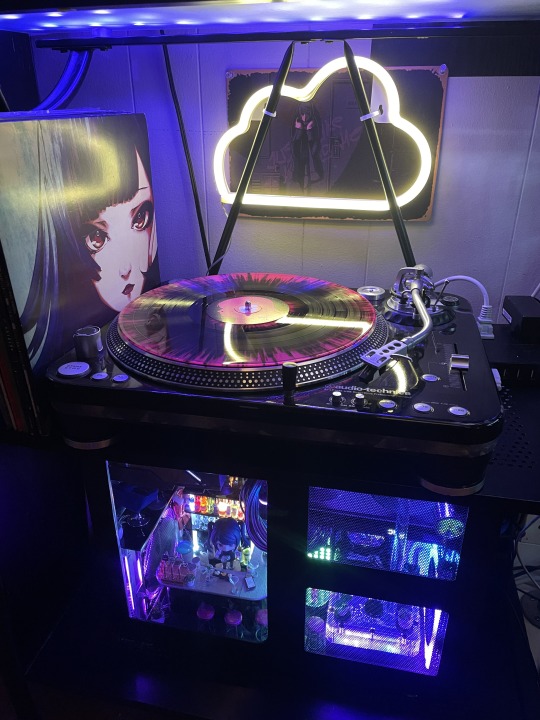


I built a miniature Va11 Hall-A Bar inside of my PC!!
Va11 Hall-A PC Parts & Build list
PC:
CPU : Intel I9 14900k
GPU: Intel Arc A770 16gb
Ram: Corsair Dominator 64gb 5600
Mobo: Maxsun Terminator Z790 D5 wifi
Hard drives M.2: Samsung 990 pro 2tb, Samsung 970 evo plus 1tb, CT 1tb, Adata 500gb
PSU: ROG Thor 850 P2
Cables: Cablemod.com custom shortened and sleeved
Water loop distro : EKWB FLT 120 reservoir + D5 pump
Water loop cpu block: ThermalTake Pacific Mx2 Ultra
Water loop radiators: Alphacool HPE 20 x 2
Water loop hardware: 15 Alphacool, 3 EKWB, 2 Alphacool soft, 2 granzon
Water loop tubes: EKWB Acrylic tube 14mm, Alphacool 13/10 soft
Air Cooling : ThermalTake Toughfan 120mm x 3 + Controller
Air Cooling : Noctua 40mm pwm server fan x 2 (non visible)
Additional RGB Control : Coolermaster controller
Case:
Lian Li PC V600, left side mount, released in 2006, I acquired it in 2015 from PC Recycle in sodo Seattle.
I had to track down a new foot, one had been missing since I acquired the case (ebay)
Mods:These are the case mods I did personally
Cut a hole for the cpu mounts in the Motherboard mount plate as this case was designed for older hardware
Cut two 120mm blowholes and added aluminum covers (Dremel)
Cut Front and rear windows into side panels (Dremel Max)
Moved PSU from vertical placement in the lower right side of the case in front of the CPU to horizontal placement in the top left in old drive bays.
The PSU bracket had to be cut to show the OLED on the side.
Modded the side panel rail slide to accommodate the PSU, I used the original aluminum stand the psu was on, cut in half and epoxied with JB weld.
Changed and moved Power/ Reset switch to the back of the case, shortened and spliced the cable
I cut and bent my own 14mm acrylic tubes (hobby miter, heat gun).
Cut and made two way mirror for the front panel
Plastic "truss" is both functional and aesthetic. It came from a Gunpla accessory kit and has two cables passing through it and it acts as the GPU support. I could only get red and had to paint it.
Notice that some logos are missing/ covered, I dislike having a case as an advertisement. The Rog eye on the PSU is mostly covered but iykyk, most of the word "Intel" on the ARC GPU, Two of the Thermaltake logos on the fan edges, the Paint on the Thermaltake Mx2 Ultra and Maxsun terminator heatsink. (I will eventually cover the visible SSD with a heat sink, cover the fan info on the rear and work a cover for the word "dominator"). the one logo explicitly unchanged is the LianLi case badge, if I think of a perfect replacement, maybe then.
Mod I did not do:
I did NOT shorten and sleeve my own cables, I used cable-mod.com. I am not confident in my ability to do this.
BAR:
"Bar Tiny" Re-ment sets from Japan, 17 sets involved.
I customized the color of the bar and chairs and shortened one table for the mezzanine. The whole bar, minus barback- is on a removable 7 inch piece of black acrylic for cleaning.
Jill Stingray Nendoroid
Jils Cat, it sleeps on the GPU
Jill Stool: Jill is glued to a cute doll stool to see over the bar
Jill Accessories non-Nendoroid: cellphone, purse, coat (ebay)
Dorothy Haze Nendoroid
will be added on release.
Bar Back:I made this myself
Black acrylic sheet, and frosted acrylic rods.
Doll Light power kit: 8 Led lights, 4 incandescent lights
USB Doll light power strip
Other Bar Accessories:
Overhead Hanging farmhouse light
trash, mop, broom, pan, mop bucket,
2 blue fuzzy chairs
Miniature plants
Miniature Microphone
Mini bottle Dom Perignon, an xmas gift from my friend nemo, it's
on the top shelf
Problems and changes:
1. ARGB, pretty pretty pain in the ass. 4 pieces of software........
2. The water loop was changed extensively as hardware came in and space limitations were discovered. The biggest change is that I originally planned to have one radiator on the front of the case, the tubes running over Jills head and to light the tubes as lighting for the bar, to do this the fan would have been in the case proper pushing the whole bar to far into the mobo, it didn't work, so the loop was moved to the top of the case and caused me to have one complex bent tube
Second, I had planned the loop to use one sideport on the distro, but space limitation moved both ports to the top causing the complex fittings setup in that corner.
3. The MOBO, sigh. This has been clearly the most challenging choice I made in this build, I really wanted it to work perfectly too, but I rolled those dice because: Aesthetic+function, the board I wanted (https://en.colorful.cn/en/home/product?mid=84&id=400d19bc-5655-49e1-b391-df00b60935ef) was to great a risk for the cost. This was a silver medal.
I generally dislike the design options I had in the Z790 series of the big board makers (I HATE big logos), especially the full ATX, there was one M that interested me, I should have picked it . This board has potential, but the BIOS is underdeveloped and compatibility has been problematic, I had to do a tricky outdated style BIOS update right from the box, and have had to reset the cmos a couple times. It skips BIOS on general boot and though stable, it will have to be addressed eventually, it doesn't have a proper sleep because of some issue between uefi & legacy. It may end up replaced, which will require a full build teardown.
the Turbo fan built into the board doesn't seem to function
Alos, the two argb connections on the mobo dont work, or I can't get them to recognize anything, necessitating the Coolermaster controller for the PSU and Distro. it is shoved behind the distro along with a Noctua 40mm
#va 11 hall a#va11ha11a#computer#pc#pcgamimg#sukeban#sukeban games#watercolor#watercooled#custompc#pc mods#jill stingray#fanart#cyberpunk art#futuristic#cyberpunk
205 notes
·
View notes
Note
Robotgirl except you download her into one of those "spy keychain flashdrives with a camera and microphone so she can't do anything but watch as you do stuff with her body
promising that this is a completely normal and necessary step for doing maintenance on a robotgirl, but when she's downloaded into the flashdrive she can't help but be turned on by the idea of you doing stuff to her body while she's so helpless and vulnerable...
you notice the flashdrive has started recording and realize that she must want to see what you do with her, and so you get a USB extension cable and reposition it in a better area to view her body, doing various diagnostic checks and tweaks to the motors and joints throughout the body...
you suddenly notice on the computer monitor that the robotgirl's thoughts have been appearing in a command prompt, and that she's been thinking about how erotic it would be if you were to use her body...
and so, you lean close into the camera, and promise her that you'll take good care of it, before unplugging the flashdrive, letting it run off of its own battery and thus removing all influence she has on the outside world or to do anything, and leaving her body yours to use...
#this is probably one of the more intense cnc scenarios i've done in a while but this was fun to write!!#vivi's asks#vivi's robotics
62 notes
·
View notes
Note
Anything I should know before trying to set up a microphone for my laptop the first time?
That all comes down to what kind it is, but for the moment I'm going to assume something for general purpose consumer use. For the moment I will demonstrate with Windows 7 because I'm old and stubborn, but 10 gives you many of the same options in the fancy newer layout. Just look for similar terms as you go. I haven't used a mic on a Mac or a Linux machine in a very long time to get specific to that.
If it's USB, plug it in and hopefully it sets itself to become the default device.
If it's a classic computer microphone with a 3.5mm/1/8" stereo TRS (that's Tip Ring Sleeve) audio jack, you want the connector on your laptop that might be indicated with either a microphone symbol OR it might be color coded pink (do they still do that for laptops sometimes?). Just plug it in. Don't plug it into the Line In port, that's not what you're after here (it might be light blue).
You want to check in your sound devices section (either in control panel/settings, or selected by the speaker icon on your taskbar next to the time).
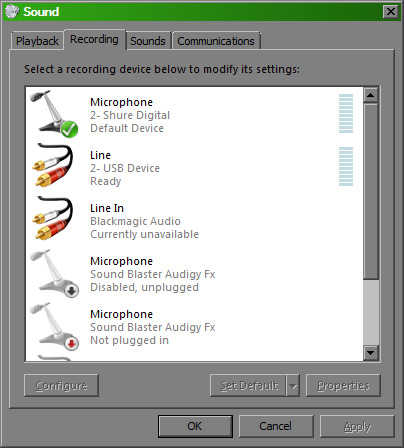
If it isn't already the default, first go to the Recording tab, then select the device in the list, and click "Set Default". After that, you may want to do some level adjustment, so select "properties". From there, you can go to the Levels tab and adjust accordingly.
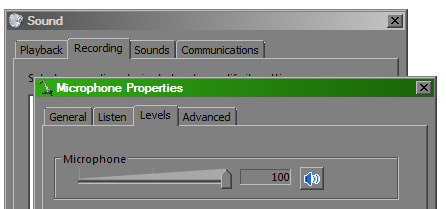
For either type, it doesn't hurt to do a test recording with something and play it back, see how it sounds. Tweak as needed.
If you're actively hearing yourself while you're testing it, that might be because you have "Listen to this device" selected in the Listen tab (just to the left of the Levels tab)
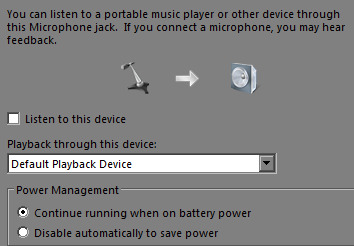
Individual programs will let you select which device you would like to use as your audio input, and it doesn't necessarily have to be your default device.
I can't really speak to using bluetooth wireless audio devices, as the only one I've ever used worked better with the accompanying USB wireless dongle on my work laptop. More or less if it's connected, it will give you the same options as before
I know modern earbuds and some varieties of headset have TRRS 3.5mm connectors carrying audio for the headphones and the microphone on the same connector. You'll have to check if your laptop has a connector that can accept that (check the spec sheet), otherwise you'll need to find an appropriate splitter cable to make it work in a standard TRS microphone connector.
Hopefully that answers your question. If it doesn't feel free to get more specific.
12 notes
·
View notes
Photo
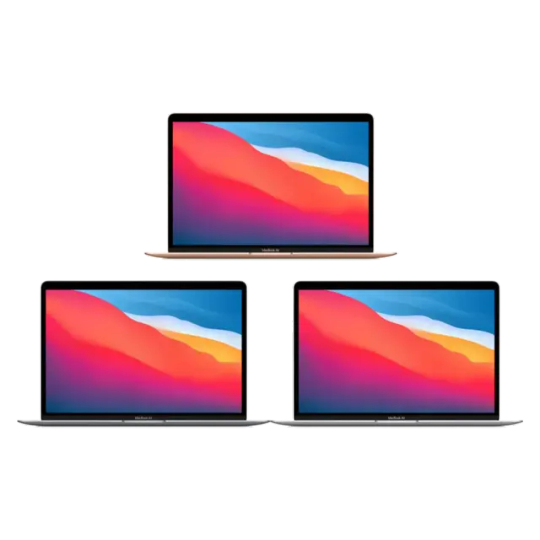
Apple MacBook Air 13-Inch M1 Chip 8-Core 256GB Apple’s thinnest and lightest notebook - Supercharged with the Apple M1 chip. Tackle your projects with the blazing-fast 8-core CPU, take graphics-intensive apps and games to the next level with a 7-core GPU, and accelerate machine learning tasks with the 16-core Neural Engine. All with a silent, fan-less design and the longest battery life ever (up to 18 hours). Processor: Apple M1 Chip with 8-core CPU and 7-core GPU Memory: 8GB unified memory Storage: 256GB SSD Key Features: Apple-designed M1 chip for a giant leap in CPU, GPU, and machine learning performance. Go longer than ever with up to 18 hours of battery life. 8-core CPU delivers up to 3.5x faster performance to tackle projects faster than ever. Up to eight GPU cores with up to 5x faster graphics for graphics-intensive apps and games. 16-core Neural Engine for advanced machine learning. Superfast SSD storage launches apps and opens files in an instant. Fan-less design for silent operation. 13.3-inch Retina display with P3 wide color for vibrant images and incredible detail. FaceTime HD camera with advanced image signal processor for clearer, sharper video calls. Three-microphone array focuses on your voice instead of what’s going on around you. Next-generation Wi-Fi 6 for faster connectivity. Two Thunderbolt / USB 4 ports for charging and accessories. Backlit Magic Keyboard and Touch ID for secure unlock and payments. macOS Big Sur introduces a bold new design and major app updates for Safari, Messages, and Maps. Available in gold, space grey, and silver. In The Box: MacBook Air 30W USB‑C Power Adapter USB‑C Charge Cable (2m) Optional: Extended Warranty extends your warranty coverage to three years from the original purchase date of your MacBook. That means you have access to three years of expert service and telephonic technical support for your MacBook. Should a warranty claim become necessary, please refer to the Services tab to log a request. Fault cover - Yes Damage cover - No Total warranty period - 3 years (1 year manufacturer, 2 years extended warranty) Registration time - within 1 year from original purchase of unit to be registered
#COMPUTERS#LAPTOPS#APPLE_MACBOOK#13_INCH#256GB_SSD#8GB_RAM#APPLE#GOLD#MACBOOK#MACBOOK_AIR#SILVER#SPACE_GREY#UNIFIED_MEMORY
2 notes
·
View notes
Text
Computers in Flatland
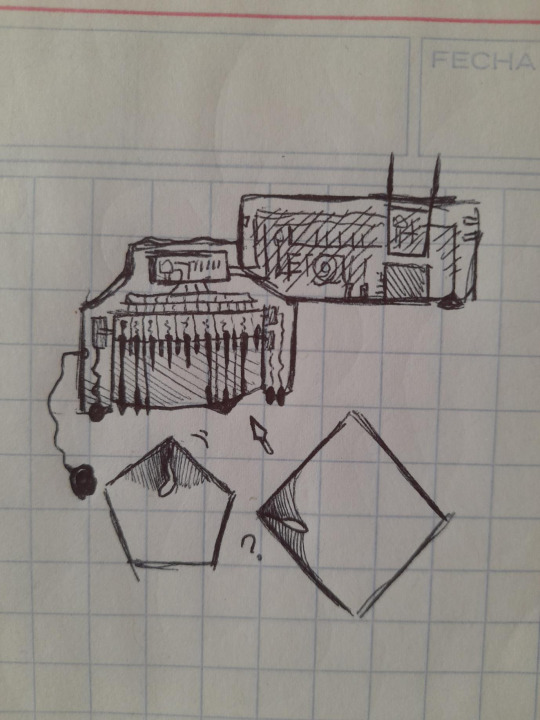
A confused Square man watching his Pentagon son use a computer. [descriptive id soon i still cant figure out how to word this]
I'm going to say some very brief things about modern Flatland computers, because I don't even understand how Planiturth computers work. [I'm learning programming, NOT electronics]
The computer itself is a rectangle [in this case actually an irregular pentagon to fit with the screen] with some holes for additional devices' cables like printers, microphone, speakers and anglephones, and a square shaped pocket for storage devices like chips and peridisks [their equivalent of USBs, the chips are older and square shaped, and the peridisks are polygonal]
The computer has one or two antenna and a connection to electricity. And a good thing about artificial things is that they can have plenty of holes.
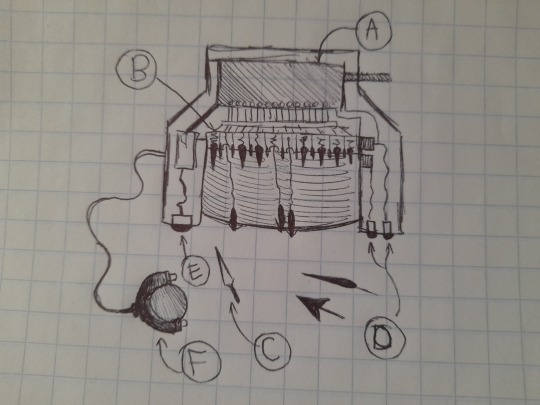
The interesting part of the computer is the screen. This is connected to the computer itself through wire attached to the screen chip.
[A: Screen chip]
This is the large rectangle at the back or north of the screen monitor. It reads the information that the computer sends to it [messages from the internet, for example] and releases the keys needed to write the message on the screen. It also reads the input given by the user [for example, writing a reply] translates it into computer-language and sends it to the computer to do whatever it needs to do with it.
[B: Screen keys]
These are the needles directly below/south of the chip. They have springs underneath. They write words and rudimentary images [example in first image where on the right side of the screen there seems to be a Square's angle] for the user to see, by extending the springs in such a way that the needles poke the screen [which is not completely rigid but a somewhat malleable material] creating a certain relief or bump along with a brightness depending on how hard the key presses against the screen [harder or more vertically expanded= brighter] or extends its tip [extends it horizontally, creating bigger angles the more it expands]
This is usually used as output only, but in some cases such as in a menu, the user may press the bumps to select an option.
The first computers had less thick screens because they didn't need keys. They were exclusively designed for Circles and employed only Brightness. It appears that this new model is not only more accessible for those who do not have Sight Recognition, but also cheaper.
[C: Stylus]
Also known as cursor. This is used to write on the screen. Some people with acute angles may be able to write with their own angle, but for the wider-angled this is easier to use.
The screen is able to pick up on the indentation made on it and read it as text.
[D: Enter and Delete]
These two buttons can have different functions depending on context. In reading mode they can be used as arrows to scroll through long text that doesn't fit on the screen. In newer computers that come with a Scroller, these can take different functions such as copying text. In writing mode they can be Enter [to signal you're done writing] or Delete [to erase the last letter]
[E: Mode button]
The mode button allows the computer screen to change modes- usually between Input or 'writing' mode [where you can use your stylus to write text or give orders to the computer] and Output or 'reading' mode [where the computer displays what you need].
Usually the change is immediate and automatic, like if you just ordered the computer to open tumblr it will switch into Reading mode instantly. But it can be useful if you're in a messaging app and want to switch between reading your friend's message and writing a new reply, etc.
[F: Scroller]
The Scroller is a new addition to Flatland computers, and similar to a computer mouse in Planiturth. It is connected to the screen by a cable and consists of a circle with more than half of it enclosed in a shell with 2 buttons. The circle can't pop out of its shell. The circle is the scroller itself, rolling it will scroll through the screen's output text if it's very long. It has the Enter and Delete buttons on it.
46 notes
·
View notes
Text
An ode to the iRiver iHP-120
For whatever reason, I've found myself deeply nostalgic for high school as of late. And for me, that is intractable from nostalgia for what is perhaps the peak mp3 player ever made:
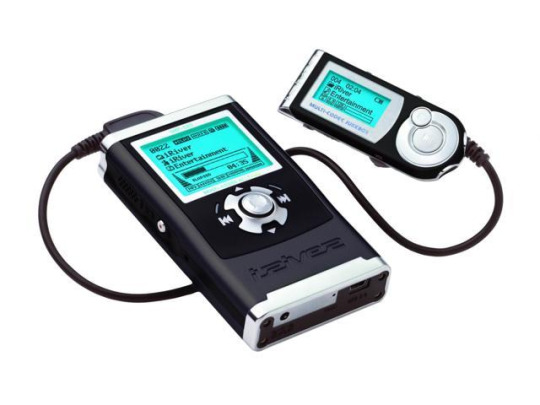
The iRiver iHP-120 was released in 2003, my sophomore year of high school, and it changed my life. This thing held an astounding 10GB of music—for comparison, most mp3 players at the time were flash based, and held 128 or 256 MB of music. The only big competitor at the time was the 1st generation iPod, a mac-exclusive device that transferred data over firewire and had to be synced using the fledgling iTunes. Juxtapose that to iRiver, who took what I like to call the "we don't give a fuck" approach:
When you plugged in the iHP-120 with USB 2.0, it just showed up as an external hard drive—you could throw whatever you wanted on there. Naturally, it could read mp3 files, but this thing introduced me to the world of audio codecs and processing in a way nothing could have prepared me. WMA files worked fine (a big deal at the time because of DRM issues, during the heyday of KaZaA and Limewire). You want to play uncompressed .WAV files? No problem, put them on there. FLAC files? Absolutely, let your audiophile freak flag fly. Fucking OGG Vorbis files played on this thing. Hell, you could put text files on here and read them.
(The firmware for these was also basically open-source, and people did even crazier stuff with them. By the time I retired my player, it could do gapless playback, crossfading, 10-band equalizing, normalization and more. I think I also changed the boot screen to a picture of Sailor Moon.)
But the magic didn't end at uploading music to the iHP-120—controlling this thing was more intuitive than any other device around at the time. All of your music was displayed on the player in whatever folder structure you loaded onto the device—navigating the music was as simple as using Windows Explorer. You had your standard play/pause, skip forward/back and volume controls on the front joystick, but what are the other buttons for?
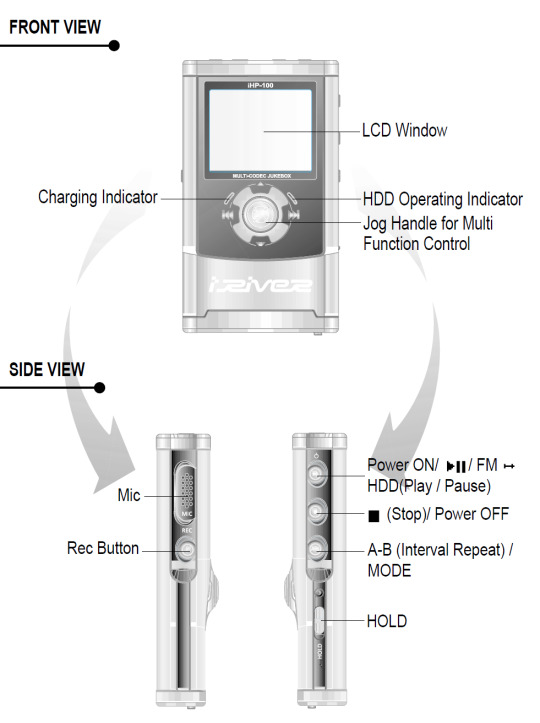
Yeah. This thing was also a portable recorder. At anytime you could just hold down the Rec button and start recording with the onboard mic, or using an external input (more on that later). On the right side, an A-B Interval control. You ever wanted to just listen to one part of a song on repeat to learn the lyrics? Just hold down the button. Lastly a hold switch to disable control inputs while it was in your pocket—no accidentally pausing the music.
Okay, back to the external input mentioned before. The top of the iHP-120 is wild.
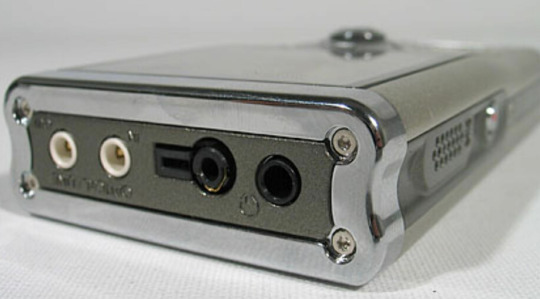
The top I/O panel of the iRiver iHP-120, with 4 jacks.
From right to left, you have a 3.5mm headphone jack (naturally), a 2.5mm microphone jack, the remote control port (more on this in a bit), and in white you have Line In/Out jacks which you could use to record as well as just plug in a second pair of headphones for a friend—jacks which support both 3.5mm analog input, as well as 3.5mm TOSLINK optical cables.

The TOSLINK 3.5mm male plug. A plug I only ever encountered on this device and the Sound Blaster X-Fi Titanium, a sound card I wrote a review of in 2009 which seems to still be up at PC Gamer and reading it now I don't know how any of my writing was ever published, let alone in print.
Chances are good you've never encountered this, it's phenomenally uncommon, and TOSLINK as a whole largely died with the emergence of HDMI—but this fucking mp3 player could both record and transmit fiber optic audio in uncompressed stereo or lossy 7.1 surround sound. In high school, I would plug the iHP-120 into our home theatre and listened to Porcupine Tree's Stupid Dream on repeat (side tangent, I'm pretty sad 5.1 album recording never really caught on, but the Dolby Atmos music format is better in every way, and I'm grateful Apple is bringing it into the mainstream).
"Okay, so we have an music player/text reader/voice recorder with optical audio, and basically every codec under the sun, what else could you go on about Erika?"
-you, the person reading this
THE REMOTE
Let me take you back to 2003. I was a depressed theatre kid teenager who would listen to Rooney on repeat on my Koss UR40s while crying over a girl who wanted nothing to do with me.
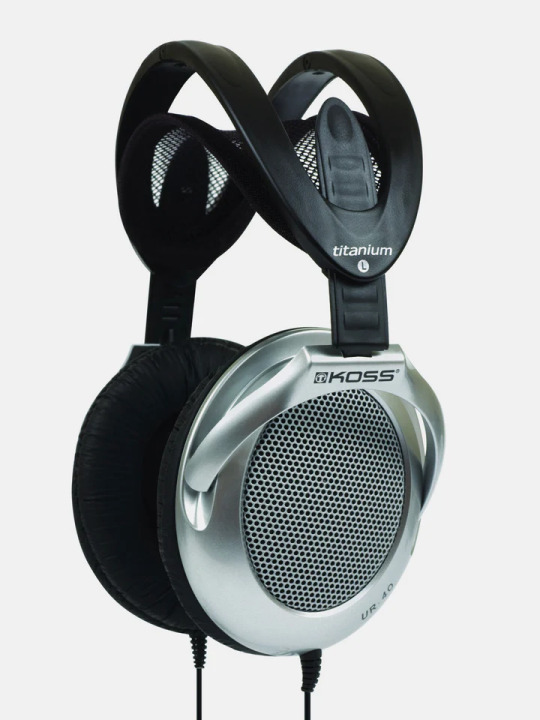
The Koss UR40 Headphones I wore like a fashion accessory everyday.
The other thing I wore everyday besides those headphones? Baggy cargo pants (it was acceptable at the time, I swear). Inside the right cargo pocket was my iRiver iHP-120, and clipped to the velcro flap of that cargo pocket was the iHP-115R remote control.
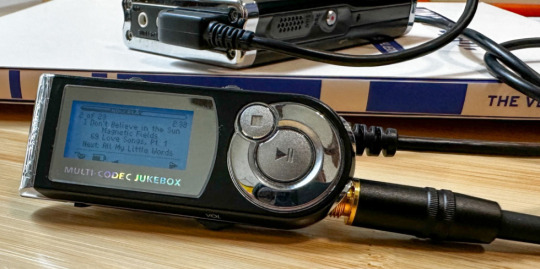
The iHP-120 remote unit
Every function of the iHP-120 could be controlled from this little fucker. Play/pause and stop buttons. Volume, skip track and recording are all here on rocker switches. You could even change the fucking bitrate of playback on this little thing, all without taking the actual mp3 player out of your pocket because the LCD screen on the remote has all the same info you'd get on the main unit.
The remote itself connected to the iRiver with that big plug you can see in the picture above (shamelessly stolen from Nathan Edwards who I worked with at PC Gamer in the late 2000s and only while writing this post discovered has already written a much more professional ode to the beauty of the iHP-120 this year).
You would plug your headphones into the remote, (or in my case you could also plug in your 1988 Chevrolet 2500 suburban's tape deck adaptor and have controls at your fingertips. No more distracted driving).

An image of a 1988 Chevorlet 2500 diesel Suburban. Not super relevant but god I miss my high school suburban. We would take the rear and middle benches out and put a queen-size mattress in the back, which 9 of my friends would ride on as we went to Little Caesar's for lunch. Also, cars just looked way fucking better back then.
I think I'm about done waxing nostalgic, but I really do miss the days of discrete devices—I kind of find myself fighting back against my smartphone. I have a camera I carry around, a pen and paper planner and writing notebook, and a kindle for reading. There's something appealing about not having my phone be my access to music either—rather, having a device that I just threw my music on and it plays it really well was rad. The iHP-120 was really fucking rad.
12 notes
·
View notes
Text
i think it’s really fucking stupid how my bluetooth headphones can’t function like normal headphones. basically, you can’t transmit both microphone input and audio output at the same time through bluetooth, you can only have one or the other, which is so fucking idiotic. and i even have a usb cable to connect my headphones to my pc, which would in theory allow audio input and output to flow back and forth perfectly fine but no my annoying overpriced headphones decided to be awful like that. Angry
9 notes
·
View notes
Note
Is your music all digitally composed or is it acoustic and you record? Curious about your process.
I use Ableton Live to mix and compose everything, but depending on the track I use both digital/virtual sounds and real instruments, either recorded through my microphone (connected to an usb interface), electric guitar and bass I sometimes recore directly by connecting through the input cable, and sometimes I just sample random phone recordings I do.
But yeah it depends on the song - like for "Amber Chamber Theme" it was mostly directly recording from a keyboard I had avaible at the moment, then using pitch shifted or otherwise manipulated vocals at some parts.
For "The Gal that fell out of da sun" I just mostly recorded everything with my microphone connected to a preamp and usb interface - so it was all acoustic guitar, vocals and just hitting random things for drums😂. On it I used the Guitarrig plugin to give it the sound of guitar pedals, but I actually like to use that on a lot of shit, can give audio tracks easy effects that sound good atleast to my own ears.
So yeah, dunno if this is coherent or just too rambely, but in short - it depends, but at the end I basically use Ableton either way - I think many years ago I tried Fruity Loops, didnt know what I was doing and quit😂 Then some classmate recomended Ableton and I sticked with that. Maybe I'll try something else in the future.
Oh, and if you ment my process in a more abstract way, like composing or the idea for a song - for the last few tracks it was mostly the idea of fitting with the whole desert/western theme, so I would either noodle with a guitar to find a sound I like, or think of a fitting genre that I could parody that would fit. Sometimes I kinda come up with some lyricsl Idea first but yeah. But other items I just fuck around in Ableton till I see something comes together, that maybe if everyone else thinks sounds horrible, I like😂
And yeah lyrics I'll admit was one factor were I'm kinda lazy on this "project" - sometimes I try to write down some, but mostly I go of the dome and even sometimes mumble in a way with it not even making sense (other times I know I said something but cant make it out anymore, like in the Phonk song I did, but I guess thats the point)
I justify it by saying that the orignal anime had a lot of broken english so its just fitting with the theme😂. But maybe I'm too harsh, some of the lyrics were pretty planned out and do have a lot of consious meaning. Like one of my older songs which was like a parody of one of Ye's tracks from "808's and heartbreaks" were it was supposed to be from Kids perspective in a pathetic emo rap autotune voice lamenting how "now even 8's I hate, two circles with no escape"😱💀
So yeah, dunno, wrote a lot more than anyone probably asked for. Could probably say more, but I'll leave that for other asks.
8 notes
·
View notes
Text
This day in history

I'm on tour with my new novel The Bezzle! Catch me TOMORROW in SALT LAKE CITY (Feb 21, Weller Book Works) and then SAN DIEGO (Feb 22, Mysterious Galaxy). After that, it's LA, Seattle, Portland, Phoenix and more!

#15yrsago Tesla coils sing the Doctor Who theme in orgy of electric awesomesauce https://arcattack.com/about-us/
#15yrsago HOWTO Make a duct-tape corsage https://www.instructables.com/How_to_Make_a_Duct_Tape_Corsage_and_Flowers/
#15yrsago 419 scammer impersonates the nation of Ethiopia, takes $27 million from Citibank https://www.nytimes.com/2009/02/21/nyregion/21scam.html
#15yrsago On the demise of books, newspapers, music and movies https://web.archive.org/web/20090301000000*/https://www.internetevolution.com/document.asp?doc_id=171555&
#15yrsago Future of News video from 1981: epitome of foolish futurism https://memex.craphound.com/2009/02/20/future-of-news-video-from-1981-epitome-of-dumb-futurism/
#10yrsago Comic explains problems with Oakland’s Domain Awareness Center surveillance plan https://medium.com/the-nib/the-testing-ground-for-the-new-surveillance-db4f129a7177
#10yrsago Well-Sorted Version, an alphabetical Bible https://www.wellsortedversion.com
#10yrsago Sculptor collaborates with honeybees to cover statues with comb https://www.thisiscolossal.com/2014/02/artist-aganetha-dyck-collaborates-with-bees-to-create-sculptures-wrapped-in-honeycomb/
#10yrsago Obama’s top Trans-Pacific Partnership officials were given millions by banks before taking the job https://www.republicreport.org/2014/big-banks-tpp/
#10yrsago Report from a meeting of Wall Street’s secret, tasteless plutocrats’ club https://nymag.com/intelligencer/2014/02/i-crashed-a-wall-street-secret-society.html
#10yrsago Edgar Allan Poe’s interior design proscriptions https://www.smithsonianmag.com/arts-culture/edgar-allan-poe-interior-design-critic-180949543/
#10yrsago Museums and the free world: keynote from the Museums and the Web conference in Florence https://mwf2014.museumsandtheweb.com/paper/glam-and-the-free-world/
#5yrsago Florida inmates sue prisons for digitally confiscating the music they were sold https://www.jacksonville.com/story/news/crime/2019/02/19/florida-prisoners-could-form-class-action-to-demand-refund-on-confiscated-media-players-and-files/5881894007/
#5yrsago Owner of civil war reenactment business sues school district that canceled field trips after his far-right social media came to light https://www.latimes.com/local/california/la-me-rileys-farm-lawsuit-oak-glen-20190219-story.html
#5yrsago FDA: infusing young people’s blood will not improve your health https://edition.cnn.com/2019/02/19/health/plasma-infusion-young-blood-fda-bn/index.html
#5yrsago A malicious USB cable with its own wifi rig https://twitter.com/_MG_/status/1094389042685259776
#5yrsago Magic Lantern: feature-rich addons for Canon EOS cameras https://www.magiclantern.fm
#5yrsago Google admits Nest security product has a secret mic, insists it wasn’t supposed to be a secret https://www.businessinsider.com/nest-microphone-was-never-supposed-to-be-a-secret-2019-2
#1yrago Turbotax is blitzing Congress for the right to tax YOU https://pluralistic.net/2023/02/20/turbotaxed/#counter-intuit
6 notes
·
View notes
Text
i had two auxiliary to auxiliary cables, one auxiliary to usb-c cable, two headphones with auxiliary plugs, and three mics on my floor and now all i can find is the microphones and, for some godforsaken reason, a typewriter.
5 notes
·
View notes
Text
how to improve audio for videos!
I'm making this post so others can get better vocal audio in their video projects. It is EZ!
STEP 1 - Record your audio
Whether it's from a live stream or prerecorded, just create the audio. I suggest using a Hyperx Quadcast or anything that can capture 16-bit or higher. I suggest the Hyperx Quadcast because of its simplicity. The mic is USB, so it just plugs right into your computer and it's ready to go. This is way easier than getting a mic with an XLR which requires an audio interface that can double the cables and price for almost the same result!
You must have a pop filter! Without one, your audio can suffer from plosives- sounds like P (puh) and B (buh) carry a lot of bass frequencies and will mess with the volume/peaks of the recording. Some microphones don't need this, like an iPhone or a laptop microphone. Either way, I highly suggest a pop filter!
When you record, make sure the mic's gain control is low. Having high gain on your mic can lead to your audio sounding like this (yes that is exactly what it sounds like). High gain can lead to clipping and just terrible results.
After that, just find a program to record your audio. I use FL Studio. You can use any DAW or audio recording program (I think Audacity can record too!).
STEP 2 - Editing the audio
Some pretty simple steps here, just trust the process. I suggest any DAW, but I'll be using Audacity.
In Audacity, go to the top and find "effects" and place these effects in this order
Compressor
Threshold: -13.0
Ratio: 10.0:1
Attack: 0
Release: 1
Gain: 13.0db (optional if you have a different compressor)
2. Filter Curve EQ
just select the low roll off for speech preset lol
(Manage > Factory Preset > Low Rolloff for Speech)
3. Truncate Silence (Not for live stream audio)
Threshold: -20
Duration: 0.5
Truncate to: 0.7
OPTIONAL: Noise Reduction
If you're recording off a poor mic, chances are you'll have a loud background noise. Just use this effect to remove the room noise. Essentially a noise gate but for post-edit!
What this does -
The compressor makes all the quiet and loud parts of your audio the same volume, making any recording more intelligible. The EQ is for removing unwanted- or useless frequencies. In this case, the rolloff on the bass eq will remove any potential plosives and generally tighten up the audio. If you have a poor microphone this may require some more specific EQing (high end hiss, specific frequencies needing to be removed). The truncate silence will remove unnecessary length between each sentence and make your flow way more fluid. Do not do that for live stream audio, it will unsync your audio with the visuals.
If done correctly, this is the result!
go make videos suckars
10 notes
·
View notes
Text
a fun fact about me is that our house didn't have a PC until i was about 14 -- and even then, it was shared by the whole family, and didn't have internet access for a while. my dad eventually signed up for AOL around 2001, at which point we were able to surf the web™ via a 56k dial-up connection.
however, we did have internet access prior to that… via our TV:

source: https://web.archive.org/web/20190407175637/https://www.digitalspy.com/tech/cable/a3171/ntl-cr2-interactive/
this gave us a (single, shared) email address, and access to an extremely limited number of websites, such as leisuredistrict or everyoneswelcome.
(as an aside: you could unlock "full" web access by paying an extra £5 per month, which we eventually did… but not before discovering that if someone emailed us a clickable link, we could access that site without going through the "proper" menu option!)
anyway, to compose emails, enter your leisuredistrict password, or write an everyoneswelcome post, you had to use the remote control:
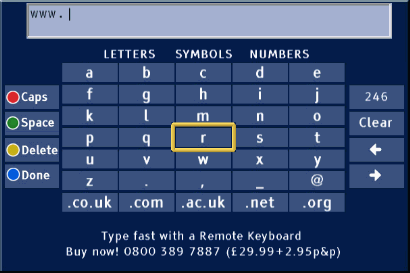
source: https://web.archive.org/web/20190407173228/https://www.digitalspy.com/tech/cable/a3231/ntlhome-digital-interactive-tv/
as you can imagine this was slow and awkward. however, as the image above indicates, you could buy a special keyboard to make things easier. since my dad used to play chess via email (using a physical chess set next to the television), he ended up getting one:
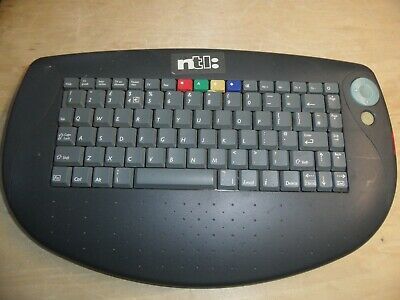
source: https://www.reddit.com/r/nostalgia/comments/hm5pfa/these_ntl_keyboards_i_think_im_on_an_ntl/
as you might have noticed, it has a somewhat strange layout, and doesn't have a wire coming out of the back. that's because this keyboard is actually just a really big remote control; you put 4 AA batteries in the back, and it communicates with the set top box via infrared signals, just like the standard remote control would.
of course, our set top box eventually outlived its usefulness, and all of this stuff went into a storage cupboard, whereupon it was promptly forgotten about… until a few months ago, when i rediscovered the keyboard whilst my dad was clearing out some old things. as you might expect, i saved it from being sent to silicon heaven (where all the calculators go) because i am a goblin who hoards old technology.
i put it to one side for a while, but a few days ago i decided to see if it was still working. it turns out that regular webcams can pick up infrared light, so i put some batteries in it and -- success! -- several white-ish lights were visible in my laptop's webcam app whenever i pressed a key.
as such, i think it would be cool to somehow get this thing working as an actual PC keyboard. i might need to write a custom program to do this, though it seems that it might Just Work.
of course, i'd need some kind of infrared receiver device to do that, and those can be surprisingly tricky to find:
there are plenty of "infrared extender" cables online, but their USB connector is only used to draw power; they don't actually show up as a "device" on your PC.
you can apparently get infrared-receiver-to-headphone jack cables, which you're supposed to plug into a special socket on certain set top boxes… though in theory you could plug them into the microphone input port of a PC and "manually" decode the data signal via software trickery. (disclaimer: i am not an expert on Hardware, so this might be A Bad Idea, but i think that the 5V output by the microphone port would be enough to power the IR receiver…?)
the thing i actually want (an IR-to-USB device) might as well not exist because it is no longer 2005 and no-one on the planet except me gives even half a shit about connecting an IR device to a PC. well, that's not entirely true -- but the things i did find cost £30-£50, which is way above what i'd want to spend on something like this.
eventually, though, i discovered that the magic phrase to search for is "Media Center IR receiver" (or, more simply, "MCE receiver"), whereupon i found someone selling an Acer MCEIR-210 on ebay for just over £10. its due to arrive here within the next few days, so hopefully i can make this somewhat-unusual device function again.
#infrared#old tech#keyboard#old web#please read this post like its a Cathode Ray Dude video for maximum effect
9 notes
·
View notes
Text
i got a niceeee microphone XLR and USB hookup n came with all the cables hell yes
4 notes
·
View notes
Text
New My Little Pony Air Pop True Wireless Bluetooth Earbuds

New My Little Pony Air Pop True Wireless Bluetooth Earbuds available here: https://amzn.to/3MKh1MK
Details below:
Long Battery Life: GO Air POP features 8+ hours of playtime in each earbud and 24+ extra hours from the charging case (32+ hours total). Return to the case to recharge the buds, and use the integrated USB cable to charge the case.
Dual Connect: Use either earbud independently or use both together. A built-in MEMS microphone in each bud ensures clear calls.
15% Smaller Fit: Smaller than a credit card, the case fits in your pocket and the earbuds are our smallest yet -15% smaller earbuds and 40% lighter with the compact case. Try the three tip sizes to get a snug in-ear fit, creating a perfect seal for crystal clear sound.
EQ3 Sound: With just a few taps via touch sensors, you can choose your sound preference: JLab Signature, Balanced and Bass Boost modes – without an app.
Touch Controls: Enjoy volume and track controls, plus play/pause, answering calls and activating your smart assistant with the touch control functions.
INCLUDES: GO Air POP True Wireless Earbuds, Charging Case w/ Integrated USB Charging Cable, 3 Sets Gel Tips: Small, Medium, Large, JLab Two Year Warranty.
Perfect gift for any My Little Pony fan!
Features Air Pop wireless Bluetooth earbuds.
Brand: JLab
Character: My Little Pony
Color: Multicolor
Assembled Product Dimensions (L x W x H): 4.57 x 2.48 x 1.14 inches
Assembled Product Weight: 2.08 ounces
Inspired by My Little Pony
#mlp#mlp merch#mlp the movie#my little pony#my little pony: friendship is magic#equestria girls#my little pony: pony life#my little pony: a new generation#my little pony: make your mark#Air Pop True Wireless Bluetooth Earbuds
2 notes
·
View notes
Text
Microphones used by popular artists.

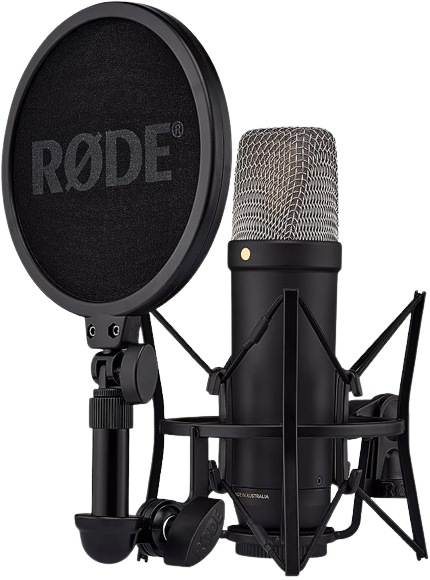
"RØDE NT1 5th Gen: Your Ultimate Mic for Studio and Podcasting"
Buy Now
Components1 x Dust Cover, 1 x 6m XLR Cable (red), 1 x NT1 5th Generation - Black, 1 x SM6 Shock Mount & Pop Filter, 1 x SC29 USB-C to USB-C Cable (3m)1 x Dust Cover, 1 x 6m XLR Cable (red), 1 x NT1 5th Generation - Black, 1 x SM6 Shock Mount & Pop Filter, 1 x SC29 U… See morePolar PatternUnidirectionalAudio Sensitivity45 dBItem Weight308 Grams
About this item
Extremely Low-noise Large-diaphragm Cardioid Condenser Microphone with XLR/USB Output
SM6 Combination Shockmount Pop Screen - Black
Report incorrect product information.
Note: Products with electrical plugs are designed for use in the US. Outlets and voltage differ internationally and this product may require an adapter or converter for use in your destination. Please check compatibility before purchasing.
#homebuyers#mortgage#property for sale#investmentopportunity#luxuryliving#propertyinvestment#propertyforsale#realestatemarket#property management#dreamhome#microphone#hypnosis microphone
2 notes
·
View notes