#unreleased cc
Explore tagged Tumblr posts
Text
Wince worthy transformation, quadruped werewolf and a howl redux. Very much a WIP.
14 notes
·
View notes
Text


Mourning in style (12.29.24)
#She ended the year with a bang for sure#tahaha#the sims 4#ts4#sims 4#jackie prescott lee jackson#unreleased cc btw i been working
104 notes
·
View notes
Text
regardless of my feelings about the program, CC Creations being an affiliate now is so poetic to me
#at this point it wouldnt surprise me if star stable just started giving cc creations access to new stuff like a month in advance#oh. oh no..we slippedd...theres unreleased content all over the ground...! i sure hope no spoilers get released onto youtube~!
55 notes
·
View notes
Text
Not a complaint, just a question: SFS is working great for me for downloads again, but it won’t upload anything, even small files. Is this the group experience??

#text post#gif#I looked through my usb drive recently and totally forgot I have a TON of unreleased cc made in 2019-2020 that I would like to share
11 notes
·
View notes
Video
tumblr
CRYSTAL CASTLES | “MUTE” LIVE @ FADER SIDESHOW, 2006
unreleased track // best quality available.
265 notes
·
View notes
Note
What burn scar overlay did you use for tybalt?

Hi ! it's here
it's currently unreleased cc, so @gaypleasantview if you want me to take this down i can
11 notes
·
View notes
Text


hhhgregg panasonic blue ray 99 dollars 32 inch LCD tv 2.99 LG 42 inch HDTV 489 everythings on sale during Christmas at-
A Greg comp during these trying times (featuring some close ups as well as me going insane about GGY, Ruin and au's catered to me)
#gregory fnaf#fnaf security breach#fnaf sb#five nights at freddy's#my art#i think a lot about both gregbot and the idea of cc/evan being greg. id hate if they were real sghdsahdg#theyre facinating hypotheticals. silly aus i spin around in my head. would not be a fan if they were real lmao#i literally have an unreleased gregbot fic that I've always wanted to get back to finishing. one day maybe fdngdfjg#granted the cc ones arent necessarily cc BEING greg but rather cc possessing and basically co-existing with him#THAT i wouldnt be as against compared to saying like cc=greg since in that situation gregory is his own person.#but its such a concept that id only rather see if it was done right and idk fellas Idk if i trust the game to do that justice jrtheiruth
31 notes
·
View notes
Text
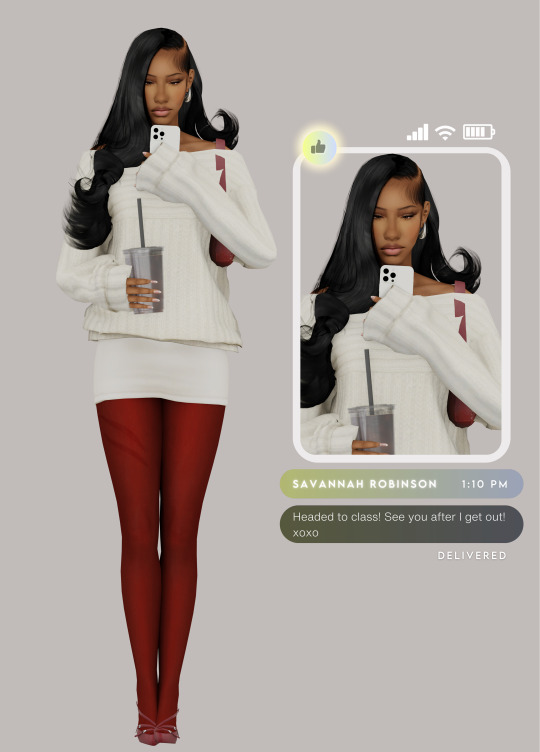
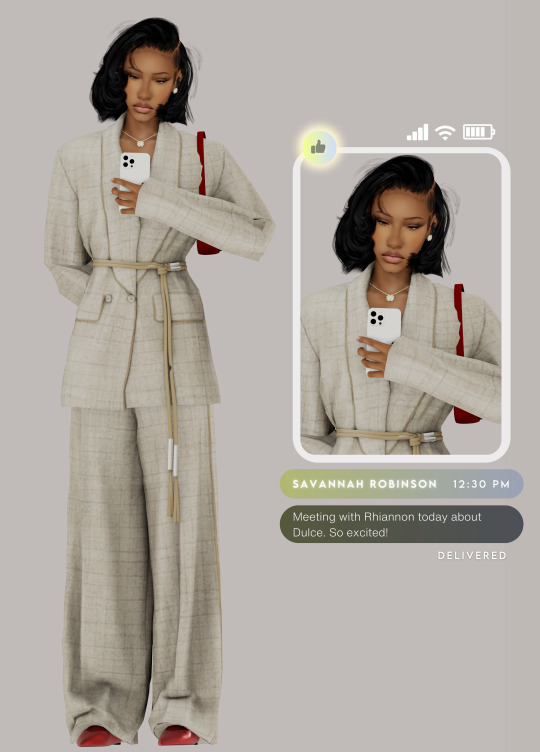
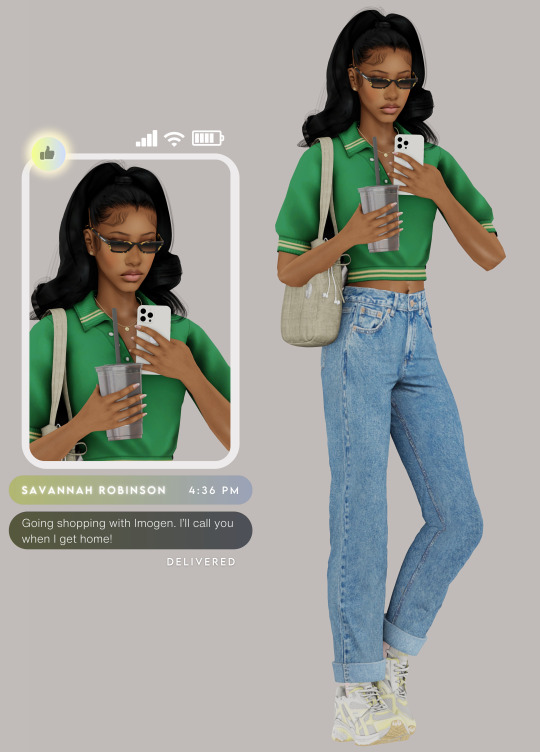
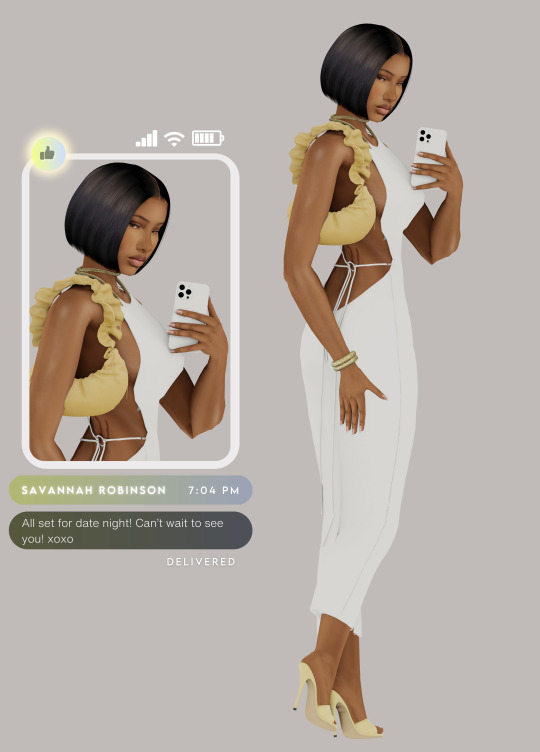
Inside Savannah Robinson's Closet
01. LOOK ONE - TOP | BOTTOM | BAG | EARRINGS | *HAIR | SHOES | TIGHTS
02. LOOK TWO - OUTFIT | *BAG | ACC | HAIR | *SHOES
03. LOOK THREE - TOP | BOTTOM | EARRINGS | NECKLACE | SUNNIES | BAG | *SHOES | *HAIR
04. LOOK FOUR - OUTFIT | SHOES | *PURSE | HAIR | [ACC ARE MINE, CURRENTLY UNRELEASED]
THANK YOU TO THE CC CREATORS: @charonlee, @kikovanitysimmer, @itsbrandysims, @seoulsoul-sims, @serenity-cc, @sentate, @pralinesims, @dallasgirl79, @fukkiemon, @yuyulie, @cool-content-star, @arethabee, @whisterias
* denotes early access content. all links lead to patreon accounts, personal blogs, simfileshare, and/or thesimsresource. iphone is blender model, coffee cup is by ddaeng-sims but is not an accessory. rendered with blender, but all pictures are unedited.
#lykaia#*savannah robinson#my characters#sims lookbook#sims 4 lookbook#thesims4#the sims#sims 4 render#the sims 4#the sims community#sims#ts4 simblr#sims 4#ts4#simblr#sims 4 simblr#showusyoursims#sims4#the sims4#black simmer
2K notes
·
View notes
Text

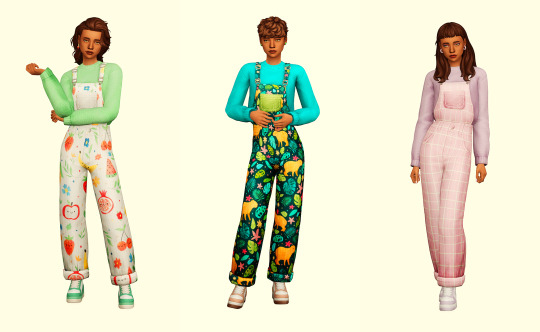
Ditzy Dungas - a @jellymoo recolour
coming out of my cage and i've been doing sub-par,,,,anyway yes i am still on Hiatus™ but the uma overalls by the always incredible @jellymoo just scritched my brain, i blinked, and here we are. i'm somewhat sure the lucy and yak clothing brand is mainly uk specific but anyway they do very cool patterned dungarees, boilersuits, trousers and so on and 99% of my wardrobe comes from them, so i just had to do some funky pattern recolours of these utterly gorgeous dungarees. can you tell i'm rusty at writing cc descriptions? truly no idea what im doing anymore lmao
details and download under the cut >:)
Details
Recolour of jellymoo's Uma Overalls - the mesh is included thanks to jellymoo's very generous tou, but i highly suggest you check the originals out because they are SCRUMPTIOUS
37 swatches featuring my patterns from some of my previous sets, some unreleased ones, and then just some personal ones from my art portfolio lmao
accessory overlay to change the colour of the jumper/sweater/top with 61 swatches
BGC, correct colour tags, disabled for random, custom thumbnail and all that jazz!
i? think that's it? i honestly feel so lost doing this again asdfghjkjhgfdsdfghj i've forgotten EVERYTHING but i think i covered it all? fuck if i know anymore tbh. if theres any issues please lmk, if not, hope you enjoy!
Download: patreon / SimsFileShare (both 100% free to everyone, always)
and if you made it this far lmao uhm. thanks for sticking with me! i still dont see myself returning back to simblr, or even just playing the fckn game, like how i was before but it was really nice to dip my toe back in the pixelated water. i miss everyone and your posts still bring me so much joy!
#TS4 cc#sims 4 cc#ts4 cc#sims 4 maxis match#maxis match cc#my cc#sims 4 custom content#sims 4 cute cc#ts4 cute cc#simblr#sims 4 cas#cas cc
1K notes
·
View notes
Text
Sul Sul!
Hello, I just wanted to say thank you to everyone who have reached out to me and my family the past few months; for those who don't know, my mum and uncle passed away on the same day in June and then in November I lost my cat of 19 years, so lets just say 2024 can do one!
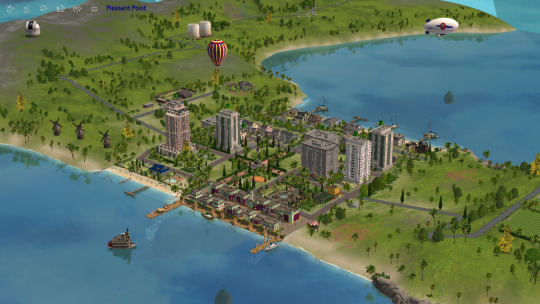
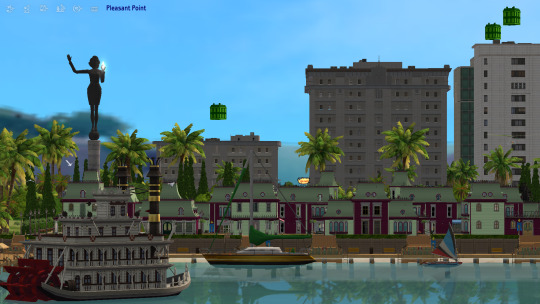
2025 brings me hope that the year will be better, and the worse of it will be over! I plan on getting back into creating CC streaming etc, but right now I am enjoying playing... well I was until my Pleasantview got corrupted due to user error, but no fear we have a new hood in the works! Pleasant Point - inspired by our very own @kashmiresims Kashmire Point!
Thanks to those who have been with me on discord calls and chats, especially those the last few months, you really helped me in more than one way and I would love to tag you all but I don't want to accidentally miss someone, but you all should know who you are!
What is to come from lordcrumps this year? Details under the cut!
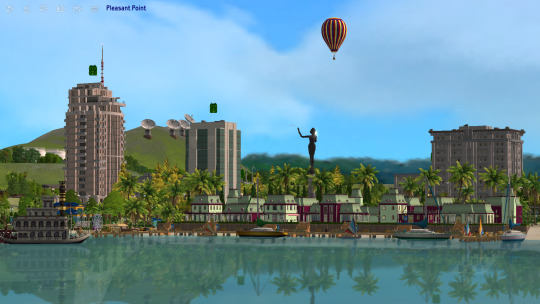
So what shall we expect from lordcrumps in 2025 and beyond? That is a big question! So let's give a big answer! Below will be of some of my most asked questions, so hope I clear things up!
STREAMING - My first goal is to get Pleasant Point finished and ready to play. Once I have this I shall get back into streaming again, setting up a schedule and what not for those who are interested! You can follow here!
YOUTUBE - Can't tell you when, but I do plan on doing more on Youtube!
CUSTOM CONTENT - Everything that I have created CC form, I will go through and upload at some point. I have TONS of stuff that was meant to be in "sets" (sets like, every wall / every floor / entire stuff packs etc) but never got around to finishing due to my hyper-focus moving onto to something different. So instead of hoarding them, I will eventually get around to uploading them! Cos lets face it, I can always update at a later date!
TERRAIN DEFAULTS - My Pleasantview redo / Pleasant Point / Sim State University Redo all use custom terrain types (like lush, dirt, concrete etc), so they are not that user-friendly to just import and play sadly, so I want to create a tutorial set and videos to go along with them. I also have to have the CC released for them to work too! As well as tutorials on how to have multiple roads sets within in one hood / different roads for different terrain types.
REQUESTS - I still do not want to take requests, this is because I do not like to promise something and never deliver. I will continue doing what I want to do and sharing with of all you. Just assume that one day the entire Sims 4 will be converted by myself or other friends of lordcrumps.com *wink* @platinumaspiration *wink*
LORDCRUMPS.COM - This site is not going anywhere, well at least that is the plan, this will be the place for all of my released CC!
LORDCRUMPS DISCORD - Back in my streaming and YouTube days, I had a discord. Feel free to join, the plan is once all the existing CC is sorted and uploaded. Anything that needs play testing / unreleased stuff / sneaky conversions, will be posted in there plus any updates to existing CC.
LINUX - Thanks to @kashmiresims and @teaaddictyt i'm now a linux boi, so will update you how that goes - so far, I am very impressed.
My TOU, I have had a lot of questions about my "rules" and what not so I want to clear things up as much as possible.
I purchase the Sims 4 for me to convert the items to Sims 2, I simply upload to lordcrumps.com for prosperity reasons, and of course to share with you all.
Feel free to use / share / edit what ever you download from me. Not 1 person owns sims conversions; so I cannot lawfully dictate who does what with the downloads. What I will say is for authentic LordCrumps and co CC, it will be on lordcrumps.com, this is where any updates, fixes etc will be posted.
If you use CC for a lot and package up that to share, fine, just make sure they have all the dependencies needed (Sims 4 shadow file, master meshes etc) Just don't take entire packs and re upload and claim as your own? I only ask of this due to the nature of updating files with minor tweaks, updating and bugginess, if it is all linked to one place (my site) then all the updates will be there too.
Hair Defaults by Platasp - this is one download I will be strict on, do not upload anywhere else, this is because of how interconnected the hairs are to each other, removing one might break another. Any updates will be kept to lordcrumps or individual files on PlatAsp tumblr. lordcrumps.com is not planning on shutting down any time soon, so there is no need to re-upload anywhere else.
SIMS 4 CC CONVERSIONS - Yes, one day once The 4T2 conversions have been done, I will be working on converting CC for the Sims 4, but right now; no, unless its really spectacular. So please stop asking to convert stuff from Sims 4 creators as that does not interest me right now. The reasoning behind this is that if I start treating myself to CC items, I will get spoilt and not want to convert actual Sims 4 stuff, silly excuse I know, but I would like to convert the Sims 4 first. That would be cool.
ANYWHO - That's all I think I have to say now, if you made it this far down thank you, here is some more pics of Pleasant Point to say thanks ahah!
Have a great day! See you soon!
115 notes
·
View notes
Text


Why yes, it seems going to plan
20 notes
·
View notes
Text
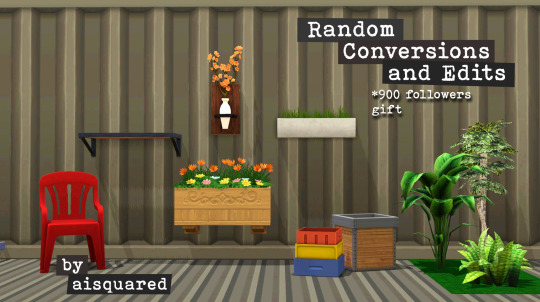
I know I said I'm getting a little rest from making cc, but I just can't sit here knowing I reached 900 followers and do nothing about it. Though these were just unreleased projects that were wating to be posted during the time I had a broken internet at home so no worries, I didn't pressure myself to make these as these were made carefully and with love. So here's a token of gratitude for the huge following I continuously receive all throughout. Thank you everyone! 🥰
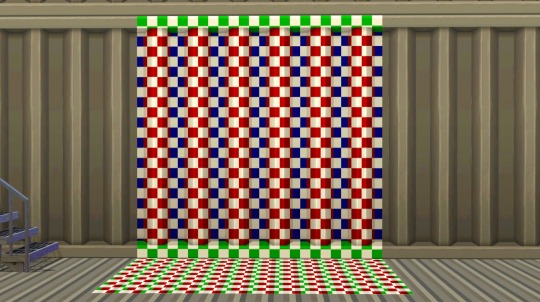
4to3 Eco Lifestyle "Panel to the Metal" Wall
-- Three channels, cost §3, found in Walls > Paneling
4to3 Eco Lifestyle "Layered Paneling" Floor
-- Two channels, cost §4, found in Floors > Metal
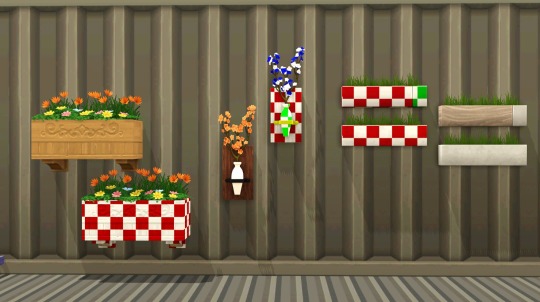
4to3 Cottage Living "All Good Days Daisy Box"
-- Ah yes, this is the plant I showed on the tutorial I shared not a little long ago. One channel with 7 presets for each flower variation, costs §50, found in Decor > Plants. Contains the original catalog description from TS4.
4to3 Seasons "Branching Out"
-- Four channels (yes, even the flowers!), costs §50, found in Decor > Plants. Contains the original catalog description from TS4.
4to3 Spa Day "Wheatless-Wheat Grass"
-- Two variations, one with a single channel and another with two channels. Costs §65, found in Decor > Plants. Contains the original catalog description from TS4.
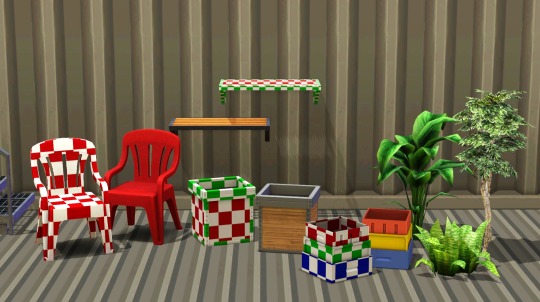
4to3 For Rent "Indoor Outdoor Plastic Chair"
-- I had my eyes set on this plastic chair when For Rent came out, so I know I have to convert it for my game. And anyone else who wants it can have it too! One channel, costs §30, found in Comfort > dining Chairs, Misc. Contains the original catalog description from TS4.
***UPDATE 12 APR 2024: PLEASE REDOWNLOAD!
***The chair's holes are not shown to be transparent. This is now updated with the corrected transparency. Sorry for the inconvenience!
4to3 Greenhouse Haven Kit "The Plant Platform by Plant-It"
-- Two channels, costs §175, found in Surfaces > Shelves, Misc. Shiftable with 7 slots. Contains the original catalog description from TS4.
Decades "JuxtaPlant" Separated Planter* and Plant
-- Self-explanatory, made the planter and plant as separate objects. The planter has the same two channels and a single slot for the plants to put on, price is reduced to §100. The plant is non recolorable and costs §75. Both are found in Decor > Plants.
Fast Lane "Stack O'Storage" as Planter*
-- Aside from being a garage clutter, this stack of crates from Fast Lane can also be a planter of your choice too, also with a slot for your plants. Priced §75, found in Decor > Plants.
Base Game Ficus and Philodendron as Separate Plants
Same with the JuxtaPlant plant, these were also 'depotted' from their vases and can be freely placed in any emptied planters. Non-recolorable, cost §150 (Ficus) and §50 (Philodendron). Both found in Decor > Plants.
*note: these planters will not work with harvestable plants, as these are made for decorative purposes only. If someone wants to remake them as functional planters, please do so!
Everything is base game compatible!
DOWNLOAD: Simfileshare | Mediafire
258 notes
·
View notes
Text
Tutorial: Manga Banners
Basic Manga Text Change/Coloring/GIF creation in PS
Hey, so as promised making a very basic tutorial for making banner gifs in photoshop for fics/drabbles/layouts, etc.
I'm going to keep things super simple here for beginners.
END RESULTS↴

(NOTE: This gif I made will be used for an unreleased story of mine so please don't use this exact gif/images but you are free to follow the tutorial to create your own).
All I ask is if you find this helpful to REBLOG! :) No need to credit me.
For this tutorial you will need ↴
Photoshop
At least 2 manga panel images (non-transparent*)
Optional: Manga fonts. I mostly use CC Wild words (speech bubbles) & Manga Temple (narrator boxes)
Basic knowledge of photoshop layout/where tools are.
*this tutorial is essentially the same if working with transparency but if you do work with transparency you will need to have knowledge of clipping masks which i do not cover here.
Tutorial ↴
(optional) Prepwork: so i didn't think to include this do this but you are going to need to crop and resize your image. make sure the width is either 540 or 1080px. This is the recommended width for pictures in tumblr. Height can be what you want it to be. This is done image > image size (make sure the link-chain is pressed for aspect ratio)
Step 1
This is what you want your setup to look similar to. Delete locked background layer.

Steps 2 & 3
Make a new layer. It might be helpful for beginners to re-name all their layers so instead of "Layer 2" you might name this ⇢ "White fill layer or Text cover up". (doubletap layer name to change it).
Use rectangular marquee to select text you want to change. If you are just replacing a word or two you dont need to white out everything. But you could choose to cover up all if you wish. I just wanted to remove "senpai".

Steps 4 & 5
Use Paint Bucket Tool to fill in selection area with white (make sure the new layer you made is selected when you do this).
Select Text Tool. There is no need to make a new layer as once you are done typing it will become a text layer. I used CC Wild Words bold font for this for emphasis. If you do multiple lines of text use a new text layer for each line.

Step 6 - Optional Step - Highly recommended if you did multiple lines of text.
Rasterize Type by right clicking the layer. This is an optional step. I tend to do it out of habit and rasterizing lets you use the move tool to give you exact px distances between other rasterized elements but nothing we are doing requires this tbh and if you do decide to do it you can't go back and edit text.
If you did multiple text layers you cause space them out evenly using the move tool (zoom into 200%-400% if necessary to get exact pixel distances). Tip: Manga text is centered in the bubble and leaves a good distance away from the edge.
When you are done ctrl/cmd to select all text layers then right click and merge the layers. This is so incase you have to move the text layer for whatever reason they are all on one layer now, evenly spaced and you won't accidentally mess that up.

Step 7
Create an exposure layer (half filled in circle in layer bar for menu). This is important as it can lighten/darken image to make the colors we will add later pop by playing with the sliders for each setting.

Step 8
Apply exposure settings. On the right-hand side there will be 3 slider bars. The screenshot shows my settings but your settings will vary depending on the image. The one that gives the biggest benefit for manga is Gamma Correction which affects the midtones to make them lighter/darker and adds better contrast to the image so it doesn't look as muddy, often in black and white images it is easy for midtones to look muddy. Offset affects mid to dark tones of an image. Exposure affects midtones to highlights to make brighter or darker, overall use this the least. TIP: If you want to make an image brighter or darker you usually want this to apply equally to the overall image so then you would create a brightness/contrast layer instead. most manga images skew muddy and need a midtone and dark adjustment rather than highlights. the better the manga scan images the less adjustments you will need.

Step 9 - Optional
Apply a gradient map (half filled in circle in layer bar for menu). This is optional. a Gradient map adds gradient but preserves the shading in the image so essentially adds a gradient to the shading. I do this in black and white. But if you are happy with how it came out in the exposure phase you don't need to.

Step 10 & 11 -
Apply a gradient (half filled in circle in layer bar for menu). So when you add a gradient there are a ton of preset color combos you can use or you can create your own. I think this one is a preset but can't remember. I like a diagonal gradient from light to dark depending on where the light source on the image is but it is completely up to you. I tend to set the gradient angles near these 4 settings: -145, -45, 45, 145 depending on what corner I want the lighter part in.
One thing to note is brighter colors work better with a darker background. Lighter backgrounds can get washed out. One you add this as you can see it will be solid color.
*note* once this layer is applied any edits such as moving text, etc. around you want to do to the lower layers beneath it click the "eye" button to hide the gradient (same for the map) or there's a good chance it will move the gradient layers around and not the layer you want.
Change layer blending mode. By default it's set to "normal". You can play around with these. Depending on the effect you want and whether the image has darker or lighter colors will decide the blending mode. My typical blending modes are screen, overlay, hard light, vivid light or pin light. You can duplicate this gradient layer and play around with multiple settings and opacities to create something you like.

Step 12 - Optional
Add a Brightness/Contrast layer (half filled in circle in layer bar for menu). Brightness/Contrast on this step will look wildly different than if you added it right after the exposure step. It's not necessary but if you want more overall contrast or brightness then you can add it.
You can see my settings below on the sliders on the right-hand side.

Step 13
Create new layer for highlights. (also good check point to see how your layers are organized).

Step 14
Select the brush tool and ensure brush settings are a soft round brush with a hardness of 0% for the highlight effect. (if you click the brush image you can see my settings better)


Step 15
Select the dropper tool and pick a color from the gradient image. I usually pick the darkest colors available as it will have the best dodge effect for highlights. Since this is pink/redish I only have one highlight color but if you were doing a green/blue gradient you would pick the darkest from both. (ignore the purple here its not being used)


Step 16
Create highlights with brush tool. Do a few tests placements randomly around the image for positioning and then swap the blend mode to either color dodge or linear dodge. I usually do color dodge. You will get awesome highlights like below. You can play with the sizing of the brushes and opacity to decrease the effect.

Step 17 & 18
Export as PNG. Do this even if you want to make a gif as I always recommend a clean canvas for gif making. If you want to be done here and don't want a gif thats fine too. File > Export > Quick Export as PNG (do not save as jpeg/gif you will lose image quality).
Repeat for second image. You don't need to open a new file unless it helps you to not get confused. You can just make a new layer and paste your new image into that layer (if you just right click copy the file in the window/finder folder you can directly paste it into a layer in PS) and use the transform tool to resize. However you can totally just open the image in PS. The benefit of same canvas is you save yourself some time as you can just duplicate gradient layers/adjustment layers and move them. But this is kinda more advanced so if you aren't comfortable with photoshop just make a new image.

Step 18-19
Create new file/open one of the PNG in PS (more advanced can just create new layer, select image, then copy > copy merged and paste on new file for each. Otherwise open one file, create a new layer then copy the other file. The bottom later will be the first image in the gif.
Create Frame Animation on the timeline window. (if the timeline window does not appear then window > timeline) *note* if this is your first time working with the window it may be set to "create video timeline", if that's the case create it then from the frame menu (in step 23 theres an example of where this is) select "convert to frame animation".
If done correctly your setup should look like the below with two images. One for each layer and one for each frame.
MAKE SURE PROPAGATE FRAME ONE BOX IS CHECKED IN THE LAYERS WINDOW.
lmao, not to be dramatic but this ensures most effects you would add to frame 1 (which corresponds to layer 1) is applied to all frames. I'm not too sure its super vital for this super basic gif I'm showing you but its better to get in the habit of always having it checked. otherwise it will fuck you over later down the line in my next tutorial where I show how to add frames to gifs.

Step 20
Select both layers, then select both frames (ctrl/cmd) and finally select tween from the timeline window. It is the multi-faded dot option on the bar below.

Step 21
Add Frames to Tween. Tween is the fading effect adding more frames is the longer the fading effect is. I added 20 for this step, you can play around and add more or less.
Once you do that you can see 20 new frames being added onto the timeline. This will not automatically add new layers, this is fine. Frames and layers don't need to be a 1-to-1. (Another reason why propagate frame 1 needs to be checked as you can still adjust those layerless frames by adjusting frame 1's layer)

Step 22
Adding delays. Automatically the delay on every frame is at zero. But especially if you have text you want people to be able to read that so you need to add in a delay. Your delays can be in increments of 1/10th of a second. I add a 1 second delay to the first frame only.

Step 23
Select and Copy the first frame and then select the last frame and Paste. A paste window will appear in this case we want to paste after selection. I circled where the menu for frames are. (sorry used a different gif as an example so ignore everything but the circled menu)


Step 24
Adding additional delays. I add a 1 second delay to the last two frames.

Step 25
Add more Tween I added 5 frames this time as we want the transition to be much quicker to reset the image. You can see frame 23 in the previous step are now frame 28.
You can add more images in than 2 and follow these steps to add tweening.

DONE! Now to save.
Step 26
Export your gif. File > Export > Save for Web (Legacy) and the screen below should pop up. Here are the settings I use for gifs. You can play around with it but I really wouldn't lol. (again ignore image size, this is from a different gif) it will also tell you how big in file weight your gif is. This isn't something you have to worry about for something simple but the bigger the image size and the more transitions/images you use the more frames you will have. Reducing image size (make sure chain link is on like in the below) will take off more sizing then removing frames will and I would recommend that. But tumblr allows 10MB MAX per gif so just something to keep in mind.

Let me know how this was! If you have questions just drop me an ask. ❤
#✩𝓀𝒾𝓏𝓏𝒶𝓉•𝔱𝔲𝔱𝔬𝔯𝔦𝔞𝔩𝔰#✩𝓀𝒾𝓏𝓏𝒶𝓉•𝕘𝕗𝕩#gfx#fic banners#tutorials#resources#photoshop tutorial#manga edit#edits#fan fic writing#fic writing#anime edits#manga edits
114 notes
·
View notes
Audio
CRYSTAL CASTLES // CUNT CANDLES [LIVE @ MAIDA VALE, 2007]
you want it off so just take my spawn feel complete after it's gone you sleep by my side, sleep on the lawn it's not too late if you want to be gone
from my insides to the outside to the nothing how does it feel when you can't feel nothing
drink sulfur, spill it in my mouth my onus is the time that you lack burrow yourself, you can't have it back drink sulfur, i spit it right back
to my insides to the outside to the nothing how does it feel when you can't feel nothing
fifteen years you've waited for me through preteen years i've been deficiency cuts on my hands, but you can't see nothing blood on my hands, you can wipe up something
to my insides to the outside to the nothing how does it feel when you can't feel nothing
#audio#crystal castles#CC#alice glass#electro#chiptune#unreleased#rare#live#maida vale#00s#electronic#music#u
130 notes
·
View notes
Text
Okay I have to actually get all my currently unreleased cc released so I'm making one big post to show everyone (Seen before and some who I haven't posted about) If you update eye packs I'm sure you'll know of some of them 👀👀
First all of my genshin cc


I'm gonna finish Mavuika's hair and update her thumbnails with her splash art! Emilie should be the next set to release tho <3 Btw Collei is done and works I just didn't have a pic of her apparently? Paimon and Chasca are comm sets so they'll take a while to release but just showing them here anyway <3


Here's the other genshin stuff I need to release (especially Ororon hair) With Kirara I'm actually gonna make her clothes too and release the rest with that!
(adding this here but Kachina is being worked on but her big bald spot is taking a bit to fix! I got my new Stylus so I can continue working on that hair 💪💪)
Dumb app won't let me add more photos so making a new post or reblog this with the hsr stuff 👍👍
66 notes
·
View notes
Text
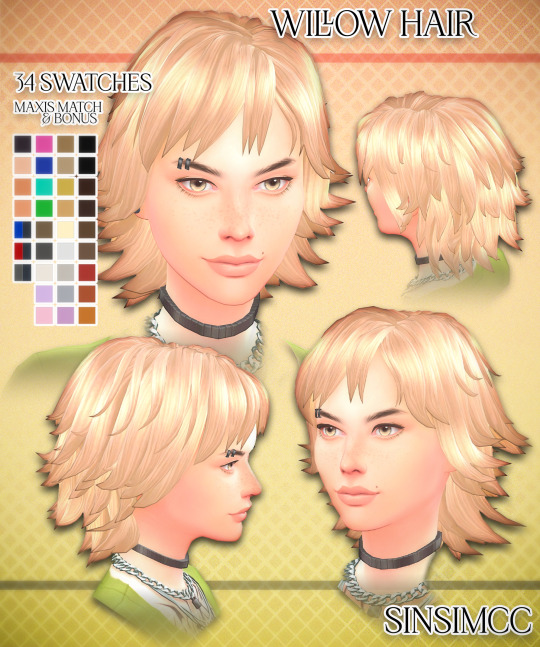

W I Lᴸ O W Hair Release
It's finally done! My first ever hair. I learnt so much during the creation of this hair, although it took a while I hope it was worth the wait <3 Let me know your thoughts and suggestions ^-^
Available to Download Now for my ✨ Sin Prime Members on Patreon
[ Download Early Here ]
◈ 34 Swatches (24 Base + 7 Bonus + 3 Special) ◈ Hat Compatible ◈ 20k Poly

CC Used in this post / Solace Eyes / 3D Lashes / Unreleased Piercing / Skin Overlay
#ts4 cas#ts4 hair#ts4 download#sims 4 cas#sinsimcc#ts4#the sims 4#sims4#simblr#sims#release#TS4CC#sims 4 cc#sims 4 hair#s4cc#ts4cc#ts4mm#thesims4#sims 4#thesims4cc#sims4cc#sims4mm#cc#s4mm#ts4 cc#s4 cc#s4 download#sims 4 maxis match
103 notes
·
View notes