#unbleached knots
Explore tagged Tumblr posts
Text
#hair replacement system#non surgical hair replacement#hair system#hair system knots#bleached knots#unbleached knots
0 notes
Text
🎀👱🏾♀️ How to UNbleach knots on 613 Wig 👱🏾♀️🎀


I'm sure we can all agree that the blonde knots in a 613 blonde lace front wig are NOT IT. They're ugly, annoying and make the wig look CHEAP (and we don't do cheap over here 💅🏾).
Here's a easy method I found on Instagram and it really works!
🎀 Products you will need 🎀

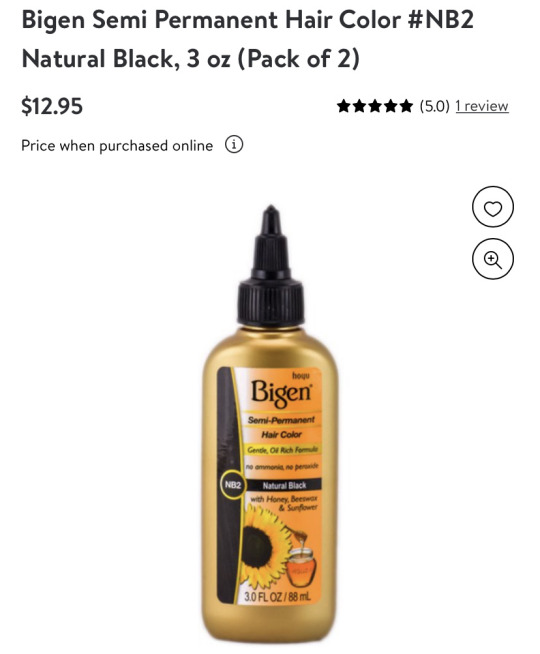

🎀 Links 🎀
Adore Honey Brown Hair Dye
Bigen Natural Black Permanent Hair Color
Aussie Miracle Moist Conditioner
🎀 Directions 🎀
1️⃣ Pour a decent amount of conditioner in a bowl and put a small amount of the Adore Honey brown hair dye on top
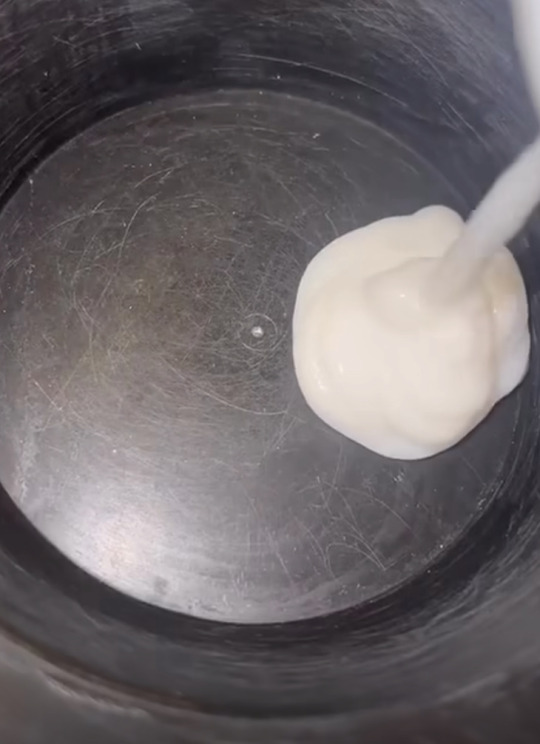
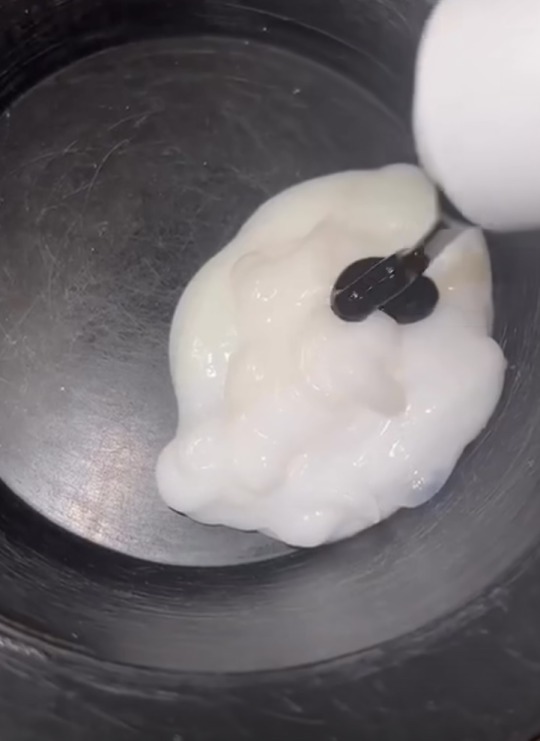
2️⃣ Add in a small amount of Bigen Natural Black permanent hair color
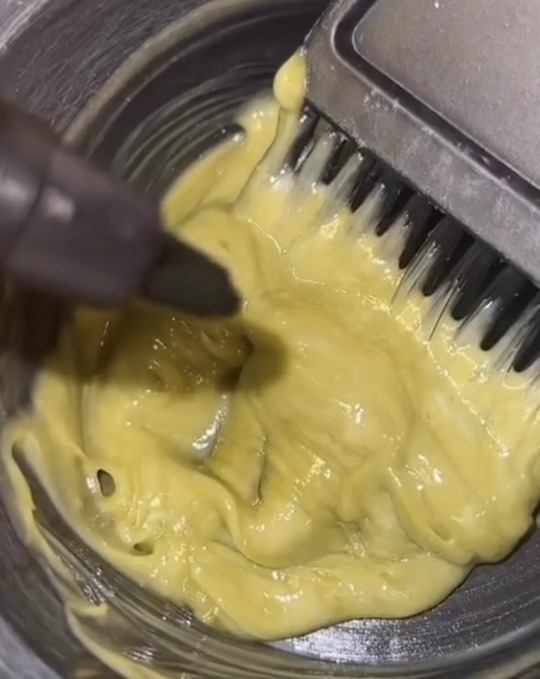
3️⃣ Mix
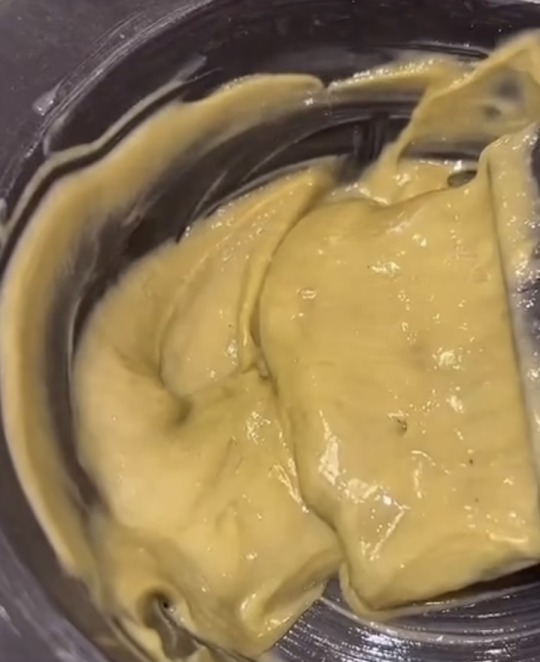
4️⃣ With a dye brush, disperse the mixture on the knots
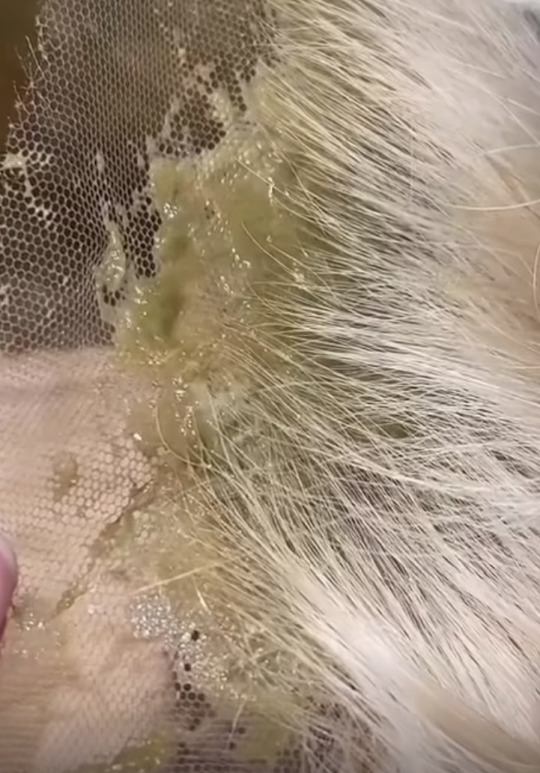
5️⃣ Let it sit for at least 30 minutes and rinse
DONE! ✅
#bombshellempire#pink blog#blackgirlbloggers#black femininity#black girl magic#soft pink#pinkcore#black tumblr#black women#black beauty#lacefrontwigs#blond hair
5 notes
·
View notes
Text
English Willow Bats for Cricket
Whether you’re an amateur or a professional cricketer, choosing the right bat is crucial. English willow bats are known for their superior ‘ping’ and durable wood that lasts multiple seasons if properly cared for.
There are 2 types of willow used to make Cricket English willow bat : Kashmir Willow & English Willow. The main difference between these two is that English Willow is white.
The Grades of Willow
English Willow is a soft fibrous timber that naturally possesses the balance, pick up & power required in a Cricket bat. It is then enhanced through the drying & pressing process.
All clefts of willow are not created equal - this is why some bats cost more than others. However, this isn’t solely down to grading alone; there are many factors that influence the price of a bat including its ping – which describes how much the willow bounces back after hitting a ball.
Grade 1 English willow- High quality unbleached English willow with a blade of 7-10 blemish free straight grains. This willow has a fantastic ‘ping’ that helps top players score centuries!
The Imperfections of Willow
The quality of a cricket bat is not just about the grade of willow, it’s also about how the bat feels when holding it. Having a bat with good ping is essential as it makes it easier for the hitter to hit the ball.
A good ping is generated by the fact that the criss-cross strands of the willow wood create a mesh-like reaction when colliding with a leather ball. The ping of a bat is measured when hitting the ball with a mallet and is often used to determine the bat’s potential.
Willow is a soft, stringy wood with high wood density and therefore a light feel. However, it is not perfect and will have its share of imperfections. This includes blemishes such as dead knots, pin knots and specks. These usually do not affect a bat’s performance and are caused by varying conditions during the tree’s growth. This includes strong winds which whip the cell structure of the willow.
The Redwood
The cricket bat is the most important weapon for any batsman. A good bat gives confidence to the batsman and enables him to play better shots. The natural qualities and characteristics of a bat are determined by the type of wood used, its shape, and grain structure. Bat manufacturers optimize these natural properties through careful selection and shaping, and by drying the wood to a specific moisture content.
The quality of a cricket bat is mainly determined by the grain structure. A narrower shaped grain has a higher performance but a shorter lifespan. Broader shaped grains have a lower performance but last for a longer timeframe. The condition in which a willow tree grows is also crucial to its suitability for use in making a cricket bat. Strong winds can break the cell structure in the wood which can lead to weakness.
The Butterfly Stain
Butterfly stain is a common blemish on bats, it appears as wider white lines that run alongside the normal grain lines of the willow. This is a result of pruning and frost damage that creates scar tissue in the wood. Whilst often viewed as a defect, this actually adds strength to the finished bat and reduces the likelihood of breaking.
While it’s important to remember that a cricket bat’s performance is primarily dictated by how the player uses it, the quality of the willow used can also make a significant difference. This is why it’s so important to understand the grading system that exists in cricket bat making.
There is a lot of debate about the benefits of English willow and Kashmir willow with many people insisting that perfectly equidistant and arrow-straight grains are the only way to go. However, we believe that a well-made bat can be just as effective in the hands of an experienced player.
0 notes
Text
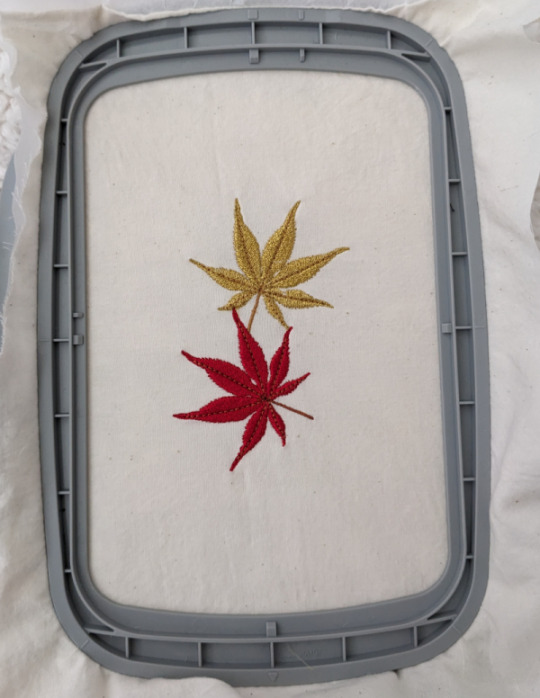
an example of embroidery on the bernette 79. as mentioned in a previous post, the embroidery part has a huge learning curve and my smooth brain struggled with it, but at least i understood the basics after 5 attempts. i went through tutorials on their site, starting from simple to more complex, this is a sampler of one of those. now it's time to learn the finicky details of getting an okayish embroidery to a better one, ugh.
the main downside of embroidery of anything, is that not all fabrics are meant to be embroidered, which seems crazy, like how could people in ancient and pre-industrial cultures embroider such fine or fragile pieces with material limits and lack of technology, but I guess stuff was made differently back then. also the large amount of thread used in embroidery machines, especially if you messed up and had to restart as there is no way to preserve the thread from a bad stitch out. with hand embroidery, you use somewhat less thread depending on the design and could undo at least a few stitches while keeping the thread intact to reuse, because there is no bobbin thread on the underside in the way, just the visible thread stitched in and out of the fabric.
currently my biggest problem is sometimes the tension is off, judging by the bobbin thread looking knotted or sometimes barely visible, i feel like the underside should be smooth and halfway visible, based on other embroideries on store bought items. i think that's due to the tension of the machine and the fragility of the fabric. here i used unbleached muslin cotton with one layer of medium weight stabilizer. but once faqs start mentioning tension my one brain cell turns off. i ain't reading all that.
my next biggest problem is the thread breaking. i have no idea what the thread is tangling over or how it's shredding itself. the gold metallic thread here, while lovely, broke at least 9 times stitching a small maple leaf (12 minutes), while the plain red machine embroidery thread did not break at all, so obviously the shiny foil material is contributing to the tangles and breaks. this i actually knew about based on watching youtube videos of other people talking about their embroidery machines, so at least i was prepared and worked on something else while watching the machine.
now it seems like i'm complaining a lot about technology and I am, but these are known issues for any sewing machine and i knew about them ahead of time. it's just annoying. i work fulltime as a pharmacist which requires precision and accuracy and math at a swift pace, and when i work on my hobbies, i don't wanna overheat my brain by focusing even more on precision and accuracy and math, and yet my two hobbies, art and sewing, are all about precision and accuracy and math!
that's why my friends know better than to ask me what the tip is or calculate percent off a sale price. i don't know!
0 notes
Text
Common Mistakes to Avoid When Installing Hair Bundles With Closure.

Installing hair bundles with closure can elevate your look, offering a seamless and natural appearance. However, achieving a flawless installation requires skill and attention to detail. Avoiding common mistakes ensures longevity and enhances the overall aesthetic. In this blog, we will discuss the frequent pitfalls encountered during the installation of hair bundles with closure and provide tips to sidestep these errors.
Incorrect Measurement and Cutting
One of the first steps in installing hair bundles with closure is measuring and cutting the wefts correctly. Many make the mistake of cutting the wefts without proper measurement, leading to uneven lengths and an unnatural appearance.
Solution: Always measure twice before cutting. Lay the wefts flat on a surface and use a measuring tape to ensure precision. Cutting wefts at an angle can also help create a more natural blend.
Failing to Prep Natural Hair
Installing hair bundles with closure on unprepped natural hair can result in a bumpy and uneven look. Your natural hair needs to be clean, detangled, and flattened before installation.
Solution: Start with freshly washed and conditioned hair. Detangle thoroughly to remove any knots and use a flat iron or braiding to ensure your hair lies flat. This creates a smooth base for the bundles and closure.
Skipping the Closure Bleaching Process
A common mistake is neglecting to bleach the knots on the closure. Unbleached knots can be very noticeable, making the closure look less natural.
Solution: Bleach the knots to match your scalp color. Be careful not to over-bleach, as this can weaken the hair on the closure. Use a bleach mixture and apply it gently to the knots, allowing it to process for the recommended time.
Improper Placement of the Closure
Placing the closure incorrectly can lead to an unnatural hairline and an awkward overall appearance. The closure should align seamlessly with the hair bundles.
Solution: Position the closure at the front of your head, ensuring it aligns perfectly with your natural hairline. Secure it in place before sewing or gluing the bundles to avoid any misalignment.
Using Too Much or Too Little Adhesive
Using the wrong amount of adhesive can cause significant issues. Too much adhesive can create a sticky mess and damage your natural hair, while too little can lead to the closure lifting prematurely.
Solution: Apply a thin, even layer of adhesive or glue along the perimeter of the closure. Press down firmly to ensure a secure bond. If sewing, use tight, neat stitches without over-pulling the thread.
Ignoring the Importance of Layering
Many people install hair bundles without considering the importance of layering. This can result in a bulky and unnatural look, as the hair does not flow seamlessly.
Solution: Trim and layer the hair bundles to create a more natural flow. Layering involves cutting the hair at different lengths to achieve a more blended and voluminous appearance.
Overlooking the Need for Blending
A noticeable transition between your natural hair and the installed bundles is a common issue. Failing to blend can make the installation look artificial.
Solution: Blend the hair bundles with your natural hair by using a flat iron or curling iron. Style the hair to achieve a uniform look. Using a bit of leave-out can also help create a more natural blend.
Neglecting Regular Maintenance
Even after a flawless installation, neglecting regular maintenance can quickly degrade the look of your hair bundles with closure. Unmaintained hair can tangle, shed, and lose its luster.
Solution: Follow a regular maintenance routine. Gently wash and condition the hair, detangle with a wide-tooth comb, and avoid excessive heat styling. Protect the hair while sleeping by using a silk or satin bonnet.
Choosing the Wrong Hair Type
Selecting hair bundles with closure that do not match your hair texture or color can lead to an obvious mismatch. This is a mistake that many beginners make.
Solution: Choose hair bundles with closure that closely match your natural hair texture and color. This will ensure a seamless blend and a more natural appearance. Consult with a professional if you’re unsure about the right type to choose.
Ignoring Professional Help
While DIY installations can save money, they often result in mistakes that could have been avoided with professional assistance. Trying to install hair bundles with closure without adequate knowledge can lead to an unsatisfactory outcome.
Solution: Consider seeking professional help, especially if it’s your first time. A professional stylist can ensure a flawless installation and provide valuable tips for maintenance. If you prefer DIY, educate yourself thoroughly through tutorials and practice.
Not Securing the Closure Properly
A poorly secured closure can shift or lift, resulting in an unattractive look. This is a common mistake for those who are new to installing closures.
Solution: Secure the closure firmly using either sewing or adhesive. If sewing, make sure the stitches are tight and neat. If using adhesive, ensure it’s evenly applied and press down the closure to eliminate air bubbles.
Overlooking the Final Styling
The final styling step is crucial in achieving a polished look. Skipping this step or doing it incorrectly can undermine the entire installation process.
Solution: Take your time to style the hair after installation. Use heat styling tools to create curls, waves, or a sleek straight look as desired. This final step ensures your hair bundles with closure blend seamlessly and look natural.
Conclusion
Installing hair bundles with closure can transform your look, but it requires careful attention to detail. By avoiding these common mistakes, you can achieve a flawless, natural appearance that enhances your beauty. Remember, preparation and maintenance are key. Whether you choose to DIY or seek professional help, these tips will guide you in the right direction for a successful installation of hair bundles with closure.
0 notes
Text
I could never let a bitch with unbleached knots try to tell me anything like be fr
#teya talks#why would this girl try to correct me about prenups in California#only one of us is prelaw and it isn’t her#then to call meghan Markle a narcissist???#it’s giving weird
0 notes
Text
Things You Should Know About Pre-Bleached Knots Wigs and Unbleached Knots Wigs.
In the world of wigs and hairpieces, innovation has brought forth a variety of options to suit diverse needs and preferences. One of the significant advancements in this realm is the introduction of pre-bleached knots wigs and unbleached knots wigs. These terms might sound technical and unfamiliar, but they play a crucial role in achieving a natural and seamless look when wearing a wig. In this article, we will delve into the details of pre-bleached knots wigs and unbleached knots wigs, highlighting their differences, benefits, and how to choose the right option for you.
0 notes
Text
Studio Project #1
This post documents the official completion of my dumping basket. I was ill for a while, but now I am finally able to document the completed basket - with all of the embellishments.

This is my project planning page that included some of the embellishment ideas that I had. I was not sure yet of the methodology and materials that I would use to achieve this.

These are the specifics for the ideas I came up with. I did keep in mind that this could only be done within reason- due to time and effort limitations. Embroidery is very beautiful and allows me to have the freedom as an artist to create anything, but this comes at the cost of time. So, I decided to create patches that I would then appliqué onto the crochet basket. I did some research and I could not find anything that documented a similar process. Most results showed appliqué of a crochet "patch" or piece onto a crochet base, but to me that seemed like a fairly intuitive process since the materials would be the same. My concern with the patch idea, was that the unbleached muslin would not mesh will with the crochet, in that it would be very detectable to an audience that there was something externally attached to the basket. This was the same issue I had with directly embroidering onto the crochet, the front would be blended and presentable, but the basket interior would be a visible mess. Therefore, I decided I would attempt the patch idea to combat this issue, and minimize the visibility of the embroidery stitches.

These are the patches that I ended up making. The first one I made was the alien, I used the satin stitch to create the head and the back stitch for the black outline. Silver sequins were used for the eyes and a black sequin was used for the mouth. The planet ended up being very true to my original intentions for it. The colors are bright, and the planetary ring is composed of silver sequins. The satin stitch was used for the planetary body itself and the black outline was created using the back stitch. For the sequins, I used a single thread of the six that compose the embroidery thread to subtly, but securely attach them for both the alien and the planet. The last one was the flower. This design might seem out of place, especially from the plans shown above, as stars would seem to fit better. However, since the fall, I have been trying to make an embroidery flower, but have never been able to successfully complete one. So, I took this as my chance to create one and feature it on my project. For me, embroidering flowers is hard, I am not sure why, but despite the basic design, I struggled. For this specific flower, I decided to use the french knot to create the center and the staggered satin stitch for the shading and texture on the flower petals ( I am very familiar with this stitch from last semester's second project that featured the embroidered tree). Despite being able to successfully create an embroidered flower, this attempt also proved to be challenging. This was because I needed to ensure the approximate evenness of the petals, as well as the composition of the dark pink in relation to the light. In addition to this, I forewent the black outline because I believed it would detract from the delicate nature of the flower, however this became an issue (will discuss this later in the post).

This is an up close of the alien patch. In this phase, the alien was still on the embroidery hoop. I selected this design to be the first patch I attempted to attach to the basket, due to the simple shape since I was not sure if my plan would work out.

All three designs together.

An up close of the planet. I was much more confident after having attached the alien, so I have better documentation of the planet and the flower.

After taking the planet off the hoop, I cut around the shape, ensuring there is enough of a free edge surrounding the design.

I began to secure the planet onto the basket. I used the "invisible" stitch to achieve this. Once again, I used a single thread out of the 6 to attach the designs, but also maintain the cleanliness of the basket interior. By using the thin thread of similar color to he crochet, I was able to efficiently blend the threads into the interior space without it being abundantly apparent. To start, I came up thru the first hole between the black outline stitches on the fabric layer only. then, I folded the fabric underneath the design, so that only the black stitch trim was visible and then threaded thru the basket. I repeated this around all three designs, so that the surrounding fabric could no longer be seen.

Continuing on.

This is the patch fully attached to the basket!

An up close view of the flower on the hoop. Note the lack of black trim.

Cut the flower out from the fabric.

I then trimmed around the flower, once again keeping an edge surrounding the design.

The flower attached to the basket! Because there was no black trim around the design, it was incredibly challenging to seamlessly attach the flower to the crochet. With the trim, the thin thread was able to blend into the black stitches, therefore minimizing the thread's visibility, while also masking the fabric peeking out. However, I could not rely on a black trim to account for this forgiveness, so the resulting finish is not as clean as the others.

This is the basket situation from the top view.

I was trying to figure out the placement of the patches, based on a favorable basket position. Ultimately, I decided that the two larger compartments would be highly compositionally effective for the patches, this is because the smaller compartment has a foundational wall that is more chaotic than the other two due to the combination of the dark and light greens. I though that this would detract from the patch visibility.

This is the final basket with the patches attached. An advantageous characteristic of the basket, is that there is room to add on more patches and embellishments, as new meanings arise.
The basket itself holds a very powerful and meaningful message to me, but the addition of patches has exponentially increased the value.
0 notes
Text

When I paint my house sign
#oil painting#colorofsoul#tea#howiroll#whatdoyoudo#candlewick needlework#french#colonial knots#unbleached#muslin#handcrafted#inspiration and creativity#whereidwell
47 notes
·
View notes
Text
Where has my Underwear Gone? OP Edition
Shenanigans on the Red Force. Bad Shanks! Wicked Bad Naughty Shanks!
Notes: Nicknames are used, Sunshine, Darling, etc. Probably smut. Yeah smut. AFAB reader so female parts are mentioned as well as that dick tho. MINORS DO NOT INTERACT. Crossposted on AO3

You searched through your chests of clothing with increasing frustration. Shirts, pants, sashes, skirts. Things to sleep in, things to sunbathe in, things to swim in. Shirts stolen from the love of your life and captain, Shanks. Stupid capes you didn't want to admit you actually liked. Stockings, hats, what Shanks lovingly referred to as 'ho wear,' that fancy coat you stole from Beckman. Not a thread, scrap, lace, or remnant of your underpants.
Your expensive, made to order, finely woven, unbleached cotton underpants. Cut to your specifications to protect your delicate bits from chafing in your preferred leather trousers, underpants. Only made by two tailors at the far ends of Emperor Shanks' wide territory, underpants. Completely missing from every chest, trunk, and drawer dedicated to clothing in the wide cabin you shared with your captain.
The captain you suspected was behind this Mystery of the Missing Underwear.
"SHANKS!" You bellowed your sweetie's name as you hit the main deck of the Red Force. Around the ship your crewmates froze, shoulders hunching against the strident tone of your voice. "Where are you, you sneaky thieving greedy pirate!" Sweeping your gaze across the deck, not a set of eyes met yours. Everyone was suddenly Extremely Busy fiddling with ropes, retying sashes, peering out into the distance with exaggerated concentration.
"Uh huh. Well GOSH I guess the Boss is GONE what a SHOCKING SURPRISE!" Once again you eyed your crewmates. Bonk Punch was ostentatious tuning his worn guitar, brows (or where he should have had brows) furrowed in peering concentration. Limejuice, Hongo, Yasopp, and Rockstar were huddled around a broad barrel playing Liar's Dice, drinks to hand and Definitely Not Noticing You. You turned in place, hands resting on your hips and quite close to the hilts of the twin long knives that always rode there. Lucky Roux was in the galley, cooking or hiding.. Gab and Building Snake were on maintenance.. one of the young apprentices was busily scouring stains out of the main deck, another was sitting in the shade of a sail practicing knots.. No Shanks, and oddly no Monster. Hmm.
Bootheels tapping you made your way to stand by the boy. You could actually hear him gulp when you slid a glance his way. Big wide eyes under a floppy bucket hat met yours. "Kid. Everyone sure is busy today. How are those knots coming?" You knelt on one knee, reaching out to inspect his work. Under your breath a mutter of "a hundred beri if you tell me where to find Boss" was met with a startled glance at you then up towards the back of the quarter deck. "Fine work, Kiddo, keep it up." You stretched, squinted up at the warm sun, ran your fingers through your hair, the very essence of Nonchalant Pirate. Who you? You were just hangin' out, nothing suspicious here. Quietly you worked free from your boots and set them down as soundlessly as you could manage, then climbed carefully up a stack of crates -- you were pretty sure it was all booze -- to slip over the polished handrail and onto the quarterdeck.
Yep, there was your one true love, Redhair Shanks, Chief of the Redhair Pirates, a man with a bounty of over a billion beri, the man who could cause entire crews of bloodthirsty violent men to faint from his simple presence. Shanks, famed for his generosity and charm, and for the way he treated those under his care. Shanks, on the way to becoming an Emperor of the Sea, ruthless in his intentions and implacable when moved to fury. Shanks, two out of three sheets to the wind and it was barely past noon. He sat in an honest to gods chaise lounge. That's what the man who had given it up as tribute called it, anyway. It was oversized which was fortunate, a pretty red-toned wood making up the sweeps and lines of the piece, the cushions a plush deep amber with gleaming bronze hardware holding it together. Pity Benn had nailed it to the deck but such was the way of furnishings on the everchanging and temperamental seas of the Grand Line. A spare sail had been rigged up to form a pleasant shelter while still affording the lounge's occupant truly breath taking sea views. Not so much of area directly behind Shanks' luxurious perch which was exactly where you landed, crouched on almost entirely silent feet to seize your lover in a surprise grip. Who were you trying to kid? This was Shanks. He'd probably known what you were going to do before you decided to do it.
"There's my Sunshine!" Shanks had set down his sake cup to slide his big hand around the back of your neck, planting a warm but somewhat uncoordinated kiss to the side of your face as he 'helped' you over the lounge to sprawl on his lap. You glared up at him, huffing at the hair than now slid over your face in your less than graceful position. Shanks literally beamed at you, his eyes almost closed with the sincerity of his flashing smile. This was one of the best sides to Shanks, all warmth and affection and goodwill. He called you Sunshine but you called this particular mode Sunny Bunny Shanks. Not today however. "I thought I heard you calling for me," said Mr. Innocent as if you hadn't been shouting his name loud enough to be heard over a gale. "What can I do for you, my darling? Moon of my night, flower of my heart?" He brought your face to his and kissed you gently between each compliment, sweet from the melon-flavored sake he preferred, a trace of salt from the sea air, and the taste that was uniquely Shanks. No! No distractions! Bad shanks!
"It's no use trying to distract me, Shanks. Bad Shanks!" This as you batted away his hand from the tie that held your Honestly Truly a Pirate Shirt closed, saying the words from your internal dialogue. "You don't deserve titties!" That brought an actual gasp of horror as his hand stopped momentarily, ruddy eyes widening as much as possible at such a terrible thought. You struggled to sit up and get up out of his lap but appalled as the no titties comment had made him, he hung on to your waist and really.. it was surprising what he could manage with that half an arm. "You are a greedy bad stealing greedy bad man. Where are all of my underpants? The real ones not the thongs or those strings you and Benn thought counted as actual panties. Where are my panties Shanks??"
Oh yeah, floated through the pirate captain's buzzy brain. She did find out, who figured that? Oh Benn had. Pfft, stupid Benn. Shanks started mouthing at the soft skin of your throat both to distract you and because he just loved the taste and feel of you. The press and soft suck of his lips and the scratch of his stubble had you stuttering, he super loved that so much. Now his mouth wandered up your chin to latch to your lips, maybe he -was- greedy with the way he suckled at your plush lower lip until your mouth parted in a gasp and he could slip his tongue inside. Mmmmm so much better, and who needs panties? Not us. He listened to your protests as your shirt was undone and somehow, without you registering it, slipped off and tossed away, giving him access to your breasts. Shanks took advantage of that opportunity gladly, deftly sliding you under him into the firm cushions, their smooth satiny texture adding to the sensations causing your skin to shiver. Warm mouth to one breast, tongue teasing gently then pulling hard to make you cry out and arch against his sculpted chest; the other breast in his large capable hand, the callouses of sword play and hauling rope just rough enough to make you wriggle against the two contrasting pleasures. You both still had pants on, for the love of loot, and you were no longer in control of this conversation that wasn't actually happening.
Shanks was a force of nature. Whatever he turned his considerable mind and implacable will to received his full attention, and like most of the world, you were simply pulled into his aura and clung on for dear life. He loved you, he truly did, he cherished and valued you, he respected you. All of those strong emotions communicated to you not just in his murmurs of adoration but in the way he touched and teased you. Shanks was a romantic and while he had every intention of bringing you to undone pleasure and ruin beneath him, it wasn't to conquer and pillage. You were his pirate queen and his greatest treasure and he loved little more than bringing these cries of pleasure and shock from your panting mouth, as he was now.
"Sh-shanks!" You hands on his shoulders didn't actually do anything to his large frame or the wonderfully solid press of his weight against you. "I'm not.. I'm not done fussing at you!" Your protest was a weak pro form at this point as his lips moved to plant firm kisses down your stomach. Ding dong you are wrong, suddenly you were laughing and the blush staining your face wasn't just from lust as Shanks blew a loud raspberry against your twitching skin. That was one of the best things about sex with Shanks: he never lost his sense of joy. Of course he never stopped being a cunning pirate either since the raspberries were a distraction for him to strip you of your trousers, slick as anything. His shoulders were simply too large for your thighs to do anything but spread wide for him, and he absolutely did that on purpose, scooting down the lounge to smile fondly at your exposed pussy like it was his best friend. (It sort of was.) You twisted your fingers into his profoundly red silky hair and pulled hard to make him look up at you. "Shanks for real! I need those underthings. They keep me from getting chafed and sore when we're running around fighting. I don't want sore skin there!" It was your last chance to put any kind of sane reason into his airy head. Those slanted eyes, their light red hue that always entranced you, caught on yours for a moment and you saw that thread of clarity run through the sake and sex haze that was piloting 99% of his brain.
"Oh no, we can't have that," the pirate agreed far too easily. He nudged your thighs even wider apart and bent to brush the softest of kissed against the skin in question, soft and stubbly caresses to the tender skin where the line of said panties would sit. "Poor Sunshine, we have to take good care of you." He hoisted your leg over his shoulder and bent to his task. A lingering swipe of his hot tongue against your folds had your grip shifting from demanding to simply finding something to cling to, skillful strokes of that wicked tongue leading into gentle nips at the your hooded pearl. Shanks had spent the last dozen years manwhoring up and down the Grand Line and he was very pleased to put the talents he'd gained to good use. Alternating between swirling his tongue around your swollen clit and biting into it tenderly, he had you straining against his face as your first orgasm rolled right on through and over you, holding you to him as your body tensed and shook. So beautiful. He used that moment to shuck out of his pink-with-pineapple-print-breeches off and kick them away. Then he slid his fingers along your thigh and over the clipped curls of your mound, parting the wet pink folds as he placed a kiss on your other thigh. He couldn't help suddenly sucking a span of your flesh into his mouth with hard pull, biting onto it to leave mark to match the ones littering your throat and chest like a leopard's rosettes. Your cry of surprise and enjoyment choked off when he slid two thick fingers into, savoring the way your tight muscles gave just a little as his digits stretched and pressed into your cunt.
"I'm so sorry for any offenses I've committed against this pretty pussy, Sunshine." He timed the strokes of his fingers to his words, sounding so sincere that only when your opened your eyes to glance at his face did you see the lust and power glowing there. "How will I ever make it up to you?" As if the steady stroking and the curl of his fingertips wasn't apology enough. Your hips twisted against his body, hands both pushing at his shoulders and pulling them closer as he worked your tensing frame up towards another giddy peak, the sheer gravity of the man pinning you under him. "What can I ever do to make it up to you?"
"Just fuck me already!" Quite a bit of exasperation and fondness both from you as you dragged at Shanks, pulling his face up towards yours. His laughter was loud and bright, vibrating through your chest as he settled atop you. One thing about this damned fancy couch: he could lean his quarter arm comfortably and prop over you with no accidental acrobatics. His mouth grazed against your panting one, tastes of sake and yourself in the long tender kiss you shared. "Anything for my pirate queen." You felt the thick tight head of his cock nestle against the flutter of your eager hole then sink in, bit by bit, the familiar ache and stretch just delicious and making that heated juncture the absolute center of both your attention. Shanks held his breath, eyes closing as he buried himself in the welcome sear of your cunt. It was nearly communion, the way you locked into each other, muscles shivering and nerves fizzling with delight, skin sliding against skin as once again you and your lover tried your best to become one being.
Then he started to move, hips thrusting smooth and sinuous, one hand gripping your thigh to pull you into the exact perfect angle to grind against that one spot perfectly. Every time his dick wedged solidly against the end of your silken tunnel the little cry you gave made him swear and move a little faster, the glide of thick hard flesh into hot slick flesh becoming a wet slap as your pussy flexed around him, your arousal just adding to the sensations of Shanks pulling you towards climax, Shanks' mouth at your throat and lip and ear,hoarse voice muttering curses amid the string of praise and your name falling with love into the heated scant space between you. Your hands were all over him, tangling in his sweaty hair, smoothing down his neck, gripping his shoulders, nails dragging down his gleaming skin, hands kissing down his straining back to clasp his hips hard and urge him to more, more.. when your greedy hands clapped his ass loud enough to be heard over the pants and cries he muffled a laugh in your hair and moved faster, stronger, fucking you into the lounge like he meant to drive you through to the deck. One particularly sweet thrust spilled you right over into an intense peak, Shanks holding on for dear life as your body writhed and tensed in its bliss. Shanks shuddered above you then in you, hard pumps of hot seed flooding you as you pulled Shanks into orgasm as well, joined bodies straining to pull tighter and shove away. One climax slid into another as overstimulated nerves were pushed past endurance with the rocking of your locked forms, waves of sparking joy all-consuming.
Several moments of your hearts racing together, pace gradually returning to normal as your breathing eased, sweat-stained skin cooling in salty ocean breeze. This was when Shanks was unfailing sweet and tender, no matter how high the alcohol content of his bloodstream, kisses all over and strokes down your cheek, holding your jaw so he could murmur endearments into the corner of your lips. His weight was so good pressing you down, your legs tangled with his heavier ones, just feeling everything as your bodies relaxed from the incredible high you'd just shared. "Mmm. Shanks." Your soft voice in his ear made him shiver, hand fondling one of your breasts like his favorite sake cup. "Amazing as that was, and it was amazing, I still need my clothes back." The pirate sighed against your throat.
"Do you just hafta have underpants?" His words were muffled and just a bit plaintive, almost whiny. You laughed and hugged him, kissing his temple and gently pulling at the silky red that gave your crew its name. "Fraid so, lovey. Time to man up and give me the panties." Shanks lifted up to pout down at you, somehow still boyish for all his power and the fact he was bare-ass naked and still buried in your cunt.
"All right all right. I'll get Monster to fetch them from where he's got them hidden in the shrouds."
Your voice rang out again, this time filling the air not with passionate cries of love but one word in that gale-shattering tone.
"MONSTER!"
274 notes
·
View notes
Text


embroidered fic recs 26/?
Breathe You In and Steal/Keep by @shealwaysreads
[useless technical shinfo: this has my usual bastardised version of a long and short stitch, back stitch and some wee French knots. i used raw unbleached cotton, 20 different shades of thread, and tiny 4cm hoops. all together it took about 16 hours.]
My first double fic feature! It's no secret I have a wild writerly crush on @shealwaysreads so when I found out I got to make her a wee christmas present, I knew I had to go all out.
There are so many Bella fics I could have picked for this and that I love but I feel like these two perfectly represent her style and incredible range: soft, tender, ingenious, scorching. Plus, she's one of the wonderful brains behind @hdsudsfest so it all made sense in my head.
Breathe You In is a perfect stolen moment in time that I have reread many, many times in the last year for a bit of peace in my heart. It's one of those fics you read and it leaves you knowing you want that kind of peace for them, so badly. It's just a beautiful, tender, perfect fic.
Steal/Keep took my breath away the moment I saw @babooshkart's art for it and I was so not ready for what I was about to read. The most amazing little heist fic, with perfect pacing that keeps you on the edge of your seat for what's next and delicious side pairings to boot.
Both of these fics are lush and decadent, with the most vivid imagery and so, so full of love that you can't help but come out of it with your heart full of warmth. Such is the magic of anything @shealwaysreads writes. 💕
#merry christmas bells <3#i hope you like these!!#m embroiders#fic recs but i embroider them?#fic rec#drarry fic rec
104 notes
·
View notes
Text
To Heal the Eyes When the eyes begin to cause suffering, they can be healed if one knows the patient’s name and makes knots in an unbleached cloth while spelling out each letter. Latin. Fifth Century. Marcellus. De Medicamentis Liber. Claude Lecouteux. Traditional Magic Spells for Protection and Healing.
18 notes
·
View notes
Text
Mesopotamian Ghost Spell (2)
Another Mesopotamian formula to drive away ghosts bypasses the realm of spirits to take banishing into one’s own hands. This method is suggested if a ghost sighting has you spooked.
The original spell might insist that one spin one’s own woolen threads. If you can spin, the spell will be strengthened by incorporating that process.
Braid a strand of unbleached wool and a strand of red wool together, so that the colors stand out from one another, remaining distinct. Use red wool that will not bleed into the other strand. The finished braid must be long enough to tie around your forehead.
Make seven knots in the braid, while focusing upon your desires.
Bind the braid around your forehead, while chanting an incantation, something like this: Until red turns white and white turns red, That ghost that appeared to me can’t come back again.
Sleep in the braid overnight (and whenever deemed necessary in the future).
Afterwards, carry it as a talisman, in a charm bag.
(from The Element Encyclopedia of 5,000 Spells by Judika Illes)
#spells#death spells#ghost spells#banishing spells#banishing spirits#wool#string#thread#red#white#bags#charm bags#sachets#mojo bags
6 notes
·
View notes
Text

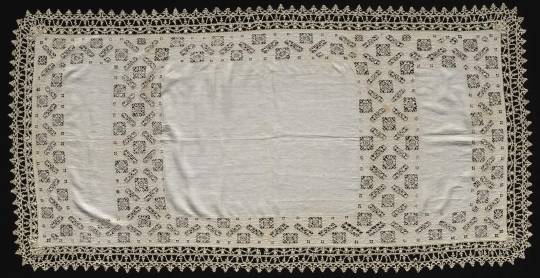
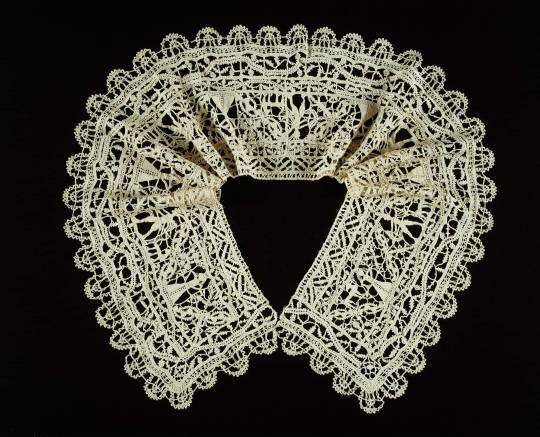
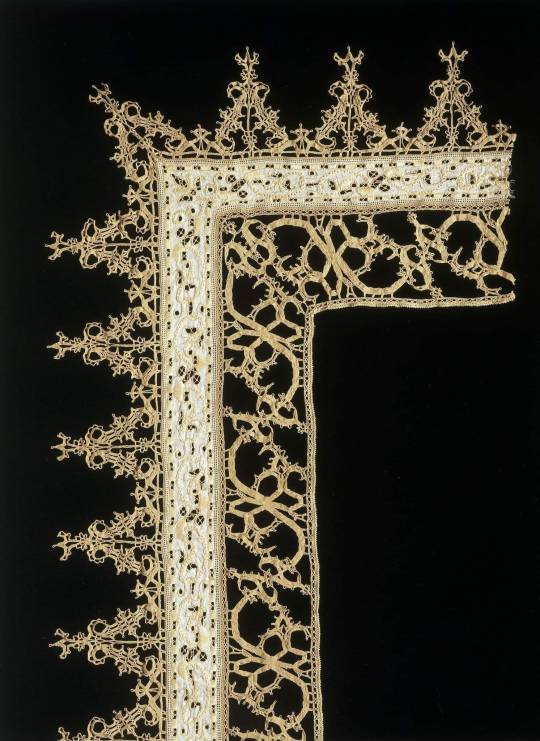


D'Artagnan.
"Having previously posted 16th century band samplers few days ago that included the essential skills of cutwork and white work; here are some examples of finished cutwork /white work showing how the same techniques were used and ultimately became the Italian needle lace known as reticella.#1 is particularly exquisite.
#1 French Linen cloth - 24 squares filet embroidery set amongst 24 squares of whitework. The cloth dates to ca.1620-30 and measures 105.3 by 137.3 cm (41.5 by 54 inches).
The cloth features darning, double running stitches, cut and drawn thread work embroidered in cross stitches, interlocking lace, overcast, and satin stitches; knots, overcast bars, buttonhole, darned, and woven wheels; needle lace filling stitches; appliquéd with plain weave and embroidered in back, bullion, cross, half cross, detached chain, double running, running, satin, single satin, surface satin, and stem stitches; buttonhole wheels, eyelet holes, and French knots; edged with bobbin straight lace.
© The Art Institute of Chicago
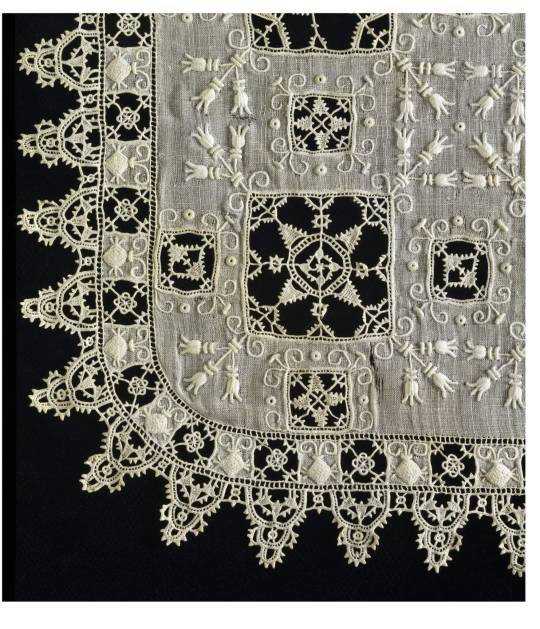
#2 Italian Handkerchief made in fine linen with cutwork by an unknown maker ca 1600-1640 It has whitework embroidery, worked in detached buttonhole and satin stitches, needle lace and cutwork decoration; with needle lace fillings, and whitework embroidery in detached buttonhole and satin stitches; edged with needle lace.Length: 45.5cm
Width : 45.5cm © V&A
#3 Italian linen needlepoint (Cutwork) and Bobbin Lace Cloth
16th century
Dimensions approx : 183.5 x 90.3 cm (72 1/4 x 35 9/16 in.) © Cleveland Musuem of Art
#4. Collar (Made from a Border)
Italy1575–1625
Linen, three bands of needle lace worked on a plain weave; cut and drawn work grid; edged with bobbin straight lace
Dimensions 22.1 × 150.3 cm (8 3/4 × 59 1/4 in.) © Art Institute Chicago
#5 Border from a cover, of embroidered linen with satin and stem stitches; edged with a band of bobbin lace worked with unbleached linen thread.Italian second half of 16th century
Max length laid flat length: 930mm
Max width laid flat width: 260mm © V&A
#6 as #4
#7 Alternative view of # 3
#8 alternative view #2
~~~~oooo~~~~
Cutwork describes any form of embroidery based on a woven ground from which sections have been cut away and edged. This style of whitework originated in Renaissance Italy, when nuns created fine textiles for ecclesiastical use. They first removed threads, then whole sections of background fabric to fully exploit a contrast between light and shade. This work was later contracted out to hired embroiderers, who established a tradition of decorating linens with intricate cutwork patterns. The intensive labour involved in this form of whitework made it an easy means of signalling wealth and social rank in Europe in the 16th and 17th century. Thus it became associated with royalty and the nobility, and pieces were often exchanged as high-status gifts.
Cutwork is also the origin of reticella lace; as over time embroiderers made larger and larger holes, creating 'reticella' (floating shapes) in which the linen backing fabric was almost entirely cut away, becoming known as as 'needle lace’.
~~~ooo~~~
Handkerchiefs in the 16th and 17cent made of plain linen served exactly the same function as today.
However, if they were decorated they would be carried purely as fashionable accessories and given as gifts.
During courtship, a couple would exchange symbolic gifts such as gloves, ribbons, rings and handkerchiefs. The acceptance of a gift indicated a binding commitment and be could used as proof of betrothal in the case of any disputes. Although a splendid handkerchief was seen as an intimate item, it could also be held in the hand as a display object and indication of status. Queen Elizabeth I frequently received gifts of embroidered handkerchiefs on New Years Day.
From about 1570 to 1620 cutwork and needlelace were important decorations on fashionable dress for women and men.
Love D'Artagnan xxx".
11 notes
·
View notes
Text
Black Salt Protection Jar
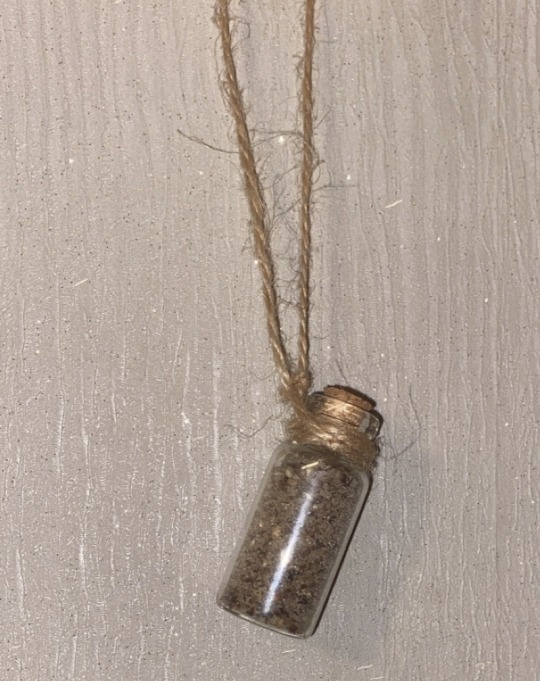
Ingredients/Equipment Used:
~ sea salt
~ black peppercorns
~ an incense stick
~ tiny glass jar
~ pestle and mortar
~ spoon
~ little bowl/plate
~ hemp string
Method:
1. Put equal amounts of salt and black pepper into your pestle and mortar. Grind these up as coarse or as fine as you’d prefer; personally, I ground them up quite small to make it easier to get them into the jar.
2. Light your incense stick and use the smoke from this to cleanse the jar. If you already have some incense ash saved up, add this to your salt and pepper mixture. If you don’t, wait for the incense stick to burn completely and use these ashes.
3. Mix the ground up salt, pepper and ash together. Some may choose to add activated charcoal or black food colouring at this stage to give the black salt a darker colour.
4. Place the jar into the bowl (or on the plate) you chose to use; this will help collect any black salt that didn’t make it into the jar! Spoon your mixture into the jar until it is almost full; I found if you fill it up to the top the cork doesn’t sit in the jar securely enough.
5. Push the cork securely into the bottle and wrap your hemp string around the neck. Tie a knot to secure it and tie another at the ends of the string at your preferred length. Cut off the excess string and burn the ends to prevent fraying.
Alternatives:
~ A different type of string or cord could be used for this necklace. I prefer hemp string because it’s unbelievably soft. It’s also sustainable, recyclable and 100% biodegradable. Hemp is deemed as a ‘carbon negative’ material as more carbon is taken out of the atmosphere by the growth of the hemp plant than is emitted as a result of its production. The fibres in hemp string are longer than those in cotton; this makes the hemp string stronger. However, hemp string is quite susceptible to fraying so burning the ends is vital to prevent this.
~ Instead of placing the black salt in a jar and wearing it as a necklace, you could place it in a bowl underneath your bed to protect you as you sleep. Additionally, you could sprinkle your black salt on your household’s property line or use it to cast a circle.
~ I have explained a few ways you could use black salt to drive away those (being spiritual or physical) that would do you harm. However, black salt can also be used to create a hex or a curse.
Disposal:
To dispose of any excess black salt (or any black salt that’s fulfilled it’s duty) bury it in your garden; if you don’t have a garden, try burying it somewhere close to home. However, if you used your black salt for a hex or a curse, bury it somewhere far from your home (and from where anyone or anything may accidentally stumble across it!); violent, negative energies are tricky things, and can turn out to be quite clingy.
Some Hoodoo practitioners recommend burying it near a crossroads or a graveyard. Additionally, you could dispose of your black salt by throwing it into running water (ie. a river). If you do this, ensure the water is really moving; you don’t want your salt to just swirl around in one stagnant spot.
About The Ingredients:
Salt is a mineral that is used often in purification and protection spells. I prefer sea salt as it is the most natural, typically unbleached, and chemically untreated salt. However, other kinds can also be used. Salt has been used for protection for a very long time, and it’s believed to absorb negative energy. Metaphysically, black salt absorbs and wards off any negative energy you don’t want coming into your home. This can be any type of energy—living people, spirits, or other energies.
Black pepper is also used to drive away unwanted people, banish negative energy, and gives protection from evil. It has a ‘masculine energy’, and is associated with the element of air, and the planet mars.
The ash you use can be from your fireplace, smudging bundles, incense, or even your BBQ grill. However, I recommend using ash that has magickal properties attached to it. For instance, I like to use the remaining ash from a burnt out incense stick or cone I used for energy cleansing, unbinding or protection spells. This allows me to combine the energy from that with the purification I seek with my black salt.
If you choose to use activated charcoal in your black salt, this will give it a much darker colour. Charcoal is enriched with magickal properties; it is associated with fire, earth, air, and is greatly powerful in its cleansing abilities (both medicinally and spiritually).
DISCLAIMER:
Please note that this recipe is NOT meant to be used internally. It is for external use only, and is not to be used in replacement of anything your doctor has recommended for your health.
#wicca#wiccan#wicca life#wiccan life#pagan#paganism#pagan life#black salt#protection#protection jar#salt#sea salt#incense#black pepper#ash#incense ash#curse#hex#witch#witches#witchy things#magick#beginner witch#baby witch#hemp#environmetalists#hoodoo#jar necklace#carbon negative#carbon neutral
32 notes
·
View notes
Photo

Last week’s voting products are now live! Comment on your favorite to get $10 in store credit. Vote here: www.ippinka.com/product-voting/
—-
These Recycled Hammam Towels are traditional Turkish towels woven using unbleached cotton and reclaimed fabric waste. They are lightweight, super absorbent yet quick-drying and soft, making them excellent bath or beach towels. With a timeless herringbone pattern and knotted tassels, they also look beautiful as a throw blanket, picnic rug or an oversized scarf.
1 note
·
View note