#ue4 camera
Explore tagged Tumblr posts
Text
It’s time to have a fully functional camera in code. There are very few things remaining. Let’s keep working on it!
youtube
#shawnthebro#ue4#unreal#stb#tutorial#youtube#unrealengine#unrealtutorial#unrealengine4#programming#the fighting game tutorial#indie fighting game#fighting series#ssb fighter#platform fighter ue4#fighter game#camera#camera system#unreal camera#unreal camera system#ue4 camera#ue5 camera#c++ camera#system#unreal engine 4#unreal engine 5#unreal engine#template#tutorials#guide
0 notes
Text
I can't believe this doesn't have more views and I can't believe I haven't seen anyone else talking about some of these games... #6 is just a Borrowers game in everything but name! Omfg.
7 FREE Giant/tiny GAMES I FOUND ON STEAM
youtube
I FINALLY DID IT! IT IS HERE! Something like this would normally come out on a wednesday BUT YALL HAVE WAITED LONG ENOUGH SO HERE YOU ALL GO! This vid covers 7 FREE G/t like games that I found on STEAM specifically~ PLEASE ENJOY
#helloooooooooo?#also i haven't looked at any others yet but postmouse is made in unreal engine 4 :)#this is good news because it means I can rip models from it lol#i wonder how hard it is to mod UE4 games though bc i would love a first-person mod for that game#i played it for a bit but the camera kinda stressed me out. the g/t feelings are more potent in first person anyway :P
70 notes
·
View notes
Text
by creating fully digital sets that can be manipulated in real time and having a cast of characters who are always in full body armor and hiring GTA 5's cinematic camera mode to direct half of their action sequences, the mandalorian has successfully become the first live action tv show that constantly looks like a UE4 tech demo
105 notes
·
View notes
Text
Street Fighter V Modding Guide and Tutorial Archived Links
People are actually still interested in modding SFV. Since Modderbase is down, here's some SFV modding links from archive.org. If you don't see images or spoiler boxes in the thread, click on the Way Back Machine search bar where you see the link url address and hit 'Enter' again. FYI this may load quite slowly. Also, If you need to download a tool from these archived links, copy the url of the tool and paste it on the browser's address bar, erase the archive.org parts and then hit enter on the actual link address. Example, copy the address from the hyperlink (https://web.archive.org/web/20240316160336/https://fluffyquack.com/tools/REtool.zip), delete the web.archive stuff, and then it should be ( https://fluffyquack.com/tools/REtool.zip ) and then hit Enter on the address bar.
Anyway, here are the tutorial links:
Unreal Engine Version : Unreal Engine 4.7.6
AES Key : _aS4mfZK8M5s5KWC2Lz2VsFnGKI7azgl
---SFV Modding Tutorial for Beginners---
https://web.archive.org/web/20230227205009/http://modderbase.com/showthread.php?tid=445
https://web.archive.org/web/20170920143910/http://modderbase.com/showthread.php?tid=97
---Tools List---
https://web.archive.org/web/20230619234458/http://modderbase.com/showthread.php?tid=18
---SFV Character Codes---
https://web.archive.org/web/20201028055311/http://modderbase.com/showthread.php?tid=60
https://web.archive.org/web/20240324163507/http://modderbase.com/showthread.php?pid=20364&tid=1000#pid20364
---Character Resource Pack---
https://web.archive.org/web/20201029015331/http://modderbase.com/showthread.php?tid=20
---Texture Guide---
https://web.archive.org/web/20230306152351/http://modderbase.com/showthread.php?tid=274
https://web.archive.org/web/20230117144443/http://modderbase.com/showthread.php?tid=1878
---Injecting Texture into UASSET file---
https://web.archive.org/web/20231013070905/http://modderbase.com/showthread.php?tid=57
https://web.archive.org/web/20220906234610/http://modderbase.com/showthread.php?tid=1448
---Color Editing---
https://web.archive.org/web/20170920143734/http://modderbase.com/showthread.php?tid=39
---Sound Modding---
https://web.archive.org/web/20210321104439/http://www.modderbase.com/showthread.php?tid=77
---Camera and Posing via Cheat Engine---
https://web.archive.org/web/20240316171311/http://modderbase.com/showthread.php?pid=23177&tid=89#pid23177
https://web.archive.org/web/20240316172307/http://modderbase.com/showthread.php?tid=89
---Hiding Some Costume Parts & Easter Eggs ---
https://web.archive.org/web/20200130095243/http://modderbase.com/showthread.php?tid=269
https://web.archive.org/web/20240324163506/http://modderbase.com/showthread.php?pid=25521&tid=1732#pid25521
---Swap A character to another Character Slot---
https://web.archive.org/web/20240303200429/http://modderbase.com/showthread.php?tid=53
https://web.archive.org/web/20220623143544/http://modderbase.com/showthread.php?tid=1000
https://web.archive.org/web/20240316164750/http://modderbase.com/showthread.php?tid=811
https://web.archive.org/web/20200926055244/http://modderbase.com/showthread.php?tid=576
---Swapping Movesets---
https://web.archive.org/web/20201030162142/http://modderbase.com/showthread.php?tid=1099&pid=22087#pid22087
---How to Pack a Mod into a Pak file---
https://web.archive.org/web/20230619231455/http://modderbase.com/showthread.php?tid=122
---Creating Physics Assets in UE4---
https://web.archive.org/web/20200130095618/http://modderbase.com/showthread.php?tid=37
---Custom Animations---
https://web.archive.org/web/20201224123539/http://modderbase.com/showthread.php?tid=873
---VFX Modding and Tips---
https://web.archive.org/web/20210825014646/http://modderbase.com/showthread.php?tid=1470
---Packing mod Powershell way if you have Windows 10---
https://web.archive.org/web/20230619231456/http://modderbase.com/showthread.php?tid=122&pid=3943#pid3943
---Hex Editing Files to be Larger---
https://web.archive.org/web/20240324163507/http://modderbase.com/showthread.php?tid=1900
Good luck!
8 notes
·
View notes
Text
Learning Godot 2023-11-14
Been spending the last week or so learning how to make stuff in Godot. It's the first time I've really felt that coding with text instead of UE4 Blueprints clicked. We've got basic schmovement, double jumping, coyote time, dashing, skidding to a halt, a half decent camera, all that good stuff. I haven't forgotten about Knight Game, as soon as I have the opportunity I'll be back on that! In the meantime, I might post more about my Godot escapades.
the nice dither effect is from here, i didn't make it: https://godotshaders.com/shader/ps1-psx-postprocessing/
2 notes
·
View notes
Text
Nostalgia and Memory (Update 4.0: Texturing)

Figure 1: Texturing of the landscape.
After referencing photos of the current Kota Bharu beaches, the landscape was textured with sand closer to the shoreline, while the higher inland areas were given a grass texture. However, the textures at that time seemed like it was obviously repeated heavily.

Figure 2: Material Editor View of the Landscape Texture.
Several techniques was utilised by viewing Unreal Sensei's How to HIDE Texture REPETITION in Unreal Engine - UE4 Tutorial YouTube Video to learn how to avoid repetition of the texture and Unreal Engine 4 Beginner Tutorial - UE4 Start Course Video to learn about landscape texturing. First, macro variation was applied to introduce large-scale, subtle variations across the surface, making it appear more natural and less repetitive. Next, distance blending was used to transition between different textures or material properties based on the camera's distance.

Figure 3: Texturing of the Bunker.
The bunker was textured with a concrete material from FAB that closely resembles its real-life counterpart. However, since the texture size was initially too small, it was upscaled slightly to ensure the concrete appeared more realistic and proportional.
Reference:
Unreal Sensei (2020). How to HIDE Texture REPETITION in Unreal Engine - UE4 Tutorial. Available at: https://youtu.be/yCRzOdo4b68?si=ENRzjbNKF-iel3fz (Accessed: 24 October 2024)
Unreal Sensei (2020). Unreal Engine 4 Beginner Tutorial - UE4 Start Course. Available at: https://youtu.be/_a6kcSP8R1Y?si=jF4b8OdlgqRAv7AK (Accessed: 24 October 2024)
1 note
·
View note
Text
FMP Practical Work
07/08/2024
Well, we definitely had a rough day today as a group. Today we had planned to get the camera in and have the majority of the camera work completed. This definitely did not happen.
Initially we started by using a sequencer camera as we had done in previous projects. This obviously worked for getting a clear and smoothb camera that followed a path, but felt completely unnatural because of the lack of movement.
youtube
"Make a Realistic Flashlight in UE4/5" (Eremental Studios, 2023)
So, we began working on a first person camera, which I took over on making since Alec was struggling. I was able to implement the torch light by following this tutorial, which we loved the effect of so that was a good start.

First person camera.

Spotlight torch.
I attached a spotlight to a spring arm on the first person camera to make the torch, and changed the manequin to our character model from Mixamo so the camera could look down and see our character’s model and animations. I then had an issue where the camera wouldn’t be the new first person camera when I pressed play, but Melissa worked out that I just needed to change the possession and that fixed the issue. After this, we had an issue where the playert camera would either fall through the environment or not move at all. Both worked fine specifically on the entrance mesh, but not on the terrain, so we looked at adding colliders, removing gravity, and even changing the camera completely. That didn’t work. In the end, adding a plane under the terrain was the successful fix and the character was able to walk on the terrain. Hooray.
However, this ended up having the exact same issue as the original sequencer camera. It was completely motionless, no walking movement at all even with a walking animation attached constantly. We also tried using the take recorder and recording “in game”, which worked to get the camera movements, but would have caused more issues down the line because we still needed the monster characters to be animated on the sequencer to come in at specific times.
For today, we decided it would be best to take a break and come back to this later. We worked on it for the entire day with no success, so we left it there before tensions got any worse in the group and I will be coming back to continue working on it with Alec tomorrow.
Bibliography
Eremental Studios, 2023. Make a Realistic Flashlight in UE4/5. [Online] Available at: https://www.youtube.com/watch?v=lTxKsGtaFhY&t=217s [Accessed 7 August 2024].
0 notes
Text
Blogpost 10: The 3D Animation Process
For the fish animation, Theodor created a base rig in Blender and animated a short swim looped animation. The next step was to find a way to control the fish. As a result, we created a spline in Unreal Engine.
To learn how to make the spline, Theodor followed a tutorial and experimented with the blueprint, adjusting it for the project.
youtube
Fig.1 Follow Spline tutorial
It was something new to learn, as neither of us had experience with using blueprints before. But following the blueprint, we managed to get the desired result.


After the spline blueprint was functional, Theodor and Harsha implemented it in the underwater scene and made the required adjustments so the spline follows the camera animation and matches the environment.
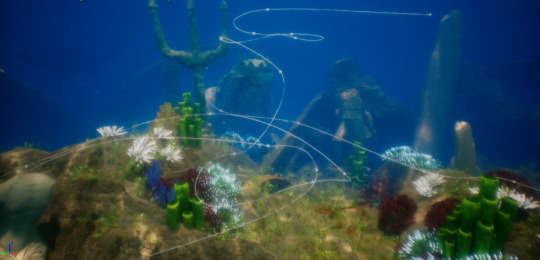
In addition, Theodor animated a sea anemone to add life to the scene and make the environment look more dynamic.
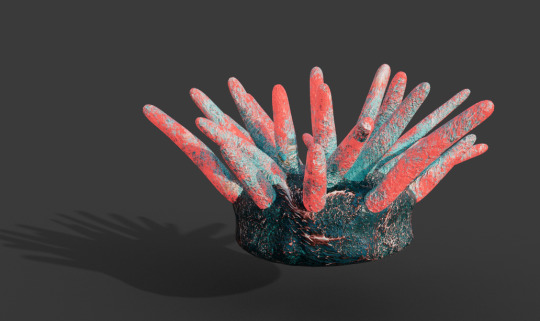
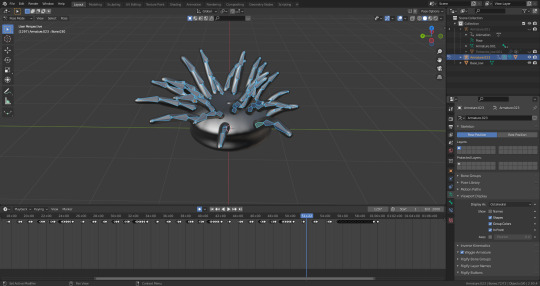
After importing the animation in Unreal Engine, we matched the fish swimming spline with the closing animation of the anemone, making it look like all the anemone close when the fish go through them.
To make the anemone close at different times, we duplicated the animation file and modified in Unreal the speed of the animation, to match the moment the fish reach their position.
Blibliography:
Fig.1: Dragonplayer (2022) UE4/5 Move actor along spline (no timeline). Youtube. Available at: https://www.youtube.com/watch?v=qKIJMQJsx2Y&list=PLmNLrfKMXuOwWtUVn-w4_IUUgeHQFwLaL&index=14 (Accessed: February 10, 2024).
0 notes
Text
Let’s update the C++ camera to support our 3D Fighter elements!
youtube
#shawnthebro#ue4#unreal#stb#tutorial#youtube#unrealengine#unrealtutorial#unrealengine4#programming#UE#ue5#unreal engine#unreal engine 4#unreal engine 5#fighter unreal#indie fighter#fighter game#how to make a fighting game#making a fighting game#indie fighting game#a fighting game#fighting series#fighting tutorial#fighting game#fightinggame#fighting#game#guide#camera
0 notes
Text
Assignment 6: Part 4
UV enhancement
This is a quick and simple step where I import each garment into 3ds Max, select the mesh, apply the Unwrap UVW modifier to it, open the UV editor, and Pack UVs. Doing this is important to make sure the UVs are properly packed and that there aren’t any pieces overlapping. It also exposes many UVs that were previously not shown.
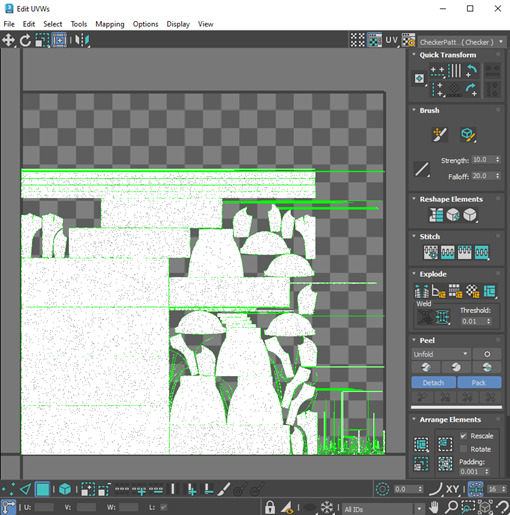
Figure 12 - 3ds MAX UV editing PACK UVs
I then select everything and export the clothes as an Alembic file once again. (Do this step for both low and high-poly versions of the models)
Texturing
In the beginning, I import the garments into Substance 3D Painter and click on Edit > Bake. Once the baking panel shows up, I adjust the settings like in figure 13 with a 4K resolution and an antialiasing of 4*4 to maintain a high level of detail.
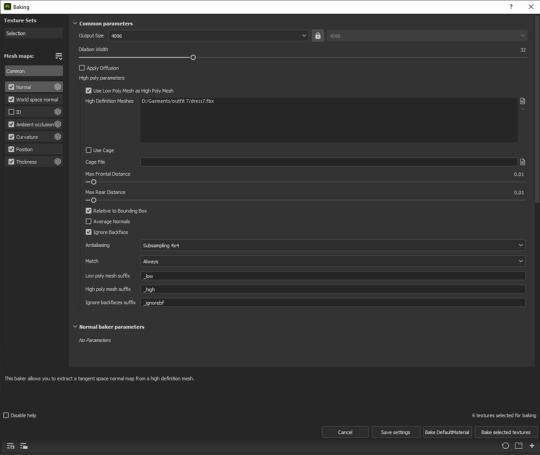
Figure 13 - Substance Painter Bake Settings
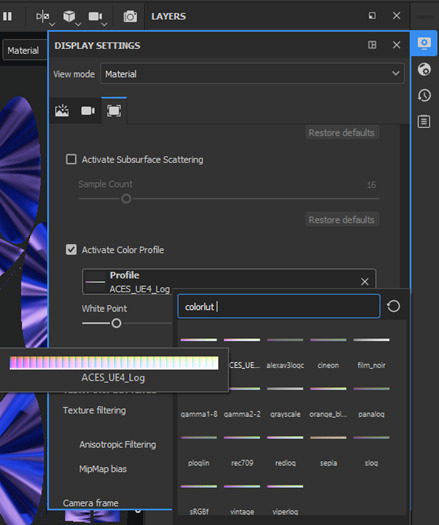
The next thing I do is setup the ACES LUT plugin that matches the lighting and color tone of UE inside of Substance Painter. This is crucial in order to make sure the textures will look the same once you use them inside of Unreal. The steps that are demonstrated in the images are: setting an HDRI for the environment, activating post effects, tone mapping, and color profile inside of the display settings, as well as, selecting the UE4 color profile that comes with the ACES plugin.
1 2
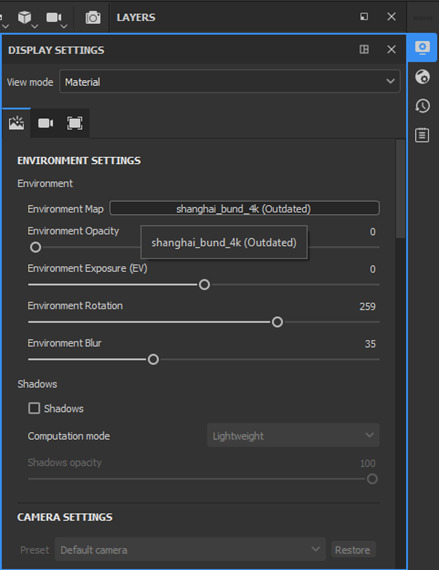
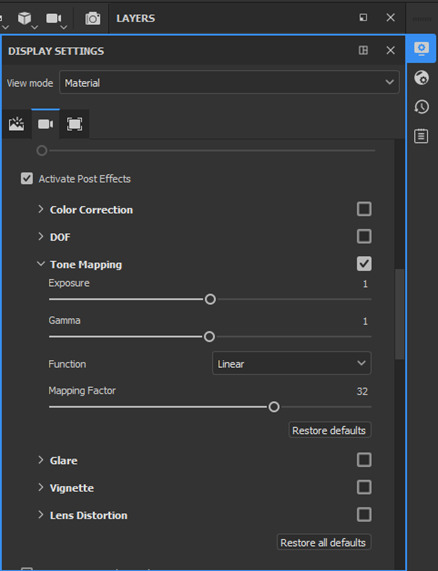
Figure 14 - ACES LUT and environment setup
Then comes the texturing process where I create all textures by mixing materials and using masks, the brush tool, and alphas to paint on the garments.
3
After I’m all done, I export the textures in 4K in the Unreal engine 4 (packed) template for a better integration. The settings are shown in figure 15.
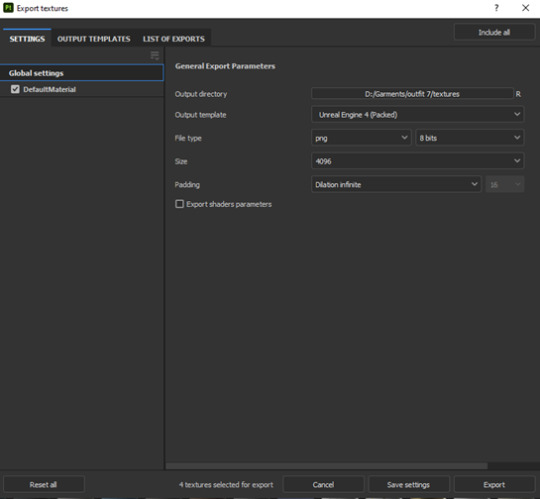
Figure 15 - Texture export settings Substance Painter
Unreal engine
Step 1 is setting up the scene and the environment. I start by downloading Quixel Bridge Megascan assets and directly dropping them in my scene. I also use foliage inside of Unreal Engine five to scatter some plant scans around using a paint tool.
Step 2 is Importing my personal assets into the content browser (all the garment alembic files with their respective texture maps)
Step 3 is setting up the lighting in the scene and adding a camera. For that, I need to add the HDRI I previously used in Substance Painter, as the Cubemap of the skylight. I also set the intensity of the skylight to a low value as it does not act as my main light in the scene but sets the color tone and temperature of the environment instead. As for the camera, I personally prefer tom use the Cinecamera actor.
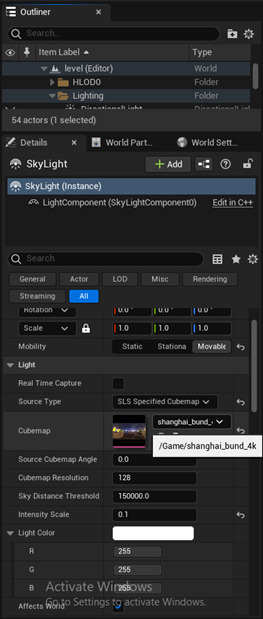
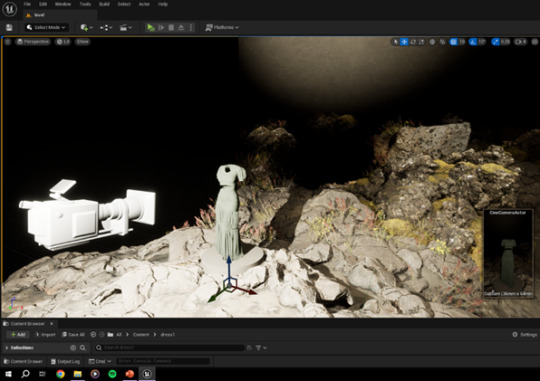
Figure 16 - Unreal Engine 5 lighting and camera
Step 4 is creating the materials inside Unreal using the textures I exported from Substance Painter. It is a process of linking the texture maps to their correct descriptions inside the Material Graph. Figure 17 demonstrates this process in detail.
Step 5 is creating a new level sequence and doing all the necessary animations before rendering everything as a sequence of images.
These last 2 steps are shown in the figures on the next pages.
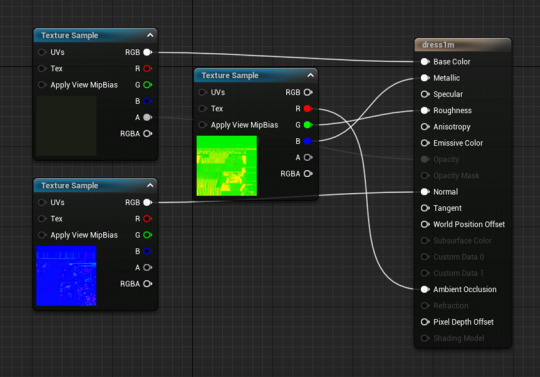
Figure 17 - Unreal Engine Material Graph
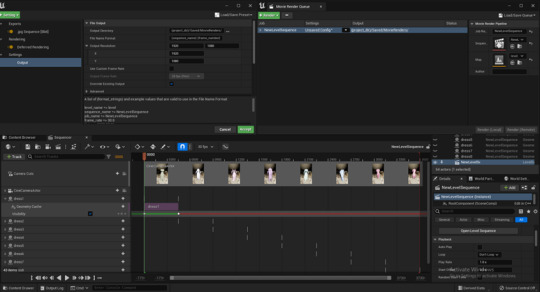
Figure 18 - Unreal Engine Level Sequence and Rendering
It is important to make sure that the aspect ratio is the same in both camera and render.
0 notes
Note
Ty for the instructions, i got it running!
I did have a few questions on how you get your specific shots (during cutscenes or when chai is doing something while calling in partners) how are you able to catch it so quickly? I tried using the speed sliders for the camera, but it doesnt seem to affect anything? So i can't catch certain things in time.
glad it worked out <3 look in settings for the keybind for pausing. i just pause the game through ue4 set up camera where i need it and unpause. it can be a little tricky though just take ur time and get familiar with the controls
0 notes
Text
so like. my dogshit experiment almost works. i sat down and stared at a bunch of opencv stackoverflow posts and Did Linear Algebra and came up with a way to calibrate for a ‘world origin’ chosen by putting a marker on the floor. and i can calculate reasonable-ish world coordinates relative to that origin (with the exception of the fact that all the axes are reversed. i can fix it if i swap the order of the vector subtraction but that doesn’t make any sense.)
and i can dump those coordinates into unity and move the box irl and it moves appropriately! except the VR viewing position is completely wrong, which throws the whole thing off. for one, the player spawns in facing 90 degrees rotated of where the editor says they should. i cannot figure out why this is happening and ironically this is apparently a problem in ue4 vr development but not for unity.
more critically the origin looks nowhere near where it is irl. so you can stand on the irl origin where the camera is looking and move the box, but it’ll be behind you and to the right. i carefully measured everything in meters and unity is also in meters, but it’s like the scale in VR is turbofucked or something
i got nothing lmao
1 note
·
View note
Text
UE4 Issue that I encountered.
When creating my project, I kept finding that the same issue would happen and cause my unreal engine project to crash (GPU detached). In a sheer effort to fix this issue, I explored different ways on google. I found a feature in the project settings that I thought would fix the GPU detach errors, but caused my entire project to be locked and stop it from opening.
I searched frantically through google to try and find the fix and eventually I found one. I had to delete the defaultengine.ini which causes unreal to create a new one at launch, so any settings I changed would be reset back. However this was more simple that it seems, what actually happened is that it reverted my UE5 settings to a UE4.27 settings. So my entire game was running on the same project settings as a ue4 project. Due to this, I had my entire screen turn white as shown below. To fix this, I used a website that ran through all the steps about upgrading a UE4 project to a UE5 project. This managed to fix all of the issues apart from the white screen.
I later found out that the white screen was caused by the post process volume that I have in my game to set the brightness to a specific level so it does not keep changing. That is also shown below.
I found that the fps was also low when loading into the game, so I used culling of foliage and assets to decrease the quality and eventually despawn them to increase the fps of the game. I also added culling to the terrain which does cause slight issues at long range, but if I add fog or some visual limit to the view distance then i believe it will be fine.
I then found that the player would not be spawned when the play button is pressed, it would just create a spectator camera. To fix this, I changed the default game mode for the project to the previous one before it changed. (seen in bottom picture)


0 notes
Text
Project start - fmp
Today I'll be starting my project in Unreal Engine.
The first thing I do in Unreal is make a first person mechanic. My project idea is to make a third person sci-fi shooter, but also be a first person shooter as well. The reasoning behind this is so you have the option to switch perspectives, you might find things better in a certain view. I found a tutorial on YouTube that does exactly what I want for the first and third person perspective, so I'll be following that. I might decide to keep this for the final game, or i might change it depending on how it goes.
youtube
Although this was made in ue4, it is still compatible with Unreal 5, but I just had to tweak a few settings, and some of the nodes might have changed names, but still works. This was actually a really simple tutorial, and I made sure to understand everything in the video before I started to replicate it, otherwise it would essentially be copy and paste. I didn't find anything difficult, it as just a matter of understanding what certain nodes do. I started the project in the first person shooter template, and then worked from there.
I downloaded the animation starter pack from the epic games store, which is free, and it contained all of the animations I needed for creating the third person shooter. I also learned some new things from this too, such as child actors, which basically are a copy of the parent actor, but they contain all of the data inside of the child actor without all of the nodes showing, because they are pre-built in from the parent.


This is what it looks like. I tweaked some settings to fit how I wanted it such as the camera angle. I'll be keeping this for the final one.
0 notes
Text
IFY Project 5 Week 1 - Proposal
Overview
For our final project, we were given the task to do... well, something. Something we wanted to do, but possibly related to our course next year. For me, that's game art. I was told to keep my sights and hopes not too low but not too high, as I'm expected to push myself but not overscope and attempt something way out of my ballpark.
What do I want to do?
3D Diorama
My pitch for my final project is meant to be something that will not only help me push towards my Game Art degree better, but also help me find my more unique voice in my own personal works.
Firstly, I want to improve my 3D modelling skills, as our course is centred upon that as the forefront in most aspects. I really enjoyed the texture work aspect of Project 4 that I had taken up as one of my tasks, as I thought deconstructing the materials I had gathered and slowly building them up was interesting.
I had thus landed on the idea of making a diorama landscape, to create a little snippet of land that I could shape and form into something of my own creation to work on my UV Mapping as well as general modelling skills. To make it more interesting, however, I want to include characters within it and as I have been nudged to implement it within Unreal Engine 4, some possible interactivity.
The reason I want to make this within UE4 is due to lighting and interactivity obviously being much easier to make within that engine than trying Maya. This will also allow me to use the other half of my project - 2D illustrations and objects. I've enjoyed a lot of RPGs and similar games that have a blend of sprites and 3D geometry, typically low-poly and it has always interested me as quite a beautiful style even if it may come off simple. Maya obviously wouldn't be as friendly with this type of content so combining the two in a proper game engine would be the best move.
I'll need to figure out how to create this diorama, make it interactive, give it good lighting and possibly some camera shots. This will make me also learn culling and billboarding as techniques, then I'll have to figure out fully how to implement this into an exhibition space.
First Draft Proposal


First Draft Time Management


0 notes