#ts4 male long hair
Explore tagged Tumblr posts
Text


1 simstrouble NicoV2
2 JohnnySims_Micah_Hair_M
3 JohnnySims_Emile_Hair
4 KISMETSIMS MINDRIOTA M HAIR
5 cerberus_hair_evelina
6 [sychik] seth hair

7 SIMANDY_Bellucci_Hair_M
8 [MER]AdeniosHairstyle
9 NolanSims_AaronHairM
10 GOAmazons_KoraHair
11 NA_CainHair
12 WistfulCastle_MitternachtHair_M

13 WistfulCastle_PhaethonMHair
14 SIMANDY_Ashay_Hair
15 bihelel_hair_23
16 simstrouble_UnisexHair_Ronnie
17 JohnnySims_Jared_Hair_M
18 JohnnySims_Julius_Hair_M

19 CLUMSYALIEN [WILFRED HAIR]
20 RamiHair_byBirksche
21 GOAmazons_DiableraHair
22 simstrouble_UnisexHair_Eddie
23 simstrouble_UnisexHair_Ruckus
24 simstrouble_maleHair_Stevie

25 GOAmazons_WitcheressHair
26 veve_aragorn v2 hair
27JohnnySims_Gerald_Hair_V1_M
28 NA_Byron hair
29 laeska_Elessar_m_hair_V2.package
30 GOAmazons_DarynaHair
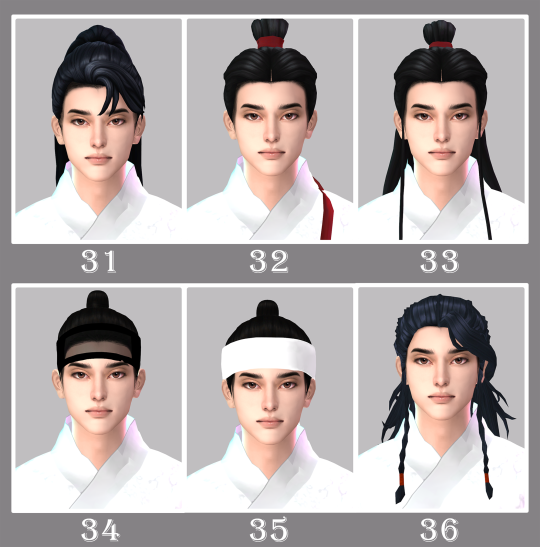
31 [EnidZZyx]Fang Hair
32 Yuqing Set b.2
33 Yuqing Set c.3
34 [Lena] Male Sang-too Hair
35 [Lena] Normal Male Sangtoo hair
36 [JOSH JO_SE_OH] Ludus Hair
🤗Here is a catalog of long hairstyles with an Asian-inspired vibe for male Sims. Thanks to all the CC creators~!💕
138 notes
·
View notes
Text

HEAVY CUT SET - Ben
Please read my TOU before download.
New meshes
Base game compatible
24 EA colours
Hat compatible
All LODs
Custom Thumbnail
Male and female versions

DOWNLOAD (Patreon Free)
CREDITS
Gradients by Simandy
#sims 4#sims#ts4cc#s4cc#daylifesims#maxis match#the sims 4#the sims#sims 4 cc#s4cc hair#s4ccfinds#ts4 custom content#ts4cc hair#s4 maxis match#sims 4 maxis match#ts4 maxis match#maxis match cc#daylife-sims#sims 4 long male hair
3K notes
·
View notes
Text
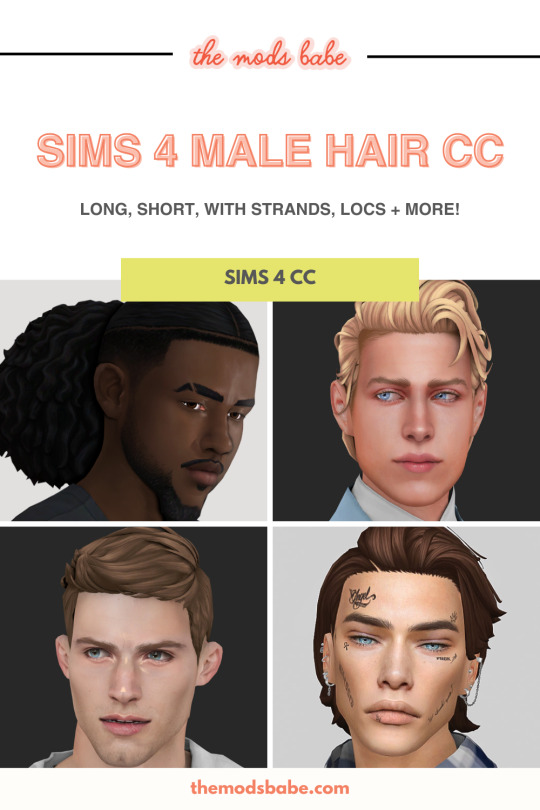
50+ BEST SIMS 4 MALE HAIR CC (SHORT, LONG, CURLY, AND LOCS MALE HAIR MODS!)
Male sims don’t get enough love in the cc department! It can be hard to find good cc for them, so I’ve taken it upon myself to help you guys out.
From short hair to long hair to curly hair and diverse hairstyles for black sims, I found a little bit of everything for you guys today.
—
CHECK OUT THE FULL POST HERE
#ts4 cc#sims 4 cc#sims 4#ts4#sims 4 mm#ts4 mm#maxis match#sims 4 mods#ts4 mods#maxis match cc#ts4 hair cc#sims 4 hair cc#ts4 male hair#sims 4 male hair#ts4 male cc#sims 4 male cc#ts4 black hair cc#ts4 long hair cc#ts4 curly hair cc
1K notes
·
View notes
Text


Sengoku beard
commissioned by @hydroponicprism!
slightly different from my usual content! this beard was inspired by Sengoku from One Piece :) honestly trying out facial hair was fun and i learned a bunch of new things in the process
also a special thanks to @natalia-auditore for helping me out with the weights on this one 🙏 i sincerely didnt even know where to begin with
INFO:
BGC
all LODs
for masc frame
24 EA Colors + 40 Puppy Crow colors
[DOWNLOAD]
#also since i never watched one piece the sim on the preview is just one of my ocs. hope u guys like him#the sims 4#ts4#facial hair#beard#maxis match#mm#one piece#sengoku#simblr#male cc#braided beard#long beard#anime#ts4cc#alwaysfreecc#always free cc#ts4mm#custom content#cc#mods#cc: facial hair#cruxcc#shoutout to parsapuff for realizing I forgot to add the cruxcc tag
70 notes
·
View notes
Text


ivo is my best man to try all new hair, and oh my god. you've gotta be kidding me. why are these so damn good.
#i can't wait till i can make part 3 of long male hair recommendations#i just need a little more of them#s:ivo#adelar shows imaginary people#ts4#simblr#the sims 4
81 notes
·
View notes
Text
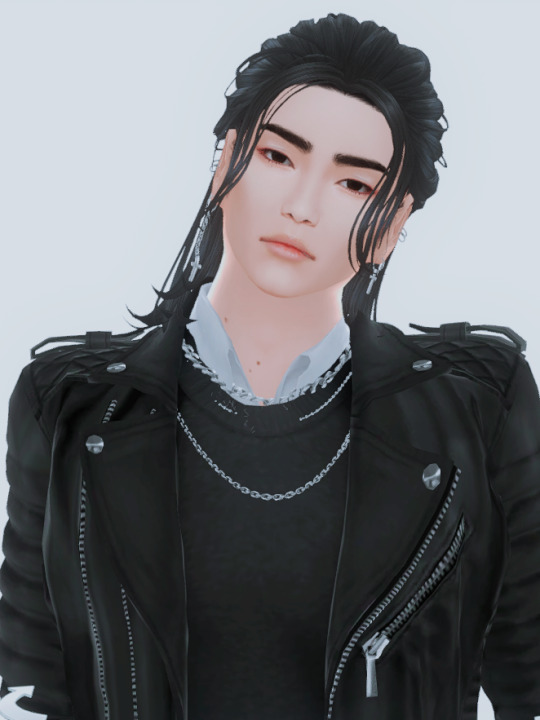
LYRE HAIR COLLECTION by TIANSHI

INFO:
CONQUER ME: 38,343 + 19 extra colors
boyzz luv: 44,826 + 22 extra colors
solar flare: 38,367 + 16 extra
JUPITER: 31,352 + 13 extra
hyacinthus kiss me: 39,840 + 11 extra
tears of Rome: 57,330 + 20 extra
LYRE LIAR: 47,850 + 22 extra
all have all LODs, hat chops, all EA colors, and are unisex



#ts4#simblr#simmer#sims cc#maxis match#maxis match cc#maxis match hair#maxismatch#ts4 cc hair male adult#cc hair#ts4 cc hair#sims custom content#the sims 4#sims#TS4#maxis match hair male middle#maxis match hair male long#maxis match hair male short#maxis match hair male adult
147 notes
·
View notes
Photo


Inspired by @paupelou
#ts4#sims 4#my sims#ts4 cas#portrait post#simblr#in my mm era 😋✌#i've been going through the paupelou tag on my blog & getting sooo much inspo 💖!!!#the second sim is def more inspired by paupelou's sims the first one is more of an idea#& the hair on the male sim i've been wanting to use for so long
124 notes
·
View notes
Text

Germania Hairstyle UPDATE
Another updated hair requested so here it is with the new colors (work with genetics).
If you find any problems please let me know.
Thanks :)
Germania Hairstyle
Germania Hairstyle for Girls
Germania Hairstyle for Toddlers
All (Patreon)
------------------------------------------------------
Follow me on Twitter | Like my Facebook
Subscribe to me on YouTube | Follow me on CurseForge
Follow me on Instagram | Support my work on Patreon
----------------------------------------------------------------------------
#sims 4#female#hairstyle#female hair#girls#girls hair#no adfly#patreon#ts4 maxis match#ts4#ts4 cc links#update#toddlers hair#toddlers#ts4 update#kiarazurk#long hair#male hair
139 notes
·
View notes
Photo
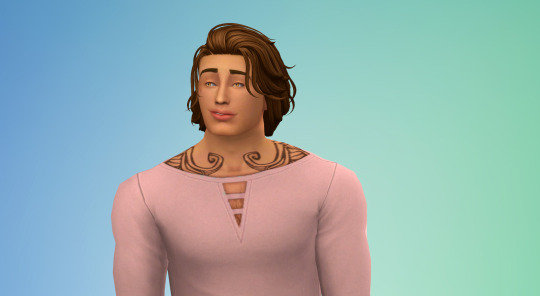

now this is more accurate if John ever were to cut his hair. it’s still thick and a little wavy.
#ts4#the sims 4#sims 4#simblr#oc: john#most short styles for guys doesn't fit for him#in that sense but also in general#like if this was the default and you think 'he'd probably look great with long hair' and you'd be SO right#bless you simstrouble for a variety of male hairs at any length
22 notes
·
View notes
Text
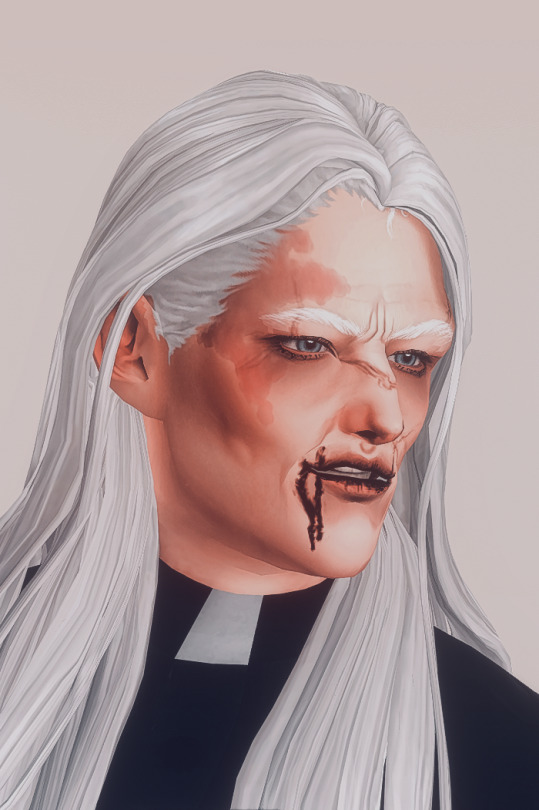
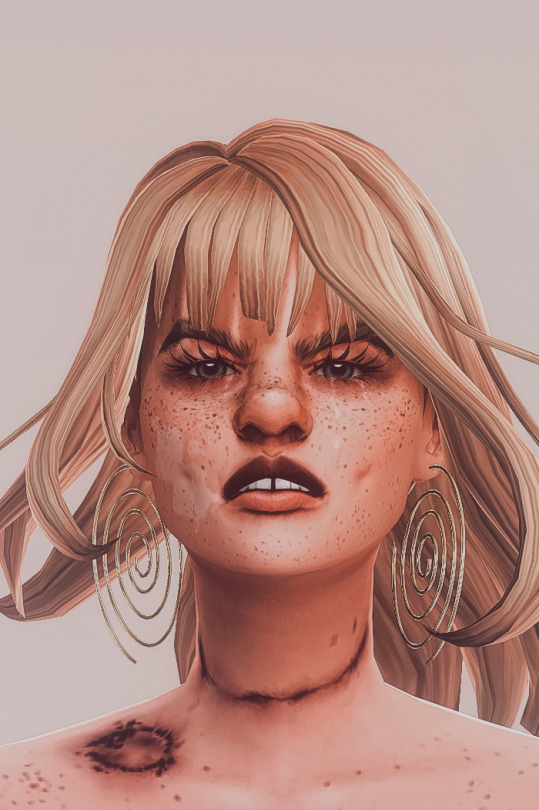

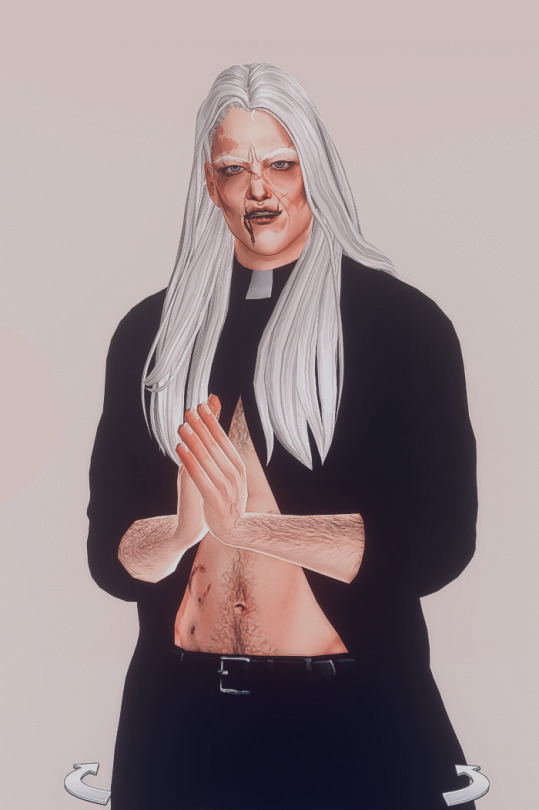
Finally managed to create sims for @tricoufamily's duo challenge
Dynamic: toxically obsessed w/ each other Genre: Dystopian
Sim 1 (Father Brennan Wiles) Traits: angry, stoic, jealous Hair colour: white Hair length: long Extra: birthmark, scars, long face
Sim 2 (Cassiel) Traits: mean, gloomy, jealous Hair colour: your choice Hair length: medium Extra: hooded eyes, freckles, non-default teeth
And yes, once again, I made a slutty sorta-evil priest (who might dabble in cannibalism on occasion, or at least blood drinking - he might think it could give him powers, I don't know). And a nearly-as-slutty angel who got her wings torn up by her priest boyfriend to ensure she doesn't leave him. But she's not better as she might have committed arson and other crimes (maybe murder?) against people she thought were too close to Brennan. I'm defo going to Hell. Oh well...
#tricoufamily duo challenge#ts4#the sims 4#ts4 cas#show us your sims#oc: cassiel#oc: brennan wiles#brennan looks nothing like a sim i would made and yet... it's the long face i think + male with long hair
5 notes
·
View notes
Text
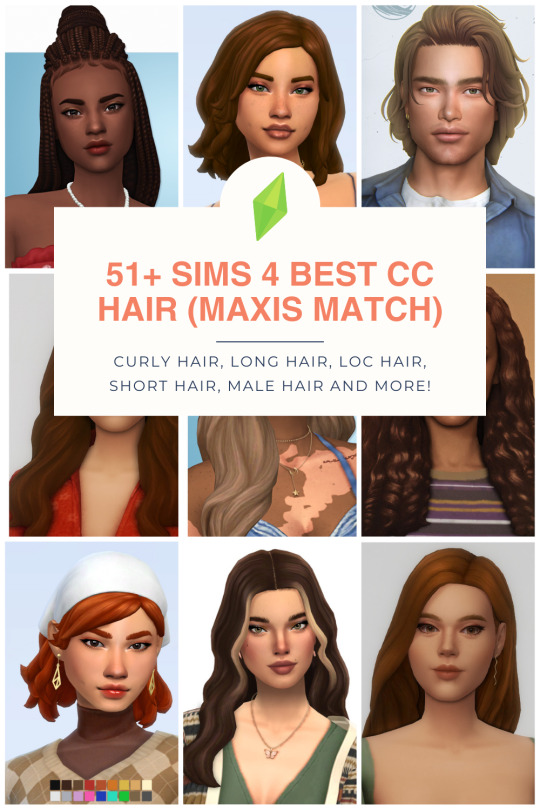
You can never have too much CC hair 😍
I've rounded up my favorites styles, including curly hair cc, Black hair cc (since EA leaves a little to be desired lol), male hair cc, long hair cc, and ALL of them are maxis match!
It has been so fun rebuilding my mods folder from the ground-up, and these hairs are the cream-de-la-cream 🙌🏻 Click through to my blog for links!
#ts4#sims 4#ts4 cc#sims 4 cc#ts4 cc hair#sims 4 cc hair#ts4 male hair#sims 4 male hair#ts4 curly hair#sims 4 curly hair#ts4 black hair#sims 4 black hair#sims 4 long hair#ts4 long hair#custom content#custom content hair#sims 4 best hairs#okruee#arethabee#oakiyo#greenllamas#johnnysims#vikai#ts4 maxis match#sims 4 maxis match#maxis match cc#ts4ccfinds
1K notes
·
View notes
Text

have another bunch of random cas items 4t2'd in one download! there are 5 (technically 7) in total: three hairs, two male, one unisex; a pantless bottom; and an accessory in two versions. happy march, y'all! i hope to see you again in april 🌸
the download below links to folders where you can download everything all in one, or pick n' choose. all details for the stuff + previews can be found under the cut. thanks for downloading, apologies for the long-ass post!
DOWNLOAD: SFS | MF 💐
credits go to @osab and @antoninko for the clouds & afterglow hair systems used, respectively; and to @sheabuttyr, @trillyke, and @johnnysimmer for the original ts4 meshes and textures 🥰
MALE HAIRS

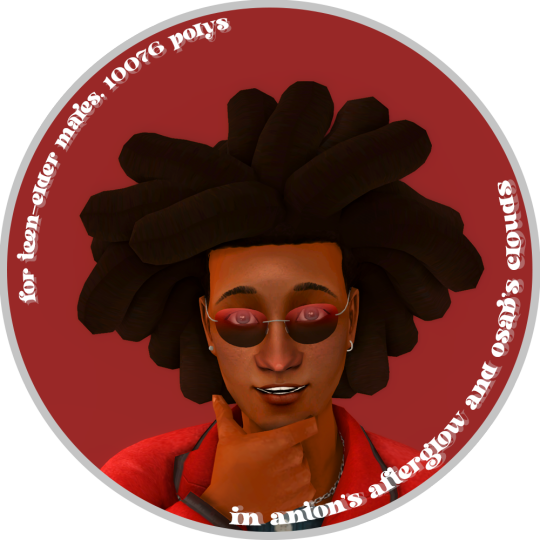
4T2 SHEABUTTYR HOBIE HAIR - 10076 polys, for tm-em only - in antoninko's afterglow + osab's clouds hair system - assigned to the head bone, unanimated - comes with a volatile base for recolorists

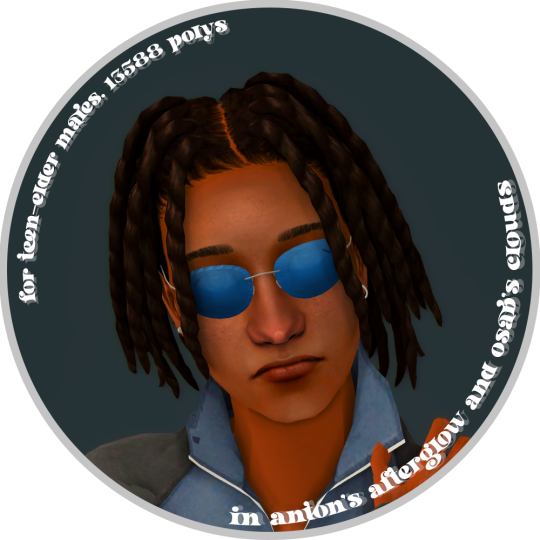
4T2 SHEABUTTYR TE'JAY TWISTS - 13588 polys, for tm-em only - in antoninko's afterglow + osab's clouds hair system - smooth-boned and animated, ends will bounce - comes with a volatile base for recolorists
UNISEX HAIRS

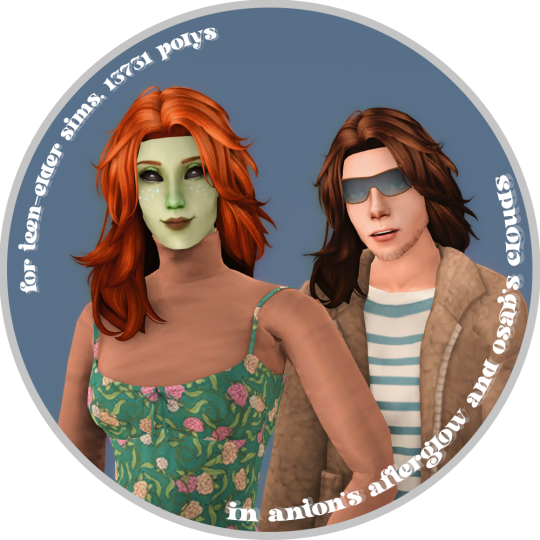
4T2 JOHNNYSIMS MITCHELL HAIR - normal version, with strands - 13731 polys, for tu-eu only - in antoninko's afterglow + osab's clouds hair system - smooth-boned and animated, ends will bounce - comes with a volatile base for recolorists
PANTLESS BOTTOMS

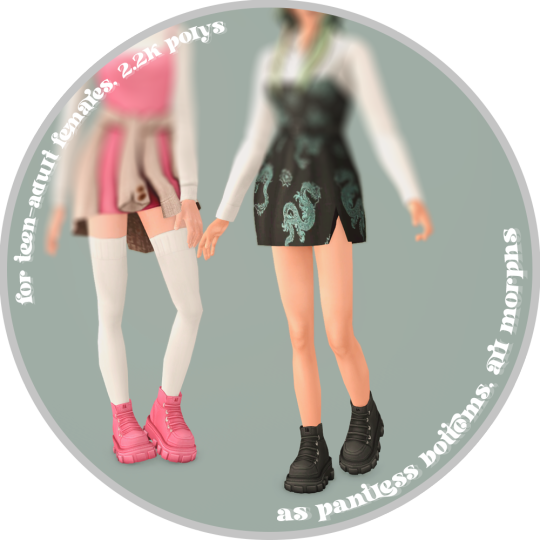
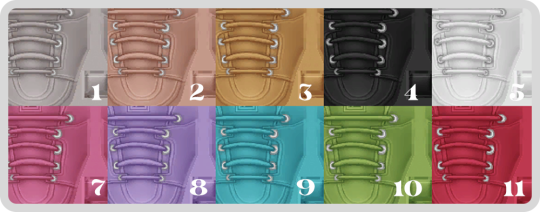
4T2 TRILLYKE NIGHTWALKER SHOES - 2.2k polys, for tf-af only - tf repo'd to af, both compatible with sock overlays - pantless bottoms with all morphs
ACCESSORIES


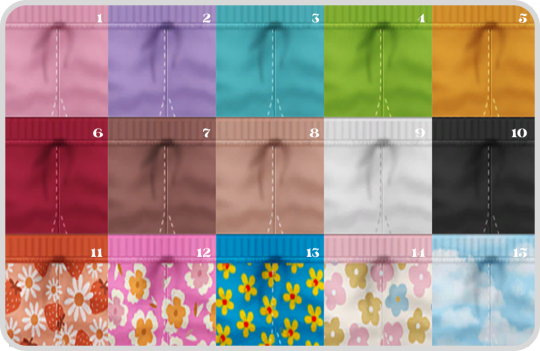

4T2 TRILLYKE SWEET & SALTY LEG WARMERS - ~1k polys and under, for tf-af only - categorised as everyday and athleticwear... i think? - two separate styles of layerable accessories - have no morphs, like all accessories, but should fit the maxis fat & pregnant morphs...?

phew, that was a long one.if there are any issues that you find with this set, please don't be afraid to let me know. happy simming, and when you download this, do keep in mind,

Love, ~ Ky 💗
[ @the-afterglow-archive | @4t2clay ]
350 notes
·
View notes
Text
How To Convert Eyelashes
I was asked to make a tutorial on converting eyelashes. Well, here it is. Dirty, badly explained tutorial by Rollo. I'm assuming you know how to work with required programs, it won't teach you the basics, just a process of converting eyelashes from ts4 to ts3.
Requirements:
S4Studio
s3pe
TSR Workshop
Sims 3 Pack Multi-Extracter
These files (full credit goes to @gruesim)
Graphical program that works with .dds files
Let's go:
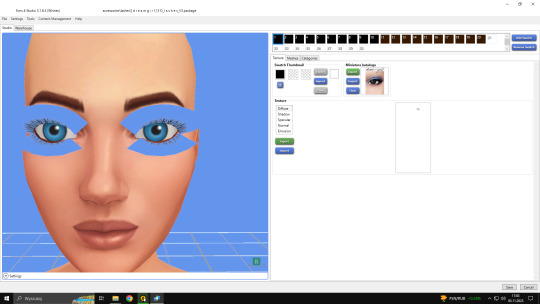
Open the desired lashes in S4Studio. Export diffuse of the ones you want to convert (you only need the black ones). You can also export the thumbnail. Close the program.
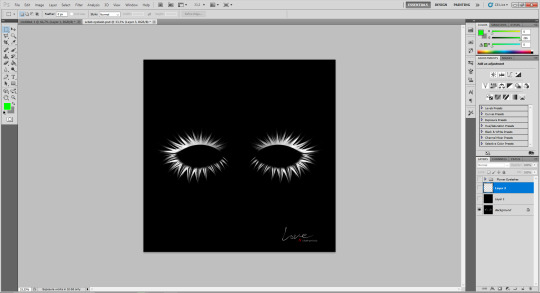
2. Unzip the folder that you downloaded from this tutorial. You will find a .dds files called "sclub eyelash". Open it up in the graphical program. Make a black layer above it and hide it for now.
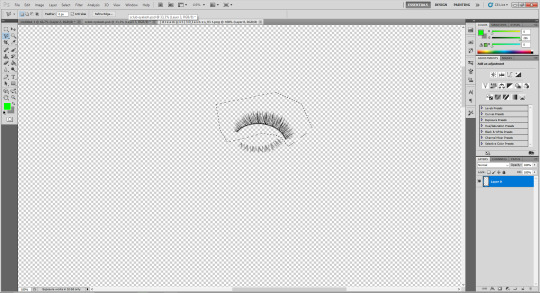
3. Now open up your ts4 eyelashes file. Start from the upper eyelash, crop it and go to the sclub eyelash.
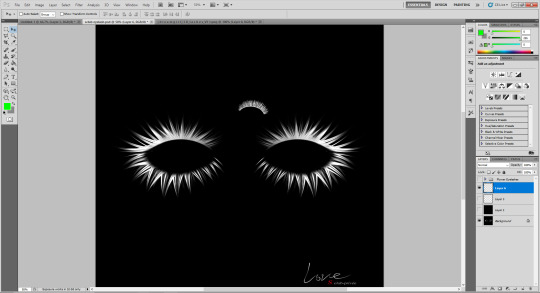
4. Paste it, click ctrl+i, it will make ts4 eyelash white.

5. This is the worst part. You have to make the ts4 eyelash fit to the sclub one as close as possible. Use every method possible!
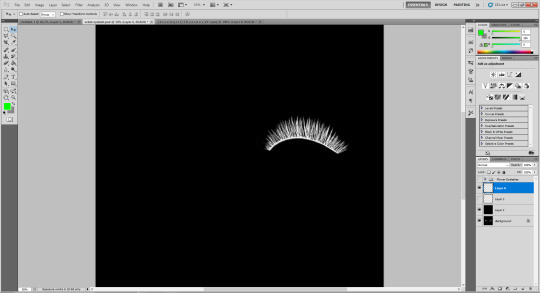
6. Unhide the black layer and see if your eyelash look alright. It may need some sharpening.
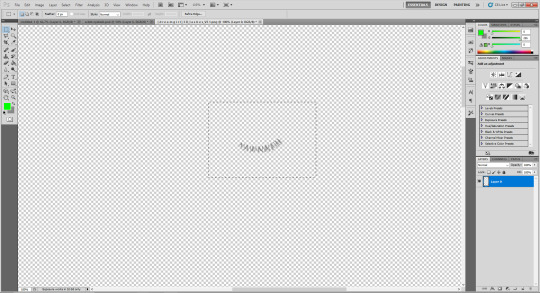
7. Now crop the bottom eyelash and follow the exact same steps as for the upper eyelash.
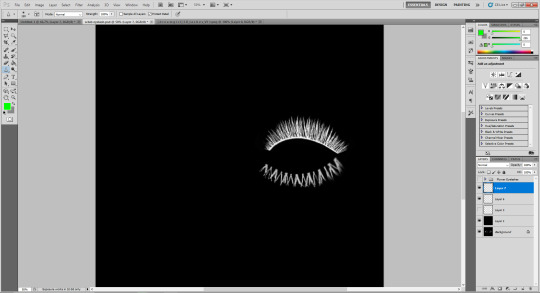
8. It should look more or less like this. Bottom eyelashes are always harder to adjust and may need even more sharpening.

9. Merge your upper and bottom eyelashes, duplicate the layer. Click ctrl+a, ctrl+t, then right mouse button and choose "Flip Horizontal".

10. Voila. You should have a complete set of your new shiny eyelashes! Save them as .dds. You can close the program. We're moving to TSR Workshop.
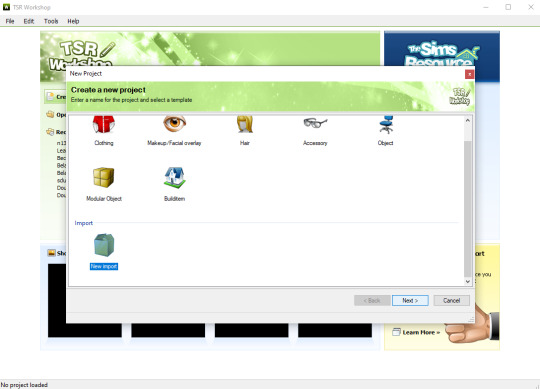
11. New Project -> New Import. Import Eyelashes AFBase from the downloaded folder.
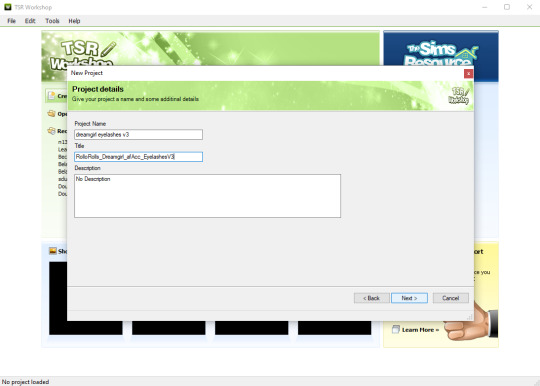
12. Name your project, name your file and click "Next".

13. You should see this. Go to Texture tab and click "Edit" on the Transparency Map.
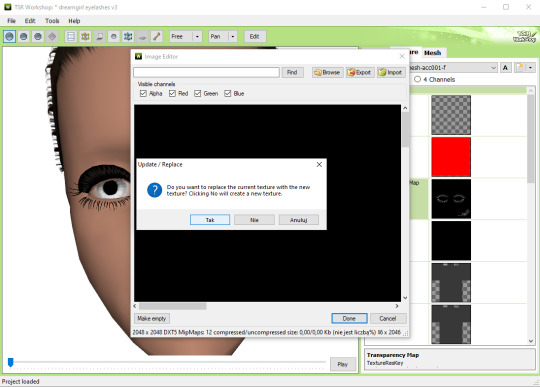
14. Import your eyelashes and click "Yes" when asked.
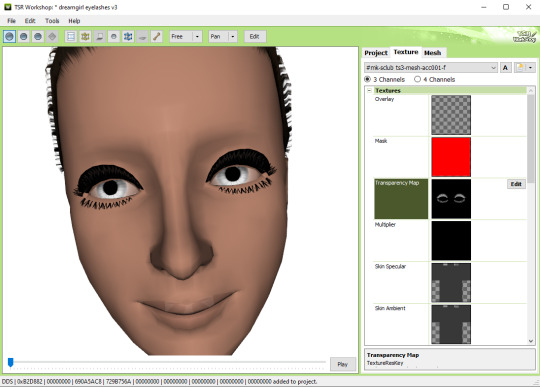
15. You should see your lashes, yay! But this is TSRW, they won't look exactly the same in game, as they look here. If you want a set of eyelashes, add more presets.
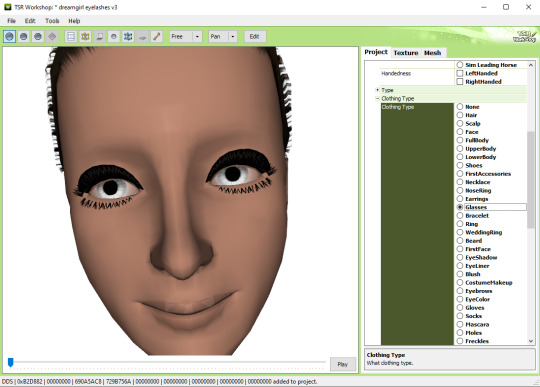
16. Now this is important. If you want to see your eyelashes in Accessories, go to Project tab, Clothing Type and change it from eyeliner to glasses. You also have to do this if you have more than one preset in one file. They won't show up in Eyeliner section. If you want to have set of eyelashes in Eyeliner category, you have to make each preset into seperate file. Also, eyelashes are recolorable ONLY in Accessories section. Don't forget to check Categories section to see which outfit has the eyelashes available.
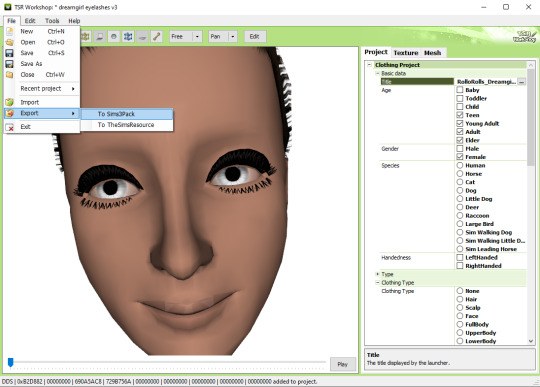
17. Now you're ready to export your file! Export -> To Sims3Pack. Use the Sims 3 Pack Multi-Extracter to convert your sims3pack to package file. We're moving to s3pe.
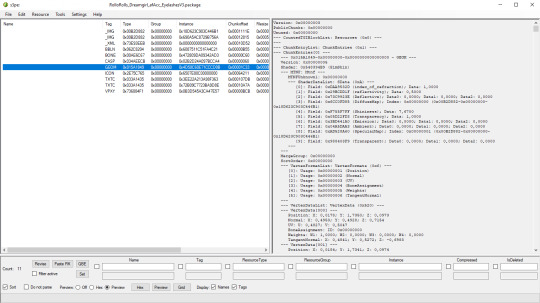
18. THESE STEPS ARE ESSENTIAL! Open up your shiny new package in s3pe. Click on the GEOM with the right mouse button.

19. Click Replace and choose AUID.simgeom from the downloaded folder. AUID is for adults, CUID for kids and PUID for toddlers. We have one more step to do.
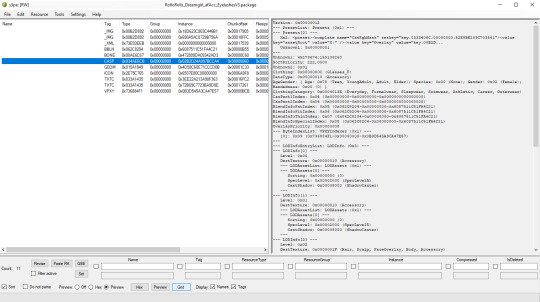
20. Now click on the CASP normally (left mouse button) and click Grid on the bottom of the program.
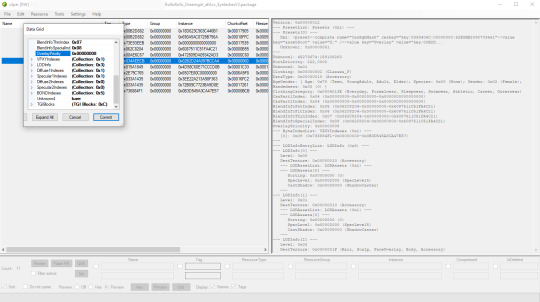
21. A small pop up window appears. Scroll to the very bottom and find a line called OverlayPriority.
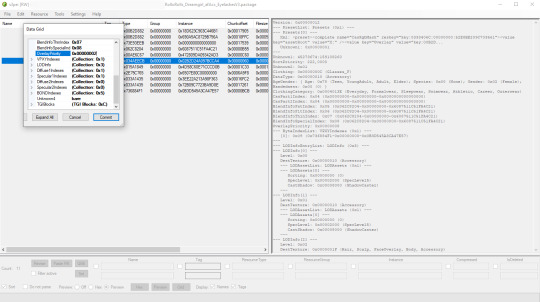
22. Change the 8 to 2. This will make eyelashes not being visible through hair that's covering eyes.
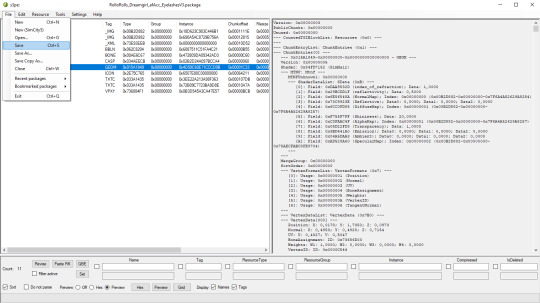
23. Save your package. You're ready to test your converted eyelashes in game!

Here they are. Nothing fancy, it was a quick conversion :D They're also compatible with S-Club eyelash sliders ^^
Btw, you don't necessarily have to convert both upper and bottom eyelashes. You can have upper or bottom only. Play with the lenght, not all eyelashes have to be very long. Convert it for males, kids, toddlers. You just have to remember to change the options in TSRW and replace the correct .simgeom file in s3pe. There is a lot of possibilities and you'll probably get better in this than me :D
Good luck! ♥
182 notes
·
View notes
Text
TS4: Senni's presets for cute boys
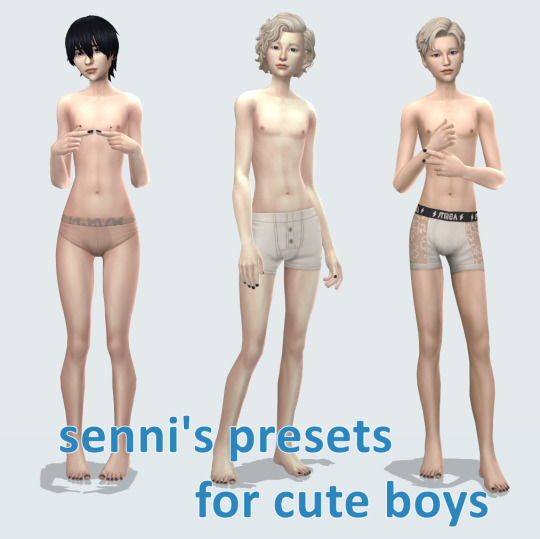
I didn't plan to public this because it's far from perfection, or just being good… But I just discarded of 90% of project I work on for last 2 months (only in my free time, so it is why so long) and felt guilty that I didn't post anything for so long…
So I decided to upload presets I made for my cute male OCs quite some time ago. I wanted them to be on male frames because of face features but have more soft/feminine body because I just want to.
[more info and download (no ads) under the cut]
Sora:
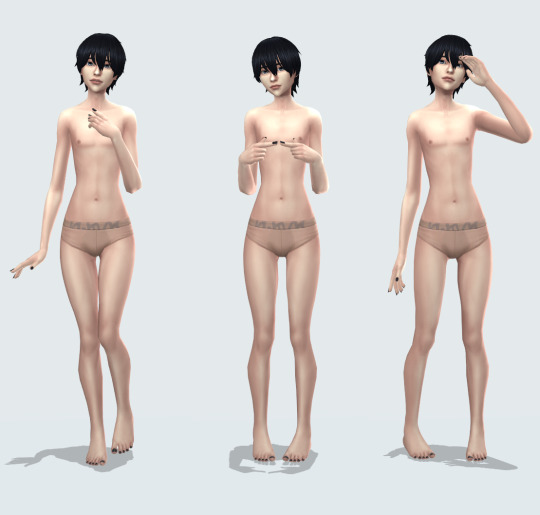
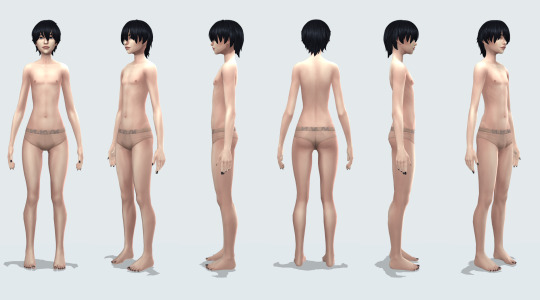
Yuki:
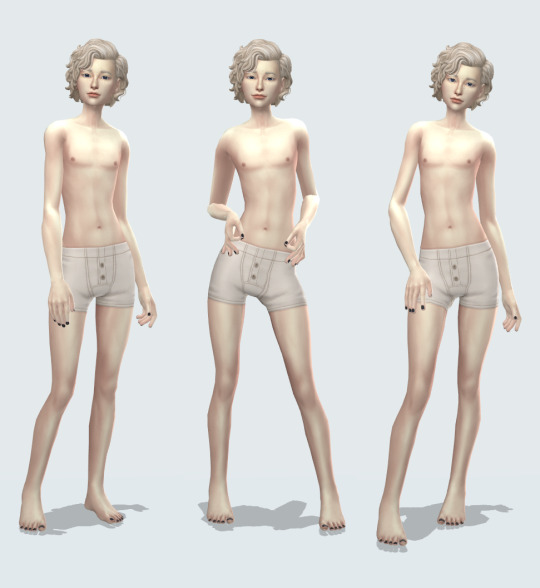
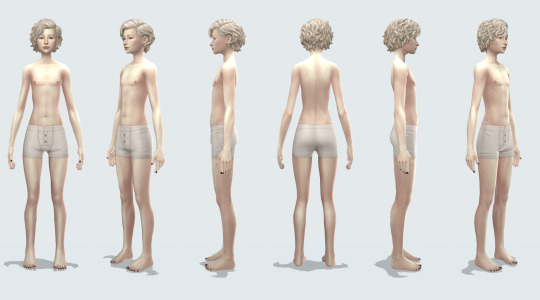
Yoichi:


custom thumbnails:

DOWNLOAD: [SFS] [GoogleDrive]
list of mods used (not full, just more visible ones) : all: feets / my default skinblend Sora: skinblend / hair / pose [1], [2] Yuki: skinblend / hair / pose Yoichi: skinblend / hair / pose
#sims 4 download#the sims 4#the sims 4 cc#ts4cc#sims 4#ts4#sims 4 cc#sims 4 custom content#sims4cc#the sims#sims 4 cas#simblr#starcaller senni ts4 cc#the sims cc#thesims4#sims4#sims 4 maxis match#s4ccmm#starcaller senni ts4#starcaller senni#starcaller senni ts4 mods#starcaller senni cc#senni sims#senni ts4 cc#sims 4 eyes#alwaysfreecc#sims 4 preset#sims 4 male preset#sims 4 male
165 notes
·
View notes
Text
Introducing... The Tattooer!
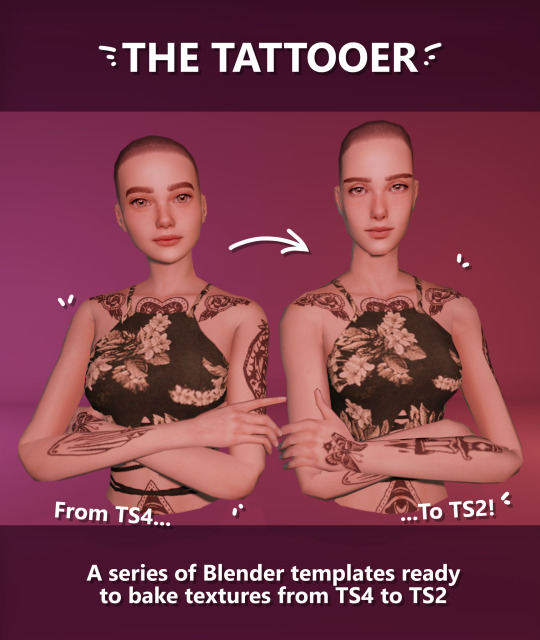
[This version is OUTDATED! Please, check the new version here. I updated the workflow, skipping a lot of unnecessary Photoshop editing. It's way faster! I'll leave this old version and files up though, for archiving purposes. But yeah I still totally recommend you use the new version!]
Finally! I’ve been working on this for so long and I couldn’t wait to share it. This is a series of Blender template files already set up to quickly bake textures from The Sims 4 to The Sims 2. Really neat for cc creators! The different Blender files will allow you to:
-Bake body textures from TS4 to TS2 (Female) -Bake body textures from TS4 to TS2 (Male) -Bake body textures from TS4 (Female) to TS2 (Male) -Bake body textures from TS2 (Female) to TS2 (Male) [Bonus!] -Bake head textures from TS4 to TS2 (Face + Scalp) [Experimental]
Check the file names to see which one is which, and the resolution of the baked texture it will give. Download! SFS / GD
Everything you see in the render above was converted using those Blender files. I only did a couple tiny edits to the eyes and lips to fix them. These templates were made mainly to bake and convert tattoos, but there’s more you can do with them if you get creative. I have to say, these are NOT perfect. Check out the eyebrows on the render above. They look a bit wonky compared to the original, don’t they? I left them as is to keep your expectations with these as realistic as possible. Results may vary depending on what you are trying to convert, so! With that in mind, this is all the stuff you will be able to convert almost seamlessly from TS4 to TS2:
-Tattoos. -Other body details such as body hair, scars, freckles, supernatural/occult details… -Body painted underwear and swimwear, as well as some other clothing that’s mostly painted on the body. -Socks, stockings and maybe leggings. -Even skintones! In some areas they will look weird, so I recommend editing and blending them with other existing TS2 skins. -Makeup. Kinda bad but hey it works! Eyeliner and anything that is around the eyes looks terrible for now, but other stuff like blush may look just okay. -Eyebrows and maybe beards. A bit of hit or miss with those. -Hair scalps. Very useful when converting some hairs! Although keep in mind part of that texture might also need to be baked on the face mesh, you know, that hairline makeup stuff.
Got your attention? Nice! Editing some of the textures from TS4 to match the UV mapping in TS2 using a 2D editing program can be incredibly hard. That’s where texture baking in Blender comes to the rescue!
It is recommended you download Blender version 2.91.0, which is the one I use. Don’t worry, it’s free! There’s also 3 Photoshop actions you will need to set up the textures for baking and then putting them back together, because unfortunately Blender doesn’t support transparencies in that baking process, so that takes a couple extra steps to make it work, but I think it’s still pretty fast and easy. And just in case Tumblr manages to blow up or something, I decided to include a pdf with the upcoming tutorial that will guide you step by step with all this process, so if this post gets deleted somehow (I really hope not!), you will still have that pdf as a backup archived.
You can download Blender here. Personally I recommend picking the fourth option, “blender-2.91.0-windows64.zip”, which is a portable version and doesn’t need to be installed. You will also need Sims 4 Studio to extract the original Sims 4 CC textures you want. As for Photoshop… I’m not going to tell you to buy that subscription service and give Adobe some undeserved money, so… yeah, there might be some other options out there to get it (very legit, yes yes).
So, before we begin, let’s clear out some questions you might have. What the heck is this texture baking thing and what does it do? Well, let’s imagine you have a projector and point an image into a blank wall. Then you pick up some brushes and start painting and copying that projected image in that wall. Texture baking is kinda like that when it comes to 3D models. You align two models and match them as closely as you can in shape and form, and once you adjust some parameters and values, Blender does the rest for you: it will give you a new texture for a new model with a different UV map. These files I’m sharing have everything already set up, so it’s a matter of plopping in that Sims 4 texture and you will get that new texture for TS2 in just a few clicks.
This tutorial assumes you know literally nothing about how to use Blender, so if you feel uncomfortable with it, worry no more! This will guide you with pictures showing where you need to click and explaining what is happening. For Sims 4 Studio and Photoshop the process might be a bit less detailed, but still this should be pretty beginner friendly. For this tutorial, I will use some tattoos as an example. Alright, enough with the rambling. Let’s get started!
·EXTRACTING TEXTURES AND EDITING THEM WITH PHOTOSHOP: First things first, you will need to extract as pngs all the textures you want to convert from TS4 using Sims 4 Studio. Once you’ve done that, open them up one by one in Photoshop and run the “No transparency” action. This will remove the alpha channel from the image, getting rid of all the transparency. Go ahead and save a png copy of it. Then run the “Make Alpha” action on those same swatches (from the beginning, make sure you’re not running the action on an already edited swatch!), which will only show the alpha channel of the image in black and white, and save another copy of that. You should have 2 textures for each tattoo swatch. For the “No transparency” action I like to name it BASE (And your swatch number or name), and for the “Make Alpha” action I usually name it ALPHA (And that same swatch number/name). I recommend saving them in different folders named BASE TS4 and ALPHA TS4 respectively to keep it organized. If you want to make this much faster in Photoshop, there’s an automation option in it that allows you to run an action through a batch of files in a folder and then saves it all. I won’t cover how to do it in this tutorial, but you should be able to find it easily on Google by searching something like “Photoshop automate batch”. It’s really powerful and will make your workflow with actions much faster. Definitely recommend learning about that!
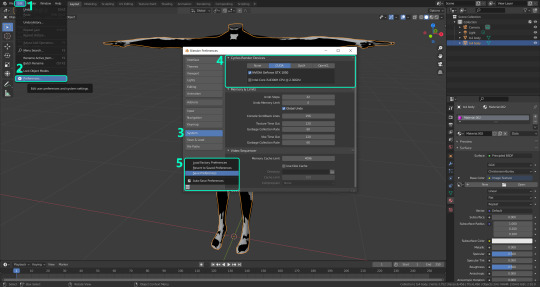
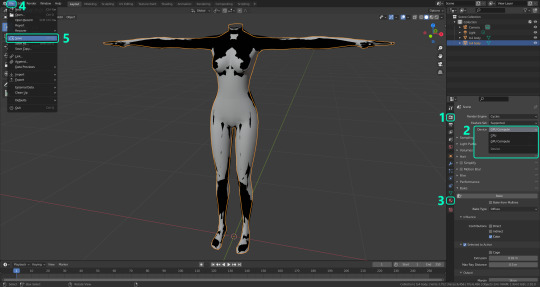
·BAKING THE TEXTURES IN BLENDER: PRELIMINARY STEP 1: CONFIGURING BLENDER’S GRAPHICS SETTINGS: Open your preferred Blender file depending on what you’re going to bake and the desired resolution (in this example I’m going to use the AF-body-4t2-1024 file). Before we start messing around in Blender, there’s one thing you should set up. It is a onetime step, and once it’s done, you won’t need to do it again. So, does your computer have a dedicated graphics card? If you don’t know or you’re not sure, just skip to the next step. Configuring Blender so it uses your graphics card instead of your CPU will make the baking render much faster, so it is recommended you set it correctly. If your computer has a dedicated graphics card, click File (1) > Preferences (2) > and on the window that pops up click System (3) > and select CUDA and make sure your graphics card is there and tick it (4). I have an Nvidia Graphics card but your case may vary. Once you’re done, click on the tiny button on the bottom left corner and Save Preferences (5).
PRELIMINARY STEP 2: CHOOSING THE RENDERING DEVICE: Click on the tiny camera button on the right, called Render Properties (1), and on Device (2) select GPU Compute if it’s not already selected. If you’re not sure if you have a graphics card or not, just select CPU. Then select the Material Properties tab (2) and Save your changes, either by pressing Ctrl + S, or clicking File (4) > Save (5). Okay, time to get into the good stuff!
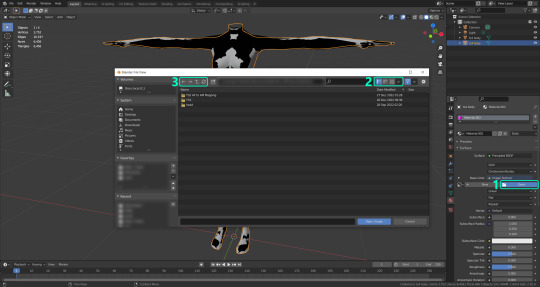
·STEP 1: LOADING YOUR TS4 BASE TEXTURE: In the Material Properties tab, click the folder icon that says Open (1) and on the window that pops up, navigate through your folders and select your first texture. For now we’re going to bake the BASE texture, so go to that folder where you saved the edited “No transparency” image. To navigate easily, the 3 buttons on the top right (2) are for the display mode. They will show your files in list mode, vertical and horizontal, and the one on the right will display the file thumbnails, pretty useful if you want to easily see your images. And the icons on the left side (3) will let you go one folder back and forward, go to the parent directory, and refresh the folder in case you just dropped something new in there. Double click on the image you need and that will load it into the Sims 4 body model, named “ts4 body”.
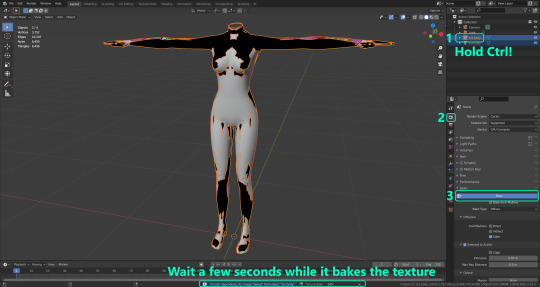
·STEP 2: SETTING UP YOUR SELECTION AND BAKING THE TEXTURE: On the top right of the screen, you will see the names of the 2 models in the scene. Hold the Ctrl key in your keyboard and left click on the “ts2 body” model (1). If you did it correctly, you should see “ts2 body” in a yellowish orange color, and right down below, “ts4 body” should look more like a red orange. If not, try again by clicking first on ts4 body, and then while holding Ctrl click again on ts2 body. Then switch to the Render Properties tab by clicking the tiny camera icon (2) and click Bake (3). Depending on your screen resolution, you might need to scroll down a bit with your mouse to see the Bake button. Wait a few seconds for it to finish. You will see the progress percentage down on the bottom of your screen. Don’t panic if you notice your computer fans start ramping up, that’s completely normal! As I said in the beginning, using your GPU will bake the textures much faster than the CPU.
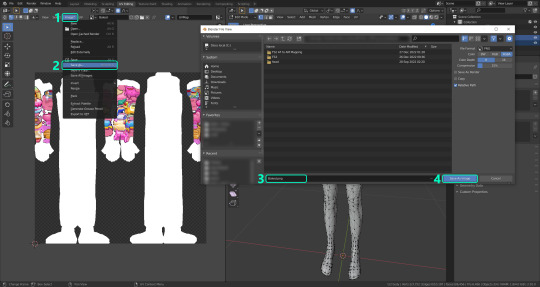
·STEP 3: SAVING YOUR NEW TS2 TEXTURE: Once it’s finished, switch to the UV Editing Mode by clicking “UV Editing” on the top of your screen. And there it is: your new texture! You might have to scroll up your mouse wheel a bit to zoom in and see it in all its glory on the left side of the screen. We’re still not done yet though. You need to save it to yet another new folder (always try to keep your stuff organized!).
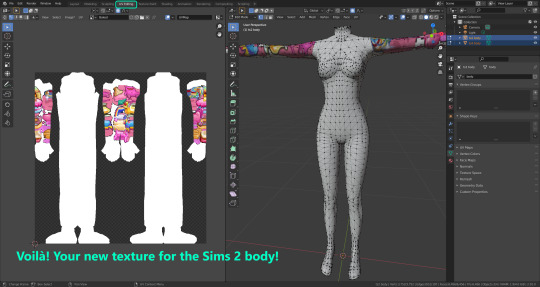
You can save it by pressing Shift + Alt + S, or clicking on Image* (1) and then Save As… (2). That will pop a window where you’ll need to navigate again and save it somewhere. Give it a proper name (3) and hit Enter to save it… well, Enter doesn’t always work for me for some reason, so if that happens just click Save As Image (4). In this case, I personally like to call it something like “BASE TS2”.
·STEP 4: GOING BACK TO STEP 1: Alright! So you have your new baked base texture, but we still need to bake the alpha channel to give it its transparency. In order to go back to step 1 and start the process once again, click Layout (1), go back to the Material Properties tab (2), select “ts4 body” (3) and click on the folder icon (4) to open and load the alpha texture you did in the beginning in Photoshop.
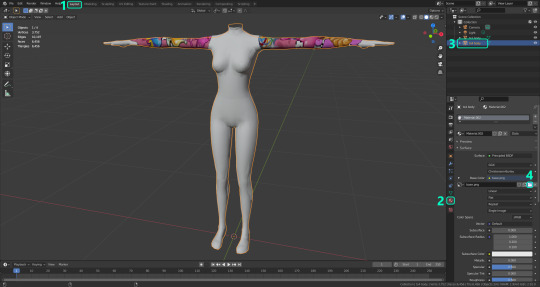
Then it’s just a matter of repeating the process from step 2: bake the alpha channel and save it again as a new image (watch out, don’t overwrite your previous image!). This one I like to name “ALPHA TS2”. When you’re ready to move on, close Blender without saving. If you see a small check telling you it will save some images, make sure you uncheck it, so you will be able to use it again in the future from the starting point with no issues. I don’t think it really matters if you accidentally save your progress in these files, but I like to keep it clean and fresh so I can do the process where I left it from the beginning the next time I open it. And in case you mess up and save somewhere, you can always just delete the .blend file and download the template files again.
·FINAL STEP: PUTTING EVERYTHING BACK TOGETHER IN PHOTOSHOP: We’re almost done! Open Photoshop and drop in both your 2 new baked textures, “BASE TS2” and “ALPHA TS2”. Keep both layers on top of each other and aligned. For that you can enable the snapping in View > Snap to… > All. Rename these layers so the Alpha layer is “ALPHA” and the Base is “BASE”, and make sure ALPHA is on top.
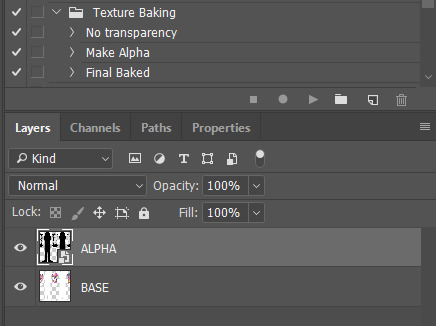
Then run the “Final Baked” action and now for real, it’s finally over! You just fully baked and converted these new textures. Congratulations!
So, to summarize, here’s a small guide with all the steps of the workflow I developed. Once you get the hang of it, baking and converting one swatch of a texture just takes a couple minutes. It really is that easy!

One small note though, some of the baking blend files save the textures with a resolution of 2048x2048 pixels, as clearly stated at the end of their file name. That’s way too overkill, because TS2 only properly supports up to 1024x1024 for most of its textures and you should always resize your final product to that max resolution. I just made those 2048 versions because there might be some really tiny and slim details on some tattoos that may look a little too blurry when baked into a 1024 resolution, so for those cases use that if you want and then resize them in Photoshop. In the Resample mode of the Image Size menu, there are a few options to choose. For the fine details, I like the Nearest Neighbor (hard edges) option, which, even if it looks a bit pixelated, it still preserves most of the texture and quality.

For anything else, I would just directly bake them using the 1024 versions in Blender.
And for the folks who feel comfortable playing around in Blender, this is just the beginning! Texture baking opens a LOT of possibilities, so feel free to move stuff around and edit the models to your liking! If you notice the baked textures look warped or stretched somewhere, or don’t like where some textures are placed in the S2 body, poke around that area moving stuff and then give it another try. The main objective of the baking process is keeping both overlapping models as close in shape as possible. You may also edit and save new copies of the templates, or make new ones from scratch using mine as a reference (keep a close look on those Baking settings and values, I think they work pretty well) and share them if you want to. Go ham, do whatever you want with them! I have plans on making templates to convert body textures from Sims 3 to Sims 2, but for now it’s not on my priorities, so we’ll see when that happens.
Whew! Hope none of this was too confusing. Need help or have any issues with these? Please ask/message me and I’ll be glad to help when I’m able to!
Credits for the CC used in the render demonstration: -Skin by Sims3Melancholic -Eyes by Northern Siberia Winds -Eyebrows by PeachyFaerie -Tattoos by xtc -Top by SerenityCC
And the Tattoo I used for the tutorial can be found here, by ValhallanSim
Last but not least, a huge, special thanks to @elvisgrace for all her help testing this for me. I’ve never shared Blender files, so hopefully everything works as intended and everyone can use them with no weird issues. Fingers crossed! And thank you for reading! Hope you have fun playing with this new toy hehe.
#ts2 tutorial#ts2 resources#ts2 blender#ts2 overlays#ts2 texture baking#4t2 conversion tutorial#i swear blender is the coolest thing ever#yes you can consider this post as blender propaganda
318 notes
·
View notes
Text
hair poll <3


i like some clay hairstyles for male sims in TS4 and i was curious about how difficult it might be to convert them over. turns out it isn't that hard... so far lol.
would you use short clay hairs for male sims in TS3?
i know 4t3 build/buy and clothes are well liked by a lot of maxis-match simmers... but what about clay hair?? 🤭
personally i think the clay style could be passable for short hair but i don't know. i'm still on the fence. i do love my high poly alpha hair. let me know how you feel!
regardless of what the result is, i will probably still go ahead and attempt a few of my fave styles. if it's wanted, i might do more.
shown above is me fitting hair 6 by @/wistfulpoltergeist onto the TS3 head which did not take very long. the uv-mapping and texture work would take some more time. but still, it seems a lot faster than 4t3 clothing.
#or maybe finish your wips before starting more 🙄🙄#i love playing sims 4........ studio!#learning new things over here :3
39 notes
·
View notes