#ts3 lighting mod tutorial
Explore tagged Tumblr posts
Visit Tumblr Blog
Explore Tumblr blogs with no restrictions, modern design and the best experience.
Last Seen Tumblr Blogs


Fun Fact
BuzzFeed published a report claiming that Tumblr was utilized as a distribution channel for Russian agents to influence American voting habits during the 2016 presidential election in Feb 2018.
Text
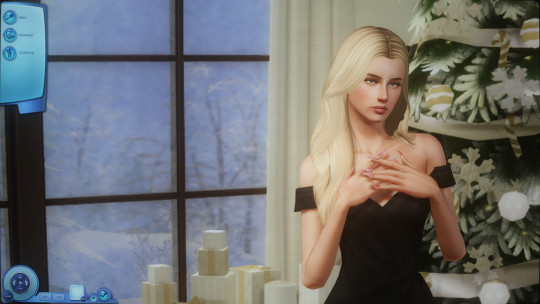
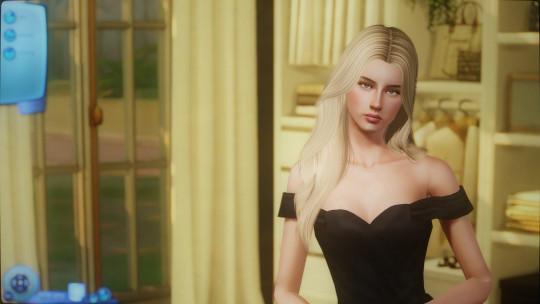
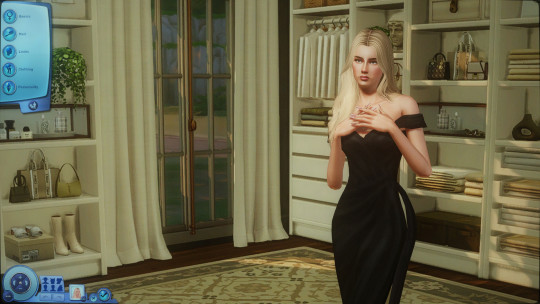

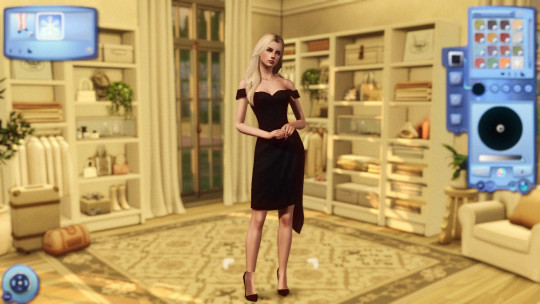
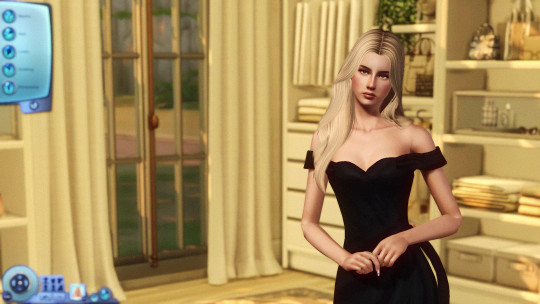
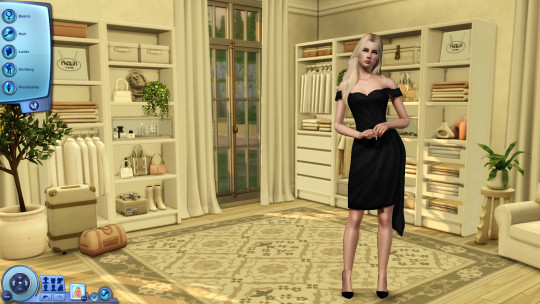
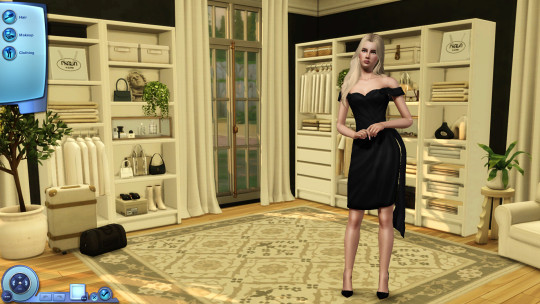
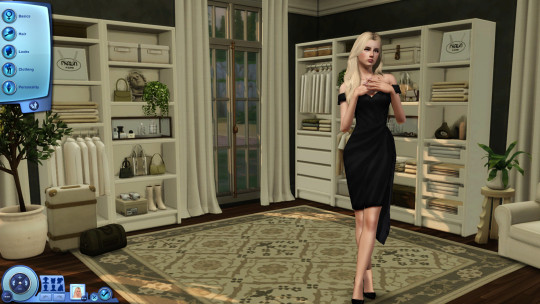
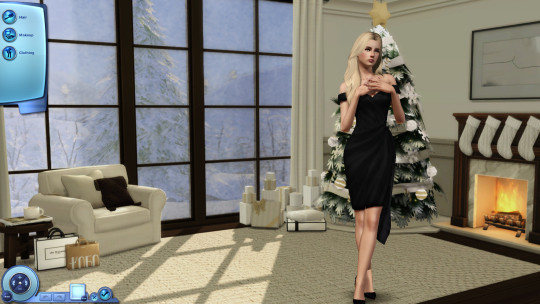
CAS Background Replacement - TS3 - Bbygyal123
This set of 4 elegant backgrounds is by Bbygyal123 on Tumblr and Patreon. They are from the "Aesthetic Closet" set and the 2023 Advent Calendar set.
The lighting in game is much more neutral, less saturated and bright than the pictures. I took these before the lighting/weather situation got fixed.
Information
The background uses a 2048x2048px image so it may slow down your computer and look blurry if graphics settings are not on high. Use at your own risk.
The CAS Room Default will replace the CAS Room, Create-a-Pet room, and the Create-a-Bot room. You can only have 1 CAS Room Default at a time.
The Stylist Room Default will only replace the Stylist Room. You can only have 1 Stylist Room Default at a time. Requires the Ambitions EP.
Credits
CherieDawn67 at Modthesims for creating the mod and the mesh used for the background.
@mspoodle1 for updating the mod.
Bbygyal123 on Patreon
Me for Photoshop work and figuring out this whole malarkey. This mod took a truly ridiculous number of hours of testing.
Make your own using my tutorial here!
Download: simfileshare / mega
430 notes
·
View notes
Text
I discover something new every day...following this tutorial I managed to export a The Sims 3 sim and I can't wait to make a render using a ts4 and a TS3 sim together!
The only problems I've found for The Sims 3 is that:
- If the sim has ccs that have been installed in the Launcher and they're not in the mods folder, the ripper won't find them. In my case it exported the sim without contact lenses (which were sims3.pack, from the launcher, so I had to recolor the default eyes from the face texture because they were red instead of brown!
- For some reason the hair always has issues and doesn't look the way it should so I had to tweak a lot of shaders
- Sims don't have eye light drawn in the eye texture, because eye light is a shader in game. So I had to draw it on the texture myself!
Random pic because The Sims 3 sims on Blender are so cool!
Don't mind the crooked eyes, it's not a ready render, I just wanted to show the model
4 notes
·
View notes
Text
I was tagged by @igotsnothing over two weeks ago whoops. I saw it went “I should do that” then completely forgot about it. But better late than never!
1. What’s your favourite sims death? Either death by satellite from TS2 or the skydiving one from TS1, entirely because of the “Whee!” at the end of it.
2. Alpha CC or Maxis Match? A mix of the two.
3. Do you cheat when your sims gain weight? I usually don’t even notice when they gain weight.
4. Do you use move objects? Yes.
5. Favorite mod?. Aside from MCC + UI Cheats it’s between Language Barriers by Frankk, RPO and Talents and Weaknesses by Lumpinou.
6. First expansion/game/stuff pack you got? Get To Work
7. Do you pronounce “live mode” like aLIVE or LIVing? aLIVE
8. Who’s your favorite sim that you’ve made?
Kathleen “Kit” Jones (Her name inspired from that "Kitchenaid Whiskey Jones" tweet). She's been around in some form as an OC since 2016.
She is also the sim in my pfp.


I want to do some gameplay/story hybrid with her (and other sims of my own) but that would mean...playing the game and not just using it as a substitute for drawing...
9. Have you made a simself? Back in 2016/7. Probably never again.
10. What sim traits do you give yourself? TS3 traits because I like them better. Adventurous, Love the Outdoors, Brooding, Unlucky, and Artistic.
11. Which is your favorite EA hair color? The color wheel. Dark Brown.
12. Favorite EA hair? This one from Get to Work.
13. Favorite life stage? YA. The only life stage.
14. Are you a builder or are you in it for the gameplay? I liked building in TS2/3 but could never get into it in 4.
15. Are you a CC creator? I’ve done poses and recolors. I’m currently doing the “Fuck around, Find out” method of learning meshing. I should probably watch a tutorial.
I also know Python (Studied C.S in uni, which means fuck all really) and have confidence that I’ve used enough HTML to figure out XML, so destroying the game from the inside out is something I’ve wanted to do for a while. I have ideas that range from adding “Wish for a baby with…” and “Wish for Pregnancy/Wish for Pregnancy with…” to the Wishing Well for all your magical conception needs and story plot purposes, to figuring out how to add a whole “Spirit of the Wishing Well” NPC for also story plot purposes, to straight up overhauling spellcaster's alchemy to be more like TS3 alchemy.
16. Do you have any simblr friends/a sim squad? Nope. I’m not introverted, shy, or socially awkward (socially incompetent maybe), I’m just bad at using social media hah.
17. What’s your favorite game? Right now it’s Breath of the Wild. I like bullying the guardians for fun.
18. Do you have any sims merch? Nah.
19. Do you have a YouTube for sims? Nope.
20. How has your “sim style” changed throughout your years of playing?
I used to try and be more story focused when the game first came out. I’m one of those TS2 Wants/Fears dictate the game players and while you can do that in TS4, it’s not as satisfying. Now I play it as an unholy mix of "Soap Opera Simulator 2014" and "How far can I take min/maxing the sims" .
21. What’s your Origin ID? I don't have anything of interest on there.
22. Who’s your favorite CC creator?
sforzcc, Peacemaker, awingedllama, Sentate, Rusty, Johnnysims, simstrouble
It’s not cc but florwalsims and windbrook for their builds/saves as like many of you, I’m tired of playing in suburbia.
23. How long have you had a simblr? Not long, I lurked awhile before posting though..."awhile" being a year.
24. How do you edit your pictures? I use Clip Studio Paint. I’m too lazy to *ahem* photoshop and I have it for drawing purposes anyways.
Usually it’s just using different blending modes (multiply, overlay, soft light, glow dodge my beloved) and special effect brushes.
25. What expansion/game/stuff pack is your favorite so far?
Expansion: Get Together. I’ve used the club functionality in nearly every save I’ve played.
Game Pack: Vampires, Realm of Magic, Werewolves. Not because they���re particularly good but because I’m a sucker for occults.
Stuff Pack: Paranormal. Again occults, but this one also has an acceptable amount of gameplay in it. I’m surprised they didn’t try to pawn it off as a game pack.
26. What expansion/game/stuff pack do you want next? I'll get Growing Together when it's 50% off. However if before then EA gets too goofy with what remains of TS4, (TS5 is going to be ""free"" to play, it's already fucked.) I'll probably just you know what the rest of the game. EDIT: I wrote this last night. After seeing that job opening for the marketing position on Project Rene...haha yeah. Shit's depressing.
I tag: your mom
2 notes
·
View notes
Text

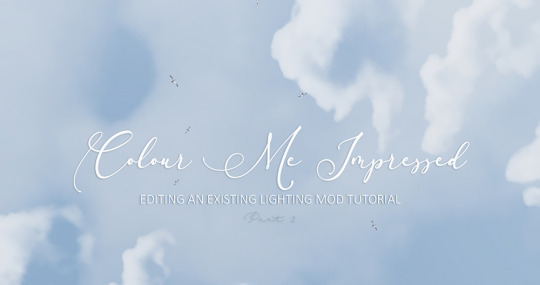
EDITING AN EXISTING LIGHTING MOD TUTORIAL PART 1.5
// Merging colour ramps to mod 1 from mod 2
So you have found an almost perfect lighting mod, but you would really like it to have northern lights dancing across the night sky? Did the previous guide leave you wondering what the actual fuck are you supposed to do to achieve that? Fear not, you can easily copy paste the colour ramps from Mod 1 to Mod 2 and vice versa, and I’ll show you how!
You may have seen my previous lighting mod tutorials Part 1 -> Explains what img colour ramps are and how to change colours and Part 2 -> Explains what they do and how to edit the technical ini files.
This guide is more of a let's just get on with it version of Part 1, concentrating on colour ramps and showing you how to cut and paste parts from different lighting mods to your current one to make it even better.
// Disclaimer: I’m using northern lights as an example throughout this guide, but you can do this with anything from daytime/night time skies to sunsets, water and cloud colours!
And because formating on these Tumblr posts is not really lengthy guide friendly, I posted it over on google docs instead. You can also save it to your harddrive from there if you so wish! As always, if you are still confuzzled or get stuck, send me a message and I'll help you!
⋆ฺ*✲゚*。✧٩(・ิᴗ・ิ๑)۶*✲゚*。
// Link to the guide
117 notes
·
View notes
Text
✨ ts3 resources
default replacements:
skin
sarhra eyes
pet eyes
lighting mod
brows
beards
fairy wings
little wisps
cas screen (latte)
skintones:
neiuro
brntwaffles
pyxis
noodlesims
fawkes
sectumsimpra
svmblr
hair retextures:
poisonfireleafs
pandelabs
chazybazzy
plumblobs
plumdrops
ifcasims
brows:
brntwaffles
makeup:
lashes set 1 / set 2 / eyelash sliders
eyeliner
blush 1
blush 2
blush 3
lipstick 1 / 2 / 3
dry lipstick
nose makeup
makeup set
skin details:
freckles part 1 / part 2
moles
birthmark
body birthmarks and freckles
cheek shadows
sliders:
slider masterlist
shoes:
pixicat
accessories:
septum piercings
braces
patterns:
cathilark
nraas mods:
careers
debug enabler
dreamer
error trap
go here
master controller (+ cheats, integration)
overwatch
register
saver
story progression
tempest
woohooer
portrait panel
traffic
other mods:
traits enabled for all ages
taxi charge
no fridge shopping
sims drinks
pregnancy controller
scolding + punishment tweaks
supernatural babies
random genetics
super hampers
sleep on sofa
faster toddler training
only important memories
lose fat / gain fitness slower
retuned attraction system
deep conversations
fewer credits for degrees
cas details 8x2
misc:
smoothness patch
reshade preset
rabbit hole rugs
poseplayer
poses
screenshot backdrop
world fixes
regul save cleaner
worlds:
fairy realm
magic town
roseward
mairin
hylewood edit
deery meadows
shigeria
hidden springs retextured
riverview redux
challenges:
random legacy
awesomesauce legacy
midnight sun
zombie apocalypse 1 / 2
youtube:
acottonsock (tutorials + let’s plays)
cjplays (world reviews)
#time to post my resources#tysm for the welcomes and follows <3#yall have amazing blogs#the sims 3#ts3#ts3cc#sims 3#ts3 resources#maxis match#ts3 maxis match
1K notes
·
View notes
Photo


okay, i have been fiddling with this preset here and i guess i fixed it? now it’s not that bright anymore. just bright enough! also made a different version that is a bit more colorful just because. feel free to adjust it if you need to, or use it as a basis for your own preset. again, some things to note:
f8 - toggles mxao and dof
turn off edge smoothing on your game settings
i am using sunblind by @softerhaze
made with gshade 3.5.0. you can follow this tutorial if you want to get it.
if you get any issues, you can shoot me a message. i am not an expert but i will do my best to help you out. this should also work for ts3, but it might be brighter if you have a lighting mod installed.
download.
more screenshots below.


#ts4#ts4cc#ts4 gshade#ts4 preset#idk what else to tag this#but anyway this is a little bit better?#my eyes dont burn as much anyway lmao#i think thats a good sign <3#anyway im gonna go to sleep now lmao
55 notes
·
View notes
Text
I have a page where I'm listing CC I'm using because TS3 is old and links to CC are scattered. I thought I might share it as a post so it would be easier to see for new TS3-ers. Also I just learned how to do a cut and I wanted to.
Start Here First
Start here.
Second, follow the guide here.
Lastly, follow this guide here, except that I use gshade and not reshade, as I found it performed better with ts3.
After doing the above, here are some more things to check out:
Performance Stuff
Lazy Duchess mods
No Intro mod
No script mods notification
Delphy’s Dashboard to check for conflicts
The ‘Wow This Game is Old’ List
JustMiha’s Clean UI
More BITS Sound Overhaul
TS4 Cursors
Smartphone instead of Blackberry
No plumbob icon on sim tag
Moon Phase icons from TS4
Interaction on Sloped Terrain Enabler
Lighting and Graphics Upgrades I Use
HQ Mod + No Glow and The Sims 3 GPU Add-on and Better Shadows combined
Gelina’s lighting tweaks here*
Tileable Shader Fix, and Reworked EA Lights*
Snow But Better
Ifca’s Default Repacements
*Changing lighting and shadows can make the game too dark sometimes.
Sims CC I Use
Buhudain’s You Are Real Sim normals
Kurasoberina UHD Primer Skin default
Kurasoberina’s Lana Eyes defaulted
Literally everything else by Kurasoberina also
Literally everything by Ifca while we’re on it
Carver’s CAS Overhaul
Walk cycle edits
Horse CC
For an up to date list of pet CC, I joined a Discord called Sims Kennel Union, which has up to date CC lists for both Pets and Horses. Nevertheless here is what I have used and can recommend:
EQHD
Luke Teth Butter HD Horse
HD Eye Mod by Performance Saddlery (in overrides)
IHTL’s Everything EQHD
Raymond Equestrian Center Downloads
Performance’s EQHD Manes
Lakeside Saddlery for EQHD Tack
Snapdragon Vineyard's Marking Folder - start here!
Haxby Stud’s Markings and Coats
Wrenegade Stables Markings
Lavender Equestrian’s Markings
Cheshire Farms Markings
Pure Spirit Markings
Cath Markings
Sliding K Ranch Markings
Faewood Markings
Old Fellow Ranch Markings
Edelweiss Markings
Calvero Terranora Showjumping’s Realistic Hoof Shaders
Briar Vale For the Barn
Halym Rose Build/Buy
Sugars Legacy Stables for the racing tack
Creators to Check Out (haven’t used but look great)
Let them eat burnt waffles for their everything
LatoyaSims who makes seemingly everything
Nilxis’s lots
ChazyBazzy for MM hair
Vasilla’s Objects and lots
Sketchbook Pixels
Donna Cunningham’s Photography Tutorials
Calvero Terranora Showjumping’s Poses
Ancient Sport Stables Poses
Old Fellow Ranch Non-EQHD Resources
Xtina Sims Equestrian
Paso Belle Equestrian’s Lots
Lavender Equestrian’s Lots
Lavender Equestrian’s Downloads Page
Rotherford Download’s List - a list, but more up to date
Other CC Lists (many broken links but still useful)
Rotherford Downloads List
A default database
OneEuroMutt’s list of default replacements
OneEuroMutt’s list of cc
OneEuroMutt’s list of sliders including FOLDER DOWNLOADS
Brntwaffles list of CC
Izo’s tags
Vasilla’s Page of Everything
1s CC Finds
1s CC Finds on non Wayback
This Retexture Catalog
Discipline Resource Guide by Equus Sims
Link List for Equus CC
A list of CC for a horsey lot that is also great
Juno Stark’s List of Horsey Sim Websites
Equus CC Database
Lastly, Actual Gameplay Mods I Use
Sunrise/Sunset Offset Mod - my own version
Longer Equestrian Center Hours - my own version
One with Nature
The Randomizer Mod
Faster Upgrade Times - 1 hr
The Sweet Simmer’s Toddler Mods
No Stretch Children Can Series
Disclaimer
Even CC and mods I have used successfully might break your game. Make a backup. I just started doing ts3 stuff and I dunno any drama that might be involved with any of the above creators or their creations. Failing to recommend a creator here doesn't mean that they suck or whatever -- just that i haven't found them yet. (Reblog to rec more and help a simmer out!)
#the sims#the sims 3#ts3#sims 3 horses#equus sims#equiality sims#sims 3 cc#ts3 download#the sims 3 cc#I dunno all the taggggs
116 notes
·
View notes
Text
navigation ⋆ ˚。⋆୨୧˚
♡ main blog ♡
♡ defaults | skinblends | skin details | makeup | presets | hairs | eyebrows | eyelashes | beards | clothes | shoes | accessories | tattoos | cas lighting ♡
♡ mods | overrides | build and buy | poses | gshade presets ♡
♡ builds | townies | base sims ♡
♡ resources | psd | tutorials ♡
♡ ts3 ♡
13 notes
·
View notes
Note
Hello!:) I'm a fellow simmer and decided to return to ts3. I do have my old downloads folder, but it's... Redundant out of measure. Could you share your resources, please? Tumblrs, websites, creators, cc-finds blogs, Pinterest boards, may be, even noob proof conversion tutorials? Thanks in advance.❤️
Hi there and welcome back to TS3!
I'm probably not the best person to ask this question of, because I don't have a go-to list. Basically, I see stuff around and download or I'll want a specific sort of thing for a lot I'm building and then do a google search (usually an image search, since that seems to work the best for the purpose) and then follow rabbit trails from there. And any kind of list I make will definitely exclude at least one source that I use a lot. Because my brain is as old as the rest of me, alas.
Cutting the rest because babble.
Of course, there's old standbys like Mod the Sims and also The Sims Resource (if you can tolerate the hoops they make you jump through to download unless you pay them *eye roll*). At T$R, I specifically have a lot of stuff made by Mutske, MsBarrows, SIMcredible!, Wolfspryte, and CycloneSue, either because they make stuff that "completes" EA objects or because they tend to make stuff that fits with my aesthetic. Aside from those, I have quite a bit of stuff from Blacky's Sims Zoo (worlds -- especially roadless ones -- as well as objects and clothing that work well with my rustic-but-not-necessarily-historical aesthetic), and Around the Sims. I've also been known to peruse Sims-New, one of the Russian re-upload sites that everyone hates, because they at least give links to the original upload so that I can download from the original uploader, but in some cases the re-upload is the only working link I could find of some stuff I've wanted, especially older stuff.
For mods, you want pretty much everything on the NRaas site if you want your game to run smoothly, and while you're there look up Ani's mods that are hosted there. For my more rustic style of playing, @anitmb (for mods of Ani's that aren't hosted on NRaas), @zoeoe-sims, and @mspoodle1 have some mods and modded objects that are invaluable for my purposes. If you're interested in lighting mods, then @brntwaffle's are lovely, as are @nilxis's (who also makes lovely, albeit usually large, custom worlds).
I don't do a whole lot with custom clothing. Most of what I have I got through finds sites and from SimsZoo, but there are some creators on T$R that make stuff that looks nice in-game and that I have some things from. Bill-sims, Harmonia, and Ekinege come to mind. Also, for men's stuff, download @nectar-cellar's stuff. It's lovely, and it's hard to find good-looking men's stuff that isn't an endless array of sloppy jeans, t-shirts, and hoodies.
Other miscellaneous things: I follow @katsujiiccfinds and @emilyccfinds where I've found stuff I wanted in lots of different categories and then looked and found other stuff from the same creator. I have lots of objects that @martassimsbook has converted to TS3. I get hairs mostly from @ifcasims, @plumdrops, @chazybazzy, and @rollo-rolls, but I replace the textures of any that I download with my own so that everything's consistent. If you want custom worlds, @sims3customworlds is an old blog that hasn't been updated in years, but it has a nice collection of links to lots of different kinds of worlds, some of which I haven't seen on other "finds" blogs. Also, for worlds and lots and such, I like My Sim Realty because their style is in line with my own preferences. @danjaley has lots of stuff that’s good for historical scenarios, which often works for my purposes, too.
And...I think that's it? I'm sure I'm forgetting a ton of people but, like I said, mostly I just cruise around the internet following rabbit trails and seeing what I can find.
18 notes
·
View notes
Text


[UPDATED] CAS Background Replacement - TS3 - Artorsims
I spend most of my time in CAS and I really wanted some prettier and more immersive CAS backgrounds. So, I have converted some from TS4 to TS3.
This first set of 5 backgrounds is by Artorsims. I completely fell in love with these when I saw them and they inspired me to attempt this conversion in the first place.
More sets are coming so please stay tuned!
Updated August 17 2024
Lighting and weather issues have been fixed thanks to a significant update of the mod by @mspoodle1
Please redownload the NEW files.
Information
The background uses a 2048x2048px image so it may slow down your computer and look blurry if graphics settings are not on high. Use at your own risk.
The CAS Room Default will replace the CAS Room, Create-a-Pet room, and the Create-a-Bot room. You can only have 1 CAS Room Default at a time.
The Stylist Room Default will only replace the Stylist Room. You can only have 1 Stylist Room Default at a time. Requires the Ambitions EP.
Credits
CherieDawn67 at Modthesims for creating the mod and the mesh used for the background.
@mspoodle1 for updating the mod.
Artorsims Twitter and Tumblr for the images used.
Me for Photoshop work and figuring out this whole malarkey. This mod took a truly ridiculous number of hours of testing.
Make your own using my tutorial here!
Download: simfileshare / mega
519 notes
·
View notes
Note
Do you have a sun default? And your lighthouse lighting illuminates a lot - how'd you achieve that? And how do you insert the lighting file into the world?
hello! i’m gonna answer these in order of difficulty haha
1. the lighthouse is just the default ea effect! i do have bloom enabled though and use lazyduchesses ts3 shaders, so that might be why it looks different?
2. to have lighting affect just one world you import the ini and img files into the world package. here is a tutorial
3. so the sun halo is something that i believe @potato-ballad-sims discovered and is included in the Clear & Bright lighting mod and in his Boroughsburgh world. i haven’t seen an official tutorial or discussion about it! i’ll ask him if i can write one up, otherwise message me privately and i can help you 😊
17 notes
·
View notes
Note
How do you take such beautiful pictures and what program do use to edit them?? Your male sims are so beautifully made ❤️❤️❤️🧑🏼😍
AHHH thank you so much anonny (。T ω T。) I use Photoshop 2020 . . yar har, and a lot of tutorials! A loooooot of tutorials. I get a ton from PiXimperfect! For TS4 pictures, I use this lovely photoshoot room, but it does require Get Famous! Alternatively, you can set up your own room using this backdrop + these recolours, and these lights! I also use this camera mod + NoGlo + NoBlu + Twinkle Toes Lighting (click names for links! sometimes Tumblr doesn’t show them as clickable links for me-) For TS3 pictures I use pretty much the same things! Backdrop + Invisible Lights (links are in the third post!) + No Drift + Lower Level Camera + Brntwaffles Dream Dimension! Pose-wise, I grab all my TS4 Poses from ccfinds blogs or the very pose blog for TS4: emilyccfinds + ts4-poses | for TS3, I found most if not all from looking through Katsujii’s CC Finds and SSSVitlans! I plan to make some posts for photoshop resources in the near future cus.. again, downloading everything on the face of the earth is my job LOL. I’ll upload a sim or two one of these days as well that’ll be free to use for anything ヽ(・∀・)ノ
#Anonymous#asks#answered#feel free to send me any questions or anything!#i might not answer them well cus I download everything on the face of the earth but I do my best LOL
8 notes
·
View notes
Photo


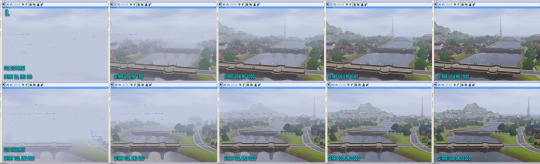

EDITING AN EXISTING LIGHTING MOD TUTORIAL // part 2
So now that we have sorted out all the IMG colour ramps (Tutorial part 1), it’s time to take a look at those INI files we ignored previously!
Just like with the last tutorial I feel I need to make it clear that I have learned most of this by trial and error, piecing information together from different tutorials and most importantly through this MTS topic by Simsample, extra high5 and credits @ Mamamudo, Riptide651 and PoisonFrog for all the INI related information they have posted and I added them in this tutorial. Some of the posts/pictures referenced to in the topic I linked are long gone and it can be a little hard to follow, so I have tried my best to combine everything in this tutorial. I have shamelessly yoinked several pictures for this tutorial too as they are most helpful and I see no reason to remake them as they explain everything so well. It’s for the greater good, so I’m sorry, but I’m not really that sorry. (ノдヽ)
Loads of people have been experimenting and finding solutions, but also leaving questions unanswered regarding the weather files as people tend to disappear without sharing their findings which is a real shame. This is such a big and important topic and if you can provide more information, please do! I will add your findings in and we will all benefit from the shared wisdom! For example I haven’t experimented with the wave settings much so this tutorial barely touches that aspect if at all.
Programs you need:
S3pe
Text editor such as Notepad
Files you need:
An existing lighting mod .package file of your choise
Alternatively a custom world that has custom lighting in it that you want to use and convert into a standalone lighting mod
// Disclaimer: This tutorial goes through the basics and covers all the INI files, within the files you can find things like fog, sunset & sunrise, bloom, sea depth, dive lot visibility, clouds, flythrough, weather changes, moon/sun size etc.
This is suuuuper text heavy and I don’t want to block your dashboard feed with endless scrolling, so all the info is under the cut. Apologies for the wall of text that looms underneath, I debated if I should chop this down into 3 parts, but I decided to keep this as it is.
1. UNDERSTANDING THE FILES
INI files are the technical side of lighting mods and you can really fine tune how the light and colours work. INI files control things such as fog, water murkiness, sunrise and sunset etc. Some premade lighting mods may not even have all these files in them or the creator didn’t keep the names intact, so do not panic if you cannot find all of the files listed here! Also some INI files are coded differently depending on which EA world they originally came from, so if you are missing some lines or see different wordings being used that’s the reason why. I will go through each and every INI file in detail what they do so you can then decide whether or not you want to edit them/create them yourself or if you are happy to leave them as is.
1. Some of the INI files have loads of text so I won’t be copypasting them all here, you ought to just open them in Notepad to follow that particular INI’s explanation as otherwise this text heavy tutorial would be even longer and you would die of old age before we get to the end.
GLOBAL FILES
WorldSpecificParams
S3_1F886EAD_00000000_3EC0CF0CC4A6540F%%+_INI.ini
This is what the INI file looks like in Notepad:
[WorldSpecificParams] LotLODHeightThresh = 400; GameEntryFlyThrough = 2;;;;;;;;;;;;;;;;;;;;;;;;;;;;;;;;;;;;;;;;;;;;;;;; ;; [LotRenderSettings] ; Color of wall tops (r,g,b) each in [0,1] range WallTopColor=0.0 0.0 0.0
If the creator of your lighting mod has kept the names intact, this file is probably called LotRenderSettings and that weird looking stuff above configures:
-Lot LOD Height Threshold -Determines which pre-programmed flythrough your world will play -Building Wall/Roof Colors
Still confused? More in depth notes:
LOD distance determines exactly when the transition between high detail and low detail will occur, I would just leave this as it is.
EA worlds usually do this little nifty flythrough when you open the map for the first time and you can pick one for yours too! This setting simply picks a premade one to use, you cannot edit the path yourself in this particular INI, it’s determined in the next INI file so you can make your own custom flythrough for your world.
WallTopColor is literally just the color of the edge of the top of the wall, does not impact roof or any other colours.
FlyThrough
S3_1F886EAD_00000000_7886A7F59355762F%%+_INI.ini
This is called FlyThrough, not all lighting mods have this unless it’s extracted from a specific world. I won’t copypaste the text from the INI here as it’s a long one, it configures:
-Path of Camera during the world introduction
Notes:
This INI file has nothing to do with weather, it’s there just for custom flythroughs and should be imported into a world file rather than in to a stand alone lighting mod
How to set it up -> Tutorial
Tunable Parameters Related to Lighting
S3_1F886EAD_00000000_5E4F8E7B226066CA%%+_INI.ini
[Lighting] SunlightScale = 0.90; ;;was 1.0 old change was 1.25 AmbientProbeScale = 1.0; ;;was 1.0 LightProbeSaturation = 0.4; GrayscaleProbeIntensity = 0.5;
BloomRampIntensity = 1.0; BloomRampThreshold = 1.60; Gamma = 0.4f;
; Used currently for FullMoon lighting [Lighting1] SunlightScale = 1.32; AmbientProbeScale = 1.0; LightProbeSaturation = 0.3; GrayscaleProbeIntensity = 0.3; BloomRampIntensity = 0.2; BloomRampThreshold = 1.9; Gamma = 0.23f;
This file is called TunableLighting and configures:
-Sunlight Scale -Ambient Probe Scale -Light Saturation -Grayscale Intensity -Bloom Ramp Intensity/Threshold -Gamma level -Then the same settings again, but applied to the night time lighting instead
Notes:
Keep in mind all these settings within this INI file are global and will impact each and every weather type setting, for example if you want gloomy stormy weather it is perhaps easier to edit the IMG colour ramps for gloomy atmosphere.
Some lighting mod files have the following note added above Gamma & Bloom “These parameters are currently not working”, while other mods do not mention it at all, so whether or not Gamma actually does anything is still a mystery to me. If it does something it’s barely visible or I have done something wrong, if anyone has more info please let me know! Bloom is a bit of a mystery too, but more on that later.
Sunlight scale impacts the overall brightness and can add a rather unpleasant blinding bloom to some objects if it’s set too high, so if that is happening in your world you might want to lower this setting.
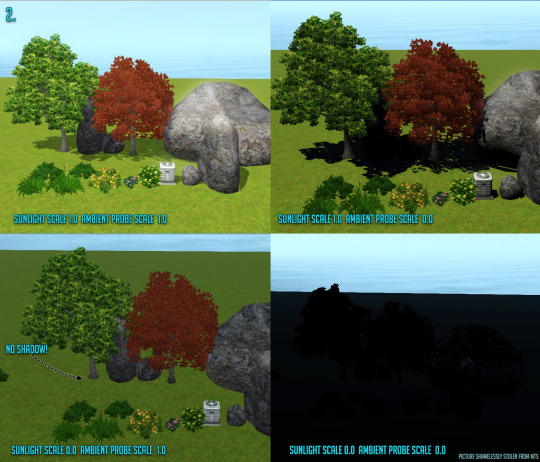
AmbientProbeScale controls the scale of ambient lighting part, which is the second and third bar of IMG Colour Ramps. This is the base environment lightness without sunlight. However, keep in mind that SunlightScale=0 will result in no shadow, no matter what value you set the AmbientProbeScale to be. (Picture #2)
LightProbeSaturation: This is an odd one, it adds violet colour tint to GrayscaleProbeIntensity. If someone has more information about this setting, please let me know!
GrayscaleProbeIntensity seems to be lighting from the ground, controlled by AmbientProbeScale. Very high value can show effect in daylight too. Confusing? Yeah! Basically the ground also radiates light ever so slightly! Hello Chernobyl, woo! (Picture #3)
I’m fairly sure that this setting partly draws from the IMG colour ramps and lowering it will reduce the intensity of bloom colours. Testing in CAW gave me mixed results, but one thing that is sure that it does add a little bit of bloom to actual light sources at least. If you do go lower than 0.2 the white light colour on light bulbs may look odd.
The little notes in between do not alter the mod in anyway, for example “;;was 1.0 old change was 1.25″, are simply notes made by the creator, logging what kind of changes they have made to the original numbers. So if you change something feel free to use such notes too in case you want to revert back and don’t want to lose the original numbers.
Tunable Parameters Related to Sky
S3_1F886EAD_00000000_5E20253AF53E517F%%+_INI.ini
;;;;;;;;;;;;;;;;;;;;;;;;;;;;;;;;;;;;;;;;;;;;;;;;;;;;;;;;;;;;;;;;;;;;;;; ;; Tunable Parameters Related to Sky ;;;;;;;;;;;;;;;;;;;;;;;;;;;;;;;;;;;;;;;;;;;;;;;;;;;;;;;;;;;;;;;;;;;;;;;;;;;;;;;;;;;;;;;;;;;;;;;;;;;;;;;;;;;;;;;;;;;;;; ;; [MiscSkyParams]
This file is called TunableSky and has loads of text in it, so I won’t copypaste the whole thing here! Configures: -Sun/Moon Radius -Sun Halo Radius -Sun/Moon Degree Offset -Starfield Degree Offset -Sunlight Transitions and Shadow parameters -Lunar Cycle Length -Moon Reflection factor -Horizon Skew Factor -Distance to which the sun or the moon can approach the horizon (Horizon light Minimum) -Sunset Dimming Speed -Sunrise/Sunset Time -Amount of time before/after Sunrise/Sunset the sun controls Light Direction -Weather Change Intervals -Bloom Threshold and Slope (Must be between -1 and 0) -Heat Shimmer -Undersea Fog
Notes:
I feel most of these are self explanatory and they are explained in great detail within the INI file itself, so I won’t go into these further unless someone has any questions about these?
Be careful when changing the size for Sun/Moon radius, if made too big it might cause lag.
Sun Halo no longer works, safe to ignore completely.
Offset setting does not make Sun/Moon/stars to travel closer to the ground, it just shortens the arc they travel: A / ���  ̄ \ B vs A /  ̄ \ B
Sunrise/Sunset Time allows you to change how long your days are. I like having long days, so I usually set the sun to rise at 5 in the morning and sunset at 21 in the evening.
Weather Change Interval allows you to set how often the weather changes, I don’t like having sunshine all day every day, so my weather changes every 6 hours, but I believe EA default is 8.
If you want to have heat shimmer effect like Egypt has, you can add the following line: HeatShimmerDistance = 600 However, there is no way of determining a specific time when the heat shimmer appears, but alas, it’s EA and their spaghetti coding we are talking about here so you can either have it on all the time or not show at all.
This is the important part for dive lots! Some INI files have the following line added at the very end of it to control dive lot vibisiblity and if yours does not have it simply copypaste it at the very end and you can tweak the numbers to your liking, but this set should give you a nice clear diving lot. [UnderSeaFog] UnderSeaFogStartDist = 10.0 UnderSeaFogEndDist = 82.1 UnderSeaFogFalloffPower = 0.42
Tunable Parameters Related to Sea
S3_1F886EAD_00000000_D89F9D186B7BB372%%+_INI.ini
;;;;;;;;;;;;;;;;;;;;;;;;;;;;;;;;;;;;;;;;;;;;;;;;;;;;;;;;;;;;;;;;;;;;;;; ;; Tunable Parameters Related to Sea ;;;;;;;;;;;;;;;;;;;;;;;;;;;;;;;;;;;;;;;;;;;;;;;;;;;;;;;;;;;;;;;;;;;;;;;
;;;;;;;;;;;;;;;;;;;;;;;;;;;;;;;;;;;;;;;;;;;;;;; ;; [MiscSeaParams]
This file is called TunableSea and again it has loads of text in it, so I won’t copypaste the whole thing here. This INI configures: -Sea Params -Normal Map texture Coordinate Scales -Time Scales for Normal map levels 1&2 -Normal Scales for Levels 1&2 -Water Angles in Radian for Normal levels 1&2 -Wave height -Time and World Scale for Big Waves -Noise Offset for Wave Ripples -Global Scaling Rate for waves -Wave Time Scales -Sun vertical stretch factor (How far does the sun reflection stretch) -MIP Level -Water Depth factor -Refraction Distortion -Shoreline Depth Settings
Notes:
The majority of how these parameters work is covered in the INI file and I haven’t experimented with the waves myself, so I cannot be much of help with these I’m afraid. If anyone else wants to chime in, please do, and I will add in your findings!
Levels 1&2 are the bump maps used for the sea texture, if you change these figures you can change the direction of sea flow. There seem to be two wave textures, and changing how they are angled to each other can change the way the sea appears.
Level 1 and 2 are wave/bump textures for the ocean.
MIP level setting no longer works, it’s safe to ignore this one completely.
Water Depth factor means how deep the water is until the haze shows, in other words how clear or murky the water is depends on how deep you have to go before the water is coloured. Really confusing, yeah? If you look straight down to the water it’s either completely clear and you see the terrain at the bottom or it’s one strong colour and you cannot see the terrain below (what this setting is really about), but when you look across it's probably a combination of several colours. The colour in the latter case is determined by the atmospheric colours as well as the sea murk colour: In Sunset valley the murk is blue, in Bridgeport grey. The water colour is controlled by both this INI file (it will not change the water color, but it will increase the depth of the water) and IMG colour ramps (colour of the water, the sun's reflection colour, the horizon fog colours, the sky colour). In the basegame files, the waterdepthfactor is set to 10. However, there seems to be a typo in the INI file notes conserning the Water Depth as it states the following: ; Lower numbers mean murkier water. But lower numbers = clearer water, or at least the water will not get murky until you go deeper. So, if you have a figure 2 in here, shallow lakes will look clear, whereas a figure 10 will make shallow lakes have some murk. Warning: If you set this figure low (1) as in Bridgeport, you could find that parts of the map edge will show beneath the water. This is not so apparent if the water is deep, but where the water is shallow it could be undesirable !! Important !! This setting does NOT impact dive lots and how clear the water is in there! As weird as it is, the setting for that can be found in the above INI file, TunableSky.
WEATHER SPECIFIC FILES
1-5 Sibling Weather Type Files
Clear S3_1F886EAD_00000000_967BC6C3B3808C00%%+_INI
Partly Cloudy S3_1F886EAD_00000000_560C0FD7012DA7F3%%+_INI
Overcast S3_1F886EAD_00000000_8DEA7AE7631A026A%%+_INI
Stormy S3_1F886EAD_00000000_2C02B3532B64EB49%%+_INI
Custom S3_1F886EAD_00000000_FE1F6A95A24A604A%%+_INI
Some of these INI files may have different wordings/notes at the very top depending on whose lighting mod you are editing and which files they have used to create them. Again these INI files have loads of text, so I will only copypaste the top bits so you can see what I mean by random wording at the top, but it makes no difference technically (You could go as far as deleting these random lines as sometimes they just cause more confusion than help since some of these notes states partly cloudy, but that INI file is actually for the clear weather) and each one works the same way (numbers are different in each one because these just happens to correspond to different weather types) .
[MiscParams] StarIntensity = 120 ManmadeLightIntensity = 48 ProbabilityWeight = 0.15 DaytimeBloom = 0.0
or
;BRIDGEPORT [MiscParams] StarIntensity = 75 ManmadeLightIntensity = 48 ProbabilityWeight = 0.4 DaytimeBloom = 0.2
or
;Sky Test From PARTLY CLOUDY
[MiscParams] StarIntensity = 255 ManmadeLightIntensity = 48 ProbabilityWeight = 0.85 DaytimeBloom = 0.0
These are the WeatherType files and they are related to the IMG ramp files, each one has a sibling IMG file and they configure:
-Star Intensity -Manmade Light -Probability Weight -Daytime Bloom -Cloud Layers -Fog Notes:
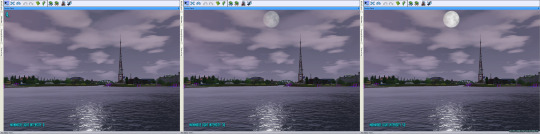
Confusingly enough Manmade Light Intensity seems to impact the Moon much more than lot lighting or street lights. When set to 0 the moon vanishes (although you can see a dark disc against a cloud), and for ManmadeLight Intensity 50 the moon is at it’s brightest. Going above 50 makes no difference. (See picture #4)
Probability Weight controls how often the weather type cycles in, higher the number - more common. So 0.1 would be rare (But it would still occur every now and then nevertheless) while 1.0 is a very high probability.
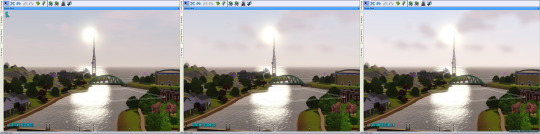
Daytime Bloom seems to impact the sky and the sun whilst having no impact on objects or the landscape. (See picture #5)
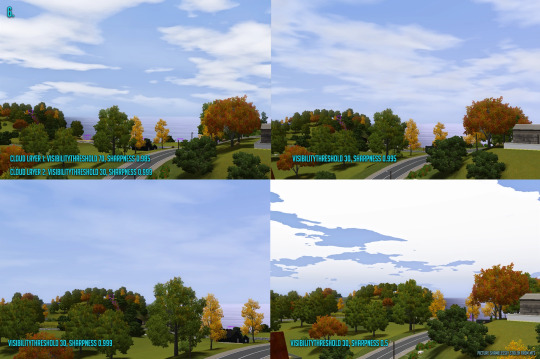
Sky_[type]1.ini controls the lower layer of clouds and sky_[type]2.ini the upper layer. The value set for VisibilityThreshold will determine how dense the layer of clouds is. The higher the value the thinner the layer of clouds - ie. set it to 255 and there will be no clouds at all whilst setting it to 0 will produce a heavily overcast sky.
Sharpness controls the clouds' opacity and if you set it to 1 and there will be no visible clouds. The higher the value the 'whispier' the clouds. The sharpness settings are quite sensitive and even changing the value the slightest bit has quite noticable effects.(See picture #6)
A negative value for the CloudLayerScrollRate figure will give a reversed cloud direction, meaning that it gives the seething stormy sky effect, with the cloud layers going in different directions and at different speeds. Example of stormy clouds with the effect described above: Cloud 1 [CloudLayer1ScrollRate] texCoordU=0.03 texCoordV=-0.065 Cloud 2 [CloudLayer2ScrollRate] texCoordU=-0.009 texCoordV=0.008
Finally, the fog. Fog does not only mean the fog you see in the air, but it also impacts water murk. Fog distance is set to be close on some of the weather types, which means that the fog affects the water (making it foggy but transparent, and removing the water 'murk' which the WaterDepthFactor controls). Note that if you have very close fog, for example start 100 end 500, water becomes transparent and takes on the colour of the fog. This might not be what you want as it can reveal the edge of your world and/or your seabed which does not look nice at all. If it happens then you have two remaining choices: 1) Make your water deeper and paint the seabed 2) Change the fog distances for each weather type.
For the fog details, the start figures are very low; 10-30. If you experiment with raising those figures (100-500 perhaps) then you'll see that the water will become less transparent/fog affected, and the water 'murk' will take over. Still not what you want? Then try making the fog start at 500 and end at 2000, that should give you the water colour back (See picture #7, #8). Dealing with the fog can be really time consuming and rather annoying too, you just have to find the start and end point that gives the effect you are after.
Try keeping the fog curve at 1, as that will make the fog more linear as opposed to fading out. (See picture #9)
Note that there is a time of day parameter too; that relates to hours so timeOfDay = 16 gives the fogginess at 4PM. You could add or remove sets of fog numbers according to how you want it to change, so for example if you wanted to specify that it gets foggy once every two hours, you could insert blocks of numbers and change the time of day to specify this. But remember the more changes you have, the more it will lag on low-end machines.
!! Sometimes no matter what you do, water goes transparent when there is fog present then that is down to the fog distance. This is because there is a rendering conflict - the game can't render the water depth colour and fog colour simultaneously, so one has to take precedent. Yay EA noodle coding!
2. EDITING AND COMPILING THE FILES
Before making any changes, make a backup copy in case shit hits the fan.
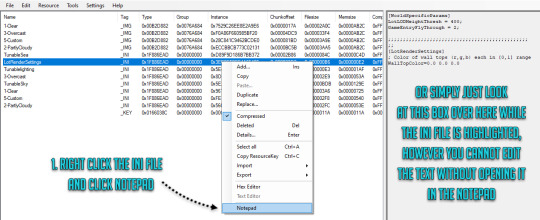
1. Open your lighting mod .package in S3pe. This time around we will ignore IMG files and you can either just right click one of the INI files and choose “Notepad” (Alternatively extract all INI files into a folder somewhere, open in Notepad or some other text program, then import them back after editing).
2. If you are unsure about doing the changes you can write little notes within the INI file as long as you start the line with the symbol ;
For example ;; Affects the sunlight transitions, especially for shadows. ;; ------------------changed was 5.0 , 5.0, 0.5, 1.0 SunDegreeMovementStep = 5.0 SunDegreeMovementBlendThreshold = 5.0 The bit in bold would not impact the code at all, it just serves as a note for yourself so you can change back to whatever number it was before.
3. Make your changes, save, close the notepad and agree to commiting to changes when the pop up appears. 4. Save in S3pe too, then close S3pe.
5. Drop your .package in your mod folders and test it in game.
//Optional!! I find it easier to test my lighting mods in CAW as it fires up faster than the game does, so if you are familiar with CAW you can alternatively test your stuff there as well. Rather than importing files into my current CAW world that I am working on I usually create a dummy test world for this purpose. Either way go to -> Documents\Electronic Arts\The Sims 3 Create A World Tool\UserToolData\Worlds and find your dummy.world file, right click it to change the name to dummy.package and open it in S3pe, import your lighting mod package into it and save. Close S3pe, change the name back to dummy.world, open CAW and open your dummy file. Pop out the Time of Day panel and you are good to go!
FILE NAMES
//IMPORTANT!! Having the IMG .dds file in the wrong format or not having the correct file names could cause strange graphical effects as well as game crashing. To clarify, having the colours appear unusually saturated is sometimes a symptom of an incorrect file format on the IMG .dds colour ramp files. Try saving them again, they need to be 32 bit A8R8G8B8 file, no mip-maps. Double check that you have all the files needed and that your file names are correct, especially the sibling files!
Clear weather type INI: S3_1F886EAD_00000000_967BC6C3B3808C00%%+_INI.ini Instance number: 0x967BC6C3B3808C00 IMG: S3_00B2D882_0076A684_7529C26EE8E2A9E6%%+_IMG.dds Instance number: 0x7529C26EE8E2A9E6 Partly cloudy INI: S3_1F886EAD_00000000_560C0FD7012DA7F3%%+_INI.ini Instance number: 0x560C0FD7012DA7F3 IMG: S3_00B2D882_0076A684_ECCBBCB773C02131%%+_IMG.dds Instance number: 0xECCBBCB773C02131 Overcast INI: S3_1F886EAD_00000000_8DEA7AE7631A026A%%+_INI.ini Instance number: 0x8DEA7AE7631A026A IMG: S3_00B2D882_0076A684_F0A86F660985BF20%%+_IMG.dds Instance number: 0xF0A86F660985BF20 Stormy INI: S3_1F886EAD_00000000_2C02B3532B64EB49%%+_INI.ini Instance number: 0x2C02B3532B64EB49 IMG: S3_00B2D882_0076A684_E422CDDE7FE1F25F%%+_IMG.dds Instance number: 0xE422CDDE7FE1F25F Custom weather type INI: S3_1F886EAD_00000000_FE1F6A95A24A604A%%+_INI.ini Instance number: 0xFE1F6A95A24A604A IMG: S3_00B2D882_0076A684_28C841C9462BCDE0%%+_IMG.dds Instance number: 0x28C841C9462BCDE0
Oh my god, you made it to the end! Rejoice! Let me know if you know a better way of doing things, have information that is missing from the wall of text above or noticed I have made an error in this tutorial! I’m happy to answer questions too if you have any!
127 notes
·
View notes
Note
can you teach us how to edit the background colorful as yours? i saw your answer somewhere in your blog sometime ago, but i can't locate it again ;=; thanks for the attention thou
Hey hey! I think this is the tutorial you’re looking for. It’s not outdated, just horribly explained. So I’ll try to explain better for everyone + I’ll talk a little bit about my editing.
Disclaimer: I use photoshop cs2 (I’m outdated, but it gets the job done lol)

Setup!
Here’s all I use to take my pictures:
backdrops by @helgatisha (I also use these)
teleport mod by scumbumbo / updated by Andrew’s studio
studio lights updated by @raspberi
pose player by andrew’s studio
📷: Here’s my setup. (It’s on a 10x10 lot.)
There’s other methods, but all I do is use a backdrop (mostly based on the sim’s outfit) and call it a day.
Editing!
Here’s my editing resources:
Pop! (.action ver.) by @virtuchem (cas ver.; to brighten my edit)
*All in one by @pleyita (for the radial gradients)
Fake it! by @poolbrop (for 3d effects)
*Scroll to the bottom until you see “photoshop psds”.
My editing preference is very minimalist, bright and colorful. It’s also heavily based / inspired by ts3 simblr editing and magazine layouts.
📷: Here’s a before & after of an edit.
My inspirations were(and still are) freysims, @sims3melancholic, @wundersims and @melltokio before I joined the sims community 💕
And that’s pretty much it!I hope this is helpful in some way and that I explained a little bit better. My setup + editing might not work for everyone, but make sure to find something you’re comfortable with and not stress out over a style. Not worth it.
Oh, and thank you so much for the compliment, it’s much appreciated! 😊💕
97 notes
·
View notes
Photo


👻 DOWNLOAD: SIMFILESHARE
Requires ReShade 3.0
Installation tutorial
Designed specifically for TS4 gameplay screenshots, but will probably work for TS3 as well
👻 INFORMATION
DOWNLOAD OPTIONS
DRAMA: This works best in daylight and other well-lit environments. This can also be used to brighten dark scenes.
DRAMA_NIGHT: This works best at night or in dark environments with minimal light sources. I recommend using grain and bloom. You may teed to tweak bloom if the light source in your scene is too bright.
TOGGLE HOTKEYS
SHIFT + 1 — Ambient Lighting
SHIFT + 2 — Depth of Field
SHIFT + 3 — Tilt-Shift
F — Gradient Desaturation
G — Grain
H — Chromatic Aberration (3D)
B — Black & White
N — Bloom
RECOMMENDATIONS
I personally think Night, Gradient Desaturation, and Black & White modes look best with grain.
When Depth of Field is on, use your mouse to adjust the depth.
I recommend using @buckleysims Tab Mode Camera Mod for better screenshots.
👻 INSTALLATION HELP
Place the .ini files in your The Sims 4 > Game > Bin folder
ex.: C:\Program Files (x86)\Origin Games\The Sims 4\Game\Bin
Run your game
Turn off edge-smoothing and post-processing effects in options
Press ‘SHIFT + F2′ to open the ReShade menu
Select the preset from the drop-down menu
Take screenshots using ‘Print Screen’
👻 CREDIT
ReShade
4K notes
·
View notes
Text
@amphorasims, thank you for your lovely comments! Right now for Sims 2, I’m using two environmental mods, a camera mod, and several objects to make the neighborhoods much prettier:
Voeille’s water mod
Criquette’s Better Nightlife Mod
These camera mods
These skylines
This Skyfix
These skyboxes
Moving clouds
This terrain default
Default neighborhood trees
I intend to install dDefinder’s radiance lighting mod, but I haven’t yet.
This tutorial is fantastic for giving neighborhoods a more open-world look and feel!
Also, since Sims 2 is an older game, I can run it at its maximum graphics settings without a problem (something I have never ever been able to do on TS3), so that helps too!
12 notes
·
View notes