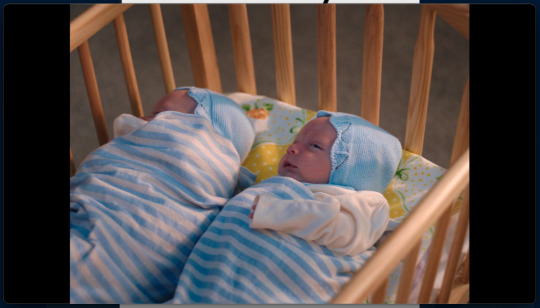
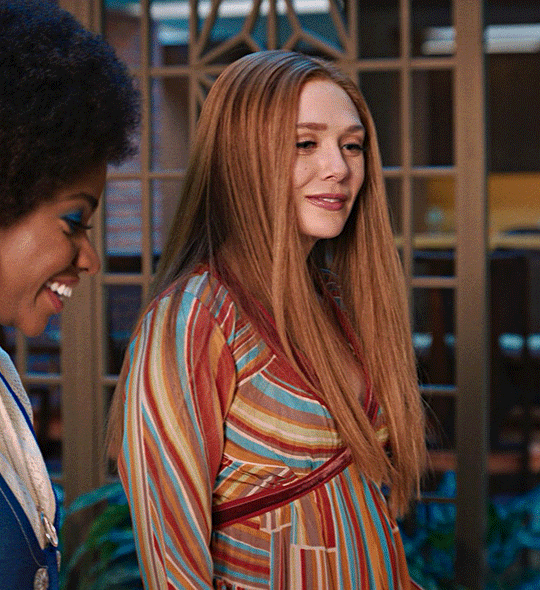
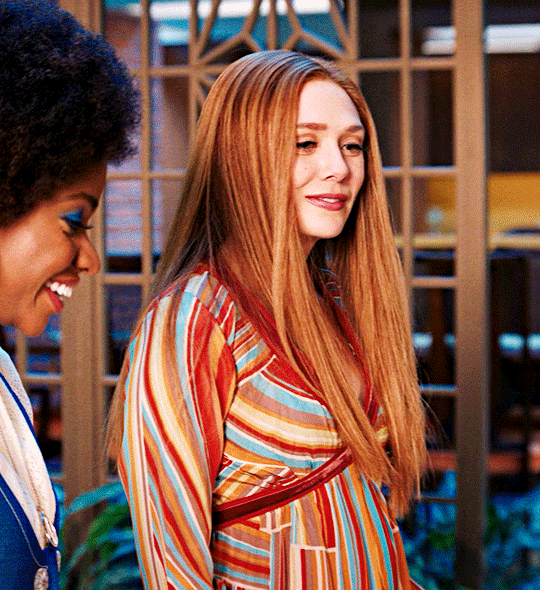
#trying smth new w the colour i like the general direction
Text

a little bit of downtime w the elf <3

#gigolas#gimleaf#gimli#gimli son of gloin#gimli gloinsson#legolas#legolas greenleaf#legolas thranduilion#lotr#lord of the rings#art only#i felt like drawing gimli sewing and them snuggling yaayy <3#trying smth new w the colour i like the general direction
399 notes
·
View notes
Note
Hi Nia! You're gifs are so pretty! Is it possible for you to show how you get your WandaVision gifs too look so clear and hd? And how do you do your colorings too? (specifically the wanda maximoff in episode 3 gifset ITS GORGEOUS) I'm new to giffing and all the tutorials are kind of old. It's okay if you don't want to though! I understand it may be time consuming.
omg no! never feel intimidated to ask!! i don’t mind at all!
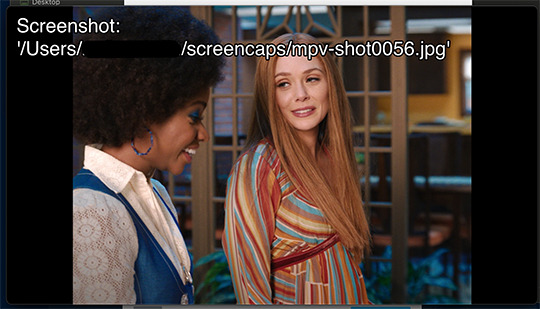
so, i’m going to show you how i made and coloured this gif
mostly bc it’s the only gif in that set w text and i’m going to share my text settings too!
tutorial is below :)
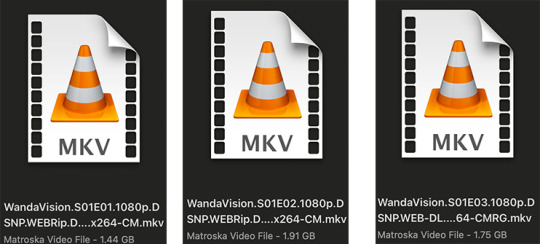
WHAT KIND OF VIDEOS ARE BEST?
.mkv files (the bigger the better BUT i usually think anything above 5 gb is excessive and unnecessary for an episode of television BUT for a movie worth it)
itunes downloads (logolesspro on twitter, hd-source on tumblr, live-action-raws on tumblr have some DEPENDING on what you’re looking for) (also, there’s a chance that if you search "show/movie hd download tumblr” you’ll find a tumblr with its itunes download available)
THAT IS IT NO OTHER TYPE OF FILES MAKE YOUR GIFS LOOK GOOD
- my suggestion is always if its new (like just came out the past month) t*rrent it! it’ll be downloaded quickly and .mkv files look the best! BUT if not check the sources above see who has the BIGGEST file if they even have what you’re looking for and then if not then you look to t*rrenting!!
here are the wandavision files i use so you can see!!
SCREENCAPPING
-if you have windows use potplayer! i have a mac so i can’t show you how to use it and it’s not available for me :( HOWEVER back when i had a windows potplayer was the best method in screencapping!!
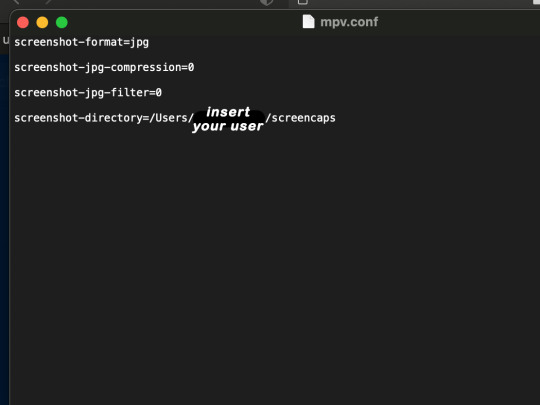
-I HAVE A MAC! so i use mpv!! (go to mpv.io and follow the directions) BUT DON’T DOWNLOAD THE LATEST ONE (it has a bug that skips frames) try each before the latest one bc from what i heard different ones work differently for everyone!! and i don’t know which one i use (yikes!) THERE ISN’T THAT MANY I PROMISE AND IT’S WORTH IT BC MPV IS THE BEST (i used to use adapter but they didn’t take impressive screencaps in my opinion and it was evident in my gifs you can see it too! )
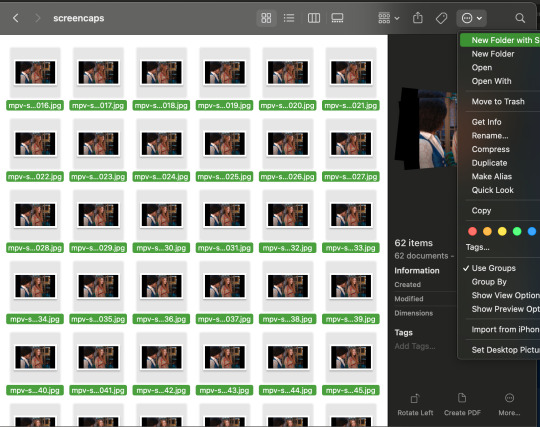
create a folder for your screencaps! and make sure to rmb the directory order! now we want to create a text file on our built in textedit app on mac! type up all this down below (i like jpg but you can replace jpg w png if you want) AND SAVE THE FILE AS mpv.conf THIS IS IMPORTANT SO DON’T FORGET IT! save it somewhere you’ll find easily and NEVER delete it until you don’t use mpv anymore
just in case you don’t know what to insert after, go to your screencaps folder
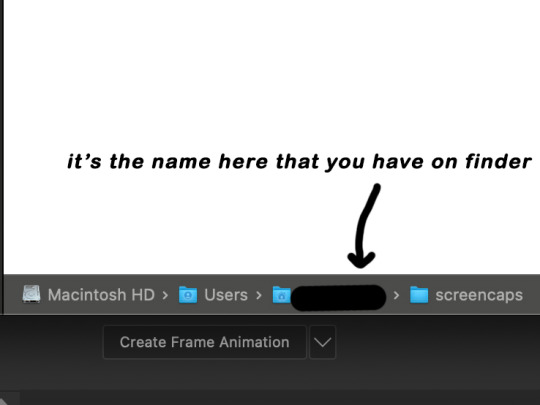
now you want to open mpv and go to the corner towards mpv -> preferences and they’ll tell you that there is no .conf file SO GO LOOK FOR THE TEXT FILE WE JUST MADE AND DRAG IT TO THE FOLDER THEY OPENED FOR US AFTER SAYING THERE IS NO .CONF FILE
(i learned all this from @kylos tutorial!! so if any of what i just said about setting up mpv makes NO SENSE to you check out their tutorial at kylos(.)tumblr(.)com/post/178497909311)
now we can screencap!
so let’s find the scene we want RIGHT BEFORE and MAKE SURE SUBTITLES ARE OFF
i pause and then press (option/alt + s) and then SCREENCAPS ARE BEING TAKEN!! and to end the screencaps being taken you once again press (option/alt + s)!!
now we want to delete the excess frames! and put it all into one folder!! DO NOT DELETE FRAMES IN THE MIDDLE OF WHAT YOU WANT TO GIF!! WHEN YOU SKIP FRAMES IT WILL BE NOTICEABLE!!

MAKING THE GIF
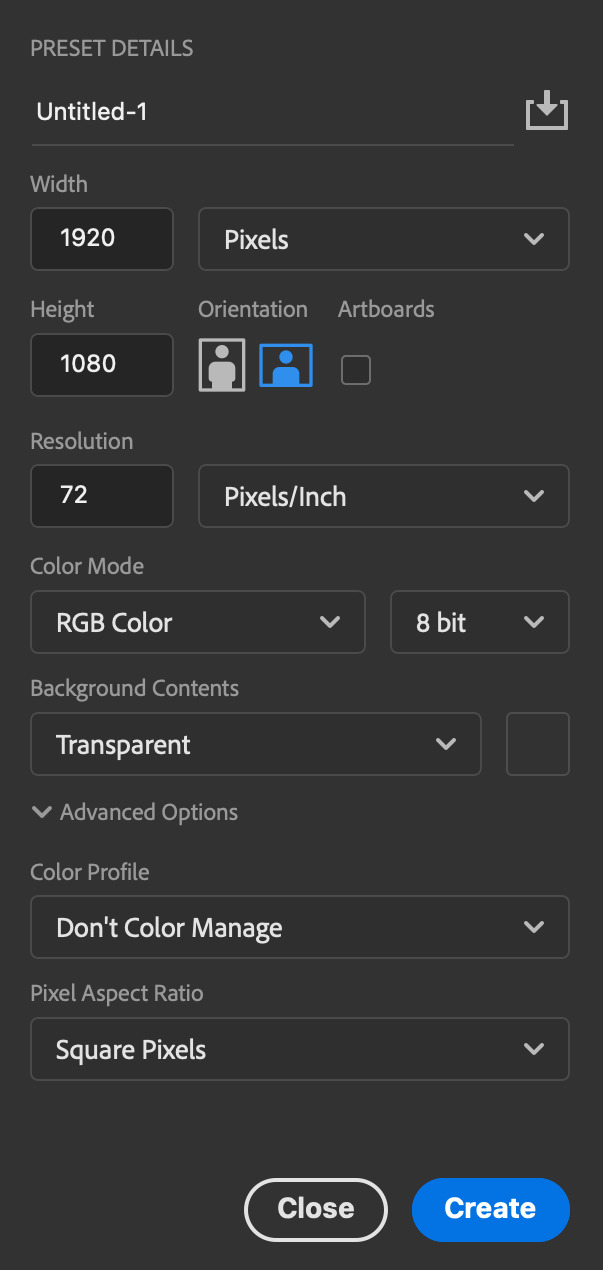
this method isn’t used that much BUT I LOVE IT so this is how i put my frames in! first i check to see the size of my frames: 1920 x 1080

so i create a NEW file on photoshop with those dimensions w these settings
now i set my tool on photoshop to path selection tool bc if you have it set on smth like move tool or crop tool at the end you might end up moving or cropping frames you don’t want to!

ok so now we select ALL our frames and drag it on top of our new file on photoshop and the MOMENT we see our first frame in photoshop JUST KEEP CLICKING ENTER until all the frames are loaded!!

you can do file -> scripts -> load files into stack but it is WAYYY slower in my opinion!
now i crop out the excess BUT i don’t resize the gif yet! the dimensions wandavision is filmed in is 4:3 so i go to crop and set the settings to this:

MAKE SURE IT’S ON RATIO SO WE’RE PRESERVING THE ORIGINAL SIZE JUST CUTTING OFF THE BLACK EDGES!! We are going from 1920 x 1080 to 1440 x 1080 this is the dimensions after i cropped

WE ARE KEEPING THE QUALITY BY NOT CHANGING THE DIMENSIONS OF ANYTHING INSIDE !!
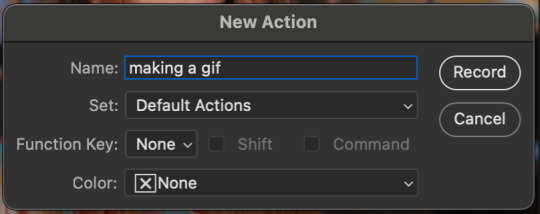
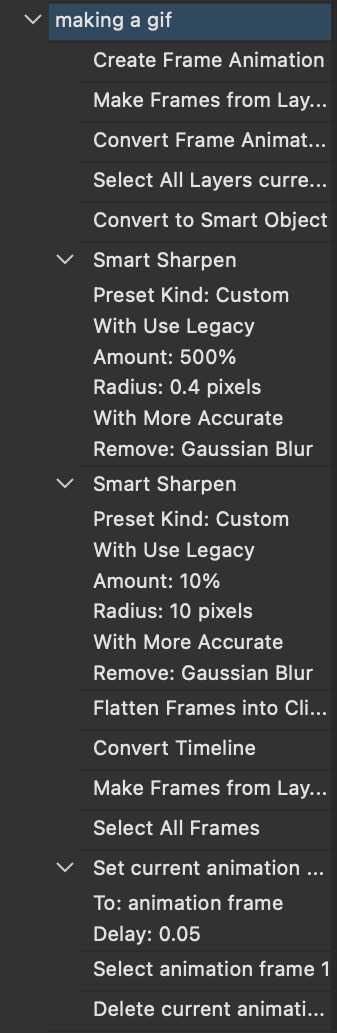
now we want to go to actions and create an action!! open up actions w one of these two depending on what your dash looks like!!


so we create an action with this button on the bottom of actions and we’re gonna title it making a gif and hit record!!

NOW LET’S GOOOOO!!
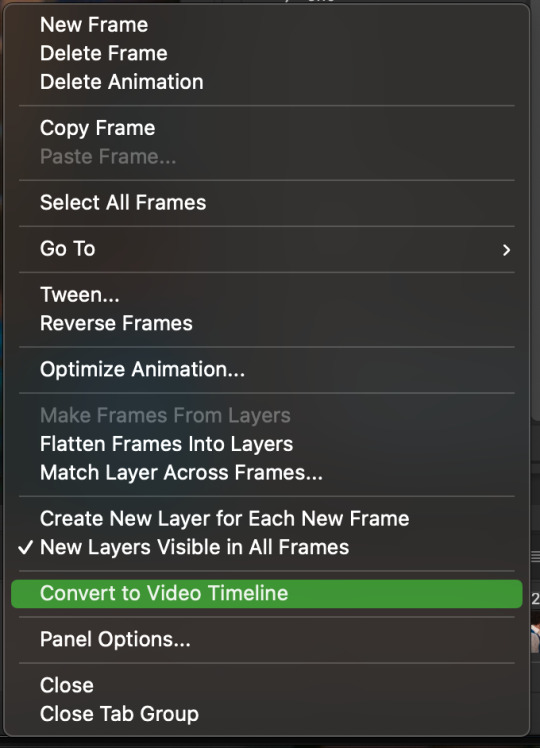
1. make sure you have timeline on your dash!

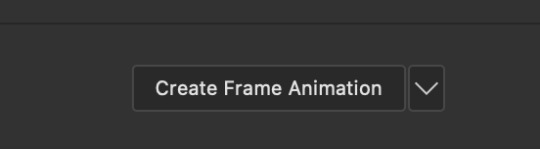
2. create frame animation (if you see create video timeline just click the arrow next to the button to see your other option which is frame animation!!)
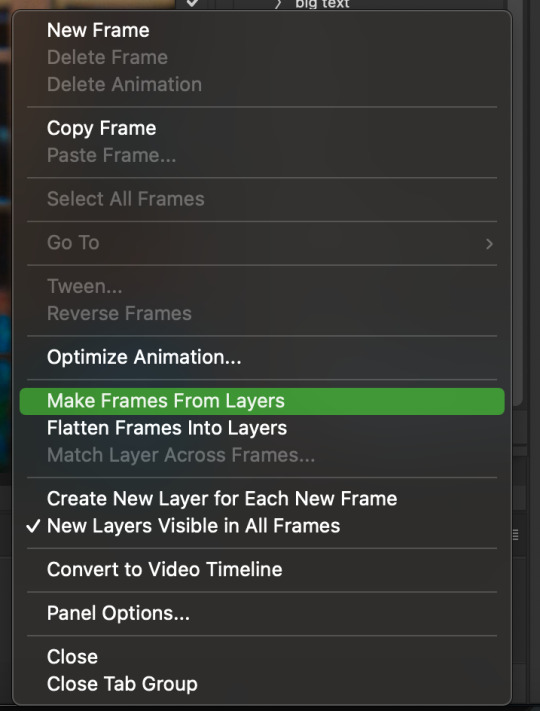
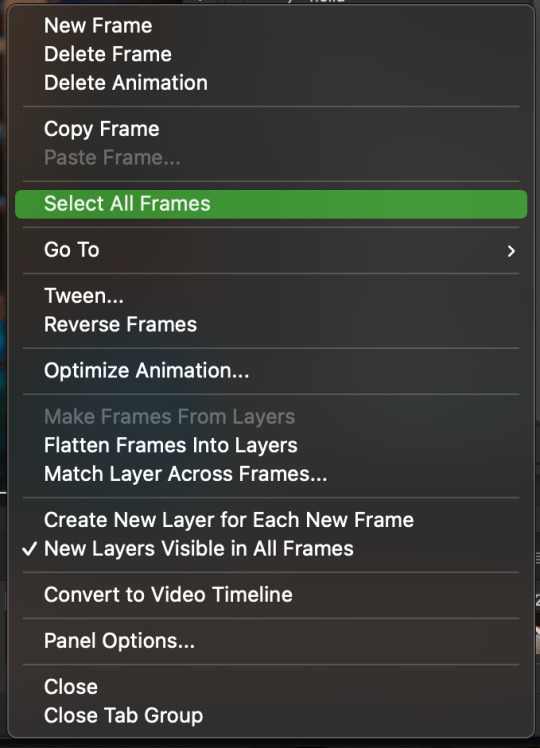
3. now let’s meet our best friend!! the little bar in the top right corner that has all the commands for making our gifs and MAKE FRAMES FROM LAYERS
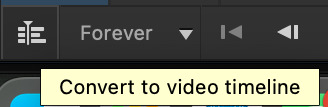
4. WE HAVE TO SHARPEN OUR GIFS NOW BUT TO DO THAT WE NEED TO CONVERT TO A SMART OBJECT SO NOW WE ARE GOING TO CONVERT TO VIDEO TIMELINE there are two ways: the button in the bottom left corner or the button in the top right corner w all the other commands!
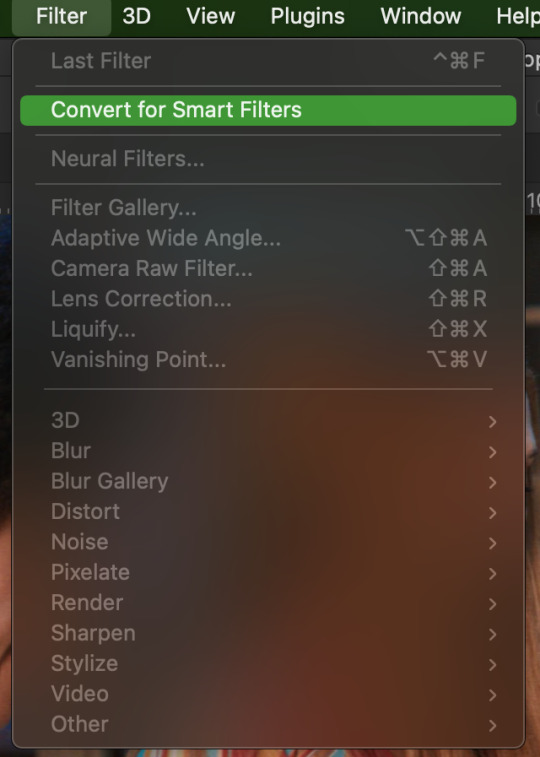
5. select -> all layers DON’T MANUALLY SELECT THEM ALL BC THE ACTION WILL ONLY SELECT THAT SAME NUMBER OF FRAMES SO IF THERE ARE MORE FRAMES YOU WON’T GET THEM IN THE SMART OBJECT!!

6. filter -> convert for smart filters
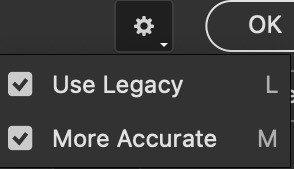
7. NOW WE SHARPEN!! (filter -> sharpen -> smart sharpen) i sharpen twice!! first, make sure we are on legacy w more accurate and remove gaussian blue! the first sharpening will be 500% with 0.4 px radius. NOW SHARPEN AGAIN (filter -> sharpen -> smart sharpen) also w legacy, more accurate and remove gaussian blur BUT this time 10% with a 10.0 px radius!


8. it’s hd now!! so let’s flatten frames into clips!! go to the top right magic button again!! and you should see a pop up saying layers are being made
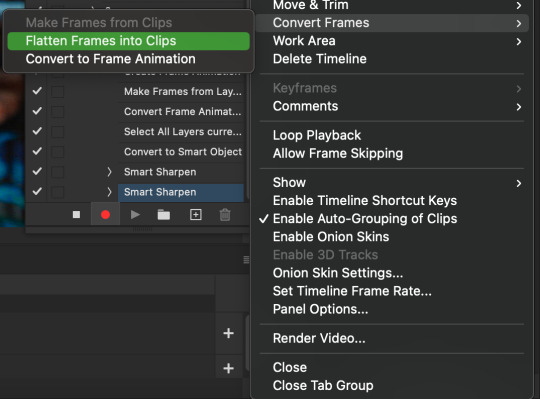

9. now we convert back to frame animation w either the bottom left button or our magic top right command center!

10. make frames from layers

11. select all frames w our magic command button
12. set the animation delay to 0.05 THAT IS THE BEST ONE ALWAYS ALWAYS ALWAYS only use 0.06 when the character is moving really fast in the video itself and it makes the gif itself look awkward BUT NEVER GO ABOVE 0.06 it’ll look slow and laggy and we don’t want that and don’t go below 0.05 bc then it’ll be tooo fast and we don’t want that either!


13. now delete the very first frame on the timeline bc it is an oversharpened duplicate of the second frame! end the recording w this button!

this is what your action should look like expanded! if you made mistakes on the way and it shows up you can just click the specific step and press the trash can on the action tab to delete in from the order!!
NOW AFTER LOADING YOUR FRAMES AND CROPPING THE EDGES OF YOUR FRAMES IF YOU NEED TO JUST PLAY THE ACTION AND THEN YOUR GIF WILL BE MADE FOR YOU!!!!
now i delete some unnecessary frames in the beginning and end and this is what my gif looks like (the size was 46 mb and the limit is 10 mb so the dimensions of the gif are 540 x 405 to get it to 5 mb BUT I HAVEN’T CROPPED IT YET SO THIS IS ME CROPPING JUST TO SHOW YOU WHAT IT LOOKS LIKE)

CROPPING THE GIF
in my opinion if you want your gif to look hd you shouldn’t crop before you sharpen!! i believe that if you crop before you sharpen you don’t allow photoshop to sharpen all the pixels whereas if you crop beforehand there is less to work with!!
dimensions is all up to you!! just make sure to go by tumblr rules!! 540 is the max width and if you want to make two gifs per row then my suggested width is 268 and for three gifs per row my suggested is 177 px! Just have the right width and the length can be whatever you want!!
now i’m going to crop my gif to 540 by 590!!

NOW THIS IS WHAT MY GIF LOOKS LIKE!
COLOURING BASICS
let me show you the best adjustment tools in my opinion and a brief explanation for what they do!!
brightness/contrast: pretty simple increase/decrease the brightness/contrast BUT one of my techniques for when i first start colouring a gif is i select all my frames and do nothing to the settings of the adjustment but i set the layer to screen LIKE THIS

curves: ik others use curves to change brightness/contrast w the squiggly thing BUT i like it to set a white point and black point, this is also a technique i use when i first start colouring a gif when screen doesn’t look good for me SO you use white point to select a pixel on the gif to set as the lightest color on the gif (setting the white point) and you use black point to select a pixel on the gif to set as the darkest colour on the gif (setting the black point) usually the white point makes it TOO bright and that’s why we use the black point to counter it and same goes for when i use screen with brightness/contrast, it gets too bright so i use black point to counter it below is the button for white point and the button for black point, respectively they are shaped as color picker tools


vibrance: generally, i never use this except for color p*rn sets but they work really well in making colors seem more strong
hue/saturation: like vibrance, i never use this except for color p*rn sets but this adjustment is to help change the colors or hue of a color for example: turn blue into purple or turn a blue into a little lighter shade of blue
color balance: I ALWAYS USE THIS!! except for in black and white gifs BUT THIS IS MY GO TO AND IF I DON’T USE IT MY GIFS ARE JUST BLAND i feel like color balance is what essentially balances the colors on your gif and adds dimension to it, it makes your gif go from looking way too yellow to a more golden neutral look and it is an essential adjustment in my opinion
channel mixer: i rarely use channel mixer BUT it is so so useful when you are working w a dark scene just play w the settings and all of a sudden all the blue in a dark scene will be a little more yellow and red and your scene will kind of just look brighter and more visible
selective color: THIS IS ALSO AN ESSENTIAL this helps SPECIFIC colors pop you’re working on a scene where there is too much red on someones face you use this tool to remove the magentaness from the yellow section OR when you feel someones face is TOO yellow and needs more blush you add more magenta in the yellow section of selective color
gradiant map: gradiant map is perfect when you’re lazy if you feel like your gif looks more neutral and you want some red in it but you don’t want to mess with any other adjustments just set a red to black gradiant on soft overlay with a very low opacity and BOOM slightly red but not too much red added!
NOW TO COLOR THE GIF!
today i have decided to start with a brightness layer set on screen
and this is what we got!

now that’s a little to bright and washed out in my opinion SOOOO to counteract it, i’m going to use my black point tool in curves and i’m going to select this point on the gif (it’s better to choose smth in the background and not smth that’s paid attention to such as monica’s hair or either of their eyelashes)

now my gif looks like this! the base color is complete!

now i think i need to balance all this yellow and red! SOOOO WE GONNA USE COLOR BALANCE!!
i think the best way to use color balance is to keep swinging the balancer until you see what you like and then keep going midtones i think i want more red and i don’t want a cyan midtone and then for shadows i think i want more cyan to counter the redness of the gif but highlights i don’t touch that much NOW HERE ARE MY SETTINGS SO YOU CAN SEE

and this is what my gif looks like

now you can stop here if you want but in my opinion i think the gif looks a lil too dead still SO IMMA USE SELECTIVE COLOR
i think there needs to be a lot lot more RED so i amp up the yellow magenta and black in the red! but i also think the yellows need to be LESS RED so i remove magenta from the yellow! and bc there’s some cyan and blue bc of monica and the flowers in the background im going to make the cyans more cyan and the blues a lil more black! i’m going to remove some yellows from the magenta!! and i add more black to the neutrals and black!! i think it’s always important to add more black to neutral and black bc it adds more depth to the gif by not just making it a bunch of bright colors and having dark colors to contrast to!! my settings are below!

and the result!
now let’s see everything together!

and the before and after!

I HOPE MY COLOURING EXPLANATION MADE SENSE!! if not you can always ask me more questions i don’t mind!!
ADDING SUBTITLES
we want to grab the text tool!
make a text box from anywhere in the middle from the left to right edge. this is so we can make sure our text is centered and will be in the same place for when we have sets w more than one gif w text!

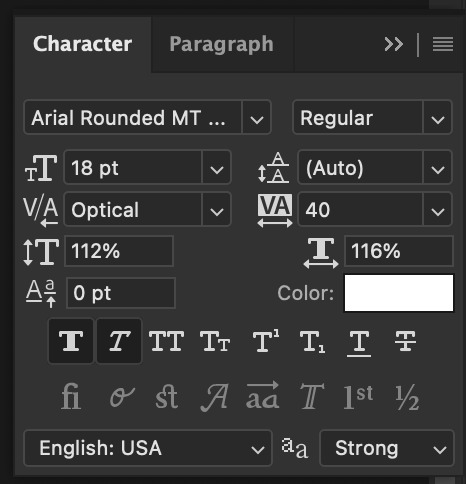
type your text out and make sure you highlight the whole text so that all the settings apply to EACH character! you can find the alignments (for center) in the paragraph tab!

now lets right click on the text layer and go to blending options! add stroke and drop shadow!


now drag it to the desired height you would like and make sure to keep it in mind for when you have more than one subtitled gif in a set!
NOW TO MAKE SURE THE TEXT STAYS IN PLACE AND THE BLENDING STAYS YOU HAVE TO CONVERT TO SMART OBJECT!!

if you want to only have the text applied to certain frames instead of all frames, select the frames you don’t want by clicking the first frame in ur don’t want section ON THE TIMELINE and WHILST HOLDING SHIFT click the last frame of ur don’t want section and then toggle the eye switch next to the text layer
now you see the text

now you don’t

tip: use opacity to fade the text in and out!
the text is going to be on all my frames so i don’t need to toggle the eye but i just wanted to show you just in case!!
now here’s my FINAL RESULT

save for web (file -> export -> save for web)
your gifs have to always be under 10 mb! so, if your WAYYY overboard YOU HAVE TO DELETE FRAMES! or you can divide the gif in two and have two gifs instead of one! however, if you plan on going the deleting frames route MAKE SURE YOU DELETE FROM THE BEGINNING OR END OF YOUR SELECTION i promise you that most of us won’t notice that your characters dialogue is being cut off BUT WE WILL NOTICE IF FRAMES ARE BEING SKIPPED so, don’t delete frames in the middle of ur gif!! idc how little you do it IT WILL RUIN YOUR GIF AND I SAY THIS FROM EXPERIENCE i would delete every fifth frame to cut down my gifs and that may seem like not that big of a deal BUT IT IS my gif looked choppy and poor so it is way better to cut from the end/beginning of the gif
ANOTHER LAST PIECE OF ADVICE in the bottom left of when the save for web menu shows up THERE’S A PREVIEW BUTTON click on it! it’ll show you your gif on your default browser and show you what it’ll look like once uploaded! this is perfect to check the speed of ur gif and the colouring and to notice if there’s a problem with your subtitles or maybe there’s an obvious jump in frames you never noticed before!! i always use preview bc the built-in photoshop viewer of ur gif shows the colors differently and the speed is NEVER ACURRATE!
I USED THESE SAVE SETTINGS!! many say to use selective pattern but i DISAGREE and i think these save settings are the ✨ best ✨
OK NOW THAT IS THE END OF THIS VERY LONG GIF TUTORIAL!! I HOPE THIS IS WHAT YOU WANTED!! IF YOU HAVE ANY QUESTIONS DON’T BE AFRAID TO ASK I SINCERELY DON’T MIND!! JUST DON’T BE RUDE OR ANYTHING BC PPL HAVE BEEN RECENTLY :(
I WISH YOU ALL THE LUCK AND FUN IN YOUR GIFFING ADVENTURES !!
#tutorials#asks#sourceblog#allresources#completeresources#itsphotoshop#dailyresources#resourcemarket#chaoticresources#onlyresources#hisources#sibylresources#dailypsd
405 notes
·
View notes
Note
I really like your shigaraki redraw! I was wondering how you choose the colours of your drawings, you begin with black and white or you have already in mind a specific palette? I always struggle with coloring, especially in this period, I always feel disappointed with my art :(
omg thank u !! im glad you like it :”)
and yeah !! so when i color something, its usually just me playing around with the different program functions; seeing what i can do with different colors and layers on multiply / color burn / overlay, etc., tone curve, gradient map, so on and so forth. i think i have some form of aphantasia, so rather than having an image in my head of what i want something to look like, i’ll usually figure it out through trial and error according to some like. i guess Feeling of how it should look. such as, if you want to go for a gloomy theme, you might want to adopt a cooler color palette; more purples, blues, and greens. or if you’re going for a different approach, say smth like love, you might opt for a warmer palette in which you use reds and oranges. ofc they arent rules or anything, but they can be a nice guideline if you’re having trouble deciding where to start . i think curiosity for how certain colors interact will bring you large percent of the way. after that, it’s more a matter of personal preference for whichever colors you think fits the best.
im sorry you’re feeling disappointed with your art though !! thats such a tough feeling to work through but i hope you can find some methods that work for you ! i can go ahead and share my process if that gives you some idea for what to try :3
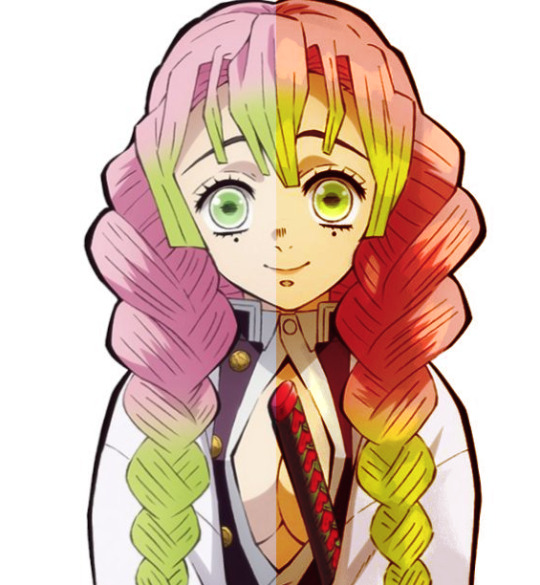
at the most basic level, i’ll usually have a base layer of a character’s normal palette and then i’ll have a few extra layers set to overlay, multiply, color burn, etc. on top. usually of reds or purples because those are my fav colors :3 i use layer settings like multiply to add shadows, glow dodge / screen to add highlights, and color burn / overlay / soft light to shift the hues or saturation of the colors in some particular direction. for instance, heres a mitsuri pic i edited. her colors are too cool for my preference, so i went ahead and added an orange color dodge layer to the right side at 74% opacity . i looked at how the layer looked in multiply, overlay, color burn, color dodge, etc. and the different opacity levels before deciding on this particular combination. depending on what program you use, you might not have these settings. i believe paint tool sai has less than clip studio paint, but they usually share a few in common.
as you can tell, its already a lot warmer and headed towards the direction i want :3 but in giving it this orange hue, i feel like i’ve made it darker, too. so to make it more exciting, im going to add some new colors to her eyes and hair. i think yellow will be a nice compliment to the greens, so im gonna go ahead and add a yellow highlight using glow dodge at 18% opacity.

and if i decide i want to add a few extra shadows just ‘cause, i’ll usually pick some pre-existing color off my drawing to keep the palette more cohesive. in this case, i went ahead and chose the reddish-purple color from her uniform and put it on a new multiply layer at 15% opacity
they’re small individual additions all things considered, but i enjoy watching them build on each other :3 . thats usually the process i’ll take when drawing w a base color. add or take how you like
in the case of the shigaraki one, i initially colored in black and white because i wanted to emulate the manga appearance, but once i colored his iris red i decided i wanted to add some more colors overall. something you can do with greyscale images that i like to do is add gradient maps !! these can transform your blacks & greys into actual color which you can then adjust with more layer editing (like above). your program may come with pre-set gradients, or you can download new color packs online / make your own.
left is the original, middle is a dark blue-to-red gradient map at 71% opacity, and the right is that same gradient with increased contrast, orange color burn layer at 60% , and 15 gradient posterization.

they all add color in their own way, its just up to you to choose which direction to go :-)
the different program settings can be confusing @ first but they’re a lot of fun to play around with if you ever have the time. and once you start to learn how these settings generally affect the drawing / its color, you’ll have a more innate feeling of how to use them without needing to think about it much before hand
but AAHH hopefully this gave u some insight for how i color my pieces 🥺️ msg me if theres anything u want clarification on :-D !!
#newdramaticvalues#asktag#lgtext#i genuinely just smash buttons until i make it work though AHAHHAAH
21 notes
·
View notes
Text
92 Questions Tag
i was tagged by @usershiin and @iviarka (thank u!! ♡ )
RULES: You must answer these 92 statements and tag 20 people.
THE LAST:
1. Drink: water
2. Phone call: uhhhh i think my mom?
3. Text message: i sent five elvis emojis to my dad bc he sends texts saying 'elvis' when he's leaving work
4. Song you listened to: chop suey by system of a down
5. Time you cried: this morning lol
6. Dated someone twice: lol no i have a personal rule to never visit the graveyard
7. Kissed someone and regretted it: absolutely
8. Been cheated on: unfortunately
9. Lost someone special: yeah, some family members
10. Been depressed: currently am
11. Gotten drunk and thrown up: uhhh yeah lets not talk abt that lmaooo
LIST 3 FAVOURITE COLOURS:
12.-14. pink, purple, and lime green!
IN THE LAST YEAR, HAVE YOU:
15. Made new friends: yup!!
16. Fallen out of love: who knows, feelings are too complex for me to try & decipher lol
17. Laughed until you cried: yeah!
18. Found out someone was talking about you: like talking shit? if so, lol yeah senior year was intense dude
19. Met someone who changed you: yup! several someones, actually
20. Found out who your friends are: yup, i have like one real irl friend bc the rest were just using me when i was conveinent. :')
21. Kissed someone on your Facebook list: uh maybe? idk i barely get on facebook
GENERAL:
22. How many of your Facebook friends do you know in real life: dude i dont even know
23. Do you have any pets: sadly, no :c
24. Do you want to change your name: i don't rly like when people say my full name but i like the abbreviated version or any other nickname
25. What did you do for your last birthday: my family went out to dinner and we came home and relaxed, i was sad all day so it wasnt great lmao
26. What time did you wake up: uhhh like ten am? i think
27. What were you doing at midnight last night: gosh i dunno...i think i was drawing? or writing, idk, one of the two
28. Name something you can’t wait for: KILLING HARMONY'S ENGLISH RELEASE YEAH BOIII
29. When was the last time you saw your mom: last night before bed
31. What are you listening to right now: seether - fake it
32. Have you ever talked to a person named Tom: my brother's name is tommy lmaoooo
33. Something that is getting on your nerves: my stomach wont shut up lol
34. Most visited website: tumblr probably
38. Hair colour: dark brown, i dyed it red a while ago so it has a red hue rn
39. Long or short hair: long!
40. Do you have a crush on someone: dude who knows honestly
41. What do you like about yourself: i dont like my body uhhh do my freckles count?
42. Piercings: nope! i rly want my ears pierced n a septum ring tho
43. Blood type: A+ !!
44. Nickname: tay or ouma!
45. Relationship status: uh single i think? i think we're ghosting eachother lmao
46. Zodiac: taurus
47. Pronouns: she/her!
48. Favorite TV show: big brother!!
49. Tattoos: none -- yet!!
50. Right or left handed: right
51. Surgery: let's see...i had severe bladder issues as a kid so i know i had smth done for that, i had my tonsils and adnoids removed...i think that's it!
52. Piercing: uhhh wasn't this already asked? lol
53. Sport: if i had to pick one, it'd probably be swimming! my fave thing is sinking to the bottom of the pool and staring up at the sky its super cool
55. Vacation: uhh its technically summer vacation rn and im not doing anything lmaoo
MORE GENERAL:
57. Eating: nothing,,,
58. Drinking: more water
59. I’m about to: smoke a cigarette bc this is taking longer than i expected
61. Waiting for: my mom to get home so we can go swimming
62. Want: a sense of purpose in life, a direction to follow, the will to live??? idk
63. Get married: that's the goal but...relationships are hard
64. Career: *cue anxiety* ummmm m uhh h hhhhh gjeafslkfjqads
WHICH IS BETTER:
65. Hugs or kisses: definitely hugs ** ok wait is this in like a potential partner? bc thats how im answering these
66. Lips or eyes: eyes
67. Shorter or taller: i generally like guys who are taller than me but for girls i don't rly have a preference
68. Older or younger: i guess ^^ applies here too, i prefer older guys but dont have a preference when it comes to girls
70. Nice arms or nice stomach: stomach i guess? doesnt rly matter to me
72. Hook up or relationship: do i have to pick one?? uhhh i guess a relationship but efjasklmf
73. Troublemaker or hesitant: hesitant!
HAVE YOU EVER:
74. Kissed a stranger: lol yeah
75. Drank hard liquor: ya...oops
76. Lost glasses/contact lenses: i don't have glasses but if i did, i would lose them for sure
77. Turned someone down: yup
78. Sex on the first date: absolutely not!!
79. Broken someone’s heart: maybe?? idk
80. Had your heart broken: yup
81. Been arrested: no
82. Cried when someone died: yup!
83. Fallen for a friend: lol yeah
DO YOU BELIEVE IN:
84. Yourself: i'd like to!
85. Miracles: yes
86. Love at first sight: not rly no
87. Santa Claus: lol ofc
88. Kiss on the first date: it depends on if it went well or not
89. Angels: it's a nice thought, but no
OTHER:
90. Current best friend’s name: lol i dont want to put it bc i dont want her finding this blog & she doesnt have a common name sry my dudes
91. Eye colour: brown
92. Favourite movie: uhhhh idk!! i watch a lot of movies w my family and can't remember all the titles, sorry^^
holy guacamole okay
now that that's over
time to tag!
i tag: @kingtatsunari @lesliebruhleria @tokyo-ghouls-eat-rawmen @piningmarco @bertoltssweat @noodlesforlyfe @levi-nyanchou @tiny-heichou and whoever else wants to do it! don’t feel obligated to do this, either;; ♡
10 notes
·
View notes
Text
ok so heres the idea for the evil team. most of the time, the villainous teams are making a statement. their appearance means something very specific, its engineered. team flare, for instance, is flashy and attention grabbing, and youre supposed to give them all of your attention, that sort of thing. team plasma are dressed as medieval knights to support an idea of chivalry, of shining armour and good deeds, to make the public believe theyre the good guys.
so you take it a different way. a team that wants to act in the shadows, individual agents acting in harmony with the greater group but ultimately alone. calls late at night deep inside houses. innocent business trips and weekend holidays. its all sneaky.
but you still want to give them a recognisable design. something that does mark them out as a group, unified. so, you keep them mostly ordinary, but with a few key items that might cause a second glance, but without context just seem like some style trend youve just sorta missed. stuff like all of them having long coats and collars that can cover their faces. stuff like them all wearing scarfs even if its summer. stuff like the same coloured shirts. stuff that individually looks generic enough, but when all combined, looks a lil smth smth. stuff like fancy lapel badges and necklaces, a belt with too many filled pouches, a hood that seems to be up more often than not. and then, in an ideal world, there’d be minor variants within that team. like, say they all that a coat and a scarf and a lapel badge. some have long skirts, some have pants, some have a button up pale shirt and some have turtleneck dark shirts. one of them has a set of hair pins that matches the badge, another wears bright coloured leggings, like you just sorta vary it up. the whole point is they seem like ordinary people. you dont think hard about seeing them.
itd get different with the higher ups, and even people like the YT. They’d have a lil more insignia stuff, like itd be more obvious. maybe one higher up is a person with a hoodie that has the teams symbol on it. then the leader, whoever that is, probably has something more formal, like a suit with the logo, a tie with the logo, shit like that. looks like its business for them.
its basically a team of secret agents, almost like team plasma v2 except they arent ninja pirates with a flying fucking ship that shoots ice lasers.
i just think itd be fun. there could even be an element of it being homemade, like some of the first grunts you encounter clearly handsewed their insignia on their shirt’s left breast and instead of lapel badges theyve got like, those cheap paper badges that you laminate in a circle and draw with texta? like theyre more ramshackle earnest. the higher up you get, the more professional it gets, and harder it becomes to spot them in a crowd because theyve tailored their Look Perfectly.
thatd be a way thered be a brief misdirect with YT. when you first meet them, they look nice and professional, though ofc their aggressive and try to tell you to go home and they probably wont let you leave town (until you beat the gym and cause a progression in the time force). but the grunts you encounter soon after, theyre so clearly members of an evil team but dont share any obvious elements with YT beyond like. dark colours, maybe. or, alternatively, the grunts are super heavy handed in how theyre clearly in the evil team, but YT just looks. like a normal person. a light coloured coat buttoned up but loose at the bottom, jeans, a scarf. just normal. but then as you progress later, and keep seeing YT (but not strictly in direct correlation to the team) and you fight the more sophisticated grunts, you notice the commonalities, the coats, the scarf.
thatd be kinda cool. like for a brief bit you might think YT is a gym leader or maybe even roaming E4 with an ego that manifests in telling people they arent worth shit. then when you notice the commonalities and connect th dots, its like OH its a fucking evil team admin. fuck there they go!
also, itd be fun if theres a slight branch. in the sense that, when you first encounter YT as a confirmed member of the evil team, heading a bit in a city, they dont tell you their name until after you beat them. as they go to leave, they tell you their name, and tell that to the older trainer whose been mentoring you. and you can just choose not to do that. you will encounter the older trainer, shortly after in fact (they dont walk in just after the guy leaves, you meet back up with them after you leave the building). and when the older trainer demands answers to what you were doing, you get the typical pokemon limited responses. you can say ‘i was fighting team [whatsit]’ or ‘i met that guy again’. you say you were just fighting team whatsit, he goes off in a rage about how he told you not to, blah blah. but if you say you fought THAT guy again, he pauses. what about him? then, w/o dialogue choosing, your trainer tells him who YT is, like their name and what they said. and the elite trainer stops. they tell you angrily you shouldnt have gone after team whatsit, but they sigh alot. its basically the same as the other branch, but with a lot of extra pauses and that additional YT mention at the start.
then, when you get to the scene where the elite trainer attempts to flee without you, the confrontation between them and YT will play out differently. if the elite trainer KNOWS thats YT, he’ll be composed if nervous, he’ll be begging for chances, he’ll be rationalising why he fled. if the elite trainer doesnt know its YT, that revelation will shake the fuck out of him, he’ll be a quivering wreck, overcome with the emotion of the fact that YT didnt die, but survived and wants to squarely kick him in the gut off the side of a skyscraper. or something. elito knowing YT is YT will be diplomatic. elito not knowing YT is YT will be emotional. i mean both would be but still. and itd slightly alter YT’s dialogue, they’d be angry at you if you didnt tell elito, but they’ll also be sadistically pleased that they get to see how elito feels. if you did tell elito, yt is actually more emotional, because elito prepared slightly for this confrontation and yt was caught off guard.
itd make slightly less changes later. like, end game. itd have some tiny dialogue changes before that. but like, after the villain story is wrapped. lets say that once you beat the villain and leave and go celebrate, YT comes and just socks elito square in the jaw. just because theyve wanted to for years. they make a speech about how his cowardice caused people to suffer. itd be pretty bitterly emotional for YT. but how THAT ends depends on the choice. like. if you told elito, YT would actually then offer elito their hand and help him back up off the ground, they’d make a sort of apology thats a bit stumbling and weak and full of digs, but itd be clear theyve thought about what elito said in this grunt gang bang and they want to put this behind them. if you DIDNT tell elito, YT will end his speech by spitting at elito and leaving. YT would show up later, possibly as part of post-game content, or maybe they fuck off into the ether like N does, idk.
it might also change elitos outcome. if they reconnect with YT and start making amends, theyd end up in a different place post game, maybe at YTs old home, talking to their parents, and theyd commit themselves further to not doing this again. if they dont connect with YT, theyd remain in their e4 villa or whatever, cowardly again, hiding from the outside.
the idea is that if YT reconnects, it affirms to the elite trainer that theyve at least slightly changed for the better, and that they can continue to improve. if they dont reconnect, they simply fall further into that anguish. fall of the wagon, as it were. the end of that story would be them resigning their elite post and simply fading from the news.
or SOMETHING like that. there could be more variables. the idea is that you can help YT and elito at least talk out their problems and help them reconcile what happened, help elito apologise for his awful behaviour and help YT sort of atone for the bad shit they did in seeking that apology (since, yknow, they sided with the villains and did some villainous shit while also pursuing that revenge). like you can basically mediate and help them at least start a dialogue. whether itd end well or even amicably between them would be debatable. but itd be better than the two of them never really getting that chance to talk it out, to just say what they thought and have it bubble inside them for years? yknow. hence why the non-reconnect ending is all bitter. it leaves elito a cowardly wreck. it leaves yt as someone who doesnt feel satisfied with their revenge and thus continues to exercise that aggression through villainy. its Bad End, buddy.
i mean itd be stupid if bad end was tied just to that one dialogue choice so it possible be possible to mention it at other points, like when elito is just standing around and doesnt have hyper fixed dialogue, you can approach them and youd get some minor options about stuff to say. dialogue choices, mother fuckers. like you approach him and you can ask how his day is, giving you basically a semi relevant thing about how he feels at that moment. and then youd have like, an advice one, like ‘got any advice’ and hed tell you something semi relevant. and then thered be the 3rd, unique option - ‘ive got something to tell you’ and that gives you the chance to tell him about YT if you picked the other option at the original dialogue. and maybe, just in general, that third option after you tell elito about YT would let you ask about YT and get a general backstory on the kid, expanded from what elito tells you in ‘vanilla’.
tl;dr i love this idea i love this shit godddddddddddddddd
#story blogging#its basically its own story. if i ever make a game where this fits im gonna fucking use this shit 100%#like if i make an action game where elito fleeing and leaving the kid behind couldve genuinely led to the kids death? sign it up#or if i make a pokemon fangame but lol i dont need nintendos lawyers in my life for trying to tell me morally weird shit#pokemon stuff#its still technically pokemon atm though but itd be REALLY easy to move it over. esp since i havent nailed the teams goal yet#might have to go back and tag the other posts w/ the story one so i can have em later#codename seren
0 notes
Last Seen Blogs

happylovertreellama
Chaitanya

scramble-with-strawberry-syrup
ScRaMbLeS
hikaruthehasama
Hikaru Hasama

hajisaab
Untitled

veryoaki
woah