#trowels suppliers
Explore tagged Tumblr posts
Visit Tumblr Blog
Explore Tumblr blogs with no restrictions, modern design and the best experience.
Last Seen Tumblr Blogs


Fun Fact
Kazakhstan’s Minister of Communications and Informatics has blocked the Tumblr site because it contained 60 sites of terrorism, extremism, and pornography in 2015.
Text
Understanding Garden Trowels: A Complete Guide to Various Types
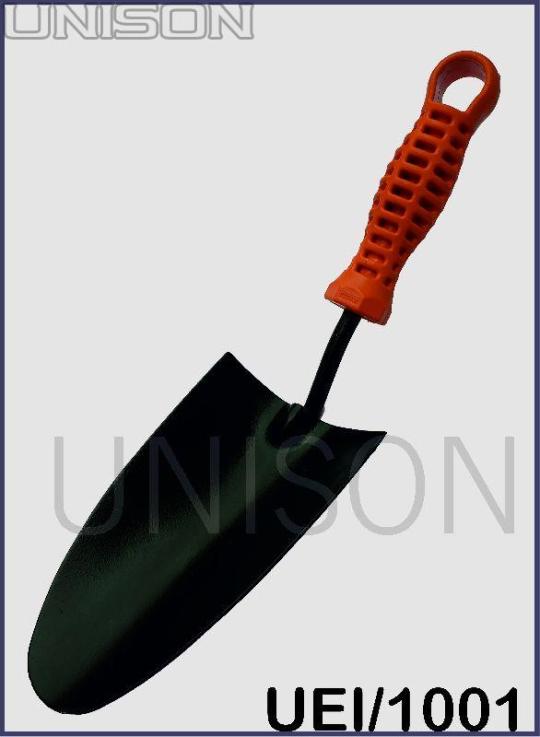
A garden trowel is a must for any gardener. You may be unsure of which one you need if you're new to gardening and haven't found one yet. There are a plethora of options available. Are they all the same, though?
Both indoors and outdoors, trowels are used for many different responsibilities including gardening, excavating, smoothing, applying, and finishing. Reliable trowels manufacturer in India are well-known for their digging, plastic hand, and transplanting trowels, among other varieties. Trowels are also used to remove rocks from soil, particularly when the soil is compacted and the boulders are clinging to the soil tightly.
However, a visit to the retailer or trowels manufacturer website will reveal that a variety of options are available, and selecting the right one might be difficult. If this describes your circumstances, continue reading to get an overview of all the different types along with a description of their uses.
Digging Trowel
Trowels manufacturer offers dependable and superior digging towels to its clientele. It has a PVC grip and is orange and black, made of mild steel. The form of a digging trowel differs from that of a standard trowel. It has a long, thinner blade with an arrow-shaped, pointy tip.
With its pointed edge, it helps break up the dirt and is great for digging out tiny stones from the garden. It's also a very helpful cutting tool when you need to make an opening in potting mix or compost bags because of its pointed edge.
Plastic Hand Trowel
To eliminate weeds, turn over soil, and transplant plants, a plastic hand trowel is a gardening tool of choice. Applying compost or fertiliser to the soil is another application for it. It comes in an orange hue and measures 6.2 x 5 inches.
One of the most popular options, it is incredibly lightweight and reasonably priced, and it includes high-impact polystyrene for increased durability. But it's not as convenient to use for digging as the other types since it usually lacks sharpness. Moreover, it may break and deform while in use.
Transplanting Trowel
The long, thin blade of this kind of trowel has gently rounded edges and a pointed tip. As the name implies, it’s generally used for transplanting seedlings, tiny plants and bulbs from one place to another in the garden.
Additionally helpful in cramped areas or for transferring plants from a tiny container into a larger one is this trowel. Planting bulbs that require a small hole is also made easier by the blade's long, thin shape. It comes with a mild steel head and a plastic grip. It is offered in orange and black.
Although there are many other types of trowels you may use in the yard, most people will probably find that digging and transplanting trowels are the most beneficial. When potting and transplanting, the plastic hand trowel comes in handy since it makes moving huge volumes of earth easier. The lightweight transplanting trowel works well for digging holes and transplanting. It also works well for pulling weeds.
The other varieties can typically finish the task and are equally helpful. Choose a lightweight trowel that is comfortable to grip when making your next buy so you can handle it without feeling exhausted.
0 notes
Text
This unearthed a childhood memory, so story time!
I grew up out in the woods, right? We also had a big pasture that has since also become woods, but at the time was open weeds and grass. Said pasture had running through it an underground stream or spring of some kind. Near to that underground stream, which left constant mud at all times of the year and in all drought conditions, was what I called my Clay Pit.
My parents didn't think much of it aside from being like "Yeah, T's out digging in The Hole again." But I had so much fun digging up clay with a stick and making things out of it. One day I brought back a lil bowl I had made and set it out on the hood of the car to cure in the sun. My dad was kinda mad, obviously, as he was the one that had to chip the thing off the car the next morning when he was already running late for work. But he was also a lot less mad than he ought to have been.
That day he came home and made me a job offer. If I could fill howevermany of those big ol 15 gallon buckets with my clay and dredge it (or whatever the proper term is for washing the regular dirt out of the actual clay), he'd pay me money. Real, actual money.
It was like a dream come true. I was gonna get paid to dig up dirt, then slosh it around in water repeatedly. I did that for free, bruh, and routinely got in trouble for it. (RIP our washing machine and every pair of shoes I owned.) But mama didn't raise no fool, so of course I didn't say that I'd have done it for free just for the chance at permission to use an actual shovel. Shovel, no. Blunted trowel, yes. (Thus I am typing this with all of my fingers; I was a clumsy child.) I filled something like 8 of those buckets with finished clay, excavating the equivalent of a adult-sized (albeit shallow) grave in the process. Best weekend ever. Only he failed to spell out the fact that he was then going to abscond with my buckets full of clay, so imagine my shock and tiny second grade rage when Monday morning rolled around and Dad ran off with them to work. I did, however, get paid that afternoon, so my indignation was short lived.
Turns out my dad had realized that what I'd been digging up was actual, quality, useable clay. He immediately contacted the ceramics/art instructors at the place he was teaching science. Said instructors had been in the teacher's lounge the day before complaining about their suppliers' prices having gone up. The man chipped my tiny bowl off the hood of the car that morning and took it with him to work, plonked it down on the art teacher's desk, and basically said "Boy have I got a deal for you."
He sold it to them for the supplier's old rate, and paid me a tiny cut for the labor so he didn't have to wreck his back doing it himself. I'd call this unethical if it weren't for the fact that the man was already on back surgery #4 by that point, and also that I had the absolute time of my life. Apparently it was really good stuff, too, and they wanted more. But alas, I had dug too greedily and too deep and the stream seeped through the walls of the Clay Grave Pit to create Tiny Pond of Quicksand-Like Clay Soup. So it was no longer feasible or safe to harvest clay from that deposit anymore, and I never found another of the same quality. Thus ended my dream job, and my father's short-lived tenure as his institution's art-crack locally sourced clay dealer.
early homo sapiens b like help i cant stop making bowls . help i cant stop domesticating plants and animals. help i cant stop developing language and architecture and religion
#story time#additions#long post#it's true#people have an innate urge to make things out of clay and dirt#sorry for hijacking the post i got really excited about the memory lol
349K notes
·
View notes
Text
How Hand Tools Suppliers in UAE Support the Construction Industry

Builders are actively developing the UAE's construction sector, which has increased a rapid expansion zone through their development of numerous towering buildings, residential projects, and infrastructure frameworks. Hand tools of high quality operate as fundamental elements in construction work to achieve safe, efficient work along with precise results for commercial and residential development.
Some hand tool suppliers in UAE supply the necessary tools that help construction executives perform their work expertly and swiftly. These suppliers maintain a supply of durable, high-performance tools that benefit contractors, engineers, and DIY hobbyists throughout the UAE.
This blog explores the fundamental position of hand tools for construction while examining supplier roles in the industry together with the importance of correct hand tool selection.
The Role of Hand Tools in the UAE Construction Industry
Every process involved in construction depends on hand tools, starting with planning, followed by measuring and finishing through assembling tasks. Hand tools are useful on construction sites where electricity and batteries cannot be accessed due to their power-free operation and mobility.
1. Precision in Construction Work
Constructive measurements and position alignment receive precise results from hand tools including measuring tapes together with spirit levels and calipers. Reliable measuring tools help maintain construction quality for all types of buildings in the UAE because architectural precision matters for skyscrapers, together with villas and commercial buildings.
2. Efficiency in Manual Tasks
Hand tools consisting of screwdrivers and wrenches alongside pliers and hammers serve essential functions for building construction and implementing accessories and finishing operations. High-quality hand tools allow workers to finish their tasks both efficiently and without facing machine malfunctions.
3. Safety and Control
Using hand tools leads to better control during operations which lowers the probability of workplace accidents. By using exact amounts of force, workers can complete delicate projects successfully including electrical wiring, plumbing, and carpentry work.
4. The flexibility of Hand Tools Quality Designed by Construction Makers
Hand tools are used widely in a number of the construction trade segments. These are some standard examples:
Masonry: Trowel and Chisel are used for a smooth finish
Woodworking: Using hand saws and measuring tools will ensure high precision they will be used for either furniture making or installation.
Plumbing: A pipe cutter, supply stops, and pipe wrenches are the tools that have the greatest utility in installing water distribution networks.
Electrical Work: Sufficient equipment for electricians includes insulated screwdrivers and pliers enabling them to operate work successfully in a secure manner.
How Hand Tools Suppliers in UAE Support the Industry
1. Offering Tools of High Quality and Long-Lasting Force
The UAE's best hand tools suppliers provide a vast array of tools from sought-after international brands. Since construction projects require durable and reliable tools, suppliers ensure that the products meet high-quality standards and comply with safety regulations.
2. Ensuring the Availability of the Tools Required
Suppliers make sure that they are having a huge amount of hand tools in stock so that the construction professionals can use them right away. This is particularly important when one is dealing with large projects that require swiftness in their execution.
3. Price Competition for Contractors and Business Companies
An assorted lot of hand tools dealers from the UAE have provisions of bulk purchase at a reduced rate as an option for the contractors. The challenge business people experience is to figure out how to get good tools as well as keep costs at an optimum level, but this is achievable through cost-effective solutions.
4. Simplify Workflow and Conserve Tools by Kit Distribution
Various tool manufacturers are now offering pre-assembled toolkits that are specially designed for different trade industries such as electrical, plumbing, and masonry work, the result will be more streamlined workflows. This ensures that professionals have all the necessary tools they need without the need to buy tools separately.
5. Expert Advice and Customer Support
Trustworthy suppliers enable you to make a better choice by offering their expert advice for the selection of the right tools for a particular project. Sometimes, the choice is between a contractor who needs durable tools or one using specialized hand tools which the supplier helps by giving insightful suggestions; to augment efficiency and productivity.
Essential Hand Tools for Construction Professionals
Hand tool suppliers offer complete tools essential for construction work in Dubai. Here are the basic hand tools you must have:
1. Measuring Tools
Tape Measure: Guarantees exact cutting and putting together of materials.
Spirit Level: Assists in the establishment of perfectly straight and equal installations.
Caliper: These are of great help for accurate component measurement in engineering and metalwork.
2. Cutting and Shaping Tools
Handsaws: Must-have tools for cutting wood and materials.
Utility Knives: Also used in insulation drywall cutting, and packaging.
Chisels: For designing and reshaping wood as well as for metal.
3. Fastening Tools
Screwdrivers: Available in different sizes and types according to the kind of screws.
Wrenches: To be used for loosening and tightening the nuts and bolts.
Pliers: Useful for bending, twisting, and cutting wires.
4. Masonry and Finishing Tools
Trowels: Designed for the application and distribution of cement and plaster.
Mallets: Used to help anchor tiles and stones without any damage.
Putty Knives: Used to smoothen out wall putty and adhesives.
How to Choose the Right Hand Tools for Construction
Right selection of hand tools is directly proportional to the possibility of being both productive and ensuring the equipment’s serviceable life. Here are some of the things users should look for when choosing a tool supplier:
1. Material and Durability
Construction tools of heavy-duty utility should be made of stainless steel, carbon steel, or heavy gauge, shatter-resistant plastic.
2. Comfort and Grip
Ergonomics is the process of studying design. Philips with rubberized window coverings reduce strain on the hands and enhance control, making them more comfortable for extended use.
3. Brand Reputation
Opting for well-known and trusted brands ensures that the tools are reliable and meet industry standards.
4. Safety Features
Tools with insulated handles, slip-resistant coatings, and protective covers reduce the risk of injuries during use.
5. Supplier Reliability
Opting for a hand tools supplier that has a well-known reputation in the United Arab Emirates can give you access to products of the best quality, personalized advice, and quick delivery solutions.
The Future of Hand Tools in the UAE Construction Industry
The building of infrastructure and smart cities has turned the UAE construction industry into a more advanced and tech-driven sector. While electric tools are trending, such as electric screwdrivers, hand tools, on the other hand, are still in demand because they can ensure precision, easiness, and cost-effectiveness.
Some trends in the hand tools sector, for example, are as follows:
Innovative Materials: The stronger and lighter materials are the reasons behind making the tool's efficiency better.
Multifunctional Tools: Small and smart tools providing multiple functions are becoming more and more popular.
Ergonomic Shaping: The main aim of the manufacturers is comfort and safety. Therefore, they are designing such products that help to reduce fatigue and injuries.
The product range of the hand tools suppliers in the UAE is now offering updated tools for new construction techniques.
Conclusion
The UAE construction business is mostly reliant on hand tool suppliers in the UAE to supply them with high-quality, durable equipment for all types of construction projects. From home renovation works to large-scale construction projects, the tools are critical in achieving and maintaining accuracy, efficiency, and safety, in addition to decreasing operational costs.
The selection of a hand tools vendor guarantees the acquisition of high-performance tools, expert assistance, and the lowest-cost alternatives. The construction sites that want to improve their operations should equip themselves with advanced and durable hand tools that come with a variety of helpful accessories. Moreover, the use of power tools along with hand tools can considerably increase the rate of work, and this in turn can better accomplish the projects by making them better and quicker.
0 notes
Text
Best Gardening Tools Manufacturers and Suppliers in Ghana, Nigeria, Thailand, UK, USA, and Canada - Ralph Martindale

Ralph Martindale offers a premium range of gardening tools, crafted for precision and durability to transform your gardening experience. Our lineup includes baby hoes, rakes, shovels, spades, digging forks, hand forks, and hand trowels, ideal for seamless cultivation and maintenance. Designed for both professional landscapers and gardening enthusiasts, our tools deliver exceptional performance and reliability. Trusted globally, we proudly serve Ghana, Nigeria, Thailand, the UK, USA, and Canada, making Ralph Martindale the preferred choice for top-quality gardening tools
0 notes
Text
High-Quality Concrete Tools for Professionals | GlobMarble
Discover premium concrete tools at GlobMarble, your trusted supplier for all concrete-related needs. Whether you're a contractor, builder, or DIY enthusiast, our wide range of durable concrete tools is designed to ensure top-notch performance and precision. From mixers and grinders to trowels and finishing tools, GlobMarble offers products that help you complete projects with ease and efficiency.
0 notes
Text
Javier Cuenca Basketball - How to Start a Small Garden at Home
Starting a small garden at home can be a rewarding and manageable project. Here’s a step-by-step guide shared by Javier Cuenca Basketball to help you get started:
1. Choose a Location
Assess Sunlight: Most plants need 6-8 hours of sunlight per day. Identify a spot in your home (yard, balcony, or windowsill) that gets adequate light.
Accessibility: Pick a location that’s easy to water and maintain.
2. Decide What to Grow
Vegetables and Herbs: Start with easy options like tomatoes, lettuce, spinach, basil, or mint.
Flowers: Consider marigolds, zinnias, or petunias for colorful blooms.
Space Consideration: Choose plants that suit the space available. Vertical gardening or container gardening is ideal for limited areas.
3. Gather Supplies
Containers or Raised Beds: Use pots, planters, or even recycled containers with drainage holes. For larger spaces, build or buy raised beds.
Soil: Use a quality potting mix or garden soil, enriched with compost for nutrients.
Seeds or Seedlings: Purchase from a local nursery or online supplier.
Tools: Basic gardening tools like a trowel, watering can, and gardening gloves.
4. Prepare the Soil
Test the Soil: If planting directly in the ground, test the soil pH and nutrient levels.
Enrich It: Mix in organic compost or fertilizers to improve fertility.
5. Plant Your Garden
Follow Instructions: Check the seed packet or plant label for spacing, depth, and other requirements.
Timing: Plant according to the growing season in your region.
6. Water Regularly
Frequency: Water deeply but avoid overwatering. Most plants prefer moist, not soggy, soil.
Time of Day: Water in the morning to minimize evaporation and prevent fungal diseases.
7. Provide Ongoing Care
Weeding: Remove weeds regularly to reduce competition for nutrients.
Pruning: Trim dead leaves and stems to encourage healthy growth.
Mulching: Apply mulch to retain moisture and regulate soil temperature.
8. Monitor for Pests and Diseases
Inspect Plants: Check leaves and stems for signs of pests or disease.
Natural Remedies: Use neem oil, insecticidal soap, or companion planting to deter pests.
9. Harvest and Enjoy
Harvest vegetables and herbs when they are ripe. Flowers can be cut for arrangements as they bloom.
10. Keep Learning
Experiment with different plants each season.
Join local gardening groups or online communities for tips and inspiration.
With patience and consistent care, your small home garden can flourish! Follow more such posts by Javier Cuenca Basketball.
0 notes
Text
Gold Coast Concrete Spraying Techniques for Flawless Results

Concrete spraying, also known as shotcrete, has become a preferred method for many construction projects on the Gold Coast. From retaining walls and pools to large-scale infrastructure, this technique delivers durability, precision, and efficiency. But to achieve flawless results, it’s essential to apply the right techniques and approaches. In this vlog, we’ll explore the key steps and best practices for concrete spraying that ensure success every time.
Step 1: Choose the Right Spraying Method The first step is selecting between wet-mix and dry-mix concrete spraying.
Wet-Mix Shotcrete: The concrete is pre-mixed with water and additives before being fed into the spraying equipment. This method is ideal for large projects as it ensures uniformity and speed.
Dry-Mix Shotcrete: The concrete mix is fed dry into the sprayer, and water is added at the nozzle. This method is better suited for smaller, detailed jobs.
Choosing the right method depends on the scope, budget, and requirements of your project.
Step 2: Prepare the Surface Thoroughly Surface preparation is crucial for proper adhesion and long-lasting results.
Clean the Surface: Remove all dirt, dust, grease, or loose debris from the area.
Ensure a Rough Texture: A slightly rough surface improves adhesion. Use tools like chisels or grinders to prepare smoother surfaces.
Apply a Bonding Agent: For added strength, use a bonding agent to enhance the grip between the concrete and the substrate.
A well-prepared surface ensures the sprayed concrete adheres effectively and resists cracking over time.
Step 3: Use Proper Spraying Techniques The way you spray the concrete has a significant impact on the final result.
Maintain the Right Distance: Hold the nozzle 1 to 1.5 metres from the surface. This helps in even distribution without overspraying or creating gaps.
Control the Angle: Spray at an angle of 45 to 90 degrees to ensure maximum adhesion and uniform thickness.
Layer Gradually: Apply the concrete in thin layers, allowing each layer to partially set before adding the next. This prevents sagging and ensures a smooth finish.
Practice consistency in movement and pressure to achieve flawless application.
Step 4: Monitor the Mix Consistency The consistency of the concrete mix is crucial. Too thick a mix can cause blockages, while too thin a mix may lead to weak adhesion. Work with experienced professionals or consult with your supplier to create the perfect blend for your project.
Step 5: Focus on Curing and Finishing After spraying, proper curing and finishing are essential to ensure durability and aesthetic appeal.
Curing: Keep the surface moist for at least 7 days to prevent cracks and enhance strength. Use curing blankets or sprays to retain moisture.
Finishing Touches: Smooth out the surface using trowels or other tools if a polished look is desired.
Conclusion By following these proven techniques, you can achieve flawless results with concrete spraying on the Gold Coast. Whether you’re working on a small-scale project or a large construction site, proper preparation, the right equipment, and consistent application are the keys to success.
For more expert tips and insights on construction methods, don’t forget to like, share, and subscribe. See you in the next vlog!
0 notes
Text
Wholesale Garden Tools: Elevate Your Inventory with Boxer Tools
The demand for high-quality garden tools has surged as homeowners and landscapers increasingly focus on maintaining lush, organized outdoor spaces. For businesses in the gardening and landscaping industry, sourcing reliable wholesale garden tools is a top priority. Located in Poland, Boxer Tools has emerged as a leading supplier, offering an exceptional range of garden tools designed to meet the needs of professionals and hobbyists alike.
Why Choose Wholesale Garden Tools?
Purchasing garden tools wholesale provides numerous benefits:
Bulk Savings: By buying in bulk, you reduce costs and boost your profit margins.
Wide Variety: Wholesale suppliers typically offer an extensive selection, ensuring you can cater to diverse customer demands.
Assured Quality: Working with reputable suppliers like Boxer Tools ensures you receive durable, high-performing products.
Steady Inventory: Partnering with a reliable supplier guarantees consistent stock levels to meet customer needs year-round.
Boxer Tools: Your Garden Tool Partner in Poland
Situated in Poland, Boxer Tools has established itself as a trusted name in the wholesale tools industry. Their collection of garden tools combines functionality, durability, and affordability, making them a preferred choice for retailers and professionals across Europe.
1. Comprehensive Product Range
Boxer Tools offers an array of garden tools to suit every task, including:
Pruning Shears: Perfect for cutting branches and shrubs.
Shovels and Spades: Durable tools for digging, planting, and landscaping.
Rakes and Hoes: Essential for soil preparation and debris collection.
Hand Trowels: Ideal for small-scale gardening tasks.
2. Durability and Performance
Garden tools from Boxer Tools are crafted to withstand the rigors of outdoor use. Made from high-quality materials, these tools ensure long-lasting performance, even in challenging conditions.
3. Affordable Pricing
Boxer Tools provides wholesale garden tools at competitive prices, enabling businesses to enjoy cost-effective procurement without compromising on quality.
4. Commitment to Sustainability
As a responsible supplier, Boxer Tools emphasizes eco-friendly practices. Many of their garden tools are designed with sustainable materials and ergonomic features, reducing environmental impact and improving user comfort.
5. Convenient Location
Located in Poland, Boxer Tools benefits from strategic access to European markets. This ensures timely deliveries and reduced shipping costs for their partners across the continent.
Why Retailers and Landscapers Prefer Boxer Tools
Retailers and landscapers across Europe choose Boxer Tools for their exceptional customer service and tailored solutions. Whether you're restocking your inventory or seeking specialized tools for large-scale landscaping projects, Boxer Tools has you covered.
How to Get Started with Boxer Tools
Explore the Product Range: Visit their website to browse their catalog of wholesale garden tools.
Reach Out: Contact their friendly team in Poland for assistance in selecting tools tailored to your business needs.
Place Your Order: Enjoy seamless transactions and prompt delivery to your location.
High-quality garden tools are essential for cultivating beautiful outdoor spaces, and Boxer Tools, located in Poland, is your trusted source for wholesale garden tools. With their extensive product range, affordable pricing, and commitment to excellence, Boxer Tools is the ideal partner for your gardening and landscaping needs.
Enhance your inventory and delight your customers by partnering with Boxer Tools today. Visit their website or contact their team to discover the benefits of working with a leading wholesale supplier in Poland.
0 notes
Text
How to Improve Your Bricklaying Technique

Bricklaying is a time-honoured skill that can be useful in construction projects, from residential homes to commercial buildings. So if you're a seasoned professional or a DIY enthusiast, mastering bricklaying can greatly improve the quality and durability of your work. To keep you guided, we’ve come up with some practical tips that top brick manufacturers recommend for strong, attractive builds for you!
Steps for Proper Bricklaying Achieving a stable brick structure requires more than just stacking bricks. Proper bricklaying involves steps that ensure each brick is placed correctly and securely. To help you through the process, here are the fundamental steps:
Preparing the Workspace Before you begin bricklaying, prepare a clean, level surface for a solid foundation for your work. A flat base will help prevent misalignment and ensure the bricks bond securely. Gather all the necessary tools and materials, including a trowel, level, hammer, measuring tape, and quality bricks and mortar.
For the mortar, mix it to the right consistency (neither too wet nor too dry) so it forms a strong adhesion between bricks. Additionally, safety should always be a priority, so wear protective gear such as gloves and goggles to avoid injuries.
To source high-quality materials, consider working with trusted brick suppliers in Australia who can provide the right bricks and mortar for your project.
Laying Bricks: Step-by-Step To begin, start with a strong corner so it properly aligns throughout the wall. Set the first brick carefully to create a solid foundation for the rest of the structure. Use the "butter" technique by applying mortar to the base and sides of each brick for better adhesion and stability.
Maintaining consistent mortar joints is also important. Keeping the spacing and joint width uniform can result in a professional finish. Also, using a bricklayer's level throughout the process is a good idea to ensure your wall remains straight and level.
Lastly, lay only a few bricks at a time. Working in small sections allows for greater precision and proper alignment. For high-quality bricks, consider sourcing materials from reliable Australian brick manufacturers who can provide the right bricks for your project.
Common Bricklaying Challenges and Solutions Here are common challenges you may encounter during your process and quick solutions to overcome them:
Uneven mortar consistency. If the mortar is too thick, it will be difficult to spread, while if it's too thin, it won’t bond properly. It is best that you adjust the mix by adding water or mortar mix as needed to achieve the right consistency.
Alignment issues. One way to fix this is to frequently check your work with a level and make small adjustments to each brick.
Mortar can dry too fast. Work in smaller sections and moisten the bricks and mortar often, especially if you're working in hot weather.
Partnering with a reliable brick company can also ensure you use quality materials that perform well under various conditions.
Choose Austral Bricks for Quality Materials Improving your bricklaying technique takes practice, precision, and the right materials. By following the proper steps, you can achieve durable and visually appealing results. Remember, the quality of your bricks can also affect your project's craftsmanship.
To ensure you use quality bricks for your project, source them from reputable brick manufacturers like Austral Bricks. We have been leading the way in brick manufacturing design and products for over 100 years. For more information, visit our website today!
Frequently Asked Questions (FAQs) If you have more questions about bricks or bricklaying, here's a quick compilation of frequently asked questions:
How do temperature and humidity affect bricklaying and mortar setting? Environmental factors can play a big role in bricklaying. In hot weather, mortar can dry too quickly, weakening its bond. Meanwhile, mortar may freeze in cold weather before it sets, causing it to lose strength.
How are bricks manufactured? Bricks are manufactured by shaping clay or other materials into moulds and then firing them at high temperatures in a kiln. This process hardens the bricks, giving them strength and durability, which are important for bricklaying.
0 notes
Text
Price of Adhesive for Tiles

The adhesive plays an important role in ensuring durability and stability when it comes to tiles. Gresbond by Kajaria is one brand that stands out in terms of quality and performance and has become trusted by the industry. Now, get the comprehensive evaluation of pricing, features, applications, and benefits of Gresbond tile adhesives for value for money in this article.
What is Gresbond by Kajaria?
Gresbond is the premium tile adhesive range from Kajaria, which is designed to give outstanding bonding strength for all types of tiles. It perfectly serves the bonding of ceramic tiles, vitrified tiles, and even natural stones.
Features and Benefits of Gresbond Tile Adhesives
Features
High Bond Strength: Tightens up the tiles at their places
Water Resistance: Great for bathrooms, kitchens, and outdoor installations.
Easy Application: Simplifies the tiling process for professionals and DIY enthusiasts.
Flexibility: Suitable for a wide range of surfaces, including concrete and plywood.
Benefits
Durability: Enhances the lifespan of tile installations.
Cost-effective: Reduces the need for frequent repairs or replacements.
Aesthetic Appeal: Minimizes the risk of tiles cracking or chipping.
Price of Gresbond Tile Adhesive
The cost of Gresbond will differ in many respects, such as packing size, type of adhesive used, and geographical location. Below are the details of price of adhesive of tiles:
Price Ranges for Gresbond Products
Gresbond Adhesive Standard: ₹500 to ₹800 for a 20 kg bag.
Gresbond Premium (heavy-duty): ₹800 to ₹1,200 for a 20 kg bag
Gresbond Waterproof Adhesive: ₹1,000 to ₹1,500 for a 20 kg bag.
Factors Influencing Price
Product Variant: Specialized adhesives like waterproof or high-bond variants will cost more.
Location: In different locations, there may be a difference in the price distribution and taxes.
Quantity Purchased: The more quantity of product purchased, usually the lesser the prices.
Retailer Margins: Sometimes prices may differ from direct suppliers to a retail outlet.
Applications of Gresbond Adhesive
Residential
Flooring of living rooms, kitchens, and bathrooms
Wall tiles: aesthetic and functional
Patios and balcony tiles outdoors
Commercial
large projects such as malls and office buildings.
Industrial floor tile laying.
Swimming pools and other water decorative features with waterproof adhesives.
Why Choose Gresbond over Competitors?
Reliability and Quality
Kajaria, as one of the best tiling companies in the world, ensures Gresbond adhesives are of international standards.
Versatility
Most adhesives are not versatile; however, Gresbond acts like a one-size-fits-all adhesive when working with an assortment of tiles and surfaces.
Customer Support
Kajaria provides superior after-sales service to ensure customer satisfaction, hence a guiding light for installations.
Gresbond Adhesive Installation Guide
Step-by-Step Guide
Prepare the Surface: Ensure that the surface is clean and free from dust or grease and is also perfectly dry.
Mix the Adhesive: Mix the adhesive according to the recommended ratio of the manufacturer's guidelines.
Spread the Adhesive: Apply the adhesive using a notched trowel for even distribution.
Lay Tiles: Lay tiles on the adhesive with pressure.
Let Dry: Allow the adhesive to cure according to the recommended set period before proceeding to grouting.
Frequently Asked Questions about Gresbond Tile Adhesive
Q. How long do Gresbond adhesives last?
Typical shelf life in cool, dry conditions is 12 months.
Q. Can Gresbond adhesive be used outdoors?
Yes, the waterproof as well as weather-resistant types of Gresbond are suitable for exterior installations.
Q. Is Gresbond suitable for large-format tiles?
Yes, the product range is suitable to handle large-format tiles, which outweighs their weight and size.
Q. How much adhesive is required per square meter?
The average requirement is 4–6 kg per square meter, depending on the tile size and thickness.
Q. Where can I get Gresbond adhesives?
Kajaria showroom, authorized dealers as well as online platforms.
Conclusion
Gresbond by Kajaria is a reliable and cost-effective solution for your tile needs. Its versatility, durability, and ease of use make it the preferred choice of professionals and homeowners alike. With an investment in Gresbond, you are assured of a long-lasting, well-looking tile installation. From renovating your own home to working on a mega commercial project, Gresbond tile adhesives assure unmatched performance in all cases.
0 notes
Text

How to Build a Brick Path Creating a brick path adds charm and elegance to your outdoor space, making it more inviting for you and your guests. Whether you're looking to connect different areas of your garden or simply want to enhance your landscape, building a brick path is a rewarding project you can tackle on your own. In this guide, you'll learn step-by-step how to design and construct a beautiful brick pathway that perfectly complements your yard's layout and your personal style.Getting Started A brick path can transform your outdoor space, adding both beauty and functionality. To begin, gather your tools, materials, and plans, ensuring you have everything on hand for a smooth installation process. Taking the time to prepare will help you feel confident as you launch on this rewarding DIY project. Choosing the Right Location If you're looking to build a brick path, the first step is to choose the proper location. Consider areas that experience heavy foot traffic, or places where you envision walking more comfortably in your garden. Ensure that the area is level and accessible, as this will make the installation process much smoother. Understanding Your Design Options On your journey to designing the perfect brick path, you'll find there are various styles and layouts to consider. Think about patterns, colors, and shapes that resonate with your home's overall aesthetic and your personal style. You might prefer a classic herringbone design or something more relaxed and natural. As you explore design options, keep in mind the intended use of your path. A winding layout can create a more organic feel, while straight lines can provide a modern touch. Additionally, you can mix colors and textures to enhance visual interest. Don't hesitate to sketch out your ideas or look for inspiration online; this is your opportunity to create a unique space that reflects you.Gathering Your Materials Assuming you're ready to get started on your brick path, it's time to gather your materials. You will need high-quality bricks that suit your design, as well as important tools to ensure a smooth installation. Make a list to avoid missing any important components, and consider visiting a local supplier to see your options firsthand. This will not only help you choose the right materials but also give you a better sense of the overall project. Selecting High-Quality Bricks Even though you may be tempted to go for the cheapest option, investing in high-quality bricks will pay off in the long run. Look for bricks that are durable and designed for outdoor use. A well-chosen brick not only enhances the beauty of your path but ensures it withstands the test of time against weather and foot traffic. Tools You'll Need Even if you're excited to start your project, having the right tools is important for success. Gather items like a level, a rubber mallet, a shovel, and a trowel to help you properly lay the bricks. A measuring tape and string line will also assist in keeping your path straight and even. This project doesn't require a ton of complicated tools, but having basic landscaping tools will make your work easier. A compacting tool is handy for leveling the ground before laying the bricks, and a jointing tool is great for filling gaps with sand or mortar. If you have a wheelbarrow, it can help transport materials more efficiently, saving you time and effort. Happy building!Preparing the Ground Now that you're ready to start your brick path project, it's time to prepare the ground. This step is crucial for a lasting path, ensuring it is stable and well-drained. You'll clear the area, plan for drainage, and create a solid foundation for your bricks to rest on. Proper preparation will enhance the beauty and longevity of your path, making it enjoyable for years to come. Clearing the Area On your way to a beautiful brick path, the first task is to clear the area where you'll be laying the bricks. This means removing any grass, weeds, rocks, or debris that might hinder your project.
You should take your time here, ensuring the area is level and tidy, as this will provide a great foundation for your path. Planning for Drainage To create a durable and functional brick path, it's important to plan for drainage. A well-drained path prevents water accumulation, which can make your bricks sink or become uneven over time. You'll want to lightly grade the ground so that water naturally flows away from the path, ensuring proper drainage for your walkway. Clearing the area for proper drainage is a vital step. You can achieve this by sloping the ground slightly away from your path, ideally at a one-inch drop for every four feet. Additionally, consider integrating a gravel base beneath your bricks, as it allows water to flow through and prevents pooling. With the right drainage plan, your brick path will remain in excellent condition, no matter the weather.Laying the Bricks Not only is laying bricks an enjoyable project, but it's also a chance to express your creativity! Begin by ensuring that your area is defined and that you've settled on a design that works best for your outdoor space. Once you have a clear outline, it's time to move on to the next steps in making your path both beautiful and functional. Starting with a Solid Base Assuming you've already prepared your area, it's important to start with a sturdy base for your brick path. This means making sure the soil is well-compacted and that you've laid down a layer of gravel or sand for drainage and stability. If you neglect this step, you might find that your path sinks or shifts over time, so taking the effort now is worth it! Tips for Even Spacing Any uneven spacing can take away from the charm of your brick path, so strive for consistency as you lay your bricks. To achieve this, consider using spacers or small pieces of wood to keep the gaps equal as you work. This will help guide your progress and ensure your path maintains a neat symmetry. Use a level to check for an even surface. Consider using a rubber mallet to adjust bricks without damaging them. Check frequently that your spacing remains consistent. Try to plan for future plant growth that may affect spacing. Any inconsistency can affect the overall look of your project. It's beneficial to have a consistent method in mind while you lay down your bricks. You might use a measuring tape to set intervals or even create a simple jig to help maintain those distances. As you proceed, take a step back every so often to view your work and ensure that everything is lining up properly. Experiment with different brick patterns for added flair. Keep a damp cloth handy for cleaning off any excess mortar on the bricks. Consider the direction of foot traffic when laying your path. Feel free to adjust your design as you go along—consultation with friends can spark creative ideas. Any feedback during the process can help refine your path design. Finishing Touches Unlike the initial stages of building your brick path, the finishing touches really bring it all together and offer that polished look you desire. Take a moment to step back and appreciate your hard work, then get ready to add those extras that will enhance both the beauty and functionality of your path. Adding Sand for Stability To ensure your bricks stay in place and provide a sturdy surface, adding sand between the bricks is a great option. Gently sweep sand into the gaps after placing all your bricks, making sure to fill every nook and cranny for a secure fit. Sealing the Path Finishing off your brick path with a sealer not only enhances its color but also provides protection against the elements. This step will help to prevent weeds from growing between the bricks and keep your path looking fresh and vibrant for years to come. Choose a high-quality stone sealer and apply it evenly across the surface, following the manufacturer's instructions for the best results. This simple addition will make a big difference in maintaining your lovely path.Maintenance Tips
To ensure your brick path remains in great condition, regular upkeep is crucial. Here are some simple maintenance tips to follow: Regularly sweep away debris and leaves. Use a garden hose to rinse off dirt and grime. Inspect for weeds and remove them promptly. Occasionally check for shifting bricks and level them as needed. Knowing how to care for your path will keep it looking beautiful for years to come. Keeping Your Path Clean Any accumulated dirt or organic material can dull the beauty of your brick path. A consistent cleaning routine is vital. Utilize a broom or leaf blower to clear away leaves and debris, and give your pathway a thorough wash with a mix of water and mild detergent to maintain its fresh appearance. Repairing Damaged Sections If you notice any damaged sections of your brick path, it's important to address them quickly to prevent further issues. Small cracks or loose bricks can worsen over time, making repair efforts more challenging down the road. To repair damaged sections, first, remove the affected bricks and clean the area underneath. If the sand base is compromised, consider adding more sand before replacing the bricks. Ensure they're securely seated and use polymeric sand in the joints to stabilize them, which helps prevent weeds from breaking through in the future. This proactive approach will keep your path safe and attractive.To wrap up Ultimately, building a brick path can be a fun and rewarding project that enhances your outdoor space. By planning carefully, choosing the right materials, and following the step-by-step process, you'll create a beautiful path that you can enjoy for years to come. Take your time to ensure each brick is placed perfectly, and soon, you'll be walking proudly along a path that you designed and built yourself! https://gardenreview.us/how-to-build-a-brick-path/?feed_id=235&_unique_id=6731c95a003cd https://gardenreview.us/how-to-build-a-brick-path/?feed_id=235&_unique_id=6731c95a003cd
0 notes
Text
Best Gardening Tools Manufacturers and Suppliers in Ghana, Nigeria, Thailand, UK, USA, and Canada - Ralph Martindale

Ralph Martindale offers a premium range of gardening tools, crafted for precision and durability to transform your gardening experience. Our lineup includes baby hoes, rakes, shovels, spades, digging forks, hand forks, and hand trowels, ideal for seamless cultivation and maintenance. Designed for both professional landscapers and gardening enthusiasts, our tools deliver exceptional performance and reliability. Trusted globally, we proudly serve Ghana, Nigeria, Thailand, the UK, USA, and Canada, making Ralph Martindale the preferred choice for top-quality gardening tools
0 notes
Text
How Bricklaying Tools Suppliers Empower Builders with Quality and Precision?
Some trustworthy builders' equipment and bricklaying tools suppliers provide a range of concrete topping, landscaping, and construction supplies and equipment at affordable prices. These regional vendors provide profitable and environmentally friendly materials that help simplify and beautify landscaping.
Due to their adaptability, durability, and affordability when purchased from reliable sources, high-quality concrete blocks and garden pebbles in Melbourne are frequently required by builders and property owners for building and outdoor landscape design and construction.

Because they guarantee stability and lifespan, these blocks are favoured for their structural support, insulation, and fire resistance.
What Kinds of Creating and Construction Materials Are Available Here? Reputable vendors provide a range of concrete blocks in different sizes and varieties for creating walls, partitions, and even whole structures.
In addition to supplies for gardens and landscaping, building owners should visit reputable local suppliers for a variety of construction and concrete supply needs, such as trowels, wall ties, expansion ties, roof and wall coverings, and damp courses.
These sellers also sell high-quality mulch, organic compost, crushed brick, crushed concrete, and other items for outdoor areas and roadways.
Owners of real estate must invest in reputable suppliers of high-quality equipment and supplies. They can find the tools needed for any construction activity, such as wheelbarrows, shovels, trowels, nippers, saws, and picks.
Additionally, trowels, expansion and wall ties, thick polythene damp course strips, wall and roof covers, and more are available. For the task to be completed accurately and successfully, several tools are required.
Their trowels and edgers guarantee a smooth finish, and their nippers are the greatest instrument for accurately modifying materials.
These suppliers offer high-quality products, boost durability, and lessen the chance of deterioration.
When these tools and materials are used, construction and landscaping projects are more cost-effective and successful.
Therefore, pick a reputable supplier who puts their client's needs first and provides reliable products and services, affordable delivery, and support for any questions or issues.
Source
0 notes
Text

Wooden handle color customization bricklaying tool brick trowel
0 notes
Text
Using LDPE Sheets for Waterproofing: Techniques and Tips
Waterproofing is a crucial aspect of construction that ensures the longevity and durability of structures. One effective solution that has gained popularity in recent years is the use of Low-Density Polyethylene (LDPE) sheets. Known for their versatility and excellent waterproofing properties, LDPE sheets are increasingly being utilized in various construction applications. This article explores the techniques and tips for using LDPE sheets for waterproofing, highlighting the benefits and best practices for their application.
Before delving into waterproofing techniques, it is essential to understand what LDPE sheets are. LDPE is a type of thermoplastic made from the polymerization of ethylene. These sheets are lightweight, flexible, and resistant to moisture, making them ideal for various construction applications. When sourced from a reputable LDPE plastic sheet supplier, you can ensure quality and durability in your waterproofing projects. LDPE sheets are available in various thicknesses, colors, and sizes, making them adaptable to different needs.
Advantages of Using LDPE Sheets
One of the primary reasons for using LDPE sheets in waterproofing is their excellent moisture resistance. Unlike traditional materials, LDPE sheets do not absorb water, making them perfect for areas prone to dampness or flooding. Additionally, LDPE is resistant to chemicals and UV rays, ensuring that it maintains its integrity over time. This characteristic is particularly important for construction projects that involve exposure to harsh environmental conditions.
Preparing the Surface for LDPE Sheets
Proper surface preparation is critical for ensuring the effectiveness of LDPE sheets in waterproofing. Before installing the sheets, it is essential to clean the area thoroughly. Remove any debris, dust, or existing moisture, as these can compromise the adhesive properties of the sheets. In some cases, applying a primer can enhance adhesion and create a better bond between the LDPE sheet and the surface.
Installation Techniques for LDPE Sheets
1. Choosing the Right Thickness When selecting LDPE sheets for waterproofing, consider the thickness required for your specific project. Thicker sheets offer better durability and resistance to punctures, making them ideal for high-traffic areas or locations subject to heavy loads. However, thinner sheets may be sufficient for less demanding applications. A reliable LDPE sheet manufacturer in India can guide you in selecting the appropriate thickness based on your needs.
2. Applying Adhesive For effective waterproofing, applying the right adhesive is crucial. Various adhesives can be used with LDPE sheets, including solvent-based and water-based options. Additionally, ensure that the adhesive is compatible with both the LDPE sheet and the substrate material.
Apply the adhesive evenly on the surface where the LDPE sheet will be installed. Using a notched trowel can help achieve a uniform application, ensuring optimal adhesion. Once the adhesive is applied, carefully position the LDPE sheet, taking care to avoid air bubbles or wrinkles.
3. Sealing Joints and Edges To achieve a fully waterproof barrier, sealing the joints and edges of the LDPE sheets is essential. Overlapping the sheets at the seams helps create a continuous waterproof membrane. Use a compatible sealant or adhesive to secure the overlaps, ensuring a tight seal. This step is particularly important in areas exposed to significant water pressure, as any gaps can lead to leaks.
For added protection, consider using mechanical fasteners in conjunction with adhesive for high-stress areas. Fasteners can provide extra security and prevent the sheets from shifting over time, ensuring long-lasting waterproofing.
Tips for Maintaining LDPE Waterproofing
Regular Inspections After installing LDPE sheets for waterproofing, regular inspections are crucial to maintain their integrity. Look for signs of wear, such as punctures, tears, or discoloration. Address any issues immediately to prevent further damage and potential water infiltration.
Cleaning the Surface Keeping the surface of the LDPE sheets clean is essential for maintaining their effectiveness. Regularly remove debris, dirt, and algae that can accumulate on the surface. Use mild soap and water for cleaning, avoiding harsh chemicals that may damage the LDPE material.
Monitoring Environmental Conditions
Be mindful of environmental conditions that may affect the performance of LDPE sheets. Extreme temperature fluctuations can cause expansion and contraction, potentially leading to stress on the seams. Monitoring these conditions can help you identify and address issues before they escalate.
Conclusion
Using LDPE sheets for waterproofing offers a practical and effective solution for various construction projects. Their moisture resistance, flexibility, and ease of installation make them a popular choice among builders and contractors. By following the techniques and tips outlined in this article, you can ensure successful waterproofing with LDPE sheet for Construction..
When sourcing LDPE sheets, it is essential to work with reputable LDPE plastic sheet suppliers and manufacturers. Doing so ensures that you receive high-quality materials that will enhance the durability and performance of your waterproofing efforts. Whether you are involved in residential, commercial, or industrial construction, incorporating LDPE sheets into your waterproofing strategy can lead to long-lasting results and greater peace of mind.
Frequently Asked Questions (FAQs) How long do LDPE sheets last? The lifespan of LDPE sheets can vary based on environmental conditions and installation quality. However, properly installed LDPE sheets can last for many years, providing effective waterproofing protection.
Can LDPE sheets be painted? Yes, LDPE sheets can be painted, but it is essential to use a paint designed for plastic surfaces to ensure proper adhesion and durability.
What thickness of LDPE sheet is best for waterproofing? The best thickness of LDPE sheet for waterproofing depends on the specific project requirements and environmental conditions. Thicker sheets generally provide better waterproofing capabilities, especially in areas with high moisture exposure.
0 notes
Text
Selections For The Best Concrete Supplies In Lampasas TX
Concrete is critical for the quality and endurance of construction projects. With many concrete supplies in Lampasas TX, with different product offerings to meet your requirements. Whether doing a residential driveway or branding up a commercial foundation, anyone got anything from ready-mix concrete to decorative finishes assisted by local suppliers. While selecting a firm, you should seek out businesses that provide excellent materials and workmanship, as these can substantially impact the resulting level of your own project.

Basic Construction or Building Tools and Equipment in Lampasas, TX
Building tools and equipment are essential for any construction job, alongside concrete supplies. Local suppliers in Lampasas, TX, have everything a contractor or DIY pro needs to complete their project, including lumber, tools, and equipment. From mixers and trowels to safety gear and measurement devices, these suppliers provide you with access to all the tools that are essential for your project, so you need not worry. Invest in good tools so that they make your life easier and give you the best outcome. For your construction project, you will get the best building tools and equipment in Lampasas TX.
Lampasas TX Concrete Trucking
When it comes to large jobs, you simply cannot have enough of the right concrete trucking in Lampasas TX. To avoid this, it is essential to stick with reliable concrete trucking that can deliver your mix on time and in the desired condition. Local trucking companies have access to various vehicles, and their drivers know how best to handle certain types of concrete deliveries, whether they are small batches or large volumes. They are essential to keep the pace of your project as well as a top priority in making sure that this concrete can be leveled correctly.
Selecting Suppliers and Services
It is important to take into account the service you need and choose concrete supplies, building tools, or trucking services in Lampasas, TX, that offer a good cacophony of products. Using local suppliers and contractors usually means you get better after-sales service, as well as more personalized service. Take the time to make sure you have trusted partners for your construction projects.
Conclusion
So, as a whole, Lampasas TX is the best for Concrete, and it can also depend on you, whether transaction-wise or comfort-wise. Putting efforts into sourcing reliable suppliers of builders and providers will keep your projects going as expected. Another thing is to avail of the concrete supplies from the portal Lampasas Trucking & Redi-Mix.
0 notes