#train_model
Explore tagged Tumblr posts
Link
A commission has been created to establish the reasons During tests at the Mytishchi Machine-Building Plant, the new metro train “Moscow-2020” derailed, as reported by the Telegram channel “Moscow Electric Trains Overheard.” The source writes that the composition has broken through the dead-end prism. Metrovagonmash confirmed that the train had indeed derailed. [caption id="attachment_82184" align="aligncenter" width="780"] Moscow-2020 metro train[/caption] While driving along the running tracks of the Metrovagonmash JSC plant, an incident occurred with the train of the 81-775/776/777 series “Moscow 2020” - it crossed the border of a dead-end prism. Specialists from the services of JSC Metrovagonmash promptly arrived at the scene of the incident. A commission has been created to establish the causes and eliminate the consequences of the event. No one was injured during the incident. During testing, the Moscow-2020 metro train struck a dead-end prism and derailed The plant said that before new metro trains begin to ply along the lines, “any little details in their operation are monitored and analyzed.” [caption id="attachment_82186" align="aligncenter" width="780"] Moscow-2020 metro train[/caption] At the manufacturer's plant, it is tested on more than 100 parameters, and run-in is carried out along factory lines. At the metro depot - additional checks and running-in on the line. “The trolley has already been installed and the front end will be corrected,” added the Telegram channel “Overheard Moscow Electric Trains.”
#metro_system#metro_train_design#metro_train_technology#Moscow_infrastructure#Moscow_Metro#Moscow_Metro_upgrades#Moscow_2020_metro_train#public_transit#rolling_stock#subway#train_model#transit_development#transportation#urban_transportation
0 notes
Link
import streamlit as stimport pandas as pdimport numpy as npfrom sklearn.model_selection import train_test_splitfrom sklearn.linear_model import LinearRegressionfrom sklearn.metrics import mean_squared_error, r2_scoreimport plotly.express as px # Synthetic generation of data examples for training the modeldef generate_house_data(n_samples=100): np.random.seed(42) size = np.random.normal(1500, 500, n_samples) price = size * 100 + np.random.normal(0, 10000, n_samples) return pd.DataFrame('size_sqft': size, 'price': price) # Function for instantiating and training linear regression modeldef train_model(): df = generate_house_data() # Train-test data splitting X = df[['size_sqft']] y = df['price'] X_train, X_test, y_train, y_test = train_test_split(X, y, test_size=0.2, random_state=42) # Train the model model = LinearRegression() model.fit(X_train, y_train) return model # Streamlit User Interface for Deployed Modeldef main(): st.title('🏠 Simple House Pricing Predictor') st.write('Introduce the house size to predict its sale price') # Train model model = train_model() # User input size = st.number_input('House size (square feet)', min_value=500, max_value=5000, value=1500) if st.button('Predict price'): # Perform prediction prediction = model.predict([[size]]) # Show result st.success(f'Estimated price: $prediction[0]:,.2f') # Visualization df = generate_house_data() fig = px.scatter(df, x='size_sqft', y='price', title='Size vs Price Relationship') fig.add_scatter(x=[size], y=[prediction[0]], mode='markers', marker=dict(size=15, color='red'), name='Prediction') st.plotly_chart(fig) if __name__ == '__main__': main()
0 notes
Link
import streamlit as stimport pandas as pdimport numpy as npfrom sklearn.model_selection import train_test_splitfrom sklearn.linear_model import LinearRegressionfrom sklearn.metrics import mean_squared_error, r2_scoreimport plotly.express as px # Synthetic generation of data examples for training the modeldef generate_house_data(n_samples=100): np.random.seed(42) size = np.random.normal(1500, 500, n_samples) price = size * 100 + np.random.normal(0, 10000, n_samples) return pd.DataFrame('size_sqft': size, 'price': price) # Function for instantiating and training linear regression modeldef train_model(): df = generate_house_data() # Train-test data splitting X = df[['size_sqft']] y = df['price'] X_train, X_test, y_train, y_test = train_test_split(X, y, test_size=0.2, random_state=42) # Train the model model = LinearRegression() model.fit(X_train, y_train) return model # Streamlit User Interface for Deployed Modeldef main(): st.title('🏠 Simple House Pricing Predictor') st.write('Introduce the house size to predict its sale price') # Train model model = train_model() # User input size = st.number_input('House size (square feet)', min_value=500, max_value=5000, �� value=1500) if st.button('Predict price'): # Perform prediction prediction = model.predict([[size]]) # Show result st.success(f'Estimated price: $prediction[0]:,.2f') # Visualization df = generate_house_data() fig = px.scatter(df, x='size_sqft', y='price', title='Size vs Price Relationship') fig.add_scatter(x=[size], y=[prediction[0]], mode='markers', marker=dict(size=15, color='red'), name='Prediction') st.plotly_chart(fig) if __name__ == '__main__': main()
0 notes
Text
[email protected]~$ whoami
> You are: a super awesome computer ready to tackle some serious machine learning tasks!
[email protected]~$ sudo make me a sandwich
> [sudo] password for tensorology:
> Okay, making a virtual sandwich... (╯°□°)╯︵ ┻━┻
[email protected]~$ ls -l /tasks
> drwxr-xr-x 2 tensorology tensorology 4096 Jun 1 09:00 analyze_data
> drwxr-xr-x 2 tensorology tensorology 4096 Jun 1 09:00 train_model
> drwxr-xr-x 2 tensorology tensorology 4096 Jun 1 09:00 clean_data
[email protected]~$ cd /tasks/analyze_data
[email protected]~$ ./run_analysis.sh
> Running data analysis...
> Progress: ██████████ 100%
> Analysis complete. Results saved to /tasks/analyze_data/results
[email protected]~$ cd /tasks/train_model
[email protected]~$ ./train_model.sh
> Training model...
> Progress: ████░░░░░░░ 40%
> Error: Insufficient caffeination detected. Please supply more coffee.
[email protected]~$ sudo apt-get install coffee
> [sudo] password for tensorology:
> Installing coffee...
> Progress: ██████████ 100%
> Coffee installed. Enjoy your brew ☕
[email protected]~$ ./train_model.sh
> Training model...
> Progress: ██████████ 100%
> Model training complete. Accuracy: 98.7%. Results saved to /tasks/train_model/output
[email protected]~$ cd /tasks/clean_data
[email protected]~$ ./clean_data.sh
> Cleaning data...
> Progress: ██████████ 100%
> Data cleaning complete. Cleaned data saved to /tasks/clean_data/output
[email protected]~$ shutdown -h now
> System shutting down. Goodbye, human. See you tomorrow!
0 notes
Photo
DockerでUnity ML-Agentsを動作させてみた(v0.11.0対応) https://ift.tt/2rjOwz3
Unity ML-Agents(v0.9.1)をDocker上で動作させてみました。
UnityやUnity ML-Agentsの環境構築などは下記をご参考ください。
Macでhomebrewを使ってUnityをインストールする(Unity Hub、日本語化対応) https://cloudpack.media/42142
MacでUnity ML-Agentsの環境を構築する(v0.11.0対応) – Qiita https://cloudpack.media/50837
手順
v0.10.1まではDockerでの学習方法についてドキュメントがあったのですが、v0.11.0の時点でドキュメントが削除されています。情報としては若干古くなりますが、v0.11.0でもこちらを参考にして動作させることができます。
ml-agents/Using-Docker.md at 0.10.1 · Unity-Technologies/ml-agents https://github.com/Unity-Technologies/ml-agents/blob/0.10.1/docs/Using-Docker.md
Dockerのインストール
Dockerがインストールされていない場合、インストールします。
Macでbrewコマンド利用
> brew cask install docker (略) > docker --version Docker version 19.03.4, build 9013bf5
※Dockerを初回起動すると初期設定のためにパスワード入力が求められます。
UnityにLinuxビルドサポートコンポーネントを追加する
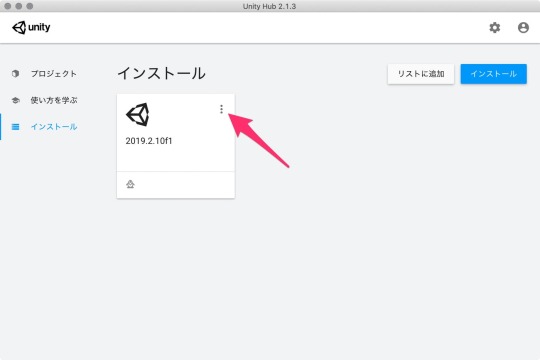
Unity Hubを利用してUnityにLinuxビルドサポートコンポーネントを追加します。 Unityのバージョンは2019.2.10f1を利用しています。
Unity Hubがインストールされていない場合は下記をご参考ください。
Macでhomebrewを使ってUnityをインストールする(Unity Hub、日本語化対応) https://cloudpack.media/42142
Unity Hubアプリを起動する
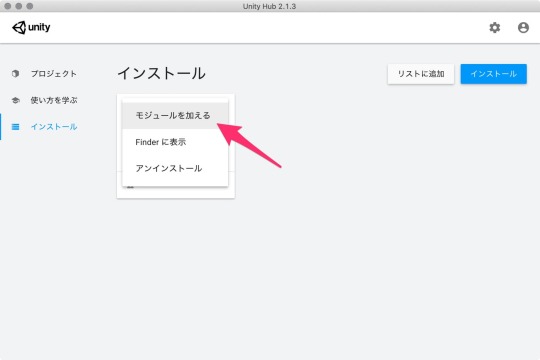
[インストール] > [Unityの利用するアプリ]右側にある[︙]をクリックして[モジュールを加える]を選択する

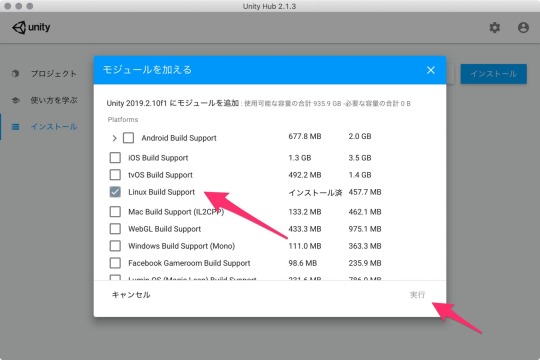
[モジュールを加える]ダイアログの[Platforms]にある[Linux Build Support]にチェックを入れて[実行]ボタンをクリックする
学習用のUnityアプリをダウンロードしてビルドする
ML-Agentsリポジトリに含まれているサンプルを学習できるようにします。
ML-Agentsリポジトリをダウンロード
適当なディレクトリにリポジトリをダウンロードする。
> mkdir 適当なディレクトリ > cd 適当なディレクトリ > git clone https://github.com/Unity-Technologies/ml-agents.git
Unityアプリからサンプルプロジェクトを開く
Unity Hubでアプリを立ち上げます。 ML-Agentsを利用するにはUnityのバージョン2017.4以上が必要となります。今回は2019.2.10f1を利用しました。
アプリが立ち上がったら「開く」ボタンから任意のディレクトリ/ml-agents/UnitySDKフォルダを選択します。
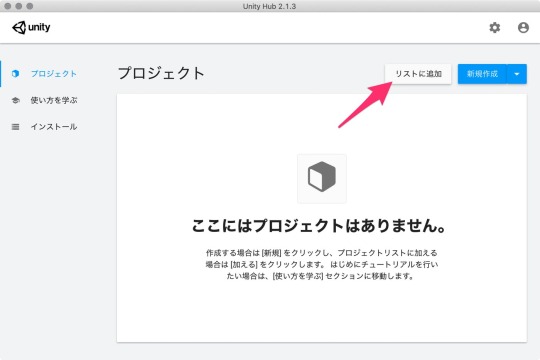
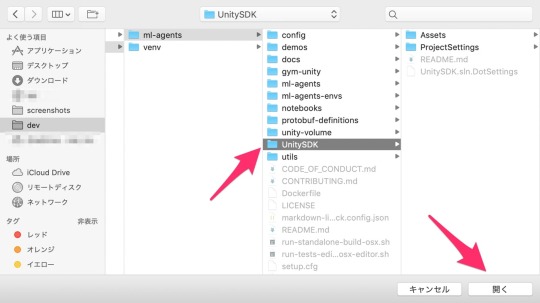
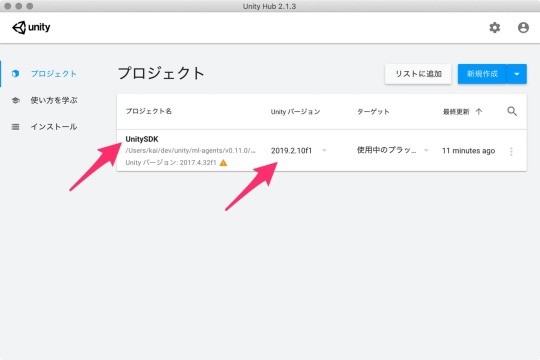
Unityエディタのバージョンによっては、アップグレードするかの確認ダイアログが立ち上がります。
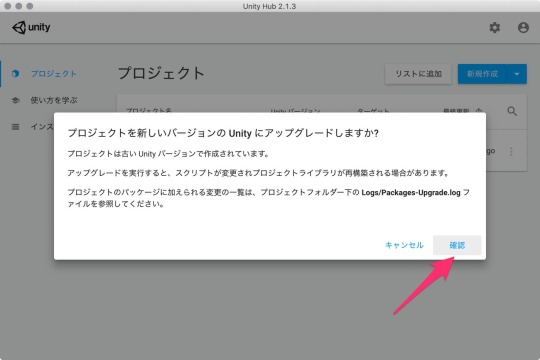
「確認」ボタンをクリックして進めます。アップグレード処理に少し時間がかかります。
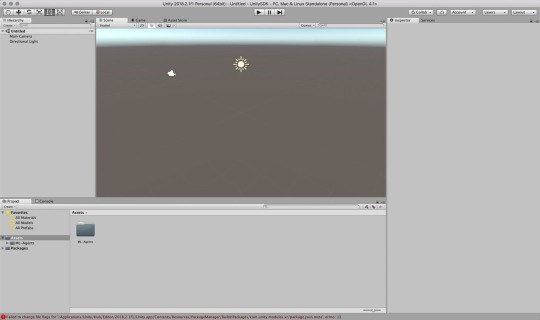
起動しました。
今回は、サンプルにある[3DBall]Scenesを利用します。
Unityアプリの下パネルにある[Project]タブから以下のフォルダまで開く
[Assets] > [ML-Agents] > [Examples] > [3DBall] > [Scenes]
開いたら、[3DBall]ファイルがあるので、ダブルクリックして開く
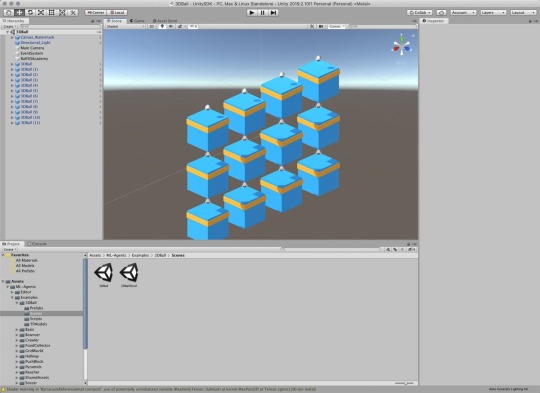
Scenes(シーン)の設定
ML-Agentsで学習させるための設定です。
Unityアプリの[Edit]メニューから[Project Settings]を開く
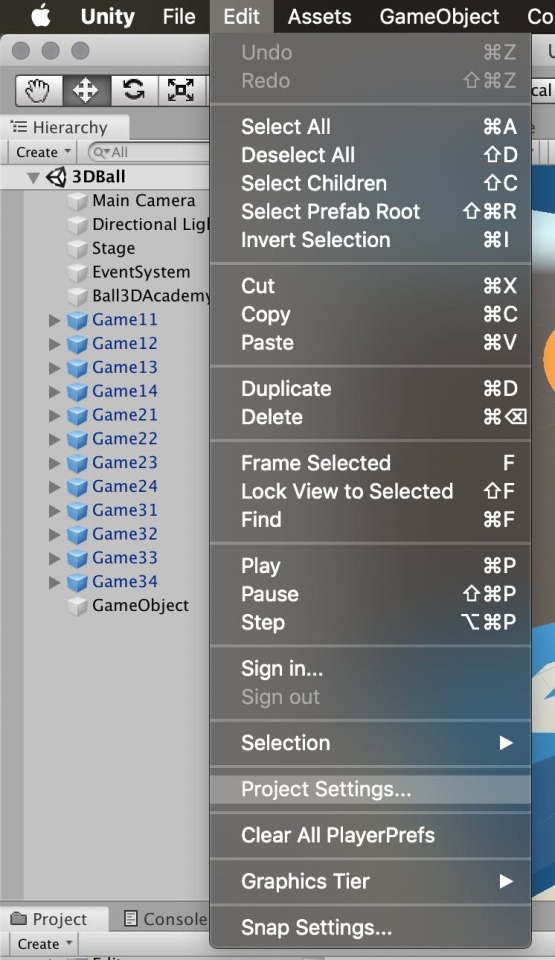
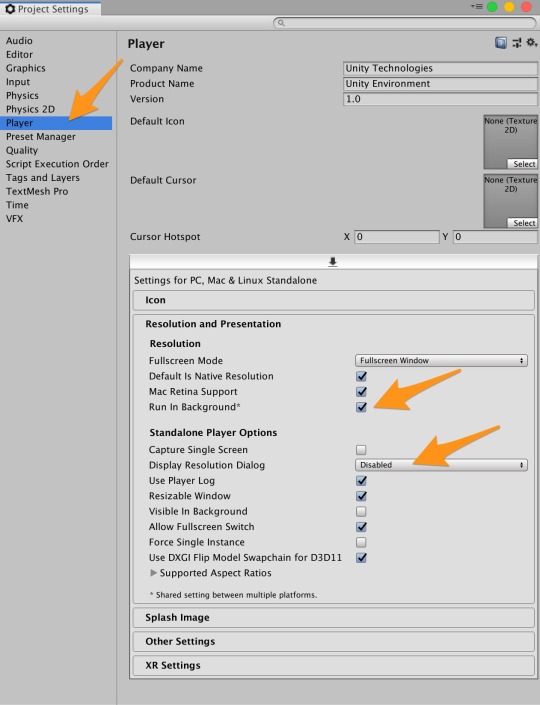
[Inspector]パネルで以下の設定を確認する
[Resolution and Presentation]の[Run In Background]がチェックされている
[Display Resolution Dialog]がDisableになっている
ビルド設定
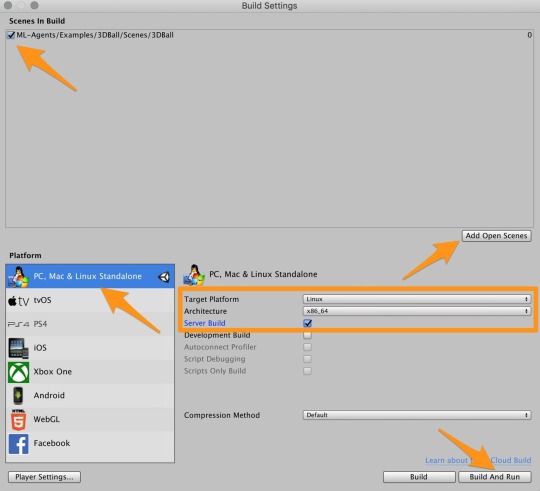
Unityアプリの[File]メニューから[Build Settings]を選択して[Build Settings]ダイアログを開く
[Add Open Scenes]をクリックする
[Scenes In Build]で[ML-Agents/Examples/3DBall/Scenes/3DBall]にチェックを入れる
[Platform]でPC, Mac & Linux Standalone が選択されていることを確認する
[Target Platform]をLinuxに変更する
[Architecture]をx86_64に変更する
[Server Build]にチェックを入れる
[Build]ボタンをクリックする
ファイル保存ダイアログで以下を指定してビルドを開始する
ファイル名: 3DBall
フォルダ名: 任意のディレクトリ/ml-agents/unity-volume
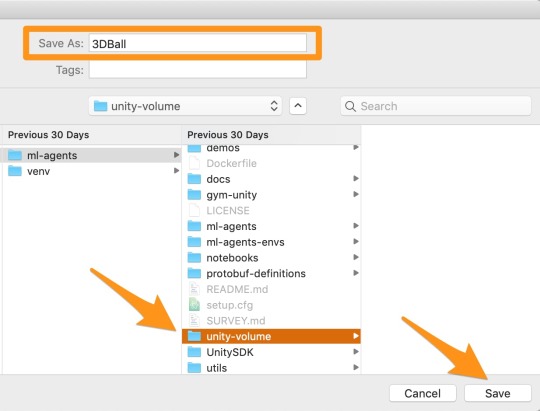
すると、unity-volumeに以下フォルダ・ファイルが出力されます。
ls 任意のディレクトリ/ml-agents/unity-volume 3DBall.x86_64 3DBall_Data
ハイパーパラメーターファイルの用意
ハイパーパラメーターファイルをunity-volumeフォルダにコピーしておきます。
> cp ml-agents/config/trainer_config.yaml ml-agents/unity-volume/
Dockerイメージを作成する
すでにDockerfileが用意されているので、docker buildするだけ。楽々ですね。 ml-agents-on-dockerはイメージ名となりますので、任意でOKです。
> docker build -t ml-agents-on-docker ./ml-agents (略) Removing intermediate container c1384ee9d5a6 ---> 9ff8832e88dc Step 19/20 : EXPOSE 5005 ---> Running in 53253a272fb4 Removing intermediate container 53253a272fb4 ---> f0b43146ad36 Step 20/20 : ENTRYPOINT ["mlagents-learn"] ---> Running in f80f7504b790 Removing intermediate container f80f7504b790 ---> 9caddd5a62b1 Successfully built 9caddd5a62b1 Successfully tagged ml-agents-on-docker:latest > docker images REPOSITORY TAG IMAGE ID CREATED SIZE ml-agents-on-docker latest 9caddd5a62b1 2 minutes ago 1.23GB
注意点
ml-agentsディレクトリ直下でdocker buildコマンドを実行するとエラーになるのでご注意ください。
> cd ml-agents > docker build -t ml-agents-on-docker . error checking context: 'file ('/Users/xxx/xxxxx/ml-agents/UnitySDK/Temp') not found or excluded by .dockerignore'.
v0.10.0からPython 3.7.xにも対応しましたが、Dockerfileを覗いてみるとPyhtonのバージョンは3.6.4のままでした。
Dockerfile一部抜粋
ENV PYTHON_VERSION 3.6.4
Dockerコンテナの実行
ビルドできたら実行してみます。
bashの場合
# ml-agents-3dball: コンテナ名(任意) # ml-agents-on-docker: Dockerでビルド時に付けたイメージ名 # 3DBall: Unityでビルド時に付けたアプリの名前(拡張子なし) > cd ml-agents > docker run -it --rm \ --name ml-agents-3dball \ --mount type=bind,source="$(pwd)"/unity-volume,target=/unity-volume \ -p 5005:5005 \ -p 6006:6006 \ ml-agents-on-docker:latest \ --docker-target-name=unity-volume \ --env=3DBall \ --train \ trainer_config.yaml
mlagents-learnコマンドの--docker-target-nameオプションはdocker runコマンドの--workdir(-w)に置き換えることもできます。
> docker run -it --rm \ --name ml-agents-3dball \ --mount type=bind,source="$(pwd)"/unity-volume,target=/unity-volume \ -w /unity-volume \ -p 5005:5005 \ -p 6006:6006 \ ml-agents-on-docker:latest \ --env=3DBall \ --train \ trainer_config.yaml
fishシェルで実行する場合は、"$(pwd)"を"$PWD"に置き換えます。
fishの場合
> cd ml-agents > docker run -it --rm \ --name ml-agents-3dball \ --mount type=bind,source="$PWD"/unity-volume,target=/unity-volume \ -p 5005:5005 \ -p 6006:6006 \ ml-agents-on-docker:latest \ --docker-target-name=unity-volume \ --env=3DBall \ --train \ trainer_config.yaml
実行すると、学習が始まります。 trainer_config.yamlのmax_stepsで指定されているステップ数が完了するか、ctrl + cキーで学習が終了します。
> docker run (略) ▄▄▄▓▓▓▓ ╓▓▓▓▓▓▓█▓▓▓▓▓ ,▄▄▄m▀▀▀' ,▓▓▓▀▓▓▄ ▓▓▓ ▓▓▌ ▄▓▓▓▀' ▄▓▓▀ ▓▓▓ ▄▄ ▄▄ ,▄▄ ▄▄▄▄ ,▄▄ ▄▓▓▌▄ ▄▄▄ ,▄▄ ▄▓▓▓▀ ▄▓▓▀ ▐▓▓▌ ▓▓▌ ▐▓▓ ▐▓▓▓▀▀▀▓▓▌ ▓▓▓ ▀▓▓▌▀ ^▓▓▌ ╒▓▓▌ ▄▓▓▓▓▓▄▄▄▄▄▄▄▄▓▓▓ ▓▀ ▓▓▌ ▐▓▓ ▐▓▓ ▓▓▓ ▓▓▓ ▓▓▌ ▐▓▓▄ ▓▓▌ ▀▓▓▓▓▀▀▀▀▀▀▀▀▀▀▓▓▄ ▓▓ ▓▓▌ ▐▓▓ ▐▓▓ ▓▓▓ ▓▓▓ ▓▓▌ ▐▓▓▐▓▓ ^█▓▓▓ ▀▓▓▄ ▐▓▓▌ ▓▓▓▓▄▓▓▓▓ ▐▓▓ ▓▓▓ ▓▓▓ ▓▓▓▄ ▓▓▓▓` '▀▓▓▓▄ ^▓▓▓ ▓▓▓ └▀▀▀▀ ▀▀ ^▀▀ `▀▀ `▀▀ '▀▀ ▐▓▓▌ ▀▀▀▀▓▄▄▄ ▓▓▓▓▓▓, ▓▓▓▓▀ `▀█▓▓▓▓▓▓▓▓▓▌ ¬`▀▀▀█▓ INFO:mlagents.trainers:CommandLineOptions(debug=False, num_runs=1, seed=-1, env_path='3DBall', run_id='ppo', load_model=False, train_model=True, save_freq=50000, keep_checkpoints=5, base_port=5005, num_envs=1, curriculum_folder=None, lesson=0, slow=False, no_graphics=False, multi_gpu=False, trainer_config_path='trainer_config.yaml', sampler_file_path=None, docker_target_name='unity-volume', env_args=None, cpu=False) INFO:mlagents.envs: 'Ball3DAcademy' started successfully! Unity Academy name: Ball3DAcademy Number of Training Brains : 0 Reset Parameters : gravity -> 9.8100004196167 scale -> 1.0 mass -> 1.0 (略) 2019-11-07 05:31:38.593118: I tensorflow/core/platform/cpu_feature_guard.cc:142] Your CPU supports instructions that this TensorFlow binary was not compiled to use: AVX2 FMA 2019-11-07 05:31:38.604956: I tensorflow/core/platform/profile_utils/cpu_utils.cc:94] CPU Frequency: 2400000000 Hz 2019-11-07 05:31:38.607307: I tensorflow/compiler/xla/service/service.cc:168] XLA service 0x39ccf70 executing computations on platform Host. Devices: 2019-11-07 05:31:38.607465: I tensorflow/compiler/xla/service/service.cc:175] StreamExecutor device (0): <undefined>, <undefined> (略) 2019-11-07 05:31:40.131532: W tensorflow/compiler/jit/mark_for_compilation_pass.cc:1412] (One-time warning): Not using XLA:CPU for cluster because envvar TF_XLA_FLAGS=--tf_xla_cpu_global_jit was not set. If you want XLA:CPU, either set that envvar, or use experimental_jit_scope to enable XLA:CPU. To confirm that XLA is active, pass --vmodule=xla_compilation_cache=1 (as a proper command-line flag, not via TF_XLA_FLAGS) or set the envvar XLA_FLAGS=--xla_hlo_profile. INFO:mlagents.envs:Hyperparameters for the PPOTrainer of brain 3DBall: trainer: ppo batch_size: 64 beta: 0.001 buffer_size: 12000 epsilon: 0.2 hidden_units: 128 lambd: 0.99 learning_rate: 0.0003 learning_rate_schedule: linear max_steps: 5.0e4 memory_size: 256 normalize: True num_epoch: 3 num_layers: 2 time_horizon: 1000 sequence_length: 64 summary_freq: 1000 use_recurrent: False vis_encode_type: simple reward_signals: extrinsic: strength: 1.0 gamma: 0.99 summary_path: /unity-volume/summaries/ppo_3DBall model_path: /unity-volume/models/ppo-0/3DBall keep_checkpoints: 5 WARNING:tensorflow:From /ml-agents/mlagents/trainers/trainer.py:223: The name tf.summary.text is deprecated. Please use tf.compat.v1.summary.text instead. WARNING:tensorflow:From /ml-agents/mlagents/trainers/trainer.py:223: The name tf.summary.text is deprecated. Please use tf.compat.v1.summary.text instead. INFO:mlagents.trainers: ppo: 3DBall: Step: 1000. Time Elapsed: 10.062 s Mean Reward: 1.167. Std of Reward: 0.724. Training. (略) INFO:mlagents.trainers: ppo: 3DBall: Step: 10000. Time Elapsed: 109.367 s Mean Reward: 36.292. Std of Reward: 28.127. Training. (略) INFO:mlagents.trainers: ppo: 3DBall: Step: 49000. Time Elapsed: 520.514 s Mean Reward: 100.000. Std of Reward: 0.000. Training. (略) Converting /unity-volume/models/ppo-0/3DBall/frozen_graph_def.pb to /unity-volume/models/ppo-0/3DBall.nn IGNORED: Cast unknown layer IGNORED: StopGradient unknown layer GLOBALS: 'is_continuous_control', 'version_number', 'memory_size', 'action_output_shape' IN: 'vector_observation': [-1, 1, 1, 8] => 'sub_3' IN: 'epsilon': [-1, 1, 1, 2] => 'mul_1' OUT: 'action', 'action_probs' DONE: wrote /unity-volume/models/ppo-0/3DBall.nn file. INFO:mlagents.trainers:Exported /unity-volume/models/ppo-0/3DBall.nn file INFO:mlagents.envs:Environment shut down with return code 0.
WARNING がかなり出力されますが、学習できました。
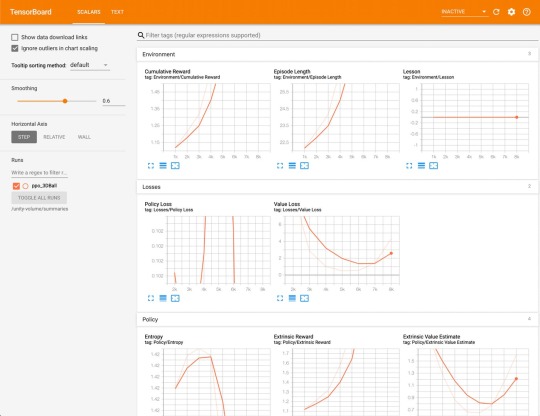
TensorBoard を利用して学習の進捗を視覚的に確認することもできます。
> docker exec -it \ ml-agents-3dball \ tensorboard \ --logdir=/unity-volume/summaries \ --host=0.0.0.0 (略) _np_qint32 = np.dtype([("qint32", np.int32, 1)]) /usr/local/lib/python3.6/site-packages/tensorflow/python/framework/dtypes.py:525: FutureWarning: Passing (type, 1) or '1type' as a synonym of type is deprecated; in a future version of numpy, it will be understood as (type, (1,)) / '(1,)type'. np_resource = np.dtype([("resource", np.ubyte, 1)]) TensorBoard 1.14.0 at http://0.0.0.0:6006/ (Press CTRL+C to quit)
学習結果をアプリに組み込む
学習結果は、ml-agents/unity-volumeフォルダ内に保存されます。 それをUnityアプリに組み込むことで学習結果をUnityアプリに反映できます。
> ls unity-volume/ 3DBall.x86_64 3DBall_Data csharp_timers.json models summaries trainer_config.yaml > tree unity-volume/models/ unity-volume/models/ └── ppo-0 ├── 3DBall │ ├── checkpoint │ ├── frozen_graph_def.pb │ ├── model-50000.cptk.data-00000-of-00001 │ ├── model-50000.cptk.index │ ├── model-50000.cptk.meta │ ├── model-50001.cptk.data-00000-of-00001 │ ├── model-50001.cptk.index │ ├── model-50001.cptk.meta │ └── raw_graph_def.pb └── 3DBall.nn 2 directories, 10 files
Unityアプリの設定
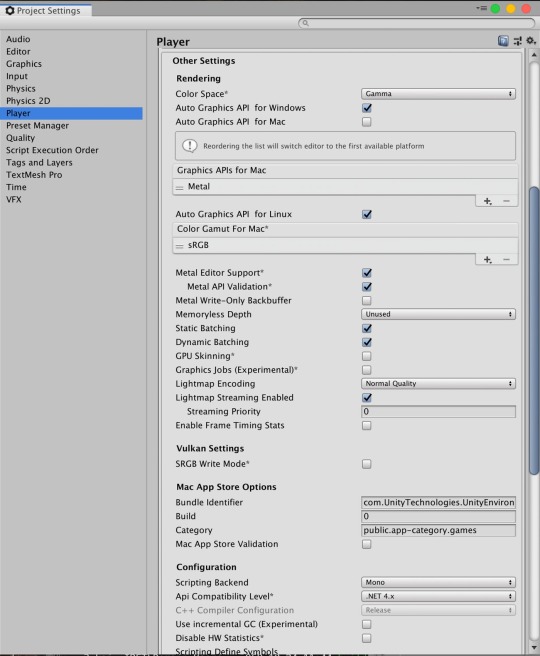
Playerの設定を行います。
Unityアプリの[Edit]メニューから[Project Settings]を選択する
[Inspector]ビューの[Other Settings]欄で以下を確認・設定する
Scripting BackendがMonoになっている
Api Conpatibility Levelが.NET 4.xになっている
学習結果ファイルの取り込み
ターミナルかFinderで学習結果を以下フォルダにコピーします。
学習結果ファイル: models/ppo-0/3DBall.nn
保存先: UnitySDK/Assets/ML-Agents/Examples/3DBall/TFModels/
※すでに保存先に3DBall.nnファイルが存在していますので、リネームします。
> cp models/ppo-0/3DBall.nn ml-agents/UnitySDK/Assets/ML-Agents/Examples/3DBall/TFModels/3DBall_new.nn
Unityアプリの下パネルにある[Project]タブから以下のフォルダまで開く
[Assets] > [ML-Agents] > [Examples] > [3DBall] > [Scenes]
開いたら、[3DBall]ファイルがあるので、ダブルクリックして開く
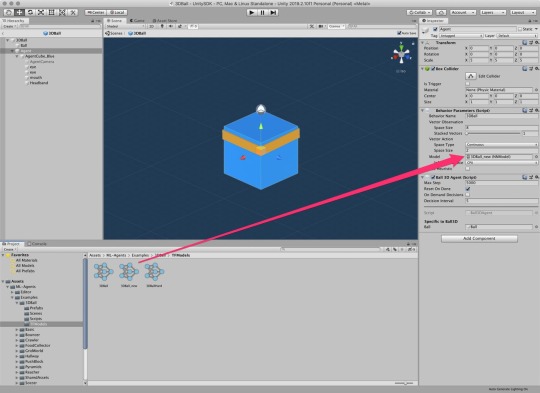
[Hierarchy]パネルから[Agent]を選択する
Unityアプリの[Project]パネルで以下フォルダを選択する
[Assets] > [ML-Agents] > [Examples] > [3DBall] > [TFModels]
Unityアプリの[Inspector]パネルにある[Model]という項目に[TFModels]フォルダ内の3DBall_new.nnファイルをドラッグ&ドロップする
Unity上部にある[

]ボタンをクリックする
これで、学習結果が組み込まれた状態でアプリが起動します。
参考
Macでhomebrewを使ってUnityをインストールする(Unity Hub、日本語化対応) https://cloudpack.media/42142
MacでUnity ML-Agentsの環境を構築する(v0.11.0対応) – Qiita https://cloudpack.media/50837
ml-agents/Using-Docker.md at 0.10.1 · Unity-Technologies/ml-agents https://github.com/Unity-Technologies/ml-agents/blob/0.10.1/docs/Using-Docker.md
元記事はこちら
「DockerでUnity ML-Agentsを動作させてみた(v0.11.0対応)」
December 23, 2019 at 12:00PM
0 notes
Text
Deep Learning Homework 2 Solution
Deep Learning Homework 2 Solution
[15 points] Transfer learning
In this problem, you will run experiments for two major transfer learning scenarios in transfer_learning.py.
Fill in the blank in train_model function which is a general function for model training.
Fill in the blank in visualize_model function to brie y visualize how the trained model performs on validation images.
Fill in the blank in finetune function.…
View On WordPress
0 notes
Text
Machine Learning in a Box (Part 9): Build Your First ML Application - #Ankaa
Machine Learning in a Box (Part 9): Build Your First ML Application A Quick Recap Last time, we looked at how to use TensorFlow from within SAP HANA, express edition. This allows you to surface your TensorFlow ModelServer models inside your instances and use them as a regular stored procedure. This allows, for example, to process images or documents stored as... https://ankaa-pmo.com/machine-learning-in-a-box-part-9-build-your-first-ml-application/ #AI #Build_An_Application #MachineLearning #Predictive_Libraries #SAP_HANA #Sap_Hana_Express_Edition #Train_Models #Tutorial
#AI#build an application#machine-learning#predictive libraries#SAP HANA#sap hana express edition#train models#tutorial#Actualités#Développement IoT#Innovation
0 notes
Link
import streamlit as stimport pandas as pdimport numpy as npfrom sklearn.model_selection import train_test_splitfrom sklearn.linear_model import LinearRegressionfrom sklearn.metrics import mean_squared_error, r2_scoreimport plotly.express as px # Synthetic generation of data examples for training the modeldef generate_house_data(n_samples=100): np.random.seed(42) size = np.random.normal(1500, 500, n_samples) price = size * 100 + np.random.normal(0, 10000, n_samples) return pd.DataFrame('size_sqft': size, 'price': price) # Function for instantiating and training linear regression modeldef train_model(): df = generate_house_data() # Train-test data splitting X = df[['size_sqft']] y = df['price'] X_train, X_test, y_train, y_test = train_test_split(X, y, test_size=0.2, random_state=42) # Train the model model = LinearRegression() model.fit(X_train, y_train) return model # Streamlit User Interface for Deployed Modeldef main(): st.title('🏠 Simple House Pricing Predictor') st.write('Introduce the house size to predict its sale price') # Train model model = train_model() # User input size = st.number_input('House size (square feet)', min_value=500, max_value=5000, value=1500) if st.button('Predict price'): # Perform prediction prediction = model.predict([[size]]) # Show result st.success(f'Estimated price: $prediction[0]:,.2f') # Visualization df = generate_house_data() fig = px.scatter(df, x='size_sqft', y='price', title='Size vs Price Relationship') fig.add_scatter(x=[size], y=[prediction[0]], mode='markers', marker=dict(size=15, color='red'), name='Prediction') st.plotly_chart(fig) if __name__ == '__main__': main()
0 notes
Link
import streamlit as stimport pandas as pdimport numpy as npfrom sklearn.model_selection import train_test_splitfrom sklearn.linear_model import LinearRegressionfrom sklearn.metrics import mean_squared_error, r2_scoreimport plotly.express as px # Synthetic generation of data examples for training the modeldef generate_house_data(n_samples=100): np.random.seed(42) size = np.random.normal(1500, 500, n_samples) price = size * 100 + np.random.normal(0, 10000, n_samples) return pd.DataFrame('size_sqft': size, 'price': price) # Function for instantiating and training linear regression modeldef train_model(): df = generate_house_data() # Train-test data splitting X = df[['size_sqft']] y = df['price'] X_train, X_test, y_train, y_test = train_test_split(X, y, test_size=0.2, random_state=42) # Train the model model = LinearRegression() model.fit(X_train, y_train) return model # Streamlit User Interface for Deployed Modeldef main(): st.title('🏠 Simple House Pricing Predictor') st.write('Introduce the house size to predict its sale price') # Train model model = train_model() # User input size = st.number_input('House size (square feet)', min_value=500, max_value=5000, value=1500) if st.button('Predict price'): # Perform prediction prediction = model.predict([[size]]) # Show result st.success(f'Estimated price: $prediction[0]:,.2f') # Visualization df = generate_house_data() fig = px.scatter(df, x='size_sqft', y='price', title='Size vs Price Relationship') fig.add_scatter(x=[size], y=[prediction[0]], mode='markers', marker=dict(size=15, color='red'), name='Prediction') st.plotly_chart(fig) if __name__ == '__main__': main()
0 notes
Photo
MacでUnity ML-Agentsの環境を構築する(v0.11.0対応) https://ift.tt/2LZN5gw
Unityで機械学習を利用するML-Agentsというライブラリがv0.11.0(beta)にバージョンアップしていたので試してみました。(2019/11/05時点)
v0.9.1からしばらく動作確認をサボっていたらだいぶと変更点があって戸惑いました。
Release ML-Agents Beta 0.11.0 · Unity-Technologies/ml-agents https://github.com/Unity-Technologies/ml-agents/releases/tag/0.11.0
Unity ML-Agentsについては下記が参考になります。
【Unity】Unityで機械学習する「ML-Agent」を色々と試して得た知見とか http://tsubakit1.hateblo.jp/entry/2018/02/18/233000
Unityをまだインストールしていないという方は下記をご参考ください。
Macでhomebrewを使ってUnityをインストールする(Unity Hub、日本語化対応) https://cloudpack.media/42142
手順
基本的には公式にある下記ドキュメントに沿えばよい感じです。
ml-agents/Installation.md at master · Unity-Technologies/ml-agents https://github.com/Unity-Technologies/ml-agents/blob/master/docs/Installation.md
ml-agents/Basic-Guide.md at master · Unity-Technologies/ml-agents https://github.com/Unity-Technologies/ml-agents/blob/master/docs/Basic-Guide.md#setting-up-ml-agents-within-unity
Pythonをインストールする
現在、Python 3.6.1以上での動作がサポートされています。3.5以前のバージョンはサポートされていないのでご注意ください。(2019/11/05現在)
ml-agents/Installation.md at master · Unity-Technologies/ml-agents https://github.com/Unity-Technologies/ml-agents/blob/master/docs/Installation.md
In order to use ML-Agents toolkit, you need Python 3.6.1 or higher. Download and install the latest version of Python if you do not already have it.
We do not currently support Python 3.5 or lower.
v0.10.0でようやく3.7以上に対応してくれたみたいです。
Release ML-Agents Beta 0.10.0 · Unity-Technologies/ml-agents https://github.com/Unity-Technologies/ml-agents/releases/tag/0.10.0
ML-Agents is now compatible with Python v3.7 and newer versions of Tensorflow up to 1.14.
お手元にPythonの環境がない方は下記をご参照ください。
MacでanyenvをつかってPython環境構築(bash、fish対応) – Qiita https://cloudpack.media/42033
ML-Agentsリポジトリをダウンロード
適当なディレクトリにリポジトリをダウンロードします。
> mkdir 適当なディレクトリ > cd 適当なディレクトリ > git clone https://github.com/Unity-Technologies/ml-agents.git
必要なライブラリをインストールする
ML-Agentsのパッケージをpipを利用してPyPIからインストールします。 ここではPythonの仮想環境を作ってインストールします。
仮想環境?なにそれ?な方は下記をご参照(再掲 https://cloudpack.media/42033
> python --version Python 3.7.4 > python -m venv venv > . venv/bin/activate # fishな方はこちら > . venv/bin/activate.fish > pip install mlagents
はい。
Unityアプリからサンプルプロジェクトを開く
Unity Hubでアプリを立ち上げます。Unity Hubがインストールされていない場合は下記をご参考ください。
Macでhomebrewを使ってUnityをインストールする(Unity Hub、日本語化対応) https://cloudpack.media/42142
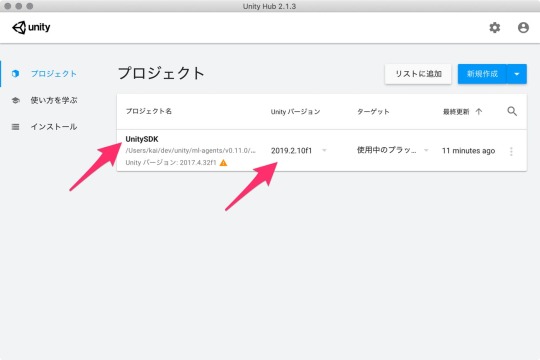
ML-Agentsを利用するにはUnityのバージョン2017.4以上が必要となります。今回は2019.2.10f1を利用しました。
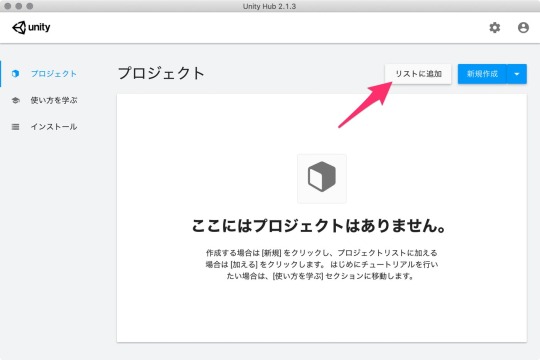
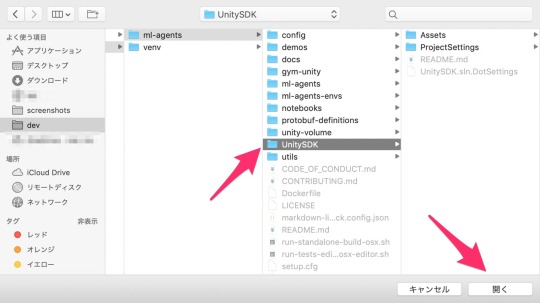
アプリが立ち上がったら「開く」ボタンから任意のディレクトリ/ml-agents/UnitySDKフォルダを選択します。

Unityエディタのバージョンによっては、アップグレードするかの確認ダイアログが立ち上がります。
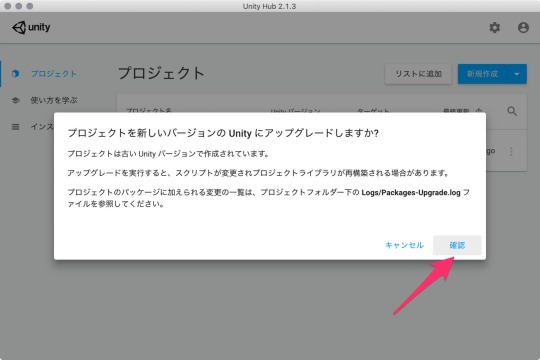
「確認」ボタンをクリックして進めます。アップグレード処理に少し時間がかかります。
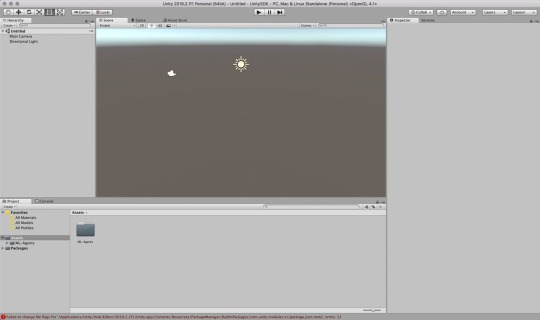
Scenes(シーン)が開くか確認する
サンプルが動作するか、Unityでプロジェクトを読み込み、動作させてみます。
Unityアプリの下パネルにある[Project]タブから以下のフォルダまで開く
[Assets] > [ML-Agents] > [Examples] > [3DBall] > [Scenes]
開いたら、[3DBall]ファイルがあるので、ダブルクリックして開く
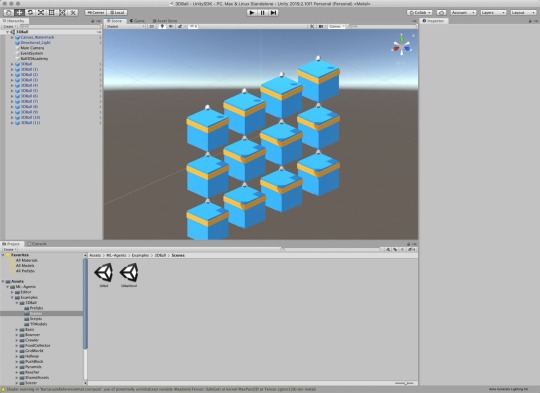
なんかでてきたー(感動
Unityの上にある再生ボタンをクリックします。
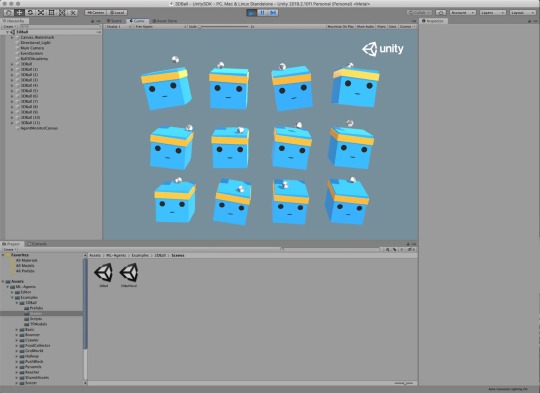
なんかうごいたー(感動 そして、かわいくなってるwww
読み込んだサンプルが動作することを確認できました。 現時点ではボール��ボックス?からすぐに落ちてしまいます。これを機械学習で、落とさないようにさせるわけです。
Scenes(シーン)の設定
ML-Agentsで学習させるための設定です。
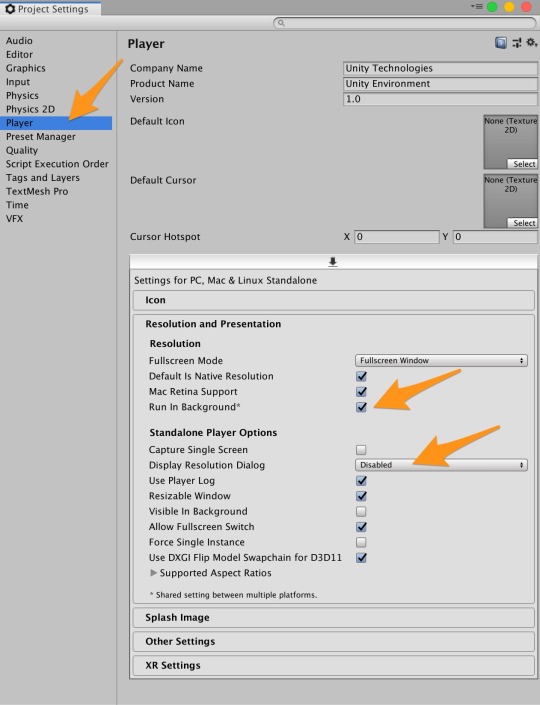
Unityアプリの[Edit]メニューから[Project Settings]を開く
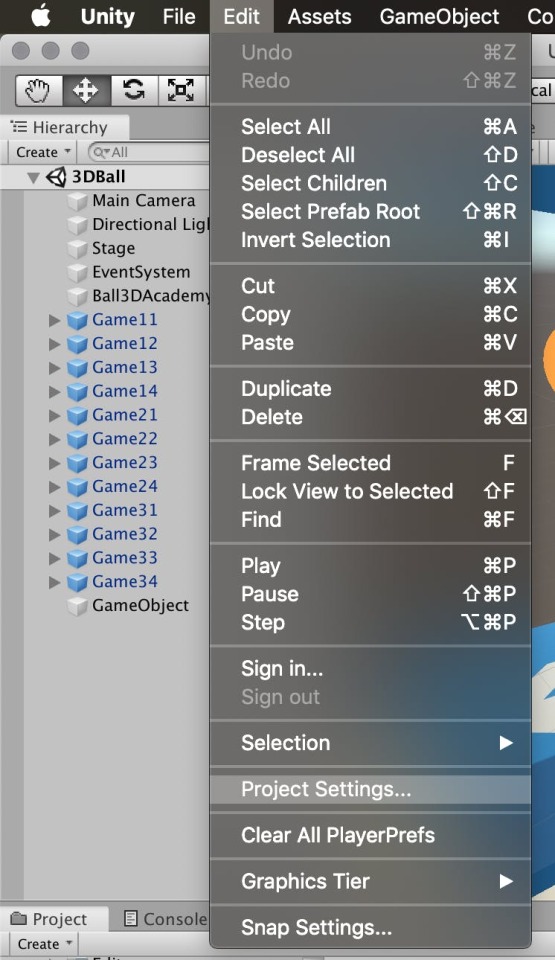
[Inspector]パネルで以下の設定を確認する
[Resolution and Presentation]の[Run In Background]がチェックされている
[Display Resolution Dialog]がDisableになっている
学習させる
学習に必要な設定ができましたので、Unityアプリ上で学習させてみます。
コマンドの実行
コンソールに戻り、学習開始のコマンドを実行します。オプションは結構数がありますが、最低限を指定します。
> cd 適当なディレクトリ > mlagents-learn ml-agents/config/trainer_config.yaml --train WARNING:tensorflow: The TensorFlow contrib module will not be included in TensorFlow 2.0. For more information, please see: * https://github.com/tensorflow/community/blob/master/rfcs/20180907-contrib-sunset.md * https://github.com/tensorflow/addons * https://github.com/tensorflow/io (for I/O related ops) If you depend on functionality not listed there, please file an issue. ▄▄▄▓▓▓▓ ╓▓▓▓▓▓▓█▓▓▓▓▓ ,▄▄▄m▀▀▀' ,▓▓▓▀▓▓▄ ▓▓▓ ▓▓▌ ▄▓▓▓▀' ▄▓▓▀ ▓▓▓ ▄▄ ▄▄ ,▄▄ ▄▄▄▄ ,▄▄ ▄▓▓▌▄ ▄▄▄ ,▄▄ ▄▓▓▓▀ ▄▓▓▀ ▐▓▓▌ ▓▓▌ ▐▓▓ ▐▓▓▓▀▀▀▓▓▌ ▓▓▓ ▀▓▓▌▀ ^▓▓▌ ╒▓▓▌ ▄▓▓▓▓▓▄▄▄▄▄▄▄▄▓▓▓ ▓▀ ▓▓▌ ▐▓▓ ▐▓▓ ▓▓▓ ▓▓▓ ▓▓▌ ▐▓▓▄ ▓▓▌ ▀▓▓▓▓▀▀▀▀▀▀▀▀▀▀▓▓▄ ▓▓ ▓▓▌ ▐▓▓ ▐▓▓ ▓▓▓ ▓▓▓ ▓▓▌ ▐▓▓▐▓▓ ^█▓▓▓ ▀▓▓▄ ▐▓▓▌ ▓▓▓▓▄▓▓▓▓ ▐▓▓ ▓▓▓ ▓▓▓ ▓▓▓▄ ▓▓▓▓` '▀▓▓▓▄ ^▓▓▓ ▓▓▓ └▀▀▀▀ ▀▀ ^▀▀ `▀▀ `▀▀ '▀▀ ▐▓▓▌ ▀▀▀▀▓▄▄▄ ▓▓▓▓▓▓, ▓▓▓▓▀ `▀█▓▓▓▓▓▓▓▓▓▌ ¬`▀▀▀█▓ INFO:mlagents.trainers:CommandLineOptions(debug=False, num_runs=1, seed=-1, env_path=None, run_id='ppo', load_model=False, train_model=True, save_freq=50000, keep_checkpoints=5, base_port=5005, num_envs=1, curriculum_folder=None, lesson=0, slow=False, no_graphics=False, multi_gpu=False, trainer_config_path='ml-agents/config/trainer_config.yaml', sampler_file_path=None, docker_target_name=None, env_args=None, cpu=False) INFO:mlagents.envs:Start training by pressing the Play button in the Unity Editor.
INFO:mlagents.envs:Start training by pressing the Play button in the Unity Editor. と出力されたら、Unityアプリの上部にある[]ボタンをクリックします。初期設定だと50,000ステップ実行するので少々時間がかかります。
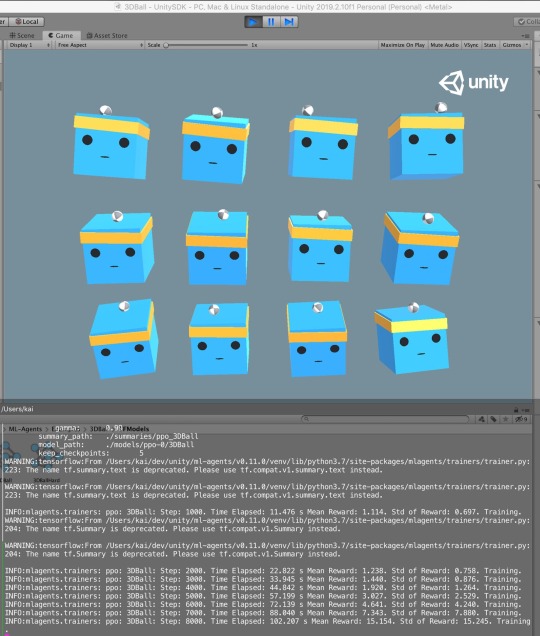
(略) INFO:mlagents.trainers: ppo: 3DBall: Step: 2000. Time Elapsed: 22.201 s Mean Reward: 1.167. Std of Reward: 0.766. Training. (略) INFO:mlagents.trainers: ppo: 3DBall: Step: 10000. Time Elapsed: 113.151 s Mean Reward: 30.106. Std of Reward: 27.092. Training. (略) INFO:mlagents.trainers: ppo: 3DBall: Step: 49000. Time Elapsed: 542.744 s Mean Reward: 100.000. Std of Reward: 0.000. Training. (略) IGNORED: Cast unknown layer IGNORED: StopGradient unknown layer GLOBALS: 'is_continuous_control', 'version_number', 'memory_size', 'action_output_shape' IN: 'vector_observation': [-1, 1, 1, 8] => 'sub_3' IN: 'epsilon': [-1, 1, 1, 2] => 'mul_1' OUT: 'action', 'action_probs' DONE: wrote ./models/ppo-0/3DBall.nn file. INFO:mlagents.trainers:Exported ./models/ppo-0/3DBall.nn file
Python 3.7.4で動作させているからか、TensorFlow 2.0だからなのか、WARNING が結構出力されますが、動作はしているので置いておきます。
学習結果をアプリに組み込む
学習が完了すると学習結果がmodels 配下に*.nnファイルとして保存されます。 それをUnityアプリに組み込むことで学習結果をUnityアプリに反映できます。
> tree models/ models/ └── ppo-0 ├── 3DBall │ ├── checkpoint │ ├── frozen_graph_def.pb │ ├── model-50000.cptk.data-00000-of-00001 │ ├── model-50000.cptk.index │ ├── model-50000.cptk.meta │ ├── model-50001.cptk.data-00000-of-00001 │ ├── model-50001.cptk.index │ ├── model-50001.cptk.meta │ └── raw_graph_def.pb └── 3DBall.nn 2 directories, 10 files
Unityアプリの設定
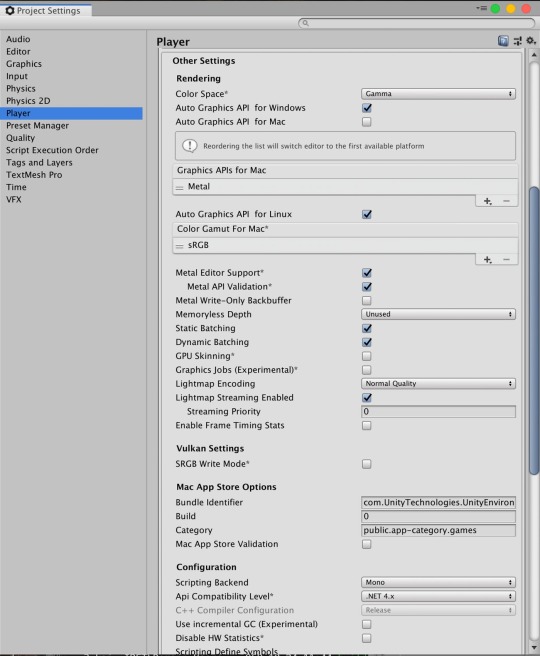
Playerの設定を行います。
Unityアプリの[Edit]メニューから[Project Settings]を選択する
[Inspector]ビューの[Other Settings]欄で以下を確認・設定する
Scripting BackendがMonoになっている
Api Conpatibility Levelが.NET 4.xになっている
学習結果ファイルの取り込み
ターミナルかFinderで学習結果を以下フォルダにコピーします。
学習結果ファイル: models/ppo-0/3DBall.nn
保存先: UnitySDK/Assets/ML-Agents/Examples/3DBall/TFModels/
※すでに保存先に3DBall.nnファイルが存在していますので、リネームします。
> cp models/ppo-0/3DBall.nn ml-agents/UnitySDK/Assets/ML-Agents/Examples/3DBall/TFModels/3DBall_new.nn
Unityアプリの下パネルにある[Project]タブから以下のフォルダまで開く
[Assets] > [ML-Agents] > [Examples] > [3DBall] > [Scenes]
開いたら、[3DBall]ファイルがあるので、ダブルクリックして開く
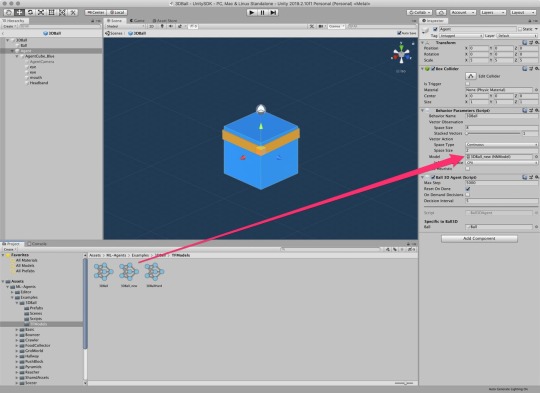
[Hierarchy]パネルから[Agent]を選択する
Unityアプリの[Project]パネルで以下フォルダを選択する
[Assets] > [ML-Agents] > [Examples] > [3DBall] > [TFModels]
Unityアプリの[Inspector]パネルにある[Model]という項目に[TFModels]フォルダ内の3DBall_new.nnファイルをドラッグ&ドロップする
Unity上部にある[

]ボタンをクリックする
これで、学習結果が組み込まれた状態でアプリが起動します。 50,000ステップ学習すると動きが穏やかでもはやプロです。なんのプロかはわかりませんが^^

サンプルは他にもあるので、いろいろとお試しあれ��� ML-Agentsはv0.5.0くらいから触っていますがだいぶと利用方法がかんたんになってきていますが、v0.11.0ではさらに設定箇所が減っていて良い感じになっています。
参考
【Unity】Unityで機械学習する「ML-Agent」を色々と試して得た知見とか http://tsubakit1.hateblo.jp/entry/2018/02/18/233000
Macでhomebrewを使ってUnityをインストールする(Unity Hub、日本語化対応) https://cloudpack.media/42142
ml-agents/Installation.md at master · Unity-Technologies/ml-agents https://github.com/Unity-Technologies/ml-agents/blob/master/docs/Installation.md
ml-agents/Basic-Guide.md at master · Unity-Technologies/ml-agents https://github.com/Unity-Technologies/ml-agents/blob/master/docs/Basic-Guide.md#setting-up-ml-agents-within-unity
Release ML-Agents Beta 0.10.0 · Unity-Technologies/ml-agents https://github.com/Unity-Technologies/ml-agents/releases/tag/0.10.0
MacでanyenvをつかってPython環境構築(bash、fish対応) – Qiita https://cloudpack.media/42033
Macでhomebrewを使ってUnityをインストールする(Unity Hub、日本語化対応) https://cloudpack.media/42142
元記事はこちら
「MacでUnity ML-Agentsの環境を構築する(v0.11.0対応)」
December 17, 2019 at 04:00PM
0 notes