#topological optimisation
Explore tagged Tumblr posts
Text

Waverider Interactive 3D Model
Project ✤ To create the Waverider from DC's Legends of Tomorrow.
Objectives :
Practice modular modelling in Maya.
Scripting in Unreal Engine.
Model optimisation for Unreal Engine.
Texturing in Substance.
Devlog 1
Focused on familiarising myself with Maya by choosing an easier part of the ship to kitbash and model - the hallway. First I collected reference images on PureRef and organised by room type.
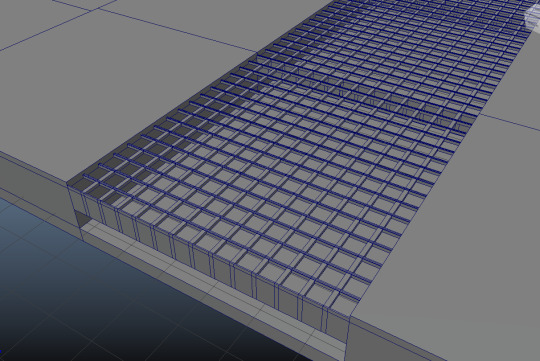
First thing I made was the floor - the grate. After watching some modular modelling/kit bashing videos on youtube, I began modelling. I adjusted grid settings in order for scale to translate to Unreal Engine. Kept model scale to whole numbers to allow kit bashing later by using ctrl + t in order to use precise measurements.

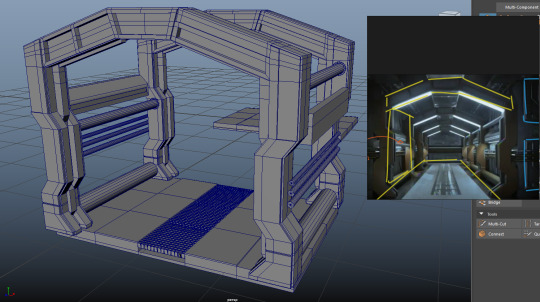
Then I focused on modelling the columns from the hallway. I was quite picky with dimensions - but I had to focus on in-game dimensions, rather than real life dimensions to make kit bashing possible later on. Kept debating throughout whether or not to UV (decided against it for now) but tried to keep things as symmetrical as possible. I used reference images with actors standing next to columns to get height estimation. Also began modelling the pipes and other details.
Reflection
Quite successful but slow start - getting used to controls etc.
Kept to good and clean topology.
Will try to speed up in future sessions.
2 notes
·
View notes
Text
Harold Halibut - Demo Feedback
Archived from Steam thread.
(Context: I have about 10 years of experience in indie game development, in various roles--including programming, art asset creation, playtesting and feedback). Mainly in story-focused 2D games, though I've also been involved with 3D games. I mention this because my experience with 3D game development is fairly limited. So I'm likely not seeing the whole picture here.)
I will be approaching composing this post from a problem-solving standpoint. Like I am being asked to give feedback on how to help reduce the file size of a game to something more reasonable.
This was going to be my feedback on optimisation, which was based on an assumption on the models being 3D scanned: Looking at the animation, the assets are handmade irl (like stop-motion), then animated digitally. It creates this surreal, full-body puppet-costume effect with the movement, which is very nostalgic for me (positive). So I think the devs 3D scanned (using photogrammetry) every model and prop into the game, but may not have reduced the vertex amount (or not reduced it as much as they could have). This would explain why this adventure game's file size is bigger than Diablo Immortal, Palworld, or Persona 5 Royal (which are part of a different genre of games with different file size expectations).
However, after reading through this thread, I realise that a significant portion of the file is owed to textures. Though I was apparently correct on my guess about the use of photogrammetry. I can't take a look at the models' topology myself, but if the vertex amount can be reduced further and have "smooth shading" and wrinkle maps added to models (in case it hasn't already), I suggest experimenting with that as well.
While I can't look under the hood myself and look through the game's files (in a pre-compiled-build state), I would suggest trying to find more ways to reduce the files' size, whether they are texture files or not. A developer has stated that the decision was made to not reduce the texture quality further, so perhaps there are other options not yet fully explored? Are all the audio files converted to .ogg or another small file type? How much of the files are packed up into archives when the build is compiled? What file types are the textures? Can they be converted to another file type that can be read by the game's engine that is smaller in size yet doesn't drastically reduce image quality?
Please understand, my words come from a place of admiration for this game. Of watching this game's development over time and wanting it to succeed with the best foot forward it can. Optimisation is held up as important for demo development, as a demo is a form of introduction to people interested in playing the full game. It is for this reason that I urge the development team to concentrate focus on optimising the file size down considerably.
It is clear to me that Harold Halibut is a labour of love, and I wish for this game to be as accessible as possible to people who love adventure games (which tend to be folks who often use laptops to play them--if the Nancy Drew fandom is to be listened to). I look forward to the full release of this game, and hope that this file size issue is but a bump in the game's long journey can be overcome and resolved.
2 notes
·
View notes
Text
FMP Forefront
21/07/2024
(Levine, 2023)
This article gives many great examples of retopology tools and techniques that could be added to my workflow. Since I had timing issues with my retopology, I’ve been looking further into different ways of retopping to be able to fall back on in the future.
It shows a variety of add-ons that can be added to Blender, ZBrush or Maya, varying in prices. Each one offers a slightly different way to create retopology, either fully automatically or incorporating some manual topology to specify how you want the quads to flow.
One tool that stands out to me is RetopoFlow 3. This add-on is designed to help with rigging and animation, which is a major help to a solo artist like myself, since I don’t have an animator. It also allows you to choose what kind of poly count you want to have, so you can choose something higher or something lower.
Another key tool that stood out to me was TopoGun 3. This tool creates good topology, and also creates and bakes maps. It has a fully optimised workflow, and is able to bake all the selected maps in one click. This is a very appealing add-on to me, because it seems like it would make the process much faster, and also allows for both automatic and manual retopology, so both can be optimised.
I think looking at these add-ons will positively impact my workflow and production speed in future projects.
Bibliography
Levine, G., 2023. 80 Level Digest: Useful Retopology Tools for Your 3D Projects. [Online] Available at: https://80.lv/articles/80-level-digest-useful-retopology-tools-for-your-3d-projects/ [Accessed 21 July 2024].
0 notes
Text
Stalker. Progress. Part 4.
I dedicated an entire day towards finishing the modelling and trying to get original textures and assets for the stalker character: It didn't go well. So I decided to improvise.
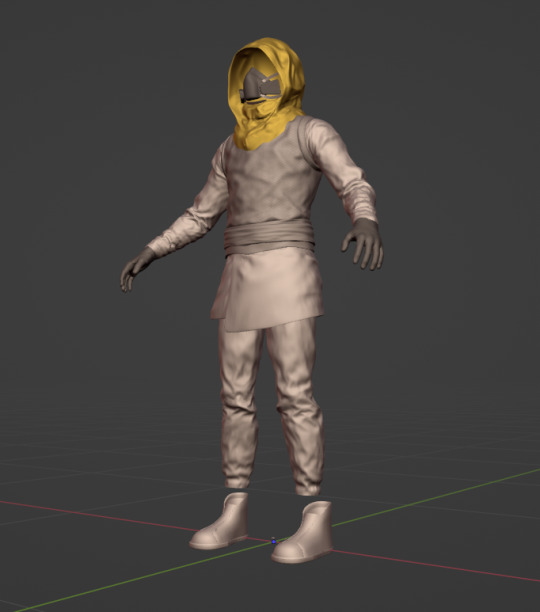
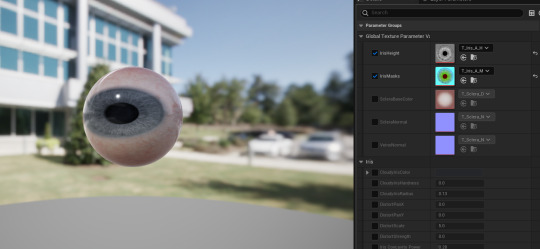
Last time I was working on the shoes. I checked the overall quality of the mesh, and once I was happy with the low poly model, I subdivided the entire mesh and began sculpting.
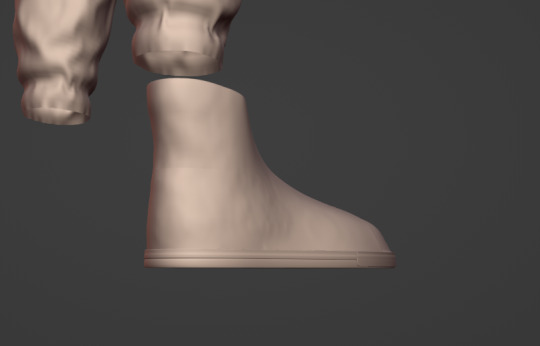
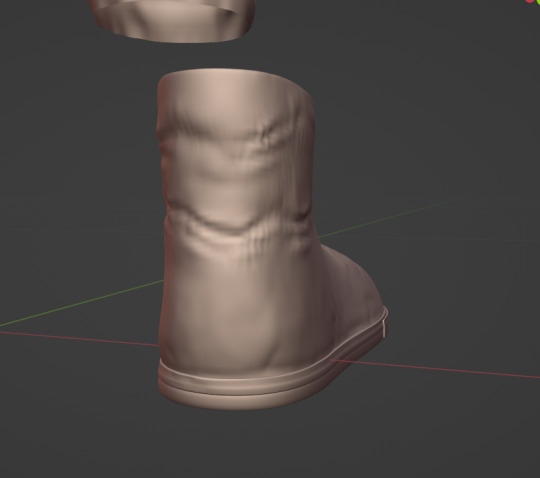
For the shoes, I combined all the techniques that I learned through the course: I sculpted simple folds, then applied a tiny bit of generated folds for the view - and then finally used alpha brushes to add special folds and details to the shoe. Before applying the references, I looked at the original images to understand how to place cloth details: I figured I should have added more details to the back side of the shoe and in the centre of the shoe while avoiding too many details at the front and sides of the boot.
For the Shoulder pads - I just decided to apply some leather sculpt for the belt, as I think it will look more defiantly together with the metallic part, and do some simple brushwork to add a texture to the surface, and mayde some damage.
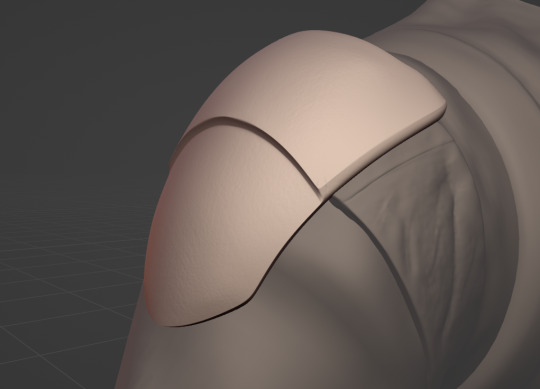
Once I was done with the sculpting, I began adapting the whole mesh for baking. I created low poly models by resetting the subdivision modifiers while still maintaining an optimised amount of vertices through the whole mesh (which is around the 95k verts, excluding the head mesh).
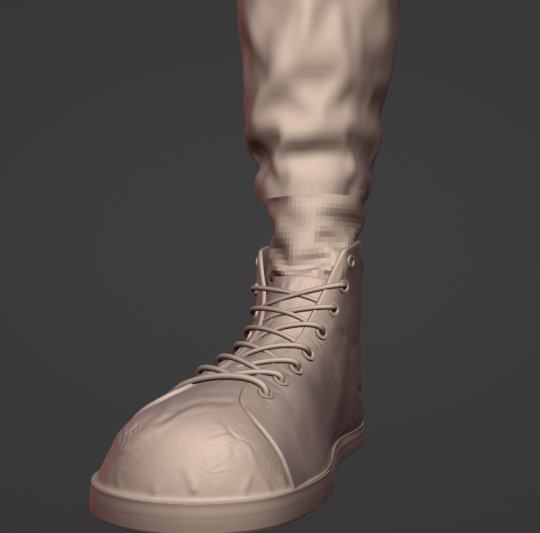
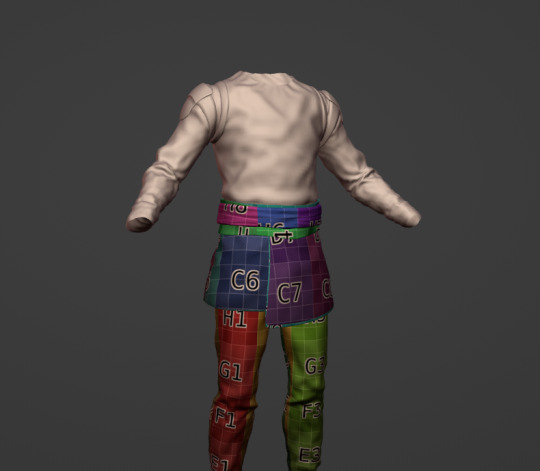
Preparing the low poly meshes was not that hard - I just had to duplicate the model and project the verts towards the mesh, and fix any rare problems that the projections make.
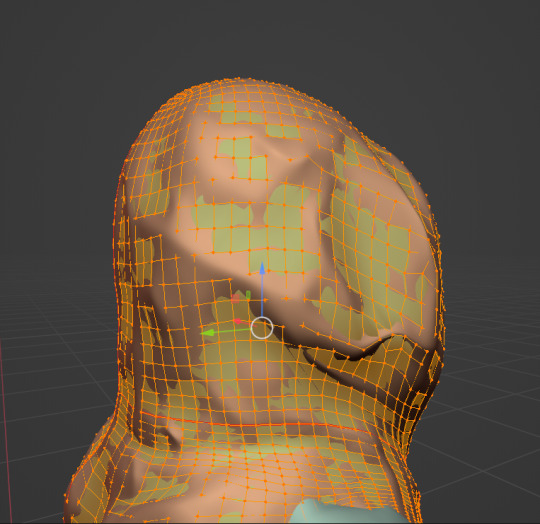
Making the hood was the hardest task since the existing multi-resolutions were too small or too big, so I had to pick the lowest level of a subdivision and manually optimise the mesh. On top of that - projection does not like corners. So I had to manually fix the problem, thankfully I just needed to drag them around the model.
In terms of UV unwrapping - I thought about hiding the seams as much as possible, but then I was suggested a Subsctance Painter tutorial video about how it's not that hard to hide seams, and I decided to give it a shot. This is a worthy idea, since relaxed seam placement allowed me to cover much of the mesh into the UV maps.
Now, we are ready to work on the textures.
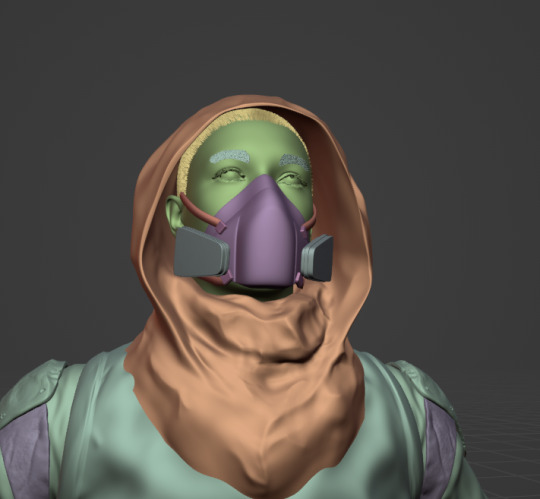
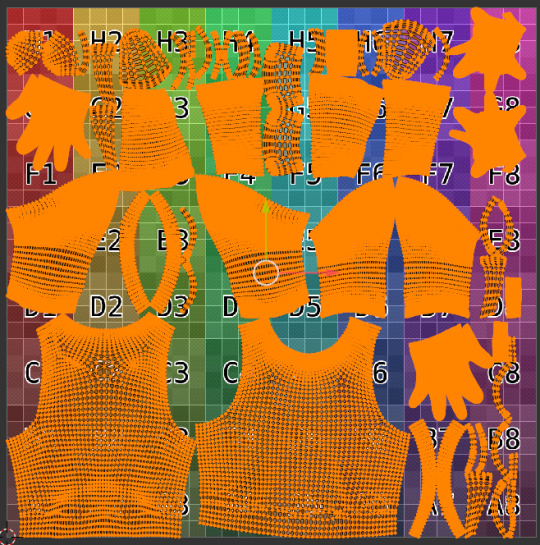
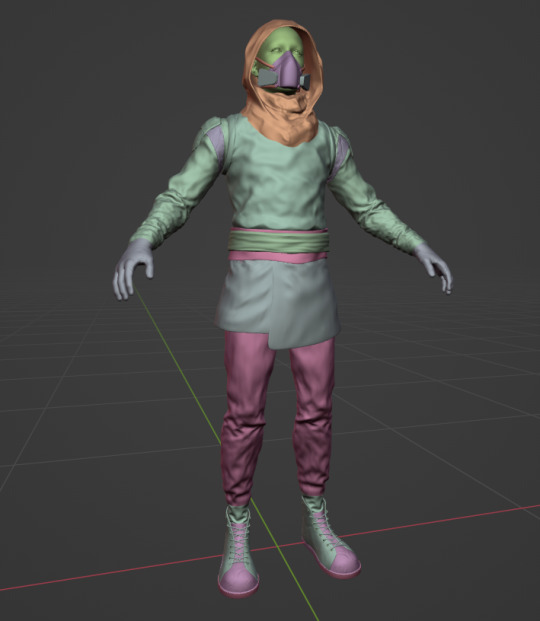
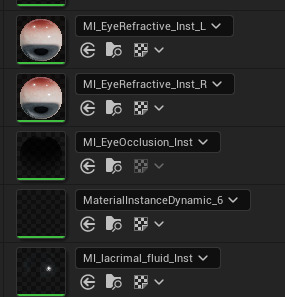
The first problem that I have encountered with - is the fact that the original face model works quite differently from what I have seen. It has many material groups (probably used to achieve various effects in UE5) - but some of the materials do not really have any face data in them, all the meshes have a weird topology level and finally - the unwrap quality is way off.

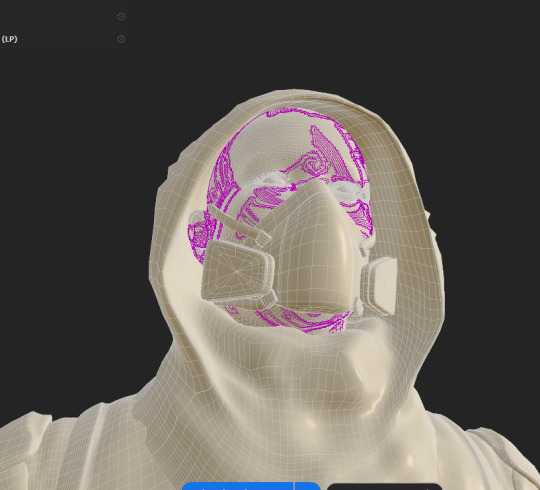
While I understood the purpose of the design of this model - since it has advanced rigging capabilities, and several effects happening in the Unreal Engine. However, I really struggled with understanding the intended way of working with the model outside of the Unreal Engine. While I still had some time to figure out what am I doing wrong, I decided to watch some tutorials.
youtube
youtube
After watching the tutorials made by Bakyt Kalmuratov (2023) and Han3D (2024), I figured that I just exported textures from the Unreal Engine in the wrong way, and corrected myself with the aid of the tutorials. I also figured that it can be easy to extract some textures, while may be hard to extract others.
Originally, I wanted to insert the MetaHuman mesh into the Substance Painter, in order to understand if I do the exports properly and also apply some simple effects. But after having various problems with the import (probably since I deleted the rig and changed the mesh by automatically removing duplicates, thus involuntarily editing the UV and mesh data), I decided to scrap that and work on it during the UE export.
References:
Bakyt Kalmuratov (2023). export Metahuman in FBX format. [online] YouTube. Available at: https://www.youtube.com/watch?v=vLJk82JgMu0 [Accessed 4 Aug. 2024].
Han3D (2024). Full custom metahuman workflow tutorial Blender Unreal Substance. [online] YouTube. Available at: https://www.youtube.com/watch?v=Pwm2zc4k1Ms [Accessed 4 Aug. 2024].
0 notes
Text
Unlock Your IT Potential: Master CCIE Data Center V3.0 with This Ultimate Guide!
The CCIE data center is a reputed networking certification. It is recognized as a network engineer's proof of skill, knowledge, and expertise. It offers deep technical knowledge to make a professional ready to take on the data center assignment challenges in the industry.
The CCIE certification is recognized globally as the pattern and the program is continuously upgraded by Cisco. The program quality, tested methods, and the relevance of the program to the core industry practices make it a desirable course for someone looking for a jump in their IT career.

About the program
The CCIE data center course is conducted by certified Cisco instructors. The students get access to the latest physical equipment as recommended by the CCIE Data Center v3.0 Lab. The course is reviewed frequently to update it as per requirements.
Here is the list of qualifying exams:
Network
Automation
Security
Storage Network
Compute
Here are the lab exams to appear for the qualifying:
Data Center L2/L3 Connectivity
Data Center Storage Protocols and Features
Data Center Automation and Orchestration
Data Center Fabric Infrastructure
Data Center Security and Network Services
Data Center Compute
Data Center Fabric Connectivity
Who should enroll in the certification program?
Apply For CCIE Data Center Training and Certification
The course is apt for:
Network engineers who have appeared for the core exam
Network engineers who come with at least 5 to 7 years of experience in deployment, designing, operation, and optimisation of the Cisco data center technologies
Network engineers that use the expert level process to solve problems and carry out option analysis to support the technologies and the topologies of the data center
Network designers who support and design data center technologies
The course is apt for professionals and students who are working in the technology and IT sectors and wish to enhance their learning and gain a globally recognised professional certification that can help improve their job prospects.
Prerequisites for the course
To gain complete benefit from the course you should have the below skills and knowledge.
Be familiar with TCP/IP networking and ethernet
Understand routing, networking protocols, and switching
A foundation knowledge of Cisco ACI
Understanding of SANs
Familiar with the fiber Channel protocol
Be able to identify the products in the Cisco MDS families. the Cisco Data enter neNxus and the Data Center architecture
Understand the architecture and the server system design
Be familiar with the virtualization fundamentals
Skills earned by professionals after CCIE Data Center training
Students gain hands-on experience on the Cisco Nexus switches, the Cisco MDS switches, Cisco USC C-series rack servers, and Cisco Unified Computing System B-Series Blade Servers
They gain practice on ways to implement the key ACI capabilities like polices and fabric discovery
Students are taught to deploy SAN capabilities like Role-based access control, virtual storage area networks, n-port visualization fabric security, and slow drain analysis
They understand troubleshooting installation, interconnectivity issues, and configuration on the Cisco multilayer director switch switches and the Cisco fabric extenders
The students get hands-on practice to implement the Cisco data center automated solutions which include programming orchestration and concepts and using automated tools
They learn ways to design practices that are focused on the solutions and technologies of the Cisco data center across the network
Benefits of earning the CCIE Data Center Certification
After the course completion, the student can validate create, and analyze the network designs. They understand the capabilities of various solutions and technologies. They are well-versed in translating the clients’ requirements into solutions. Students are capable of operating and deploying the network solutions and can position themselves as a technical leader in enterprise networks. They can combine their design and technical skills and are capable of meeting the new-age tech needs of network programmability and automation.
Exam pattern
The candidate needs to appear for an 8-hour practical exam which accesses their skill on the network lifecycle. The exam has 2 modules each of which has a minimum mark and a passing score.
Reason to choose CCIE data centre
The Cisco Certified Internetwork Expert is a prestigious certification and here are the reasons why it is one of the most sought-after courses today.
CCIE professionals earn a high salary and many job opportunities open up for them after this certification
The certification is globally recognized and demonstrates the professional’s expertise in Cisco networking technology
Networking is critical to almost all businesses and thus CCIE certification is highly in demand
Those with the certification can demand over 30% higher salary in comparison to their noncertified peers
The certification is designed to keep up with the latest trends in the IT industry and this keeps the skill relevant in the market
Several job opportunities open up for a CCIE certified professionals as consultants, network managers, and network architects
Why learn the CCIE Data Center course from Lan and Wan Technology
Personalised training program that helps students meet their full potential
Certified trainers who come with years of teaching and practical experience
Cost-effective coaching which makes the course value for money
Choice of online and offline courses which give students the flexibility to study as per their comfort
Several courses to choose from as per the professionals’ career dreams
A mix of theoritical and practical knowledge that offers independent analysis and helps in boosting the student's career
100% job assistance after completing the certification
Interview assistance to help students crack the toughest of rounds
Lan and Wan Technology offers courses that are accredited and help students build their career
Job opportunities after passing the certification
Once the candidate gets the CCIE Data Center certification they are eligible to work as a Sr. data center engineer, lead consulting systems engineer, LC network designer, or a Sr technical solutions architect
Lan Wan Technology is a trusted CCIE Data Center Training institute that helps and trains students to achieve their goals of being CCIE certified.
FAQ
Who are the ideal candidates to enroll in the CCIE data center training program?
The ideal candidates are those who come with basic networking knowledge as the training is designed to meet the skill set of IT and network engineers.
What are the devices used in the hands-on lab?
The students get a hands-on experience on the CCIR Racks which is based on the latest examination blueprint.
What is the demand for CCIE Data Center experts in the market?
There is a huge demand for certified CCIE Data Center experts as it lets them establish themselves as an expert in their industry.
How much is the passing score in the CCIE Data Center examination?
There are two modules and each module has a minimum and a passing score. The scores are decided based on the difficulty of the exam paper.
What is the pass score and the minimum score?
The pass score corresponds to the competence at an expert level. The minimum score is the lowest minimum scored that you can expect from an expert candidate.
What is the scoring pattern to pass the exam?
The candidate should score higher than the aggregate pass score of both the modules and they should score higher than the minimum score that is set on each of the modules. In case the candidate scores less than the aggregated pass mark of both the modules or gets less than the minimum score on any module then they fail the exam.
What happens if the candidate fails the exam?
If the candidate fails the exam, then they will get a score report that indicates the module that they have failed or passed. They will also get a cumulative scoring percentage on a per-domain level basis across both modules
What can students expect in the exam?
This is an eight-hour practical examination that examines the candidate's skill through the network lifecycle of deploying, designing, and operating the complex scenarios of networking. The exam has 2 modules.
#CCIE Data Center Certification Online#CCIE Data Center Course#CCIE Data Center Course in Noida#CCNP Service Provider#CCIE Data Center certification cost#CCIE Data Center full form#CCIE Data Center Course online#CCIE Data Center exam#CCIE Data Center certification#Cisco CCIE Data Center training and certification free#Cisco CCNP Service Provider#CCIE Data Center training and certification online#CCIE Data Center training and certification free#Cisco certification path#How much does CCIE Data Center certification cost?#Which CCIE Data Center certification is best?#How do I get my CCIE Data Center certificate?#What are the 5 levels of Cisco certification?
0 notes
Text
Google GKE Autopilot Pricing: Pay Only for What You Use

Cloud Run, fully-managed Autopilot mode, container orchestration with Google Kubernetes Engine (GKE), and low-level virtual machines (VMs) in Google Compute Engine are just a few of the fantastic ways that Google Cloud can run your workloads. Up until recently, you had to buy multiple Committed-use Discounts (CUDs) to cover each of these many products in order to maximise your investment. For instance, you may have bought an Autopilot CUD for workloads operating in Google GKE Autopilot, a Cloud Run CUD for Cloud Run always-on instances, and a Compute Engine Flexible CUD for VM expenditure including workloads running in GKE standard mode.
What is GKE Autopilot?
GKE In Google GKE Autopilot, Google controls your cluster configuration, including nodes, scaling, security, and other predefined parameters. Autopilot clusters use your Kubernetes manifests to provision compute resources and are optimised to run most production applications. The simplified configuration adheres to scalability, security, and cluster and workload setup best practices and recommendations from GKE. See the comparison table between Autopilot and Standard for a list of pre-installed settings.
Autopilot GKE pricing
When using Google GKE Autopilot, you often only pay for the CPU, memory, and storage that your workloads require. Since GKE oversees the nodes, you are not charged for any capacity that is not utilised on your nodes.
System Pods, operating system expenses, and unforeseen workloads are all free of charge. See Autopilot pricing for comprehensive pricing details.
Advantages
Concentrate on your apps: Google takes care of the infrastructure, allowing you to concentrate on developing and implementing your apps.
Security: By default, clusters are configured with a hardened configuration that activates numerous security parameters. GKE complies with whatever maintenance plans you set up by automatically applying security fixes to your nodes when they become available.
Pricing: Billing estimates and attribution are made easier with the Autopilot pricing model.
Node management: Since Google oversees worker nodes, you can set up automatic upgrades and repairs and don’t need to build new nodes to handle your workload.
Scaling: GKE automatically assigns additional nodes for those Pods and automatically increases the resources in your existing nodes based on demand when your workloads encounter high load and you add more Pods to handle the traffic, such as with Kubernetes Horizontal Pod Autoscaling.
Scheduling: Autopilot takes care of the pod bin-packing process, saving you the trouble of keeping track of how many Pods are active on each node. Pod spread topology and affinity are two further Kubernetes technologies that you may use to further regulate Pod placement.
Resource management: Autopilot automatically sets pre-configured default settings and adjusts your resource requirements at the workload level if you deploy workloads without configuring resource values, such as CPU and memory.
Networking: Autopilot automatically activates some networking security measures. For example, it makes sure that all network traffic from Pods travels via your Virtual Private Cloud firewall rules, regardless of whether the traffic is intended for other Pods in the cluster or not.
Release management: Your control plane and nodes will always operate on the most recent certified versions of the software because every Autopilot cluster is registered in a GKE release channel.
Managed flexibility: Autopilot provides pre-configured compute classes designed for workloads with specified hardware or resource requirements, like high CPU or memory. Instead of having to manually establish new nodes that are supported by specialised machine types and hardware, you can request the compute class in your deployment. Additionally, GPUs can be chosen to speed up workloads such as batch or AI/ML applications.
Decreased operational complexity: By eliminating the need for constant node monitoring, scaling, and scheduling, autopilot lowers platform management overhead.
A SLA covering both the control plane and the compute capability utilised by your Pods is included with Autopilot.
Arrange your Autopilot clusters
Plan and build your Google Cloud architecture prior to forming a cluster. You specify the hardware you want in Autopilot based on your workload requirements. To run certain workloads, the required infrastructure is provisioned and managed by GKE. For instance, you would ask for hardware accelerators if you were running machine learning workloads. You ask for Arm CPUs if you are an Android app developer.
Depending on the size of your workloads, plan and request quota for your Google Cloud project or organisation. Only when your project has sufficient quota for that hardware will GKE provide infrastructure for your workloads.
When making plans, keep the following things in mind:
Cluster size and scale estimations
Type of workload
Cluster organisation and application
Network topology and setup
Configuring security
Cluster upkeep and administration
Deploying and managing workloads
Record-keeping and observation
Increasing Calculus Flexible CUDs
Google is happy to report that the Compute Engine Flexible CUD, which is now called the Compute Flexible CUD, has been extended to include the premiums for Autopilot Performance and Accelerator compute classes, Cloud Run on-demand resources, and the majority of Google GKE Autopilot Pods. The specifics of what is included are contained in the manuals and our SKU list.
You can cover eligible spend on all three products Compute Engine, GKE, and Cloud Run with a single CUD purchase. For three-year agreements, you can save 46%, and for one-year commitments, 28%. You may now make a single commitment and use it for all of these items with one single, unified CUD, maximising its flexibility. Moreover, you can apply these commitments on resources across all of these goods in any region because they are not region-specific.
Eliminating the CUD Autopilot
Google is eliminating the Google GKE Autopilot CUD because the new extended Compute Flexible CUD offers a larger savings and more overall flexibility. The old Google GKE Autopilot CUD is still for sale until October 15; after that date, it will be discontinued. It makes no difference when you purchase an existing CUD; they will still be applicable for the duration of their term. Having said that, Google advise you to investigate the recently enhanced Compute Flexible CUD for your requirements both now and in the future due to its improved discounts and increased flexibility!
Read more on Govindhtech.com
#GoogleGKEAutopilot#googlekubernetesengine#GoogleCloud#cloudcomputing#AutopilotandStandard#autopilotpricing#operatingsystem#CloudFirewall#CPU#NetworkingSecurity#AI/MLapplications#GPU#CloudRun#computerengineering#news#technews#technologynews#technologytrends#govindhtech
0 notes
Text
D'Adda's Ghibli-Style Mountain Village - Part 1
This post will explore the work done by Lara D'Adda, a 26-year-old art student at Howest DAE in Belgium. She shares her journey from fine arts to her new passion for 3D art, particularly in environment creation. She presents her most recent creation, the Stylized Mountain Village, which demonstrates her passion for creating landscapes evocative of Ghibli films. I find the breakdown of her process with this project exciting, particularly modelling and texturing, as I am looking to achieve a similar level of artistry in the future.
youtube
D'Adda's success depended on thorough planning and preparation. Before beginning the production process, she picked a concept art as a reference for her art and spent significant time evaluating it and finding the necessary assets and resources. The task was to dissect and understand the various components of her environment and what techniques she could use to create it. This initial phase, while admittedly messy and subject to change, served as a vital roadmap for the project's execution, providing her with a solid basis to ensure her vision had accuracy and clarity.
The artist moved on to the blockout stage after her planning phase, which was a critical step in realising her vision. When faced with the problem of reproducing a large town in a landscape that has height differences, Lara used a combination of simple blockouts for structures, and basic boxes for the terrain, an approach similar to ones I've analysed in previous blog posts. She says that this technique enabled her to imagine the arrangement of the scene, playing with angles, and height positions to capture the basic look of her concept. Furthermore, she saved fixed camera locations, allowing her to build main views and adjust her scene accordingly.
To set an initial ambiance and mood, Lara used a basic lighting setup that included a skylight with an HDRI and a directional light. This helped not only to supplied illumination, but also lay the platform for further lighting adjustments, ensuring a cohesive light and colour tone for the environment. Then the post-planning stage followed through, where she handled the modelling step systematically, starting with the design of numerous general components that would serve as the basis for the village houses. Drawing inspiration from the concept, Lara chose to create assets that can be constructed modularly, using beams to form several sets of walls, a practical and efficient solution. This sped up the modeling process, and gave her the freedom to effortlessly exchange pieces when needed, increasing the overall flexibility of the objects.
The size and pivot of the walls and windows were standardised, ensuring continuity and cohesiveness throughout the production of the scene. This simple detail not only made modifications easier, but it also added to the buildings' overall visual coherence in terms of proportion which is a main factor of good composition. Lara used a smart way to create the roofs as well, starting with a flat plane mesh and then carefully adding extruded tiles to give more volume and geometry to them. Similarly, she used the same method to increase the three-dimensionality of the brick walls and chimneys, by inserting single bricks into the wall plane to create shadows and depth. I like this type of mixed approach since it helped keep the assets optimised while faking a complex mesh topology.
Initially, Lara struggled with the overwhelming task of organising the texturing process. Nonetheless, drawing inspiration from tutorials and her own creative ideas, she turned to Substance 3D Designer where she built basic materials for plaster, bricks, and roofing, which helped establish a uniform style that would be portrayed in the entire village environment. After importing her materials into Unreal Engine, she began developing master materials to maintain the uniformity and flexibility she had previously set. Lara's technique revolved around the use of blend nodes and masks in UE to give her materials some depth and complexity, a method I have yet to learn. Blend Overlay and noise textures were used to add subtle colour and texture variations, which contributed to believability and authenticity.
One unique feature of Lara's approach was her emphasis on reusability and efficiency. By multiplying instances for the various houses and using a modular approach to shader generation, she gained better productivity without losing visual identity. Furthermore, her attention to detail extended to the incorporation of moss, a minor element that helped create a rustic natural beauty in the village. Using a gradient from the bottom to the top of each mesh and noise textures for variation, Lara created a realistic depiction of moss development, a technique that is also used for grass and other types of foliage in games.
Reference:
Lara D'adda. (2023). Making a Ghibli-Inspired Mountain Village in Unreal Engine 5. 80.lv [e-journal] Available at: https://80.lv/articles/making-a-ghibli-inspired-mountain-village-in-unreal-engine-5/
0 notes
Text
Week 3 - Siblings. Part 6.
I created the assets for the siblings, by following the references that Camila has created.


I started with the simple forms for the bags, extruded and deformed it a bit. Then I activated the subdivision modifier, and worked alongside it to control the topology.

Then, I used curves, made them pass around the character, and created some knots to hide the entrance holes on the bag, and for decoration.

Finally, I created the high and low poly of the same mesh, made some small adjustments on a high poly with a brush, and adjusted the amount of vertices the curve would have to optimise the mesh.
The same goes with the bags and a mouse - I started with a simple form, then sculpted it into a bag. Later on, I applied a knot or a tail to it so that it would look more appealing.


References:
D. P. Camila (2024) Hansel and Gretel - Coloured Hansel, design #1 [Digital Art]. University of Hertfordshire.
D. P. Camila (2024) Hansel and Gretel - Coloured Gretel, design #1 [Digital Art]. University of Hertfordshire.
D. P. Camila (2024) Hansel and Gretel - Mouse concept work.[Digital Art]. University of Hertfordshire.
0 notes
Text
Live brief sword prop
I took the task of creating a sword model for rogue character. This is due to the fact I enjoy creating props and it allows me to continue to work on my hard surface modelling.
I was inspired by a Chinese sword I had seen recently when rewatching Avatar: The Last Airbender. It is called an Oxtail sword and believe it fits well with the aesthetic of the rogue character.
I used Blender to create it since I am most familiar with that software and overall, I am pleased with the progress so far. I’m particularly happy with the topology, which is well optimised and should help keep things smooth in Unreal Engine.


Bibliography
‘Zuko Alone’ (2006) Avatar: The Last Airbender, Series 2, episode 7. NICKELODEON, 12 May
0 notes
Text
Unreal Engine MetaHuman Test
To make sure I know how to process works, I tested the workflow and implemented the custommed MetaHuman in Unreal Engine.

Fig.1: MetaHuman To Unreal Engine 5 Workflow Test
For the production process, I will use the base mesh of the custom made MetaHuman and sculpt it while preserving the UV maps. This will allow me to give the unique look of my character and add cloth and hair simulation while preserving clean topology.
youtube
Fig.2: Bad Decisions Studio Tutorial
In addition to tutorials, I also researched different articles from other artists that would use a similar pipeline with complex characters. The 80.lv article from Nick Gaul helps me have a good understanding of a professional workflow and the steps that I will have to take when making the characters.

Fig.3: Nick Gaul 80.lv Article
I will also use Sean Dixon's article as reference for good topology and UV mapping.

Fig.4: Sean Dixon Article
In previous projects I was lacking efficiency and optimisation. As a result, this project I am determined to pay more attention and learn how to properly optimize my characters.
Bibliography:
Fig.2: Bad Decisions Studio (2023) Customise your MetaHuman | Unreal Engine 5 Tutorial. Youtube. Available at: https://www.youtube.com/watch?v=b_ZjsUg2XCc (Accessed: April 25, 2024).
Fig.3: Gaul, N. (2024) Character production in unreal engine’s MetaHuman & XGen, .80.Lv. 80lv. Available at: https://80.lv/articles/character-production-in-unreal-engine-s-metahuman-xgen/ (Accessed: April 23, 2024).
Fig.4: Dixon, S. (2016) UV mapping, texturing and shaders, rigging and animation, Medium. Available at: https://medium.com/@sdixon3/uv-mapping-texturing-and-shaders-rigging-and-animation-be9b4ddf0d48 (Accessed: April 23, 2024).
0 notes
Text
Maya - Barrel Asset
As a bit of homework I was tasked to recreated a barrel (in broad shape) in Maya. It was a reasonably easy bit of homework, but good fun and I figured I'd break it down a bit here.
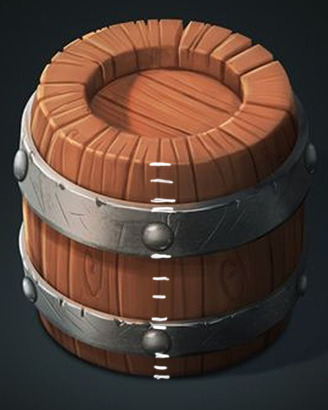
Firstly, the source material:
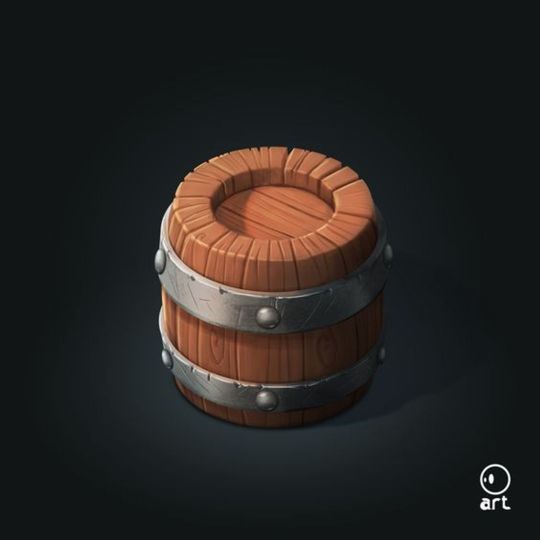
Knowing just enough about 3D modelling I figured out some rough ideas of edge loops from the jump, knowing that otherwise things could get rough.
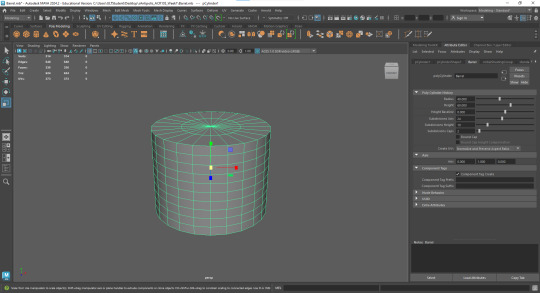
Starting with a polygon primitive, then, was the way to go. Since the barrel has quite a cute, cartoony affect I figured it should be quite stumpy. I decided on 80 cm diameter, 60 cm height, 24 faces around, 10 edge loops vertically and a loop on the cap ready to go.
Next up I moved some edgeloops to make the distinctly spaced metal bands.
I could have made those separate objects, but this felt pretty efficient in terms of polygons, and also a pretty trivial difference.

Selecting the faces of both bands I scaled them out uniformly, then selected each band's faces and scaled in down vertically again, that way the bands would come out exactly the same.
I then selected the top and bottom caps, extruded them towards each other evenly.
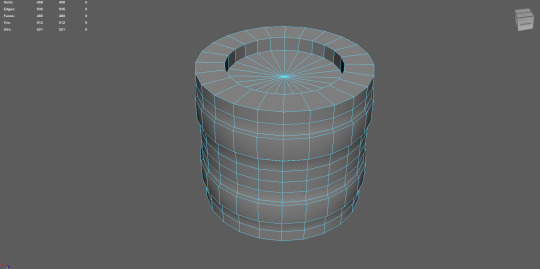
Next up I wanted to develop the overall, rounded nature of the barrel, so I selected the very top and bottom vertices as rings turned on soft-selection and increased the area of effect.
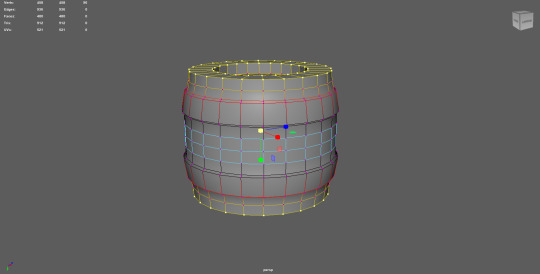
With that selection made, I scaled all the vertices along the X and Z axes, which curved the whole body nicely inward and giving me a nice round form.

Next I selected the middle faces which were out of reach of the previous soft-selection scaling, and just scaled them out to give the barrel a nice, chubby feel, as well as a continuous, consistent profile.

With the body looking right I created new objects to be the bolts that live on the metal bands of the barrel. I used polygon spheres but with a largely turned down face count.
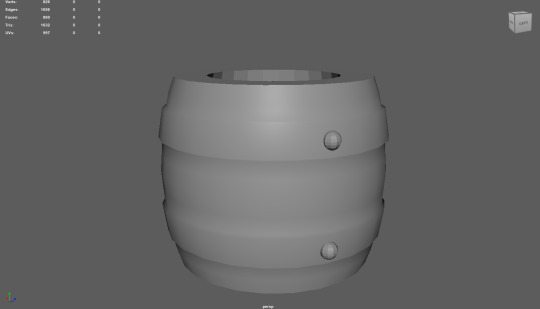
I scaled these spheres down so as to flatten them, then rotated and embedded them in ways that made sense for the source.
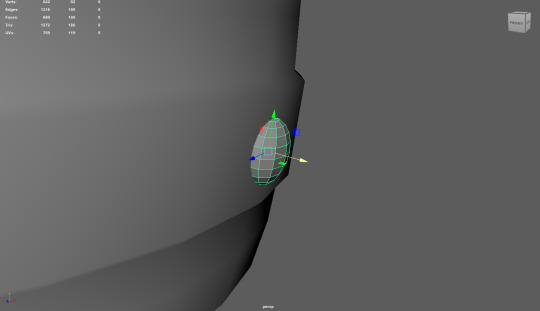
Selecting two of the spheres I then duplicated them and put them on the opposite side, largely mirroring their placement (at least well enough at a glance). To complete the form I would need another set of four spheres, so I selected my four, duplicated them, grouped them and rotated them 90 degrees. This fairly trivially allowed me to have a complete set of spheres and in the right positions even on close examination.

Looking over the barrel again I found the shape of the metal bands didn't stand out enough and decided to bevel them to make them stand out more sharply and distinctly.
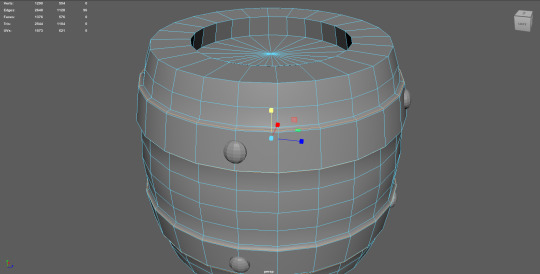
Finally, the form looked pretty much how I was hoping it would.
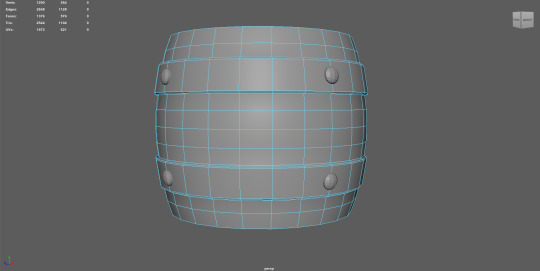
And here is the final result:

In contrast with the original asset you can see a few differences.
Firstly, the concept has a lot of splits in the wood that mine don't, but that would largely be addressed using normal maps and textures, more than it would modifying the topology.
More importantly, the source image of the barrel has a much cuter shape. I notice now that the metal bands stick out even further than mine do, the spheres are larger and more bulbous, and the barrel itself is bottom-heavy, whereas mine quite symmetrical.

Finally, my asset came out at a total of 1376 faces. This is actually much higher than I should like and I'll need to work on bringing that down, but that's an alright result for the moment.
If I was optimising for a fixed-rotation camera perspective like Diablo 3 I would be able to cut every underside face, as well as almost the entire back half of the barrel... But I would like to know how I might have lowered the poly count from the start without compromising too hard on feel.
Some thoughts that came out of this:
When performing operations in Maya how can I ensure that those operations are precise? (such as when scaling using the gizmo. I can do that to a grid, but what if I want an exact scaling of 69.69?
I need to spend more time observing the source material for quirks and affect. If I had spotted the tricks that made the barrel so cute I would have adapted my technique
1 note
·
View note
Text
Assignment 3: Part 1
This project is titled "Nostalgia and Memory". One object in particular evokes a sense of nostalgia within me every time I see it. It's a retro TV that we have in my family's mountain house back in Lebanon. Back when we were kids, my grandfather would always play for us some cartoons and we'd watch them together on this TV, that to this day still exists. Every time we went back to the mountain house to spend the day or the weekend, I would get a flood of sweet memories from my childhood.

Since this TV holds so much nostalgic and emotional importance for me, I decided to recreate it as a 3D game asset that could be displayed inside of the Unreal Engine 5.
I first began by looking for references online to help me get details on the structure from different sides of the object, as I only had pictures of the TV from the front. I was unable to find the exact same version online, but I was able to find similar ones from the same time period and the same manufacturing company. I also came across a 3D model posted on https://free3d.com/3d-model/retro-tv-toshiba-blackstripe-9624.html. It was similar in shape, so I decided to use it as a guide for modeling.

At first, I was trying to do the same thing that the creator of this asset did, and model the entire object as one piece. After a few attempts, I realized that this method is actually not well optimized at all for video games, so I decided to follow my own method of work. I decided to split the mesh into multiple pieces that are modeled individually, then combined to form the asset. I also divided the asset into 3 levels of detail: the first level refers to the main shape of the TV and all the parts that will need to be modeled. The second level represents all details that could be done by baking textures, but I still chose to model to get a cleaner look. and the third level being all the details that will need to be made using textures only.

And that's how I ended up with an 8K polygons TV asset that is better optimized than the 40K polygons model I had found online. This was my first time taking into consideration optimisation and polygon count, so it was pretty satisfying to see how two assets of different polygon count ranges could still look similar. This exercise helped me get over the misconception that I had about having to increase the number of polygons of game assets to achieve a good level of detail. Since I ran through multiple problems when modelling the TV, I was able to learn how to create a good topology and a good looping system to prepare for UV unwrapping.


After I was done modeling, I gave each set of parts a common material inside of 3ds MAX and unwrapped each piece individually so that I am able to apply high-resolution textures inside of Substance Painter.
Sources:
Free3d (n.d.). Retro TV Toshiba Blackstripe 3D Model. Free3D. [online] Available at: https://free3d.com/3d-model/retro-tv-toshiba-blackstripe-9624.html.
0 notes
Text
Sažetak, Team Topologies - Matthew Skelton, Manuel Pais
Fenomenalna knjiga. Točka. Autori su kroz niz godina proučavali timove i njihove interakcije u agilnim organizacijama. Identificirali su četiri temeljne vrste timova i, najvažnije, 3 temeljna modela interakcije između timova. Knjiga daje izvrstan model kada, kako i prema kojim principima organizirati timove. Također daje model kako upravljati interakcijom između timova da se maksimalna efikasnost timova. Preporučujem pročitati cijelu knjigu bez obzira na sažetak kako je puna izvrsnih primjera, patterna, anti-patterna i case-study primjera. Izvrsno se nadopunjuje na knjige poput "A Seat at The Table" (sažetak dostupan ovdje), "The Phoenix Project", "The Unicorn Project", "Accelerate", "The DevOps Handbook" i "Agile Conversations" (sažetak uskoro :)).
Foreword
"Team Topologies describes organisational patterns for team structure and modes of interaction, taking the force that the organisation exerts on the system as a driving design concern" "Notably, it identifies four team patterns, describing their outcomes, form, and the forces they address and are shaped by"
Preface
"This book offers a practical, step-by-step, adaptive model for organisational design that we have used and seen work across businesses of varying levels of maturity: Team Topologies"
Teams as the Means of Delivery
"Systems thinking focuses on optimising for the whole, looking at the overall flow of work identifying what the largest bottleneck is today, and eliminating it. Then repeat" "Team Topologies provides provides four fundamental team types - stream-aligned, platform, enabling and complicated-subsystem - and three core team interaction modes - collaboration, X-as-a-Service, and facilitating" "Team structures must match the required software architecture or risk producing unintended designs" ".. and "Inverse Conway maneuver", whereby and organisation focuses on organising team structures to match the architecture they want the system to exhibit..." "When we talk about cognitive load, it's easy to understand that any one person has a limit on how much information they can hold in their brains at any given moment" "This requires restricting cognitive load on teams and explicitly designing the intercommunication between them to help produce the software - systems architecture that we need (based on Conway's law)"
Conway's Law and Why it Matters
"The way teams are set up and interact is often based on past projects and/or legacy technologies (reflecting the latest org-chart design, which might be years old, if not decades)" "Organisation design using Conway's law becomes a key strategic activity that can greatly accelerate the discovering of effective software design and help avoid those less effective" "Our research lend support to what is sometimes called the "inverse Conway maneuver", which states that organisations should evolve their team and organisational structure to achieve the desired architecture" "Architecture thus becomes an enabler, not a hindrance, but only if we take a team-first approach informed by Conway's law" "Conway's law suggests that this kind of many-to-many communication will tend to produce monolithic, tangled, coupled, interdependent systems that do not support fast flow. More communication is not necessarily a good thing" "One key approach to achieving the software architecture (and associated benefits liske speed of delivery or time to recover from failure) is to apply tre reverse Conway maneuver: design teams to match the desired architecture"
Team-First Thinking
"Therefore, an organisation should never assign work to individuals; only to teams. In all aspects of software design, delivery, and operation, we start with the team" "The limit on team size and Dunbar's number extends to groupings of teams, departments, streams of work, lines of business, and so on" "The danger of allowing multiple teams to change the same system or subsystem is that no one owns either the changes made or the resulting mess" "Teams may use shared services at runtime, but every running service, application, or subsystem is owned by only one team" "Broadly speaking, for effective delivery and operations of modern software systems, organisations should attempt to minimise intrinsic cognitive load (through training, good choice of technologies, hiring, pair programming, etc.) and eliminate extraneous cognitive load altogether (boring and superfluous tasks and commands that add little value to retain in the working memory and can often be automated away), leaving more space for germane cognitive load (which is where the "value add" thinking lies)" "Tip: Minimise cognitive load for others - is one of the most useful heuristics for good software development"
Static Team Topologies
"The first anti-pattern is ad hoc team design. The other common anti-pattern is shuffling team members" "On the contrary, organisations that expose software development teams to the software running in the live environment tend to address user-visible and operational problems much more rapidly compared to their siloed competitors" "The DevOps Topologies reflect two key ideas: - There is no one-size-fits-all approach to structuring teams for DevOps success - There are several topologies known to be detrimental (anti-patterns) to DevOps success. In short, there is no "right" topology, but several "bad" topologies for any one organisation" "The Cloud team might still own the provisioning process - ensuring that necessary controls, policies, auditing are in place (especially in highly regulated industries)" "However, without a clear mission and expiration for such a DevOps team, it's easy to cross the thin line between this pattern and the corresponding anti-pattern of yet another silo (DevOps team) with compartmentalised knowledge"
The Four Fundamental Team Topologies
"... four fundamental team topologies are: stream-aligned, enabling, complicated-subsystem, platform" "A stream-aligned team is a team aligned to a single, valuable stream of work; this might be a single product or a service, a single set of features, a single user journey, or a single user persona" "The stream-aligned team is the primary team type in an organisation, and the purpose of the other fundamental team topologies is to reduce the burden of the stream-aligned teams" "An enabling team is composed of specialists in a given technical (or product) domain, and they help bridge this capability gap. Such teams cross-cut to the stream-aligned teams and have the required bandwidth to research, try out options, and make informed suggestions on adequate tooling, practices, frameworks, or any of the ecosystems choices around the application stack" "A complicated-subsystem team is responsible for building and maintaining a part of the system that depends heavily on specialist knowledge, to the extent that most team members must be specialists in that area of knowledge in order to understand and make changes to the subsystem" "The purpose of a platform team is to enable stream-aligned teams to deliver work with substantial autonomy. The stream-aligned team maintains full ownership of building, running and fixing their application in production. The platform team provides internal services to reduce cognitive load that would be required from stream-aligned teams to develop those underlying services" "The change from infrastructure team to platform team in not simple or straightforward, because a platform team in managed as a product using proven software development techniques that might be quite unfamiliar to infrastructure people" "Existing teams based on technology component should be either dissolved, with the work going into stream-aligned teams or converted into another team type" "For example, DBA teams can often be converted to enabling teams if the stop work at the software-application level and focus on spreading awareness of database performance, monitoring, etc" "Likewise, middleware teams can also be converted into platform teams if they make those parts of the system easier to use for stream-aligned teams" "The most effective pattern for an architecture team is as a part-time enabling team (if one is needed at all)" "A crucial role of a part-time, architecture-focused enabling team is to discover effective API's between teams and shape the team-to-team interactions with Conway's law in mind"
Choose Team-First Boundaries
"Typically, little thought is given to the visibility of boundaries for teams, resulting in a lack of ownership, disengagement, and a glacially slow rate of delivery" "In summary, the business domain fracture plane aligns technology with business and reduces mismatches in terminology and "lost in translation" issues, improving the flow of changes and reducing rework" "Splitting along the regulatory-compliance fracture plane simplifies auditing and compliance, as well as reduces the blast radius of regulatory oversight" "Another natural fracture plane is where different parts of the system need to change at different frequencies. With a monolith, every piece moves at the speed of the slowest part" "Splitting off subsystems with clearly different risk profile allows mapping the technology changes to business appetite for regulatory needs" "There are situations where splitting off a subsystem based on technology can be effective, particularly for systems integration older or less automatable technology" "We need to look for natural ways to break down the system (fracture planes) that allow the resulting parts to evolve as independently as possible. Consequently, teams assigned to those parts will experience more autonomy and ownership over them"
Team Interaction Modes
"... three essential ways in which teams can and should interact, taking into account team-first dynamics and Conway's law: collaboration, X-as-a-Service, facilitating. A combination of all three team interactions modes is likely needed for most medium-sized and large enterprises" "Collaboration: working closely together with another team" "The collaboration team mode is suitable where a high degree of adaptability of discovery is needed, particularly when exploring new technology or techniques" "X-as-a-Service: consuming or providing something with minimal collaboration" "The X-as-a-Service team interaction mode is suited to situations where there is a need for one or more teams to use a code library, component, API, or platform that "just works" without much effort, where a component or aspect of the system can be effectively provided "as a service" by a distinct team or group of teams" "Facilitating: helping (or being helped by) another team to clear impediments" "The facilitating team interaction mode is suited to situations where one or more teams would benefit from active help of another team facilitating (or coaching) some aspects of their work" "To address the problem of poorly drawn service boundaries, the collaboration team mode can be used to help redraw service boundaries in a new place"
Evolve Team Structures With Organisational Sensing
"Deliberately changing the interaction mode of two teams to collaboration can be a powerful organisational enabler for rapid learning and adoption of new practices and approaches" "Ultimately, be expecting and encouraging team interactions to move between collaboration and X-as-a-Service for specific reasons, organisations can achieve agility" "The aim should be to try to establish a well-defined and capable platform that many teams can simply user as a service" "A key aspect of this sensory feedback is the use of IT operations teams as high-fidelity sensory input for development teams, requiring joined-up communications between teams running systems (Ops) and teams building systems (Dev)" "As we saw in Chapter 5, one of the simplest ways to ensure a continued flow of high-fidelity information from Ops to Dev is to have Ops and Dev on the sam team, or at least aligned to the same stream of change as a stream-aligned pair of teams, with swarming for operational incidents"
Dodatne poveznice
Goodreads: Team Topologies Amazon: Team Topologies Book Depository: Team Topologies
Video materijali
YouTube kanal: Team Topologies
Preuzimanje sažetka
https://vladimir.remenar.net/sazetak-team-topologies-matthew-skelton-manuel-pais/ Read the full article
0 notes
Text
Defining the natural (b)logarithm
Hey everyone!
I’ve always wanted to have a Maths blog dedicated to interesting concepts and cool facts, so I’ve finally created one! While I wouldn’t call this blog a studyblr per se, I’ll mostly be using this blog to post about the maths I’m currently working on in uni. Unlike a typical studyblr, I’m aiming to make my posts a little more more informative and provide a little bit of context to the things I post about, just so other people might be able to understand what’s going on under the hood when it comes to maths.
As someone who has just finished their first year studying Maths at the University of Cambridge, I might also post a bit about my experience studying there as an international student, as well as my journey getting there for anyone who is considering applying.
While I’m on the break at the moment, I’ve been trying to read ahead and complete some of the problem sheets and programming tasks we’ve been set over the holidays. Some of the things I’m currently working on/reading around include:
(Convex) Optimisation
Metric & Topological Spaces
Group & Ring Theory
Programming in MATLAB & JavaScript
Quantum Mechanics
Apart from Maths, I’m also passionate about Graphic Design and Art, and might share some of my works in the future. If that sounds interesting to you, feel free to follow and/or drop a message, I’d love to get to know as many of you as possible!
As a note, is a sideblog, so I’ll be following from my main account @blog-normal-distribution. That blog is also mostly about Maths, but also includes some miscellaneous stuff.
Hope to see you guys soon with a new post!
#about#math#mathblr#studyblr#studyblr introduction#Cambridge#university of cambridge#blog-normal-distribution#optimisation#topology#group theory#programming
8 notes
·
View notes
Text
M1A riffle. Progress. Part 4.
I finished with modeling, fixed some issues, and prepared the model for baking.

The model was getting close to being finished, so I proceeded to finish the receiver and add finish the remaining parts.
I revisited some of the artifacts that I had on the model and fixed them. The topology was still way off on this model - I personally do not like how some edges transit from one shape into another, or how they are flat at one end, and then awkwardly soften on the other. I figured that it would be easier to work on more critical problems, rather than try to deliver a perfect model - since a good chunk of a model would be hidden behind the lever and a cover.


I believe I could have done a better job with this model, and I think the main reason why I got such output is simply that I panicked during the production and did not follow the steps of the production properly: I should have finished the model and made sure that all the essential details were there and only then jumped into topology optimisation.
But the world did not rely on this single receiver, so I began working on a few parts that I completely missed on earlier in the production: I completely forgot to add a metal buttstock to the mesh of a riffle, the sights were unfinished, and I had to improve the detail a bit, and finally the trigger was not connected properly into the wood, and lacked a metal cover. So I worked on all of them.


Once settled, I took a short break and began the work of unwrapping the weapon.


One of the feedbacks that I got is that I should avoid placing the islands with a weird angle, since it could make the texture work harder later on, and more.
Another feedback that I received is that if I have some texture sets that are free and do not occupy that much space - I should connect more unwraps into them. Initially, I wanted to have the upper and lower stock to have separate texture sets, but then I figured that it would be more effective if they were combined, as the upper cover only occupied a small portion of the grid.

Finally, I got a tip to prioritise maintaining the same texture density across all meshes, since later on the texturing of meshes with irregular densities could make it harder to balance the work. Can't argue with that!
In the end, I have unwrapped the weapon and prepared it for the texturing. In order to get a high poly model I would just need to apply the modifiers, so technically I am done here.


0 notes
Link
Topology Optimization in 3D Incredible aids in - Material saving - Reduction in production time and cost - Product performance improvement - Carbon footprint reduction
0 notes