#timecontrol project
Explore tagged Tumblr posts
Visit Tumblr Blog
Explore Tumblr blogs with no restrictions, modern design and the best experience.
Last Seen Tumblr Blogs


Fun Fact
In February 2021, Tumblr had 518.6 million blog accounts.
Text
Wait. TimeControl has GANTT Charts?
Wait. TimeControl has GANTT Charts now? In fact, TimeControl has had them for a long time. Much longer than the more recent options in TimeControl project!
It’s not really news. TimeControl has had a GANTT / Barchart view as part of the product for many years. In fact, there are a couple of places to see a barchart view in TimeControl. The most available is often from each users MyAccount area where they can see their own tasks in either a Calendar or Barchart (GANTT) view. For TimeControl users who have been given access to the Reports / GANTT…
0 notes
Text
@uk @gb @london @scotland @bbcscot @skynews @bbc_whys @youtube @wireduk .@all .@world @all @world donthugm e im scared is https://m.youtube.com/watch?v=xAtszTWOu mM& a church project of truthtelling this episode shows c ontrol over automated electrical systems the layers of society in academia as a big show of cages only but th e players above timecontrollers and delta triangle idi dnotknow theyare equal iassumed time is broken remnant notthat villany compared to others and the coordinating abovethem i didnotknow iassumed a decentralised coordianted but not that centralised top lead of it the batte rymetaphore is clealry the pillage leechery of secretive bloodplasma science lifeti me energy cellmatter blood corematter fibrin decarbonis ation things from ellbowsknees agaisnttheir artirits la wyers thisis germany they setup the smear and decoys thaaattttmany times that everytime
@uk @gb @london @scotland @bbcscot @skynews @bbc_whys @youtube @wireduk .@all .@world @all @world donthugme im scared is https://m.youtube.com/watch?v=xAtszTWOumM& a church project of truthtelling this episode shows control over automated electrical systems the layers of society in academia as a big show of cages only but the players above timecontrollers and delta triangle ididnotknow theyare…
View On WordPress
0 notes
Text
Assign hours to an employee in timecontrol

#Assign hours to an employee in timecontrol license
Weird affect with a star when under TAF for an extended period (2014).
No Torus speedup if TorusToSun is installed also. v1.1 Default Torus multiplier reduced to 4x. If you are re-using any piece of this OXP, please let me know by sending an e-mail to norbylite at .Ĭhangelog 2015.05.18.
#Assign hours to an employee in timecontrol license
This work is licensed under the Creative Commons Attribution-NonCommercial-ShareAlike License version 4.0. TimeControl.1.0.oxz (downloaded 249 times).solution for tracking attendance and working hours Integrated time control functions. TimeControl_1.1.oxz (downloaded 1285 times). Employees are able to track their attendance and working hours.oxz file, just move into the AddOns folder of your Oolite installation. Low FPS: If your FPS fall below 20 due to the increasing CPU load then the multiplier will be set to a smaller level which can produce at least 20 FPS.ĭo not unzip the.With Personio you can now set up country-specific maternity leave periods and. Green Alert: There is another setting in timecontrol.js where you can assign a TAF to the Green alert, but this is 1x (off) by default. Now you can compensate your employees for overtime with time off in hours.give workers some control over their scheduling tend to result in at least some improvements in health. Press "p" for pause, then horizontal arrow keys to change TAF - and "p" again to continue the game. Work hours and occupational health and safety. Press shift+F during flight to see "TAF: x1.00" under the FPS display. Either enter a new name in the column, or add resources to your. If you don’t see any names in the list, then no one has been added to the project yet. If you don’t see the name of the person you want to assign, enter a new name. Click the arrow and pick the people to work on the task. Default settings (adjustable in the timecontrol.js file):Ģx TAF with Injectors, except in red alert 4x TAF with Torus, except if there is something on your scanner, like asteroids. In the Gantt Chart, go to the Resource Names column.Torus to Sun: no Torus speedup if TorusToSun is installed to avoid addition.Wormholes: The automatic turning off feature near wormholes is a help if waiting for fuel-free jump: you can set 16x TAF by hand after you undock and time acceleration will fall back to 1x when a wormhole is created by another ship: you can then turn towards the blue lollipop on your scanner.Needs the OXP Developer release version of Oolite (beneath the Current Version - and not the Nightly release) which is identical in gameplay but contains time acceleration (TAF) and other debug functions. Dear (name of the employee), As you know that our company has started to operate on the international level also after having succeeded in domestic operations, we are thinking to focus on the international operation of the company.
0 notes
Text
HMS Software Releases TimeControl Project, an Evolutionary New Product for Project Management at all Levels
HMS Software Releases TimeControl Project, an Evolutionary New Product for Project Management at all Levels
This Premium version of the popular TimeControl Online timesheet system adds Project Planning and Execution tools to work simultaneously at the Strategic, Operational, and Tactical Levels. MONTREAL, April 13, 2022 /PRNewswire/ – HMS Software, a thought leader in enterprise project management and enterprise timesheet system has just announced TimeControl Project. This is a premium version of HMS…

View On WordPress
#accuracy#cracksthecode#efficiency#optimization#practice#productdevelopment#productivity#Saas#software#softwareprojects#softwaresystems
0 notes
Text
ThingSpeak, IFTTT, Temp and Humidity Sensor and Google Sheet
Story

In this project, we will measure temperature and humidity using NCD temperature and humidity sensor, ESP32, and ThingSpeak. We will also send different temperature and humidity readings to Google Sheet using ThingSpeak and IFTTT for analyzing the sensor data.
Hardware
ESP-32: The ESP32 makes it easy to use the Arduino IDE and the Arduino Wire Language for IoT applications. This ESP32 IoT Module combines Wi-Fi, Bluetooth, and Bluetooth BLE for a variety of diverse applications. This module comes fully-equipped with 2 CPU cores that can be controlled and powered individually, and with an adjustable clock frequency of 80 MHz to 240 MHz. This ESP32 IoT WiFi BLE Module with Integrated USB is designed to fit in all ncd.io IoT products. Monitor sensors and control relays, FETs, PWM controllers, solenoids, valves, motors and much more from anywhere in the world using a web page or a dedicated server. We manufactured our own version of the ESP32 to fit into NCD IoT devices, offering more expansion options than any other device in the world! An integrated USB port allows easy programming of the ESP32. The ESP32 IoT WiFi BLE Module is an incredible platform for IoT application development. This ESP32 IoT WiFi BLE Module can be programmed using the Arduino IDE.
IoT Long Range Wireless Temperature and Humidity Sensor: Industrial Long Range Wireless Temperature Humidity Sensor. Grade with a Sensor Resolution of ±1.7%RH ±0.5°C. Up to 500, 000 Transmissions from 2 AA Batteries. Measures -40°C to 125°C with Batteries that Survive these Ratings.Superior 2-Mile LOS Range & 28 miles with High-Gain Antennas.Interface to Raspberry Pi, Microsoft Azure, Arduino and More
Long-Range Wireless Mesh Modem with USB Interface
Software Used
Arduino IDE
ThingSpeak
IFTTT
Library Used
PubSubClient Library
Wire.h
Arduino Client for MQTT
This library provides a client for doing simple publish/subscribe messaging with a server that supports MQTT
For more information about MQTT, visit mqtt.org.
Download
The latest version of the library can be downloaded from GitHub
Documentation
The library comes with a number of example sketches. See File > Examples > PubSubClient within the Arduino application. Full API Documentation.
Compatible Hardware
The library uses the Arduino Ethernet Client API for interacting with the underlying network hardware. This means it Just Works with a growing number of boards and shields, including:
Arduino Ethernet
Arduino Ethernet Shield
Arduino YUN – use the included YunClient in place of EthernetClient, and be sure to do a Bridge.begin() first
Arduino WiFi Shield - if you want to send packets greater than 90 bytes with this shield, enable the MQTT_MAX_TRANSFER_SIZE option in PubSubClient.h.
Sparkfun WiFly Shield – when used with this library
Intel Galileo/Edison
ESP8266
ESP32The library cannot currently be used with hardware based on the ENC28J60 chip – such as the Nanode or the Nuelectronics Ethernet Shield. For those, there is an alternative library available.
Wire Library
The Wire library allows you to communicate with I2C devices, often also called "2 wire" or "TWI" (Two Wire Interface), can download from Wire.h
Basic Usage
Wire.begin()Begin using Wire in master mode, where you will initiate and control data transfers. This is the most common use when interfacing with most I2C peripheral chips.
Wire.begin(address)Begin using Wire in slave mode, where you will respond at "address" when other I2C masters chips initiate communication.
Transmitting
Wire.beginTransmission(address)Start a new transmission to a device at "address". Master mode is used.
Wire.write(data)Send data. In master mode, beginTransmission must be called first.
Wire.endTransmission()In master mode, this ends the transmission and causes all buffered data to be sent.
Receiving
Wire.requestFrom(address, count)Read "count" bytes from a device at "address". Master mode is used.
Wire.available()Returns the number of bytes available by calling receive.
Wire.read()Receive 1 byte.
Uploading the Code to ESP32 using Arduino IDE
Before uploading the code you can view the working of this sensor at a given link.
Download and include the PubSubClient Library and Wire.h Library.
You must assign your API key, SSID (WiFi Name) and Password of the available network.
Compile and upload the Temp-ThinSpeak.ino code.
To verify the connectivity of the device and the data sent, open the serial monitor. If no response is seen, try unplugging your ESP32 and then plugging it again. Make sure the baud rate of the Serial monitor is set to the same one specified in your code 115200.
Serial Monitor Output

Output

Create an IFTTT Applet
To send data to ThingSpeak you can view it at this link.
IFTTT is a web service that lets you create applets that act in response to another action. You can use the IFTTT Webhooks service to create web requests to trigger an action. The incoming action is an HTTP request to the webserver, and the outgoing action is an email message.
First, create an IFTTT account.
Create an applet. Select My Applets.

Click the New Applet button.

Select the input action. Click the word this.

Click the Webhooks service. Enter Webhooks in the search field. Select the Webhooks.


Choose a trigger.
Complete the trigger fields. After you select Webhooks as the trigger, click the Receive a web request box to continue. Enter an event name.

Create trigger.

Now the trigger is created, for resulting action click That.

Enter “Google Sheets” in the search bar, and select the “Google Sheets” box.

If you have not connected to Google Sheet, then connect it first. Now choose action. Select add a row to a spreadsheet.

Then, complete the action fields.

Your applet should be created after you press the Finish.
Retrieve your Webhooks trigger information. Select My Applets, Services and search for Webhooks. Click Webhooks and Documentation button. You see your key and the format for sending a request. Enter the event name. The event name for this example is VibrationAndTempData.You can test the service using the test button or by pasting the URL into your browser.


Create a MATLAB Analysis
You can use the result of your analysis to trigger web requests, such as writing a trigger to IFTTT.
Click Apps, MATLAB Analysis and select New.

Select Trigger Email from IFTTT in the Examples section. The code below is prepopulated in your MATLAB analysis window.


Name your analysis and modify the code.

Save your MATLAB Analysis.
Create a Time Control to Run Your Analysis
Evaluate your ThingSpeak channel data and trigger other events.
Click Apps, TimeControl, and then click New TimeControl.


Save your TimeControl.

Output

0 notes
Text
Project_BuildTutto Development Update 15
Hello everyone!
Stefano here with another update! This week fewer stuff went on the changelog and feature list, but that's only because I dedicated a lot of time to the design and the planning of new objectives to aim at during the development of the project. Since these weeks I'll be away from my usual working place’s, I'll pause the timelapse’s recording until I'll be back in March.
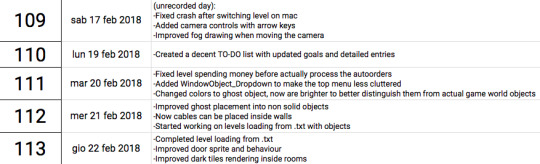
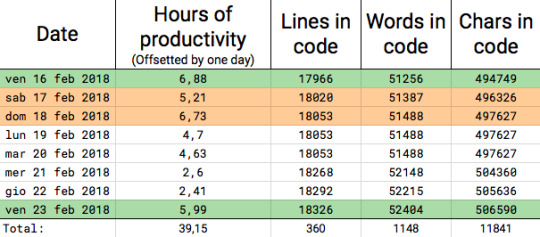
Updated To-Do list
The development process of a big project for me usually comes up to a three phases loop : 1) Write up a bunch of objectives and features to code until I think I wrote down everything the games needs 2) Code one by one each thing in the list until I come short on the list and I get depressed because I feel lost and without objectives 3) Get back to write objective since now the project is bigger and better than the time I wrote down the previous list and now I have a better vision of the project and its main goals.
So this week I wrote down a lot of things to do and now I feel much better.
The previous development iteration was aiming at having a nice code base and structure to work with crafting, machines, objects, pipes, cables, and stuff like that. With this iteration I can aim at wrapping all those features up and start working to have a gameplay structure with Level's interactions, timecontrol, areas management, multiple floors level, guys improvements, and an overall better interface and communication with the player.
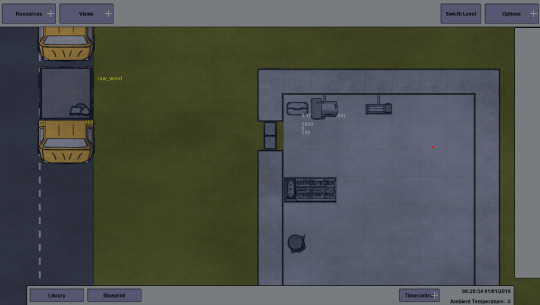
Level loading with txt
One of the points of the list which I cared the most at the time being was the ability to choose the starting layout of a level with an external .txt file. This system will help me a lot with testing/debugging but also will be useful to choose starting configuration of different levels inside the game with a easy to use interface.
One of the bigger challenges was to design how to layout the .txt to have a good balance between flexibility, clearness, and easy to use. After some thoughts about it I came up with this idea: The first section will store a list of object's UniqueIDs and will link each ID with an increasing power of two number

The second section will be a comma-separated grid of number, where each number represent the sum of the object's number that should be present in that tile

So in this example a tile with a value of 130 will mean that in that tile will be present a floor object (number 2) and a chest object (number 128).
That txt will be then parsed if passed as a parameter to a level constructor and will be understood by the game and will create the level as planned out in the txt.
Minor GUI changes
A smaller, but still important, feature that as been added to the game this week is the presence of the new GUI object "WindowObject_Dropdown". This object seems like a button but on click will create a dropdown list of other buttons.

Keep in touch
If you are curious to see how things will go feel free click any of these links to join our community: Discord Server: https://discord.gg/mSCn4BU YouTube channel for Timelapses: https://www.youtube.com/channel/UC2l3kcw6wUn4Z1-cr5UMLMw Twitter: https://twitter.com/ElkiwyDev Changelog: https://docs.google.com/spreadsheets/d/1kVIHUpf0jC8NFg5rxJF_hiWDkw-0VWnMI-Au4op0MiQ/edit?usp=sharing
0 notes
Text
TimeControl and Microsoft Project Futures
We have had numerous questions about how we will support changes in the Microsoft Project list of products. Here's a detailed response from HMS Software.
We are getting an unusual number of requests regarding our support of the link between TimeControl and Microsoft Project. This isn’t a huge surprise as Microsoft has made a number of announcements regarding the future of Microsoft Project in the coming months and years. Project started as a single license per computer product over 30 years ago. By the time TimeControl 1.0 was released in 1994,…

View On WordPress
#Microsoft Project#microsoft timesheet#MSP#project online#project server#TimeControl#timesheet integration
0 notes
Text
Write your own timesheet or subscribe to one?
Write your own timesheet or subscribe to one? There is a temptation to think our needs for timesheets and project management are so unique we would never be able to find a commercial solution but there is a lot to consider if you're planning to write your own timesheet system.
You need to update your timesheet or your project management system. A host of potential developers are pitching for your business often with low-cost overseas developers. It might sound tempting. You could commission exactly the features you’re looking for and, after all, it’s a timesheet. How hard could it be? Here at HMS we hear this quandary on a regular basis. Sometimes we hear that the…

View On WordPress
#saas project management#SaaS Timesheet#TimeControl#TimeControl Online#timecontrol subscription#write or saas
0 notes
Text
The challenge of choosing a timesheet system
You would think it would be easy. After all, timesheets mostly look all the same don’t they? Well, that’s often true but the front end of the timesheet isn’t the challenge. Mostly timesheets look like a grid and you enter hours or some value in columns and rows. It’s once that data has arrived into the timesheet that it becomes more challenging. A timesheet might be used by an end user for 5…

View On WordPress
#billing timesheeet#Choosing a timesheet#Multi-function timesheet#payroll timesheet#project timesheet#TimeControl
0 notes
Text
Agile, Waterfall or Hybrid, what does TimeControl support?
Agile, Waterfall or Hybrid, what does TimeControl support? TimeControl was designed to support multiple project methodologies at the same time from a single interface. Find out more here...
We are often asked a series of questions in sequence about TImeControl. It usually sounds like this: “Does TimeControl support Agile?” “Yes, it does.” “Does TimeControl support Waterfall?” “Yes, it does.” “Ah, but we have some project management using Waterfall and some project management using Agile. Does TimeControl support a Hybrid project management environment? “It certainly does.” For…
0 notes
Text
HMS and TimeControl welcome Idexia to our Partner Network
HMS and TimeControl are pleased to officially welcome Idexia to our Partner Network. Find out more about this Quebec-based consulting firm specialized in Microsoft technology.
We are delighted to add Idexia to our list of Partners this month. Idexia is a Quebec-based consulting firm specialized in the Microsoft productivity, collaboration and development ecosystem. They have experience in project management systems such as Microsoft Project and BrightWork both of which are included as integrations in TimeControl. We have worked with members of the Idexia team for…
0 notes
Text
Business Talk Magazine Interviews President of HMS Software
Our president, Chris Vandersluis, was recently interviewed by Business Talk Magazine where he described his 40 years leading HMS Software and the 30 year evolution of TimeControl.
We are delighted to share an article written about our President, Chris Vandersluis. He was recently interviewed by Business Talk Magazine about his 40 years leading HMS Software, and making it into a leading publisher of project management and project timekeeping systems. Mr. Vandersluis describes the evolution of TimeControl over 30 years from version 1.0 in 1994 to the soon-to-be released…
0 notes
Text
Line Item Approvals
Timesheet approvals seem like the easiest thing - until you sit down to figure out how you will accommodate the interests of both Finance who needs to see the whole timesheet in context and Project Management or Billing or anyone who has to do approvals on a task-by-task basis. TimeControl has had this in mind since its very first version and this ability has been enhanced over the years with TimeControl's Line Item Approval function. It's a powerful method of taking care of not just the whole timesheet but also each line on it, even when there are multiple interests in how to interpret or approve of the data. Find out more.
It’s almost never enough to just approve a timesheet based on the total hours in it. If you are in any kind of project or activity-based scenario, you will still need to approve the total time for the timesheet, but you will also want to do approvals for the projects. We encountered this problem way back in 1983 as we wrote our first timesheet. There were two groups sponsoring the initiative. One…
0 notes
Text
The Timesheet Buyer's Guide is available to all
The Timesheet Buyer's Guide is available on the TimeControl website but it was designed for anyone to use for evaluating project oriented timesheet systems including TimeControl. There is a lot of free material for the using on the site.
Over the years here at HMS we’ve become used to questions about how TimeControl compares to other products. Our answers are always the same. We don’t publish those kinds of comparisons. Whatever we would say about another product would be unfair as we aren’t experts in whatever those other products are. What we’ve done instead is to provide tools for prospective clients to find out what is…

View On WordPress
0 notes
Text
Why is TimeControl so popular with the Payroll Department?
What is it about the TimeControl timesheet system that makes Payroll people so happy? TimeControl is well known by the project management community for its value in tracking project actuals but TimeControl also has huge popularity in Payroll Departments for the numerous elements of functionality and process that Payroll needs.
We often talk about TimeControl in association with project management tools but, because it is a multi-function timesheet system, TimeControl is often managed by the Payroll department. What is it about TimeControl that makes it so popular with Payroll Departments? First of all, let’s acknowledge that virtually every Payroll system has some kind of timesheet attached to it. We have nothing bad…

View On WordPress
0 notes
Text
Supporting contractors in your corporate systems
Managing Contractors can be a massive challenge for many organizations. TimeControl and TimeControl Industrial were built for that challenge.
We often speak with organizations who are struggling with how to integrate their contractors into their corporate systems. Payroll is rarely a problem. The contractor is almost always paid by their own employer and that employer will submit an invoice for their person’s time. It is in the project management and timesheet tracking areas where contractors become a more logistical nightmare. …

View On WordPress
#Chris Vandersluis Christopher Vandersluis#Christopher Peter Vandersluis#Contractor timesheets#crew timesheets#TimeControl#TimeControl Industrial
0 notes