#this is pretty short + i dont make tutorials often so i hope this is comphrensible
Explore tagged Tumblr posts
Visit Tumblr Blog
Explore Tumblr blogs with no restrictions, modern design and the best experience.
Last Seen Tumblr Blogs


Fun Fact
The total number of visits Tumblr.com received during January 2021 is 327 million.
Note
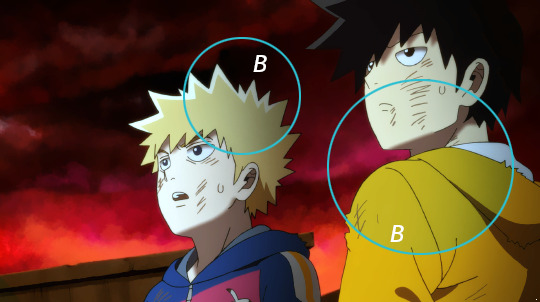
can you do a tut about how you draw eyes?? i love love love how they look in your style and they’re the hardest thing for me to draw

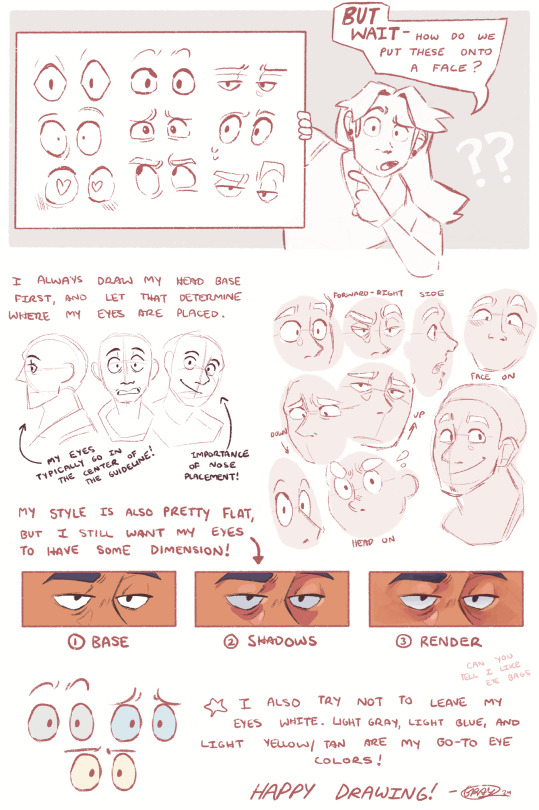
oh boy well do i have good news for you- my eye style is pretty simple! Hopefully this is helpful for ya, happy creating!
#gray talks#gray’s art#art tutorial#thanks for the ask!#this is pretty short + i dont make tutorials often so i hope this is comphrensible
940 notes
·
View notes
Note
hello, i hope you're having a good day!! i was wondering, do you have any tips for making amvs? like, what programmes you use, how you handle the timing, etc. thank you for all the fun edits you make!!
hi!! sorry for the delay in answering this, i just wanted to take the time to answer it thoroughly and i kept forgetting lol & thank you! i already typed this once and tumblr made it disappear so i apologize if anything i say comes out short ‘cause i’m just trying to remember all that i typed before lol
ok so ill just go through my general editing process in Vegas, i dont know any other program well enough to talk about it at length:
(disclaimer: this is just how i do it, i dont watch tutorials and my editing friends and i don’t watch each other edit often so i would assume that my way is very different from other ways you’ve probably seen! i might even do something in a very stupidly hard way, please feel free to tell me if theres an easier way to do anything lol)
1. Song: So skipping past the “choosing song and ship/character/show” theme, I’ll dive straight into CUTTING THE SONG! I’m not about that Editing The Entire Song life, and neither is most of the editing community anymore, so I cut it up into a shorter thing that I’m better equipped to edit to. I’m just using a random example but here I’ve taken this long ass song and turned it into this:

(the next step just kind of depends on my mood, or ill do both, doesnt matter)
2-A. Subclips: if im making a shorter video or a video where i’m not 100% super familiar with the footage, i will immediately start making subclips using the episodes ive already pulled into the project. if it’s a ship/character that i’ve edited before, i’ll just go to Import->Media from Project and import the subclips i made previously. either way, subclips are there!
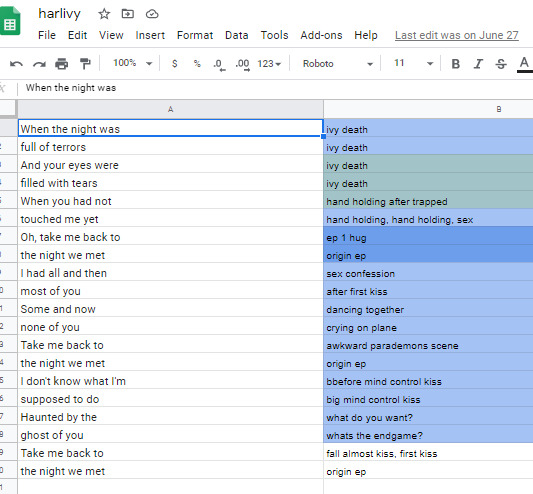
2-B. Sheets: for ships that i know very well/have a lot of footage/im concerned about potentially repeating something, i will go to Google Sheets/Excel and take the lyrics im editing to and put them in column A, separating by pauses in the singing. then i put corresponding footage i think will go well in column B! im often not super specific because i know the beats are gonna be different than i remember, so i usually stick to referencing whole scenes instead of specifics moments. here’s an example:
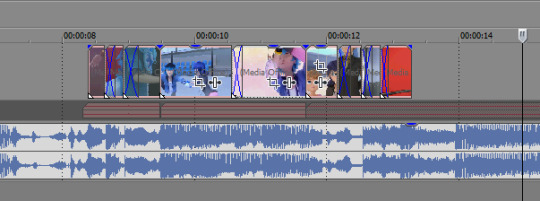
3. Clip placement: Then I start placing clips down! Below is how I organize my timeline tho I know a lot of editors who put the music on top, this is just how I like it. I also keep a single muted audio layer in between for the video footage’s audio and then I’ll delete that layer when I’m done (or sometimes I don’t, it doesn’t really matter)
I think it’s good to hit the beats as much as possible, it makes for a more dynamic audio-visual experience! In general I try to make my videos so that, if I didn’t add any zooms or typography or coloring, it would still be a good amv. And don’t limit yourself to just one layer, you can have as many layers as you’d like and put clips on top of each other (cookie cutter/changing the layer to dodge or add or screen or whatever) is a good way to mix things up
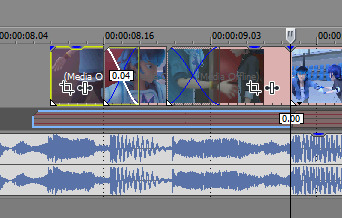
when I zoom in you can see I’ve got some variety already in my transitions, I know I use that motion-blur-zoom a lot these days but I still try to mix it up and keep my brain invested
4. Typography: After all the clips have been placed (or most of the clips, ofc sometimes I’ll want to add more later) I move on to typography! I’m lazy so the first thing I’ll do it just put down unedited text where I think I’ll want it to go. It just helps me organize myself. Then I’ll pretty up the text afterwards.
Typography isn’t necessary for a good AMV, but really nice typography can really spruce things up. I’ve only very recently gotten confident in my text editing skills, and I just kept watching typography done by editors I really like until I figured out what they were doing. My recommendation is to just KEEP ADDING EFFECTS! Convolution kernel, gaussian blur, mask the text so it appears from angles that the transitions wouldn’t be able to do - of course there’s gotta be a limit for taste, but just add stuff until you like how it looks. Also changing the blending style of the text layer is good, dodge and difference are my go-tos for typography layers.
5. Transitions: I don’t go crazy with transitions, but it’s fun to mess around with them. You don’t want too many crazy/different transitions, you want them to match the mood of the song and the type of beat you’re hitting. I usually ensure that all similar beats in the song have the same transition type on them, bbbbbbut that’s cuz I’m overly obsessed with parallel structure. There’s plenty of fantastic AMVs where they just go ham and do whatever types of transitions they want to in each part of the song and they make it work just fine
(next step, once again, kind of depends on my mood lol)
6-A. Zooms: Time for zooms! I usually just use the pan/crop for zooming, but often I’ll incorporate Sapphire FX BlurMoCurves or NewBlue AutoPan, especially if I’m trying to zoom typography with the footage at the same rate. I try to keep my zooms short and slower, I mean obv it just depends on the song but yeah. There’s a lot of different ways to do zooms so I recommend experimenting and just playing around with different effects
6-B. Zooms...but different: Another way that I’ll do zooms which is definitely pretty different (but this is what I do for crossovers like 95% of the time because I am laaaaaaaaaaazy) is I’ll drag the project into a new project timeline and start editing it there. It’s similar to how After Effects works and it makes it easier to put effects overtop of multiple layers without having to pre-render anything.
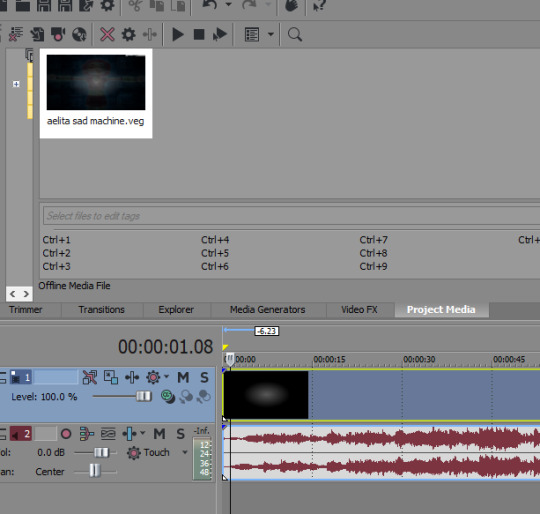
So you can see I’ve just pulled in the .VEG file and popped it in the timeline! So this way I can add zooms and transitions without worrying about layers. And if I see a mistake I need to fix, I can just go back into the original .VEG file and edit it, and it’ll be edited when I come back here. So it’s much easier than pre-rendering or trying to do zooms on a lot of layers. To be clear tho, this doesn’t work well if you have a lot of fade transitions, it’s best for sharp transitions and it’s great when you’re using Sapphire FX BlurMoCurves a lot.
7. Overlays: After that I’ll add more typography (or if you didn’t add any earlier, you can add some here overtop of the new project file) that kind of goes on top of everything. And then I’ll add any overlays or objects or whatever else I wanna add! I’m not someone who uses a lot of backgrounds cuz I don’t have a background-creative-brain so I stick to simple overlays at the most.
8. Coloring!!! This is very sad but I only JUST learned a few weeks ago that you can add coloring/effects to your entire video with this button here, so in case anyone else hates watching tutorials as much as I do here’s where I’m talking about:

This shit would’ve made my life so much easier throughout the years lol But alas. Anyway so for coloring there are some effects that are popular for any colorings you’ll find on YT (but you can certainly just download some, Riverdale editors in particular share a lot of really great colorings but you’ll find them anywhere in the live action editing community):
Channel Blend, Color Curves, Color Blend, Color Balance, Convolution Kernel (best for live action footage or footage that isnt very crisp), Color Corrector Secondary
These are all just fun to mess with. Channel Blend in particular is something of a mystery for me, I haven’t studied it fully to understand what I’m doing so I mostly just mess with it randomly until I like what I see lol
9. Render time! First render, anyway. Usually there’ll be some random problem in the footage or something and I’ll have to either go back into the project and fix it OR if I’m feeling particularly sour (or maybe if I’ve rendered like 3-4 times already) I will just take the finished render and manually remove any errors, stretching out the good footage to cover my tracks. You’d be surprised how often I end up doing that lol
And then it’s good to post! I primarily render as .WMV but I also go for .MP4s every once in a while. If I want to upload it to Twitter I’ll do an .MP4 but it’s a new thing for me so I’m still stuck on .WMV mostly.
Anyway I hope this answered your question at least a little bit, I can go into more detail about certain parts of this if you’d like!
8 notes
·
View notes
Text
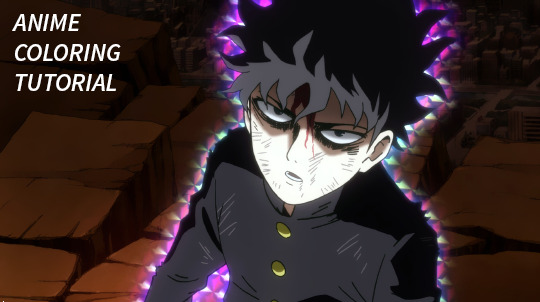
a semi thorough coloring gif tutorial cause i get asked this often enough
Anon asked me to cover what I think are the best adjustments to use for making anime gifs. Short answer: Levels and Selective Colors are the only adjustments you need. In that order. I wont be going over Selective Colors in this tutorial because its very easy to use.
I went over this briefly in my first tutorial when I brought up Levels but now I will go more in depth into how to use it as I think it’s pretty much the only adjustment you need and you can make do with just levels alone a lot of the time. Its the only adjustment I’ll be covering today because its the most important one and if you take away anything from this tutorial I hope its the knowledge that you can achieve great colors through levels alone. I want to be thorough so this is going to be kind of long so... get relaxed.
Before the tutorial begins, I encourage everyone to get 3 different anime screencaps or at the very least, 3 anime screencaps with very different lighting to follow along because the last example will make more sense if you do so.
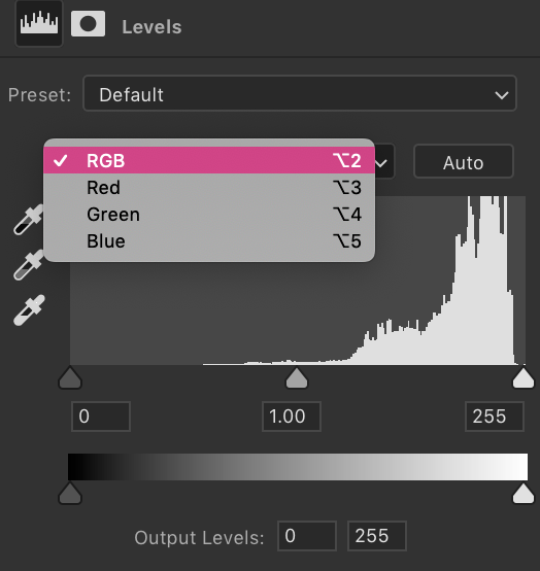
Theres no easy way to explain what the R/G/B in Levels does without opening up like 50 images and editting them yourself to see what each one does. It would require me going into color theory and I dont think thats something that can’t be easily explained, and really you just need to get a feel for it yourself. You click the ‘auto’ button at the right corner to achieve almost similar results, but I think doing it manually is better because it lets you have more of a feel for how each Red / Green / Blue levels works on its own and gives you more control.
Before I get into it, what does auto or R/G/B levels do? Well, it allows you to remove the filters anime usually have on their scenes to pull out the natural colors from underneath the filters. It sounds confusing at first but it’s easy to understand once you see an example and do it yourself.
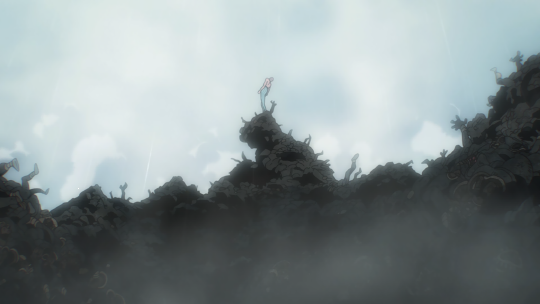
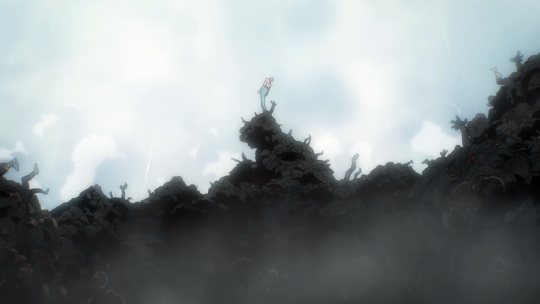
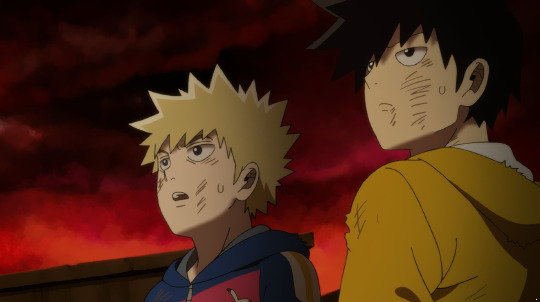
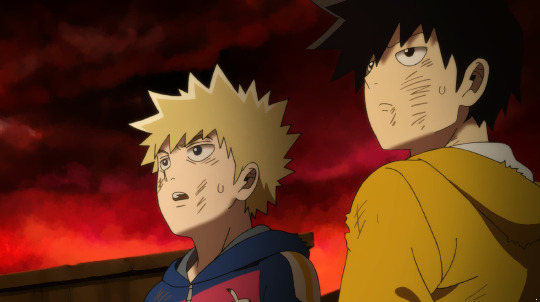
Here’s the original image I’m working with for my first example. As you can see theres a slightly blue filter all over the entire image, the dirt on the ground is brown but theres still a faint blue color fill all over it. Our aim when using Levels this way to color it is to remove that filter.
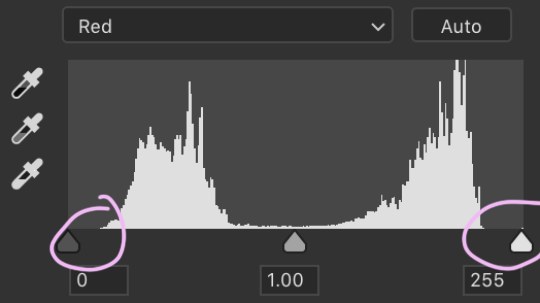
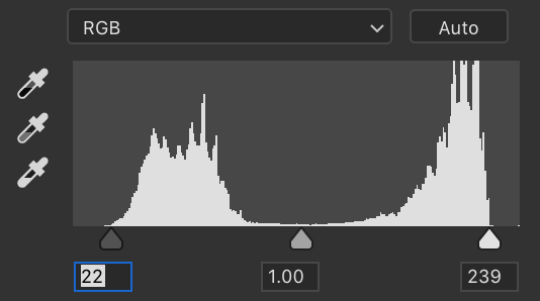
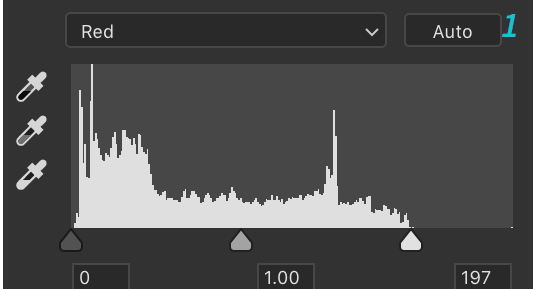
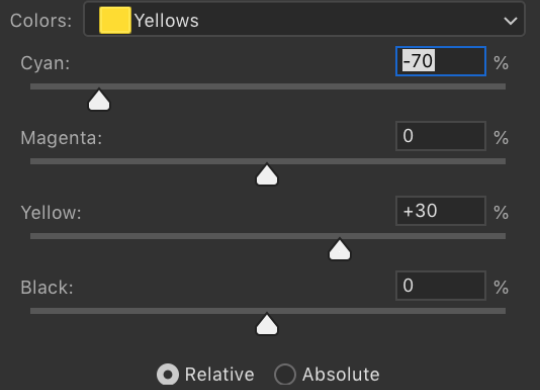
First you go to ‘Red’ and see these two levers at the right and left? You pull those two in until they hit the edge of where the graph starts.
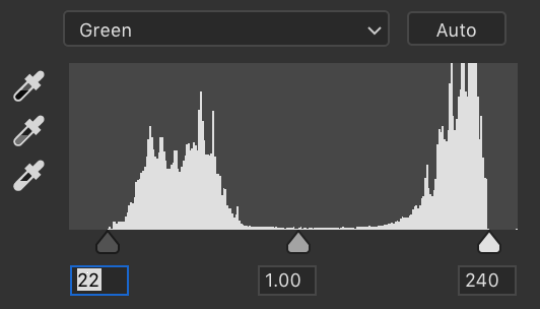
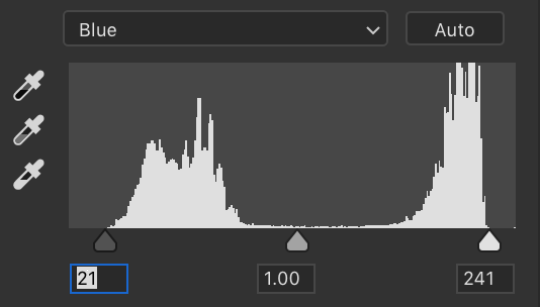
Repeat this process for ‘Green’ and ‘Blue’ as well.
And thats it.
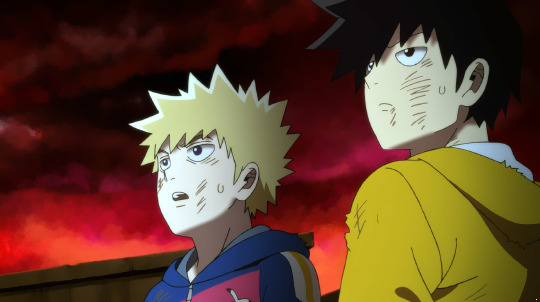
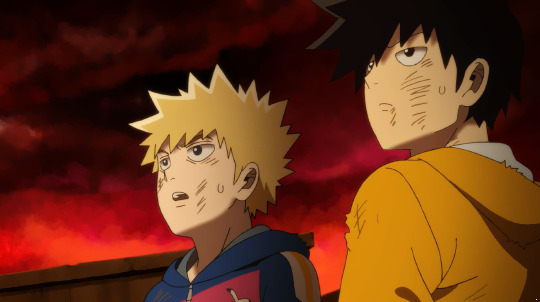
End result:
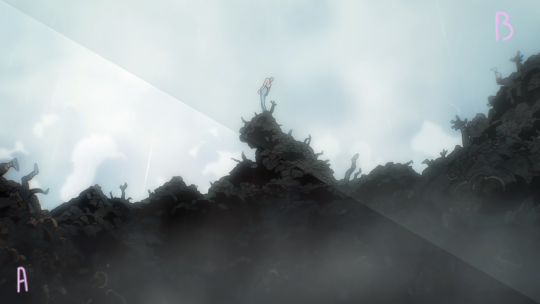
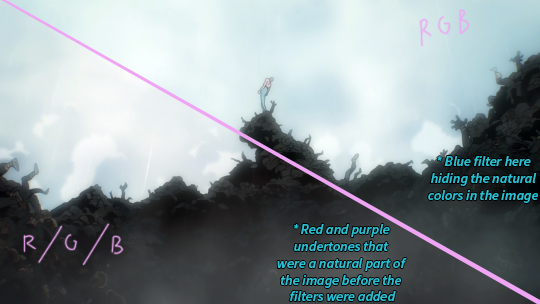
The dirt is much clearer now, theres no blue filter on it so we can finally see the red and purple undertones that werent clear before. The sky is a lot more dynamic as well now that the blue filter is gone. Here’s a side by side comparison to make it clear just how much the image has changed
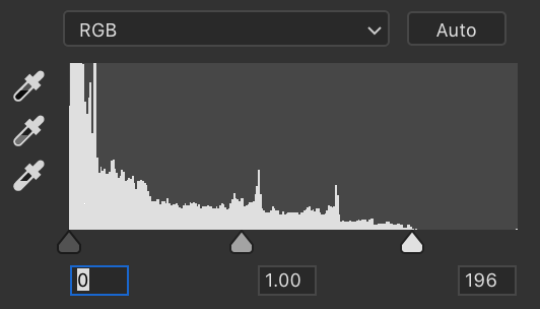
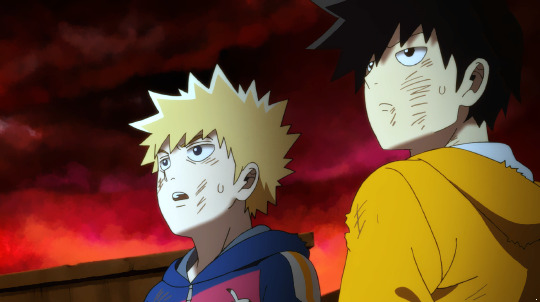
It might seem like it only has contrast to the untrained eye, but you cant achieve the same result with just contrast. It added contrast by taking away the blue filter on top of the image, but if you used the normal RGB levels instead of going in manually changing the Red, Green and Blue
this is the result you get.

While theres contrast, the blue filter is still there. Here’s another side by side comparison with the method I showed here vs. the ordinary way to use levels.
If you’ve been following along using your own screen caps you’ll notice the levers on the very right change the whites / brights / highlights of the image, while the levers on the very left change the darks / blacks of the image.
Thats the jist of it, it’s main purpose is to bring out the natural colors in the image. When you do this method and all the colors come out and theres decent amount of brightness and contrast as a result, it makes it much easier to work with the gif because now you can tweak the colors more easily when you use selective colours.
Recap: Using Red/Green/Blue individually gives you the control you need to bring back the natural colors of an image and remove the filters anime tend to usually add everywhere which tend to make scenes look very dull.
Here’s another example but with a tweak.
Original image before neutralising the scene using Red/Green/Blue individually instead of the basic RGB. Notice the yellow filter on top of the boys to help them blend with the background more.
Add Levels. Change the Red/Green/Blue.
Result:
It looks pretty great all on its own and gives you a lot more to work with when you get to selective colors since all the colors are popping now from the pinks in the background to the blues and even yellows.
For example if you tweak the yellows in selective colors in the original image, it would have affected almost the entire image as it’s almost fully yellow. Here’s how the image looks when you brighten it using RGB.
Say if I wanted to boost the yellows here and make them more vibrant and a little more orange-ish. I opened up selective colors and tweaked the yellows like so.
and this is what happened to my coloring.
It’s not great. Because the filter on this entire image is yellow, when I tweaked the yellow in selective colors, it changed the characters skin tones, hoodie, hair quite drastically. Theres no control over the image because theres not many colors to work with. So when you go to change individual colors through selective colors, half the image ends up being changed like this.
Now this is how the exact same selective colors looks on top of my edit of this image using Red/Green/Blue.
Heres a before and after of the selective colors.
The yellows are vibrant without drowing out the entire image now. This is what I mean by having greater control for when you go to edit individual colours. Levelling your image out this way allows you to have greater control over the image because the natural colors pop so much.
However as great as using Levels to make your image more neutral and remove all filters is, it doesnt mean you have to stick with neutral look 100%. What I mean by this is, as you can notice when you remove the filters, all the natural colors in the images become more vibrant and pop, which looks fantastic but when your making gifs is not that great because more colors means more noise and grain for when you save for web. But keeping the natural filters on doesnt look good either so what I like to do is strike a balance of sorts.
This might be a little confusing if you havnt been following along with the tutorial editting your own images.
Example:
Mostly neutral, just a very slight warm yellow tone to it, his uniform is a little yellow as are the whites of his eyes.

And here’s the image after I add Levels and to the magic
It’s a little blue-ish now. The image was mostly neutral to begin with so not much has changed but it’s fully neutral now with no filters. Theres a nice contrast but I want it to be look even more dynamic and I want to bring the colors together without removing the Levels we added to the image.
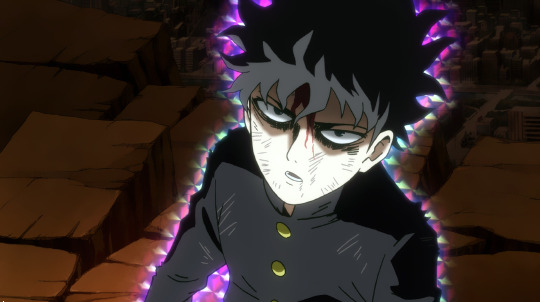
I decided I wanted to add a bit of a purple tinge on top for two reasons. Firstly, because the image already had a yellow brown tone to the background, I dont want to add more yellows to it, I want it to stand out. Secondly, the aura around the character is pink and I think purple will make those colors look more intense so thats why I decided on purple.
This is where the middle lever that we hadn’t touched before comes in. Changing the middle changes the neutrals / middle balance of the image. I went to ‘Green’ and move the lever a little bit to the right from 1.00 to .95
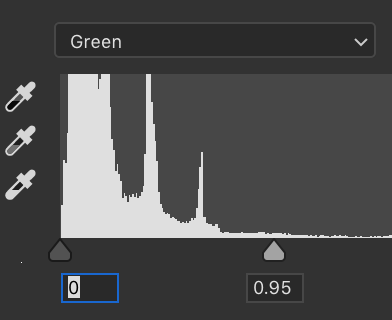
Result:

Everything is slightly more purple, but image is still mostly neutral from removing the yellow filter. It looks clean and the colors pop but by adding a bit of purple the entire image comes together as well.
There’s no tips or tricks when it comes to figuring out what lever does what color change unfortunately but theres only 9 levers in total meaning 9 colors so trust me when I say you get the hang of it really fast if you do it often. My advice is save about 25 images from various different anime and open them up and turn them neutral using Red/Green/Blue, and then try to bring the colors back together again a bit using the middle lever for every single image. Once its ingrained into your memory, your coloring experience will be so much easier. I hope that wasnt too tricky to follow and you learned something here.
295 notes
·
View notes
Photo
We’re excited to announce that Leigh has decided to level up Lola Alvarez from a mumu minor character to a main character! Please go through the checklist to make sure you’re ready to go and send in your account within the next 24 hours.
OOC INFO
Name + pronouns: Leigh, she/her Age: 26 Timezone: EST Ships: Lola/Chemistry Anti-Ships: Lola/No Chemistry
IC INFO
Full Name: Louisa Cristina “Lola” Alvarez Face Claim: Lauren Jauregui Age/Birthday: April 11th (Aries mood), 24 Occupation: Model/make-up artist/burlesque dancer/photographer Personality: enigmatic, magnetic, confident, lonely, passionate Hometown: Brooklyn, NY Bio:
[DEATH TW]
Louisa doesn’t talk about her birth parents, simply because there’s nothing to talk about. Her father, she can assume, was never really in the picture, and her mother left her on the stoop of a fire department in the 99th precinct of New York City, so it’s not as if she cared. Louisa rarely thinks about her birth parents, if at all. The truth was, Consuelo Migdas was sixteen when she gave birth to Louisa, and wasn’t ready to have a family. She had hoped that by putting her daughter up for adoption, she’d be put into a good home.
It took twelve years for Louisa to be adopted. Twelve years for the world to show Louisa its cold nature. By the time she turned ten, Louisa had been carted to four different foster homes. Every time it looked like there was a promise of someone wanting to take her home, she ended up being returned like a blouse that didn’t fit quite right. Louisa quickly began losing hope that anybody would keep her for good. She’d be stuck in the foster system until she was eighteen years old, and then she’d become a ward of the state. She’d have to fend for herself in the extremely cruel city of New York.
If you asked her now, she’d tell you that it could have been much worse, but that’s very much in line with Louisa’s character. She’s not dramatic in that way. She’ll downplay anything to make you think she hasn’t suffered, she’s perfectly fine. But truthfully? Not having the unconditional love of a family had more of an impact on her than she’d ever care to admit. Louisa was awful in school– on the days she came in and wasn’t starving, she found that it was tough for her to concentrate. Numbers and words didn’t make sense. Once, as a Christmas gift, she was given a book from one of her teachers: Little Women, by Louisa May Alcott. Louisa loved that they had the same name, and she loved the idea of growing up with four sisters who loved her and a mother who would do anything for her. All she wanted was a stable, consistent life.
Louisa found that she loved art from the very beginning, and would lose herself in drawings. She loved to play dress up. She liked to take things, too. It started small, like a pack of gum or a candy bar. Nobody was any the wiser, and Louisa would never steal from the same place twice. She would steal art supplies from her school and only got caught once. Crying, she explained to her teacher that she only wanted to be able to draw at home. Three days later, she was gifted a beautiful set of over a hundred colored pencils. Every hue and shade Louisa could possibly imagine was in that set. She saved the nubs of those pencils and strung them together to make a necklace. It serves as a reminder for her– how far she’s come, and how much farther she has to go.
Things changed rapidly for the better when Mimi adopted her. At least, that’s how she introduced herself to Louisa: “I’m going to be your Mimi and we’re going to be very happy together.” It took Louisa a solid three months to believe her. If she could last longer than three months, that would be all. But Mimi showed her a home that was full of love, and a place where she was accepted. She had dinner every night, she had a quiet, cozy place to read her favorite book, and Mimi made sure she did all of her homework instead of roaming the streets.
It was when she was thirteen that she started going by Lola, if only because that’s what Mimi called her. When she asked why, Mimi would start singing the song from Damn Yankees– whatever Lola wants, Lola gets. And honestly, Lola wasn’t used to being spoiled. She wasn’t used to someone loving her. She wasn’t used to a real home.
When she applied to FIT, she put the design on the side and instead chose to focus on the modeling aspect. She got her degree, fine, but found herself loving the idea of being someone’s muse. Someone’s obsession. Someone’s love. Lola began to become heavily involved in making her own clothing, with the sewing machine that had been passed down from Mimi’s dressmaking mother right into Lola’s greedy little hands. It cost them a fortune to send her to college, but Mimi swore Lola was going to be on the cover every fashion magazine someday. Lola assured Mimi that she was too short, and focused on building a following via social media, something that she keeps up with today.
Lola’s life couldn’t be without one more tragedy, though. Mimi was cleaning the floor of their apartment in Brooklyn when she slipped on a puddle and hit her head. The injury resulted in dementia-like symptoms, not uncommon in Mimi’s age. After calling emergency services, Lola was told that there was nothing more that the doctors could do. Mimi was transferred to a care facility in Queens, and Lola visits her as faithfully as she can. Mimi is lucid sometimes, but often has no idea who Lola is other than the nice girl who visits her and sketches her.
Mimi’s current state has broken Lola’s heart. She’s picked up a few random jobs trying to make some extra cash– including dancing at a burlesque club (she insists it’s for the glamor of it all, but it’s mostly because she likes the attention), modeling for a series of painting classes (again, Lola likes attention), and working as a make-up artist. All the money she makes goes to pay for Mimi’s care, and to keep her room full of fresh flowers. Lola feels lost, understandably so, which is why she’s been so happy to join April’s Growers. It’s given her a new sense of purpose, even if sometimes she’s still kind of sad. Lola is doing the best that she can to juggle her odd jobs, her newfound roommates, her beloved mother, and pursuing what she loves.
Pets: Lola recently rescued a French bulldog puppy named Donatella, who she loves more than life itself. Relationships:
[WANTED CONNECTIONS: Roommate for Nicola & Kitty, April’s Grower]
Santana Lopez
All things considered, they should be rivals– they’re both Latinas who can sing, they’re both drop dead gorgeous, and they usually go for the same modeling gigs– but Lola and Santana have somehow managed to become friends. It also doesn’t hurt that they’re now prone to admire each other’s beauty as often as they can in someone’s bedroom.
Reggie Clifton
Ah, how does Lola even begin to describe Reggie Clifton? They met at a rally in the city more than a year ago, which is only too fitting for the both of them. Lola fell for Reggie and she fell very hard. They flirted, they messed around a lot, and when they admitted that they had feelings for each other, it was peppered with the worst thing Lola’s ever heard: I like you, but I don’t want to be in a relationship with you. Reggie, apparently, wasn’t ready, and Lola took her broken heart all the way back to Brooklyn and away from Acup. She’s come back around, though, and Lola is wasting no time in showing Reggie what she passed up.
X Scott
X and Lola have a really beautiful relationship, based on a mutual love of art. Lola has become something of a muse to X, and she’s always willing to pose for a photo or painting. They’re very much kindred spirits and Lola would go to the ends of the earth for X.
Nicola De Rocha & Kitty Wilde
Her roommates, but also her best friends. She’s only moved in with them recently, after Mimi’s death. Her Brooklyn home got to be too quiet, and Lola loves their chatter. Lola thinks of them as three larger-than-life personalities who could gossip until the sun comes up. She’s not so subtly hinting to Kitty that she wants to shoot at Vogue, and always dropping her wishlist to Nicola. She loves her roommates and would do anything for them.
EXTRA INFO
lola/lolalvarez/description: some women fear the fire. some women simply become it.
Five latest tweets:
@lolalvarez: @PamelaLansbury if y'all decide that the internal dating becomes to be too much and you need a new member, my door is open #justsaying @lolalvarez: I posted a makeup tutorial from my latest photoshoot on Instagram, please continue to @ me and tell me how pretty I am. @lolalvarez: DO YOU WANT TO SEE A PICTURE OF MY DOG? @donatellanotversace @lolalvarez: I could go to Central Park, or I could binge ANTM. Or, I could order Insomnia cookies #3amthoughtswithLola @lolalvarez: @nicoladerocha @awildecard Tell me I’m pretty.
2 notes
·
View notes
Note
Ok coming into your inbox for 2 things: 1) yes your gifs are beautiful & gorgeous & god-tier quality don't sell yourself short! (but at the same time I think I know where you're coming from because you get used to your own methods after a while so it doesn't seem *~special~* anymore, or at least that's how I've felt in the past) & 2) I am curious about your topaz settings please teach me your ways orz. And unrelated but another Sailor Moon fan! I started making gifs with that anime ngl
omoo awww >///< hush they are not lol >< , but thank you for saying that, your so sweet ♥ it makes me happy to know you like them :) and yea i think thats a lot of it , like you said i we get used to our methods so they dont seem special >< and oh really! you are! awesome <3 i love sailor moon, that show is a one of a kind for sure <3 id love to see your gifs from it! ( that is if your sharing ofc ^_- ) and
aww id be happy to try to share what i know with you …..
..mmm now i suck at tutorials so ill give this my best shot >///< .. plz keep in mind im not a pro at Photoshop at all, so im not good at explaining things,.. so i tried to make a video tutorial on how i do the gifs ( i hope thats ok ^^”) +you already make beautiful gifs, so you may not need to know a lot of the process i tried to explain in the video , just skip to about 3 mins in lol >< ♥ here it is :
youtube
so here are the links i was talking about all thru the video ^^ :
( now you may not need some of these, but just in case you may want some i added them ^^)
1. convert timeline action
2. convert to smart filters action 1
3. convert to smart filters action 2.
4. convert to frame animation ( topazzing process action ) (credit to :ceohan♥)
5. action to delete 1st part and set frame timing/delay +select all action
Smart sharpen/Gaussian blur actions : i use a often:
1. ( i use this one the most lately)
2. ( i switch up between this one and the 1st one a lot)
3. ( i used to use this one a lot too)
here are the topaz filters i use :
1. ( i use this one the most lately ♥)
2. ( i switch up between this one and the 1st one a lot)
3. ( i used to use this one a lot too)
and here is a mega list of topaz denoise settings that are really nice if you dont already have it :)
topaz settings
I also here are some really good sharpen actions and tutorials for topaz that i use a lot as well (bless the gif makers for sharing theyre knowledge they are awesome :) ) :
1
2
3
4
5
for coloring ive been using this curves action a lot before i do my psds and it seems to be helping here it is if you want it :)
curves action
for psds, i use a lot here is where i found them and bless the awesome people who shared them : ♥♥
1.
2
3
4.
5.
also for more coloring tips i love from some pretty awesome giffers are here:
1
2
3
4
5
also here are some really cool wonderful blogs that update and share awesome psds and Photoshop info that i love to check out often :
1
2
3
4
5
6
7
also if you want avisynth info this tutorial is really good :
1
2
3
4
#hope this wasnt to much#lol i sometimes overdo things#i hope youll find something youll find useful out of all this ♥#thank you again for being so sweet#and if you ever want to know anything else#ill do the best i can to be of help#:)
3 notes
·
View notes
Photo

so i spent the afternoon collecting links to help out people who want to watch skam but do not know how or where :) don't hesitate to tell me if some of these links do not work or if i made a mistake or if you are mentioned want to be removed from this post for some reasons ^^ hope some of you will find this useful! ♥
this post will be organized in 6 categories :
the basics of skam
tags to check for updates
how to watch skam outside norway
where to check for translations
where to watch previous seasons
extra links
first a few basics
official website : skam.p3.no
episodes come out through short clips through the week
this way we follow the lives of the characters "in real time"
the clips are complemented with "extras" : texts or instagram posts
most characters have official social media accounts
you do not need those extras to follow the series
full episodes are broadcasted on norwegian tv every friday evening
each season has a new main character :
S1 - Eva
S2 - Noora
S3 - Isak
S4 - Sana
the main squads are the following :
The Girl Squad [Chris, Eva, Noora, Sana, Vilde]
The Boy Squad [Isak, Jonas, Magnus, Mahdi, +Even]
The Balloon Squad [Adam, Elias, Mikael, Mutasim, Yousef]
The Kollektivet [Eskild, Linn, Noora, +Isak]
The Penetrators [Boy Chris, William, etc.]
a few of my tags to check for updates
skam
skam timeline
skam translated
skam texts
skam instagram
skam youtube
how to watch skam outside of norway
without a vpn
tuto for mozilla by @skamenglish
uses the extension x-forwarded-for header
pros and cons : works fine for me,check that your flash player is up to date
note : this tutorial also explains to you how to download episodes directly from the website as well, if you wish you can then add soft subs which can be downloaded here (this can be pretty useful if you want to make gifs for example). [+ here is a tuto on how to add soft subs]
tuto for chrome by @evenetisak
uses the extension modheader
pros and cons : easy to use but doesnt work for everybody
with a vpn
Tunnelbear (checked by me and @isakvaltersern)
Cyberghost (checked by @rainmeansteatime)
how does it work : download and then select norway, the vpn will then move you to a Norwegian server and you will be able to watch skam from your own country
pros and cons : they are safe and free and easy to use however there are some limitations such as limited amount of data or advertising
where to check for translations
tumblr :
@skamenglish posts and reblog transcripts and subbed clips usually in the few hours following the update [info]
@stayinherewithyou posts transcripts under the tag #skam for almost every update as far as i know
@skamedits posts transcripts under the tag #translation for all the updates i think
@skamtranslated posts translation of all the text conversations
@skamforfaen has been posting and reblogging transcripts under the tag #translation since season 3
@stormbox has been posting transcripts of every updates since season 3 under the tag #skam translation
@shametv is the famous google drive owner who subbed every episodes and allowed us to watch the clips during season 3 and even though they dont translate anymore i think they deserve to be here
aaaand thats about it, there are probably many others but these are the one i check more often
else
google drive : SKAM S4 (ENG SUB) / tumblr @isaksaltereven
google drive : SKAM S4 / tumblr @skamenglish
mega drive : SKAM S4 [access key] / tumblr @skamenglish
youtube : @feudly usually posts the clip first without and then with subtitles, but be quick as the video tend to be taken down rather quickly
dailymotion : @Skam TV has many skam related videos, and posts the new clips with subs
where to watch previous seasons
Now these links are the one i used but some of them may have been taken down im not sure
google drive :
season 1
season 2 [part 1]
season 2 [part 2]
season 3 [5,6,7,10 + texts & interviews]
season 3 [full]
season 1, 2, 3 by @skinsplaces
else :
season 3 masterpost by @shametv
all seasons masterpost by @skaam
note : you may experience issues using google drive, if you cannot watch it directly on the drive try downloading it and it has exceded download quota, right click on it, add to your own drive and then download it from there
extra links
update notification : you can use this to get notified by email when the website is updated
skam playlist : spotify | apple music | youtube | tidal
the balloon squad youtube channel : @Hei Briskeby
characters instagrams :
Sana Bakkoush : @therealsanabakkoush
Noora Sætre : @loglady99
Eva Mohn@evamohn2
Vilde Hellerud@ellevillevillde
Chris Berg : stas_a_vaere_chris
Elias Bakkoush : @eliasfraoslo
Yousef Acar : @yousefacar
Isak Valtersen : @isakyaki
Jonas Vasquez : @jonas9000
Mahdi Disi : @mahahahadi
Magnus Fossbaken : @reggismeggis
Eskild Tryggvasson : @eazy_eskild
Sara Nørrstelien : @saranors
Ingrid Theis Gaupseth : @ingrid_tgif
Christoffer Schistad : @chrisschistad
William Magnusson : @magnussonwilliam
actors social media [source] :
quick parenthesis to say that this is not hollywood and the actors are very young and have real lives / real jobs and are not used to creepy stalkers and obesessive fans and all that so lets be decent people and respect their private lives
instagram
Iman Meskini : @imanmeskini
Josefine Pettersen : @josefinpettersen
Ulrikke Falch : @ulrikkefalch
Ina Svenningdal : @inasven
Henrik Holm : @henkeholm
Marlon Langeland : @marlonlangeland
Sacha Kléber : @sachakleber
David Alexander : @davidsjoholt
Carl Martin Eggesbø : @carlmartinegg
Herman Tømmeraas : @hermantommeraas
Simo El : @cengizal
Yousef Hjelde Elmofty : @yousefhjelde
Mutasim Billah : @muttaa97
Adam Ezzari : @adamezzari
snapchat
Ulrikke Falch : @ulrikkefalch
Ina Svenningdal : @inasvenningdal
Sacha Kléber : @sachakleber
Marlon Langeland : @marlonlangeland
Herman Tømmeraas : @hermantommeraas
Simo El : @simoeljr
Cengiz Al : @cengizl
Yousef Hjelde Elmofty : @yousefkc
Mutasim Billah : @motta05
Adam Ezzari : @ezzarius
▻ detailed masterpost by @skaam
#skam#skamedit#skam translation#skam translated#skamnet#skam guide#skam cast#skam episodes#watch skam#how to watch skam#skam help#mine#skamdaily#skam*
995 notes
·
View notes