#the covers are glued down construction paper
Explore tagged Tumblr posts
Text


made myself a new artbook out of old aldi bags. hoping to make some art that's as fun and experimental as the book itself
#the covers are glued down construction paper#it's bound with thread from a sewing kit and staples#i did not follow a tutorial i just trial and error'd my way through that hoe
12 notes
·
View notes
Text

◜ 👻 𓂃 Cottonball Ghosts! ‧ 🏚️◞
⁺ ◍ . ⁺ ☆ ⁺ . ◍ ⁺
Hello Space Cadets! Todays text post is being replaced by a craft!! im gonna teach you silly guys how to make Cottonball Ghosts !
⁺ ◍ . ⁺ ☆ ⁺ . ◍ ⁺
Materials you'll need:
A ghost cutout! [you can either print one and cut it out, or just draw your ghost on your paper!]
Elmer's liquid school glue
Cotton balls
Any color construction paper
Safety Scissors! [make sure you are being careful if doing this alone with big kid scissors, don't want any accidental cuts to little fingers!]
⁺ ◍ . ⁺ ☆ ⁺ . ◍ ⁺
Step by step, what to do next:
⧼ 1 ⧽ Cut out and glue or draw your ghost on your page [remember, it doesn't need to be perfect!]
⧼ 2 ⧽ Take your cotton balls and begin to glue these over the outline of your ghost, leaving a little bit of space between the cotton balls to give it a fluffy look!
⧼ 3 ⧽ Keep gluing cottonballs until your ghost is completely covered!
⧼ 4 ⧽ After all cotton balls have been glued down, take some construction paper, and cut out a few shapes for your eyes and mouth
⧼ 5 ⧽ Take Your brand new mouth and eyes, and glue them on onto your ghost to make a face!
⁺ ◍ . ⁺ ☆ ⁺ . ◍ ⁺
And you're done!
Congrats little one, you have a cute little ghost decoration you can hang up on the wall! You can even take some string and punch a few holes on your paper to hang them up from the celling or from doorknobs!

18+ blogs // DD!LG, AB!DL and variants [even "SFW"] // 27 and older // DNI


#✩⸜⸜babi posts 💫#✩⸜⸜Finns funs 🪐#anti endo#age dreaming#age regression#age regression blog#age regression caregiver#age regression community#age regressor#agedre#agere#agere activities#agere blog#agere caregiver#agere cg#agere community#agere games#agere lifestyle#agere little#agere post#agere sfw#autistic agere#sfw age dreamer#sfw age dreaming#sfw agere#baby regression#sfw toddlerre#agere crafts#halloween agere
37 notes
·
View notes
Text
My Little Love
Chapter 27
Pairing: Bucky Barnes x enhanced!Reader
Word count: 3.1k
Warnings: Fluff, angst, explosion, implied character deaths
A/N: So here we go!!!
Series Masterlist


With a deep breath and a small stretch you begin to wake up. You smile when you realize that Bucky is still laying next to you. It’s a small comfort knowing he’s getting his much deserved rest since he tends to be awake earlier than you. Turning your head you take in his muscular back. It’s riddled with scars, scars that you’ve kissed many times already and will again. You shift slowly so as to not wake him and drape your arm around his midsection. Many nights it was Bucky pulling you into his chest and making you feel safe, at this moment you get to do the same. It makes you smile and you can’t help but lean forward and kiss his left shoulder blade. One kiss turned into two and then three and so on. By now you knew Bucky was awake but he stayed still as he accepted your affection.
“Good morning, baby.” You whisper into his ear.
Bucky turns his head to look at you with a lazy smile and sleepy eyes. He was beautiful and all yours.
“It’s a great morning, Sugar.”
Bucky turns in bed and lays on his back. You take the opportunity to straddle him and lean down to give him a quick kiss.
“I have a date planned for us today.” Bucky says when you pull back.
“Really?��
“Yup. Just the two of us.”
“Have you informed our daughter? You know she’ll want to go with us.”
“I did talk to her about it. She did pout but she knows it’s a surprise so she’s ok.” Bucky chuckles as his hands slip under your sleep shirt.
“Let’s get up, old man, before those two can wreak havoc on the compound.”
“Give me five more minutes with you just like this.”
“Just five?”
“Fine,” Bucky rolled his eyes. “Ten.”
“Happily.”
****
“Uppies.” Lottie says with a yawn, it’s still early and you’re surprised to see her awake.
With her hair sticking up in all directions and her purple princess footed-pajamas still on Lottie clings to Bucky. Hiding away from the light by sticking her face into the space between his shoulder and neck she holds onto her pink teddy bear. You wave Bucky over to the couch since he won’t be able to do much now that Lottie has decided to fall back asleep. You smile as you watch Bucky smooth out her hair as he sits down and gets comfortable.
“Morning mama.” Henry walks into the kitchen. He’s still sleepy too but he smiles in your direction as he holds up a hair tie. “Can you help me?”
You grab it and pull his hair up into a manbun.
“Have you thought about getting a haircut?”
“No, I don’t want it short.” Henry covers his head with his arms.
“It was just a suggestion, sweet boy. I won’t make you do something you don’t want.” You kiss the top of his head. “You know your dad had long hair too and he looked very handsome with it.”
“Do I look handsome with it?”
“So handsome. Now why don’t you go cuddle up with dad and Lottie on the couch.”
“Ok.” Henry smiles and gives you a hug before he walks away while you work on breakfast.

“Hi Buce.”
“Hello Charlotte, how are you today?” Bruce asked as he pushed his glasses up the bridge of his nose.
“Am good. Can habe uppies?”
Charlotte stopped right in front of Bruce, her hands busy with a paper plate while you trailed behind her. He picks her up and sets her down on one of the free spaces of his table.
“Habe pwesent Buce.”
“You do? Who’s it for?”
“Fo’ you.” She holds up the paper plate full of glued down dried macaroni pieces and painted cotton balls all laid down to look like him. You even helped her make the frame for his glasses out of construction paper.
“Is this me?”
“Yup.”
You chuckle as Bruce holds it up beside his face and asks if he and the macaroni art look alike. Charlotte giggles and nods happily.
“We’ve been playing around with different arts and crafts.”
“Habe this too.” Lottie holds up a bracelet made of green beads.
“Well this is so nice of you Charlotte. Thank you.”
“Now that we are done with the gift giving, here are my files that you needed.”
“Thanks. I’ll get them back to you as soon as I can. I also have those reports on those people that received the same shot you did. If you can look at them and give me your opinion, that would be great.” You nod while he pulls out two lollipops from his lab coat pocket. Something you realize he started doing recently. “And this is for you and your brother, Charlotte.”
“Wook mama.” Lottie holds up both lollipops.
“I see that. It was very nice of uncle Bruce, can you say thank you?”
“Oh, Tank you Buce.”
“You are very welcome.”
“I’ll see you later Bruce.”
“Bye-bye Buce.”
“Bye, Charlotte.” Bruce says as he sets her back on the floor.
****
“Here are the reports you needed.” Bucky holds up a stack of files and places them on Steve’s desk.
“Thanks. Is everything ok?”
“Yeah.” Bucky nods but then sits down on one of the chairs across from Steve’s desk. Henry takes the other one but is distracted playing with Alpine. “I’m taking Y/N out on a date tonight.”
“Nice, want me to watch the kids?”
“Nat volunteered, said something about you hogging up their time.” Bucky shrugs. “But I’m kind of nervous.”
“Nervous about what?”
“Steve, it's the date.”
“Oh. Wow ok so it’s happening tonight. When you come back you’ll be an engaged man.” Steve says with a grin. “This is great.”
“You don’t know that. Y/N could say no.”
Henry scoffs. “Please, mama would never say no to you.”
“I second that. I know she won’t say no, she loves you way too much.”
“Mama talks about how much she loves you all the time.”
Bucky nods slowly and takes a deep breath. It’ll be easy. All he has to do is ask a simple question. Although the thought of being rejected is really making him have second thoughts. It’s not about the rejection but the person doing it. He really can’t see his life without you now and he wants to give you the perfect evening and end it with the perfect proposal. Something small and intimate, just the two of you.

You were standing in the living room waiting for Bucky and saying your goodnights to the kids. Charlotte was giggling as she clung to you like a koala.
“Are you going to be good for auntie Nat?” You ask while smoothing out her hair.
“Am good mama.”
“What about you mister?”
“Yup.” Henry said between taking sips of his juice box. “You look pretty in your dress mama.”
“Thank you sweet boy. I just had to wear the dress you got me.”
“Yeah, so pwetty mama. Wike a pwincess.”
“Do you think daddy will think I look pretty?”
“Stunning, beautiful, gorgeous, bewitching. Should I go on?” Bucky says from the door with a fond smile. He closes the distance and wraps his arms around you and Charlotte, who is now sandwiched between you.
She giggles as she looks up at both of you.
“Dada am here.”
“I didn’t see you there, doll.”
Charlotte giggles some more before Bucky scoops her up. He peppers her cheeks with kisses and sets her down on the couch next to Henry and then places a kiss on Henry’s head.
“We have to go or we’ll be late to our reservations.”
“Ok well, have fun kids.” You wave at them as Nat walks in. “Thanks for watching them.”
“You’re welcome. Now go and have your own fun.”

Bucky drove you into the heart of the city. He was nervous, you could tell but you didn’t know why. Still he’d look over at you every few minutes and flash you his most charming smile. It wasn’t until you got to your destination that you knew something was up. Getting reservations at one of the most exclusive restaurants in the most exclusive hotel in New York City was no easy feat.
Bucky parks at the entrance and jumps out of the car to open your door. You admired how handsome he looked in his all black suit and t-shirt combo. He holds his hand out to help you up and out of the car and then offers you his arm.
“How did you manage reservations here?”
“Had a little help.” He winks as you walk toward the elevator to the top floor.
****
The view of the city was spectacular from the top floor where the restaurant was. The hostess led you from the entrance off to the left and onto a private balcony. There was only one table at the center and a bar at the end. Bucky pulls a chair out for you and a server is there in an instant to take your drink order.
“This is beautiful.” You murmur as you look out over the city.
“You’re beautiful.”
Bucky takes one of your hands over the table. His cheeks are tinted pink as he looks at you. You squeeze his hand to reassure him everything was ok even though you were trying to figure out why he was acting the way he was.
“Y/N, I-“ Bucky’s cut off by the ringing of both of your phones.
“Maybe it’s the kids.” You say as you fish yours out of your purse.
Bucky mutters a curse in Russian and grabs his phone. He stands and walks away to a corner so you won’t hear his conversation.
“Hey Nat, is everything ok?” You answer your phone.
“So sorry to ruin the date but we need you both back here immediately.”
“What’s wrong?”
“It’s a mission, can’t say more.”
“Fine, we'll be there as soon as possible.” You look up at Bucky just as he turns to look at you. He frowns and hangs up the call.
“Sorry Sugar, guess we’ll have to reschedule the date.”
“It’s ok.” You say as you take his hand and start walking back toward the elevator. You wrap your arms around Bucky’s midsection and rest your head against his chest. “Don’t be upset.”
“I just wanted tonight to be special. I even had a room reserved for us.”
You pull back to look at him.
“Oh really?” You give him a mischievous smirk.
“Mmhmm. I wanted you all to myself tonight.”
“We will definitely reschedule then.”
Bucky smiles and kisses you. He feels like the ring is burning a hole in his pocket. Maybe he should have asked you right before leaving the restaurant anyway.

Everyone was already in the conference room when you walked in. Lottie and Henry were in a corner with noise canceling headphones and tablets unaware of what was going on.
“Sorry for ruining your date guys.” Steve gives you an apologetic smile. “But trust me you’ll want to be here for this.”
“What’s going on?”
“As you know since the moment we found Charlotte and then Henry, Hydra has been trying to get them back. That included the trap they set up for Y/N, Sam, Clint and Nat and the one they set up for me and Steve.” Tony says as he pulls up some images on the large screen at the front of the room. “These people were responsible for developing the future winter soldier program. While most of them have died or retired, the program is still going strong. Right now their focus is getting the kids back.”
“They’ve mostly stayed underground.” Steve adds. “It’s been hard to track them but finally after all these months we have intel that they will be meeting tomorrow so we have to leave tonight if we want to get all of them.”
“If we do that, that means it’s over?”
“No one will be after the kids anymore?” You ask hopefully as you reach for Bucky’s hand.
“Exactly, we can get rid of this part of hydra for good.”
“I’ll call my dad and we can go.”
“I’m sorry but you won’t be able to go with us, Y/N.” Steve says.
“Why not?”
“Because Hydra has a hit out on you.” Tony presses a button on the remote in his hand and up pops up multiple communications from hydra officials wanting you to be dealt with. “Since you were the one to carry the kids out and the one to kill one of the highest ranking members in hydra you’ve painted a big old bullseye on your back. If you went with us well…”
You sit back and nod as you realize that they’re right. If you go on this mission it will just make it easier for hydra to try and kill you.
“Ok. I’ll stay.”
“Everyone suit up. The faster we get there the faster we can end this.”
****
“Good wuck.” Charlotte tells everyone on the team as they walk into the jet. Henry stands beside her and offers everyone high fives.
You stood not too far away from the kids and watched as everyone got on. Steve walked up and stopped next to you.
“I’ll keep an eye on him, don’t worry.” Steve places a hand on your shoulder.
“I know you will, just don’t get too reckless because I’m not there to keep my eye on you.”
Steve chuckles before giving you a quick hug and walking over to the kids. Bucky’s hands wrap around your waist as he pulls you into his chest. He presses a kiss to your shoulder as you both watch Steve hugging Lottie and Henry.
“Once this is over we can actually do things with them outside of the compound.” Bucky says.
“I’ll be making a list. They’ll be so excited when we take them out.”
“Not too excited when they start school though.”
You turn in his arms and perch your hands on his shoulders. Bucky rests his forehead against yours.
“It’s almost over.”
“Be careful out there.”
“I will. I love you.”
“I love you too.” You tell him before giving him a kiss.
Henry and Charlotte run towards you and Bucky. He pulls away from you and grabs Henry before the latter can run into him. There are hugs and kisses for both kids before Bucky finally and reluctantly pulls away from you. With one final wave goodbye Bucky gets on the jet and you watch as it takes off.
“Alright kiddos, let's go inside.”
“Mama can habe mobie night?” Lottie asks as she takes your hand.
“That sounds like a fun idea, sweet angel. We can get in our pajamas and get our favorite snacks and watch as many movies as we can. We can even make a pillow fort in the living room. What do you say Henry?”
Henry nods. “ Can we watch Cars?”
“Of course we can.”
“Tonight is going to be awesome.”
“Yeah it is.”

After an almost 10 hour flight the team had finally made it to the facility where hydra was meeting. Bucky was anxious to get this over with and go home. Home to his family to finally start a new chapter in his life. One that would begin when you said yes to his question. He couldn’t wait for that moment.
“Gear up team, it’s time. Don’t forget the plan.” Steve says.
Everyone double checks their gear before finally starting the mission. Tony, Sam and Vision head out first as they do a fly over and lay down cover fire. The rest of the team drops down soon after while Bruce stays on the jet as back up. A small group of hydra agents fight to protect the building but it’s no use and it doesn’t take too long for the team to regroup in front of the main doors.
“Does anyone else think that was too easy?” Nat speaks up as she looks around the area.
“I wouldn’t be surprised if they have all of the other agents protecting these sick sons of bitches.”
“Just be prepared and stay focused, there’s no turning back if we lose these people now we might never find them again.” Steve says. He takes his shield and hits the lock on the door handle to break it open. As soon as it’s open everyone runs in to complete their objective.
****
Every level of the building is checked and nothing. The building is practically empty with the exception of a few agents that were taken care of easily.
“What the hell is going on?” Sam says as he and Bucky walk into the control room to meet up with everyone else.
All of the monitors in the room lit up at the same time. A video of you and the kids walking through the compound halls starts playing.
“Where the hell is everyone?” Bucky asks as he looks around.
Tony and Nat begin to type furiously on some of the computers as they try to figure it out.
“Has anyone heard from command central? I’m getting radio silence.”
“It’s not radio silence.” Steve answers Nat as he realizes what’s going on. “It’s a trap, like your first mission after we found Charlotte.”
“Soldat.”
“What the fuck?”
“You should have given our assets back when you had the chance.” The voice said. “I hope you had fun playing house.”
There are several pictures of the kids playing outside from days and months prior. Bucky pulls out his phone to try and call you but there’s no connection.
“Tony please tell me you got something.”
Steve and Sam head for the doors but when they try to open them they can’t.
“We’re locked in.”
“Tony!”
“I’m trying here.” He shouts back.
“Say goodbye to your family, Soldat.” The voice says.
A missile hits the living quarters. It’s as if the air had been sucked out of the room as the team watches the compound get hit.
“No, no, no, no,no. Please tell me this isn’t real.” Bucky cries out. “It can’t be real. They’re in there.”
“We’ll figure it out, Buck, but right now we have to get out of here.”
“What if they’re gone?” Bucky watches as the footage of the explosion replays over and over again.
“Bruce, we need your help getting out of here.”
A few minutes later the building is practically destroyed as the Hulk smashes his way through. Everyone rushes to the jet. The whole flight Bucky can’t stop pacing. Steve and Sam try to calm him down but nothing works. He’s a mess and rightfully so. It takes halfway through the flight for them to finally have some type of connection to the outside world again. Bucky immediately starts to call your phone but it goes to voicemail.
By the time they finally get to the compound Bucky’s worst fears are realized when the jet lands and he sees that the compound is completely destroyed. Bucky felt his chest seize as he took in the damage. Any hope he had that you and the kids were ok is gone.
Ch. 28

Permanent Taglist:
@rebekahdawkins
@cjand10
@nalny5
@Sturchling
@angywritesstuff
@seitmai
@writing-for-marvel
@goldylions
@almosttoopizza
@littleseasiren
@pono-pura-vida
@talesofadragon
@midnightramyeoncravings
@bunnygirlwriter876
@pandaxnieenke
@kandis-mom
Series Taglist:
@buckystevelove
@vicmc624
@just-someone11
@sjsmith56
@emily-roberts
@spencerriedisagorgman
@superduckmilkshake
@samfreakingwinchester
@lofaewrites
@enchantedbarnes
@callsign-athena
@broadwaybabe18
@saranghaey
@viperchick47
@ilovetaquitosmmmm
@da-pimp-river-niall
@ozwriterchick
@jenn-f
@rebel-soldat
@therealwritersblog
@alyroseking
@samlworld
@capswife
@oceaniamadness
@queenie32
#bucky barnes x reader#bucky barnes#bucky x reader#my little love series#dad!bucky barnes x mom!reader#dad!bucky#girl dad!Bucky Barnes#Boy dad! Bucky barnes#Charlotte barnes#Henry Barnes
181 notes
·
View notes
Text
Tiny Book? Tiny Book. Pt3.
Previously we covered everything from typesetting and printing, to rounding and backing. Let's continue on with step 4, endbands!
Tiny books part 1; Tiny books part 2

Just like with regular ficbinding, there are layers, and they are:
1 - Typesetting and Imposing 2 - Printing 3 - Cutting, Folding, and Sewing 4 - Gluing, Rounding/Backing, Endbands 5 - Building the Case and Casing In 6 - BOOK
In this part we will be focusing on the rest of step 4, and we'll see how far we get before I run out of photo space tbqh. Please feel free to skip to the area you're interested in most.
4, pt2 - Endbands
Endbands--there isn't anything overly exciting to say here, except that sewn endbands on tiny books isn't impossible, just ridiculously fiddly. For a core I recommend going with embroidery floss, stiffened with PVA. It's a nice relatable scale to the tiny book and will be perfectly firm-yet-flexible with the PVA coating. Because of the thickness I do not recommend using more than one strand of embroidery floss, if that's what you are using right now for your regular books. For all of the examples I include below, they've been sewn in a double core french style with a single strand of satin-finish sewing cotton sewing thread. Here are some examples of ones I've done:


Doable, but at what cost? My sanity. If you've got some to spare though, it will be very impressive to other bookbinders lol.
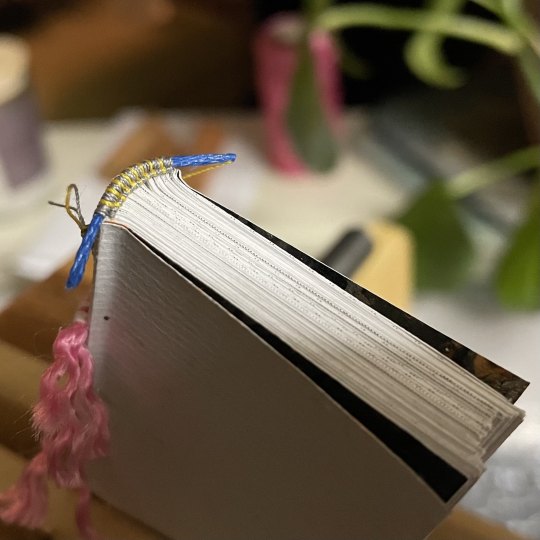
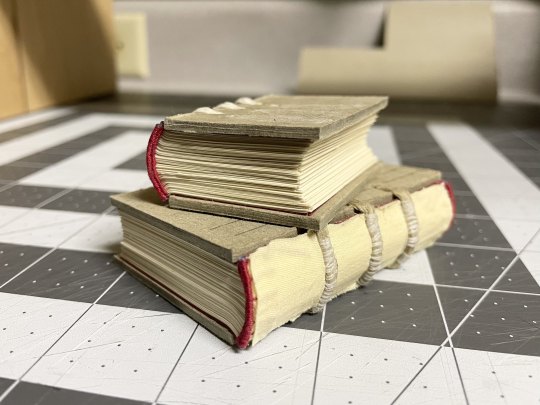
Don't be fooled into thinking tiny sewn endbands will be quicker or easier than their regular sized counterparts. And as a treat, here is how the tiny endband looked in my press while I sewed:
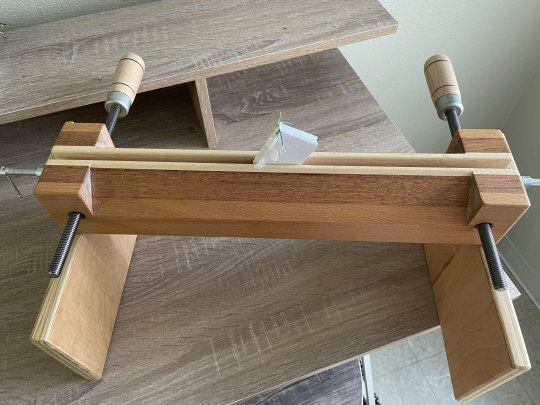
It's just 🧍♂️
In a sewn endband's stead I can recommend using prefab endbands, which will just be snipped to size and glued to the spine. Might be hard to do on tiny books with fewer signatures but not impossible, and it will look... as fine as a prefab endband can. Otherwise what I've really liked doing are paper endbands. I make these a bit wider than my textblock, so that I can trim them down later after they've been glued.
These are made from taking a strip of paper, applying glue around 15mm down the length, and laying down a piece of the PVA-coated embroidery floss. After a moment, to let the paper soften from the moisture and the core material stick a bit, you just roll it up a few times. Go slowly, as it can be finicky. Set aside to let it dry completely, then glue to your spine, as with the prefab ones. Let that dry, and trim to size carefully with your scissors.
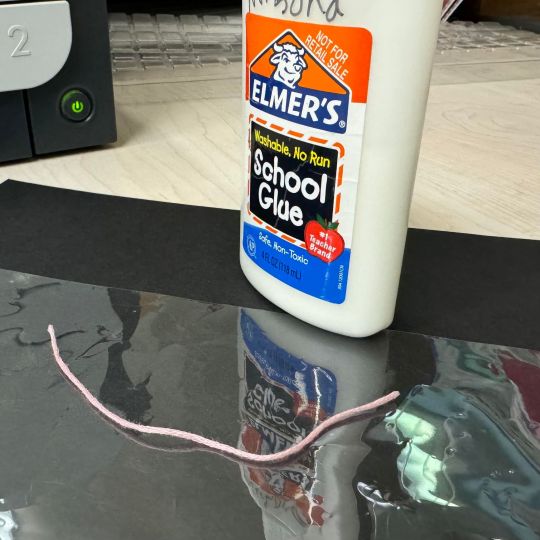
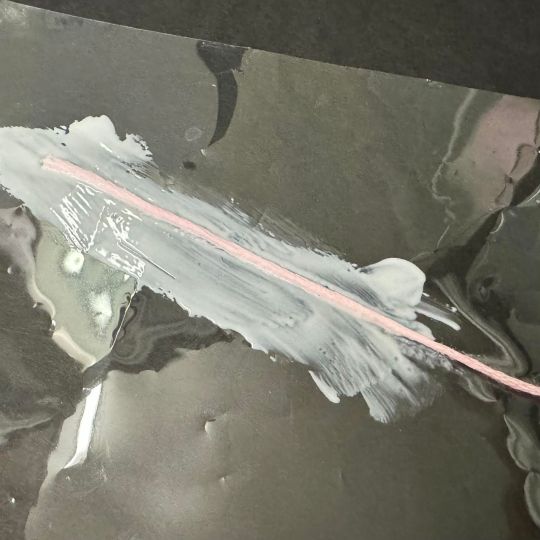
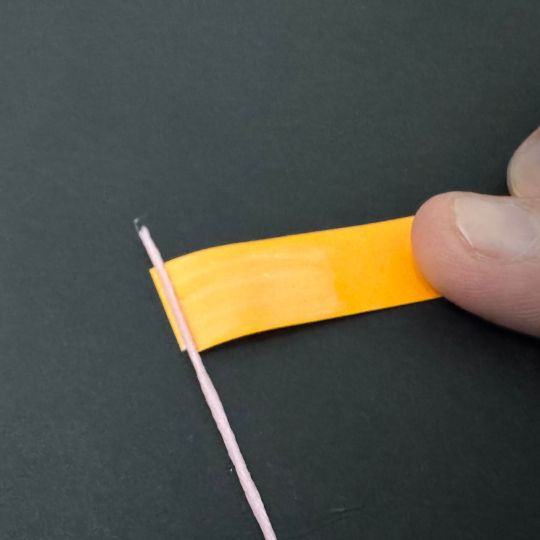


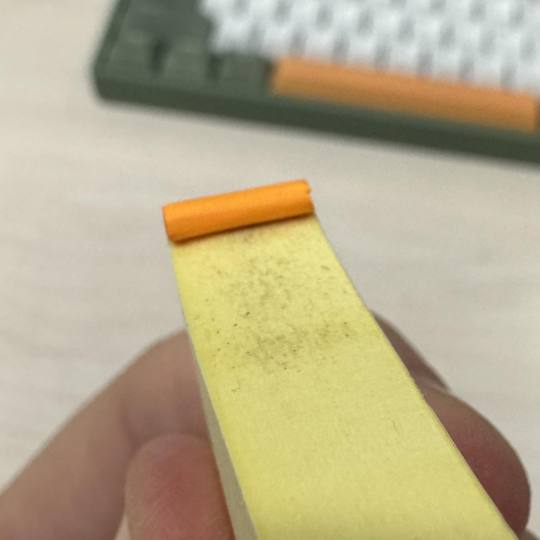
(Imagine the pad of sticky notes is our tiny book lol, it's what I had on hand) Anywho it's that easy! I find these so preferable in part because the rolled up core sits forward and covers the folds of my signatures, where prefab endbands usually don't. A tip--while you're coating your floss in PVA, you can take advantage of any remaining glueyness to roll it between your fingers, to remove any hard edges or unevenness from the thread before it's totally dry, and won't transfer any lumps or bumps to your finished paper endband. Once you've glued and trimmed the paper endband to size, you can reshape it with your fingers to remove the pinched ends from the scissors. @simply-sithel got me onto this process and it changed the game for me. She's been my tiny-book mentor 🙏

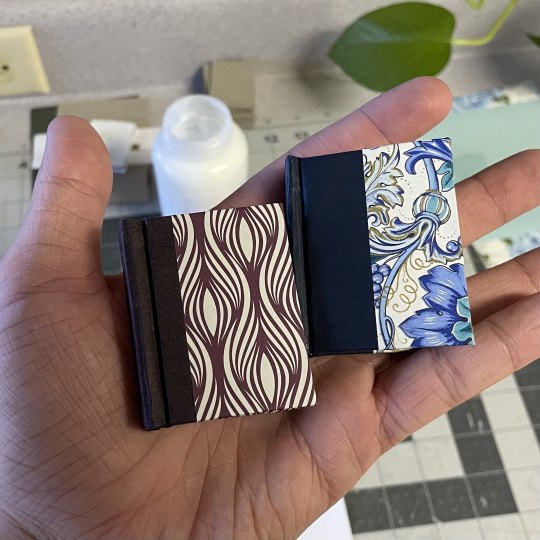
Referencing this image again, the book on the right has the paper endband, compared to the left, which has a sewn endband. On a regular book endbands are protective, decorative, and offer some support; on a tiny book they are purely decorative. I like to use the accent paper of my case as the paper for the endband, to bring everything together.
5 - Building the case and casing in
SO! We've made it this far, to what I believe are the easiest steps of this whole thing, building the case and casing in. As with my regular sized books I do these tiny ones in a square back bradel binding method. This construction uses a piece of connecting paper across the spine stiffener and allows you to tailor the case to your textblock's unique shape, rather than fiddling with it's exact measurements.
Instead of making this a square back bradel binding tutorial, I will refer you to DAS's video where I learned it myself. The case construction begins around the 13 minute mark. There are no notable different between using this method between regular sized books and tiny books.
The first things to note in this step are your hinge measurements. Whereas on regular books they may be 9-12mm, depending, on tiny books anything much wider than 8mm is noticeable and not strictly necessary. The full range of motion gained from the hinge measurement isn't as important with tiny books, so I recommend staying within the 6-7-8mm range for the aesthetics.
My other note is that the 2mm overhang measurement surrounding the textblock is still preferable, even on this tiny size. Something in your heart will try to make it nearer to scale, like .5mm or less, but this will result in a tiny book that looks badly made. My recommendation is not to go any narrower than 1mm in your overhang measurement. But also this is purely for appearances' sake and I'm not your mom, and even if I was you're (hopefully) an adult. Go nuts and find out what works best for your tastes!
In my experience you also have a slight bit more freedom selecting your cover materials. I've never gotten full-paper cases to work where regular sized books are concerned, but it's been my preference for tiny books. I have so much decorative scraps of paper that otherwise wouldn't have a home with regular books. This is also a great place to use offcuts of bookcloth as well. No gods so rules!!
Here are some photos of the process of building my tiny case on a tiny textblock following the square back bradel method:

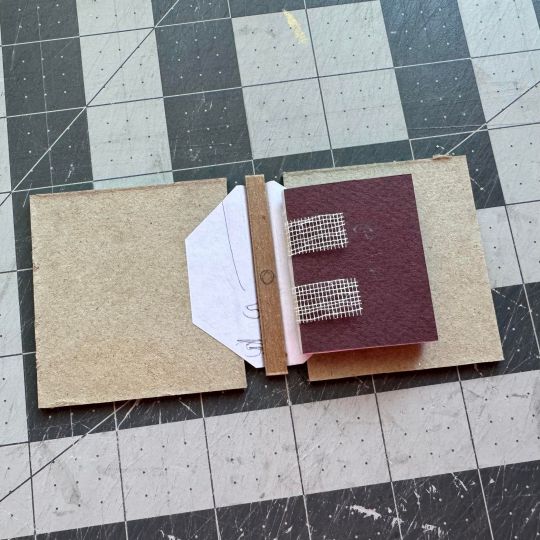

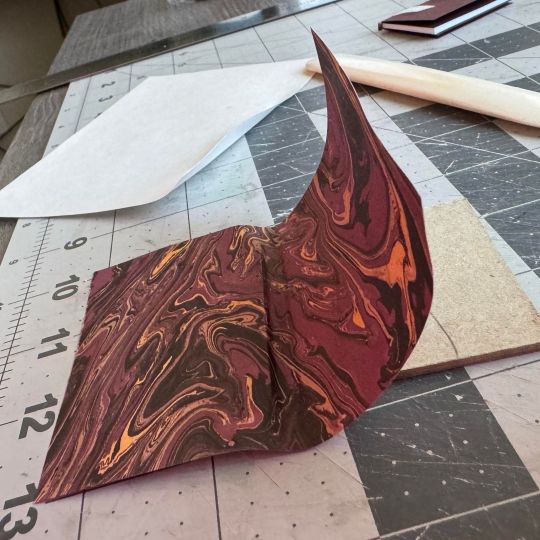

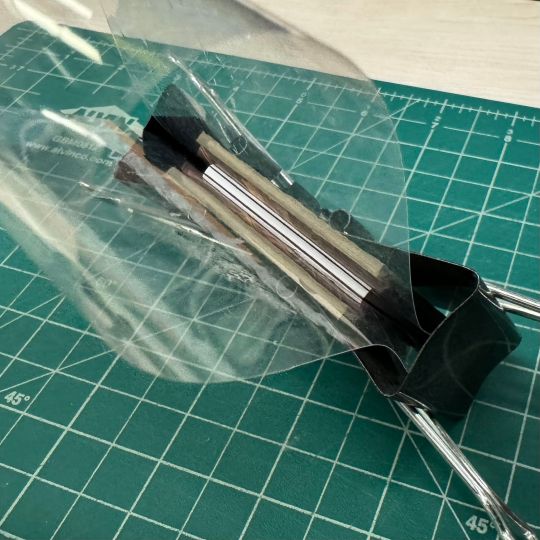
Now comes casing in. This part also couldn't be easier imo. I almost feel like I don't need to even say anything. I've found straight PVA, while having too short a worktime for full sized books, is perfect for casing in tiny books. You're brushing over like 2 square inches of paper?? You're using virtually no glue AND it takes 15 seconds?? I can only get so hard. As standard you should use some kind of moisture barrier between your endpages and your textblock while it dries in whatever your press situation looks like. For me these are sheets of plastic stolen from some plastic envelopes you use for archival work. These stop the moisture from going into your textblock and warping it. Some people have luck with parchment paper, but I am not one of them.
If you're using plain PVA, these babies will totally dry in maybe like, 3 or 4 hours. Take them out after an initial nipping time of like 20 minutes and let them dry open.
6 - BOOK

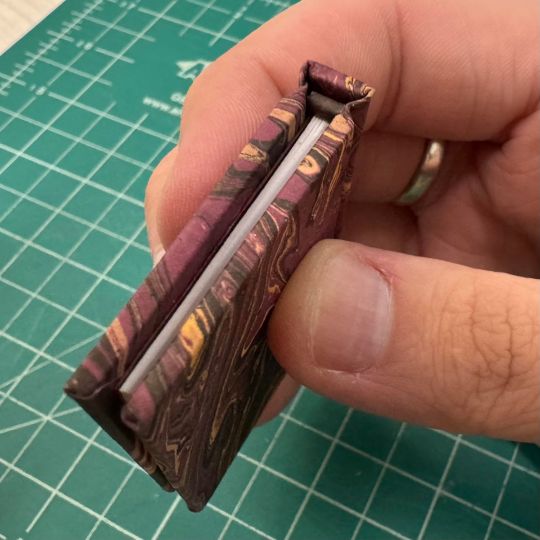
You've got a tiny book!!!

If you have any questions on something I've covered or didn't cover, please don't hesitate to ask!
117 notes
·
View notes
Text
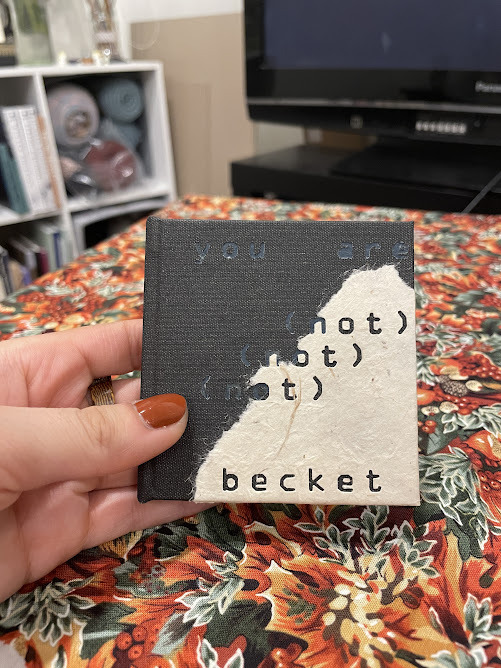
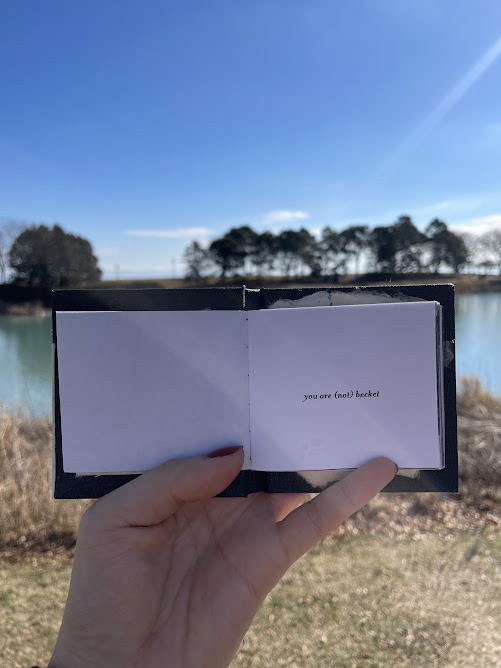
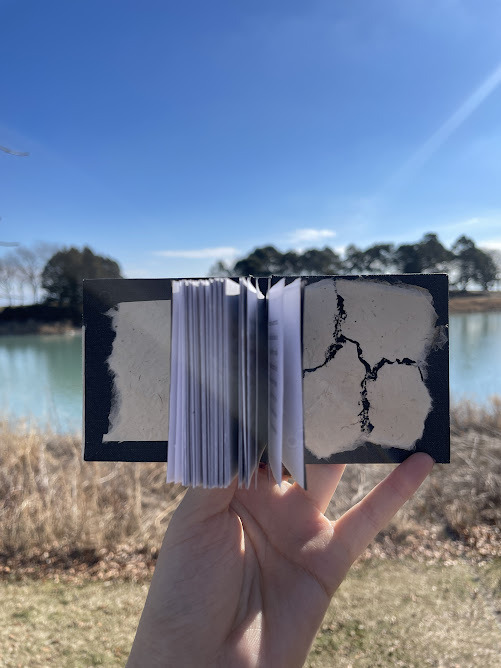
you are (not) becket by @gyzym
Here, it's simple: you and me and your dead brother are all swimming in the sick stillness of the water after the storm.
Titles: Mrs. Eaves Body text: Garamond Case title: OCR A Extended
3,079 words | 108 pages
Binderary book 2 (these are absolutely not in order of when I finished them. This was a frantic ten-minute case-in on the morning of the 27th before being three minutes late to work because I was washing my glue brush.): Pacific Rim is a story that went inside my ribcage and my brainstem and won't ever leave. It was my first exposure to a character who's dead from the beginning and who haunts the story for the rest of it and I think about Yancy Becket every two days and I will for the rest of my life. And thus, from there, I get here, where "my name is Becket and I didn't ask to be your gravestone. Like I wanted this, Becket, I swear to fucking god" is just a line that is tattooed on my brain. I've cried over this fic a bunch of times. It makes me feel ice-cream-scooped out in the middle of my chest. I love it and it needed to be in printed form.
More pictures/design/process under the cut.
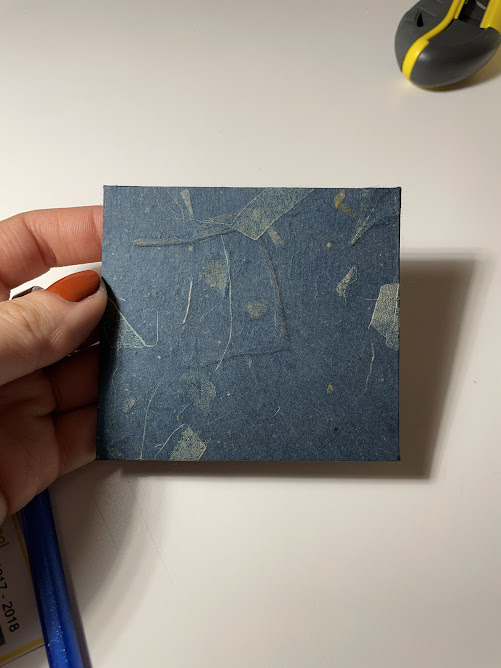
Design and Construction Case and covers: Flat-back case binding with bradel board covers and spine. This was my first time experimenting with layered materials for the case, because I wanted to mirror the missing pieces that are such a prominent part of the vibes of the fic to me, and oh boy. Layer 1 was on the front board, Hollander's Mango Leaf tissue in blue. Layer 2 was a full-cloth binding with Hollander's pearl linen cloth in charcoal grey, with the upper left half of the title text cut out using a Cricut. Layer 3 was again on the front board, Hollander's Lokta paper in natural. All of the title text was cut out with a Cricut and then I ripped the paper in half (an ordeal) and glued it down with a glue stick. I chose to tear the front because there's a lot of imagery of being torn free versus letting go in Pacific Rim in general, and this fic specifically, and yknow, it felt right.
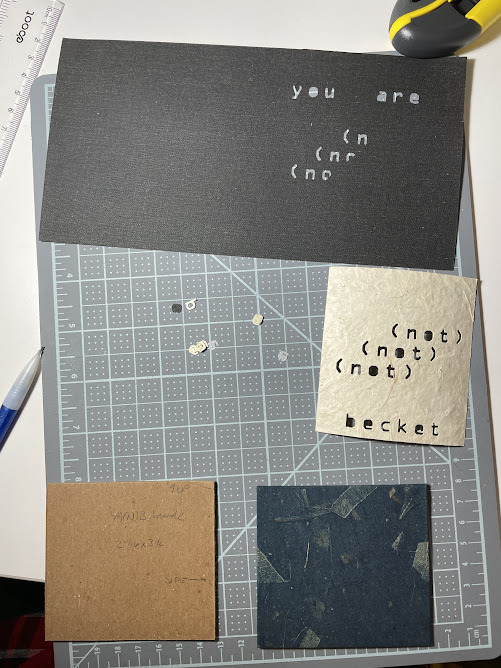
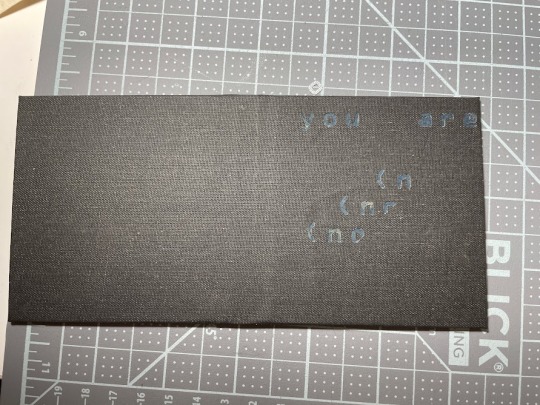
Insides: No endbands; the book was too small for the pre-sewn ones to work. Endpapers are black cardstock and torn Lokta paper. The casing in was done with PVA, gluing a small tongue of the black cardstock to the case, and then I glued the torn Lokta paper over the rest of the bare board to create a faux endpaper. The torn papers are the same idea that I mentioned with the cover. The front paper is a torn piece of a whole - Raleigh, after Yancy. Mako, after her parents, after Stacker. Yancy. The back is a set of torn pieces pasted back together - Raleigh-and-Mako, without the people they've lost. Yancy, after. I don't know. I think about this a lot. (Also, I'll come clean. The black ink on the back endpaper is eyeliner. My deepest most sincere apologies to any archivists. I don't own black ink and it was three in the morning.)
Typesetting Typeset was done in InDesign. It's nothing fancy. Grief, in real life, and in the way that it is in Pacific Rim too, is a stark thing, and I wanted to reflect that. So, no headers, no page numbers even, and just plain black page breaks for each of the numbered sections. Garamond, my beloved.
We All Do It, or, the Mistakes Section Honestly, this was one enormous oops after another. Since the book's so small each page had to be cut out individually and I won't even get started on the number of mistakes I made doing that. Then I utility knife trimmed and sanded down the edges maybe six times because I couldn't achieve a straight line (I had to change my knife blade. This did not occur to me). The top margin is like 1.3 times bigger than the bottom margin. The Lokta paper faux endpapers were because I cut the original cardstock papers an inch too short and didn't feel like cutting them again. And then the big one...I measured for the case and then didn't write down which measurement was width and which was height. The case is literally the wrong orientation and I didn't realize until I put the block in and the top/bottom margins were wrong. I'm so fucking lucky that the margins were already so small that the block covered all the exposed board so I just cased in anyway but I did have to sit on my floor in despair for a good ten minutes.
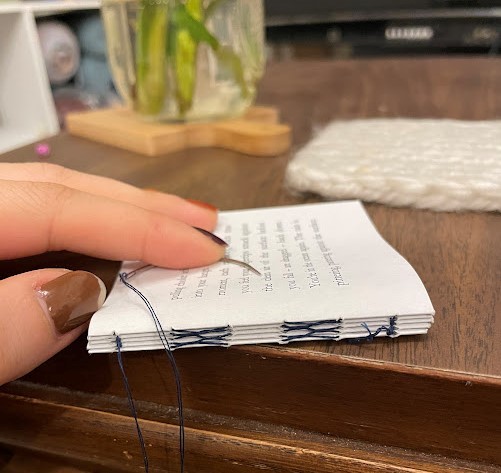
Here's the French link in progress because I didn't want to end on my series of fuck-ups. This was incredibly fun but I never want to make a book this small again. That's a lie. It's going to happen again but better. <3
102 notes
·
View notes
Note
Hello! I really love your work— it was a huge inspiration for me to get started on my own bookbinding journey :)
I just have one little question: When attaching the endpapers to the case, how do you make sure that the mull + tapes don’t leave an unsightly bulge in the glued-down endpaper? I’ve made a few books now, and have been continually frustrated by this.
Awww, thank you!!! I'm always delighted to know more people are getting into this hobby, I really think it's so fantastic and rewarding.
And ahh, this is a tricky question! So, part of my answer is that this is a part of the construction I am still FREQUENTLY lazy with. I often just... experience lumps and try to photograph from flattering angles.
Now, some endpapers will be more forgiving than others. If I'm working with something as thick as, say, scrapbook paper, I rarely see any bumps at all, even with something as thick as linen tapes. A lot of heavier cotton papers are also very generous. The hard thing is the thin papers, like a lot of the hand-marbled types, or the pretty prints. This is the stuff that feels sturdier than printer paper in your hand, but when it gets wet, it molds to the edges of your turn-ins and your tapes and shows ALL your sins.
The answer to this is a process called 'infill.' The idea is that before you case in, you go along the front and back cover of your case, and you add paper (like cardstock or printer paper) to bring everything up to the same level. Usually this means it'll be tucked within the edges of your turn-ins, and (the tricky part), you'll want to feel out where your tapes and mull will fall, and *also* remove paper from those areas. This can be tricky to tell without actually casing in your text block, and I usually get SUPER reluctant to slow down and do something that annoying at that stage, and skip it. So I can't give much advice on the how, but that's the general process!! The easiest solution is to choose thick endpapers that will hide your book crimes, but there are better ways if you're picky about materials or want to add that really special extra degree of polish. Best of luck to you!
21 notes
·
View notes
Text

ITEMS PART FIVE! Including maybe the most labor-intensive part of this project-- the lantern!

I know I have better pictures of this somewhere, but the lantern I wanted to try to make. Well, not try-- I would do it because I'm bad at giving up.

Two challenges I encountered were 1- how to hide the wires going from under the light to the batteries, and 2- where to store the batteries. The batteries are pretty big, and they wouldn't just fit in the bottom or the top of the lantern. The whole thing, finished, is about 1.5 inches high.
I got a bulb and wiring from my older sister (2, actually, not pictured is the one I absolutely destroyed) with the plan that I'd have the wires go down through the bottom of the lantern, then up into the top through the supporting pieces.

Two of the bordering pieces would have to be hollowed to fit the wires and then covered up. I dunno how many times I super glued this thing back together, drilled holes, cut up new pieces because I drilled too many holes in them, etc.


To hang it from something poking out of the rafter(s) I needed something hollow that also could support the weight of the lantern, so I ended up cutting up a plastic lollipop stick, which worked!
The wires were hidden, and then I had to figure out how to hide the battery casing, so I made a little box to sit on the rafter above the lantern pole, and drilled a hole through it to feed the wires through.

Like so. And with everything in place I covered the lantern in the usual stuff; black construction paper, black wash, Mod Podge, and then painted highlights:


I put a little clay around the light to vaguely look like a candle? Ehgh lol

Then I secured the rafters to the roof of the workshop by drilling holes in the walls and the wood itself, shoving in thick wire and then dumping super glue in there, and then filling cracks with epoxy putty.

(Gen-chan judging me while I work on the battery case box)

Here's how the batteries fit inside. It's another shred up tealight, and I decided to give it a false lid to make it look like it's full of stuff


Little chunks of painted wood, wrapped up fabric and embroidery thread, some dyed moss and a piece of blue glass I picked up on the side of the road while I was hobbling home with my groceries on my back.

Complete wiring, which involved a little cutting and soldering of the copper wires.


Rafters and lantern complete ✨ And it lights up nicely:


Other items that hang out up there are some of the books I made, an unfinished hilt, wood, a tiny barrel and a black bone (prefab), because CURSES (blackened bones are common loot in FFXII)

My shitty attempt at an animal pelt (cream felt and paint)...

And this empty burlap sack that's just fabric and twine sewed together and then dunked in watered down paint.
Not much left to go now!
3 notes
·
View notes
Text


WIP - The Crown of the Summer Court
case construction (long post under the cut, see the finished bind here)
Did I ever mention I hate sanding? Well, I did a lot of sanding for this bind. Sadly I forgot to take pictures of all the steps, but I'll try my best to fill in the gaps.
The series of steps jumps a bit back and forth and feels reversed at times, because I needed different measurements to do different step on another part of the bind.
Basically I started like I always do, with the spine stiffener and a piece of paper to gather the case before covering. Only this time there was a bit more to think about. I knew I wanted a thaumatrope on the case and it should not be a dangly bit, but still removable. Also it should not stick out too much (preferably not at all to avoid damage to the thaumatrope). To achieve that I planned on using a magnet and sink one into the board and sandwich the other between card board on the thaumatrope. So part of the board thickness was simply dictated by the thickness of the magnet. I was in luck to have some really thin neodymium magnets and still the boards ended up ~3mm, which is massive for an A7 sized book.
The case is made of 2 different kinds of board, one solid 2,5mm the other layered to make a cut out easier.


Here you can see the different levels of the front board . A thinner base with an inset magnet, covered by cardboard so the magnet will not show through (maybe that is doable by working the inset neater but I have not managed that so far so I went for the additional cardboard) On top a thinner grey board to accommodate for the thaumatrope, so it would not stick out (too much).
The small ledge was cut back later when I trimmed the boards to fit the book block.


I also sanded the edges to a bevel so they would not look as massive as they actually are.
To get smooth paste downs I also sanded the paper used to connect the boards. Which later proved unnecessary, because I decided to glue in more cardboard to even out the cork veneer, which is comparably bulky and left too much of a step for my liking.

Next up was covering the front and back board with a nice base paper. Naturally I had nothing I liked. I considered the same paper as the endpapers.
I tried the front...


... and backside


While I think both are actually okay, neither made me really happy. Eventually I set out to make paste papers. The idea was to get something with earthy colours in the 'root' area, a yellowish colour in the trunk height and some leafy green in the upper part.


Lesson learned in this session: - patterns are harder than you imagine them to be - getting colours right is harder than you imagine it to be - size matters! if you have just a small area to show some colour shift. use paper only a little larger than needed to get all the colours you want/need on it.
The winner was some fooling around when I had actually given up on my idea and a sunrise/sunset pair of papers turned out nicely. I checked with the patter I cut for the cork veneer and it fit surprisingly well.


I was a little worried for the paper to tear in the recessed area. but it was trouble at all to work the paper in there. Still to keep the edges crisp I cut the cut out circle a tiny bit smaller and put it back in the recessed area to let the paper dry with a weight on top.


By the way, the papers have not been waxed! Since I wanted to glue another layer on top and most of the paper would be covered again, I didn't want to seal the surface.
Next step was preparing the cork veneer with the cut outs. I had started with some scribbles on paper and simply used those to trace on the paper backside of the cork paper. To not get confused I had marked front and back before drawing anything and hatched the areas that were to cut away.

The gluing it self was easy on the spine and then I realised, that I could not just cover the front in glue and lay down the veneer because I'd never manage to just apply glue to the parts where the cork was meant to be. So working one side after the other I dabbed the glue on to the veneer in midair while holding it up. It works, but I really can't recommend that.


The turn-ins were easy after that though. For the second bind I applied glue to the whole of the cork paper. Which wasn't much better to be honest. With all the tiny bits and pieces I had glue pressing out to the front and smearing a bit to the cork. Fortunately the material is rather forgiving to glue stains though.


Last I leveled out the inside of the case with cardboard. This time I remembered to bevel the cardboard on the hinge side to soften the step there!
#bookbinding#wip the crown of the summer court#fanbinding#1000 tiny steps that aaaaaall needed drying time#also loooooots of sanding#and I really hate sanding#good thing I had 2 binds to complete and also a couple of parts to work on in turns#this felt like it took forever because every 2 steps I had to wait for something to dry#magnets#thaumatrope#cut out#paper backed cork veneer#handmade paste paper
6 notes
·
View notes
Note
how did you make the milgram phone covers?
Woo craft time! My original inspiration for the style was from searihart, and she wrote up a lovely reference post on doing the scrapbooking here! It definitely helped me a lot when planning and putting together these two


So, I started with the clear phone case and some scrap paper. I traced the inside as best I could and cut the little rectangle out. I stuck it inside, tested it on my phone, made some adjustments, and cut another one out. I did this a few times until I was satisfied with how it sat inside the case. (You can draw the middle hole to make sure it lines up, but you don't need to worry about cutting it out for all these test-shapes). Once I had one that fit well, I used it as a template to cut out my main piece of construction paper.
I had a fair amount of craft supplies already (the lace, sequins, little strawberries and stickers from Rokkucha), but other than that everything was printed out/drawn myself! I didn't have a ton of patterns for the bigger shapes, so I tried to print some from the mvs as well as finding the individual images. I glued everything down, purposefully dipping into the center holes.
Then I cut out those holes. If you have an exacto knife I would recommend that. If not, uhhh, a pocket knife and kitchen cutting board work just fine 😅 You may want to add some clear nail polish/modpodge right around it, since it'll be exposed to the elements more than the other parts. I still need to do that for mine, it sits juuust off enough that if I were to spill something it could get onto the edges...
I attached the paper with a single loop of tape onto the back of my phone while I put the clear case over it. This helps 1. if you have a textured design that's hard to attach right to the case, 2. if you plan on swapping out multiple designs like I am, and 3. makes it so there's no risk of glue or tape showing.
Now, the little strawberry at the bottom of Mappi's actually pushed the case up a bit, and made it impossible for my charging plug to connect all the way 😅 I was able to fiddle around with it so that it works fine -- it's still pretty thin, but if you've got thicker materials just be wary of that.
Good luck with yours, I hope it goes well :D
#id love to see it when you finish if you wanted to share!#thank you seari 😤👍 still in your debt for how well mine worked out#ive just been using mappis but i had to take the case off when they fixed my phone so i know it comes off/on just as easy as planned#im sure theres a way to glue the paper to the case that stays hidden but i still wouldnt want to risk it after all that hard work ya know#my partner made one too and messed up cutting out the center hole but was able to cover it up by gluing a border of paper/lace over it#so dont go crazy if you miscut there#my germaphobic ass wipes down my phone a lot and i dont want the hand sanitizer to drip and make the paper wet/bleed so i want to seal that#and if youre doing adventurous things and your phone goes through a lot its still a good idea#so yeah!! i hope this can help! good luck and have fun :D#ask#reference
6 notes
·
View notes
Text
The Chronicles of Narnia Rebinding Pt 2
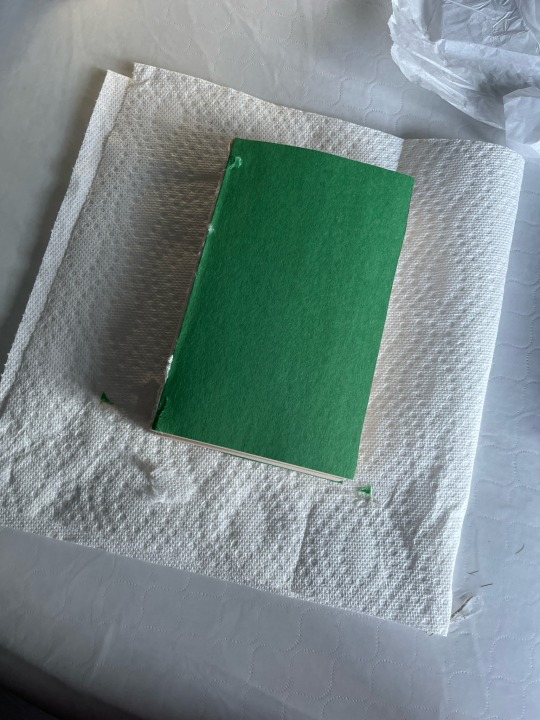

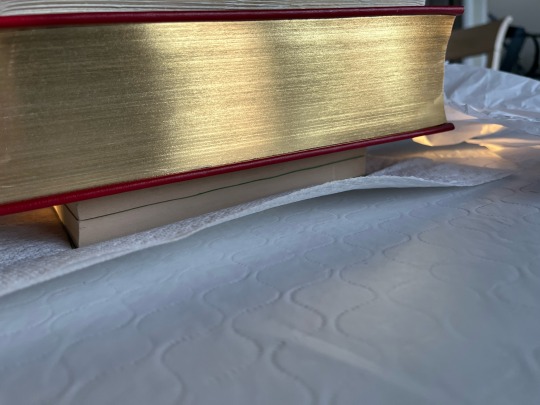

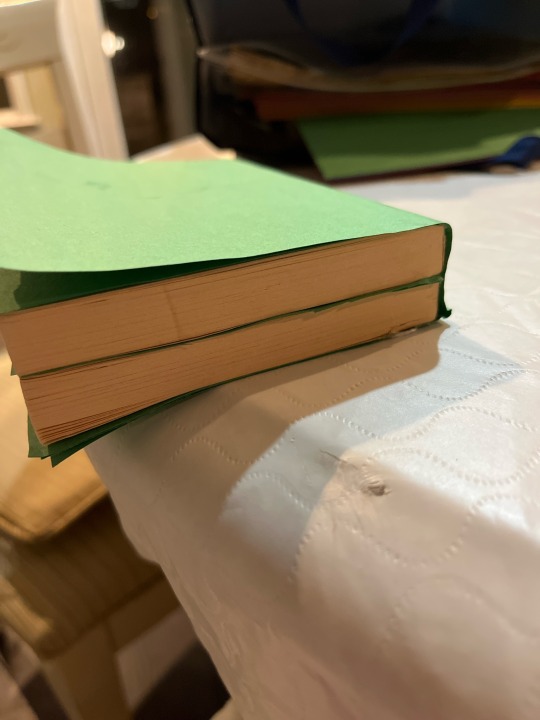
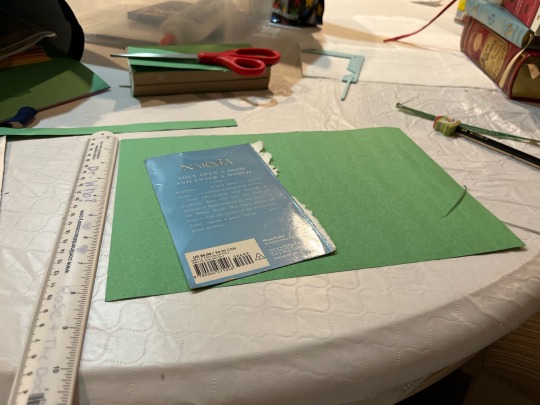
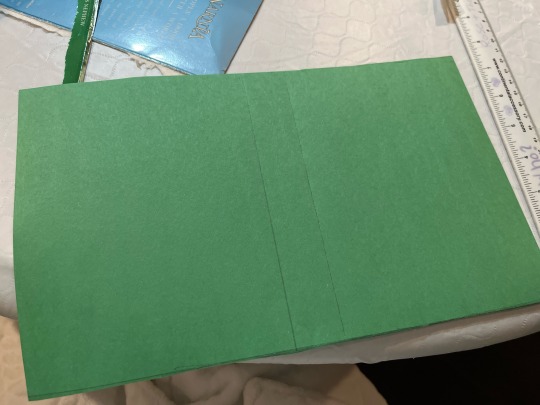
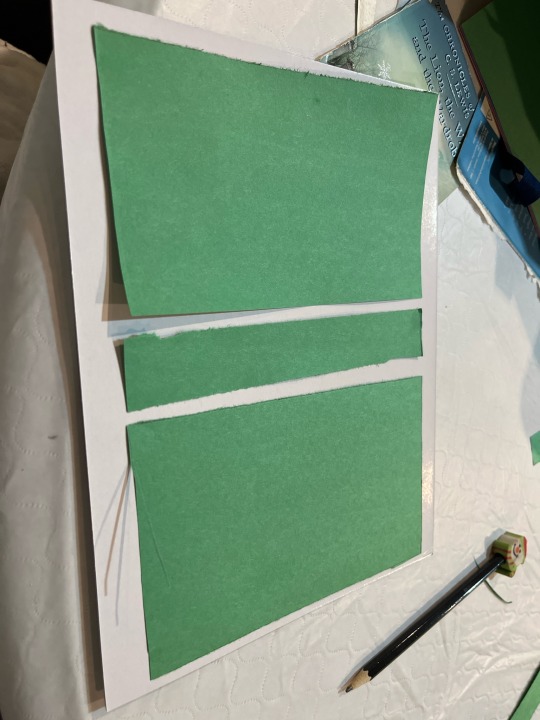
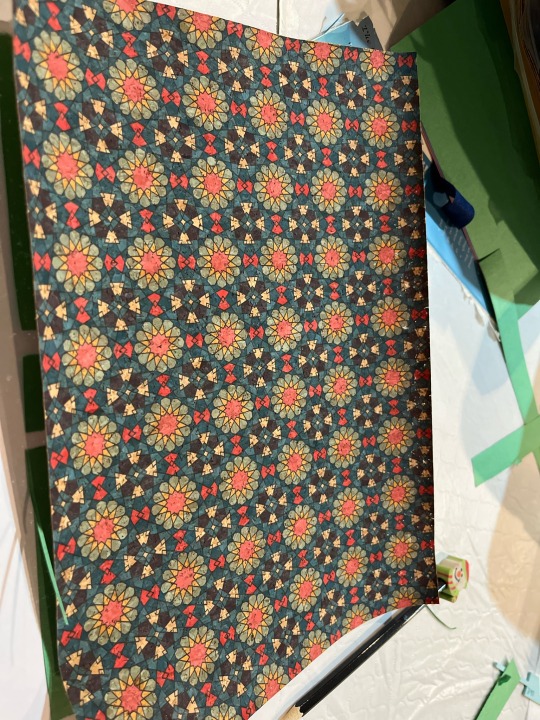

Well, here is part two of the rebinding! I learned that dividing papers between text blocks to separate the two separate books is usually better as one dividing paper over the folded two you make for end papers. Thus I needed a little more glue for the text block than I originally wanted.
From there I went on to work on making the actual cover and for this I have two pieces of advice:
Keep the original paper back cover for measuring (it makes making the measurements so much easier).
Sit down when you do this. Standing up might be great for the body but trying to use a ruler is a pain.
I noticed that my cardstock was slightly bent which makes it harder to adhere to the cork fabric, so I’m testing a theory. I put my heaviest book down on top of my cover drying cover then placed the text block on top, followed by my other books that I use for pressing to see if that will flatten the stock out and help it stick to the fabric.
I also suggest making templates from the covers out of construction paper. This can be multi-use as it makes it easier to take measurements as well as help with keeping the fabric glued down to the cardstock if you’re using cork fabric.
#book binding update#chronicles of narnia#cork fabric#glue#cardstock#random update#new installment#adventures in bookbinding
5 notes
·
View notes
Note
What do you think a simple beach day date of Made Inevitable would be like?
The sun burned bright far above, making the pale sand in between Paul and Wilbur's toes almost glow. Fluffy white clouds dotted the wide expanse of blue, reminiscent of cotton glued to construction paper. The couple wore matching sunglasses with blue and green frames respectively. Heat filled the choking air, though notably, neither person's cheeks were flushed. Waves lapped against the shore, pushing sand to and fro. They were rhythmic, constant, calming; a contrast to the rocks not far away where they instead crashed loudly, spewing salt into the air.
Wilbur held a waffle cone in their hand, fingers rubbing against the semi-soft grooves and licking up the melting cream. Mint chocolate chip ice cream filled the cone; its chill was so stark against the warmth of the sun that they could see a billow of frosty fog in the air around it. Instead of their typical thick layers of jeaned jacket, shirt, and pants, they wore a tank top black as night and baggy dark blue shorts.
Paul wore something similar, though his was much more azure in hue and his shirt's straps were a little thicker. Clearly drawn lines adorned the veins on his arms and necks, identical in color to the veins though notably lacking any purple. His hands absentmindedly picked up fistfuls of sand, letting it fall through his fingers over and over again as he studied Wilbur's bare, pale limbs.
There were a dozen or so scars drawn up and down them, vivid and impossible to not notice. They came in nearly every shape in size; some thick, some thin, some long, some short, some a deeper tan than Wilbur's natural skin tone and some paler than snow. He could never help but ponder what caused them, curious to each and every story they held within. There was a particular one that always caught Paul's attention; the lightning-esque scar covering their right thigh.
Wilbur paused their eating for a moment. "Enjoyin' what ya see?" they asked.
Paul shrugged playfully. "A little." He motioned at them. "You should take off your jacket more often."
He could see them raise an eyebrow around the glasses. "My pants too?"
A bright cerulean blush bloomed on Paul's cheeks "N-no," he stammered, caught off guard yet again by Wilbur's bluntness.
"I ain't blind," they stated, taking another casual lick of their ice cream. "I can see where your eyes wander."
Paul shook his head, letting Wilbur's words fall off his back like water off a duck. He pointed at the mark on Wilbur's leg, deciding to give Wilbur's way of conversation a shot.
"Where'd you get that?"
"Oh," Wilbur muttered. "That." They ate some more ice cream, stuffing their mouth as if in an attempt to excuse themself from talking. Paul simply waited, knowing that eventually they'd give up their dedication to secrecy.
They swallowed a few more mouthfuls before answering. "The same place you got yours, sweetheart."
"Huh," Paul hummed, looking down at his arms, glancing at the way the lines cracked apart just like Wilbur's injury, the only difference in that Wilbur's were hued a bit more normally. "Thought that was just my veins."
"Nope," Wilbur said before letting out a small scoff. "We got matchin' scars, ain't that cute?"
Paul burst out in a wide smile. "That is cute," he agreed. Paul scooched closer to Wilbur, throwing up a slight bit of sand and rested his head on Wilbur's shoulder.
#sorry this just popped into my head#drabble#beach date#made inevitable#appletheosis#infected paul matthews#wilbur cross
1 note
·
View note
Text
THE SORE BIRDS ARE COLD HERE

Here's the second release of THE SORE BIRDS ARE COLD HERE with 6 tracks of the same 'sessions' as the previous release (totstellen-grmmsk.bandcamp.com/album/rathill-pt-1). This time with slightly shorter tracks of experimental drone / field-recording assemblages. Recordings of reclaimed spaces, shelters, transitional zones and 'new homes lost'. Swallows nesting in flooded bunkers. City dwelling crows building nests from anti-bird spikes. Wasps building hives inside sheds from material they chew of the outer walls of the same structure. Clusters of material, repurposed, stolen, salvaged, reclaimed, re-assembled. Building another new home from the avalanche of debris pushed around for ages. It is all leaking, no matter how many layers we patch together. Between the construction noise, we even hear some melodies here and there, when the drones become less static and start to move around in the vast container spaces. We hope you like our sonic explorations, as much as we did. Keep moving. Find homes. Tear down borders. Give shelter. White translucent C90 tape in white backed standard case. the tape has a hand stamped sticker and has a blank B-side full of magnetic potential. the cover is a black and white laser print with fragments of a found wasp nest, that was already destroyed glued to it. the standard stock paper has the number of the copy and edition rubber-stamped on it's rear-flap. Limited edition of 34 copies. Released by Totes Format. totes-format.weebly.com THE SORE BIRDS ARE COLD HERE are Matt and Grm. Mastering, layout and production by GRM for TOTES FORMAT. THERE ARE NO BIRDS HERE: therearenobirdshere.bandcamp.com COLDSORE: coldsore-sound.tumblr.com


1 note
·
View note
Text
Glue Coverage Calculator

A glue coverage calculator determines the amount of adhesive needed for a project. It factors in surface area and glue specifications. Glue Coverage Calculator
Glue Coverage Calculator
Area to be Glued (square inches): Glue Amount (ounces): Thickness of the Glue Layer (inches): Calculate Coverage Crafting or construction projects often require precision in the amount of materials used, and glue is no exception. Ensuring you have the right amount of adhesive can make the difference between a successful project and a sticky situation. A glue coverage calculator simplifies the estimation process, saving time and reducing waste. Whether you're laying down hardwood floors, assembling homemade crafts, or dealing with intricate model-building, accurately calculating glue coverage helps maintain both efficiency and budget. This handy tool assists in tailoring purchase quantities to project needs, promoting more sustainable practices by avoiding overconsumption.

Credit: www.gluegun.com
The Basics Of Glue Coverage
Understanding the fundamentals of glue coverage is crucial for everyone from DIY enthusiasts to professional carpenters. It's not just about slathering your material with glue. Optimal glue use ensures a strong, long-lasting bond without waste. Defining Glue Coverage Glue coverage refers to the amount of glue applied on a surface to create an effective bond. This is usually measured in grams per square meter or ounces per square foot. Too little and your bond weakens; too much can cause issues like warping and increased drying times. Glue Coverage Calculator tools help to estimate the correct quantity. They use the size of your project and glue specifications. With this, you get a custom guideline for your specific task. Importance Of Accurate Glue Application - Saves Money: Using the right amount prevents buying extra glue. - Improves Strength: Correct coverage means stronger bonds. - Reduces Mess: Avoids overflow and cleanup time. - Enhances Appearance: No excess glue means a cleaner look.
Types Of Adhesives And Their Coverage
Selecting the right adhesive is crucial for any project. The coverage of glue, meaning how much area it can adhere with a certain volume, is a key factor. This depends on the type of adhesive. Let's explore different types and their coverage to ensure your project's success. Pva Glues PVA glues, or Polyvinyl Acetate, are water-based adhesives. They work well with wood, paper, and fabric. PVA glues are popular due to their easy cleanup and non-toxic nature. The coverage varies, but a single gallon can cover approximately 200 square feet when applied thinly. Epoxy Resins Epoxy resins are known for their strong bond and chemical resistance. They are two-part adhesives, combining a resin and hardener. Suitable for many materials, epoxy resins have a varied coverage. For example, a 1-gallon kit can cover around 12 to 150 square feet, depending on thickness. Contact Adhesives Contact adhesives are ideal for quick fixes. They bond materials on contact and are great for laminate, rubber, and leather. Coverage highly depends on the application method. Approximately, one quart can cover up to 60 square feet when spread thinly. Construction Adhesives Construction adhesives boast high strength. They're perfect for heavy materials like stone, concrete, and wood. A 10-ounce tube can cover about 20 to 30 square feet, but this can vary with material type and weather conditions. Understanding the coverage of different adhesives helps avoid waste and ensures durability. Always check the manufacturer's guidelines for the best results.
Factors Influencing Glue Coverage
Understanding the various factors that impact glue coverage is crucial for any project. Whether in woodworking, crafting, or construction, knowing these factors ensures the right amount of glue is used. This prevents waste, saves money, and guarantees a strong bond. Let's dive into the key elements that play a role in glue coverage. Material Surface Area The size of the surface getting glued is a primary factor. Measure length by width to calculate the area. Use a calculator to find the total. Larger areas need more glue. Keep measurements accurate for the best results. Glue Thickness How thick the glue layer must be varies with the project. A thin layer might suffice for tight-fitting pieces. A thicker layer might be needed for gaps. Check the glue manufacturer's guidelines. Aim for even distribution across the surface. Porosity Of Surfaces Porosity means how much a material can absorb. Porous materials like unsealed wood absorb more glue. Non-porous materials like plastic need less. Adjust glue amount based on porosity to avoid weak bonds or excess squeeze-out. Summary - Factors Influencing Glue Coverage - Surface Area: Calculate size for proper glue amount. - Glue Thickness: Determine needed thickness for the bond. - Surface Porosity: Porous materials may require more glue. Quick Reference for Glue Coverage Factors Factor Impact on Glue Quantity Material Surface Area More area, more glue needed Glue Thickness Varies with the gap between surfaces Porosity of Surfaces Porous surfaces absorb more glue
Calculating Glue Amounts
Before starting any project, knowing how much glue to use is vital. Not enough glue means weak bonds. Too much, and you waste resources. The Glue Coverage Calculator simplifies this. It tells you how much glue your project needs. Let's break down how to calculate glue volume for various tasks. Basic Calculation Formulas Understanding basic formulas is the first step. Take the area of the surface and multiply it by the glue manufacturer's recommended coating thickness. This tells you the volume of glue needed. Always measure surfaces in square footage or square meters for accuracy. The formula looks like this: Glue Volume = Surface Area x Recommended Coating Thickness. To ensure precision, use a coverage calculator. Enter your figures, and get the exact glue amount. Examples Of Common Projects Let's apply the formula to real-life situations. Here are a few examples: - Woodworking: For a tabletop, measure its length and width for the area. Then, use the recommended thickness. - Scrapbooking: Small pieces need a light glue layer. Calculate total album area and adjust for thinner coverage. - Tile Adhesive: Floor dimensions give the surface area. Factor in notching size for precise adhesive volume. Project Surface Area Recommended Thickness (inch) Total Glue Volume Wooden Tabletop 30 sq ft 0.01 0.3 cubic feet Scrapbook 2 sq ft 0.003 0.006 cubic feet Tile Flooring 100 sq ft 0.02 2 cubic feet
Tools For Measuring Glue Coverage
Tools for Measuring Glue Coverage are essential for precise application in a range of projects, from woodworking to crafting. Knowing how much glue to use can save time and materials, and ensure a strong bond. Whether preferring tried-and-true manual techniques or modern digital solutions, an array of options exists. Manual Methods Manual methods for measuring glue coverage rely on simple techniques and tools. These are cost-effective and easy to execute: - Spread charts: Visual guides that suggest the right amount of glue. - Glue gauges: Tools to measure the thickness of glue application. - Weight-based measurements: Using a scale to measure glue quantity. A typical manual method includes spreading a known weight of glue over a test area and calculating coverage from the results. Digital Glue Calculators Digital glue calculators streamline the process with algorithms and are accessible online or as apps: - Input the project's dimensions. - Select the glue type. - Get instant recommendations for coverage. Many digital calculators also account for glue type and substrate porosity for precision. They remove the guesswork, offering quick, reliable coverage calculations. Type Advantages Usage Manual Cost-effective, no tech needed Small projects, traditional methods Digital Precise, fast, versatile Large projects, modern practices
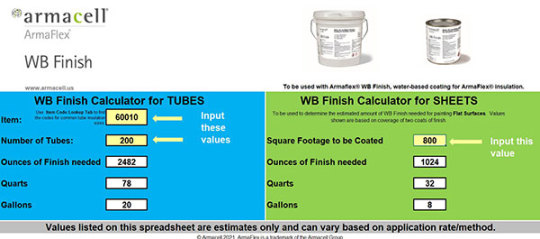
Credit: www.armacell.us
Maximizing Glue Efficiency
Maximizing glue efficiency is crucial in crafts, woodworking, and construction. Using a Glue Coverage Calculator helps ensure you use the right amount of adhesive for your project. Doing so prevents waste and saves money, giving you optimal results every time. Best Practices For Glue Application For the best glue application, consider the following: - Measure precisely using a coverage calculator. - Choose the right type of glue for your material. - Prepare surfaces by cleaning them. - Apply glue in a thin, even layer. - Use clamps to secure surfaces as the glue dries. - Allow ample drying time before stress is applied. Common Mistakes To Avoid Avoiding these mistakes can enhance your project's longevity: Mistake Problem Solution Overapplication of glue Creates a mess, wastes glue Use coverage calculator Under-application Weak bonds, project failure Follow manufacturer's guidelines Uneven application Uneven adhesion, poor finish Use a spreader or brush Not clamping Inadequate bond strength Clamp during curing time Rushing drying time Compromises bond integrity Allow full drying time Following these practices and avoiding common pitfalls can greatly improve your project's durability and appearance. Remember, a Glue Coverage Calculator is a handy tool to guide you in using just the right amount of glue for maximum effectiveness.
Glue Calculator Software Features
Discover the robust features of Glue Calculator Software. It's a tool for professionals and hobbyists alike. This software makes any gluing project simple and efficient User Interface Elements The glue calculator's user interface is simple and intuitive. Here's what you can expect: - Clear layout: Find features quickly and easily. - Visual aids: Graphics help users understand the data. - Responsive design: Work on any device with ease. Adjusting For Different Variables Accurate glue coverage is vital. The software allows for adjustments based on: Variable Adjustment Feature Material type Select from a dropdown menu Surface area Input dimensions for precise calculations Glue type Choose from various glue options Change settings to fit your project's demands. Your results will be as accurate as possible.
Case Studies: Glue Coverage In Action
Understanding how much glue you need is important. It saves time and money. Here are real-world examples. They show glue coverage in different settings. Each case offers insights into the right glue amount. Furniture Manufacturing Furniture makers use lots of glue. They want strong, durable pieces. Calculating the right amount means no waste. Let's look at a company scenario: Project Glue Type Surface Area Required Amount Wooden Chair PVA Glue 3 sq. meters 80 ml A calculator helped them. The company saved 20% on glue costs last year. Craft Projects Glue is key in crafts. But, too much glue means a mess. A local school project shows this: - Paper Mache Globe: A small batch of glue was needed. - Cardboard Fort: Used a calculator to find needed glue. - Measure surface area. - Choose glue type. - Get exact glue amount. Students finished their projects neat and clean. Industrial Applications Industries require precision. A local factory's example clarifies this: Conveyor Belt Repair: Needed a quick-fix solution. The glue calculator ensured they used the right amount of industrial adhesive. No delays occurred. The production ran smoothly. The factory maintained its schedule.
Avoiding Waste And Ensuring Quality
Avoiding waste in any project is crucial for both cost-effectiveness and environmental responsibility. When it comes to bonding materials, a Glue Coverage Calculator becomes an essential tool. It helps to ensure quality by calculating the exact amount of adhesive needed. This precision avoids overuse, which can compromise the adhesive's effectiveness, and prevent underuse, which can result in weak bonds. Conservation Techniques Effective conservation starts with planning. Utilizing a Glue Coverage Calculator, professionals and DIY enthusiasts can both minimize waste. Below are techniques to use adhesive judiciously: - Calculate precise coverage area. - Select the right glue type for the material. - Apply glue evenly to avoid excess. Quality Control Measures Ensuring the lasting bond and integrity of materials is paramount. The following quality control measures are necessary: Step Action 1 Test glue on small area first. 2 Use Glue Coverage Calculator for accuracy. 3 Adjust based on environmental conditions. By adhering to these quality control measures, the chances of future failure significantly decrease. Projects will stand the test of time with the right amount and type of glue applied.
The Future Of Adhesive Application
The advancement of adhesive application methods is revolutionizing how we approach bonding materials. A Glue Coverage Calculator stands at the forefront of this innovation. With precision and efficiency in mind, these tools are set to reshape our use of adhesives in various industries. Technological Advancements Embracing tech improvements, Glue Coverage Calculators bring forth significant benefits: - Accuracy: Deliver exact amounts of glue, reducing waste. - Consistency: Offer uniform application for better bond quality. - Data Analysis: Record and analyze usage patterns for optimization. These tools incorporate AI and machine learning for smarter application. They adapt to different surface materials to ensure optimal glue use. Sustainability Considerations Today’s calculators focus on sustainable practices. Key features include: - Reducing adhesive waste, which lessens environmental impact. - Regulating usage to conform with eco-friendly standards. - Promoting the use of biodegradable adhesives. These advancements not only conserve resources but also support a greener planet. With calculators, businesses move towards sustainable production.
Conclusion
Wrapping up, our Glue Coverage Calculator is a must-have tool for any bonding project. It saves time, reduces waste, and helps ensure a perfect application every time. Remember, precise calculations lead to professional results. For your next venture, trust this calculator to guide you through to a flawless finish. Read the full article
0 notes
Text
Sept 17 - worked my way through scanning a bunch of stuff over a 4-5 hour long period (possibly longer, I didn't keep track of when I started). Which barely made a dent in the stuff-to-be-scanned. I'm trying to tackle some of the more unwieldy parts of it, like those ancient huge photo albums with pages like black construction paper, with photos often glued directly to them and only rarely fastened in with adhesive photo corners, and envelopes full of newspaper clippings, and the like.
Best find so far? Small green cloth covered photo album, about the size of half a sheet of letter-sized paper (fits very neatly across the glass of my scanner). The subject? A cycling trip four male friends took together in June 1905 through counties Cork and Kerry in Ireland. I have zero knowledge at all about how (or really even if) any of them are related to my nephew (it's handed down from his father's side of the family), and only one of the four men's names is mentioned at all (a short article he wrote about the trip is glued inside the front cover). But it's all these lovely mostly quite small old photos of things like Blarney Castle and the Lakes of Killarney, people they met along their way, and different places where they pitched their (quite small) tent for a night as they travelled around by a mix of boat, train, and bicycle. A time capsule from the past, of people long dead and places long changed. I've put that one in a pile of stuff that he should consider donating to an archive somewhere if he doesn't keep it himself.
Most amusing find so far? Apparently when he was a young teen or pre-teen my BIL was in the scouts, and was due to attend some sort of special ceremony, but broke his leg skiing and was in hospital up in Collingwood as a result. Rather than him missing out entirely, his troop and adults related to it went and visited him in hospital to present him his certificate. There's copies of four large format publicity photos with him wearing a massive cast on his leg and his bed surrounded by various combinations of scouts and adults, plus copies of articles about the event in the Toronto Star and the scouting newsletter. Seeing what my BIL looked like as a young boy was deeply weird, in an "I know that face, but not that version of it" way.
...I'm kind of sad that I can tell the nephew so little about his father's side of the family. His grandparents on that side both died well before he was born, and his dad died several years ago; with my sister having died this spring, there are so few people left who knew anything about who the people in these photos might be. The one cousin we're both aware of and in contact with on that side is in his 80s, and IIRC is the BIL's mother's father's brother's son.
Nephew cooked dinner, it was chicken in a dijon-cream-mushroom sauce served with mashed red potatoes.
0 notes
Text
Perfect Binding prototype
In the first part of Thursday's class, I went in wanting to try out doing the perfect binding. I worked with Sarah and she was super useful in helping me do the book. It was a lot easier than I thought because the process was kind of similar to the box that I constructed. She also sent me a video that can help me when I am doing my final one for the summative later in the year.


Sarah gave me some white paper and then we used some blue paper as the protector pages. We then put it through the wooden press to press a spine for the book. I had never seen or used this tool so it was interesting to see how it works. I also then use this teeth-like tool to zig ziag the spine. This would allow the glue to seep through a lot easier.

Then we put this net on it and put some glue on it as well and let it dry with some blocks and weight on top.

Here it is drying. While it was drying we then did some measurements for the cover - the cardboard.

Here are the measurements that we did for it. Keep in mind to make it a bit bigger than the actual pages. As for the spine make it 0.8 spine because originally had it at 0.5 adding 0.1 for the m pages (yellow ones) because that's the thickness of it. And then also a 2mm for the board which makes it 0.8.

These are the boards all cutout.


Them we had to cut out the net of the pages and rip off the blue pages. When I am doing my final I need wait for it dry a bit longer.

Putting the inside pages on top of the bottle and the top of the pages.

Then put glue to the net and stick it on. Had to work quick because it would dry on the newsprint. While it dried I worked on measuring out the material for the boards - the cover.

I measured that there was a 1 cm in the in between the spine and the two boards. Just like this at the bottom.


Then these corner cutters to cut the sides. And then used the craft knife to cut them off. This just makes it a lot easier for it to all fold down. It is essential to fold down the long parts first. And then crease the sides. Then fold down the short sides too. Using the bone kniferin this process.


Just like this gluing it down. Using the bone knife to keep it sharp and clean.

Kinda like this.


This is it done. Then we had to press it down too.

After the pages dried we then had to cut to the size I wanted.

This is cut to size. I think Sarah said next time to move the net more up or add a bit more; like longer.


Then had to glue down on of the M pages keeping some newsprint in between so it wouldn't go through. And then doing it for the other side and making sure that both black bits from the top to the bottom match up well.
Overall I am really happy with the outcome. It was a lot easier process I believe because it had some steps that were similar to the box which helped a lot. Sarah was also a lot of help to help me guide it. And I feel like I got a good idea and understanding for my final one for summative later on.
0 notes
Text
Dress Up (CH3 - Lying to Himself)
*Archive Edition* Previously only linked to AO3, full work now available under the cut.
Read on AO3
Rating: Explicit | Guy Gardner/Kyle Rayner, Hal Jordan, John Stewart, Original Character
Additional Tags (All chapters listed): Established Relationship, hand wavy timeline, Lace Panties, Spanking, Lingerie, Oral Sex, Angst, Post-Traumatic Stress Disorder - PTSD, Character dealing with/avoiding their PTSD, Rimming, Drinking, Canon-Typical Violence, Blood, Bloody Kisses, Polyamory
Guy's still looking for some way to help. Kyle's still trying to barrel towards a sense of normalcy. Guy takes a turn at making their dress-up surprises a thing and it doesn't go the way he hoped.
Guy was hunched over his desk, head leaned in his folded hands as he tried to piece together a question or command to ask the ring for what he needed. The most powerful weapon in the universe was also a storehouse of all the universe’s knowledge for anyone who knew how to draw it out. If I was on Earth, he thought, what would I look for? How would I look?
He leaned back, one arm wrapping around his chest and the other rubbing his chin. He stared at the empty space in front of the desk. He pictured a bookshelf and watched it manifest.
“Alright. Gimme everything you’ve got on human psychology and trauma.” Immediately the bookshelf overflowed with with books, more appearing in stacks on the floor. Stacks began appearing on the desktop, under the desk, in Guy’s lap, anywhere there was flat space.
“Okay. Woah. Narrow it down. Gimme everything specifically on unhealthy coping mechanisms for trauma.”
Most of the books vanished, and the bookshelf refilled with a few more stacks appearing on the floor. Guy pointed at the first one on top of one of the stacks, flicking his fingers towards himself. The book floated in front of him and opened. He reached into his vest and pulled construct glasses from within. After paging through the first book, he slid it unceremoniously off the side of the desk and it disappeared. He repeated the process with the next three.
Looking up at the ceiling and rubbing his eyes he sighed, “This is gonna be a long night.”
Over the course of the evening, the bookshelf refilled over and over. Each time the stacks for a little smaller. Yet, no connection could be made between Kyle’s symptoms. Nightmares and flashbacks don’t present alongside hyper-sexual behavior. They create the opposite problem. Especially in males.
Fuck.
Unless it’s something compound? Complex?
“Show me the definition and conditions for C-PTSD and all known symptoms.” Guy carefully read through the stack of papers that appeared. Long term exposure. Childhood. Detachment. Relationship issues. Negative self-image and worldview. Nothing matched there either. That he knew of anyways. Should probably show this to Hal. “Add this to my notes.” The papers added themselves to a vey large three ring binder that appeared, opened, shut, and disappeared.
Guy leaned back in his chair and rubbed his eyes. He needed a walk and some water. He’d have to walk passed Kyle who was still haunting the sofa, pretending to watch TV.
Fuck.
“What would you do?” Guy asked the ring, pressing the cool surface to the skin of his cheek. “For Kyle, I mean. What would you do to help?”
A business card materialized on the desk. 'Leslie Thompkins, Psychiatrist’, it read.
“I remember her. Yeah. Yeah you’re right. How the hell do I get him to go?” A very large pet carrier and a bag of candy appeared. Guy stood up and waved his hands through the constructs to dismiss them. “Get outta here with that,” he laughed softly.
__
“You coming to bed?” Guy asked, leaning in the doorway of their bedroom.
“Yeh,” Kyle murmured, eyes glued to the screen.
“Later?”
“Yeh.”
“Okay.” Guy shut the door to block out the light and the noise. He dreamed of Kyle’s laugh and the taste of his skin.
When the door closed, Kyle pulled the bottle of vodka out from under the covers and took a drink. He preferred doing bong rips. The relaxation and elevated mood were a lot nicer than the slosh and brain fog from the booze but it would have to do.
“You’ll have to do.” Ganthet had said.
Should I even be here? Why won’t he sit with me? He’s up my ass all day until I’m sad. Am I becoming a burden? Does anyone else know? He probably wants to fuck. I’m not in the mood to fake it right now. I’ll surprise him with something tomorrow to make up for it.
Kyle propped himself up against the armrest, sipping from the bottle as he watched the DVD he put in earlier. When he and Guy left Earth, he had tried to back up all of his pirated movies and shows. For whatever reason the episode lists played in reverse order but he’s unconcerned. It was nostalgic and it felt good. Firefly played in front of his eyes and his fonder memories with Guy and Hal and John played in the back of his mind. He fell into a restless sleep and the bottle slipped from his hand.
Kaylee is shot. She gasps as blood soaks her overalls.
“Kaylee, stay with me. Can you move your feet?”
Guy look at me. Look at me. Stay with me. Squeeze my hand. Stay awake.
“Are you asking me to dance?”
You wanna hold my hand and skip? Heh, heh.
Kyle staggers to the bathroom and vomits.
__
Guy woke up with Kyle wrapped around him. They were side by side, chest to chest. Kyle’s head was tucked under Guy’s chin. Guy felt warm breath on his skin as Kyle snored and twitched in a deep sleep.
The bed smelled like sex and sweat. Kyle had gotten into the habit of coming to bed in the barely light hours of the morning, coaxing Guy awake with light kisses and caresses. Kyle would tuck himself into Guy, urging the bigger man on top. Kyle would writhe and beg to be touched, but his body didn’t always respond.
“This okay?” Guy would ask.
“Hell yeah,” Kyle would groan and Guy would waver between a desire to give his partner what he’s asking for and the guilt for doing it at all.
“You’re sure?”
“I’m with you. This is all I want.” And Kyle would smile with all the warmth and light of a new star.
And until Kyle woke, either kissing Guy and asking about his plan for the day or vanishing without a word, so stood their nightly routine.
__
Guy watches the rookies twist and dive through the obstacle course John built. Flight training was one of their favorite exercises. It’s impossible to forget your first real flight. In some ways you never really come down.
“How’s he doing?” John asks.
“‘Bout the same.” Guy answers.
“Hey it’s not worse. One day at a time. You get him to talk to anyone yet?”
“No.”
“Keep trying. Everything’s gonna be fine. And when it isn’t, I got you. Both of you.”
“I know. You took care of me. I don’t think I ever thanked you.”
“You did in your own way.” John smiles fondly, watching the blush creep up behind Guy’s ears.
“‘Suppose so.”
__
Guy returned to the apartment. He checked for Kyle and heard the shower running. He sat on their worn couch, next to Kyle’s depression nest. He picked up the mostly empty bottle of vodka, replacing the lid. He picked up candy wrappers and folded the blanket, tossing it neatly over the back of the couch. Kyle’s sketchbook tumbled to the floor with a thud. Guy scooped it up and searched the cushions for any lost pens and pencils. He set the drawing implements down on the end table and sat down with the sketchbook. It’s newer, the cover only mildly blemished with wear and graphite smears. He saw that a little over half the pages are still blank as he thumbed through them. He felt his heart wriggle with a deep joy. Kyle was drawing again. Too many months it seemed Kyle would drink and stare off the balcony, into unfamiliar constellations forever.
Guy popped open the cover, starting from the beginning. He was immediately greeted with a pencil drawing of a poorly wrapped fruit basket. He’d put it together and set it out on the kitchen table with the new sketchbook and art supplies in an attempt to lure Kyle out of his blanket fort. The next page was sketches of John’s face in various expressions, most of them joyful and all from his right. Next was Hal’s face given the same treatment from the front. Then Guy’s own face from the left. They were all smiling, laughing, hands shaping the stories they had been telling. Kyle’s ability to draw from memory was unparalleled.
There were sketches of Oan flowers that grew by nearby waterways. Superman, for no one’s enjoyment. A beagle. Hal holding a beagle, smiling indulgently. One in full color; Guy could make out the blonde hair and the shape of her face—Alex. Then the next one was just a refrigerator in high contrast, pouring out eerie light. Piano keys. A pitched battle scene, Lantern and Sinestro Crops symbols mixed throughout. Guy’s face with bedroom eyes. Hal in his flight suit, sticking his tongue out. A night scene where the only light came from a streetlamp over an empty park bench. Hal’s face, again, his salt-and-pepper hair rendered in loving detail. A young woman Guy had never seen before, wearing overalls and bleeding from a gunshot wound.
The last image sprawled across two pages and the only word Guy could think to describe it was demon. It was the alien that nearly killed him. It was massive—top-heavy and bipedal like Arkillo. It had a serpentine neck and horse-like head with a maw that opened like an eel. Sinewy arms ended in talons with an opposable thumb. Two agile tails whipped behind it, each tipped in a scorpion-like barb.
Alpha Lanterns had simply called them Hunters. They preyed along the Outer Limits. They were solitary, rarely in a pair. No one was sure yet where they came from but they lived up to their name with malicious intelligence. They had some kind of primal telepathy. Guy had perceived it as a push in his mind; just feelings, no images or words.
Guy had been hunched down inside the outpost he and a few Lanterns had been sent to build. The Guardians wanted to set up a way station to increase the range and support of Lantern sweeps in those areas. To look for problems like the Hunters. He had been welding, he remembered. They were piecing together the ventilation system when he heard the first scream. Something that big, that heavy, shouldn’t have been able to move in perfect silence. Before he knew it he had been beaten down and stabbed twice. Poison burned a path though his veins. He had ordered the team to make a distress call and retreat. But Kyle refused to leave his side. He remembered the agony of being run through again, of hearing Kyle scream. Hearing Kyle sob and not being able to draw a breath to say it’ll be okay.
“You remember it?” Kyle asked, suddenly behind him. He was leaning on his elbows on the back of the couch.
Guy startled and caught the sketchbook before it fell, “Uh. Sorry. I shouldn’t be snooping like that. I was just excited, you know. You’re getting back to nor—comfortable again.”
“No,” Kyle sighed. “I’m not. But I really want to.” His shoulders scrunched up and he crossed his arms tightly. “Do we have to look at it?”
“Nah, course not.” Guy closed the sketchbook and set it on the end table without looking away from Kyle’s face. They looked at each other for a long time. Guy could see the emotions rolling through Kyle’s expressions as they both reached for something to say. “C’mere,” he offered instead, holding his hand out.
Kyle took his hand and rounded the couch. He had a hair clip holding one of their shitty bath towels around his waist. He dropped himself into Guy’s lap with a heavy sigh and Guy wrapped him up in a tight hug.
“You warm enough?” Guy asked, laying a big, warm hand on Kyle’s thigh.
“Yeah.” Kyle nuzzled into Guy’s neck, his arms returning to their crossed position around himself. Guy could feel him shiver so he pulled the folded blanket down around them.
“You okay?”
“Yeah.”
“You gonna talk to someone?”
“Can’t I just talk to you?”
“Yeah, I mean, you can tell me anything. I’m just not really qualified to help with this.”
“Weren’t you a psychologist?”
“I was a counselor. It’s different.”
“You talked to people when they were at their worst. Didn’t it help?”
Guy sighed heavily. “I wasn’t wheedling the plot out of Hannibal, Kyle. When I worked in the prison, it was mostly a dumping ground for undesirables. I’d ask these guys what was going on and they’d tell me things like how I’m the first person who used their name or asked them what was wrong at all. I gave them respect and sometimes I gave them some hope to hold onto.” Guy looked away as the words sped up, realizing he was rambling. “Didn’t make me a real psychiatrist, though. I couldn’t treat the schizophrenia or whatever that got them tossed into the street. Even if I had the credentials all I’d be able to do is medicate them while they were locked up.”
“I’m sorry, I didn’t mean to bring all that up.”
“No, I’m sorry. I’m so sorry I can’t be what you need.” Guy tightened his hold and rubbed his thumb along Kyle’s back.
Kyle felt too warm and trapped under Guy’s big hands. He wanted to get up but feared the look in Guy’s eyes if he pulled away. So he sat and listened to Guy breathe. He tried not to think too hard about being pressed up against the hole in Guy’s side.
__
“Alright poozers, listen up. Today we’re working on your speed. You’re going to have to outrun and outthink one of the fastest Lanterns in the Corps.” Killowog addressed the five fresh Lanterns, all sans their Corps symbols and ready to change that today. Each one wore a construct belt around their midsection with two flags hanging from the sides. “Your goal is to remove one of Kyle’s flags before he takes both of yours.”
“That’s it?” One of the newbies asked.
“Oh? Did I mention—they’ll all be trying to kick your faces off the entire time.”
“They?”
“Show ‘em, Kyle.”
Kyle grinned as he held his hands out, crossing his first two fingers on both hands to make a plus sign, “Shadow Clone Jutsu!” Four more identical Kyles appeared, each one photorealistic and moving independently. His clones followed as he leapt into the air, tearing through the sky at breakneck speed. The rookies followed in his wake like a formation of geese. Weak constructs of lassos and nets floated passed as they missed. He laughed, elated at the feel of the wind in his hair and the sun on his face. The world below shrank as he climbed, leaving the weight on his mind far behind.
As he tagged the rookies out one by one, he noticed the squid-like Lantern lurking behind buildings and rock formations. He could feel its gaze studying him as it kept its distance. When it was down to just the two of them, it shot a stream of bubble constructs passed Kyle. They floated by without touching him, but gave him an ominous feeling as they slowly closed in. They were shiny, and he could see his own reflection swaying on all their surfaces like funhouse mirrors.
He’d lost sight of his clones. He shot an energy blast at one of the bubbles and it opened like a doughnut, letting the blast pass through before it snapped shut again. He released his clones and they dematerialized instantly. He formed a Gundam inspired mech around himself and shot a hail of missiles at the surrounding bubbles. They repeated the same trick—shifting, opening, and closing.
He reached behind his back and drew an energy sword, thrusting forward and slashing side to side. Their texture was like slime, his weapon dragging through their cores like trying to cut through tar. His chest heaved and his muscles burned with the effort. The ring of bubbles pressed in closer, their shape throwing the light of Sto-Oa into his eyes, blinding him. He let himself fall through the swinging mech construct, sinking away from the bubbles. A tentacle whip-cracked at his ankle, barely missing as he changed direction and sped off. The Squid-Lantern’s arms spun and it shot forward in pursuit.
Kyle dodged row after row of the creepy bubbles, glancing over his shoulder to track his opponent. He ran his palm over his belt, making sure both flags were still there. Squid-Lantern was missing one. This was anyone’s game. A ray of light shot over his shoulder. He rolled and dove to dodge it. When he faced forward again, he slammed into one of the bubbles, sinking chest deep into its sticky surface. Squid-Lantern landed gently on the surface, its tentacles bowing the bubble’s skin without breaking it. It gently removed both flags from Kyle’s belt. The short, crescent eyelids over its opalescent eyes widened. It lifted all of its tentacles into the air and swayed.
“Hooray! Hooray! I have the winning!” Kyle’s ring translated. The bubble released him and he turned himself upright.
“Wow! Nicely done,” Kyle offered his hand to the victor. Squid-Lantern’s swaying paused as it considered Kyle’s appendage. It stuck half of its tentacles out, mimicking Kyle’s motion.
“Oh, uh, handshake?”
Squid-Lantern’s tentacles vibrated. Kyle flailed his arm and laughed.
__
Kyle approached the battery, bathed in its ethereal glow. He’d reluctantly left the cackling pack of rookies behind at Warrior’s. Even their enthusiasm couldn’t drown out the incessant nagging of his ring reminding him that his charge was “Critically! Low!”. He raised his ring hand, making a fist and squaring his shoulders.
The words wouldn’t come.
He tried again. And still nothing. He was just tired. This had been the longest day out of the house in a long time. It was a good tired, his mother would say, from playing so hard. You’ll sleep well.
He lowered his arm. He knew the words—could hear them in his mind. There was no power, no conviction in his voice. Would it charge if he could only whisper? He raised his arm again. He felt stupid. He felt weak.
He nearly leapt out of his own skin when he felt a hand under his forearm, a body pressed against his back. Kyle leaned into the familiar scent of aftershave and whiskey.
“In brightest day,” Hal began, voice warm and unwavering. Kyle repeated the words, gaining strength as they finished the oath in tandem.
Kyle’s ring recharged and he felt the surge of power through his whole body. He was still leaning into Hal. He turned his head to look at his friend, leaving their faces inches apart.
“You okay, kid?” Hal asked and Kyle’s heart pounded. Hal had his mask off and dark eyes glittered in the battery’s light. At 5’10 they were the same height, but Hal was extremely wiry and compact. He was warm and so solid. Where in the fuck was this coming from? Hal lowered his arm to Kyle’s waist to support him.
“Yeah,” Kyle’s body quivered. “Thanks.” He spun around suddenly, shoving Hal aside. “I should go,” he pointed stiffly at the doorway. “Bye.”
“Dude?” Hal asked of the empty room.
__
Kyle landed on the balcony. He looked down at his still trembling hands. How was he gonna sneak this thing into the house without Guy asking too many questions. He willed his skintight uniform away, leaving him in jeans and hoodie. He adjusted himself and pulled the hoodie down. Why was it so hard to get it up for Guy like this?
The balcony door slid open about a foot and Guy’s freckled, smiling face emerged. Speak of the devil. “You’re home! How’d it go?”
Kyle couldn’t help the smile that came across his face. God but he loved those big blue eyes. “Really good actually. I thought I’d be more tired but I recharged and uh,” he faltered, rubbing the back of his neck, “I feel pretty peppy now.”
“Good because I have a little surprise for you,” Guy’s expression melted into a naughty grin and he dramatically whipped the sliding door open. He stood in a cheap Halloween sexy-nurse costume, complete with a little red cross cap and white thigh-highs. “I thought you could use a little TLC after you had such a hard day.”
Kyle’s brain flipped to the static channel as he zeroed in on the gap between Guy’s very short skirt and the top of the stockings. “Th-thighs,” he mumbled.
“Get in here,” Guy rumbled, grabbing Kyle’s shirt and dragging him inside. Kyle surged forward, roughly shoving Guy into the back of the couch, and pulled his big man down for a kiss. Guy spread his feet until they were even height making his skirt ride up obscenely over his erection. His plan to soothe Kyle’s stress and gently tuck him into bed was already gone out the window. Kyle kissed him like he’d been gone for months. His hands roved up and down Guy’s thighs, fingers dipping into the tops of the stockings.
“Turn around, lemme see you,” Kyle murmured as he pulled on Guy’s hips. Guy turned, leaning over the couch and raising his ass in the air obediently. He had nothing on underneath the costume. “Goddamn,” Kyle growled, digging his fingers into the backs of Guy’s thighs and spreading him open with the heels of his hands. Guy had shaved everything and his skin smelled fresh from the shower. Kyle rolled the pad of his thumb against Guy’s quivering hole, “You need me to get you ready?”
“P-please,” Guy whispered, his hands moving to cover his face as his hips pressed back into Kyle involuntarily.
Kyle spread Guy open and leaned forward, licking a stripe from Guy’ balls to his tailbone. Guy clapped his ring hand over his mouth to keep the high-pitched sounds from escaping. His other arm braced his weight against the cushions as he lost his footing.
“Oh fuck, oh fuck,” Guy wailed into his palm.
Kyle lapped and rolled his tongue, coaxing every imaginable sound out of his big, broad partner. He pinched and squeezed those thick thighs, only coming up when he had to breathe. He smiled and groaned against Guy’s entrance, thoroughly enjoying driving him wild. His attention had Guy literally on his toes. He glanced down at Guy’s pretty feet, perched on that sexy angle. Feet freaked Guy the fuck out so he didn’t dare mention his obsession. He just quietly scooted all of Guy’s normal shoes into the back of the closet.
Guy’s hips rolled with an unconscious rhythm and Kyle leaned back with his tongue out and let him rub his ass into his face. Guy’s eyes were clenched shut and a deep blush had worked its way down the back of his neck.
“Kyle,” Guy breathed, both hands clenching the cushions now, “Please.”
“Please, what?”
“I…um,” Guy looked over his shoulder, beet red, “Will you…?” He glanced at his ass and back up at Kyle.
Kyle leaned over Guy’s back putting his lips against Guy’s ear, “You are so hot, Guy. I can’t get enough.” Guy dropped his face into his hands again. Kyle ran his hands up and down Guy’s back, making the cheap fabric of the costume crinkle with static. “I want you so bad.” He rolled his hips against Guy’s ass and realized with horror that he’d lost his hard-on.
Are you fucking kidding me? Now??
Kyle’s body tensed as he held in a frustrated sigh. He’d die before he made Guy feel like anything about this wasn’t perfectly hot and welcome. He sent a construct hand into the bedroom to grab the lube off of the nightstand. He coated his fingers and rubbed the tip of the middle one against Guy’s hole. “You ready?” Kyle asked as he pulled his clothes off, making a pile somewhere off to the side of the couch.
“Yes, please,” came the muffled reply.
Kyle pressed his finger slowly in, soaking up the desperate sighs escaping his partner. Guy was so good to him. He was gonna make his man come rivers no matter what his body would or wouldn’t do. He fucked Guy open slowly until he had three fingers buried in his tight heat.
“Kyle please, please,” Guy moaned from behind his hands.
Kyle took a deep breath to focus, making a construct around his limp dick. Like the rest of his creations, it was true to life. It even felt warm and twitched if he willed it. He lined himself up and pressed in gently. He had to keep pushing the costume up and out of the way to see what he was doing. “Take this off for me, love.”
Guy pushed himself up, gasping as the angle changed. He crossed his arms in front of himself, grabbing the bottom of the slinky costume dress. He chanced a heated look over his shoulder as he very slowly pulled it up and over his head. Kyle’s eyes flicked back and forth between the inches of sexy freckled skin slowly being revealed and the passion in those gorgeous eyes. His hands chased the hem of the dress, traveling over all the familiar constellations on Guy’s back. Guy’s freckles were concentrated on the tops of his shoulders like a permanent sunburn. They thinned out as they spread down his back, then gathered again at the dips in his hipbones, filling the spaces like a liquid—like someone had poured a galaxy over his body. Kyle’s hands brushed along the back of Guy’s neck, fingertips dragging in his hair. Guy leaned into the touch and groaned. Kyle wanted to lay kisses along the nape of Guy’s neck but he couldn’t reach.
“Alright,” Kyle nudged Guy forward with a hand between his shoulder blades, “Get back down there, you’re too tall.” He felt Guy’s laugh under his hand and Guy leaned down until he was on his elbows.
Guy groaned as he shifted, feeling Kyle still inside him, “Baby, please, I’m so horny.”
Kyle finally started to move, keeping his pace steady and not too rough.
“God, yes,” Guy sighed, arching his back, “That’s perfect. Please, please don’t stop.” He covered his mouth again, embarrassed with how soft he sounded.
Kyle focused on Guy’s voice, his own breathing picking up with the exertion. He wrapped his hands around Guy’s waist and felt for tells in his body—the tremors, the way he’d start to push back, the soft, high sighs when he finally took his hand away from his mouth again.
“Kyle, I—I’m…Are you…?”
“Yeah, yeah I’m good.”
Guy reached back, grasping the back of the couch as he came with a long moan. Kyle feigned a little stutter in his hips, pulling out and pretending to finish himself with his hand. Watching to make sure Guy hadn’t looked up, he sucked his cheeks and quietly spit on Guy’s back.
Kyle stepped back and wiped the sweat from his face. “Wow,” he said, the smile coming through in his voice, “That was hot.”
Guy was still panting, still leaned over the couch.
“You alright?”
“Yeah,” Guy groaned, as he stood up. He rubbed hips where they’d been pressed into the couch, “Just a little sore. M’alright.”
Kyle held his hands out with a bright smile on his face, “Wanna go lay down?”
“Nah,” Guy said looking at Kyle’s hands, “I’m gonna go get a shower.”
“Oh,” Kyle watched Guy walk away. “Oh, okay. Are you coming to bed after?”
The bathroom door clicked shut.
Guy turned the water on full blast and sat on the toilet lid. He rested his chin on his folded hands with his elbows on his knees.
Fuck.
I’m the problem.
0 notes