#take a screenshot on windows 10/11
Explore tagged Tumblr posts
Visit Tumblr Blog
Explore Tumblr blogs with no restrictions, modern design and the best experience.
Last Seen Tumblr Blogs


Fun Fact
The KCSC sent more than 20K requests to delete posts related to prostitution and porn to Tumblr from January to June 2017.
Text
How to Take a Screenshot on HP Laptop: Easy Methods (2025)
Taking a screenshot on an HP laptop is a useful skill, whether you're capturing important information, saving error messages, or sharing content. In this guide, we’ll cover multiple methods to take a screenshot, including keyboard shortcuts, built-in tools, and third-party apps.
1. Quick Screenshot Using Print Screen (PrtScn)
One of the fastest ways to take a screenshot on an HP laptop is using the Print Screen (PrtScn) key.
Steps to Use Print Screen:
Locate the PrtScn key on your keyboard (usually in the top row).
Press PrtScn to copy the entire screen to the clipboard.
Open Paint, Word, or any image editor.
Press Ctrl + V to paste the screenshot.
Save the file in your preferred format.
✅ Best for: Capturing the full screen quickly.
2. Capture Active Window Using Alt + PrtScn
If you only want to capture the active window instead of the full screen:
Press Alt + PrtScn simultaneously.
Open an image editor and press Ctrl + V to paste the image.
Save the screenshot.
✅ Best for: Capturing only the active window.
3. Windows + Shift + S (Snip & Sketch)
Windows offers a more advanced snipping feature called Snip & Sketch, allowing more control over screenshots.
How to Use Windows + Shift + S:
Press Windows + Shift + S.
The screen dims, and a toolbar appears.
Select a snipping mode:
Rectangular Snip
Freeform Snip
Window Snip
Full-Screen Snip
The screenshot is copied to the clipboard.
Paste it into an editor or save it from the Snip & Sketch window.
✅ Best for: Quick and flexible screenshots.
4. Snipping Tool (Pre-installed in Windows)
HP laptops come with the Snipping Tool, which allows more precise screenshots.
How to Use the Snipping Tool:
Open Snipping Tool (Search for it in the Start menu).
Click New and select a screenshot mode.
Capture the desired area.
Edit and save your screenshot.
✅ Best for: Custom area selection with easy editing.
5. Taking a Screenshot on an HP Laptop with Windows 11
Windows 11 users have an even more streamlined experience:
Press Windows + PrtScn to automatically save a full-screen screenshot to the Screenshots folder in Pictures.
Use Windows + Shift + S for Snip & Sketch.
The Snipping Tool has an updated UI with new features.
✅ Best for: Windows 11 users looking for built-in screenshot tools.
6. Using the Xbox Game Bar for Screenshots (Windows 10 & 11)
The Xbox Game Bar allows capturing screenshots and recording videos.
Steps to Capture Screenshots with Xbox Game Bar:
Press Windows + G to open the Game Bar.
Click the Camera icon to capture a screenshot.
Find your saved screenshot in Videos > Captures folder.
✅ Best for: Gamers and users who need built-in screen recording.
7. Third-Party Screenshot Tools for HP Laptops
If built-in tools are not enough, consider third-party apps like:
Lightshot – Quick and easy screenshot tool with editing features.
Greenshot – Lightweight and customizable screenshot utility.
Snagit – Advanced tool with annotations and video capture.
✅ Best for: Users needing extra editing and sharing features.
8. Taking a Screenshot on an HP Chromebook
If you're using an HP Chromebook, the shortcuts are different:
Full screen: Press Ctrl + Show Windows key.
Selected area: Press Ctrl + Shift + Show Windows key, then drag to select an area.
✅ Best for: Chromebook users looking for quick screenshots.
9. Where Are My Screenshots Saved?
Windows + PrtScn: Pictures > Screenshots
Snipping Tool & Snip & Sketch: Asks where to save.
Xbox Game Bar: Videos > Captures
Conclusion
Now that you know multiple ways to take a screenshot on an HP laptop, you can choose the method that suits your needs best. Whether you prefer simple keyboard shortcuts, built-in tools, or third-party applications, capturing your screen has never been easier!
🚀 Did this guide help? Share it with others who might need it!
Resources
How to Take Screenshot on HP Laptop:A Step by Step Guide
1 note
·
View note
Text
Nintendo is removing twitter integration next week, here's what to do to share screenshots instead
So in case you missed it, Nintendo announced last month that they're removing the Switch's twitter integration on Jun 10/11 (depending on your time zone) as a result of twitter jacking up their API fees to absolutely ridiculous degrees. This will not affect making posts in the plaza (at least in Splatoon 3) but it does mean you will not be able to upload screenshots and videos to twitter for easy access.
If you're like me and do this a lot, then you've got two alternatives.
One of these methods is significantly easier than the others, but requires a computer that runs Windows and a USB cable. With your Switch in portable mode, go into your System Settings and find the Data Management section:

Click it and scroll down to the "Copy to PC via USB Connection" option.

Click it and you'll be prompted to connect your Switch to your PC via USB. When you do, a folder containing all your Switch screenshots and videos will pop up on your PC. From there, you can copy as many videos and screenshots as you'd like to a location of your choosing, at which point you can disconnect your Switch.

And now you're done!
The other option is a bit more finicky (and also I can't take screenshots to show you the process), but can be done with any smart device. Go into your Album and pick a video or screenshot you would like to share. Select Send to smart device, after which you'll be prompted to scan a QR code. Scan it with your smart device and you'll be given a link to connect to a Wifi, which sounds weird but is just how the console and smart device connects. Once they have, you'll be able to send your images and video to your phone.
966 notes
·
View notes
Text

By popular demand (I saw two people asking) I thought I would throw together a quick guide to using the road editor tool in the newest version of SimPE! You'll see that this is a very easy tool to use, and best of all, goof-proof. If you do mess up (you probably will) it's very, very easy to correct.
Very, very, very important to make a backup of your hood before you ever do any tinkering in SimPE! I also recommend practicing on a test hood you don't actively play in to get a feel for it before you do anything to your main hoods.

We're starting with a vanilla Strangetown. I would recommend going in your game and taking a nice overhead screenshot of the hood like this first to look at for reference of where everything is situated the way that you're used to looking at it.

2. Open SimPE, go to Tools> Neighbourhood> Neighbourhood Browser and open the hood you're wanting to work on. If you're not so familiar with SimPE, opening your hood can take some time. Touch nothing until it's loaded!

3. Once it's all loaded, from the Resource Tree list pick Neighbourhood Terrain Geometry (NHTG). Then you'll see one file populate the Resource List - click that. Make sure on the bottom that you have Plugin View tab selected.

4. Now you should see this map of your hood pop up! There are different things you can toggle, I like to check the Show Lots box when I'm editing the roads. Then click the Road Editor button on the right.

5. To be able to see better, I've pulled this Plugin View window up a bit - it may rearrange the Resource List and Resource Tree windows a bit to accommodate. You can also press the Zoom 2x button to see closer, and then you'll have to use the scroll bars to move around the map and the road editor tool.

6. The road editing tools here will be placed down in the same orientation as the map. So the two parallel roads running through Strangetown from this perspective are the vertical straight road pieces (top row, second from left).
When you select a road tool, above it will indicate which tool you have selected.
Also - I recommend having Handle Stop Signs ticked.

7. Once you have the correct type of road selected for the spot you're working on, simply click on the map - it lays it down one tile at a time. If you miss a spot like shown here, just fill it in.

8. If you want to create an intersection, first delete the section of road where the intersection will go.

9. Then choose the type of junction for the intersection you're making, and add that piece in. You'll see a red circle appear (unsure if this is because it's an intersection or because you have handle stop signs selected, but I recommend you do have that selected either way).

10. Once you're done making all your changes, click Close Editor.

11. This is the part where you save your changes! First click Commit in the top right of the editor. Then, File> Save!

12. Load your game to check! Looks pretty good with all those new roads!

13. However, we have indeed made some mistakes! Which were absolutely for illustrative purposes and not truly an accident.

14. Never fear! Simply reload the hood in SimPE - I've deleted the spot where the T-junction should go and added one in, and deleted where the road just ended abruptly and added a proper end piece.
I have not experimented with what happens if you try to build a road through hood deco - if you have, please let us know in the comments how that went!
I also have barely touched the terrain editing tools, so that's outside the scope of this tutorial.
I hope this helped!
#the sims 2#sims 2#ts2#ts2 maxis match#ts2 simblr#ts2 tumblr#simblr#brightmaple#ts2 tutorial#simpe tutorial#simpe road editor
421 notes
·
View notes
Text
I have thoughts on this week's episode of Ranma 1/2 (ep 11)!
I thought that the re-framing that the anime did of Shampoo and Akane's match was very interesting. Choosing to have Akane lob a desk at Ranma and then have him hit in the head by a football (holy head trauma, Batman!) was such an interesting change to make! Ranma being unconscious for a minute or two before running off in search of Akane gave the match more time to occur, built more suspense, and gave Ranma himself more urgency in his search.
The rest of what I have to say contains spoilers (can we say this of a manga series that finished in 1996?) for the end of the manga, under the cut
I'm a die-hard 乱あ shipper and have been since I first read Ranma 1/2, so this episode delighted my little shipper heart. There are some small but significant deviations from the manga that I wanted to expand on, and one particular change that is narratively significant in light of manga canon.
Putting aside the issues of Shampoo's newer fixation on Ranma-as-male as her future husband per Amazonian law and how that impacts the dynamics of our tsundere couple in this ep, I'm choosing to focus on the scenes related to Akane's showdown with Shampoo and the changes that the anime made from the manga (and why I'm living for them).
As mentioned, the decision to knock Ranma unconscious is an interesting change to make, but I'd argue that it works well and was a well thought-out deviation from manga canon. As I said above, it gives the match more time to occur—whether that impacts the duration of time that the Xi Fa Xiang Gao technique takes is yet to be seen. It also builds suspense for the audience, especially in light of the younger generations/newer audience members who may be interacting with Ranma 1/2 for the first time. Most importantly, though, it gives urgency to Ranma's search for Akane that isn't quite there in the manga. Sure, he's worried as he runs after Shampoo and Akane after he gets delayed (by Akane slamming a window in his face lol), but the time that elapses between the two girls going off to fight and Ranma going after them is very short. Maybe 30 seconds, 60 at the very most. I'll include a panel below to illustrate this:
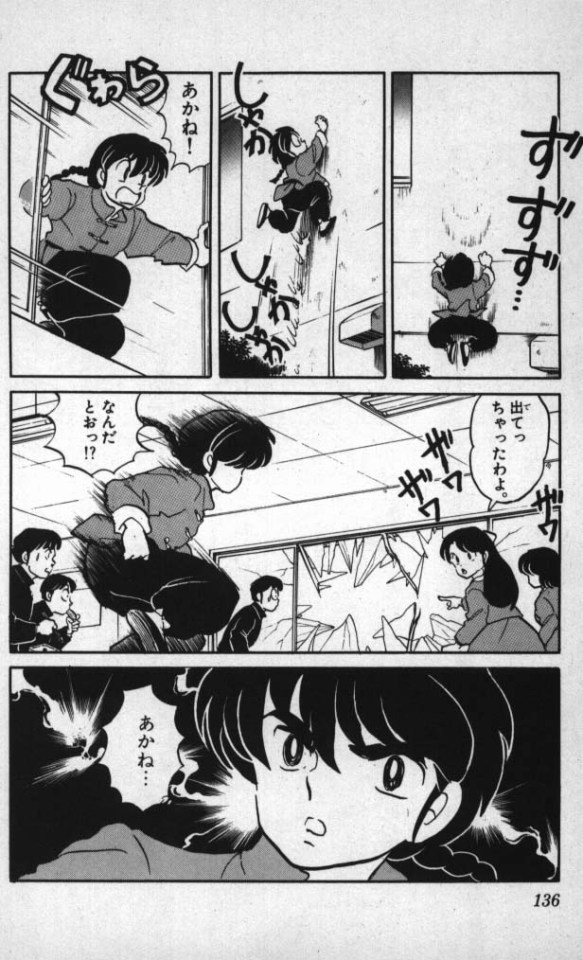
And of course, I'm not arguing that Ranma isn't worried about Akane or fearful that she'll get hurt. But there's a fairly significant difference in how this is portrayed (see below) versus how the anime chose to approach this.
For one thing, the framing is very different. Akane getting injured, while of real concern, is being shown in a humourous way; her facial expressions (like the swirly eyes) and Takahashi-san's characteristic "るーみっくサイン" (rumic sign) are used for comedy, to make it seem like any hurt Akane might incur won't be too serious. Plus, while Ranma does try to diffuse the tension after Akane grabs P-chan from the tray and gets the Kiss of Death for her trouble (lol Shampoo just gives those things out like party favours, doesn't she?), and tries to avert the fight between the two girls, the time that passes doesn't truly allow his concern to sharpen further. As seen above, Ranma's worried-but-determined. He's not flooded with anxiety (or particularly intrusive thoughts imo).
However, the anime chose to allow Ranma to actually lose consciousness at the beginning of the girls' match. We don't (and probably won't) know how long Ranma was actually unconscious, but it certainly was long enough to warrant his frantic search for Akane.
And frantic it is! This man starts running around the entire campus yelling her name, escalating to screeeeaming by the end. Please see below (subs are Akane's name [あかね] and onomatopoeia/sound effects for running and heavy breathing):


But don't worry, guys, he's super laid back, super chill. Jk just in these screenshots alone, he's calling/yelling her name 10 times.
Let's talk quickly about framing here! This is pretty starkly different from how the manga frames these scenes. The colouring is dark, the sky is cloudy, there's no lightheartedness to be seen, and Ranma's frantic and anxious, underscored by the, uh, musical scoring. The anime is treating this as Serious Business, which does make a lot of sense, given that Shampoo chased onna!Ranma all over China trying to kill him, and that experience is what's informing Ranma here. He has an interspersed imagination spot (see below) of Shampoo hitting Akane point blank in the chest with one of her chuí, and we see Akane exclaim in pain, fall to the ground, and remain motionless. He's panicking because he knows how dangerous Shampoo is, and he's afraid for Akane. He doesn't want her to get hurt; he wants to protect her wellbeing, especially because he's seen that she's less concerned with that than he thinks she should be. His insult from the skating arc makes another appearance here: he calls Akane "鈍い女" [nibui onna; slow/dull girl chick], which in his imagination looks like Akane leaving herself completely open for a sternal strike? But his anxiety is informing this mental image, so he's probably imagining a worst-case scenario. I'd hope that his opinion of Akane's capability would be higher, but I digress.


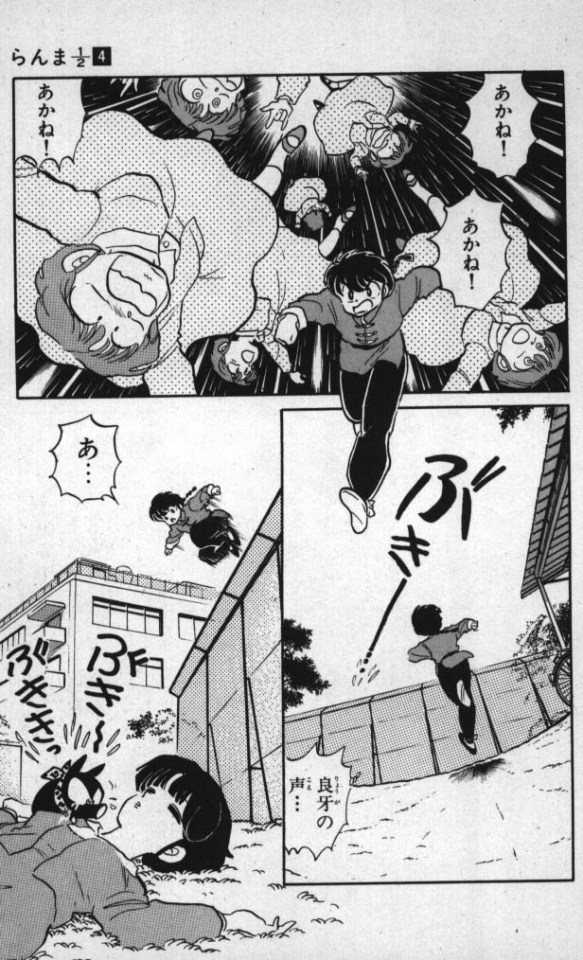
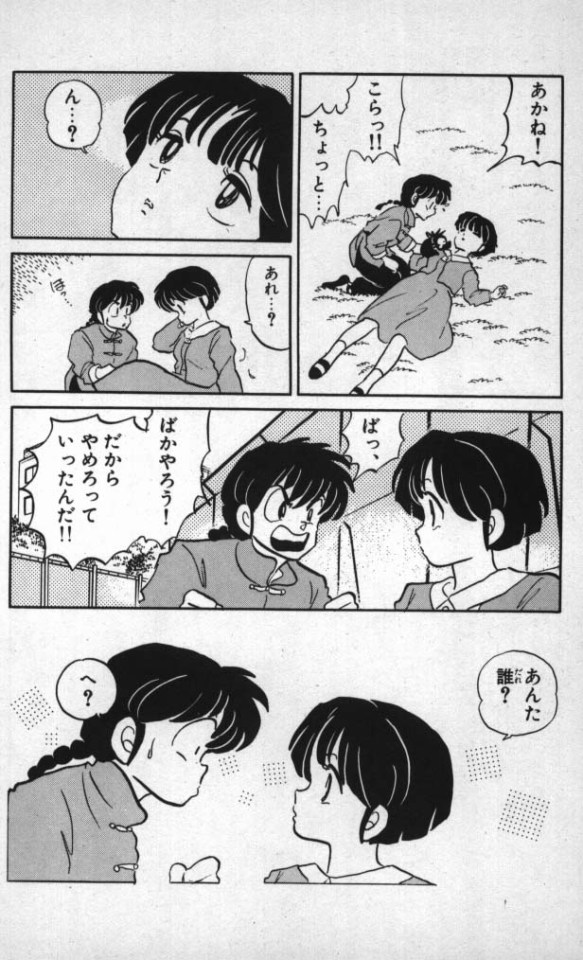
After he stops running about and screams Akane's name in desperation, he quickly hears Ryouga-as-P-chan's voice, he dashes toward the sound, finding Akane unconscious on the ground: fears confirmed!


And here's where, to me, it gets really interesting. We see that Ranma is calling Akane's name and cradling her in his arms; very different to this scene in the manga, where he's on his knees next to her, calling her name and saying, "hey, [untranslatable word that could best be read as] just..." (see below):
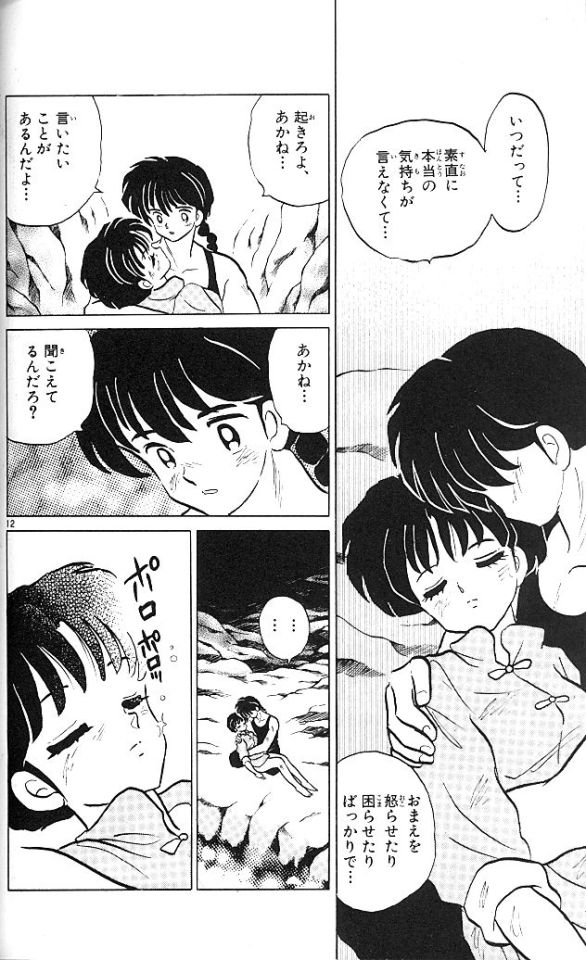
And in the anime, this becomes what I think must be an intentional reference to the end of the Saffron arc in the last volume of the manga (38). Ranma says the same thing in one of the last scenes of that story arc, cradling an unconscious Akane in his arms, calling her name, and begging her, "起きろよ、あかね" (okiro yo, Akane; wake up, Akane], among other things. See below for comparison of the manga (upper left-hand panel, specifically) vs the anime:
And here's episode 11's parallel:


Well, gee, what does Ranma screaming her name while holding her with tears in his eyes remind me of? I'm glad you asked! It's the next panel in the manga!

Spoilers, but really.
I've reached my pic limit on this post, so I can't compare and contrast much more, but I do have more to say on this parallel. Might make another post later, so that I can show more pics for illustration.
Whether I make that follow-up post or not, my immediate thought when I saw this in the episode was both that it was an intentional reference to Jusendō, and that it was intended to be the first of a pair of narrative bookends (i.e. recurring or similar scenes meant to refer & compare to one another within the narrative to illustrate something, whether character growth, story progression, relational changes, etc). If we do get the Full Ranma Series animated (may it please God), this is both foreshadowing and bookending, and I'm delighted by it!
Also, even if we don't get to see the Jusendō arc animated, Yamaguchi Kappei will have had the opportunity to play a version of that iconic scene from the manga and do his best "Akaneeeee!" scream.
#ranma remake#akane tendo#ranma saotome#乱あ#tendou akane my beloved#saotome ranma my beloved#here there be spoilers#discussion of manga canon#ranma 1/2#ranma x akane
148 notes
·
View notes
Text
mutt's guide to using dsr on ts4, with pictures!!!
ok so, dsr is a thing available for nvidia gpus that allows you to take veeery high resolution screenshots of games without much trouble, like this
it's an alternative to srwe, as it plays nicer with a lot of reshade shaders and is just, generally more nice to use! let me teach you how to use it - full tutorial with pictures for every step under the cut (im sorry its too long without the cut)
step 1: right click your desktop and open the nvidia control panel
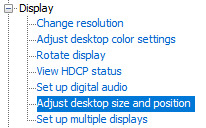
step 2: go here (adjust desktop size and position)
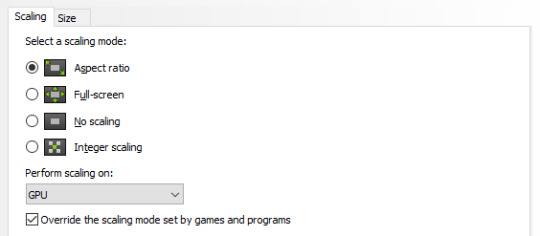
step 3: make sure your settings are set as follows! this is important
step 4: now, go here (change resolution)

step 5: under change resolution, click on this button (highlighted with a red square)
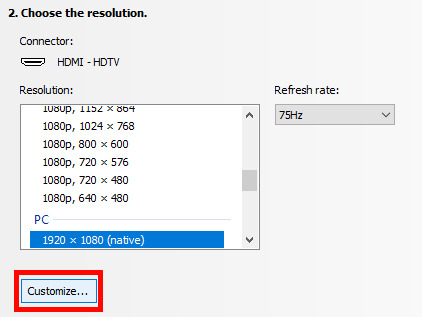
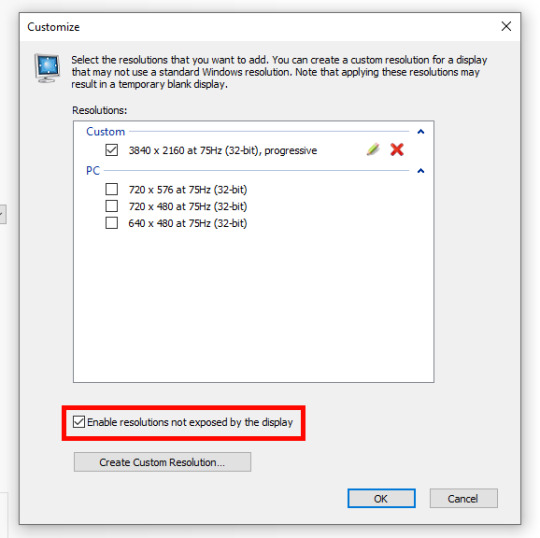
step 6: in the windows that appears, make sure that "enable resolutions not exposed by display" is ticked! this is very important! (again, highlighted in red - it should look like this)
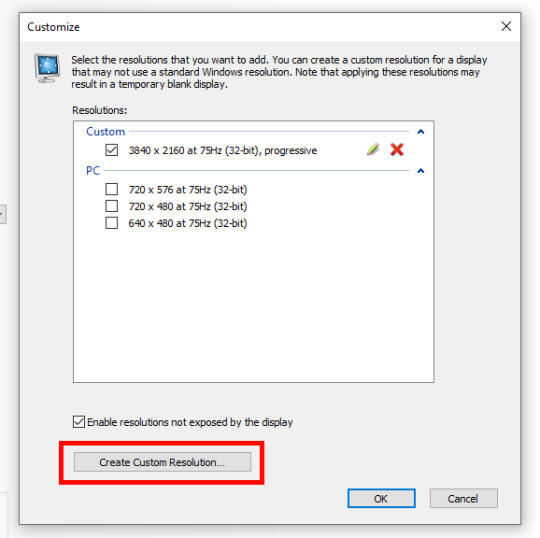
step 7: now, click on "create custom resolution"
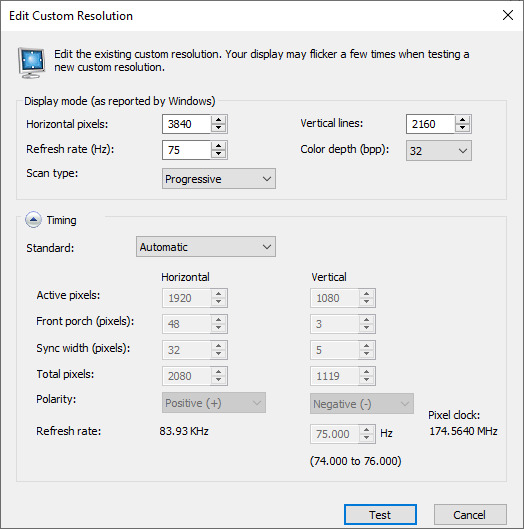
step 8: this is where you set your desired resolution, and where i get a bit rambly; so, in my opinion, there is ZERO reason to go above normal 4K for TS4, as it's generally not a really high-poly game and it has rather simple graphics. you can fuck around a lot here, but if you don't feel like it, here are my settings - this will give you 4K screenshots. NOTE: THE REFRESH RATE DOESN'T NEED TO BE 75! SET IT TO WHATEVER THE REFRESH RATE OF YOUR MONITOR IS!
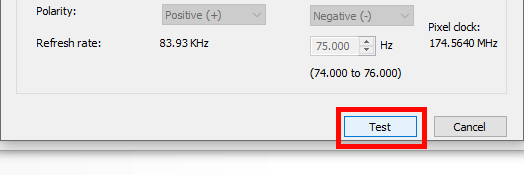
step 9: now, click on test
step 10: let the thing load, and after it's done, a window like this should pop up.. but yknow, in your language. click on "yes" (or accept or ok!! idk mine's in russian; basically, the button highlighted here!)
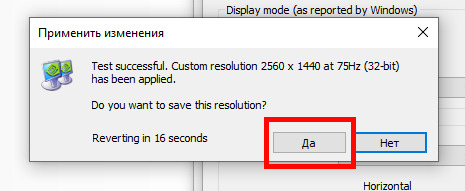
step 11: click "ok" in the window that pops up! like this! afterwards, close the nvidia panel

step 12: open the sims 4 and go into game options, then into graphics
step 13: set your "display type" as "fullscreen", like this

step 14: under "resolution", select whatever resolution you setup earlier; in my case it's 4K, so if you used the same resolution, your settings should look like this
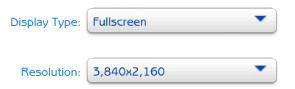
step 15: click on apply changes!
AND UR DONEE!! WAHOOIEE!! now, take your screenshot using reshade, and then go back into sims settings and set it back to what you usually play at, then apply changes!
every time you need to take an HD screenshot, simply open game settings and use your custom resolution! that's it, have fun :3
#sims 4 tutorial#ts4 tutorial#sims 4 screenshots#ts4 screenshots#sims 4 screenshot tutorial#ts4 screenshot tutorial#sims 4 hotsampling#ts4 hotsampling#srwe#nvidia#dsr#tutorials
735 notes
·
View notes
Text
My 𝐓𝐨𝐩 24 𝐒𝐜𝐫𝐞𝐞𝐧𝐬𝐡𝐨𝐭𝐬 from 2024🎉
Thank you @theplottdump for the tag! I'm tagging @southernsimmin, @sansabirdanne, @lynzishell, @nefaricussims, @raspberrywhimss and anyone else who wants to! I'm also just using story screenshots because that's easier haha.
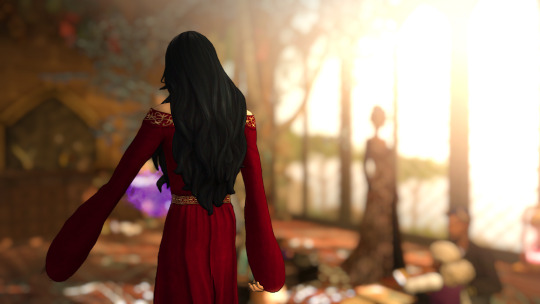
Big Windows Era: I had a lot of fun with lighting during the medieval arc. Did it make sense? Rarely. But there were big windows and bright sunlight everywhere.
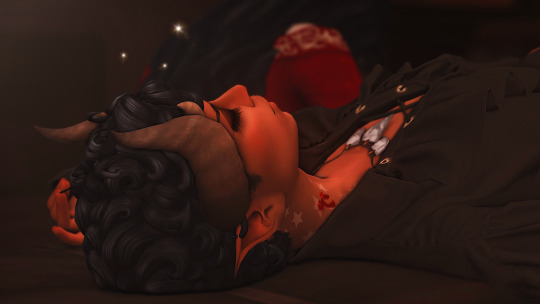
The rest below a cut. CW for blood and censored NSFW!
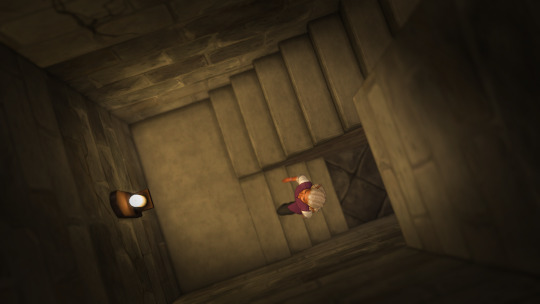
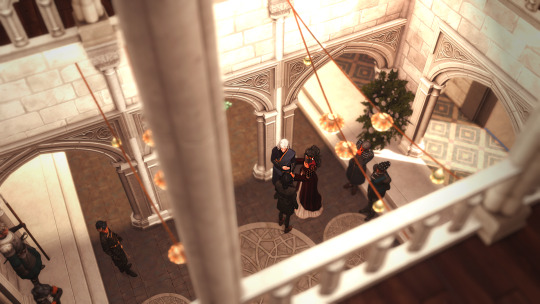
2. I Love Castles: this is such a basic shot of Elidyr climbing the stairs, but I really liked it lmao. Poor kid was trying to find the garderobe and instead they found a depressed vampire.
3. Beautiful Amari: getting to have @southernsimmin 's beautiful boy play the role of court mage during this arc was the coolest. I think this is my favourite photo of him though. Those eyelashes are so delicate. Plus he looks so elegant laid back like that, while Sax is just slumped on the floor behind him hahahah.
4. I Really Love Castles: big rooms, big windows... it was big. The biggest. I loved building these little movie set style locations (they were all just bland boxes on the outside!).
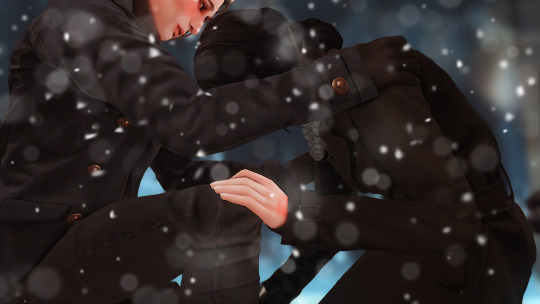
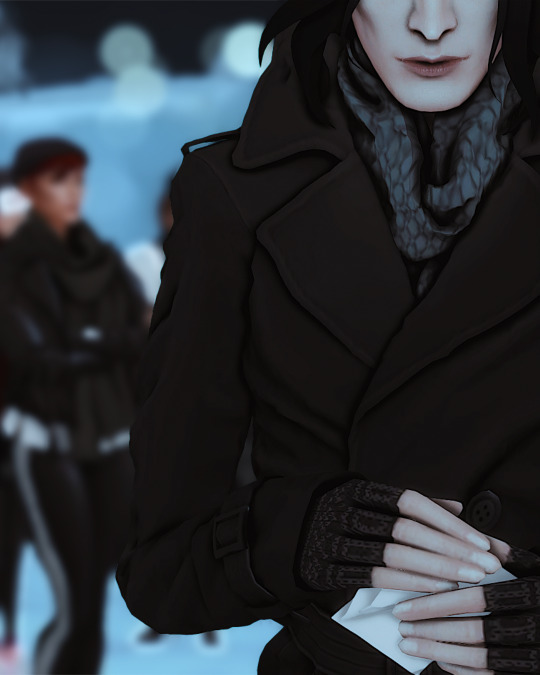
5. Take A Shot Every Time Sax Passes Out: Fen trying to get some kind of sense out of Sax after the portal yeeted him and Idris back into our world. I just really loved the vibes of this shot, with the focus on Saxen's hand trying to steady himself, while his face is hidden.
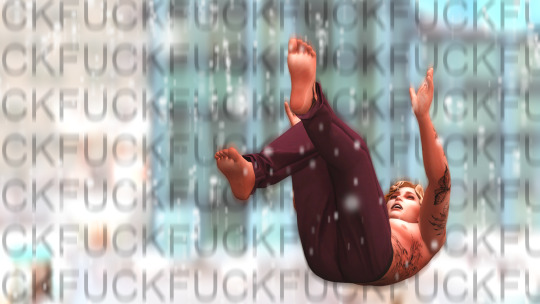
6. That Was The Moment He Realised, He Fucked Up: these aren't good shots, but they were very funny to me. Jasper accidentally teleporting himself outside of a skyscraper, and then teleporting in and out of increasingly low altitudes because his magic was malfunctioning lmao.
7. Rudeys: I just really liked this shot hahah. I like the shadows and the soft winter light through the windows.
8. Puppies Are Loud: Sax taking a nap - and then waking to discover that his fiance and kid-he-stole-as-a-baby-and-now-raises-as-his-own have managed to acquire a puppy during that time - was very funny to me. I was really pleased with his expression here hahah.
9. Cute Family Shot, Unless: I was soooo pleased with how this shot came out too, because it is a sweet family portrait of Sax with the people he cares about most in the world (plus puppy) and El and Fen are very happy... but the way his eyes are hidden in shadow give it a slightly darker vibe. He would do terrible things to keep them safe.
10. Sax Try Not To Ruin Christmas By Dying Challenge: I just think they're cute.
11. Creepy: I spent aaaages decorating this room full of illicitly obtained occult goods, because where else do billionaires hold their Christmas parties (my story had Christmas back in July btw). I really liked this shot of Vlad being sinister.

12. Creepy But Now Underwater: also from the Christmas party, this shot from inside the mermaid tank.

13. Boss Fight: Sax walking out to meet Vlad.
14. Fen Saves The Day: to be honest... neither the pose nor the picture turned out how I'd hoped. But I still really like this moment hahah.
15. Idris: it's just a random reaction shot but I really liked this picture of Idris calling her parents! This was before I had relight so it was purely from in game lighting. I liked the softness.
16. Burger King: again, a random scene setting shot, but I really liked how it came out.
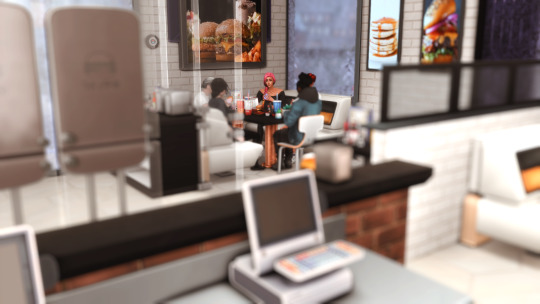
17. Idris vs. Vlad: this whole scene contained deeply uncomfortable mind games, so saying I like this shot feels very wrong... but I felt like it got the tension across.
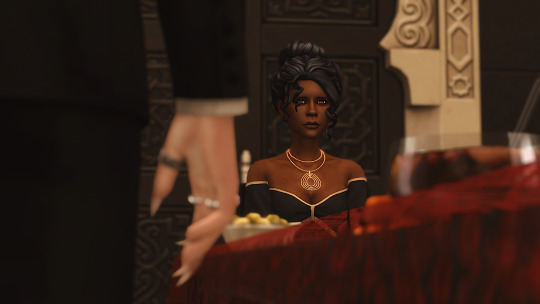
18. The Only Competent Person Here: I looove her focus.
19. Gently Folding Tissue: Sax trying to regain control of his emotions by ignoring everyone and just slowly folding the tissue he'd used to wipe his own tears was iconic behaviour tbh.
20. Jasper Gets Yeeted Again: Jasper trying to attack Sax and being repelled by the cottage's boundary protection. I was really pleased that I managed to get the camera in the right angle to show Jasper flying backwards, Fen reacting in shock, and Sax just standing there calmly because he knew what would happen.
21. Rudey II: I was so pleased and disgusted with myself for putting this conch shell in the foreground of my most NSFW pose hahahaah. Take that IG censors.
22. Shadows: the shadows were a paid actor.
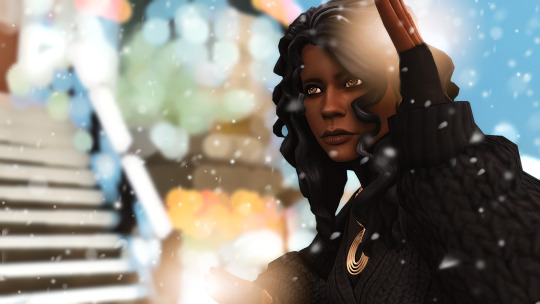
23. I Love Landscapes: help I'm obsessed with snowy landscape shots. I really liked this one of Sax and Fen on either side of the boundary.
24. A Normal Reaction When Being Handed To Saxen: baby boy's already working on his side-eye game.
Oki... now I've said that I actually liked 24 things I made and I feel weird about it, so I'm gonna post before my brain makes me hit delete. 🥲
47 notes
·
View notes
Text
If you have Windows 11, please turn off the Recall feature unless you have Bitlocker on your computer. This is because it takes screenshots of your PC and stores them in such a way that the screenshots could be stolen and passwords etc. taken. (It can be encrypted automatically by Bitlocker, so if you do have that enabled, turning Recall off is optional). If you want to turn off Recall, please do the following:
Please open "Settings".
Next, please click on "Privacy & Security".
Select the "Recall & Snapshots" page.
Turn off the “Save snapshots” toggle switch.
Do this for every account on the computer (the setting is saved per account).
This will completely turn off the Recall option on the account. If you use Windows 10 or earlier, you can put your feet up and relax - Recall isn't available on these operating systems. Obviously, it's a non-issue on non-Windows computers too.
#windows 11#could someone please introduce microsoft to 21st century security practises#recall#tech support#information security
46 notes
·
View notes
Text
Making Gifs Part 1 - Capturing Video
I am making this for @errruvande but I thought maybe others could use this guide to. This is my own personal workflow on how I make my gifs. Everyone has their own way of doing it, and there is no right or wrong way, but I have found this works best for me, with my limited tools and since I do not have photoshop.
Please note I am not an expert lol! There are people out there making far better gifs than me, and many other gifmaking resouces on Tumblr that are probably better than mine.
Keep reading below >>>
So there are two ways that I have found that work for capturing video. If you have the discs like I do, using a program like Videobyte BD-DVD Ripper works really well to grab video clips from Blu-Rays and DVD's. I recommend only using Blu-Rays if you have them. since DVD's are much lower quality.
However I have noticed the videos I captured with this program tend to be dark and have some compression artifacts, even when rip to an MKV with high quality settings. So I use a different method which I feel produces higher quality video captures.
I use Windows Screen Recorder (I have Win11 but this will work for all versions of Windows) with the quality settings set to High. In order to do this, go to Settings > Gaming > Captures and set the following:
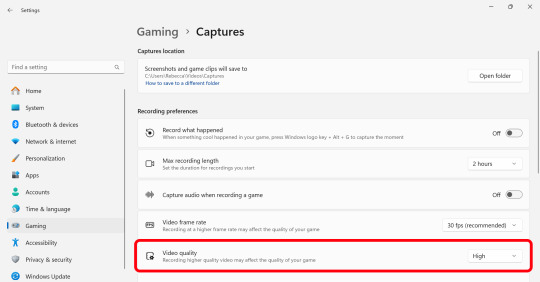
Make sure the Video Quality is set to High, set your Screenshots folder, turn off Audio (you don't need it), and keep the frame rate to 30 fps.
For Windows 11 press WIN + ALT + R to activate the screen recorder. There is usually a bit of a delay so make sure you start a few seconds before the scene you want to capture. And try to keep the length of the capture below about 90 seconds; the shorter the better.
______________________________________________________________
Capturing Sequential Caps
So, for those of you with Photoshop, you can import your video directly into the program and make your gif from there. But I found that Photopea really does not like videos, and will stall and crash if I load a video directly. So I have to capture sequential screencaps to make my gifs.
I use VLC Media Player. There are a few others out there that take sequential caps, but I have not been able to get them to work myself.
Download and install the latest version. Then go to your settings to set up the Sequential Caps function. They have a great guide on their website here but I will reiterate it in this post.
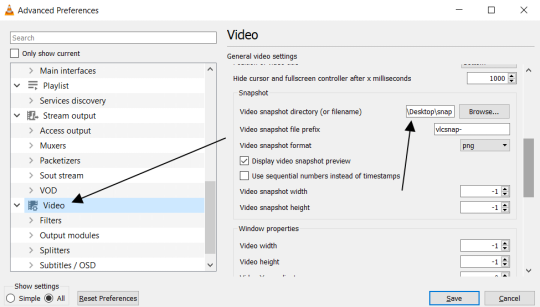
Go To Tools > Preferences and then at the bottom of the screen select the All radio button to show all settings.
Select Video from the left menu. Scroll down about halfway until you see the Snapshot section. Choose the folder where you want the caps to go.
3. Then, under Video on the left, expand the Filters list.
4. Check the "Scene Video Filter" from the list.
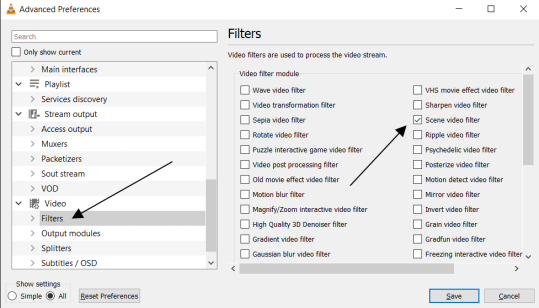
5. Then scroll down on the left menu under Filters and click on Scene Filter. This will open up the settings for that particular filter.
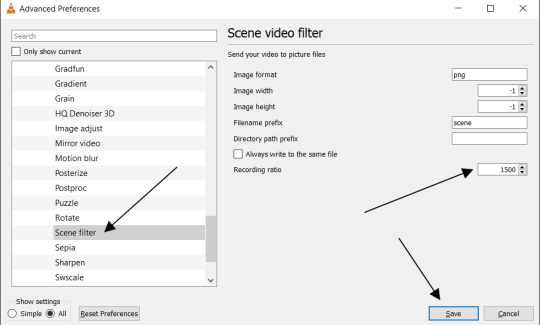
6. Set the Image Format to PNG.
7. Then for the Recording Ratio, change to "1". The Recording Ratio is the frame interval. So for example, if it was set to "300" (with a 30fps video), then it would take one cap every 10 seconds. Setting it to "1" will make it take a cap once per frame.
8. None of the other settings need to be changed.
9. One more important setting, otherwise this will not work! Close the menu, and go back to Tools > Settings and leave it on Simple. Go to the Video section and MAKE SURE the output is set to "Automatic". This is important because if it is not on Automatic the Scene Filter won't work!
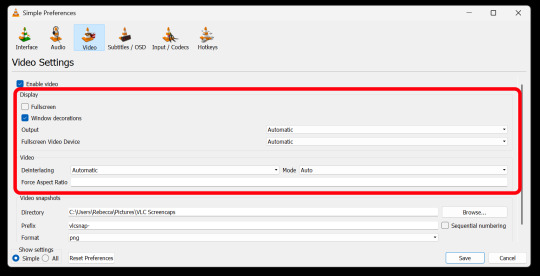
Then just open your video with VLC. VLC will automatically take the screencaps while the video is playing. If you pause the video, it will stop taking caps.
NOTE: For smoother gifs, change your playback speed to be slower. Go to the top menu > Playback > Speed > Slower (fine). The more you click this the slower the video will playback, and that means more caps will be taken over that time frame. I usually set it to 0.75x, but if you want even smoother gifs for really short clips, you can set it even slower than that.
Your screenshot folder will look like this:

Then we are done with this part and onto Photopea! Which I will go into detail in another post: PART 2
#gifmakers#gifmaking#gif making#gifmaking resources#gif making resources#my guides#giffing tutorial#screencapping#sequential caps#gif making tutorial
40 notes
·
View notes
Text
Gonna ramble about gaming capture software for a moment
So back when I started seriously playing RPGs, back in 2013, I used FRAPS to capture everything. I loved it. I loved that you could have separate folders for videos and screenshots. It was easy to use and I had no issues
Until I had to upgrade to Window 10 for work. Suddenly, FRAPS didn't work anymore and I was very sad. Switched to bandicam and had no issues. (Well, it didn't have some features I really liked in FRAPS, but nobody's perfect)
Until I got a new computer last year. Then suddenly, when I pressed the hotkey to record video or screenshots, it would freeze the game for a few seconds. Which, not great for recording
But I dealt with it. However, this past week, the freezing was up to 10 seconds and crashed my game more than once. I couldn't find a good answer about what was happening, so I assumed it was my computer
Not proud to admit that I panicked a bit. After all, VG is coming out at the end of the month and I don't want any issues recording or taking screenshots. I tried every troubleshooting guide I could find and I just didn't have any luck
I seriously started looking for a new computer (again, I was panicking) but decided instead to simply do a search for video capture software 2024
And lo and behold, FRAPS was on that list. Apparently it works with Windows 11, which I have. So I installed it and checked out
It works! There's no freezing, not stuttering, just beautiful screenshots and video. I am now officially ready for VG!
#hippo rambles#had another panicky moment tonight#I updated my graphics card#and nvidia changed my inquisition settings#to high from ultra#so none of my hair or armor mods#showed up#I was ready to cry#but luckily#I figured it out quick!
19 notes
·
View notes
Text
Train Puzzle v0.3 internal milestone
youtube
Train Puzzle dot exe (title pending) has been in continuous development by me and @msasterisk for about a month. It took a long time to get everything to come together, but now we're excited to show off everything we added and changed and begin playtesting (internally) again.
To celebrate, I drew the game a new splash screen, which you can see in detail here.
The big changes:
10 new levels, including 3 tutorial levels, a new layout based on John Allen's famous Timesaver, and some original layout designs.
PBR cars--cars can now have PBR textures, though this is currently only supported by two tankers.
16 new cars, including logging flatbeds, reefers, and tankers.
Physics works much better in the kinds of edge cases that turn out not to be edge cases, particularly, cars will no longer overlap when converging into the same switch track side by side.
New switch stands and track path highlighting. Switches will change if a car converges through them (which takes me some getting used to, but really helps in levels that involve runaround loops and switchbacks), and they are animated with moving lever and target.
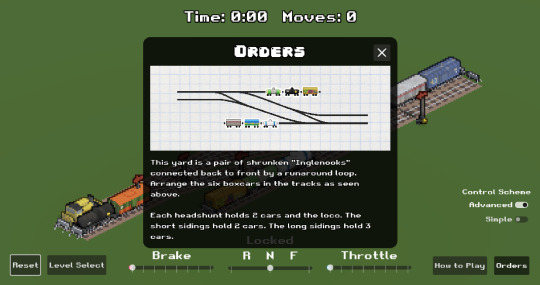
The eyesore order sheet was moved to an orders window that can be opened and closed at any time, and a new on-screen destination highlight was added, active while holding "F" key.
A lot of little UX polish to help streamline the experience.
Screenshots and full changes below the cut.


v0.3 - 2024-Jan-27
Levels:
It is now possible to have multiple levels in the game.
New level select screen with 11 levels: Tutorial 1: Moving Cars, Tutorial 2: Swapping Cars, Tutorial 3: Runaround Loop, Tuning Fork, Inglenook Sidings, The Timesaver, Ice Boxed In, Interchange Yard, Crossover, 10-car Doublenook, 16-car Doublenook.
Physics:
Cars will now resolve collisions when they are converging through a switch, rather than overlapping.
Cars can now fall down slopes correctly (though no current levels take advantage of this).
Cars:
Cars use linear mipmap sampling rather than nearest.
Cars can have PBR textures.
Update Steam Loco model with thicker front and back boards, and center it on the rails.
New logging flatbeds: A grey skeleton car with and without logs, and grey, purple, and yellow stake flats with and without logs.
Three new reefers.
New trans pride flag inspired tanker.
New shiny metallic "Silver" tanker.
PBR texture applied to RustedGrey tanker.
UI/UX:
Remove "Intermediate" Control Scheme.
Added pixel art fonts.
Can click through timer and move counter.
Update How To Play screen to be more general.
Added loco-triggerable text boxes for the tutorial level.
Destinations:
Move "Orders" sheet showing the destinations from the top left to a separate screen, with some introductory text added as well. Orders sheet appears at the start of each level instead of How to Play.
Hold "F" key to highlight destinations in the game world. Mouse over the icons to highlight the corresponding car.
Cars must be stopped at their destinations, not just touching them, in order to win.
Switches:
Replace switch arrows with animated switch stands with a red arrow target and yellow lever. The red arrow points parallel to the track when normal and perpindicular to the track when diverging.
Mousing over a switch now highlights the active route by darkening the inactive one.
Cars converging through switches will set the track to the direction it came through.
Misc:
Coupler click spheres raised and shrunk slightly.
Splash screen artwork depicting the slimegirl crew of the locomotive.
Custom icon.
Add tree and rock assets, though they're currently unused.
Sounds:
Cars will now make collision sounds when colliding with buffer stops.
Switches make a ratcheting sound when changing direction.
#Train Puzzle#indie dev#game dev#game development#train#steam train#steam engine#train game#puzzle game#shunting puzzle#switching puzzle#shunting#slimegirl#slime girl#slimegirls#slime girls#Youtube
12 notes
·
View notes
Note
Hi there. So I read your tags on an other post and thought I would give you challenge.
What were your 10 (or really how many you want) favourite locations in 2023 QLs? Can be places or buildings, or both. Your choice. Rose💜
@nothingsbetterthancoffee thank you for enabling on the clown website!! Did you have any favourite locations in this year's QLs?
I referred to MDL and so I've only included shows that started in 2023 and to keep this under Tumblr's maximum of 30 images, so I didn't include all screenshots for shared locations!
Anyway, these are my favourite QL locations from 2023:
1. Chong Nonsi Canal Park (Bed Friend, Chains of Heart and The Promise) (location) Shout out to @winnythanawin (aka @aprilblossomgirl) for our discussions about parks lol


2. The timber mill (Chains of Heart) I love wide angle and maximalist shots, so this location has been stuck in my mind.


3. Thai Muslim Women Foundation School (My Dear Gangster Oppa, Y-Destiny, Return Man, 55:15 Never Too Late, Midnight Motel, Never Let Me Go and My Only 12%) (location) I love that the building has specific motifs that are seen in other Islamic architecture. But also, an excessive number of chandeliers is always fun to me. (There are also far too many shared locations, so I picked only a few screenshots).


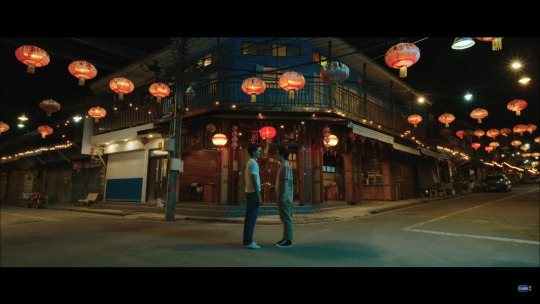
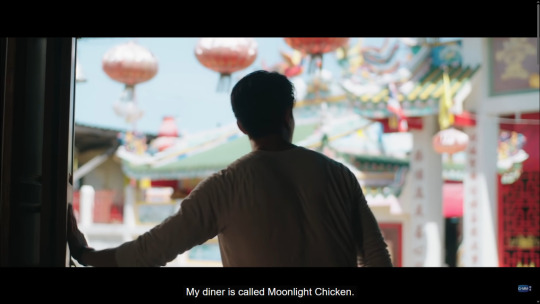
4. Chakngeaw Chinese Market (Moonlight Chicken) (location) Maybe it's the lanterns and the colours in the scenes, but I loved this location!
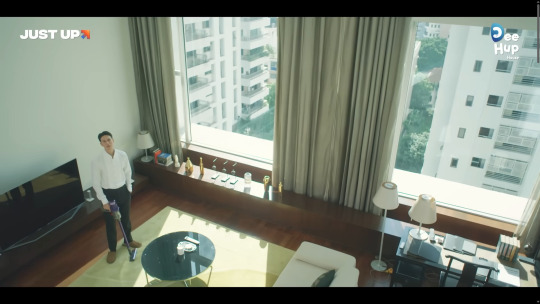
5. Como Metropolian Bangkok (Step by Step and Middleman's Love) (location) I described this as a Pride & Prejudice moment once. LOOK AT THE HUGE WINDOWS. That is all, lol
6. 13 Coins Tower Ngamwongwan (Playboyy and 3 Will Be Free) (location) I cannot explain how the slightly dead and uninhabited vibes of this hotel appeal to me but here we are 🤷♀️🤷♂️🤷


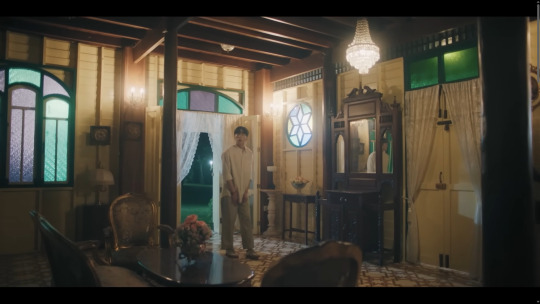
7. The houses (I Feel You Linger in the Air) (location, location) These details are *everything*. I'm especially a fan of the windows and stained glass!


8. Factopia (Pit Babe) (location) One thing about me is that I am chaotic. Look at this studio that's being used as a home. I love it lol
9. These two temples (Cherry Magic Thailand) (locations) The boat is selling the whole idea for me, though I've been told that there isn't actually a boat operating in these canals anymore, but let me imagine it!


10. Chao Phraya Sky Park (Last Twilight and Low Frequency Pilot Trailer) (location to come) I have actually been waiting to see this bridge/park used and was so excited to see it in Low Frequency's pilot trailer, though it didn't make it to the show. THEN Last Twilight showed up for me. Thank you to the location manager of the show.

11. Tokyo Tower (Shigatsu no Tokyo wa... / Tokyo in April is...) Please ignore how bad Ren looks in the screenshot. I don't care that only the base of my favourite tower can be seen. I'm taking it!!!
12. Whatever this building is (Pit Babe) I mean, I AM CURIOUS about it but haven't found the location. Maybe that's why I'm obsessing a little. Just let me find the location and I will get over it. Probably.

+ BONUS 13. Ikea Sukhumvit (Cherry Magic Thailand) I'm just kidding about this one, but I did google to see where it was @callipigio

Tagging @blmpff, @callipigio, @dribs-and-drabbles, @telomeke because we discuss locations, or at least I make you listen to me talk about them. I'd love to know if you had any favourites/ones that I forgot to add to the list!
If anyone else has their favourite locations, I'd love to know!
Also including these collections of locations, because why not: Troye Sivan's Got Me Started and its shared locations in Thai queer media
If I were in Bangkok, I might want to... in response to @lurkingshan's ask about my favourite locations
64 notes
·
View notes
Text
CJL LIVE BLOG SEASON 1 [EPISODE 1]
So. I know, this is wrong. Coz I put the IPK one on hold and now i am starting another, but I thought, this one is just for 82 epis(SO SHORT? WTF? CHALA HI NAHI SHOW?!?!?) So, it wont take much time to complete this and I also wanted to keep this content and ipk content separate. Hence, a separate blog. I know y'all might be hard-core Arshi fans and ipk fans, but, give this one, a chance, as well, ok? Just for entertainment's sake? Please? Baaki, it's your choice ofc :) Hope you enjoy this.
1.) Hmm. Pune. Maharashtra. A girl peeping out through the car window. Enjoying the 'jaadu' in the air. Btw, I like the BG score, here.
2.) In the flashback, we see two kids sitting on a white horse and the horse is galloping in its full galore. The girl confirms the magic in the air as her hands are flying. Lol. Typical kids.
3.) Tara di's sister is asking about her opinion on her looks. IDK but I cringed real hard when she said, "Achi lag rahi hun naa?"(Like yeah darling, you look average. Lol. JK. You look stunning but stop with that cringe acting, ok?)
4.) Tara Di opens her hair and A SECOND-LITERALLY A SECOND AGO, she was irritated but then immediately she is impressed with her di's improvisation. Whatever. Lol.
5.) Selfies. Di is excited so she starts taking selfies and her younger sister is suspicious instantly. Why? Does she not take selfies on any normal day? Maybe. *shrugs*
6.) How typical of people to instantly assume that if a girl seems excited then she might be having a 'chakkar' with some boy. Why girl? Your sister can't be happy for her own self, just like that, without any reason? *hmph* Do you make her that upset? Lol. That now her excitement seems abnormal.
7.) NGL but this Tara di's sister is a really bad actor, whoever she is. Sorry. Lol.
8.) Tara Di gets off the car and lets them drive by. Then, she quickly runs to the Bus Station to catch a bus for--?--whatever.
A Side Gyaan : But that's such a bad way to catch a bus, actually. First, you catch the attention of the bus driver coz they are at a considerable height and then they stop the vehicle ONLY THEN you cross it and get on the bus, okay? My readers? Don't be like Tara Didi, okay? Good. Now, we come back to the epi.
9.) So. Tara didi is changing her shoes. I really thought for a sec that she will change her outfit too. Lol. A kid is staring at her antiques and she notices people are staring at her. So.
What do you think will she do?
a) ignore them
b) make faces at them
c) sunaoify (rudely) them for staring at a slightly differently dressed girl
d) give them a five page ka gyaan on social etiquettes as a soon-to-be 'Starplus Bahu'
Yeah. You are neither right nor wrong, coz she will randomly pull out a jar of lollipops and distribute it to appease them. Yes. We all do that. We all step out of our homes, thinking we might happen to be in a bus and can then distribute it among the children on the said bus. Whatever.
10.) TD gets off the bus and buys chana and gur for--?--*shrugs*
11.) TD is now sitting in a-tempo?-transport vehicle. Whatever. Driver announces her destination which is- "Sehgal Estate"
12.) The driver assuming her to be a tourist, warns her, of the place having been shut down for quite a few years now and he tells her that an accident had taken place, many years ago. TD flashes back to that 'haadsa' and politely dismisses him by stating that she is a local.
13.) Ok, ladies, so all things aside, who all can climb up and cross that gate, that high, with a WHITE SAREE and that too without staining it!?!? Anyone? No? See, our Tara D (Lol. I have so many name ideas for this girl.) CAN. She is a champion at this. (Okay so i wanted to take a screenshot of that long-ass gate but Jio Cinema didn't let me. Fudge you, Ambanis'. Whatever. Lol.)
14.) She takes help from Deva's flash back advice when he had first guided her to climb that (same?) gate. Okay, so that saxophone BG score is cute, okay? Lol.
15.) Gosh. How did they manage to find a small girl who looks exactly like Kanika Mann? Wow. Casting directors take a bow. *bows down with joined hands*
16.) Okay, so the titular song has started in the BG and I am loving it. Meanwhile, TD is going about the mansion and recalling that 'haadsa'.
17.) I am actually kinda liking this kid, Deva. How sweet of him. He extends a bunch of yellow flowers (symbolizing friendship). And damn, he has one hell of a head full of soft and flowy tresses. Wow. Any hair care tips for us, girls, Deva? Lol. Whatever.
18.) She digs out the 'nishaani' of their friendship which is basically two thick stones(or rocks?) joining like a puzzle piece and 'Badshah' along with caricatures of Deva and Tara, carved on the two pieces.
19.) She becomes very emotional, holding the symbol of a once very beautiful bond she had with some boy named- Deva. And then out of the blue we hear a horse neighing and Tara instantly brightens as she recognizes Badshah.
20.) Sure enough, we see Badshah running towards Tara and Tara on reaching close to it, touches it affectionately on it's jaws. We see that Badshah is indeed angry and disappointed on Tara. He starts running away as Tara tries to pacify it(him?). Oh. So. The chana and gur was for a horse. Ok. Nice.
Fun-Fact : All things set aside, Kanika genuinely had to interact with a horse in the middle of the shoot. I wonder if there's some story to this episode which she might have, like she was hell scared of horses and yet had to learn how to interact even if it's a well trained horse, we are talking about. Okay. Enough. Now back to the epi.
21.) Basant Kaka has come to see Tara Bitiya. What's with that line?-"Main janta tha ki aaj ka din tu bhulegi naayi, zarur aayegi." Kya hai aaj ke din mein aisa? Tara's demeanor changes as she recalls the incidents that took place in today's date.
22.) She tells BK that today is the day she met HIM (Deva?) and she reveals that he was the only one who made her Tara from 'Phus Tara' (Deflated Star or according to Jio Cinema's caption-'Timid Tara'. Basically an insulting nick name.)
(Lol. See. I got another name. But. Sorry i won't use that coz it triggers her childhood trauma.)
22.) Do I see vengeance there, Tara? Okay. So, we are being taken 15 years back.
23.) Wow. What an a__hole of a brother. He is chasing Tara all over the house with a bunch of crackers (chataai?) Tara is hidden inside the cupboard but she wants to come out because she is scared of darkness and it's all dark inside the cupboard. Ronak bhaiya fools her to come out but lays the chataai bomb and lights it with a matchstick giving her a 'Sehgal Promise'. These Sehgals seem to be too stuck up of a family tho.
Not-So-Fun Fact : God, these are the worst kind of crackers not only coz of the sound but also they keep scattering everywhere, while bursting, once lit. Even I am hell scared of these and always stand at least 1 Km away from these. Lol.
24.) Not knowing better (how would she? she is just a kid of 7-8 something.) Tara trusts her wicked brother, who has already run away to the veneration, steps out of the cupboard but it's too late the crackers keep scattering everywhere and bursting in the meantime and the poor kid is hell scared she starts calling out for her father ("Baba").
25.) Baba is doing aarti of Devi Maiyya (Oh. Hello DM. How are you? How are Khushi-Arnav and their munchkins doing? Lol. Sorry. I get carried away a bit.)
26.) WAIT. WHAT!?!!?!?! Is that the same guy, who was in Sheesh Mahal, on the fashion show night and Khushi came, asked him for directions but instead got to listen to an Urdu Shayari? Wow. See. A crossover we didn't deserve but got anyway. Whatever.
27.) Baba was doing aarti when his hell scared daughter comes and merely touches his back and the veneration plate skips away from his hand. Lol. What kind of a diet Baba takes that he couldn't even handle a gentle push from a mere kid of 7? Whatever.
But the thing that surprises me more is that he is about to lash out at her in front of the whole-family?- bunch of people. This is where I thought that there's some major tiff going on, in the family, like, everyone is against a mere kid.
28.) Baba, your daughter was hell scared, that too, coz of your a__hole of a son. A lil bit of compassion would go a long way. Thank you.
29.) Wow. A__hole father, a__hole brother. Tara. Run. I said. RUN. Whatever. Poor kid. Is getting blamed for the thing that she couldn't have any control of. So. Baba's wife died at childbirth. So. Now. He has got a lifetime license of blaming and punishing his daughter for it. WoW. jUsT. wOw.
30.) Some one please call a gynecologist and enlighten him that it hardly has anything to do with the child but has everything to do with proper timely medical care. Whatever.
31.) OH. She is crying in front her mother's portrait. Asking if she would ever be loved by anyone or not. I so desperately want to go and give her a looooooong jaadu ki jhappi. Uff. I am getting goosebumps now.
32.) She hears a melody being played out from a harmonica and is instantly drawn to its source. She sees, a boy riding a horse named Badshah and carrying balloons on it's saddle. She is kind of intrigued by this boy.
33.) The boy introduces himself as Deva and in the process, mocks Ronak. Ronak is kind of irritated of this boy already and tries to take over the horse and orders BK to light a long-ass chataai (do they have nothing else in the name of crackers? Lol. 'sEhGaLs') But, Deva is frantic and warns not to burst crackers as it will make Badshah go crazy and mocks him again and Ronak pushes him and Deva falls down.
34.) BK, following his master's orders, lights the chataai and Badshah goes crazy, starts running around violently. There is chaos everywhere, somewhere in the midst, Baba also shouts. The horse Badshah is now running towards Tara and Tara is frightened to the core. She freezes at her spot and covers her face ready to face the impact. Deva pulls off a high jump stunt and lands on the horse's back and calms him down in the process.
35.) Deva tries to cheer Tara up and is successful and from there on they both spend time together and thus become hard core friends.
36.) Deva lightens up her world. She smiles more, laughs more, conquers her fears a lil bit more, every time she is with Deva. And one fine day, they both are celebrating Deva's birthday and Tara has brought a cake for him. A candle is perched on its top. Deva lights it up and blows it away to make a wish. But the candle keeps lighting up again and again automatically, this surprises Deva and Tara falls into a pit of laughter and we see grown up Tara laughing in front of BK recalling the incident. This show is really moving something inside me. It's so heart warming tbh.
37.) Ok. So now they are celebrating BK's b'day and she has a cake-cum-aate-ka-halwa. BK lights up a matchstick and the small speck of fire again ignites that trauma in Tara. Poor girl is traumatized on loosing her only best friend.
38.) Tara and BK think that Deva is dead. And, Badshah has been bought by someone in exchange of lakhon rupiye. Altho, Bhojariya ji had a deal with Tara that she would pay him to keep Badshah in the Sehgal Estate but upon getting a greater amount of money, naturally, Bhojariya Ji sells it.
39.) Tara is heart-broken that she could not keep his only belonging safe and so apologizes to Deva (who she thinks is in heaven) and we are instantly taken to a hilltop where we see a man, also in white. So. Deva. He is alive and probably a reech buzinez man, i think? And, now, the plot is quite predictable, Tara will try to take back Badshah from that 'man' and he will in turn not reveal that he is indeed Deva becoz there is some misunderstanding on both of their side. So. He will try to seek revenge from Tara for what he had to go through in the past. As it is clear from the line, "Bohot jal chuka suraj, ab chaand ko jalna hoga." Wow. What a beautiful parallel tho. (Suraj-Deva and Chaand-Tara and also the title of the story makes a lot more sense now.)
40.) Ok. So. Jalebi reminded me that I did not mention Deva's entry scene. So. Yeah. Deva's entry scene, huh? Wow. Yeah. Sirf. Wow. I had literal goosebumps already and then that drone shot from the hilltop. The teapot hanging above the fire. Lol. What a traditional way to make chai amidst nowhere. Btw where did he get chai ki patti from? And what about chini? Cup? Lol. Banda puri taiyyari ke saath aaya tha. So. Yeah. Amazing scene. Handsome Deva. Beautiful white suit. Already swooning.
Not-so-Fun Fact : Damn this reminds me that I have been chai-deprived since yesterday coz chai was finished and no one in our house(as in me and my parents) were bothered enough to bring it from the general store altho we all were very much bothered for not being able to have a cup of chai. uGh. Whatever.
41.) Wow. Wow. Wow. This show has already started to cast its spell on me, to be honest. And it's just the first episode.
P.S. : So. Yeah. Very beautiful. Very very very beautiful indeed. Cinematography wise. Script wise. Costume wise. Look wise. Everything is perfect for Chaand Jalne Laga. TBH I was underestimating this show but it indeed is beautiful. Please do give it watch. Ok. Then. Bye. God bless you.
#Tara-Deva#CJL#Suraj Hua Maddham#Chaand Jalne Laga#Lol#i couldnt find a ship name for them#like?#TaDe?#TaVa?#RaDe?#RaVa?#TarDeva?#Lol.#Whatever.#You decide that.#I am too bad at picking ship names#Or tell me if a name already exists#I felt like i was too harsh on our Tara Di in this one#i promise you; will be a lil softer for her from the next one :)#but ngl kanika mann is so damn beautiful and the frames are so aesthetically pleasing#it is indeed beautiful#hats off to the cvs team and cinematography their hard work is visible and is very heart touching as well :)#i actually enjoyed the episode :))#Added Deva's entry scene thoughts :)#I got drunk and forgot to mention it earlier :(#Pardon my drunk-ness :(
20 notes
·
View notes
Note
first of all, I'm so sorry you had to deal with all those troubles. I'm just entering the fandom, so I have no clue how bad it was or possibly still is, but that shit ain't acceptable. I hope you're feeling well in the future, and better now.
Second of all, I have a question for you about a technical problem that I can't find much of any resources on how to combat, and seeing that you're very good with virtual photography, I thought I'd ask you.
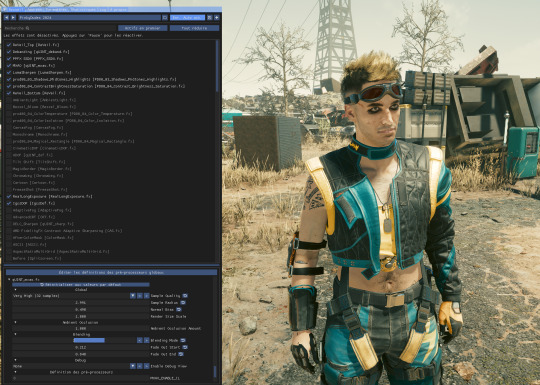
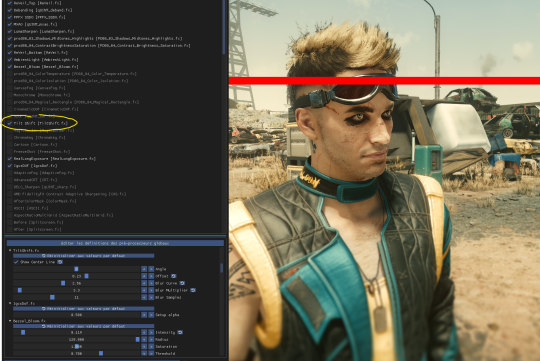
Depth of Field in the vanilla game's photomode is handled oddly, with artifacting(?) around V and certain other objects and NPCs at lower aperture values
Example:
The only advice I've seen that directly addresses this issue is simply "Raise the aperture" but that doesn't help when I'm trying to take photos with a very intense DoF (Which I really would love to do)
is there a mod/setting I could use to fix this issue?
Welcome in the fandom and thanks a lot for your words! 🧡 If you know how to curate your space, use the filter and block features, it's not that bad, especially if you find people you vibe and hang out with! Hope you'll find your comfy corner there :>
As for the question; The vanilla PM's DOF isn't really good and there isn't anyway to "tweak" it as far as I know (we can forcely disable it via some settings but that's about it)
If you're playing on PC, I can recommend getting ReShade! It's totally free, it allows you to layer all kind of shaders and post-processing effect on top of games. Since CP77 is a single player game, I recommend downloading the version with Addons support!
▶ ReShade
⚠ ReShade has its own Screenshot key; using the Vanilla photomode's key to capture your screenshots won't capture the layered shaders! So set up your pic, hide the HUD using photomode, and then use ReShade to set up more effects and polish, before taking your pic with ReShade!
More aboute ReShade and Tips on different DOFs under read more :>
Launch the installation and select Cyberpunk 2077 in the list, pick DirectX 10/11/12 as its API and dowload the recommended shaders pack
After launching the game, ReShade window should open, I recommend going through the tutorial to understand the interface better!
Then, you can start either enabling some shaders and tweaking them yourself, or looking for ReShade Presets on the internet! There's a lot of them on Nexus Mods too :>
▶ My old ReShade preset
When it comes to DOF shaders, the best one imo is IGCSDof The problem is that, even tho the DOF itself is free, you need the IGCS camera for it to work properly, and this plugin is not free
For free DOF, I can recommend ADOF and CinematicDOF! They can work together, tho I recommend only using One or Another
Here's an example of ADOF Both shaders can be tweaked with to achieve similar results

You'll notice some artifacts and pixels around the hair especially, that's when RealLongExposure save the day!
It allows you to "freeze" the game by staking frames on top of each others, "smoothing" the edges and getting rid of the artifacts
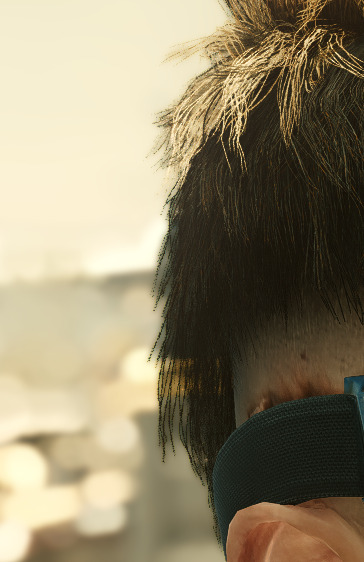
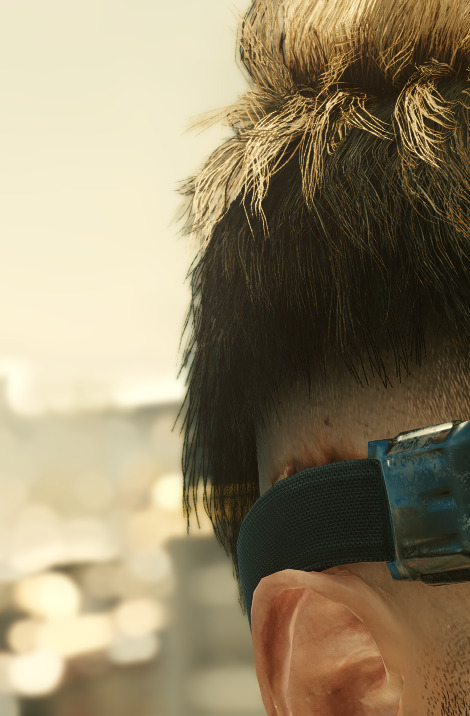
It looks less "crispy" on the right, but it's easier to spot in game!
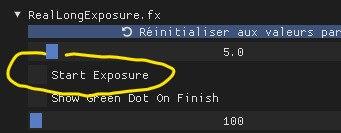
It's recommended to bind this shader to a shortcut; to bind it to a key, simply right click on the "Start Exposure" box
Another Shader that I like is called Tilt Shift It allows you to place a gradient blur that follows a Line's angle and position!
These are only just a couple of Shaders, I invite you to test and play around with all of them to see what you vibe with!
#Hope this answer your question! And thank you for the kind words 🧡#Cyberpunk 2077#Tutorial#ReShade#Ask#demon-of-side-quest-hell
20 notes
·
View notes
Text
remember how windows takes screenshots every few seconds, including of passwords and bank details?
well itd be very funny if every windows user opened a split screen of the words "hope you like it, windows ai" next to a search result for "furaffinity unbirth". just to "train" the ai
(anyway heres some cool things to help you defeat it)
3 notes
·
View notes
Note
Hi! I love your cc!! I've been trying to find a tutorial for how to make something take on the texture of a sims body, like your tails do, and vice versa how to make a piece of cc that does that have different swatches instead. Haven't been able to find anything and I was wondering if you might know of one? No worries if not, thank you!
Hi! Thank you so much! So sorry for the delay with this, my internet died last week and I’ve been busy since then. I honestly can’t remember when I learnt how to make it take the texture from the skin but iirc it was me just asking someone else how to rather than an actual tutorial. The process is super simple so I’ll do a lil tutorial here for it

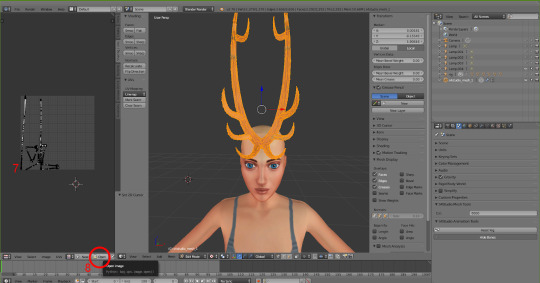
Depending on how you have your blender set up you might not have the extra window like I do, so go up to where the red circle is, click and drag those 3 diagonal lines and it’ll open a new viewpoint.
Click on the icon at the bottom of the viewpoint.
Select UV/Image Editor, the window will then look like the one on the left with the pixel grid.

4. Click this box and change the mode from Object Mode to Edit Mode. 5. Press A on the keyboard to select the entire mesh. 6. Press U on the keyboard and select Unwrap. (There are different ways to unwrap an object, but considering how tiny the UV will end up and it not needing a "proper" texture, there’s not really any point in doing any fancy unwrapping here)
7. After unwrapping you will see the UV map of your mesh in the UV editor 8. Click Open and find the UV image (Linked Here)

9. Click in the UV Editor window so it is active, press A to select the object's UV and then press S and scale it down (Move the mouse to scale it). Then press G and move it to where you want the object to take the skin colour from. For horns I tend to go for mid forehead, for my tails I go near the ear because the back skin is slightly darker/shaded so it blends better.

10. Now, the texture won’t immediately take note of the skin colour, so to fix that click the Material icon and then click New.

11. Click the icon next to Material and choose BaseTexture. This will apply the texture to the horns.

12. (Edited two screenshots together to show the uv placement, it won’t show it when you’re in object mode) Now back in object mode on the mesh viewpoint you can see that the mesh is now taking the colour or skin from the sim's forehead! You can move it around if you want to see if there's any other area you prefer, but be mindful of where other objects and textures will interact. With my tails and horns any hairs that have shadows or cover the ears will have issues with darkening the horns' colour. It's kinda inevitable honestly.
13. Now it’s just a case of importing it into Sims 4 Studio like other cc, for my horns I used earrings, but for the children and younger I used the blank body mesh (Because there's literally no base game accessories for any of them which don't have additional issues? I tried a bracelet but with long sleeve the horns would disappear, and I didn't have the patience to figure out exactly how to stop that lol). I replace the existing texture in Sims 4 Studio with a completely blank image (That’s the same size as the UV map)
The process for regular texturing is very similar, but I used a regular blender tutorial for that. There is also This Tutorial which goes over how to properly divide up your mesh for a cleaner UV map.

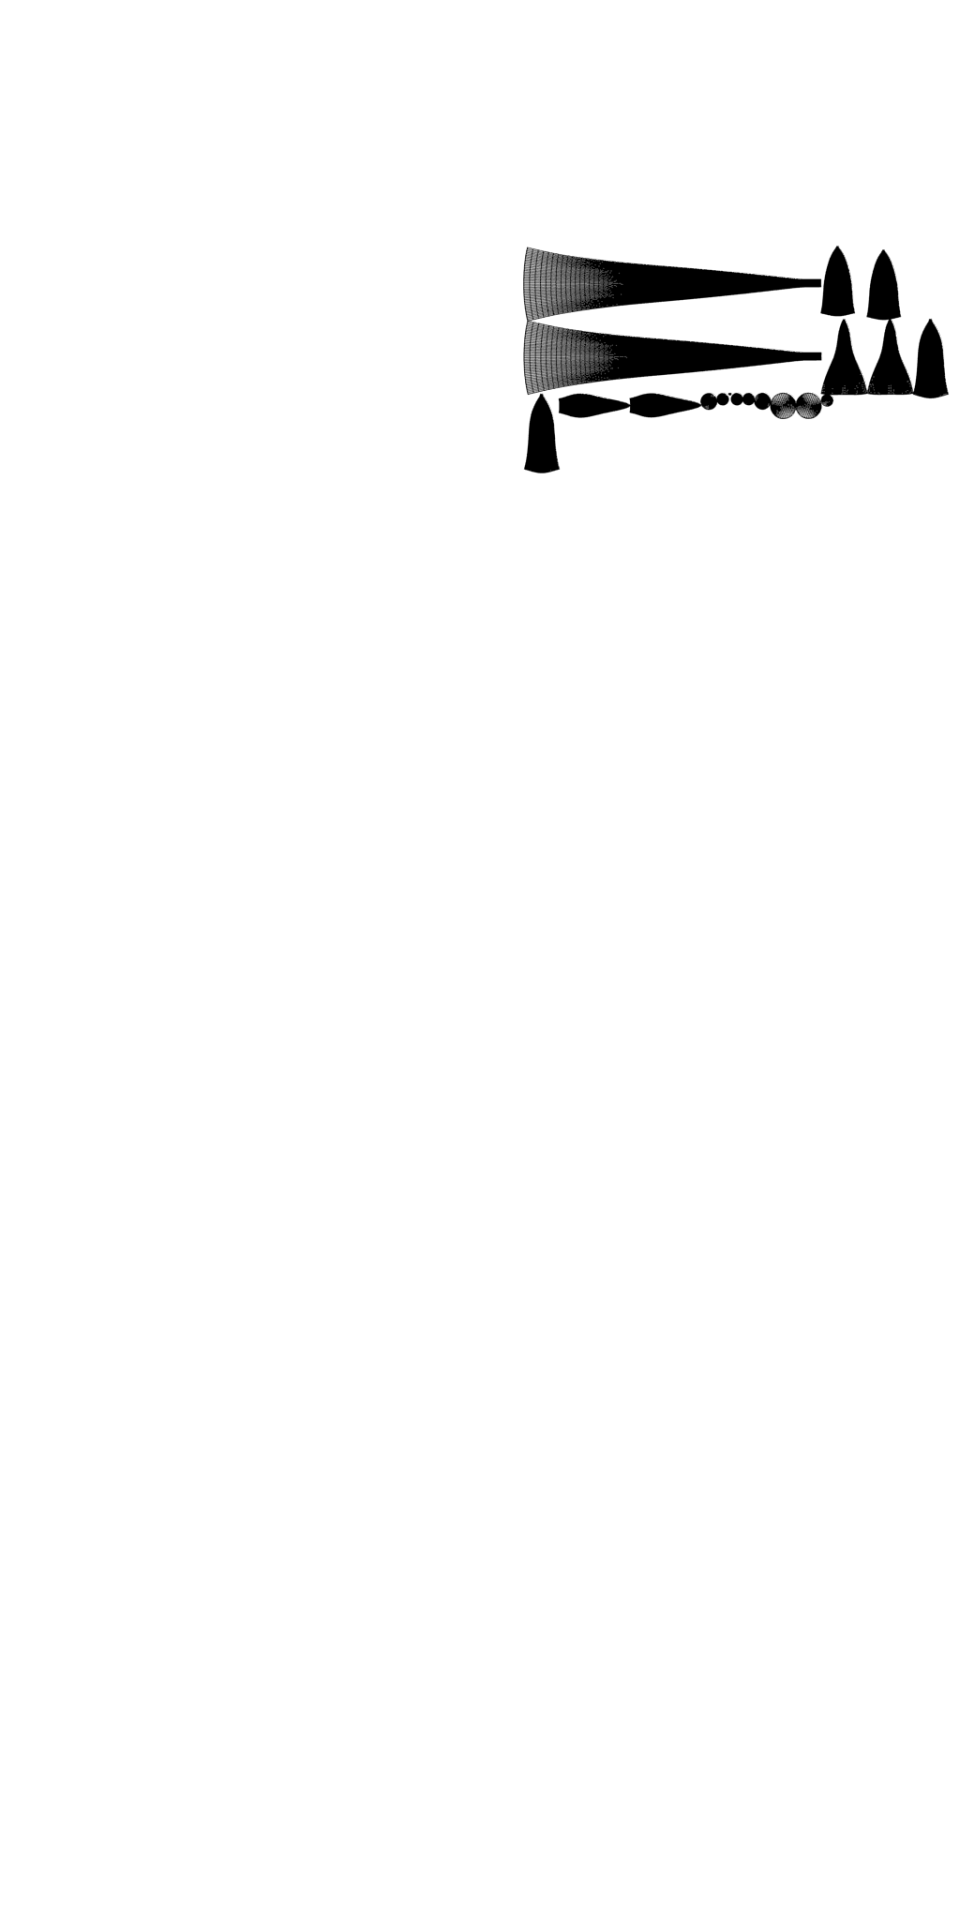
To get a image you can use to apply an actual texture, whilst in edit mode, click A to select the UV map, then click UV at the bottom and then Export UV Layout. This will save an image that just shows where your UV is, you can then use this as a guide when painting/applying a texture.
This is how my UV map looks after exporting and after painting it the texture I want. You can then reimport your textured image back into blender to see how it looks. Also if you've already imported your file into S4S you can simply just import the texture and it should apply.

I hope this all makes sense! Any questions I'll try to answer!
#sims 4#simblr#ts4#sims tutorial#cc tutorial#sims 4 tutorial#most of this is muscle memory at this point I almost forgot you had to apply the material for it to actually show lol#my regular methods of doing things is fucking around and finding out honestly lol
11 notes
·
View notes
Text
probing colour management - the case of discord grey
background: as described in canmom's guide to fixing the colours, I have gone to the trouble of getting a colorimeter to calibrate my monitor. because I want accurate colours, nya!
it turns out the story is even more of a mess than I thought, as I discovered when I tried profiling my laptop and was shocked, shocked to discover that even with profiling Discord looked different on the two screens side by side.
so let's say we're trying to render this shade of grey.

sRGB colour: srgb(50, 52, 57)
it's a slightly cool grey. this is the background colour in Discord, dark mode. (actually Discord specifies this in HSL according to hsl(223, 7%, 21%). I'm going to hope that the HSL-RGB conversion is standardised enough that it won't be different between browsers...)
desktop (Windows 11):
colour calculated in Firefox (monitor colour space): rgb_monitor(52,54,58)
colour calculated in Chrome/desktop Discord (monitor colour space): rgb_monitor(49, 51, 56)
since we're using colour management, we should expect these two sets of values to be different from the original sRGB, but equal to each other since the calculation should be identical in both cases.
so already we see a problem: same inputs, different outputs. not a good start.
ok, but which (if either) is right? we paste the screenshot into Krita (an art program) with the instruction "interpret the paste data as living in our monitor's colour space, not sRGB, and would you kindly please convert it back to sRGB for us". Krita's colour management generally seems to be pretty good, at least insofar the colours of the screenshot inside Krita look much the same as they do on my desktop. (in fact Krita has three different sRGB ICC profiles but they appear to be equivalent as far as this exercise is concerned).
monitor round-trip (sRGB-Firefox-Krita-sRGB): srgb(49, 51, 55)
monitor round-trip (sRGB-Chrome-Krita-sRGB): srgb(45, 48, 53)
going via firefox, it's very slightly darker but that is very likely an accumulating rounding error. going via chrome... it's around 8-10% darker, and I think a bit more saturated.
so we can conclude that the way Krita and Firefox handle this colour are pretty close. Firefox increased the values to convert from sRGB to the monitor space, and Krita decreased them again to convert back to sRGB. chrome on the other hand... honestly, I don't know what Chrome is doing. at first I thought it was just ignoring colour profile information, but the laptop test suggests it's doing something different on different devices.
here are the two shades of grey side by side (a screenshot converted back into sRGB in Krita)...
...ok, they're pretty close, i'll admit. I might not have noticed this problem if not for the laptop thing. it is more visible when the windows are bigger and not surrounded by bright white though.
now, all of this is in software that is using the same monitor ICC profile btw - we haven't even gotten to the question as to whether two computers with different screens really can be made to 'look the same' by profiling.
so next up, let's try this exercise on my laptop.
laptop (Windows 10):
my desktop monitor is a wide gamut screen. colours in a narrower gamut must take up a subset of the colours available on the monitor.
my laptop monitor is a narrow gamut screen covering about 70% of sRGB. colours outside of its gamut must be squashed inside. this will have the general effect of making uncorrected colours look less saturated.
so, in the laptop's space we get
Firefox: rgb_laptop(54,56,61)
Chrome/desktop Discord: rgb_laptop(52, 54, 59)
this time both Firefox and Chrome increased the values. Firefox increased them more.
once we ask Krita to convert back into sRGB...
laptop round-trip (sRGB-Firefox-Krita-sRGB): srgb(51, 53, 58)
laptop round-trip (sRGB-Chrome-Krita-sRGB): srgb(49, 51, 56)
this time, Firefox ends up slightly lighter than the target, and chrome slightly darker. but they're both pretty close.
part of what I think is happening here is that we've run up against the limit of bit depth. you can see we're changing values by only a few bits. if a colour lands halfway between two values, it gets rounded off. doing a series of colour space conversions like this causes rounding errors at each step.
so I think we've found two culprits here...
Chrome (and by extension Electron) is doing something wrong. i'm not quite sure how it's coming up with those numbers.
bit depth limits make it harder for software to compensate for hardware when the levels are lower, in general.
what this seems to suggest to me is that the lower the values, the more likely colour corrections are to be affected by rounding issues. it's easier to fix saturated primaries than dark greys. unfortunately, dark colours are also where the eye tends to be most sensitive. it's not that colour management is a sham - there is a logical explanation at the bottom of this!
you could mitigate this by doing the colour computations in 10bits per channel... funnily enough my graphics card is set to output in 10bit, but I guess applications need to be set up to do internal colour calculations in 10bit for that to actually be relevant. this would be a tradeoff against performance.
Krita admittedly has the option of using 16 bits per channel - the above calculations were all done in 8bit. for the sake of argument, let's see what happens if we convert our 8bit screenshot into 16bits before doing the colour space conversion. Firefox starts out as rgb_laptop_16bit(13828,14289,15585) in the laptop space, and after conversion to sRGB we land on srgb_16bit(13120,13634,14897). divide that by 256 and we can get an estimate that the 'correct' deltas in 8bit colour would be 2.76, 2.56, 2.69, which are all about halfway between 2 and 3. it's no surprise we see some rounding errors during the 'round trip'!
in general this all suggests the comparison I'm making is kind of the worst case comparison, where the screens will be most visibly different.
screens side by side
so we can conclude that if I were to put the laptop right by my monitor, there's no reason to expect anything in Chrome/Electron to look consistent, because whatever it's doing it doesn't seem to be properly converting to the monitor's space. but we could at least expect Firefox to look consistent, up to the limits of rounding errors, right?

I did this experiment. I can't meaningfully show you the 'real' difference because the camera adds a whole new layer of complications lmao (exposure, white balance, calibration of the tone response of the camera etc.), and I don't currently have the ability to just press the colorimeter against the screen and say 'what colour is this' - maybe DisplayCAL has that feature.
In any case, using my eyes, what I discovered was... viewing angles are a real issue! Doing a fullscreen colour comparison, the differences between a VA panel (a newer panel type which has good contrast and speed but poor viewing angles) and an IPS panel like on my laptop were very evident. At some angles the colours looked almost the same, at others quite noticeably different. The monitor's curve is supposed to help compensate for this a bit but damn! it's a strong reminder I have to hold my head pretty much dead central or I'll see a slight but definitely visible gradient across the screen. I guess it's one way to fix my posture. The current top dog panel type, plasma screens, should improve on this issue a lot, but they're still very $$$.
Even despite that, the monitor feels subtly 'cooler' in its grey balance than the laptop - perhaps more purple? Though it's hard to see if you don't have them side by side. I am starting to get hypersensitive to desaturated purple tones and thinking like 'is my monitor fucked or is that supposed to be grey' lmao. I think this is something DisplayCAL might be able to address - when the drivers drop I'll look forward to seeing if it will generate a better calibration.
It's crazy, I was getting by making digital art for years on monitors way less capable than this one and tbh those pictures look pretty much fine on a calibrated screen... but now I've become aware of all this shit it's really bugging me. Just gotta live with it for now though!
#canmom vs colour#i really thought i was done but digital colour just keeps finding new ways to get into my head
16 notes
·
View notes