#striderification
Explore tagged Tumblr posts
Text
reject roxy striderification and accept dave lalondeification . its the only way
221 notes
·
View notes
Text
hi everyone, i posted more fanfiction for the first time since *checks notes* august of 2023 lol
i've gotten a lot of attention on my fics since the remake of sh2 came out and i've always meant to keep posting stuff but it's tough for me to make the time ! i'm crossing my fingers that i can make more dedicated uploads to ao3 moving forward. thanks to everyone that has sent kudos and comments my way so far, it really does mean a lot :))
#a lot of the fic i've written is months/over a year old#i just haven't posted it anywhere publically!#i'm hoping to change that but we'll see :)#hmmmm how to tag this haha#leon s kennedy#james sunderland#kennderland#YEET
10 notes
·
View notes
Note
A question: do you think, in a kidswapped AU, that universe’s strider family should have the shades, or is it an inherently strider trait? In other words, are the shades inherent to the strider name or the characters themselves?
I think figuring out new eye-darkening setups is half the fun of Striderification, shades or no. Give Jade Strider perfectly circular sunglasses OR let her bangs grow into a veil. Have Rose Strider don a pair of Whoopi Goldberg's smoldering crushed hexagons OR make her a person who is so aloof that she refuses to open her eyes. Let John Strider really, really commit to the beaglepuss. Et cetera
18 notes
·
View notes
Text
Half Doomed and Semi Sweet Collection - Leon S. Kennedy/James Sunderland
When Leon and James stumbled into each other in a backwater town of Spain, they didn’t realize how close they would become over a couple harrowing days together. After narrowly escaping with their lives, they discover how they can rebuild and grow together and find themselves finding peace and comfort neither of them thought they would ever have. There’s still more adventures for them both to experience and plenty of friends to make along the way, but in they end they’ll, hopefully, get their happily ever after.
Half Doomed and Semi Sweet Collection contains Promise, Pianissimo Epilogue, and @fly-rye‘s one shots in one easy location.
Promise and Pianissimo Epilogue - by me
One Shots by @fly-rye (Striderific on ao3)
#leon x james#leon s kennedy x james sunderland#james sunderland x leon s kennedy#kennderland#kenderland#resident evil#silent hill
11 notes
·
View notes
Text
partial striderification has occurred (hair needs a second bleaching)
0 notes
Text
How I make my Homestuck troll horns - Molding
Now, onto the first real step: molding!
Basically the one guideline I’ll be giving through the whole process is to take your time! Seriously! The molding process should take hours. It is, I think, the most touchy step of making horns, and thus more imperative that you be diligent in handling them! Fair warning: this is going to be very thorough. I apologize in advance for my near-Rose-level explication.
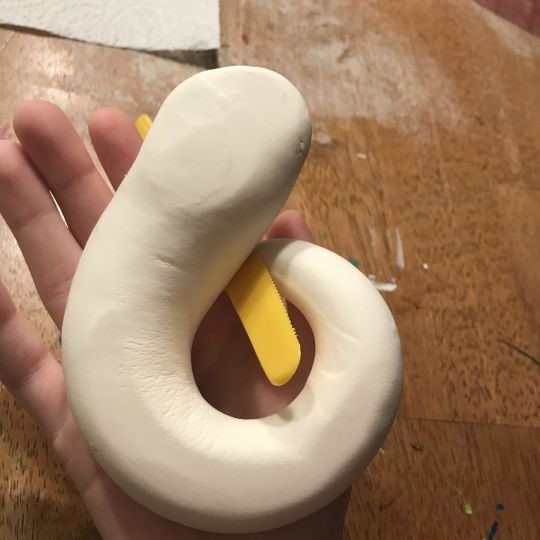
To begin, I equally bisected the package of model magic. Depending on which horns you’re trying to make, the entire package will probably be way too much. Though for this tutorial, I was making Megido horns, so the whole package was the perfect amount. Before you begin shaping anything, I think it’s helpful to get a sketch of your desired shape down. Of course, always keep up a photo reference of the character, but it helps to have an understanding of a 3-D model of the horns if they’re more complex in shape (like Aradia’s)!


You should shape both horns at the same time to make sure that they’re as symmetrical as possible. The usual process I use is to roll out the two segments into cones, that you could then use to curl (for Aradia) or bend (for Kanaya, Vriska, etc.) before adding the other segments like hooks. Of course, this doesn’t really work for horns like Karkat’s, which aren’t conical, and likely Tavros’ because of their size.

Make sure that the bases have a tilt so that they can naturally rest on your head without a gap, or poor placement.

Next, I got into shaping these cones into the general shape of the troll’s horn. This will take the bulk of the molding time, and it’s really important to pay close attention to how the horns are portrayed in proportion to the character’s face in canon! A common error I see is making horns too large for the cosplayer’s head. For example, Kanaya, Vriska, and Feferi horns are at most the length of your face. Karkat and Terezi horns should both be quite small, and Terezi’s shouldn’t be very long! Don’t just take my word for it, compare not just with the basic sprites, but with the talksprites, hero mode, and other canon depictions. (Pesterquest may help but considering that they’re more of a fan depiction... I don’t consider their appearances as entirely canon. But their detail can help if you’re stuck!)


Another common error I see is not taking enough of the horn’s curve into account, and making the horns too straight, or at the wrong angle off the head.
So take your time, as Model Magic is very delicate and it’s really frustrating at times when the smallest touches leave unsightly indents that change the whole shape :/. But the good news is that smaller indents like these can be buffed out in the sanding process.

Then, when it comes to more dynamic horn shapes, you may need an object to prop it “open” to let it dry somewhat in that shape before removing it when it solidifies over the next few days.
This isn’t shown in this tutorial given the horn type I picked, but when it comes to horns like Vriska and Kanaya’s, in my experience it’s best to make the base cone shape, form the curve, then add the extra shapes from there (instead of bending at the top or something) and do your best to smooth over the “seam” (sanding helps here a lot!). These little segments can be rather delicate and hard to nail the exact shape of (I hate it) (I believe in you <3).

It’s going to leave some marks, but don’t worry too much about it, especially if they aren’t in a visible location. The good thing about Model Magic is that it takes days to dry! This means that after the first day (the most crucial time for modeling), the clay dries enough to hold shape, but is still malleable enough to be adjusted and smoothed.


After you feel that you’ve gotten the best shape you can, you can replace the first item to prop with another, maybe softer item like wax paper (pictured, lol), or tissues.
This is where my tutorial demonstration differs from the usual horn construction; In most cases, the horns will need to be routinely flipped and smoothed/rounded to avoid one side getting too flat. This wasn’t a possibility for Aradia horns because of their shape. This also isn’t necessary for Karkat, Nepeta, or Terezi horns, because they can stand on their own on their bases. I have no experience with Eridan, Gamzee, or Tavros horns either, though I’d apply the same logic there as well. In this instance, I picked up the horns often to smooth them over before setting them back down. In most cases, it’s best to leave them as is for a while (usually I model them at night and smooth over in the morning) to let them solidify some to avoid damaging what progress you’ve already made.

Flat back >:(
After you feel that the horns are solid enough to pick up and check out (this may be overnight, or it could be a full day or couple days), make sure to compare their size and fit to your head.

Checking that the angle of viewing (pretty much the front) is desirable and the horns are the right size for my head.

It gets less daunting from here on out for the rest of the molding process. From now on, you’ll just have to check in every few hours (flipping, smoothing as you can) for the first couple days, then spacing it out further and further as time goes on. You can make slight curve adjustments as well, because remember that Model Magic is always relatively soft!
There isn’t much to delineate from here, but make sure that once the horns are quite solid, to prop them up onto another surface/object so that all sides can get air and it’ll expedite the (usually week-long for me) drying process somewhat and prevent flattening.


And now, onto sanding!
19 notes
·
View notes
Text

day 37
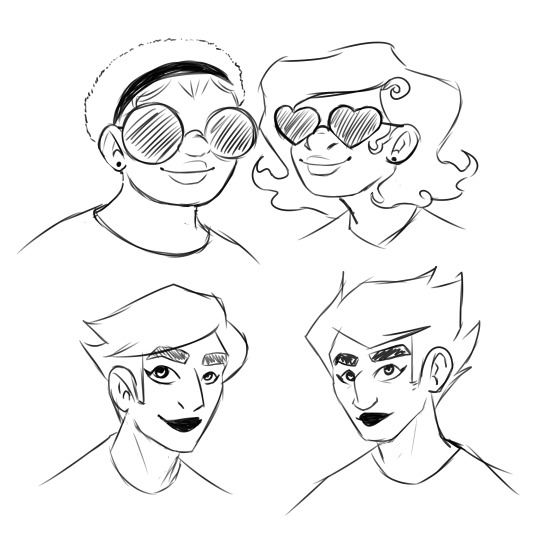
yknow we see art of the lalondes doing the sunglasses thing, like. Striderification. so rarely do i see the striders adopting the black lipstick and winged eyeliner.
i think we need to lalondify them more
#day 37#year 3#homestuck#rose lalonde#roxy lalonde#dave strider#dirk strider#its equality. family bonding.
212 notes
·
View notes
Text
[grits my teeth] I told myself I would not write an Angsty Gurathin Backstory I told myself I would not write an Angsty Gurathin Backstory I have ETHICAL OBJECTIONS to participating in the Dave Striderification of this man—
#Artemis rambles#Guess who is consumed with the desire to write a Fucked Up Angsty Gurathin Backstory
15 notes
·
View notes
Text
The Dave Striderification of one TommyInnit
5 notes
·
View notes
Text
So, at the end of lesson my driving instructor called me Dave (my name isn't Dave BTW)... and there was only one way I could think of responding...
AGGRESSIVELY GRABS SUNGLASSES AND SHOUTS "STRIDERIFICATION COMPLETE"
...my instructor now thinks I'm insane...
3 notes
·
View notes
Text
oops, i didn't get around to posting this forrrrr like three weeks lol. another james/leon one-shot for the half-doomed and semi-sweet collection <3
#james sunderland/leon s kennedy#leon s kennedy/james sunderland#kenderland#kennderland#i will just keep using both ship name spellings until the day i die i guess#this is soooo late but the adhd was kicking my ass hahaaa#also yes all of my titles are going to be fob lyrics. what of it
5 notes
·
View notes
Text
oh hey, i wrote something
the first of my leon/james one-shots based on the half-doomed and semi-sweet series that katie (@wanderingmoonmen) and I have been doing! (also the first thing i've ever posted to ao3, damn)
#katie: 'what if it was more angsty'#me: 'what if it was more horny'#leon s kennedy/james sunderland#kennderland#kenderland#is it one N or two Ns lol#not putting this in the main tags cuz im scared#i've got at least 5 or 6 more of these and am still writing lmao
6 notes
·
View notes
Text
more james/leon nonsense from yours truly <3
#my brain isn't working well enough to summarize properly rn#also yes i am making all these titles fob lyrics#what of it#leon s kennedy/james sunderland#kennderland#kenderland
2 notes
·
View notes
Note
Is the james/Leon fic still being worked on BTW? It's become a huge fave of mine. Ofc no rush! Ik life can be nuts!
Yes it is! I'll actually post the next chapter right now since I have some time before work :)
Striderific/fly-rye/Carley has been really busy with their last semester in college (and my job was /supposed/ to calm down last week but alas) so we got around to proofreading the next chapter yesterday.
Thank you for asking!!! I'm so glad you really like it!!! 😭
1 note
·
View note
Text
How I make my Homestuck troll horns - Mounting
Now to the epilogue (cursed term, now) of sorts. Mounting practices vary between on your wigs and other preferences, but this is what I’ve found to be the most durable, personally.
Essentially, I start with a headband, and while wearing it, mark with chalk on the top where I’d like the horns to lay. Then I’d drill holes through these marks, large enough to push a screw through. If the screw is loose, then add some hot glue!


I don’t have a picture of the marking process since I still had the headband from my last pair, but here’s how this first step should end up!
Next, carefully place the wig on top of the headband, making sure that the headband doesn’t slip or that it locks the wig into a weird horn placement. Then poke the screw through the wefts of the wig. It might be necessary to cut a small slit depending on the placement of the horns, if they hit a skin cap or something similar at the top. I’m using my ancient, retired Jade wig for this demonstration!

Then while the wig is on and secure, test out where you think the screws best situate the horns and poke a small hole into them using the screw. It can be hard to see whether one horn is further forward than the other while it’s on, so it can be helpful to take the headband/wig combo on and off a few times to see what really looks best.

This ended up being my general placement marker on the underside of these Aradia horns.
Model Magic is very soft, as I’d mentioned in the molding section, so all you need to do from here is to push the horns directly into the screw. Depending on your preference, you can glue the horns onto the screws with hot glue to make sure they don’t swing, or just leave them as is so you can swap wigs and such.

And here is how the final Aradia turned out!

And as this one’s edited to hell and everything, here’s some other finished examples with more common horns:


And that concludes everything I have to share for horn crafting. Again, thank you all!
18 notes
·
View notes