#SDFCtrollhorntut
Explore tagged Tumblr posts
Text
How I make my Homestuck troll horns - Molding
Now, onto the first real step: molding!
Basically the one guideline I’ll be giving through the whole process is to take your time! Seriously! The molding process should take hours. It is, I think, the most touchy step of making horns, and thus more imperative that you be diligent in handling them! Fair warning: this is going to be very thorough. I apologize in advance for my near-Rose-level explication.
To begin, I equally bisected the package of model magic. Depending on which horns you’re trying to make, the entire package will probably be way too much. Though for this tutorial, I was making Megido horns, so the whole package was the perfect amount. Before you begin shaping anything, I think it’s helpful to get a sketch of your desired shape down. Of course, always keep up a photo reference of the character, but it helps to have an understanding of a 3-D model of the horns if they’re more complex in shape (like Aradia’s)!


You should shape both horns at the same time to make sure that they’re as symmetrical as possible. The usual process I use is to roll out the two segments into cones, that you could then use to curl (for Aradia) or bend (for Kanaya, Vriska, etc.) before adding the other segments like hooks. Of course, this doesn’t really work for horns like Karkat’s, which aren’t conical, and likely Tavros’ because of their size.

Make sure that the bases have a tilt so that they can naturally rest on your head without a gap, or poor placement.

Next, I got into shaping these cones into the general shape of the troll’s horn. This will take the bulk of the molding time, and it’s really important to pay close attention to how the horns are portrayed in proportion to the character’s face in canon! A common error I see is making horns too large for the cosplayer’s head. For example, Kanaya, Vriska, and Feferi horns are at most the length of your face. Karkat and Terezi horns should both be quite small, and Terezi’s shouldn’t be very long! Don’t just take my word for it, compare not just with the basic sprites, but with the talksprites, hero mode, and other canon depictions. (Pesterquest may help but considering that they’re more of a fan depiction... I don’t consider their appearances as entirely canon. But their detail can help if you’re stuck!)
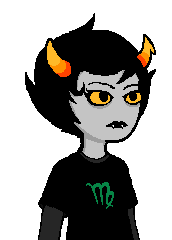
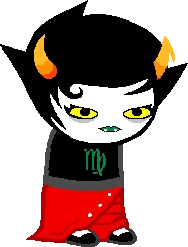
Another common error I see is not taking enough of the horn’s curve into account, and making the horns too straight, or at the wrong angle off the head.
So take your time, as Model Magic is very delicate and it’s really frustrating at times when the smallest touches leave unsightly indents that change the whole shape :/. But the good news is that smaller indents like these can be buffed out in the sanding process.

Then, when it comes to more dynamic horn shapes, you may need an object to prop it “open” to let it dry somewhat in that shape before removing it when it solidifies over the next few days.
This isn’t shown in this tutorial given the horn type I picked, but when it comes to horns like Vriska and Kanaya’s, in my experience it’s best to make the base cone shape, form the curve, then add the extra shapes from there (instead of bending at the top or something) and do your best to smooth over the “seam” (sanding helps here a lot!). These little segments can be rather delicate and hard to nail the exact shape of (I hate it) (I believe in you <3).

It’s going to leave some marks, but don’t worry too much about it, especially if they aren’t in a visible location. The good thing about Model Magic is that it takes days to dry! This means that after the first day (the most crucial time for modeling), the clay dries enough to hold shape, but is still malleable enough to be adjusted and smoothed.


After you feel that you’ve gotten the best shape you can, you can replace the first item to prop with another, maybe softer item like wax paper (pictured, lol), or tissues.
This is where my tutorial demonstration differs from the usual horn construction; In most cases, the horns will need to be routinely flipped and smoothed/rounded to avoid one side getting too flat. This wasn’t a possibility for Aradia horns because of their shape. This also isn’t necessary for Karkat, Nepeta, or Terezi horns, because they can stand on their own on their bases. I have no experience with Eridan, Gamzee, or Tavros horns either, though I’d apply the same logic there as well. In this instance, I picked up the horns often to smooth them over before setting them back down. In most cases, it’s best to leave them as is for a while (usually I model them at night and smooth over in the morning) to let them solidify some to avoid damaging what progress you’ve already made.
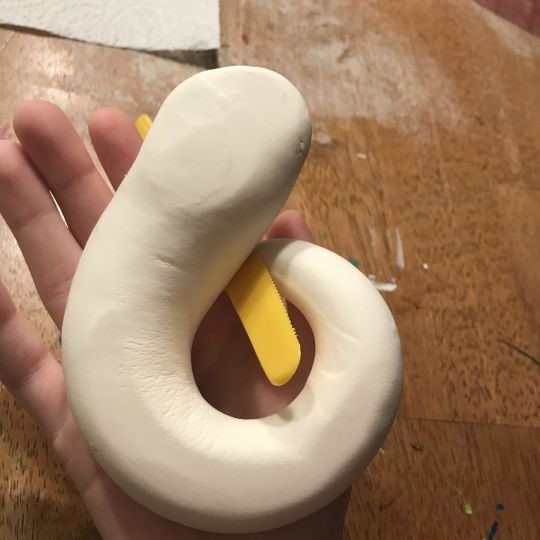
Flat back >:(
After you feel that the horns are solid enough to pick up and check out (this may be overnight, or it could be a full day or couple days), make sure to compare their size and fit to your head.

Checking that the angle of viewing (pretty much the front) is desirable and the horns are the right size for my head.

It gets less daunting from here on out for the rest of the molding process. From now on, you’ll just have to check in every few hours (flipping, smoothing as you can) for the first couple days, then spacing it out further and further as time goes on. You can make slight curve adjustments as well, because remember that Model Magic is always relatively soft!
There isn’t much to delineate from here, but make sure that once the horns are quite solid, to prop them up onto another surface/object so that all sides can get air and it’ll expedite the (usually week-long for me) drying process somewhat and prevent flattening.


And now, onto sanding!
19 notes
·
View notes
Text
How I make my Homestuck troll horns - Mounting
Now to the epilogue (cursed term, now) of sorts. Mounting practices vary between on your wigs and other preferences, but this is what I’ve found to be the most durable, personally.
Essentially, I start with a headband, and while wearing it, mark with chalk on the top where I’d like the horns to lay. Then I’d drill holes through these marks, large enough to push a screw through. If the screw is loose, then add some hot glue!


I don’t have a picture of the marking process since I still had the headband from my last pair, but here’s how this first step should end up!
Next, carefully place the wig on top of the headband, making sure that the headband doesn’t slip or that it locks the wig into a weird horn placement. Then poke the screw through the wefts of the wig. It might be necessary to cut a small slit depending on the placement of the horns, if they hit a skin cap or something similar at the top. I’m using my ancient, retired Jade wig for this demonstration!

Then while the wig is on and secure, test out where you think the screws best situate the horns and poke a small hole into them using the screw. It can be hard to see whether one horn is further forward than the other while it’s on, so it can be helpful to take the headband/wig combo on and off a few times to see what really looks best.

This ended up being my general placement marker on the underside of these Aradia horns.
Model Magic is very soft, as I’d mentioned in the molding section, so all you need to do from here is to push the horns directly into the screw. Depending on your preference, you can glue the horns onto the screws with hot glue to make sure they don’t swing, or just leave them as is so you can swap wigs and such.

And here is how the final Aradia turned out!

And as this one’s edited to hell and everything, here’s some other finished examples with more common horns:


And that concludes everything I have to share for horn crafting. Again, thank you all!
18 notes
·
View notes
Text
How I Make My Homestuck Troll Horns - Tutorial Introduction
Hello everyone! Thank you for looking this tutorial over.
A note before I begin:
All of these steps and tips are aimed at my personal aesthetic choice for troll horns. Since my number one priority in Homestuck cosplay is to render my costumes as indistinguishable from canon as possible, this tutorial deals with smooth, un-blended (color) horns. If you have the preference for textured or gradient horns, I can’t offer any guidance for you!
To begin: Supplies!
I use white Model Magic (modeling clay), 150 and 200 grit sandpaper, matte Mod Podge, and several shades of red, orange, and yellow paint (with white as well). While many crafters use foil to fill out a “core” for the horns, in my experience this has only led to much worse cracking than the horns without a core.


The sandpaper shown on the right here is too course, though I didn’t realize it until after I had begun sanding (I believe it was 100 grit, try for higher than that to avoid making the surface rougher).


Next up: Molding!
18 notes
·
View notes
Text
How I make my Homestuck troll horns - Painting
This is the last major step! The big whammy: painting.
It can also be the most daunting though (definitely not what causes me to avoid working on them for weeks). You’ll have to set aside a good chunk of time for this, it usually takes much longer than the molding to get it right. For me, the right coloring can make or break troll horns, and the exact hue is really hard to get right (it just takes a lot of time and anger. lmao).
Basically my advice boils down to about the same as the molding; stare at canon depictions of the horns while mixing paint, getting an understanding of the hue and value before committing it to the horns.
However, before all of that, I’d recommend adding a layer of matte Mod Podge. It seemed to make the paint I used less prone to soaking into the horns (necessitating additional layers), and smoother because it filled in the left over holes from sanding. Disclaimer here: My horns from years past did not have this, and the paint generally stayed fine. While my recent sets of horns that prompted the demand for this tutorial look much smoother, I can’t vouch for the longevity of the paint with such a step. Time will tell, and I’ll update if my horns appear to be suffering from the craft glue/finish under it.

For some reason, my photos of this step are corrupted, which is really unfortunate, but luckily it doesn’t take many visual cues to explain. After the Mod Podge is fully dried, you can sketch out lines where you think the sections of color will go. My general advice for this: most of the horns seem to have a general pattern of the lightest/top color having the most area. It’s not exactly in thirds!
Some examples:

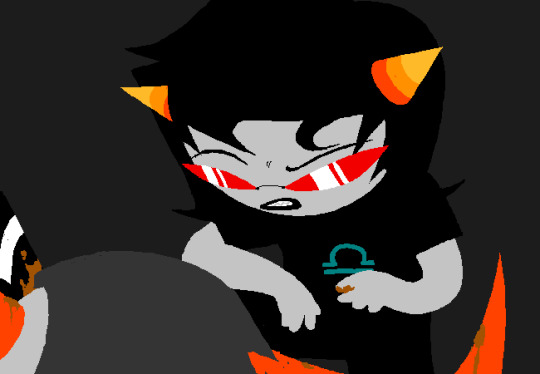

Once you think you have them adequately sectioned off (make sure to compare them with each other; the most important thing is consistency within your own design!), you can move on to mixing.
Let’s start with the troll color palette:
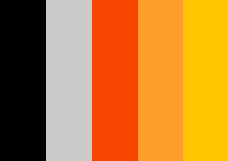
Some things I like to remember while coloring troll horns (for both art or cosplay):
The bottom two colors are fully saturated in a digital depiction, the lightest is offset somewhat with white. However, most “fully saturated” paint mixes for troll horns end up looking brighter than canon, somehow. I offset all three with white (not much).
All three colors are more orange than you would expect. This is the biggest one, for me. I see a lot of interpretations of the horns as “red, orange, yellow” when really they’re just red-orange, orange, and orange-yellow. (Some breakdowns of the colors from a basic color picker off google below)
While I’ve kind of relentlessly insisted on canon adherence, it’s more important to have the colors internally agreeable. In most cases, it’s hard to tell when they’re off if all three work well together and the other tips are kept in mind.
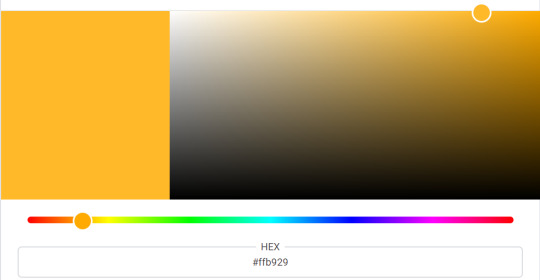

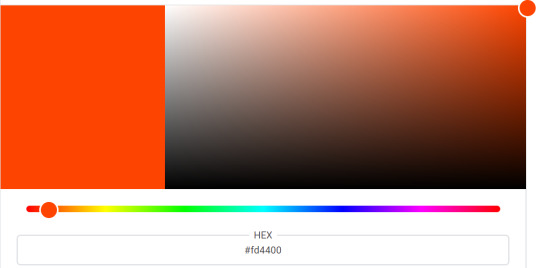
So after you think you have a good understanding of what colors to mix, try out some combos! This is what I started with for the red-orange and orange-yellow:

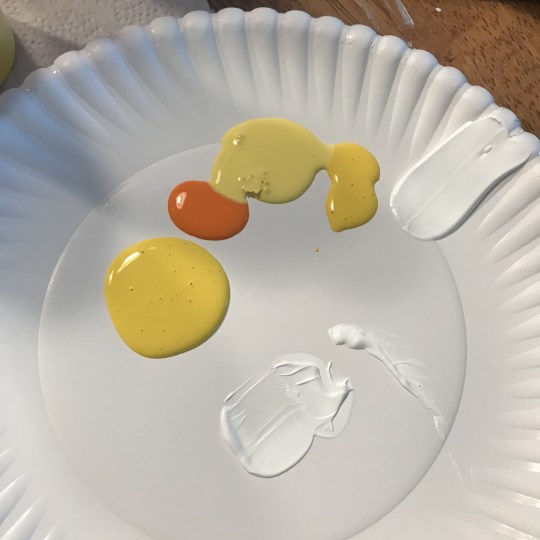
These mixes are certainly not what ended up being the final mix, but they were pretty close and only needed minor adjustments on my end. As you can probably tell, I have several paints for red, orange, and yellow, and I kind of mix them in here and there to prevent the color scheme from looking too “primary”.
Now, for me, with this latest attempt, I already had recent horns to compare back to, and I know that isn’t the case for most others. A general rule that I follow though is to have the “base” color as red, orange, and yellow, but add more orange to the red and yellow, and some yellow to both the red and orange. Then usually I will offset it with some white (sometimes the amount pictured, though more is typical too).
The general order I work in is bottom to top, or “darkest” to “lightest”. However, this process generally requires that you have all three shades at once and work on them in one sitting to be able to correct errors in your lines. It is also occurring to me now that you could use painting tape for this. Unfortunately, I’m stupid.

A mix for the middle color.

Since I had a former pair to compare back to, I used the base of one of my Kanaya horns to test my new mix. Again, I know this isn’t possible for others, but it may be helpful to see what the troll palette looks like off-screen, and wet vs. dry.

After deciding that the mix was satisfactory, I went through and painted the first couple layers of the bottom shade.

Letting that dry somewhat while still comparing it along the way with my former pair.
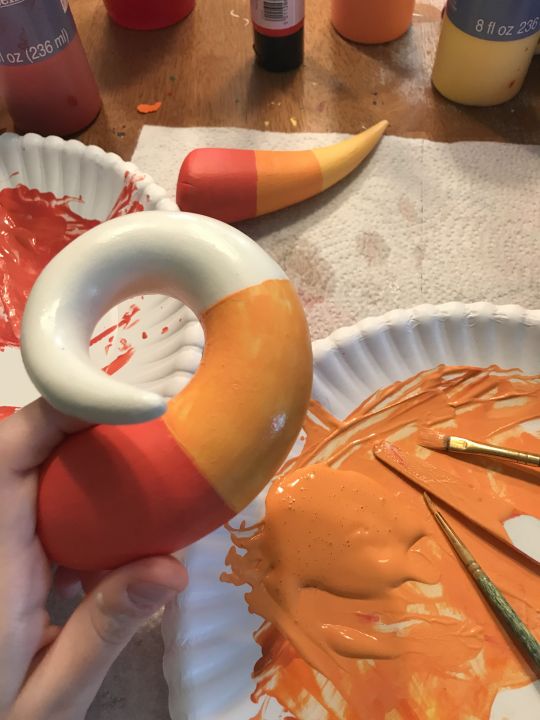
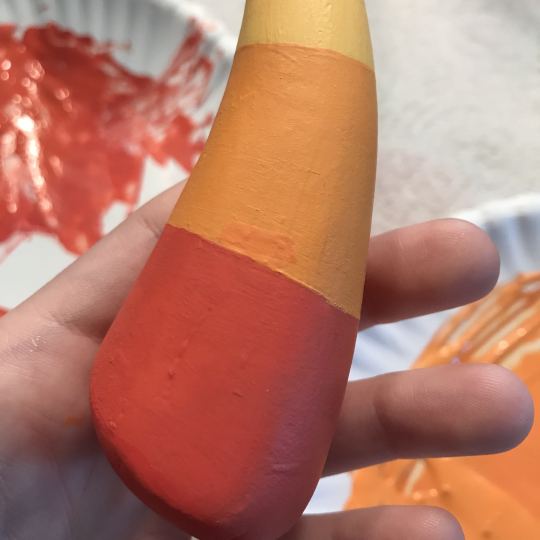
Comparing this mix to the last batch on the Kanaya horn.
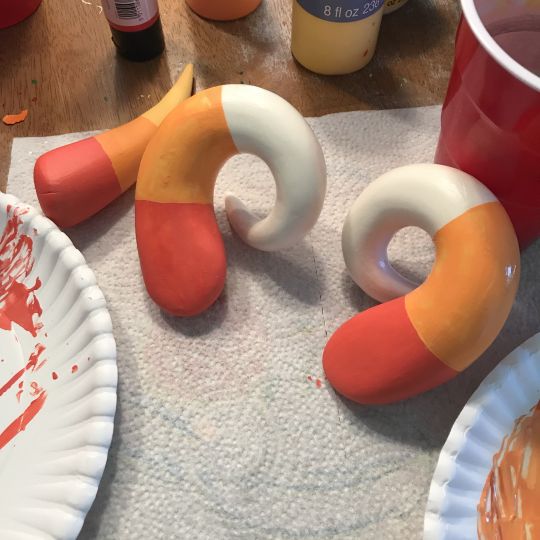

It’s probably common knowledge that all of them will need multiple layers, though for me it depended on which types of paint I had mixed for each color. In this case, I think the middle orange needed the most coats.
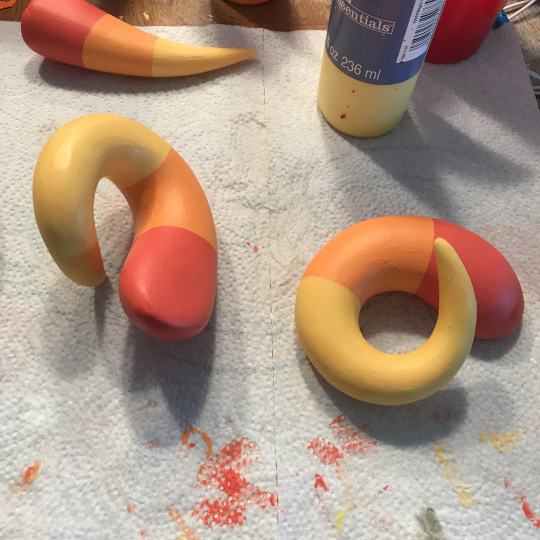
Drying the final product! It should be noted that canonically, the troll horns do not appear to have any shine. Even matte Mod Podge has a shine to it, and for that reason, I do not add anything further to seal on top of the paint. While this may possibly compromise the horns’ safety with time, I felt that as long as I take good care of them, it’s worth it to have a more accurate look.
And now, comparing the latest pair with my ones from a few years ago before declaring them finished:

These previous horns had a foil core, hence the large crack in the left horn, exposing the foil at the center there.
Mounting is an even more subjective step, but if you wanted to see how I wear them, continue on to the next step.
Up next: Mounting!
If not, then thank you so much for reading! Please let me know if I seemed to make a mistake in my explanations or neglected to mention something, and don’t hesitate to reach out if you have questions about my process. As a reminder, I’m not a final authority on anything, lol, I’m just some 19 year old cosplayer that’s just been doing this for over 6 years and there’s definitely people out there more experienced than me.
As always, I can be found on instagram under @striderification as well. As I only intend to use this tumblr for longer posts such as these, that is the best place to find me.
Again, thank you all! <3
14 notes
·
View notes
Text
How I make my Homestuck troll horns - Sanding
The next step: sanding!
For me, this is generally the least stressful step of the process, but it’s still important to get the details right for the look of the whole.

Again, I used pretty fine sandpaper, like 150 grit and above for this process. I made the mistake of using 100 grit to begin with, and it ended up with some of the surface being more rough. Try to work in circles to avoid leaving directional marks in the clay.

More “smooth” in terms of indents, rougher in texture.

The horns will likely have some wrinkles from being bent during modeling, but be careful about sanding these parts because (as pictured), they can just get more rough if you aren’t careful.


Here’s a comparison of the underside of the same horn before (above) and after (below) sanding. Sanding won’t eliminate all of the little holes and such, but this shouldn’t be much of a worry, especially since they can be filled in with Mod Podge in the next step!
There isn’t much to describe for this step, but one tip I’d have is that this is the step where you can really refine what the tips of your horns look like! If they were too dull during molding, then you can sharpen them now. If they also still have remnants of flattening, these can be smoothed out as well (which is usually the bulk of my sanding time, just ensuring that they are as round as possible).

The finished product of the sanding process!
Next: Painting (hoo boy)
7 notes
·
View notes