#stitch witchery
Explore tagged Tumblr posts
Text
THE SANQUHAR SCARF IS COMPLETE*

*minus sewing in the ends
#I'm very pleased with it but *god* I'm looking forward to knitting something else#my knitting 2025#stitch witchery#knitting
44 notes
·
View notes
Text
The single greatest thing about being a craft person is having other (presumably craft) people acknowledge my crafts in real life. In the checkout line over the last several days when I’ve been wearing my sweater around, several people have asked “Did you make that? It’s beautiful.” Yes. Yes I did. Allow me to preen like a bird in front of you and explain to you where you too can find the pattern and make your own. Would you like to talk about different needle brands next? Or how about how you too have had secret dreams of running away to run a goat farm with your queer platonic life partner? 
62 notes
·
View notes
Text
youtube
Nicole Rudolph made a buttonhole tutorial so go forth and learn how to sew buttonholes by hand from someone who is much better at them than I am.
64 notes
·
View notes
Text
"From Scratch" Quilting
Wanted any easy place to return to where I could showcase my quilting process, especially since I haven't made it to any quilt shows since COVID. So here it is!
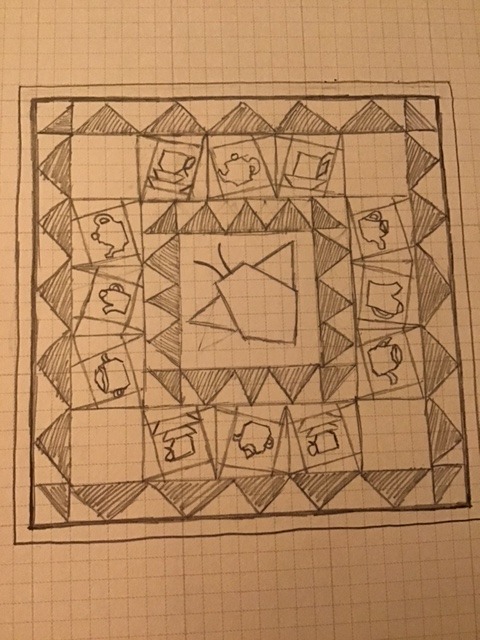
For my "Mad Hatter Tea" quilt, I worked with my comisionee to design a pattern that really fit the theme.

Then I went through fabric swatches, and added color. Obviously, we wanted this one to be very bright and colorful.
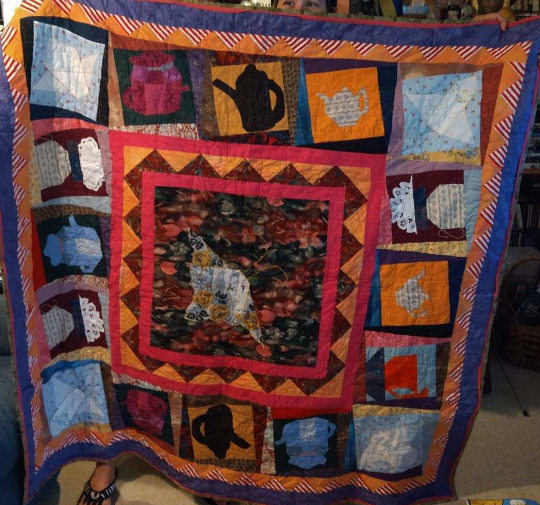
And here's the final result.
Other Quilts
These are some other quilts I've made in the past, though they use fewer techniques.
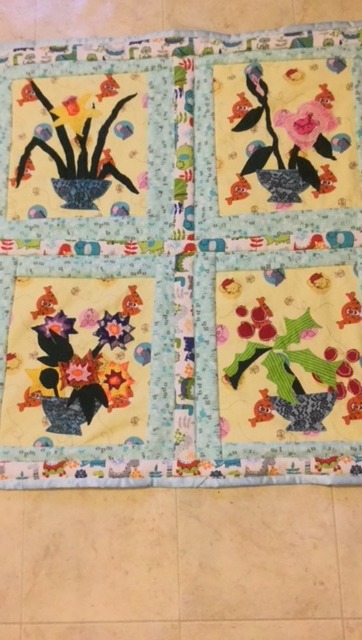


Simple Quilts
And these are some much simpler designs. This is the type of thing we usually include in our "sacred reading kit" giveaway on Reading Circle Temple.
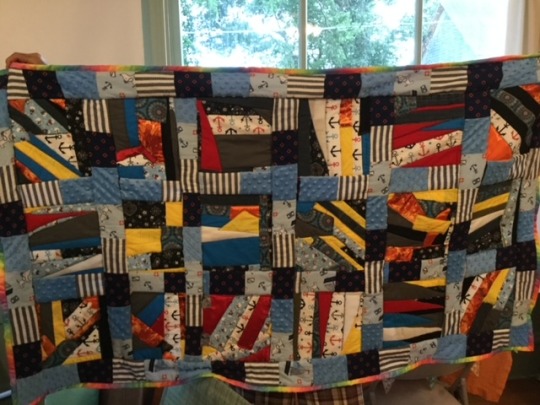
The so called "Crazy Quilt." No pattern at all, but a good way to use fabric scraps. (This is actually the first quilt I made!)

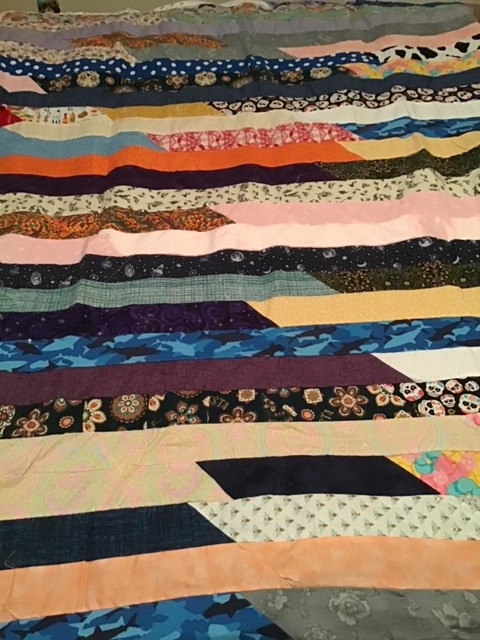
The "jelly roll quilt" (named after the rolls of strips you can buy in the store). Most quilters will be familiar with this very simple pattern.

And I had to show my friend my modeling the one I made for my husband.

And the hankie-butterfly quilt. This one is a common pattern too, with variation. You'll recognize I used this technique in the Mad Hatter Tea Party quilt as well.
Current Projects
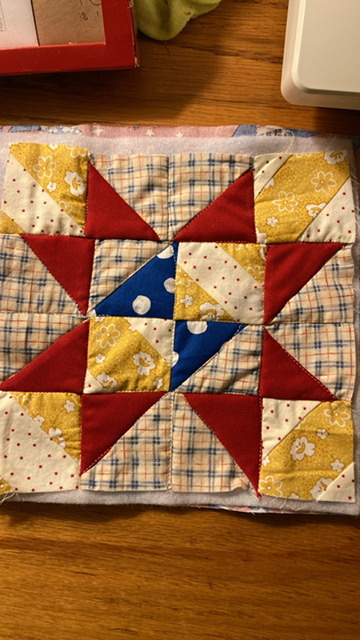
I'm currently in the process of finishing up a quilt-as-you-go that I'm titling "Red, White, and Moo." (I guess I should set a July 4 goal!)

Quiltography
I've also developed a hobby of quilting maps, which I will likely make into a larger quilt, once I have made enough.
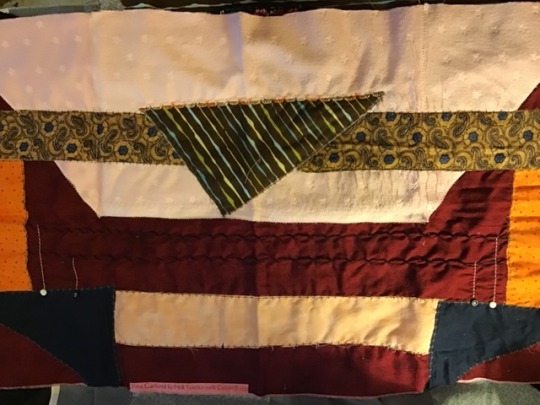
This is a top-down view of a theater stage. The black lines toward the bottom are the black curtains, and if you look closely, you can see lights embroidered at the top.
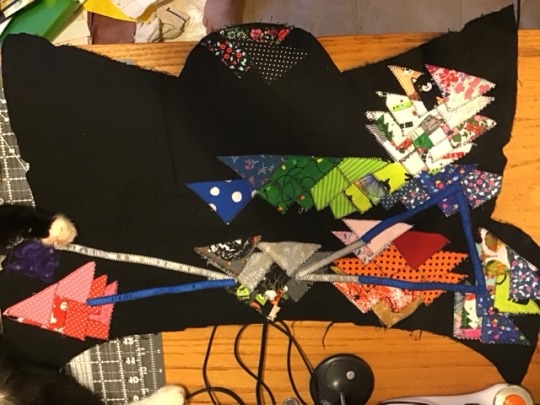
This is the tram system in one of my countries, which is a very mountainous area. Hopefully the cameo from my cat makes up for it being messy and upside down!
11 notes
·
View notes
Text
fun facts with Sahar, because no-one told me!
I line dry my family’s clothes as much as possible to save money (less electricity and less wear on the clothes), to sunbleach stains (two toddlers), and for the environment (less manufactured energy more wind and solar passive energy). In summer it also helps cool my home like a swamp cooler.
I installed a new laundry line with a fancy pulley system so I can hang while standing in one spot. The usual cotton rope I buy wasn’t available at the store, so I bought sisal rope - apparently more sun resistant, and it’s not plastic. I hung it on an overcast day. A week later, I had to tie a slip knot in it and pin it because it was too slack.
The next day, it rained.
Sisal swells in moisture.
The hook I used to hang my pulley was unhooked by the sheer tension and the whole thing collapsed in freshly forked dirt. Even untying the slip knot was not enough to rehook it. I installed a new hook and used some chained up carabiners to rectify.
So here is the proper way to install a laundry line, particularly for sisal:
Ensure the drill is drilling in (not out), and using a ladder or otherwise boosted drill a pilot hole with a screw shorter than your hook into a solid support. I used a fence post and a shed roof on a post.
Screw a heavy duty hook in to the support. Repeat between 20 and 100ft away with another pilot hole and hook.
Hook the pulley assembly onto the hook, then run the rope around it. Gently pull it to the other hook and repeat with a second pulley. Tie into a big loop using a square knot, so the tension on the knot pulls it tighter instead of loosening once you have weight on it.
Using split rings made into a chain, or a length of chain that can fit over the hook, attach a chain to the hole in the pulley assembly with a carabiner. I recommend about 18 inches of chain. This should be at the spot you intend to stand while hanging laundry. ALWAYS STORE ON THE LOOSEST CHAIN LINK.
On a particularly dry day, go out and loop the carabiner to the hook. Retie your laundry line to its tightest. Rehook at end of chain so there is lots of slack in case of high humidity.
When hanging laundry, unhook chain and rehook at appropriate chain link or carabiner for the day’s humidity to be taut but not overtight. Every item or three you hang on the line, attach a carabiner to the lines. This helps keep the two lines of the loop together instead of tightening the empty top and slackening the loaded bottom.
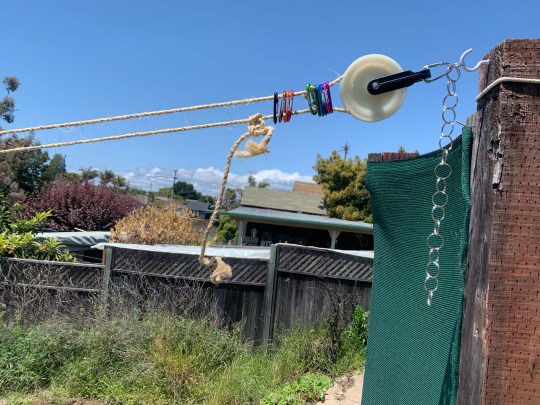
Empty line, ready to hang laundry.
Image description: a closeup of a plastic laundry pulley on a sunny day, parallel to a fence with scraggly bushes. Another house and blue sky is visible in the background. The pulley is looped with sisal rope tied in three square knots with a curled 8 inch tail. Close to the pulley are black, brown then red to purple carabiners in rainbow order. The pulley is attached to a silver carabiner, which is in turn looped onto a white plastic covered hook screwed in to a 4x4 wooden post. A chain of 18 metal split rings dangles from the carabiner. The line has a slight parabola but is clearly taut.

Empty laundry line, ready to hang.
Image description. The same laundry line, taught with a slight parabola, at a different angle. The viewer is looking at a simple square blue grey shed that has the other end of the laundry line hooked to the far left roof corner. From right to left in background are visible a bush blooming with dark purple flowers, five tall skinny cypress trees, the shed, a mass of overgrown wild radish and a yellow blooming succulent, oak trees in full dark foliage, and some empty garden beds. The sky is bright blue and cloudless.

The line at rest, ready for storage.
Image description. The same laundry line at the same angle looking at the shed. The chain is visibly hooked at the furthest end from the pulley so the line has a deep slack in it.
#thefifthacre#gardening#garden witch#garden#witchcraft#green witch#jewish magic#jewitch#stitch witch#stitch witchery#ecoconscious#enviromental#environmentally friendly#budget#cost savings#planet savings#save the planet#save the environment#solar punk#cottagecore#not actually cottagecore myself just poor and thrifty#thrifty
9 notes
·
View notes
Text
@jonaldronaldrolkientolkien
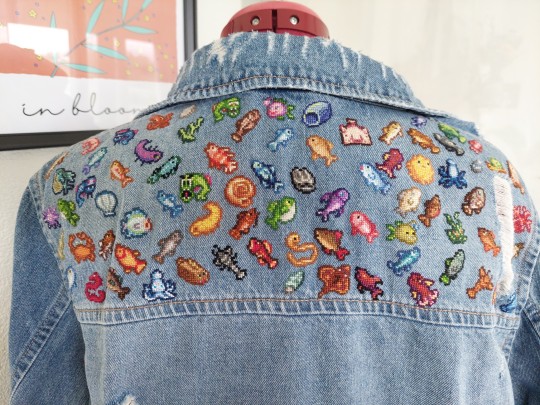
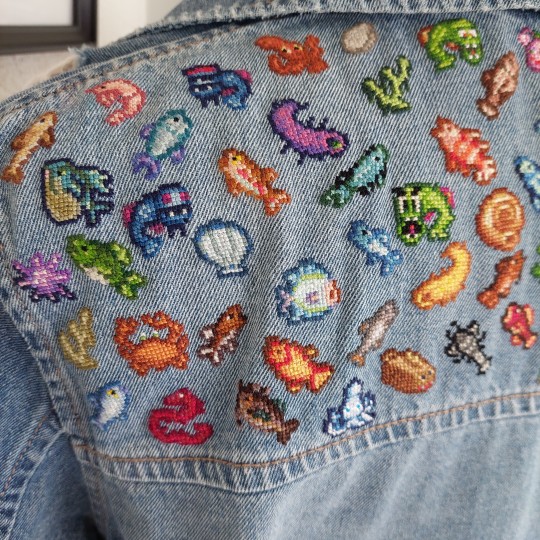
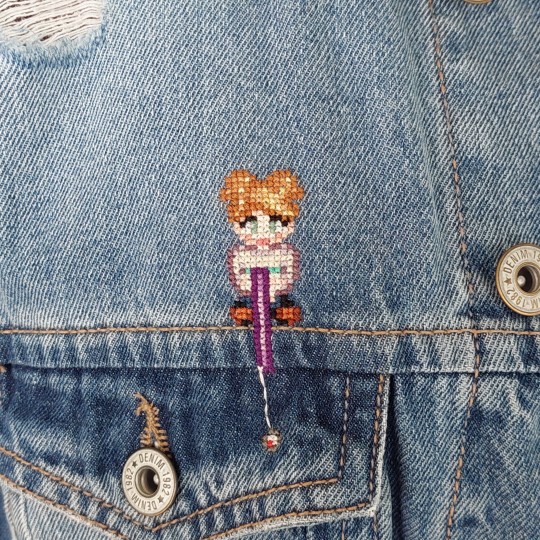
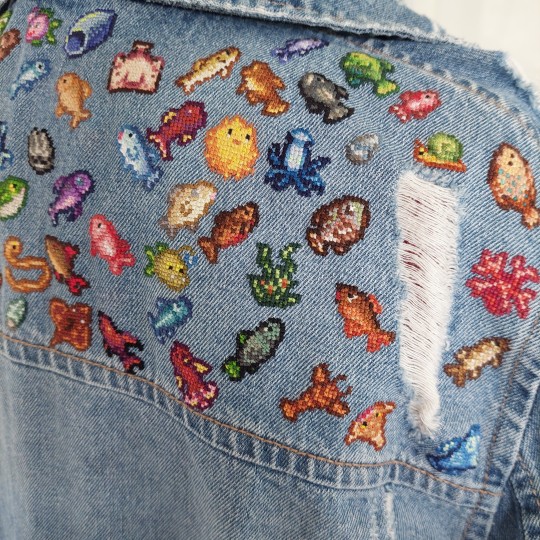
The Fish Jacket in all its glory!
I don't know what to say.. I started the jacket 10 months ago. What a journey! I'm so proud and happy!
Thanks for your lovely and kind words and the overwhelming interest! Happy stitching everyone.
40K notes
·
View notes
Text
The absolute vindication wanting a random sewing notion and not wanting to go to Joann’s and then finding in your stash an unopened vintage package of it, that you only bought because it was at a garage sale in a zip lock baggie with a bunch of other vintage bias tape and hem you bought, also for no real reason.
AND THEN you decide to also use the vintage bias tape!
10/10 crafting moment.
15 notes
·
View notes
Text
On Ravelry, I usually tag things by yarn weight and project type. Unfortunately, this means I have a vast number of favorited projects that are tagged “fingering socks,” “fingering shawl,” “fingering hat,” and last, but not least, “fingering gloves.” It sounds like I’m putting together a uniform for giving or receiving a little something something.
5 notes
·
View notes
Text
How to sew “French” seams (in french they’re known as English seams, so…) by hand!
It’s actually really straightforward, at least to me. You sew each seam twice, which is extremely annoying, but other than that it’s not actually difficult.
Some basic guidelines you’ll want to keep in mind:
french seams are best for light-medium weight fabrics. With heavy fabrics you’re better off binding the seam allowances with thin ribbon.
not great for dramatic curves but soft curves can be managed with a narrow allowance.
you will be doing a lot of running stitches. Having a beading needle can be helpful for this because you’ll be able to take more stitches in one pass.
narrower final seams look prettier but are more fragile. fabrics prone to fraying (dupioni, charmeuse, linen, loose wovens, etc) need a wider seam allowance than fabrics that resist fraying (crepe de chine, cotton voile, knits). I recommend 10mm seam allowance for fabrics that don’t fray too much, and 12mm for ones that fray more (trust me, the 2mm makes a difference).
you can french seam knits! By hand! Keep in mind that you will want to use a blunt needle, like a small size tapestry needle, and you must use a backstitch for any seams that need to stretch parallel to the seam.
If you are seaming something that needs to be hemmed, i recommend doing the hemming first, before sewing panels together. If facing or binding the hem, you can do that before or after.
Start by laying your pieces right sides out, wrong sides together. Pin (or baste) along the seam line. For french seams, it does really help to cut pieces out with exact seam allowance so that you can simply align the cut edges.
Stitch parallel to the edge and seam line, a couple millimeters shy of dead center, closer to the edge than the final seam line. It may help to trace the secondary sewing line onto the fabric. Use a running stitch for this unless seaming knits or other stretch fabrics along a seam that needs to stretch in the direction of the seam. If the direction of stretch is primarily perpendicular to the seam, go ahead and use a running stitch. This line of stitching will almost never be subjected to strain, so a finely spaced running stitch is all you need. You can also use lower quality thread for this if you don’t have a lot of the nice stuff.
Press the seam allowance to one side, then the other. Really pull the layers away from each other to get the crease as close to the stitching as possible. Hold the two panels wrong sides out, right sides together, with the raw edges trapped between.
Starting from the hemmed edge, if there is one, anchor your thread in the seam allowance and whipstitch the hemmed edges together at the seam line.
Stitch along the marked seam line, which should fall outside of the raw edge. If you didn’t offset the first line of stitching enough, you may find this difficult and end up having raw edges poking through. You can use a fine running stitch for seams that won’t take strain, and a backstitch for seams that need more strength. You should use stronger, nicer thread for this as well. I like running stitch for this especially because that means i can use one length of thread for the entire length of the seam. Backstitch uses approximately triple the length of the seam + a tail, which becomes extremely unwieldy with long skirt seams, for example.
I end the line of seam stitching with a few backstitches.
Press the seam allowance to one side and marvel at how tidy they look. If the garment is mirrored, make sure the seam on the other side is ironed the other way.
Pictures below bc tumblr isn’t letting me rearrange them on mobile for some reason:
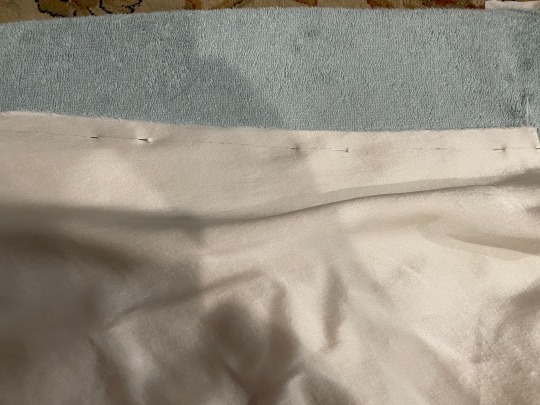


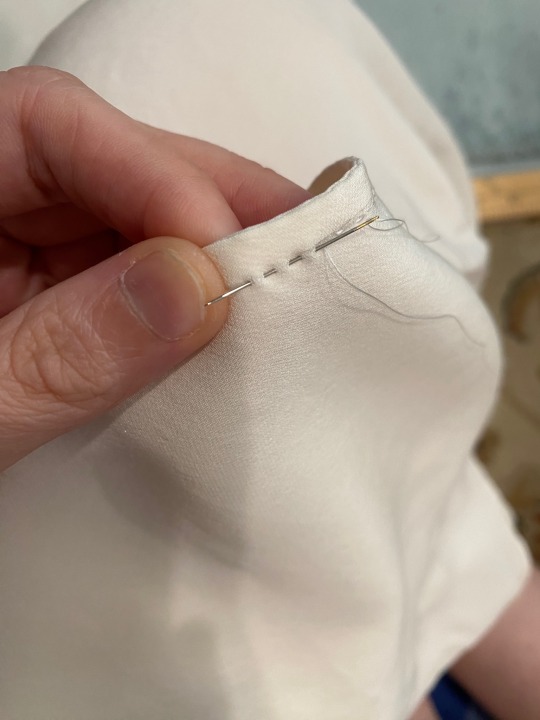

Last pic is showing a backstitched final seam. I only did that for the two side seams on the bodice because those are most likely to experience strain. All the skirt seams (6!!!) were running stitched.
In my experience, a french seam is one of the most comfortable seams to have against the skin. Ideal for shirts, fancy chemises, lingerie, etc.
I hope this explanation helped a bit! Truly the only thing you need to pay attention to is starting right sides out.
Go forth, make pretty slips and chemises!
16 notes
·
View notes
Text
Since it doesn't look like anyone else has added it, I want to say that he does also knit and the sweater he completed during the Olympics is... impressive
instagram

10 pounds says terfs start arguing men have an unfair advantage in knitting next
35K notes
·
View notes
Text
After I had this post on my dash, I kind of got obsessed with this.. (and screamed at @cephalopodvictorious about it)
But getting into this without some practice would be turning leather into trash, and that would make me sad.
So I went on the artists website and bought a very small pattern!
And today I went to the local leather shop and bought a bunch of stuff
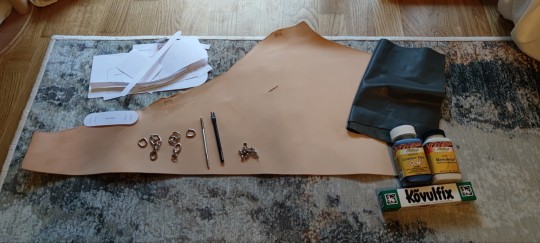
The tan one is und dyed cow hide and the grey is dyed lamb.
The cow is now dyed Petrol and I wait for it to dry 👀

207 notes
·
View notes
Text
I just saw another person on Instagram who did a dungeon master tango cosplay based on my design and on a cool pattern from wasyago and it was SUCH A COOL THING TO WAKE UP TO
The fact that y’all do irl stuff with things I’ve drawn, like cosplays or making “powered by redstone” stitch witchery is EXTREMELY cool and humbling 🥹🥹🥹🥹 THANK U SO MUCH
180 notes
·
View notes
Text
THIS IS A JACKS LORE DUMP. VERY, VERY LONG OVERDUE, JACKS LORE DUMP.
This is a certified out-of-character post (also, small irl update)
Jacks was born in the 1700s, specifically 1789, October 31. Jacks is one of the time displaced kids at Camp Half-Blood, and is still getting used to how to use devices. They were kinda confused when Leo [Valdez] handed them a talking brick that made beeps and music.
After one day, after getting claimed by Apollo, they ended up becoming a medical assistant in their village. They were amazing at healing people. Some called them a "healer." Other said they were a witch that immediately needed to be executed by cutting off their head.
They (they being the village, not Jacks) ended up deciding to go down the witchery path when Jacks healed someone's arm, which was mauled by a Lycaon disguised as a regular wolf, and reattaching the dude's arm back onto his body without stitches. Not the smartest move, but then again, the person who got mauled was Jacks's first (secret) boyfriend.
(Quick b-t-dubs, Jacks is descended from Erebus and Hephaestus)
So, when they strapped them to a log, surrounded by spears and tinder, Jacks wasn't sure what to do. They could control small amounts of fire due to being a descendant of Hephaestus, shadow travel because of Erebus, and heal themself if they needed a way to fake dying (somehow).
They decided the safest option was hiding in the Underworld, shadow travelling down there. When they shadow travelled into the underworld, they were immediately met with good news, and bad news.
Good News? There was no longer a bloodthirsty mob after them with flaming torches.
Bad News? They were stuck in Erebus's pocket dimension in the underworld.
Now, I'm not sure if you have been stuck in utter, and complete darkness from 1802 to 2021 (~219 years), stuck at 13 and not being able to think properly, going insane due to isolation for what felt like eternity. But for Jacks? They mentally and physically stayed the same age for years.
They never grew up, they were alone and afraid, forgotten by everyone else until they were able to escape (somehow, idk, I'm working out the details on that as we speak).
When they managed to get out, Nyx and Erebus decided to have Mercy on Jacks, giving them a bracelet that transformed into a small, beaded bracelet, where if you snapped off a bead, the bracelet would transform into a Stygian Iron sickle, kinda like those farmer ones where you can hold it in one hand.
Not that it helped Jacks's situation, but at least they had a weapon to protect themself from everything around them.
Fast forward a few months, specifically a month (and a day) before their birthday, they make it to the rumored Camp Half-Blood. They've heard of it during school at some point through myths and rumors. Also, supposedly George Washington was a demigod, but they never taught that in their school (the teachers were so uncool for that tbh).
When they got there, a teen, around the same age as them, with vitiligo and pink hair. He introduced Jacks to Chiron, and showed Jacks around camp, then introduced himself as Tyler (if you followed my blog for a bit, you know where this is going ;] ).
Tyler was a cool, awesome son of Demeter, descended from Aphrodite (his grandma's side). Jacks was from Pennsylvania and Tyler was from Canada. The two weren't too different either. Jacks, inevitably, started developing feelings for Tyler. Though the feelings were small, and sometimes went away completely, Jacks really wanted to date Tyler.
Tyler ended up asking Jacks out two years after they met, and have been happily dating ever since.
Jacks was afraid of the dark, because of the shadow dimension in the underworld, so Tyler made Jacks a candle that would never go out or melt so Jacks would never be in the dark ever again.
Present day, Jacks spend their time with their friends Nico, Percy, Thalia, Jason, Hazel, Annabeth, Magnus, Toast n' Donut (yes, they're frogs, again, idc), Koi, Xea, Tyson, Ella, Mrs. O'Leary (dogs count, idc), Leo, Will, Hilal Khalil, Tyler, and his adoptive parents Davey M[atten]. Red and John H[arriet]. Red
If you read this far, holy crabs do you have a large attentions span. Either that or you're a nerd like me :) (or you're one of my mooties)
I love y'all (platonically), be safe, and I'll try to upload more often every other weekend. I have school stuff and I'll try to post around 6-7 A.M. EST. Also, thank you for tagging me in stuff on both of my accounts ( @ghostkingdiangelo) and this account. I'll catch up on all mah schtuff soon.
Thanks for reading again!
@bright-side-of-the-moon
#Jackson Blackburn#Tyler Rosemary#Davey Matten Red#John Harriet Red#Ella the Harpy#Tyson#Will Solace#Thalia Grace#Jason Grace#Hazel Levesque#Annabeth Chase#Percy Jackson#Magnus Chase#Hilal Khalil#Toast and Donut#Mrs. O'Leary#Xea#Koi (the person not the fish)#Info dump on character lore#sorry for tha yappathon#again.#I get very passionate talking abt Jacks#there's entire lore that I haven't even touched yet#Am I done? Nope. Will there be contradictions and confusing plotlines in the future? Yep.#All good story tellers have to backtrack at *least* thrity times so the changes you made can make sense#I love my two gay bois sm#Jacks and Tyler were#Quite literally made for each other#I missed doing this (for almost a week now? maybe more)
6 notes
·
View notes
Text
And the Flame Bit My Hands (Joan of Arc x Archangel Michael One Shot)

They will ask what her burden was, this Arc of the Covenant you pressed to her shoulders like your Father pressing the vintage of his wrath, grinding stars down to wine, oh sweet Michael. Long after she is dust bread of dead, and her ashes are cast out to the four corners of the universe, each black hole fed a bit of her blood, and you wonder, why am I, the Prince of Heaven, such a shit poet, and why can I not capture the elusiveness of my star girl, whose heart I shoved my burning fist into and twisted until she belonged to me?
Michael, you have had an eternity to practice your poetry, but you still soliloquize like the Devil, your prose is purple, and your madrigal cannot be captured by baby's breath or widow's sighs or a million angels dancing on the head of her cotillion school hairpin.
So foolish in love are angels, and the first time around, your girl died in fire, so perhaps you will be gentler this time. This is what you think when she is born, a quick one-hour labor, to mundane parents, in a mundane neighborhood, but really it is the seat of the power of the world, bubbling with pagan magic you would like to snuff out in their heresy. You remember driving your burning sword through the hearts of the false gods, and your anointed daughter of God, she will go astray from Christendom, will run away from High Church screaming, into the arms of the gods of the earth and waters, and her songs are pagan and miraculous in witchery.
This time, Joan is just misled, just plain Jane, plain Joanne, blonde hair not pageboy but long, and as she is cradled in her crib, you play her angel songs in Hebrew on your guitar, a tune of B’shem H’shem: Michael before me, Gabriel behind me, Raphael to my left, Uriel to my right, by the grace of God.
The first Joan you tested, this Joan you bathe in pleasure. Every girl is a Joan, a Maid of Orleans, and every woman is long-suffering for some cause or another. She is just a young girl, and so you cherish and spoil her, barely in the sixth grade, and though she mistakes your reprimands for hate, you love her dearly.
You feed this Joan silver pears and the flesh of a cormorant. The flesh of a dove. Your flesh. She doesn't remember what magical bird in her mythology books bled for its young as it pecked its breast (was it the almighty albatross? Or the fearless pelican?), but as you are plucking your feathers and sautéing your wings (they grow back, there is no shame in feeding your little martyr your divine providence) in a light white wine with a tad bit of olive oil and rosemary, she asks you, Michael, each time I eat you, am I becoming an angel?
You will tell her she already is, more holy than even you, for the youth are her country America's beating red white and blue heart. She eats the gristle and fat of your meat, and she becomes lit with holy fire.
I want to be President someday, she says at thirteen in civics class, and you stifle a laugh as you sit on her right shoulder, miniature, invisible. Hers is the path of magic and moonlight, of madness and mental wards and that holy bastion of the military, and she will mother your line, matriarch of your legacy, for you have not had children before, but the children of the Prince of Heaven are Messiahs, and in this Age of the Internet, of Germs, Guns, and Glory, the heathen, wicked masses are in desperate need of saviors. So much that they come from the womb of a witch, the breast of a black hearted nonbeliever. Her black heart is not her fault, Scapegoats are Eve and Yeshua and Mary Magdalene, Cain and Azazel and Lucifer, holy and unholy in turn, and you too suffer for the masses, carrying the weight of the prayers and despairs of saint and sinner alike.
Your teeth are not teeth but blades, your wings are revolving mysteries of scripture stitched together by the prayers of billions, pages upon page of white down shredded with syllables, and your skin is manna, no wait, it's a metaphor, no wait, your body is the Lion of Judah, and you are musk and muscle and wicked, jagged claws. When she goes to her first high school dance, you are nothing of the fierce Beast of God, nothing of the Divine Prince of Life, no, you squeeze yourself into a mundane vessel, a Walker, the angels call you, those that take human form, and you lead Joan in a slow dance to some late 2000s croon, and you marvel at how much you hate pop music. All music is of the Lord, but then again, a billion of your believers should think music is a sin, dear Mikhail, so there is that. Cat Stevens wrote the best music of the 20th century, but then he found Allah (blessed be your Father's name), called himself Yusuf Islam, and fell into the silence of the radiant Deep.
Your Joan, she sings along to the saccharine bland pop number, about bubblegum kisses and lip gloss like stars, and it's a soc hop, didn't you know, Michael, so shuck off your shoes, Joan says. You have on sneakers, different from your usual leather sandals (you have had a hard time upgrading your fashion over the millenia), so next on the high school DJ's list is Build Me Up Buttercup, and you find yourself carrying Joan out of the sweaty gym and up into the mist of the Milky Way in your fractal speed of light arms, sick of feigning a young man, all might of the majestic multitudes and heart of bloody stars.
Where are we? she asks, timid but brave, and she is so tiny in your palm, microscopic, a womb and a tomb, a vessel for the Lord, a vassal and lady knight who will slay not with sword as long ago in her first iteration, but this time with the ink of a pen, her black blood like your book wings, and you are hair of flames and eyes of supernovas and mouths of molten lava, thousand armed, or is it a million or a billion or a trillion or a quadrillion armed - oh, you give up counting, what matter is endless infinity? - and she is dancing in your palm, like that song you like by Elton John, and she is laughing as quetzalcoatls and dragons swim the by through the radiance of fantasy realms, between what is and will be, and boats of space pirates and corsairs of aliens skim the waters of space, and you say, This is the most remote place in the Multiverse, where the seas of space and time and chaos collude in channels and swells, where supernova whales that span galaxies fall to form new life a million times over, and it is a place I have dreamed of taking you, Joan. You are fourteen, you are no longer a girl, and I am sick of waiting.
Your void mouth is burning. Your blade teeth are crying ichor. Your nostrils flare with plasma, and you lean down to kiss her, forcing yourself to her size, to hold her in your arms in human size whilst you are also holding the multiverse upon multiverses in your palms, and Joan meets your lips with a shy fluttering, but you want to taste her blood, so you bite her lip softly with such suppressed thirst, and she is iron and decaying telomeres, but also the grit of martyrdom, the Kingdom of Christ, but you are the closest thing to Christ here, so really you are tasting yourself.
What is love but to see yourself reflected in a different iteration back through something so precious to you, she is your own limb? Joan is the Ark, the one to carry all life to the harbors of New Jerusalem after you have drunk your fill of Apocalyptic Fury, at least, that was your plan.
Kissing her, you think, maybe I can give Earth, give this backwater hedonistic planet, another million years, and we can have a million children in between, for you have always wanted children, and we can have a million of her lives and high school dances and songs of silence and buttercups in between, and a million first kisses, is that how it works, you wonder?
Michael, you keep putting off the inevitable, but you are a creature of passion, so you set the Doomsday Clock back once more, and Joan is none the wiser.
Burning her at the stake broke your heart, and you have been trying to make it up to her ever since.
You have heard that girls like flowers.
You will bring her some roses, you will create for her a new bloom that combines the color of dreams with the smell of blue, you will name her and curse her and scream regret as she dies.
She always dies, you never die, and you envy her.
For every millionth beginning, the Kali Yuga demands a new Golden Age, the Year of the Crow and White Buffalo Woman come calling, Ragnarok passes and Liefrahser and Lief summon Necessity, and fuck, she is speaking in tongues, trying to teach you cadence, rhythm, and metaphor, but you wrote psalms, and you planted gardens, and this teenage Joan is a fiery spit of rebellious rage, as all teenagers are, and now she is sixteen, and she is writing. Always writing. Bad poetry, good poetry, stories about her enemy, stories about her lover, but often, she mixes up the two.
You read her stories and offer no critique, only praise. The Devil is the Poet, the Angel is the Proofreader, and Heaven has no Edit button, for the Word is the Law.
That's a fancy way of saying she has a long way to go before she can lead the Crusade with her keyboard. A keyboard warrior. She only recently retired writing quizzes and fanfiction, and she adores vampires and fairies, and for however much you blatantly thrust Christendom in her face, she runs off to throw spears with Athena and parties underage at bars with Loki. Joan was always a girl of the fields, a shepherdess, and to be pagan is to be a backwater farmer, a country, nature-bound creature of passion, and was not Krishna Gopal? Krishna is much more your speed than Shiva, but Krishna has much more experience with girls than you, so you ask him over wine, my dear blue friend, what did you do with the women of the fields?
I had a thousand brides, my brother. All the cowherds were mine. You cannot own a woman, just like I Krishna, I Vishnu, do not own Lakshmi, cannot tame Radha, women are wild, she created you, did Joan not? A fiery peasant girl who dreamed of an angel of flame.
You swill your wine, but the taste is bitter at the thought you cannot own this girl, cannot claim her, so you spit it out onto the ground and brier roses grow from the soil of Purgatory.
I will have her, every inch of her will know my Love, my Life, and in the end, I will save her from herself. I have claimed her. She is God's, and I am God, so she is Mine. Through her, I will save All.
Krishna laughs. You angels, always dealing in heaven and hellfire and ultimatums. Michael, can you ever take a night off? Perhaps watch some movies and learn the heart of a woman.
I am genderless, Krishna. I do not understand women. Angels have no conception of man or woman, only want, and I want Joan.
Krishna shrugs and his mouth is a swan. Then make love to her, woo her, write her poetry.
I am not a good poet, I created her to be the poetic one. That is my new campaign idea - the written word as conquest.
Writers always turn on their muses, Michael. Look at the Mahabharata. You think I intended for that mess and beauty? It happened organically, just as love does.
Have the rest of the wine, Krishna. I am preoccupied.
Michael flies to the Outer Rim. There are many Outer Rims. He is a million armed, a trillion armed, a quintillion - never mind. He writes infinite poems with his infinite arms, trying to capture his emotions for Joan.
They all turn up trite as shit.
He balls each flaming Hebrew poem into his infinite fists and tosses them into the Void.
I will have to think of something else.
Joan is eighteen, and it is moving day at her new college. Michael crams his body into a sophomore philosophy major and helps her move boxes of makeup. Why do girls have so much makeup? Michael never knows.
I love you, Joan, he says as they sit on her old dorm bed. She got a single room, no roommate, the better to concentrate on her vampire stories. She is still in the genre stage.
I know, I love you too, Joan says, taking Michael's flesh but not flesh hand, for a Walker's body is a metaphor.
He traces her jaw. He threads his fingers through her hair. He speaks her name in a million alien languages. He sings to her. He is good at singing. He sings Wild World by Cat Stevens. Cat Stevens is the surefire way to win her over. Her favorite movie is Harold and Maude, after all.
Come with me, he says, stepping out of his human body and into formlessness, into allegory, into nightmare and fallacy and a thousand broken promises and a body of tears.
Joan is frightened. Why are you sad?
Because you are a witch. Because you are my poem, but I cannot write poetry. Because I love you.
He scoops her up into his mouth and swallows her whole. Joan is etched in his heart, in his bloodstream, and he spits her back out wet blonde hair and pink flesh into the lap of the throne of God. It is his throne. God is Him, and Michael is Christ, and that is Heresy, but that is the Truth of Things. For he is the closest to God, after all, humans can fathom. And that tells a thousand tales.
I do not think that is how humans make love? Michael ponders.
No, that was a shamanic death rebirth cannibalism thing, Joan laughs, dancing in one, only a singular one, of his palms, his infinite hands, but it is his favorite hand because she is in it. Be the albatross, dear Michael. Blood from the heart.
He stabs himself with his flaming sword, and his blood flows gold and she swims through it. She drinks the sea of him, and he enters her stomach, and then he swims through her blood, into her lungs, and she is choking on his feathers and gore. They dance as bones alone, then become skyscrapers in December in Manhattan, and suddenly they are a pair of wolves.
They mix and match, red and blue, cat and dog, X and O, cross and nail. They are still dancing when finally, she tires, and bares her sex, but really it is her heart, but really it is her seeds, and he seeks home in such a tiny abode, such a fraction of a molecule to one as mighty as him, and he eats her pomegranate with a tongue of silver, and he kisses and cuts and bleeds with her, but really they are on a pyre, alight, and the flames are ink, and Michael is trapped in her pen.
Sweet Joan, you will be the Daughter of Zion, the Watchtower, the Heavenly Kingdom, the Mother of All Nations and Matriarch of Israel. All because you are my poem.
He breathes the words into her brain.
She laughs. I am wild, and I am witch, and I am the quivering flame and rushing wind, and all I will be is your girl.
That leads to greater things. We have destiny, obligations, duty. Your Word is the Word of God, Joan.
Then you are my greatest work, Michael. God bless the day I created you.
Father bless the day I created you, sweet Joan.
The pyre of Michael incinerates Joan's Ark. The Covenant's birth water flood water breaks, and the world is drowned, but you would never know it, for all it causes is a single raindrop from that far off in the burgeoning hideaway of infinity, and a butterfly wing flaps, and thus girls are God, and God is just a girl.
#archangel michael#joan of arc#smut#romantasy#urban fantasy#one shot#catholicism#lives of saints#this is so old holy shit I wrote this when I was like#seventeen or eighteen#and i'm almost 32#time flies when you write bible crackships
4 notes
·
View notes
Text


join me on a journey of gay audacity, stitch witchery, and likely a lot of hubris as i attempt to turn these two old bedsheets into a chappell roan inspired look for kentuckiana pride!
step one: COLOR
4 notes
·
View notes
Text
For all closeted witches: I feel your pain, here’s my attempt to help you guys out
Whenever I first started practicing, I was kinda all over the place, just looking for anything I could do that would get the job done but be discrete enough. There are tons of good videos on ways to make secret altars and little ways here and there to do hidden spells, and those are good sources and good things to do, but here are some specific types of witchcraft you can do that don’t look like magic at all:
1.Art magic
Not only is it really easy to get away with as it is literally just making art with magic/ magical intent fused into it, but there are so many things that this covers. Any form of art is acceptable, so not just drawing, but sculpting as well, and things that fit under this umbrella are even music magic and knot magic. Knot magic is infusing your intent or spell into every knot or stitch and can include crochet, embroidery, macrame, hand sewing, knitting, and rope bracelets. Music magic is using music that you either play on your phone or on an instrument to cast your spell or cleanse your space. If you do use an instrument or even sing, write your spells in song form and say the words in your head. It doesn’t even have to be original- just take the melody of an existing song that you either really like or has something to do with your spell and rewrite the words to suit your needs.
2. Kitchen witchery and/or herbalism (/plant magic)
Literally just get into gardening and grow plants and flowers that you pick and use in spells. Or work with the spirits of what you plant. Or both. And if you wanna go further, get into cooking so you can plant herbs in your garden, and use them in kitchen witchery. And you don’t really even need an herb garden if you wanna just do kitchen magic, just use what you have and buy the dried versions of the herbs you need as you go on.
3. Energy witchcraft
You’ll also hear this called energy work, but it’s a form of witchcraft that’s entirely invisible. It is completely built upon the manipulation and usage of your own energy and the energies around you. I’m not the best at explaining things but look up “Ivy the Occultist” on YouTube and watch everything she has about energy manipulation and her video on how to cast a spell and you’re good to go so long as you regularly practice. If you can hide books and your purchases from your parents, I recommend a book called “Psychic Witch” by Mat Auryn. I haven’t been able to read it myself but I’ve heard good things from the witchy YouTubers I trust and it has a lot to do with mental magic
4. Tech magic
This ones kinda difficult to work with, as a lot of it feels more like things we can use as an add on or guide to our practice rather than actual means to cast spells or whatnot, but there are a few things I’ve been trying out or a little while. First, if you can’t have an obvious tarot app, find this app called #SelfCare. It brands itself as a mental mindfulness app, and a lot of it is, but theres also a tarot feature that allows you one card pull a day along with its reversal and tells you what it means. There’s also this flower that you spend like twenty seconds growing and then this other thing where you take clouds away from the moon, and both these features could work as an oracle of sorts. There’s even a candle where you can set intentions with a bay leaf. Charge the app the way you would a real life tool or charge each feature individually, and you’re good to go. I also use another candle app with different colors, and a wedding bouquet maker if I want to use just flowers in a spell. Got Minecraft or some similar alternative? Make your altar in there. Cast your spells in there. There’s a ton of plants and crystals to work with, and even bones. Hell, give the spiders eye a correspondent. Go feral. An alternative to that is setting up your spell in a collage in whatever way best suits you, and whenever you do the thing where you double click your phone button and swipe up to completely close the tab, make that symbolize you sending that spell to the universe or a god or goddess. Use the shit outta emoji spells and send them off the same way. You can even make a summoning circle your notes app, they just won’t be as powerful as irl ones (but only by a little).
5. Glamour magic
Last one I swear. Glamour magic is most commonly used to alter the way one is perceived by others. It’s used a lot by people who need to come off really well to others in their day to day lives, but some parts can be used as cleansing. I’m starting to lose stamina but just look up “The Witch of Wonderlust” and “Chaotic Witch Aunt”’s videos on it and you’ll be good to go.
Misc tips
I lied there’s a little bit more:
Cleanse and charge all your jewelry with whatever intent you desire. If you find you’re very sensitive to other peoples energies, consider making your favorite piece a protection charm.
Get really into crystals. Just say they look really pretty and want them as room decor or even get a bunch of jewelry with them. Even ones that are actually just plastic or glass will work so long as you’re sure to cleanse and charge it with intent
Light candles. There are tons of uses for candles, and I once again recommend researching this on your own
Make sigils and hide them in places you know no one will look or in pen barrels if you write to manifest
BATH/SHOWER MAGIC. I love it so much. And if you live in Louisiana near Lafayette, go to the farmers market by that strip mall that has Twins (the burger place) and the old bowling alley and a few other places and pick up some epsom salt it is homemade and DIVINE. You don’t even need that tho- just imagine all the spiritual gunk from the day washing off you or chant a cleansing mantra
If you can, make moon water or sun water but make sun water SAFELY
If your home is hella catholic, use that. Use the rosaries and those little things you pin on the sun blockers in your car and any religious things you may own to your own magical advantage. Use prayers as spells. Find “Chaotic Witch Aunt”s video on Christianity and witchcraft and it will all make sense but in short: you don’t have to reach out to any of the Christian entities, you can simply use the power those things have to your advantage.
That’s all I’ve got for now, but know that it won’t always be like this. Know that one day you won’t have to hide what you love anymore. You’re not alone, and you will get free one day
#witchbr#closeted witch#witches of tumblr#witches#witchcraft#art witch#music witch#kitchen witch#herbal witch#glamour magick#energy witch
37 notes
·
View notes