#square sine sawtooth
Explore tagged Tumblr posts
Visit Tumblr Blog
Explore Tumblr blogs with no restrictions, modern design and the best experience.
Last Seen Tumblr Blogs


Fun Fact
In 2020, 44% of users from Denmark used Tumblr daily.
Text


imagine living in a world where shadow people try to take over the bodies of living creatures and the only thing you have to fight against them is a little guy made of paper that summons glitter. how often would you save your game
271 notes
·
View notes
Text

ANGEL HOURS
#btdraws#digital art#melodrama...!#carmen#keiko#square sine sawtooth#maddox#edsel#simon#ramona#eleanor#babylon#urik
20 notes
·
View notes
Text
youtube
Intro to Synthesis Part 1, the building blocks
#newyork#school#synthesis#oscillator#filter#envelope#lfo#sine#square#sawtooth#triangle#pulse#wave#waveform#amp#amplifier#audio#synth#synthesizer#tutorials#Youtube#attack#decay#sustain#release#adsr#matrixsynth
6 notes
·
View notes
Text
Wanna make some music?
Don't want to use other people's notes?
Here's a video on how to make your own!
youtube
0 notes
Note
hello hello! i love your blog and it has been a fantastic resource for me. if i may ask, how does one go about writing music? my character is put in a situation where listening to a song is a large part of a scene, and i want to describe the song and music itself. while i would describe a guitar or drum, the song i have in mind specifically is mostly digital (think similar to edm) so i'm not sure how to do it. do you have any idea how i could tackle this?
thank you in advance!
Writing Notes: Electronic Music
Electronic Music - any music involving electronic processing, such as recording and editing on tape, and whose reproduction involves the use of loudspeakers.
It is produced from a wide variety of sound resources—from sounds picked up by microphones to those produced by electronic oscillators (generating basic acoustical waveforms such as sine waves, square waves, and sawtooth waves), complex computer installations, and microprocessors—that are recorded on tape and then edited into a permanent form.
Generally, except for one type of performed music that has come to be called “live electronic music”, electronic music is played back through loudspeakers either alone or in combination with ordinary musical instruments.
Musicians are always quick to adopt and explore new technologies.
The fast-paced changes wrought by electrification, from the microphone via the analogue synthesizer to the laptop computer, have led to a wide range of new musical styles and techniques.
Electronic music has grown to a broad field of investigation, taking in historical movements such as musique concrète and elektronische Musik, and contemporary trends such as electronic dance music and electronica.
The Art of Noises (1913) by Luigi Russolo is an important text in the history of electronic music, because it is the first attempt seriously to categorise all sounds and, indeed, to treat them as potential music.
Russolo wrote:
Every manifestation of our life is accompanied by noise. The noise, therefore, is familiar to our ear, and has the power to conjure up life itself. Sound, alien to our life, always musical and a thing unto itself, an occasional but unnecessary element, has become to our ears what an overfamiliar face is to our eyes. Noise, however, reaching us in a confused and irregular way from the irregular confusion of our life, never entirely reveals itself to us, and keeps innumerable surprises in reserve. We are therefore certain that by selecting, coordinating and dominating all noises we will enrich men with a new and unexpected sensual pleasure. Although it is characteristic of noise to recall us brutally to real life, the art of noise must not limit itself to imitative reproduction. It will achieve its most emotive power in the acoustic enjoyment, in its own right, that the artist’s inspiration will extract from combined noises. Here are the 6 families of noises of the Futurist orchestra which we will soon set in motion mechanically:
Rumbles: Roars, explosions, crashes, splashes, booms
Whistles: Hisses, snorts
Whispers: Murmurs, mumbles, grumbles, gurgles
Screeches: Creaks, rustles, buzzes, crackles, scrapes
Noises obtained by percussion: Metal, wood, skin, stone, terracotta etc.
Voices of animals and men: Shouts, screams, groans, shrieks, howls, laughs, wheezes, sobs
In this inventory we have encapsulated the most characteristic of the fundamental noises; the others are merely the associations and combinations of these.
Some Electronic Music Vocabulary
ADSR – Stands for Attack, Decay, Sustain and Release – refers to the envelope [i.e., characteristic of a sound (e.g. volume or filter) as it changes over time; can be used as a tool to shape a sound over time] applied to a sound to shape it over time. Can be applied to the volume, filter, pitch or more. Can make things sound plucky, soft, or ambient etc.
Aliasing – Subtle distortion that occurs in the digital realm when the input frequency is higher than the sample rate. The sample cannot be measured accurately and thus introduces imperfections into the sound.
Ambience – Can refer to a sound in a track which creates a sense of space or atmosphere – typically achieved by the use of time-based audio effects such as delays and reverbs. Also can refer to the level of sound in a recording that contains background noise, separate to the intended recording. Typically this background noise is undesirable, but sometimes it is an aesthetic choice.
Arpeggiator – A MIDI Effect that turns a static chord into an arpeggio. If that doesn’t make sense, it makes things go bleep-bleep-bleep.
Atmosphere – A sonic effect created by reverb, long tails and quieter sounds. Referred to as the background of a track.
Beat Repeat – A type of effect that takes audio as an input and repeats the snippet back at timed intervals to create a glitch effect.
Chill – A loosely-defined term to describe the sound of more relaxed, deeper and melody-driven music in electronic music. Sometimes people refer to this as a genre in itself.
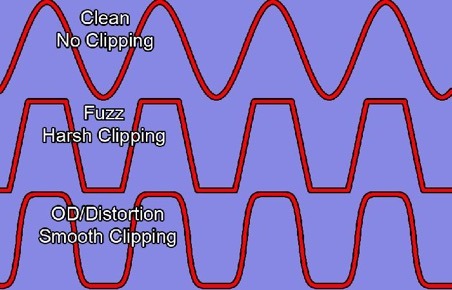
Distortion – The processing of audio such that extra harmonics and loudness are added, creating a more fuller or aggressive sound. Distortion types include tube, clipping, tape, diode, overdrive, fuzz and many more.
Doppler Effect – The sonic effect of frequencies sounding higher pitched when moving closer to an audio source, and lower pitched when moving away. Like when you drive past a police siren.
Formant – A vocal quality of a sound relating to vowels, and a filter type that achieves a vowel-like sound. If you’ve ever heard an ‘oooh’ or ‘aaah’, then you’ve heard what a formant sounds like.
Gate – An audio effect that reduces the volume of a sound once it passes below a certain threshold. It’s good for reducing background noise or unwanted sounds in a recording or sample. Just like your gate at home stops unwanted people coming into your house.
Glide – Portamento—when the pitch slides evenly from note to note
Lazer – A type of sound made by a synth that features fast-moving pitch envelopes to create a ‘pew pew’ type effect.
Masking – A phenomenon when two sounds with similar frequency content cause one to become ‘buried’ due to phase cancellation or differences is loudness. For example, two piano sounds playing at the same time might cause one of them to sound less powerful and thin in the mix.
Normalize – Increases a waveform’s level to its highest before it becomes distorted
Panning – The process of moving a sound either left or right in the stereo field. Panning is a great mix technique to achieve width and space.
Polar Pattern – The way a microphone picks up a sound. Some pickup sound in many directions, others only in one direction, and everything in between.
Reflections – Part of a reverb that creates echoes based off sounds hitting walls and bouncing around rapidly.
Transient – The initial start point of a drum sound, where the audio goes from near silence to sudden loudness. Sounds clicky.
Voice stealing – When a synthesizer is programmed to play more sounds than accessible voices shuts down some present voices so new tunes can be played
Tips for Writing About Music
The most important step when writing about music is to write, read, and listen to as much as possible. Writing hones your voice, while reading exposes you to various styles and information that will shape your writing. The wider the range of music you embrace and study, the better your perspective and critical ear.
Read about music: Understand as much as possible about music, from instrumentation to how artists create their song lyrics. Reading also helps teach the technical vocabulary specific to certain genres. To help you gain a better command of music, use music writing reference books, such as A Short Guide to Writing About Music by Jonathan Bellman and How to Write About Music, edited by Marc Woodworth and Ally-Jane Grossan. Both of these works discuss how to research and write about music effectively, and are great resources for new music writers.
Stay informed: Develop an understanding of news, events, and cultural conversations that inform songwriters. For example, understanding the politics behind Russian feminist collective/punk group Pussy Riot is necessary if you want to write an informed piece on their output.
Learn music theory: The more informed your technical language, the better your music writing will be. Elements such as BPM, timbre, crescendos, adagio, and other music sounds will help you more deeply understand a particular piece of music and its relationship to other songs on an album.
Listen to music: Don’t only listen to genres that you prefer, but expand your ear to different types of music. Artists are inspired by music across time and genre, and the best music critics recognize those references.
Put work out: Whether you join your school’s paper, do creative writing, or start your own blog, getting eyes on your work is imperative to improving your music writing. There are also online resources that aggregate opportunities and writing prompts for writers of all experience levels, providing a great opportunity for new writers to get their foot in the door.
Pitch to publications: Online and print publications are always looking for new pitches from writers. The more places you pitch, the more likely it is that you will sell a piece. Don’t be discouraged if you pitch one outlet and never hear back. Lean into your passion, keep writing, and pitch some more.
Also describe the effects of the song to your character/s. The effects of music can be described using various adjectives like relaxing, calm, refreshing, soothing, etc.
Sources: 1 2 3 4 5 6 7 ⚜ More: References ⚜ Writing Resources PDFs
Thanks so much, really glad to hear this! Choose which of these notes would be most appropriate to incorporate in your story. Do go through the sources as there are more information I wasn't able to include here.
Another reference on music-related terms, plus some great additions. And more resources that could help with describing sounds and scenes related to music in your story:
Words to Describe Sounds
100 Sensory Words
Some Percussion Instruments
Some Pop Music Vocabulary
Writing Template: Singing Scene
Finding the right words that could accurately describe the specific song you have in mind to your readers is one way to tackle this, but it's definitely a challenge. Hope you find the right words/references here!
#music#writing reference#writeblr#literature#writers on tumblr#dark academia#creative writing#spilled ink#writing prompt#writing ideas#writing inspiration#light academia#writing resources
66 notes
·
View notes
Text
was talking about music with yellow and thought of something interesting

so this on simon's face is a sine wave. it's the symbol of the apex, and it's also the wavetype that was on amelia's conductor suit thingy.
there are multiple types of waves in audio, here's the most common:
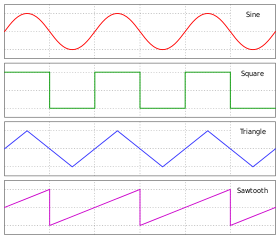
sine, square, triangle, and sawtooth. sine waves are known as the "natural wave" in part because natural sounds are made from sine waves. square, triangle, and sawtooth waves don't occur in nature, from what i understand. i think this can be connected to the apex's worldview. the apex prioritize 'natural' (i.e. not made by the train) beings above all else.
moreover, simon's motif in the book 3 soundtrack is an electric guitar. while acoustic guitars produce sound in a sine wave, electric guitars are often distorted in unnatural ways, for example, into becoming a square wave.
i think there's some interesting symbolism here. simon starts off as a "natural" kid, but grew obsessed with power and influence on the train. as he did, his number rose to the point that he was unnatural. even if he wanted to get off the train, it would take years and years for him to do so, making him almost like a denizen. it distorted his humanity in the view of the train, much like an amplifier distorting a sine wave.
i also think there's some symbolism in the fact that grace was represented by the electric guitar as well in the first half of the season, but nearing the end her motif changes to vox synths. not only is she separating herself from simon and regaining her own sense of identity, but she goes from being represented by a "natural" (acoustic) instrument mimicking an artificial (electric) one to an artificial (electric) instrument mimicking an acoustic one. i think there's a sense of irony in all of this.
#infinity train#infinity train book 3#simon laurent#grace monroe#infinity train theory#infinity train analysis
66 notes
·
View notes
Text

piece for school! my writeup for it, and sources, under cut.
The assignment was to make a collage of yourself.
I wanted to mess with themes of science and religion as complimentary processes, not opposites. Here's a poem that inspired this piece that I couldn't figure out how to work in, which is attributed to Brian May in this tumblr post but that I can't find anywhere besides that post.
"When I had a couple of serious bouts of depression in my life the stars were a big factor in pulling me out. People used to say 'what is your spirituality?' and I'd say I don't know, but I found out looking at the stars one night that that's what it was."
bonus for tumblr: the ASL included (which i wanted as a tie in to the catholic hand symbols used in classic iconography) means transgender. obviously being transgender ties very strongly into the link between spirituality and the body and science.
Sources:
conography is from real safety sign iconography, accessed by me through here (they have very clean pngs)
circuits in the background are from here
i said 'explain physics to me like youre in love with me' and after a while of quiet he went 'everything sings'. so i get it now '
'The fact that a sine wave sounds smooth but a sawtooth wave sounds nasally, and a square wave has a certain hollow fuzz to it.'
Astronomers say they have heard the sound of a black hole singing. And what it is singing, and perhaps has been singing for more than two billion years, '
'Let's Try That Again' screenshot is from @screenshotsofdespair
'natura valde simplex est et sibi consona' is a newton quote (according to the internet)
'What is the difference between a cathedral and a physics lab ...' is from annie dillard, teaching a stone to talk
'my battery is low and it's getting dark' is a poetic interpretation of the Mars Opportunity Rover's last data transmission to earth that was in many articles around the time of its death
unit circle is from https://www.mometrix.com/academy/unit-circles-and-standard-position/
moire patterns were made using a concentric circle from https://www.istockphoto.com/vector/circle-round-target-spiral-design-elements-gm1015672460-273317564
36 notes
·
View notes
Text
Making Music In Pyxel Game Engine
This little manual was written by someone experienced with chiptune trackers like Furnace, but inexperienced with Pyxel. I thought about making this because after a quick Google search there wasn’t much documentation on how to make music in Pyxel. If there’s any incorrect information here, feel free to correct me.

For those who aren’t familiar, Pyxel is a game engine designed to imitate retro consoles. It was developed by Takashi Kitao, lead developer of the Zone of the Enders series. You can run Pyxel in Python or you can use Pyxel Studio, which lets you use Pyxel in your browser. (It seems that the Pyxel Studio website is primarily in French, but you should be able to use it if you only speak English.)
The music and sound effects limitations of Pyxel appear to be inspired from the NES and Game Boy. There are 4 channels. As per usual with NES and Game Boy chiptune music, it is recommended the sound effects be used in the least musically important channel, which is often the channel used for harmony.
Be sure the Speed is set to the same number for all parts of the song. Otherwise, the sections will be out of tempo with each other when played back.
The piano roll allows notes from C1 to B5. The lowest pegs are blue. Blue pegs indicate a rest.
You have 5 wave shapes for timbre: triangle, pulse, square, sawtooth, and noise. From what I can hear, I think the triangle wave is an NES-like, stepped triangle wave instead of a perfect triangle shape. (A stepped triangle has more character to it; normal triangle waves sound very similar to sine waves otherwise.)
A Sound is a small section of the Editor where you can place notes on a piano roll sequencer. There are 6 measures per Sound. You can fit 8 pegs into one measure. You can fill a Sound with a max of 48 pegs.
There are 8 volume levels to assign each peg, labeled 0 through 7, with 0 being mute.
The Music Section is a section of the Editor where you arrange your Sounds into a complete song. There are 8 songs, labeled 0 through 7. There are 32 spots per channel to place your Sounds.
You can create 64 Sounds, labeled 00 through 63. This means that ultimately you are limited to a max of 384 measures (or 3,072 pegs) for both music and sound effects in a game.
It is clear that this is not a composing tool, but a tool you use to arrange the music to Pyxel chiptune format. I recommend composing your music on an instrument or DAW separately and then manually convert the song in Pyxel.
Apparently, it is possible for games to play audio files in Pyxel—and not only audio files but also play them in 5.1 surround sound—as shown by GRASLAY by Ontake44…but I don’t know how to do this lol
10 notes
·
View notes
Note
What if you put sounds through a full wave rectifier? i.e. an abs(x) function.
good question! naively I would expect it to double the frequency and reduce the volume, as the speaker cone is going to move back and forth faster but move less overall; it's also going to mess with the sound in weird ways, like a sine wave will still be curved up top but spiky down below where it bounces off the zero line, but that's just my completely uninformed intuition, let's try it!
here is the original waveform:
and here it is after going through abs():
actually doesn't sound as different as I expected? strangely though if we switch from a sine wave to a sawtooth wave to get a bit of buzz:
then when we run it through abs() it smooths it right out again:
finally abs() completely destroys a square wave which I was momentarily confused by until I realised of course, a square wave ping pongs instantaneously between +1.0 and -1.0, so running it through abs() will leave a constant +1.0 signal: utterly silent!
13 notes
·
View notes
Text
Which Are the Most Advanced Electronic Laboratory Equipment for Education in India?

Electronic laboratory equipment is an integral part of educational institutions, where it allows the student to gain some practical experience regarding electrical and electronic concepts. Since technology is always under innovation, modern laboratories require good quality and innovative implements to enhance the learning experience in laboratories. Finding the right electronic laboratory equipment manufacturer and supplier in India is the right degree of precision, reliability, and durability. With advanced Electronic laboratory equipment, students learn technical skills along with a practical understanding of circuits, microcontrollers, and communication systems. In this blog, we mentioned some of the most advanced electronic laboratory equipment for education in India.
8 Most Advanced Electronic Laboratory Equipment for Education in India
Digital Oscilloscope
A digital oscilloscope is an essential measuring and analyzing device for electrical signals in real time. It has become a crucial teaching tool for students in many educational labs teaching waveforms, voltage levels, and signal analysis. Modern oscilloscopes are high bandwidth, touch screen, and with advanced triggering, making them quite efficient for the student to learn.
Function Generator
A function generator is an essential device used to generate different kinds of electrical waveforms, like sine, square, and triangular waves. The function generator is mainly used for circuit testing in educational laboratories or for research projects. Advanced models have frequency modulation, phase-locking capabilities, and digital control for precision.
According to Wikipedia, In electrical engineering, a function generator is usually a piece of electronic test equipment or software used to generate different types of electrical waveforms over a wide range of frequencies. Some of the most common waveforms produced by the function generator are the sine wave, square wave, triangular wave and sawtooth shapes.
Spectrum Analyzer
Spectrum analyzers measure the electric signal frequency spectrum. They teach students about signal strength, bandwidth, and distortion from communication systems. Modern spectrum analyzers include high-speed digital processing, a touchscreen interface, and wireless connectivity for remote monitoring.
Digital Multimeter
It is an essential tool used in measurements of voltage, current, and resistance. The modern Digital Multimeter offers high resolution, data logging, Bluetooth connectivity, and more, so it is a good educational tool.
Microcontroller Development Board
Embedded microcontroller development boards such as Arduino and Raspberry Pi are used in educational institutions to teach students the fundamentals of an embedded system. With this board, students will be able to develop real-time applications, offering a practical platform in terms of programming and integration of hardware into software.
Power Supply Unit
Testing and powering electronic circuits require a regulated power supply. In a modern power supply, digital displays along with programmable voltage settings and overcurrent protection safeguard the integrity of experiments in the laboratory.
Soldering and Desoldering Station
Soldering stations are the stations used to assemble and repair electronic circuits. A high-class soldering station, with highly sensitive temperature regulation and ESD-protected working features, includes high-speed heating for student learning through PCB designing and repairing techniques.
Wireless Communication Trainer Kit
A wireless communication trainer kit is intended to help the student understand a number of different wireless technologies such as Bluetooth, Wi-Fi, and RF communication. These kits make it possible to demonstrate complex wireless concepts with practical demonstrations and experiments.
Enhancing Engineering Education in India through Advanced Electronic Laboratory Equipment
In accordance with a research study done by Smart Learning Environments, adding high-technology Electronic laboratory equipment, including augmented reality (AR) systems in the educational process of engineering improves the level of practical skills and students' understanding of complex contents. The analysis showed that students trained by using AR tools improved their skills for working with laboratory instruments like an oscilloscope and a function generator and obtained better practice-based assessment results. This helped build not only confidence but also relieved the cognitive load of having their familiarization with equipment through virtual devices before the real experiment was undertaken. Such advanced tools in engineering curricula at Indian colleges help close that gap between the knowledge acquired and the moment of practical application, hence setting up an effective learning environment.
Why Choose Eduscope India?
Eduscope India is the leading electronic laboratory equipment manufacturer and supplier in India, that offers high-quality innovative and educational solutions for laboratories. Steady on precision and durability, products from Eduscope India address the latest industry standard.
This equipment helps in learner practice and real-time experiments to boost students' learning abilities. In addition, Eduscope India offers extended support by providing proper installation, training, and maintaining all its products.
Conclusion
Electronics Laboratory Equipment for students is something that needs to be chosen right to provide the students with practical experience and technical know-how. The advanced laboratory equipment mentioned above increases the efficiency of learning by providing the student with problem-solving skills and innovation. For any institution looking for the best electronic laboratory equipment manufacturer and supplier in India, Eduscope India is one of the finest, with its commitment to quality, reliability, and customer support. A laboratory investment in quality helps to prepare future-ready learning environments in electronics preparation for real-world applications.
#electronic laboratory equipment manufacturer and supplier in india#electronic laboratory equipment manufacturer and supplier#electronic laboratory equipment manufacturer
0 notes
Text
Step-by-Step Guide to Learning Any Synthesizer: Essential Tips for Beginners and Pros
Learning how to use a synthesizer can feel overwhelming at first, but with the right approach, it becomes an exciting journey of sound exploration. Whether you're a beginner looking to dive into synths for the first time or an experienced musician wanting to refine your skills, understanding the fundamentals and working through key steps can help you master any synthesizer. This Guide to Learning Any Synthesizer offers a step-by-step breakdown to help you build a solid foundation and grow your synth expertise.
Step 1: **Understand the Basics of Sound Synthesis**
Before jumping into a synthesizer, it’s important to grasp the basic principles of sound synthesis. Synthesizers create sound by manipulating audio signals in various ways, and knowing these fundamental concepts will make the rest of your learning experience easier.
Key Concepts to Know:
- **Oscillators (OSC):** These generate the basic waveforms that are the starting point of most synth sounds. Common waveforms include sine, square, triangle, and sawtooth, each having a distinct tone and character.
- **Filters (VCF):** Filters shape the sound by removing or emphasizing certain frequencies. The most common is the low-pass filter, which cuts high frequencies, making the sound warmer or darker.
- **Envelopes (ADSR):** Envelopes control how a sound evolves over time, including Attack (how quickly the sound reaches its peak), Decay, Sustain (the level the sound holds while a key is pressed), and Release (how quickly the sound fades after the key is released).
- **LFO (Low-Frequency Oscillator):** LFOs modulate various parameters like pitch, filter cutoff, or volume, adding motion and depth to the sound.
Step 2: **Familiarize Yourself with the Interface**
Each synthesizer, whether software or hardware, has a unique layout. Spend some time getting to know the layout of your particular synth. Understanding where things are located on the interface will save you time and allow you to dive deeper into sound creation.
How to Get Started:
- **Identify key sections:** Most synths have sections like Oscillators, Filters, Envelopes, and Modulation. Start by familiarizing yourself with where these are located.
- **Check out presets:** Most synthesizers come with pre-made sounds or presets. Use these as a way to explore how the synth works, and examine the settings used to create these sounds.
- **Label important controls:** If your synth allows for custom labeling or notes, make reminders of what certain knobs or sliders do, especially when learning a more complex interface.
Step 3: **Experiment with Basic Presets**
Many synthesizers come with a wide variety of presets. While your ultimate goal may be to design your own sounds, presets are a great starting point for understanding how specific parameters affect sound.
Steps for Experimentation:
- **Choose a simple preset:** Start with a basic sound, like a clean sine wave or a pad, and begin tweaking different controls like the filter cutoff or LFO rate.
- **Analyze the settings:** Compare the settings on different presets to see how changing parameters (oscillators, filters, effects) alters the sound.
- **Modify presets:** Once you're familiar with the basics, try making small adjustments to the presets to see how they change. For example, increase the attack to make the sound fade in slowly, or add more resonance to the filter for a sharper, more focused tone.
Step 4: **Learn to Create Your Own Sound from Scratch**
Once you’ve gotten comfortable with presets, the next step is creating your own sounds from scratch. Start with a blank slate by initializing the synth (resetting all settings) and build your sound one element at a time.
Steps for Sound Design:
- **Start with a single oscillator:** Choose a waveform (sine, saw, square, etc.) and listen to how it sounds by itself. Experiment with adding other oscillators or tuning them slightly apart for a richer tone.
- **Add filtering:** Use the filter section to shape the sound. A low-pass filter can soften a harsh waveform, while a high-pass filter can thin out a sound to make it fit better in a mix.
- **Use envelopes for dynamics:** Set the envelope to control how the sound evolves. For example, a short attack will make a punchy sound, while a long release will create a more ambient, sustaining tone.
- **Experiment with modulation:** Add movement by applying an LFO to parameters like pitch or filter cutoff. This can add subtle wobble or dramatic sweeps, depending on the settings.
Step 5: **Explore Modulation and Effects**
Modulation and effects can take your sounds to the next level by adding complexity, movement, and texture.
Modulation Tips:
- **LFO to Pitch:** Modulating the pitch of an oscillator can create vibrato or a more extreme wobble effect. Adjust the rate and depth to find the sweet spot for your sound.
- **LFO to Filter Cutoff:** This can make your sound sweep in and out, which is great for rhythmic effects or evolving pads.
- **Envelope to Filter:** By routing an envelope to a filter, you can control how the filter opens or closes over time, creating a dynamic sound that changes as you play.
Effects Tips:
- **Reverb:** Add space to your sound with reverb to give it depth and atmosphere. A short reverb works well for rhythmic sounds, while a long reverb can turn a simple sound into an epic ambient wash.
- **Delay:** Use delay to create echoes that add texture and rhythmic interest.
- **Chorus:** Apply chorus to thicken up your sound by slightly detuning multiple versions of the same signal, creating a lush, wide stereo effect.
Step 6: **Use Arpeggiators and Sequencers**
Many synthesizers include arpeggiators and sequencers, which can be powerful tools for creating rhythmic patterns and melodies.
How to Use Arpeggiators:
- **Activate the arpeggiator:** This will automatically play the notes of a chord in a repeating pattern. Experiment with different arpeggio styles (up, down, random) and tempos.
- **Adjust the rate:** Changing the speed of the arpeggiator can create different feels, from slow, evolving soundscapes to fast, energetic riffs.
Sequencer Tips:
- **Program simple patterns:** Start by programming a basic sequence of notes and tweak the timing, velocity, or pitch to add variation.
- **Sync with tempo:** Many synths allow you to sync the sequencer with your DAW’s tempo, making it easy to integrate the sequence into your production.
Step 7: **Practice with Purpose**
Like learning any instrument, mastering a synthesizer takes time and practice. Set aside regular practice sessions where you focus on specific aspects of the synth.
Practice Tips:
- **Focus on one section at a time:** One day, practice working only with oscillators; another day, focus on filters or modulation. This approach helps you master each component before moving on.
- **Recreate sounds:** Listen to your favorite songs and try to recreate the synth sounds you hear. This is a great way to apply your knowledge and understand how different settings work together.
- **Keep experimenting:** Synthesis is an art form, so don’t be afraid to push boundaries and create unconventional sounds. The more you experiment, the more confident you’ll become.
Final Thoughts
Learning how to use any synthesizer is both a technical and creative journey. By understanding the fundamentals of sound synthesis, experimenting with presets, and diving into modulation and effects, you can unlock a world of sonic possibilities. Whether you're a beginner or a seasoned pro, this step-by-step guide will help you gain the skills you need to confidently design and manipulate sounds with any synthesizer. Keep exploring, stay curious, and let your creativity lead the way!
#SynthesizerGuide#MusicProduction#LearnSynthesizers#BeginnerMusician#ProTips#ElectronicMusic#SoundDesign#MusicEducation#SynthesizerTips#MusicTheory
0 notes
Text

Close up wips!! I hope you like brown haired men
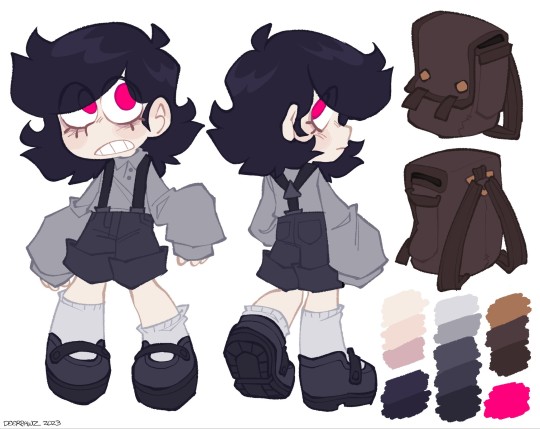
#thinking about doing fully rendered commissions like these once I'm caught up with my current ones...#btdraws#digital art#square sine sawtooth#wip#edsel#elias#vince
35 notes
·
View notes
Text
Sound Design Basics: Tools and Techniques for Beginners
What excites me is this absolutely dynamic field merging creativity with technology. Whether you want to be a film music producer, compose music for video games, or just simply work with sound on personal projects, some basic concepts about sound design are quite essential. For this blog post, we're going to look into the very basic tools and techniques beginners need to know to get started on their own journey.
Understanding Sound
Well, sound is, in essence, a vibration transmitted through the air-or another medium-but when it reaches our ears, it becomes audible. So, before we look into the tools and techniques of sound design, let's first think about what sound is.
Key Concepts in Sound
1. Frequency: This is the pitch of a given sound in Hertz. The higher the frequency, the higher the pitch, and vice versa.
2. Amplitude: The sound loudness is termed as amplitude. The more the amplitude, the louder the sound will be and vice versa; that is, lesser the amplitude, softer it will be.
3. Waveform: The shape of a waveform. Waveforms exist in different forms, such as sine, square, sawtooth etc, which will determine the variations or differences of timbre associated with sounds produced.
4. Envelope: A description of how a sound changes over time. It typically has four stages: Attack, Decay, Sustain, and Release.
Essential Tools for Sound Design
Sound design always depends on the right tools and equipment. So here's a list of basic tools and software you'll need to begin with:
1. Digital Audio Workstation (DAW)
The right sound design always depends on the proper tools and equipment. So here's a list of basic tools and software you'll need to begin with:
Ableton Live: Mostly known more for simplicity and flexibility in use, especially for electronic music.
FL Studio: The best for beginners and advanced alike.
GarageBand: More intuitive in design. For free loving, Mac specific individuals it includes most of the basics required by the actual sound design.
2. MIDI Controller
A MIDI controller is used to create and influence your music and sounds. In all forms from keyboard and drum pad to many others, the device can help you send notes into a DAW, control virtual instruments, among other things.
3. Audio Interface
An interface with audio quality will offer you high-quality sound for your recordings and give you the opportunity to connect microphones, instruments, and speakers through your computer. It is a great tool, especially if you record high-quality audio.
4. Virtual Instruments and Plugins
Virtual instruments and effects plugins expand your sonic palette. Here are some beginner-friendly options:
Native Instruments Komplete Start: It's a free group of instruments and effects.
Spitfire Audio LABS: Offers all sorts of sampled instruments of highest quality for free.
iZotope Ozone Elements: A mastering plugin with extreme ease of use for newcomers and to make the final touches on your audio somewhat easier.
Basic Sound Design Techniques
Now that you have your tools, it's time to jump into sound design techniques. Here are some basic methods to explore:
1. Synthesis
Synthesis is the process of synthesizing sounds; you create sounds from the beginning by using electronic instruments. Here are some forms of synthesis:
Subtractive Synthesis: This is the most basic form of synthesis; it employs the filtering of harmonically-rich waveforms in order to outline the sound.
FM Synthesis: It utilizes another waveform to modulate the frequency of another. This creates a highly complex sound.
Wavetable Synthesis: Here, a series of waveforms determines an evolving sound. It causes the texture to be rich and varied.
2. Sampling
Sampling is taking a bit of recorded sound and manipulating it to create something new. You can sample anything-from field recordings to snippets of existing music. One of the nicest features most DAWs have built in is built-in samplers that can take your audio and slice it, stretch it, and do all sorts of transformation to it.
3. Layering
Layering sounds is a powerful technique to create depth and complexity. By combining different sounds, you can create a richer final product. For example, layering a synth pad with a vocal sample can add warmth and texture to your mix.
4. Effects Processing
Effects are also crucial aspects to the shaping and transformation of sounds. Some of the common effects are:
Reverb: It adds space and depth to sounds, simulating a variety of environments.
Delay: Even delay creates echoes. Adding it to sound design might create a sense of rhythm as well.
EQ (Equalization): It lets you amplify or reduce certain frequencies in order to aid in defining the tonal balance of your sounds.
Compression: This regulates the dynamic range of the audio. So quiet sounds become as loud as necessary, and loud sounds less loud. It makes your mix sound more professional.
5. Field Recording
Field recording is the act of recording sound from your environment. This could include everything from city noise to nature sounds. These recordings can then be utilized in projects toward which you are designing the sound, thereby giving each piece a level of authenticity and uniqueness.
Learning and Experimentation
Sound design is a fluid and evolving category of work that is partly fueled through experimentation. The following are some ways you might continue your own learning:
Online Courses and Tutorials: There are some such platforms that have vast amounts of resources for beginners like Coursera, Udemy, and YouTube. Look up courses that are specifically on sound design.
Join Communities: Online communities might inspire you and also support you. You might find a sense of belonging with online forums like Gearslutz or r/sound design on Reddit.
Practice Regularly: Give yourself every week to just go out and try new techniques and sounds. The more you practice, the better your abilities will be.
Summary
Sound design is a fun and very fulfilling creative activity. First, getting a handle on the basics of sound, knowing the main tools, and a vast accumulation of techniques, you can start to create your own unique sounds. The bottom line, experiment and have fun-and there are no strict rules in sound design other than endless possibilities. So, grab your DAW, take it for a spin, and let your creativity flow!
0 notes
Text
Creating a solid bassline in Ableton involves a mix of sound design, rhythm, and music theory. Here’s a step-by-step guide:
### 1. **Choose the Right Sound:**
- **Instrument Selection:** Start with a bass instrument. Ableton’s built-in instruments like Analog, Operator, or Wavetable are great choices. You can also use third-party VSTs like Serum or Massive.
- **Sound Design:** If you're using a synth, adjust the waveform (sine, square, or sawtooth) to shape your bass tone. Sine waves are smooth and deep, while saw and square waves add more harmonics and grit.
- **Add Effects:** Use filters (low-pass), saturation, and EQ to sculpt the sound further. A compressor can help to even out the dynamics and make the bass punchier.
### 2. **Write the Bassline:**
- **Start with Root Notes:** Begin by playing the root notes of the chords or harmonies in your track. This ensures the bassline fits well with the rest of the music.
- **Add Rhythm:** Experiment with different rhythms. Short, staccato notes give a tight, punchy feel, while longer, sustained notes can create a deep, flowing groove.
- **Syncopation:** Try off-beat rhythms or syncopation to add groove and movement to the bassline.
- **Use Octaves:** Adding or alternating between octaves can create variety and richness.
### 3. **Layering and Processing:**
- **Layer Bass Sounds:** You can layer different bass sounds (e.g., a sub-bass with a mid-range bass) to fill out the frequency spectrum.
- **EQ:** Cut unnecessary low frequencies to avoid muddiness. Boost around 100 Hz for more punch and clarity.
- **Sidechain Compression:** Use sidechain compression to duck the bass when the kick drum hits, creating a tighter mix and more room for the kick.
- **Distortion/Saturation:** Add distortion or saturation to give the bass more character and warmth.
### 4. **Refine and Iterate:**
- **Test with the Rest of the Track:** Continuously listen to the bassline in context with the other elements of your track. Make adjustments as needed.
- **Tweak Parameters:** Experiment with filter cutoff, resonance, or envelope settings to shape the bassline’s character and movement.
- **Automation:** Automate filters, volume, or effects to add dynamic changes throughout the track.
By combining these elements, you can craft a bassline that’s solid, dynamic, and fits well within your track.
0 notes
Text
Learning to make synths is amazing, man.
Let me paint you a sound. I can imitate a sound or Ii can go abstract. I can make it mellow and soft or harsh and buzzy. I can make the pluck of a string or the gentle swell of the ocean waves.
Tell me the sound and I will paint it for you with mathematical functions. The square, the sine, the sawtooth. These are the colors I paint with. I can mix them or modulate them. I can filter the highs and bring up the bass. I can add the overtones. I can distort and phase and flange. I am the maker of this sound, and it can sound however I like.
All I need is my computer.
0 notes