I'm Max, a 3D artist from France. I do animation for video games. This is my more serious blog. The non-serious one is over here (it's where I reblog all kinds of stuff I like).
Don't wanna be here? Send us removal request.
Text
A quick look at what YouTube's "1080p Premium" option is actually made of

What's the deal with this quality option? How much better is it? What are the nitty-gritty details? Unfortunately, Google Search is worthless nowadays, and a topic as technical as video compression is unfortunately rife with misinformation online.
I had a look around to see if any publications covered this subject in any way that was more thorough than a copy-paste and rewording of YouTube's press release, but the answer was unfortunately no.
So I looked into it myself to satisfy my curiosity, and I figured I might as well write a post about my findings, comparison GIFs, etc. for anyone else who's curious about this.
Quick summary of things so far: YouTube has a lot of different formats available for each video. They combine all these different factors:
Resolution (144, 240, 360, 480, 720, 1080, 1440, 2160, 4320)
Video codec (H.264/AVC, VP9, AV1)
Audio codec (AAC & Opus in bitrates ranging from 32 to ~128k. Yes, it says 160 up there, but that's a lie. Also, some music videos have 320k, if you have Premium...)
Container (MP4, WebM + whether DASH can be used)
Different variants of these for live streams, 360° videos, HDR, high framerate...
Here's everything that's available for a video on Last Week Tonight's channel.

I believe that the non-DASH variants used to be encoded and stored differently, but nowadays it seems that they are pieced together on-the-fly for the tiny minority of clients that don't support DASH.
In fact, 1080p Premium shows up under two different format IDs here, 356 & 616. The files come out within a few hundred KiBs of each other... and that's because only the container changes. The video stream inside is identical, but 356 is WebM, while 616 is MP4.
⚠ — Note that the file sizes and bitrates written by this tool are mostly incorrect, and only by downloading the whole file can you actually assess its properties.
YouTube has published recommended encoding settings, but their recommended bitrate levels are, in my opinion, exceedingly low, and you should probably multiply all these numbers by at least 5.

What bitrate does YouTube re-encode your videos at?
YouTube hasn't targeted specific bitrates in years; they target perceptual quality levels. Much like how you might choose to save a JPEG image at quality level 80 or 95, YouTube tries to reach a specific perceptual quality level.
This is a form of constrained CRF encoding. However, YouTube applies a lot of special sauce magic, to make bad quality input (think 2008 camcorders) easier to transcode. This was roughly described in some YouTube Engineering blog post, but because they don't care about link rot, and — again — because Google Search has become worthless, I'm unable to find that article again.
So, short answer: it depends. Their system will use whatever bitrate it deems necessary. One thing is for certain: the level of quality they get for the bitrate they put in is admirably high. You've heard it before: video is hard, it's expensive, computationally prohibitive, but they're making it work. For free! (Says the guy paying for Premium)
There's a pretty funny video out there called "kill the encoder" which, adversarially, pushes YouTube's encoders as much as it can. It's reaching staggeringly high bitrates: 20 mbps at 1080p60, 100 mbps at 2160p60.
The point I'm getting to here is that you can't just say "1080p is usually 2mbps, and 1080p premium is 4mbps", because it depends entirely on the contents of the video.
Comparisons between 1080p and 1080p Premium
⚠ — One difficulty of showcasing differences is that Tumblr might be serving you GIFs shown here in a lossy recompressed version. If you suspect this is happening, you can view the original files by using right-click > open in new tab, and replacing "gifv" in the URL with "gif". I've also applied a bit of sharpening in Photoshop to comparison GIFs, so that differences can be seen more easily.
Let's get started with our first example. This is a very long "talking head" style video, with plain, flat backgrounds. This sort of visual content can go incredibly low, especially at lower resolutions.
youtube
Normal: 1,121 kbps average / 0.022 bits per pixel
Premium: 1,921 kbps average / 0.037 bits per pixel (+71%)
The visual difference here is minimal. I tried to find a flattering point of comparison, but came up short. This may be because this channel's videos are usually cut from recorded livestreams.
youtube
Normal: 1,402 kbps average / 0.027 bits per pixel
Premium: 2,817 kbps average / 0.054 bits per pixel (+101%)
Let's look closer at a frame 17 seconds in.
First, Mark Cooper-Jones's face:

Note the much improved detail on the skin and especially flat areas of the shirt (the collar sew line partially disappeared in standard 1080p). Some of the wood grain also reappears. YouTube is very good at compressing the hell out of anything that is "flat enough".

As for Jay Foreman, note that the motion blur on the hand looks much cleaner, and so does the general detail on his shirt and beard.
youtube
Last Week Tonight's uploads are always available in AV1, and this reveals an interesting thing about 1080p Premium: it's always in VP9, and never in AV1.
Normal AV1: 936 kbps average / 0.015 bits per pixel (-24%)
Normal VP9: 1,165 kbps average / 0.018 bits per pixel
Premium: 1,755 kbps average / 0.028 bits per pixel (+87%)
youtube
"VU" is a daily 6-minute show which weaponizes the Kuleshov effect to give a new meaning to the flow of images seen in the last 24 hours of French television, through the power of editing. (Epilepsy warning)
Normal: 1,132 kbps average / 0.022 bits per pixel
Premium: 2,745 kbps average / 0.053 bits per pixel (+142%)
Looking at 2m10s in for images from boxing championships, we see, again, more of a general cleaner image than a stark difference. The tattoos are much more defined, so is the skin, the man's hair, and the background man's eyes.

Shortcomings of these comparisons
Comparing two encodes of a video from still images is always going to be flawed, because there's more to video than still images; there's also how motion looks. And much like how you can see that these still images generally look a lot cleaner with "Premium" encodes, motion also benefits strongly. This is not something I can really showcase here, though.
In conclusion & thoughts on YouTube's visual quality
To answer our original question, which was "how much does 1080p Premium actually improve video quality?", the answer is "it doubles bitrate on average, and provides a much cleaner-looking image, but not to the degree that it's impressive or looking anything like the original file". I think they could get there with 3x or 4x the bitrate, but who knows?
This is not a massive upgrade in quality, but it does feel noticeably nicer to my eyes, especially in motion. However, I might have more of a discerning eye in these matters, and this is much more noticeable on a big desktop monitor, rather than a 6-inch phone screen. I suspect that YouTube's encodes are perceptually optimized for the platform with the most eyeballs: small, high-DPI screens.
One thing that I find regrettable is that this improvement is solely limited to some videos that are uploaded in 1080p. Although I heavily suspect it, I don't know for certain whether YouTube has reencoded old videos in such a way that there is massive generational loss, but they do seem to look much poorer today than they did 10 years ago, especially those that top out at 240p. I would love for "Premium" to extend to each video's top resolution as long as they are 1080p and under. Give us 480p and 720p Premium, at the very least.
There are many, many, many things you can criticize YouTube for, but their ability to ingest hundreds of hours of video every minute, while maintaining a quality-to-bitrate efficiency ratio that is this high, for free, is, in my opinion, one of their strongest engineering feats. Their encoders do have a tendency to optimize non-ideal video a bit too aggressively, and I will maintain that to get the most out of YouTube, you should upload a file that is as close to pristine as possible... and a bit of sharpening at the source wouldn't hurt either 😃
8 notes
·
View notes
Text
Adventures in MMS video in 2023: "600 kilobytes ought to be enough for anybody"
MMS is a fairly antiquated thing, now that we have so many other (and better) options to share small video snippets with our friends and families. It's from 2002, the size limit is outright anemic, and the default codecs used for sharing video are H.263 + AMR wideband.
So MMS video looks (and sounds) like this.
It's... not good! Can I get something better out of those 600 kilobytes, entirely from my Android smartphone?
As it turns out, yes, I can! Technology has gotten a lot better in the past 21 years, and by using modern multimedia codecs, we can get some very interesting results.
The video clip above was recorded straight from the camera within the "Messages" app on my Galaxy S20+. By taking a look at the 3gpp file that has been spat out, I can see the following characteristics:
Overall bitrate of 101 kbps
H.263 baseline, 176x144, 86.5 kbps, 15 fps (= 0.23 bits/pixel)
AMR narrow band audio, 12.8 kbps, 8 KHz mono
Terribly antiquated, to an almost endearing point.
Note that if you feed an existing video to the Messages app, it'll ask you to trim it, and it'll be encoded slightly differently:
Overall bitrate of 260 kbps
H.263 baseline, 176x144, 227 kbps, 10 fps (= 0.89 bits/pixel)
AAC-LC, 32 kbps, 48 KHz mono (but effectively ~10-12 KHz)
So, before we get any further, here are two hard constraints:
600 kilobytes... allegedly. This may change depending on your carrier. For example, many online sources said that my carrier's limit was 300. Some may go as low as 200 or 100. I don't know how you can find this out for yourself; the "access point" settings don't ask you to specify the size, so I assume the carrier server communicates this to the phone somehow.
The container must be 3GP or MP4. I would have loved to try WebM files, but the Messages app refused to send any of them.
With that in mind, the obvious codec candidates are:
For video: H.264/AVC, H.265/HEVC, and AV1
For audio: AAC or Opus
I will not be presenting any results for H.264 because it's so far behind the two others that it might as well not be considered an option. Likewise, everything supports Opus, so I didn't even try AAC.
An additional problem to throw into the mix: Apple phones don't support AV1 yet. No one that I communicate with using SMS/MMS uses an iPhone, so I couldn't try whether any of this worked there.
How are we going to encode this straight on our phones?
FFmpeg, of course. 😇
This means having to write a little bit of command line, but the interface of this specific app makes it easy to store presets.
Wait, I don't want to do any of that crap
If you want to convert an existing video to fit into the MMS limit, this is probably as good as it gets for now. I looked around for easy-to-use transcoding apps, but none fit the bill. That said, if you want to shoot "straight to MMS but not H.263", one thing you can try is using a third-party camera app that will let you set the appropriate parameters.
OpenCamera lets me set the video codec to HEVC, the bitrate to 200kbps (100 is unusable), and the resolution to 256x144 (176x144 is also unusable)... you can't set the audio codec, but amusingly, it switches to 12kbps 8 KHz mono AAC-LC at these two resolutions anyway! There must be something hardcoded somewhere...
This means 20 seconds maximum, which is not much, and it doesn't look great, but besides that reduced length, it's still better than the built-in MMS camera.
There may be better camera apps out there more suited to this purpose, but I haven't looked more into them. This may be worth coming back to, if/when phones get AV1 hardware encoders.
Let's transcode
So without further ado, I'll walk you through the command line.
-c:v libaom-av1 -b:v 128k -g 150 -vf scale=144:-4 -cpu-used 4 -c:a libopus -b:a 32k -ar 24000 -ac 1 -t 30 -ss 0:00 -r 30
For the sake of readability, I have divided this into 3 lines, but in the app, everything will be on one line.
The first line is for video, the second one is for audio, and the third one is for... let's call it "output".
-c:v libaom-av1 — selects the AV1 encoder for video
-b:v 128k — video bitrate! this is going to be your main "knob" for staying within the maximum file size.
-g 150 — this sets a maximum keyframe interval. The default is practically unlimited which sucks for seeking, but I believe it also increases encoding complexity, so it's probably better to set it to something smaller. This is in frames, so 150 frames here, at 30 per second, would mean 5 seconds.
-vf scale=144:-4 — resize the video to a lower resolution! This is width and height. So right now, this means "set width to 144 & height to whatever matches the aspect ratio, but set that to the nearest multiple of 4" (because most video codecs like that better, and I assume these do as well)
-cpu-used 4 — the equivalent of "preset" in x264/x265. 8 is fastest, 4 is middle-of-the-road, 3 & 2 get much slower, and 1 is the absolute maximum. The lower the number, the longer the video will take to encode. There's a chart over there of quality vs. time in presets, and the conclusion is to stick with 4, unless you want absolute speed, in which case you could go with 8 or 6.
-c:a libopus — sets the Opus encoder for audio. (there's another one that's just "opus", but it's worse. This one is the official one.)
-b:a 32k — audio bitrate! And yes, 32k is very much usable... that's the magic of Opus. You could go down to 16 for voice only.
-ar 24000 — sets the audio sample rate to 24 KHz. Not sure if that's super useful since AAC-HC and Opus are smart with how they scale down, but I figured I might as well.
-ac 1 — set the number of audio channels... to just one! So, downmix to mono. With one less audio channel but the same amount of bitrate, the resulting audio will sound slightly better.
-t 30 — only encode 30 seconds
-ss 0:00 — encode starting at 0:00 into the input file. This setting, in combination with "-t", lets you trim the input video. For example: "-t 20 -ss 0:15"
-r 30 — sets the video framerate. Yeah, this one is all the way at the end out of habit (the behaviour is kind of inconsistent if it's placed earlier on). You don't need to have this one in, but it's useful for going down from 60 to 30, or 30 to 15.
To use H.265/HEVC, replace "libaom-av1" by "libx265", and outright delete "-cpu-used 4", or replace it by "-preset medium" (which you can then replace by "slow", "veryslow", "faster", etc.)
My findings
Broadly speaking, AV1 is far ahead of x265 for this use case.
This is going to sound terribly unscientific, and I'm sorry in advance for using this kind of vague language, because I don't have a good grasp of the internals of either codec... but AV1 has its "blocks" being able to transition much more smoothly into one another, and has much smoother/better "tracking" of those blocks across the frame, whereas x265 has a lot more "jumpiness" and ghosting in these blocks.
Even AV1's fastest preset beats x265's slowest preset hands down, but the former remains far slower to encode than the latter. x265 does not beat AV1 in quality even when set to be slower. For this reason, you should consider x265 (medium) to be your "fast" option.
Here are some sample videos! Unfortunately, external MP4 files will not embed on Tumblr, so I must resort to using regular links. You should probably zoom way in (CTRL+scrollwheel up) if you open these in a new tab on desktop.
The sample clip I've chosen is a little bit challenging since there's a lot of sharp stuff (tall grass, concrete, cat fur), and while it's not the worst-case scenario, it's probably somewhere close to it.
Here's my first comparison. 240x428, 30 fps, medium preset:
x265 took 1:27
AV1 took 3:15
So you can get 35 seconds of fairly decent 240p video in just 600 kilobytes. That's pretty cool! But we can try other things.
For example, what about 144p, like the original MMS?
x265 medium took 1:21
AV1 fast took 2:31
Sure, there aren't many pixels, but they are surprisingly clean... at least with AV1, because the stability in the x265 clip isn't good.
Now, what if we followed in the original MMS video's footsteps, and lowered the framerate? This would let us increase the resolution, and that's where AV1 really excels: resolution scalability...
Here's AV1 fast at 15 fps 360p, which took 3:05 to encode.
It's getting a bit messier for sure, but it's still surprisingly high quality given how much is getting crammed in so little.
But can this approach be pushed even harder? Let's take a look at 480p set to a mere 10 frames per second. This is very low, but this is the same framerate the original MMS video was using.
Here's AV1 fast, 480p @ 10 fps, 4:01 to encode.
We are definitely on the edge of breaking down now. It's possible there's too much overhead at that resolution for this bitrate to be worth it. But what if we use -cpu-used 4 (the "medium" preset)? That looks really good now, but that took 9:10 to encode...
Wait, is this even going to work?
I have to manually "Share" the file from my file explorer app in order to be able to send it (because the gallery picker won't see it otherwise), but once that's done, it is sent...
... but is it getting received properly?
A core feature of MMS is that there's a server that sits in the middle of all exchanges, getting ready to transcode any media passing through if it thinks that the receiving phone won't be able to play it back. This was very useful back in the day, if you had a brand-new high-tech 256-color phone capable of taking pictures, but the receiver was still rockin' a monochrome Nokia 3310. Instead of receiving a file they wouldn't be able to display, they would instead receive a link that they could then manually type on their computer.
In my case, having sent AV1+Opus .mp4 files to other recent Samsung smartphones, I can tell you that they received the files verbatim. But this may not be the case with every smartphone, and most importantly, this may vary based on carrier...
Either way, it's really cool to see how much you can get out of AV1 and Opus these days.
Finally, here are two last video samples in conditions that are a bit more like "real world footage".
Sea lions fighting in the San Francisco harbor (512x288, medium, 8:51)
Boat to Alcatraz (360x204, medium, 8:24)
Why though
Because I can
and because I think it's kind of cool on principle
1 note
·
View note
Text
How to automate downloading the CSV of your Google Sheets spreadsheet as a one-click action pinned to your Windows taskbar
Howdy folks, I’m currently working on a project (under NDA), and the vast majority of my time is spent in a giant spreadsheet which feeds the game vast quantities of data. Every time we make a change, we have to do this:
Go click the File menu
Go down to “Download...” and wait for the CSV option to show up
Wait a couple seconds while the Google servers process the request
Browse to the appropriate directory if the File Explorer that just showed up isn’t there
Double-click on the existing CSV file
Agree to overwrite
That gets tiresome very quickly, and takes 10 seconds every time. How can we turn that into a one-click action? Preferably pinned to the Windows taskbar?
The idea is to use cURL (which you have already, if you use Windows 10 1803 or newer), along with a couple of other tricks.
IMPORTANT: note that this is assuming that the spreadsheet’s privacy setting is set to “accessible by anyone”, meaning that it would have a public (or “unlisted”) URL. If your spreadsheet needs authentification, you���ll need to pass along parameters to cURL or Powershell... but I don’t know how to do that, so you’ll have to do your own research there. (Good luck!)

STEP ONE: finding the URL that lets you fetch the CSV
So, I found out that there’s some endpoint that is supposed to let you do this “officially”, but when I tried it, it returned a CSV file that was formatted completely differently than the one which the File > Download option provides. Every cell was wrapped in quotes, and the lines were... oddly mixed together... so the file was unusable, because the game I’m working on was expecting something else.
Instead, we’re gonna take a look at the request sent by your browser when you ask for a download manually. In this example, I’ll be using Chrome.
In your sheet, open the developer console using F12. Open the “Network” tab. Then go request a download. You’ll see a bunch of new requests pop up. You’re looking for one like this.

Right-click on that, Copy > Copy link address. Boom, you’ve got your URL.
IMPORTANT: note that, when you download a CSV, you are downloading only ONE sheet of your entire document. If you have several sheets inside one document, each sheet will have its own URL. When you ask Google Sheets to download a .CSV, it will download the sheet that is currently open. So... repeat this first step to find out the URL of every sheet you wish to download!
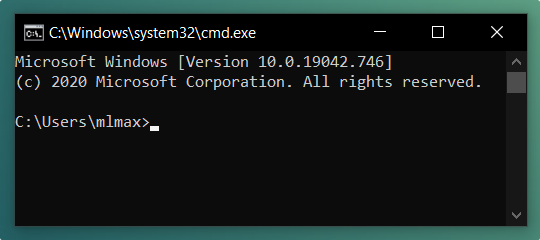
STEP TWO: creating the .batch file
Now, create a .bat file. I’ll be doing it on the Desktop for this example. Here’s the command you’ve got to put in there:
curl -L --url "your spreadsheet URL goes here" --output "C:\(path to your folder)\(filename).csv"
Mind the quotes! Yes, even around the URL, even though it’s one solid block without spaces! If you don’t do that, cURL will interpret the downloaded data instead of passing it along nicely to whichever file it’s meant to go to.
However, if you are a Powershell Person, here’s how to get started:
Invoke-WebRequest "google docs url goes here" -OutFile "C:\(path to your folder)\(filename).csv"
That said, we’re going to continue doing it with a batch file here. Save your .bat and execute it. You should see cURL pop up for a couple seconds, and the CSV will be retrieved! (If that doesn’t happen... well... you’ll have to troubleshoot that on your own. Sorry.)
If you want to download multiple sheets, now’s the time to stack multiple commands too! 😉

STEP THREE: pinning to the Windows taskbar
Windows 10 only lets you pin shortcuts to programs. Not shortcuts to files. Therefore, we need to create a shortcut that will open cmd.exe and points it at our .bat file. And that’s easy!
Right-click your .bat file and select Create Shortcut.
Before you do anything else, right-click your .bat file again, hold SHIFT, and select “Copy as path” (a very useful feature! but hidden.)
Right-click your shortcut > Properties > go into the “Shortcut” tab
Replace the Target field by: C:\Windows\System32\cmd.exe /C
Then hit CTRL+V after that to paste the path you copied before
The Target field should now look like this:
C:\Windows\System32\cmd.exe /C "C:\(path)\(filename).bat"
Make sure the “Start in” field is the folder your .bat is in.
Bonus style points: hit “Change Icon” and go pick an icon you like from any executable on your system (such as the game you’re working on)
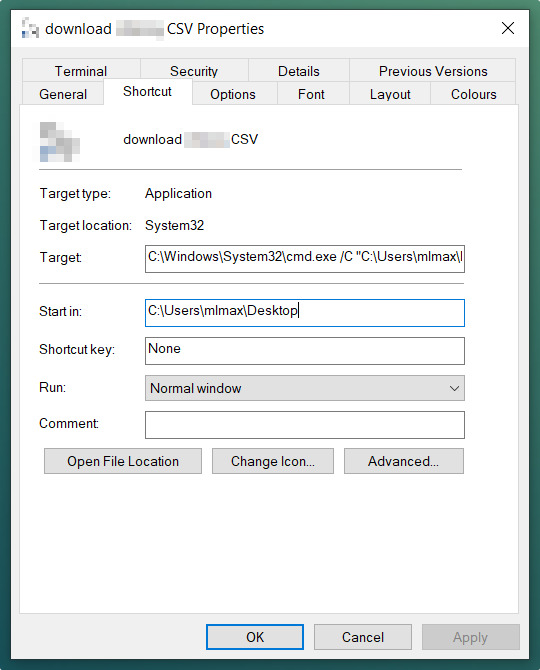
Now, you can drag-and-drop that shortcut onto your Windows taskbar! And you can keep your local CSVs updated in just one click! 🙌
One last warning: if you are working live, making changes, don’t hit your download button TOO fast. If you look at the top of the browser, next to your document name, the little cloud icon should have “all changes saved” next to it. If you’re working on a particularly large spreadsheet (say, more than 10k rows), it may take a couple of seconds for changes to finish saving after the moment you do something! Keep an eye on it when you go hit your taskbar button.

Hope this helped!
Enjoy! 🙂
8 notes
·
View notes
Text
2019 & 2020
Hello everyone! So yeah, this yearly blog post is about three... four months late... it covers two years now.
I did have a lot of things written last year, last time, but the more things have changed, the more I’ve realized that a lot of things I talked about on here... were because I lacked enough of a social life to want to open up on here.
In a less awkwardly-phrased way, what I’m saying is, I was coping.
Not an easy thing to admit to in public by any means, but I reckon it’s the truth. Over the past two years, I’ve made more of an effort to build better & healthier friendships, dial back my social media usage a bit (number 1 coping strategy), not tie all my friendships to games I play, especially Dota (number 2 coping strategy), so that I could be more emotionally healthy overall.

Pictured: me looking a whole lot like @dril on the outside, although not so much on the inside. (Photo by my lovely partner.)
To some degree, I believe it’s important to be able to talk about yourself a bit more openly in a way that is generally not encouraged nor made easy on other social networks (looking at you, Twitter). I know that 2010-me would be scared to approach 2020-me; and it’s my hope that what I am writing here would not help him with that, but also help him become less of an insecure dweeb faster. 😉
Not that recent accomplishments have stopped me from being any less professionally anxious. Sometimes the impostor syndrome just morphs into... something else.
Anyway, what I’m getting at is, the first reason it took me until this year to finish last year’s post is because, with my shift in perspective, and these realizations about myself, I do want to keep a lot more things private... or rather, it’s that I don’t feel the need to share them anymore? And that made figuring out what to write a fair bit harder.
The other reason I didn’t write sooner is because, in 2018, I wrote my "year in review” post right before I became able to talk about my then-latest cool thing (my work on Valve’s 2018 True Sight documentary). So I then knew I’d have to bring it up in the 2019 post. But then, I was asked to work on the 2019 True Sight documentary, and I know it was going to air in late January 2020, so I was like, “okay, well, whatever, it, I’ll just write this yearly recap after that, so I don’t miss the coach this time”. So I just ended up delaying it again until I was like... ��okay, whatever, I’ll just do both 2019 and 2020 in a single post.”
I think I can say I’ve had the privilege of a pretty good 2019, all things considered. And also of a decent 2020, given the circumstances. Overall, 2019 was a year of professional fulfillment; here’s a photo taken of me while I was managing the augmented reality system at The International 2019! (The $35 million dollar Dota 2 tournament that was held, this that year, in Shanghai.)
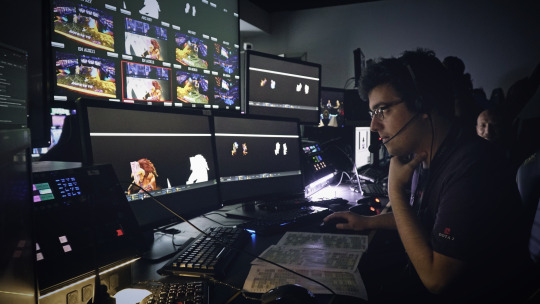
If I’d shown this to myself 10 years ago it would’ve blown my mind, so I guess things aren’t all that bad...!
I’ve brought up two health topics in these posts before: weight & sleep.
As for the first, the situation is still stable. If it is improving, it is doing so at a snail’s pace. But quite frankly, I haven’t put in enough effort into it overall. Even though I know my diet is way better than it was five or six years ago, I’ve only just really caught up with the “how it should have been the entire time” stage. It is a milestone... but not necessarily an impressive one. Learning to cook better things for myself has been very rewarding and fulfilling, though. It’s definitely what I’d recommend if you need to find a place to start.
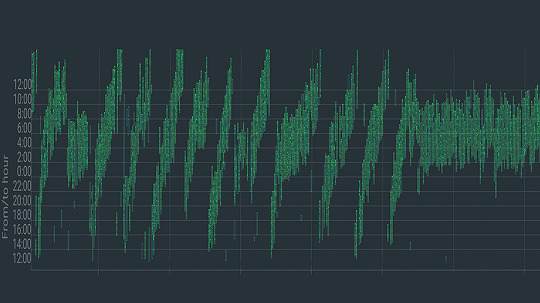
As for sleep, throughout 2019, I continued living 25-hour days for the most part. There were a few weeks during which I slowed down the process, but it continued on going. Then, in late December of 2019, motivated by the knowledge that sleep is such a foundational pillar of your health, I figured I really needed to take things seriously, and I managed to go on a three month streak of mostly-stable sleep! (See the data above.)
Part of what helped was willingly stopping to use my desktop computer once it got too late in the day, avoiding Dota at the end of the day as much as possible, and anything exciting for that matter... and, as much as that sounds like the worst possible stereotype, trying to “listen to my body” and recognizing when I was letting stress and anxiety build up inside me, and taking a break or trying to relax.
Also, a pill of melatonin before going to bed; but even though it’s allegedly not a problem to take melatonin, I figured I should try to rely on it as little as possible.
Unfortunately, that “good sleep” streak was abruptly stopped by a flu-like illness... it might have been Covid-19. The symptoms somewhat matched up, but I was lucky: they were very mild. I fully recovered in just over a week. I coughed a bit, but not that much. If it really was that disease, then I got very lucky.
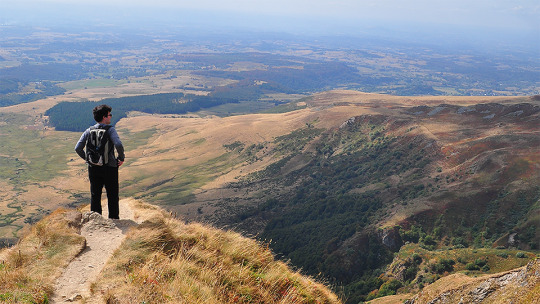
(Pictured: another photo by my lovely SO, somewhere in Auvergne.)
My sleep continued to drift back to its 25-hour rhythm, and I only started resuming these efforts towards the fall... mostly because living during the night felt like a better option with the summer heat (no AC here). I thought about doing that the other way (getting up at 3am instead of going to bed at 7am), and while it’d make more sense temperature-wise, that would have kept me awake when there were practically no people online, and I was trying to have a better social life then, even if had to be purely online due to the coronavirus, so... yeah.
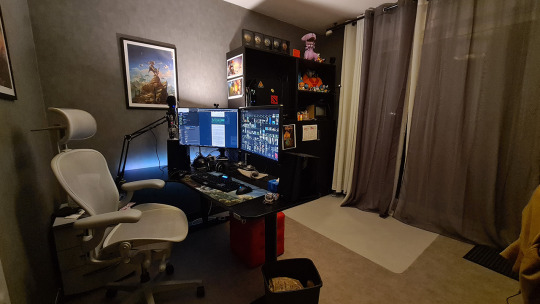
I’ve been working from home since 2012! I also lived alone for a number of years since then. For the most part, it hasn’t been a great thing for my mental health. Having had a taste of what being in an office was like thanks to a couple weeks in the Valve offices, I had the goal of beginning to apply at a few places here and there in March/April. Then the pandemic hit, so those plans are dead in the water. I wanted 2020 to be the year in which I’d finally stop being fully remote, but those plans are now dead in the water.
Now, at the end of the year, I don’t really know if I want to apply at any places. There’s a small handful of studios whose work really resonates with me, creatively speaking, and whose working conditions seem to be alright, at least from what I hear... but, and I swear I’m saying this in the least braggy way possible... there’s very little that beats having been able to work on what I want, when I want, and how much I want.
This kind of freelance status can be pretty terrifying sometimes, but I’ve managed (with some luck, of course) to reach a safe balance, a point at which I’ve effectively got this luxury of being able to only really work on what I want, and never truly overwork myself (at least by the standards of most of the gaming industry). It’s a big privilege and I feel like it’d take a lot to give it up.
Besides the things I mentioned before, one thing I did that drastically improved my mental health was being introduced to a new lovely group of friends by my partner! I started playing Dungeons & Dragons with them, every weekend or so! And in the spirit of a rising tide lifting all boats, I managed to also give back to our lovely DM, by being a sort of “AM” (audio manager)... It’s been great having something to look forward to every week.

Something to look forward to... I’ve heard about the concept of “temporal anchors”. I had heard about how the reason our adult years suddenly pass by in a blur is because we now have more “time” that’s already in our brains, but now I’m more convinced that it’s because we’re going from a very school routine such as the one schools impose upon us, to, well... practically nothing.
I thought most of my years since 2011 have been a blur, but none have whooshed by like 2020 has, and I reckon part of that is because I’ve (obviously) gone out far far less, and most importantly there wasn’t The Big Summer Event That The International Is, the biggest yearly “temporal anchor” at my disposal. The anticipation and release of those energies made summer feel a fair bit longer... and this year, summer was very much a blur for me. In and out like the wind.
I guess besides that, I haven’t really had that much trouble with being locked down. I had years of training for that, after all. Doesn’t feel like I can complain. 😛

(Pictured: trip to Chicago in January of 2019... right when the polar vortex hit!)
Work was good in 2019, and sparser in 2020. Working with Valve again after the 2018 True Sight was a very exciting opportunity. At the time, in February of 2019, I was out with my partner on little holiday trips around my region, and, after night fell, on the way back, we decided to stop in a wide open field, on a tiny countryside path, away from the cities, to try and do some star-gazing, without light pollution getting in the way.

And it’s there and then that I received their message, while looking at the stars with my SO! The timing and location turned that into a very vivid memory...
I then got to spend a couple weeks in their offices in late April / early May. I was able to bring my partner along with me to Washington State, and we did some sightseeing on the weekends.

(Pictured: part of a weekend trip in Washington. This was a dried up lakebed.)
After that, I worked on the Void Spirit trailer in the lead to The International. In August, those couple weeks in Shanghai were intense. Having peeked behind the curtain and seen everything that goes into production really does give me a much deeper appreciation for all the work that goes unseen.
Then after that, in late 2019, there was my work on the yearly True Sight documentary, for the second time. In 2018, I’d been tasked with making just two animated sequences, and I was very nervous since that was my first time working directly with Valve; my work then was fairly “sober”, for lack of a better term.

(Pictured: view from my hotel room in Shanghai.)
For the 2019 edition, I had double the amount of sequences on my plate, and they were very trusting of me, which was very reassuring. I got to be more technically ambitious, I let my style shine through (you know... if it’s got all these gratuitous light beams, etc.), and it was real fun to work on.
At the premiere in Berlin, I was sitting in the middle of the room (in fact, you could spot me in the pre-show broadcast behind SirActionSlacks; unfortunately I had forgotten to bring textures for my shirt). Being in that spot when my shots started playing, and hearing people laughing and cheering at them... that’s an unforgettable memory. The last time I had experienced something like that was having my first Dota short film played at KeyArena in 2015, the laughter of the crowd echoing all around me... I was shaking in my seat. Just remembering it gets my heart pumping, man. It’s a really unique feeling.
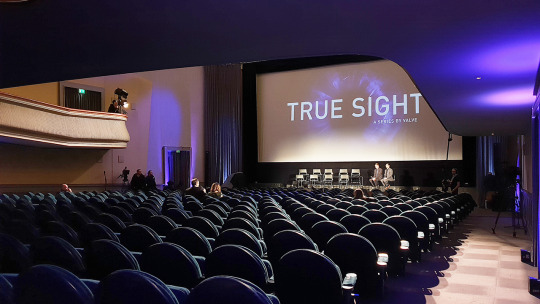
So I’m pretty happy with how that work came out. I came out of it having learned quite a few new tricks too, born out of necessity from my technical ambitions. Stuff I intend to put to use again. I’m really glad that the team I worked with at Valve was so kind and great to work with. After the premiere, I received a few more compliments from them... and I did reply, “careful! You might give me enough confidence to apply!”, to which one of them replied, “you totally should, man.” But I still haven’t because I’m a massive idiot, haha. Well, I still haven’t because I don’t think I’m well-rounded enough yet. And also because, like I alluded to before, I think I’m in a pretty good situation as it is.
It’s not the first encouragements I had received from them, too; there had been a couple people from the Dota team who, at the end of my two week stay in the offices, while I was on my way out, told me I should try applying. But again, I didn’t apply because I’m a massive idiot.

(Pictured: view from the Valve offices.)
To be 200% frank, even though there’s been quite a few people who’ve followed my work throughout the years, comments on Reddit and YouTube, etc. who’ve all said things along the lines of “why aren’t you working for them ?”, well... it’s not something I ever really pursued. I know it’s a lot of people’s dream job, but I never saw it that way. I feel like, if it ever happened to me... sure, that could be cool! But I don’t know if it’s something I really want, or even that I should want?
And if you add “being unsure” to what I consider to be a lack of experience in certain things, well... I really don’t think I’d be a good candidate (yet?), and having seen how busy these people are on the inside, the last thing I want to do is waste their time with a bad application. That would be the most basic form of courtesy I can show to them.
Besides, Covid-19 makes applying to just about any job very hard, if not outright impossible right now. And for a while longer, I suspect.

(Pictured: the Tuilière & Sanadoire rocks.)
I’m still unhappy about the amount of “actual animation” I get to do overall since I like to work on just about every step of the process in my videos, but well. It’s getting better. One thing I am happy with though, is “solving problems”. And new challenges. Seeking the answers to them, and making myself be able to see those problems, alongside entire projects, from a more “holistic” way, that is to say, not missing the forest for the trees.
It’s hard to explain, and even just the use of the term “holistic” sounds like some kind of pompous cop-out... but looking back on how I handled projects 5 years ago vs. now, I see the differences in how I think about problems a lot. And to some extent I do have my time on Valve contracts to thank a LOT in helping me progress there.
Anyway, I’m currently working on a project that I’m very interested & creativefuly fulfilled by. But it has nothing to do with animation nor Dota, for a change! There are definitely at least two other Dota short films I want to make, though. We’ll see how that goes.
Happy new year & take care y’all.
4 notes
·
View notes
Text
How I encode videos for YouTube and archival
Hello everyone! This post is going to describe the way in which I export and encode my video work to send it over the Internet and archive it. I’ll be talking about everything I’ve discovered over the past 10 years of research on the topic, and I’ll be mentioning some of the pitfalls to avoid falling into.
There’s a tremendous amount of misguided information out there, and while I’m not going to claim I know everything there is to know on this subject, I would like to think that I’ve spent long enough researching various issues to speak about my own little setup that I’ve got going on... it’s kind of elaborate and complex, but it works great for me.
(UPDATE 2020/12/09: added, corrected, & elaborated on a few things.)
First rule, the most golden of them all!
There should only ever be one compression step: the one YouTube does. In practice, there will be at least two, because you can’t send a mathematically-lossless file to YouTube... but you can send one that’s extremely close, and perceptually pristine.
The gist of it: none of your working files should be compressed if you can help it, and if they need to be, they should be as little as possible. (Because let’s face it, it’s pretty tricky to keep hours of game footage around in lossless form, let alone recording them as such in the first place.)
This means that any AVC files should be full (0-255) range, 4:4:4 YUV, if possible. If you use footage that’s recorded with, like, OBS, it’s theoretically possible to punch in a lossless mode for x264, and even a RGB mode, but last I checked, neither were compatible with Vegas Pro. You may have better luck with other video editors.
Make sure that the brightness levels and that the colors match what you should be seeing. This is something you should be doing at every single step of the way throughout your entire process. Always keep this in mind. Lagom.nl’s LCD calibration section has quite a few useful things you can use to make sure.
If you’re able to, set a GOP length / max keyframe range of 1 second in the encoder of your footage. Modern video codecs suck in video editors because they use all sorts of compression tricks which are great for video playback, but not so efficient with the ways video editors access and request video frames. (These formats are meant to be played forwards, and requesting frames in any other order, as NLEs do, has far-reaching implications that hurt performance.)
Setting the max keyframe range to 1 second will mildly hurt compressability of that working footage but it will greatly limit the performance impact you’ll be putting your video editor’s decoder through.
A working file is a lossless file!
I’ve been using utvideo as my lossless codec of choice. (Remember, codec means encoder/decoder.) It compresses much like FLAC or ZIP files do: losslessly. And not just perceptual losslessness, but a mathematical one: what comes in will be exactly what comes out, bit for bit.
Download it here: https://github.com/umezawatakeshi/utvideo/releases
It’s an AVI VFW codec. In this instance, VFW means Video for Windows, and it’s just the... sort of universal API that any Windows program can call for. And AVI is the container, just like how MP4 and MKV are containers. MP4 as a file is not a video format, it’s a container. MPEG-4 AVC (aka H.264) is the video format specification you’re thinking of when you say “MP4″.
Here’s a typical AVI VFW window, you might have seen one in the wild already.
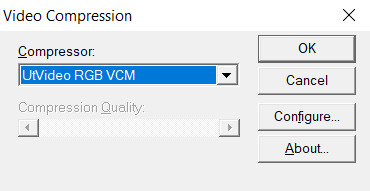
In apps that expose this setting, you can hit “configure” and set the prediction mode of utvideo to “median” to get some more efficient compression at the cost of slower decoding, but in practice this isn’t a problem.
Things to watch out for:
Any and all apps involved must support OpenDML AVIs. The original AVI spec is 2GB max only. This fixes that limitation. That’s normal, but make sure your apps support that. The OpenDML spec is from the mid-90s, so usually it’s not a problem. But for example, the SFM doesn’t support it.
The files WILL be very large. But they won’t be as large as they’d be if you had a truly uncompressed AVI.
SSDs are recommended within the bounds of reasonability, especially NVMe ones. 1080p30 should be within reach of traditional HDDs though.
utvideo will naturally perform better on CGI content rather than real-life footage and I would not recommend it at all for real-life footage, especially since you’re gonna get that in already-compressed form anyway. Do not convert your camera’s AVC/HEVC files to utvideo, it’s pointless. (Unless you were to do it as a proxy but still, kinda weird)
If you’re feeling adventurous, try out the YUV modes! They work great for matte passes, since those are often just luma-masks, so you don’t care about chroma subsampling.
If you don’t care about utvideo or don’t want to do AVIs for whatever reason, you could go the way of image sequences, but you’ll then be getting the OS-level overhead that comes with having dozens of thousands of files being accessed, etc.
They’re a valid option though. (Just not an efficient one in most cases.)
Some of my working files aren’t lossless...
Unfortunately we don’t all have 10 TB of storage in our computers. If you’re using compressed files as a source, make sure they get decoded properly by your video editing software. Make sure the colors, contrast, etc. match what you see in your “ground truth” player of choice. Make sure your “ground truth” player of choice really does represent the ground truth. Check with other devices if you can. You want to cross-reference to make sure.
One common thing that a lot of software screws up is BT.601 & BT.709 mixups. (It’s reds becoming a bit more orange.)
Ultimately you want your compressed footage to appear cohesive with your RGB footage. It should not have different ranges, different colors, etc.
For reasons that I don’t fully understand myself, 99% of AVC/H.264 video is “limited range”. That means that internally it’s actually squeezed into 16-235 as opposed to the original starting 0-255 (which is full range). And a limited range video gets decoded back to 0-255 anyway.
Sony/Magix Vegas Pro will decode limited range video properly but it will NOT expand it back to full 0-255 range, so it will appear with grayish blacks and dimmer whites. You can go into the “Levels” Effects tab to apply a preset that fixes this.
Exporting your video.
A lot of video editors out there are going to “render” your video (that is to say, calculate and render what the frames of your video look like) and encode it at the same time with whatever’s bundled in the software.
Do not ever do this with Vegas Pro. Do not ever rely on the integrated AVC encoders of Vegas Pro. They expect full range input, and encode AVC video as if it were full range (yeah), so if you want normal looking video, you have to apply a Levels preset to squeeze it into 16-235 levels, but it’s... god, honestly, just save yourself the headache and don’t use them.
Instead, export a LOSSLESS AVI out of Vegas. (using utvideo!)
But you may be able to skip this step altogether if you use Adobe Media Encoder, or software that can interface directly with it.
Okay, what do I do with this lossless AVI?
Option 1: Adobe Media Encoder.
Premiere and AE integrate directly with Adobe Media Encoder. It’s good; it doesn’t mix up BT.601/709, for example. In this case, you won’t have to export an AVI, you should be able to export “straight from the software”.
However, the integrated AVC/HEVC encoders that Adobe has licensed (from MainConcept, I believe) aren’t at the top of their game. Even cranking up the bitrate super high won’t reach the level of pristine that you’d expect (it keeps on not really allocating bits to flatter parts of the image to make them fully clean), and they don’t expose a CRF mode (more on that later), so, technically, you could still go with something better.
But what I’m getting at is, it’s not wrong to go with AME. Just crank up the bitrate though. (Try to reach 0.3 bits per pixel.) Here’s my quick rough quick guideline of Adobe Media Encoder settings:
H.264/AVC (faster encode but far from the most efficient compression one can have)
Switch from Hardware to Software encoding (unless you’re really in a hurry... but if you’re gonna be using Hardware encoding you might as well switch to H.265/HEVC, see below.)
Set the profile to High (you may not be able to do this without the above)
Bitrate to... VBR 1-pass, 30mbps for 1080p, 90mbps for 4K. Set the maximum to x2. +50% to both target and max if fps = 60.
“Maximum Render Quality” doesn’t need to be ticked, this only affects scaling. Only tick it if you are changing the final resolution of the video during this encoder step (e.g. 1080p source to be encoded as 720p)
If using H.265/HEVC (smaller file size, better for using same file as archive)
Probably stick with hardware encoding due to how slow software encoding is.
Stick to Main profile & Main tier.
If hardware: quality: Highest (slowest)
If software: quality: Higher.
4K: set Level to 5.2, 60mbps
1440p: set Level to 5.1, 40mbps
1080p: keep Level to 5.0, 25mbps
If 60fps instead of 24/30: +50% to bitrate. In which case you might have to go up to Level 6.2, but this might cause local playback issues; more on "Levels” way further down the post.
Keep in mind however that hardware encoders are far less efficient in terms of compression, but boy howdy are they super fast. This is why they become kind of worth it when it comes to H.265/HEVC. Still won’t produce the kind of super pristine result I’d want, but acceptable for the vast majority of YouTube cases.
Option 2: other encoding GUIs...
Find software of your choice that integrates the x264 encoder, which is state-of-the-art. (Again, x264 is one encoder for the H.264/AVC codec specification. Just making sure there’s no confusion here.)
Handbrake is one common choice, but honestly, I haven’t used it enough to vouch for it. I don’t know if the settings it exposes are giving you proper control over the whole BT601/709 mess. It has some UI/UX choices which I find really questionable too.
If you’re feeling like a command-line masochist, you could try using ffmpeg, but be ready to pour over the documentation. (I haven’t managed to find out how to do the BT.709 conversion well in there yet.)
Personally, I use MeGUI, because it runs through Avisynth (a frameserver), which allows me to do some cool preprocessing and override some of the default behaviour that other encoder interfaces would do. It empowers you to get into the nitty gritty of things, with lots of plugins and scripts you can install, like this one:
http://avisynth.nl/index.php/Dither_tools (grab it)
Once you’re in MeGUI, and it has finished updating its modules, you gotta hit CTRL+R to open the automated script creator. Select your input, hit “File Indexer” (not “One Click Encoder”), then just hit “Queue” so that Avisynth’s internal thingamajigs start indexing your AVI file. Once that’s done, you’ll be greeted with a video player and a template script.
In the script, all you need to add is this at the bottom:
dither_convert_rgb_to_yuv(matrix="709",output="YV12",mode=7)
This will perform the proper colorspace conversion, AND it does so with dithering! It’s the only software I know of which can do it with dithering!! I kid you not! Mode 7 means it’s doing it using a noise distribution that scales better and doesn’t create weird patterns when resizing the video (I would know, I’ve tried them all).
Your script should look like this, just 3 lines
LoadPlugin("D:\(path to megui, etc)\LSMASHSource.dll")
LWLibavVideoSource("F:\yourvideo.avi")
dither_convert_rgb_to_yuv(matrix="709",output="YV12",mode=7)
The colors WILL look messed up in the preview window but that’s normal. It’s one more example of how you should always be wary when you see an issue. Sometimes you don’t know what is misbehaving, and at which stage. Always try to troubleshoot at every step along the way, otherwise you will be chasing red herrings. Anyway...
Now, back in the main MeGUI window, we’ve got our first line complete (AviSynth script), the “Video Output” path should be autofilled, now we’re gonna touch the third line: “Encoder settings”. Make sure x264 is selected and hit “config” on the right.
Tick “show advanced settings.”

Set the encoding mode to “Const. Quality” (that’s CRF, constant rate factor). Instead of being encoded with a fixed bitrate, and then achieving variable quality with that amount of bits available, CRF instead encodes for a fixed quality, with a variable bitrate (whatever needs to be done to achieve that quality).
CRF 20 is the default, and it’s alright, but you probably want to go up to 15 if you really want to be pristine. I’m going up to 10 because I am unreasonable. (Lower is better, higher numbers means quality is worse.)
Because we’re operating under a Constant Quality metric, CRF 15 at encoder presets “fast” vs. “slow” will produce the same perceptual quality, but at different file sizes. Slow being smaller, of course.
You probably want to be at “slow” at least, there isn’t that much point in going to “slower” or “veryslow”, but you can always do it if you have the CPU horsepower to spare.
Make sure AVC Profile is set to High. The default would be Main, but High unlocks a few more features of the spec that increase compressability, especially at higher resolutions. (8x8 transforms & intra prediction, quantization scaling matrices, cb/cr controls, etc.)
Make sure to also select a Level. This doesn’t mean ANYTHING by itself, but thankfully the x264 config window here is smart enough to actually apply settings which are meaningful with regards to the level.
A short explanation is that different devices have different decoding capabilities. A decade ago, a mobile phone might have only supported level 3 in hardware, meaning that it could only do main profile at 30mbps max, and if you went over that, it would either not decode the video or do it using the CPU instead of its hardware acceleration, resulting in massive battery usage. The GPU in your computer also supports a maximum level. 5.0 is a safe bet though.
If you don’t restrict the level accordingly to what your video card supports, you might see funny things happen during playback:

It’s nothing that would actually affect YouTube (AFAIK), but still, it’s best to constrain.
Finally, head over to the “misc” tab of the x264 config panel and tick these.

If the command line preview looks like mine does (see the screenshot from a few paragraphs ago) then everything should be fine.
x264 is configured, now let’s take care of the audio.
Likewise, “Audio Input” and “Audio Output” should be prefilled if MeGUI detected an audio track in your AVI file. Just switch the audio encoder over to FLAC, hit config, crank the slider to “smallest file, slow encode” and you’re good to go. FLAC = mathematically lossless audio. Again, we want to not compress anything, or as little as possible until YouTube does its own compression job, so you might as well go with FLAC, which will equal roughly 700 to 1000kbps of audio, instead of going with 320kbps of MP3/AAC, which might be perceptually lossless, but is still compressed (bad). The added size is nothing next to the high-quality video track you’re about to pump out.
FLAC is not an audio format supported by the MP4 container, so MeGUI should have automagically changed the output to be using the MKV (Matroska) container. If it hasn’t, do it yourself.

Now, hit the “Autoencode” button in the lower right of the main window. And STOP, do not be hasty: in the new window, make sure “no target size” is selected before you do anything else. If you were to keep “file size” selected, then you would be effectively switched over to 2-pass encoding, which is another form of (bit)rate control. We don’t want that. We want CRF.
Hit queue and once it’s done processing, you should have a brand new pristine MKV file that constains lossless audio and extra clean video! Make sure to double-check that everything matches—take screenshots of the same frames in the AVI and MKV files and compare them.
Now all you’ve got to do is send it to YouTube!
For archival... well, you could just go and crank up the preset to Placebo and reduce CRF a little bit—OR you could use the 2-pass “File Size” mode which will ensure that your video stream will be the exact size (give or take a couple %) you want it to be. You could also use x265 for your archival file buuuut I haven’t used it enough (on account of how slow it is) to make sure that it has no problems anywhere with the whole BT.601/708 thing. It doesn’t expose those metadata settings so who knows how other software’s going to treat those files in the future... (god forbid they get read as BT.2020)
You can use Mediainfo (or any player that integrates it, like my favorite, MPC-HC) to check the metadata of the file.
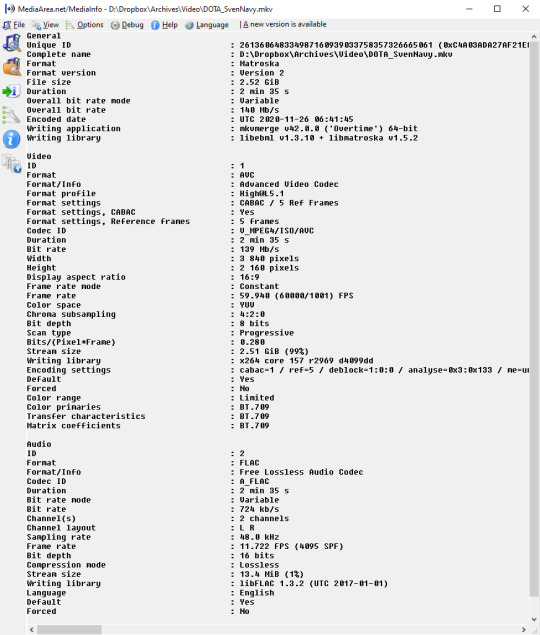
Good luck out there!
And remember to always double-check the behaviour of decoders at every step of the way with your setup. 99% of the time I see people talk about YouTube messing with the contrast of their video, it’s because they weren’t aware of how quirky Vegas can be with H.264/AVC input & its integrated encoder.
Hope this helps!
15 notes
·
View notes
Text
The hunt for Realtek’s missing driver enhancements
I just had to switch from a x399 motherboard to a B550 model, both by ASRock, both “Taichi”. It’s a long story as to why my hands were tied, but anyway, I did it without reinstalling Windows, and it worked fine! (I don’t think it’s an important detail as far as this story is concerned, but you never know.)
There are two features that I want with my desktop audio:
Disabled jack detection: plugging in a front headphone jack does not disable rear speaker output. There are no separate audio devices in Windows, which is the most important thing to me. A lot of apps still don’t handle playback devices being changed in the middle of execution.
Loudness equalization: does exactly what it says on the tin. Very important to me for a few reasons. Because it works on a per-stream basis, it greatly enhances voice chat in games, for friends who are still too quiet even on 200% boost. If a video somewhere is too quiet, well now it’s not. And it means that I can keep my headset volume lower overall, which is healthy. (Especially as someone who suffers from non-hearing-loss-related tinnitus.)
The problem is, with the default Windows drivers, I could have #2, but not #1, because the Realtek Audio Console UWP app wouldn’t work. (You can only find this app through a link, not the Win10 store itself, for some goddamned reason!)
And with my motherboard’s drivers, I had #1, but not #2!
Now, I can’t say this with 100% certainty, but it seems like the reason is that ASRock has made their Realtek driver integrated with some Gamer™ Audio™ third-party thing called Nahimic. And in doing so, they disabled the stock enhancements, Loudness Equalization included.
But don’t bother trying to download the “generic” drivers through Realtek’s own website: they’re from 2017, and as far as I understand it, they’re not the new DCH-style drivers, they’re the old kind. DCH is a new driver system with Windows 10 that decouples a driver and its control panel, so that either can be installed & updated separately. (This is actually a pretty great thing, especially for laptops in general, but especially laptop graphics.)
So where could I find drivers without any kind of third-party crap?
The solution was, for me, this unofficial package:
https://github.com/pal1000/Realtek-UAD-generic
It uses other sources (like the Microsoft catalog) to fetch the actual latest universal drivers. However, I had to go download this one other tool, “Driver Store Explorer”, to force-delete a couple of things that were causing the setup script to loop.
Anyway, now I have both #1 and #2, I’m happy, but also pretty annoyed that I had to go resort to this kind of solution just to get the basic enhancements & effects working. Don’t fix what isn’t broken...
If this ever breaks I’ll probably just stick with #2 only and buy a jack splitter to fix the lack of #1. Ugh.
I hope all of this helps the next poor fool who has to fix what wasn’t broken before. Godspeed to you, traveler.
4 notes
·
View notes
Text
How to launch a symlinked Source 2 addon in the tools & commands to improve the SFM
I like to store a lot of my 3D work in Dropbox, for many reasons. I get an instant backup, synchronization to my laptop if my desktop computer were to suddenly die, and most importantly, a simple 30-day rollback “revision” system. It’s not source control, but it’s the closest convenience to it, with zero effort involved.
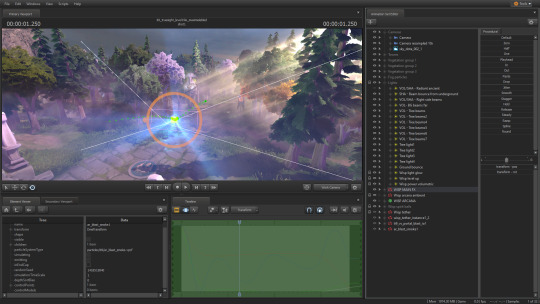
This also includes, for example, my Dota SFM addon. I have copied over the /content and /game folder hierarchies inside my Dropbox. On top of the benefits mentioned above, this allows me to launch renders of different shots in the same session easily! With some of my recent work needing to be rendered in resolutions close to 4K, it definitely isn’t a luxury.
So now, of course, I can’t just launch my addon from my Dropbox. I have to create two symbolic links first — basically, “ghost folders” that pretend to be the real ones, but are pointing to where I moved them! Using these commands:
mklink /J "C:\Program Files (x86)\Steam\SteamApps\common\dota 2 beta\content\dota_addons\usermod" "D:\path\to\new\location\content"
and
mklink /J "C:\Program Files (x86)\Steam\SteamApps\common\dota 2 beta\game\dota_addons\usermod" "D:\ path\to\new\location\game"
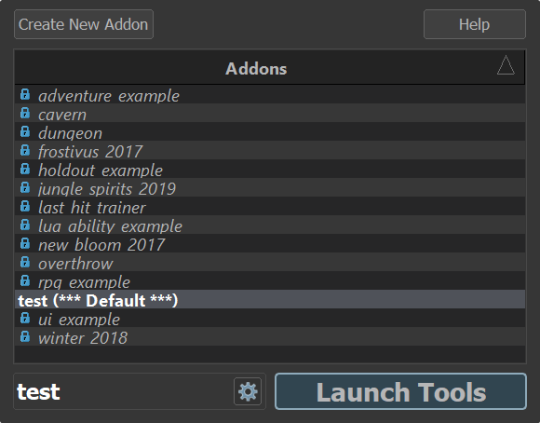
Now, there’s a problem though; somehow, symlinked addons don’t show up in the tools startup manager (dota2cfg.exe, steamtourscfg.exe, etc)
It’s my understanding that symbolic links are supposed to be transparent to these apps, so maybe they actually aren’t, or Source 2 is doing something weird... I wouldn’t know! But it’s not actually a problem.
Make a .bat file wherever you’d like, and drop this in there:
start "" "C:\Program Files (x86)\Steam\steamapps\common\dota 2 beta\game\bin\win64\dota2.exe" -addon usermod -vconsole -tools -steam -windowed -noborder -width 1920 -height 1080 -novid -d3d11 -high +r_dashboard_render_quality 0 +snd_musicvolume 0.0 +r_texturefilteringquality 5 +engine_no_focus_sleep 0 +dota_use_heightmap 0 -tools_sun_shadow_size 8192 EXIT
Of course, you’ll have replace the paths in these lines (and the previous ones) by the paths that match what you have on your own machine.
Let me go through what each of these commands do. These tend to be very relevant to Dota 2 and may not be useful for SteamVR Home or Half-Life: Alyx.
-addon usermod is what solves our core issue. We’re not going through the launcher (dota2cfg.exe, etc.) anymore. We’re directly telling the engine to look for this addon and load it. In this case, “usermod” is my addon’s name... most people who have used the original Source 1 SFM have probably created their addon under this name 😉
-vconsole enables the nice separate console right away.
-windowed -noborder makes the game window “not a window”.
-width 1920 -height 1080 for its resolution. (I recommend half or 2/3rds.)
-novid disables any startup videos (the Dota 2 trailer, etc.)
-d3d11 is a requirement of the tools (no other APIs are supported AFAIK)
-high ensures that the process gets upgraded to high priority!
+r_dashboard_render_quality 0 disables the fancier Dota dashboard, which could theoretically by a bit of a background drain on resources.
+snd_musicvolume 0.0 disables any music coming from the Dota menu, which would otherwise come back on at random while you click thru tools.
+r_texturefilteringquality 5 forces x16 Anisotropic Filtering.
+engine_no_focus_sleep 0 prevents the engine from “artificially sleeping” for X milliseconds every frame, which would lower framerate, saving power, but also potentially hindering rendering in the SFM. I’m not sure if it still can, but better safe than sorry.
+dota_use_heightmap 0 is a particle bugfix that prevents certain particles from only using the heightmap baked at compile time, instead falling back on full collision. You may wish to experiment with both 0 and 1 when investigating particle behaviours.
-tools_sun_shadow_size 8192 sets the Global Light Shadow res to 8192 instead of 1024 (on High) or 2048 (on Ultra). This is AFAIK the maximum.
And don’t forget that “EXIT” on a new line! It will make sure the batch file automatically closes itself after executing, so it’ll work like a real shortcut.

Speaking of, how about we make it even nicer, and like an actual shortcut? Right-click on your .bat and select Create Shortcut. Unfortunately, it won’t work as-is. We need to make a few changes in its properties.
Make sure that Target is set to:
C:\Windows\System32\cmd.exe /C "D:\Path\To\Your\BatchFile\Goes\Here\launch_tools.bat"
And for bonus points, you can click Change Icon and browse to dota2cfg.exe (in \SteamApps\common\dota 2 beta\game\bin\win64) to steal its nice icon! And now you’ve got a shortcut that will launch the tools in just one click, and that you can pin directly to your task bar!
Enjoy! 🙂
8 notes
·
View notes
Text
My quick review of the ASUS XG27UQ monitor (4K, HDR, 120Hz)
I originally wanted to tweet this series of bullet points out but it was getting way too long, so here goes! I got this to replace a PG278Q, which was starting to develop odd white stains, and never had good color reproduction in the first place (TN film drawbacks, very low gamma resulting in excessively bright shadows, under-saturated shadows, etc.)
The hardware aesthetic is alright! The bezels may feel a bit large to some people, but I don’t mind them at all. If you’re a fan of the no-bezel look, you’ll probably hate it. There is a glowing logo on the back that you can customize (Static Cyan is my recommendation), but it isn’t bright enough to be used as bias lighting, which would’ve been nice.
The built-in stand is decent; it comes with a tacky and distracting light projection feature at the bottom. It felt quite stable, though I don’t care about it because it got instantly replaced by an Ergotron LX arm. (I have two now, I really recommend them in spite of their price.)
The coating is a little grainy and this is noticeable on pure colors! You can kinda see the texture come through, a bit more than I’d like. Not a huge deal though.
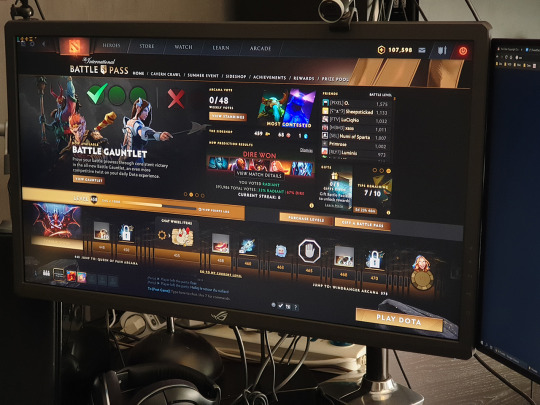
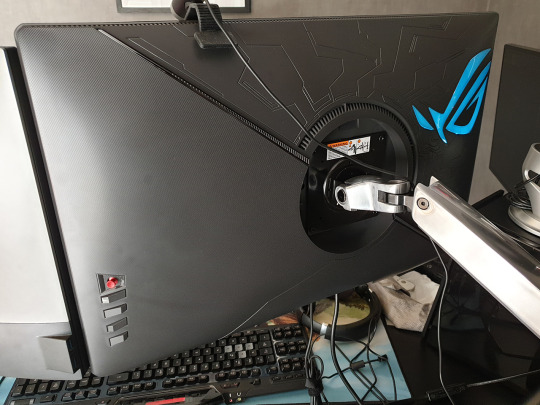
The rest of the review will be under the cut.
The default color preset (”racing mode”), which the monitor is calibrated against, is very vivid and saturated. It looks great! But it’s inherently inaccurate, which bothers me, so I don’t like it. It looks like as if sRGB got stretched into the expanded gamut of the monitor.
sRGB “emulation” looks very similar to my Dell U2717D, whose sRGB mode is factory-calibrated. However, the XG27UQ’s sRGB mode has lower gamma (brighter shadows), so while the colors are accurate, the gamma is not. It feels 1.8-ish. Unless you were in a bright room, it would be inappropriate for work that needs to have accurate shadows. This mode also locks other controls, so it’s not the most useful, but the brightness is set well on it, so it is usable!
The “User Mode” settings use the calibrated racing mode as a starting point, which is a big relief. So it’s possible to tweak the color temperature and the saturation from there! I checked pure white against my Dell monitor and my smartphone (S9+) and tried to reach a reasonable 3-way compromise between them, knowing that the Dell is most likely the most accurate, and that Samsung also allegedly calibrates their high-end smartphones well. My configuration ended up being R:90/G:95/B:100 + SAT:42. This matches the saturation of the U2717D sRGB mode fairly closely. You also get to choose between 1.8, 2.2, and 2.5 gamma too, which is not too granular, but great to have. It kinda feels like my ideal match is between 2.2 and 2.5, but 2.2 is fine.
The color gamma according to lagom.nl looked fine, but I had to open the picture in Paint, otherwise it was DPI-scaled in the browser, and that messed with the way it works!! (That website is an amazing resource for quick monitor checks.)
Colors are however somewhat inaccurate in this mode. It’s easy to see by comparing the tweaked User Mode vs. sRGB emulation. There are some rather sizeable hue shifts in certain cases. I believe part of this is caused by the saturation tweak not operating properly.
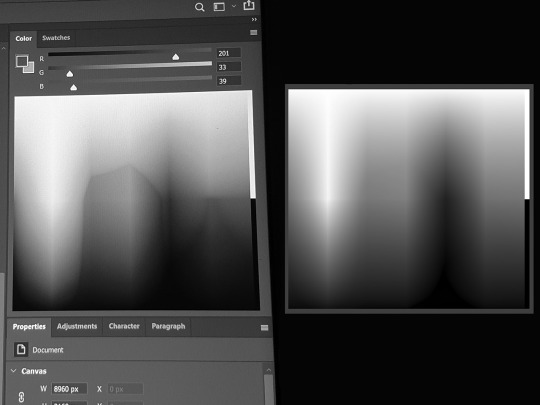
Here’s a photo of what the Photoshop color picker looks like when Saturation is set to 0 on the monitor, vs. what a proper grayscale conversion should be. It’s definitely not using the right coefficients.
So in practice, when using the Racing & User modes, compared to the U2717D sRGB, here’s a few examples of what I see:
Reds are colder (towards the purple side) & oversaturated
Bright yellow (255,215,90) is undersaturated
Bright green (120,200,130) is undersaturated
Dark green (0,105,60) is fine
Magenta (220,13,128) is oversaturated
Dark reds & brown (150,20,20 to 90,15,10) is oversaturated
Cyan (0,180,240) is fine
Pink (230,115,170) is fine
Some shades of bright saturated blue (58,48,220) have the biggest shifts.
The TF2 skin tone becomes slightly desaturated and a bit colder
It’s not inaccurate to the point of being distracting, and you always have the sRGB mode (with flawed gamma?) to check things with, but it’s definitely not ideal, and some of these shifts go far enough that I wouldn’t recommend this monitor for color work that needs to be very accurate.
I’ve went back and forth, User vs sRGB, several times, on my most recent work (True Sight 2019 sequences). I’ve found the differences were acceptable for the most part; they bothered me the most during the Chronosphere sequence, in which the hazy sunset atmosphere turned a bit into to a rose gold tint, which wasn’t unpleasant at all — and looked quite pretty! — but it wasn’t what I did.
I’m coming from the point of view of a “prosumer” who cares about color accuracy, but who ultimately recognizes that this quest is impossible in the face of so many devices out there being inaccurate or misconfigured one way or the other. In the end, my position is more pragmatic, and I feel that you gotta be able to see how your stuff’s gonna look on the devices where it’ll actually be watched. So while I’ve done color grading on a decent-enough sRGB-calibrated monitor, I’ve always checked it against the inaccurate PG278Q, and I’ve done a little bit of compromising to keep my color work looking alright even once gamma shifted. And so, now, I’ll also be getting to see what my colors look like on a monitor that doesn’t quite restrain itself to sRGB gamut properly.
Well, at least, all of that stuff is out of the box, but...
TFTCentral (one of the most trustworthy monitor review websites, in my opinion) has found suspiciously similar shifts. But after calbration, their unit passed with flying colors (pun intended), so if you really care about this sort of stuff and happen to have a colorimeter... you should give it a try!
I hope one day we’ll be able to load and apply an ICC/ICM profile computer-wide, instead of only being able to load a simple gamma curve on the GPU with third-party tools like DisplayCAL. Even if it had to squeeze the gamut a bit...
Also, there are dynamic dimming / auto contrast ratio features which could potentially be useful in limited scenarios if you don’t care about color accuracy and want to maximize brightness. I believe they are forced on for HDR. But you will probably not care at all.
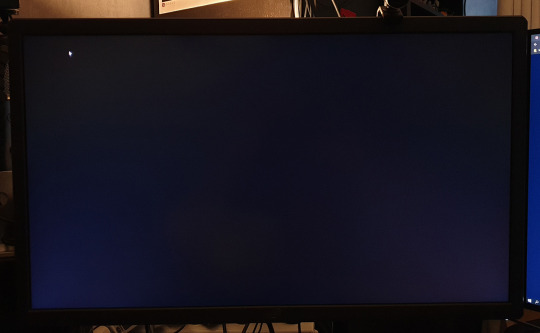
IPS glow is not very present on my unit; less than on my U2717D. However, when it starts to show up (more than a 30°-ish angle away), it shows up more. UPDATED: after some more time with the monitor, I wanna say that, in fact, IPS glow isit's slightly stronger, and shows up sooner (as in, from broader angles). It requires me to sit a greater distance from the monitor in order to not have it show up and impede dark scenes. It is worse than on my U2717D.
Backlight bleed, on the other hand, is there, and a little bit noticeable. On my unit, there’s a little bit of blue-ish bleed on the lower left corner, and some dark-grey-orange bleed for a good third of the upper-left. However, in practice, and to my eyes, it doesn’t bother me, even when I look for it. It ain’t perfect, but I’ve definitely seen worse, especially from ASUS. The photo above was taken at 100% brightness, and I’ve tried to make it just a tad brighter than what my eyes see, so hopefully it’s a decent sample.
Dead pixels: on my unit, I have 5 stuck dead green subpixels overall. There are 4 in a diamond pattern somewhat down and right to the center of the screen, and another one, a bit to the right of that spot. All of them kinda “shimmer” a little bit, in the sense that they become stronger or weaker based on my angle of view. They’re a bummer but I haven’t found them to be a hindrance. Took me a few days to even notice them for the first time, after all.
HDR is just about meaningless and uses some global dimming techniques, as well as stuff that feels like... you know that Intel HD driver feature that brightens the content on the screen, while lowering the panel backlight power in tandem, to save power, but it kinda flattens (and sometimes clips) highlights? It kinda looks like that sometimes. Without local dimming, HDR is just about meaningless.
Unfortunately, the really nice HDR support in computer monitors is still looking like it’s going to be at the very least a year out, and even longer for sub-1000 price ranges. (I was holding out for the PG27UQX at first, but it still has no word on availability, a whole year after being announced, and will probably cost over two grand, so no thanks.)
G-Sync (variable refresh rate) support is... not there yet?! The latest driver does not recognize the monitor as being compatible with the feature. And it turns out that the product page says that G-Sync support is currently being applied for. Huh. I thought they had special chips in those monitors solely for the feature, but it’s possible this one does it another way? (The same way that Freesync monitors do it?)
DSC (Display Stream Compression) enables 4K 120Hz to work through a single DisplayPort cable, without chroma subsampling. And it’s working for me, which came as a surprise, as I was under the impression this feature required a 2000-series Turing GPUs. (I have a 1080 Ti.) I was wrong about this, it’s 144 Hz that requires DSC. And I don’t have it on this Pascal card. But I don’t really care since I prefer to run this monitor at 120 Hz, as it’s a multiple of the 60 Hz monitor next to it.
Windows DPI scaling support is okay now. Apps that are DPI-aware, and the vast majority of them are now, scale back and forth between 150% and 100% really well as they get dragged between the monitors! The only program I’ve had issues with is good old Winamp, which acted as if it was 100% on the XG27UQ... and shrinked down on another monitor. So I asked it to override DPI scaling behaviour (”scaling performed by: application”), which keeps the player skin at 100% on every monitor, but any call to system fonts and UI (Bento skin’s playlist + Settings panel) are still at 150%. So I had to set the playlist font size to 7 for it to look OK on the non-scaled monitor!

A few apps misbehave in interesting ways; TeamSpeak, for example, seen above, scales everything back from 150% to 100%, and there is no blurriness, but the “larger layout” (spacing, etc.) sticks.
Games look great with 4K in 27 inches. Well, I’ve only really tried Dota 2 so far, but man does it get sharp, especially with the game’s FXAA disabled. It was already a toss-up at 1440p, but at 4K I would argue you might as well keep it disabled. However, going from 2560x1440 to 3840x2160 requires some serious horsepower. It may look like a +50% upgrade in pixels, but it’s actually a +125% increase! (3.68 to 8.29 million pixels.) For a 1080 Ti, maxed-out Dota 2 at 1440p 120hz is really trivial, but once you go to 4K, not anymore... you could always lower resolution scale though! (Not an elegant solution if you like to use sharpening filters though, looking at you RDR2.)
Overall, the XG27UQ is a good monitor, and I’m satisfied with my purchase, although slightly disappointed by the strong IPS glow and the few dead subpixels. 7/10
6 notes
·
View notes
Text
PState overclocking on the x399 Taichi motherboard and a Ryzen Threadripper 1920x
It’s broken. Just writing this quick post so that someone out there might not waste an hour looking for info like I did.
Little bit of context: “p-state overclocking” is better than regular overclocking, because it doesn’t leave your clock speed and voltage completely fixed. So your processor will still ramp down when it’s (mostly) idle. On Ryzen, this can save you dozens of watts.
But here’s one thing: on the x399 Taichi motherboard, according to the information I’ve gleaned from various sources, it is partially broken, unless you have a 1950x.
How so? The Vcore will stay fixed, no matter what the current clock speed is. This means you’ll still be using ~1.35 volts at 2.2 GHz, which is extremely suboptimal and a tremendous waste.
Several solutions were pointed out, such as having to leave the pstate VID to be the exact same and modifying voltage using the general offset instead, etc. etc. but nothing works. I’ve reset my BIOS settings and then modified pstate0 by +25 Mhz, this being literally the only change done from the default settings.
It still made Vcore fixed at ~1.22 volts, and it wouldn’t budge.
From what I gather, this behaviour is broken since about 1.92 or 2.00, but pstate tweaking should still work properly if you have a 1950x...?
For what it’s worth, as a sidenote, overclocking a Ryzen processor is wasteful and not really needed. (Why did I do it? I was mostly just curious about how well my cooling setup worked.) Instead, you are much better off undervolting. I have my 1920x set to -100mV in offset mode + the droopiest load line calibration setting, Level 5. I could probably push it further, though probably not by much. This ensures a voltage that is as low as possible, especially during heavy load. This, in turn, allows the auto-boosting behaviours to go to their full potential. That’s especially true on Zen+. I have a friend whose 2700X boosts at 4.2 GHz all the time solely thanks to undervolting, no other tweaks needed. As for my 1920x, it’s gone from an all-core max-load frequency of 3500 to 3700 MHz.
1 note
·
View note
Text
2018
Hello again, it’s time for the yearly blog post. I’m a couple weeks late, and I’d like to keep it short this year, so let’s get started.
I am technically still publishing this in January so it’s cool.
One thing that I remember writing about last year is that I constantly felt hesitant, self-questioning in my writing. I think I’ve managed to dial that back a bit
Overall I feel less distraught than last year. I feel like I’ve managed to internalize how to feel less depressed by the world in general. Maybe I went through the five stages of grief and landed at acceptance. Maybe this is some kind of better form of nihilism... healthy nihilism? If nihilism, or what it is commonly understood to be, is: “nothing matters at all, not even you, speck of dust, universe, etc.”, would a healthy variant of it be: “realize your insignificance in the vast majority of areas, but don’t forget about what you can do, and which intrinsically matters”?
I’ve managed to let my tinnitus bother me mentally and morally a lot less. Even though I’ve had to increase the volume of the ambient rain sounds (on my left) and music (on my right) that I put on in order to sleep. I remember, a few years ago, I only needed about 20% on my phone. Now it’s easily 50%.
However, I recently had a flare-up on the day that I came back from the holiday festivities at my family. It was a lot stronger for a week, for no good reason. I think it’s back to normal (although a tiny bit worse), but I don’t wish to let go of my “mental firewall” that I try to convert into a completely subconscious function. Tinnitus is a lot worse when trying to ignore it is on the level of “you are now breathing manually”. (Sorry, best example I could think of.) I also had another flare-up, but not as bad, in the second half of January. It suuuuuuucckkkssss.
youtube
I made this video in January. It was pretty intense, but it was a great experience. I think this might have been my first standalone “big gig”. I think it turned out okay! I did a small interview about it over here if you’d like to read more. I was pretty happy about doing what was semi-official work, something that was effectively one step removed from being qualifiable as such.
Then I participated for the fourth time in the Dota 2 Short Film Contest.
youtube
I was really really really stressed with my 2017 entry, because 3 in a row is the magic number, the goal that sounds cool and all that. 4 in a row? That’s not particularly newsworthy. Or catchy-sounding. And I remembered that some people said (jokingly or not) stuff along the lines “Max, give them a chance”, “go easy on them next time”, “do you really need to win again”, etc.
So instead of going all-in on comedy and jokes, which is more or less the recipe for success in a 90-second format, I decided instead to fully indulge myself. I wanted to do what I wanted to do. (Great sentence, I know.) Completely. I didn’t really succeed, but I’m really happy of this piece of work regardless. I always get tempted to go back to previous projects and make “director’s cuts”, extended versions that would fully reflect my original vision, and then I never actually follow through on that desire, but man, that desire has been the strongest with this one.
And I may not have won, only placing 8th (which would make me a “finalist” and not a “winner”, those in the top 3), but what I got instead was indirect benefits.
First of all, I didn’t stress over my entry and whether it would win for an entire month. In 2017, I was working really hard on my film. Hard enough that it took me days to wind down. Even three days after I was all done and everything was uploaded, submitted, shared, I still woke up in the morning and my first thought was “gotta get downstairs to work on my movie now, quick”. This year, though, I took my time. Chill. No crunch. It took me exactly one month, my previous entry took me three weeks. But that month was stress-free, no anxiety. And I accepted really fast that I wasn’t going to place top 3, so half my time in Vancouver for TI8 wasn’t spent worrying about it. This made me enjoy my time overseas a lot more. And the second indirect benefit was that, being the most technically and artistically impressive thing I’d done to date, it brought professional attention to my work.
After TI8, I had brunch with a few people from the local indie game scene. I felt really out-of-place, I was sick from “con flu”, and the whole day is a blurry mess in my head, but they were really welcoming and appreciative of my work. It was a huge burden of self-doubt, of questions like “am I worthy”, “am I good enough”, etc. lifted away.

Then a couple of very cool Valve-related things happened... I was hired by Scraggy Rascal Studio, a team that was formed to work on official SteamVR Home environments.
Then directly by Valve themselves, to work on a couple of cinematics for True Sight, their series of documentaries that follow players during the biggest Dota 2 tournaments. They were really pleasant to work with, and it was a very validating moment for me. I hope we’ll get to do something again.
I also wrote a lengthy blog post about everything that I could remember about video games and how I related to them from about age 3 up until present day.
I’ll get around to making that double-feature (TI8+TI7) breakdown video one day.
That’s it for now, see you next year.
3 notes
·
View notes
Text
Growing Pains - Zelda, Tony Hawk, The Sims, games and related memories from my formative years
This blog post is about my personal history with video games, how they influenced me growing up, how they sometimes helped me, and more or less an excuse to write about associated memories with them.
This is a very straightforward intro, because I’ve had this post sitting as a draft for ages, trying to glue all of it cohesively, but I’m not a very good writer, so I never really succeeded. Some of these paragraphs date back at least one year.
And I figured I should write about a lot of this as long as I still remember clearly, or not too inaccurately. Because I know that I don’t remember my earliest ever memory. I only remember how I remember it. So I might as well help my future self here, and give myself a good memento.
Anyway, the post is a kilometer long, so it’ll be under this cut.
My family got a Windows 95 computer when I was 3 years old. While I don’t remember this personally, I’m told that one of the first things I ever did with it was mess up with the BIOS settings so badly that dad’s computer-expert friend had to be invited to repair it. (He stayed for dinner as a thank you.)
It was that off-white plastic tower, it had a turbo button, and even a 4X CD reader! Wow! And the CRT monitor must have been... I don’t remember what it was, actually. But I do once remember launching a game at a stupidly high resolution: 1280x1024! And despite being a top-down 2D strategy, it ran VERY slowly. Its video card was an ATI Rage. I had no idea what that really meant that at the time, but I do recall that detail nonetheless.
Along with legitimately purchased games, the list of which I can remember:
Tubular Worlds
Descent II
Alone in the Dark I & III
Lost Eden
Formula One (not sure which game exactly)
Heart of Darkness
(and of course the famous Adibou/Adi series of educational games)
... we also had what I realize today were cracked/pirated games, from the work-friend that had set up the family computer. I remember the following:
Age of Empires I (not sure about that one, I think it might have been from a legitimate “Microsoft Plus!” disc)
Nightmare Creatures (yep, there was a PC port of that game)
Earthworm Jim (but without any music)
The Fifth Element
Moto Racer II
There are a few other memorable games, which were memorable in most aspects, except their name. I just cannot remember their name. And believe me, I have looked. Too bad! Anyway, in this list, I can point out a couple games that made a big mark on me.
First, the Alone in the Dark trilogy. It took me a long time to beat them. I still remember the morning I beat the third game. I think it was in 2001 or 2002.
youtube
There was a specific death in it which gave me nightmares for a week. You shrink yourself to fit through a crack in a wall, but it’s possible to let a timer run out—or fall down a hole—and this terrifying thing happens (16:03). I remember sometimes struggling to run the game for no reason; something about DOS Extended Memory being too small.
I really like the low-poly flat-shaded 3D + hand-drawn 2D style of the game, and it’d be really cool to see something like that pop up again. After the 8-bit/16-bit trend, there’s now more and more games paying tribute to rough PS1-style 3D, so maybe this will happen? Maybe I’ll have to do it myself? Who knows!
Second, Lost Eden gave me a taste for adventure and good music, and outlandish fantasy universes. Here’s the intro to the game:
youtube
A lot of the game is very evocative, especially its gorgeous soundtrack, and you spend a lot of time trekking through somewhat empty renders of landscapes. Despite being very rough early pre-rendered 3D, those places were an incredible journey in my young eyes. If you have some time, I suggest either playing the game (it’s available on Steam) or watching / skimmering through this “longplay” video. Here are some of my personal highlights: 25:35, 38:05, 52:15 (love that landscape), 1:17:20, 1:20:20 (another landscape burned in my neurons), 2:12:10, 2:55:30, 3:01:18. (spoiler warning)
But let’s go a couple years back. Ever since my youngest years, I was very intrigued by creation. I filled entire pocket-sized notebooks with writing—sometimes attempts at fiction, sometimes daily logs like the weather reports from the newspaper, sometimes really bad attempts at drawing. I also filled entire audio tapes over and over and OVER with “fake shows” that my sister and I would act out. The only thing that survived is this picture of 3-year-old me with the tape player/recorder.

It also turns out that the tape recorder AND the shelf have both survived.
(I don’t know if it still works.)

On Wednesday afternoons (school was off) and on the week-ends, I often got to play on the family computer, most of the time with my older brother, who’s the one who introduced me to... well... all of it, really. (Looking back on the games he bought, I can say he had very good tastes.)
Moto Racer II came with a track editor. It was simple but pretty cool to play around with. You just had to make the track path and elevation; all the scenery was generated by the game. You could draw impossible tracks that overlapped themselves, but the editor wouldn’t let you save them. However, I found out there was a way to play/save them no matter what you did, and I got to experiment with crazy glitches. 85 degree inclines that launched the bike so high you couldn’t see the ground anymore? No problem. Tracks that overlapped themselves several times, causing very strange behaviour at the meeting points? You bet. That stuff made me really curious about how video games worked. I think a lot of my initial interest in games can be traced back to that one moment I figured out how to exploit the track editor...
There was also another game—I think it was Tubular Worlds—that came on floppy disks. I don’t remember what exactly lead me to do it, but I managed to edit the text that was displayed by the installer... I think it was the license agreement bit of it. That got me even more curious as to how computers worked.
Up until some time around my 13th or 14th birthday, during summer break (the last days of June to the first days of September for French pupils), my sister and I would always go on vacation at my grandparents’ home.
The very first console game I ever played was The Legend of Zelda: A Link to the Past on my cousin’s Super Nintendo, who also usually stayed with us. Unlike us, he had quite a few consoles available to him, and brought a couple along. My first time watching and playing this game was absolutely mind-blowing to me. An adventure with a huge game world to explore, so many mysterious things at every corner. “Why are you a pink rabbit now?” “I’m looking for the pearl that will help me not be that.”
Growing up and working in the games industry has taken the magic out of many things in video games... and my curiosity for the medium (and its inner workings) definitely hasn’t helped. I know more obscure technical trivia about older games than I care to admit. But I think this is what is shaping my tastes in video games nowadays... part of it is that I crave story-rich experiences that can bring me back to a, for lack of a better term, “child-like” wonderment. And I know how weird this is going to sound, but I don’t really enjoy “pure gameplay” games as much for that reason. Some of the high-concept ones are great, of course (e.g. Tetris), but I usually can’t enjoy others without a good interwoven narrative. I can’t imagine I would have completed The Talos Principle had it consisted purely of the puzzles without any narrative beats, story bits, and all that. What I’m getting at is, thinking about it, I guess I tend to value the “narrative” side of games pretty highly, because, to me, it’s one of the aspects of the medium that, even if distillable to some formulas, is inherently way more “vague” and “ungraspable”. You can do disassembly on game mechanics and figure out even the most obsure bits of weird technical trivia. You can’t do that to a plot, a universe, characters, etc. or at least nowhere near to the same extent.
You can take a good story and weave it into a number of games, but the opposite is not true. It’s easy to figure out the inner working of gameplay mechanics, and take the magic out of them, but it’s a lot harder to do that for a story, unless it’s fundamentally flawed in some way.
Video games back then seemed a lot bigger than they actually were.
youtube
I got Heart of Darkness as a gift in 1998 or 1999. We used to celebrate Christmas at my grandparents’, so I had to wait a few days to be back home, and to able to put the CD in the computer. But boy was it worth it! Those animated cutscenes! The amazing pixel art animations! The amazing and somewhat disturbing variety of ways in which you can die, most of which gruesome and mildly graphic! And of course, yet again... a strange and outlandish universe that just scratches my itch for it. Well, one of which that forged my taste for them.
I can’t remember exactly when it happened or what it was, but I do remember that at some point we visited some sort of... exposition? Exhibit? Something along those lines. And it had a board games & computer games section. The two that stick out in my mind were Abalone (of which I still have the box somewhere) and what I think was some sort of 2D isometric (MMO?) RPG. I wanna say it was Ultima Online but I recall it looking more primitive than that (it had small maps whose “void” outside them was a single blueish color).
In my last two years of elementary school, there was one big field trip per year. They lasted two weeks, away from family. The first one was to the Alps. The second one was... not too far from where I live now, somewhere on the coast of Brittany! I have tried really hard to find out exactly where it was, as I remember the building and facilities really well, but I was never able to find it again. On a couple occasions, we went on a boat with some kind of... algae harvesters? The smell was extremely strong (burning itself into my memory) and made me sick. The reason I bring them up is because quite a few of my classmates had Game Boy consoles, most of them with, you know, all those accessories, especially the little lights. I remember being amazed at the transparent ones. Play was usually during the off-times, and I watched what my friends were up to, with, of course, a bit of jealousy mixed in. The class traveled by bus, and it took off in the middle of the night; something like 3 or 4 in the morning? It seemed like such a huge deal at the time! Now here I am, writing THESE WORDS at 03:00. Anyway, most of my classmates didn’t fall back asleep and those that had a Game Boy just started playing on them. One of my classmates, however, handed me his whole kit and I got to do pretty much what I wanted with it, with the express condition that I would not overwrite any of his save files. I remember getting reasonably far in Pokémon before I had to give it back to him and my progress was wiped.
During the trip to the Alps, I remember seeing older kids paying for computer time; there was a row of five computers in a small room... and they played Counter-Strike. I had absolutely no idea what it was, and I would forget about it until the moment I’m writing these words, but I was watching with much curiosity.
The first time I had my own access to console games was in 2001. The first Harry Potter film had just come out, and at Christmas, I was gifted a Game Boy Advance with the first official game. I just looked it up again and good god, it’s rougher than I remember. The three most memorable GBA games which I then got to play were both Golden Sun(s) and Sword of Mana... especially the latter, with its gorgeous art direction. My dad had a cellphone back then, and I remember sneakily going on there to look up a walkthrough for a tricky part of Golden Sun’s desert bit. Cellphones had access to something called “WAP” internet... very basic stuff, but of course still incredible to me back then.
I eventually got to play another Zelda game on my GBA: Link’s Awakening DX. I have very fond memories of that one because I was bed-ridden with a terrible flu. My fever ran so high that I started having some really funky dreams, delirious half-awake hallucinations/feelings, and one night, I got so hot that I stumbled out of bed and just laid down against the cold tile of the hallway. At 3 in the morning! A crazy time! (Crazy for 11-year-old me.)
(The fever hallucinations were crazy. My bedroom felt like it was three times at big, and I was convinced that a pack of elephants were charging at me from the opposite corner. The “night grain” of my vision felt sharper, amplified. Every touch, my sore body rubbing against the bed covers felt like it was happening twice as much. You know that “Heavy Rain with 300% facial animation” video? Imagine that, but as a feverish feeling. The dreams were on another level entirely. I could spend pages on them, but suffice to say that’s when I had my first dream where I dreamed of dying. There were at least two, actually. The first one was by walking down a strange, blueish metal corridor, then getting in an elevator, and then feeling that intimate convinction that it was leading me to passing over. The second one was in some Myst-like world, straight out of a Roger Dean cover, with some sort of mini-habitat pods floating on a completely undisturbed lake. We were just trapped in them. It just felt like some kind of weird afterlife.)
I also eventually got to play the GBA port of A Link To The Past. My uncle was pretty amused by seeing me play it, as he’d also played the original on SNES before I’d even been born. I asked him for help with a boss (the first Dark World one), but unfortunately, he admitted he didn’t remember much of the game.
We had a skiing holiday around this time. I don’t remember the resort’s or the town’s name, but its sights are burned in my memory. Maybe it’s because, shortly after we arrived, and we went to the ski rental place, I almost fainted and puked on myself, supposedly from the low oxygen. It also turned out that the bedroom my parents had rented unexpectedly came with a SNES in the drawer under the tiny TV. The game: Super Mario World. I got sick at one point and got to stay in and play it. This was also the holiday where I developed a fondness for iced tea, although back then the most common brand left an awful aftertaste in your mouth that just made you even more thirsty.
We got a new PC in December of 2004. Ditching the old Windows 98 SE (yep, the OS had been upgraded in... 2002, I think?). Look at how old-school this looks. The computer office room was in the basement. Even with the blur job that I applied to the monitor for privacy reasons, you can still tell that this is the XP file explorer:
A look at what the old DSLR managed to capture on the shelf reveals some more of the games that were available to me back then: a bunch of educational software, The Sims 2, and SpellForce Gold.
I might be misremembering but I think they were our Christmas gifts for that year; we both got to pick one game. I had no idea what I wanted, really, but out of all the boxes at (what I think was) the local Fnac store, it was SpellForce that stood out to me the most. Having watched Lord of the Rings the year prior might have been a factor. I somewhat understood Age of Empires years before that, but SpellForce? Man, I loved the hell out of SpellForce. Imagine a top-down RPG that can also be played from a third-person perspective. And with the concept of... hero units... wait a second... now that reminds me of Dota.
Imagine playing a Dota hero with lots of micro-management and being able to build a whole base on new maps. And sometimes visiting very RPG-ish sections (my favorites!) with very little top-down strategy bits, towns, etc. like Siltbreaker. I guess this game was somewhat like an alternate, single-player Dota if you look at it from the right angle. (Not the third-person one.)
I do remember being very excited when I found out that it, too, came with a level editor. I never figured it out, though. I only ever got as far as making a nice landscape for my island, and that was it!
A couple weeks after, it was Christmas; my sister and I got our first modern PC game: The Sims 2. It didn’t run super well—most games didn’t, because the nVidia GeForce FX 5200 wasn’t very good. But that didn’t stop me or my sister from going absolutely nuts with the game. This video has the timestamp of 09 January 2005, and it is the first video I’ve ever made with a computer. Less than two weeks after we got the game, I was already neck-deep in creating stuff.
Not that it was particularly good, of course. This is a video that meets all of the “early YouTube Windows Movie Maker clichés”.
youtube
Speaking of YouTube, I did register an account there pretty early on, in August of 2006. I’ve been through all of it. I remember every single layout change. I also started using Sony Vegas around that time. It felt so complex and advanced back then! And I’m still using it today. Besides Windows, Vegas Pro is very likely to be the piece of software that I’ve been using for the longest time.
I don’t have a video on YouTube from before 2009, because I decided to delete all of them out of embarassment. They were mostly Super Mario 64 machinima. It’s as bad as it sounds. The reason I bring that up right now, though, is that it makes the “first” video of my account the last one I made with the Sims 2.
But before I get too far ahead with my early YouTube days, let me go backwards a bit. We got hooked up to the Internet some time in late 2005. It was RTC (dialup), 56 kbps. my first steps into the Internet led me to the Cube engine. Mostly because back then my dad would purchase computer magazines (which were genuinely helpful back then), and came with CDs of common downloadable software for those without Internet connections. One of them linked to Cube. I think it was using either this very same screenshot, or a very similar one, on the same map.
The amazing thing about Cube is not only that it was open-source and moddable, but had map editing built-in the game. The mode was toggled on with a single key press. You could even edit maps cooperatively with other people. Multiplayer mapping! How cool is that?! And the idea of a game that enabled so much creation was amazing to me, so I downloaded it right away. (Over the course of several hours, 30 MiB being large for dialup.)
I made lots of bad maps that never fulfilled the definition of “good level” or “good gameplay”, not having any idea how “game design” meant, or what it even was. But I made places. Places that I could call my own. “Virtual homes”. I still distinctively remember the first map I ever made, even though no trace of it survives to this day. In the second smallest map size possible, I’d made a tower surrounded by a moat and a few smaller cozy towers, with lots of nice colored lighting. This, along with the distinctive skyboxes and intriguing music, made me feel like I’d made my home in a strange new world.
At some point later down the line, I made a kinda-decent singleplayer level. It was very linear, but one of the two lead developers of the game played it and told me he liked it a lot! Of course, half of that statement was probably “to be nice”, but it was really validating and encouraging. And I’m glad they were like that. Because I remember being annoying to some other mappers in the Sauerbraten community (the follow-up to Cube, more advanced technically), who couldn’t wrap their heads around my absolutely god awful texturing work and complete lack of level “design”. Honestly, sometimes, I actually kinda feel like trying to track a couple of them down and being like, “yeah, remember that annoying kid? That was me. Sorry you had to deal with 14-year-old me.”
youtube
At some point, I stumbled upon a mod called Cube Legends. It was a heavily Zelda-inspired “total conversion”; a term reserved for mods that are the moddiest mods and try to take away as much of the original foundation as possible. It featured lots of evocative MIDI music by the Norwegian composer Bjørn Lynne. Fun fact: the .mid files are still available officially from his website!
This was at the crossroad of many of my interests. It was yet another piece of the puzzle. As a quick side note, this is why Zelda is the first series that I name in the title of this post, even though I... never really thought of myself as a Zelda fan. It’s not that it’s one of the game series that I like the most, it’s just that, before I started writing this, I’d never realized how far-reaching its influence had been in my life, both in overt and subtle ways, especially during my formative years.
And despite how clearly unfinished, how much of a “draft” Cube Legends was, I could see what it was trying to do. I could see the author’s intent. And I’m still listening to Bjørn Lynne’s music today.
The Cube Engine and its forums were a big part of why I started speaking English so well. Compared to most French people, I mean. We’re notoriously bad with the English language, and so was I up until then. But having this much hands-on practice proved to be immensely valuable. And so, I can say that the game and its community have therefore had long-lasting impacts in my life.
I also tried out a bunch of N64 games via emulation, bringing me right back in that bedroom at my grandparents’ house, with my cousin. Though he did not have either N64 Zelda game back then.
The first online forum I ever joined was a Zelda fan site’s. There are two noteworthy things to say here:
It was managed by a woman who, during my stay in the community, graduated from her animation degree. At this stage I had absolutely no idea that this was going to be the line of work I would eventually pursue!
I recently ran into the former head moderator of the forums. (I don’t know when the community died.) One of the Dota players on my friends list invited him because I was like “hmm, I wanna go as 3, not as 2 players today”. His nickname very vaguely reminded me of something, a weird hunch I couldn’t place. Half an hour into the game, he said “hey Max... this might be a long shot, but did you ever visit [forum]?” and then I immediately yelled “OH MY GOD—IT IS YOU.” The world is a small place.
Access to the computer was sometimes tricky. I didn’t always have good grades, and of course, “punishment” (not sure the word is appropriate, hence the quotes, but you get the idea) often involved locking me out of the computer room. Of course, most times, I ended up trying to find the key instead. I needed my escape from the real world. (You better believe it’s Tangent Time.)
I was always told I was the “smart kid”, because I “understood things faster” than my classmates. So they made me skip two grades ahead. This made me enter high school at nine years old. The consequences were awful (I was even more of the typical nerdy kid that wouldn’t fit in), and I wish it had never happened. Over the years, I finally understood: I wasn’t more intelligent. I merely had the chance to have been able to grow up with an older brother who’d instilled a sense of curiosity, critical thinking, and taste in books that were ahead of my age and reading level. This situation—and its opposite—is what I believe accounts for the difference in how well kids get to learn. It’s not innate talent, it’s not genetics (as some racists would like you to believe). It’s parenting and privilege.
And that’s why I’ll always be an outspoken proponent for any piece of media that tries to instill critical thinking and curiosity in its viewer, reader, or player.
But I digress.
Well, I’ve been digressing a lot, really, but games aren’t everything and after all, this post is about the context in which I played those games. Otherwise I reckon I would’ve just made a simple list.

I eventually got a Nintendo DS for Christmas, along with Mario Kart DS. My sister had gotten her own just around the time when it released... she had the Nintendogs bundle. We had also upgraded to proper ADSL, what I think was about a ~5 megabits download speed. The Nintendo DS supported wi-fi, which was still relatively rare compared to today. In fact, Nintendo sold a USB wireless adapter to help with that issue—our ISP-supplied modem-router did not have any wireless capabilities. I couldn’t get it the adapter work and I remember I got help from a really kind stranger who knew a lot about networking—to a point that it seemed like wizardry to me.
I remember I got a “discman” as a gift some time around that point. In fact, I still have it. Check out the stickers I put on it! I think those came from the Sims 2 DVD box and/or one of its add-ons.
I burned a lot of discs. In fact, in the stack of burned CDs/DVDs that I found (with the really bad Sims movies somewhere in there), I found at least three discs that had the Zelda album Hyrule Symphony burned in, each with different additional tracks. Some were straight-up MIDI files from vgmusic.com...! And speaking (again) of Zelda, when the Wii came out, Twilight Princess utterly blew my mind. I never got the game or the console, but damn did I yearn badly for it. I listened to the main theme of the game a lot, which didn’t help. I eventually got to play the first few hours at a friend’s place.
At some point, we’d upgraded the family computer to something with a bit more horsepower. It had a GeForce 8500 GT inside, which was eventually upgraded to a 9600 GT after the card failed for some reason. It could also dual-boot between XP and Vista. I stuck with that computer until 2011.
We moved to where I currently live in 2007. I’ve been here over a decade! And before we’d even fully finished unpacking, I was on the floor of the room that is now my office, with the computer on the ground and the monitor on a cardboard box, playing a pirated copy of... Half-Life! It was given to me by my cousin. It took me that long to find out about the series. It’s the first Valve game I played. I also later heard about the Orange Box, but mostly about Portal. Which I also pirated and played. I distinctly remember being very puzzled by the options menu: I thought it was glitched or broken, as changing settings froze the game. Turns out the Source engine had to chug for a little while, like a city car in countryside mud, as it reloaded a bunch of stuff. Patience is a virtue...
But then, something serious happened.
In the afternoon of 25 December 2007, I started having a bit of a dull stomach pain. I didn’t think much of it. Figured maybe I’d eaten too many Christmas chocolates and it’d go away. It didn’t. It progressively deteriorated into a high fever where I had trouble walking and my tummy really hurt; especially if you pressed on it. My parents tried to gently get me to eat something nice on New Year’s Eve, but it didn’t stay in very long. I could only feed myself with lemonade and painkiller. Eventually, the doctor decided I should get blood tests done as soon as possible. And I remember that day very clearly.
I was already up at 6:30 in the morning. Back then, The Daily Show aired on the French TV channel Canal+, so I was watching that, lying in the couch while waiting for my mom to get up and drive me to my appointment, at 7:00. It was just two streets away, but there was no way I could walk there. At around noon, the doctor called and told my mom: “get your son to the emergency room now.”
Long story short, part of my intestines nuked themselves into oblivion, causing acute peritonitis. To give you an idea, that’s something with a double-digit fatality rate. Had we waited maybe a day or two more, I would not be here writing this. They kind of blew up. I had an enormous abcess attached to a bunch of my organs. I had to be operated on with only weak local anaesthetics as they tried to start draining the abscess. It is, to date, by far the most painful thing that has ever happened to me. It was bad enough that the hospital doctor that was on my case told me that I was pretty much a case worthy to be in textbooks. I even had medical students come into my hospital room about it! They were very nice.
This whole affair lasted over a month. I became intimately familiar with TV schedules. And thankfully, I had my DS to keep me company. At the time, I was pretty big into the Tony Hawk DS games. They were genuinely good. They had extensive customization, really great replayability, etc. you get the idea. I think I even got pretty high on the online leaderboards at some point. I didn’t have much to do on some days besides lying down in pain while perfecting my scoring and combo strategies. I think Downhill Jam might’ve been my favorite.
My case was bad enough that they were unable to do something due to the sad state of my insides during the last surgery of my stay. I was told that I could come back in a few months for a checkup, and potentially a “cleanup” operation that would fix me up for good. I came back in late June of 2008, got the operation, and... woke up in my hospital room surrounded by, like, nine doctors, and hooked up to a morphine machine that I could trigger on command. Apparently something had gone wrong during the operation, but they never told me what. I wasn’t legally an adult, so they didn’t have to tell me. I suspect it’s somewhere in some medical files, but I never bothered to dig up through my parents’ archives, or ask the hospital. And I think I would rather not know. But anyway, that was almost three more weeks in the hospital. And it sucked even more that time because, you see, hospital beds do not “breathe” like regular beds do. The air can’t go through. Let’s say I’m intimately familiar with the smell of back sweat forever.
When I got out, my mom stopped by a supermarket on the way home. And that is when I bought The Orange Box, completely on a whim, and made my Steam account. Why? Because it was orange and stood out on the shelf.
(As a side note, that was the whole bit I started writing first, and that made me initially title this post “growing pains”. First, because I’m bad at titles. Second, because not that I didn’t have them otherwise (ow oof ouch my knees), but that was literally the most painful episode of my entire life thus far and it ended in a comically-unrelated, high-impact, life-changing decision. Just me picking up The Orange Box after two awful hospital stays... led me to where I am today.)
While I was recovering, I also started playing EarthBound! Another bit of a life-changer, that one. To a lesser extent, but still. I was immediately enamored by its unique tone. Giygas really really really creeped me out for a while afterwards though. I still get unsettled if I hear its noises sometimes.
I later bought Garry’s Mod (after convincing my mom that it was a “great creative toolbox that only cost ten bucks!”), and, well, the rest is history. By which I mean, a lot of my work and gaming activity since 2009 is still up and browsable. But there are still a few things to talk about.
In 2009, I bought my first computer with YouTube ad money: the Asus eee PC 1005HA-H. By modern standards, it’s... not very powerful. The processor in my current desktop machine is nearly 50 times as fast as its Atom N280. It had only one gigabyte of RAM, Windows 7 Basic Edition, and an integrated GPU barely worthy of the name; Intel didn’t care much for 3D in their chips back then. The GMA 945 didn’t even have hardware support for Transform & Lighting.
But I made it work, damn it. I made that machine run so much stuff. I played countless Half-Life and Half-Life 2 mods on it—though, due to the CPU overhead on geometry, some of those were trickier. I think one of the most memorable ones I played was Mistake of Pythagoras; very surreal, very rough, but I still remember it so clearly. I later played The Longest Journey on it, in the middle of winter. It was a very cozy and memorable experience. (And another one that’s an adventure wonderful outlandish alien universe. LOVE THOSE.)
I did more than playing games on it, though...
This is me sitting, sunburned on the nose, in an apartment room, on 06 August 2010. This was in the Pyrénées, at the border between France and Spain. We had a vacation with daily hiking. Some of the landscapes we visited reminded me very strongly of those from Lost Eden, way up the page...
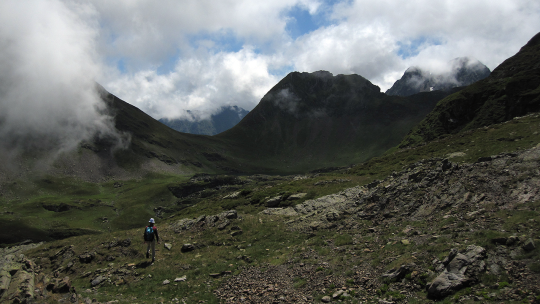
So, you see, I had 3ds Max running on that machine. The Source SDK as well. Sony Vegas. All of it was slow; you bet I had to use some workarounds to squeeze performance out of software, and that I had to keep a close, watchful eye on RAM usage. But I worked on this thing. I really did! I animated this video’s facial animation bits (warning: this is old & bad) on the eee PC, during the evenings of the trip, when we were back at our accomodation. The Faceposer tool in the Source SDK really worked well on that machine.
I also animated an entire video solely on the machine (warning: also old and bad). It had to be rendered on the desktop computer... but every single bit of the animation was crafted on the eee PC.
I made it work.
Speaking of software that did not run well: around that time, I also played the original Crysis. The “but can it run Crysis?” joke was very much justified back then. I had to edit configuration files by hand so that I could run the game in 640x480... because I wanted to keep most of the high-end settings enabled. The motion blur was delicious, and it blew my mind that the effect made the game feel this smooth, despite wobbling around in the 20 to 30 fps range.
Alright. It’s time to finish writing this damn post and publish it at last, so I’m going to close it out by listing some more memories and games that I couldn’t work in up there.
Advance Wars. Strategy game on GBA with a top-down level editor. You better believe I was all over the editor right away.
BioShock. When we got the 2007 desktop computer, it was one of the first games I tried. Well, its demo, to be precise. Its tech and graphics blew my mind, enough that I saved up to buy the full game. This was before I had a Steam account; I got a boxed copy! I think it might have been the last boxed game I ever bought? It had a really nice metal case. The themes and political messages of the game flew way over my head, though.
Mirror’s Edge. The art direction was completely fascinating to me, and it introduced me to Solar Fields’ music; my most listened artist this decade, by a long shot.
L.A. Noire. I lost myself in its stories and investigations, and then, I did it all again, with my sister at the helm. I very rarely play games twice (directly or indirectly), which I figure is worth mentioning.
Zeno Clash. It was weird and full of soul, had cool music, and cool cutscenes. It inspired me a lot in my early animation days.
Skyward Sword. Yep, going back to Zelda on that one. The whole game was pretty good, and I’m still thinking about how amazing its art direction was. Look up screenshots of it running in HD on an emulator... it’s outstanding. But there’s a portion of the game that stands tall above the rest: the Lanayru Sand Sea. It managed to create a really striking atmosphere in many aspects, through and through. I still think about it from time to time, especially when its music comes on in shuffle mode.
Wandersong. A very recent pick, but it was absolutely a life-changing one. That game is an anti-depressant, a vaccine against cynicism, a lone bright and optimist voice.
I realize now this is basically a “flawed but interesting and impactful games” list. With “can establish its atmosphere very well” as a big criteria. (A segment of video games that is absolutely worth exploring.)
I don’t know if I’ll ever make my own video game. I have a few ideas floating around and I tried prototyping some stuff, though my limited programming abilities stood in my way. But either way, if it happens one day, I hope I’ll manage to channel all those years of games into the CULMINATION OF WHAT I LIKE. Something along those lines, I reckon.
20 notes
·
View notes
Text
Automatically kill an application if it takes up too much memory on Linux / Debian / Raspberry Pi
I use a Raspberry Pi 3B to do video encoding — see this post.
However, under certain circumstances, ffmpeg might end up ballooning in memory, and this can get serious very fast given that a Raspberry board has a relatively small amount of RAM.
In my case, this can happen if my local network goes down in a specific way... I think ffmpeg ends up not getting an instant refusal / timeout on connecting to the server and buffers forever instead. This could also potentially happen if whatever your camera is pointed at suddenly becomes much more complex to encode, and your options cause ffmpeg to buffer the input instead of dropping frames.
So I figured, maybe I could look into running a script that kills ffmpeg as soon as it takes up too much memory. I found a base of a script somewhere on the Internet, but it didn’t work; here’s a fixed version.
TOTAL=`cat /proc/meminfo | grep MemTotal: | awk '{print $2}'` USEDMEM=`cat /proc/meminfo | grep MemAvailable: | awk '{print $2}'`
if [ "$USEDMEM" -gt 0 ] then USEDMEMPER=$(( (TOTAL-USEDMEM) * 100 / $TOTAL)) echo "Current used memory = $USEDMEMPER %" if [ "$USEDMEMPER" -gt 80 ]; then killall -9 ffmpeg fi fi
To be honest, this makes the title of this post inaccurate: this script evaluates the total active usage of the entire system, not how much one application takes up by itself. But generally, since you’re trying to avoid a “one application makes everything else go OoM” disaster scenario, this is for most intents and purposes identical. And you could change it to use a different memory type, maybe, but MemActive is the one that would be relevant to me, since I leave a tmpfs (ram disk) worth a couple hundred megs running on the board.
And, of course, this script explicitly runs a killall command on ffmpeg, not “the application that is taking up too much memory”. It’s not a smart script; it assumes you already know which application(s) is susceptible to misbehave.
So, we’ve got our watchdog script. Let’s save it at /home/pi/watchdog.sh
We could add a loop right in the script but that’s probably not the most elegant solution. We could also use “cron”, but the instant I learned it was possible to wipe all of its data simply by calling it with no parameters, I figured I would stay away from that thing as much as possible.
Let’s use the services system instead! (It’s systemd & systemctl.)
We have to create the service definition and its timer, separately.
First, the service: let’s sudo nano a new file into /etc/systemd/system/ffmpeg_watchdog.service
[Unit] Description=FFMpeg Watchdog Service After=network.target
[Service] Type=simple User=pi WorkingDirectory=/home/pi/ ExecStart=/bin/bash /home/pi/watchdog.sh Restart=on-failure
[Install] WantedBy=multi-user.target
In case you’re wondering, ExecStart has “/bin/bash” in front of the path to your .sh file, because it doesn’t magically know that this is supposed to involve the shell / bash.
Now, let’s create the timer, which will define when and how often our newly-created service will run. Create the same file but replace .service by .timer!
[Unit] Description=Run FFMpeg watchdog
[Timer] AccuracySec=1s OnBootSec=1min OnUnitActiveSec=10s Unit=ffmpeg_watchdog.service
[Install] WantedBy=multi-user.target
It’s fairly straightforward once you’ve figured out what to do—something that describes at least 90% of Linux-related tasks. Now you just need to enable all of this with two systemctl commands:
sudo systemctl enable ffmpeg_watchdog.service sudo systemctl enable ffmpeg_watchdog.timer
And now everything should be active! Make sure to test it by forcing the application to devour all your RAM; your new protection should kick in. 10 seconds and 80% is a good interval for me, since the bloat happens slow and steady under my circumstances, but depending on your application, you might need to adjust the .timer to check slightly more often.
Anyway, the usual caveats of my “tech solutions” posts apply: I don’t pretend to know all the answers, I don’t know if this is the proper way to do something, and I don’t know if this will work for you, but I do hope it will help you, or at least guide you towards what you’re looking for! Cheers.
4 notes
·
View notes
Text
Use your monitor’s turbo button!
Some high refresh rate monitors, such as my PG278Q, have a “Turbo” button that allow it to switch on the fly between 60 Hz, 120 Hz, and 144 Hz.
I use it, and so should you!
I’m going to explain why here. For context, my system is currently:
Windows 10
nVidia GeForce 980 Ti
Asus ROG PG278Q
Dell U2717D
First, your monitor itself will draw more power at a high refresh rate. (source)

That might not seem like too much of a difference, but monitors are a source of heat closer to you, and in the summer, that can make a difference.
Second, your video card itself might draw much more power with your monitor set to a high refresh rate. With a fairly standard set of apps open, that is to say [Steam chat + Discord chat + this browser] on the 60 Hz Dell, and, nothing but the desktop on the PG278Q...
60 Hz:

144 Hz:

The idle power consumption of my video card jumps from 25 to 70 watts!!
Third, unless you’re playing a game in exclusive full-screen mode, there is a “lowest common denominator” effect with the Windows DWM. If one of your monitors is set to 144 Hz and another to 60 Hz, and the latter were to play back video at 60 frames per second, this would lock the 144 Hz monitor to also only be able to display 60 frames per second. You can read more about it here.
Fourth, games are almost always going to select the highest refresh rate supported by your monitor if you play them in exclusive full-screen mode—which you absolutely should, if only for G-sync / Freesync support, but also because it lowers latency and doesn’t have the Windows DWM standing in as an intermediary.
And last, some apps misbehave if the monitor is set to a high refresh rate, most notably the UWP Netflix app (the one you can get from the Microsoft store).
That’s why, if you have a physical switch button on your high refresh rate monitor, I encourage you to set the refresh rate(s) to 60 Hz, and use the button!

UPDATE: note that the Turbo button functionality is unfortunately broken with recent nVidia drivers the new Windows WDDM standard, as are a few other things. I was on the 391.24 driver when writing this.
Here’s a great app that I use to have a turbo button in my taskbar instead:
https://github.com/kostasvl/ToggleMonitorRefreshRate
3 notes
·
View notes
Text
Undervolting, Intel Turbo Boost, power usage, and you!
Nowadays, I use an Alienware 13R3 as my laptop. Before that, however, I was on the i7 model of the Surface Pro 4. It had a funny quirk, you see: it was powerful hardware... too powerful to be contained. The i7-6660U present in the device was rated for a TDP of 15 watts, but it turned out that merely using the CPU at a decently high load could blow past through that power allowance.
Thankfully, Intel processors come with two power limits. Beyond the TDP, you also have the “boosted” limit, which, in this case, was 25 watts. It still wasn’t enough to sustain both the CPU and GPU at full load at the same time, though. And consuming 25 watts generates a lot of heat, enough that the system will be like “hmm, things are toasting up in here, let’s throttle things down back to 15W.” While you could play games on the machine, that flaw made it annoying.
There were two things that you could do:
Pointing a small USB fan at the back of the device allowed it to significantly cool down (the insides and the chassis acted as heatsinks)
Using software to reduce the amount of power that goes through the chip; less power means less heat, which means less throttling, and so on.
A lot of people in the Surface subreddit back then recommended using something called Intel XTU (which stands for Extreme Tuning Utility), and while it’s probably a great tool for people who go overclocking and fine-tuning every low-level variable of their hardware, it’s very overkill if you just want to reduce the current that goes through your processor. (It also had a few very annoying quirks that needed extensive workarounds.)
We only need to reduce the current that goes through the chip: undervolting.
UNDERVOLTA-WHAT?
In a sense, it’s very similar to overclocking, while sorta being its opposite. When you try to overclock hardware, you try to push its clock speed as high as you can for the voltage that goes through it. Sometimes, overclockers go through very involved steps in order to be able to increase the voltage: custom heatsinks, liquid cooling, nitrogen, etc. because more current inevitably means more heat.
Undervolting is really just taking that same problem, but looking at it upside-down: “how much can I reduce the voltage for my current clock speed?” (mostly because 1) you can’t and shouldn’t overclock laptop processors, and 2) you’re trying to reduce heat, not keep it while increasing performance)
And unlike overclocking, this process does not carry, to the best of my knowledge, any risks to your hardware. There is a danger (albeit low) of damaging some of your components when you overclock, because you might stress them too hard, thermally or otherwise. Undervolting, however, can only cause crashes, BSODs, or freezes, when you might not be feeding the chip enough power.
HOW TO DO THAT THING THEN?
There is an excellent piece of software called ThrottleStop:
https://www.techpowerup.com/download/techpowerup-throttlestop/
It is much more lightweight and easy to use than Intel XTU! You can find all of the voltage controls under the [FIVR] button.

All that you need to change is the Offset Voltage for CPU Core, CPU Cache, and the Intel GPU. You will need to experiment by yourself to figure out how much voltage you can take away from the components. Core & Cache should be the same.
On my Surface Pro 4 i7, I was able to stay at -60 mV (I can’t remember how much for the GPU), but the i7-7700HQ in my Alienware laptop can go all the way down to -120 mV. However, my ThrottleStop preset that has Turbo Boost enabled only goes down to -115 mV, just in case. I’m only taking 10 mV away from the Intel GPU.
All hardware is different, however, even chips with the same model number. Your i7-7700HQ may be able to do more or less undervoltage. This is something called the Silicon Lottery. Here’s an explanation I copypasted off Reddit:
When chip manufacturers like Intel, TSMC, UMC, GF, etc. make wafers, there are slight variations in material quality across the wafer surface, there are local variations in how the lithography, metal vapor deposition, photoresist chemical deposition, etc. are done and this can yield a significant contrast between how good the best chip of a given batch will perform vs how bad the worst chip of the same batch will perform.
And of course, there is a difference across generations of hardware. I believe the “wear” on the processor (transistor degradation due to heat, etc.) may also have an influence. The i7-4770 (non-K) in my desktop computer will only let 40 mV be taken away before it becomes unstable under high loads. That said, even small undervolts are valuable and will save you power... and therefore heat... and therefore wear... in the long run!
I would recommend starting at -50 mV, running some stress tests (Prime95, maybe some gaming benchmarks) and then using your computer like that for a while, with usages that are heavy on resources. If it doesn’t freeze/crash/BSOD, you can keep undervolting down and down until it eventually happens. You might be able to get a decent idea of how much undervolting you can do by looking around for reports by other users on the same generation & class of processors.
I’ve got some test results which perfectly illustrate why this is a great idea, but first:
INTEL TURBO BOOST
Turbo Boost Technology (TBT) is a microprocessor technology developed by Intel that attempts to enable temporary higher performance by opportunistically and automatically increasing the processor's clock frequency. This feature automatically kicks in on TBT-enabled processors when when there is sufficient headroom - subject to power rating, temperature rating, and current limits.
https://en.wikichip.org/wiki/intel/turbo_boost_technology
It’s kind of like a built-in overclock that scales somewhat intelligently. The thing, though, is that it may not be very efficient in terms of how much power you’re spending vs. how much performance you’re getting out of that. An image is worth a thousand words:

This chart illustrates how much power the smartphone Exynos processors spend when they are at a certain frequency. It starts off being roughly linear, but at some point, starts bending very fast towards being exponential. There is a point where components have an ideal performance-per-watt ratio. For example, it’s this specific point of efficiency that “Max-Q” GPUs are attempting to exploit.
Turbo Boost arguably stays within this window of efficiency, of course... as far as desktops are concerned. For laptops, you may really want to minimize “waste of power”, both for battery and for heat. And toggling Turbo Boost off is actually a worthwhile tradeoff. Now let me show you the numbers. You can see the entire set of benchmark screenshots here in full-res in this Imgur gallery, or over here.
HERE COME THE BENCHMARKS

Let’s start with a synthetic benchmark: Prime95.
Without undervolting, and with Turbo Boost ON, the power consumption goes up to 52W. However, it doesn’t stay there for long, because the TDP of this processor is 45W! The boost limit is 60W, but the temperature is too much to keep that extended limit enabled: it’s going up to 87°C, which is TOASTY.
With undervolting, the power goes down to 43W, which is 82% of before. The temperature only went down by one degree, but the fans were spinning slower.
However, with undervolting and Turbo Boost OFF, the power went all the way down to a measly 25W! That’s 58% of before, and 52% from the first result, while only lowering frequency by ~20%. 3.4 GHz with all-cores Turbo Boost became 2.8 Ghz. The temperature is now only 65°C too!

Now, let’s check out a semi-synthetic usage: the BOINC client running scientific research tasks from the World Community Grid, on all eight cores.
Regular voltage, Turbo Boost ON = 38W, 79°C.
Undervolted, Turbo Boost ON = 29W, 70°C.
Something especially noteworthy: with Turbo Boost OFF and the undervolt in place, I can set BOINC to only use three cores, and the fans will (almost) never spin up, because the CPU isn’t using enough power to reach 60°C. It is effectively cooled passively! Isn’t that cool?

Here’s a benchmark more representative of real-world usage: I’m encoding a video in H.264/AVC at 4K resolution using Adobe Media Encoder.
Undervolted, Turbo Boost OFF = 21W, encoding time is 249s.
Undervolted, Turbo Boost ON = 34W, encoding time is 216s.
That’s a 15% speed gain for 61% more power. Not very efficient!

And last, let’s take a look at Dota 2. This was done at highest settings, but with vertical synchronization off to uncap framerate, as well as one-quarter screen resolution to make sure the test was bound by the CPU and not the GPU.
Undervolted, Turbo Boost OFF = 133 fps, 17W, 68°C.
Undervolted, Turbo Boost ON = 152 fps, 26W, 74°C.
This equals 52% more power for 14% more framerate and 6 more degrees.
While these benchmarks are fairly naive and don’t get into framerate percentiles (TBT may help with usage spikes and such), I think they paint a clear picture: on laptops, Turbo Boost is usually not worth it, and undervolting is a huge help.
ThrottleStop allows you to toggle Turbo Boost off with one simple box to tick.

You see the four little radio buttons in that box labeled “Performance”? Those are the presets. You have four, each pre-labeled. I use the first two as an easy way to disable/enable the boost. (you only need to click “Save” to make sure the presets get saved.)
As a side note: ThrottleStop allows you to enable SpeedShift, but I’d recommend against it, as it caused very odd issues for me: Dota 2 would only run at 55 to 57 fps while capped at 60, while uncapped behaviour was normal. To make that issue even more confusing, it only happened in DX11 mode.
Note that, if you wish to keep the frequency at maximum (which may be potentially useful for extreme usages such as virtual reality), you can do so by:
Windows 7/8: using the “High Performance” power plan
Windows 10: sliding this bar to the right

I hope this article was insightful and helps you get the most out of your laptop and the power you’re letting your computers draw. I’ve often contemplated making some sort of simple website to fight against all the uneducated myths that Gamers(tm) like to spread regarding performance that amount to “disable every power-saving feature ever and let your hardware run at full clock speeds all the time”, but I’m not much of a website designer or a writer.
That said, I thought the impact that undervolting can have on power consumption to be big enough to warrant a blog post. Even the modest -40 mV change on my desktop can measure itself in watts, and I’m sure that’s probably at least a few bucks off the power bill. And of course, we are currently living in dire times where every little thing we can do matters, from boycotting megacorps fucking up our environments, to little gestures like this.
Thanks for reading!
9 notes
·
View notes
Text
Adventures with a Raspberry Pi camera module, its inaccurate timing / timestamps, & ffmpeg
I have been toying with a Raspberry Pi 3 for a few months in my spare time. If you don’t know what that is, it’s a $35 computer, a card-sized motherboard. It’s using a system-on-a-chip (SoC) that is very similar to what you’d have in a smartphone. Unlike most desktop PCs, it runs on the ARM architecture, not x86. It’s a great way to learn lots of new things, mostly about Linux, scripting tasks, and the lower-level intricacies of computers. It doesn’t have much computing power... but it has enough for software-based video encoding! And the foundation behind the Pi also sells an optional camera module for it.
I wanted to create a permanent-ish video feed. I had several options in front of me; the OS comes with easy tools to faciliate the use of the camera, but it also has a build of ffmpeg and a V4L2-based camera driver!
I was also planning on having audio in this stream, but it drifted off-sync incredibly fast. I was able to partially solve this issue after many hours pouring over many pages of documentation and google results. I’m still not even sure of what exactly (or which combination of things) has helped, but I hope this offers answers or leads to other people that may also be seeking a solution.
As a disclaimer, some of the more tricky details may be inaccurate and are my own guessing, but at the end of the day... this works for me.
CHAPTER 1: GETTING AUDIO SUPPORT
Make sure your build of ffmpeg comes with pulseaudio or alsa support. At first, I was using a static, pre-compiled build that didn’t even work properly in armhf (and I had to fall back to the slower armel). If I tried to call for my microphone with it, it would complain about some missing code somewhere.
Thankfully, I then realized that, since its Stretch release, Raspbian now comes with a pre-compiled version of ffmpeg. It’s version 3.2, and that’s a little old, and for the sake of it, I messed with apt-get sources in order to grab 3.4.2 from the “unstable” branch of the distribution. At some point during that process, I was one key stroke away from screwing up the entire OS by updating over a thousand more packages, so if you go down that route... be careful.
You could compile ffmpeg yourself too, but at this point in time, that goes beyond my technical know-how, unfortunately.
Here’s another very simple thing that eluded me for a while: how to call for the microphone. I saw a lot of posts telling people to ask for hw:0,1 (or other numbers), and I kept doing this with no success. It turns out the better solution is to ask ffmpeg what it sees by itself:
ffmpeg -sources alsa
That’s just it! I would have loved to show you what that looks like, but unfortunately, it is now returning a segmentation fault on both my ffmpeg builds. I think that might have been caused by a recent kernel update. But that is supposed to work... I promise. My USB Yeti Blue mic can be called like this:
-f alsa -i sysdefault:CARD=Microphone
You may also be able to use pulseaudio. My understanding is that Raspbian is configured to run it on system boot, but it tries to initialize too early and silently fails. So you’ll have to start it yourself, manually, without sudo:
pulseaudio --start
And right after that, you can enumerate sources just as shown above (just replace “alsa” by “pulse”). For me, the result is:
Auto-detected sources for pulse: alsa_output.usb-Blue_Microphones_Yeti_Stereo_Microphone_REV8-00.analog-stereo.monitor [Monitor of Yeti Stereo Microphone Analog Stereo] alsa_input.usb-Blue_Microphones_Yeti_Stereo_Microphone_REV8-00.analog-stereo [Yeti Stereo Microphone Analog Stereo] * alsa_output.platform-soc_audio.analog-stereo.monitor [Monitor of bcm2835 ALSA Analog Stereo]
And the one I have to choose has, of course, “input” in the name.
I don’t know if there’s really a difference between using pulse and alsa. It didn’t seem to make any differences over the course of my testing. I am using alsa as it’s allegedly the standard.
CHAPTER 2: CHOICES OF VIDEO INPUT
The cool thing about the Pi’s SoC is that, across all models, they have the same GPU... almost. They all come with H.264 hardware encoding support. It means that the encoding takes place in (fixed-function?) hardware, and therefore, for all intents and purposes, doesn’t take up resources on the CPU. However, hardware doesn’t implement all the fancy refined techniques that are present in the state-of-the-art software encoder, x264, which are used to get the most out of the bitrate: psychovisual optimizations, smarter decisions, trellis stuff, and all that. In short: it’s extremely fast, but it’s not as good.
Now, just in case, I’m going to give you a little reminder on what is probably one of the most abused set of terms in computer video:
MPEG-4 is a set of standards (Part 10 is AVC, aka H.264, while Part 2 is ASP, aka DivX, xVid)
MP4 is a container (it’s also Part 14 of the standard set)
H.264 is a video compression standard.
x264 is a software library which makes available an encoder, which can encode video into the H.264 standard.
ffmpeg is software that implements a lot of libraries, including x264, in order to decode, encode, etc. video and audio content.
Let’s all try to not mix up these terms. Though, understandably, to some degree, a bit of overlap, hence why a lot of people say one to mean the other.
On all the Pi boards, except the 3, you’ll most likely want to try to work using the hardware-encoded H.264 stream, because the CPU is just too slow. The 3, however, is good enough to use x264 — with some compromises. You can even get up to 720p if you’re willing to heavily cut on the framerate. But we can talk about that later, because for now, we need to get the video to ffmpeg!
There are a variety of ways we can do this:
Raspivid, raw H.264
Raspivid, raw YUV/RGB/grayscale
V4L2 driver, raw video (a lot of formats)
... and others
Raspivid comes with the most settings, and is probably the easiest. Seriously, look at all this! Here’s a run-of-the-mill command line that I got started with:
raspivid -t 0 -o - \ -b 900000 --profile high --level 4.2 \ -md 4 -w 960 -h 720 -fps 20 \ -awb auto -ex nightpreview -ev -2 -drc med \ -sh 96 -co 0 -br 50 -sa 5 \ -p 1162,878,240,180 \ -pts \
Let’s go over this:
The backslashes allow me to go to a new line; very useful.
-t 0 makes the time “infinite”; the program won’t stop running until you stop it by yourself, by using CTRL+C when in the terminal that runs it.
-o - makes the output go to stdout, which your terminal will print. So you’ll have a whole lot of gibberish. But you’ll understand why soon.
On the second line, gives the video a bitrate of 900kbps, and it is then encoded with the High profile of H.264 with the highest level available on the hardware encoder. This compresses the video better (by allowing stuff like 8x8 intra-predicted macroblocks), but makes it slower to both encode and decode. However, the High profile has very broad hardware decoding support by now, and if you have that, it doesn’t matter.
On the third line, I am manually selecting the fourth sensor mode of the camera module. It offers the full field of view and bins pixels together for a somewhat less noisy image (but also slightly less sharp). I also define the resolution and framerate.
On the fourth line, I select the white balance, scene mode, exposure bias, and dynamic range compression modes. I’m not sure how the latter works, or what it really does. It might only make a difference in bright outdoor scenes when the sensor is operating at its lowest ISO and exposure values... but that’s only an hypothesis.
On the fifth line, I tweak the image. I sharpen it (at 96%) and saturate it a little bit (+5%). I don’t change the contrast and brightness from their default values, but you can lift the blacks a little bit with -2/51 if you wish.
On the sixth line, I am defining where the preview window sits. This will display the camera feed on your screen; it’s displayed as a hardware layer that will go above everything else, because, as I understand it, it’s drawn directly by the GPU and bypasses everything the OS does below. By default, it will take up the whole screen, and that can be troublesome. Here, I make it take up a little 240x180 square in the lower-right corner, whose coordinates are adequate for a resolution of 1400x1050.
And last, -pts is supposed to add timestamps to the feed.
So now you have a video stream... but how do you get it to ffmpeg?
You have to pipe it. With this: |
Can you believe that character is useful for more than just typing the :| face ?
Computers are incredible.
When you add this between two programs, the output of one goes to the other. This is where the -o - from earlier comes in; all of that data which would otherwise get displayed as gibberish text will go straight to ffmpeg!
Let’s now take a look at the entire command:
raspivid -t 0 -o - \ [...] -pts \ | ffmpeg -re \ -f pulse -i alsa_input.usb-Blue_Microphones_Yeti_Stereo_Microphone_REV8-00.analog-stereo \ -f h264 -r 20 -i - \ -c:a aac -b:a 112k -ar 48000 \ -vcodec copy \ -f flv [output URL]
We have to tell ffmpeg that what’s coming in is a raw H.264 stream from stdin, and to copy it without reencoding it: that’s -vcodec copy. After that, you can redirect the stream to wherever you want; a RTMP address for live-streaming (hence the FLV), or you could have it record to a local file with the container of your choice.
You can also ask Raspivid to pipe in raw video, like so:
-o /dev/null \ -rf yuv -r - \
The H.264 stream will go to /dev/null (a sort of “file address” that disgards everything sent to it; it’s the black hole of Linux systems), while a new stream of raw video will get piped to stdout instead. Then, on the ffmpeg side, you have to accomodate for this change:
-f rawvideo \ -pixel_format yuv420p -video_size 960x720 -framerate 20 \ -i - \
And then, of course, you can’t just pipe raw stuff towards your output, so you’ll have to reencode it (but we’ll go over that later).
You remember the -pts setting that I mentioned before? It doesn’t really work, and even if it did, you can’t use it. That’s because, when piping raw feeds towards ffmpeg, raspivid seems to be adding this data as some sort of extraneous stuff, and this corrupts how ffmpeg reads it.
Have you ever tried to load an unknown audio file in Audacity, only to be prompted “give me the sample rate, the little/big endian format, the bit depth”? And if any of the settings were off, you would just get screeching distorted audio? This is kind of a similar situation. With a raw H.264 feed, I would get funny distortion on the lower 2/5ths of the video, while the raw YUV feed would just be like an out-of-phase TV, but way worse, and much much greener.
You can also use the video4linux2 driver for the camera. It offers slightly less control over the settings, but it has one major advantage over raspivid: once you launch it, it will keep running, and you can tweak settings over time; with raspivid, you can only input settings before the launch. Here’s how to proceed:
sudo modprobe bcm2835-v4l2 sudo v4l2-ctl -d 0 -p 20 --set-fmt-video width=768,height=432,pixelformat=YU12 \ --set-ctrl contrast=-3 --set-ctrl brightness=51 --set-ctrl saturation=10 \ --set-ctrl sharpness=98 --set-ctrl white_balance_auto_preset=1 \ --set-ctrl auto_exposure_bias=14 --set-ctrl scene_mode=0 v4l2-ctl --set-fmt-overlay=width=240,height=180,top=894,left=1160 v4l2-ctl --overlay=1
The first line loads the driver. (you can use rmmod to unload it)
The second line specifies that we are, on device 0 (-d 0), setting a framerate of 20, which resolution, and which pixel format (YU12 being ffmpeg’s YUV420p).
Then we have all the other image settings that I mentioned before.
And then the overlay settings, very similar to Raspivid’s.
So, all of this works, except there’s a problem; the audio goes out of sync very very fast. In fact, it’s not even synchronized in the first place, and it only gets worse as time goes on!
You see, it turns out that our raw H.264 / YUV streams don’t have timestamps. Raspivid is unable to add any. However, the video4linux2 driver supposedly supports them.
One thing to keep in mind, however: it doesn’t really matter what framerate and resolutions you specify in your V4L2 controls; those will be “overriden” by what you have in your ffmpeg command line.
And unfortunately, the V4L2 driver seems to have an annoying limitation; I can’t get it to go past 1280x720. It might be forced into using the wrong sensor modes, or maybe it is incorrectly assuming the first version of the camera module somehow.

CHAPTER 3: A MATTER OF TIME
Audio drift.
I have tried so many settings, folks. And so many combinations. Mostly because of that, I’m still not 100% sure what’s contributing towards solving it, or what is the exact reason of this lack of audio synchronization.
At first, I had drift right off the start. Then it was over the course of 45 minutes. Then it took 5 hours to become really bad. And now, it only starts being noticeable after around 7 hours. I haven’t managed to fully fix it yet, but unfortunately, I’m running out of ideas, and testing them is becoming more and more tedious when I have to wait several hours before the audio drift rears its ugly head.
From what I understand, the camera module has its own timing crystal, which runs at 25 MHz. On the first version of the camera module, it accidentally ran at 24.8 for a while. As a result, for example, people were getting 30.4fps instead of 30.0. This was said to be fixed, and that the drift was then “less than a 1/100th of what it used to be”. But that means there was still drift. I don’t know what is up with the second version of the camera module, though.
I didn’t really take notes while solving the issue, I’m writing a lot of this from memory, so I can’t give a lot of details, and I might be misremembering a few things. A lot of this is just guesses, some of which are somewhat educated, some of which are a lot wilder.
My hypothesis is that there are separate issues that compound and/or add on top each other, somehow. But there’s one thing that I’m 99% sure of: the framerate is inaccurate. You see, I was requesting 20fps, but I wasn’t getting 20. I was getting ~20.008. I noticed this after leaving the stream on for a while with -vsync vfr, and piping part of its output with another ffmpeg instance to a bunch of MKVs for analysis.
This checked out with the fact that the video was lagging behind audio more and more as time went on, and that, with -vsync cfr, I was dropping frames like clockwork, once every 2 minutes and 15 seconds.
So why does this happen? My best guess is that ffmpeg “naively” thinks that it is going to get the exact framerate that it’s asking from V4L2, and then assumes certain things based on that. That could explain why, even with dropping the extra frames, things still went out of sync eventually.
Unfortunately, .008 is not precise enough and a couple more of decimal places are nice for streaming over many hours. Putting -vsync cfr back on, I tried with .007 instead, and compared the dropped vs. the duplicate frames. If more dropped than were duplicated, then .008 was too much, and vice versa (or maybe it was the opposite). This is how I landed on .00735, which, over the course of 89 hours (I was off visiting Paris with my girlfriend in the meantime), dropped “only” 29 frames but also duplicated 3, somehow—maybe jitter in that timing, even if it ends up averaging to the right number?
In the end, the solution is to work out what the actual framerate is yourself, and then insert it in there as both the input and output rate.
From what I understand, -framerate 20 -r 20.00735 as input options, right after one another, are telling ffmpeg to query 20fps from the input device, but then to actually “sample” the source at 20.00735fps. (update: I think this is actually wrong. I have removed the -r in input now.)
Chances are that, on your camera module, the number will be different; it seems probable to me that the timing error might differ across camera modules, as a sort of timing crystal lottery, akin to the silicon-overclocking-potential lottery.
There is also something else altogether, the -async option (followed by a number of samples, e.g. 10000). It’s supposed to keep the audio and video clocks synced together, but it doesn’t seem like it never really did anything; I believe it’s because it’s pointless to sync 2 clocks if one of them is not working properly to begin with. That said, if it wasn’t there, it might be causing another drift on top of the existing one(s), so I’m leaving it in just to be safe.
I also use -fflags +genpts+igndts right at the start, which supposedly re-generate the timestamps properly or something like that.
The “nuclear option” to ultimately get rid of the drift is to restart ffmpeg after a certain amount of time. It’s not a solution as much as it is a workaround, really.
I don’t think you can avoid doing that, because you can’t get a precise enough timing for it to go on synced forever. This can be achieved by using the -t option right before the output, e.g. -t 12:30:25 for 12 hours, 30 minutes, 25 seconds, and after the ffmpeg command line(s), calling for your own script again. (see below)
CHAPTER 4: x264 ENCODING SETTINGS
Here’s the thing: if you’re gonna go the way of software encoding, you will need to actively cool the Pi, especially if you overclock it. Speaking of overclocking, here are my /boot/config.txt settings (which may not work on your Pi, silicon lottery, etc.):
arm_freq=1320 core_freq=540 over_voltage=5 sdram_freq=600 sdram_schmoo=0x02000020 over_voltage_sdram_p=6 over_voltage_sdram_i=4 over_voltage_sdram_c=4
It turns out you can actually push the RAM that high with the help of those other settings (schmoo controls the timings). While I’ve always had small heatsinks in place, they’re not enough to sustain a hard load for an extended period of time. At first, I used an “Arctic” USB fan, and that actually worked quite well, but I switched to a case with a tiny fan inside of it a couple days ago. It doesn’t cool as much, and has a whine, a very quiet one, but one nonetheless. I am able to stay at ~72 °C while the CPU is hovering around 75% load.
My encoding settings are:
ffmpeg -re \ -fflags +genpts+igndts \ -thread_queue_size 1024 \ -f alsa -i sysdefault:CARD=Microphone \ -thread_queue_size 1024 \
-video_size 768x432 -framerate 20 -r 20.00735 -i /dev/video0 \
-c:a aac -b:a 128k \
-threads 4 -vcodec libx264 -profile:v high -tune stillimage \
-preset faster -trellis 1 -subq 1 -bf 6 -b:v 768k \
-vsync cfr -r 20.00735 -g 40 -async 24000 \
-vf "hqdn3d=0:0:4:4,eq=gamma=1.1,drawtext=fontfile=/usr/share/fonts/truetype/ttf-dejavu/DejaVuSans-Bold.ttf:text='%{localtime\:%T}': fontsize=16: [email protected]: x=6: y=8″ \
-f flv -t 8:00:00 [OUTPUT URL/FILE]
(empty line)
sleep 2s
bash ./V4L2_transcode_raw.sh
The order of the options matters a lot in ffmpeg and is quite finnicky. I start from the “faster” preset. My goal is to use from 50 to 80% of the Pi’s CPU on average. In my case, the image will be pretty static, so there are a few things I can do to make the most out of the processing power available to me.
I enable the “stillimage” tuning preset, which turns down the strength of the deblocking filter and tweaks the psychovisual RD settings accordingly.
I turn the sub-pixel motion estimation accuracy (subq) down one notch. Update: subq is very important because, speaking very broadly, it defines the precision of macroblocks, which are the foundation of how the video is encoded. However, it’s one of the, if not THE most expensive setting, and its cost scales up with resolution very fast. Ideally you’d want at least 3/4, but that’s too much at 768x432 for the RPi 3 at this framerate.
Increasing from 3, I allow up to 8 b-frames in a row. B-frames are bi-directional, instead of being only able to reference the past. They are one of the cornerstones of H.264 and very efficient, but costly. The more I allow, the more of a big resource spike I have if I wave my hand in front of the camera to simulate lots of motion. You can see how many consecutive B-frames x264 ended up using in the end-of-encoding stats. In my case, they ended up being the maximum allowed amount in a row well over 90% of the time.
I also enable trellis quantization. To quote Wikipedia: it “effectively finds the optimal quantization for each block to maximize the PSNR relative to bitrate”.
I set the keyframe interval to 40 frames: 20 fps = 2 seconds, the standard compromise for streams. A longer keyframe interval would increase compression efficiency...but CPU usage too, as well as the initial delay to connect.
I also make use of a couple video filters. The first one is the excellent hqdn3d denoiser; it runs very fast and does an excellent job. I don’t use spatial denoising at all (the first two numbers), but I dial temporal denoising up to 4.
I’ve gone up to 100 just for fun and I saw that in the absence of motion, with noise being pretty much entirely wiped out, the CPU usage stays relatively low at around 50%. The downside is that everything is a ghost and leaves a hell of a trail. You should definitely play around with hqdn3d’s settings; whatever little cost it has is far offset by not having to encode anywhere near as much noise. I’d recommend a minimum of 3.
The second video filter displays the current time in the upper-left corner.
Then I ask for a maximum of 8 hours of running time, and make the script loop in on itself as explained before. This also makes it retry over and over if my router temporarily goes down in case of a DSL de-sync or whatever reason. It also becomes a lot easier to iterate on encoding settings; all you gotta do is press Q to force ffmpeg to stop encoding, and it will re-read your bash file again.
You can easily go up to 720p and up the speed vs. quality preset ladder if you’re willing to compromise on framerate. Around 5-6 fps, you should be able to use settings that are around the medium/slow preset. And of course, if bitrate is not a concern, you can use the ultra/superfast preset and up the framerate. But then you might as well be using the hardware-encoded stream :)
I can’t find the source of that information again, but x264 with the superfast preset, IIRC, beats everything else at equivalent speed, competing software encoders and especially hardware encoders. That said, I have noticed that the Pi GPU’s own hardware encoder works pretty well for very static content, even at surprisingly low bitrates. Make of that what you will! In the end, you should definitely experiment on your own (that’s what Raspberry Pi boards are for), and not take everything that I say at face value.
Update, March 3rd, 2017 : better video settings for lower res stuff:
This is with a resolution of 480x272 and a framerate of 20.
-threads 4 -vcodec libx264
-profile:v high -preset medium -tune stillimage \
-b:v 512k -bufsize 768k -maxrate 768k \
-subq 6 -bf 5 \
It turns out subq is a bit more important than I thought, especially at lower resolutions. To see what I mean, try setting bitrate very low, like 128k, and observe subq 1 vs. subq 6. Dialing it up to 6 really pays off. The “medium” preset has it up to 7, which is maybe a bit too much. With these settings, it’s possible to go down to lower bitrates while maintaining excellent quality, enough to potentially see your stream over unstable 3G connections if you wanted to.
It also turns out that specifying a bufsize and maxrate is very important. If your camera ends up filming something that’s very flat (e.g. pitch black night), x264 is designed to not waste bits where there’s no need. So the bitrate lowers itself way under what you specified... but x264 also interprets this as “all that bitrate I’m not using now, I can use it as soon as I have something meaningful to encode again!”. And when that happens, it will not only make the bitrate spike enormously, but also saturate the Pi’s CPU because x264 now wants to do a lot more than before... bufsize and maxrate keep this in check.
Because the resolution is so low, I do something a little bit different with the filtering chain: I crank up the temporal denoising a bit higher & add sharpening.
-vf "hqdn3d=0:0:5:5,unsharp=5:5:0.8:5:5:0.8,[......]
Be careful with the filter chain: I suspect a lot of (if not all) filters are single-threaded, and could be “semi-invisibly” holding back encoding if you ask too much of them. For example, I can’t reliably run unsharp on resolutions above 480x272 if the framerate is 20. I also tried, at one time, to keep the video input at 720p, then to resize it to the final resolution with the scale filter; turns out if you do it with lanczos instead of bicubic, it won’t be fast enough.
Ultimately, I’ll say again, read up on what settings do, experiment with their impact on both quality and speed, gauge which tradeoff you need between framerate and resolution, and you’ll find something that suits what you’re filming.
IN CONCLUSION
This was a real pain in the ass, but also interesting to play detective with. I hope this helps other Raspberry Pi users. There are definitely other things to be explored, such as encoding ffmpeg’s output in hardware again (using the OMX libraries), so that you can still do the denoising, text, etc. in ffmpeg, but still have very cheap hardware encoding (which the Pi 1, 2, and Zero models desperately need). And maybe someone else will figure out how to fix the audio desync further.
This is what the Pi and open-source things are about, anyway: sharing your discoveries and things that you made, your process... even if they’re not perfect.
My understanding is that, were I to use a device that works as both a video AND audio source, I would (maybe) not be facing this issue, as both sources would be working off of the same internal clock. However, that’d be worse than a workaround, it would have other issues (driver support?) and it defeats the point of trying to solve this on the hardware that Raspberry Pi users have :)
Thanks for reading!
24 notes
·
View notes
Text
2017
Howdy! Time for the yearly blog post! There's enough depressing stuff that happened this year, so I want to try and not focus too much on that; talk more about the positive and the personal. (I am looking back on this opening paragraph after writing everything else, and I don’t think that ended up true.)
I find it increasingly harder to just straight up talk about things, especially in a direct manner. I think it comes from continuing to realize that so many things are extremely subjective and everything has so much nuance to it that I feel really uncomfortable saying a straight "yes" or a straight "no" to a lot of questions ("Nazis are bad" is not one, though). Or even just a straight answer.
I always end up wanting to go into tangents, and I inevitably run into not being able to phrase that nuance. You know that feeling, when you know something, you have the thought in your head; it is so clear, right there in your head, it is crystal-clear to your soul, yet you have no idea how to word it, let alone doing so in 140/280/500 characters. Frustrating!
I guess I could just put a big disclaimer here, "I am not a paragon of absolute truth and don't start interpreting my words as 'Max thinks he is the authority on XYZ' because you'd be quite foolish to do so"; but that doesn't help that much. Online discourse, let alone presence, can be so tiresome these days; not to be too Captain Obvious, but, there are quite a lot of people that delight in engaging those they see as their "opponents" in bad faith.
As a white man, I don't have it that bad, but still, I'll continue to tell you one thing: the block button is extremely good and you should feel no shame in using it. It drastically improves your online experience. (There are some very clear signs that make me instantly slam the button. I’m sure you know which ones too.)
Anyway, regardless, it's hard to get rid of a habit, especially one you've unwillingly taken on yourself, so I apologize in advance for constantly writing all those "most likely", "probably", "maybe" words, and writing in a style that can come off as annoyingly hesitant sometimes.

I started watching Star Trek this year. My Netflix history tells me: January 29th for TOS/TAS, March 26th for TNG, June 3rd for DS9, November 9th for Voyager.
TOS was really interesting to watch. A lot of things stood out: the (relative) minimalism of the sets and the directing was reminiscent of theater, and even though that was, generally speaking, because that's how TV shows used to be made, it was still striking. From a historical perspective, "fascinating" would still be an ill-suited word to describe it. Seeing that this is where a lot of sci-fi concepts came from, suddenly understanding all the references and nods made everywhere else... it was also soothing to watch a show about mankind having finally united, having exploration and discovery as its sole goal. I feel like it wouldn't have made as big of an impact on me, had I watched it a year prior.
I've always thought of myself as rejecting cynicism, abhorring it, but it's harder and harder to hold on to that as time goes on. I still want to believe in the inner good of mankind, of people in general, but man, it's hard sometimes. I think what really gnaws at me most of the time is how so many of the little bits of good that we can, and are doing, individually, and which do add up... can get struck down or "wasted away" so quickly. The two examples that I have in mind: Bitcoin, this gigantic mess, the least efficient system ever designed by mankind, has already nullified a decade's worth of power savings from the European Union's regulations on energy-efficient light bulbs. And then there's stuff like big prominent YouTubers being, to stay polite, huge irresponsible fools despite the responsibility they have in front of a massive audience of very young people. It can be really depressing to think about the sheer scale of this kind of stuff.
What we can all do on an individual level still matters, of course! I try my best not to use my car, to buy local, reduce my use of plastic, optimize my power usage, etc.; speaking of that, I've often thought about making a small website about teaching the gamer demographic in general quick easy ways to save energy. There is so much misinformation out there, gamers who disable all the power-saving features of their hardware just to get 2 more frames per second in their games, people who overclock so much that they consume 60% more power for 10% more performance, the list goes on. Maybe I'll get around to it some day.
All this stuff going on makes it hard to want to project yourself far ahead in the future. Why plan ahead your retirement in 40 years when it feels like there's a significant chance the world will go to shit by then? It's grim... but it definitely makes me understand the saying "live like there's no tomorrow". Not that I'm gonna become an irresponsible person who burns all their savings on stupid stuff, but for the time being... I don't feel like betting on a better tomorrow, so I might as well save a little bit less for the far future and have a nicer present. You know the stories of American workers who got scammed out of their own 401k? That's, in essence, the kind of stuff I wish to avoid. If that makes sense.
Anyway, going off that long depressing tangent: something I liked a lot across The Next Generation, Deep Space Nine, and Voyager, was how consistent they were. The style of directing, framing, camera movement, etc. was always very similar. Now, you can argue that's just how 80s and 90s TV shows on a budget, a 4:3 aspect ratio, and smaller SD screens worked, yes, but I do believe there is a special consistency that stuck out to me. I jumped into the newest series, Discovery, right after finishing Voyager (I don't plan on watching Enterprise) and the first two episodes were confusing to watch... shaky cam, a lot of traveling shots, shallow depth-of-field, and the tendency to put two characters at the extreme left and right of the frame.It’s a hell of a leap forwards in directing trends. It all gets better after the first two episodes, though.
youtube
I remember alluding to the King of Pain project in my last yearly post. I'm glad I managed to finally do it. I'd talk about it here, but why do it when I've made 70 minutes of video about it? (And unlike my previous behind-the-scenes videos, it's a lot more condensed, and hopefully entertaining.) Unfortunately for me, I completed the video in late June, with only a month left to the TI7 Short Film Contest deadline. So I ended up making two videos back-to-back. I had to buy a new laptop in order to finish the video during my yearly pilgrimage to Seattle. It was intense! And thankfully, I managed to pull off the Hat Trick: winning the contest three years in a row. I would like to think it's a pretty good achievement, but you know how us artists are in general; as soon as we achieve something, we start thinking "eh, it wasn't that good anyway" and we raise our bar higher still.
While I do intend to participate in the contest again next year, I know I'll most likely do something more personal, that would probably be less of a safe bet, now that the pressure of winning 3 in a row is gone. I already have a few ideas lined up...
... and I do have a very interesting project going on right now! If it goes through and I don't miserably land flat on my face (which, unfortunately, has a non-zero chance of happening), you'll see it in about a month from now.
youtube
I'm pretty happy to have reached a million views on all three of my shorts; a million and a half on the TI7 one, too... it might reach two million within six months if it keeps getting views at the current rate. It surprises me a bit that this might end up being my first "big" video, one that keeps getting put on people's sidebar by the all-mighty YouTube™ Algorithm™. There's often a disconnect between what you consider to be your best work, and what ends up being the most popular.
This reminds me that, a lot of the time, I get people who ask me if I'm a streamer or a "YouTuber". My usual answer is that I'm on YouTube, but I'm not a "YouTuber". I wholeheartedly reject that subculture, the cult of personalities, the attempts at parasocial relationships, and all that stuff. It's just not for me. Now, that said, I do hope to achieve 100k subscribers one day... I'm getting closer and closer every day! The little silver trophy for bragging rights would be neat.
My office was renovated by my dad while I was gone. It's much nicer now, and I finally have a place to put most of my Dota memorabilia. He actually sent me this picture I didn't know he'd taken, behind my back, in 2014; the difference is striking... (I think that game I'm playing is Dragon Age: Inquisition.)
Tinnitus. I first noticed my tinnitus when I was 20. I vividly remember the "hold on a second" moment I had in bed... man, if I'd known back then how worse it'd get. Then again, the game was rigged from the start; as a kid, I had frequent ear infections because my canals are weird and small. What didn't help either was the itching; back then, they thought it was mycosis... and treatment for that didn't help at all. Turns out it was psoriasis! Which I also started getting on my right arm that year. (It's eczema, it's itchy, it's chronic, and the treatment steroid cream. Or steroids.) Both conditions got worse since then, too.
Tinnitus becomes truly horrible when you start the doubt the noises you're hearing. When all you have is the impossible-to-describe high-pitched whine, things are, relatively speaking, fine. You know what the noise is, and you learn, you know not to focus on it. But with my tinnitus evolving, new "frequencies", I have, on occasion, started doubting whether I was hearing an actual noise or if it was just my inner ear and brain working in concert to make it up. So I end up thinking about it, actively, and that makes it come back. I had a truly awful week when, during an inner ear infection, the noise got so shrill, so overwhelming, I lost so much sleep over it. I couldn't tune it out anymore. It was like it was at the center of my head and not in my ears anymore. I wouldn't wish that on anyone. I'm not even sure that I'm in the clear yet regarding that. But, like I said, it's best if I don't dwell on it. Thinking of the noise is no bueno.

Really, the human body is bullshit. Here's another example. A couple months ago, I managed to bite the inside of my mouth three separate times. I hate when it happens, not because of the immediate pain, but because I already dread the mouth ulcer / canker sore (not sure which is the appropriate medical translation; the French word is "apthe"). Well, guess what: none of these three incidents had the bite degenerate into an ulcer... but one appeared out of nowhere, in a different spot, two weeks later. And while mouthwash works in the moment, it feels like it never actually helps... it's like I have to wait for my body to realize, after at least ten days, oh yeah, you know what, maybe I should take care of this wound in my mouth over here. And it always waits until it gets quite big. There's no way to nip these goddamn things in the bud when they're just starting.
But really, I feel like I shouldn't really complain? All in all, it could be much worse, so so so much worse. I could have Crohn's disease. I could have cancer. I could have some other horrible rare disease. Localized psoriasis and tinnitus isn't that bad, as far as the life lottery goes. As far as I'm aware, there's nothing hereditary in my family, besides the psoriasis, and the male pattern baldness. I wonder how I'll deal with that one ten, fifteen years down the line...

Just as I'm finishing writing this, the Meltdown & Spectre security flaws have been revealed... spooky stuff, and it makes me glad I still haven't upgraded my desktop PC after five years. I've been meaning to do it because my i7 4770 (non-K) has started being a bit of a bottleneck, that and my motherboard has been a bit defective the whole time (only two RAM slots working). But thankfully I didn't go for it! I guess I will once they fix the fundamental architectural flaws.
The Y2K bug was 18 years late after all.
Here's a non-exhaustive list (because I’m trying to skip most of the very obvious stuff, but also because I forget stuff) of media I enjoyed this year:
Series & movies:
Star Trek (see above)
Travelers
The Expanse
Predestination (2014)
ARQ
Swiss Army Man
Video games:
Hellblade: Senua's Sacrifice
Horizon: Zero Dawn
What remains of Edith Finch
Uncharted: Lost Legacy
Wolfenstein II
Super Mario Odyssey
Metroid: Samus Returns
OneShot
Prey
Music:
Cheetah EP by James Hunter USA
VESPERS by Thomas Ferkol
Some older stuff from Demis Roussos and Boney M.... and, I'll admit reluctantly, still the same stuff: Solar Fields, the CBS/Sony Sound Image Series, Himiko Kikuchi, jazz fusion, etc. I'm still just as big a sucker for songs that ooze with atmosphere. (I've been meaning to write some sort of essay on Solar Fields... it's there, floating in my head... but it's that thing I wrote earlier: you know the idea, intimately, but you're not sure how to put it into words. Maybe one day!)
I think that's about it this year. I hope to write about 2018 in better terms!
See you next year.
6 notes
·
View notes
Text
My quest to disable Wi-Fi background scan on the ASUS PCE-AC88 AC3100 card
My computer is, unfortunately, not in the same room as my modem. And up until recently, I was using ethernet-over-powerline adapters. It’s fairly “old” technology and depends a lot on the quality of the wiring in your walls. I went through three models of those adapters until I found one that would allow me to actually reach the complete bandwidth offered by my phone line.
I eventually did find that model, but slowly, problems started creeping it. I didn’t think much of it at first, but a constant 5% packet loss showed up in Dota 2. I figured it was just the servers themselves. But then the speeds started to plummet unless I turned unplugged and replugged either adapter. And in the end, that ended up not working anymore.
Well, time to go back to Wi-Fi connection then! The other alternatives was to either move my office to the living room (not gonna happen), or to lay down a good 20 meters of Ethernet cable and trip all over it in the hallway (unlikely to happen, but honestly, I’m strongly considering it now).
I started looking for adapters. I actually did had a dongle lying around from about 6 years ago. Unfortunately, it caused blue screens of death, I assume because it didn’t have proper drivers for Windows 10.
First, I bought the TP-Link Archer T9E AC1900. It was pretty good, seemed to have no problems, and allowed me to reach about 95% of my speed capacity. However, its driver has an awful problem: the speed starts to plummet after some time (usually a day of uptime). The two solutions are to “restart” the card by clicking on the Wi-Fi tile toggle in the network list (merely disconnecting and reconnecting does not work), or just reboot your computer. Using generic drivers from the chipset manufacturer did not alleviate the issue; in fact, it made the first solution, which was already sometimes unreliable, not work at all: the card would freeze altogether, and a reboot would be the only option.
I returned that one and went for the most expensive one I could find! It ended up being the Asus PCE-AC88 AC3100. It is very very fast. It’s actually the first time I’m completely maxing out my connection; neither ethernet-over-powerline or any previous Wi-Fi solutions that I’d used actually unlocked its full potential.
However, there is one problem (hey, look, we’re finally getting to the actual topic of this post). Every five minutes, exactly 300 seconds, there would be a short spike in latency and/or packet loss.

This software is called PingPlotter, it’s very neat, and thankfully it offered a 15-day trial version. I’ve set it to ping my router every 100 milliseconds. The spikes generally reach 250 to 400 ms in latency, and last about 300 ms.
It’s not a big deal, but it was disappointing that a 100 € card with such blazing speeds ended up having this problem when the other one, with an actually crippling issue, didn’t suffer from it.
This is caused by Windows (or the driver) scanning for Wi-Fi networks in the background. If you search for that on Google, you’ll see a lot of people have the same issue on other cards. See, though, most other cards have had the decency to offer a driver-level setting that would stop background scans. The PCE-AC88 does not!
This is what opening the list of Wi-Fi networks, triggering a full scan, looks like:

It’s mind-blowingly bad, but I can understand that since it’s a full scan, and thankfully, the 5 minute spikes are nothing like that so you could totally bear with them. But I still wanted to look for a fix!
There’s this piece of software called WLAN Optimizer, which does a bunch of behind-the-scenes voodoo magic to disable background scans, and/or enable settings that could prevent them. Unfortunately, it did not help at all!
Then I ended up trying a few crazy things, and here’s one that surprisingly worked... it actually touches the same thing that WLAN Optimizer does, but does so differently.
If I restarted Windows 10′s WLAN AutoConfig service, the system tray would display the wireless icon with a red X, as if the adapter was unavailable. Yet I was connected! It’s like Schrödinger’s Wi-Fi.

The WLAN AutoConfig service is responsible for quite a lot of things that are related to wireless connectivity, but as far as I understand, what WLAN Optimizer does is that it pauses or interrupts it in a specific way so that opening the network list would not display any access points. But it’s... still kinda running? I’m not 100% sure.
Anyway, doing this by itself did not solve the issue, and another thing I tried in tandem with that, toggling on Flight Mode, ended up making the spikes happen in a much worse fashion, every 45 to 60 seconds!
Instead, after the service was restarted, I turned WLAN Optimizer back on, with only the “stop background scan” and “streaming mode on” settings.
And guess what... it works! No more spikes.

Constant 2ms latency to my router over 6 hours!
However, one thing I experienced shortly before writing this post was explorer.exe crashing and restarting (lol). This restored the wireless icon back to normal and broke the fix... until I just applied it again. Go figure!
You can restart the WLAN AutoConfig service using a batch file, too!
net stop WLANSVC net start WLANSVC PAUSE
I’m wondering if maybe the whole thing is caused by the Windows UI wanting to refresh the signal strength and having to scan for it or something... I’m thinking of investigating that, and a couple of other potential avenues that might make the fix easier to apply or more reliable. I’m worried that this fix is little more than an exploit, using a bug to fix another one.
I wrote to ASUS Support but I’m not hopeful to get a reply, let alone a driver fix.
3 notes
·
View notes