#sorry for the crunchy quality the image is.... large
Explore tagged Tumblr posts
Text
here’s a screenshot of the full list of things threads collects data on. don’t download threads.

#threads#data privacy#sorry for the crunchy quality the image is.... large#also still ends in ''other data'' so there's even more#absolute nightmare
2 notes
·
View notes
Text
🎃 twst halloween 2023 ABEMA stream news 👀

SIT DOWN, Y'ALL IT'S A DOOZY AND YOU'LL NEED IT
***SPOILERS FOR THE TWST HALLOWEEN 2023 EVENT + OTHER ABEMA LIVESTREAM NEWS BELOW THE CUT!***
First main topic of discussion is the Disney100 Campaign and a reminder about the SSR Platinum Jacket Grim banner. There is also a limited design parka giveaway in JP.

PV ALREADY??????????? ?? ??? ?? ? ??? ?? ??? AND DESIGN REVEALS FOR THE TWO NEW CHARACTERS (so sorry for the crunchy quality on Ace)
You can watch the new Halloween animation (English fansubbed) here!
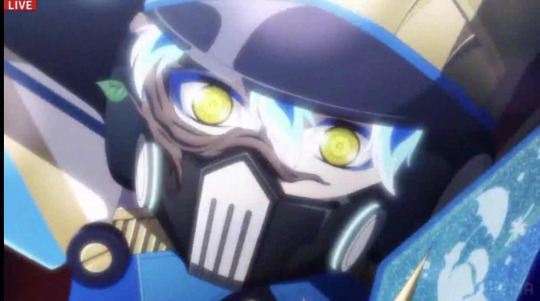




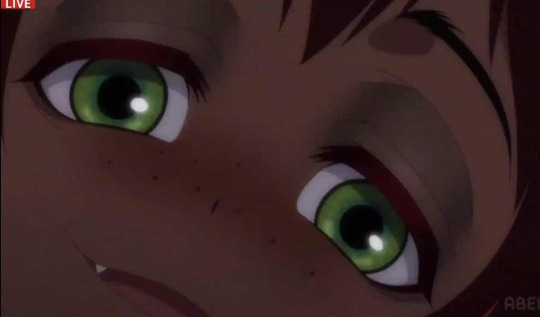

The new characters are Ferro Honest and Gideru/Gidel/Gidell, the latter of which is not voiced. However, Ferro Honest will be voiced by Tomokazu Sugita!!


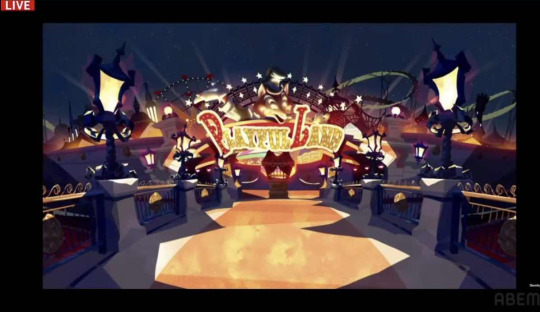
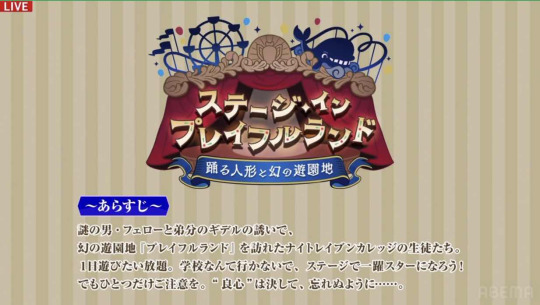
Some new event images!! The new event is called "Stage in Playful Land ~Dancing Puppets and the Fantastical Theme Park~"! The boys will be headed to "Playful Land", an amusement park of illusions. They've been specially invited by the two new characters. You get to forget all your worries and have fun all day, no need to pay! Maybe you'll even become a star... Hey, why not just skip school and stay here forever? How shady! There has to be a catch to it...

NEW CARDS TIME!!!!!
First up, the Rs (Trey, Jack, Jade, Lilia)! You can automatically see that the poses are very dynamic and incorporate ribbons. They look like they're being puppeteered on strings!! You'll also notice that they still have the eye masks, just with a different overall outfit theme than in Glorious Masquerade.




Next, the SRs (Cater, Leona, Floyd, Vil)! asdihlbaoyfeqfba They all look like they're having so much fun moving around their limbs and posing~




Last, but not least, the SSRs (Ace, Kalim, Ortho)! THEY'RE ALL SO DRAMATIC (especially Ace, look at him hamming it up)... It's really rare to see this kind of an expression on Kalim too, so it's a treat! Ortho was practically a given because of the Pinocchio inspiration of this event, but it's still so great to see the confirmation.


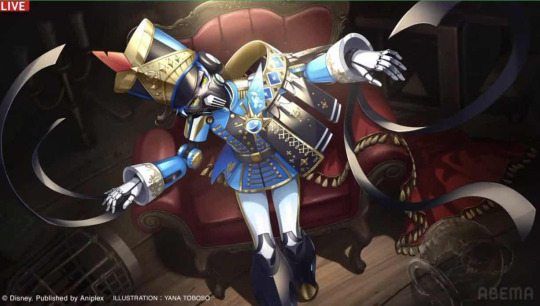
Yana-sensei was inspired by marionettes while designing this line of cards! She paid special attention to the patchwork in the clothes (there are even some easter eggs in there, particularly on the SSR trio). THE NEW HALLOWEEN EVENT STARTS ON THE 20TH 🤡THAT'S THE END OF THIS WEEK.... . . .. ............ . . .. . . .... . . .. . . . .
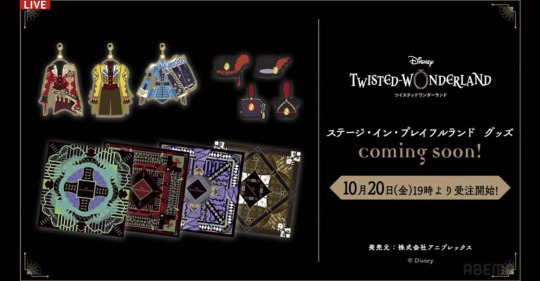
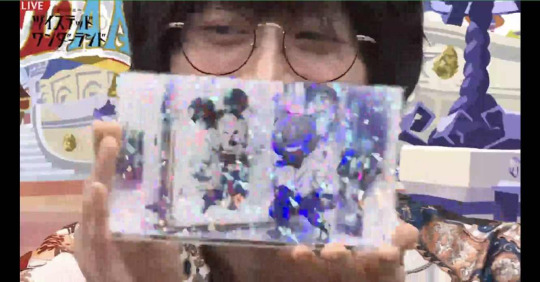
Ooh, new event merch! Keychains and scarves, plus a large holographic acrylic block with the Platinum Jacket Grim initial art.
#twisted wonderland news#twst#twst news#twisted wonderland#Leona Kingscholar#Floyd Leech#spoilers#disney twisted wonderland#notes from the writing raven#Jack Howl#Cater Diamond#Ace Trappola#Trey Clover#Tweels#Jade Leech#Kalim Al-Asim#Vil Schoenheit#Ortho Shroud#Lilia Vanrouge#Grim#twst merch#twisted wonderland merch#Pinocchio#Ferro Honest#Gidel#Gideru#Fellow Honest
887 notes
·
View notes
Text
equate coffee @ orchard central
a couple months before their orchard central outlet opened, i visited equate coffee’s original tanjong pagar store. i can’t remember the exact cost of the items or the exact variety of food or drinks offered, but i do remember only being able to order mostly coffee and some tea variants (i believe i had a matcha latte?). i did enjoy the ambience at the tanjong pagar outlet—apart from being located in a small, quiet corner in tanjong pagar plaza, the storefront is framed with a gigantic jagged-edged, almost raw-looking (but not really, obviously) hole in the wall that serves as the entrance to the café. inside, the décor is a mix of brutalist and minimalist aesthetic, with unfinished (again, done intentionally, of course) cement screed floors and tiny stools next to tiny coffee tables.
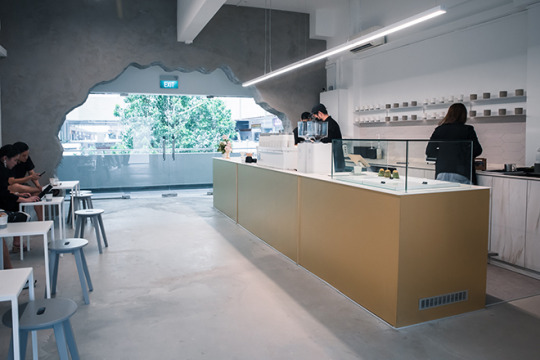
(photo from shout.sg, sorry. i didn’t intend to review this place when i was there)
so when i heard they were opening a new outlet in orchard, i was pretty excited. i was a little disappointed, though, when i found out it was in orchard central, a shopping mall. i don’t know if it’s personal bias, or if it’s a legitimate design concern, but cafés in malls just don’t feel the same as cafés located in your average gentrified-retro-looking-shophouse neighborhood. i could go on about how the location of these cafés plays a role in its “artisanal” image but that’s probably a topic for another post.
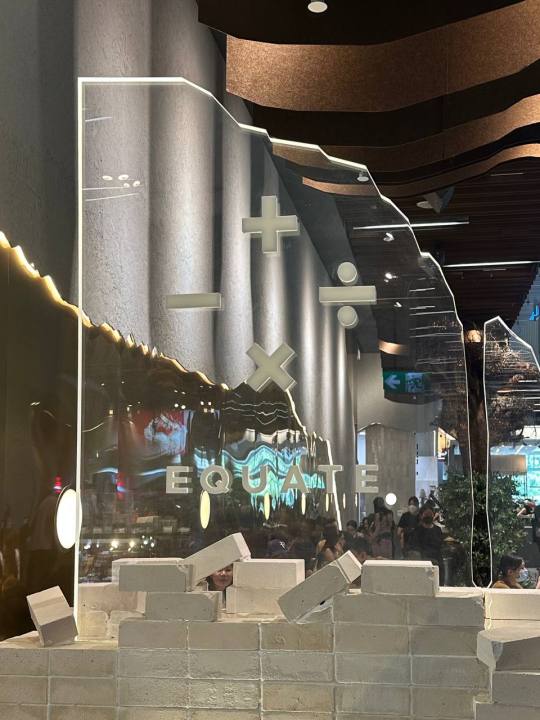
i don’t completely hate the design of the new outlet. i do like how they kept the brutalist theme and added an eco twist to it—the two large tree trunks sprouting from the center of the space and the shrubs growing between slabs of rocks add a hint of nature and greenery to the drab of the steel-and-glass interior of orchard central.
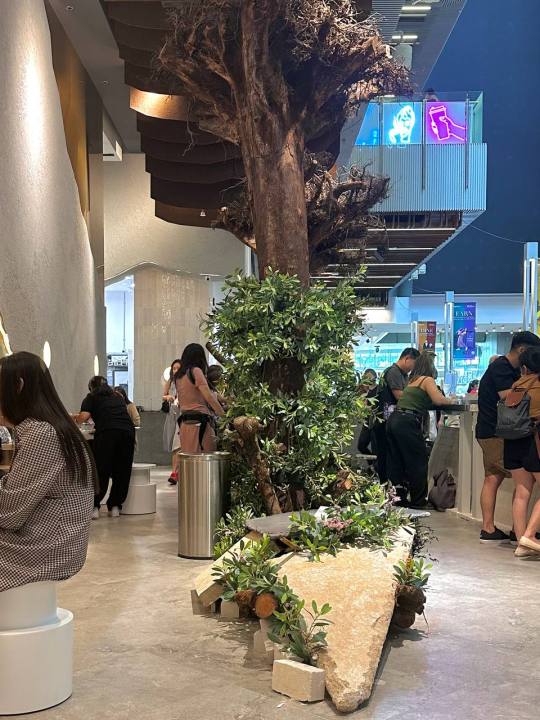
the counter, like the tanjong pagar outlet entrance, is also framed by the same jagged-edge, hole-int-the-wall design, which again helps break the monotony of the mall setting.
the décor couldn’t save the café from the awful overhead lighting of the mall, though. it ultimately made for a difficult time trying to capture photos of the food without any harsh shadows lurking over the table. combined with my lack of skill in photography, it’s safe to say my pictures were not the best. i apologize in advance.

as for the food, i had a cup of hot mocha ($5.50) with a tonkatsu sandwich ($15.80) and hazelnut chocolatine ($7.80).
the mocha was a little bitter and acidic; admittedly, i can’t say much about its quality or value-for-money, but it was good for the most part. i wanted the iced version but must’ve screwed up my order. it’s my bad, they do operate on a self-served ordering system where you scan a qr code for the menu, select what you want and pay on the website.

the tonkatsu sandwich is supposedly made up of “japanese panko-breaded pork loin, emmental, sesame dressing and shredded cabbage in toasted milk bread”, according to the café menu. the pork loin was cooked perfectly, which helped to bring the whole dish together.
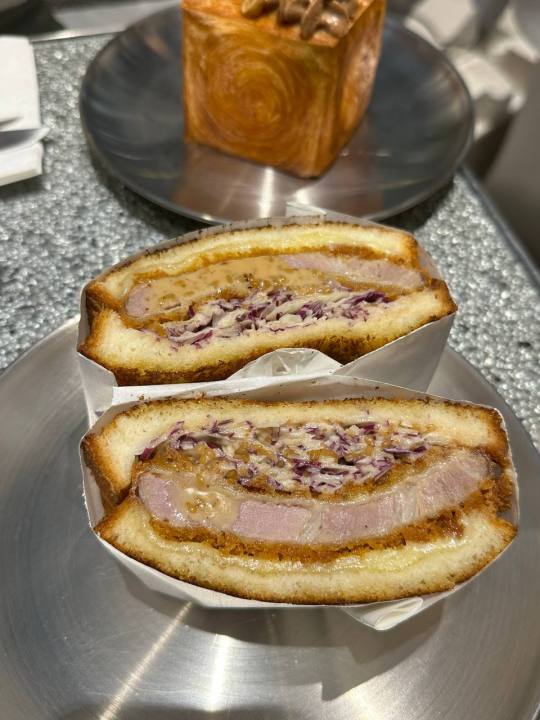
the hazelnut chocolatine is essentially a filled croissant in cubic form—to be fair they do state it on the menu, as i quote here: “croissant filled with homemade chocolate hazelnut praline”. i appreciate the aesthetic novelty though.


i like the contrasting textures in this one. the softness of the praline pairs nicely with the crunchiness of the hazelnuts and mini chocolate biscuit balls. along with the perfectly flaky pastry and irresistible cube shape, this is probably my favorite dish here.
overall:
7/10 affordability
8/10 taste
6.5/10 ambience
0 notes
Note
Hii Shelly! Been reading your blog and it's extremely informative, so thank you for that! Anyways, i was really wondering what are your favourite songs from MFS! Thank you!
Hi there!!! 😁✌️
Hmm ….. that’s an interesting question 🤔. OK, my list changes with times I must say. There was a time when I used to listen to the album 虚言NEUROSE everyday during my daily commute to work as I liked ZERO Gravity and ROOM very much. I used to like What’s My Name? from BONEDS split album a lot too. Apart from the 1st song in the following list which is a crucial song to me, the rest are songs that I’ve noticed I tend to repeat every time I listen to them nowadays.
WARNING: I will be mentioning Taka and OOR a lot here. Read on to understand why.
1. 最終回STORY [Saishuukai STORY]
youtube
This is the most important MFS song for me because THIS is the song through which they stole my heart at the height of my “love affair” with OOR back in 2013. The one that turned me into an MFS fan. Don’t get me wrong, I still am an OOR fan. It’s just that I was also looking for something else I wasn’t getting from them. A certain kind of aggressiveness. Not necessarily had to be appealing to the commercial mass market. Something more metal yet still melodic and accessible. I was in love with the song March of Mephisto by Kamelot at the time and I wanted something that leaned more towards that. Then, I heard 最終回STORY. BAM! I found what I was looking for 😍! Different from OOR. Played it on repeat that night and it became the most played song on my phone quickly. I love everything about it and the MV, which somewhat hides the band members’ faces, is just right for it. It makes us focus on the amazing music and not their pretty faces.
* Though I feel Hiro somewhat ruined it when he swang his mic at one point in the MV (one short second of a movement that his Onii-chan is famous for is enough to tarnish Hiro’s image for life 😖), but overall especially the angles that the video was shot, more than makes up for that “oops …” moment 😊.
2. 終焉レクイエム [Shuuen Requiem]
I do love string sections anywhere and the orchestral arrangement intensifies the song’s melancholic melody. Furthermore, I like how musically, this one leans more towards the work of older rock artists from HYDE’s generation than the younger OOR kind of crowds. It reminds me a lot of my favourite song Gekoukka by Janne da Arc from the anime Dr. Black Jack.
While I understand Hiro’s intention with BLACK RAIL, this one has a lot more depth and is far more revealing of his feelings about being cyber-bullied by some of his brother’s fans. I talked a lot more about it here.
3. 君のいない夜を越えて [Kimi no Inai Yoru o Koete]
Part of Sho’s musical works for Ochanomizu Rock. Musically, it’s safe and sweet.While it wasn’t love at first listen to me but thanks to the drama series, I got drawn more and more towards it. Upon finding out that Hiro cleverly inserted a lyric line that clearly mentions “my first story” which also seems to answer why he and big bro Taka appear detached in public, the song then totally etched itself on my heart. I wrote what I thought about that “hidden” message here. Despite the crazy accusations about him hating Taka, Hiro once again wants us to decipher all the clues he left here and there indicating how he carries his big brother in his heart very much ❤️.
4. FAKE
Surprised to see this one? This one is in a league of its own to me. I wrote my thoughts on it back in 2015 here. OK, this one represents the time when I was adjusting to the fact that Hiro was no longer a boy when I first saw the trailer. How he had blossomed into a man. I remember that day very well. My hands felt cold and my heartbeat was racing, telling myself, “He’s not a baby anymore. Accept it,” 😮.

Just look at how he flirted with the viewers through the camera lens 😍.
He ended it with alternate wink of one eye! Oh my kokoro ❤️❤️❤️

The song also has a different and sexier groove that sets itself apart from other MFS songs. Listen to those crunchy rhythm guitars 😙!! My favourite part is when they put Hiro’s voice through that “groveling” vocal effect about 1 min into the song. Come on, how can I not find that sexy 😉? You don’t often get to hear Hiro sounding masculine, thanks to his high-pitched natural voice. So, this is where the right voice effect works very well to enhance the man side of him. I also love how schizophrenic the song arrangement is. How it twists to different turns one after another. Weird but good weird 😉. Whether you like the song or not, you have to admit that this song is only one of its kind in their repertoire as they have never made another song that sounds like FAKE again.
* Some fans compared the chorus to OOR’s Never Let It Go but still the overall feels of both songs are worlds apart. The former is an arena rock anthem with a soaring chorus. The latter is just weird but a deliciously sexy groovy kind of weird.
youtube
5. The Puzzle
The song that didn’t impress me AT ALL during the trailer. Then they released the video on STORYTELLER in full. Wow! Suddenly I knew how to appreciate it. You can feel the raw feelings and vulnerability they exuded with that video. The video was recorded at their 1st public performance after the lineup change. It was a period of MAJOR adjustment especially for the 3 youngest members Hiro, Teru and Kid’z. Hiro trying to hold back his tears mid-song, Teru still playing under Sho’s shadow and Kid’z (who was still worrying about fans’acceptance) doing his best to prove his worth by elevating the song through his own style of drumming. I almost feel like Kid’z was making his drum beats “sing” with Hiro at certain parts.
* For those just joining STORYTELLER Club, you can watch The Puzzle MV only after being a member for 90 days. Be patient, OK? It’s worth waiting to see Hiro’s raw pain when he sang the line “boku dake / only me”.
6. BOOM
I love heavy sounding bass lines which this song has in abundance. TQ Nob for your awesome work! What a pity it was not made into an MV. To me, this song is a missed opportunity for MFS to show the world especially the skeptics that they really do play a different kind of music from big brother band OOR. Where the big bro is more Good Charlotte & Yellowcard, this one has Limp Bizkit running through its veins. Different leagues. Fred Durst would be proud 😉
7. 悪戯フィクション [Itazura FICTION]
It’s dark and lyrically intense! I wrote about what I think the lyrics are about here, here and here. Also, why I think it inspired the lyrics to LET IT DIE here. Then how to not fall head over heel over that drumming ❤️? Turned out it was the most challenging arrangement to Kid’z from that album and the one he worked the hardest on to get it right. Hmm …. does that mean I can now trust my ears to detect quality work? Hehe 😁. That sounds like bragging but, from the start, the drumming had been the part that drew me to this song 😊. A song meant to be performed in large halls/arenas.
8. 不可逆リプレース [Fukagyaku REPLACE] acoustic version
The reason? My mind likes to imagine Taka singing with Hiro on this version. Somehow I think the gentler music arrangement fits to bring the two brothers’ voices together onstage. Imagine them singing the lines “… I will follow you … follow you ….“ and “keep you close to me …. close to me ….” to each other. But, I want to see them both together onstage NOT because I think it would be an explosive collaboration. Instead, I want to see the “tears fest” that would happen on that stage. My mind also likes to make a bet who from each band would cry first watching them. My bet ….. from MFS, it’s a toss between Nob and Teru. Then from OOR, it’s Ryota. Am I sadistic or what 😮? Wanting a song to be performed just to see people cry 😄?
9. REVIVER
I love how somewhat 80′s rock and old school this song is. I talked about that in this post. Even the MV’s aspect ratio is old school! Teruki shines here 😊. Proudly wearing an Ozzy Osbourne T-shirt. Basically declaring where his musical influences came from. OK. I don’t need to repeat REVIVER because they actually made TWO equally excellent versions of it and now they added the orchestral version too. Aah …. MFS loves me 😍!
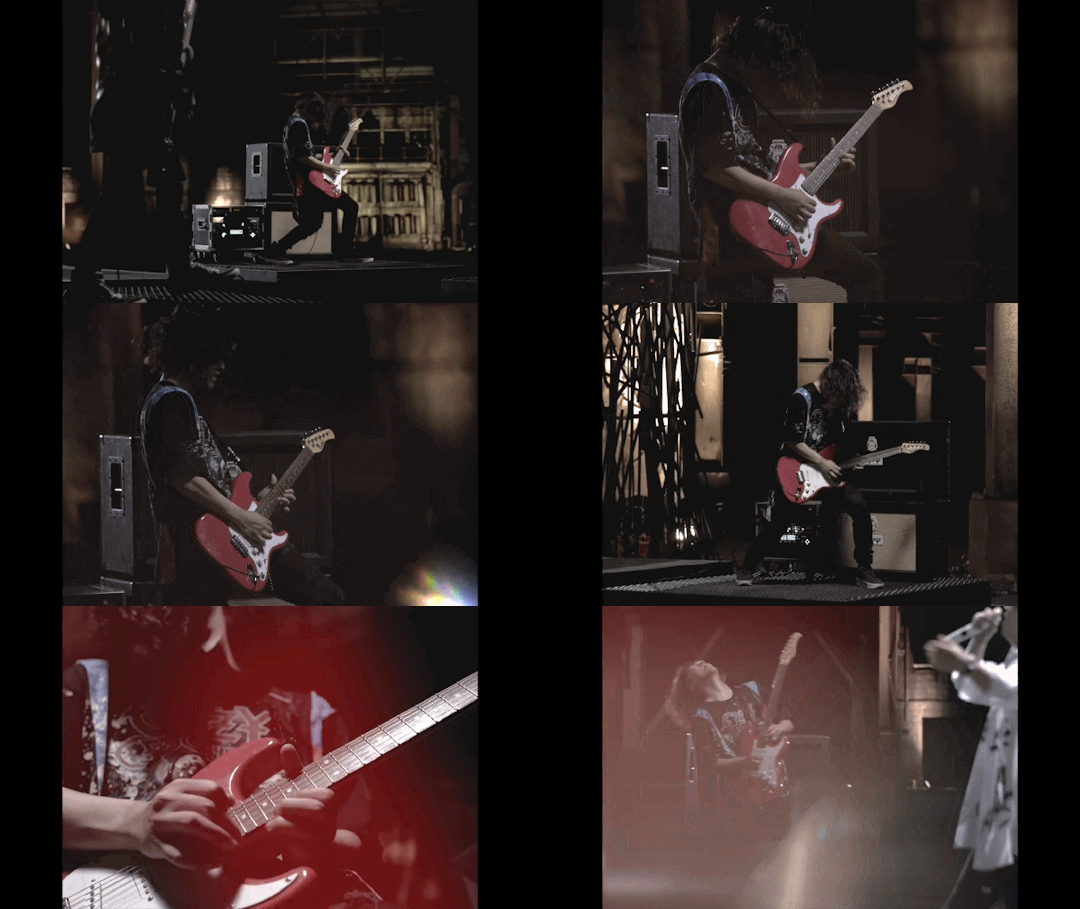
Of course, like the rest of you, I love ALONE, LET IT DIE, Missing You etc. Special mention for AWAKE which I call “the song Hiro has never screwed up Live”. An older song Warning always makes me happy too. Another special mention is If I Am which everyone else seems to find lame but I, on the other hand, think that it has an epic acoustic potential LOL. Did you all see how dead and quiet the crowd was when they performed this song in the ITSUWARI NEUROSE Tour Final DVD 😂? Yeah, I think the guys need to revive the song with a different arrangement.
Sorry this got too long 😮
24 notes
·
View notes
Text
12 Black-Owned Pet Brands You Can Support Today
#Poop4U
In light of world events right now, I wanted to take this time to shine a spotlight on some amazing black-owned pet brands and small businesses. Some of these brands are already firm favourites here at Pretty Fluffy and some are fresh faces that I wish I’d known about earlier – or to be completely honest, made more of an effort to know about earlier.
If the recent weeks have shown us anything, the entire world is ripe for change. Change is messy. Change can bring fear, anger, and hostility. But it needs to happen and frankly, is long overdue. As an Australian, I can confirm the Black Lives Matter movement applies just as much here as it does in the US. We all need to be having more conversations about race, white privilege, bias, social injustice, diversity, and inclusivity. We all need to be voting, protesting and campaigning for true, deep change within our societies. And as with any social change, it’s starts with ourselves.
To our readers, I want you all to know that this post marks a refreshed commitment to showcase more diversity on Pretty Fluffy – from the brands featured, to imagery used, and voices heard. I’m sorry it’s taken such history making worldwide events for me to actively acknowledge this. I now realise (like many others) that being pro-actively anti-racist and intentionally inclusive needs to be the new normal, to try to counteract the inherent bias of white privilege faced by so many. To find out more how Pretty Fluffy wants to support black-owned pet brands and small businesses from people of colour, please scroll to the bottom of this post.
Today though, is all about these amazing black-owned pet brands. Each one has an innovative black woman or man behind the brand – from seriously stylish fashion, to delectable dog treats and more, these are some amazing brands I’m incredibly proud to share.
Danes & Divas
I have a secret. Every time I’m doing a gift guide or editorial feature I visit Danes & Divas because I just know CEO, Shalla, will have stunning new pet accessories my readers will love. Their collars, leads, bow ties and accessories are of exceptional quality, and their designs range from bespoke, timeless pieces to on trend collections. Head over there yourself and do yourself a favour.
SHOP NOW
Leela Ryan
Plant based healthy dog treats? Check. Incredibly beautiful packaging? Check. Oprah approved? Check. Leela Ryan had us at hello and has been a Pretty Fluffy fav for a few years now. Their vegan, human grade ingredients are as healthy as they are tasty. Dog treats don’t get any better than this.
SHOP NOW
Bark and Tumble
CEO, Leah Betram uses her degree in Fashion Design to create tailored, luxe hoodies and sweatshirts for fashion forward pooches. As stylish as they are cozy, you’ll find it hard to stop at one.
SHOP NOW
Brixxy & Co.
Featuring the cutest pet bandanas, all of Brixxy & Co’s pieces are fully reversible and are custom made in Philly. Head to their insta to shop (and see some seriously cute pups rocking some seriously awesome bandanas.)
SHOP NOW
Brock n Bone
Not only can you get the cutest customised dog bandanas by Brock n Bone, but they offer headbands for humans and ‘Dog Mom’ Bundles too – it’s every dog mama’s matching dreams come true.
SHOP NOW
House Dogge
Prepare your jaw to hit the floor when you see the House Dogge’s collection of toys and doggie sweatshirts. With a glorious emphasis on natural textiles such as cotton, veg tanned leather and merino wool, the quality is second to none. Designer and owner, Angela, brings her extensive design experience (she was the design director for Nike) to create a modern, luxe, eco brand. Don’t forget to check out her latest release – a vintage inspired ‘Love Heals’ bandana inspired by the events of 2020.
SHOP NOW
Pet Plate
Personalised meals for your dog designed by vet nutritionists and delivered to your door? Yes please! MIT grad, Renaldo Webb, launched Pet Plate following consultant work with some of the large pet food companies. He wanted a fresher, healthier option for his (super cute) pup Winston that focused on human grade ingredients to provide a complete balanced diet. With every type and size of dog catered for, your dog could be chowing down on their new favourite meal in no time.
SHOP NOW
Sir Dogwood
Chic. Modern. Curated. Everything about Sir Dogwood screams style. Owner, Chaz, selects only the most luxe, unique pieces for her online boutique – from ready to wear fashion, limited edition collections with emerging brands, walk and home accessories. Chaz’s discerning eye sees her source pieces fro around the globe – I even spy some Australian made goodies in her boutique. Shut up and take my money.
SHOP NOW
Trill Paws
We’ve featured Trill Paws’ cooler than cool dog tags and accessories here before and we still love them just as much. These are not your boring pet ID Tags. Faves include the ‘Have your People Call My People’, ‘I Know I’m Extra’, ‘Sup’, and ‘Straight Outta Rescue’ tags…the hardest decision will be which one to pick.
SHOP NOW
Homescape Pets
Nana and Marcus, with help from their furry sidekicks, created Homescape Pets to provide holistic alternatives to common pet ailments. Anyone who has a senior dog would love their Mussel Mobility mix. And owners of anxious pups rave about their Restful Pet oil. A great brand for anyone focused on their dog’s health and wellbeing.
SHOP NOW
Little L’s Artisan Dog Treats
The Little L’s in this brands namesake refers to Lilly and Lulu – two pooches who inspired their fur-parents to make their very own brand of oven dehydrated treats called “Krak’ems”. Crunchy and packed with flavour, they’re a premium alternative to big brand jerkies. Their signature single ingredient brittle Krak’ems are all made from locally sourced chicken breast, turkey breast, beef steak, and pork loin.
SHOP NOW
Ava’s Pet Palace
Talk about saving the most inspired til last! Ava Dorsey is 12 years old. Ava created her dog treat company when she was just 8 years old, and all of her 100% organic and preservative free treats are made in small batches by herself. From ‘Minty Woof Poppers’ to ‘Peanutty Paw Cookies’ there’s something to entice every pooch.
SHOP NOW
Want to see more brands by people of colour? We’ll be featuring more favourites in our next post.
PRETTY FLUFFY’S COMMITMENT TO CHANGE
To support diversity and inclusivity here at Pretty Fluffy we will be implementing the following effective immediately:
We will actively search to include pet brands that are owned by black women and men, indigenous persons and people of colour. This will be especially so for our popular holiday and seasonal gift guides that have the greatest reach of our readership. How you can help? Let us know if there’s a brand we need to know about!
We will actively try to use more imagery featuring black, indigenous men and women, and people of colour. Not only for our own shoots, but we will advocate for more diversity in brand imagery provided from our partners.
Each month for the rest of the year, I will be offering one ad placement on Pretty Fluffy free of charge for a small business owned by a person of colour – this includes black-owned businesses as well as indigenous Australians. To apply – send your brand info to [email protected]
Each month for the rest of the year, I will be offering a ‘Pick of the Week’ placement free of charge for a small business owned by a person of colour – this includes black-owned businesses as well as indigenous Australians.To apply – send your brand info to [email protected]
We will be here to LISTEN and LEARN. I wholeheartedly encourage brands and readers to reach out to me with suggestions for features, and ideas on how we can promote pet brands from people of colour AND promote a place of inclusivity here on the site.
– Serena Faber-Nelson, Founder.
IMAGE CREDITS: Title Image C/O Sir Dogwood
The post 12 Black-Owned Pet Brands You Can Support Today appeared first on Pretty Fluffy.
Poop4U Blog via www.Poop4U.com Serena Faber Nelson, Khareem Sudlow
#poop4u#cute dog#dogs of tumblr#puppy doggo#doglover#doggrooming#my doggo#dogmeme#dog blog#blog#watch dogs#dogstagram#cats dogs#doggosofinstagram#hot dog#doglife#doggolove#dungeons and doggos#dogoftheday#pups of tumblr#pupsofinstagram#puppygirl#tuff puppy#puppy smiles#doggo.tube#doggolife#doggram#sleepy doggo#doggos#doggomemes
0 notes
Text
A Digital Landscape Photographer’s Introduction to Film
I am constantly asked questions about how I started and how to start shooting film. So, here we go! This guide is intended to be a story of my introduction to film as a landscape photographer, provide some tips, introductions, and guidance, but in no means is it intended to be a foolproof method of how to shoot film.
Film is a path that’s unique for everyone and is definitely not for everyone, so be prepared for failures and having some trial and error. That’s part of the process!
My introduction to film was very simple. About 7 years ago, I was fully immersed in the digital photography world, and nearly every image I shot was a stitched panorama. The reason I stitched was the drive for resolution – I wanted to print…and print HUGE. Sound familiar?
It was a single trip to the California coast, where I was attempting to stitch a panorama of the Golden Gate Bridge along the shoreline, where I began to become incredibly frustrated with stitching. Everything was moving, and when I got back to the computer, I just couldn’t get the images to stitch properly. Practically everything I had attempted to photograph was ruined. Thus, I began the search on how to create a large panorama in a single frame. The short answer was film.
The more I searched for a solution, the simplest answer was a panoramic camera – a film camera. I settled on a Linhof Technorama 617 SIII, a medium format roll film camera, due to its optical reviews, and the fact that it had a dark slide which allowed me to change lenses mid-roll. This was all Greek to me at the time, but it’s what the reviews said, so I went with it.
My first successful image from a 617 transparency on Fuji Velvia 50 film.
I purchased the camera, threw in a couple rolls of Fuji Velvia 50 (again…because the reviews said it was the best) and started rocking and rolling with the camera (or so I thought.) I sent the rolls out to be developed, and a couple weeks later, I was horrified by the results. Everything was drastically underexposed or overexposed and everything was basically ruined. I kept trying and trying, and after about three or four months, I finally nailed an exposure and the lightbulb came on. Thus, began the love affair with film. It was only the beginning.
Why Shoot Film? What’s the Point?
The Process
Film was the simple choice for me. It achieved the results I wanted to create at that time, shooting a high-resolution panorama in a single frame, but I quickly began to love the process. I have met so many people who began shooting film when they were young, transitioned to digital and have never looked back.
Digital is the height of their experience with photography and it’s exciting for them. For me, digital was an incredible method of learning photography. It provided instantaneous technical feedback, provided me with a skillset in Photoshop and gave me the foundation I needed to even begin to think about film. But, for me, digital photography lacked the soul I crave with film. Everything is too perfect and is quickly becoming more perfect than we had ever anticipated.
Film is a very unique, thoughtful, and tedious process that is not for everyone. For me, it’s meditation. It’s a separation from the anxiety of creating an image when the light is fantastic, knowing you may possibly fail, the film could be ruined, lost, or damaged, and requires the photographer to be calm. Prior to beginning to shoot film, I’d run around during a sunset, stressing about the light, creating multiple compositions, and attempting every shot I could think of. Now, my compositions are thoughtful, planned, and calculated – because they have to be! Film is inherently slow, but I have never viewed this as a crutch.
Having the time away from the exposure of an image to the time you develop it, and until you finally see it on a computer screen is incredibly beneficial to me. To those of you reading this who still photograph digitally, I encourage you to try to wait a week before you digitally process your images from a shoot. Instead of acting purely on the moment, allow time to pass so you can be more thoughtful in editing and processing your work.
A single sheet of 8×10” Fuji Velvia 50, as it sits on my light table. This image is available as a fine art print, in editions of 90, entitled “Eternal Flame.”
Specifically, with large format, composing has now become a meditative process as well. Large format cameras are naturally cumbersome – they take time to set up, compose, and focus. Using this camera, you compose upside down and backward on a ground glass, which has taught me to be more thoughtful with compositions. You’re much more aware of shapes, compositional motion in your images, and patterns, when you are not seeing your composition as your eyes naturally see the world. During the exposure, unlike most SLR and rangefinder cameras, when you’re photographing large format, you are standing next to the camera. You become part of the exposure, timing everything precisely. Again, it’s meditative, thoughtful, and very involved.
The Prints
I am a huge advocate for learning photography through printing your work. I teach for Muench Workshops and it always shocks me how many people choose to never print their work. If you never see your photograph printed larger than what you can see on a computer screen, then why take the photo? In my opinion, a print is just the final process of creating a photograph, and by leaving that step undone, you’re limiting yourself as an artist.
Since I began shooting film, I’ve loved printing so much more. I’m not going to get into the film vs. digital wars here, because I am of the opinion that both have their advantages and disadvantages, especially in print. I will say that I feel prints from film have more character and life. Why? Firstly, there’s a certain way film renders color that I feel will always have an advantage over digital, specifically subtle color.
Secondly, grain! Grain is a bad word for most photographers these days, but with film, you must embrace it. It’s part of its character, and the smaller the format, the larger the grain appears in print. But this isn’t detrimental to the print in my opinion. With grain, the print feels more tangible and has more character.
I personally choose to not enlarge a shot from a 35mm camera to 60×90”, but if you did, you’d just see larger and larger grain. That’s the beauty of it! At a certain point, the prints from a digital camera begin to break down and you begin to see pixelated artifacts. With film, you just begin to see grain. (Note: naturally, unless you’re printing directly from film, you’ll be scanning, so your film image is truly a digital image, so at some point your grain will become pixels…but that would be grossly over-enlarged.)
The Technique
Metering for film is probably my most asked question and deserves its very own blog to come at a later date. What I can simply tell you is that with film, specifically transparency film, it forces you to truly understand the exposure triangle.
I want to note that with each particular film stock, you must meter precisely to achieve the best results with that film, but generally speaking, film can make you a more technical photographer. You must understand and choose your depth of field accurately based on the scene you are wishing to photograph, know how to set your hyperfocal distance, know how to tilt/swing/rise/fall, and then know how to meter and expose.
It takes some work and trial and error, but I guarantee that it will make you a better digital photographer. You will soon begin to slow down and think about what aperture and shutter speed to use, rather than blindly looking at the back of your LCD screen. I challenge every digital photographer to go out on a shoot, tape up the LCD screen, and see if they can make an accurate and proper exposure without using the crutch of instant feedback.
What film has taught me beyond anything else is how to see, understand, and photograph light. With digital photography, you somewhat have a scapegoat in your ability to resolve nearly every detail and tonality in a scene, and it’s getting worse (or better, depending on your platform) by the day. That fateful morning when I was photographing sunrise and captured my first piece of properly exposed film, mentioned above, was not necessarily due to me being technically proficient, as much as it was photographing in quality light.
You may think the term “quality light” is subjective, but as a matter of fact, I feel it is absolutely objective. Film, specifically transparency film (you’ll learn more about this below), has a very low exposure latitude, meaning it can only capture a small dynamic range of light. Within this range (about 5-7 stops of light) is where I truly believe quality light exists. This fatal “flaw” of transparency film has taught me to see within this range of light because I frankly had no other choice. But by limiting my options and only photographing within this boundary, I began to have more successful imagery than ever.
Before, with digital, I was very much in the vein of HDR. Not necessarily crunchy Trey Ratcliff (sorry Trey) HDR, but I would create images where I would have to blend multiple exposures to create a final image in Photoshop. At the time, I thought they looked great, but I was pointing my camera into the sun, making an exposure for the sky, and making an exposure for the incredibly dark, shadow-laden foreground and then blending so that everything was relatively the same exposure.
Film taught me to turn around and look for the good light, rather than attempt to create it in Photoshop. By looking 90 degrees or completely in the opposite direction of the sunset, I was able to capture light ON the subject in a single exposure, within 5-7 stops of dynamic range, and was thus photographing in “quality light.”
Film Sizes and Equipment
35mm
35mm is probably the easiest jump into shooting film. 35mm film is self-contained into little canisters that are pretty painless to use. In many cases, you’ll be able to use your current digital lenses with some film cameras. For instance, remember how I said I learned on digital? I’ve always been a Nikon shooter, and when I switched fully into film, I was able to use some of my old Nikon lenses on a Nikon F5, a late model fully automatic professional film body Nikon made before jumping fully into digital.
With the Nikon F5 (and many other Nikon film cameras) you’re able to use all your modern autofocus F-Mount lenses with the film camera. So with a minimal purchase ($300-$500) for the camera body, you’re ready to start shooting. Film is also incredibly easy to find in 35mm, with a huge array of choices, from B&W to color negative to transparency film, the options are all yours. I use 35mm for telephoto wildlife and landscape work, when I can’t use a tripod, which is very few and far between.
One debatable downside to shooting 35mm is your scans will be relatively small and if you decide to shoot a higher speed film, your shots will be much grainier than larger formats. I’ve had success with drum scans printing 24×36” from a 35mm low-speed transparency, but that’s pushing the limits of the film in my opinion. On a higher speed film, you’d just have to play it by ear. If your intent is to just post online, then maybe 35mm is for you! This past year in Antarctica is the first time I have been truly successful with 35mm paired with telephoto lenses, and I feel its uses for my personal work will be extremely limited.
Camera suggestions
Fully Automatic Cameras
Nikon F5
Nikon F100
Semi Automatic Cameras
Leica M6
Canon AE-1
Fully Manual Cameras
Leica M3
Medium Format
I would have to say that a medium format camera is probably the best bang for your buck if you think you’ll end up wanting to take film fairly seriously. For those seeking the “film look,” or to those wishing to have an overall film camera for portraits, landscape, etc., I think you’ll be most happy with a medium format camera.
Medium format is a camera that uses either 120 or 220 (no longer made) roll film. There are many different formats available that are considered “medium format” and include 6×4.5(cm), 6×6, 6×7, 6×8, 6×9, 6×12 and 6×17. Within each of these formats, there are seemingly endless different kinds of cameras that can fit inside of every budget. With that being said, film has been on the rise in the last few years, and some cameras have absolutely skyrocketed.
My medium format Mamiya 7ii, loaded with negative film somewhere in the backcountry of the Desert Southwest.
You’ll find your more compact and mostly automatic cameras with the smaller formats such as the 6×4.5 (or just 645) cameras. These are very popular with portrait and wedding photographers, but I also think that some of the 645 SLR cameras can be great for landscape photography, specifically if you are backpacking or just want a fully automatic, autofocusing, autowinding camera, and auto metering camera. These cameras also usually have faster optics, so you’ll be able to handhold them in lower light more easily (hence the reason portrait and wedding photographers generally use them.)
So…where to start? I suggest starting simple with a 645 camera. A Pentax 645 N is a great, hardy camera that is well built and has fine optics. As is the Mamiya 645, both AF and earlier models. There are plenty of rangefinder cameras in this format as well that are incredibly small, lightweight, and have amazing optical performance, but have become very expensive in the past few years and can be difficult to use since you can’t see through the lens.
If you’re still itching for a slightly bigger aspect ratio, my favorite is 6×7. I personally use a Mamiya 7ii, which is a rangefinder but is small, lightweight and perfect for the backcountry and air travel. It’s been a magnificent camera for me, and the optical performance is some of the best I have ever used in a medium format camera. If you aren’t as concerned about weight, the Pentax 67 MLU (mirror lockup) is a fine choice and set the standard for landscape photographers in its heyday.
Camera Suggestions
6×4.5
Mamiya 645
Pentax 645 N
Bronica RF645
6×6
Hasselblad 500 c/m
Mamiya 6
6×7
Pentax 67 MLU
Mamiya 7 (7ii)
Mamiya RZ67
Large Format
Large format film ranges from 4×5 (inches) to 8×10, with a few less popular formats in between, such as 5×7. This film comes in sheets, usually in boxes of 10, 20 and 50, and have to be manually loaded into film holders by the photographer in complete darkness. Resolution goes through the roof with 4×5 and continues up with the larger film you begin to use. It’s truly remarkable to see how detailed these sheets of film can be. Large format cameras allow the photographer ultimate control over the image, from focus to perspective control, by the use of camera movements (tilt, swing, rise/fall) to achieve the desired results.
My large format, Arca Swiss 8×10, set up in the field.
Naturally, of this added control comes with a much steeper learning curve. If you are just getting into film and have never worked with a fully manual camera of any kind, then my biggest piece of advice is to steer clear of large format for a spell. Buy a medium format camera and see if you like the process of shooting film, wrap your head around metering, exposing, and processing your film before you make the jump into large format. For me, large format is the most rewarding of all the film cameras, as they are at the height of resolution and I feel the cameras are a joy to work with, but they are naturally cumbersome…all of them.
With that being said, if you feel you’re ready for large format, then, by all means, go for it! That’s an amazing step to take.
Light Meter
Spot meter: As a landscape photographer, you will full control over your film. Because of that, you’ll want to have the ability to spot meter the scene. With a “1-degree spot meter” you’ll be able to meter the shadows, highlights, and everywhere else in between as you point the meter throughout the scene. This will let you build an array of different exposures in your head and decide how you want to expose the scene. This is extremely crucial with transparency film, and not quite as much, but still useful, with negative film.
Now my backup meter, the Sekonic L-558 offers the photographer both a 1 degree spot and incident meter.
Incident Meter: As you peruse the internet, you’ll probably hear something about incident meters. As a landscape photographer, I don’t find incident meters all that useful. The meter exists within a white plastic dome and essentially measures the diffused light your subject is in. So, in other words, you need to have the ability to place your meter in the same light your subject is in, which isn’t always possible with landscape photography.
(I now use a Sekonic L-778 and my backup is a Sekonic L-558 (pictured above), which includes both an incident meter, and a spot meter.)
The Polaroid Method: Back in film’s heyday, Polaroid film (instant film) could be used to check correct exposure. With traditional light metering techniques, you essentially have to blindly guess and trust your exposure based on what you’ve metered, but having the ability to fire off that exposure on a piece of instant film, you were able to check exposures. Well, now that it’s 2019 and Polaroid film in larger formats is essentially dead and gone, we’re stuck in the dark (pun intended.)
But all hope is not lost! You’re a digital photographer, right? Well, you have your light meter in your current camera case – your digital camera, AKA digital Polaroid. If you have a zoom lens from around 18-55 (in full frame), this is a perfect range for both composition and checking your exposure. You’ll be able to meter, dial in your settings, and fire off frames with instant feedback, which you can then translate to your film camera. Cheating? I don’t think so, but it’s definitely extra weight and hassle to carry, and generally I do not generally opt for this method myself. I know a few professional photographers, such as my good friend Alex Burke, who have used this method extremely successfully for quite some time. But it’s a great method to achieving fast results and to learn to expose film properly without as much trial and error.
Film For Landscape Photography
Transparency Film
Transparency film is probably the most rewarding of all film stocks to receive back from your processing lab. Seeing those perfectly exposed transparencies on a light table for the first time is one of the more nerve-wracking and exciting experiences even to this day. There’s really nothing like it. Below is the breakdown of my favorite transparency film stocks that are still available to purchase fresh. Exposing these stocks can be tricky, but ensure that the film IS NOT overexposed. Overexposed transparency film is essentially useless, so if you’re unsure, bracket and meter carefully.
Fuji Velvia 50: My favorite film, hands down. The way Velvia 50 renders soft, subtle color is out of this world. I’ve never been able to capture such subtleties in any other photographic medium and it is, and will remain, my film of choice for 90% of my subject matter. Velvia 50 is very contrasty and can be difficult to use in challenging light. Be careful when you are metering and be wary of a dynamic range beyond 6 or so stops of light. Velvia 50 is best used in soft, reflected light, such as the scene above.
Velvia 50 is a perfect film for intimate scenes such as this, where the contrast is low and the light and color is soft. This image was photographed on an 8×10 sheet of film.
Fuji Velvia 100: Velvia 100 is, in my opinion, more difficult to use than its slower sister (Velvia 50). It’s a very contrasty film and doesn’t render big landscapes very well. Generally, images also have a bit of a magenta cast. With that being said, I think it’s an excellent film for intimate scenes, specifically those with greens, and I use it almost exclusively for my work in the prairie.
Velvia 100 has a strong magenta cast and very high contrast, which can work well in some situations, such as this scene at twilight. Photographed on 8×10 sheet film.
Fuji Provia 100F: Provia is probably my second most used transparency film with a very fine, even grain that’s very wonderful to scan. It’s much less contrasty than either of the Velvia film stocks and isn’t quite as warm. At times, it can have a blue cast, so be careful with the quality of light you use this film in. Having less contrast than other transparency films, Provia is a wonderful choice for very intense sunsets. Where the Velvia film stocks tend to saturate reds and oranges beyond the point of realism, Provia tones them down a bit and makes them more usable for scanning and printing. Overall, Provia is the most usable slide film for this reason.
Provia 100F is a great film for intense sunsets, as it is a bit lower contrast, and not quite as saturated as other transparency films. This was photographed on 120 medium format film on my Mamiya 7ii.
Kodak E100: Until recently, Fujifilm had been the only manufacturer of transparency film stocks. In 2018, Kodak announced its new E100, modeled after its old Ektachrome film stock. It is one of the finer grained films I’ve ever used and can produce very sharp images. It has a very neutral color palette and would be a fine choice for any situation. Currently, it’s only available in 35mm.
Kodak E100 has a very neutral color palette, making it a great overall film. This was photographed on my Nikon F5 with a 70-200mm lens.
Color Negative Film
If you are completely new to film, negative film may be your best choice to start shooting with. Negative film has an incredibly wide exposure latitude and makes it very easy to expose – basically, it’s nearly impossible to overexpose. My tip with negative film is if you’re in doubt about your exposure, meter for the shadows and shoot!
Kodak Ektar 100: Ektar is an amazing negative film that was designed for scanning. It has more contrast and saturation than a typical negative film, which somewhat makes it the “Velvia 50 of the negative world.” It’s very sharp, fine-grained, and produces fantastic results. Ektar can be substituted for transparency film in situations where the dynamic range exceeds the exposure latitude of transparency film, but you want to attain the same level of saturation. It’s generally fairly simple to meter, as it can rarely be overexposed.
Ektar is a high saturation color negative film, which renders colors similarly to Velvia 50. This was photographed on 4×5 sheet film.
Kodak Portra 160: Recently, I’ve been shooting a lot more Portra 160, specifically in 120 and 4×5. As you may have deduced by the name, it was designed as a very low contrast, low saturation film for portraits, but it has absolutely found its way into my kit for landscapes. Because of its low contrast and high exposure latitude, you’re able to capture every detail in a scene with a very muted color palette. It’s definitely not a film for every situation but it has a very appealing aesthetic that I’ll be using more and more over the years to come.
Portra 160 has an outstanding exposure latitude. This image was photographed with no graduated neutral density filter, metered for the shadows. Exposed on my Mamiya 7ii.
Kodak Portra 400: Essentially, everything I wrote for Portra 160 applies to 400, but just in a faster speed. It definitely has larger grain, but it’s very appealing and allows you to be a bit freer compositionally because the higher speed will allow you to generally be free of a tripod. I’ll typically not use this film in sheets, but use it regularly in medium format.
Portra 400 has many similar characteristics as Portra 160, although can be used in lower light situations. This was photographed on my Mamiya 7ii.
Processing
Home Developing
Home developing is generally reserved for those shooting mostly black and white film, which I haven’t discussed here. I have never been much of a black and white photographer, and don’t claim to be an expert with black and white photography, but developing your own black and white film is incredibly easy at home, without very much need for temperature control.
Color negative film (C-41) is a bit more of an issue because it requires more precise and accurate temperature control. I’ve seen methods where people use recirculating water baths designed for cooking to develop their film with, but the easiest method is a Jobo. They are roller processors that are relatively easy to find these days and run anywhere from $750 to $1,000. While developing at home is relatively easy, it can be expensive to invest in the equipment, and dust control also becomes a bit of an issue. If you’re just starting out, I recommend using a professional developing lab.
Developing Lab
Chances are, because you’re just starting out, that you’ll want to use a photographic lab to process your film. This, in my opinion, is the best way to start and the best way to achieve the fastest good results. If you’re just learning to expose film correctly, the last thing you want to be doing is developing it incorrectly, thusly getting skewed results. A few good labs that I use currently and have used in the past are:
AgX Imaging: Mike Lussier owns/operates this lab and is an outstanding person to deal with. He treats every order with precision and care, just as if it were his own film. I now use him exclusively for my E-6 developing. AgX ONLY develops E-6, for C-41 and B&W, you must go elsewhere.
North Coast Photo: This is a great lab on the west coast, and one I’ve used extensively for my C-41 and B&W developing. They achieve consistently good results and have been great to work with.
Scanning
Scanning is an art form within itself. Just like developing, a quality scan can make or break a film image. Improper handling and care of the negatives, a poor quality scanner, or just an inexperienced operator can be very detrimental to the outcome of your work. If you are just beginning to shoot film, pay the extra bit to get your film scanned by the lab you are processing with. This way, you know you’ll be achieving quality results from a trained operator. When you want to begin scanning your own work, generally the first step is investing in a flatbed scanner.
Flatbed Scanning
Flatbed scans are generally what most people gravitate towards when first scanning their work, and even some professionals never scan any other way. Good quality flatbed scanners offer good quality scans, once you learn to operate them. Generally speaking, today Epson is making the best consumer flatbed scanner on the market, the V800 or V850. These scanners provide the end user a quick and easy way to get decent scans from their film, while not breaking the bank. They run about $700-$800 usually and a software package is included with the camera. I highly suggest not skimping and buying a used scanner, as if they are improperly cared for, they can become full of dust and you’ll be cleaning dust out of your images for years to come.
Pros of flatbed scans:
Very easy to use
Relatively inexpensive
Produce decent quality scans for photographers who don’t do a lot of printing
Cons of flatbed scans:
Non-optimal film flatness, which can cause out of focus ares on the scans
Difficult to grain focus, which makes the end result not very sharp
Limited dust control
Not optimal for printing – the sharpness is generally lacking from most flatbed scans
For the most part, flatbed scans will accomplish 90% of your needs as a film photographer. They’re inexpensive, easy to set up and use, and it requires little effort put forth to get decent quality digital images from your film. For those who are doing a lot of printing or need ultimate color duplication, sharpness, and clarity, a drum scan may be in order.
Drum Scanning
Drum scanning is a relatively complicated process that involves a very skilled operator, specialized equipment, and a high level of dust control and precision. Generally, you won’t be going out and buying yourself a drum scanner. There are commercial labs across the country that provide drum scanning services for those photographers wishing to have the most accurate digital replication of your original film possible. This process can be expensive, but the results are absolutely worth it if you are needing that level of scan. In 2016, I purchased a drum scanner for my own use, built a dust-controlled studio, and began commercially offering my drum scans for photographers.
In Conclusion
So, you must now ask yourself, “Why?” Why do you want to shoot film? Is it a particular look you’re going for in your images? Is it because you want to be a better photographer? Or do you just want a challenge? Or do you just want to be cool on Instagram?
P.S. If you’re interested in further instruction, feel free to contact me, as I offer many private and group photography workshops throughout the year.
About the author: Michael Strickland is a large format landscape and nature photographer based out of Kansas. The opinions expressed in this article are solely those of the author. You can find more of his work on his website, Facebook, Twitter, and Instagram. This article was also published here.
source https://petapixel.com/2019/01/18/a-digital-landscape-photographers-introduction-to-film/
1 note
·
View note
Text
A Digital Landscape Photographer’s Introduction to Film
I am constantly asked questions about how I started and how to start shooting film. So, here we go! This guide is intended to be a story of my introduction to film as a landscape photographer, provide some tips, introductions, and guidance, but in no means is it intended to be a foolproof method of how to shoot film.
Film is a path that’s unique for everyone and is definitely not for everyone, so be prepared for failures and having some trial and error. That’s part of the process!
My introduction to film was very simple. About 7 years ago, I was fully immersed in the digital photography world, and nearly every image I shot was a stitched panorama. The reason I stitched was the drive for resolution – I wanted to print…and print HUGE. Sound familiar?
It was a single trip to the California coast, where I was attempting to stitch a panorama of the Golden Gate Bridge along the shoreline, where I began to become incredibly frustrated with stitching. Everything was moving, and when I got back to the computer, I just couldn’t get the images to stitch properly. Practically everything I had attempted to photograph was ruined. Thus, I began the search on how to create a large panorama in a single frame. The short answer was film.
The more I searched for a solution, the simplest answer was a panoramic camera – a film camera. I settled on a Linhof Technorama 617 SIII, a medium format roll film camera, due to its optical reviews, and the fact that it had a dark slide which allowed me to change lenses mid-roll. This was all Greek to me at the time, but it’s what the reviews said, so I went with it.
My first successful image from a 617 transparency on Fuji Velvia 50 film.
I purchased the camera, threw in a couple rolls of Fuji Velvia 50 (again…because the reviews said it was the best) and started rocking and rolling with the camera (or so I thought.) I sent the rolls out to be developed, and a couple weeks later, I was horrified by the results. Everything was drastically underexposed or overexposed and everything was basically ruined. I kept trying and trying, and after about three or four months, I finally nailed an exposure and the lightbulb came on. Thus, began the love affair with film. It was only the beginning.
Why Shoot Film? What’s the Point?
The Process
Film was the simple choice for me. It achieved the results I wanted to create at that time, shooting a high-resolution panorama in a single frame, but I quickly began to love the process. I have met so many people who began shooting film when they were young, transitioned to digital and have never looked back.
Digital is the height of their experience with photography and it’s exciting for them. For me, digital was an incredible method of learning photography. It provided instantaneous technical feedback, provided me with a skillset in Photoshop and gave me the foundation I needed to even begin to think about film. But, for me, digital photography lacked the soul I crave with film. Everything is too perfect and is quickly becoming more perfect than we had ever anticipated.
Film is a very unique, thoughtful, and tedious process that is not for everyone. For me, it’s meditation. It’s a separation from the anxiety of creating an image when the light is fantastic, knowing you may possibly fail, the film could be ruined, lost, or damaged, and requires the photographer to be calm. Prior to beginning to shoot film, I’d run around during a sunset, stressing about the light, creating multiple compositions, and attempting every shot I could think of. Now, my compositions are thoughtful, planned, and calculated – because they have to be! Film is inherently slow, but I have never viewed this as a crutch.
Having the time away from the exposure of an image to the time you develop it, and until you finally see it on a computer screen is incredibly beneficial to me. To those of you reading this who still photograph digitally, I encourage you to try to wait a week before you digitally process your images from a shoot. Instead of acting purely on the moment, allow time to pass so you can be more thoughtful in editing and processing your work.
A single sheet of 8×10” Fuji Velvia 50, as it sits on my light table. This image is available as a fine art print, in editions of 90, entitled “Eternal Flame.”
Specifically, with large format, composing has now become a meditative process as well. Large format cameras are naturally cumbersome – they take time to set up, compose, and focus. Using this camera, you compose upside down and backward on a ground glass, which has taught me to be more thoughtful with compositions. You’re much more aware of shapes, compositional motion in your images, and patterns, when you are not seeing your composition as your eyes naturally see the world. During the exposure, unlike most SLR and rangefinder cameras, when you’re photographing large format, you are standing next to the camera. You become part of the exposure, timing everything precisely. Again, it’s meditative, thoughtful, and very involved.
The Prints
I am a huge advocate for learning photography through printing your work. I teach for Muench Workshops and it always shocks me how many people choose to never print their work. If you never see your photograph printed larger than what you can see on a computer screen, then why take the photo? In my opinion, a print is just the final process of creating a photograph, and by leaving that step undone, you’re limiting yourself as an artist.
Since I began shooting film, I’ve loved printing so much more. I’m not going to get into the film vs. digital wars here, because I am of the opinion that both have their advantages and disadvantages, especially in print. I will say that I feel prints from film have more character and life. Why? Firstly, there’s a certain way film renders color that I feel will always have an advantage over digital, specifically subtle color.
Secondly, grain! Grain is a bad word for most photographers these days, but with film, you must embrace it. It’s part of its character, and the smaller the format, the larger the grain appears in print. But this isn’t detrimental to the print in my opinion. With grain, the print feels more tangible and has more character.
I personally choose to not enlarge a shot from a 35mm camera to 60×90”, but if you did, you’d just see larger and larger grain. That’s the beauty of it! At a certain point, the prints from a digital camera begin to break down and you begin to see pixelated artifacts. With film, you just begin to see grain. (Note: naturally, unless you’re printing directly from film, you’ll be scanning, so your film image is truly a digital image, so at some point your grain will become pixels…but that would be grossly over-enlarged.)
The Technique
Metering for film is probably my most asked question and deserves its very own blog to come at a later date. What I can simply tell you is that with film, specifically transparency film, it forces you to truly understand the exposure triangle.
I want to note that with each particular film stock, you must meter precisely to achieve the best results with that film, but generally speaking, film can make you a more technical photographer. You must understand and choose your depth of field accurately based on the scene you are wishing to photograph, know how to set your hyperfocal distance, know how to tilt/swing/rise/fall, and then know how to meter and expose.
It takes some work and trial and error, but I guarantee that it will make you a better digital photographer. You will soon begin to slow down and think about what aperture and shutter speed to use, rather than blindly looking at the back of your LCD screen. I challenge every digital photographer to go out on a shoot, tape up the LCD screen, and see if they can make an accurate and proper exposure without using the crutch of instant feedback.
What film has taught me beyond anything else is how to see, understand, and photograph light. With digital photography, you somewhat have a scapegoat in your ability to resolve nearly every detail and tonality in a scene, and it’s getting worse (or better, depending on your platform) by the day. That fateful morning when I was photographing sunrise and captured my first piece of properly exposed film, mentioned above, was not necessarily due to me being technically proficient, as much as it was photographing in quality light.
You may think the term “quality light” is subjective, but as a matter of fact, I feel it is absolutely objective. Film, specifically transparency film (you’ll learn more about this below), has a very low exposure latitude, meaning it can only capture a small dynamic range of light. Within this range (about 5-7 stops of light) is where I truly believe quality light exists. This fatal “flaw” of transparency film has taught me to see within this range of light because I frankly had no other choice. But by limiting my options and only photographing within this boundary, I began to have more successful imagery than ever.
Before, with digital, I was very much in the vein of HDR. Not necessarily crunchy Trey Ratcliff (sorry Trey) HDR, but I would create images where I would have to blend multiple exposures to create a final image in Photoshop. At the time, I thought they looked great, but I was pointing my camera into the sun, making an exposure for the sky, and making an exposure for the incredibly dark, shadow-laden foreground and then blending so that everything was relatively the same exposure.
Film taught me to turn around and look for the good light, rather than attempt to create it in Photoshop. By looking 90 degrees or completely in the opposite direction of the sunset, I was able to capture light ON the subject in a single exposure, within 5-7 stops of dynamic range, and was thus photographing in “quality light.”
Film Sizes and Equipment
35mm
35mm is probably the easiest jump into shooting film. 35mm film is self-contained into little canisters that are pretty painless to use. In many cases, you’ll be able to use your current digital lenses with some film cameras. For instance, remember how I said I learned on digital? I’ve always been a Nikon shooter, and when I switched fully into film, I was able to use some of my old Nikon lenses on a Nikon F5, a late model fully automatic professional film body Nikon made before jumping fully into digital.
With the Nikon F5 (and many other Nikon film cameras) you’re able to use all your modern autofocus F-Mount lenses with the film camera. So with a minimal purchase ($300-$500) for the camera body, you’re ready to start shooting. Film is also incredibly easy to find in 35mm, with a huge array of choices, from B&W to color negative to transparency film, the options are all yours. I use 35mm for telephoto wildlife and landscape work, when I can’t use a tripod, which is very few and far between.
One debatable downside to shooting 35mm is your scans will be relatively small and if you decide to shoot a higher speed film, your shots will be much grainier than larger formats. I’ve had success with drum scans printing 24×36” from a 35mm low-speed transparency, but that’s pushing the limits of the film in my opinion. On a higher speed film, you’d just have to play it by ear. If your intent is to just post online, then maybe 35mm is for you! This past year in Antarctica is the first time I have been truly successful with 35mm paired with telephoto lenses, and I feel its uses for my personal work will be extremely limited.
Camera suggestions
Fully Automatic Cameras
Nikon F5
Nikon F100
Semi Automatic Cameras
Leica M6
Canon AE-1
Fully Manual Cameras
Leica M3
Medium Format
I would have to say that a medium format camera is probably the best bang for your buck if you think you’ll end up wanting to take film fairly seriously. For those seeking the “film look,” or to those wishing to have an overall film camera for portraits, landscape, etc., I think you’ll be most happy with a medium format camera.
Medium format is a camera that uses either 120 or 220 (no longer made) roll film. There are many different formats available that are considered “medium format” and include 6×4.5(cm), 6×6, 6×7, 6×8, 6×9, 6×12 and 6×17. Within each of these formats, there are seemingly endless different kinds of cameras that can fit inside of every budget. With that being said, film has been on the rise in the last few years, and some cameras have absolutely skyrocketed.
My medium format Mamiya 7ii, loaded with negative film somewhere in the backcountry of the Desert Southwest.
You’ll find your more compact and mostly automatic cameras with the smaller formats such as the 6×4.5 (or just 645) cameras. These are very popular with portrait and wedding photographers, but I also think that some of the 645 SLR cameras can be great for landscape photography, specifically if you are backpacking or just want a fully automatic, autofocusing, autowinding camera, and auto metering camera. These cameras also usually have faster optics, so you’ll be able to handhold them in lower light more easily (hence the reason portrait and wedding photographers generally use them.)
So…where to start? I suggest starting simple with a 645 camera. A Pentax 645 N is a great, hardy camera that is well built and has fine optics. As is the Mamiya 645, both AF and earlier models. There are plenty of rangefinder cameras in this format as well that are incredibly small, lightweight, and have amazing optical performance, but have become very expensive in the past few years and can be difficult to use since you can’t see through the lens.
If you’re still itching for a slightly bigger aspect ratio, my favorite is 6×7. I personally use a Mamiya 7ii, which is a rangefinder but is small, lightweight and perfect for the backcountry and air travel. It’s been a magnificent camera for me, and the optical performance is some of the best I have ever used in a medium format camera. If you aren’t as concerned about weight, the Pentax 67 MLU (mirror lockup) is a fine choice and set the standard for landscape photographers in its heyday.
Camera Suggestions
6×4.5
Mamiya 645
Pentax 645 N
Bronica RF645
6×6
Hasselblad 500 c/m
Mamiya 6
6×7
Pentax 67 MLU
Mamiya 7 (7ii)
Mamiya RZ67
Large Format
Large format film ranges from 4×5 (inches) to 8×10, with a few less popular formats in between, such as 5×7. This film comes in sheets, usually in boxes of 10, 20 and 50, and have to be manually loaded into film holders by the photographer in complete darkness. Resolution goes through the roof with 4×5 and continues up with the larger film you begin to use. It’s truly remarkable to see how detailed these sheets of film can be. Large format cameras allow the photographer ultimate control over the image, from focus to perspective control, by the use of camera movements (tilt, swing, rise/fall) to achieve the desired results.
My large format, Arca Swiss 8×10, set up in the field.
Naturally, of this added control comes with a much steeper learning curve. If you are just getting into film and have never worked with a fully manual camera of any kind, then my biggest piece of advice is to steer clear of large format for a spell. Buy a medium format camera and see if you like the process of shooting film, wrap your head around metering, exposing, and processing your film before you make the jump into large format. For me, large format is the most rewarding of all the film cameras, as they are at the height of resolution and I feel the cameras are a joy to work with, but they are naturally cumbersome…all of them.
With that being said, if you feel you’re ready for large format, then, by all means, go for it! That’s an amazing step to take.
Light Meter
Spot meter: As a landscape photographer, you will full control over your film. Because of that, you’ll want to have the ability to spot meter the scene. With a “1-degree spot meter” you’ll be able to meter the shadows, highlights, and everywhere else in between as you point the meter throughout the scene. This will let you build an array of different exposures in your head and decide how you want to expose the scene. This is extremely crucial with transparency film, and not quite as much, but still useful, with negative film.
Now my backup meter, the Sekonic L-558 offers the photographer both a 1 degree spot and incident meter.
Incident Meter: As you peruse the internet, you’ll probably hear something about incident meters. As a landscape photographer, I don’t find incident meters all that useful. The meter exists within a white plastic dome and essentially measures the diffused light your subject is in. So, in other words, you need to have the ability to place your meter in the same light your subject is in, which isn’t always possible with landscape photography.
(I now use a Sekonic L-778 and my backup is a Sekonic L-558 (pictured above), which includes both an incident meter, and a spot meter.)
The Polaroid Method: Back in film’s heyday, Polaroid film (instant film) could be used to check correct exposure. With traditional light metering techniques, you essentially have to blindly guess and trust your exposure based on what you’ve metered, but having the ability to fire off that exposure on a piece of instant film, you were able to check exposures. Well, now that it’s 2019 and Polaroid film in larger formats is essentially dead and gone, we’re stuck in the dark (pun intended.)
But all hope is not lost! You’re a digital photographer, right? Well, you have your light meter in your current camera case – your digital camera, AKA digital Polaroid. If you have a zoom lens from around 18-55 (in full frame), this is a perfect range for both composition and checking your exposure. You’ll be able to meter, dial in your settings, and fire off frames with instant feedback, which you can then translate to your film camera. Cheating? I don’t think so, but it’s definitely extra weight and hassle to carry, and generally I do not generally opt for this method myself. I know a few professional photographers, such as my good friend Alex Burke, who have used this method extremely successfully for quite some time. But it’s a great method to achieving fast results and to learn to expose film properly without as much trial and error.
Film For Landscape Photography
Transparency Film
Transparency film is probably the most rewarding of all film stocks to receive back from your processing lab. Seeing those perfectly exposed transparencies on a light table for the first time is one of the more nerve-wracking and exciting experiences even to this day. There’s really nothing like it. Below is the breakdown of my favorite transparency film stocks that are still available to purchase fresh. Exposing these stocks can be tricky, but ensure that the film IS NOT overexposed. Overexposed transparency film is essentially useless, so if you’re unsure, bracket and meter carefully.
Fuji Velvia 50: My favorite film, hands down. The way Velvia 50 renders soft, subtle color is out of this world. I’ve never been able to capture such subtleties in any other photographic medium and it is, and will remain, my film of choice for 90% of my subject matter. Velvia 50 is very contrasty and can be difficult to use in challenging light. Be careful when you are metering and be wary of a dynamic range beyond 6 or so stops of light. Velvia 50 is best used in soft, reflected light, such as the scene above.
Velvia 50 is a perfect film for intimate scenes such as this, where the contrast is low and the light and color is soft. This image was photographed on an 8×10 sheet of film.
Fuji Velvia 100: Velvia 100 is, in my opinion, more difficult to use than its slower sister (Velvia 50). It’s a very contrasty film and doesn’t render big landscapes very well. Generally, images also have a bit of a magenta cast. With that being said, I think it’s an excellent film for intimate scenes, specifically those with greens, and I use it almost exclusively for my work in the prairie.
Velvia 100 has a strong magenta cast and very high contrast, which can work well in some situations, such as this scene at twilight. Photographed on 8×10 sheet film.
Fuji Provia 100F: Provia is probably my second most used transparency film with a very fine, even grain that’s very wonderful to scan. It’s much less contrasty than either of the Velvia film stocks and isn’t quite as warm. At times, it can have a blue cast, so be careful with the quality of light you use this film in. Having less contrast than other transparency films, Provia is a wonderful choice for very intense sunsets. Where the Velvia film stocks tend to saturate reds and oranges beyond the point of realism, Provia tones them down a bit and makes them more usable for scanning and printing. Overall, Provia is the most usable slide film for this reason.
Provia 100F is a great film for intense sunsets, as it is a bit lower contrast, and not quite as saturated as other transparency films. This was photographed on 120 medium format film on my Mamiya 7ii.
Kodak E100: Until recently, Fujifilm had been the only manufacturer of transparency film stocks. In 2018, Kodak announced its new E100, modeled after its old Ektachrome film stock. It is one of the finer grained films I’ve ever used and can produce very sharp images. It has a very neutral color palette and would be a fine choice for any situation. Currently, it’s only available in 35mm.
Kodak E100 has a very neutral color palette, making it a great overall film. This was photographed on my Nikon F5 with a 70-200mm lens.
Color Negative Film
If you are completely new to film, negative film may be your best choice to start shooting with. Negative film has an incredibly wide exposure latitude and makes it very easy to expose – basically, it’s nearly impossible to overexpose. My tip with negative film is if you’re in doubt about your exposure, meter for the shadows and shoot!
Kodak Ektar 100: Ektar is an amazing negative film that was designed for scanning. It has more contrast and saturation than a typical negative film, which somewhat makes it the “Velvia 50 of the negative world.” It’s very sharp, fine-grained, and produces fantastic results. Ektar can be substituted for transparency film in situations where the dynamic range exceeds the exposure latitude of transparency film, but you want to attain the same level of saturation. It’s generally fairly simple to meter, as it can rarely be overexposed.
Ektar is a high saturation color negative film, which renders colors similarly to Velvia 50. This was photographed on 4×5 sheet film.
Kodak Portra 160: Recently, I’ve been shooting a lot more Portra 160, specifically in 120 and 4×5. As you may have deduced by the name, it was designed as a very low contrast, low saturation film for portraits, but it has absolutely found its way into my kit for landscapes. Because of its low contrast and high exposure latitude, you’re able to capture every detail in a scene with a very muted color palette. It’s definitely not a film for every situation but it has a very appealing aesthetic that I’ll be using more and more over the years to come.
Portra 160 has an outstanding exposure latitude. This image was photographed with no graduated neutral density filter, metered for the shadows. Exposed on my Mamiya 7ii.
Kodak Portra 400: Essentially, everything I wrote for Portra 160 applies to 400, but just in a faster speed. It definitely has larger grain, but it’s very appealing and allows you to be a bit freer compositionally because the higher speed will allow you to generally be free of a tripod. I’ll typically not use this film in sheets, but use it regularly in medium format.
Portra 400 has many similar characteristics as Portra 160, although can be used in lower light situations. This was photographed on my Mamiya 7ii.
Processing
Home Developing
Home developing is generally reserved for those shooting mostly black and white film, which I haven’t discussed here. I have never been much of a black and white photographer, and don’t claim to be an expert with black and white photography, but developing your own black and white film is incredibly easy at home, without very much need for temperature control.
Color negative film (C-41) is a bit more of an issue because it requires more precise and accurate temperature control. I’ve seen methods where people use recirculating water baths designed for cooking to develop their film with, but the easiest method is a Jobo. They are roller processors that are relatively easy to find these days and run anywhere from $750 to $1,000. While developing at home is relatively easy, it can be expensive to invest in the equipment, and dust control also becomes a bit of an issue. If you’re just starting out, I recommend using a professional developing lab.
Developing Lab
Chances are, because you’re just starting out, that you’ll want to use a photographic lab to process your film. This, in my opinion, is the best way to start and the best way to achieve the fastest good results. If you’re just learning to expose film correctly, the last thing you want to be doing is developing it incorrectly, thusly getting skewed results. A few good labs that I use currently and have used in the past are:
AgX Imaging: Mike Lussier owns/operates this lab and is an outstanding person to deal with. He treats every order with precision and care, just as if it were his own film. I now use him exclusively for my E-6 developing. AgX ONLY develops E-6, for C-41 and B&W, you must go elsewhere.
North Coast Photo: This is a great lab on the west coast, and one I’ve used extensively for my C-41 and B&W developing. They achieve consistently good results and have been great to work with.
Scanning
Scanning is an art form within itself. Just like developing, a quality scan can make or break a film image. Improper handling and care of the negatives, a poor quality scanner, or just an inexperienced operator can be very detrimental to the outcome of your work. If you are just beginning to shoot film, pay the extra bit to get your film scanned by the lab you are processing with. This way, you know you’ll be achieving quality results from a trained operator. When you want to begin scanning your own work, generally the first step is investing in a flatbed scanner.
Flatbed Scanning
Flatbed scans are generally what most people gravitate towards when first scanning their work, and even some professionals never scan any other way. Good quality flatbed scanners offer good quality scans, once you learn to operate them. Generally speaking, today Epson is making the best consumer flatbed scanner on the market, the V800 or V850. These scanners provide the end user a quick and easy way to get decent scans from their film, while not breaking the bank. They run about $700-$800 usually and a software package is included with the camera. I highly suggest not skimping and buying a used scanner, as if they are improperly cared for, they can become full of dust and you’ll be cleaning dust out of your images for years to come.
Pros of flatbed scans:
Very easy to use
Relatively inexpensive
Produce decent quality scans for photographers who don’t do a lot of printing
Cons of flatbed scans:
Non-optimal film flatness, which can cause out of focus ares on the scans
Difficult to grain focus, which makes the end result not very sharp
Limited dust control
Not optimal for printing – the sharpness is generally lacking from most flatbed scans
For the most part, flatbed scans will accomplish 90% of your needs as a film photographer. They’re inexpensive, easy to set up and use, and it requires little effort put forth to get decent quality digital images from your film. For those who are doing a lot of printing or need ultimate color duplication, sharpness, and clarity, a drum scan may be in order.
Drum Scanning
Drum scanning is a relatively complicated process that involves a very skilled operator, specialized equipment, and a high level of dust control and precision. Generally, you won’t be going out and buying yourself a drum scanner. There are commercial labs across the country that provide drum scanning services for those photographers wishing to have the most accurate digital replication of your original film possible. This process can be expensive, but the results are absolutely worth it if you are needing that level of scan. In 2016, I purchased a drum scanner for my own use, built a dust-controlled studio, and began commercially offering my drum scans for photographers.
In Conclusion
So, you must now ask yourself, “Why?” Why do you want to shoot film? Is it a particular look you’re going for in your images? Is it because you want to be a better photographer? Or do you just want a challenge? Or do you just want to be cool on Instagram?
P.S. If you’re interested in further instruction, feel free to contact me, as I offer many private and group photography workshops throughout the year.
About the author: Michael Strickland is a large format landscape and nature photographer based out of Kansas. The opinions expressed in this article are solely those of the author. You can find more of his work on his website, Facebook, Twitter, and Instagram. This article was also published here.
from Photography News https://petapixel.com/2019/01/18/a-digital-landscape-photographers-introduction-to-film/
1 note
·
View note
Text
2018 Best of Arkansas editors' picks
Exotic sodas, cool relief in July, sweet treats on the cheap and more.
Best multicultural experience on the cheap
My wife loves to cook different curries, so we occasionally find ourselves at Indian Grocers, Mr. Chen's or other Little Rock Asian markets in search of certain ingredients not typically available at the neighborhood Kroger. While there, I invariably am drawn toward the beverage coolers. I don't usually drink sodas, but I lived for a year in Japan and grew fond of its delightful array of canned drinks (with names like "Sparkling Beatnik" and "Pocari Sweat"), and I just can't help myself when confronted with strange beverages from faraway lands featuring a flavor profile fundamentally different from what we usually imbibe. For example, Jeera Masala and Bisleri Spyci (both from India) seem made for people who thought the fundamental problem with New Coke was the lack of an overpowering cumin taste. And if you like your beverages with a little bit of chew, there's Grass Jelly Drink (Taiwan), which comes in an array of flavors from banana to lychee and contains little cubes of grass jelly, a tapioca-like substance. In a similar vein, the Hemani company of Thailand produces several varieties of basil seed drinks that have the consistency of loose Jello with little crunchy seeds held in suspension; my current favorite is lemon mint, but you can also buy rose-flavored. And if you need something to quench your thirst after mowing the lawn under the hot sun, try Yeo's White Gourd Drink (Malaysia), which tastes like a crisp cucumber crossed with caramel.
But let me reassure the less adventurous that there is plenty for you, too, to sample. Quice Ice Cream Soda (Pakistan) is a pleasant variant of the classic cream soda, full-bodied and delightfully sweet, while Sosyo (India) proves an odd little fruit drink just crying out for a shot of rum.
However, even my expansive cosmopolitanism fails when confronted with Bird's Nest Nice Look Drink (Taiwan), the main ingredients of which are water, white fungus, rock sugar and bird's nest. The nest in question is made by Southeast Asian swifts from solidified saliva, so you get bird spit and fungus, all in one little can! The actual experience of drinking it is nowhere near worth the bragging rights, I am sorry to report, for it tastes rather like a mushroom just sneezed into your mouth. But aside from that one, I highly recommend going out and embracing the unknown at $1.50 a can — it's a small price to pay for a glimpse into the other side of the world.
— Guy Lancaster Best escape from Interstate 40 homogeneity
It's probably hard for the youngsters who have never known Northwest Arkansas as anything but the hurly-burly of rampant capitalism and rampant highway ramps to fathom, but the now-sleepy section of U.S. Highway 71 in the region was once the main conduit between that part of Arkansas and the rest of the world.
This section of 71 is the road to get into a literal and metaphoric lower gear — not as low as the steep, serpentine Pig Trail, but getting there. After you hit the antique stores and do the Tony Alamo trail in Alma, head north and make a pickup (or drop off) at the vacuum cleaner hospital. See Winslow — birthplace of writer Douglas C. Jones and forever the home of the Squirrels! Stop for a Mountainburger at Mountainburg's Dairy Dream; it's a loose mix of ground beef with onion and mustard, and a favorite in Crawford County and beyond since the 1950s. Get a milkshake and sit for a spell on the newly renovated patio behind the restaurant and ponder the vistas ... and is that a large, live pig roaming in someone's front yard? Yes, it is a large, live pig.
Other areas just have the skeletal stone remains of attractions like restaurants, tourist courts and artists' galleries slowly becoming kudzu sculpture, but remain just as compelling to sightseers as they were decades ago. (Brentwood in Crawford County — a once-happening burg?) There are breathtaking views of the valleys and peaks of the Boston Mountains throughout. Once you get into the ever-connecting hub of Springdale/Fayetteville/Bentonville, it's a fascinating glimpse of what were once the faces of these older parts of towns. Travelers can take U.S. 71 all the way to Canada. We hope someone we know will do this soon and take us along for the ride.
— Stephen Koch Best venue for emerging artists
Young Arkansas artists whose obvious talent could still use a boost in the public arena have an invaluable leg up: The Thea Foundation's The Art Department, a quarterly showcase of art in all its forms. The foundation, at 401 Main St. in North Little Rock, supports Arkansas schoolchildren with its scholarships for high school students, its Arkansas A+ Schools that weave the arts into the fabric of academic work, and providing music programs and art supplies. With The Art Department, the foundation has brought high-quality work in a wide variety of styles and embodying social and cultural messages. Over the past five years, The Art Department series has shown a spotlight on the gender-focused works of Lyon College art professor Carly Dahl and the abstract, pattern-heavy work of her husband, gallery director Dustyn Bork; Emily Wood's paintings of friends and family; John Harlan Norris' fantasy depictions of people as occupations; Jon Rogers' landscapes; Guy Bell's levitating pyramid. It's shown Michael Church's surreal collages, Sandra Sells' wood assemblages and video art, Kat Wilson's "Habitat" photographs of people in their homes, Michael Shaeffer's images of drag queens, illustrator Chad Maupin's pulp-fiction-inspired printmaking. Coming up: "The Mind Unveiled," an exhibition of works by painter and printmaker Carmen Alexandria Thompson that address mental illness. In her artist's statement, Thompson writes, the work "seeks to unveil, expose and open up a discussion for everyone about the beauty and tragic workings of the human mind." Like all Art Department shows, the Friday, Aug. 3, opening reception will feature heavy hors d'oeuvres, an open beer and wine bar and a chance to win a work of art by the featured artist. Tickets are $10.
— Leslie Newell Peacock Best culinary bargain
Mike's Place at 5501 Asher Ave. is an outpost for Vietnamese food, which is good in its own right. The bun (rice vermicelli) enlivened with bean sprouts, a fried pork egg roll and bits of pig skin, once doused with fish sauce and a dash of squirt bottle hoisin, is interesting, crunchy and filling. But here's the thing: There's a one-line item on the appetizer list that is Little Rock's single best food bargain. It's the banh mih thit, or the Vietnamese sandwich. No slice of pate here. You choose beef, pork or chicken; each comes dipped in a sticky sauce. The meat is dressed with crunchy fresh and pickled vegetables, plenty of fresh cilantro and slices of fresh hot peppers (watch out!). They stuff a torpedo-shaped bun that is served hot and crusty. They call it an appetizer, but it's easily a lunch. And it costs THREE DOLLARS. That's right. THREE DOLLARS.
— Max Brantley Best place to pair an egg roll with a milkshake
For the past few years, Park Avenue (aka "Uptown," aka "Highway 7") in Hot Springs has been attempting an upswing. There's a dope neighborhood community garden, the much-lauded Deluca's Pizzeria and the crisp, clean Cottage Courts tourist court, which looks freshly sprung from a time machine. The Hot Springy Dingy costume shop at 409 Park Ave. keeps it comfortingly weird. But our nation has learned that the path to righteousness isn't a straight line, and there are still pockets of Park Avenue that are ripe for renovation — former Bohemia Restaurant, we're looking at you ... with increasingly misty eyes.
But stalwart amongst the comings and goings in this funky cool section of the Spa City is the tidy and tiny Bailey's Dairy Treat, 510 Park Ave., with its distinctive neon ice cream cone serving as a beacon to those who not only tolerate lactose, but revel in it.
Every Arkansas community needs at least one of these — an ice cream and burger drive-up, hopefully from the Truman era, but at least strongly evoking the days of sock hops and cult of personality radio DJs. (Lucky Hot Springs has an embarrassment of creamy riches in this arena, with Mamoo's ParadICE Cream and a Kilwin's on Bathhouse Row nearby, crosstown rivals King Kone on Malvern Avenue and Frosty Treat on Grand Avenue, and with bougie Dolce Gelato and Scoops "Yes We Really Make It Here" Ice Cream holding frozen court on the other end of Highway 7.)
Bailey's mixes up its menu from the standard dairy bar fare with offerings of fried rice and egg rolls and the like, and they are a refreshing off-script surprise. But if you're here, you're here for shakes, ice cream or burgers, probably in that order, and that's where Bailey's shines brightest. Long may you anchor Park Avenue, Bailey's Dairy Treat.
— Stephen Koch Best non-museum museum
The only place that has issued me a handwritten IOU this century sits on Grand Avenue in Hot Springs, just south of historic Bathhouse Row and the Hot Springs Farmers Market. Google Maps calls it Young's Trading Center Inc., but the business name printed in Durango Western font across the old general store-style façade — Young's Trading Post — gives a much more accurate indicator of what lies within. James Henry, the 83-year-old patriarch of the antique palace, sat in a rocking chair at the open-air entrance last Saturday, occasionally chiming in as his daughter (and Young's co-owner), Karrie Jackson, regaled a few curious visitors about the history of the place.
Jackson pulled out a color photo she says was taken sometime between 1952 and 1955. In it, a surlier twentysomething Henry stands in front of the very same storefront, dressed in a striped linen shirt and dark blue jeans with the cuffs rolled up, with what appears to be a red pencil tucked behind his ear. Beside him are his parents, Willie Matilda and Jim Henry. James, as it turns out, had gone to California to work in the logging fields for three months or so when he was called back to help run the new family business, a store the Henrys had acquired from Monroe Young, whose family was sort of a big deal in mid-20th century Hot Springs. "One set of brothers were in the law," Jackson said, "and the other set of brothers were in the moonshine business." Before their ownership, as a photo with "October 1940" scrawled on the back reveals, it was a fruit and vegetable stand, with the same corrugated tin facade.
Now, it's a labyrinthian warehouse with every square foot of its walls lined with old farm tools and wicker baskets and light fixtures and cookbooks and oil cans. Metal box fans circulate air through the corners and wooden rafters, and there's a loft full of antique furniture up a staircase with a preemptive "Watch Your Step" sign at the top.
It's more likely to smell of WD-40 than Old English — a sort of agrarian counterpart to the strain of antique shops lined with lace and chandeliers. It's a place people tend to recommend when you've searched everywhere else and still can't find a replacement for the broken ceramic radiant on your old gas space heater, or when you want to outfit your workshed with some vintage tin beer signs. It's also good for picking up slightly dusty things you weren't looking for in the first place, which could include, but are not limited to: a maroon-and-gold footstool with the Lake Hamilton Gray Wolf mascot where your feet should rest; a briefcase bar lined in coral satin straight out of a "Mad Men" episode, with its rocks glasses still in their plastic packaging; a 1920s enamel gas range by Laurel; an oversized tin sign advertising Salem menthols ("Menthol Fresh!"); a pegboard full of swing locks and cabinet hinges; a vinyl record titled "Good Times with The Happy Goodmans" next to an Oak Ridge Boys cover album subtitled "Songs We Wish We'd Recorded First" and a Ray Charles LP called "Country and Western Meets Rhythm and Blues"; cast iron skillets in all shapes and sizes; drawers of mismatched silver flatware; hacksaws; old-school stand mixers; blank Scotch-brand VHS tapes; ceramic beer steins from Pabst's and Budweiser's classier days; brass doorknobs; pedestal sinks; snow shovels; birdhouses; birdcages; a Royal typewriter from the Roosevelt era; a rack of glass soda bottles; china cabinets; a "Legend of the Lone Ranger" tin lunchbox; a tiny beige Panasonic TV with an earphone jack; empty cans of every sort of salve, remedy and household cleaner imaginable (something called "$1,000.00 Guaranteed Moth Killer," for one); myriad lampshades and wrenches; washboards; an elaborate hinged octagonal jewelry box made of popsicle sticks; box fans from the days when box fans weren't plastic; and at least a hundred items whose original intended function eludes me. One of these items, I'm certain, is the perfect purchase to make with that lingering $7.50 IOU burning a hole in my pocket, and Young's is a perfectly fine place to get lost in, realizing that you've whittled away your afternoon muttering "Look at this" and "What is it?" to yourself at turns for a few more quarter hours than you'd planned.
— Stephanie Smittle Best summertime sweet treats under $3
There comes a time in the peak of every Arkansas summer when the heat's oppression feels historic: Lethargy sets in, the body humors are overwhelmed by choler and sweat, and even the best conversationalists are reduced to nonstop complaining about the temperature.
Treats of the sweet and frozen persuasion are the best salvation I've found for the proverbial dog days, and Little Rock has some pretty damn good ones. Here are my top three, all found at stellar local establishments, all quick, all easy to take on the road:
Paletas La Michoacana from Del Campo a la Ciudad
I was a paletas naysayer for some years, mostly because they're usually sold at top-dollar by people who don't speak Spanish and at a smaller-than-appropriate serving size for adults.
Enter Del Campo a la Ciudad, a taqueria mercado on South University with countless festive and culinary treasures — delightful paletas de hielo o crema (ice or cream), crispy chicharrón (fried pork belly) and an immaculate piñata display.
The paletas with a cream base are where it's at, particularly those de coco (coconut), arroz con leche (rice pudding), café (coffee), fresa (strawberry) and mango (mango). They are exceptionally rich and velvety, with some notable chunks of fruit or nuts of cookies dispersed throughout. Take the coconut paleta. Something about an opaque white popsicle is just plain satisfying, and the shredded coconut flakes are a welcome addition.
Del Campo a la Ciudad, at 6500 S. University Ave., is open 9 a.m. until 9 p.m. Monday through Saturday.
Frozen lemonade from Shark's
Sharks Fish & Chicken is a chain with a down-home feel and delicious food: Each franchise is locally owned and has specialty menu items, striking real-life shark photography, a bold teal and yellow color scheme, signature lemon-pepper dust (ask for it on everything!), and a brilliant condiment caddy that I give thanks for every time I set foot inside.
The frozen lemonade is of premium quality, and because there's a new Shark's popping up every which way in this town, they are easy to acquire. People tend to have views on ice, and they know what they like — I've heard the term "soft ice" uttered affectionately on many occasions. The frozen part of the drink is exceptionally cold, and the iciness falls somewhere on the spectrum between margarita and snow cone; it's somehow both crunchy and soft, and there's an unexpected delight that comes when the lemonade concentrates at the base of the cup. Last I asked about flavors, I was told each brick and mortar has its own selection (all have classic lemonade, my favorite), including Orange Tang, Pink Lemonade, Cherry Lemonade, Grape, Green Apple, Strawberry and Fruit Punch. I have yet to make this pairing, but I believe any aforementioned frozen drink would pair well with clear liquor.
Shark's Fish & Chicken is open 10 a.m. until 11 p.m. or midnight every day of the week at all of its locations in Central Arkansas.
Sugarcane Coke float from K. Hall and Sons
K. Hall and Sons holds a special place in the heart of the Little Rock community for a host of wonderful reasons. For me, it's a nostalgic spot, reminding me of my days of cutting class at Central High School to pick up a fried chicken to-go box and a bottle of Orange Fanta. K. Hall hosts a legendary Seafood Saturday during the hot months of the year with shrimp, lobster, crawfish and a line of customers around the block. And, for those who know where to look, it sells soft-serve homemade vanilla ice cream in Styrofoam cups.
Slide open the door on the glass-top freezer near the checkout and reach for the unmarked Styrofoam; it looks like a coffee cup with a pull-back drinking tab. The homemade ice cream somehow maintains its softness, even after being immersed in a deep freezer. I recommend purchasing a bottle of sugarcane sweetened Coca-Cola from the ice bath, consuming about half that vanilla cup, then pouring your soda inside the cup (may I suggest creating a few shallow caverns with your spoon for easier saturation?). What results is a coke float of the highest order, one that both quenches my thirst and brings me back to what it felt like to skip school looking for treats.
K. Hall & Sons Produce, at 1900 Wright Ave., is open 8 a.m. until 6 p.m. Monday through Saturday, 8 a.m. until 3 p.m. Sunday.
—Rachael Borne´ Best non-sexy way to be in the dark with strangers
High church and hot yoga are for the devout. And, while the net serenity yielded is, no doubt, commensurate to your 90-minute investment in mindfulness, sometimes you have more like ... 17 minutes. Tops. And an affinity for sleeping in on Sunday mornings. And perhaps a commitment to the idea of divinity that vacillates between lukewarm and "I'm not religious, but I'm spiritual, you know what I mean?" So, for the rest of us, there's the weekly Compline service at Christ Episcopal Church — a quarter-hour of sung prayers, short readings and silences, intoned by candlelight every Sunday at 6:45 p.m. in a 179-year-old church downtown. If you're looking to get right with the universe, and feel like that's better accomplished with psalm than with pranayama, pull up a pew (or a kneeler) at the corner of Scott Street and Capitol Avenue every now and again.
— Stephanie Smittle The best county for cool relief
Last week, some old friends who used to live in Arkansas but now live in New Jersey came for a visit with their kids. It's somehow remained light jacket weather at night in New Jersey and our friends came off the plane in long sleeve shirts and hoodies to 100 degrees. We spent several days talking about frying an egg on the sidewalk. Then we did one of the few things you can do outdoors in Arkansas in July and feel cool, even cold sometimes: We drove to Stone County and plopped our butts into the Sylamore, the mostly spring-fed creek that originates somewhere in the Ozark Mountains. The water was so cold that, even though I'd been cursing the sticky triple-digit heat for weeks, it took me a few minutes of hemming and hawing before I let anything above my knees get wet. It was also crystal clear; you could watch little bream nibbling at your toes. Swimming kept us occupied for the bulk of three days, but on our way home we made the obligatory visit to check in on the stalactites and stalagmites and bats of Blanchard Springs Cavern, where it was a blissful 57 degrees.
— Lindsey Millar Best pizza night shortcut
I can cook, but I can't bake. Whether that's due to some misunderstanding of the craft or some unnamable necrosis of the spirit infecting my being, I'm not sure. I've just never had success with yeast. My attempts at homemade bread or pizza always end up as airless and dead as the surface of the moon.
So, I was pleased to make the discovery recently that Vino's sells fresh pizza dough at a bargain rate. For $3, you can get a double-fist-sized portion of dough, equivalent to a large pizza. It comes ensconced in the same plastic clamshell used to package a calzone or a salad — flour-dusted and pregnant with possibilities, like some great ghostly mushroom harvested from a distant, malt-scented forest.
I like Vino's pizza. But honestly, I like what I've made at home from their dough quite a bit more — maybe from simple pride of ownership or maybe because I get to use exactly the ingredients I want. I suggest jalapeno escabeche (homemade, if possible), a little chorizo from Farm Girl Meats and a modest layer of shredded cheddar. Or, if you can get past the perversity of turning on the oven in August, a summertime Margherita with fresh Arkansas tomatoes and front-yard basil. It's life-affirming even for those of us dead at heart.
— Benjamin Hardy Best local spat
In September 2017, the Eureka Springs Independent reported that six box elder trees in the quaint, quirky mountainside town's North Main Music Park had been vandalized. Well, sort of. The vibrant crochet coverings that decorated the tree trunks — created by crochet artist Gina Gallina for the city's "Art of Crochet" Festival — had disappeared. Rumors circulated. Conjectures flew. Letters to the editor were written. Dendrological hypotheses about whether yarn-wrapped trees are more susceptible to disease and stunted growth were formed and discussed. The breathability of yarn was called into question. "If I find out who they are, and I catch 'em," Gallina said in a radio segment on KUAF-FM, 91.3, "I'm gonna make 'em learn how to crochet!" Would that social divisions in Little Rock could be woven of such stuff.
— Stephanie Smittle Best Little Rock collection
Earlier this summer, an anonymous local started the Instagram account @letterrockarkansas to document the wonderful and varied typography found around town. It's an essential follow for those who enjoy design ephemera or simply delight in trying to figure out where they've seen that type. Favorites include the massive wooden "Club Jimmy" sign, once wired with 255 lightbulbs, but knocked down by a storm long ago, that leans against the side of Jimmy Doyle's Country Club off Interstate 40; a modernist Church of Christ sign with a letter missing that reads "Church O Christ" with the caption "All out of F's"; and the chunky, hand-painted drop-shadow Sims Bar-B-Que sign outside the Barrow Road location.
— Lindsey Millar Best collection of business cards
Foster's Garage, the classic, no-frills body shop mainstay at 409 W. Eighth St., has been collecting the business cards of patrons and vendors apparently since the Eisenhower administration. They're contained within the span of an arm's-length corkboard on the wall in the garage's unceremonious lobby, and the card collection is augmented so gradually and delicately that each card is gingerly tucked into the folds of the cards that preceded it; our own tiny, greasy, secular version of the Wailing Wall.
— Stephanie Smittle Best political protest
Look, when you manage to piss off Willie Nelson — the unofficial ambassador of stoner serenity and goodwill toward men — your path is surely strewn with hubris and folly. The 85-year-old played a June 29 set at Verizon Arena — the finale to an Outlaw Music Festival that began at 4:30 p.m. that Friday — and included a rendition of his 1986 release "Living in the Promiseland." The song, sung as a trio with Nelson and his two sons, is a bittersweet anthem of an America that, theoretically, anyway, counts Lazarus' "New Colossus" as part of its ethos: "Give us your tired and weak/And we will make them strong/Bring us your foreign songs/And we will sing along." And, performed at such a crucial juncture of the family separation crisis at the nation's southern border, it read as a blistering indictment of our broken immigration policy.
— Stephanie Smittle Best return
After a long hiatus, David Jukes, one of Little Rock's greatest — and least heralded — singer/songwriters, dropped two EPs under his Magic Cropdusters moniker this summer. "Snowfall" collects songs Jukes recorded with Jeff Matika (Green Day) playing bass and Max Recordings head honcho Burt Taggart (Big Cats) playing drums in the mid-2000s in a Denton, Texas, studio owned by Matt Pence (Centro-Matic). Joe Cripps, the Little Rock native and famed percussionist, helped pay for an album from the sessions and to distribute it. When Cripps went missing in 2016 (he still hasn't been found), the record fell into limbo. "Snowfall" represents a scaled-down version of that album. It's five songs, many familiar to longtime Cropduster fans, like "Hey Wonder," "England" and "Marry Them for Free." The other EP, "Woodstock," was recorded more recently in Woodstock, N.Y., at a studio owned by Jukes' former bandmate in The Gunbunnies, Chris Maxwell. There's a cryptic beauty to Jukes' lyrics that emerges after repeated listens. That's easy to do because his warble and general pop sensibilities will have you immediately bopping along. The records, via Max Recordings, are available for purchase at maxrecordings.com, and on streaming platforms.
— Lindsey Millar Best, no, actually, the only music festival worth attending
The whole experience of attending a big music festival feels like participation in an overwrought performance art piece on the pitfalls of consumerism. You're looking for a special experience, a fun time, a little reward for your weeks of toil. You pay way too much money to gain entrance to a gated community that promises unique access to an array of precious goods — the bands and artists you adore — and spend hours of extra labor finagling the logistics. It'll all be worth it, though — because just look at that lineup.
You wind your way through an acre of security and get stamped with the imprimatur of elite access. Then, once inside, plot twist, YOU'RE the ones trapped in a borderline humanitarian crisis. It's hot, it's crowded, everything smells like a urinal cake. Induced scarcity jacks up the price of basic commodities (bottled water, kebabs) and you grow to loathe the hordes of fellow sweaty mammals jostling for limited resources. You retreat inward mentally, become beady-eyed and narrow-minded, jealously protect the pitiful patch of turf you've staked out in front of whatever beer-branded stage is presenting whatever performer you've come to see. You damn well better see them up close, and you damn well better enjoy yourself after all this trouble, because you paid for it with your own money, goddammit.
Then there's Valley of the Vapors, the antithesis of all that.
VoV, in case you haven't heard, is a five-day nonprofit-run festival in Hot Springs that captures bands as they travel to and from SXSW in Austin, allowing it to attract a fantastic spread of under-recognized national and international talent. This spring, a day pass was $10. The music is mostly to be found at one of two venerable venues in town, Low Key Arts — the driving force behind VoV — and Maxine's. There are also a few "secret shows" that pop up in unexpected places. Around 4 p.m. on a rainy Sunday this March, about two dozen of us crammed into a Waffle House on Central Avenue to watch a goofily too-cool-for-school Brooklyn rocker named Zuli churn out swaggering guitar riffs, occasionally using a sugar dispenser as a slide. Later, at Low Key Arts, I was treated to a succession of artists playing everything from country to bouncy indie pop to gloomy, Eels-esque bedroom ballads on a tiny electric keyboard. Some of it was good, some of it was not and at least two acts were genuinely terrific.
What makes VoV truly special, though, is the miracle of your fellow concertgoers: You don't despise them. There's just something about being crammed into a big festival that breeds contempt. At Valley of the Vapors, that sour note of impersonal hostility turns to one of, well, actual community. It's an all-ages affair, so you'll see teenagers, a handful of families, older folks. You're in it together, and you're there to hear music you'll probably never get the chance to hear again. What could be better than that?
— Benjamin Hardy
2018 Best of Arkansas editors' picks
0 notes