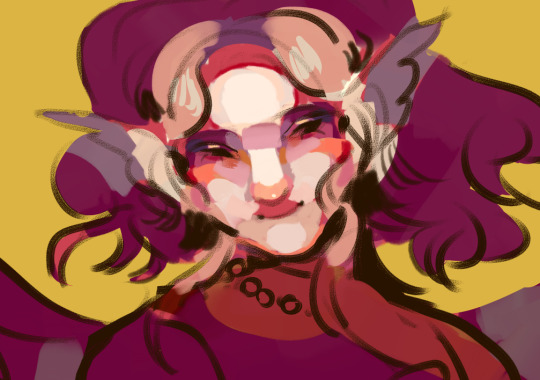
#so i finished the lineart for 2 drawings and the colouring for everything in the past 24 hours sdfjfs like i'm ready for the Biggest Nap
Explore tagged Tumblr posts
Visit Tumblr Blog
Explore Tumblr blogs with no restrictions, modern design and the best experience.
Last Seen Tumblr Blogs


Fun Fact
Post activity is at the highest at 4:00 pm EDT; notes peak at 10:00 pm EDT.
Text


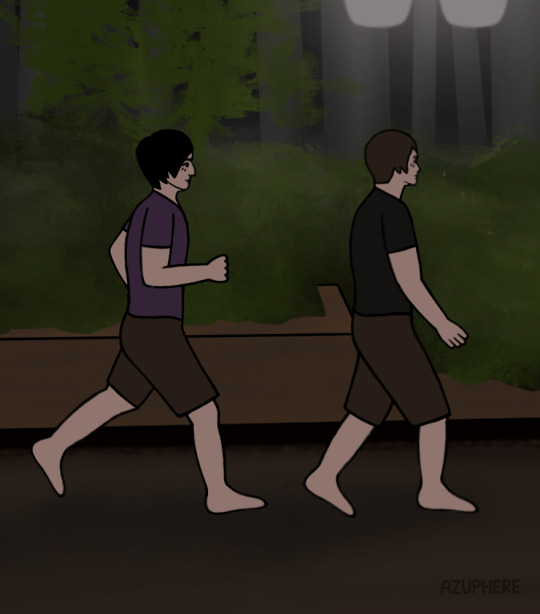

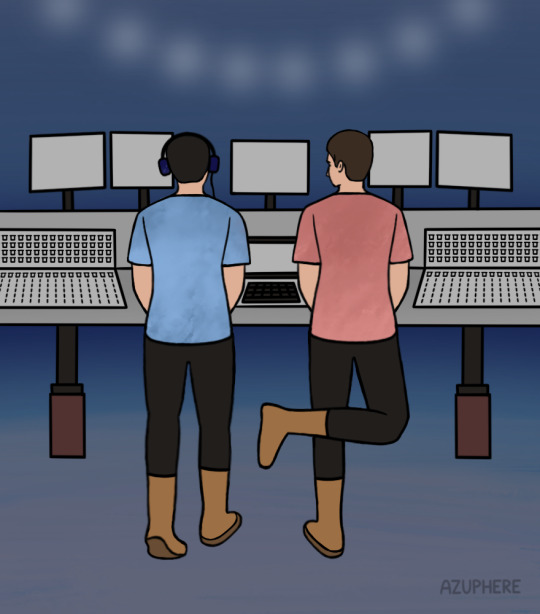


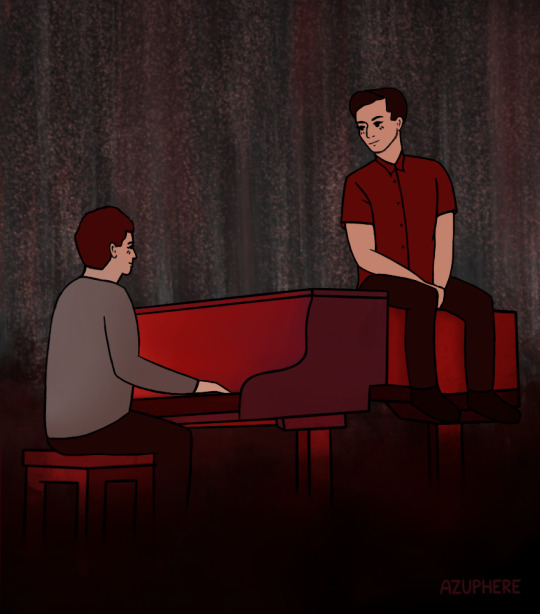
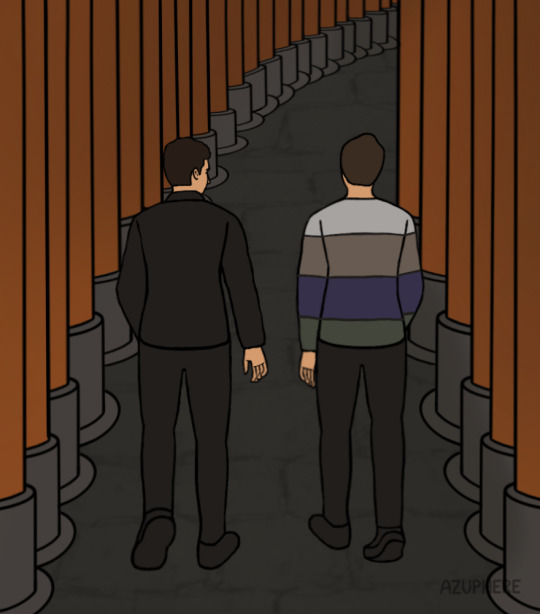
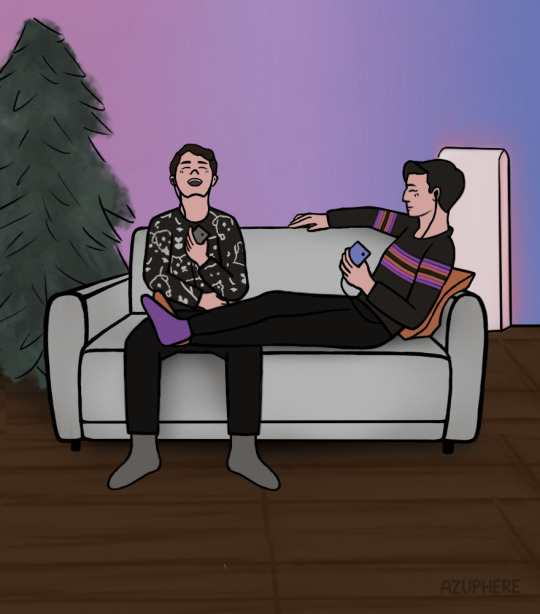


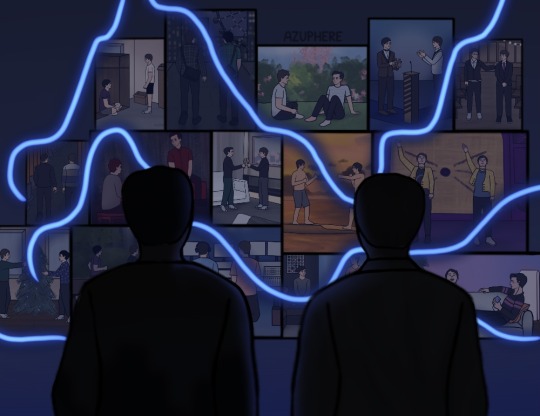
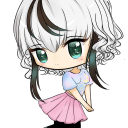
dan and phil vs the world
happy 15 years of dnp <3
#the way i Knew i wanted to do 15 drawings but it takes me like 20 hours over the span of a few weeks to finish one (1) drawing#so i was working on this as early as ?? august?? but the 15 days of dnp gifseries took more time than i expected#so this had to be put on the backburner until i could work on it again. which was yesterday.#so i finished the lineart for 2 drawings and the colouring for everything in the past 24 hours sdfjfs like i'm ready for the Biggest Nap#but i finished with one hour to spare <33#dan and phil#phan#amazingphil#phil lester#danisnotonfire#daniel howell#my art#dnp art#dpgdaily#phanart#DPGPhanniversary
573 notes
·
View notes
Text
DAY 13 - «On Thin Ice» Good Omens AU - Triptych Tribute for @blairamok
Part 1/3: "Falling Angel" Aziraphale
Please, listen to this
Change everything you are
And everything you were
Your number has been called
Fights and battles have begun
Revenge will surely come
Your hard times are ahead
Don't let yourself down
Don't let yourself go
Your last chance has arrived
Best, you've got to be the best
You've got to change the world
And use this chance to be heard
Your time is now
Falling Angel, your time is now!
(yes I know this Muse song has another sense in the On Thin Ice universe - for Crowley. Well, our Fallen Serpent will show us what IS a true Survival, tomorrow. ;-)
[Previous] [Next Day] [First Day]
Don't forget to 💕/ reblog ;-)
Personal challenge: a simple sketch each day
Goal: forcing me to keep things simple - inking, shading, just a few sashes of colour
Improvement pursued: to get the movement, the emotion, finding how to add depth, learning how to leave things barely finished
Max time allowed: 2 hours, as usual for my Daily Challenges. Well, this is a very special Tribute for me, and I was on a three-days break. So I didn’t really set a timer for the « On Thin Ice » sketches. Plus, I drew them quite in the same time and on the same file to be sure Crowley and Aziraphale would match. I guess I spent more or less 3 hours on the lineart for each one of them (the clothes and the figures needed a lot of time), plus 1h30-2h on the colouring/shading for each one.
Be aware that in my first sketches for this project, Crowley and Aziraphale were supposed to train on the same ice rink, and I dearly wanted Crowley to be watching Aziraphale, and Aziraphale was supposed to glance back to him. I had to give up on this idea later – because the figure I chose for Aziraphale definitely couldn’t allow such a shared glance. (but, hello, it will be a triptyque ! So, guess what? About the third part… :-p)
About Aziraphale, as my « Falling Angel ».
« On Thin Ice » author, @blairamok, describes the Hydroplane ice skating figure as very representative of Aziraphale, and the drawing reference pictures were numerous enough to get some solid inspiration. It’s a complex skating figure. I have watched some ice skating tutorials on YouTube – because I wanted the movement of the clothes and hair to be accurate and, if I understand everything properly, even a slight alteration in the position of the arms can make you fall. Such perfection ! That IS the right move for Aziraphale !
I told sooner on my Gymnast !AU challenge that I appreciated drawing Aziraphale with realistic curves more and more each day – even if it still triggers me sometimes about my own shaming roundnesses. I realised my way of doing art – and my mind too, maybe - was evolving when I got back to check references in the amazing Blair artworks (link AO3). A few months ago, I felt insecure watching Blair’s Aziraphale, which seemed to me too much plump and very soft – not a « good sportive look », I thought then. But now I like him more and more, so maybe my way of thinking is changing, and I think this is for the very best.
My Aziraphale is performing a difficult figure, so he is using all his muscles into maintaining his balance. He seems so statuesque, so powerful, yet very focused and oblivious to the world around him, with his eyes shut. That is why he couldn’t share a glance with my Crowley. T.T
.
Maybe this is my way to guess Aziraphale’s behavior in the so-awaited « On Thin Ice » next chapters. Focused on his own training, trying to ignore Crowley’s sassyness but still secretly impressed by his partner’s skills. Because they share the same love for Ice Skating, even if they don’t show it in the same way.
Blair, if you ever read this, thank you. For your artworks, for making us dream about a wonderful story that still remains to be told.
Thank you for « On Thin Ice », for your so-kind message last week, and for everything else.
I have faith. I’ll wait for your story. But even if it doesn’t exist yet, I am already dreaming about it, and this is priceless.
[Previous] [Next Day] [First Day]
Don't forget to 💕/ reblog ;-)
#on thin ice#blairamok#I am so happy about it!#good omens#good omens fanart#Aziraphale#Crowley#aziracrow#art#my art#ineffable husbands#David tennant#Michael Sheen#ElenPersonnalChallenge#ElenthyaAndGoodOmens#Ineffable Feathers#good omens au#Ineffable lovers#Ineffable Ice Skaters#ElenthyaGallery
133 notes
·
View notes
Note
sorry if youve talked about this before, but do you have any tips relating to your coloring process? i ADOREE the way you render things and it looks soso cool and once i saw a post where you said your art typically only took a couple hours and i was in SHOCK. cuz ive been working on a yuji piece that has a similarish (not really but idk how to describe it…) coloring style and ive been working at it for. about a month now…sorry this is rambly i hope u have a good day!!!
hi!!! first of all thank you so much I'm happy you like the way I render! honestly it Is still the aspect of drawing that takes the longest for me, I've only recently started to come up with ways to streamline my process (mainly through keeping my layers/brushes limited and overall being less anal about details) . these days my average drawing does take about 2.5-4 hours I'd say, with Big Illustrations obviously being the exception
i wouldn't beat yourself up too much about taking longer to finish a drawing tho ! it took me. a While to learn how to speed up and honestly my biggest piece of advice is loosen up and let certain things look imperfect or unfinished ! and if you're like i was and want to work at getting faster then i would recommend practicing churning out sketchy/rough pieces and see what tricks and habits you can implement or adjust to save time
all that being said I realize haven't done an updated overview of my colouring/rendering process so I guess this can be that ! I'll put it under the cut because i too like to ramble and this Will get long
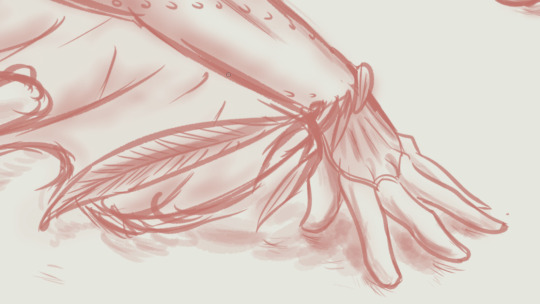
lineart and base colour/underpainting


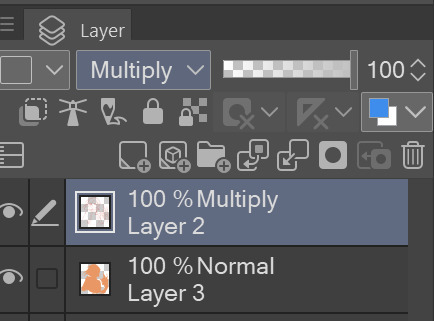
my lineart is nearly Always on multiply. it helps the lines stand out less starkly against the colours and makes it so that I don't have to change the colour of as many sections of lines later on
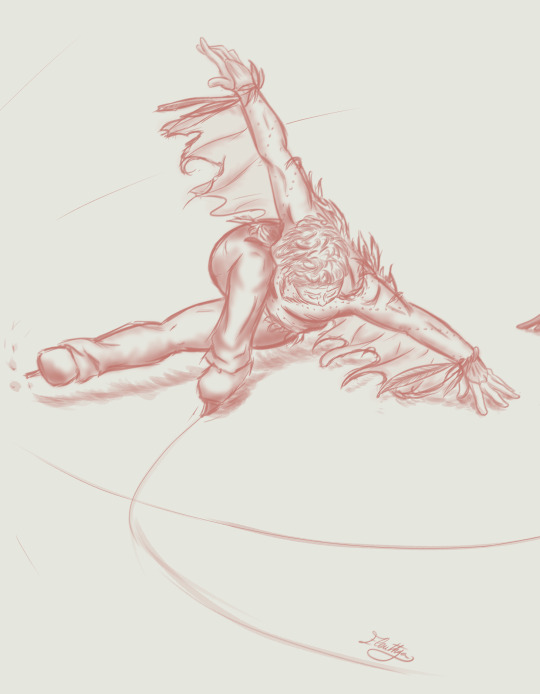
the base colour layer is honestly completely optional, tbh i sometimes skip it so you don't Have to have one but i like it for a few reasons: - I like to keep all my colours on the same layer so if i'm going for a painterly style this serves as an underpaint layer of sorts . having this means that when i paint, whatever colour i have here will blend with all the other colours i use and help them look cohesive - even if I'm not painting, i still like to work with all my colours on the same layer and it helps me make sure I'm not missing any spots, which helps when it comes time to section individual areas off in the next steps
2. flats
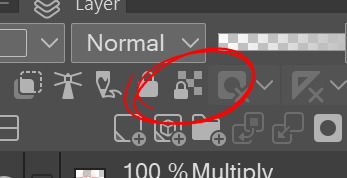

lock transparency button my beloved . this makes it so that you're only able to paint on areas where there is Already colour (which is where having an underpaint layer comes in handy)
not much else to say about this step, just choosing colours rly !
3. shading
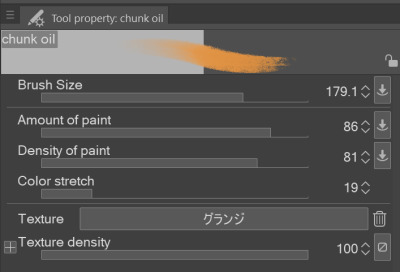
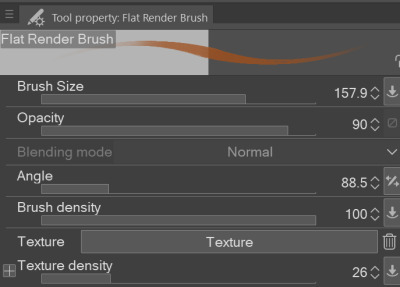
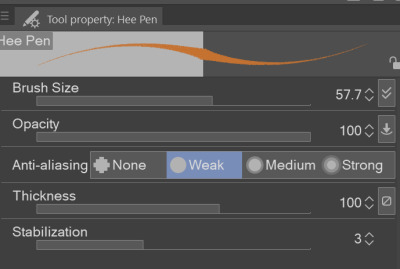
here's where the fun starts ! since i'm working all on one layer, i use the wand or lasso tool to section off whatever area I want to work on, then go in with (usually) one of the three brushes below: from left to right 1. my favourite dry brush that i use to cover large areas, it has an amazing dry paint stroke-y texture and i use it in everything. great for skin/clothes/hair/fur/organic material...she does it all 2. smaller, blendier/smoother brush that I use to soften out the rougher edges left by the first brush. I find it's really good for hair and small clothing creases 3. rough pen brush that I use to add little bits of flavour in the form of crosshatches or stray lines, usually to hint at individual hair strands! I also use it to line sometimes but I'm using it less for that recently
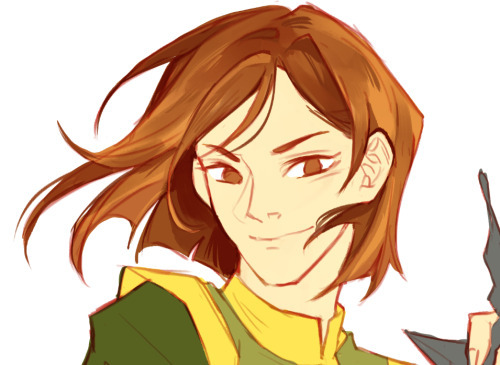
also, since the lineart layer is set to multiply, it's super easy to colour directly under the lines on my colour layer and use that as a way to make certain lines Darker . it's most obvious at the eyelashes and under the jaw but I do it everywhere

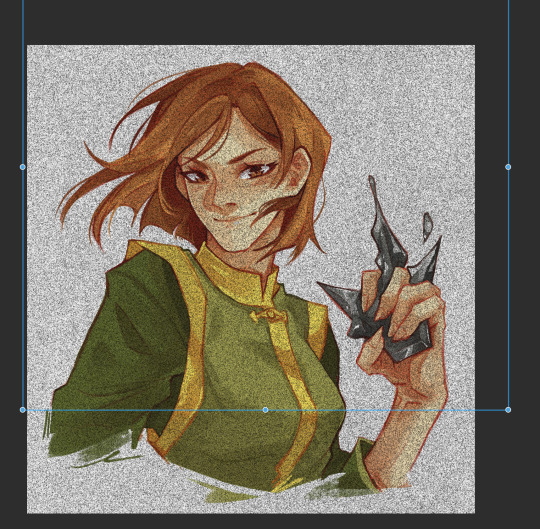
4. finishing touches and texture overlay
here I add another layer above the multiply/lineart layer and use it to add highlights and other details! this is also the layer i use to paint directly on top of any areas that got messy or need extra definition
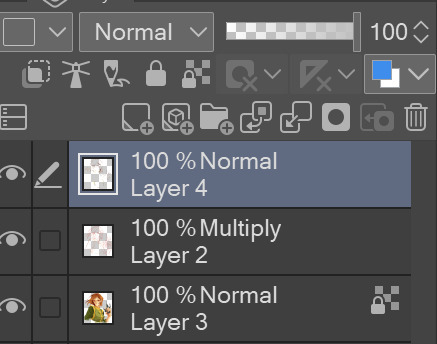
my texture overlay of choice is just a rough monochrome static file that I got on the csp assets page but use whatever you'd like tbh ! set the layer mode to overlay and adjust the opacity to your liking (I also like to rasterize the layer to make it easier to work with but it's not too consequential if you skip that step since you're basically done by this point anyway)
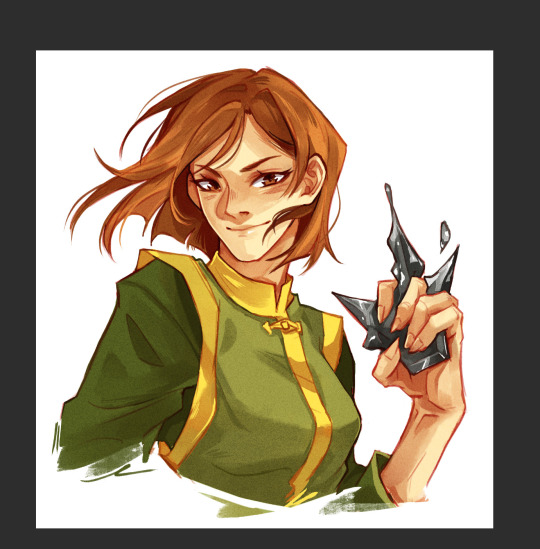
And done ! slap a signature on that bad boy and send it <3

#answered#flowingredscale#art advice#my art#i rly hope this was helpful!!!#best of luck with your yuuji piece <3
35 notes
·
View notes
Text
Why I'm shifting to Pixel art!
Sooo my last 4 uploads of my art were pixel art, so I think it is clear I'm deciding to soft-abandon non pixel art. This doesn't mean I'll stop drawing non pixel art entirely, but It's not going to be the main method of art anymore, and I have a few reasons for that.
The art program I use for Pixel art is just better than every other art program I have tried.
Aseprite changed my life and Its majority the reason why I'm switching over to it. You can dither with ease by making literally any dither brush by drawing the shape yourself, you can even use the fill bucket like that. You can make perfect lines so they are consistently 1 pixel, it makes gradients between colours for you, you can animate easily in it, you can scale your art easily in it, it has everything you need ( opacity changing, effects, etc. ), their shading mode allows you to layer colours perfectly, Everything about this program is perfect. It is also extremely easy to learn. The only critique I even have for this program is that moving layers up and down using grabbing the very edge of the layer can be kind of annoying and i wish i could just select the main box to move it, not its sides.
2. It just makes sense for the art I do
" But ridley, you don't draw little guys " its true, but if you seen how I do my thick lineart, youd see how drawing in pixel art makes doing this so much faster. Additionally I never liked my shading and always felt like it lacked, always wanted to dither but wasn't able to with my program. I feel like it has brought my art to where I wanted it to be. 3. Its easier of a method in my situation
Aseprite is on desktop, my other art program is on mobile. Truthfully my zflip phone has made drawing art extremely frustrating and makes me want to give up. the fold on the screen is so almost unnoticible but its *there* and so drawing on a non perfectly straight screen makes me want to explode. I now just use a mouse and aseprite and its much easier. Crazy how I'm going from finger to mouse, I truly will never know a drawing tablet.
4. I'm kind of tired of caring about social media and other peoples opinions
I feel like for years I was very self conscious about the art style I developed, and I always just wanted to go for an art style that most people found appealing, which is why i leaned into more proportional humans rather than really cartoonish and I also avoided pixel art; I always wanted a very kushy appealing style and im just over it honestly. I want to start drawing stuff that makes me happy and thinks looks cool.
Anyways, I have a few non pixel art projects Ive never finished, so You'll see those soon! but overall, I'll probably majorly focus on pixel art.
8 notes
·
View notes
Note
Hi, i hope this question doesn't bothers you, do you have any videos of your process?, im currently starting to learn how to do digital art and have trouble knowing where to start and what to do (im always like, should i start drawing this part first?, is it better to do clean lineart or just paint over the sketch?, do i work on the lights first or the shadows?, etc)
I can probs make you a video on this at some point based on something I'm currently working on, although I have a few on my tiktok already (@ xephia) if that helps!
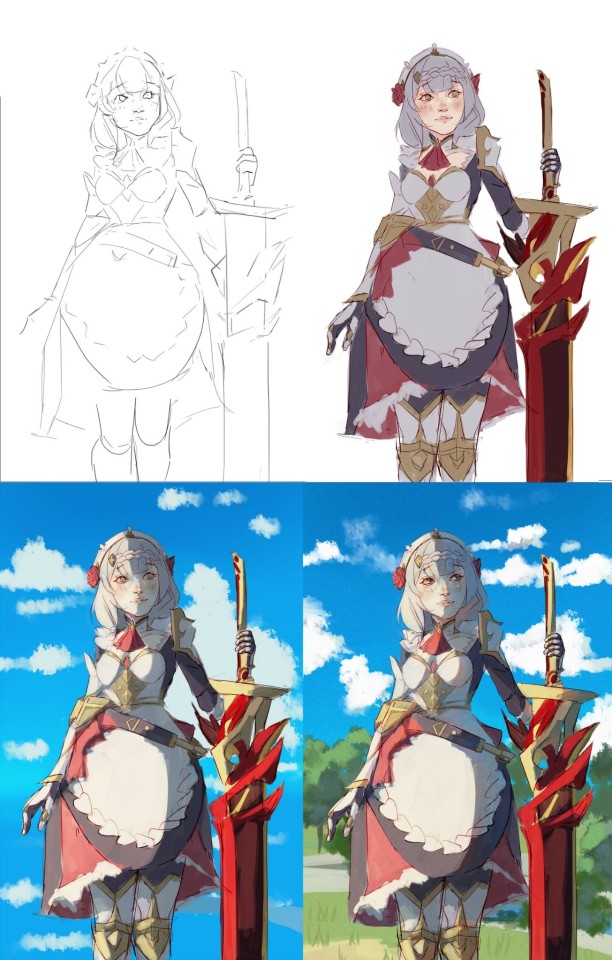
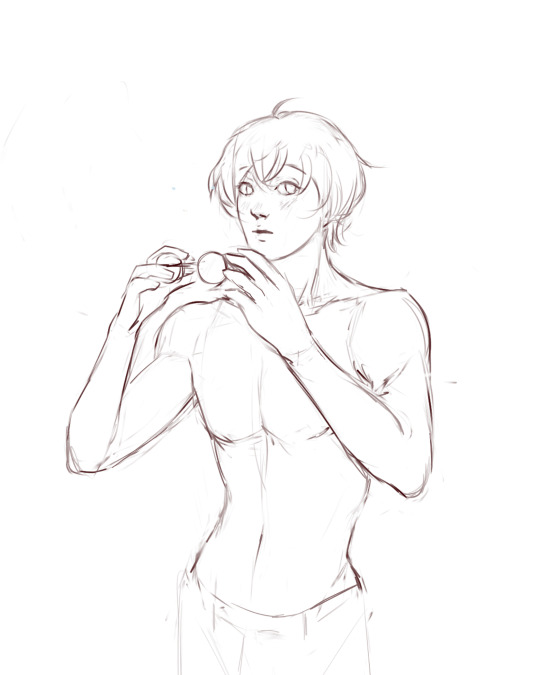
My process is a bit messier than many other artists - I alternate between stages of sketch and colour before I even think about ‘final colour’. I’ll start with a sketch like the ones below, then slap some rough colour on. This is because IMO colour is an important part of the composition so I want to see what works before I line. They’re not meant to be pretty or social media ready. This stage can look super messy or tidy depending on how I feel or how complicated it is. And they can look wildly different; here’s some examples:
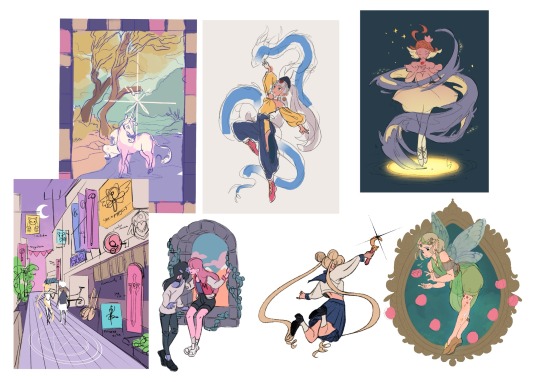
That stage also helps me decide if I want to finish the piece or if I should abandon it (I abandon a lot). Sometimes this stage takes 15min, sometimes 2 hours, it really depends on the piece. But for me personally, it’s crucial because otherwise I find it very hard to envision how it will look later, or forget what I was planning.
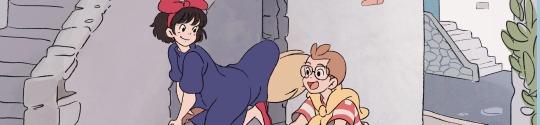
Then, I do at least one more layer of ‘sketch line art’, which is basically a first layer of line art to see what works and what needs changing. I colour the important bits relatively cleanly (usually character/s) and add might some subtle shadows/gradients and/or lighting to get a feel of what it will look like finished. Sometimes I repeat this process a couple of times if I’m not happy with how the first iteration looked. This stage usually looks a little like this character sheet I’m working on, and this slice from a Kiki delivery service sketch:
It’s usually not until I’ve done all that, that I go over and do the final lineart, making it thicker, colouring the lines, redoing the flat colours, tidying it up, and adjusting where needed. Essentially I don’t start ‘finishing’ a piece until I’m happy with where everything sits and what colours I’ve picked. It’s only at this point I feel like the sketch is ready to line, and lining and final colouring can actually take less time for me than all those layers of planning somehow haha.
At this point I keep tidying, cleaning, lining, colouring, until the piece feels complete. Sometimes complete for one piece is tidier than complete for another, it really depends.
I’ll also use Procreate’s push tool to adjust things as I go in all steps - it saves a lot of time and isn’t cheating.
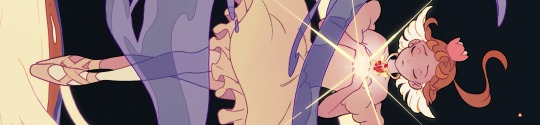
Although as you can probably tell from my examples, I do change this procress up a lot depending on the piece! Sometimes I’ll even paint over parts of my final piece like I did in this magical girl street. I think find whatever works for you, everyone will work differently and things like mood, energy levels, how patient you feel, how stressed you are, if you have any hand pain or shaking, and how much free time you have that day to draw can all affect your process day to day, week to week.
Some days it will be easier and more comfortable to sketch messily, other days tidier. Some days you will draw well, other days not well at all. At least for me, I find consistency almost impossible.
So I think there's no right or wrong order to do things and it's great to switch it up and keep things interesting for yourself, and different processes work for different people. Hope this helps!
#faq#art process#art advice#art tips#drawing guide#sketch progress#digital art#procreate#human artist
33 notes
·
View notes
Text
colouring tutorial from sygni aka sima
DISCLAIMER 1. eng is not my native language 2. i am using techniques of a realistic art so it's not for everyone! but you may find some tips interesting tho
big text screamer
so obv 1. making our sketch (and after lineart if you're using it bc im not) 2. filling up background, then character. think about what atmosphere you want to create in result, try to use different background colours for your characters for diff effects in result. i've had a small post with a little explaining for choosing colours, you can use that too! i suppose i can make a post about emotional effects of different colours if someone interested bc that's really a HUGE part of final effect on viever. actually i can tell and explain in art so much feel free to send questions <:D so like that! (tbx i changed it like 3 times so it's okay to change your colouring desigions mid-drawing if you're feeling something feels off)

3. time to get some basic shading going! don't skip that step i swear to god you can think bruh sima for what do you they added overlays that i can use after i finish the art? are you a caveman or what please just trust me it'll add so much charm in your art so how to do it: 1. choose where your light sourse is. on my art it's in front of griande 2. use a CONTRASTING colour for each big part of a character (hair, clothes, face etc) and make shades with that. REMEMBER dark colours going next to light ones, light to dark. please don't use black for shades for god's sake. also shades are cold coloured most of the time thats important too ig 3. if you're confused where you shall place shades then find a ref or make a photo of yourself OR use a mirror (preferable!) and this things can help you understand face shading better too \/
don't feel not good enough that you need to study sth or use refs it's fully okay every good artist using that!

so i know this looks like mess BUT what did i do (guys trust the process): 1. desided i want a face to be a centre of viewer's attention so made everything else darker 2. put a light on a face, the most light shade on the parts which are closer to light sourse - at my art it's nose and a bit of forehead. and exact same thing but backwards with eyes remember face isn't flat! so even if forehead is in the light, it slowly goes back, so it won't be light all the way (you can see it on previous photo of the gypseous head)
then the longest part goes: we're using semitones (colour which are simmilar to base shade) to connect shades to light parts, to add volume to the art make sure your brush moves according to .. ehh.. face shape? just take someone and weirdly touch their face to understand how it goes and with your brush cope that example (look closely to the strokes):

so i've did something
i know this looks like "let's add some details" type of thing but: i've added semitones to the shadows to correct their forms -> to suit the relief of the face added a contrasting (to pink of the base) orange as blush, a dark blue to show the farthest spots from light added a basic reflects on the sides of the noce (orange spots), chin (peach). reflections on things are sooo important and add so much life in your art! yet it's easily done: you just create a little light blended line on the bottom of your shade. if next to thing you're making a reflection on is the diff-coloured thing, then pick a colour from it and mix them. example \/
made an edge on a forehead (dark-red line) yet i'd make it more accurate later, and will add it on the chin and sides of the nose to highlight them and separate from other parts of the face. actually this edges are just the darkest spots between the light of the item and reflection on the bottom of it. i like to make it noticible, yet someone tend to blend shades in. if you're just studying how to shade i'd reccomend starting without using blending yet you can notice how colours going more dull from forehead to chin to make her look like she's angling her head forward, i guess i'll make it more noticible later
AND i'm going to sleep but i have more to tell + i need to finish the work later anyway so put some feedback for part 2
61 notes
·
View notes
Note
Hello! I am a beginner artist and I love ur art!! Super pretty and the colors are very tasty. Do you have some tips? I'd love to see your art process!
HELLO ANON!! first of all i am very honoured that u would ask me this because 90% of the time i feel like i have no idea what i am doing and like im still a beginner artist myself DSDSJDF. i would love to share some stuff i learnt and some stuff about my process (regardless of how messy it is sdfhsj)
(final piece)
here's an old example of my process i found! while the steps sometimes look different for other pieces, i feel like this is a good demonstration of how the basic structure looks.
1. the sketch - this is where i'm mainly figuring out how i want the piece to look. i was redrawing a screenshot for this piece so it looks a LOT neater than what a lot of my other sketches look like, for example, here's the process of me figuring out my recent drawing of haise:


(final piece)
in the first two steps, i was mainly working with showing myself what the piece was going to be. the last one was where i used references/technical knowledge to try and show whoever will be looking at it what the piece was
2. cleaning up the sketch + base colours. these two usually occur simultaneously because i will get bored cleaning up the sketch midway through and want to start adding colour LMAO. on a more practical note, sometimes putting down the base colours and having a better idea of what the finished product will look like might make it easier to refine things.
a note: cleaning up for me doesn't mean doing lineart. it mostly means erasing any overly messy lines on the sketch and redrawing small parts to make it look tidier where needed. i often leave it 'messy' at this stage, too. like here:

(final piece)
3. light/shadow. this is my FAVOURITE part because it's where the piece starts pulling together. the method i used in the current piece was putting a multiply layer over the colours folder and filling in where light would be obstructed. after that, i used a luminosity layer to put in some bright sunlight. marc brunet has a great way of explaining it by advising to pretend that the light is the camera and you're behind the lens. this is such a good way to block in average light/shadow values! sometimes this looks a bit crazy because everything is still so messy but that is why we have...
4. rendering. this is where i fit all the remaining pieces of the puzzle together. i'll refine the colours a bit more -- e.g. colouring in the eyes, -- and fiddle a bit with the shadows to add some more variation to the hues/value. this is where i think a lot about light and shadow theory and try and make it look more realistic. marco bucci saved my LIFE with his videos about ambient occlusion and ambient light (part 1 / part 2) -- essentially, what i keep in mind the most is that if a plane in shadow is facing the sky (or is open to any other form of light that isn't the direct light source) it will contain ambient light. it is SUCH a game changer when you add it to your pieces, trust me, even if youre lazy about it. if needed i'll pull up some references to make everything look good!
5. rendering... part 2? honestly this step kind of blends with the last one as i tend to do it simultaneously. i basically clean up all the messy lines from before by painting over them! with the majority of the colours i need put down, i can just eyedrop them and paint over anything that's needed. this also comes in with the light/shadow, where, if i need a more subtle hue for either/or, i will eyedrop it and brush it in.
some further notes:
i very rarely use references during the first stages of my sketch. i think it tends to look quite stiff and unnatural if i rely too hard on the. and i personally prefer the creative room when the idea is still being conceived. references come in when i can look at what i have down on the canvas and have a fairly decent idea of what i want, including pose, composition, etc. it's essentially a first draft to guide me to where i want to go with the piece. it's when i'm done with this that i bring out references, and even then, they don't necessarily have to be the exact pose -- i'll usually get a couple of pics which show what i need to double check and keep them up as a guide. by the end of the 'sketch', i usually have a basic construction of what i need to continue, even if it's messy.
i use very soft brushes when putting down colour because it allows for more hue variation. like i said, i enjoy eyedropping and brushing in colours afterwards, so this really helps!
layer modes are ur friend! i try not to rely on them too hard during rendering because i like the freedom of painting over but they're very useful when you're blocking in your initial colours
sometimes, when i feel like i want to try something new with my art, i'll keep pieces that inspire me up in front of me. i have two of sui ishida's art books and sometimes i'll just flick to a page that oils the Art Gears in my brain and keep it open while i draw. i don't necessarily reference it, but i like having it there so i can glance over every once in a while. i don't usually make a conscious choice where i'm like "ok i want to render skin the way he does" but it's more like. my brain knows what it likes in his art and it'll try and push that part of my art in a similar direction.
honestly the best advice i have is that art is very much based on vibes. everytime i've tried to think too much about it, to do things 'correctly', to rigidly stick to art theory, my art has not come out nicely. i think the technical parts of art are important to know and understand but i also think it's important to let your knowledge come through naturally when it is needed instead of pressuring yourself to do things 'right'. tbh you probably already know that but it's something i forget a lot so maybe it serves as a helpful reminder?? sedsfhsl
ANYWAY SORRY THIS WAS SO LONG! i hope i covered what you needed and if you need anything else/want me to expand on anything feel free to drop me another ask ! <3
make sure to look after yourself and trust yourself and ENJOY!!! art is about having fun!
81 notes
·
View notes
Text
Ya know what?
You fuckin Know
wat? I’m sleep deprived, I suck at colouring and I don’t think I even have the energy or motivation left to finish this because I have already drove myself nuts on getting every lil thing right and fixing and tweaking SO.MANY.THINGS with it that if I try and colour I will just get angry and hate the art piece and think I’ve ruined it. Its a common occurrence sadly

Cute shit. We love to see it. I FINALLY kicked my art block after like 2 years after playing a game with a buncha people and doing a bunch of stuff for that. Apparently now i can draw again. And apparently everything I have been drawing involves a lot of feathers I swear to FUCK I HATE FEATHER- ahem Julian is my favourite boi ever and every time I read his reversed ending I sob like a fucking baby so I wanted to draw cute shit of him and my MC. I have yet to draw him in just his human form because I still struggle drawing humans. ESPECIALLY if its like a character from smth and I go insane trying to make sure it definitely looks like the character. Think I got this pretty spot on tho ngl, and its one of the most detailed linearts I have EVER done. f e a t h e r s s s s s Anyways, enjoy, and don’t art steal or I will bite your face off. Respectfully. Or not so respectfully PS: More sprite edits soon I’m just a lazy bitch rn
#The Arcana Game#the arcana#julian devorak#arcana julian#Reversed ending Julian#birblian#My fuckin bird husband#i love him#my art#my mc#arcana mc#quack <3
74 notes
·
View notes
Text
Art of the Day: My 1st fur OC CapyBARA
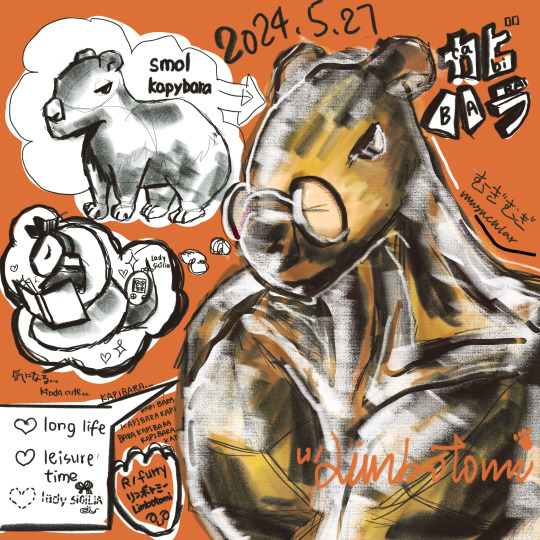
Day 13: I am an Embarrassment to myself
I've read all the rules before I post anything to any subreddit but I always get my first post deleted with something so stupid that I put in, thinking I was being precise and conclusive but I conclude too much & triggered every auto-bot with my precised words. I want to crawl up in a hedgehog ball.
Here's his story if u made it past my rant, you deserved it:
CabyBARA lore:
He was once a capybaby, adopted by kangaroos.
Capibaby thought he was a kanga-baby, so he worked out super hard as his parents were BUFF.
Lately he developed a tiny tiny crush to Lady Sicilia Snake, the librarian.
He started reading more.
He daydream about being an old, healthy capy, with lots of stories to tell, and possibly, Sicilia by his side.
"How do others give out their best first impression?" CapyBARA wondered.
His kangaroo parents met on stage at a boxing match. So their love story weren't really helpful here.
I ended coz I ran out of ideas and thought I'd get some comments on the subreddit, & I typed everything for so long. My eyes dried up & now's perfect to cry. Following is a long promo for my FREE (+ paid) art sale.
Free sketch includes:
Monochrome / lineart for ONE fur-oc / fur-fanart / fursuit / fursona / any non-100%-human creature.
Default size in square canvas. Change can be requested.
From headshot only, half body, to full body, can be requested.
SFW or NSFW, clothes to naked, can be requested.
Pose is decided by Tomi, for studying anatomy.
A name : your human name / username / fursona's name.
Tomi's watermark-signature. Unremovable.
Gratitude from CapyBARA.
A request from Tomi to share the sketch on social media / portfolios. You can say yes or no if you own the character.
Sketching for anatomy study purposes, & possible friendships.
FREE SKETCH IS ROUGH & NOT FOR COMMERCIAL USE plz.
Sketch is protected by copyright laws. ASK for PERMISSION to RE-DISTRIBUTE sketches.
NOs: 100% guarantee offers / multiple offers to 1 human / re-doing finished offers.
If you want to have more in the artwork / to support CapyBARA + Tomi: (Paypal) - USD 4.20: The above + specified pose + specified angle - USD 6.90: The above + base colours - USD 9.60: Detailed clean line art + base colours - USD 19.98: Detailed clean line art + detailed shaded colours + simple background - USD 24.68: The above + background line art - USD 30.62: The above + detailed background - USD 42.00: Full art with detailed line art, shaded colours, and background - USD 69.00: The above with 2 characters - USD 96.00: The above with 3 to 5 character (+ less or more than USD 10.00 : per request)
If you just want the basic free one, you probably skipped, so here's more to read:
By requesting for a sketch, you allowed Tomi Limbo to use the requested character in the said sketch, with aforementioned conditions. If the character is not yours, it should be a personal use fanart or you received the original creator's permission for Tomi to draw. Tomi do not own any legal responsibilities if drawing the requested character was not permitted.
If you want the free art, please give the following info to Tomi in a legal, and friendly to CapyBARA manner:
The character's name, Your name
The character's species
The character's appearance / important features / signature outfit
Head / shoulders / knees / toes. Or be greedy for full body;)
Any gender / nationality / personal identities important to the character
Answer yes or no, if you allow Tomi to post it, as mentioned above
Possible reference images of the character
Possible reference to your prefer art style (E.g. "Disney" or "Ghibli" styles, NO asking for independent artist's styles)


#commission open#free commissions#character design#furry#sfw furry#furry oc#furry commisions#digital illustration#style study#capybara
3 notes
·
View notes
Text


I’m (almost) done with thesis so I’m updating my commission info! DM/email/fill out THE FORM to commission me.
The Rules:
I take payment upfront, through PayPal (or e-transfer if you live in Canada).
All prices are in USD.
I will draw most things, but I have the right to refuse your commission for any reason. Please respect that.
Things I am likely to refuse include EXTREME nsfw, or technical things I feel I'm not qualified to draw (for example, a very complex, photorealistic portrait, or an extremely detailed vehicle). The last point is up for discussion, but please respect my choice to refuse your proposed commission.
Please be patient. My turnaround right now, unless you have a hard deadline, is 2-3 weeks. Do not expect finished work a day after I start on your drawing. If you need something faster than that - let me know and we can arrange a rush fee.
I will send you process screenshots as I work: the sketch, the final lines, the flat colour, and the shading. At each stage, you are welcome to make any changes (for example, once I send you a screenshot of the flat colours, you can tell me if you want something to be a different colour/lighter/darker/etc). However, once you approve it and I move onto the next stage of the drawing, any changes/revisions to previous stages will cost 5USD each (for example, if you want to change the lineart once I've coloured and shaded everything, that will cost extra).
If you post the art somewhere, please credit and tag me (apollinares on insta and twitter, apollinaresart on tumblr).
Happy commissioning :)
29 notes
·
View notes
Text
Tips for maintaining/building art motivation!
Want to get better at art but feel like you're not getting anywhere? Have a sad folder full of unfinished art? Does it take you three months to finish a single artpiece if it ever does get finished? Here are some tips that worked for me to keep me interested in art!
Tip 1: Notice the goal markers in each project and consider that a piece!
If you're like me and take forever to finish one piece, you're probably spending ages on each part of the project. Maybe you do just the hair, then just the face, then just the clothes. Maybe you do a sketch, then another sketch, then another sketch, then another sketch, then flat colours then rendering. Each time you hit one of those, save an image/scan/video/gif/whatever you're making of that version. Put it in that folder where you put all your finished art.
If you do lose interest in that project, one day when you look back you'll see an "unfinished" artpiece with some pretty boss stuff. It will be a more accurate record of what you actually spent your time on. Sure, this sketch doesn't have a clean lineart on it, but you can totally tell what it is! Sure, this piece has super detailed hair but flat everything else, well maybe the hair is the star of the show and for that matter that's really cool technique you used for the hair! Art doesn't always have to be finished! Just look at the work out there you're aspiring to:
Tip 2: Look at how others use art to communicate
If you're here on tumblr, there's a wide range of art out in the wilderness for you to forage. You're gonna see some people that are probably gods painting the most intensely beautiful artwork you'll never be able to fantasise - but that's just one type of content. I'm constantly attracted to art that are absolutely not in the style I lean towards, but they express emotions or pitch a new design or honestly are just about characters that I'm starving for. Not all art has to be perfectly polished, often you'll see a sketch posted instead because that was sufficient to get across the idea. Focus on the idea. Aspire to create art that gets across these ideas in one way or another.
I would also say to read comic books. Webtoons are good too - there are many stories I've read where I was interested enough in the story, and the art wasn't all that appealing to me. But if the art gets across that story, mission achieved, and it's also motivating to see the change in the artists' style over time. You're a baby deer taking your first steps but you're not the only one; artists that you look up to are all doing the same.
Tip 3: Set staggering "finishedness" goals
Okay, so we've talked about treating "unfinished" artwork like finished work, and we've talked about how artwork doesn't have to look "finished" to be enjoyable for us. How 'bout we do it on purpose now?
Again, I'm gonna assume you're like me and take several months to finish one piece that maybe has background, lineart, full rendering, the works. Well, remember that that's not the only type of "finished" artwork. Here are a couple of mild suggestions:
Draw the proportions cartoonised or chibi.
Work on creating a really pretty background.
Skip the lineart. Just colour straight over the sketch.
Skip the colouring too. Just tidy your sketch up slightly.
Instead of colouring your lineart, add some fun embellishments in monocolour and/or change the colour of your linart.
Pick up a sketchbook (oops I've been assuming you do digital all this time) and do any of these. After being trapped in digital I find physical sketching quite freeing.
Do this for a concept/design that you want to communicate. Consider this the equivalent of jotting down notes in a meeting that you don't want to forget.
Tip 4: Break up your art projects with more art projects
Perhaps controversial, but I find that forcing myself to stay on a single artpiece is the fastest way for me to lose motivation for it. Plus, our brains do like the satisfaction of having finished a project, so we can't deprive ourselves of that for too long.
So we have our staggered "goals"finishedness" goals above. The idea is to plan break projects that won't last more than a day or two. For example, I'm working on a piece that's been going for a month already. On a day that I just feel stuck looking at it, I'll choose to maybe do a design concept art for a different character with just a basic sketch and messy flat colours. This took me about two 1-hour sessions, which meant it was done after a day. After that, I'm back to the main project. When I'm out, I do some physical sketches, nothing coloured or super lined, just new characters again.
Give yourself permission to do other art, with the only rule being don't plan a project that's gonna be just as long. The timing is going to be different for everyone, but no one's keeping track except you.
Tip 5: Draw for yourself
Art is subjective. If you're planning to be a professional artist then you might have to be harsher on yourself, but as someone who draws for enjoyment I implore you to make yourself your biggest audience. You don't have to scrutinise every piece you make. You don't have to wonder whether others will like it. You don't have to heed unasked criticism. If you like it, an enormous goal has already been reached. We are all already our biggest critics. Draw the weird idea and never show anyone. It's fine. It makes you happy. Now go out into the wild and create <3
0 notes
Note
hi hina i have some art related questions! 1) is it easy to go back to an old art style on account of already having drawn in it or do you actively have to train yourself to go back? for example, i notice that your lmhs art style is softer and your current one is sharper (that's the extent of my technical art terms knowledge gomen) 2) which of your own art styles/eras is/are your favorite(s)? 3) do you prefer more stylized or more realistic art styles? 4) are you easily influenced (consciously or unconsciously) by other art styles? i know when i read something i really love, i start to mimic that style in my own writing. 4) do you have any favorite classical paintings? i know the fallen angel is one.
hi mariam!!! sorry it’s taken me so long to this so late fjhdskgdjf i won’t lie some of these questions Stumped me but i will try my best to answer !
it depends? I think a lot of my art style shifts come naturally as the result of growing and improving my skills, so “going back” to an older style might be hard to do without falling back on bad habits that I might have grown out of, or simply things that i no longer think look good. i don’t think i would have to train myself necessarily because the muscle memory is still there, but i might have to stop myself from wanting to Improve aspects of the style in ways that might fundamentally alter what made the style recognizable in the first place. in terms of the lmhs art style, or the soft/sketchy look i was using at the time, that specifically would be pretty easy to go back to I think, since it’s basically a slightly cleaned version of how my art looks early in the process :> i would just have to take a clean sketch + add colours w minimal shading, skipping the lineart and intense render
it feels like a copout to say but i love where i am now :’> from what i’ve seen it’s almost like. a gag among artists of arcane being a catalyst fr drastic art improvement but it IS . everything about the art and animation in that show inspires me so much and it’s been great taking what I like from it and trying to mimic and adapt it into something that suits how I like to work. even though it’s frustrating that I take longer to finish a piece, I really am so happy i’m back to painting i’m so proud of my current render and anatomy and use of colour. i think i’ve finally found a good balance of textures as well and overall i’ve just been having so much fun pushing myself into new brushes and finding new ways to use old ones :D
i think i’m somewhere in the middle but leaning more into realism, especially when it comes to the way I colour. obviously there are aspects that I stylize to suit my needs but especially in terms of Other Anime Art i’m aware that I fall more on the realism side of things lol
yes omg i’m so easily influenced and that constant influx of new inspiration and learning how to adapt to it is one of the things i love most about drawing and making art!!! i kind of mention this notion in my lil gush about arcane but i LOVE looking at other artists' works or at things that inspire me and picking it apart in my brain to see what/how i can use it! i got into art by “copying” and even as i’ve grown into being comfortable enough to make my own stuff, I think that there is always value in learning from what you love and figuring out how to make what you love about it your own. maybe it’s not that deep bc i draw anime fanart but art fr me is an amalgamation of every piece of media ive loved and of everything i’ve ever found beauty in
i do love the fallen angel painting but tbh i don’t think classical art occupies a very big place in my brain fhjdskgfj my knowledge is sadly lacking :< i like claude monet and roberto ferri’s work a lot but overall i think modern art and media means a lot more to me in terms of where I draw my inspiration from
11 notes
·
View notes
Text
This Week In "Time & Again" #11: Still Colouring, And Some Distractions
So... I have a few internet-posting goals for the close future. I know that I keep saying that all the time, but - since I'm an interwebs hermit, and I've been this way for, like, at least 10 years of my life now (and I have zero regrets 😁) - going online to post something takes an enormous mental effort from me. This is probably what happens when ageing, too. Every time I think about that, I just feel like those dogs from the funny videos who are being scolded for doing something their two-legged companions do not appreciate. So, basically and in a nutshell, this is my face when I think about going online to post stuff:

(source: https://makeagif.com/i/UyVZCW) And after all... why would I distract myself from work anyway? 😁 However, I really want more people to get acquainted with Lothar and Jeanny, and Edgar, and Winston, and Beatnik (oops, giant spoilers), and Daniel (oops, even more spoilers), and all of those other weirdos that our violent lovers meet on their strange path towards happiness (hopefully, because, truly, sometimes it's very difficult to say). So this is something that must be done eventually, so I will persevere😁💪 Rolling up my sleeves already!
Anyways, we know that Valentine's Day is coming! And I already have an artwork prepared to be uploaded very soon. Since in December last year I skipped a Christmas and New Years artwork, breaking my own good tradition and ever so slightly ruining a nice progression in the completion of my "2023 Pre-Christmas To-Do List", I figured I really should not delay with this one. And after all, everybody likes a little bit of spicy to set the mood for the upcoming Valentine's Day 😉 (and most of my Valentine's Day artworks are usually nothing short of "spicy" 😁 well, because they have to be that way).
I also made a totally random artwork, because I wanted to practice drawing certain something, a design element I would love to incorporate into my art style - so I came up with an idea to draw a parody of sorts. And it makes me really happy. It felt... rather refreshing. It gave me extra energy and happiness that I could use to continue working on the colouring for the actual chapter. Working so hard on the chapters of "Time & Again", I almost forgot how it feels to draw something random. Or something out of canon. Something simply for the fun of it. Many years ago most of my artworks used to be random and they were dedicated to random, various things and sometimes people. It was good. Now, since "Time & Again" to me is no less that a self-invented job (yeah, pretty much, for better or worse), I almost never do random funny and cute arts anymore, nevermind my greeting cards store had no updates from last year whatsoever... "Time & Again" might sound like a sort of obsession - but that is merely because I really, really, REALLY want to finish it up as soon as I can, because everyone should know what happened to Lothar and Jeanny and how they manage. Even if the confusion about the timelines still persists - but it's twice as fun this way! 😁
A fun observation: there's something in Lothar that I absolutely hate colouring! And the thing is absolutely essential to that particular dirtymouth individual! And the thing is... His glasses. Don't get me wrong! I love his glasses, the way they match his appearance, and that tiny bit of extra sexiness he magically acquires when wearing them. But dear goodness gracious, boy do I ever hate colouring them! 😤 It usually takes me at least 3 layers (lineart inclusive) to colour them, and then I have to arrange all the layers in the proper order. If the rest of the colours - including the skin and the clothing, but excluding special shiny/textured surfaces, if present - take me only one - ONE! - puny layer to make everything as it should be, then the glasses alone - that effing pathetic piece of... accessory! - take at least 2 layers of colouring. 3 with extra shine. Duuuuh. And they appear on every each panel with Lothar, because he wears them all the time. Geez, man! I hope sometime in the future that hot yet disgusting guy gets himself a pair of smart contacts with the built-in voice activated UI overlays. I'm sure he's rich enough to afford such a gimmicky thing. That will free me from a lot of extra work!.. (imagining things? entertaining my designer's hunger? foreshadowing? who knows?!?!;)))
... Which lead me to another one thought about the simplification of the colouring process. You see, with the colouring the way I do it, there's a lot of "automatic" work that is not really creative, one might say. I just need to fill the certain areas of the lineart with a certain colour and remove all the unfilled pixels afterwards... which is just a process of clicking, selecting areas and colours, and filling those areas with the right colours. And it's... kinda tedious. And monotonous. To be 100% fair, it's getting old fairly quickly. Now, shading and adding lighting effects is totally different. But filling the areas with the plain, flat colour prior to applying the shading... is incredibly "mechanical" to me. And my idea was... an AI program to do that. YES, YES, I KNOOOOW YOU'RE EITHER TURNING YOUR BACK ON ME NOW OR DOING THE ROBERT DOWNEY JR. MEME FACE after hearing (reading?) what I just said. I know the whole world just split into 2 groups of people who say either "AI yay!" or "AI nay!". Because, well, you see, human beings really enjoy disagreeing with each other, so there always has to be a reason (says I, cynically). My experience with AI is fairly limited as of now, but as a computer nerd - and a wife of yet another one computer nerd, for the full picture - the new technology mesmerizes me. I was shocked when ChatGPT named me the game I had trouble remembering the title of simply by my extremely vague (and partially wrong!) description - and it did it right off the bat, from the first try. I was utterly mind-blown. We've already heard a lot about AIs ruining the artists' works and yada yada, and we're not gonna touch this topic right now. But since AIs are capable of manipulation with the visual material, then why not teach it to automate the rather tedious processes in creating art while still keeping the essential "human" involvement intact? I would definitely use some nice program to automate the "select and fill, rinse and repeat" part of my work on Chapter 5 and potentially all the future chapters. An algorithm that would recognize the characters by their facial/bodily features and automatically colour them according to the colour scheme I created earlier (so, no random green hair if the character is blond, and no brown eyes if the eye colour must be blue, for example). Or something along the lines of that. Dammit, that would really make the work of the human artists so much faster whenever needed! I vote for this! I will hope from now on that somebody makes me a Krita extension with such a functionality now 😁
Deary me! I can't believe this actually happened! Sorta!.. I think this might be potentially the shortest blog post that I've written IN YEARS!.. Wowza! Apparently I can do that when I'm not trying, haha (but isn't it always this way?..😑 come to think of it, shopping works this way, too: when you're looking for something specific, you can never find it anywhere around!)
Sorry, no gifs today (aside from the funny dog one above). Moreover, when I looked into my screenshots folder, I have discovered that I did not take any this time while I've been working on the colouring like mad. This is sad, perhaps... So let me fix this! Here's a random screenshot that is very difficult to unsee, and it makes me super, super happy - especially considering what's actually happening in the story while Lothar is so... high? (would that be the right word in this situation? 🤔 man, sharing screenshots of random panels from the comic out of context is fairly odd)

... And now, I disappear into my little and comfy tree hollow, ruffling my feathers, so that I could work more on Chapter 5. Gotta make it stellar, after all! So I need more time in my tree hollow! Silky smooth! (ok, I start to get carried away associatively, so I better stop. Bye! See you soon in the next update!.. ah daaaaw, the next blog post! 👋)
0 notes
Text
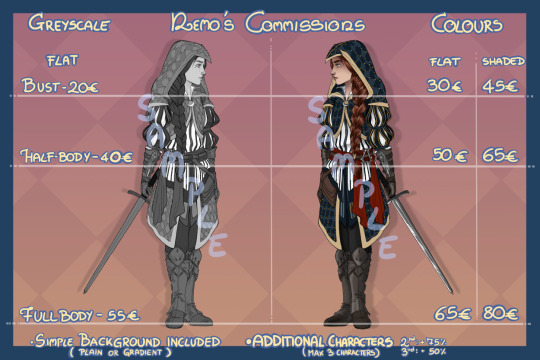
COMMISSIONS OPEEEEN!!!
Hi there, everyone!
So I finally decided to open my commissions and after tinkering a little, I finally figured out how to make a proper post.
I decided to open 6 slots to begin with, and it will work on a FIRST COME FIRST SERVED basis!
So, before contacting me, be sure to read EVERYTHING thoroughly.
PRICE LIST:
WILL DRAW:
-Your OCs
-OC Characters Design Ex Novo
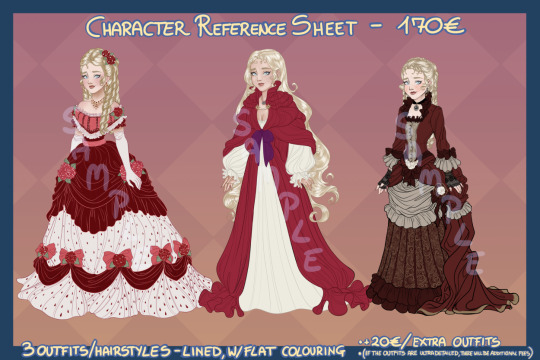
-OCs Character Reference Sheets
-Canon Characters
-Fanart
-Ship Art (only between two adult characters.)
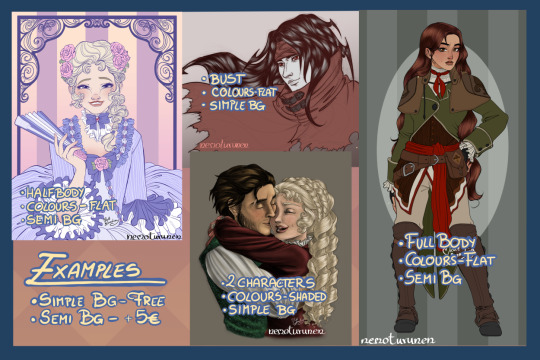
-Simple Backgrounds (flat colours, gradients, or simple shapes)
WON'T DRAW:
-NSFW
-Realism
-Complex Background
-Mecha
-Gore
-Hate Art
RULES:
I retain the right to turn down any commission that would make me uncomfortable (before payment);
When Commissioning me, you agree to my terms and policies;
Your Commission is to be used for PERSONAL USE ONLY;
Payment is done in PAYPAL ONLY and in EURO (or the equivalent in AMERICAN DOLLARS);
Payment is done upfront and won't be refunded UNLESS something happens on my side that renders me unable to finish the commission. If for whatever reason I find myself unable to finish your commission, you will get a full refund, and that’s THE ONLY CASE a refund shall be issued back;
For Commissions over 80 Euros, 50% of the payment will be paid upfront and the other 50% after you receive the finalized sketch (there is to say, before I move on to do the lineart and colouring);
Any addition/changing AFTER we have agreed on the finalized sketch will entail additional costs;
When drawing your characters, I will need CLEAR VISUAL REFERENCES, for both the pose and the physical appearances, especially if the characters have a complex design (examples: mood boards of your character, other artworks of your characters, a 3d render, a face claim (tho, in that case, I will try to capture the resemblance WITHOUT copying the IRL person), etc, etc. Pinboards on Pinterest are useful to me to get an idea of what you want, but not nearly enough for me to fully understand your design). If you won’t provide all these references, I will automatically assume that this falls under the category of “Costume Character Design”, and the fees will be adjusted accordingly (Original Price + 30% of it, since I will have to craft the characters. However, while discussing your commission, I will tell you right away if the references are enough or if I need more, so you won't end up with any unexpected surprises).
Due to the fact that I am a mom and also working a part-time job on the side, I will estimate the artwork to be ready (after the full payment) in a period of 2-3 weeks, during which I will send you constant updates. If there is any delay, I shall notify you in that regard. (This applies to normal commission. If you commission me a Character Reference Sheet, the time will extend between 4-5 weeks);
Once the artwork is complete, I shall send you the high-resolution PNG/JPEG format to your mail;
I will retain the right to post the finished commission on my art page unless agreed otherwise;
If you are interested into commissioning me, feel free to contact me at my email address [email protected] , with the Object being
"Commission". Contact me only if you are interested in Commissioning.
NO DMS HERE ON TUMBLR.
In the Email, make sure to include:
-Commission Type and Background of Choice;
-Character Visual References;
-References for both Pose AND expression, if you have anything in
particular in mind;
-Your Paypal email in order for me to send you your invoice;
-Your Tumblr Handler, so I know who I am talking to;
Please, consider reblogging this even if you don’t plan to commission me! I can use the help! <3
Thank you so much for your consideration!
--Nemo
#Commissions#Assassin's Creed#Final Fantasy#Art Commission#Commission Sheet#OCs Commissions#Historical fashion#fashion#original character
83 notes
·
View notes
Text
CW this is a huge ramble but this is a blogging platform so I’m just going to ADHD my thoughts everywhere
I've been thinking a lot about 'artistic talent' recently and what it means to me.
As a kid, I don't know; I wasn't what I'd call naturally gifted with art? Right from age 5 up to my early teens - I loved art, I drew constantly, I wanted so badly to be good at art. I grew up without a computer or art programs for the most part, partly because of how old I am and partly because we didn't have a lot of money. My parents could afford paper and cheap art materials, but that was about it - definitely no time or money for any kind of formal training.
There were kids in my first art classes with way better technical skills, better knowledge of anatomy and proportions, lighting etc etc. But I never got the impression they were as passionate about it as I was.
My first art teacher only seemed to have time for his male students that had those technical skills. I remember very vividly watching him enthuse over my male friends work, holding it up for the rest of the class to see - and me just sitting opposite him, drawing my heart out desperately, producing and producing and trying my best just desperately craving that same attention.
But he never had much time for me despite how obviously enthusiastic I was. Even when I assertively asked for his feedback, he was overly critical and just seemed frustrated by what I interpreted as this lack of innate talent some of my peers had. He never actually taught me much.
My disabilities held me back too - my undiagnosed ADHD made art tutorials I found online dull and difficult to follow. My perfectionism made creating even more frustrating (any other ADHDers with the irony of also being a perfectionist as you miss out glaring details as you’re rushing to finish something?). As online communities became more accessible I tried to join them and befriend other artists; but my skills were juvenile and frankly, I was super young and super annoying, so I didn’t get much of the creative community and feedback I craved a lot. When we did have a computer at home I could use, we couldn’t afford any digital art programs or tools, I just drew with a mouse in MSPaint and did so for a long long time. If I wanted to do lineart, eventually I started sketching on paper, scanning it in, and then painstakingly cleaned it up by erasing with a mouse so I could colour it.
I did befriend one artist eventually, who is still my friend today - she’s a little older than me and is incredibly technically talented. Her dad had art skills himself and taught her, and these days she’s won awards for her wildlife illustrations. She tried to help me and taught me more in one lesson on lighting and shading than my art teacher had done in 2 years. But comparison is the thief of joy and I just felt mournful comparing my art to hers. What was the point in trying to be an artist if I was never going to reach that level of skill?
Now I’m older I realise more where my friends skill came from. Her dad never had much time for her - but he would spend time with her and talk to her about her art. He was very overly critical to his own child and she so badly wanted to get his approval and spend time with him that she channelled absolutely everything into her art. But that never occurred to me when I was younger - I didn’t think about the lack of opportunities I’d had, or the circumstances of the artists I envied for being so much better than I was. I just felt so incredibly hopeless, disappointed and frustrated at myself.
Eventually that all stopped me from creating art entirely, for years. I just gave up. I didn’t start trying to create art again until very recently, a few years ago; after I finally managed to escape an abusive relationship and used my creative skills to help me work through what I now know was the beginning of my PTSD.
I guess the point of me writing this other than just wanting to purge my thoughts, is the hope that maybe somebody else might read this and see their own fraught experience with creating reflected in my own journey, and feel a little less alone. Sometimes it’s easy to think other creatives have a journey of sunshine and rainbows, but mine has been anything but.
I still struggle with a lot of these feelings - I still feel as though I’m lacking some magical spark of illusive 🌟tALEnt✨. It’s all been made worse by the many, many years where I just didn’t draw at all out of hopelessness and shame, and therefore fell even further behind where I feel I should be by now. But I managed to get that passion back and I use that to keep myself going; I remind myself all the time of how much I lost in those years where I just gave up. I constantly drive myself to improve and try to ignore how small my follower count and notes are. It’s still frustrating, still disheartening at times. But I’ve come so far and intend to keep going further ♥
#Betho Speaks#I mean essentially I wanted to be good enough at art that I could depict my blorbos. And the blorbos of people who can't art themselves#And I've maybe managed to get that far but I've still got a crazy drive to keep gEttInG bEttEr#if you read all this mess well done JBJKG.
17 notes
·
View notes
Note
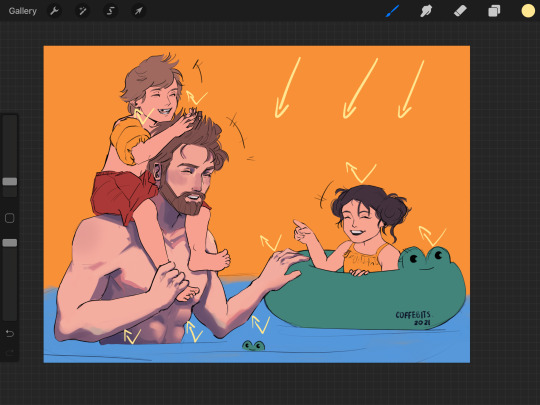
hello !! i'm absolutely in LOVE with your art and i wanted to know how did you colour and choose your colour palette (especially the skin,,,) in your latest uncle obi post ? 😳👉👈
i dunno how to explain but there's that soft yet sharp?? pink glow that contrasts with the skin tone and the blueish-shadows and it's so so pretty...
plz continue to make beautiful art and take care of yourself 💖
AAAA TYSM 💖💖💖 I’m literally the worst explaining these things tho :’) I’ll try my best :’o
Also little disclaimer before starting: drawing is just my hobby so I’m not posting this as a tutorial (?) this is just to show you my process aaaa, I’m sure a professional would help you a lot more than me with this but I hope I’m able to help you in someway 💖💖💖) (also, I know someone else asked me about my drawing process a while ago, it had to do with shading, lighting and color picking, but I wasn’t sure how to respond until now aaaa, sorry about the delay 😔, I’ll answer both questions here)
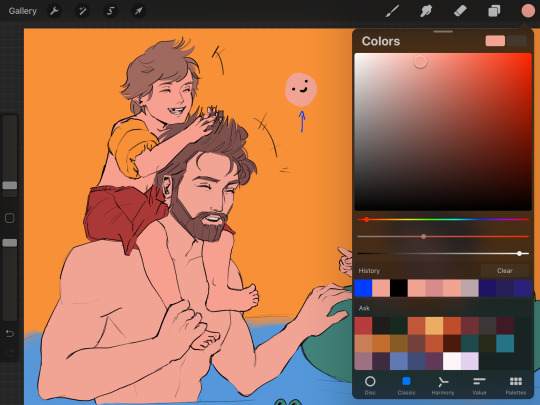
Ok, so first of all, I choose my background color :0. Background colors affect how your eyes perceive all other colors so it’s very important for me to start with that (like white background makes you choose whiter (?) or less saturated colors. Red background: redder colors, etc)
When I want a white background, I tend to use another color at first and then when I’m finished, I change it back to white just because most of the time my colors are not that good when I’m painting on a white canvas.
This drawing, for example, I painted first on a yellow background and later I changed it to white :) (this also applies to complex backgrounds... I always start with painting the background)

Then I open a new layer and place base colors :). I pointed out the color I used on Obi’s skin :)...
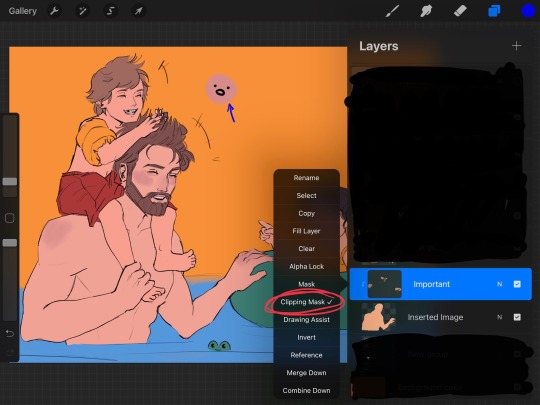
Now I open another new layer, set it to clipping mask and I paint a little bit of blush here and there on the skin with the standard round brush on approximately 40% opacity. I also use the same color for the lips :). (I covered up stuff that is not necessary with black to not confuse you lol 💖)
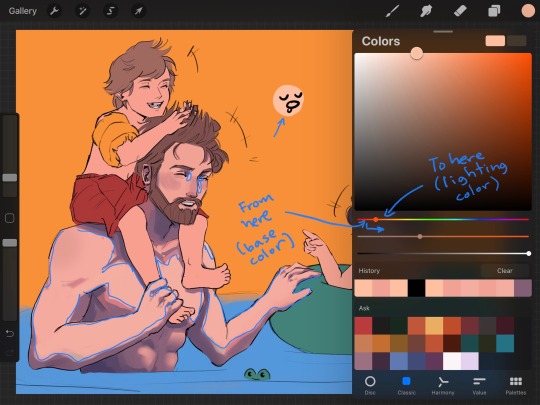
Now here’s where the fun begins :D... I have two things I apply to pick shadow colors and light colors
1. First I pick my “most common” colors (these would be the purpleish/blueish for shadows and kind of a yellowish tone for light, I circled them with blue on the pictures) but how did I got to these? (This might sound so stupid but it works for me lol) (look at the pictures below to understand better 😂) When I want to pick a color for shadows, I slide the color picker to the left, and if I want to pick a color for lighting, I slide it to the right :D ISKDMDKKF LOL Yes you read well aaa it doesn’t always works but 90% of the time does lol, if I’m using pretty “normal” lighting like this one on a drawing, works perfectly 😂
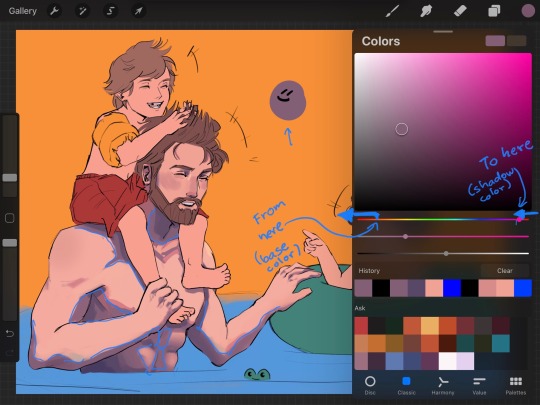
There’s no rule for me to know exactly where to “stop sliding” lol I just test how it looks and also play around with saturation a little. I must poin out, I never use the same color on all shadows (like a solid cell of color) I pick more tones of purple/ blue for shadows and more tones of yellow for lighting to put in there so it looks more natural. I use the airbrush to help me with that as well as the round brush.
2. So this is what really makes it look good. First some VERY short theory to understand why I do this and to help you apply it on other things. Light can not only come from a direct light source (like the sun, a lamp, fire, etc), light bounces, and when it bounces it kind of “brings the colors with it”
The arrows are pointing the direction of sun light. See what it does?
So when I’m coloring, I pay attention to the surroundings. In this case, light bouncing from the water, light bouncing from the green float tube, light bouncing from Luke’s red shorts, etc, all coming to Obi’s skin. Adding these, imo, makes everything look awesome
Of course, as the light bounces more and more, the colors become less saturated. Let’s take the light coming from the water for example. How do I choose the right color to paint this light on Obi’s skin?: I go to the blue tones and I just pick a very desaturated tone :), with the help of the standard round brush with approximately 40% opacity, I put a little bit of blue tones where I believe this light will hit the skin (circles with blue⬇️)

*Red circle is showing where the less saturated colors are*
This drawing was made kind of fast lol, so I didn’t really pay much attention to this here, but other drawings of mine show this better :0.
The “pink glow” you mentioned is something that I like to add to separate light from shadow :) you can see it above pointed in green⬆️ (I just like how it looks aaa)
Finally I change the background color to white.
I also add some freckles to the arms and chest
I add a multiply layer with 40%- 50% opacity and, with a blue saturated tone, I darken some places I wish to be more dark (like the abdomen, Obi Wan’s neck, some parts on the water, etc)
I open another layer set on “add” (15%-20% opacity) and, with a yellowish saturated tone, I lighten some other places like hair, arms, float tube, etc
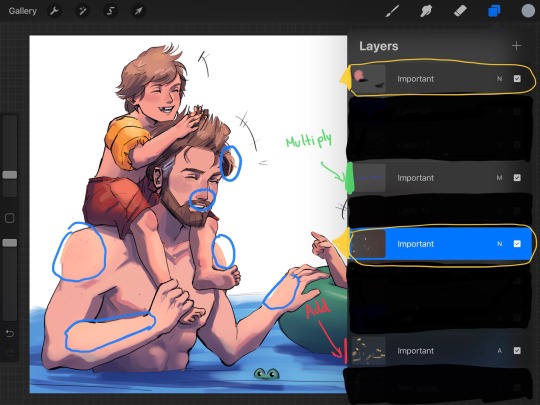
Finally I open a layer (or two) above everything (layers marked with yellow) and I start painting over the lineart where I consider needs some work (I marked those places with blue), sometimes I also add texture with other brushes in this layer too :0.
And that’s it oof lol, hope it wasn’t too long ;;; also ignore grammar mistakes aaa English is not my first language :’D
#obi wan kenobi#art process#ask#artists on tumblr#my art#coffe chats#hope it’s not super confusing :’)#coffe art
274 notes
·
View notes