#small square pavers
Explore tagged Tumblr posts
Visit Tumblr Blog
Explore Tumblr blogs with no restrictions, modern design and the best experience.
Last Seen Tumblr Blogs


Fun Fact
Tumblr was named as a finalist in Lead411’s New York City Hot 125 in Aug 2010.
Photo

Chicago Traditional Patio Small elegant courtyard brick patio fountain photo with no cover
#intimate courtyard#spiral staircase#brick curbing#small square pavers#brick planter#small garden#decorative fountain
0 notes
Text
Chicago Traditional Patio

Small elegant courtyard brick patio fountain photo with no cover
#intimate courtyard#spiral staircase#brick curbing#small square pavers#brick planter#small garden#decorative fountain
0 notes
Photo

Modern Exterior Hip roof on a large, minimalist beige, two-story stone house.
0 notes
Text
Asian Landscape - Landscape

Summertime photo of a medium-sized, fully-shaded, concrete-paved Asian backyard.
0 notes
Photo

Asian Landscape - Landscape Photo of a mid-sized asian full sun backyard concrete paver landscaping in summer.
0 notes
Text
What Is the Purpose of a Patio?
A patio isn’t just a slab of concrete in the backyard. It’s an extension of your home, a space that blends the comfort of the indoors with the open air of the outdoors. Whether you’re sipping coffee in the morning, hosting a summer barbecue, or creating a quiet retreat from the world, a patio serves multiple functions—and for homeowners in South Bend, those functions can be as varied as the seasons.
So, what exactly is the purpose of a patio? Let’s break it down.
Expanding Your Living Space (Without a Pricey Renovation)
If your home is feeling a little cramped but the thought of knocking down walls makes your wallet cringe, a patio is a game-changer. It acts as an extra room—just without the four walls. You get additional space for entertaining, dining, or relaxing without committing to a major (and expensive) remodel.
For families, that means more room for the kids to play outside. For homeowners working remotely, it’s a perfect outdoor office where you can soak up some fresh air while typing away. And for retirees, it’s a peaceful spot to enjoy a good book, away from the distractions inside.
A patio is the easiest way to make your home feel bigger without actually adding square footage.
A Gathering Place for Friends and Family
Ever noticed that no matter how big your kitchen is, everyone always ends up crowding in the same spot? A patio shifts that dynamic by giving guests a reason to spread out. It’s an ideal place for get-togethers—whether it’s a casual cookout, a birthday party, or just an evening around the fire pit.
For homeowners who love to entertain, a well-designed patio with cozy seating and string lights can turn any night into an occasion.
For families, it’s a go-to spot for summer dinners or weekend brunches.
For local businesses, cafés, and restaurants, outdoor seating is an attraction all on its own.
A patio naturally draws people together, making it one of the most social spaces in a home.
Connecting You to Nature (Without the Bugs)
There’s something special about being outside—feeling the breeze, hearing the birds, and soaking in the sunshine. But let’s be real, South Bend isn’t exactly known for year-round perfect weather. And mosquitoes? They don’t care about your patio dreams.
That’s where screened-in patios or sunrooms come in. They let you enjoy all the benefits of outdoor living—minus the pests, harsh sun, or unpredictable Midwest rain. For people with seasonal allergies, an enclosed patio is a lifesaver, offering fresh air without the pollen.
And for homeowners with pets, a screened patio gives furry friends a safe place to lounge while keeping them protected from wildlife or busy streets.
Adding Value to Your Home
Thinking about resale value? A patio isn’t just a personal luxury—it’s a smart investment.
For real estate investors, property managers, or anyone looking to sell in the future, a well-maintained patio is a selling point that stands out. Buyers love the idea of move-in-ready outdoor spaces, and in South Bend’s suburban and rural areas, a great patio can boost curb appeal.
Even if you’re not planning to sell anytime soon, adding a patio increases your home’s usable space, which means it’s already paying off in the present.
A Relaxation Retreat—Your Own Backyard Escape
Life gets hectic, and sometimes you just need a quiet corner to unwind. A patio can be that spot—a personal retreat right outside your door.
Picture a morning routine with coffee on a cozy outdoor sofa.
Imagine an evening unwinding under twinkling lights, wrapped in a blanket.
Think about a small garden oasis, complete with potted plants, a fountain, or even a hammock.
For seniors, a patio can be a peaceful, bug-free space to enjoy fresh air without the effort of going out. For DIY enthusiasts, it’s a fun project waiting to happen—customizing the space with pavers, planters, or even a built-in firepit.
A patio turns your backyard into a retreat, giving you a reason to step away from screens and just be.
Extending the Usability of Your Yard—No Matter the Season
South Bend weather has a mind of its own, but that doesn’t mean your patio has to sit unused for months. With the right setup, you can enjoy it year-round.
Spring & Summer: Pergolas or retractable awnings provide shade, and outdoor fans keep things cool.
Fall: A fire pit or outdoor heater extends patio season well into the crisp autumn months.
Winter: Enclosed patios or sunrooms let you enjoy the snowy scenery without freezing.
Adding weather-resistant furniture and outdoor rugs helps too—because a patio doesn’t have to be a summer-onlyspace.
A Functional Space for Any Lifestyle
At the end of the day, a patio is what you make of it.
For homebuyers, it’s a customizable space ready to fit their vision.
For gardeners, it’s a stepping stone to a greenhouse-style sunroom or outdoor plant haven.
For vacation rental owners, it’s a major draw for Airbnb or Vrbo guests looking for a home with character.
For local businesses, it’s a chance to offer customers an inviting, open-air experience.
Patios aren’t just about relaxation—they’re about making a home more functional, inviting, and enjoyable.
So, What’s the Purpose of a Patio? All of the Above.
A patio is more than just an outdoor space—it’s an extension of your lifestyle. Whether you’re hosting, relaxing, working, or simply enjoying a breath of fresh air, it adds value in more ways than one.
For homeowners in South Bend, a patio isn’t just a luxury—it’s a smart, versatile addition that makes life better, one season at a time.
And if you’re thinking about upgrading your outdoor space, Screenmobile South Bend can help you create a patio that fits your needs perfectly—whether that means screening it in, enclosing it for year-round use, or designing something entirely unique.
Don’t wait to make the most of your outdoor space. Start planning your perfect patio today.
7 notes
·
View notes
Text
Upon the Eternal Shore: An EPIC the Musical Fanfiction (Chapter 5)
Snippets of the 7 years Odysseus spent with Calypso.
---
CONTENT WARNING: heavily implied r*pe, non-con, victim-blaming, emotional abuse, PTSD, descriptions of violence. Please consider before reading.
---
Day 705
-
The majority of Odysseus’ days recently had been spent remeasuring the cliffside. He had long since accepted that this would be one of the more inexact parts of the map, given the impossibility of properly measuring and recording the jagged rocks and steep overlook above them. For one thing, he had been entirely unsuccessful maneuvering his log in between the stones. They were far too uneven- and his aerial view from the cliffside itself offered a decent enough idea of what it looked like from above. Enough to etch it in, anyways. But recently, he'd designed a more flexible measuring system. A series of rope, tied together in a net. Every square measured a half-log by half-log. It was hard to maneuver, harder to keep straight- but it was much more flexible for certain landscapes. It helped him clean up his depiction of the river’s bend, and it was a new tool for his ever growing arsenal.
Today was a break from the rocks. Instead, he'd taken to extending his hand dug-perimeter so that it cut through the center of the island. He was partially concerned that his measurements were off- resulting in his lack of progress. Forming a center line would at least give him another point of reference. Still, it would take hundreds of holes, each a few logs apart. Weeks of work.
The sun was slowly melting down the sky when he finally allowed himself an opportunity to rest for the day. Digging was always especially hard on the body- and he'd been doing it with such a ferocity that he'd practically blinded himself to just how bad the pain had gotten. His back was rigid and achy, his hands practically numb to sensation.
He fetched his map from nearby and allowed himself to sit down. The gentle breeze of the island tugged at the smallest of tears at the corner of the page. He peered down, letting out a slow exhale.
He let his eyes close for a moment. He was so very tired. He recalled an afternoon in Ithaca, when he'd helped lay the foundation for Penelope's garden outside of the palace. It had been meticulous work, ensuring every paver was completely level. He remembered looking down at his hands coated in calluses and caked in mud- how proud he had felt. It had been an honor to dirty his hands for her- to use his own sweat and labor to bring her joy. He had planted her the most beautiful orchids in the world.
The orchids on Ogygia brought him no such joy. As his eyes fell on the small representative feature on the map, he felt nothing more pleasant than utter indifference.
But as he stared at the symbol, he felt his chest grow tense. The garden, sketched in by his very own hand, seemed to form the letter “T”. It was hard to see at first. The end of the letter was spindly and faint, where the flowers ended at a stream’s edge. But sure enough- the flowers formed the shape of a long line, cut through by a shorter one.
His breath hitched. He bent over, narrowing his eyes at the paper.
Above it, to the left, the edge of a forest- an “L”. Unmistakably! A long, thin stretch apart from the rest of the forest by a few log measures, separated distinctly by a pathway. He hadn't considered it before, had naively overlooked it, but he saw it now.
Excitement grew in his stomach as he continued on, sprawling over the papyrus. Where a small bridge crossed over the river, an “X”. Where the river dipped down, a “U”.
“XLTU”. It didn't mean anything, not yet. He was missing letters, neglecting them somewhere. He felt his heart begin to race in his chest, beating so loudly it interrupted his thoughts. “P”, where the spring was- if one counted the road next to it. “P” for Penelope, he was so close to her, now. And an “H” beside it, the shape of a valley in between the hills. “E”- the jagged shape of the cliffside, jutting in and out. It was becoming so clear, now. He just hadn't seen it. He'd been too tired, too distracted to see it before.
“XLTUPHE”. Incoherent still, but closer. He could feel it, deep within his gut.
He wrote the letters in the sand, hands trembling. Something was still off. The “P”- perhaps a “T”, instead. The road, ignoring the spring. XLTUTHE
He sat the paper down on the sand, terrified he'd accidentally tear it.
Another “E”- the contour of the sand along the grass in the northwest- and another where Calypso grew fruit trees. The “U”, nonexistent- the river dipped too much, too unevenly to count it. He scribbled out his letters in the sand as he continued, writing out the new approximation.
“EXELTTHE”
He felt the air leave his lungs. EXELTHE. One extra T, but that was no matter, he'd contrived another by mistake. It said EXELTHE, clear as day, hidden in the contour of the landscape. “Exelthe”. “Go forth”. A command. A simple, but now painfully obvious solution. The answer. The key.
He could hardly catch his breath. Joy rushed into his body like a tide. The gods had been testing him for years- but he'd proven himself worthy, yet again. His wit had cracked the puzzle of Ogygia. He had won.
A laugh bubbled in his chest, trembled out of his lips. He'd done it. He snatched the map from the ground, quivering with anticipation. He attempted to stand up so quickly that his heel slipped in the sand and he fell. He laughed at the error- effortlessly laughed for the first time in years.
“Calypso!” He cried out, glee married to his voice as he sprinted through the sand. She was further down the beach, still in eyesight, preparing supper over the fire. His vision blurred as he kicked up the sand behind himself, holding the map like a fragile vase he was afraid to break.
He trembled with excitement as he ran towards her. A grin crawled across his face, pure delight rippling through his chest. “Calypso!” He cried again.
“Odysseus?” Calypso greeted him, standing and turning from the fire in front of her. She looked perplexed by his expression- by the look on his face, but he didn't give her the time to question it.
“I did it!” He announced feverishly, holding the map forward proudly. “It was a game- always just a game! And I solved it, Calypso!”
She looked back at him, feigning confusion. He laughed. “Don't play dumb- exelthe!” he said, pointing to the “L” of trees. “There's the L- and the T- I found all of letters-” he squinted, trying to remember where the second “E” had been hiding. “But I found it- see- there's the E!” He traced the letters where he found them, looking up occasionally to see her face. For once, he wanted to see her face.
“What are you talking about?” She asked carefully, her face contorted into a frown.
“You aren't looking at the map-” he tsked, shaking his head quickly. “Look- look, Calypso- it spells ‘exelthe’- now you have to say it!”
“What?” She narrowed her eyes at the papyrus. She bent her head down. She was playing him for a fool, hoping he hadn't really found the puzzle.
“Say it!” Odysseus insisted, his voice raising in volume, every word trembling out of his lips. “Say it! Say ‘exelthe’! SAY IT!” He was yelling now. He couldn't help himself. His entire body shook wildly.
She didn't say anything at all. Her eyes only met his’ again, big and sad. She looked as though she finally understood something. She looked as if she wished she didn't.
But she was cheating. He'd won, and she was refusing to admit it. He reached out, grabbed her wrist, yanked it desperately. “You're not saying it, because it'll let me go! It'll let me go home! I figured it out fair and square, Calypso! Say it, and- and I can go! It's too perfect! Look, it says it right there!” He shook the map in his hand, gripping her wrist tighter yet. “You're just not looking at it right, tilt your head-” he moved his other hand, took hold of her jaw, shifted the map.
She didn't respond. Tears welled in her eyes, but her tongue remained mute. She didn't pull away.
“You put those damn letters there!” Odysseus cried, his voice raising an octave. “You left that message, and now you want to take it back because I figured it out! Say it, damnit!” He dropped the map, took hold of her shoulders, shook her.
Calypso’s voice was cautionary and soft. “...I can say ‘exelthe’ if it pleases you, Odysseus-” His breath hitched when the word left her mouth. The code word- the solution- spoken by the goddess herself. He looked around wildly for some consequence of it. A ship, or a clearing in the water, or some sort of sign. The sun glistened the way it always did. The clouds looked all the same. It was the all too familiar island, without change. “...But there's no… puzzle here. There's no game. You haven't found anything. Whatever you’ve created in your mind- it's not… real.”
He let go of her shoulders. He picked up the map. His vision blurred. The world felt as though it was slowly tipping- tipping over. He tried to find the letters again. They weren't as clear, now.
“It's not… real?” he repeated softly. “It's not… You're just saying that, aren't you? You're just tricking me…?” The enthusiasm in his voice had died. He looked back at her, wide eyed and pleading.
“I swear it by Zeus, Odysseus,” she said carefully. A vow. “It’s not a trick.”
A short, cough of a laugh escaped his throat. It wasn't real. Any of it. Any of the patterns he'd found had been merely coincidence or contrived. It was just a map. A highly detailed, pointless map.
“There's no answer.” His words came out in a rasp. His hands trembled on the papyrus. His knees sank into the ground before he realized he was falling.
A shrill, guttural eruption tore through his throat. His own voice echoed in his ears, burning with agony. His hands clutched the papyrus and gripped it- tearing it down through the middle. It was useless. Useless. There was no solution, no letters. He felt the lick of the campfire on the back of his hands- tasted the heat. He turned, threw the scraps into the fire.
“Odysseus-”
“It's not real!” he cried, tears choking out of his eyes, blinding him, spilling down his face. “None of it’s real!” He lunged for the stack of maps sitting against the tree. It never rained, they never soiled.
He threw one after the other into the fire. He screamed again. His body heaved back and forth, like a ship caught in a storm.
He watched every one of them burn. Ink, papyrus, weeks, months, years, curling into ash. The letters that have never existed, the hope he'd forced into existence, disappearing in a matter of seconds. The fire roared, devoured them. He only stopped screaming when his throat could no longer force a sound.
-
Link to other chapters
#epic the musical#epic the musical fanfiction#epic fanfiction#upon the eternal shore#epic calypso#epic odysseus#epic musical#epic!calypso#epic!odysseus
7 notes
·
View notes
Text
So I've decided I want to meditate outside. I need to go outside and be around plants and whatnot on a regular basis but going for walks or walking to the park are often overwhelming. So I'm going to set up a space in the back yard to meditate at.
We have a small square of concrete pavers underneath my gf's ex wife's fire pit that my gf said I could have. I'm going to move them a little out of the way, then use the cardboard + mulch method to kill the grass around my little concrete pad. And then in the spring I'll plant all heal (prunella vulgaris) around it because it's a medicinal plant that's native to here (and the rest of the northern hemisphere) and it's got some research backing up its status as a medicinal plant in every culture where it grows. Plus it's pretty and the flowers are purple.
Won't have a nice patch of it the first year but that's okay. I'm putting down roots! I'm planting plants I'll have to take care of and won't see the payoff of right away! Gives me something long term to look forward to!
In the meantime, I've ordered waterproof fabric to make another (less comically large) meditation cushion so I can at least meditate on the one clear section of the back porch until it gets too cold. I need to spend more time outside and hey maybe the sunlight will fix my sleep problems. It's supposed to help.
7 notes
·
View notes
Text
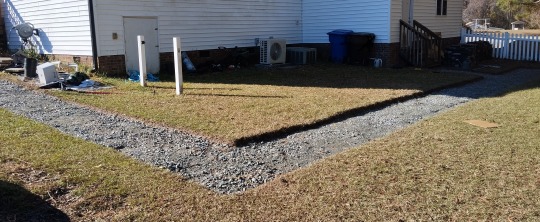
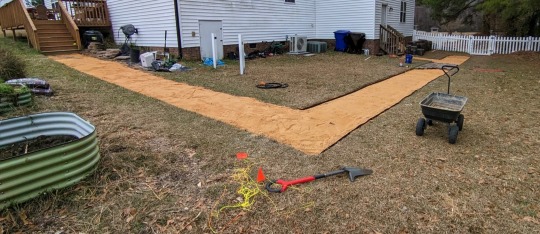
After nearly a month of digging, shoveling, crushing, loading, scooping, bricklaying, and tamping, my path is finally 90% finished
But I ran out of bricks 🙃

The pavers were free from a friend of a friend of a friend, but they were 12" x 5" x 2.5" gray concrete, a size that I can't find anywhere. I'm starting to think they just made these themselves with a frame and a load of concrete.
135 bricks short to cover the whole distance that I was looking for. Definitely the most manual labor I've put into anything at the house so far, but it ain't done yet, and not sure where to go from here.
progress pics:
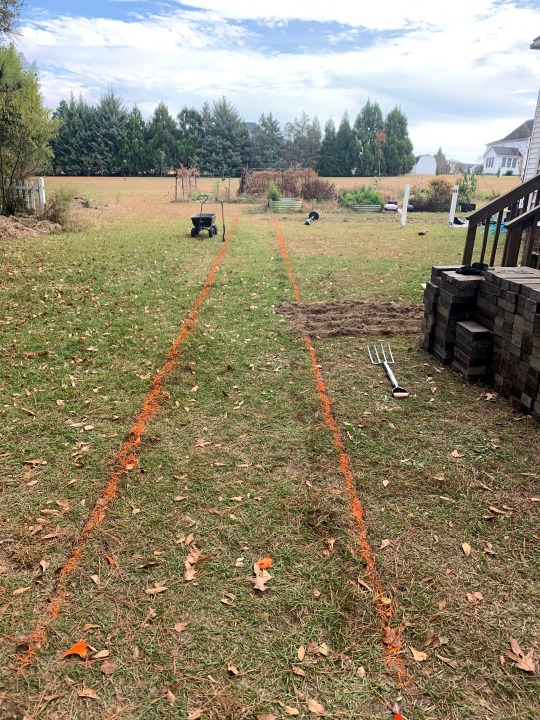

What's more is that the pavers didn't have notches for spacing, so it took forever to level and space each paver, probably triple the amount of time it would have taken for regular bricks. Huge pain in the ass.
If I had to give advice, I'd say find bricks with spacer notches and if money is no object go for the foam paver base. I think they're 12 dollars for 5 square feet so exorbitantly expensive for a larger footprint, but if it's just a small path it's worth it. Shoveling 12 tons of gravel and sand and hauling it around in a wagon is a crazy workout, and getting it 'level' in a yard with a massive slope is a huge pain.
19 notes
·
View notes
Note
For the butterfly thing:
Paisley? I feel like she’d be a moth but

Oh yes, of course! Thank you so much for requesting her! She’s the first leading lady requested for the WK Butterfly Assignments!
I kind of agree with you, I think a moth suits her personality better, but I did find one little gray butterfly, like the ONLY gray butterfly, that I think works for her! So for Ms. Paisley Paver, we have the….
Gray Hairstreak (also called bean lycaenid or cotton square borer) or (Strymon melinus)!


Some cool facts about this amazing little creature below the cut!
1)The Gray Hairstreak is small, just like Paisley herself (which is one thing we all love about her right? She’s a sassy, strong, little bean!) This butterfly’s wing span is only about one and a quarter inches at most, or around 20–32 millimeters!
2)The Gray Hairstreak’s physical features are quite unique. The butterfly earns its name from its unusual gray hued color and it’s wing extensions that resemble strands of hair. As I mentioned at the beginning of this post, it is the only gray butterfly I found in my research! Making it one of a kind like our gray loving Paisley.
3) In their caterpillar form, this butterfly participates in Myrmecophily, which means they they develop a mutual relationship with ants. The ants protect the Gray Hairstreaks in exchange for a sweet liquid emitted by the caterpillars’ “honey gland.”
These caterpillars also are known to communicate with ants through sounds, leading them be called singing caterpillars. The sounds are another component to the ants protection of the caterpillars. So, like Paisley with Rex and her pavers, they are a butterfly that has much help and assistance.
If anyone would like to request any other characters feel free too, see the master list in the post linked above!
#wild kratts#wild kratts fandom#paisley paver#butterfly#butterflies#tw insects#tw bugs#bug tw#animal facts
15 notes
·
View notes
Text
Build Your Own Pool Deck: A Simple DIY Guide in Newcastle
Create Your Dream Pool Deck Today!
Are you tired of lounging around your pool in an uninspiring space? Do you envision a beautiful pool deck where you can relax and entertain friends and family? With the right tools and a little elbow grease, you can transform your outdoor area into a stunning oasis. The good news? You don’t need to hire a contractor to achieve this dream.
Building your own pool deck can be a straightforward and rewarding DIY project. Whether you’re in Newcastle or anywhere else, this guide will help you navigate the process step-by-step, ensuring you create a space that complements your home and lifestyle.
At Decking Gold Coast Experts, we understand the importance of a well-designed outdoor area, especially in a beautiful location like Newcastle. Not only does a pool deck enhance the visual appeal of your backyard, but it also adds value to your property. Ready to dive in? Let’s get started on your DIY pool deck project!

Planning Your Pool Deck
Assess Your Space
Before you grab your tools, assess the area around your pool. Determine the size and shape of the deck you want to build. Consider factors like the layout of your yard, existing landscaping, and the position of your pool in relation to the sun. This will help you determine how much decking material you’ll need and where you want to place furniture, plants, and other features.
Choose Your Materials
When it comes to pool decks, you have several material options, each with its own benefits:
- Timber: A classic choice that offers warmth and a natural look. It requires regular maintenance but can last for years with proper care.
- Composite Decking: Made from a blend of wood fibres and plastic, composite decking is durable and low-maintenance, making it a popular choice for pool areas.
- Pavers: These offer a solid, slip-resistant surface and come in various styles and colours. They are also easy to replace if damaged.
Consider your budget, maintenance requirements, and aesthetic preferences when choosing materials.
Designing Your Deck
Create a Plan
Once you’ve assessed your space and chosen your materials, it’s time to create a detailed plan. Sketch out your design, paying attention to the dimensions. This will help you visualise the finished product and ensure you have enough materials.
Design Features
Think about the features you want to include in your pool deck. Do you want built-in seating, planters, or a pergola for shade? Adding these elements can enhance the deck’s functionality and aesthetic, making it a perfect spot for relaxation and entertaining.

Building Your Pool Deck
Gather Your Tools
Before you start building, make sure you have all the necessary tools on hand. Common tools for building a pool deck include:
- Measuring tape
- Level
- Circular saw
- Drill
- Hammer
- Screwdriver
- Safety gear (gloves, goggles)
Foundation and Frame
1. Mark the Area: Use stakes and string to outline the area where your deck will be built.
2. Excavate: Remove any grass, rocks, or debris in the area and dig to the desired depth.
3. Lay the Foundation: You may need to pour concrete footings for the support posts. Check local building codes for requirements.
4. Build the Frame: Use your chosen materials to construct the frame. Ensure it’s level and square, and use brackets for added stability.
Installing Decking Boards
Once the frame is complete, it’s time to install the decking boards:
1. Lay the Boards: Start at one end and work your way across, leaving a small gap between each board for drainage and expansion.
2. Secure the Boards: Use screws or nails to secure the boards to the frame. Make sure they are flush and level.
3. Finishing Touches: Sand any rough edges and apply a protective sealant to enhance durability if you are using timber.
Safety Features
Safety should be a priority on your pool deck, as it will be near water. Ensure that the surface is slip-resistant, and consider adding railings or barriers if your deck is elevated or if there are young children around.

Enjoy Your New Pool Deck!
Once your pool deck is complete, it’s time to enjoy the fruits of your labour! Set up lounge chairs, add some potted plants, and perhaps even a fire pit to create a cozy atmosphere. Your new pool deck is not just a functional space; it’s an extension of your home where you can create lasting memories with loved ones.
At Decking Gold Coast Experts, we believe that every homeowner should have the opportunity to create their ideal outdoor space. Building your own pool deck in Newcastle can be a fulfilling project that enhances your lifestyle and the beauty of your property. So, roll up your sleeves and get started on your DIY journey today! Your dream pool deck awaits.
For more tips and expert guidance on decking, visit Decking Gold Coast Experts and unlock the potential of your outdoor space!
0 notes
Video
youtube
The Latest Trends in Hardscape Design to Elevate Your Outdoor Space by Brooks Landscaping
Hardscape design isn’t just about your backyard looking good—it’s about creating a space you'll love spending time in. From cutting-edge materials to creative layouts, the trends we’re seeing this year are transforming ordinary outdoor spaces into jaw-dropping retreats. If you’re planning to upgrade your landscape, or just looking for inspiration, here’s what’s hot in hardscape design right now.
1. Sustainable and Eco-Friendly Materials
The spotlight is on sustainability. Homeowners are seeking eco-conscious materials that reduce environmental impact while still delivering style and durability. Think permeable pavers that improve drainage and reduce runoff, or natural stone sourced responsibly. Reclaimed materials like brick and timber are also making waves, adding rustic charm and helping reduce waste.
How to Get the Look:
Consider integrating gravel paths or stone pavers paired with native plants for a minimal ecological footprint. Consulting with professionals like Brooks Landscaping ensures all your materials are both beautiful and environmentally sound.
2. Multi-Functional Outdoor Spaces
It’s all about versatility! Outdoor spaces are being transformed into multi-functional areas that can seamlessly transition from cooking to relaxing to entertaining. Built-in seating, outdoor kitchens, and fire pits are must-have features this year. The idea is to make every square foot work harder while boosting the comfort and usability of your space.
How to Get the Look:
Focus on zones. Divide your backyard into dedicated spaces—like a dining area with a pergola, a lounging nook with a fire pit, or a small putting green for the kids (or yourself!). Retaining walls, expertly designed by pros like Brooks Landscaping, are perfect for creating defined areas while adding architectural appeal.
3. Modern Meets Minimalism
Clean lines, simple shapes, and uncluttered designs are stealing the show. Modern hardscapes emphasize sleek materials like large-format pavers, poured concrete, or even glass accents for a minimalist vibe. Combining these elements with streamlined outdoor furniture creates an understated elegance that feels both contemporary and timeless.
How to Get the Look:
Go bold with materials. Pair smooth concrete steps with decorative gravel and linear pathways for a dramatic statement. Don’t forget functional design—this trend is all about blending form and purpose!
4. Statement Lighting
Lighting isn’t just a practical feature anymore—it’s an art form. Designers are using innovative lighting solutions like LED strips along pathways, up-lighting to highlight trees or walls, and solar-powered fixtures for an eco-friendly glow. The goal is to extend the usability of your space long after the sun goes down while adding mood and drama.
How to Get the Look:
Layer your lighting. Install spotlights to emphasize features like retaining walls or steps, and add soft, string lights across patios for ambiance. Brooks Landscaping specializes in creating lighting designs that balance beauty and functionality.
5. Natural Colors and Textures
Color palettes are leaning toward earthy tones—think warm browns, soft grays, and neutral beiges. Textures like rough stone, exposed aggregate, and weathered wood are being used to connect outdoor designs with their natural surroundings, creating a harmonious and relaxing aesthetic.
How to Get the Look:
Opt for decorative gravel or Crab Orchard steps to bring in natural texture while ensuring durability. These materials are not only visually appealing but also practical for withstanding outdoor elements.
Why Work with a Professional?
Hardscape projects can be complex. From material selection to ensuring proper drainage and building structures that will stand the test of time, partnering with experts like Brooks Landscaping gives you peace of mind. Their expertise ensures your design incorporates the latest trends without compromising on quality or functionality.
Tips for Homeowners Embarking on a Hardscape Project:
Start with a Plan – Think about how you’ll use the space, and communicate your needs to your landscaper.
Invest in Quality Materials – Durability and maintenance should guide your choices.
Think Long-Term – Plan for growth, whether it’s plants maturing or future family needs.
Whether you’re drawn to the clean lines of modern minimalism or the charm of natural, eco-friendly features, there’s a trend perfect for your style and needs. With the right vision and professional guidance, you’ll create an outdoor space that's not only trendy but also a joy to experience for years to come.
At Brooks Landscaping, we make dirt look good! Reach out today to discuss your landscaping dreams, and let's make them a reality.
Your blog post on hardscape design trends is ready to inspire! If there's anything else you need, just give me a shout.
0 notes
Text
Top Paver Patterns to Enhance Your Home’s Curb Appeal

1. Herringbone Pattern
The herringbone pattern is timeless and features pavers laid in a zigzag formation. Known for its durability and visual interest, this pattern is especially effective for driveways and walkways as it provides excellent load distribution. Whether you opt for traditional bricks or modern concrete pavers, the herringbone pattern creates a sophisticated look that complements various architectural styles.
2. Basket Weave Pattern
The basket weave pattern brings a classic charm to outdoor spaces, evoking a vintage aesthetic reminiscent of cobblestone streets. This pattern alternates horizontal and vertical pairs of pavers, creating a woven appearance. It’s an excellent choice for patios and courtyards, particularly when combined with well-maintained brick repair and clean edges for a polished finish.
3. Running Bond Pattern
The running bond is one of the simplest and most versatile paver patterns. It involves laying pavers in a linear, offset pattern, similar to traditional bricklaying techniques in masonry. This pattern works well for pathways, driveways, and patios, offering a clean and modern look. Pair it with decorative edging or retaining walls for added depth and texture.
4. Circular or Radial Pattern
For a dramatic and unique design, consider a circular or radial paver pattern. This layout involves arranging pavers in concentric circles or spirals, creating a striking visual effect. It’s ideal for driveways, fire pit areas, or garden paths, where it can act as a centerpiece. Ensure precision during concrete construction or masonry work to maintain the pattern’s symmetry and integrity.
5. Stack Bond Pattern
The stack bond pattern is a minimalist design where pavers are aligned in a grid with no offset. Its geometric simplicity makes it a favorite for contemporary homes, offering a sleek and modern aesthetic. While visually appealing, this pattern is better suited for low-traffic areas like patios and courtyards, as it lacks the interlocking strength of other designs.
6. Chevron Pattern
Similar to herringbone but with a sharper and more structured appearance, the chevron pattern involves cutting pavers at precise angles to form a continuous “V” shape. This pattern adds a sense of movement and elegance to driveways and pathways. Combining it with contrasting materials or colors can further enhance its appeal, making it a standout feature in any masonry project.
7. Flagstone or Random Patterns
Consider using irregularly shaped flagstones in a random pattern for a natural, organic look. This style mimics the appearance of natural stone pathways, blending seamlessly with landscaping and gardens. It’s perfect for patios, pool decks, and walkways. Incorporating matching retaining walls can further emphasize the rustic charm of this pattern.
8. Ashlar Pattern
The ashlar pattern uses rectangular and square pavers in varying sizes, arranged in a repeating or random layout. This design balances structure and variety, offering a refined yet dynamic look. Ashlar patterns are highly versatile and work well for traditional and modern homes. High-quality concrete construction ensures the pattern remains consistent and durable over time.
9. Cobblestone Pattern
Cobblestone paver patterns evoke old-world charm and timeless elegance. Typically made from stone or brick, this pattern features small, rounded pavers arranged in interlocking layouts. It’s perfect for driveways and pathways where durability and aesthetics go hand in hand. Regular brick repair and proper sealing can keep the cobblestone looking pristine for years.
10. Combining Patterns for a Custom Look
If you want to make a bold statement, consider combining two or more patterns within the same project. For instance, you can frame a herringbone patio with a running bond border or use a circular pattern as a focal point surrounded by a stack bond layout. Collaborating with skilled masonry professionals ensures seamless transitions between patterns.
Final Thoughts
Choosing the right paver pattern is about more than aesthetics—it is about creating a functional, durable, and visually cohesive outdoor space. Whether you prefer classic designs like basket weave or bold options like radial patterns, working with experts in concrete construction, brick repair, and masonry will ensure your project stands the test of time. Enhance the look further with complementary retaining walls, and watch your home’s curb appeal soar.
At Emerson Masonry & Pavers, we offer a wide range of high-quality pavers and professional installation services to help you create the perfect patio. Located at 2007 N Collins Blvd #509c, Richardson, TX 75080, You can contact us today at 972-474-6524 or visit our Emerson Masonry & Pavers website to get started on your patio project. With our wide range of materials and design options, masonry and pavers allow you to create a home that is both visually appealing and built to withstand the test of time.
For other home services, visit our page at Emerson Pro Services for Chimney maintenance and installation, Air duct and Dryer services, Gutters and Drainage Repair, Roofing and Siding, and Outdoor Living. Let us help you keep your home experience in top shape.
#Richardson TX Masonry Services#Masonry Repair#Richardson TX Chimney Repair#Chimney & Flashing Repair#Retaining Walls#Brick & Stucco Repair#Concrete Construction#Richardson TX Concrete Contractors#Richardson TX Stucco Services#Richardson TX Brickwork
0 notes
Text
Masonry Cost Estimator in St. Augustine

When it comes to construction and remodeling in St. Augustine, masonry plays a vital role in creating durable, aesthetically pleasing structures. Understanding masonry costs can be complex due to various factors such as material choices, labor requirements, and project scale. This blog provides an in-depth guide to using a masonry cost estimator in St. Augustine, helping you plan your project effectively.
What is Masonry?
Masonry involves the use of materials like bricks, stones, and concrete blocks to construct walls, pathways, patios, and other structures. It is valued for its strength, fire resistance, and timeless appeal. Masonry projects can range from small repairs to large-scale construction, each varying in cost. A reliable masonry cost estimator in St. Augustine can streamline this process.
Factors Affecting Masonry Costs in St. Augustine
Several variables influence masonry costs. Here are the most significant factors to consider:
1. Type of Material
Brick: Costs range between $8 and $15 per square foot, depending on the style and quality.
Concrete Blocks: Typically cost $9 to $12 per square foot.
Natural Stone: A premium option costing $20 to $50 per square foot.
Pavers: Generally priced at $10 to $25 per square foot for pathways and patios.
2. Labor Costs
Labor rates in St. Augustine average $40 to $75 per hour. Complex designs or custom work can increase these costs.
3. Project Size
Larger projects benefit from economies of scale. For example, a 1,000-square-foot brick wall may cost less per square foot compared to a 100-square-foot project. Using a masonry cost estimator in St. Augustine can help optimize this process.
4. Preparation and Cleanup
Site preparation, such as leveling or demolition, and post-construction cleanup add $1,000 to $3,000 to the total cost.
5. Permits and Inspections
In St. Augustine, permits for masonry work can range from $150 to $500, depending on the project scope.
Average Masonry Costs in St. Augustine
Masonry costs can vary widely depending on the project type and specifications. A brick wall for a residential property may cost anywhere from $15,000 to $25,000. Stone veneer siding is another popular choice, with prices generally ranging from $10,000 to $18,000. Concrete driveways are a common feature in St. Augustine homes and cost between $3,500 and $7,000, while patio construction can range from $2,000 to $6,000 based on size and materials. For smaller projects like chimney repairs, homeowners typically spend between $800 and $3,000. Always consult with a masonry cost estimator in St. Augustine for the most accurate estimate tailored to your specific needs.
How to Estimate Masonry Costs for Your Project
Follow these steps to estimate your masonry project cost accurately:
Step 1: Determine the Scope
Define the size and type of project, including materials and any unique design features.
Step 2: Calculate Material Costs
Multiply the square footage of your project by the cost per square foot of your chosen material.
Step 3: Include Labor Expenses
Estimate labor costs based on local rates and the complexity of the work.
Step 4: Add Additional Costs
Factor in permits, site preparation, and cleanup.
Step 5: Add a Contingency Budget
Set aside an extra 10% to 15% for unexpected expenses. A masonry cost estimator in St. Augustine can simplify these calculations.
Benefits of Masonry Construction
Masonry offers several advantages, including:
Durability: Long-lasting structures that can withstand harsh weather.
Energy Efficiency: Natural insulation properties reduce heating and cooling costs.
Low Maintenance: Minimal upkeep required compared to other construction materials.
Aesthetic Appeal: Wide variety of designs, colors, and finishes available.
Increased Property Value: High-quality masonry work can boost curb appeal and market value, making it a worthwhile investment.
Additional Tips for Managing Masonry Costs
Choose Cost-Effective Materials: While natural stone offers premium aesthetics, materials like concrete blocks provide a durable and budget-friendly alternative.
Plan Ahead: Detailed planning helps avoid costly design changes during the construction process.
Hire Local Experts: Local contractors understand St. Augustine’s specific requirements and can provide accurate cost estimates.
Combine Projects: If you have multiple masonry needs, bundling them can save on labor and material costs.
Why Choose Estimate Florida Consulting?
At Estimate Florida Consulting, we specialize in providing accurate masonry cost estimates tailored to your project needs. Our team’s expertise ensures you stay within budget while achieving high-quality results. We’re dedicated to helping homeowners and businesses in St. Augustine plan their construction projects with confidence. A reliable masonry cost estimator in St. Augustine is just a call away.
Get Your Masonry Cost Estimate Today
Planning a masonry project in St. Augustine? Contact Estimate Florida Consulting at 561-530-2845 for a detailed estimate. Our experts are here to guide you every step of the way with the help of a professional masonry cost estimator in St. Augustine.
FAQs About Masonry Costs in St. Augustine
1. What is the average cost to build a brick wall in St. Augustine?
The average cost ranges from $15,000 to $25,000, depending on the size and complexity. A masonry cost estimator in St. Augustine can provide precise figures.
2. Are natural stones more expensive than bricks?
Yes, natural stones typically cost $20 to $50 per square foot, making them more expensive than bricks, which cost $8 to $15 per square foot.
3. How long does a masonry project take?
The timeline varies by project. For example, building a 500-square-foot patio might take 1-2 weeks. Consult a masonry cost estimator in St. Augustine for better time management.
4. Can masonry work increase property value?
Absolutely! High-quality masonry can enhance curb appeal and property value.
5. How can I reduce masonry costs?
Choose cost-effective materials, keep designs simple, and hire experienced professionals to avoid costly mistakes. Using a masonry cost estimator in St. Augustine can also help optimize your budget.
0 notes
Text
Choosing the Right Cobblestones for Driveways: A Complete Guide

When it comes to designing a beautiful and durable driveway, nothing quite matches the charm and longevity of cobblestones. These natural stone pavers have been used for centuries in roadways and driveways, offering a timeless look that enhances curb appeal while providing practical durability. However, selecting the right cobblestones for driveways can be a bit challenging, especially with the wide variety of options available in the market.
In this guide, we will walk you through everything you need to know about choosing the perfect cobblestones for driveways, from the types of materials available to installation tips and maintenance advice. By the end, you’ll be well-equipped to make an informed decision for your driveway project.
1. Why Choose Cobblestones for Driveways?
Before we dive into the selection process, let’s first discuss why cobblestones for driveways are a popular choice among homeowners.
Durability: Cobblestones are made from natural stone, typically granite, limestone, or basalt, making them incredibly durable and long-lasting. They can withstand heavy traffic, extreme weather, and require minimal maintenance over time.
Aesthetic Appeal: Cobblestones provide a rustic, old-world charm that adds sophistication to any driveway. Their unique shapes and natural color variations create a visually pleasing surface that enhances the overall look of your property.
Sustainability: Because they are made from natural stone, cobblestones are an eco-friendly choice. They can be reused and repurposed, making them a sustainable option for homeowners looking to reduce their environmental footprint.
Low Maintenance: Once installed, cobblestones require very little upkeep. They are resistant to cracking, chipping, and staining, meaning your driveway will look great for years without constant repairs.
2. Types of Cobblestones for Driveways
When selecting cobblestones for driveways, it’s essential to understand the different types of materials available. Each type has its unique qualities, so choosing the right one depends on your specific needs and preferences.
Granite Cobblestones: Granite is one of the most popular choices for cobblestones due to its incredible strength and resistance to wear. It is ideal for high-traffic areas, making it perfect for driveways. Granite cobblestones also come in a variety of colors, including grey, pink, and black, allowing for versatile design options.
Basalt Cobblestones: Known for its dark and rich color, basalt is another durable option for driveways. Its smooth texture and uniform appearance make it a modern choice for those looking to create a sleek and contemporary look.
Limestone Cobblestones: Limestone is a softer stone compared to granite and basalt, but it still offers excellent durability. Limestone cobblestones often come in lighter shades like beige and cream, giving driveways a softer, more elegant appearance.
Sandstone Cobblestones: Sandstone offers a more rustic and textured look. It is often used in traditional or countryside homes. Although it is less durable than granite, sandstone can still withstand regular driveway use and offers beautiful natural patterns.
3. Size and Shape Considerations
Cobblestones come in various sizes and shapes, and the right choice will depend on the design you have in mind for your driveway.
Large Cobblestones: Larger cobblestones provide a more traditional and rugged look. They are also faster to install due to their size but may require a more robust foundation to ensure they stay in place.
Small Cobblestones: Smaller cobblestones give a more refined and detailed appearance. They are perfect for intricate designs or curved driveways where precision is key. However, they may take longer to install compared to larger stones.
Square and Rectangular Cobblestones: These shapes are ideal for creating a uniform, structured look. They are easier to install and provide a neat, organized pattern.
Irregular or Tumbled Cobblestones: For a more natural, organic look, irregular or tumbled cobblestones are the way to go. They offer a rustic aesthetic with varied shapes and sizes, perfect for those looking for a more relaxed and informal driveway design.
4. Installation Tips for Cobblestones for Driveways
Once you’ve selected the material, size, and shape of your cobblestones for driveways, the next step is proper installation. Proper installation ensures the durability and longevity of your driveway.
Base Preparation: The first step in installing cobblestones is to prepare the base. This involves digging out the existing surface to a depth of about 8-12 inches, depending on the weight the driveway will bear. A solid base layer of compacted gravel or crushed stone should be laid to provide stability and drainage.
Edge Restraints: Installing edge restraints is crucial to keep the cobblestones from shifting over time. These can be made from metal, plastic, or concrete and should be installed along the perimeter of the driveway.
Laying the Cobblestones: Cobblestones should be laid out in the desired pattern, starting from one corner and working your way outwards. You can choose from various patterns, including herringbone, running bond, or random patterns, depending on the look you want to achieve.
Joint Filling: Once the cobblestones are in place, fill the gaps between them with sand or a specialized joint filler to lock them in place. This prevents the stones from shifting and ensures a smooth surface.
Compacting: After filling the joints, use a compactor to press the stones firmly into place. This step is essential to prevent future movement and ensure the stones are tightly packed.
5. Maintenance of Cobblestones for Driveways
Although cobblestones for driveways are known for their low maintenance, a few simple practices will ensure they remain in excellent condition for years to come.
Regular Cleaning: Sweep or hose down your cobblestone driveway regularly to remove dirt, debris, and organic matter. This prevents the buildup of moss and algae, which can make the stones slippery.
Weed Control: Over time, weeds may grow between the joints of the cobblestones. To prevent this, apply a weed killer or lay weed-proof fabric under the base during installation.
Resealing: Some types of cobblestones, like sandstone or limestone, may benefit from periodic sealing to protect them from water damage and stains. Sealing also enhances the color and appearance of the stones.
Conclusion
Choosing the right cobblestones for driveways can make a significant difference in the overall look and functionality of your property. From the type of material to the size and shape of the stones, there are many factors to consider when planning your cobblestone driveway. By understanding the options available and following best practices for installation and maintenance, you can create a stunning, durable driveway that will stand the test of time.
Whether you’re looking for a traditional, rustic appearance or a sleek, modern finish, cobblestones offer a versatile solution that combines beauty and practicality. With the right selection and care, your cobblestone driveway will not only enhance your home’s curb appeal but also provide years of reliable service
#wallcladding#naturalstone#stonecladding#wallcladdingstone#jkstone#cobblestones#natural stones#claddingstone#cobblestone#jkstones
0 notes
Text
10 Space-Saving Concrete Patio Ideas for Small Backyards

Designing a functional and beautiful patio in a small backyard may seem challenging, but with the right ideas, even limited spaces can be transformed into cozy and stylish outdoor retreats. Concrete patios are an excellent choice for small backyards, offering durability, versatility, and endless design possibilities. Whether you're looking to create a simple space for relaxation or a stylish area for entertaining, concrete provides the perfect blank canvas.
Here, we’ll explore 10 smart concrete patio ideas for small backyards that maximize space while enhancing both aesthetics and functionality.
Why Choose Concrete for Small Backyards?
Concrete is a fantastic material for small backyard patios because of its flexibility in design. It can be stamped, stained, or shaped to create various textures and patterns, allowing you to tailor your patio to your personal style. Concrete is also long-lasting, low maintenance, and cost-effective, making it a great choice for homeowners looking to invest in their outdoor space.
1. Stamped Concrete for a Stylish Finish
Stamped concrete is an excellent option if you're looking to add some style to your small patio. This technique allows you to mimic the appearance of more expensive materials like stone, brick, or tile, but at a fraction of the cost. Stamped patterns can bring depth and character to your outdoor space, giving it a high-end look without overwhelming a smaller area.
Faux Stone Patterns
For a more natural look, choose stamped concrete with a faux stone pattern. It’s perfect for creating a rustic, yet elegant, feel that makes your small backyard patio appear larger than it actually is.
2. Concrete Pavers for a Modular Look
If you prefer a modern aesthetic, concrete pavers are a great solution. These individual blocks can be arranged in various geometric patterns, creating a unique, contemporary design that adds personality to your patio. Concrete pavers can also be spaced out with gravel or grass in between to create visual interest and give the illusion of more space.
Grid Layout
A grid layout using concrete pavers can provide clean lines and a minimalist vibe. This design is especially effective in small backyards where you want to keep the space organized and open.
3. Multi-Level Patios for Dimension
One way to make the most of a small backyard is to create different levels in your patio design. A multi-level concrete patio can give the illusion of more space by breaking up the flat surface into distinct zones. Use one level for seating, another for a fire pit, and a third for plants or decorations. This layered approach adds dimension and maximizes your backyard's functionality.
Zoned Areas for Different Uses
Incorporate specific zones for lounging, dining, or even an outdoor kitchen, ensuring that every square foot of your patio is used wisely.
4. Stained Concrete for a Pop of Color
While natural concrete is typically gray, stained concrete allows you to add a pop of color to your patio. You can opt for earthy tones to blend with your garden or bold colors to make a statement. Staining also enhances the texture and pattern of the concrete, giving your small patio a customized and polished look.
Earthy Tones for a Cozy Atmosphere
For small backyards, choose soft, earthy tones like browns or tans to create a cozy, intimate space that feels inviting and warm.
5. Concrete with Grass or Gravel Inlays
For a more organic look, consider alternating concrete slabs with grass or gravel in between. This design breaks up the solid surface of the concrete and adds a natural touch, making the patio feel lighter and more integrated with the garden.
Eco-Friendly and Stylish
This design not only looks great but also helps with drainage, making it an eco-friendly choice for your backyard.
6. Circular Concrete Patio
A circular concrete patio can make a small space feel more intimate and dynamic. It breaks away from the typical rectangular or square designs and gives your backyard a more organic flow. Use the center for seating or a fire pit to create a cozy gathering spot.
Softening Sharp Edges
The rounded shape softens the overall look of your backyard and adds a unique focal point to your outdoor area.
7. Concrete Bench Seating
In a small backyard, every inch of space counts, and incorporating built-in seating can help save room. A concrete bench along the edge of your patio eliminates the need for bulky outdoor furniture, creating more open space for movement.
Seamless Design
Concrete benches can be poured directly into the patio design, creating a seamless, integrated look that maximizes your available space.
8. Concrete Fire Pit Feature
Fire pits are a great way to make your backyard patio functional year-round. A small concrete fire pit can serve as the centerpiece of your patio, adding both warmth and ambiance. Opt for a simple, circular design that complements the overall aesthetic of your space.
Cozy Gathering Spot
Even in a small backyard, a fire pit creates a welcoming spot for friends and family to gather, especially on cool evenings.
9. Concrete Planters for Vertical Gardening
In a small backyard, you may have limited ground space for plants. Concrete planters can be incorporated into the patio design to create vertical gardens. These planters can be built directly into the patio, serving as decorative features while maximizing your growing space.
Add Greenery Without Sacrificing Space
Concrete planters allow you to add lush greenery to your patio without taking up valuable floor space, making your outdoor area feel vibrant and alive.
10. Minimalist Design with Smooth Concrete Finish
Sometimes, less is more. A smooth, minimalist concrete patio can provide a sleek and modern look. Keep the design simple with a smooth finish and minimal furniture to avoid overcrowding the space. The result is a clean and contemporary backyard that feels open and uncluttered.
Simplicity for Small Spaces
A minimalist approach works well in small backyards, as it focuses on open space and functionality without overwhelming the area.
Conclusion
Designing a beautiful and functional patio in a small backyard is entirely possible with the right ideas. Concrete patio ideas for small backyards offer endless customization options, from stamped patterns and stained finishes to modular pavers and built-in features. Whether you want a modern, sleek look or a cozy, rustic vibe, concrete provides a versatile solution that maximizes space and adds lasting value to your home.
0 notes