#small rice cooker
Explore tagged Tumblr posts
Visit Tumblr Blog
Explore Tumblr blogs with no restrictions, modern design and the best experience.
Last Seen Tumblr Blogs


Fun Fact
Post activity is at the highest at 4:00 pm EDT; notes peak at 10:00 pm EDT.
Text
Best Instant Pot Duo | Top 4 Chosen for You!
Introduction:
The Instant Pot Duo has become a sensation in kitchens worldwide, transforming the way people cook and bringing unparalleled convenience to home cooking. This innovative multi-functional electric pressure cooker has revolutionized meal preparation, saving time and effort for busy individuals and families. In this article, we will explore the features and benefits of the Instant Pot Duo and understand why it has gained such popularity.
Go to our product page Click Here>>
What is the Instant Pot Duo?
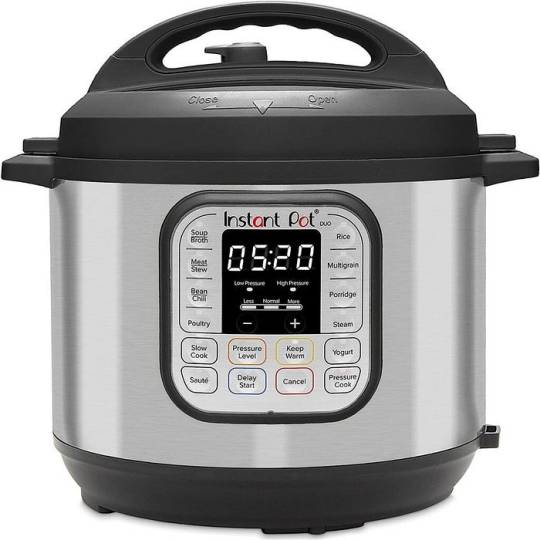
The Instant Pot Duo is a smart and versatile kitchen appliance that combines the functions of a pressure cooker, slow cooker, rice cooker, sauté pan, steamer, yogurt maker, and warmer all in one compact unit. Developed by Canadian company Instant Brands, the Instant Pot Duo has gained a massive following due to its ability to simplify cooking processes and enhance culinary creativity.
Features and VeOne of the standout
One of the standout features of the Instant Pot Duo is its versatility. With a range of cooking functions, users can prepare a wide variety of dishes with minimal effort. Whether you’re looking to cook a hearty stew, tenderize meat, prepare fluffy rice, or even make homemade yogurt, the Instant Pot Duo has you covered.
Go to our product page Click Here>>
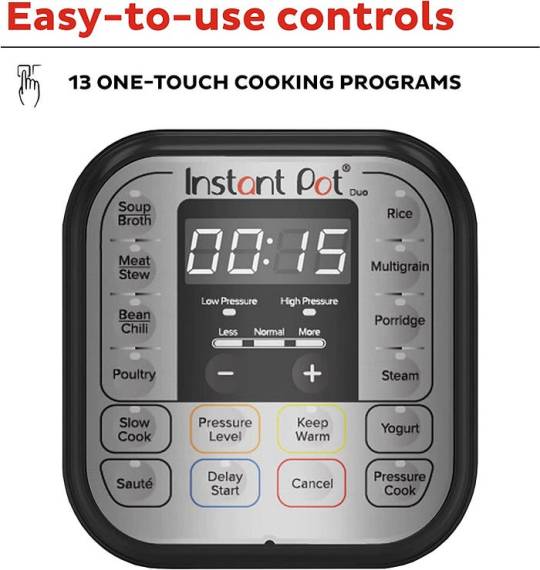
The device comes equipped with pre-set programs for popular dishes, making it easy for even novice cooks to achieve consistent and delicious results. Additionally, the manual mode allows experienced cooks to take control and experiment with their own recipes, providing a customizable cooking experience to suit individual preferences.
Time and Energy Efficiency
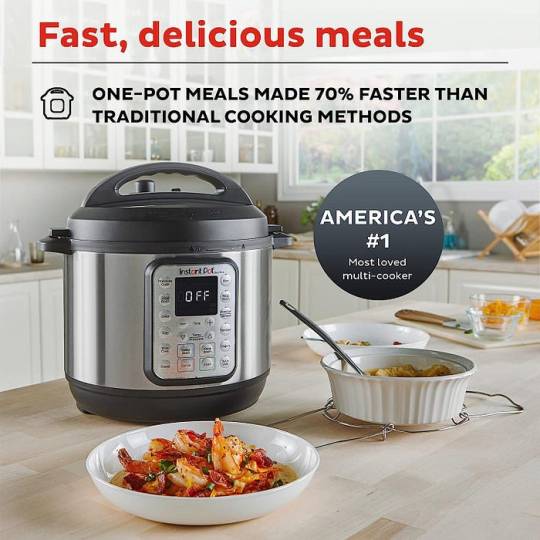
Time is a valuable commodity, especially for those leading busy lives. The Instant Pot Duo’s pressure cooking functionality stands out for its ability to significantly reduce cooking time compared to traditional stovetop methods. By creating a sealed environment, the pressure cooker raises the boiling point of liquids, cooking food faster while retaining essential nutrients and flavors.
Go to our product page Click Here>>
Furthermore, the Instant Pot Duo is remarkably energy-efficient. Its well-insulated design and precise temperature control consume less power than conventional ovens and stovetops, contributing to lower energy bills and a smaller carbon footprint.
Ease of Use and Safety
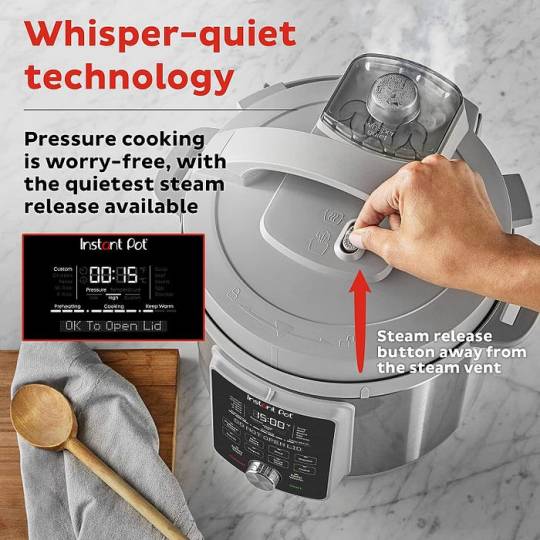
The Instant Pot Duo has gained a reputation for its user-friendly interface. The digital control panel with clear buttons and a bright display makes navigation intuitive and hassle-free. Additionally, the safety features incorporated into the device provide peace of mind during cooking.
Go to our product page Click Here>>
Features like the lid lock ensure that the cooker remains sealed while under pressure, preventing accidental spills or burns. The pressure release valve allows controlled venting of steam, eliminating the risk of sudden eruptions. These safety measures, coupled with the automatic temperature and pressure controls, make the Instant Pot Duo a reliable and safe cooking companion.
Health Benefits
Cooking with the Instant Pot Duo offers health benefits beyond convenience. The pressure cooking method preserves more vitamins and minerals in food compared to conventional cooking methods that require longer exposure to high heat. Additionally, it allows for reduced use of oil and fats without compromising on taste or texture, promoting healthier eating habits for individuals and families alike.

Go to our product page Click Here>>
Community and Recipe Sharing
The Instant Pot Duo has fostered a strong online community, where enthusiasts share recipes, cooking tips, and hacks. Websites, social media groups, and forums are dedicated to the Instant Pot Duo, allowing users to learn from each other and discover new and exciting dishes to try. This sense of community has played a significant role in the appliance’s widespread popularity and its continued evolution as a versatile kitchen tool.
Read Full Review Click Here>>
#rice cooker#rice cookers#top rice cookers#rice cooker 2023#best rice cooker#small rice cooker#tiger rice cooker#best rice cookers#aroma rice cooker#cuckoo rice cooker#toshiba rice cooker#zojirushi rice cooker#top rice cookers 2023#best rice cooker 2023#best rice cookers 2023#fuzzy logic rice cooker#best budget rice cooker#rice cooker with steamer#best japanese rice cooker#best electric rice cooker#best zojirushi rice cooker#hamilton beach rice cooker#instant pot duo#instant pot duo reviews#instant pot duo review#instant pot duo Brand#instant pot duo Good or Bad#instant pot duo Amazon#instant pot duo Price#instant pot duo Features
0 notes
Text
i can’t wait to move and get a crockpot😍😍😍and a standing mixer😍😍😍 maybe an air fryer. i need them so bad!
#the kitchen in my apartment is so small so we can’t fit anything#LOL#our rice cooker and blender and griddle are all stuffed away and suffering
10 notes
·
View notes
Text


#this dog has nothing to do with it but i imagine thats the face seungmin makes when he asks these things#anyway Yuh i made creamy mushroom bacon and chicken pasta in the rice cooker so it got enfused woth the flavour for ages and it was SO good#so good.#i cpuld have eaten it all but i left enough for a small bowl for lunch#Wah Wah
11 notes
·
View notes
Text
Also, I'm beginning to worry that my 25-year-old rice cooker might finally be on its last legs. I forget how much I paid for it, but clearly, I got my money's worth. My partner said she'd ask her parents for a new one for Christmas, so maybe we can upgrade to a fancy one.
5 notes
·
View notes
Text
just tried cooking rice on the stove. the entire bottom is burnt 😭
#my mom didnt want me doing it in the usual rice cooker and the other one is too small#its that rice cooker meal tiktok. it tastes. ok LMAO but who#knows if thats just a skill issue lmao. also wow 2 cups is way more rice than i thought#possibly its too much rice actually. tabang
10 notes
·
View notes
Text

PPYOPULI SLEEPS IN A RICE COOKER sobbing unfortunately i am obsessed with this little rice ball character 😭
#miniteen#ppyopuli#and his little pink blushy rice grain 😭😭😭😭😭😭#crying he’s so cute#everyone else has a BED#except the moon triplets but they have a cat tree which absolutely counts#and then here's ppyopuli in his RICE COOKER akdhdkshdjs#he's so small and cute i love him 😭
6 notes
·
View notes
Text
bad things happening on the baking front
#didn't have a tin small enough so i thought hey i'll use my rice cooker's cake button instead since i've got decent cakes that way before.#apparently this time there was too much mix. i have sent it to the oven in an attempt to prevent it from being raw‚ at the very least
2 notes
·
View notes
Text
Proud owner of a rice cooker now btw
#important development in my life#in my rice cooker era ♡#(i do understand that for many people this is a very common and integral kitchen appliance#but not for me#for me this is the hight of luxury thank you very much)#i can't store it in my own apartment though because it's too big and i have no space (actually my apartment is too small)#but for now it's okay to have it at my mother's place#void screams
3 notes
·
View notes
Photo

Essential Chinese Cooking Tools
Cooking Chinese food does not require a ton of special kitchen tools, and you probably already have many of them. However, there are a few items that are quite important and they can make your cooking so much easier. Check out the list of essential Chinese cooking tools that I use in my kitchen. https://omnivorescookbook.com/chinese-cooking-tools/
#Chinese Cooking Tools#nonstick skillet#carbon steel skillet#Small carbon steel flat bottom wok#Wok turners#Stainless steel steamer#Bamboo steamer set up on a wok#Chinese kitchen knives#Kitchen scale#Vacuum storage#Rice cooker#Instant Pot#Air fryer#Kettle
18 notes
·
View notes
Text
Ya Ever Touch Something And Have Your Brain Give You An Error Code? Like You Touch A Thing And Your Brain Just Goes "Throw It." Cause It Didn't Pass The Vibes Check? Ya Know Like Velvet?
#captain's posts#i had to get a new rice cooker cause I couldn't touch the pot in my old one without having a small mental breakdown...#✨Sometimes The Real Enemy Was The Textures We Impulsively Touched Along The Way✨
17 notes
·
View notes
Text
i finally have just ordered a rice cooker. it doesn't help me at this moment but like yay. finally. that's gonna make life much easier ;;;
#i've gotta make rice the old fashioned way tonight rip#but i'll just make a small helping and save the chicken/sauce/veggies separately#and then when therice cooker gets here i can make as needed :)#shh ac
4 notes
·
View notes
Text
i dont have polls but i must know; rice in the pot or the rice cooker
#we only ever make small batches#and im better than the rice cooker#even though it was my birthday present. lol#i make better short grain for sure
3 notes
·
View notes
Text
Bitch, why did nobody tell me that rice cookers are this good? I was making rice on the stove top like a madman. This shit's fantastic.
#one time I burnt the rice so badly that even steel wool wouldn't get it off#it took me like an hour of scrubbing#that pot still has marks in the stainless steel where each rice grain was#|||#cooking with white people#cooking#rice#rice cooker#kitchen appliances#small kitchen appliances
3 notes
·
View notes
Text
merry crumbus or whatever
#yay its almost overrrrr#im still stressed out lmao#im gonna complain a little okay. cause our family decided to do a secret santa this year instead of the traditional gift giving#of whoever buying whatever to whoever depending who has money and whatnot#but anyways. i got off fairly easy with getting my sister so no problem there. i know what she likes and everything#the problem is that my gift giver is most likely gonna be either of our parents. and i know i shouldnt complain butttttttt#(i also know its not my older brother due to context clues and i doubt my sister got me back. which leave our other brother and parents#i'd trust my brothers but not my parents to buy me gifts. especially since we had a 'no requests' rule in place for this exchange)#so either 1. im gonna be hearing from my mom that im difficult to shop for and she doesnt know what i like and i get to listen how estranged#i am. once again. hurray#or 2. my dad is gonna buy me clothes that are a size too small and then complain to me and call me fat which. great /s#the best option is my brother did get me and im just gonna get nerd shit for christmas but. im not super hopeful#so i hope im terribly wrong about this and it'll all go fine and i know i shouldnt care so much about gifts but also#we are only giving out things to one person each this year. it has some weight to it. so like... i dont wanna be rude but my parent dont#know how to shop for me. just because i couldnt ask for a hairdryer and a rice cooker that i would have wanted#anyways. i need to clean a little idk when my dads picking me up. im just ugh. stressed and its stupid but yeah#complaining about gifts as a 32 year old is so entitled i know but goddamn what am i gonna do with clothes that dont fit for example#sigh. sorry i needed to get that out#also my face still hurts yay fuck my wisdom tooth tbh#night is an absolute mess on main
1 note
·
View note
Text
I need to ban my sisters boyfriend from the house he “made” rice by eyeballing the amount of water (NOT NEARLY ENOUGH), dubiously washing it (up for debate), and not salting it. yeah buddy youre done
#GIO GET OUT OF MY HOUSE WHAT IS THISSSSSSS#its such a huge amount of rice too which is FINE but its a small rice cooker like its an amount that you can TELL is gonna spill over#I genuinely cannot tell if it was washed or not either but i know it wasnt salted and he said he put in ‘a medium amount’ of water#YOURE BANNED FROM MY HOME!!!!!!!!!#shut up evan
1 note
·
View note
Text

i got an acacia cutting board to go with the knife block ~
#personal#blog#i think they look very nice together on the counter#my next thing to get will be a small rice cooker and steamer#the kitchenette is finally ready for groceries#blue aesthetic#acacia cutting board#kitchenette#diary post
1 note
·
View note