#silicone rubber tube cutter
Text
DIY Pet Projects: Fun and Creative Ideas for Your Furry Friends Introduction: Engaging in do-it-yourself (DIY) projects for your pets not only allows you to exercise your creativity but also provides a unique opportunity to bond with your furry companions. From toys and treats to accessories and furniture, there's no shortage of exciting projects to undertake. In this blog post, we'll explore some fun and creative DIY pet projects that will keep your pets entertained and happy. 1. DIY Pet Toys: a. Braided Rope Toy: Cut old t-shirts or fabric into strips, braid them together, and tie knots at each end to create a durable and interactive chew toy for dogs. It's a great way to repurpose old clothing while providing a fun and engaging toy for your pup. b. Feather Wand: Attach colorful feathers or fabric strips to a string or stick, creating an interactive wand for your feline friend. The movement and textures will captivate their attention, stimulating their natural hunting instincts. 2. Homemade Pet Treats: a. Frozen Treats: Blend together ingredients like plain yogurt, ripe fruits, and a small amount of honey. Pour the mixture into ice cube trays or silicone molds and freeze them. These frozen treats are a refreshing and healthy snack for hot summer days. b. Baked Treats: Find simple recipes online for homemade pet treats using ingredients like peanut butter, pumpkin, or sweet potato. Shape the dough into fun shapes using cookie cutters and bake them. Your pets will love the delicious and wholesome goodies. 3. DIY Pet Bed: Transform an old suitcase or a wooden crate into a cozy pet bed: a. Suitcase Bed: Remove the inner lining of a vintage suitcase and add a soft cushion or blanket inside. Decorate the outside of the suitcase with fabric or paint to match your home decor. It creates a unique and stylish resting place for your pet. b. Crate Bed: Line a wooden crate with a plush cushion and add pillows or blankets for extra comfort. Customize the crate with paint or stencils to give it a personalized touch. Your pet will have a comfortable and fashionable spot to relax. 4. Pet Enrichment Projects: a. DIY Puzzle Toys: Repurpose plastic bottles or cardboard tubes by cutting holes in them and placing treats inside. Your pet will have to figure out how to access the treats, providing mental stimulation and entertainment. b. Snuffle Mat: Make a snuffle mat by tying strips of fleece or fabric to a rubber mat or sturdy base. Hide treats or kibble within the strips, encouraging your pet to use their sense of smell and forage for food. It's a fantastic enrichment activity for dogs and cats. 5. DIY Grooming Accessories: a. Homemade Pet Shampoo: Create a natural and gentle pet shampoo by mixing liquid castile soap with water, adding a few drops of essential oil if desired. It's a cost-effective and chemical-free option for keeping your pets clean and fresh. b. Pet Paw Balm: Combine natural ingredients like coconut oil, shea butter, and beeswax to make a soothing paw balm. Apply it to your pet's paws to protect them from dryness and cracking, especially during harsh weather conditions. Conclusion: Embarking on DIY pet projects not only allows you to unleash your creativity but also provides numerous benefits for your furry friends. From toys and treats to accessories and enrichment activities, these projects engage your pets' senses and strengthen the bond you share. So, roll up your sleeves, gather your materials, and embark on a fun-filled journey of creating homemade delights for your beloved pets.
Engaging in do-it-yourself (DIY) projects for your pets not only allows you to exercise your creativity but also provides a unique opportunity to bond with your furry companions. From toys and treats to accessories and furniture, there’s no shortage of exciting projects to undertake. In this blog post, we’ll explore some fun and creative DIY pet projects that will keep your pets entertained and…

View On WordPress
#affiliate#article#articles#blog#bloggers#blogging#catblog#catfood#CATS#catsplay#dog health#dog products#dogpotty#DOGS#dogtraining#petsupplies#PUBLICATIONS#publishers
0 notes
Text
Fully Automatic PVC Soft Tube Latex Tubing Yellow Wax Tube Teflon Tube Silicone Rubber Tube Cutting Machine
Fully Automatic PVC Soft Tube Latex Tubing Yellow Wax Tube Teflon Tube Silicone Rubber Tube Cutting Machine
This model 100 automatic heat shrinkable tube cutting machine is a fully automatic shrink tube cut to length machine driven by stepper motor, designed for cutting heat shrink tube,soft tube,sleeve, ribbon cable,foil, paper and other thin and soft materials, set cutting length and quantity, auto feeding, working and stop.
Product NameFully Automatic Heat Shrink Tube Cutting MachineModel…
View On WordPress
#auto cutter#heat shrink tube cutter#heat shrinkable tubing cutter#roll to sheet cutting machine#silicone rubber tube cutter#strip cutting machine#tubing cutter
0 notes
Text
How to Make Jirou’s Earjacks
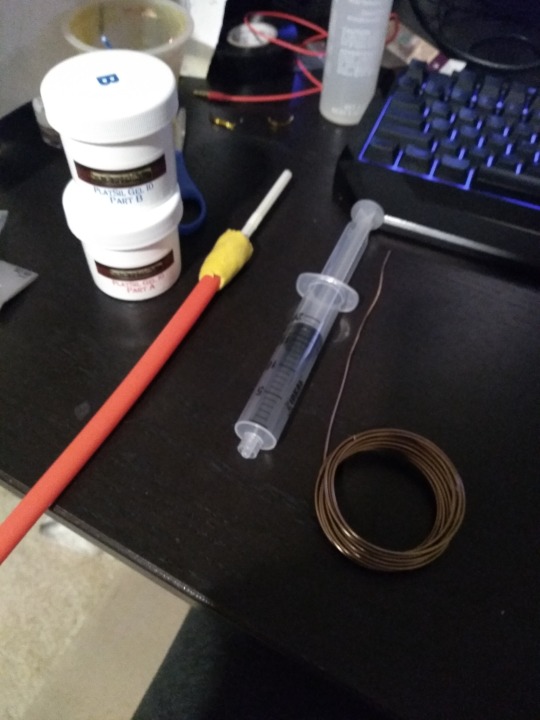
I figured I’d make a tutorial for those who want to make realistic earjacks that can be flimsy enough to twirl (1st image) and firm enough to bend for posing (2nd image). This was my first time experimenting with silicone and latex, so if you have any tips for me, let me know! Unfortunately I don’t have a ton of pictures because this stuff works quickly and I was in a time crunch for a convention, so i’ll tried to be detailed when needed (these images were a test run, the final result is on my Instagram at Sakine-cosplay).


Materials (with apprx cost):
1. Platsil Gel 10 silicone ($17) https://www.ebay.com/itm/M00511-150-MOREZMORE-Try-PlatSil-Gel-10-Pourable-Silicone-Rubber-Liquid-150-g/142987077241?hash=item214ab1a679:g:-FgAAOSw2JxboBja
2. Flesh colored pigment ($5) https://www.ebay.com/itm/Concentrated-Silicone-Pigment-Flesh-Peach-Platsil-Gel/372628136273?hash=item56c25e2151:g:G38AAOSwyedbIBG8 (If you’re skin tone is darker than this, I’d suggest searching for brown pigment, I couldn’t find a skin tone set to share, but just a little goes a long way so i’d suggest one of the two)
3. Mold release spray ($11) (I bought my Castin Craft spray at Hobby Lobby. Look for coupons online!)
4. Rubber straw ($4 for a set at Target)
5. Regular straw (free at many fast food restaurants)
6. Wire ($3 optional but necessary for posing) https://www.hobbylobby.com/Beads-Jewelry/Bead-Stringing-Chains/Beading-Wire/Aluminum-Wire---22-Gauge/p/JL85073 (I threw out the package, so i forget exactly which size it is. I want to guess size 20 or 22. Go to Hobby Lobby or your craft store and feel the difference. It should be easy to bend, but strong enough to hold its shape)
7. Amazing Mold Putty kit ($8-$20) You don’t need a lot, but they only sell one size for about $20. It’s good if you plan on using more in the future, however, I’m including a link I found that gives you 4oz for $8. If used wisely it should be enough. https://www.etsy.com/listing/594123659/make-your-own-silicone-mold-food-safe?gpla=1&gao=1&utm_campaign=shopping_us_ClayPaperScissors_sfc_osa&utm_medium=cpc&utm_source=google&utm_custom1=0&utm_content=16561831&gclid=CjwKCAjw67XpBRBqEiwA5RCocd4_HioObmZud-27R8H16b_djgqcI3uObN-7GqEf1Vq5AqGV_6hDexoC7REQAvD_BwE
8. Liquid Latex ($8 at Walmart)
9. Earring studs ($3-$5) (if your ears are pierced, it helps with support, if not, only use latex. WARNING: make sure the back of the studs are not super tight on the posts. Try sliding them back and forth and see if it glides. Loosen the backs manually if they are very tight by gently pulling it apart)
10. Earphone/Aux jacks (x2) ($1-$5 each) (I used two headphones jacks as long as they aren’t the L shape)
11. Wire cutters ($2-$5) or see if you can borrow them from someone
12. Tape and scissors (look at a dollar store, I used electrical tape for flexibility)
13. Small mixing cups (x3)
14. Popsicle sticks or something similar to stir
15. Sandwich baggies (2-3)
16. Very small disposable measuring cups (x2) (check dollar store)
17. Piece of carboard/plastic/newspaper to work on top of (it’s gonna get messy, a thicker material is best if you have it)
18. Q-tips (preferably the pointy ones they use on nails)
19. Vaseline (travel size should be cheap)
20. Hair dryer
(you can ignore the syringe in the picture. The amount of pressure it created inside didn’t allow me to use it with the material because of how thick it was, I replaced it with a baggy as a piping bag)
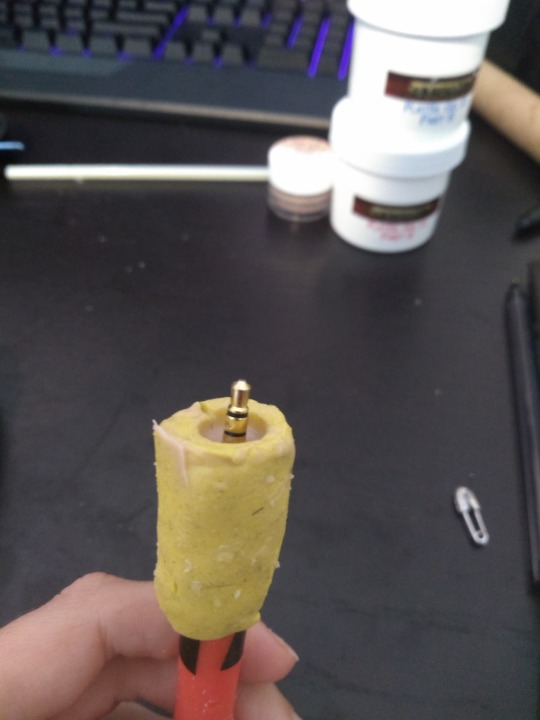
Step 1: Use the mold putty to create the earjack shape.
Since we are using a rubber straw (tube) to create the extended lobes, we need to enlarge the nub at the end (that yellow bit in the above image). If you look at your headphones/aux cord you’ll see the nub that that connects the wire to the plug is larger, so we need to make that so we can attach it.
-Take a small amount of your molding putty in a 1:1 ratio (equal amounts) and use your hands to mush them together and blend it until its a light yellow.
-Once evenly mixed, flatten it until its about 1.5″ (inches) wide (measure it out, you may under estimate how small an inch is) and then pull it until its long enough to fully wrap around the rubber tube. You don’t want it to be too thin, make sure it’s about 1/8″.
-Wrap it around the edge like shown in the above image. Smooth out the end that is covering the body, as if blending it into the tube (not where the tube ends, other side), that way its less likely any silicone will leak through later.
-Wait about 30 minutes or so until it hardens to a rubber like texture (try lightly pinching it towards the bottom and see if it tries to return to its shape)
- Once it’s done, you’re gonna have a bit of a difficult time wiggling the tube out of it. Be patient, just squish and pull it until its out (it should look similar to the one a couple images down).
Step 2: Align the wire to the center of the tube.
This part depends on how bendable you want them to be. For mine, I used wire that went down one fully for posing, and the other about a 3rd of the way so it could be adjusted by the ear if necessary and 2/3rds of it flimsy and flesh-like. You can also opt to not use wire at all, but you wont be able to pose it (although without wire will make it a lot easier to apply to your ears due to the lack of weight. Even for the flimsy one, I still use a little bit of wire just in case, but its not necessary). If you don’t want it to pose, skip step 2 and step 5.
-Using the wire cutters, either cut about 4″ of wire for a partial pose, or cut enough to match the same length of the tube for full pose.
-Find a small flat surface that you can tape one end of the tube to (small square of cardboard works well. You can probably use one of the containers your materials came in). Take the cut wire and tape it so it is standing vertically on the flat square as straight as possible (I’m sorry I dont have a picture of this). Try not to have the tape too far up the wire since it will be poured over with silicone. Try bunching layers of it at the bottom to reinforce it instead.

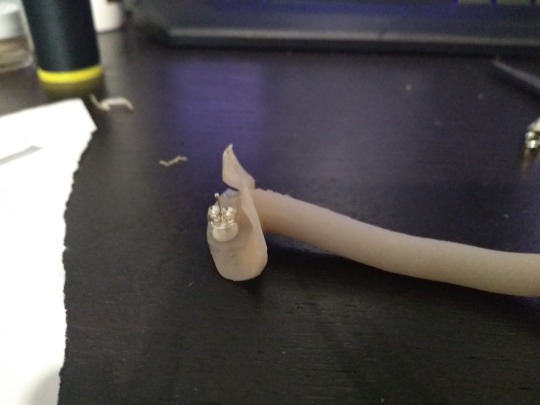
Step 3: Cut the tube
-Take the yellow jack nub you created and slide it over one end of the tube. Make sure there’s at least one full inch that hangs over the tube edge, that’s the part that will be filled in (so only 1/2″ should actually be covering the tube).
-With the yellow nub attached, take scissors and make a straight cut through the yellow nub and the tube all the way towards the end, but leave about 1/2″ at the end uncut. This will help make sure the tube closes evenly since it’s still intact (nubless cut tube shown above). Now you can easily take the nub off, but I suggest leaving it on whenever you can so the seams from the cut stay aligned.
Step 4: Apply mold release and liquid latex
This next process is what takes the most time to do.
-Following the instructions on the bottle, shake the mold release well and then spray a couple inches of the inside of the tube, covering the center and edges completely. I find it easier to do sections at a time and keep it held open under a fan until it dries since its hard to keep the entire tube spread open.
-Shake, spray, and let dry until you have the entire tube coated. Make sure to spray enough at the end that isn’t cut so the bottom doesnt stick.
-Repeat this at least one more time (3 times total to be safe). The silicone doesn’t let go of the rubber very easily and sometimes will prefer to rip off if there’s not enough mold release applied, so if you are patient enough, spray multiple layers along the center and edges of the inside.
- Once 2-3+ coatings are applied, make sure the inside seams and the top seam is also covered.
Unfortunately silicone doesn’t like to separate from the mold putty, even with the mold release, so we’re going to use a layer of liquid latex to cover the inside of the yellow nub. This is IMPORTANT because without a full coat, the putty will attach to the silicone and you will need to cut it off, which we don’t want. I usually went back and forth between adding layers of latex and spraying mold release depending on when they dried so they can be worked on at the same time.
- Take the nub off the tube. I recommend using the small mixer tool they include with the silicone to apply the liquid latex. Dip the tool into the latex and only add a thick stripe starting at one side (starting from one end of the seam to the other end on the inside of the tube). You don’t want to coat the entire thing in one go because its round and the latex will spread out and bunch in the center. Also, when applying, be quick about it since it starts to dry relatively quickly. If you’re smoothing it out as it dries, it can begin sticking to the spreader and mess up the coat. The latex on the spreader will dry, make sure to remove it before each coating.
-Once the first portion is dried, slowly make your way coating (and drying) until there’s an even coat all inside the nub. It doesnt need to be a thick layer as long as the entire surface is covered. If you add too much thickness if could dry unevenly and make it look lumpy, so try to keep it smooth.
-Apply a layer of latex to the top of the nub and along the seam (save the inside of the seam for last). Once the inside is done, the outside edges are done, then we can apply a coat to the seam area where the nub was actually cut. We save this for last because if the two seams touch (even when dry), they’ll want to stick, and we don’t want that yet. All of these areas are being coated because its going to get messy and its better to have everything covered so there’s no accidental sticking. The only spots we aren’t covering are the outside center and bottom of the nub since silicone shouldn’t reach there (although its still good to add a little to the bottom just in case)
-Once the seams have their layers dry, make sure to keep them spread apart, if they touch you may need to peel that portion off and redo it.
-Add a spritz of the demold spray to the inside.
Step 5: Attach wire and tube
- Take the uncut end of the tube and place it over the standing wire and feed it through until the end meets the taped stand (you can tape the tube closed if it makes it easier). Now the wire is inside the tube and the bottom should be as close to the cardboard as possible.
-Look through the top of the tube down the tub to see where the wire is. You can gently move the tube around until you see the wire is in the center (if the wire isn’t straight enough, bend it until it is), if the wire is leaning against the side, then it will puncture through the silicone since it wont be coated properly.
-Once you think its centered enough, tape the tube to the flat surface the wire is attached to. Make sure the bottom of the tube is as flat as it can be so silicone doesnt seep through. Tape around it thoroughly.
-With your tube sprayed down and the nub coated, wrap the nub back over the tube (1/2″ covering the tube, 1″ hanging over) and align the seams, BUT DONT press the seams together yet, keep the nub open. You can tape the bottom of the nub to the straw so it doesnt move around.
Step 6: Mold your ear
-Using the mold putty again, make another small 1:1 mixture. Depending how much you have left from the nub, use about half each to mix together.
-Once blended- flatten it a bit, choose an ear, and wrap it around the earlobe (If you are not doing earrings, this step is optional). You dont need to cover a lot of the ear, just make sure to get it around the base of the ear, and the front and back of the lobe. If you make it too tall/big, we can always cut it down a bit.
-Hold/press it to your earlobe for at least 30 minutes while it sets. The finished product are the yellow pieces in the image below (one for each ear, make sure to label them with a marker RF-Right Front and LF-Left Front for later)
- These are also made out of the putty so they also need coats of latex within the entire mold (thats why they look shiny).

Step 6: Prepare your station
Now that the tube itself is prepped, we need to get the rest of the station prepped because once you mix the silicone it begins to dry quickly, so we don’t want any mistakes.
-Make several precut tape stripes (10 to be safe) and have them ready nearby (about the length of your thumb)
-Lay out your newspaper/cardboard for your work area
-Take the cords/earbuds you’re using for the plug tips and cut it as close to the tip as possible (most likely need to cut where the nub starts, so you have a nub and a tip).
-Cut just over an inch off from the regular straw and set the larger amount aside
- Have your baggy, regular straw (inch), mixing cups (3), measuring cups (2), and mixing materials nearby.
- Mark each of your mixing cups/measuring cups as A, B, and C (no C for measuring cups). Do the same if you’re using Popsicle sticks, otherwise make sure you keep the mixing items separated).
-Lay down the tube so the open seam is facing upwards. You will fill it like this and tape it closed as you work.
Step 7: Mix the Silicone/pigment
We don’t have a lot of silicone, so we need to be careful with how much we use at a time. I actually had to buy a second batch since i was new to it.
-Using your measuring cups and separate mixing sticks, pour about a third of the corresponding container into it (Part A to A cup, Part B to B cup.
-Open your pigment container. A little goes a long way, so start with just a small dot at a time and mix it into the Part A cup. Your ears tend to be darker than you might think since it has red mixed in it (feel free to buy some red pigment flecks if you want, but i think its unnecessary for this since the silicone wont blend well anyway when applying it)
-Once you think you have your skin tone, add a bit more until its a tone darker. Mixing it with Part B will lighten it up again. It doesnt have to be a perfect match, but make sure its not too light or you’ll see a big difference (compare my skin to the test i made in the first image).
-Add half of A and half of B into the corresponding mixing cups. Now we have 1/2 in the mixing cups and 1/2 in the measuring cups. Since it tends to dry quickly, and you dont want to work too fast, we’ll use half of the mixture at a time. Once you finish the first half, you can quickly mix up the second premade half and finish it. But make sure to keep some off to the side, we’re filling the tube and nub separately. It will be the same color so there should be no blending issues.
-It can be done by yourself, but if you have an extra pair of hands, I highly recommend getting help.
Step 8: Mixing and filling the tube
Before taking these steps, I highly suggest reading through them first to get familiar with what you will need to do so you don’t waste time.
-Pour the Parts A and B from the mixing cups into the C mixing cup and use the C mixing stick to stir it.
-Stir quickly and thoroughly to make sure its blended. If you still think you need a bit more pigment, carefully add a bit more, but try not to do this so we keep both mixtures the same tone. It’s harder to do that when you add extra color separately.
-Once it’s mixed, carefully take the mixing cup and pour it into a sandwich baggy as close to the corner as possible using your mixing stick. Make sure to push all the mix to the corner so it’s tightly packed and can be used as a piping bag.
-Cut a very small hole at the corner of the baggy (small enough to fit within a regular straw opening. Which is very small. This way the mix won’t overflow out of it from a large opening). If you have a friend available, have them hold open the tube and be in charge of closing it as you pipe in the silicone. If it is only you, use one hand to hold open the tube while the other pipes it in. It will be messy.
-Starting from the bottom of the tube (taped), you’re going to open the nearest seam and insert the piping bag into it as far as you can and squeeze the mixture towards the end until it fills up. Basically squeeze until you see it coming towards the seam.
-Continue slow piping underneath the wire until it begins to fill to the top.
-As you pipe, let the seams close as evenly as they can and take a piece of tape and throw it over the seam to keep it in place. You can go over it with more tape after you finish. As you close the seam along the way, it will seep through the seam. That’s fine, you’d rather have too much mix instead of air bubbles from not being filled enough.Just try to smooth out the top of the seam from the mix so its only a thin layer of silicone instead of a gob. the tape will stick better and you can try to push the mix into the tube.
- As you pipe and tape up the tube, keep the wire in mind and make sure you’re piping under it so it’s not touching the tube itself.
-It’s likely you’ll run out midway. Now you can take an equal portion of A and B of the the premade mixture into cup C (Don’t use all of it, just enough to fill the tube, not the nub.). While that mixes, if you have a friend, have them fix up the tape and make sure the seams are smooth.
-Once the next batch it mixed, add it to the piping bag. If you noticed the old mix beginning to harden already, use the other corner of the baggy to pipe. Remember, cut a very small hole.
-Only fill up to the other end of the tube where the nub starts. Once you get to that point, you can tape that up as well as the press the nub seams together (make sure it’s pressed evenly for a seamless seam). Now that the tube is full of silicone mix, feel free to tape the nub together and add more tape to secure the seam.
-Once everything is taped up, let the tube stand vertically and lean it against something where it won’t fall over (I had a cardboard tube that fit over it to keep it straight while it leaned lightly against my monitor. Try to have items surround it to keep it standing straight).
- After about a half hour, it should be firm enough that liquid wont spill out (check any leftovers in the C cup and see how firm it is, it should be similiar), so you can now mix the remaining mixture and add it to a new piping bag (or a clean corner).
-Cut a very small hole. This time you will use the inch long straw to help pipe the mix through the nub from the top.
- With the hole cut, place the straw into the nub (make sure there's still enough sticking out so you can hold it.) and place the baggy tip (with its tiny hole) over the top of it. You will be filling it vertically from the nub opening.
-Pipe the mix into the straw and slowly bring it up as it fills. By using the straw, it ensures no air bubbles from where you left off. If you run low of mix in the bag, remember to squeeze out the mix trapped in the straw.
- DO NOT fill it to the top of the nub, stop short.
Step 9: Insert the jack tip
- Once it is 85% full, while still holding it vertically, take the jack tip you cut off earlier and slowly insert it into the middle of the mix from the top until only the metal it showing (image above). If you get some mix on the metal, you can peel it off, but try to keep it clean.
- Hold the jack tip steady so as much metal is showing while hiding the nub attached to it. This requires patience, you cannot let it move until it hardens after a few minutes. If you let it go, it will sink down. If you tilt it to the side to make it straight, make sure to check all the sides. It’s best to hold it by the tip if possible to ensure it stays int he middle and doesnt move.
Step 10: Opening the tube and touch ups
After about a half hour, you can check the top of the nub to check the firmness (remember, check the C cup to check the firmness without touching the actual pieve first).
-Once it is done setting, you can remove all the tape.
-Carefully and slowly begin to pry open the nub seam. You may need to cut it a little if its resistant.
- As you open the nub, the latex should peel off with the silicone. peel the latex off once detached.
-Very delicately, wedge open the seam for the tube. Depending on how even and how much it was sprayed will decide how easily it comes off. sometimes there are tough spots that want to stick, you need to slowly pull at it and use your finger to jab at the stuck silicone to nudge it off. If you pull too much it may rip, so pull and nudge. Take your time if needed, it will be a waste if you rush this part.
-As you gently make your way down, you can undo the tape securing the tube to the flat surface to free it along with the wire.
-Once it’s all freed, snip off the end to make it flat (use wire cutters to snip excess wire).
-As long as everything came out okay, you can use scissors to cut the seam excess. Boom, main body is done
(If you have bubbles, tears, or other issues, it’s possible to make a small of amount of mix, recoat the tube in spray, pipe a thin line down the center, and use that as a layer to cover up imperfections, but you need to make sure the skin tone matches up, so make sure you have references to match it. This isn’t recommended because it makes the earjacks thicker and only complicates it more, but when trying to cover imperfections in other ways, it didnt turn out smooth and it came out shiny which was noticeable. Use only if needed.)
Step 11: Add the earlobes
-Now that the main body is done, use the same process for the ear molds. Make sure they are properly coated with latex, spray the demold in it.
-Make small batches for the ear and apply thin layers, one side at a time. If its too thick, it will build up and make it thick along the bottom instead.
-Continue on the front, back, and bottom of the ear until if has a decent thickness to it from several layers.
-Once done setting, remove it along with the latex.
-Take the main body and the lobe, and see how they should line up in the mirror for where you should attach them.
- Cut out a slit on the top of the end of the body where the lobe will be attached. This way it will sit in a small slit comfortably instead of on top of it.
- Mix more silicone to use as glue. You shouldn’t need that much. Add some in the sit before placing the lobe there, and around both of them to help blend the lobe of body together. Once done, it will look like the image above (minus the earring).
Step 12: Add the earring studs
-Go back to the mirror and see approximately where the stud should go on the inside of the lobe where it fits in your ear. If you don’t have earrings, skip this step.
WARNING: make sure the back of the studs are not super tight on the posts. Try sliding them back and forth and see if it glides. Loosen the backs manually if they are very tight by gently pulling it apart. It will be impossible to take them off if they are super tight, please check and adjust them before testing them out. Once they slide easily on the posts with minimal friction, then you can try them on and go from there.
-Make another very small batch of silicone and place the stud where it belongs on the inside of the front of the lobe. Use the silicone as glue to attach the stud all around it (make sure the stud is attached to the front so the pole can go through your ear and to the back). It should look like the image above when dried.
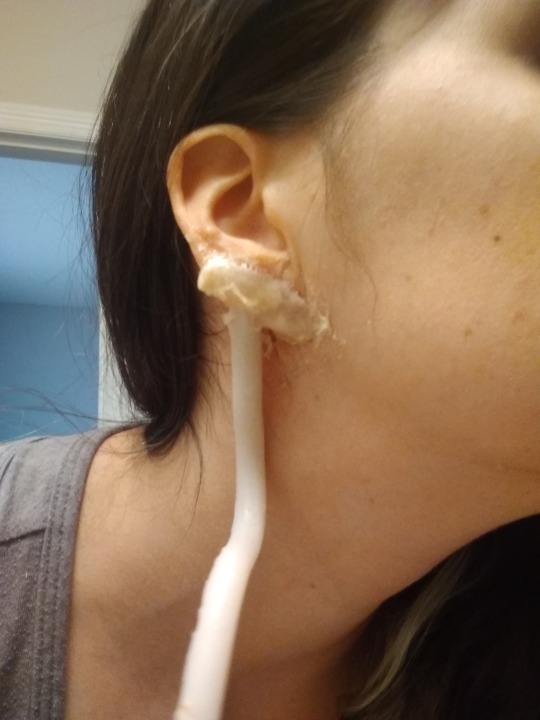
Step 13: Attaching the earjack to your ear
I know it doesnt look pretty, but your wig should cover it anyway. This also takes a long time (about an hour each ear from my experience)
-Pull your hair up away from your ears (wig cap is best)
-Generously apply Vaseline all over your ear (front, back, sides and bottom) and an inch or so around it by your jaw and hair line. This is the only way you will get the latex to come off without absolutely ripping all your facial hair off.
-Align the correct earjack to the correct ear.
-With a Q-tip (preferably the pointed ones they use on nails), take a bit of latex and apply it inside the edges of the lobe on both sides of the earring stud. Make sure not to get any on the earring itself, only the edges of the lobe
-With the wet latex, insert your ear to fit within the piece properly and push the earring through and secure it with the backing.
-With one hand, hold the lobe in place so the edges are as close to your ear as possible for the best seamless fit. Let it dry for ten or so minutes.
-Once the inside dried a little bit, take the Q-tip and apply a layer of latex around the seam on the lobe and on your ear. MAKE SURE to not add latex to the earring! otherwise you’re gluing it to yourself. You want the latex and your earring always separate.
-Let it dry using the hairdryer on cool. It’s best to wait until its completely dry before adding a new layer.
-Keep adding thin layers and letting them dry. Add latex along the seams in the front, along the bottom, and along the top where the lobe is suppose to blend in. You can add a little bit to the back as long as it does not touch your earring, you might want help with this part (If you’re not wearing earrings, just slather the latex on everywhere, but still in layers).
After layers upon layers, it’s done! Just repeat the process for the second one. Be careful though, latex will fall off after awhile if it moves around too much. The more layers and the more ear it’s attached to, the better, but I still had issues when using them. It’s not comfortable when they start coming off and hard to fix on your own if you’re at a con. When taking it off, just start peeling off the latex and take off the earring. It’s still probably gonna hurt a bit, but not nearly as much if you didn’t use the Vaseline. It’s not gonna be blend in very nicely, and make up didn’t work well for me, but rely on the wig to cover that and try to take front facing pictures.
For the flimsy ones, it’s a little easier. Full wired ears take more latex and more time to dry because of the added weight. (then again, the one i made was thicker overall so that probably didn’t help). For the wired ones, I suggest making a pose where you can walk around and have the wire rest against your collarbone. I kept the wire straight down until it was resting against me, then curved it up and forward like a U shape, then twisted the jack-tip from there. The U is what sits on your collerbone though which helps support it’s weight. To see some examples (if I posted them) you can see me finished cosplay at Sakine-cosplay on Instagram.
It’s not perfect, but it served me well for the con (as long as you have time in the morning). If you have any suggestions on how to improve it, let me know! If you have any problems or questions feel free to ask. And if you make some or any other silicone related projects you may have used this for, I’d love to see how they turn out!
#cosplay#props#makeup#costume#jirou kyouka#tutorial#my hero academia#boku no hero academia#earphone jack#mha#bnha#how to#my art#convention
11 notes
·
View notes
Text
How to Remove a Windshield & Quarter Glass
Press the glass into the opening from the outside of the car. Use even pressure to hold it up against all of the opening. You may need more hands to do this so use an assistant if you have to. While pressure is being applied from the outside of the car holding the glass into its opening, start pulling one end of the nylon cord towards you while you are inside the car. Be careful not to tear the lip of the weatherstrip while doing this. Starting at a corner of the glass, gently pull the nylon cord, working it in a circular motion to gradually coax the lip of the weatherstrip into into its seat on the mating flange.
Sometimes it is best to R & R (remove and replace) glass for a repair. This article will demonstrate how to remove a windshield, quarter glass and instructions for other automative glass, whether you need to repair or replace it. One of the limitations of refinishing around glass openings is achieving a good masking of the weatherstripping without the tell-tale line of paint where the masking tape covers the weatherstrip. When doing a total restoration of an older car (such as a Ford Mustang), the only way to achieve a perfect paint job around the glass openings is to remove the glass.

Glass Definitions
First, let’s clear up the words. The front glass is called the "windshield" here in the USA (the British call it the "windscreen"). The rear glass is not called the "rear windshield". It is called the "back light".
Then there is the "door glass" for windows that retract into the doors. Lastly, there is the "quarter glass" as found on 2-door coupes. Quarter glasses can either retract like door glass or open outwards at the rear by means of front hinges. They can also be stationary (like in a Volkswagen Beetle).
Two Ways To Mount Automotive Glass
Other than mounting quarter glass with screws (such as in the Honda Civics and Accords), there are two ways glass is usually mounted in the vehicle.
Windshields, back lights and quarter glasses are mounted to the body shell to a mating flange where the inner and outer body panels are welded together.
One way the glass is mounted is with rubber weatherstripping to hold the glass in place.
Weatherstripping sometimes comes with strips of metal trim which is inserted after the glass and weatherstrip is installed. Sometimes these trim pieces actually wedge the glass and weatherstrip to help hold them into place.
The other way is where a water-tight adhesive is used to glue the glass in place. This adhesive takes the place of overlap both the body panels and the glass. In this case the glass contributes to the overall structural integrity of the car. In most modern unibody cars this is the usual method of mounting glass.
There are a number of different brand options for tools depending on the type of installation or repair you are going to undertake, but a couple standouts are Equalizer and Glass Technology.
Windshield Knives
To remove glass that is held by adhesive, you need a windshield knife. Pneumatic versions of these windshield cutters are available, along with assortments of blades.
In reality, there is little chance of removing glass that is held with adhesive without breaking it. Usually you remove glass that is already broken, such as in collision repair.
The knife is worked into place under the glass and it is drawn towards you, steadily rocking back and forth while pulling on the knife.
Windshield Wire Kits
Another alternative to the knife is the use of windshield wire along with a pair of grips. Some handy windshield tools include the windshield chisel and windshield scraper.
Replacing Automotive Glass Using Adhesive
Once the body panels have been refinished, replacing glass held in place with adhesive is a straightforward process. First, fit the glass to the opening to make sure there is a perfect fit. If necessary, continue with sheet metal straightening before refinishing the panels until the glass fits perfectly. Obtain a caulking gun and a tube of windshield adhesive (such as one manufactured by 3M) obtainable at your local refinish supply house.
Make sure that both the glass and the body panels have been thoroughly cleaned to remove all contaminants and old adhesive so a perfect water-tight seal is attained. Apply the adhesive to the mating flange on the body panel evenly so there is an unbroken bead all the way around the glass opening.
Carefully place the glass onto the opening and press it down so the bead of adhesive spreads slightly. Make sure to allow room for the trim pieces. There are spacers designed for this purpose which can be obtained. Let the adhesive set for the recommended time. Then reinstall the trim pieces.
Remove Quarter Glass
Removing and replacing glass held in place by weatherstripping is a little more straightforward but there are a handful of glass removal tools that could prove helpful. Let’s use an example of a quarter glass first. Quarter glass can easily be removed by one person without breaking.
From the inside of the car and using the thumbs and forefingers, start by gently working out the lip of the weatherstrip on a corner of the quarter glass. Proceed from this corner around the quarter glass gradually working out the lip while gently pushing the quarter glass outward. Work all the way around the quarter glass in this manner to first loosen the lip of the weatherstripping.
Finish Removing Quarter Glass
Select a rounded corner of the quarter glass as a candidate for pushing the glass and weatherstrip out and push out this corner to dislodge the weatherstrip from the sheet metal mating flange.
If the glass doesn’t dislodge without flexing, you have to work the lip out more before pushing. Don’t force it or you will break the glass.
Once you have worked a corner completely out, it is easy to finish the job. Gradually pull the lip of the weatherstrip away from the mating flange from both directions of the pushed-out corner. The glass will come completely out with the weatherstrip attached to it.
Remove Windshield
Removing the windshield is a little trickier than quarter glass, though we do have a handful of windshield repair kits that can make it easier. First, it’s bigger and it is usually curved. Second, sometimes this requires an assistant to help. Start by removing any trim pieces on the weatherstrip that may be wedging the weatherstrip in place. Also remove any interior trim from around the glass. Start by loosening the lip of the weatherstripping all the way around from the inside of the car as with the quarter glass.
You will be using your feet to dislodge the glass. Adjust the front seats and assume the position shown in the diagram. You will be pushing both top corners at the same time. If you have used enough silicone lubricant and loosened the weatherstrip enough, the top two corners will pop out.
Reinstalling the Windshield
The technique for reinstalling quarter glass or windshield or back light for glass held in place by weatherstripping is all the same. Obtain a piece of 5/16 to 3/8 inch dia. nylon cord. Make sure it is long enough to wrap completely around the weatherstrip and overlap across the corner of the glass (see diagram). First attach the weatherstrip to the glass making sure that the outside of the weatherstripping faces the outside of the glass.
The weatherstrip has two grooves, one for the glass and one for the mating flange on the body shell. Insert the nylon cord into the groove for the sheet metal flange. Push it all the way down inside the groove and pull it tightly around the weatherstrip and overlap it at one of the corners of the glass as shown in the diagram.
Press Glass Into Opening and Pull Cord
Spray silicone lubricant into this groove so the cord and the weatherstrip is thoroughly soaked on the inside as well as the side that faces the glass opening. You can’t use too much lubricant for this step.
Press the glass into the opening from the outside of the car. Use even pressure to hold it up against all of the opening. You may need more hands to do this so use an assistant if you have to. While pressure is being applied from the outside of the car holding the glass into its opening, start pulling one end of the nylon cord towards you while you are inside the car. Be careful not to tear the lip of the weatherstrip while doing this. Starting at a corner of the glass, gently pull the nylon cord, working it in a circular motion to gradually coax the lip of the weatherstrip into into its seat on the mating flange.
youtube
Work in one direction only, seating the weatherstrip as you pull out the nylon cord. You will pull the cord out all the way around until you hit the overlap area. The overlap is there in case the weatherstrip unseats as you go around.
Find Original Article Here!
1 note
·
View note
Text
Handy Tools for Sculpting
I have used each type of tool listed here a couple of times. You will not need most of the tools listed here, so I will start with the most important ones.
At the end you will find tools that do not help with sculpting directly, but help creating your wiremeshes for your sculpts, for example.
Here we go!
Basic Sculpting Tools:
"Surgery tools"

Price: 10-20€ per set
Purpose:
handy allrounders, very flexible usage
good for wavey shapes (clothing)
reach areas you normally can’t
good for detail work
good for smoothing work
I absolutely love these, they are my fav tools!
Buying Advice:
Make sure the tools are from stainless steel
If you do not, the material may smell badly when hold in your hands
Styluses

Price: ~8-10€ per set
Purpose:
maximum surface control
good for organic shapes, e.g. muscle, facial features
small styluses are good for detail and texture work
large styluses are good for smoothing out areas and getting them into shape
my second fav tools!
Other Sculpting Tools:
Artist’s Spatula/Cutting Knife

Price: 3€ per set
Purpose:
cutting rolled out sculpey (works better than with a scalpel!)
evening out large areas and getting a basic shape done
Noodle machine
Price: 14-30€
Purpose:
fabricate even sculpey surfaces for clothing, hair, belts, and pieces meant to correct (e.g. make something thicker)
can be used to properly condition sculpey
Buying Advice:
DO NOT buy the modelling mass machine from Staedtler. It’s way too expensive (50€).
Make sure the noodle machine has an attachment for lasagna
Make sure you can adjust the thickness somehow
The one pictured above is very similar to the one I got and was ~14€. It can roll out sculpey so thinnly it’s semi-transparent. It also allows a thickness of around 10mm and more.
Usage Advice:
Do not make actual noodles with the attachment you formed your sculpey. If you do, clean it thoroughly.
“Wiretools”

Price: ~15€
Purpose:
removes sculpting mass
handy for rough work and correction work, like evening out surfaces if you added too much mass
Easy texturing
The smallest one is superb for fur and hair
Buying Advice:
You can make these easily yourself using wire, some kind of container, like old pens (see above) or brass tubes, and an adhesive, e.g. superglue. My first little set of self made “wiretools” were made of wire, cotton sticks and super sculpey.
if you need a special head shape, buying them might be appropriate
Silicone or Rubber Clay Shaper

Pictured: Silicone clay shapers
Price: ~5-10€ per set
Purpose:
smoothing out surfaces
removing tiny clay pieces
carving subtle details
good for details on hair
Buying Advice:
Silicone is softer than rubber. Which ones you get depends on what you want to do with it. Silicone is good for shaping Super Sculpey Medium and smoothing out Super Sculpey Firm. It also allows you to carve in very subtle details. Rubber makes more distinct details on Super Sculpey Medium. With it, it’s possible to make details on Super Sculpey Firm too, but smoothing it only works decently if used with water together.
Other Tools:
Scalpel/Cutter

Price: 5-7€
Purpose:
cutting stuff
carving stuff
can be used for both sculpey and wood
Buying Advice:
Make sure you can reattach the blades so you can switch broken ones or attach other types of blades
Clamps

Price: 10-30€ and up
Purpose:
bending wire
holding pieces e.g. when grinding or drilling sculpey, wood, metal
more for creating accessoires for your figurines
Buying Advice:
These go in different shapes and sizes!
small to mid-sized clamps suffice for attaching pieces to your work surface
the best is to attach a table clamp to a workbench, if you have one
if you want to use them for drilling holes, buy heavy clamps designed for this purpose (these can be attached to a work surface as well)
I have 3 clamps in my possession: A small one (a similar one pictured above in red), a mid-sized wooden clamp, and a heavy drill clamp (pictured above in blue). This setup suffices for most of DIY applications.
Pliers

Price: 3-20 €
Purpose:
bending wire for your sculpture wiremesh
hold stuff when you can’t use your fingers
Buying Advice:
Make sure the pliers have a rectangular profile and are kinda pointy, this allows for more precise bending
If you only intend to bend wire, a small pair of plies for about ~5€ suffices
Try to avoid the real cheap pliers if you plan to keep it for a bit longer. Mine was ~15€ and is pictured above; it should hold out for a lifetime. I also have a tiny pair of pliers that was 3€ before that one and it’s just bad
You can use a pliers/cutter combination tool to save money, but it may have some drawbacks compared to a sole pair of pliers
Cutter/Cutting Pliers/Wire Cutter:

Price: 5-20€
Purpose:
cutting stuff, especially wire (duh)
Buying Advice:
if you’re going to use it for different purposes too, it may be advantageous to buy a more expensive tool (+10€) so it lasts longer
You can use a pliers/cutter combination tool to save money, but it may have some drawbacks compared to a sole cutter (dedicated cutters just cut better, esp. small parts)
14 notes
·
View notes
Text
ALL ABOUT SILICONE RUBBER DIE CUT GASKETS& ITS CUTTING METHOD
Silicone Rubber Die cut Gasket manufactures have changed over the years to provide new and better originations for all sorts of gaskets and seals. Die cutting silicone rubber gaskets is ultimately the easiest and most cost effective process manufactures offer.
Silicone Rubber Die Cutting
When it comes to make outline design for die cutting machined tools is being used. In this case gasket and used with a hydraulic press to shear material out of large rolls of raw material. This type of raw material could be anything from silicone rubber to metallic materials. This type of process is just like the same as a hole puncher generally we used for office provisions work. The press will house the die under the hydraulic press and while operation it will press itself into a material cutting to the die design that is suitable for your desired application.
These type of dies are made of steel rule, that have long life probability, and it should be good for mass production. Die cutters could easily products thousands of silicone rubber tubing, gasket and seal per hour. It has low tooling cost and great for high volume orders. Design tolerances can be anywhere from tenth to thousandth of an inch from the desired design.
Elastostar Rubber Corp is a leading die cut gasket manufacturer in USA with a wide array of capabilities and techniques focused on bringing best value to customers. Here are some benefits you will only get with Elastostar Rubber Corp.
CNC Die Cutting
Large Die Cut Footprint
Cost Effective Steel rule die cutting
Machined solid steel dies for complex and acceptance delicate parts
Which is the Best Die Cutting Method:
There are various die cutting method utilized to make die cut gasket. The best and effective manufacturing gaskets will be depending on acceptances, quantities, and the rubber materials being cut. Elastostar Rubber Corp will work with engineers to help design for the best converting method, to make it cost effective and improving handling. The Applications Engineers at Elastostar Rubber Corp will help you evaluate design for manufacturability and minimize manufacturing cost. Minor design changes will surely save your thousands of dollars in products cost for sure.
High Speed Die Cutting Gasket
Automated Die cutters are generally used for relatively less, thin die cut gaskets which have med level volume. Die cut gasket range from 0.25 square or round to 12 square. The flatbed die cutters are capable of cutting with adhesive on side. Fast cutting is when the die blade cuts through the gasket material and don’t cut the adhesive line.
CNC Gasket Die Cutting Unit
Elastostar Rubber Corp CNC cutting unit is naturally utilized to die cut mid to large sized gaskets. With its enhancing software, constant feed belt, and faster hit rate, the CNC unit is used for larger rubber gaskets with mid-level volumes (200,000 – 4500,000 per year).
Die Cut Gasket Applications
Elastostar Rubber Corp focuses in die cutting custom silicone rubber gaskets for many applications and industries. The following are some examples of custom die cut gaskets and their uses:
Die cut adhesive LED gaskets
Die cut LCD bezel gaskets
Die cut battery pads
Die cut radome gaskets
Die cut eco-friendly gaskets
About Elastostar Rubber Corp:
Elastostar Rubber Corporation is an industry leader in silicone manufacturing with goal to help our customers in achieving sustained profitable growth as a problem solver and provider of high quality products and services. We provide design, engineering and manufacturing of elastomer products to our customers globally backed with our streamlined and innovative supply. Feel free to contact us for more information.
0 notes
Link
Rubber Tube Air Shaft manufacturer, Air Shaft Manufacturer India, Mechanical, Expandable shaft with different size and different length on requirement. Rubber Tube roller is effectively used in textile. State of the Art technology to remove complete ovality from the existing tube rollers and to prevent them in the future a special development of SS Rings has been provided. Used for Mercerizing Machine. roll cutting machine, rubber tube sleeve, rubber piping,4 inch rubber hose, rubber inner tube, neoprene tube sleeve,2 inch rubber hose, latex rubber tubing, flexible rubber tubing, silicone rubber tubing, slitting cutter, rubber tube roller,
0 notes
Text
Check Out These Must Have Kitchen Tools
New Post has been published on https://homekitchen.info/check-out-these-must-have-kitchen-tools/
Check Out These Must Have Kitchen Tools
Do you have all of the kitchen utensils that you need to become a better baker of cook? Most kitchen tools are easy to find and inexpensive but it is easy to overlook some basic pieces that should be in every kitchen. Here is a list of some must-have kitchen tools.
An Assortment Of Good Spatulas
This is the number one kitchen utensil in every kitchen and the one that is missed by beginning bakers. A spatula of some design is vital in baking and cooking and is an amazing multi-purpose tool. Most spatulas are made of silicone coated rubber, wood or light aluminum. A basic baking tip taught in all culinary schools is that you can never have too many good spatulas.
Dry And Liquid Measuring Cups
Don’t fall into the trap of grabbing a cup out of your cupboard and using it to measure ingredients for the recipe that you are trying. You need to have two types of measuring cups for any kind of baking or cooking. One set will be for liquid measurements and will have a spout for pouring. These cups are usually clear with the amounts marked on the outside. Dry ingredients require a separate set of cups, ones that have a smooth, even rim for whisking off excess ingredients. In baking, one needs to be exact. Guessing will almost always cause you problems in the long run. Every home kitchen needs two sets of measuring cups.
Sifter For Flour and Other Dry Ingredients
It is very important that all of your dry ingredients, especially your flour, is lump free and is smooth. Using a sifter breaks up any clumps of flour or corn starch (or baking powder and baking soda) and gives you a silky bowl of dry ingredients. You will notice the difference in any batter or dough that you make using sifted flour.
youtube
Rolling Pins
In shaping and flattening your dough, using a rolling pin is more practical so you may as well forget about the ides of kneading or molding it with your bare hands. Rolling pins are usually made up of wood, glass, marble, stainless steel or plastic.
Cookie Cutters
You’re made with your dough and are now ready to form your cookies. Go artistic and utilize cookie cutters! Cookie cutters which are normally comprised of tin, stainless steel, plastic, copper or aluminum are designed to cut cookie dough in specific distinct shapes. Designs include stars, hearts, moon squares, shapes and circles to call a couple of. Kids will surely be attracted to grab one of these cookie characters.
Cookie Presses
A tube style cookie press is an extremely handy baking tool utilized to push designs on cookies. It is usually made up of a cylinder which has a plunger on the other end. Designer plates are connected to the press to mark the cookies.
Ovenproof Mitts
Baking suggests needing to deal with a hot oven so it is best that your hands are secured from heated surfaces like the stove or baking pans. To prevent getting burns, oven mitts need to always be worn in the kitchen. These mitts are frequently made out of materials that are heat and flame resistant and are usually insulated. These oven mitts keep you safe and burn free in the kitchen, although they are not invincible from hot liquids which may still leak through the fabric.
0 notes
Text
Materials You May Requirement for Residence Enhancement
youtube
The materials that you will should tackle a home enhancement project depends on exactly what the job handy is. With any home improvement or repair service job, you will require numerous kinds of devices as well as materials. Lots of materials can be purchased a rather reduced price, while some equipment will certainly be pricey, yet could be made use of for multiple works.One thing that will certainly be needed before you begin any type of home enhancement task is a building license. If you do not get one, you will go through steep fines and also penalties. Contact codes enforcement before starting any large home improvement project.For works that need you to deal with sub-flooring, you will likely call for some kind of bonding agent, screws, a level, plywood, lumber, and nails. If you are installing brand-new hardwood floor covering you will most likely require sandpaper, clean cloths, paste wax, timber restorer, oxalic acid, cleansing tools, rubber gloves, vinegar, timber spots, nails, a putty blade, a floor buffer, a hammer, and also a vacuum to complete the work appropriately. fayetteville ar houses for sale Not having the best products for any home improvement job can result in additional cost as well as any type of number of issues. Study just what you need, and get the very best materials that you can afford. As an example, paneling the walls will call for a selection of devices and also materials, consisting of a putty blade, a nail collection, a caulk gun, a level lever, a square, a mallet, a hammer, a carpentry knife, as well as a wallboard blade. You will certainly also have to get the paneling, timber filler, putty stick, completing nails, glue, as well as shims to end up the job right.An usual outside project is constructing a pond, which will certainly need you to have a tube, hammer, spade, some fish pond liner, a degree, sand, ornamental rocks, and mortar. You might likewise wish to consider landscape products, such as plants or blossoms.Pipes works could be challenging, however could be done yourself. For instance, repairing a shower can typically be done by acquiring a repair work set. The package could consist of floor covering, wall surfaces, or doors. It might likewise contain showerheads as well as faucet.Considering that packages do not usually had devices, you should have a fundamental stock of them. For plumbing, you could need PVC Pipeline, primer, CPVC Concrete, screwdriver, a pipe wrench, tubes cutter, liquid nails, and Silicon Sealant.To fix or replace drywall, you just need to comply with a couple of easy steps. The task will need a putty trial, tray, sandpaper, joint putty, and also a scraper.Tile repair service could be challenging if you don't have the right tools for the task. You will certainly need sticky, scraper, a carve, a hammer, as well as caulk.For woodworking tasks, you will should get certain devices for the job. You will require some type of ear security and also eye security. You will certainly need a flooring sander and belt sander, which could be rented out by the hr. You will likewise require a dirt mask, a fining sand block and also different grains of sandpaper, a paintbrush, and go across peen hammer. Various other woodworking devices you may intend to purchase include an aircraft and a cut hook.It is necessary to remain on job when dealing with house enhancement tasks, and also to get the right tools for the task. This will protect against complication as well as errors, will could cost more time and money.
0 notes
Text
Advice on Emergency Dental & Orthodontic Treatments During COVID-19
New Post has been published on https://www.sonriadentalclinic.co.uk/advice-on-emergency-dental-orthodontic-treatments-during-covid-19/
Advice on Emergency Dental & Orthodontic Treatments During COVID-19
BOS Covid-19 Orthodontic Emergencies Protocol
In light of the most recent evidence on the spread of covid-19 in relation to AGPs, the PPE available and to prevent transmission of the disease, we have created an emergency orthodontic protocol to deal with all but the most urgent orthodontic problems.
Most orthodontic appliances can be left in situ for some months without detriment to the patient if the patient continues with the usual after care instructions;
• Exemplary oral hygiene – brushing 3 times a day with their standard toothbrush, followed by interproximal brush use. As an adjunct, use of a fluoride mouthrinse eg. Fluoriguard (225ppm), once a day.
• Low sugar diet – Where possible avoid all snacking on sugars and drinks with ADDED SUGAR. Fizzy drinks should be avoided in particular.
• Avoid hard, sticky and hard foodstuffs that could break the brace wire or fracture brackets (debond) off a tooth.
Patients may ring in the coming weeks with pain, problems and loose wires. At present, the best advice is to avoid all but the most essential mouth procedures to limit spread of the disease to the wider population.
In the event of a patient needing to attend with an orthodontic emergency, the following protocol has been put together to help best treat the patient and keep staff members safe.
Upon receiving a call it would be wise to have a member of the orthodontic team speak to the patient or parent (either immediately or at a later agreed time) to identify the problem and determine if a visit to the practice is essential;
1. Are they in pain?
2. What is the problem?
3. Identify if it is something the patient can deal with at home?
4. Verify that they have an acute orthodontic problem that is affecting lifestyle?
If the practice/unit member contacting the patient is not a clinician and is in doubt about the triaging of the urgency a suitably qualified health care professional (HPC) should be informed to assist the decision making.
The following information should be obtained
1. A summary of the issue
2. Any medical issues that may impact on the decision making
3. Photos of the problem taken on a smartphone and sent to the team by the route determined by that unit.
Once the appropriate information is received
1. Advice should be given over the phone (+/- video calling) where possible
2. Arrangements made to see patients where necessary (see justifiable issues below)
Please refer to your local area arrangements regarding emergency care. This may be local or in secondary care units BOS Emergencies protocol v5 25th March 2020
Common ‘emergency’ brace problems and solutions:
If you are an orthodontic patient following the advice contained here PLEASE where possible contact your orthodontic HCP first to ensure that you are carrying out procedures safely and not preducing other aspects of your orthodontic appliance
If you are a dental health practitioner seeing a patient please consider these guides for safe practice
o Full PPE is advised (see link here)
o Patients only attend at the time of their appointment
o Patients must not bring other family members with them
o Patients should wait outside the practice until their appointment can commence
o Patients should leave the unit immediately after their appointment
o Units must make all emergency appointments long enough to ensure there is adequate time for cleaning and management of clinical waste
o Patients should wash their hands or use of hand sanitiser on entering the unit.
Wires Digging in
Home advice ○ If a thin wire, it may be possible for the patient or family member to use tweezers to replace wire in the tube/band or tweezers and a nail clipper/scissors to shorten the long end
○ It may be that a thin wire is the correct size but may have rotated round the teeth so that it is short on one side and long on the other. Using tweezers a pencil with a rubber on the end or a teaspoon, it may be possible to push the wire back round to prevent the long end digging in.
○ If the wire is very thick and stiff (discuss with your HCP) it may not be possible to cut the wire with home instruments. If this is the case it may be necessary to cover the wire to prevent it being sharp. Relief wax/silicone may be sent to you or you can buy it online (Orthodontic Wax) Failing that using a wax covering from hard cheese (baby-bell, cheddar), Blue tack or even chewing gum may help
● In clinic advice ○ Trim and adjust as simply as possible. (Distal end cutter if available – wire cutters and forceps to hold the loose end if not)
Broken Bonded Retainers
Home advice ○ Push wire back down towards the tooth as much as possible. (Fingers or tweezers)
Cover with best medium available (Ortho wax, Cheese wax, Blu tack, chewing gum)
Cut the exposed unbonded wire using tweezers and nail clippers/scissors
Gently pull the wire to remove the whole retainer
Advise greater use of removable retainers if present
BOS Emergencies protocol v5 25th March 2020
In clinic advice ○ Trim wire
Remove wire
Advise greater use of removable retainers if present
Lost Retainers
Home advice ○ Contact HPC – it may be that your unit has access to your final moulds and can make a new retainer remotely which can be posted out to you
If it is not possible to get a replacement retainer you could consider ordering online a ‘boil in the bag’ (heat mouldable) gumshield to use and wear at night to reduce the risk of relapse (unwanted tooth movement). It should be noted that these appliances aren’t specifically designed to hold teeth in position so the manufacturer cannot be held responsible for any relapse. Please contact your HCP before investing in this strategy to ensure all aspects of this compromise for retention are understood
In clinic advice ○ Do not visit unit
Gold Chains
If the gold chain was recently place and is now dangling down, it may be possible to cut it short. Gold is quite a soft metal and it may be possible to cut the chain using some nail scissors or nail clippers. Always hold the loose end with tweezers or similar item. If possible leave at least 5 links through the gum so it can used later by your orthodontic team
If you have a none dissolvable coloured stitch discuss with your HPC about the feasibility of removing it at home using nail scissors to prevent a minor infection in the gum.
In clinic advice ○ Do not visit unit
Orthognathic Post-Op
● Home advice ○ Discuss with your local hospital team your specific concern/problems for the best advice
○ Consult yourjawsrugery.com for general post op advice (Here)
○ Stop or reduce post surgery elastic wear as advised by your HPC.
● In clinic advice ○ Ensure patient doesn’t have acute infection/swelling/infected plate.
○ Stop or reduce post op elastic wear as you see fit.
○ Reassure patient about continuity of treatment at next visit.
○ Do not provide any active orthodontic tooth movement
Aligner therapy
Home advice
BOS Emergencies protocol v5 25th March 2020
○ If your current aligner is in good order keep wearing it as much as possible
○ If your current aligner is broken or ill fitting, step back to your previous aligner
○ If neither option is open to you, ring you HPC for advice ■ It may be possible to have a new aligner at the correct stage made for you and sent out to you
Or with advice from your HPC a ‘boil in the bag’ (heat mouldable) gumshield to use and wear at night to reduce the risk of relapse (unwanted tooth movement). It should be noted that these appliances aren’t specifically designed to hold teeth in position so the manufacturer cannot be held responsible for any relapse. Please contact your HCP before investing in this strategy to ensure all aspects of this compromise for retention are understood
● In clinic advice ○ Do not visit unit
Bracket off
This is not urgent unless it is causing trauma to the soft tissues.
Home advice ○ It may be possible your HPC can guide the you on how to remove the bracket from the wire via video if it is causing trauma.
It may be the possible to leave the bracket if it is not causing any problems at present. Consider contacting your HPC for advice.
In clinic advice ○ Do not visit unit
Elastic Bands
Home advice ○ At this time if you run low or out of elastics your HPC may either send you a some more out via the post or advice cessation of wear.
In clinic advice ○ Do not visit unit
Band off
Home advice ○ If band is very loose your HPC may be able to talk you through removal of the band and trimming of the wire depending upon your stage of treatment.
It may also be also be the case your HPC advises you to leave the band in place. If this occurs please ensure you adhere to good oral hygiene and a low sugar diet to prevent decay under the band and around your tooth.
In clinic advice ○ Remove band and trim any excess wire to the distal aspect of the last back tooth with a bracket or band on.
Band off Quadhelixes, RME, TPA +/- Nance
Home advice ○ Discuss with your HPC about the nature of the looseness and take advice accordingly.
BOS Emergencies protocol v5 25th March 2020
Push band back onto tooth if it will locate and ensure you adhere to good oral hygiene and a low sugar diet to prevent decay under the band and around your tooth.
Remove appliance
In clinic advice
Removable/Functional appliances
Home advice
Check for comfort and retention
If unsure about how much to continue to wear the appliance discuss with your HPC
If fractured or ill fitting do not wear the appliance
In clinic advice o Do not visit unit
Separators
Home advice
These should be removed at the earliest opportunity – Attempt removal with end of safety pin, small paper clip or wooden tooth pick
• In clinic advice o Do not visit unit
Lost module(s)
Home advice
No action required – try and make wire where the module has been lost secure with dental wax, cheese wax or blu tack and chewing gum
In clinic advice ○ Do not visit unit
Temporary anchorage Devices TADS
Home advice
HPC may assist you in removing and springs or elastic chain moving the teeth
In clinic advice
Remove
Headgear
Home advice
Stop wear
In clinic advice ○ Do not visit unit
Lost spring
Home advice
No treatment required
• In clinic advice o Do not visit unit
Fractured/Frayed power chain BOS Emergencies protocol v5 25th March 2020
Home advice o Accept situation– most powerchain will denature in 4-6 weeks and become passive
Remove powerchain with tweezers if necessary
Cut fayed end as short as possible to improve comfort
In clinic advice o Do not visit unit
Exposed end of wire tie – long ligature or short ligature.
• Home advice o Re-tuck sharp end under wire/bracket using tea spoon or tweezers
o Remove wire if broken with tweezers if possible
o Cut fayed end as short as possible to improve comfort with nail cutters or scissors
o Cover for comfort using Ortho wax, Cheese wax, Blu tack, chewing gum
• In clinic advice o Do not visit unit
0 notes
Text
TOP Do It Yourself Home Plumbing Projects With Tricks In 2019
Repair a Toilet
What You'll Need: Pliers, adjustable wrench, cable cutters, fresh flapper (optional), new float (optional), new fill valve (optional), vinegar or mineral spirits, toothbrush What It'll Cost: Up to $25, based upon supplies and the equipment required Everything You Can Save: Upwards of $100, depending on the nature of the project Much Time It Require: 10 to 60 minutes How to Do It: Should you blessed, repairing your bathroom will cost nothing and take only a couple of minutes of your time. You could be in for an hours-long process of trial and error punctuated by successive trips to the hardware shop In case you not lucky. Here's how to tackle common issues that can cause your toilet adapted from WikiHow: Flapper Problems: Faulty flappers are responsible for many, if not most, running toilets. First, turn off the water into the toilet (locally if possible) and flush. Remove the lid and inspect the valve. When it's obviously warped or deteriorated, it done for; install it in accordance with the instructions of producer , buy a new one, and visit the shop. If it is not forming a tight seal since the string attaching it to the flush lever is too brief or long, fix the string accordingly (using wire cutters to shorten the chain if needed ). If mineral buildup seems to be the offender, remove the flapper and submerge it for longer or half an hour in vinegar or mineral spirits to dissolve the residue. Scrub clean with a toothbrush and then replace. Float Issues: The most probable cause is a float that is faulty. Floats come in two flavors: ball floats and cup sticks. In either case, an out-of-whack float may result in higher-than-normal water levels, which encourage running. Examine the bathroom 's overflow tube -- your water level is high, if it taking on water. Use pliers to turn your float's controller until the water level stabilizes at least an inch below the overflow tube. Monitor the water levels and fix accordingly. Fill Valve Problems: This is costly and definitely the most vexing of the three issues. Close off the toilet's water, flush, and disconnect the service line (you'll want pliers or an adjustable wrench). Dry the inside of the tank with a sponge or rag. Eliminate with your wrench, bring it to the hardware store, and buy a replacement. Follow the directions of the maker . Flush to test.
Caulk a Tub
Everything You'll Need: A tube of caulk, plastic razor, mineral spirits, fine-threaded rag, painter's tape, Magic Eraser or comparable cleaning pad, scissors What It'll Cost: $5 to greater than $30, based on how big the job and which supplies You Have to Purchase new Everything You Could SaveUpwards of $100, depending on the job's size Long It Require: 60 How to Do It: This task is even easier than replacing a drain flange. It's the bathroom repair project I handled, long until I had an ounce of self-confidence in my DIY plumbing skills. I guarantee you can do it all you'll need is a steady hand and some patience. Here's the way to take action, adapted from This Old House: Purchase silicone or acrylic latex caulk. The former is harder to work with, but lasts more; the latter is much a lot easier to work with, but shorter-lived. Use a plastic razor (not a normal razor blade) to cut away the old caulk. Remove lingering chunks with a sterile pad or Magic Eraser, then complete the job with a fine rag soaked in mineral oil. Follow the instructions on your own tube. You'll need scissors to cut on the suggestion . Lay down painter's tape on either side of the joint to be caulked. Use a rag to smooth the applied caulk in one fluid motion. Wipe away excess caulk as you go, taking good care to leave behind a program. Without disturbing the caulk, Gently remove the painter 's tape. Repeat the process. Await the caulk to heal before using the tub -- ideally, 24 hours.
With leased or borrowed equipment, your DIY soul, and repeated how-to movie viewings, you can tackle these home plumbing replacement and repair projects on your own.
Install an Automatic Dishwasher
Everything You'll Need: Your brand new dishwasher, a Philips head screwdriver, an adjustable wrench or pliers, electric tape, suitably sized screws, nuts, and the dishwasher 90 assembly (see your dishwasher's instructions for specific requirements) What It Cost: $200 for a simple, entry-level dishwasher to more than $1,000 for a model What You Can Save: $100 based on the complexity of the Work and exactly what your plumber fees Much Time It'll Take: 90 to 120 minutes The way to Do It: Installing a dishwasher is amazingly straightforward. There are just two catches that trip DIYers up: the dishwasher's weight and the prospect of working with electrical wiring. If you're game, here's what you need to perform (adapted from DIY Network's tutorial): Turn your home's power off. Turn the water off in the sink, even if possible. Otherwise, turn the water off at the main line. Take the dishwasher and inspect against the included pruning sheet. Confirm that everything is in the right place and what the manufacturer says is included in the kit is. Uncap your home's dishwasher drain line and hook to your new dishwasher's drain socket. Crimp the metallic clamp (included) around the drain line and thread through the pit to your own sink compartment. Position the dishwasher in its home compartment. Adjust its leg height using an adjustable wrench. Fasten the dishwasher to the countertop with appropriately sized screws (likely provided in the kit). Attach the dishwasher's wiring into the local power inlet (such as colors together). Screw on the cable nuts and pay with tape. Position the floor cable. Consult with the directions to ensure you of the manufacturer 've done this. Hook the dishwasher's supply line to the dishwasher 90 (a exceptional fresh water link that you will want to purchase separately) and twist. Attach into the sink drain. Turn on the power and water. Test a load and then repeat those steps as required. Caution: This project requires some electrical work that is light. If the thought of manipulating wiring leaves you uneasy, even with your home's power away, save this one to the pros.
Change or Reseal a Tub Drain
What You'll Need: A brand new drain stopper and flange (optional), a brand new drain shoe gasket (optional), mineral spirits, plumber's putty or silicone, a drain removal tool, an adjustable wrench (optional), a flathead screwdriver (optional) What It'll Cost: $15 to $20 to get a fundamental stopper and flange meeting (per Grainger Industrial Supply -- such as stopper) What You Can Save$200 or more (a HomeWyse) How Much Time It Require: 30 How to Do It: This how-to covers only the drain flange (basket) and stopper. It doesn't address the drain , nor the piping that connects your sewer line and your drain. Replacing these things may require putting a hole through your toilet wall moving your tub, or tearing your bathtub . I've adapted these measures from PlumbingSupply.com's tutorial on removing and replacing a drain flange. Unscrew your drain stopper and set aside (if not replacement ). Insert your drain removal tool (drain key or smart dumbbell) to the drain and rotate counterclockwise before the drain flange pops out. If the removal tools don't work, use a hair dryer to heat the drain flange and soften the plumber's putty or silicone holding the flange and base set up. Try again after a few minutes. Clean the drain hole and surrounding regions. Pat dry, then allow to air dry. Examine the shoe gasket. If the rubber is obviously worn out or it doesn't seem to be sealing tightly against the shoe any longer, use a flathead screwdriver to pop it out. If justified, replace the gasket. Press it firmly against the twist to create a watertight seal. Apply plumber's putty in a ring on the underside of the new drain flange -- enough to form a complete seal with the tub. Place the flange that is new and twist into the drain shoe's threads. Hand-tighten for the first few rotations, then utilize a drain removal tool to tighten (clockwise) until there's only a bit slack left. Use an adjustable wrench for the. Don't overtighten -- this may squeeze the gasket from place or crack the tub. Use mineral spirits to remove the putty of plumber from around the drain. Add replacement stopper or the . Caution: Be sure to apply a liberal quantity of silicone or plumber's putty . Inadequate coverage means flows, which could wreak havoc on your bathroom flooring -- not to mention the walls and ceilings beneath. My dining room walls and ceilings lasted countless dollars in entirely preventable water damage since the previous owner (or a contractor he hired) skimped on plumber's putty in the upstairs tub.
0 notes
Link
Devia 0.8mm Plated TPU Soft Case for iPhone 8/7 + Tempered Glass Screen Protector - Black -----> $5.69 0.8mm Ultra-thin Soft TPU Phone Case for iPhone 6s / 6 - Black -----> $0.77 0.8mm Ultra-thin Flexible TPU Phone Cover for iPhone 6s / 6 - Dark Blue -----> $0.85 0.8mm Ultra-thin Gel TPU Case Protector for iPhone 6s / 6 - Baby Blue -----> $0.85 Ultra-thin 0.8mm Soft TPU Back Shell for iPhone 6s / 6 - Red -----> $0.71 Solid Color 0.8mm Ultra-thin Soft TPU Protective Cover for iPhone 6s / 6 - Transparent -----> $0.71 0.8mm Ultra-thin TPU Protector Shell for iPhone 6s / 6 - Purple -----> $0.71 USAMS Sanze Series 0.8mm Liquid Silicone PC Hybrid Back Case for iPhone X - Black -----> $4.95 USAMS Sanze Series 0.8mm Liquid Silicone PC Mobile Phone Case for iPhone X/10 - Red -----> $4.95 USAMS Sanze Series for iPhone X 0.8mm Liquid Silicone PC Phone Casing - Blue -----> $4.95 For iPhone 8 Plus / 7 Plus Fresh Color Rubberized Candy TPU Gel Case Ultra-thin 0.8mm - Yellow -----> $0.86 Fresh Color Rubberized Candy TPU Cover Case Ultra-thin 0.8mm for iPhone 8 Plus / 7 Plus - Transparent -----> $0.76 Fresh Color Rubberized Candy TPU Case Ultra-thin 0.8mm for iPhone 8 Plus / 7 Plus - Black -----> $0.76 Rubberized Fresh Color TPU Candy Case Ultra-thin 0.8mm for iPhone 8 Plus / 7 Plus - Purple -----> $0.77 0.8mm Fresh Color Rubberized Candy TPU Phone Case for iPhone 8 Plus / 7 Plus - Dark Blue -----> $0.77 Rubberized Fresh Color Candy TPU Cover Ultra-thin 0.8mm for iPhone 8 Plus / 7 Plus - Red -----> $0.76 Fresh Color Rubberized Candy TPU Skin Case Thin 0.8mm for iPhone 8 Plus / 7 Plus - Baby Blue -----> $0.76 Ultra-thin 0.8mm Fresh Color Rubberized Candy TPU Shell for iPhone 8 Plus / 7 Plus - Pink -----> $0.77 Ultra-thin 0.8mm Rubberized Fresh Color Candy TPU Cover for iPhone 8 Plus / 7 Plus - Green -----> $0.76 USAMS Sanze Series 0.8mm Liquid Silicone PC Hybrid Mobile Cover for iPhone 8 / 7 4.7 inch - Red -----> $4.95 USAMS Sanze Series 0.8mm Liquid Silicone PC Hybrid Case for iPhone 8 / 7 4.7 inch - Black -----> $4.95 USAMS Sanze Series 0.8mm Liquid Silicone PC Hybrid Phone Case for iPhone 8 Plus / 7 Plus 5.5 inch - Red -----> $5.24 USAMS Sanze Series 0.8mm Liquid Silicone PC Hybrid Phone Cover for iPhone 8 Plus / 7 Plus 5.5 inch - Black -----> $5.24 USAMS Sanze Series 0.8mm Liquid Silicone PC Combo Mobile Shell for iPhone 8 Plus / 7 Plus 5.5 inch - Blue -----> $5.24 USAMS Sanze Series 0.8mm Liquid Silicone PC Hybrid Back Shell for iPhone 8 / 7 4.7 inch - Blue -----> $4.95 400g 60/40 Tin Lead 1.8-2.2% Flux 0.8mm Dia Soldering Solder Wire Reel -----> $14.38 300g 0.8mm Reel Roll Welding Wire Welding Solder Wire 63/37 Tin Lead 1.2% Flux -----> $10.11 0.8mm Cross Head Screwdriver Repair Tool for IPHONE 4 / 4S / 5 - Silver -----> $3.99 LSON 15 x 0.8mm Gold-Plated Copper Current Pins - Golden (25 PCS) -----> $3.38 Oratek SS 0.8mm Portable Teeth Care Interdental Brushs - Blue (8 PCS) -----> $4.25 0.8mm Tin Soldering Wire - Silver (50g) -----> $3.46 100W 0.8mm Active Soldering Tin Wire - Silver -----> $22.34 WLXY WL-5023 Repair Tool 0.25~0.8mm Wire Stripper Cutter Clamp - Yellow + Black -----> $6.20 GZ3D01 3D Printer Replicator / Reprap3M Thermostable Adhesive Tape - Blue (50.8mm x 54.8m) -----> $30.76 0.5mm / 0.8mm Pitch QFP64 to DIP64 Adapter Board for Arduino (Works with Official Arduino Boards) -----> $3.55 5M Black Heat Shrink Tubing (0.8mm) -----> $2.31 Universal 0.8mm Alto / Tenor Saxophone Bite Block Teeth Pad - Black (32 PCS) -----> $8.43 Aluminium Alloy Bicycle Seat Post Clamp - Golden (30.8mm Inner Diameter) -----> $3.49 BONATECH Membrane Switch - Golden + Black (100 PCS / 4 x 4 x 0.8MM) -----> $4.71 0.8mm Thickness Color Pen - Multicolored (12 PCS) -----> $6.30 WLXY WL-0810 0.8mm Soldering Tin Wire - Silver -----> $5.79 032 0.8mm Stainless Steel Repair Torx Screwdriver - Orange + Green -----> $3.50 ZW 0.8mm High Quality Solder Wire - Silver (1.7m) -----> $2.61 QC-M-Prince Universal 0.8mm Motorcycle Rearview Mirror - Silver + Black (Pair) -----> $18.73 QC-M-Storm Prince Universal 0.8mm Motorcycle Rearview Mirror - Black + Silver (Pair) -----> $18.67 0.8mm 45M/Roll Nylon Cord Thread Chinese Knot Macrame Rattail Bracelet Braided String -----> $1.19 Screwdriver Screw Driver Open Tools Five Star 0.8mm For Apple iPhone 7 6 6S 5S 5 Apple watch -----> $1.08 1 Round 6cm Box 0.8mm/1.0mm/1.2mm/1.3mm Steel Beads 3D Nail Decoration Fashion Manicure Nail Art Decoration -----> $1.21 0.8mm Ultra-Thin Protective PC Matte Back Case for Iphone 5 / 5s - Fluorescent Green -----> $3.44 Ultra-Thin 0.8mm Protective Frosted PC Back Case for Iphone 5 / 5s - Yellow -----> $3.37
0 notes
Text
Products You Might Need for Home Renovation
youtube
The products that you will should take on a home renovation task depends on just what the task handy is. With any residence renovation or repair work, you will need many types of tools and materials. Many materials can be bought at a relatively low rate, while some equipment will certainly be expensive, but can be utilized for numerous works.One point that will certainly be required prior to you start any house improvement job is a structure license. If you don't get one, you will certainly go through steep penalties and also fines. Check with codes enforcement before starting any type of large home renovation job.For jobs that need you to deal with sub-flooring, you will likely require some kind of bonding agent, screws, a level, plywood, lumber, and also nails. If you are installing brand-new hardwood floor covering you will possibly require sandpaper, clean cloths, paste wax, timber conservator, oxalic acid, cleansing tools, rubber handwear covers, vinegar, timber patches, nails, a putty knife, a flooring barrier, a hammer, as well as a vacuum cleaner to complete the task properly. fort lauderdale fl houses Not having the best products for any type of house improvement work can bring about extra expense and any kind of number of problems. Study exactly what you require, and also acquire the best products that you could pay for. As an example, paneling the walls will certainly need a selection of devices and also materials, including a putty blade, a nail collection, a caulk weapon, a level crowbar, a square, a club, a hammer, a carpentry blade, as well as a wallboard blade. You will certainly additionally need to get the paneling, wood filler, putty stick, completing nails, sticky, and shims to end up the task right.A typical outside project is building a pond, which will certainly require you to have a pipe, hammer, spade, some pond liner, a degree, sand, attractive rocks, as well as mortar. You may likewise want to consider landscape materials, such as plants or blossoms.Pipes jobs can be challenging, yet can be done on your own. For instance, fixing a shower could commonly be done by purchasing a repair kit. The kit might consist of flooring, wall surfaces, or doors. It could likewise contain showerheads and also faucet.Because sets do not typically included tools, you should have a basic stock of them. For plumbing, you may need PVC Pipeline, primer, CPVC Concrete, screwdriver, a pipe wrench, tubing cutter, liquid nails, as well as Silicon Sealant.To repair or change drywall, you just should follow a couple of straightforward actions. The job will certainly call for a putty test, tray, sandpaper, joint putty, and a scrape.Tile repair service could be challenging if you do not have the right tools for the task. You will need adhesive, scraper, a sculpt, a hammer, as well as caulk.For woodworking tasks, you will certainly should acquire particular devices for the job. You will require some sort of ear protection as well as eye protection. You will certainly need a flooring sander and belt sander, which could be rented out by the hr. You will certainly also require a dirt mask, a sanding block and also various grains of sandpaper, a paintbrush, as well as cross peen hammer. Various other woodworking devices you could wish to buy include an aircraft as well as a cut hook.It is necessary to stay on job when working on house renovation projects, and to obtain the right tools for the job. This will certainly prevent complication as well as blunders, will certainly can set you back even more time and money.
0 notes
Text
Products You Could Demand for Home Enhancement
youtube
The materials that you will should take on a residence enhancement project relies on exactly what the job at hand is. With any kind of home renovation or fixing task, you will require lots of types of devices and materials. Several materials could be purchased a fairly reduced price, while some devices will certainly be expensive, but can be used for numerous tasks.One thing that will be needed prior to you begin any kind of home improvement job is a building authorization. If you do not get one, you will undergo high penalties and fines. Get in touch with codes enforcement before beginning any kind of substantial residence improvement project.For jobs that require you to work with sub-flooring, you will likely call for some sort of bonding agent, screws, a level, plywood, lumber, as well as nails. If you are setting up brand-new wood flooring you will possibly need sandpaper, clean fabrics, paste wax, timber conservator, oxalic acid, cleaning devices, rubber handwear covers, vinegar, wood patches, nails, a putty blade, a flooring buffer, a hammer, and also a vacuum to complete the job appropriately. fort lauderdale fl houses Not having the ideal materials for any type of home improvement task can cause extra cost and any type of number of issues. Study exactly what you need, as well as buy the best materials that you can pay for. For example, paneling the walls will certainly require a selection of devices and materials, including a putty blade, a nail collection, a caulk weapon, a level pry bar, a square, a mallet, a hammer, a carpentry knife, and a wallboard blade. You will certainly also have to get the paneling, timber filler, putty stick, completing nails, adhesive, and also shims to complete the task right.A typical outdoors task is constructing a pond, which will certainly require you to have a hose, hammer, spade, some fish pond lining, a degree, sand, ornamental stones, and mortar. You may likewise want to take into consideration landscape products, such as plants or flowers.Pipes works could be tough, however could be done yourself. For instance, fixing a shower could usually be done by purchasing a repair work package. The package may consist of flooring, wall surfaces, or doors. It may additionally include showerheads and faucet.Considering that sets do not generally featured devices, you ought to have a basic stock of them. For plumbing, you might require PVC Pipeline, primer, CPVC Cement, screwdriver, a monkey wrench, tubes cutter, liquid nails, and also Silicon Sealant.To fix or change drywall, you just have to follow a couple of simple actions. The job will require a putty test, tray, sandpaper, joint putty, and also a scrape.Ceramic tile repair work can be testing if you do not have the right devices for the job. You will certainly require glue, scrape, a chisel, a hammer, as well as caulk.For woodworking tasks, you will certainly need to get specific tools for the project. You will certainly need some sort of ear defense and also eye defense. You will require a floor sander and also belt sander, which could be rented by the hour. You will additionally require a dust mask, a fining sand block and various grains of sandpaper, a paintbrush, and also go across peen hammer. Other woodworking tools you may wish to purchase consist of a plane as well as a shave hook.It is important to remain on job when working on house renovation projects, as well as to get the right tools for the job. This will prevent confusion and blunders, will could set you back more money and time.
0 notes
Text
Blood Collection Tubes Manufacturing
A Blood Collection Tube Manufacturing is of BCT/ Vacutainer which is a sterilized glass or plastic test tube with a colored rubber stopper which creates a vacuum seal inside the tube supporting the draw of a fixed volume of liquid. It is also referred to as the “Vacutainer”. Vacutainer tubes consist of additives that are designed to preserve the specimen earlier to the accurate testing.
These tubes or containers have a security planned plug with en number of labeling alternatives and draw volumes. The shading on the top shows the added substances of the containers or tubes. Vacutainer tubes may contain an extra substance that preserves blood from preparing in a medical research laboratory. Utilizing an inappropriate tube can make the blood test unusable for the intended purpose.
Furthermore, some tubes contain added substances that save certain segments of or substances inside the blood, for example, glucose. At the point when a tube is centrifuged the materials inside are isolated by thickness, with the platelets sinking to the base and the plasma or serum gathering at the top. Tubes containing gel can be effectively taken care of and moved after centrifugation without the platelets and serum blending.

Types of Blood Collection Tube
No Additive Tube – This tube is used for collecting blood and storing it for biochemistry, serology and other tests. It provides non-contaminated serum samples for clinical tests, keeping the serum stable for an extended period of time.
Serum blood collection tube – This tube aims at giving high-quality serum sample for medical technologies. It has 3 kinds of tubes: no additive tube with & without clot activator and brick red cap.
Hemo Repellent Coated tube – blood collection and storage for biochemistry tests, silicon are used. It is appropriate for a broad range of operation, quick in coagulation. These blood cells do not stick to the side of the tube.
Gel + BCA – such tubes are used for clinical and biochemical immunology. There’s a barrier gel present inside the tube at the bottom. After the centrifugation, the gel can easily separate the serum from the cells without causing additives exchange between blood cells and serum.
Whole blood collection tube – this tube provides good quality of blood sample for the laboratories. It has 2 kinds of the tube (ETDA) (ETDA.K2/K3 and ESR tube.
ETDA tube is used for haematology and also as various kinds of blood cell test instruments.
ESR tube is used for blood collecting and anticoagulation rate test.
Plasma blood collection tube – plasma blood collection tubes give a high-quality plasma sample for medical laboratories. This includes 3 kinds of tubes:
Blood Collection Tube Manufacturing Process
Moulding machine
The moulding machines are used for making small plastic tubes which are made to collect a blood sample in it. The moulding machines can be of many different types, like an electric moulding machine.
Component Cleaning
Component cleaning or parts cleaning is significant to all industrial processes as a preparation for the surface finishing or else to protect the essential components. Electroplating is generally a sensitive part of cleanliness since the molecular layers of the oil can keep the adhesion of the coating.
Blood Collection tube Assembly line
An assembly line has to assemble cleared blood collection tubes with various tubes sizes. The limit of the basic line layout is 200parts/minute and it carries all process from feeding and sorting of the tubes to the caps/closures and dosing of all kinds of testing agents. There are two types of BCT assembly line,
Automatic (fully)
Semi-Automatic
Secondary packing (Gamma Sterilization)
Sterilization is a process that efficiently kills or deletes all the micro-organisms like bacteria, and other viruses. There are various types of sterilization process that depends on the type of material and its sterilization process.
Quarantine (Finished Goods Store)
Quarantine period or process helps to assure that there is no defective or infectious product which is reaching to the consumers.
Blood Collection Tube Manufacturing Machinery
BCT Cap and stopper Combination Machine
Blood Collection Tube cap machine is used for inserting the rubber stopper cap into the plastic cap for blood collection tube cap. It has 24 pcs of assembling punches with two sets of vibration material loaders, which exactly fit the rubber stoppers and caps running in one row.
BCT Labeling machine
In the packaging industries, stickers labelling machine is used for applying labels and stickers on products, containers, tubes, injections, and bottles etc. As labelling plays a significant role, these machines have a huge demand in the industries. There is en number of labelling machines available in the market according to their types and features.
Dosing machine
The dosing machine is an automated system for feeding the equipment with the products which contain liquid like lubricants and water.
Capping machine
Capping machines are used for applying the plastic and metal threaded caps as well as plastic snap caps, fitments, corks and plugs.
Centrifuge machine
A centrifuge is equipment which pushes the object in rotating motion around the fixed axis with applying a force which is very strong. The centrifuge works with the help of the sedimentation principle, where centrifuge’s acceleration can cause denser substances and particles to move outwards in a radial position.
Shrink packaging machine
Shrink tunnels using a heated air system, it used for shrinkable films (PE POF PVC) that have been applied by L-bar sealers, sleeve wrappers, and sealing cutters. Planned for high production, the airflow method helps to circulate the air to avoid bubbles and bumps in plastic film.
The interest for blood collection could be hampered by dangers related to blood transfusion, for the most part in underdeveloped countries. In any case, there are a few awareness plans and crusades led by governments and outside people to handle this issue. The command of enlisting capable and qualified healthcare services experts could make great development prospects on the planet blood collection market. Besides, technological advancements in blood collection methods and items have opened a few entryways of chance for the key players in the blood collection market throughout the years to come. More info:http://bit.ly/2qNMmr2
#Blood Collection Tube Manufacturing consultant#centrifuge machine#capping machine#Blood Collection Tube Manufacturing Machinery
0 notes
Text
ALL ABOUT SILICONE RUBBER DIE CUT GASKETS& ITS CUTTING METHOD
Silicone Rubber Die cut Gasket manufactures have changed over the years to provide new and better originations for all sorts of gaskets and seals. Die cutting silicone rubber gaskets is ultimately the easiest and most cost effective process manufactures offer.
Silicone Rubber Die Cutting
When it comes to make outline design for die cutting machined tools is being used. In this case gasket and used with a hydraulic press to shear material out of large rolls of raw material. This type of raw material could be anything from silicone rubber to metallic materials. This type of process is just like the same as a hole puncher generally we used for office provisions work. The press will house the die under the hydraulic press and while operation it will press itself into a material cutting to the die design that is suitable for your desired application.
These type of dies are made of steel rule, that have long life probability, and it should be good for mass production. Die cutters could easily products thousands of silicone rubber tubing, gasket and seal per hour. It has low tooling cost and great for high volume orders. Design tolerances can be anywhere from tenth to thousandth of an inch from the desired design.
Elastostar Rubber Corp is a leading die cut gasket manufacturer in USA with a wide array of capabilities and techniques focused on bringing best value to customers. Here are some benefits you will only get with Elastostar Rubber Corp.
Original Article
SILICONE RUBBER DIE CUT GASKETS
0 notes
Last Seen Blogs

ayellowchip
A Yellow Chip

ceriaolshop
Untitled

eradne
aquarian

smokinmen
Smokin-Men

hardybardy
hardybardy