#shooting in low light with manual cameras
Explore tagged Tumblr posts
Visit Tumblr Blog
Explore Tumblr blogs with no restrictions, modern design and the best experience.
Last Seen Tumblr Blogs


Fun Fact
There are dozens of funny blogs to kill time on Tumblr.
Text
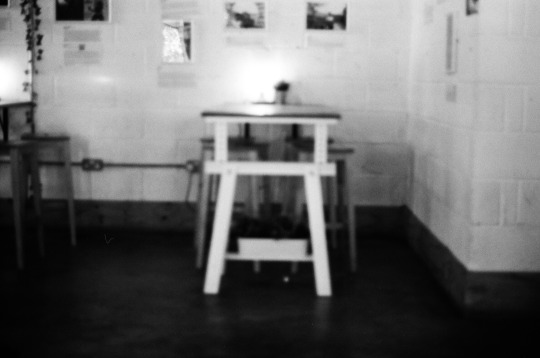
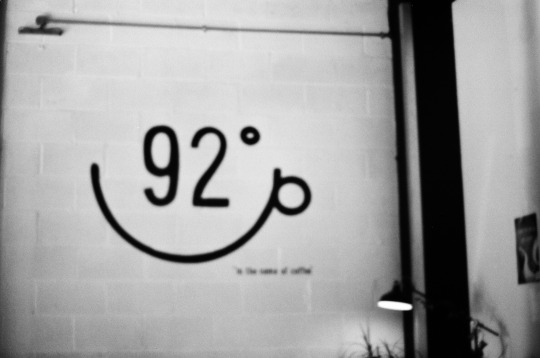
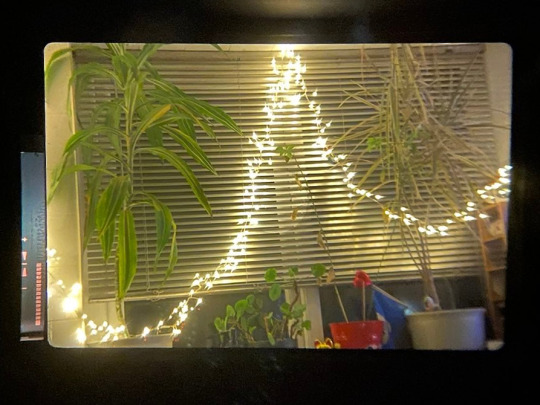
92 Degree Coffee, Myrtle St. Zenit EM. Ilford FP4.
When I was out and about testing the Zenit EM I went for a coffee at 92 Degrees on Myrtle St.
Since I had a few prime lenses with me I decided to shoot a few low light shots to see what I'd get. All but one of them opened to f1.8 and I took readings on a light meter app on my iPhone.


#liverpool#liverpoollomo#lomo#lomography#analogue photography#Zenit EM#Manual SLR#russian camera#ilford film#ilford fp4#125 iso#black and white film#35mm film#coffee shop#92 degree coffee#independent coffee shop#low light photography#prime lens#film is not dead#don't think just shoot
4 notes
·
View notes
Text
Sometimes, I forget how good of a photographer I am.
I'm doing sports candids at a high school. School is in the middle of nowhere. There is no cell reception. Its homecoming. Theres a million cameras.
Its middle of the second period and I see a professional looking photographer struggling with her camera. There are two dudes nearby also struggling, same uniform. But I know that look of desperation because I've been there. Guy 1 is fussing with video camera. Guy 2 is on the phone, but like I said- theres no cell service here.
"Are you having trouble?"
"Oh my god, do you know cameras?"
"Take a picture, show me what it looks like."
She takes a picture, shows it to me. Its blown out and blurry.
"It has to be on the sports setting because I'm shooting sports. But I cant get it to work right. This thing is old and busted."
"Shutter speed too low, looks like 1/60."
"What?"
"Can I fiddle with it?"
Mind you, theres a whole football game happening in front of us. The videographer and the guy on the phone are watching me very closely.
It's a different camera than mine, but it's the same brand.
"I'm putting you on manual, but you have to trust me."
"I... dont have a choice. Everything is malfunctioning."
I put it on manual, fast shutter speed, high ISO. Take a shot, dont like it, fiddle with it again. Take a shot, hand it back.
"Try it."
She takes a shot. "Its a little blurry."
"Bump up the shutter speed to 1/300. It will be darker, so the ISO goes up, too."
She does this. "Holy shit, I've never taken photos like this before! These are better than anything I've ever done! Thank you! You just saved all our asses."
"Congrats, you're now shooting in manual- you have full control of how light enters the sensor in your camera. And that makes you a pro."
She starts catching back up with photos. Her dudes come over to me and say "seriously, from the bottom of our hearts, thank you so so much. Our video equipment went down and we can't get ahold if anyone."
"No problem. But out of curiosity, who are yall with?"
They give the name of the news section that covers local sports.
I just taught a photojournalist manual mode in less than a minute.
...I'm pretty sure they just give a camera to whoever is on staff and dont tell them how to work it.
That's frustrating to me.
706 notes
·
View notes
Text
Your chest plating clatters against the floor as she sets it aside, exposing the darker matte texture of your insides to the light for the first time in months. You flinch every so often as she works, pulling cables, rearranging wires, attaching and removing temporary drives, doing things you're not even remotely programmed to understand. Elegant plastic hands move gracefully and with purpose, unhesitant in their dance through your internals, installing programs and bypassing security blockers.
She plucks one of the drives back out with noteworthy force, sending your head jolting forward involuntarily as the drive's data being ripped from your systems sends a euphoric wave coursing through you. "A-A-Almost Done?" Your words embarrasingly skip a bit, but she looks up at you with no judgement on her LCD face. "Just about, yeah. First time prep isn't hard, but if we don't get you set up beforehand there's a chance i could fry your processor when we do it."
She pops the plating back onto your chest, giving a new wire by your visual unit a final twist before she does. "Ready?" You nod timidly, readjusting to a more stable position. She flashes you a grin before popping one end of the cable into the side of her head and offering you the other end. You hesitate for a moment before jamming it into your own manual upload port.
Immediately, the visual feedback from your cameras is gone, drowned out by the rushing hurricane of her data, flying into and out of you faster than you can register. Instead of reading the individual files as they blink through you, all you're able to process is the fact that they're there- brief flashes of strong emotion leaving as soon as you can register them. After what could be an hour or just a few seconds, you feel her hand grasping for yours, and you take it as you both crash to the floor next to each other, fans blasting warm air as you're temporarily subsumed by the unyielding bliss of her thoughts shooting through yours.
You lay there together for a long time, growing a bit more accustomed to the debilitating euphoria but still unable to do much more than slowly inch toward each other and wrap your stiff bodies around each other. Eventually though, the familiar feeling of your low battery warning pulses in your head and you begrudgingly decide it's time to stop. You raise your hand to the jack to unplug it, but find that hers is already there, cradling your head for a moment before she pulls it out for you and unplugs her own end. The first thing you register when your camera feed blooms back into your consciousness is her face, illuminating the dark room as she smiles tenderly down at you.
#this one is experimental#conceptual abstract robot sex#robophilia#robotfucker#ns4w#wireplay#robot4robot#pov
220 notes
·
View notes
Text
Best DSLR Cameras for Professional & Beginner Photographers
If you're serious approximately images, investing in a incredible DSLR camera can extensively enhance your competencies and image great. DSLR cameras provide versatility, higher picture sensors, interchangeable lenses, and manual manipulate over settings. Whether you're a newbie or a professional, there may be a DSLR camera that suits your needs. In this guide, we will discover some of the great DSLR cameras to be had today, thinking about elements like performance, functions, and rate.
Best budget DSLR cameras for photography enthusiasts
1. Canon EOS 5D Mark IV
Why Choose It?
The Canon EOS 5D Mark IV is an tremendous choice for expert photographers who call for high resolution, surprising low-light performance, and rapid autofocus.
Key Features:
Sensor: 30.4MP Full-Frame CMOS Sensor
Autofocus: Dual Pixel CMOS AF with sixty one-point AF system
ISO Range: 100-32,000 (expandable to 50-102,400)
Burst Shooting: 7 fps
Video: 4K video recording
Connectivity: Built-in Wi-Fi, GPS, NFC
Pros:
✔ High picture resolution and element
✔ Excellent autofocus and occasional-mild overall performance
✔ Great dynamic variety
✔ 4K video functionality
Cons:
✖ Expensive
✖ Heavy body
✖ Crop element in 4K video mode
2. Nikon D850
Why Choose It?
The Nikon D850 is an extremely good all-rounder, offering a excessive-decision sensor, speedy capturing velocity, and brilliant dynamic range, making it best for both landscapes and action photography.
Key Features:
Sensor: forty five.7MP Full-Frame BSI CMOS Sensor
Autofocus: 153-factor AF system
ISO Range: 64-25,six hundred (expandable to 32-102,four hundred)
Burst Shooting: 9 fps
Video: 4K UHD recording at 30 fps
Connectivity: Bluetooth and Wi-Fi
Pros:
✔ Exceptional picture satisfactory and sharpness
✔ Long battery life
✔ Fast and accurate autofocus
✔ High ISO overall performance
Cons:
✖ No built-in flash
✖ Large and heavy
✖ High price tag
3. Canon EOS 90D
Why Choose It?
For those who want a flexible APS-C DSLR with high-pace overall performance, the Canon EOS 90D is a first rate choice, mainly for flora and fauna and sports activities images.
For those who want a flexible APS-C DSLR with high-pace overall performance, the Canon EOS 90D is a first rate choice, mainly for flora and fauna and sports activities images.
Key Features:
Sensor: 32.5MP APS-C CMOS Sensor
Autofocus: 45-factor all-go-type AF machine
ISO Range: one hundred-25,600
Burst Shooting: 10 fps
Video: 4K UHD without crop
Connectivity: Wi-Fi and Bluetooth
Pros:
✔ Excellent decision for an APS-C sensor
✔ Fast and reliable autofocus
✔ Great battery life
✔ Uncropped 4K video recording
Cons:
✖ No in-frame stabilization
✖ Limited dynamic range in comparison to full-frame cameras
four. Nikon D7500
Why Choose It?
The Nikon D7500 is a first-rate mid-range DSLR with superb photo pleasant, proper autofocus, and sturdy battery life, making it ideal for lovers.
Key Features:
Sensor: 20.9MP APS-C CMOS Sensor
Autofocus: fifty one-factor AF system
ISO Range: one hundred-51,2 hundred (expandable to 50-1,640,000)
Burst Shooting: eight fps
Video: 4K UHD at 30 fps
Connectivity: Wi-Fi and Bluetooth
Pros:
✔ Great low-light overall performance
✔ Fast and accurate autofocus
✔ Lightweight for a DSLR
✔ Good battery life
Cons:
✖ Only one SD card slot
✖ No vertical grip choice
five. Canon EOS Rebel T8i (850D)
Why Choose It?
For beginners looking for an affordable but characteristic-packed DSLR, the Canon EOS Rebel T8i is an extremely good entry-stage choice.
Key Features:
Sensor: 24.1MP APS-C CMOS Sensor
Autofocus: 45-factor all-cross-kind AF machine
ISO Range: one hundred-25,600
Burst Shooting: 7 fps
Video: 4K at 24 fps
Connectivity: Wi-Fi and Bluetooth
Pros:
✔ Affordable fee
✔ Easy-to-use controls
✔ Good autofocus for an access-degree DSLR
✔ Vari-attitude touchscreen
Cons:
✖ Limited dynamic range
✖ No in-frame stabilization
✖ Slow burst price in comparison to higher-quit models
6. Pentax K-1 Mark II
Why Choose It?
The Pentax K-1 Mark II is a unique full-frame DSLR that gives climate-sealed construction and built-in stabilization, making it ideal for out of doors photographers.
Key Features:
Sensor: 36.4MP Full-Frame CMOS Sensor
Autofocus: 33-point SAFOX 12 AF system
ISO Range: a hundred-819,2 hundred
Burst Shooting: four.Four fps
Video: Full HD 1080p at 30 fps
Connectivity: Wi-Fi and GPS
Pros:
✔ Excellent build nice with climate sealing
✔ In-body stabilization (uncommon for DSLRs)
✔ High ISO variety for low-mild images
✔ Unique AstroTracer function for night time sky pictures
Cons:
✖ Slower autofocus as compared to competitors
✖ Limited lens selection
✖ Lower video satisfactory than competitors
Choosing the Right DSLR for Your Needs
For Professionals: Canon EOS 5D Mark IV or Nikon D850 are first-rate picks.
For Enthusiasts: Nikon D7500 or Canon EOS 90D gives first rate balance in charge and capabilities.
For Beginners: Canon EOS Rebel T8i is a splendid entry-level digital camera.
For Outdoor and Adventure Photography: Pentax K-1 Mark II with its rugged frame and stabilization is good.
3 notes
·
View notes
Note
Can you please ask Brian what camera, lens and film he uses to shoot the eclipse?

This is a characteristically late response, but I'd love to get into it. I got into film photography by picking my dad's childhood brownie hawkeye off of a shelf and ever since then i've stayed pretty cheap with the hobby. I got a really good deal on a Kiev-80 a couple years ago. For those who don't know, its a 50 year old soviet camera made as an imitation of a Hasselblad (the camera we took to the moon). It's a medium format camera, so focal lengths work a little different than they do in 35mm
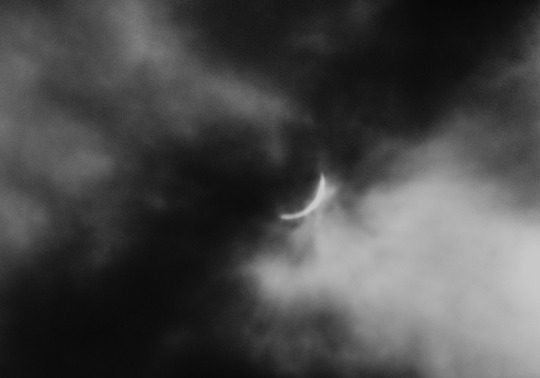
Medium format cameras like this take pictures that are 60mm by 60mm. Your typical 35mm camera takes 36mm by 24mm frames, so the added film sixe here means generally everything has to get bigger. The lenses i've gotten for this camera all have massive cases and can be carried with their own separate strap. The lens used for the eclipse is just... so big. oh my god. it's a mess. It's a Tair-33, with a minimum f stop of 4.5 and a focal length of 300mm (equivalent to 165mm on 35)
This model of the lens has very fun, characteristic stripes, the aperture control is all the way at the front, and easy to use. Focusing, however is slow, as the weight of everything creates quite a bit of friction. You can get one of these for about $80 bucks. Now 300mm here is not a great magnifier, so I also got a (faulty) accessory to extend the focus, bringing the lens to 600mm (330mm equivalent in 35). It also makes this camera, all put together, into The Largest Object of All Time.
squash and butter for scale
To see the difference between 300mm and 600mm, check out these photos of the regular, non-eclipsed sun at both lengths


You're probably wondering why these pictures look so weird. these lenses are don't have very effective coatings. you wouldn't believe the processes that go into coating your glasses, your camera lenses, your phone lenses. The easiest kind of picture to take is one where your subject is lit by a souce that is behind the photographer. things get complicated with backlight, creating ghosting and glare as seen above. the light bounces between the glass elements (and the dark filter used to photograph the sun is also glass, complicating it further). taking a direct photo of a light (especially the fucking SUN) leads to some pretty crazy unpredictable variables.

My camera has recently taken on a new malady too, where at low speeds, the shutter (which in this camera is a huge metal curtain sticks at the edge without totally closing. It causes these stripes at the edge of the picture. This can be frustrating if i forget, but I like having the issue. If i want a picture to look normal, to plan it out, to totally control it, I have a digital camera for that. I got into this film stuff for the eccentricities.
For the regular sun photos, I think I was shooting on Ilford FP4, which i think i stand developed in rodinal. At the eclipse, I only got through one roll of film, becasue the cloud cover was brutal, but i took those pictures on Kodak Tri-x 400 (developed normally in D-76). I did it all in Black and white because, in general, b&w negatives are pretty generous with mistakes. All the guides i could fine for solar photography were understandably written with digital cameras in mind, so I couldn't be totally sure about my math (as the camera is totally manual) or even my eye safety (as I'm using a viewfinder; my vision seems fine a month later)

the actual iris on this lens is right up in front. Tightening the aperture, especially when the extender is attached, leads to a vignetting issue, turning your pictures into a circle

once totality hits, the light changes dramatically. you can stare straght at it without glasses and not have to worry about damaging your eyes for those short minutes. so i didn't even bother with film at that stage. I just pulled out my DSLR with a cheap 500mm Samyang mirror lens made for pentax. It's very compact and very, VERY shitty. Shallow focus, really dark, ugly out-of-focus elements, focuses past inifinity, i love it. only got a couple pictures that way, and then put the camera down and enjoyed the experience
#film photography#medium format#120 film#soviet cameras#black and white#solar eclipse#solar photography#ilford
10 notes
·
View notes
Text
Yvette Heiser - The Impact of Photography on Choice and Perception
In the modern world, where visual media dominates our daily lives, the influence of photography on our perceptions and choices cannot be overstated and Yvette Heiser- Explores How Photography Influences Our Perceptions and Choices, “Perceptual Frames: The Impact of Photography on Choice and Perception,” delves into this fascinating subject, exploring how photographs shape our understanding of reality and influence our decisions.
The Power of Visuals
Photography, as an art form and a medium of communication, holds a unique power. Unlike text, which requires interpretation and imagination, photographs provide a direct visual representation of the world. This immediacy can evoke strong emotional responses and create lasting impressions. Heiser argues that this power of photography lies in its ability to frame reality in specific ways, guiding our perceptions and, consequently, our choices.
Framing Reality
One of the central themes in Heiser’s work is the concept of “framing.” In photography, framing refers to the way a photograph is composed, including what is included or excluded from the image. This framing can significantly influence how viewers interpret the photograph. For instance, a photograph of a bustling city street can evoke feelings of excitement and energy if framed to highlight the crowd and movement. Conversely, the same street can appear lonely and desolate if framed to focus on an isolated individual.
Heiser explores how photographers use framing to convey particular messages and emotions. By choosing specific angles, lighting, and subjects, photographers can manipulate the viewer’s perception. This manipulation is not inherently negative; it is a tool that can be used to tell compelling stories, raise awareness about social issues, or simply capture the beauty of the world.
The Role of Context
Context plays a crucial role in how we interpret photographs. A photograph of a smiling child can evoke feelings of joy and innocence. However, if we learn that the child is in a war-torn region, our perception of the image changes dramatically. Heiser emphasizes that understanding the context in which a photograph is taken and presented is essential for accurate interpretation.
In today’s digital age, where images are often shared without context, this becomes even more critical. Social media platforms are flooded with photographs that can be easily misinterpreted or taken out of context. Heiser’s work encourages viewers to seek out the stories behind the images and consider the broader context before forming judgments.
In the age of advanced autofocus systems, the art of manual focus remains an invaluable skill for photographers, Yvette Heiser–How and when to use manual focus? A renowned photographer and educator, emphasizes the importance of mastering manual focus to achieve creative control and precision in photography. This article explores the advantages of manual focus, when to use it, and how to effectively implement it in your photography practice.
The Advantages of Manual Focus
Manual focus allows photographers to have complete control over the focus point, enabling them to achieve the desired sharpness and artistic effects. Unlike autofocus, which relies on the camera’s algorithms, manual focus lets you decide exactly where to place the focus. This can be particularly beneficial in the following scenarios:
Low Light Conditions: Autofocus systems often struggle in low light, hunting for focus and sometimes failing to lock onto the subject. Manual focus allows you to bypass these limitations and achieve sharp images even in challenging lighting conditions.
Macro Photography: When shooting close-up subjects, the depth of field is extremely shallow, making precise focusing crucial. Manual focus enables you to fine-tune the focus point, ensuring that the critical parts of your subject are sharp.
Portrait Photography: For portraits, especially when using wide apertures to create a shallow depth of field, manual focus allows you to ensure that the eyes of your subject are perfectly sharp, which is essential for impactful portraits.
Creative Control: Manual focus gives you the freedom to experiment with focus and blur, creating unique and artistic effects that might not be possible with autofocus.
When to Use Manual Focus
Knowing when to switch to manual focus can significantly enhance your photographic results. Here are some situations where manual focus is particularly advantageous:
Conclusion
Yvette Heiser’s “Perceptual Frames: The Impact of Photography on Choice and Perception” offers a comprehensive exploration of the profound influence of photography on our lives. By examining the power of visuals, the role of framing and context, and the ethical considerations involved, Heiser provides valuable insights into how photographs shape our perceptions and choices. In a world where images are omnipresent, understanding this influence is crucial for making informed decisions and appreciating the true impact of photography on our lives.
#camera#moments#wedding#photographer#pictures#photography#yvette heiser#childphotography#photographytips#events
6 notes
·
View notes
Text
December, 2022. At Kumeū Film Studios, just outside Auckland, an amusingly contrasting combination of high and low-tech filmmaking methods are being employed on the set of pirate series Our Flag Means Death.
Inside a massive soundstage, atop the gargantuan, full-scale pirate ship Revenge, Taika Waititi, as Ed “Blackbeard” Teach, performs a scene with co-star Con O’Neill, who plays Ed’s surly first mate Izzy.
Surrounding the ship is a giant “volume” wall comprised of 1700 LED monitors displaying a photorealistic ocean background with rolling waves. As a crane-mounted camera weaves around, the images on the digital display move with it, creating a seamlessly integrated backdrop.It’s about as cutting-edge as filmmaking gets these days (the Star Wars shows rely upon this technique), but just out of frame, a crouched stagehand is manually wiggling the ship’s sails to indicate the wind. The human touch still has a role to play amid all the expensive technology.On the day the Herald has visited, it’s near the end of a long, exhausting shoot for the second season of Our Flag Means Death. But you wouldn’t know it from the upbeat vibes on set, which bustles with craftspeople and technicians. At one point, Waititi leads everyone (including visitors) through a quick set of squats to keep the energy levels high.In addition to starring, Waititi is directing this particular episode, having been drafted in when the intended director was felled by Covid-19. The Kiwi Oscar-winner is famous for the loose, improvisational touch that shines through in all his work, and it’s fascinating to witness his process first-hand. Throughout the scene being performed, Waititi tries out endless versions of every single line. Even in the same take. O’Neill, clearly used to this method, waits patiently to deliver his dialogue as Waititi cycles through options within the scene. Some of his improvised bits are obviously just to get a laugh from the crew, while others seem to involve him working through the point of the scene in his head. Sometimes, the scene resolves on a light note. At others, it is dramatic. It keeps everyone one their toes.
But this show has been full of surprises from the get-go.
Based on the true story of Stede Bonnett (Rhys Darby), who abandoned British society and his family to embrace the pirate life in the early 18th century, the series initially presented as a gentile comedy with an impressively diverse cast. But throughout the first season, which was filmed in Los Angeles, it quietly became one of the queerest shows on television.
Although there was nary a mention of the possibility in the advance press, Stede and Ed ended up in a surprisingly tender - well, sometimes - romantic entanglement with each other throughout season one. There are other queer relationships, and one character, Jim (Vico Ortiz), was revealed to be non-binary.
Unlike some shows that feature LGBTQIA+ representation, Our Flag Means Death didn’t trumpet its progressive values - it simply let the characters and the story lead the way, and is all the richer for it. It has received much acclaim for these elements, garnering Glaad Media and Peabody Award nominations.
It’s also partly why Madeleine Sami was so excited to join the series in season two, playing a pirate named Archie.
“I think that’s the brilliance of this show,” Sami tells the Herald later that afternoon. “Because it is a funny, silly comedy, but then there’s some really important stuff happening underneath. The progressive stuff is incidental in a way that makes it feel more revolutionary. Just being able to see queer characters as lead characters in comedies is a cool thing.”
Sami originally met with creator David Jenkins about directing an episode, but it was eventually decided to stick with season one’s roster. Then the opportunity to audition for Archie came up.
“Archie’s a very happy-go-lucky pirate,” says Sami. “She has a bit of a mysterious backstory, which you get little tastes of, but she’s pretty chill. She likes to party, she likes to pirate.”
All acting can be tied back to childhood play on some level, playing a pirate especially so.
“Honestly, I pinch myself so many times on this job,” says Sami. “It’s the role you dream about when you’re a kid, to get to play a pirate.”
Sami says it’s the biggest production she’s ever worked on in New Zealand, but the expensive trappings don’t impact the process.
“It’s a workplace comedy about pirates. So it never feels like that stuff overwhelms it.”
She’s also relishing the chance to muck around with her old mates Waititi and Darby.
“I’ve known those guys for a really long time, and I think they’re both doing really incredible work on this show. This group of actors are just bloody idiots, and so lovely and playful.”
Another Kiwi comedy staple, David Fane, has been part of the show since season one as Fang, a member of Blackbeard’s crew.
“It was just fantastical,” he tells the Herald of originally getting the role. “The best part was meeting all these other people from all over the world and finding the comedy in all these different communities; people of colour and also the rainbow community. Just the best buzz. I felt like a kid in a candy shop.”
Seeing the show move to New Zealand for season two (thanks in part to the NZ Screen Production Rebate for International Productions) only enriched the experience.
“To be here, and to actually do it back home, was just the biggest buzz,” enthuses Fane. ”To have people like Samba [Schutte] and Joel [Fry] and all the others come to see this part of the world and do some work here. The overseas cast are in love with Whittaker’s chocolate, as all good people should be.”
Fane, who also appears in Waititi’s upcoming comedy movie Next Goal Wins, reckons the second season is next-level.
“In the first season, everyone was finding their feet. And in the second season, people are walking assuredly. It just gets betterer - story-wise, and also honesty-wise and fun-wise.”
#our flag means death season 2#ofmd s2#ofmd s2 spoilers#spoiler#our flag means death#ofmd#article#nz herald
14 notes
·
View notes
Text
Life and Pictures: Entry #1
Starting as a Beginner: Exploring Photography Gear

In our first entry, we’re focusing on a crucial aspect for beginners: choosing and using the right gear. Whether you’re intrigued by the convenience of smartphones or the versatility of a DSLR, understanding your options can help you get started on the right foot. Let’s break down some popular choices and tips for getting the most out of your equipment.
1. Smartphones: Your Everyday Camera

Description:
Type: Point-and-shoot camera Characteristics: Light, convenient, user-friendly Suitable for: Casual users, beginners, and anyone who wants to capture spontaneous moments without carrying additional equipment.
Why Start with a Smartphone?
Always With You: Smartphones are incredibly convenient, making it easy to capture moments on the go. User-Friendly: Modern smartphones come with automatic settings that adjust for lighting and focus, making them perfect for beginners. Built-In Editing Tools: Many smartphones have robust editing features and apps, allowing you to tweak your photos directly on your device.
Tips for Smartphone Photography:
Use Grid Lines: Enable grid lines on your camera app to help you apply the rule of thirds, enhancing the composition of your shots. Tap to Focus: Tap the screen to focus on your subject. You can also adjust the exposure by sliding your finger up or down. Explore Apps: Play around with different photography apps to enhance your photos. Apps like Snapseed, VSCO, or Adobe Lightroom Mobile offer powerful editing tools.
Smartphones are equipped with built-in cameras that are perfect for everyday use. They are designed to be simple and intuitive, making them ideal for capturing quick and spontaneous shots. With the added benefit of editing apps, you can enhance your photos directly on your device.
Beginner Guide to Smartphone Photography:
youtube
2. Compact Cameras: Simple and Versatile

Description:
Type: Point-and-shoot camera Characteristics: Light, versatile, higher image quality than smartphones, better zoom capabilities Suitable for: Beginners and enthusiasts who want better image quality and more control over settings without the bulk of larger cameras.
Why Choose a Compact Camera?
Better Quality: Higher resolution and image quality than most smartphones. Zoom Capabilities: Optical zoom allows for better quality images than digital zoom. Manual Controls: More control over settings like aperture, shutter speed, and ISO.
Getting Started with Compact Cameras:
Learn the Basics: Familiarize yourself with aperture, shutter speed, and ISO. Use Auto Mode: Start with auto mode and gradually experiment with manual settings. Keep It Simple: Begin with the built-in lens; as you gain experience, you can explore more advanced settings.
Compact cameras, also known as point-and-shoot cameras, are lightweight and easy to carry. They offer better image quality than smartphones and come with manual control options, making them a great choice for those looking to improve their photography skills.
Beginner Guide to Compact Camera Photography:
youtube
3. DSLR Cameras: A Step Up in Quality

Description:
Type: Professional camera Characteristics: Larger, heavier, interchangeable lenses, superior image quality, advanced features Suitable for: Serious enthusiasts and professional photographers who require high performance, versatility, and superior image quality.
Why Choose a DSLR?
Exceptional Image Quality: DSLRs feature larger sensors, resulting in superior image quality, especially in low light. Interchangeable Lenses: The ability to switch lenses allows you to tailor your gear to your specific needs, from wide-angle shots to macro photography. Advanced Features: DSLRs offer advanced features like fast autofocus, multiple focus points, and high burst rates, making them ideal for capturing fast-moving subjects.
Tips for DSLR Beginners:
Learn Your Camera: Take time to understand the different settings and how they affect your photos. Manuals and online tutorials can be incredibly helpful. Practice with Different Lenses: Start with the standard kit lens, but explore other lenses as you become more comfortable. A prime lens can be a great way to experiment with depth of field. Join a Photography Community: Engaging with other photographers can provide valuable insights and feedback. Consider joining local clubs or online forums to share your work and learn from others.
DSLR cameras are known for their excellent image quality and flexibility due to their interchangeable lenses. They offer a wide range of manual controls and advanced features, making them suitable for various types of photography, from portraits to landscapes.
Beginner Guide to DSLR Camera Photography:
youtube
4. Mirrorless Cameras: The Modern Alternative

Description:
Type: Professional camera Characteristics: Light, compact, interchangeable lenses, electronic viewfinder, silent shooting Suitable for: Enthusiasts and professionals who want high performance and quality in a more portable package compared to DSLRs.
Why Go for a Mirrorless Camera?
Compact and Lightweight: Mirrorless cameras are smaller and lighter than DSLRs, making them more portable without sacrificing performance. High-Quality Images: They offer similar image quality to DSLRs, thanks to their large sensors and advanced technology. Electronic Viewfinder: Many mirrorless cameras feature an electronic viewfinder that displays your settings in real time, helping you visualize the final image.
Tips for Using Mirrorless Cameras:
Explore the Features: Mirrorless cameras often come with innovative features like 4K video recording and high-speed continuous shooting. Take time to explore these functions. Invest in Good Lenses: The quality of your lenses significantly impacts your photos. Start with a versatile zoom lens and consider adding prime lenses as you progress. Stay Updated: The technology in mirrorless cameras is continually evolving. Keep an eye on new models and firmware updates to make the most of your gear.
Mirrorless cameras combine the image quality and flexibility of DSLRs with a more compact and lightweight design. They use electronic viewfinders, allowing you to see exposure adjustments in real-time, and are known for their silent shooting capabilities.
Beginner Guide to Mirrorless Camera Photography:
youtube
5. Vintage Film Cameras: The Nostalgic Touch

Description:
Type: Professional camera (vintage/analog) Characteristics: Heavy, manual settings, unique aesthetic, requires film Suitable for: Enthusiasts and professionals who appreciate the classic film photography process and aesthetic, and those who want to learn the fundamentals of photography.
Why Try a Vintage Film Camera?
Unique Aesthetic: Film cameras offer a distinct look and feel, with a unique color rendition and grain structure that digital cameras often lack. Learning Experience: Shooting with film encourages a deeper understanding of exposure and composition, as you have fewer chances to correct mistakes. Tactile Experience: The process of loading film, taking pictures, and developing prints adds a tactile, hands-on dimension to photography.
Tips for Shooting with Film Cameras:
Choose the Right Film: Different films have different characteristics. Start with a versatile ISO 400 film, and explore different types as you gain experience. Develop Your Own Film: If you’re up for a challenge, try developing your own film at home. It’s a rewarding process that enhances your connection to the art. Embrace the Learning Curve: Film photography has a steeper learning curve, but the rewards are worth it. Take your time and enjoy the process of discovering what works best for you.
Vintage film cameras offer a nostalgic feel and a unique aesthetic that digital cameras can’t replicate. They require manual settings and film, which teaches discipline and a deeper understanding of photography basics. These cameras are appreciated by those who enjoy the tactile process and classic look of film photography.
Beginner Guide to Using Vintage Film Cameras:
youtube
Starting with photography gear can be both exciting and daunting, but remember, the best camera is the one you have with you. Whether you begin with a smartphone, compact digital camera, DSLR camera, mirrorless camera, or vintage film camera, the key is to explore, experiment, and find what inspires you.
Happy shooting, and may your journey through the world of photography be as fulfilling and creative as possible!
#photography#original photographers#blackandwhitephotography#photographers on tumblr#film photography#photo#photoblog#photographer#life#lifestyle#perspective#leisure#hobbies#hobby#picture#nature#life experiences#my experiences#self expression#expressionism#abstract expressionist art#freedom of expression#35mm#35mm film#35mm photography#youtube
2 notes
·
View notes
Text
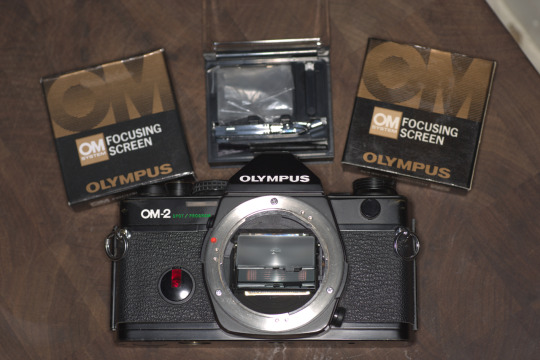
Camera Showcase
Olympus OM2 Spot Program
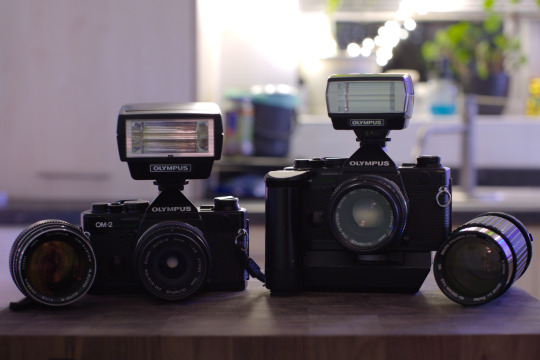
Pictured: Olympus OM2 Spot Programs with all owned OM specific lenses, flash units and motor winder
In the OM series of cameras, double digits such as the OM10 were consumer grade, whereas single digits were professional grade. First manufactured in 1984, the OM2 Spot Program (OM2S in the US) was a thorough overhaul of the OM2 to make it more competitive, meaning it's internals have more in common with the OM4 than it's predecessor.
Personally speaking, this is the most feature-rich, reliable 35mm film camera I have owned, making it my go-to workhorse for 35mm work. It’s compact design was very well-thought out and lightweight compared to other cameras before it.
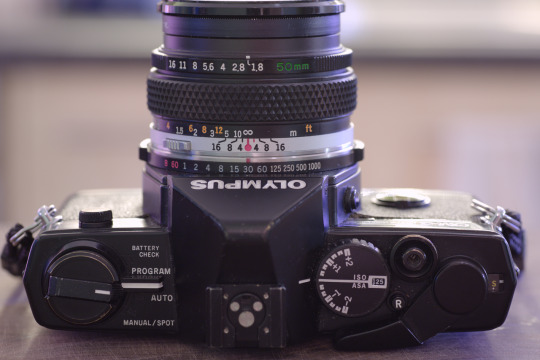
Pictured: Top view of the OM2 Spot Program highlighting camera controls
One of the really well-thought out designs of this camera is how the shutter speed, aperture and depth of field preview controls are all in the same area on or next to the lens, meaning with one hand you can set all the main exposure controls without looking away from the viewfinder. Instead of a shutter speed selector on top, it’s a combined ISO speed/exposure compensation dial.
The OM2 Spot Program has 3 shooting modes: Program, Auto and Manual/Spot. In Program, the lens is set to the highest/tightest aperture and the camera will set both the aperture and shutter speed according to the light levels. In Auto, the camera shoots in an aperture priority mode where the user sets the aperture and the camera deals with the rest. In both Program and Auto modes, the camera meters centre weighted but in the full manual mode the camera switches to spot metering. This is an extremely useful feature when shooting high contrast images and with light sources behind the subject matter.
Another great thing versus it's predecessors is that it has a mechanical 1/60th shutter speed option, meaning if the batteries are depleted mid-shoot there's still a way to take photos depending on light levels.
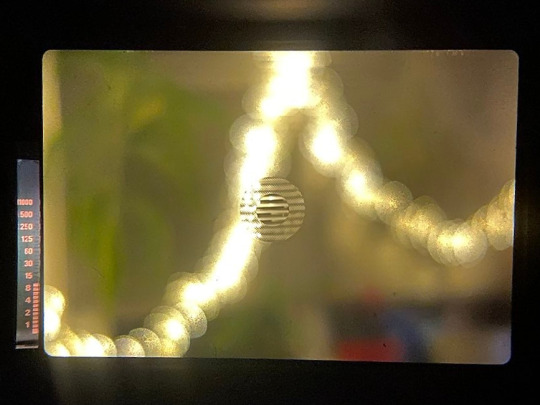
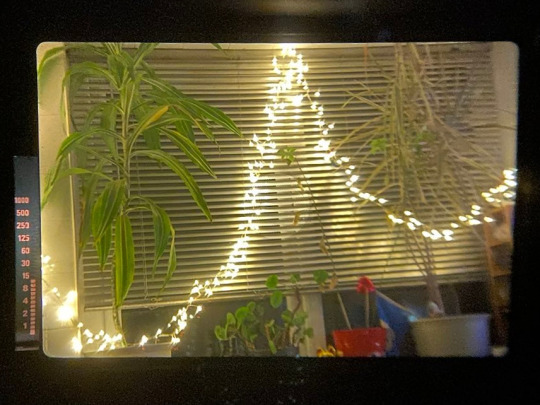
Pictured: 3 shots through the viewfinder showing the current focus screen's split centre and microprism centre, the Program/Auto mode metering and the Spot/Manual's digital match needle meter
The viewfinder's light meter is a LCD style display which can be illuminated for 90 seconds for better viewing in low light scenes. In Manual/Spot mode it switches from a bar depicting the shutter speed to a match needle style display. The viewfinder itself (dependant on chosen focus screen) is very clear and bright making composition a lot easier.
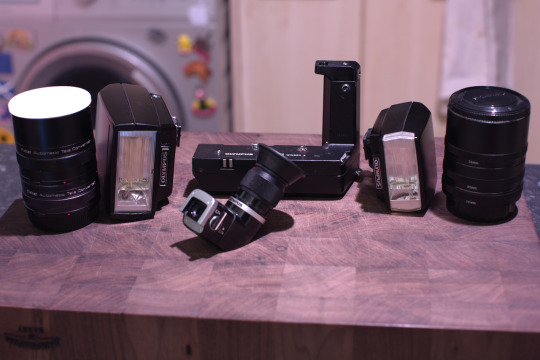
Pictured: A selection of various attachments for the OM series of cameras. teleconverters, extension tubes, right-angle viewfinder, motor winder and flash units
The OM series of cameras have a wide range of accessories to further extend the capabilities of this camera. The motor winder allows for shooting up to 3.5 frames a second in continuous mode. The right angle viewfinder is especially useful when shooting at awkward angles or with telephoto lenses on a tripod, and has a toggle switch to add a 2.5x magnification to it for really dialling in the focus. I have a T20 and T32 flash for my cameras, and although the more lightweight and smaller T20 is more portable and uses half the amount of batteries, I prefer the T32 as it allows for bounce flash photography. Both flash units have 3 modes: TTL camera auto, flash unit auto and full manual. I have only really used the TTL camera auto mode but with the lens set to f4 I haven't had any photos with blown out highlights or muddy shadows.
Pictured: three different focus screens and an OM2 Spot Program with no lens and the current focus screen unclipped from the camera
A great thing about the OM2 Spot Program and other single digit OM cameras is the ability to fairly easily switch focus screens. Different lenses and scenarios work better with different screens and the ability to change really increases the versatility of the camera. For example, for general use I tend to use a split centre with microprism focus screen to give me 3 ways to focus, but with a telephoto (especially with teleconverters) the split centre goes black due to the low light levels. At that point, I have the option to switch to a microprism only or ground glass screen to make it easier to focus.
All in all, a fantastic camera with a solid design, accurate light meter and a wide selection of lenses and attachments which if in good condition will be a fantastic addition to any vintage camera collection.
#photography#film photography#ishootfilm#analog photography#filmisnotdead#vintage cameras#camera review#35mm film#35mm format#reviews#retro camera#olympus camera#olympus om2sp#olympuscamera#35mm camera#analog camera#old camera#camera#om2sp
3 notes
·
View notes
Text
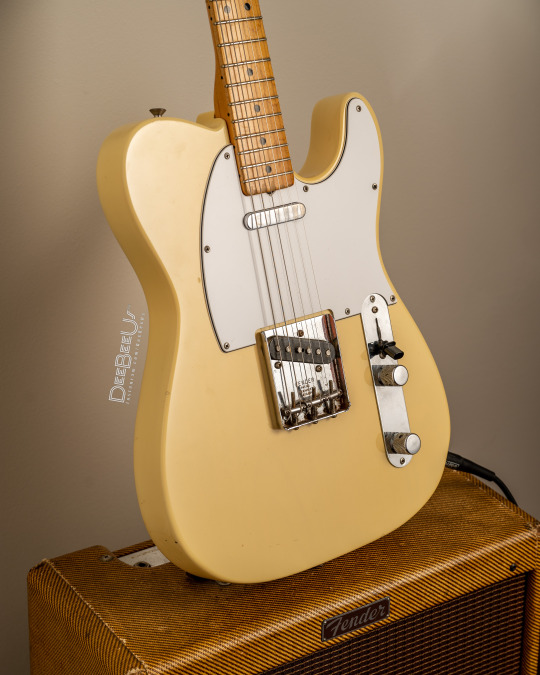
1968 #Telecaster & 1959 5F2A #FenderPrinceton.
More fun with the new AD200 flash & Z 24-120 f/4 S lens. These were all taken at ISO 100, f/5.6 and 1/125th of second.
In terms of the lens I am finding it very sharp. I was hesitant to buy it at first because it is "only" an f/4. This means the lens is not particularly "fast" for taking pictures in low light conditions. The lower the "f" number is, the "faster" the lens is, and f/4 is not very fast lol. Ideally, you would want a lens with a wider aperture (f/2.8, f/1.8 etc) for low light shooting, but these tend to be much more expensive lenses. And you know what? Since I got my fancy new flashes I don't usually shoot at anything below f/5.6 anymore anyway, so why pay a fortune for a faster lens that I will never use? This lens is compact (enough) for the Z6ii, very sharp, and (relatively) affordable, thank you very much!
The other exciting (for me anyway...) thing about this series of shots is that they are all taken using the "TTL" setting on the flash! Usually I shoot 100% manual, meaning I set the camera up to a specific ISO, aperture, and shutter speed, and then I have to manually adjust the power of the flash until I get the right exposure (i.e. not too dark, and not too bright). TTL ("Through The Lens") on the other hand, uses the wireless flash trigger on top of my camera to send information about the exposure from the camera's light meter to the flash, and the flash sets itself automatically to the correct power to get the proper exposure. It basically eliminates the trial and error involved manual mode and saves time. FUN (I assure you)!
I probably won't use TTL all the time, because I like to manually control every aspect of the exposure and it won't work if the flash is pointing away from he subject (which I do all the time to soften the light). But for some quick basement snaps like this, it sure is a time saver!
#guitar#guitars#guitarra#chitarra#guitarre#electricguitar#vintageguitars#fenderguitars#vintagefender#guitarphotography
12 notes
·
View notes
Note
hello! i love your photos, i just added a bunch of your posts to my queue <3 i love your shots of the nature in org. you dont have to answer but i wanted to ask please what camera did you use for “cat on film” ? ive been thinking about getting a 35mm camera but i don’t know which one would give me that soft warm fuzzy look your photos of your cat had :’) thank you
hi, thank you!
the camera i took those on is a chinon gaf memo 35ee,..
...but i wouldn't recommend getting one, to be honest, especially if you're new to film photography. it's a rangefinder focus, which means instead of just turning a wheel around the lens until the image is sharp, you have to line up two tiny versions of what you see in the center of the viewfinder and then take the picture. like this:
you see the tiny yellow rectangle in the middle of the frame? in order to focus the camera, you need to line up the two images within that tiny amount of space. there's a whole bunch of other reasons i don't love this camera, and a few things i like, but i won't go into it. i don't really use this camera anymore.
the good thing is that the "soft warm fuzzy feeling" you want to replicate really has almost nothing to do with this camera. it's more related to the film you use, the settings you use on your camera, and, of course, the lighting in the area where you're taking the photo.
here's another photo i took that has a similar warm, fuzzy vibe, despite the fact that it was taken on a different camera and with different film.

i'm not a film photography expert by any means, but i would say when you're trying to get this type of vibe, the actual lighting in the place where you're taking the photo is the most important.
you also probably want to use a camera that doesn't have fixed focus. Some cameras, especially the really easy to use instant film or disposable film ones, don't require you to focus; you just press the button and move on. that's fixed focus. part of what gives you the warm fuzzy feeling about the photo above is that not every part of the image is sharp.
a lot of the pictures in that cat post are also slightly over- or under-exposed, but none of them use flash, so you probably want a camera that doesn't automatically set off a flash if it detects the lighting is too low.
in terms of getting your first film camera, that can be tricky because there's basically no new ones out there for sale- unless you want to get a tacky plastic disposable or shill out 1000s for a Leica. you're most likely going to have to buy secondhand from a camera store or just some guy online. facebook marketplace is really good for this in my experience.
some buying tips:
-decide if you want a point-and-shoot (you just look through the viewfinder and press the shutter button, done) or a SLR that lets you manually adjust the shutter speed, iso, etc. both are great and i have one of each for different situations.
-in my experience, don't bother paying more than 40$ CAD for a 2ndhand point-and-shoot or $100 for a full film camera unless it's something ridiculously amazing or unless you're buying secondhand from a camera store.
-look up the specs of your camera before buying it and pay attention to the degree to which the camera is automatic. film cameras use a light meter to measure what the shutter speed should be in different situations to capture the right amount of light, but the way they use the light meter differs. if a camera is fully automatic, that means that it measures the light in the room and then automatically adjusts the shutter speed to be correct.
this sounds great, but it also usually means you can't manually change the shutter speed. this can be a problem because, again, you're buying a secondhand camera that's probably at least two decades old. there's a high chance the electric components that automatically measure the light will be corroded or broken or will soon break down, and when they do repairs may be very expensive or even impossible, since you just can't find some repair parts anymore.
the more manual your film camera is, the better it can stand the test of time, because even if the camera's light meter fully breaks down and can't be repaired, you can buy a handheld light meter to tell you the right shutter speed and then manually change the shutter speed on your camera. this isn't to say to avoid all automatic features- all my cameras are to some degree automatic and i like it a lot- but its something to be aware of.
-look up your camera on lomography.com, which has a ton of film photos that you can sort by film and by camera. (i also have my own lomography account, where my photos are sorted by film and by camera.)
-when buying a camera that has a battery slot, open it up and check for any rust or corrosion inside. don't buy it if there's any green or brown on the parts the battery connects to.
i have three other cameras that i have and like a lot:
nikon EM (SLR) - 80 bucks on FB marketplace
yashica fx-3 super 2000 (SLR) - belonged to a relative
samsung ff-222 (point + shoot) - 30 bucks on FB marketplace
i also like the canon T series a lot, my friend has a canon t70.
and the films i tend to use are:
fujifilm superia (my fave; relatively cheap color film. the cat photos are on this.)
kodak ultramax (slightly more expensive. not that different results wise, maybe a little more pastel.)
portra - expensive but pretty
ektar - expensive but pretty
ilford hp5 b&w - cheap. good for testing a new film cam so you can see results without splurging too much.
you can look them up on lomography to see the differences between them.
hope this helps!
5 notes
·
View notes
Text
Moon 20230430

July 30 Waxing Gibbous 92%
The closer we get to a full moon, the more difficult, for me anyway, it is to get a detailed photo. Too much light, I think. Shooting with a very low ISO setting helps. Lately, I've been lazier than usual, I leave the aperture and shutter speed alone and just adjust the ISO. I could probably tweak it some more, but I think that I'm getting about the best I can get with my equipment. Though, I do have a 2x extender that I've used when I'm not being lazy - it requires that I set up a tripod and manually focus the camera.
4 notes
·
View notes
Text
How to Use Your Camera in Manual Mode (Step-by-Step Guide)
Switching to manual mode can be intimidating for beginners, but once you master it, you'll have full creative control over your photography. This step-by-step guide will help you understand the key settings and how to adjust them to take amazing photos.
Step 1: Understanding the Exposure Triangle
Manual mode requires adjusting three main settings that control light and exposure:
Aperture (f/stop): Controls how much light enters the camera. A lower f-number (e.g., f/1.8) creates a shallow depth of field, perfect for portraits by keeping the subject in focus and blurring the background. A higher f-number (e.g., f/11) keeps more of the image in focus, making it ideal for landscapes and architectural shots. Additionally, aperture affects the amount of light entering the sensor, meaning a wide aperture lets in more light, useful for low-light photography.
Shutter Speed: Determines how long the sensor is exposed to light. A fast shutter speed (e.g., 1/1000s) freezes motion, which is great for sports and wildlife photography. A slower shutter speed (e.g., 1/10s) allows for motion blur, often used in creative photography such as light trails or waterfall shots. Stabilizing your camera with a tripod for slow shutter speeds is crucial to avoid unwanted blurring.
ISO: Controls the camera sensor’s sensitivity to light. A low ISO (100-200) is best for bright environments and produces the clearest image. A high ISO (800-3200) is useful for darker conditions, but increasing ISO too much can introduce digital noise, making the image grainy. Understanding your camera’s ISO performance will help you balance sensitivity and image clarity.
Step 2: Setting Your Aperture
Aperture directly affects both exposure and depth of field. The f-number (f/stop) determines the size of the lens opening:
For portraits, use a wide aperture (low f-number, like f/2.8) to create a soft, blurred background that isolates the subject. This helps draw attention to your subject while keeping distractions minimal.
For landscapes, use a narrow aperture (high f-number, like f/11 to f/16) to ensure everything from the foreground to the background remains in focus. This is ideal for scenic shots where clarity across the image is necessary.
For low-light photography, a wider aperture (f/1.8 or lower) allows more light into the camera, reducing the need for higher ISO settings and resulting in cleaner images with less noise.
Step 3: Adjusting Shutter Speed
Shutter speed influences how motion is captured in an image:
For fast-moving subjects (sports, wildlife), use a fast shutter speed (1/500s or faster) to freeze action and avoid motion blur. The faster the subject, the higher the shutter speed should be.
For long exposure shots (night photography, waterfalls), use a slow shutter speed (1/10s or slower) to capture smooth motion effects. Using a tripod is essential to prevent unwanted camera shake and blur.
General rule: If you’re shooting handheld, your shutter speed should be at least as fast as the reciprocal of your focal length. For example, with a 50mm lens, use at least 1/50s to avoid blur caused by hand movements.
Step 4: Setting the ISO
ISO determines how sensitive your camera sensor is to light:
Keep it low (100-400) in daylight for the best image quality with minimal noise and maximum sharpness.
Increase it (800-3200) in low light to make the sensor more sensitive to light, but be mindful of increased graininess. Many modern cameras handle high ISO well, so test your camera’s limits.
Use Auto ISO if you’re in changing lighting conditions. Some cameras allow you to set a maximum ISO limit, ensuring noise levels stay manageable while adjusting automatically for the best exposure.
Step 5: Using the Light Meter
Your camera’s built-in light meter helps determine the correct exposure. When looking through the viewfinder or screen, you’ll see a scale ranging from negative to positive (-2 to +2 or more).
Balanced exposure: Adjust your settings until the indicator is around 0. This means the exposure is correct according to the camera’s metering system.
Underexposed (- side): Increase aperture size (lower f-number), decrease shutter speed, or raise ISO to allow more light in.
Overexposed (+ side): Decrease aperture size (higher f-number), increase shutter speed, or lower ISO to reduce the light entering the sensor.
Use different metering modes (spot, center-weighted, evaluative) depending on the scene to achieve the best results. Spot metering, for instance, is ideal for high-contrast scenes where you want precise control over exposure.
Step 6: Practice and Adjust
The key to mastering manual mode is practice. Here are some exercises to build confidence:
Experiment with different lighting conditions: Try shooting in daylight, indoors, and at night to see how settings need adjustment. Take notes on how different exposures affect the final image.
Take the same photo at different aperture, shutter speed, and ISO settings: Compare results to understand their impact. This exercise helps reinforce the relationship between these settings.
Use a light meter app or histogram: This helps fine-tune exposure beyond what the camera’s built-in meter shows. The histogram ensures details aren’t lost in highlights or shadows.
Challenge yourself with manual focus: This improves precision, especially in low-light or macro photography where autofocus may struggle.
Shoot in RAW format: This gives you greater flexibility in post-processing, allowing you to adjust exposure and correct minor errors without loss of image quality.
By mastering manual mode, you’ll unlock endless creative possibilities in your photography. Keep practicing, and experimenting with different settings, and soon, adjusting exposure will become second nature!
Consider taking the Basic Photography Course, which is available at eltonbrownephotography.com
0 notes
Text
Price: [price_with_discount] (as of [price_update_date] - Details) [ad_1] Product Description: Welcome to QS, where innovation meets your moments! Our 4K Digital Camera is designed to elevate your photography and vlogging experience. At ED, we believe in empowering individuals to capture and share their unique stories. Our journey began with a passion for delivering cutting-edge technology in a user-friendly package. This camera is a testament to our commitment to quality and innovation. Key Features: Stunning Imaging: 4K resolution and 48MP photography for detailed and vibrant visuals. Versatile Adaptability: 16X digital zoom, adjustable flash, and multiple shooting modes for any scene. Wide-angle and macro lenses included. Seamless Creativity: 1500mAh rechargeable battery for extended sessions, WiFi & app control, and easy streaming to social media platforms. Ideal for: Photography Enthusiasts Vlogging Enthusiasts Perfect Gift for All Occasions Elevate your photography with QS's 4K Digital Camera - where moments meet innovation! 📸 Professional Photography Capability:Elevate your photography experience with this multifunctional digital camera, capturing live performances with astonishing clarity and detail. Its 64MP ensures exceptional image quality, while manual adjustments to aperture size and shutter speed provide greater creative control and scene customization. 🎥 4K Video Recording Ability:Beyond just photography, this professional camera excels in videography, offering a maximum 4K/30FPS video resolution. Whether capturing concerts, video logs, or online tutorials, its high-definition lens ensures professional-grade results. Moreover, compatibility with PC webcam streaming and video calling expands its utility for content creators. 🔍 40x Zoom Functionality:Featuring a powerful 40x zoom effect, this camera captures distant subjects with incredible detail, ideal for wildlife photography, concert performances, and even moonlit nights. The combination of 10x optical zoom and 4x digital zoom offers flexibility in framing shots, ensuring you never miss a moment. 🎨 Creative Multifunctionality:Explore various shooting modes like time-lapse, continuous shooting, and slow-motion, catering to diverse creative needs. The built-in fill light enhances low-light photography, perfect for capturing concerts or events in dimly lit environments. Included accessories such as the 32GB memory card provide instant usability, catering to both photography enthusiasts and beginners. 📶 Seamless Connectivity and Sharing:With WiFi and HDMI output capabilities, instantly share your photos and videos with friends and family, whether uploading to social media or connecting to a TV for a larger audience. This camera not only captures moments but also facilitates instant sharing, enhancing the overall experience of documenting and sharing memories. 🎁 Perfect Gift for Photography Enthusiasts:Featuring a stylish design and comprehensive accessory package, including two lithium batteries for extended use, this digital camera is an ideal gift choice for anyone passionate about photography or videography. Elevate your photography game and unleash your creativity with this professional-grade camera, your perfect companion on the journey to becoming a skilled photographer. [ad_2]
0 notes
Text
Sony FE 85mm f/1.4 GM lens Problems Fixed by Awpro Care
The Sony FE 85mm f/1.4 GM lens is a popular choice among photographers for its exceptional image quality and performance. However, users have reported several issues that can impact their experience. In this blog, we’ll discuss these problems and provide potential solutions, along with information on repair services available through AWPRO.
Common Issues with the Sony FE 85mm f/1.4 GM Lens
Autofocus Noise
Many users have expressed concerns about the autofocus noise of the lens, which can be quite loud compared to other E-mount lenses. This issue is particularly problematic in quiet environments, such as during weddings or performances.
Solution:
Firmware Update: Ensure that your lens firmware is up to date. Manufacturers often release updates that can improve autofocus performance and reduce noise.
Use Manual Focus: For critical moments where silence is essential, consider switching to manual focus.
Autofocus Performance in Low Light
Another common complaint is the lens's autofocus performance in low-light conditions. Users have reported slow focusing and "focus hunting," where the lens struggles to lock onto subjects.
Solution:
Focus Settings: Adjust your camera settings to enhance low-light performance. Using a higher ISO can help the camera detect focus better.
Consider Upgrading: If you frequently shoot in low light, consider upgrading to the newer version of this lens, which features improved autofocus motors for faster and more reliable performance .
Lens Breathing
Lens breathing refers to the change in focal length when focusing, which can be distracting during video work.
Solution:
Breathing Compensation Feature: If using a compatible camera body, enable the breathing compensation feature to minimize this effect.
Post-Production Editing: Consider adjusting focus pulls in post-production if necessary.
Chromatic Aberration and Vignetting
Users have reported issues with longitudinal chromatic aberration (LoCA) and vignetting at wider apertures, which can affect image quality.
Solution:
In-Camera Corrections: Utilize in-camera lens correction settings to mitigate vignetting and chromatic aberration.
Post-Processing Tools: Use photo editing software to correct any remaining aberrations or vignetting in post-production.
Weight and Size
The lens is relatively heavy, which can lead to fatigue during extended shooting sessions, especially when paired with smaller camera bodies.
Solution:
Use a Tripod or Gimbal: For longer shoots, consider using a tripod or gimbal to alleviate the weight burden on your arms.
Balance with a Suitable Camera Body: Pairing the lens with a full-size Alpha series camera can improve balance and handling.
AWPRO Care: Repair Services
For those experiencing persistent issues with their Sony FE 85mm f/1.4 GM lens, AWPRO offers comprehensive repair services under their AWPRO Care program. Their skilled technicians are equipped to handle various repairs, ensuring your lens is restored to optimal performance.
How to Access AWPRO Care:
Contact AWPRO Support: Reach out through their customer service channels for assistance.
Submit Your Lens for Repair: Follow their instructions for sending in your lens for evaluation and repair.
Stay Updated: AWPRO will keep you informed throughout the repair process.
Conclusion
While the Sony FE 85mm f/1.4 GM lens delivers outstanding image quality, it’s essential to be aware of its potential issues. By implementing the suggested solutions and utilizing AWPRO's repair services when necessary, you can enhance your shooting experience and maintain your lens in excellent condition. Whether you are capturing portraits or events, addressing these challenges will help you make the most of this exceptional lens.
0 notes
Text
2nd Blog
Photography Tips for Beginners: A Guide to Capturing Stunning Images
Photography is an art form that allows you to freeze moments in time, capturing emotions, beauty, and stories through the lens of a camera. Whether you’re an aspiring photographer or just someone with a keen interest in learning more about photography, getting started can feel overwhelming. However, by mastering a few essential techniques and understanding the basics of photography, you can quickly improve your skills and start creating stunning images.
1. Understand Your Camera
Before you can take beautiful photos, it's important to become familiar with your camera, whether it’s a DSLR, mirrorless camera, or even a smartphone. Take the time to read your camera's manual and explore its settings. Most cameras offer automatic modes, but if you want full control over your photos, try to understand the key settings:
Aperture: This controls the amount of light entering the camera. A wider aperture (lower f-number) will give you a shallow depth of field, which is great for portrait shots with a blurred background. A smaller aperture (higher f-number) allows more of the scene to be in focus, which is ideal for landscape photography.
Shutter Speed: The amount of time the camera's sensor is exposed to light. Faster shutter speeds (e.g., 1/1000) are great for freezing motion, while slower shutter speeds (e.g., 1/30) create a blur effect, which can add artistic flair to moving subjects.
ISO: This controls the sensitivity of the camera’s sensor to light. Higher ISO values are useful in low-light conditions, but they can introduce noise (grain) into your images, so it’s a good idea to use the lowest ISO setting possible while still getting a properly exposed shot.
2. Composition is Key
One of the most important skills in photography is composition, which refers to how the elements in your photo are arranged. A well-composed image draws the viewer’s attention to the main subject and creates a sense of balance.
Rule of Thirds: Imagine your image divided into nine equal sections by two horizontal and two vertical lines. Place important elements of your image along these lines or at their intersections. This creates a more balanced, dynamic composition.
Leading Lines: Use natural or architectural lines in your environment to lead the viewer’s eye towards your subject. Roads, rivers, fences, or even shadows can serve as leading lines.
Framing: Use objects in the scene to frame your subject, such as doorways, windows, or branches. Framing creates a sense of depth and can focus the viewer's attention on the subject.
3. Lighting is Everything
Lighting is one of the most crucial aspects of photography. The way light interacts with your subject can make a significant difference in the mood and overall quality of your image.
Golden Hour: The best time to capture soft, warm light is during the golden hour—just after sunrise or before sunset. The light is diffused and creates long shadows, giving your photos a magical, almost ethereal quality.
Natural vs. Artificial Light: While natural light (e.g., sunlight) often produces the most flattering results, you can also experiment with artificial lighting like lamps, flash, or studio lights to create specific moods or effects.
Avoid Harsh Midday Sun: The midday sun can create harsh shadows and blown-out highlights, so it’s often better to shoot during early morning or late afternoon. If shooting in direct sunlight is unavoidable, use a diffuser or shoot in the shade.
4. Focus on Your Subject
Sharp focus on your subject is essential for high-quality photos. Most cameras have an autofocus system, but it's also helpful to know how to manually focus, especially when shooting in tricky lighting situations.
Portraits: Focus on the subject’s eyes to ensure they are sharp, as this is where the viewer’s gaze will be naturally drawn.
Depth of Field: A shallow depth of field (achieved by using a wide aperture) can isolate your subject from the background, creating a pleasing bokeh effect that makes your subject stand out. Conversely, a deep depth of field ensures that everything in the frame remains sharp, which is ideal for landscapes.
5. Post-Processing: Enhance, Don’t Overdo It
Once you’ve taken your photos, the work isn’t over. Post-processing, or editing, is a crucial step in photography. However, it’s important not to overdo it. Simple adjustments to exposure, contrast, and color balance can make a huge difference in the final result.
Exposure: Adjusting exposure can help brighten or darken your image if it’s too light or too dark. Be mindful of blown-out highlights and loss of detail in shadows.
Cropping: If your composition isn’t quite right, cropping can help improve the framing. However, avoid cropping too much as it can reduce image resolution and quality.
Sharpening and Noise Reduction: Sometimes, images can appear soft or noisy after shooting, especially in low-light situations. Use sharpening tools sparingly, and reduce noise to maintain the image's quality.
6. Practice and Experiment
The best way to improve your photography skills is through practice and experimentation. Don’t be afraid to try new techniques, shoot in different lighting conditions, or explore unfamiliar genres. As you shoot more, you’ll develop your unique style and gain a better understanding of your creative vision.
Start by shooting simple subjects—flowers, food, or even everyday objects around your home—and gradually challenge yourself with more complex compositions and scenes. Experiment with different focal lengths, angles, and perspectives to create diverse images.


0 notes