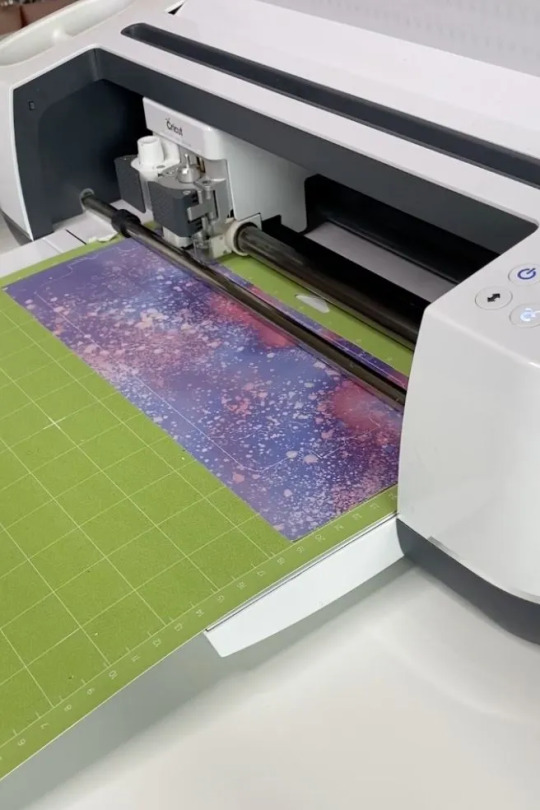
#setting my cricut maker
Explore tagged Tumblr posts
Visit Tumblr Blog
Explore Tumblr blogs with no restrictions, modern design and the best experience.
Last Seen Tumblr Blogs


wandavision1x05streamingvf-blog
WandaVision 1x05 Saison 1 Épisode 5 streaming Série tv frança
1 post

gutterfest
22 posts
Fun Fact
Tumblr was acquired by Yahoo for $1.1B in 2013.
Text
Why Won’t My Cricut Design Space Open (Easy Steps)
Why won’t my Cricut Design Space open? This is a question that I frequently receive from many readers. Finally, I got a chance to write something about it. Recently, I experienced the same issue, and it was not opening on my PC at all. At that time, I had to use the Cricut software on my mobile device; thanks to Cricut, it is compatible with smartphones, too.
Now, you might wonder why this happens and what the reasons behind it are. So, I tried to research it, and after extensive research, I figured out that it happens because of third-party virus interference, incorrect network settings, and corrupt cache files. For these reasons, our Cricut app doesn’t open the way we want it to.
But chillax! It’s not a big deal and can be fixed easily with some methods I’ll explain in this blog. Without any further ado, let’s jump into the solutions!
Solution 1: Check System Compatibility
Did you know that system compatibility plays one of the biggest roles in the smooth functioning of any software? Therefore, we check our system requirements to see whether our computer or any devices we want to use the software meet all its needs. To fix the “why won’t my Cricut Design Space opening“ issue, I will walk you through the following system requirements for PC and Mac:
For example, if you are a Windows user, verify the following points:
Now, if you are a Mac user, you have to check the following points:
Once you have ensured the above points, you will be able to fix the “why won’t my Cricut Design Space not Working“ issue quickly. If the above solution doesn’t work for you, you can try the next one.
Solution 2: Check the Internet Connection
Sometimes, the Cricut software will not open properly just because of your unstable internet connectivity. This software requires a constant internet connection to work properly. An unstable connection can cause many issues, hindering you from creating and opening your projects. Although you can create projects offline, sometimes it is better to cross-check.
For both Windows and Mac users, the internet requirements are as follows:
Solution 3: Force Cricut Design Space Reloading
Sometimes, I have seen that a slow speed can cause the “why won’t my Cricut Design Space open” issue on your desktop. However, the software can be sluggish due to several reasons. Therefore, you need to do the force reload.
Here’s how to perform a force reload of the Cricut Design app:
Once you have performed the above steps, you need to make sure whether the errors are resolved or not. If the issues still persist, go and check for the next solution.
Solution 4: Relaunch Cricut Design Space on Mac/PC
Here, we will try one last solution, which is the easiest one. All you need to do is relaunch the Cricut software on a compatible computer, such as a Mac or Windows PC.
For Windows
For Mac
By following the above steps, I assure you that you can fix the “why won’t my Cricut Design Space open” in no time. There are four solutions mentioned above; you can try any of them. One of them must work for you.
Final Words
Finally, I have given all the solutions on Cricut Design Space that won’t open issues. These solutions are really effective and will work for sure, as I have tried them myself. Besides, the Cricut software hardly shows any errors, so if you try to solve the issues by following the above methods, they will be resolved as soon as possible.
FAQs
Question 1: Why Cricut Design Space won’t open?
Answer: Sometimes, Cricut Design Space fails to open due to several reasons. It can also happen due to an unstable internet connection or the presence of viruses. There are other additional causes, which I have mentioned below:
Question 2: What do I need to know before downloading Cricut app?
Answer: Before you download and install the Cricut Design Space app on a desktop or phone, make sure your device meets all the system requirements. The RAM size is the same for Windows, Mac, Android, and iOS, including the 2 GB free disk. However, in terms of operating system, ensure that you are using the latest one.
Question 3: Why is my Cricut stuck on loading?
Answer: If you find your Cricut machine stuck while loading, you should try the following steps:
Visit: install cricut design space app
www.cricut.com setup login
Source: https://connectcricut.com/why-wont-my-cricut-design-space-open-easy-steps/
#install cricut explore air 2#install cricut design space app#cricut.com/setup#www.cricut.com setup login#www.cricut.com#www.cricut.com/setup login#cricut.com setup mac#cricut setup#cricut setup create account#cricut setup for pc#cricut setup explore air 2 setup#cricut setup maker#cricut setup log in#cricut design space#cricut setup on computer#cricut new machine setup#cricut explore air 2#cricutprojects#cricut venture#cricut#setting up my cricut maker#connecting cricut maker to computer#setting up new cricut maker#cricut printer setup
0 notes
Text
Cricut Joy Setup: A Step-by-Step Guide for Beginners

Are you looking for an easy Cricut Joy setup tutorial? I’ve got you covered! Cricut Joy is a cutting tool that is great for beginners and anyone who wants to craft occasionally just for fun.
I also have it, and recently, I bought one of its new versions, the Cricut Joy Xtra, but I will only talk about the Cricut Joy machine. I understand some new users find it difficult to setup their Cricut machine. Therefore, I came up with this blog. Here, I will talk in a stepwise manner to make it easier for everyone to understand my points.
The Cricut setup includes various things, such as connecting Cricut to Bluetooth and downloading the Cricut app. However, I will only discuss the Cricut setup for Windows users. So, let’s get started now.
Minimum System Requirements for Cricut Joy Setup
Before you dive into the setup process of the Cricut machine, let’s understand whether your system meets the basic requirements for using Cricut Design Space software. In order to ensure the smooth functioning of the software, I advise you to check the system needs once and then proceed. Once you have checked it, you can move to the next steps, which I have answered: How do I setup my Cricut Joy?
Here is what you need to check on your Windows PC:
Operating System – Windows 10 or later (64-bit)
RAM – 4 GB
Disk – 2 GB free
CPU – Intel Dual Core or equivalent to AMD processor
Display – Minimum 1024px x 768px screen resolution
Connection Type: Bluetooth connection
Cricut Joy Setup Guide: 4 Quick and Easy Steps
Have you checked the above system requirements before proceeding with this step? If so, then GREAT!! Now, you are ready to setup your Cricut without any hassle. In it, we will connect the Cricut and download the software from scratch. If you have bought a new Cricut Joy and haven’t unboxed it yet, then don’t worry. You can join me on this journey. Let’s unbox it and finally set it up together.
Step 1: Unbox the Cricut Cutting Machine
In the first step of the Cricut Joy setup, you will need to unbox the machine.
Here’s the picture of my Cricut machine setup unboxing! Now, let me tell you what I got in the box of the Cricut machine. Let’s take a look below:
Cricut Joy machine
Fine Point Pen (0.4mm)
StandardGrip Mat, 4.5″ x 6.5″
Powder Adapter
Welcome Card
Blade + Housing
Free trial membership to Cricut Access
50 ready-to-make projects online
Materials for a practice cut
Step 2: Connect Cricut to Your Windows Computer
This second step is crucial in the Cricut Joy setup. In it, we are going to connect our Cricut to our PC using Bluetooth. Before that, make sure your Cricut machine is placed on a flat surface, and the distance should not be more than 10 – 15 between the PC and the machine.
Here’s what you need to do to connect your Cricut to your PC via Bluetooth:
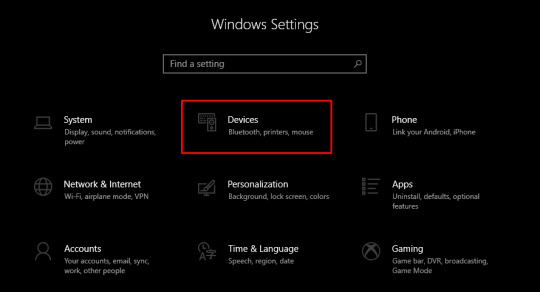
Navigate to the Start menu and then tap the gear-like icon in your settings.
Then, you will need to choose Devices on the next screen.
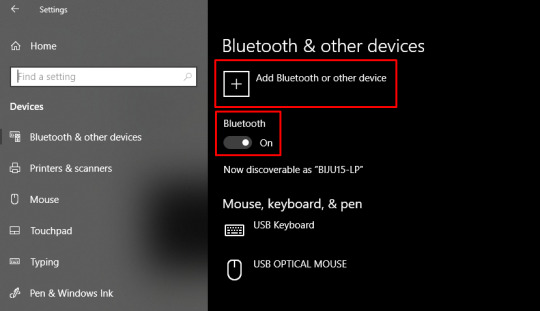
Now, check whether you have turned on your Bluetooth. If not, please turn it on. Once done, click on the Add Bluetooth or other device.
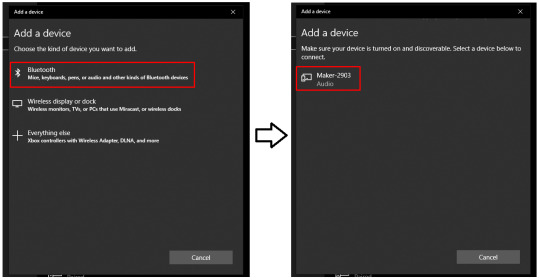
On the next screen, you have to select the Bluetooth option.
After that, wait for a while for your PC to check your Cricut machine.
As you can see in the available list, you have to select your Cricut model.
Step 3: Download Cricut Design Space
Here’s how to download Cricut software on Windows 10:
Launch the Internet browser on your desktop.
Search design.cricut.com is on your browser search bar.
On the displayed screen, click the I agree checkbox and then hit the Download button.
Now, you have to hit the Download tab to start downloading the Cricut Design Space.
Once you have downloaded the Cricut app, double-click on your file from the Downloads folder.
Afterward, the installation will start.
Step 4: Complete Cricut Joy Setup Steps
Launch your Cricut software on your PC.
Then, you need to select Cricut New Product Setup.
After that, you will need to sign in to your Cricut IS using your username and password.
Next, select the Smart Cutting Machine.
Now, you will need to choose the Cricut model.
Finally, follow the on-screen instructions to complete the steps. Although you will find many steps that you have already taken, it is okay to follow them.
FAQs
Which software do I need for Cricut Joy setup?
You will need the Cricut Design Space app to setup your new Cricut Joy machine. Cricut Joy is smaller in size and made portable to carry anywhere. Just because it is different from the rest of the machine, it doesn’t mean it will use different Cricut software. The app is indeed the same, and you don’t need to worry about anything. Simply download the app and start making DIY projects like a pro.
Can I setup Cricut Joy without connecting to Bluetooth?
No, there is no other way to connect your Cricut machine to your computer, as Joy comes with built-in Bluetooth. Unlike Cricut Maker and Explore models, Cricut Joy doesn’t come with a USB port, and hence, you can’t connect it using a USB cord if your Bluetooth is not working due to some reasons. In short, Bluetooth is a must for connecting your Cricut to any device.
Is Cricut Joy worth the investment?
It depends on your needs and the type of materials that you want to cut on it. Since Cricut Joy can cut only up to 50 materials, you should know that you will not be able to do all kinds of projects on it. There will always be some materials that you can’t cut on it. Cricut Joy can be worth the investment only for those who are novice crafters and have less budget. In addition, it is the perfect choice for occasional crafters.
Source: Cricut Joy Setup
#cricut joy setup#how do I setup my cricut joy#cricut joy xtra#cricut joy app#Cricut design space download#cricut design space app#cricut design space software#cricut maker setup#cricut machine set up
1 note
·
View note
Text
How to Connect Cricut to App: A Stepwise Setup Guide
So, here you will learn how to connect Cricut to app. Right? But before I dive further into this blog, I would like to clarify one thing. This blog talks about how to connect your Cricut machine to an app (Cricut Design Space), but I don’t think it is the same as connecting Cricut to your computer or mobile phone.
Connecting a Cricut to an app and connecting Cricut to a compatible device are two different things. Don’t get confused! The question is, if both are different, then what are we going to learn from this blog? In this blog, I will teach you how to connect a Cricut machine to an app. However, it is also called a Cricut setup. We will be learning about machine setup on Windows computers. Let’s dive into it without any further ado!
Step 1: Unboxing a Cricut Product
Okay, so to get to the exciting part of the Cricut machine setup, we will first need to unbox the machine. However, if you have already unboxed it, enjoy🥳and move to the second step in order to learn how to connect Cricut to app.
Here, let me share my experience of unboxing my Cricut.
I opened the box’s lid and saw a matted folder over the top surface of the Cricut machine. Here I am, actually, opening my Cricut Explore Air 2 machine. It came with a blue LightGrip mat. Those who got the Cricut Maker machine then will receive a green StandardGrip mat.
The list is long; let me show you what else I got with my Cricut Explore:
Step 2: Open Your Cricut Cutting Machine
To open the Cricut machine, I pressed the Open button (on the left side). As I pressed the button, the rest of the doors opened on their own. Here, Cricut Maker users need to lift the top lid. After that, the front door will open on its own (automatically).
Note: Do not open the doors that open automatically. Just wait and let them open slowly on their own.
When your Cricut is opened, you need to remove the foam and other tape on the side.
Step 3: Plug Into a Cricut Machine
Plugging the power cable into the Cricut cutting machine is the first step in learning how to connect Cricut to app. Now, it’s time to turn it on. Yes! So, let’s grab the power cords that come with our Cricut machine.
You can just plug the main plug into the wall outlet and insert the other into the back of your Cricut machine. But, here, you have to plug in the machine; you don’t need to turn it on the machine here. We’ll do it later.
As the machine is turned on, you need to move to the next step, where we will start setting up our machine.
Step 4: Pair Cricut to a Computer via Bluetooth
I have connected my Cricut using a USB cable, too. Currently, I am using a Bluetooth wireless connection. So, let me show you how to connect Cricut to PC via Bluetooth:
Now, let’s download a Cricut app so that you can understand how to connect Cricut to app, i.e., how to setup Cricut.
Step 5: Download Cricut Design Space
The machine setup requires software called the Cricut Design app. To download the software, you need to go through the steps given below:
Next, follow the prompts until your installation is done. Once done, move to the last steps to learn how to connect Cricut to app.
Step 6: Finish the Cricut Setup
Launch the Cricut Design Space software, and you will see the option to select your Cricut cutting machine on the app. Select the type of machine you want to setup. Next, sign in to your Cricut account. If you don’t have an account, sign up to create one.
Once you have created an account, you need to sign in and then start connecting your Cricut to your app. Although you will get screen prompts to setup the machine, I will explain it briefly.
First, turn on the machine by pressing the power button, and then you need to connect your machine. After that, your setup is done!
HURRAY!!!!!!!!! 😍 YOU DID IT!
FAQs
Question 1: Can I connect my Cricut to an app on my mobile phone?
Answer: Yes, absolutely! Connecting Cricut to the app or setting it up is the same. For this, you will need a Cricut app that you can download from an online app store where you can download the app. For example, if you want to install the Cricut software on iOS, then you can get the application from the App Store, and for Android, you need to go to the Google Play Store. In short, you can easily connect your Cricut machine to an app.
Question 2: Is Cricut machine setup difficult or time-consuming?
Answer: Setting up the Cricut machine is easy and not that time-consuming if you have the right software. The simple-to-use interface of Cricut Design Space will walk you through the easy directions to setup the Cricut cutting machine, which will take you a few minutes. So, install the right software on a compatible device, and then you will be ready to go.
Question 3: Is Bluetooth compulsory for Cricut machine setup?
Answer: No, it is not necessary if your Cricut has a USB cable. Except for the Cricut Joy machine, all the Cricut models have USB ports so that they can be connected via USB cords, too. However, for Cricut Joy users, Bluetooth is compulsory when setting up the machine. In short, Bluetooth is compulsory only for machines for which Bluetooth is not available.
Source: https://desincricut.wordpress.com/2024/04/16/how-to-connect-cricut-to-app-a-stepwise-setup-guide/
#cricut.com/setup#cricut.com setup download#cricut.com setup#cricut.com setup mac#cricut.com setup windows#cricut.com/create#cricut.com sign in#cricut.com/register#cricut.com design space#www.cricut.com setup mac#install cricut printer#install cricut design space app#install cricut explore air 2#cricut explore air 2#cricut create connect to computer#connecting cricut maker to computer#cricut com setup#cricut setup#setting up my cricut maker#setting up your cricut maker#cricut new product setup#cricut design space app#cricut design space#cricut new machine setup#cricut software app#cricut explore 3#cricut account on setup#cricut setup on account#cricut
0 notes
Text
This is probably like. A weird thing to be concerned about, but like. The degree of polish and like. Quality in some of the recent entries to the V/H/S franchise sometimes is like… intimidating and feels like. I mean I don’t wanna tell people specifically to be worse at film making or anything, and it’s not like I think anyone broke rules making their entries I don’t think. But I think I mostly mean this to say towards audience members sometimes, ‘cause a lot of V/H/S is kinda *supposed* to be lower budget and experimental in comparison to blockbuster movies or whatever. That’s why the first one has that like “what the fuck?” Aspect to some of the shorts, they kinda feel like student films, because they were like… “gather some people up, get some relatively affordable equipment you can maybe rent, and go film on a rented set or out in the woods which is mostly free”
It feels cheap because it is cheap, and the cheapness makes it have that exact kind of horror vibe it was going for by being VHS. The more polished and high budget and impressive it gets, the less it feels like an experiment in cheapness.
I think there’s a really strong charm to the shorts that feel a little like “film makers create a student film” and I’m not using student film as an insult because I think there’s something really interesting and raw to the like. Sets and characters and costumes put together when you’ve got really really passionate, but broke and unpolished creators? When you’ve got like the cameras and equipment rented from the school and you’re filming it in the weird woods by your old house because you always thought they looked cool and wrote a lot of stories there anyway and now you’re trying to make one of them into a reality and the makeup person might just be your friend who spends too much money at Sephora so everyone voted them to be in charge of makeup and now they’re having a nervous breakdown because they only know how to do their own makeup and they’re looking up tutorials online for blood effects and actually really pulling it off and maybe figuring out something new about themselves.
One of the biggest personal expenses turns out to be a Cricut machine for the prop department but then the fact you don’t have to worry about carpal tunnel taking out your prop and costume department does make up for it eventually. Also someone made you a custom graphic T and you stop grumbling about the budget for a while.
Chances are also probably good you made a deal with the local produce shops to take the cabbage and melons that go bad for reduced price if you’re making a movie with violence, for all the free sound effects available online, it helps to have something live on the day. And head of cabbage or a melon works good on a low budget set.
It has been like two decades since I’ve been anywhere near even a low budget TV/Film set in Canada and I think some of these might be stage tricks instead. But still. There’s so much charm to them??? And it’s why I think a lot of horror fans love low budget horror.
(Also I should note, I was like. A youth working as an extra on a couple filming projects and took independent personal acting/filmmaking classes that taught me about aspects of the industry and tricks of the trade, but I never got super deep into anything. I saw how stuff was done and did some amateur filming projects which is how I learned how to fake things, but I never learned how big budget things were made. Everything I ever learned was cheap corner cutting for people making things on grants or for the passion of arts, not… uh. Millions or hundreds of thousands of dollars. I learned small Canadian Arts Film, not Hollywood Filmmaking. They were… not all encompassing and I am not positioning myself as an expert in anything… just… running my mouth like a know-it-all honestly.)
And like. I think most of V/H/S still accomplishes a lot of it. Praise Ratma.
It’s probably just a couple like… big sensational show stopping shorts by directors who really know how to work with their budgets more than like… any kind of change to the system. And the fact that I like it when it’s kinda messy and sloppy and shows the seams and the actors aren’t super great and the premise feels a little half baked? Not… fully bad because that “actually the cult was fake and the raid was a ploy by us, the sexy lady cops who are actually… big name sexy snuff film peddlers who’ve been profiting from all the sick twisted videos you’ve been watching and we’re gonna make out while killing you” was like. Running a full sprint into a wall, like they almost made it and then they just made a really bafflingly bad decision in the final moments to like. Completely derail that train at the station and I don’t think anyone was satisfied with how that ended.
I don’t think I have the most solid of a point, really, except that a lot of films are very big and polished and expensive lately. And horror is one of those last bastions of “no budget? No problem.” Mindsets. And I kinda love it for that. And I wanna see it continued. I wouldn’t mind it catching on to other genres again because too much of everything has to look and feel and seem high quality making the barrier to entry nearly impossible to pass. But, I hope V/H/S maintains its cheapness because it’s kinda integral to keeping horror accessible. It’s good, it’s fun, it’s experimental, it creates access to new voices.
Yeah going back to the early entries some of it is like “wow that’s pretty gross” but like. There’s a reason most of those characters died horrible deaths. They were shitty garbage trash people on purpose and you were supposed to hate them so when they were brutally murdered you didn’t feel too bad about being like “ohh my got holy shit” and probably doing the mix of laughing and wincing and screaming when the rapist gets his dick literally ripped off and thrown across the room you don’t really feel that terrible about your fear response also being kinda giddy and giggly.
I am overthinking this. Idk. I love this franchise. I hope it lives in cheap gritty gross weird glory forever. Anthology Horror is such a good genre.
#v/h/s#pointless navel gazing#I don’t know I just love weird shit#I wish more people were able to make more weird shit#I wish more people funded cheap horror anthologies and put them on large platforms#I need more small creators to get the chance to be experimental without huge risks#anthologies are perfect for that because you don’t have to have the whole thing riding on you
5 notes
·
View notes
Text
How to Pair Cricut Maker to Phone and Computer: Full Guide
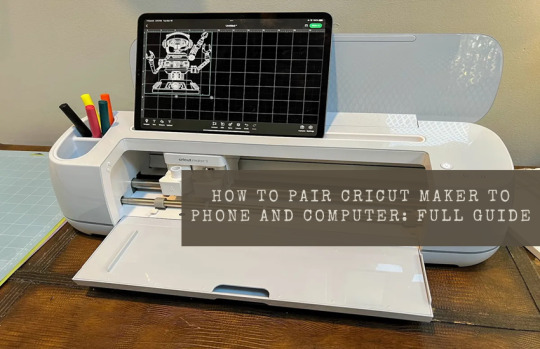
Every crafter will agree that the Cricut Maker Setup is one of the smartest and favorite models among cutting machines. This Cricut machine can cut 300+ materials such as vinyl, iron-on, cardstock, and more. It can also cut, write, foil, and score different materials. To start with this Cricut cutting machine, one must know how to pair Cricut Maker with a computer and smartphone.
Crafters have two options for pairing both devices: Bluetooth and USB cable. However, it is their call to decide in which mode to connect their Cricut machine to a computer and mobile devices. Also, to begin any projects, all users must download the Cricut software and connect it to their device.
If you cover the entire blog from top to bottom, you will quickly learn how to set up and pair this Cricut machine with devices.
How to Setup Cricut Maker on a Computer?
Before getting started with how to pair Cricut Maker, all the users need to set up their Cricut product on a computer. To properly end the setup process, they need to go through the below-shared steps:
Lay the first stone of the setup process by unpacking your Cricut machine & switching it on.
After doing that, connect both devices via USB cable or Bluetooth.
Next, visit cricut.com/setup and install the Design Space app on your computer.
Then, create your Cricut ID or sign in with the login details.
Now, follow the instructions appearing in your front on the screen.
Finally, you will be called for a test cut after completing the setup process.
How to Pair Cricut Maker to Windows and Mac?
Below are some tips and instructions for pairing this Cricut product with Windows and Mac systems.
Windows
In addition to this blog section, look at the steps below and learn about setting up both devices.
Go ahead with the process by checking that your Maker machine is within 10-15 feet of your computer.
Now, tick the Settings icon and land on the Windows Settings tab.
Following this, choose Devices and check that the Bluetooth is on.
After that, hit Add Bluetooth or other device that appears at the top of the screen.
Next, click the Bluetooth button under the Add a device tab.
A window will appear at this point. Click on your Cricut model.
Finally, your Maker and Windows pairing process will come to an end.
Mac
This section explains how to pair Cricut Maker with a Mac system.
Make the first move by ensuring that your Cricut cutting machine is on.
Afterward, check that it is under the range of 10-15 ft of your Mac system.
Next, open the Apple menu, choose System Preferences, and click the Bluetooth icon.
Check that your Bluetooth is on, and select your Cricut model from the list.
After a few minutes, your device’s pairing process will end.
How to Pair Cricut Maker to Phone (Android/iOS)?
Further referring to the blog, let’s discuss the process that will help the user pair smartphones with this Cricut product.
Android
Take the first step and ensure that your Cricut machine is on and positioned within 10-15 ft of your mobile device.
After that, scroll down your phone’s home screen and hold on to the Bluetooth icon for a few seconds.
Now, turn on your device’s Bluetooth and let it scan for the machine for a few minutes.
Next, choose your model name, and the pairing process between your Android and Maker will end.
iOS
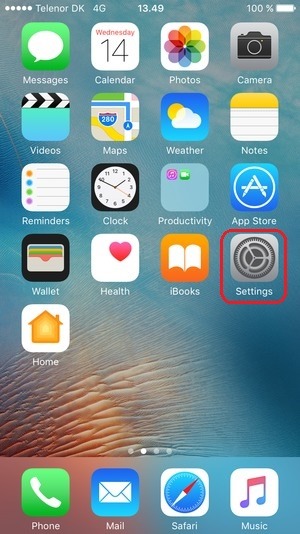
To get things moving, check that your Cricut Maker is on and within 10-15 feet of your iOS device.
Go to the Settings tab and activate your device’s Bluetooth feature.
After activating the Bluetooth, a list of available devices will be shared in front of you.
Select your model name from the list at this point, and both of your devices will be paired successfully.
By paying special attention to these steps, the user can swiftly pair up their respective smartphones with the Cricut Maker machine. Moreover, they need to be very cautious so they don’t make any mistakes during the process.
Frequently Asked Questions
How to Setup My Cricut Maker on a Smartphone?
With the help of the below steps, you can effortlessly set up a Maker machine with smartphones:
Begin the process by plugging the machine and turning on its power.
After that, pair your smartphone with the Cricut machine via Bluetooth.
Install the Design Space app on your device and create your account.
Next, go to the Menu section and tick the Cricut Machine Setup option.
Following this, choose your machine name from the list and follow the steps to finish the setup.
Finally, when informed of the test cut, you will know about the setup completion.
How to Connect Cricut Maker to Devices via USB Cable?
To connect the Cricut cutting machine with devices via a USB cord, the user needs to follow these steps:
First, unpack your Cricut product and USB cable very carefully.
Following this, switch on your machine and put one cord into the machine port.
Afterward, insert another end of the cable into the device and let it connect with each other.
Now, the Cricut Maker will turn on and be ready for cutting purposes.
How Do I Pair My Cricut Maker With iOS via Bluetooth?
With the help of these steps, you can effortlessly connect the Cricut product with iOS devices:
Check that your Cricut machine is enabled and place it under your device’s 10-15 ft range.
Next, go to the Settings tab and turn on your device’s Bluetooth.
After a few seconds, a list of devices will be shared on your phone screen.
Tap the model name, and the pairing process will end after a few seconds.
For More Information Visit: www.cricut.com setup login Cricut Design Space Download Cricut setup on computer
Source: How to Pair Cricut Maker
#how to pair cricut maker#cricut maker setup#cricut design space app#cricut design space login#cricut design space download#Cricut setup on computer#cricut machine setup#how to setup cricut maker
3 notes
·
View notes
Text
Lots of progress this weekend.
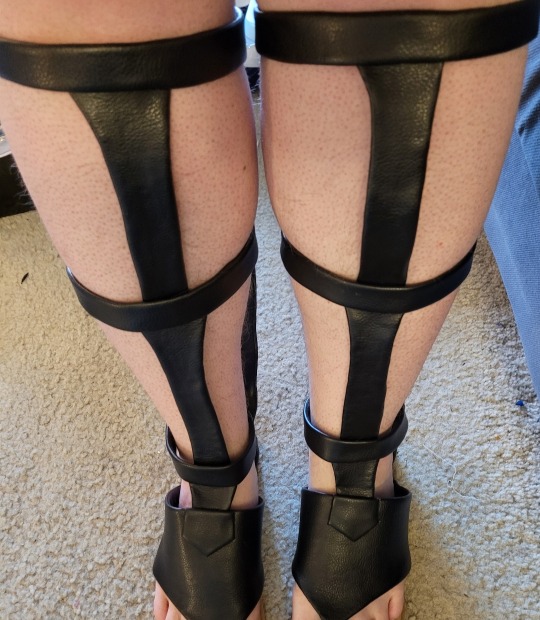
Firstly, the shoes are finished. I'd love it if I never have to make gladiator sandals again, personally. I had to redo the top of each one several times for fit, and I completely depleted the scrap fabric I was using to make these.
I also went ahead and finished the necklace. I've have the prism part done since about November or so but I was putting off doing the necklace because I hate foamwork. I really love the resin gem. I added glitter to the bottom when I cast it which creates a nice depth when the light hits it.
I managed to get it to work as a solid band around the back of the neck - not particularly important for Dimitri, who has hair that will cover that spot, but important for Felix, who my wife is cosplaying and who has a ponytail and will continue to have a ponytail as a genderbend.

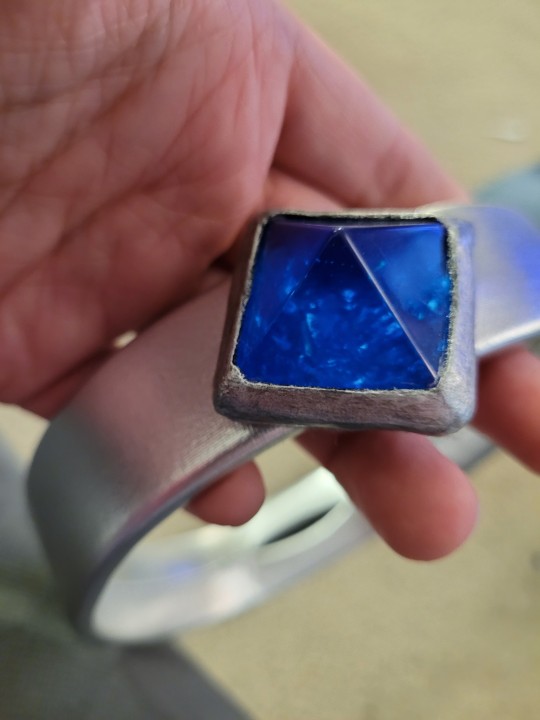
Ugly seam is ugly, but it can be because it's hidden. The closure is magnetic and nestles behind the gem. The 5 mm foam is thick enough to hold its shape when pressed together, so I didn't need another stabilization point. Ideally, I would have liked to match the color on this for the felt, but it's hidden anyway and that was the closest color I had on hand that wouldn't give me an allergic reaction (I have wool felt in that color, but it would cause me trouble on my neck).

I got a chunk of beading done on the tabard sides, and added the last of the trim that it needed. Hopefully I can finish the beading on the tabard today. I also want to go in on the silver part of the skirt and add some silver preciosa bicones at some point.
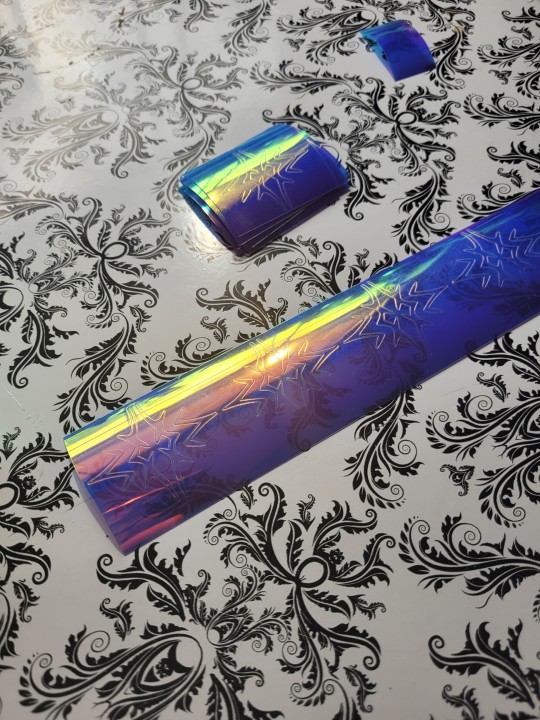
I think I finished everything that I wanted to do with my Cricut Maker as well. I cut 12+ crests for each of us in holographic vinyl (blue for me, transparent blue for her... they're both blue and transparent though). These will be on our dangles as an embellishment.
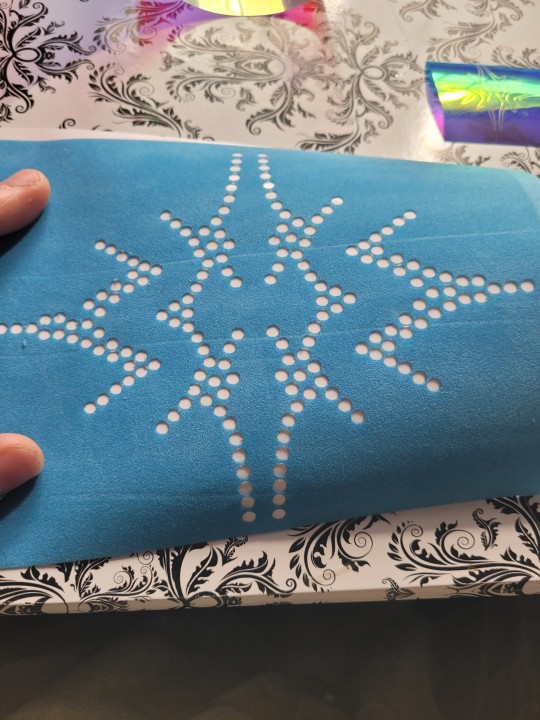
I also cut my rhinestone flock template. This will be used to add hotfix rhinestones to the bottom of the skirt. I'm planning to color match so it should be subtle.
In case you also have a Maker, I cut this flock without the paper backing, flock side up on a standard grip mat with the bonded wool felt setting, and ran it through twice. Once probably would have worked fine but I wanted to make sure it would work.
If you want to do anything with rhinestone templates, I can't recommend flock enough. It was pretty easy to design (I just went over the Blaiddyd Crest with dots the right size), mirrored and flipped pieces as needed, and cut it in my cricut. It worked on the first try with how I'd spaced everything. This is so much faster and precise than placing everything by hand would have been.
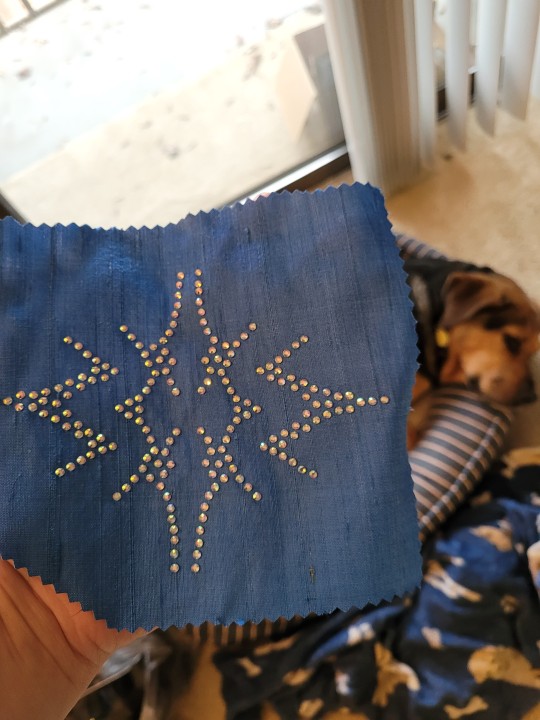
And here's the test on a scrap piece of dupioni with scrap rhinestones in the same size that came with my rhinestone brush. Unimpressed dog in background is unimpressed. 20 seconds at 320 F with my heat press at about 30 lbs of pressure did the job and caused no problem with the silk. Only one rhinestone of the entire design got displaced, which I adhered with gem tac (I didn't want to get my hotfix tool out).
👀 And not because I know from experience or anything, but don't use cricut transfer tape for rhinestone transfers. It isn't heat resistant and will try to melt on your heat press (I got it off in time).
Thankfully I figured out my rhinestone flock came with transfer tape so I'm all set tor doing this on my actual costume.
I won't be getting as much done this coming weekend because I'm going out of town Thursday night - Friday midday, then I have a friend coming in that afternoon from out of town, and on Saturday, I get my Byleth tattoo on my leg so I won't really feel like doing much after that.
2 notes
·
View notes
Text
Harry Potter Ollivanders Wand Shop SVG, Makers Of Fine Wands SVG PNG, Cricut File, Instant Download File, Cricut File Silhouette Art, Logo Design, Designs For Shirts. ♥ Welcome to SVG OCEAN DESIGNS Store! ♥ ► PLEASE NOTE: – Since this item is digital, no physical product will be sent to you. – Your files will be ready to download immediately after your purchase. Once payment has been completed, SVG Ocean Designs will send you an email letting you know your File is ready for Download. You may also check your Order/Purchase History on SVG Ocean Designs website and it should be available for download there as well. – Please make sure you have the right software required and knowledge to use this graphic before making your purchase. – Due to monitor differences and your printer settings, the actual colors of your printed product may vary slightly. – Due to the digital nature of this listing, there are “no refunds or exchanges”. – If you have a specific Design you would like made, just message me! I will be more than glad to create a Custom Oder for you. ► YOU RECEIVE: This listing includes a zip file with the following formats: – SVG File (check your software to confirm it is compatible with your machine): Includes wording in both white and black (SVG only). Other files are black wording. – PNG File: PNG High Resolution 300 dpi Clipart (transparent background – resize smaller and slightly larger without loss of quality). – DXF: high resolution, perfect for print and many more. – EPS: high resolution, perfect for print, Design and many more. ► USAGE: – Can be used with Cricut Design Space, Silhouette Cameo, Silhouette Studio, Adobe Illustrator, ...and any other software or machines that work with SVG/PNG files. Please make sDisney Father's Dayure your machine and software are compatible before purchasing. – You can edit, resize and change colors in any vector or cutting software like Inkscape, Adobe illustrator, Cricut design space, etc. SVG cut files are perfect for all your DIY projects or handmade businDisney Father's Dayess Product. You can use them for T-shirts, scrapbooks, wall vinyls, stickers, invitations cards, web and more!!! Perfect for T-shirts, iron-ons, mugs, printables, card making, scrapbooking, etc. ►TERMS OF USE: – NO refunds on digital products. Please contact me if you experience any problems with the purchase. – Watermark and wood background won’t be shown in the downloaded files. – Please DO NOT resell, distribute, share, copy, or reproduce my designs. – Customer service and satisfaction is our top priority. If you have any questions before placing orders, please contact with us via email "[email protected]". – New products and latest trends =>> Click Here . Thank you so much for visiting our store! SVG OCEAN DESIGNS Read the full article
0 notes
Text
How to Download Cricut Design Studio: An Easy-to-Learn Guide
Do you want to show your creative side to the world? If so, you need to Download Cricut Design Studio. You may be wondering what exactly Design Studio is. Don't worry; I will be your tutor and provide all the details related to this Cricut app. Starting from scratch, it is a Cricut Design Space software that will help you create DIY projects and give you access to the ever-growing library.
For the past seven years, I've been using a Cricut machine and the Cricut software to make new designs. This free-to-use app supports all Cricut models and runs smoothly on Android, Windows, iOS, and Mac devices. Along with the app, you will also get a Cricut Access plan, which offers various benefits to users.
Are you curious to learn more about the Cricut app? This tutorial will be very beneficial. It details the system requirements and download method.
System Requirements for Using Cricut Design Studio on Computers
Before using the Cricut app, check whether your device fulfills the system requirements. If it doesn't, you won't be able to operate this design software on your device. Don't get anxious; this section will introduce you to the system requirements for Windows and Mac systems.
Windows
To download Cricut Design Studio on your Windows computer, you must know the system requirements needed for the computer, whose details are given below:
Mac
In addition to the blog, it is time to discuss the system requirements needed for the Mac system:
After coming across the Cricut Design app's basic system requirements, let's save time and refer to the most essential part of this blog. You are very well aware of what I am going to talk about. Yes, it's about downloading this Cricut app on your computer system. You need to pay special attention to the coming content to do so.
How to Download Cricut Design Studio on Windows?
For all the Windows users out there, it's time to pull up your socks. You will be introduced to the process of getting the Cricut software on your system. Follow the below tips as they will assist you in downloading this easy-to-get design software on your device:
This method will make it much easier for you to install the Cricut Design app on your Windows computer. Don't try to skip any step; otherwise, you might encounter an error while opening the app.
How to Download Cricut Design Studio on Mac?
On the contrary, you must understand the importance of getting the Cricut software on your Windows system. If you are a proud Mac owner and want to get it on your device, then you need to follow the instructions given below:
As a result of this respective guide, you must have gotten the answers to all your Cricut Design app system requirements. Also, regarding the app download and installation process queries. Following this, you can also do several customized projects using this design software.
Frequently Asked Questions
Question: How Can I Use My Cricut Design Studio?
Answer: If you intend to use Cricut Design Studio to make various DIY crafts, you need to download and install it on your devices. You can easily get the Cricut software from the official site, Play Store, or App Store. After you download it, you need to connect it with your craft plotter and make various projects of your choice.
Question: Which Devices Are Compatible With Cricut Design Space?
Answer: Cricut Design Space supports PCs and smartphones very smoothly. However, certain models are supported when doing projects. Those devices are Windows, Mac, iPhone, iPad, Samsung Galaxy series, Google Pixel series, and LG series. The app doesn't support Chromebooks, and the performance completely relies on the chipset and processor.
Question: How Do I Install Cricut Design Space on My Windows?
Answer: To install the Cricut Design app on your Windows computer, you are supposed to follow the below steps:
Visit: cricut.com/setup www.cricut.com setup/login
Source: https://cricricutdesigncut.wordpress.com/2024/04/03/how-to-download-cricut-design-studio-an-easy-to-learn-guide/
#digital design#design space setup#cricut.com/setup#www.cricut.com/setup login#cricut setup#cricut design space login#cricut explore air 2#cricut explore#design space cricut#cricut project ideas#cricut#cricut design space setupp#cricut design space#setup cricut design space setup#install cricut design space app#cricut design space app#cricut create connect to computer#setting up your cricut maker#setting my cricut maker#cricut explore air 2 setup#install cricut explore air 2 setup#install cricut air 2 setup#install cricut explore air 2
0 notes
Text
How to Install Cricut Design Space on Windows [Beginners Tutorial]
We all know that you should have a device if you want to use a Cricut machine. It can be a phone or a computer. One such device is a computer with Windows 11 on it. It is an excellent choice for a Cricut machine. To use your crafting machine, you must learn how to install Cricut Design Space on Windows 11. For that, I would suggest you read this blog till the end. This guide will help you not only download the app on a computer but also connect the machine to your device wirelessly. You will also be able to check the computer’s system requirements.
You can download the Design Space software from the Internet for free. To download it on Windows 11, you have to visit the official site. This blog explains the process for downloading the app. So, let’s dive into it to start the crafting journey today.
Minimum System Requirements for Cricut App on Windows 11
If you want to use a Windows computer on your machine, you have to first make sure that it is capable of downloading and running Design Space. The computer will require certain features that are essential to run the app. The features that the computer requires for Design Space are mentioned below:
How to Connect Cricut Machine to Windows 11?
Once you make sure that your computer has the required system features in the process of learning how to install Cricut Design Space on Windows 11, you should connect it to the machine. Here, we will see the connection process of the Windows PC to a machine via Bluetooth:
How to Install Cricut Design Space on Windows 11?
By now, you have checked the features of your computer and have learned the Bluetooth connection process on the machine. Now, you have to download the app on a Windows 11 computer. But before downloading the software on your computer, you have to connect it to a stable Wi-Fi network. To download the app, you have to follow the steps written below:
Conclusion
To conclude, I would say this blog helped you learn how to install Cricut Design Space on Windows 11. Windows 11 is one of the newest operating systems and has the ability to run the app on it. But before you download the software on a computer, you must know about the minimum features any computer needs to run the app on it. Once you are sure of your computer’s compatibility, you can connect it to the machine. You read about the Bluetooth connection on the computer. Finally, you saw the Design Space installation process. Now, you can easily set up a machine on a Windows PC.
FAQs
Is Cricut Design Space Available for Windows?
Yes, it is! Design Space is an official app, and it is essential for Cricut machines. It works with multiple devices, including a Windows computer. If you want to use the machine on a Windows PC, you will have to download the software from the Internet. It is available on the official site. After installing the app, you can start crafting on your desktop.
Why Is Cricut Design Space Not Installing on My Computer?
If you are trying to install the app on your computer but are unable to do so, you should do a few things. First, you must ensure that your computer is connected to good internet broadband. After that, you will have to check the compatibility of your computer. If the computer lacks the required features, you might have trouble downloading the app. Also, you have to check the browser you are using to download the app. If it is an outdated browser, you must update it.
Is Windows 11 Compatible With Cricut Design Space?
Windows 11’s operating system is good enough to download the Design Space software on it. A Cricut machine requires Windows 10 or newer. But to make sure that it is actually compatible with the machine, you also have to check its features. The computer should have at least 2 GB free disk space and 4GB RAM. It needs to have a resolution of 1024 x 768 pixels and 2-3 Mbps of internet speed.
Visit: cricut com setup www.cicut.com setup login setting up my cricut maker install cicut design space app
Source: https://cricutspaces.blogspot.com/2024/09/how-to-install-cricut-design-space-on.html
#cricut.com/setup#cricut.com/setup login#cricut setup#install cricut explore air 2#cricut.com setup mac#www.cricut.com/setup login#www.cricut.com/setup#cricut install setup#install cricut design space app#cricut design space setup#cricut design#setting up new cricut maker#setting up your cricut maker#cricut design space app#cricut explore air 2
1 note
·
View note
Text
How to Use Heat Transfer Vinyl With Cricut for DIY Projects?

Heat transfer vinyl (HTV) is a material that is used to create designs and text on fabrics and other materials. HTV has a heat-activated adhesive that bonds permanently to the fabric when heat is applied. This step-by-step guide will show you how to use heat transfer vinyl with Cricut. Let’s dive into this write-up and explore what you can make with a Cricut machine. First, collect the materials you need for your crafting project.
Cricut Supplies You Will Need for Your Project
Before you dive into this guide, let’s gather everything you need to complete this project. Read the below list:
An HTV
A blank shirt
A Cricut cutting machine (Here I am using Maker for cutting)
Standard Grip mat
Weeding tool
Cricut EasyPress 2
EasyPress mat
You have gathered all the materials now. Let’s focus on how to use heat transfer vinyl with Cricut. Read ahead to know.
Step 1: Create a Design
Now that you have gathered all the materials, let’s proceed to the main part, which is how to use HTV with your crafting machine. First, open Design Space app and click on New Project to create a design. You can upload an SVG file if you do not want to make a design. From the left toolbar menu, click the Upload option.
Step 2: Prepare Your Design for Cutting
When you are done with your design, which has layers, you need to hit the Attach option in Design Space. This will group the layers together so they all move together when you move or resize the image. To change the color of a layer or an image, select the image and then hit the colored square under the line type menu to choose a new color. When you are done choosing the color, click on the Make It button.
Step 3: Put the Iron-on Vinyl on Mat
On the preview screen, click on the Mirror option. This option is necessary when cutting the heat transfer vinyl. After that, click on the Continue button. Here, I am using Everyday iron-on vinyl for this project. Under the materials settings, choose iron-on. If you are using the Explore machine, you can’t choose this option; instead, you have to set the Smart dial on the top of your machine. Put your HTV on the StandardGrip mat and make sure the shiny side is down. Press down the vinyl to make sure it is stuck properly to the mat. Install the blade on Clamp B and then load it into the machine and press the Load button. After loading the mat, hit the Go button on the machine to start cutting.
Step 4: Cut HTV on a Cricut Machine
Now that you have put the material on your mat and mirrored your design, you have to cut. You can use iron-on vinyl with any of the machines. With the Explore series machine, you can set the dial to iron-on for cutting or on custom and pick from the list in Design Space.
Step 5: Weed Out the Vinyl
After your design is cut, you need to remove all of the excess iron-on vinyl from around the design with the help of your weeding tool. You can trim the excess iron-on vinyl around your design.
Step 6: Apply Heat Transfer Vinyl
Once you have weeded out the extra part from your design, I am going to add this to my shirt. For that, you will have to use the heat press machine to transfer your design. Set the time and temperature on your machine to transfer your vinyl. Before you put the design on the shirt, get ready with your shirt. Preheat your shirt for a few minutes to remove any wrinkles and moisture. Correctly place your design and apply the heat with the machine so your design can be transferred smoothly. Let it cool for a few minutes, then peel off the liner material.
Now, you are ready with your shirt.
Tips for Using a Heat Press With HTV
Above, you read about using heat transfer vinyl with your machine. Now, there are some tips you should remember when using HTV. Follow the below instructions:
When you apply your design to the shirt, use a hard, flat, heat-resistant surface underneath.
Place the parchment paper or a Teflon sheet between the iron-on and the vinyl carrier sheet.
You should wait at least 24 hrs before washing your shirt. Wash it inside out with mild detergent.
Conclusion
In short, with the help of this blog, you learned how to use heat transfer vinyl with Cricut to make customized shirts. You need some other tools and materials for making it. The process is very easy and straightforward if you follow it correctly and stepwise. HTV is a special kind of material that can be used to make designs and text on various fabrics. You can use the press machine to transfer the design to your fabric permanently.
FAQs
Why Do I Need to Mirror the HTV?
You need to mirror your HTV before cutting. Otherwise, your design will appear incorrectly on the base material. When you cut HTV, you cut from the back side of the vinyl. If you do not mirror your design, it will appear backward on the material, and it includes. Most HTV comes with a shiny, clear, heat-resistant liner that protects the design.
What Cricut Settings Should I Use for HTV?
When you use HTV on a Cricut, you will have to choose an iron-on material setting from Design Space. The default pressure setting should work fine for most standard HTVs. You can increase the temperature if necessary and when you are working with intricate designs. Before cutting, always mirror your design. If you are using another type of vinyl, like glitter HTV, you need to change the blade as the glitter vinyl is thicker.
What Is the Difference Between HTV and Iron-On?
Heat transfer vinyl and iron-on are used to transfer images onto the fabric, but they differ in a few ways. HTV is a material that has glue with its backing, whereas iron-on is a design that can be printed using transfer paper. If you use HTV, you need to remove the extra part, while iron-on needs a crafting machine and a heat press machine.
Visit: Cricut.com/setup www.cricut.com/setup login
Source: How to Use Heat Transfer Vinyl With Cricut
#how to use heat transfer vinyl with cricut#cricut eassy press#cricut design space download#cricut design space app#Cricut machine setup#cricut software download
1 note
·
View note
Note
Thank you so much for responding!
I have all of those things and never once has it occurred to me to laminate the stickers to protect them! I switched over to a print on demand company (POD) because the ink kept smudging half the time on Cricut's gloss sticker sheets. There was no rhyme or reason behind which ones would smudge and which ones would stay in their lane. With a POD there's a lot they can do that I can't, but the sticker pricing can get a little out of hand. Especially with trying to make and sell sticker sheets specifically.
Thank you again! I'm definitely gonna set up my Cricut maker and give this a go! Hopefully in the future I'll be able to make all my stickers myself!
Hello! I was wondering what company you use for your sticker sheets? I bough one from your Ko-Fi shop and really like the quality, and the pricing you were able to sell at is waaaaaay more reasonable compared to any of the companies I've seen and used myself. Is it a POD company, or a mass purchase of them to sell on your own?
Thank you for your time if you're able to respond!
I'm really glad you like the quality, because I actually make them by hand at home! (Please forgive the lighting, my bedroom is my office lmao.)
I don't use a company (and Idk what a POD company is sorry!) but making them at home gives a lot more freedom of stock, just be wary it can be very time consuming depending on how many you need to make.
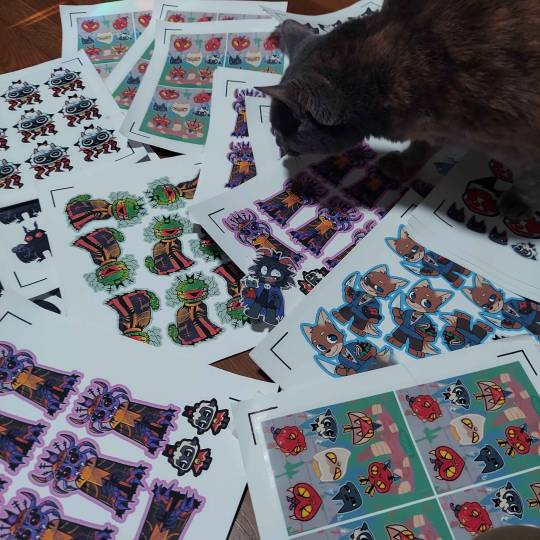
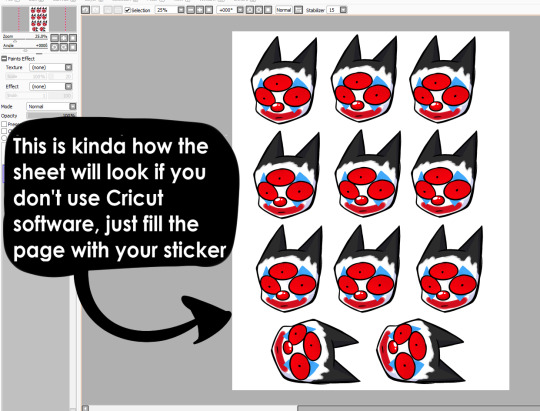
I've had other people ask before, so here's a rundown of how I make my stickers at home: At most you'll need:
Printer
Sticker paper (this is the type that I use)
Laminator and lamination paper (the lamination paper that I use.) You can also use adhesive non-heat lamination paper if you don't have a laminator, gives you the same result, just be careful of bubbles. You will get double your worth out of a pack because we are splitting the pouches to cover two sticker sheets.
Your choice of a sticker cutting machine or just using scissors.
First, I use Cricut's software to print out the sticker sheet with the guidelines around the corners so the machine can read it. If you do NOT have a Cricut machine, open up your art program, make a canvas of 2550x3300 and fill it up with your sticker design with some cutting space between them. This the 8.5x11 size for the sticker page.
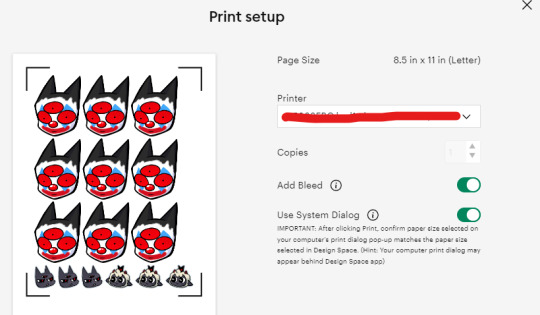
I usually have bleed selected so the cut comes out cleaner. Tip for non-Cricut users below: Increase the border around your sticker design to fake the 'bleed' effect for a cleaner cut.
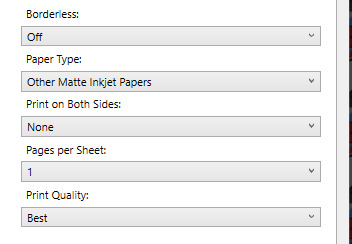
These are the print settings I use for my printer. I use the 'use system dialogue' to make sure I can adjust the settings otherwise it prints out low quality by default. Make sure if you're using the above paper that you have 'matte' selected, and 'best quality' selected, these aren't usually selected by default.
So you have your sticker sheet printed! Next is the lamination part. I use a hot laminator that was gifted to me, but there is no-heat types of lamination you can peel and stick on yourself if that's not an option.
(This is for protection and makes the colors pop, but if you prefer your stickers matte, you can skip to the cutting process.)
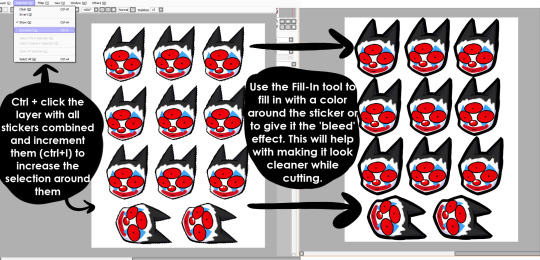
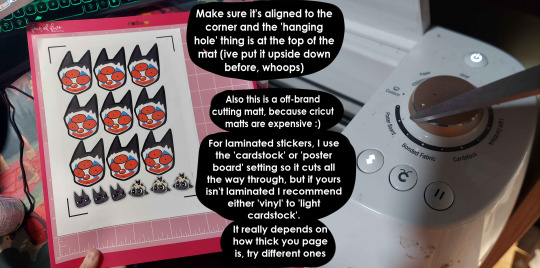
Important for Cricut users or those planning to get a Cricut: You're going to cut the lamination page to cover the stickers while also not covering the guidelines in the corners. First, take your lamination page and lay it over the sheet, take marker/pen and mark were the edges of your stickers are, and cut off the excess:
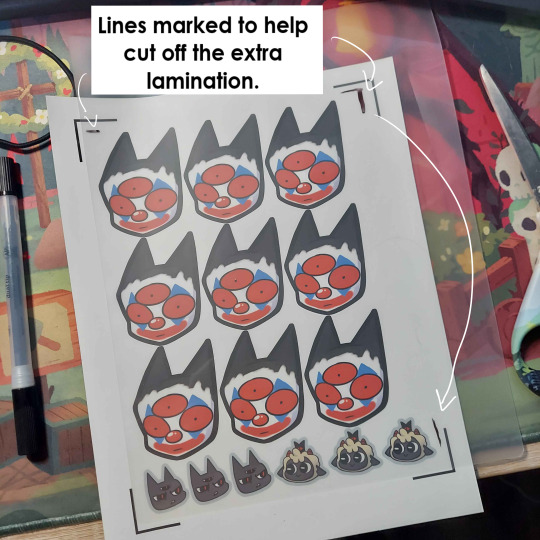
(I save the scrap to use for smaller stickers or bonuses later on)
After you've cut out your lamination rectangle, separate the two layers and lay one down on your sticker sheet over your stickers with matte side down, shiny side up. (Save the other sheet for another sticker page)
The gloss of the lamination will prevent the machine from reading the guidelines, so be careful not to lay it over them. It also helps to cut the corners afterwards to prevent accidentally interfering with the guidelines.

Now put that bad boy in the laminator! (Or self seal if you are using non-heat adhesive lamination)
Congrats! You now have a laminated page full of stickers.
For non-cricut/folks cutting them out by hand: this is the part where you start going ham on the page with scisscors. Have fun~
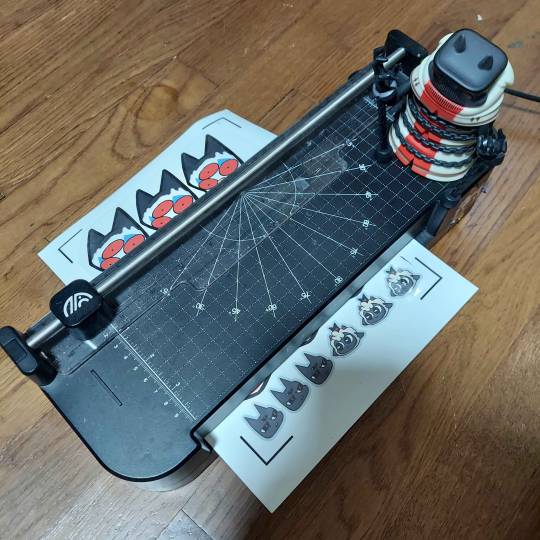
Cutting machine: I put the page on a cutting mat and keep it aligned in the corner, and feed it into the machine. For laminated pages I go between 'cardstock' and 'poster board' so that it cuts all the way through without any issues, but for non-laminated pages or thinner pages, I stick for 'vinyl' and 'light card stock'. Kinda test around.
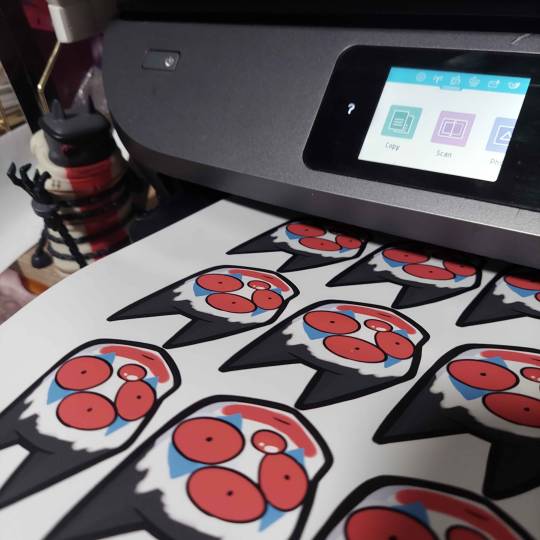
Now I smash that go button:

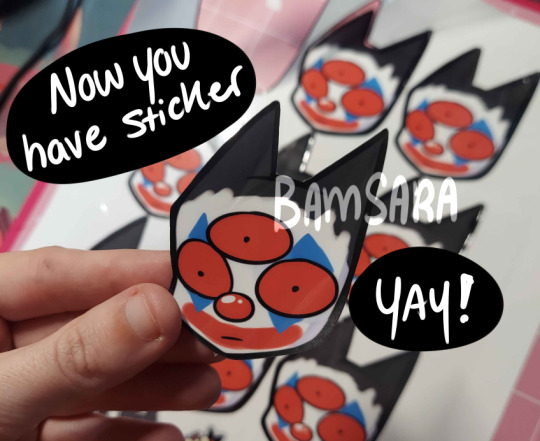
You have a sticker now!
The pros of making stickers at home is that you save some cost, and you have more control of your stock and how soon you can make new designs. (I can't really afford to factory produce my stickers anyway)
However, this can be a very time consuming, tedious process especially if you have to make a lot of them. There is also a LOT chance for some errors (misprints, miscuts, lamination bubbles, ect) that will leave you with B-grade or otherwise not-so-perfect or damaged stickers. (Little note, if you have page mess up in printing and can't be fed into the cricut machine, you can still laminate it and cut it out by hand too.)
I have to do a lot of sticker cutting by hand, so if you don't have a cricut don't stress too much about it. I have an entire drawer filled to the top of miscuts/misprints. I keep them because I don't want to be wasteful, so maybe one day they'll find another home. Sucks for my hand though.
But yeah! This is how I make my stickers at home! Hope this is helpful to anyone curious
1K notes
·
View notes
Text
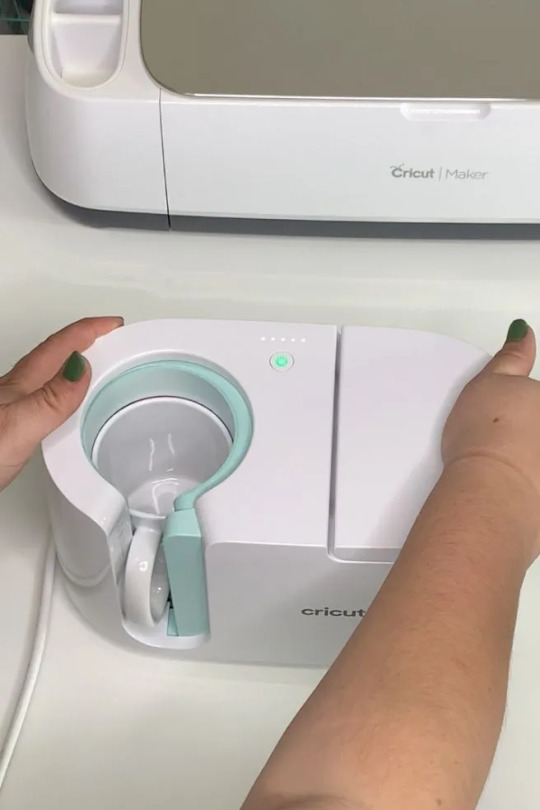
How to Use a Cricut Mug Press: A Step-by-Step Guide
When I first bought my Cricut Mug Press, I was quite nervous about learning how to use a Cricut Mug Press. It took some time to read many articles and gather all the essential information. Now that I have gained experience using it, I want to share all the basic instructions for using this Cricut machine. If you are uncertain about using it, make sure to read this post to the end.
The Cricut Mug Press is a small yet impressive tool that transforms plain mugs into stylish designer pieces. Despite its compact size, it is incredibly capable and essential for crafting custom mugs for personal use or as gifts for loved ones. So, let’s start with the materials you will need for your project.
Tools and Supplies You Need to Create a Personalized Mug
Before learning how to use a Cricut Mug Press, it is important to know the necessary materials you are going to need. Here is a detailed list:
Cricut cutting machine: You will have to use this machine to cut designs from the infusible ink sheet. Suitable Cricut models are Cricut Maker 3, Explore 3, or Joy.
Cricut Mug Press: This is the machine used to transfer the infusible ink design onto your mug.
Sublimation mug: Specific mugs made for the Mug Press machine are necessary because they fit perfectly and ensure the best results. Using other mugs of different shapes and sizes may not fit or work well with the machine.
Infusible ink sheet: This material is basic as it is where you will cut your designs, which will later be transferred onto the mug using heat in the machine.
Heat-resistant tape: It is essential for securing the infusible ink sheet onto the mug during the pressing process.
Lint roller: Used to ensure the surface of the mug is clean and free of debris before applying the infusible ink design.
Weeding tools: These are used to remove excess or unwanted material from the design before transferring it to the mug.
Once you have assembled all these supplies and tools, ensure your setup is ready. Connect your Cricut machine to power and turn it on. Establish a connection between the machine and your device using Bluetooth or USB. Download the Design Space app on your device and log in with your account. This setup is essential before proceeding with the Mug Press.
Before beginning to use the Mug Press, ensure it is on and heating up properly. Following these steps ensures you are ready to create custom mugs with your Cricut machine.
How to Use a Cricut Mug Press in 4 Simple Steps?
When you have assembled all the necessary tools and completed the setup, you can start working on your project. Here are the 4 steps you need to follow to use the Mug Press:
Step 1: Create a Design on Cricut Software

Step 2: Cut and Weed Out the Excess Material

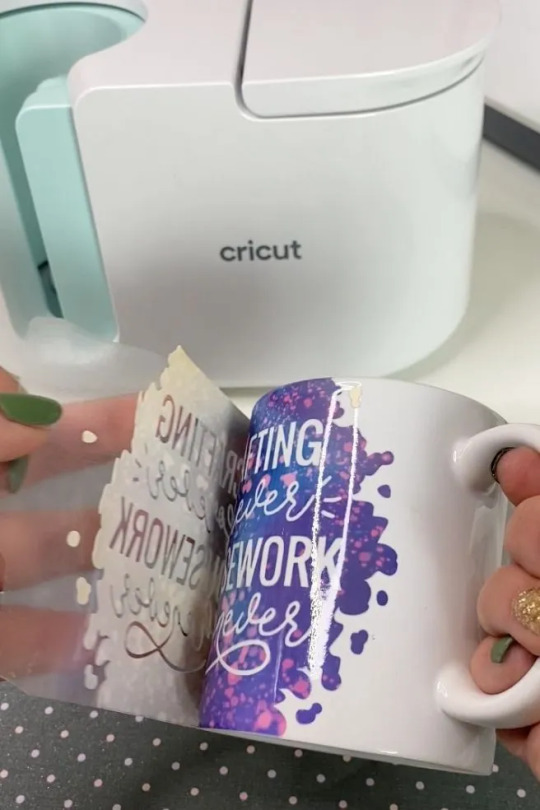
After completing the design, insert the material into the machine and press the Load button. The design will be cut quickly. Once the cutting is done, unload the material and use a weeding tool to peel away any unwanted parts from the design.
Step 3: Transfer the Design to Your Mug

Step 4: Reveal the Final Result

When the pressing is complete, carefully remove the mug from the machine, handling it by the handle to avoid burns. Allow the mug to cool for 20–30 minutes. During this time, it’s important to avoid touching the heated areas to prevent injury. Once the mug has cooled down completely, it will be ready for use, showing your newly transferred design beautifully.
Conclusion
In short, learning how to use a Cricut Mug Press is quite easy. As you can see, the process is simple. First, gather all the necessary tools and accessories and set them up. Once the setup is done, create a design on the Design Space app, cut it on the Cricut cutting machine, and press the design onto the mug using the Mug Press machine. Once the pressing is finished, you will have a beautiful mug ready to use however you like.
FAQs
What Are the Supplies Required for Cricut Mug Press?
To work with a Cricut machine and create designer mugs, you will need some essential supplies:
Cricut cutting machine
Cricut Mug Press
Infusible Ink
Heat-resistant tape
Weeding tool
Lint roller
Sublimation Ink
These tools are important to prepare and execute projects with Cricut effectively.
Do I Need a Computer to Use Cricut Mug Press?
No, not necessarily! You can download the Cricut Design Space app on your computer or any device. If you don’t have a computer, you can use your Android or iOS mobile instead. However, using a computer for the app allows you to work on projects more effectively. Just ensure your computer runs on either Windows or macOS, as Chromebooks do not support the software.
Can I Use Any Mug in Cricut Mug Press?
No, you cannot! The mug used in the Cricut Mug Press must meet specific criteria. It should have a maximum height of 4.72 inches and a diameter between 3.2 to 3.4 inches, with a capacity of 10 to 16 ounces (295 to 450 ml). Also, the mug’s surface should be plain; textured or rough mug surfaces are not suitable for the machine. Ideally, the mug should be white for best results.
Source: how to use a Cricut Mug Press
Visit here to Know More: Cricut Easy Press
Pinterest
0 notes
Text
How to Print and Cut on Cricut: Ultimate Guide
Print and Cut is a versatile tool for enhancing your Cricut projects. With the help of this feature, you can create bookmarks, greeting cards, printed stickers, and many more. To explore these possibilities, knowing how to use Print and Cut on Cricut is essential. If you are not familiar with it and want to use this tool, continue reading the write-up for a full guide.
The Print and Cut tool in the Design Space app requires an inkjet printer. Make sure that your printer is compatible with your operating system; for example, if you are using a mobile with the Cricut app, choose a compatible printer that can add to your mobile wirelessly. This setup process ensures smooth work and allows you to print directly from the app for your DIY projects.
Tools and Supplies for Your Cricut Project
Before you learn how to Print and Cut on Cricut, it is crucial to know about the materials required to use this tool effectively. Here are all the items you will need: sticker paper, standard paper, holographic, sticker paper, magnetic paper, printable vinyl, a4 cardstock, and medium-colored paper.
Important Note: After collecting all the supplies, start by setting up your Cricut machine. Connect it to a power source, turn it on, and then connect it to your device. Download the Cricut Design app, and you are ready to start. Ensure your printer is also connected for Print and Cut projects.
How to Print and Cut on Cricut: 4 Easy Steps
Once you know about the materials and gather all the tools for your projects, you are set to begin.
Step 1: Choose a Design in the Cricut App
To start a Print and Cut project, your first step is selecting a design. Cricut provides access to a vast gallery where you can find thousands of pre-made options. Just browse through and pick one that suits your project.
Apart from picking the designs from the app, you can also import designs from external sources. Whether it’s from other design apps like Canva, your computer’s library, or the internet, uploading these designs to Cricut Design Space is easy.
Step 2: Print Using the Compatible Printer
When your design is complete, you can print it using your printer. Make sure that the printer is connected to a power source and linked to your device. After adjusting the design to your desired size and shape in the Cricut software, click on “Make It.” Before that, you have to load the printable material into the printer’s paper tray. Then, upon clicking “Make It,” the printer will automatically start printing the design onto the material.
Step 3: Start Cutting With Your Cricut Machine
After finishing the printing, you can cut the printed material using your Cricut machine. Place the material on a cutting mat and insert it into the machine. Start the cutting process, which will be completed quickly. When you complete the cutting, remove the material from your machine.
Step 4: Finish Your Project
Lastly, remove the material from your Cricut machine and use a weeding tool to peel away any unwanted remnants of the design. Your project is now complete, thanks to the Print and Cut tool.
Conclusion
Now that you have finished reading the blog, you have learned everything about how to Print and Cut on Cricut. You can now easily work on any project like this. Simply gather your supplies and set up your Cricut machine. When you set up the machine, choose or upload a design in the Cricut Design Space app. After that, use the Print and Cut feature in the app, and your project will be ready quickly.
FAQs
Can I Use Print and Cut on My Android Phone?
No, you cannot use the Print and Cut tool on the Cricut Design Space app if you are using an Android mobile device. This feature is only available for iPhone smartphones. Fortunately, you can also use it on Windows and Mac computers.
What Cricut Machine Can I Use for Print and Cut?
You can use most Cricut machines with the Print and Cut feature, such as the Cricut Maker, Maker 3, Explore Air 2, Explore 3, and Venture machines. Just note that the Print and Cut tool does not work with the Cricut Joy machine.
What Printer Is Good for Using the Print and Cut Tool?
You need an inkjet printer to print with the Cricut Print and Cut tool. Some of the brands like Canon, Brother, Epson, and HP are suitable choices. Make sure to use an inkjet printer, as other types of models won’t work with this Cricut feature.
Visit: install cricut design space app
Source: https://designspace-cric
#cricut.com/setup#install cricut explore air 2#cricut setup#cricut.com/setup mac#cricut design space#cricut new machine setup#www.cricut.com/setup login
0 notes
Text
How to Set up Cricut Maker 3: Get Started in Minutes!
Hey there! Are you looking for instructions on how to set up Cricut Maker 3? You will now set up your Cricut machine, which means you have possibly bought a new one. Being a novice user, I can understand what it feels like. Fear not; I have curated this blog, especially for beginners who want to set up their Cricut cutting machine.
Since I have been crafting for many years, setting up Cricut and creating new projects have been my forte. So I can better teach you about this setup. In this post, I will first unbox the machine and then move on to the basic steps to get the machine set up hassle-free in no time.
Ensure you have either a Mac or Windows computer, as I will cover Cricut Maker 3 set up for desktop users only. What are you waiting for? Join me on my journey, and let’s dive in now!
Step 1: Unboxing Cricut Maker 3
Before diving into how to set up Cricut Maker 3, let’s unbox your Cricut if you haven’t done it yet. Let me tell you what you will get in your new Cricut box. Here’s the list of items you will see in your Cricut machine box:
Maker 3 machine
Warranty document
Accessory Adapter (already installed in the clamp A)
USB cable
Power adapter
Material for a test cut
Bonus materials
Premium Fine-Point Blade and Blade Housing (already installed in clamp B)
Power cord
Quick Start Guide
Safety document
Step 2: Downloading the Cricut Design Space App
In order to learn how to set up Cricut Maker 3, you need to know how todownload the Cricut Design Space for Mac and Windows. So, whether you are a Mac or Windows user, follow the steps given below and complete one step for Cricut Maker 3 set up.
To begin, you need to visit cricut.com/setup and select your product type: Cutting Machine.
After that, click on the I agree checkbox and hit the Download button.
The above steps to download Cricut Design Space are the same for both computers, including Mac and Windows. Now, after downloading, you should start the installation. For installation, you have to follow the steps separately for your device.
Installing Cricut Software on Windows
Once the Cricut app is downloaded, move to the Downloads folder or the file location where you have saved your downloaded file.
There, you will find your file; double-click on it to begin the installation.
Before the installation, your PC will pop up a window screen asking whether you trust the application’s source. Click Yes to proceed.
Finally, your software will be installed in a while.
Installing the Cricut app on Your Mac
Once the software is downloaded, you have to navigate to the file folder where your .dmg file is saved.
To install the Cricut app, you have to double-click on the .dmg file.
After that, you will move to a new screen.
Now, drag the Cricut icon to the Applications folder. As a result, it will begin the installation.
Step 3: How to Set Up Cricut Maker 3
Here, we will follow several steps one by one to set up our Cricut cutting machine. By now, you should have installed your Cricut Design Space app. Now, it’s time to open it. Once you have opened it, you need to follow the steps given below:
In the beginning, click on Product Setup.
Then, you will be prompted to a Create a Cricut ID window. Create a new account; if you already have one, sign in to proceed.
On the following screen, click on Smart Cutting Machine.
After that, you have to select the Cricut model.
Once you’ve done this, you’ll be prompted to prepare your workspace. Next, you’ll need to plug the machine into the wall outlet.
Once you have followed the above steps, you are required to connect the Cricut machine to your computer. To do this, you have to jump to the steps below.
Step 4: Connecting Cricut Machine to a Computer
In this step, we will use Bluetooth to connect our Cricut machine to compatible devices, such as PCs or Macs. Before you connect, ensure your machine is placed on a flat surface and maintains at least 10 inches of gap behind the machine. Since connecting Cricut to a Mac is entirely different from connecting it to your Windows PC, follow the instructions below for your system only.
Connecting via Bluetooth on Windows
Turn on your PC and Cricut product.
Head to the Windows desktop and open the Settings.
Next, select the Devices on the upcoming screen.
Now, turn the Bluetooth on and select Add Bluetooth or other device.
Then, you will notice a pop-up asking you to add a device. Select Bluetooth here.
Afterward, wait some time and check if your PC finds the nearby Cricut machine.
Once it is found, select it and pair the machine with the PC.
Connecting via Bluetooth on Mac
Power on your Mac and select the Apple menu > System Preferences option.
After that, enable Bluetooth.
Now, let the Mac’s Bluetooth find the nearby Bluetooth Cricut machine.
Once detected, click on it and pair the machine with your Mac.
Now that you have almost learned how to set up Cricut Maker 3, the rest is a cakewalk. Let’s delve into the final step.
FAQs
Question 1: Which computer is compatible with Cricut Maker 3?
Answer: The Cricut Maker 3 machine has nothing to do with your computer directly. Cricut uses Cricut Design Space companion software to communicate with your computer or mobile device. Hence, you will need to download it to your compatible device. For this, you must have at least 4 GB of RAM and 2 GB free disk. Besides, the latest operating system will be perfect for running this software.
Question 2: Do I need internet to set up my Cricut Maker 3?
Answer: Yes, you need an internet connection while setting up your Cricut Maker 3. During the machine setup, we need to download a Cricut Design Space; hence, the internet is a must. After installing Cricut software, you will use it to set up your Cricut machine, and again, you must have an internet connection that is fast enough.
Question 3: What should I need to get started with my Cricut Maker 3?
Answer: If you want to get started with your Cricut, you will need the following items. These following items are a must if you are creating a new project. Here are the items you need to get started with the Cricut cutting machine:
Cricut Design Space
Essential Tool Kit
Vinyl or Iron On
Heat Press
Cutting Mats
Cricut Roll Holder
Source :-https://cricutie.wordpress.com/2024/07/09/how-to-set-up-cricut-maker-3-get-started-in-minutes/
design.cricut.com/setup
cricut.com setup mac
cricut new machine setup
cricut explore 3 setup
0 notes
Text
Connecting Cricut Bluetooth: A Complete Guide
Connecting Cricut Bluetooth is an easy task! All you need is a Cricut machine and a compatible device. In this post, I will cover the most frequently asked questions, such as how to connect Cricut to computer.
Do you know what is the most interesting part of this blog? I’ll be talking about connecting Cricut cutting machines, such as Maker, Explore, and Joy. I will also show you how to connect Cricut to different types of computers and mobile devices.
While connecting, you will also need to maintain the proper distance of the Cricut machine by placing it in the right place. Let’s delve into this guide and start connecting it to the Bluetooth device.
Connecting Cricut Bluetooth to a Windows PC
Connecting a Cricut machine to a PC is not a big deal. Anyone with little guidance can do it in no time. All you need is a Cricut cutting machine, and you have to locate it in the right place, such as a flat surface like a table. Once you have placed the machine, make sure it is not too far from the PC.
Here are simple steps to connect Cricut to a Windows PC:
You need to turn on the Windows PC and your Cricut product.
Place your Cricut machine at a distance of 10 to 15 feet from the PC.
After that, you should navigate to Settings.
Next, you will need to choose the Devices option on the next screen.
Once done, you should turn on the Bluetooth.
Then, you will have to click on Add Bluetooth or another device.
Once done, you will receive pop-up windows telling you to add a device.
There, you need to select the Bluetooth option.
Also, hold on and see if it detects your nearby Cricut model.
Now, you need to choose the machine and pair it with your PC.
Connecting Cricut Bluetooth to Your MacBook
If you are connecting your Cricut to your MacBook, it will be easier by following the steps below. Let’s go to the steps below:
Start by placing your Cricut on a flat surface. Ensure it is within 10 to 15 feet of your Mac.
Then, you will need to navigate to the Apple menu and select System Preferences.

After that, you should search for the Bluetooth option.

On the following screen, turn the Bluetooth on.
If it is already turned on, then you have to choose the Cricut model from the available list.
Finally, you have connected your Cricut machine to your macOS desktop.
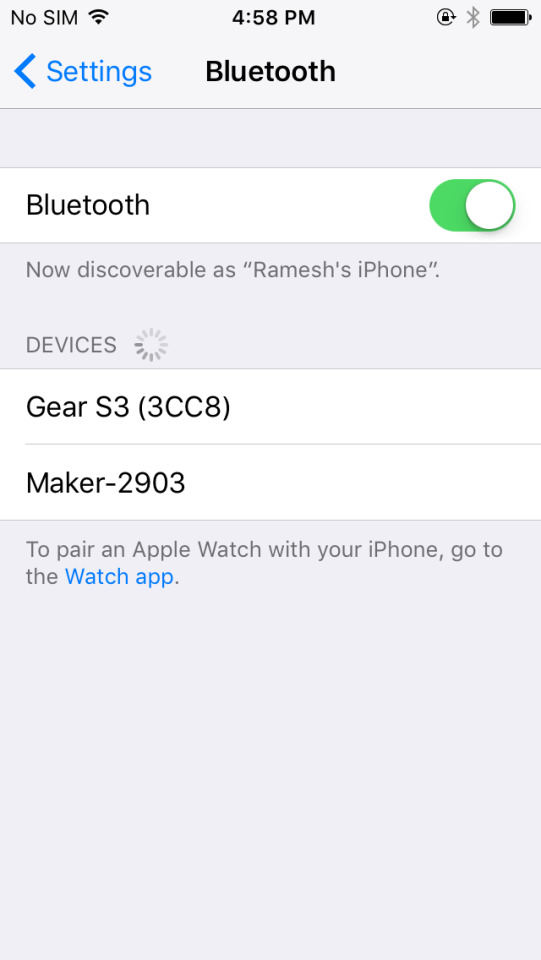
Connecting Cricut Bluetooth to an iOS Smartphone
Are you an iOS device user? Don’t worry; I am here to explain the stepwise instructions for connecting your Cricut to your Bluetooth on iOS in no time. Let’s start!
On the iPhone, you need to find the Settings app.
After that, navigate to find the Bluetooth option.
Now, you need to enable Bluetooth by clicking on the toggle button.
https://cdsassets.apple.com/live/7WUAS350/images/iOS/iOS-17-iphone-14-pro-settings-Bluetooth-pair-third-party-device.png
Wait for some time and let your iPhone find your Cricut model.
Once it is seen, select the Pair option to connect the device.
Now, you have made the connection between your iOS and Cricut machine.
Connecting Cricut Bluetooth to Your Android Device
Here are the steps to connect your Cricut to Bluetooth on an Android device. If you are an Android user, you must go through the steps below:
Go to your Android phone and find the Settings app.

Once you reach your phone settings, navigate to the Bluetooth option.
Then, you should enable your Bluetooth.
https://www.digitalcitizen.life/wp-content/uploads/2018/05/android_Bluetooth-10.png
After that, you should wait and visit until your device is located in your nearby Cricut machine.
Once you find the Cricut model, select it to pair it.
Finally, you have connected your Cricut to an Android device.
FAQs
Question 1: How do I get my Cricut in pairing mode?
Answer: Connecting Cricut Bluetooth or getting it into pairing mode is done by the following steps:
First of all, you will need to turn on the Cricut machine.
Locate the machine 15 feet away from your device.
Then, go to Settings and Bluetooth.
Turn on Bluetooth and pair the device.
Question 2: Why is my Cricut not connecting to Bluetooth?
Answer: Several reasons, such as Bluetooth, devices, pairing, and computers, can affect the process of connecting Cricut to Bluetooth. Therefore, you should ensure that your Bluetooth is working or turning on properly. Also, make sure the distances are properly maintained or do not exceed 15 feet between the device and Cricut.
Question 3: Is connecting Cricut Bluetooth the same for all devices?
Answer: Absolutely not! The process of connecting Cricut via Bluetooth is not the same for all devices. For example, if you are connecting it on your Mac, then the same steps cannot be used for Windows computers or other devices. Therefore, follow the right methods to connect your Cricut to Bluetooth.
#Connecting Cricut Bluetooth#www.cricut.com/setup#How to setup cricut maker#Install cricut design space app#Setup Cricut.com
0 notes
Text
How Do I Set Up My Cricut Maker? [Ultimate Guide]
Buying a new Cricut Maker can be overwhelming for all of us. Initially, setup can be daunting, but once you do it, you will love the overall process. However, you can easily set up any Cricut machine without needing much assistance.
The post is all about how do I set up my Cricut Maker. Through this write-up, we will see the items while unboxing the new Cricut Maker. Further, you will explore the Cricut Maker and its types. Afterward, we will explain the complete process of setting up your Cricut Maker machine.
What Do You Get in the Cricut Maker Box?
Unboxing a new product is always an exciting task. While unboxing the Cricut Maker machine, we got several items that we will be discussing here. However, you always have the option to select the bundles when you buy the machine from Cricut's official website.
Following are the items that you get in the box of the new Cricut Maker:
Apart from these, you will get the following:
The best thing is that we get the blades and tools along with the new Cricut machine. These blades allow us to try various products before buying more blades.
How Do I Set Up My Cricut Maker on a Computer?
When we talk about setting up Cricut Maker machine, it means we want to connect it to our devices like computers or mobile phones. However, there are certain ways to connect these machines to our devices. For example, we can connect our Cricut Maker to our computer or phone via Bluetooth or USB cable. So, it is the users’ choice to choose which way is the most suitable for them.
Below, we explain how to set up Cricut Maker. This method is only applicable for Windows or Mac users only:
How Do I Set Up My Cricut Maker on a Mobile?
Here's how to set up your Cricut Maker on Mobile devices with iOS or Android operating systems:
Cricut Maker is the most advanced and versatile in Cricut's lineup. However, the box contains various items that you can use to make several projects uninterruptedly. In this write-up, we explained the Maker and its features in detail. It helps the users to get an overview of machines so that they can use them without any hassle. After exploring the Maker cutting machine, the blog found out how do I set up my Cricut Maker.
FAQs
Question 1: Can I set up the Cricut Maker easily?
Answer: People think the setup is daunting, but this is not the case. Cricut machines are just like printers. The only difference is that Cricut has blades to cut. However, when you go through the notice period, you will find the setup is too easy and complete in less time. While setting up, you will need to download and install the Design Space app. This app will guide you through the further setup process, making it easy for beginners to set up the machine in one go.
Question 2: How do I connect my mobile phone to my Cricut?
Answer: Here, we are going to show you the method to connect your mobile device to the Cricut machine. Here, we are using iPhone or iOS devices. So, ensure you have an iOS device.
Question 3: Can I use the Cricut without its software?
Answer: No, you must use the Cricut Design Space app to send your design to your Cricut device. The machine is the companion for your Cricut cutting machine. Without this machine, you can't cut anything. However, the Design Space is essential for creating intricate designs and then sending them to the machine. Also, the app is the only way to maintain communication between your computer and Cricut.
Visit: cricut.com/setup
cricut.com/setup
Source: https://cricutmakersetup.wordpress.com/2023/10/21/how-do-i-set-up-my-cricut-maker-ultimate-guide/
#cricut explore air 2#design space setup#cricut maker#cricut.com/setup#cricut.com design space#cricut.com/create#cricut.com sign in#design cricut.com download#digital design
2 notes
·
View notes